Community Brag Posts


Queen Loft Bed

I made this bed for my 6 year old daughter. I loved Anna's Loft Bed plans, but she wanted a bigger play area underneath. So I modified the twin loft bed plans to fit a queen mattress. I also added extra supports for the mattress, and I used PureBond plywood on top of the supports for the mattress to sit on.
That's the Farmhouse Toddler Bed underneath. My younger daughter inherited her big sister's twin bed, so the toddler bed was put to use in the new "playhouse."

Built from Plan(s)
Estimated Time Investment
Week Long Project (20 Hours or More)
Finish Used
I sanded the wood and primed it. Then I sanded (lightly) again and painted it with Valspar latex enamel in Gloss Almond.
Recommended Skill Level
Intermediate
Comments
Wed, 02/09/2022 - 15:31
We’ve been looking for…
We’ve been looking for exactly this!! Can you share your modified plans and the list of lumber and supplies needed?
Sun, 09/02/2012 - 12:45
Modified Queen Size
I think it's great that you modified it to a queen! I live a studio and NEED something like this. Could you share the modifications? It looks beautiful = )
Sun, 09/02/2012 - 20:58
The changes I made were: End
The changes I made were:
End planks cut to 63"
Top back guard and front and back rails cut to 87"
The top guard rails on ends cut to 66"
I measured for the mattress supports and the front guard rail after the rest was completed.
You should also measure for the bookcases after the rest is completed, but each of mine wound up being about 31" wide.
Everything else was pretty much the same.
Hope that helps.
Thu, 11/01/2012 - 08:24
Thank you!
This is wonderful - I've been looking to make something like this for an urban efficiency (adult) apartment! Thanks so much for sharing your modifications!
Mon, 07/29/2013 - 14:08
queen loft for adults
Will the height of the bed allow for adults to stand under it? If not what modifications should be made to make the height fit a standing adult? (the highest being 6'1" male) Thanks! =D

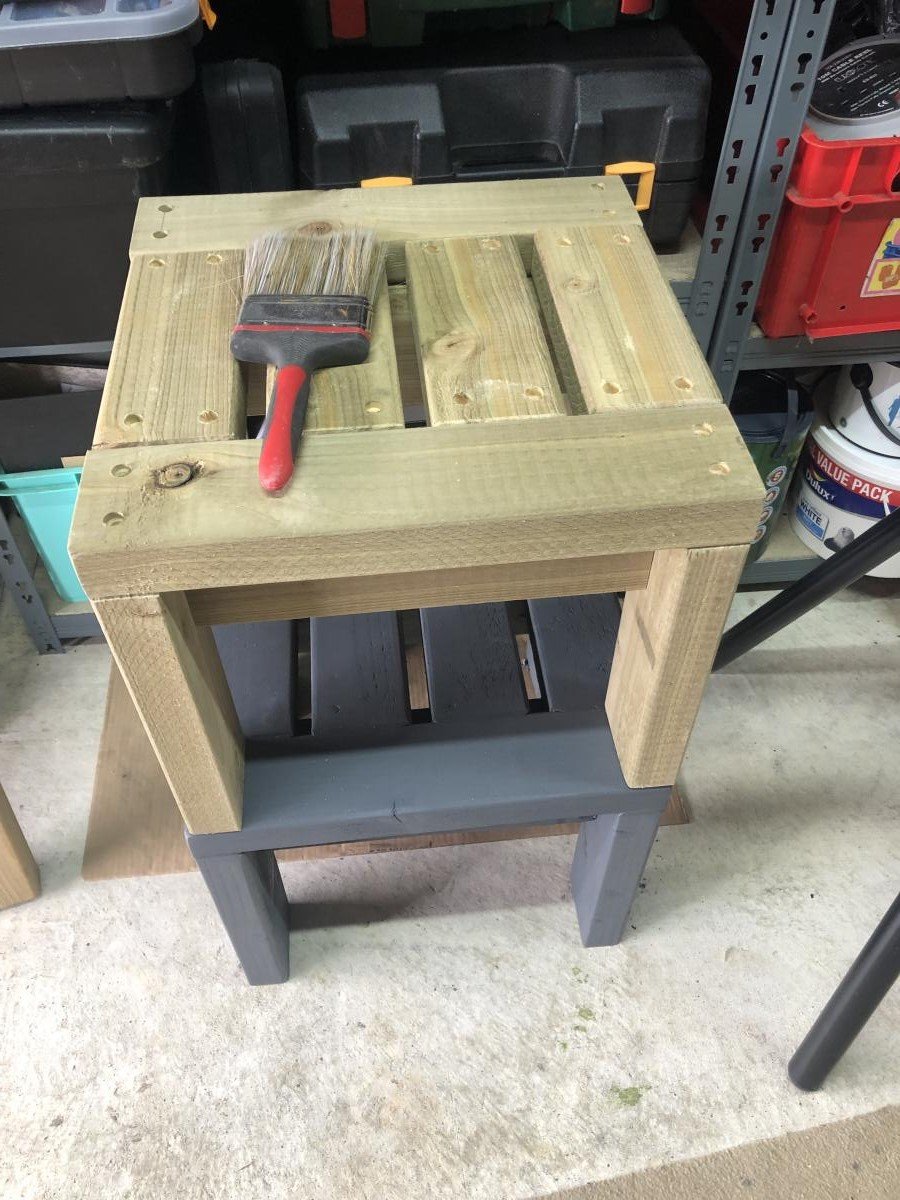
Easy small space side table

This was my first project. It was relatively easy but I did make some mistakes that are now design features


Built from Plan(s)
Estimated Cost
Reclaimed wood
Estimated Time Investment
Afternoon Project (3-6 Hours)
Finish Used
Minwax English chestnut
Recommended Skill Level
Beginner
The Boys Create!
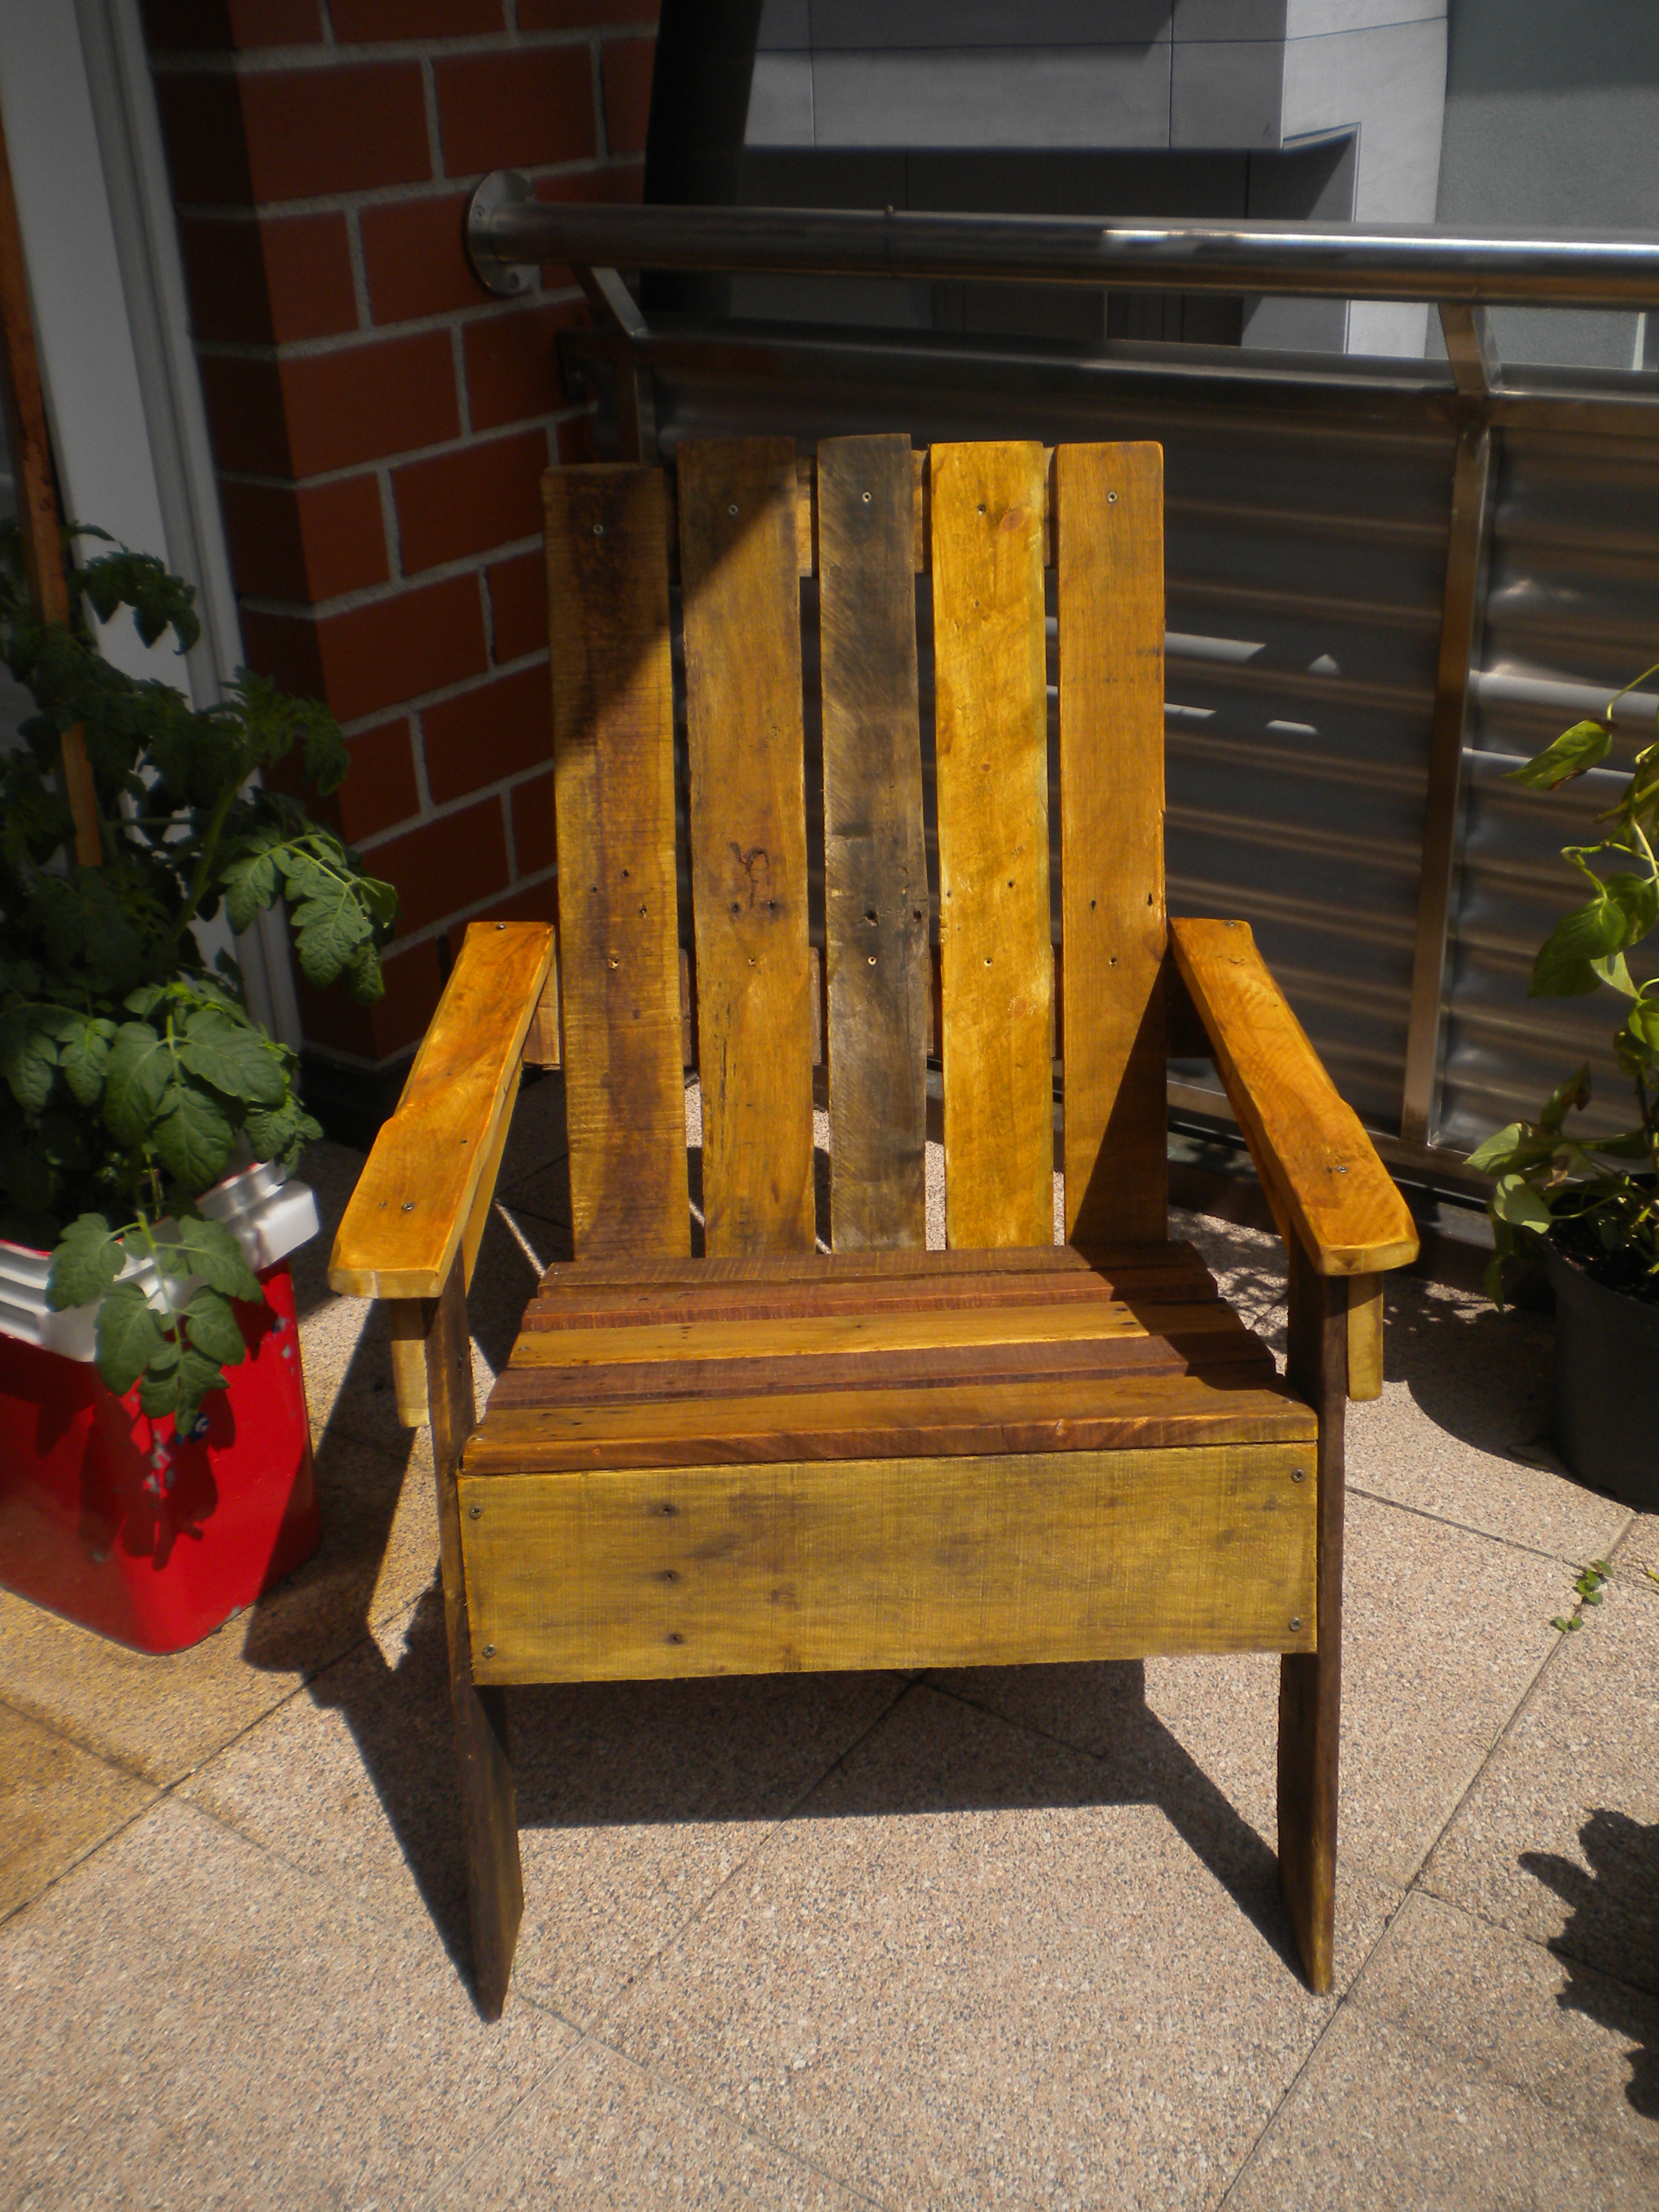
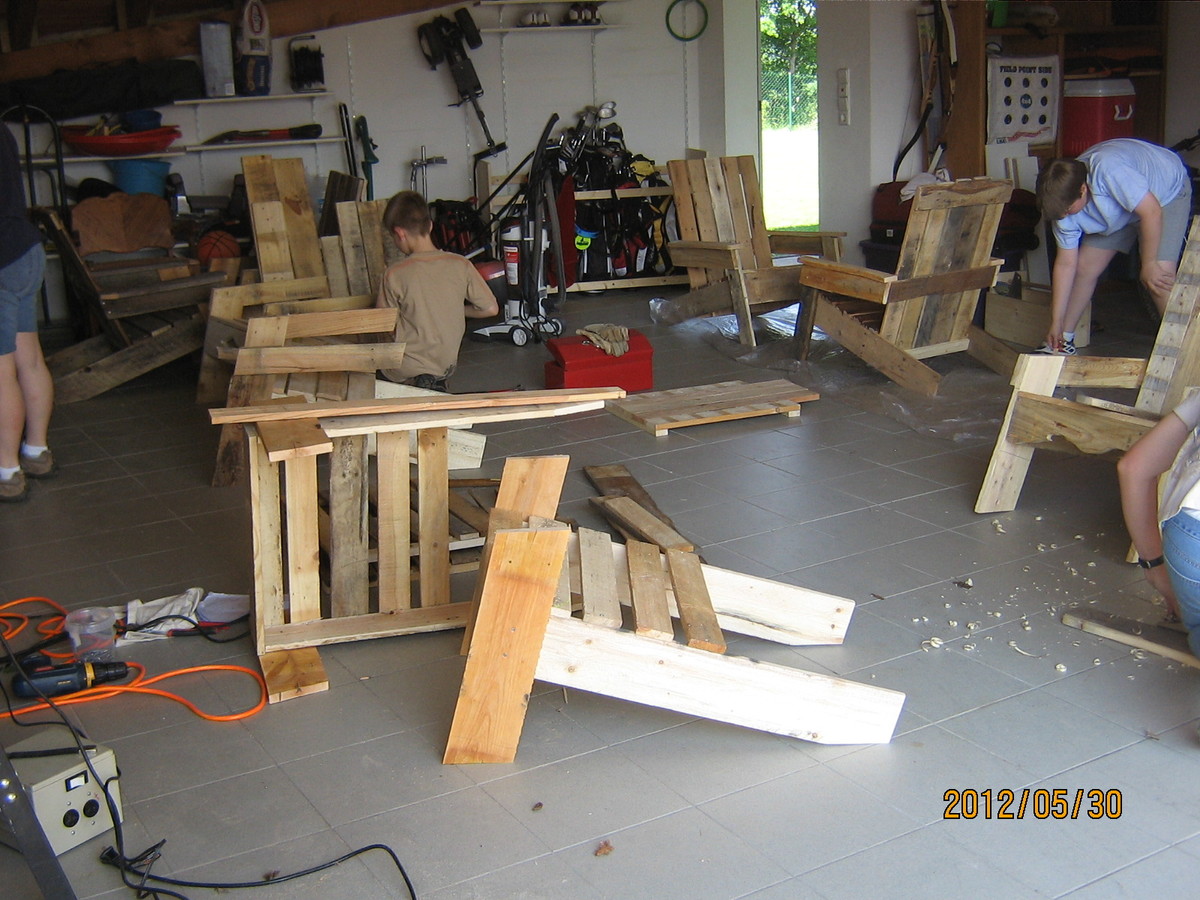
We were able to pick up pallets for free. There were 6 boys aged 10-13 years old. They each took apart 5 pallets. Their pallets with time and patience became two adirondack chairs each. We love the chairs and the boys learned quite a bit. The challenge was that the pallet peices differed in thickness and widths so the boys had to really focus on each piece and the overall look. They look fantastic. The finishes were all different. We are so thankful that Ana has put together such a wonderful website.
Thank you Ana! These boys learned that if they need something, they can make it themselves! They also learned that trash can be a treasure.
Thank you,
Amy
Built from Plan(s)
Estimated Cost
$80 for 12 Chairs
Estimated Time Investment
Week Long Project (20 Hours or More)
Finish Used
The boys chose between outdoor paint, stain, or deck stain finishes.
Recommended Skill Level
Beginner
Comments

17” square, 2x4 side tables / stools
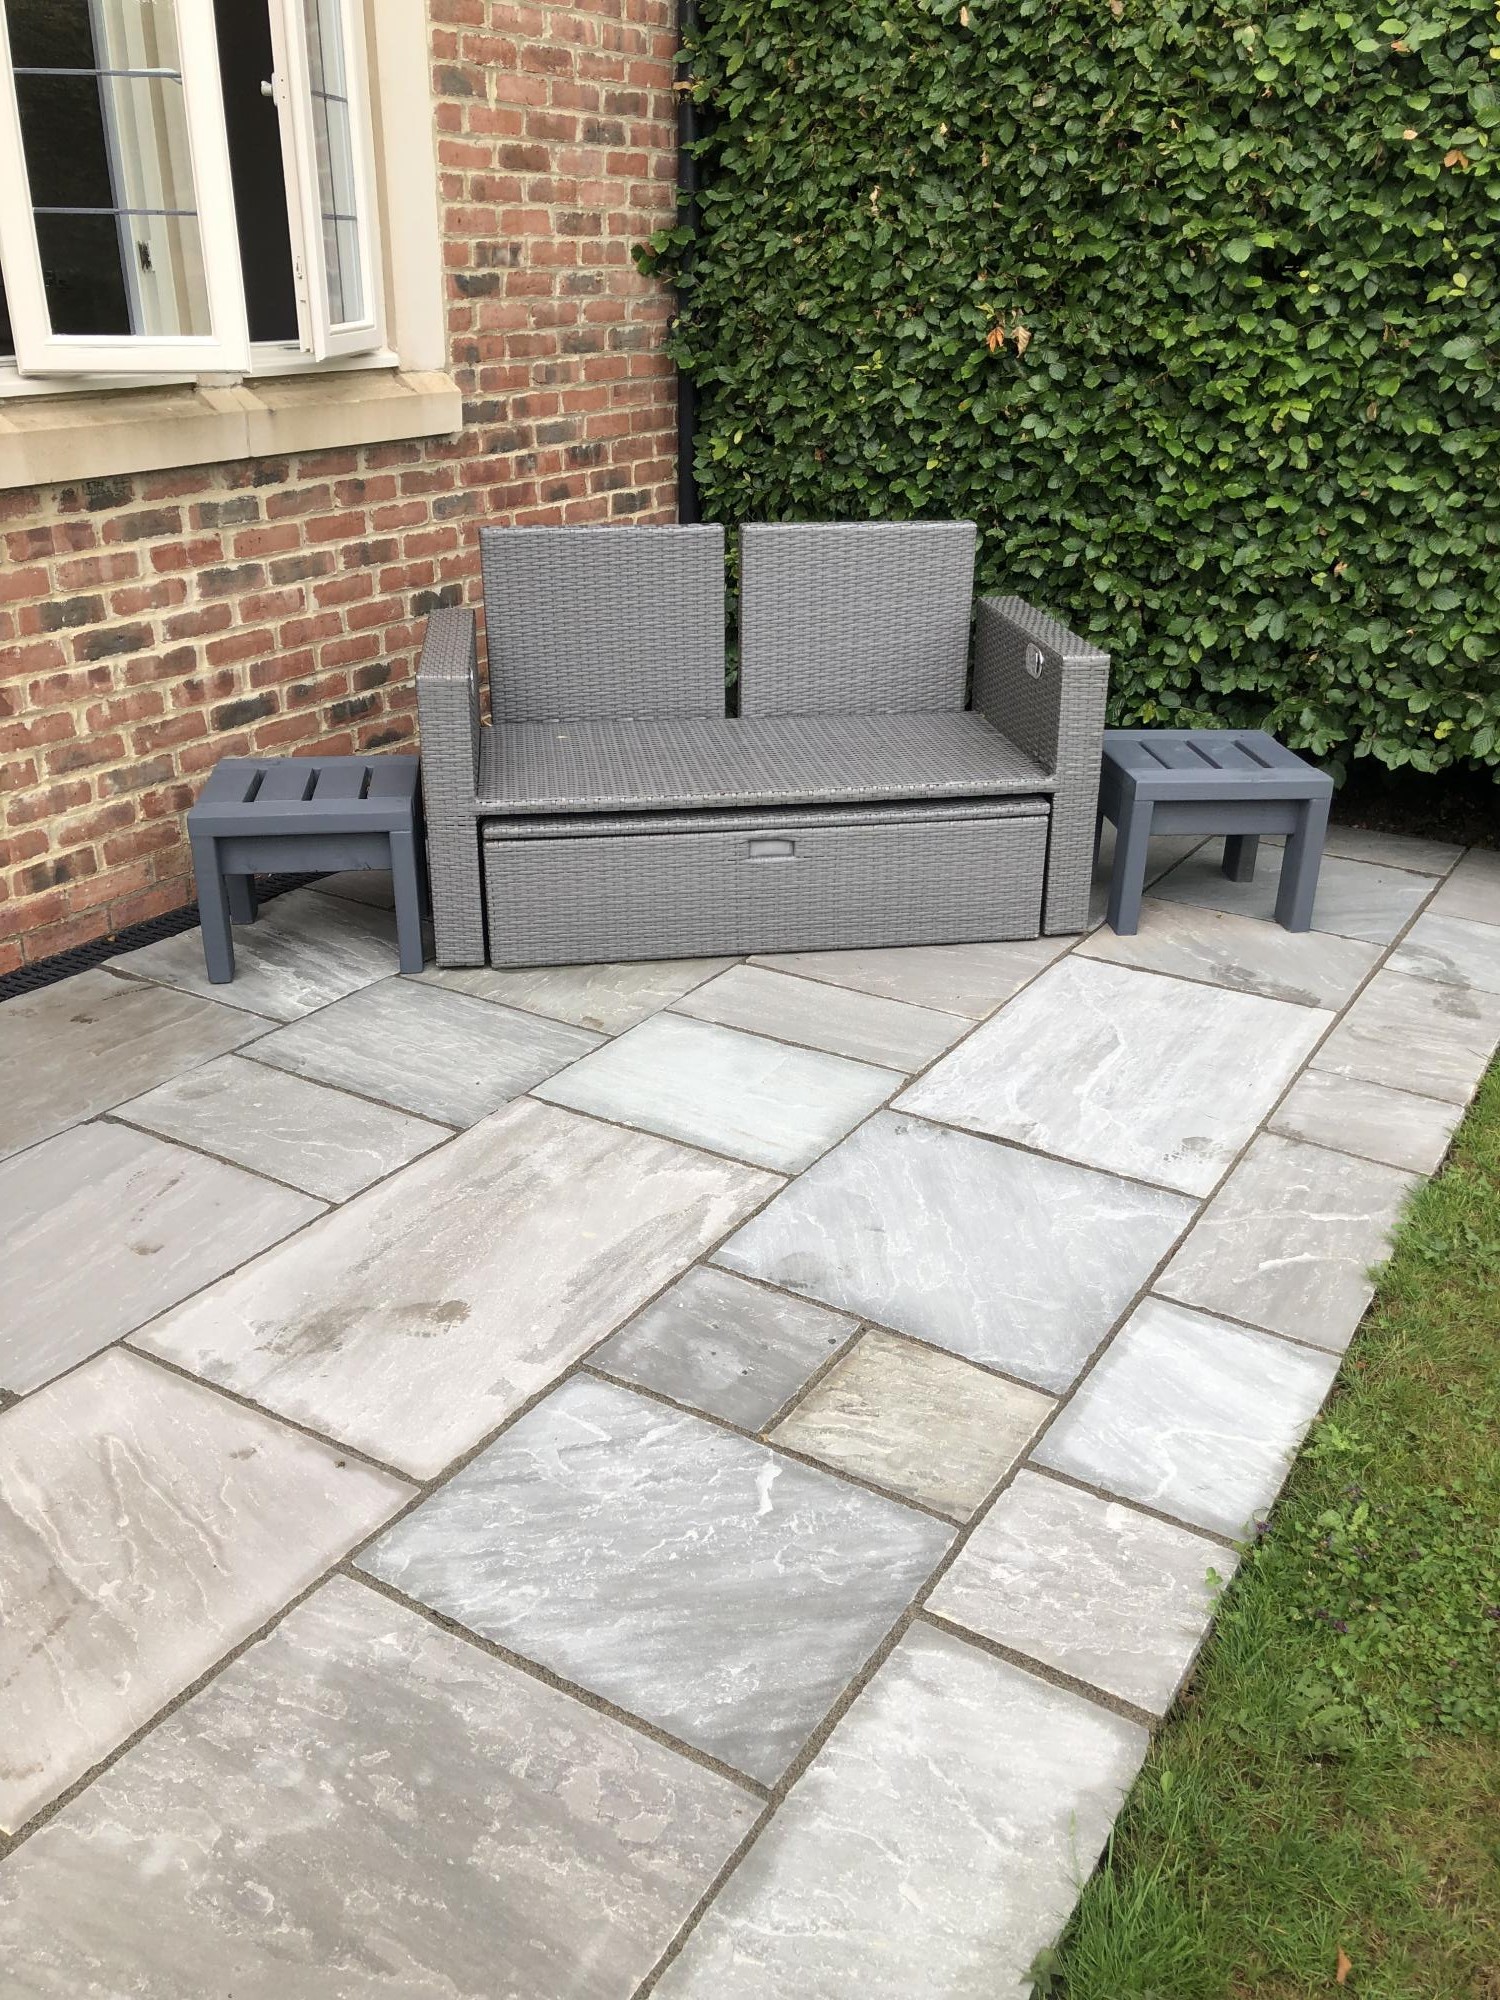
Well my wife bought 2 x 17” square seat cushions the problem was we didn’t have any stools to put them on so decided to enhance our front seating patio area with 2 solid 2x4 side tables that would double up as stools.
I based the design on Ana’s table design but decided to counter sink all the screws & cut plugs to suit so no screw heads could be seen, they turned out perfect & very robust, perfect for the U.K. weather, my wife finished them in grey outdoor paint to match the furniture, all in all they took only around 6hrs to make & paint.
Built from Plan(s)
Comments
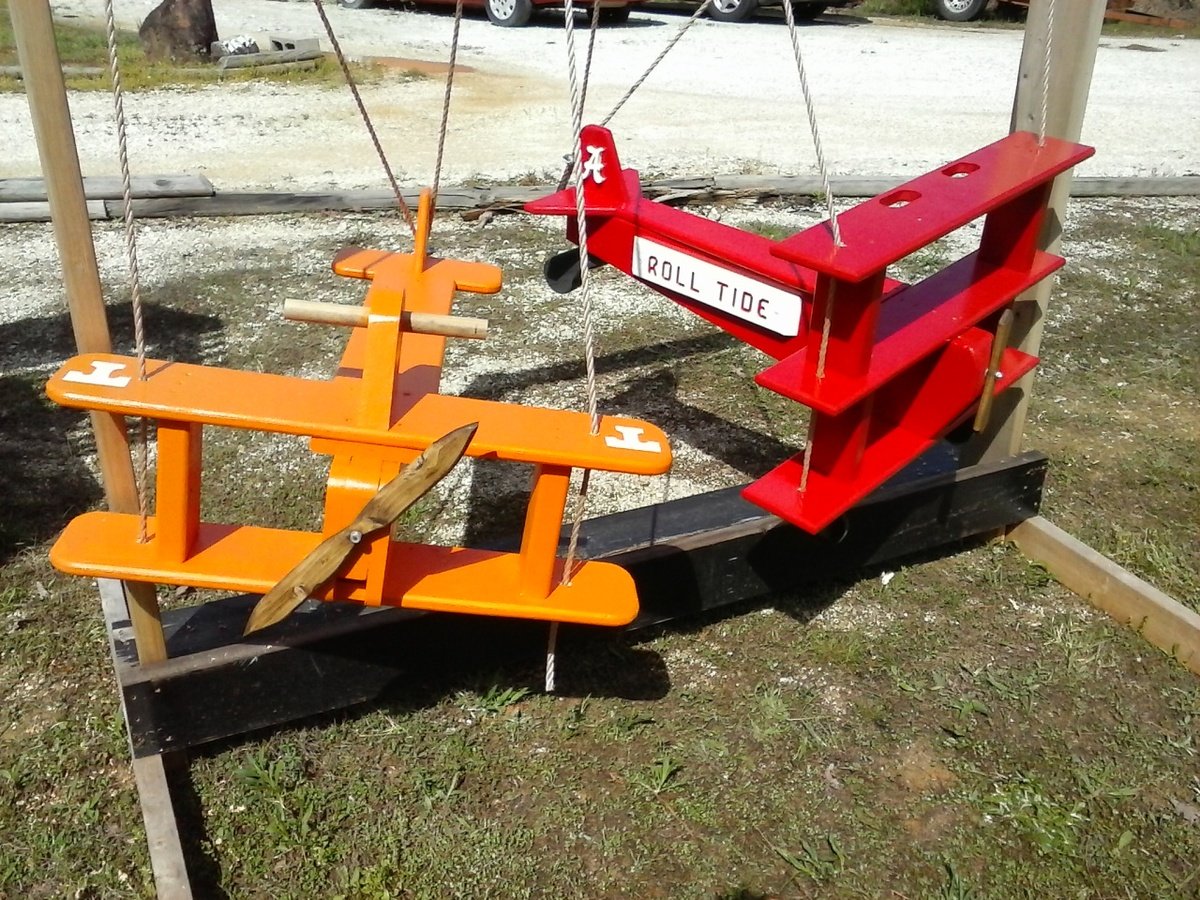
Airplane Swings
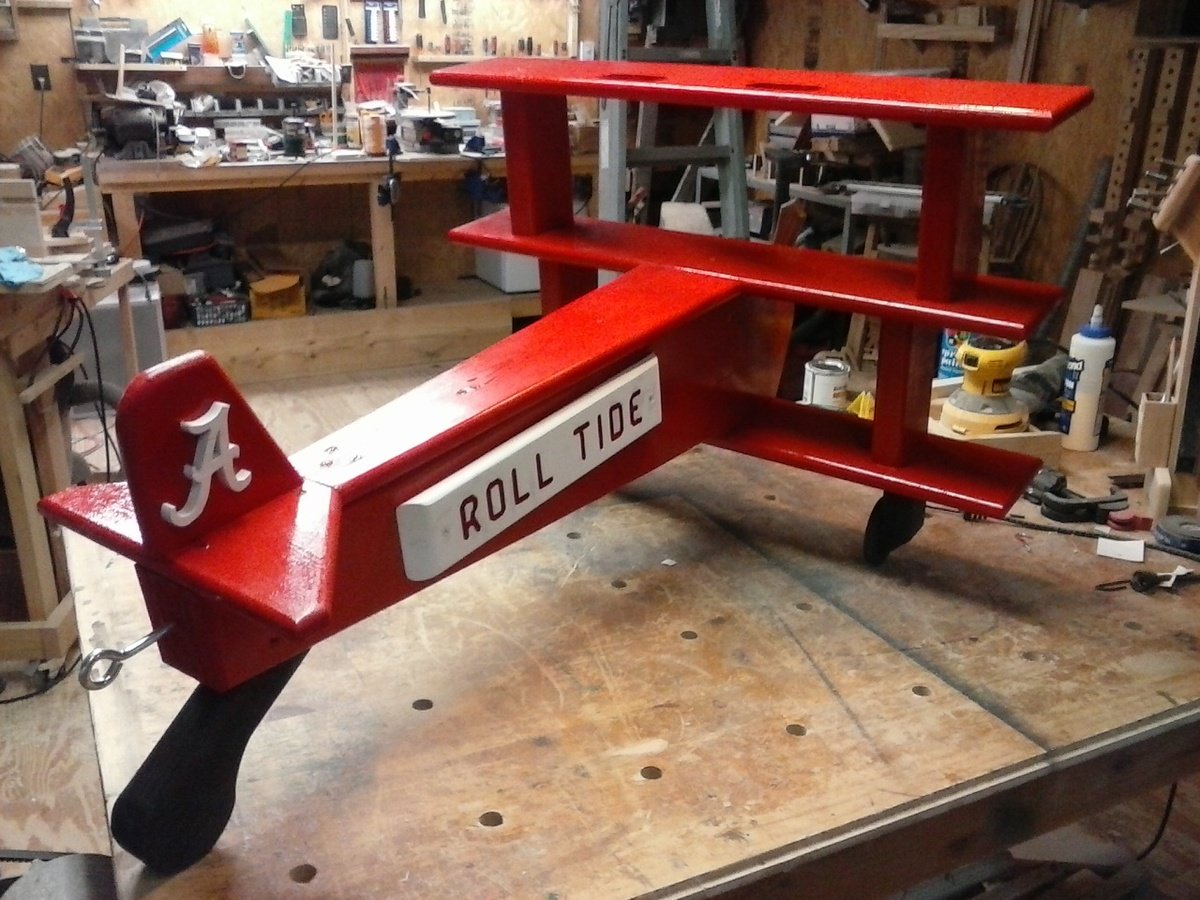
Built in an afternoon. I built them from a picture on Ana White website and modified a bit with both planes. Roll Tide was routed into a piece of wood and glued to the sides of the plane. The "A" was cut out on the band saw and finished on the scroll saw. The "T" on the orange plane was painted on The tri plane is the favorite. Roll Tide !
Built from Plan(s)
Estimated Cost
$20.00 plus paint
Estimated Time Investment
Afternoon Project (3-6 Hours)
Finish Used
Oil Based paint
Recommended Skill Level
Intermediate
Comments
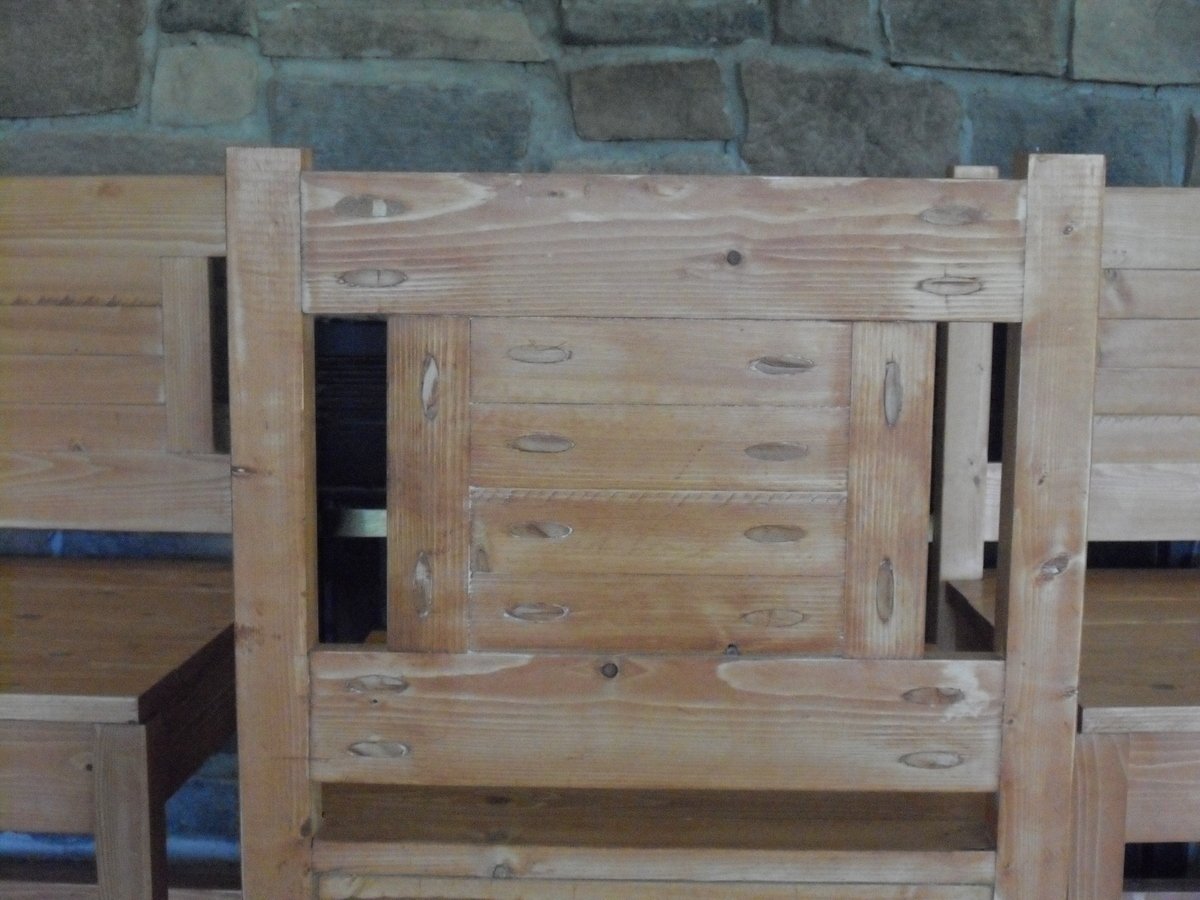
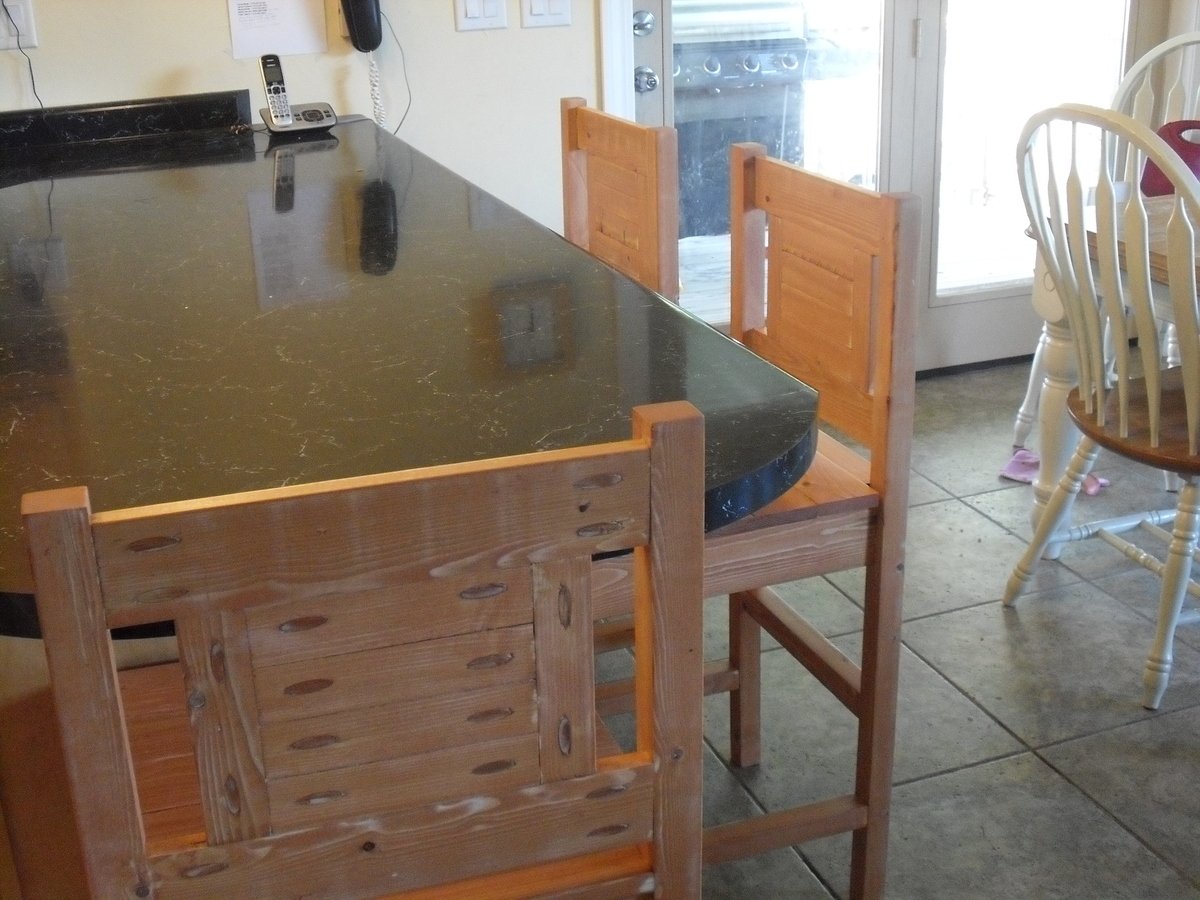
Colonial Maple Bar Stools
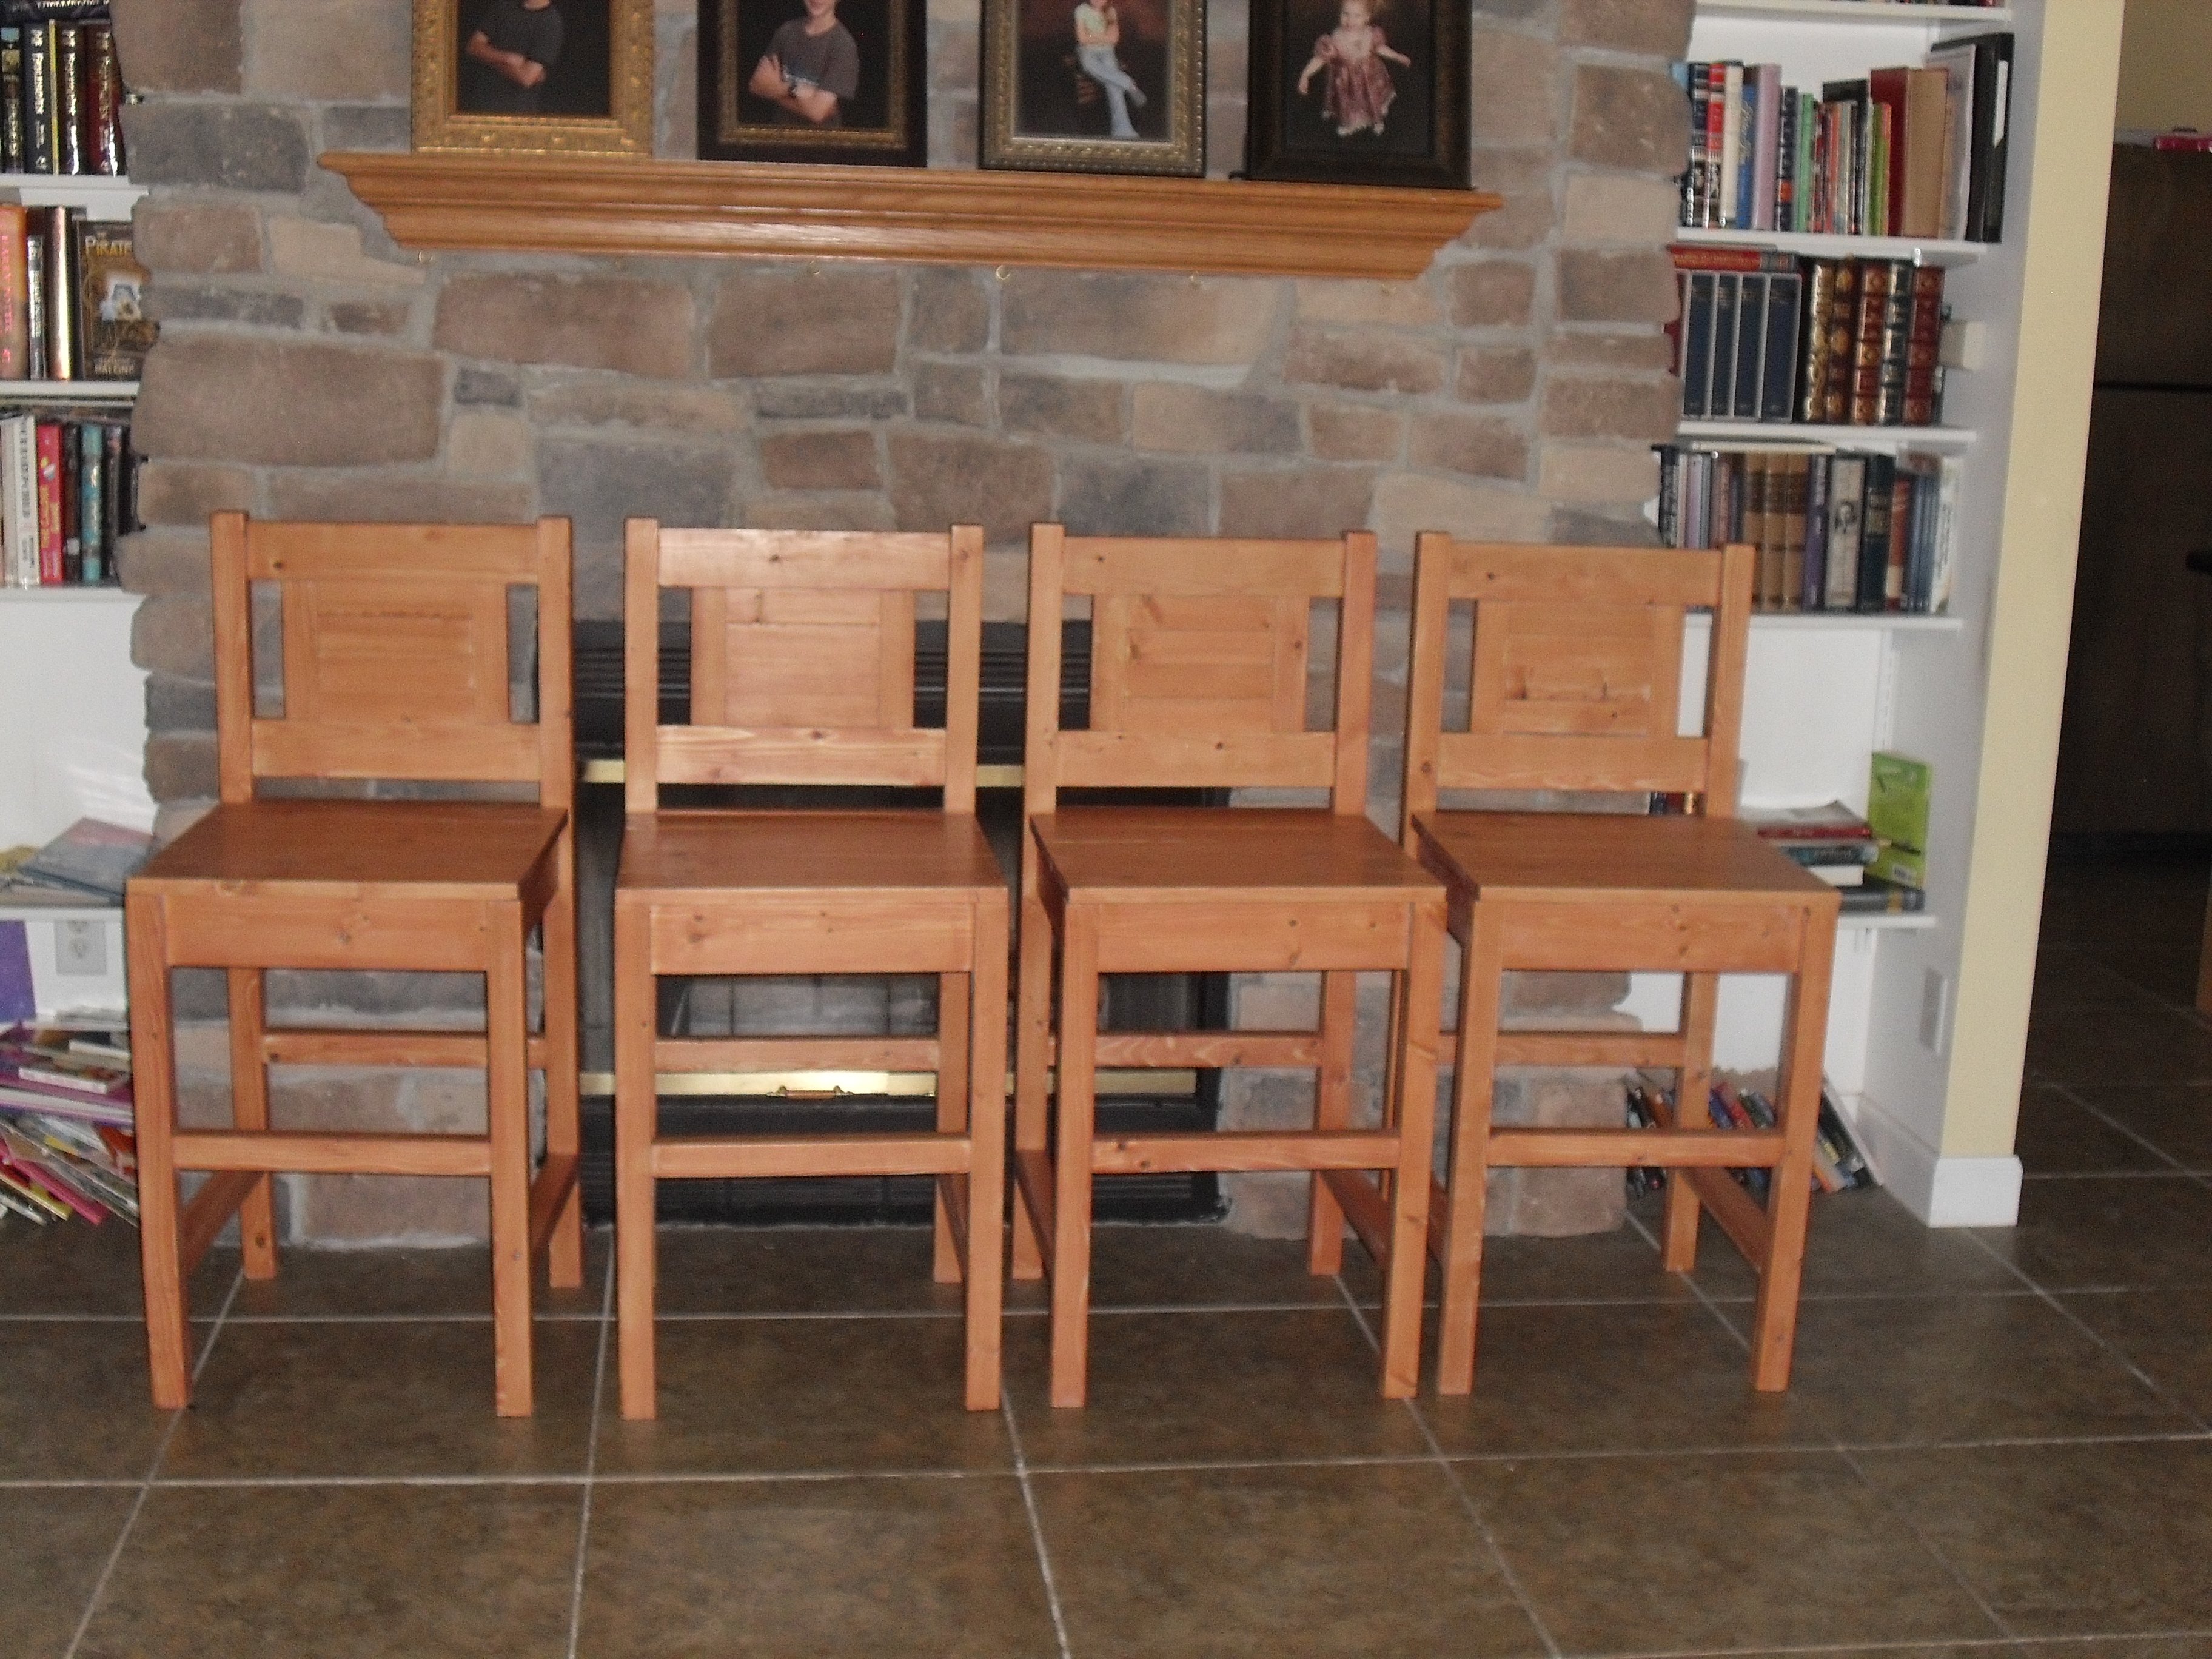
My sixteen-year old son took this on as a summer project and built four bar stools. He did a great job! We lowered them by 4 inches from the plan specs to fit under the counter. He used a Miniwax Colonial Maple finish. This project took a lot of Kreg Jig screws and plugs - almost 100 of each. They are very comfortable and beautiful.
Built from Plan(s)
Estimated Cost
$65.00 for wood for four, $20.00 for other supplies
Estimated Time Investment
Week Long Project (20 Hours or More)
Finish Used
Wood Conditioner, Miniwax Colonial Maple oil-based stain, and 3 coats of polyurethane
Recommended Skill Level
Intermediate
Comments
Corner Banquette Bench with Storage
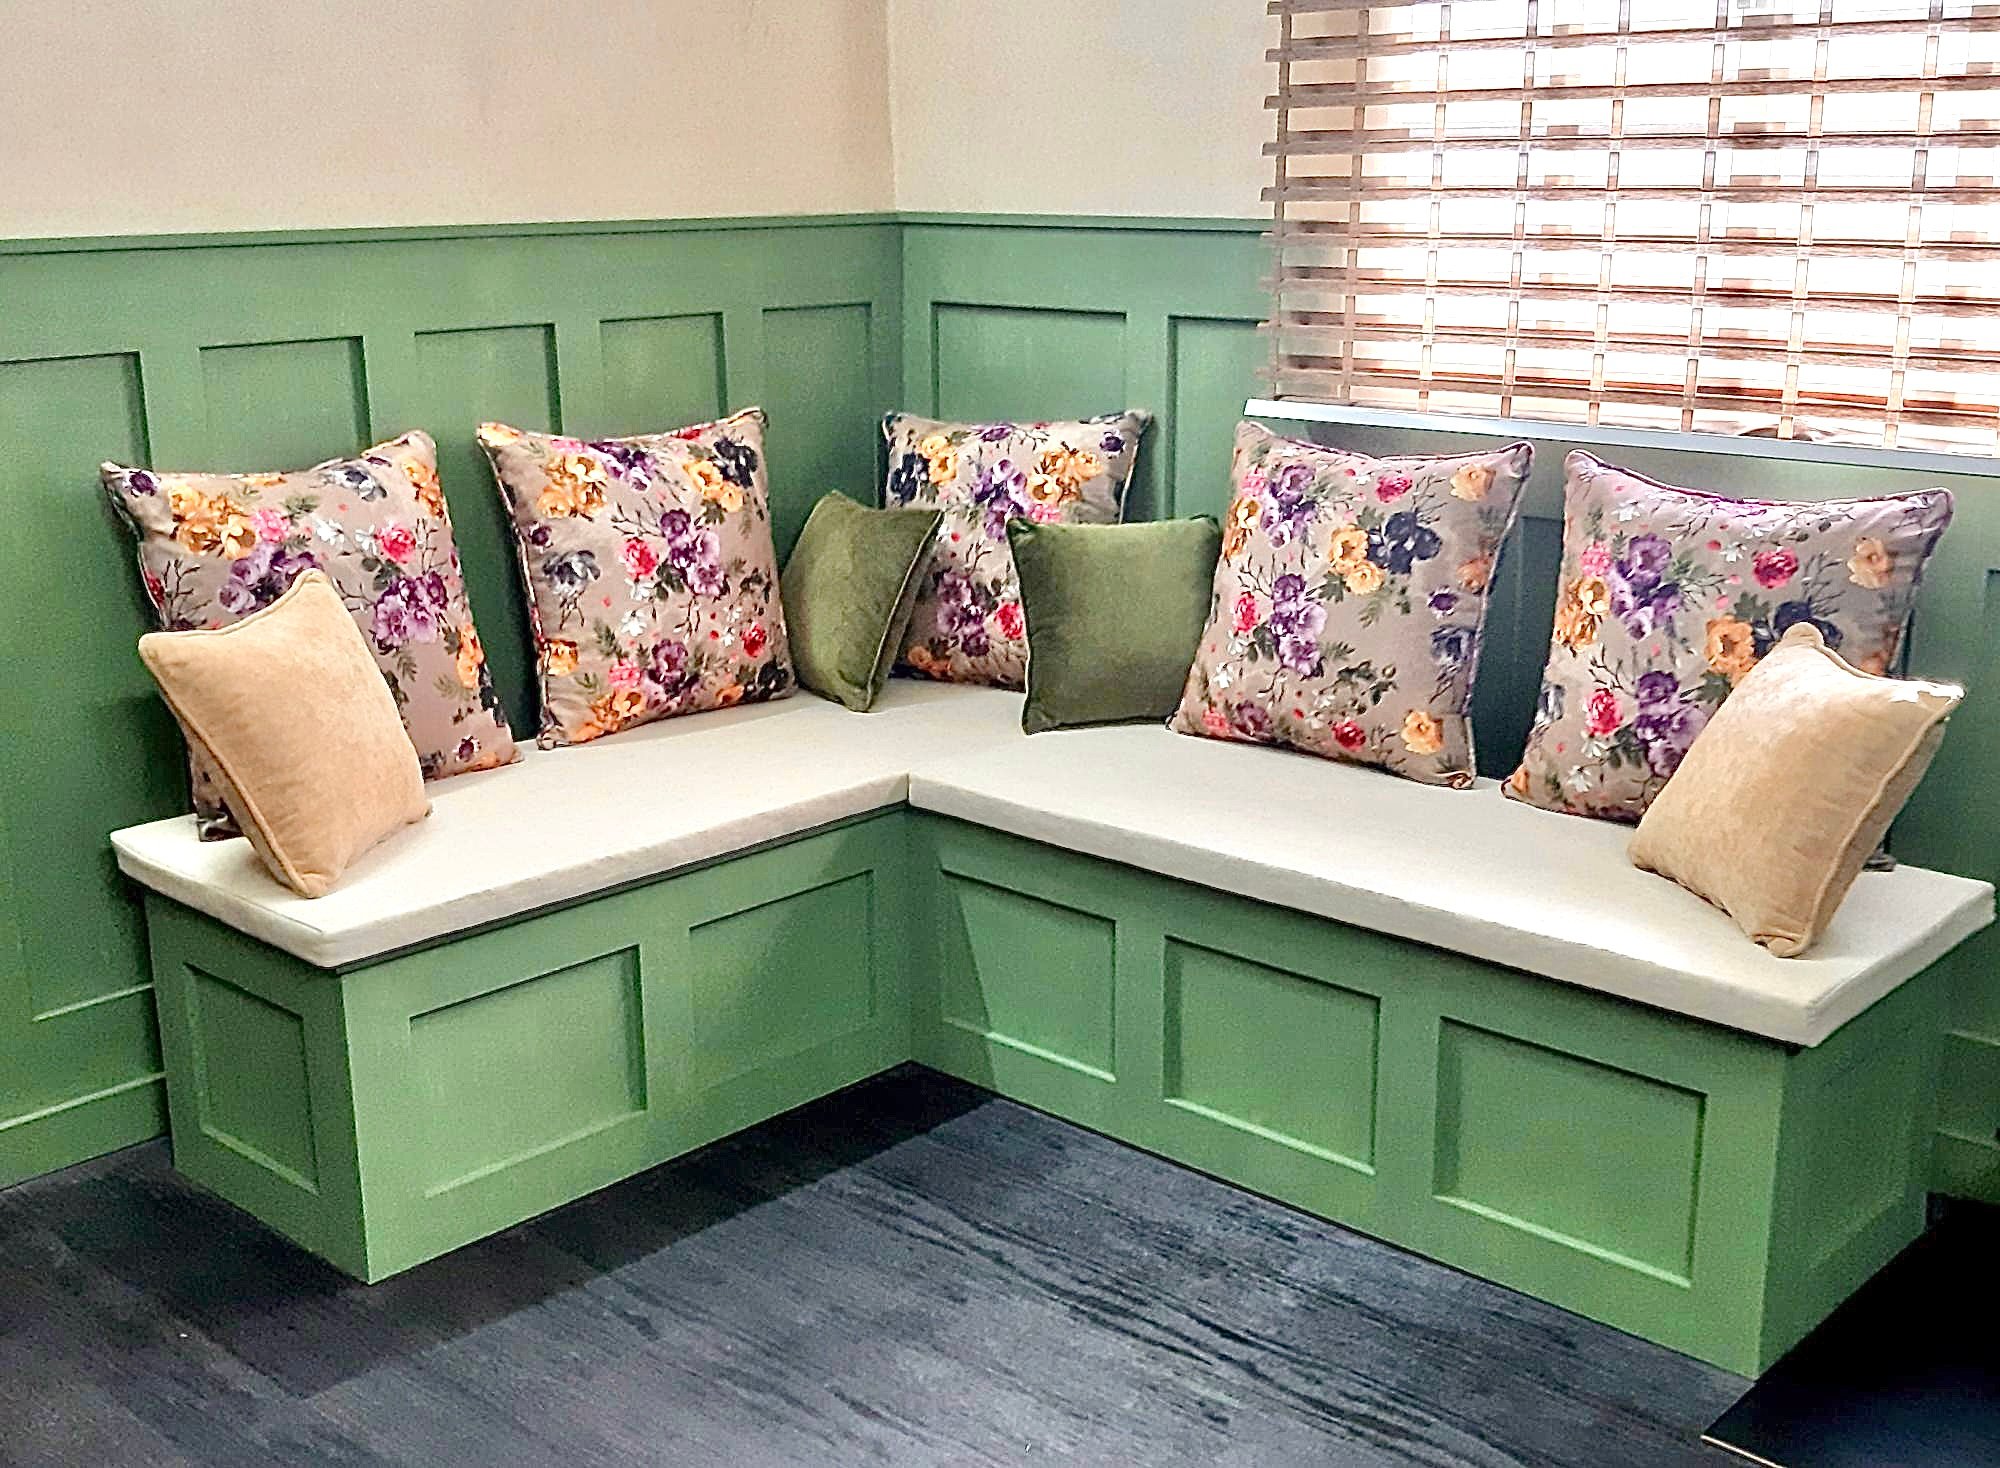
Beautiful banquette bench by Khalid Al-Bahi
Built from Plan(s)
Modern Craft Table *tweaked*

Completed Modern Craft Table! We tweaked the plans a bit because I was looking for a larger table top. The top now measures 48" x 76". We simply did this by adding an extra set of cubbies to the other side of the shelves. Absolutely LOVE how this turned out! All I need now is 4 counter height stools built and lots of shelves to complete my craft room! Will be sure to post those once they are completed!
Built from Plan(s)
Estimated Time Investment
Weekend Project (10-20 Hours)
Finish Used
Ultra White Latex Paint
Recommended Skill Level
Beginner
Comments

Thu, 11/17/2011 - 01:10
Darn I was so excited to see
Darn I was so excited to see you craft table! I apologize that your brag post did not show images. If you can send me images at knockoffwood(at)gmail.com I'd be happy to post. Thanks so much for submitting a brag post. Ana
Sun, 03/04/2012 - 07:31
Craft Desk
I LOVE LOVE LOVE your craft table. I want one! Looks like my husband wil have to get busy! Thanks for sharing!
Kristina
Houston, TX
Tue, 05/29/2012 - 00:05
Question about Middle support
This is great!! I am planning something similar, but what is your idea or the plan you used for the middle support to keep it from sagging over time? My idea is to run another cubby in the middle from side to side. What do you think?
Mon, 01/21/2013 - 09:54
I love the modern craft
I love the modern craft table, just what I have been looking for, do you share instructions, dimensions, etc.? thanks, Laura
Thu, 05/12/2016 - 15:14
Are plans for the tweaked version?
I'm loving this and would love to have FIL build it for me but the plans look like its for the regular modern craft table but not the tweaked? Also is there support for the middle? Can you send me a link for the tweaked supply list please, can't seem to find it. Love what you do!
Cedar Shed
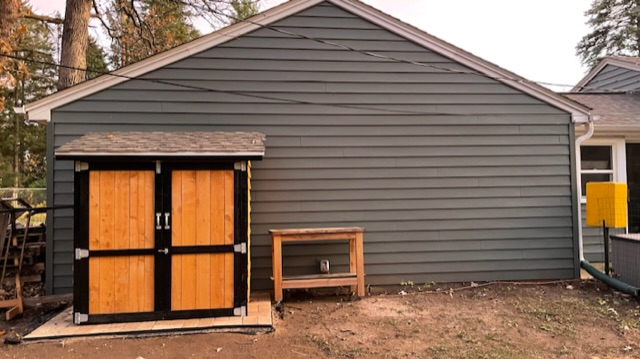
I needed a place for all my gardening pots and planter boxes and this was a perfect solution. So with my dads help we built this shed.
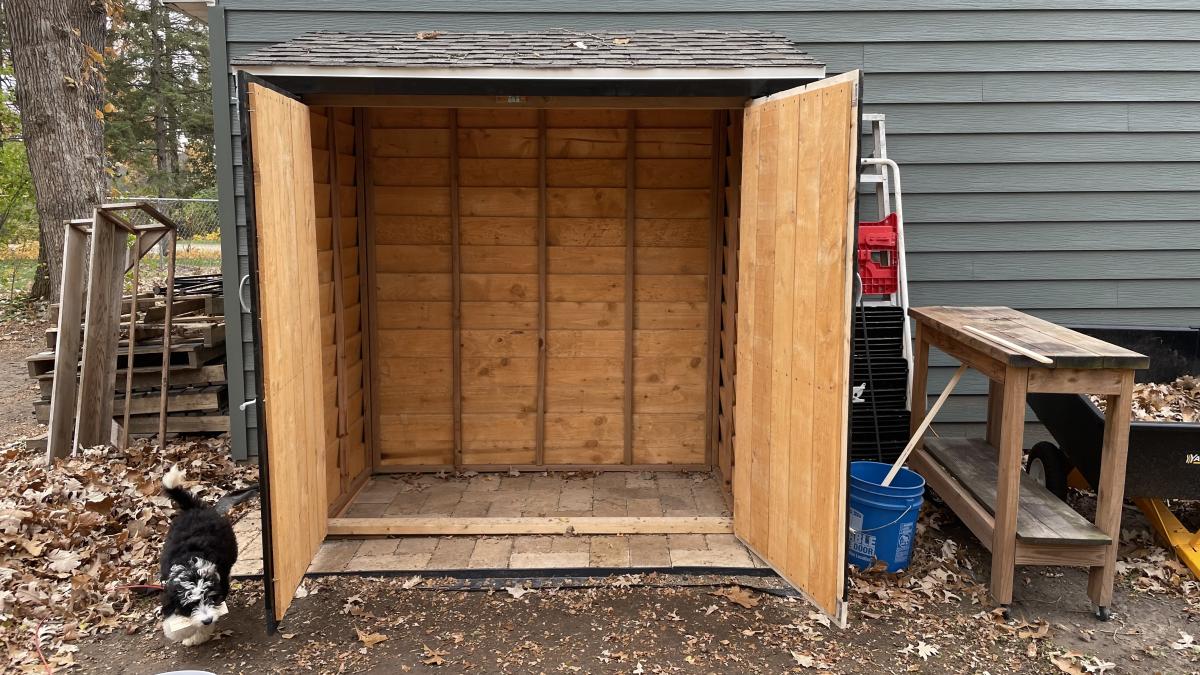
Built from Plan(s)
Comments
Outdoor buffet table
My first project using Ana White plans. Used pressure treated lumber and Kreg pocket hole jig. Cost: $126.
Built from Plan(s)
Comments
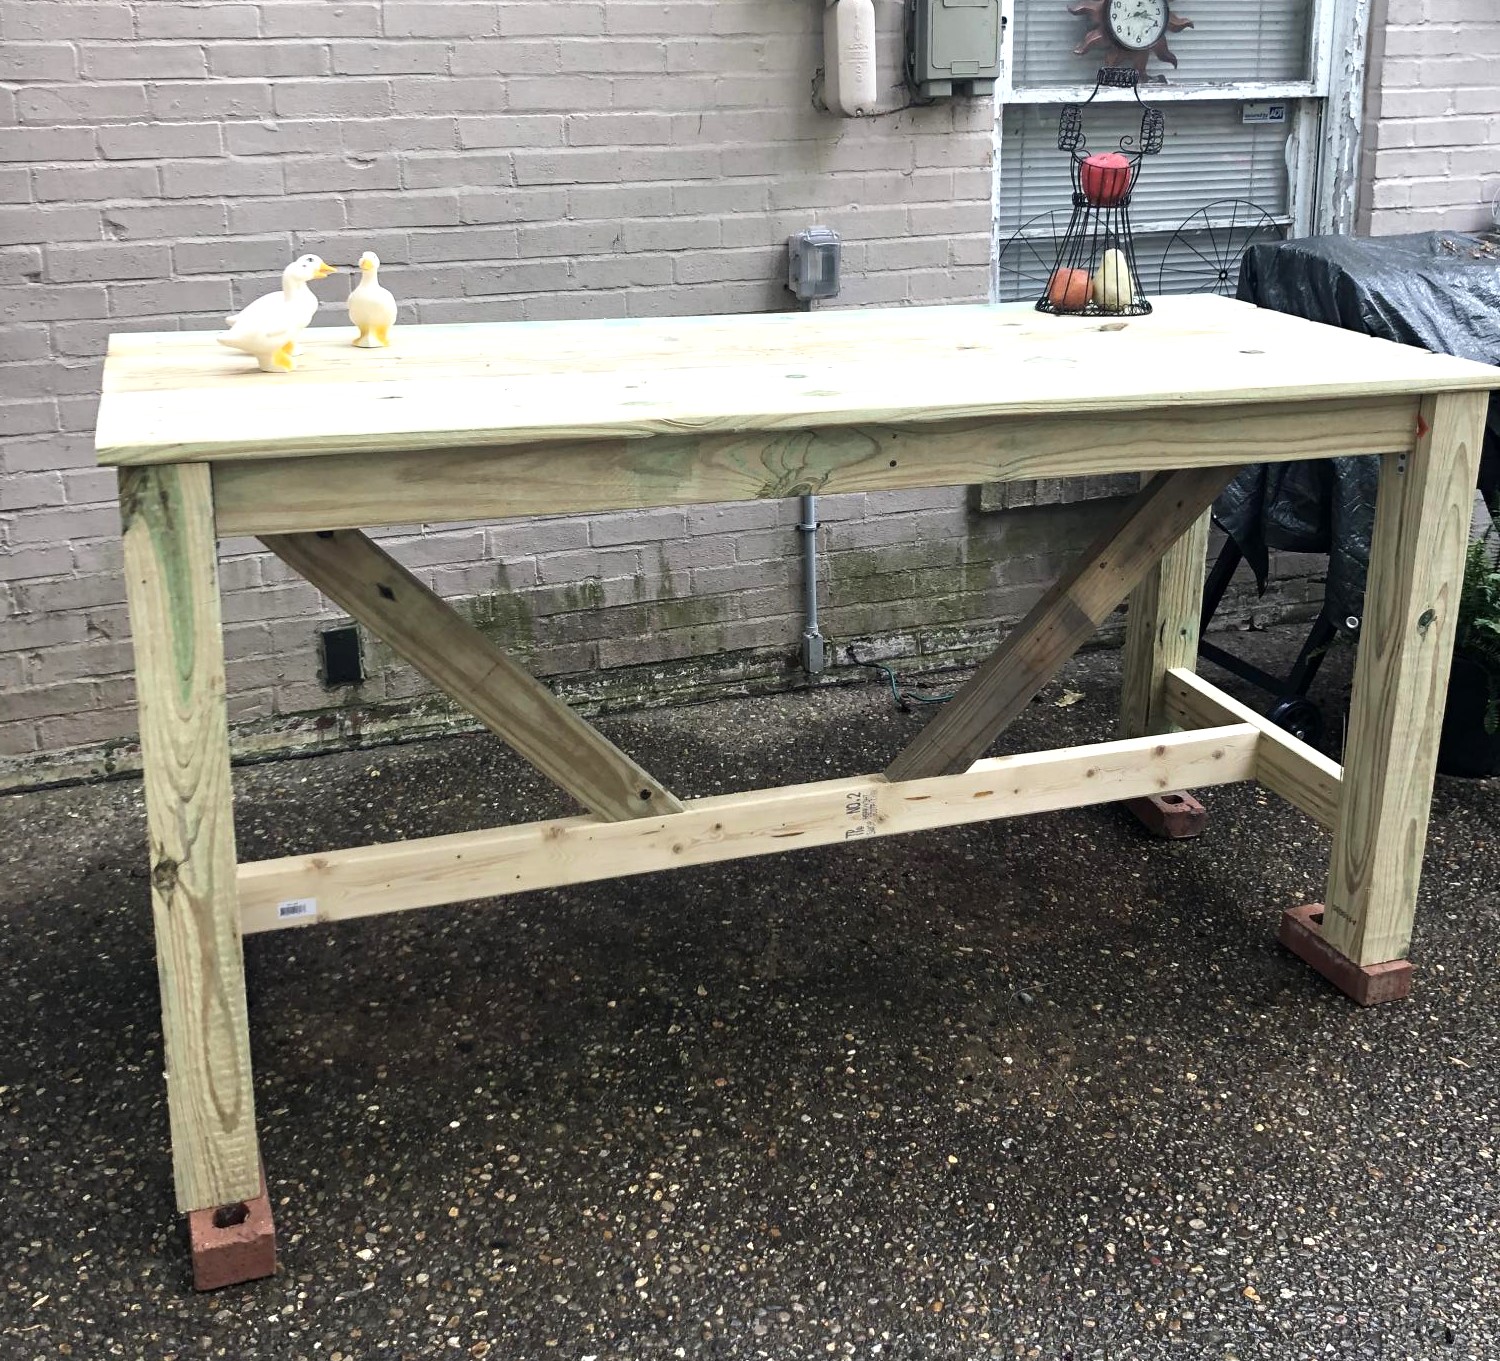
Rustic X-Entryway Table
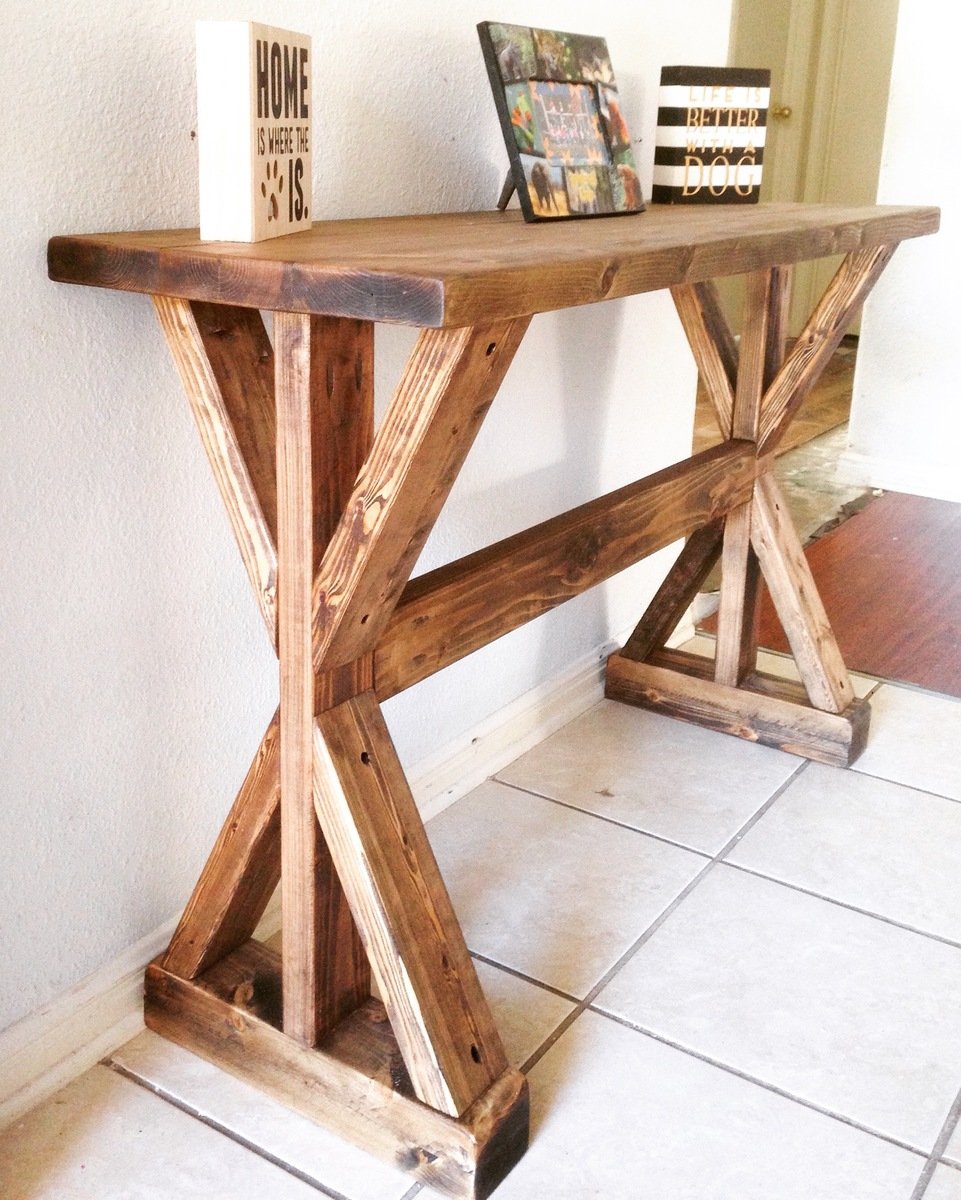
Handmade rustic entryway table. Stained with Varathane Stain and made from 2x4s & 2x6s Canadian white pine
Estimated Cost
$25
Estimated Time Investment
Day Project (6-9 Hours)
Finish Used
Varathane Ash Stain.
Varathane Polyurethane Satin
Varathane Polyurethane Satin
Recommended Skill Level
Intermediate
Comments
Mon, 04/11/2016 - 05:30
Dimensions
Hi,
I really love your entryway table. Do you have a plan that we can use with dimensions and cut list?
Thank you
Tue, 05/17/2016 - 20:33
Plans? What saw(s) did you use?
Hello can you provide us with plans for this? What saw(s) did you use?
Sun, 08/21/2016 - 08:18
Do you have plans for this
Do you have plans for this entry table?! I love it but can't seem to find the plans?
Thank you!
In reply to Are there plans for this ? by Jatin2286
Fri, 03/16/2018 - 10:49
I could draw you plans...
If you are OK with waiting a few days, I could draw you plans based off of the images.
In reply to Are there plans for this ? by Jatin2286
Sat, 03/17/2018 - 19:38
Here are plans for you.
I modified the design slightly, by adding feet and a 1x4 board accent (that makes it easier to build). I'm assuming the overall height is 29.5" and the length is 48". If you want these to be different, feel free to reach out to me and I can help you adjust.
You can find the plans here: http://famousartisan.com/diy-x-base-sofa-table-plans-or-entry-table/
In reply to Are there plans for this ? by Jatin2286
Sat, 03/17/2018 - 19:39
Here are plans for you.
I modified the design slightly, by adding feet and a 1x4 board accent (that makes it easier to build). I'm assuming the overall height is 29.5" and the length is 48". If you want these to be different, feel free to reach out to me and I can help you adjust.
You can find the plans here: http://famousartisan.com/diy-x-base-sofa-table-plans-or-entry-table/
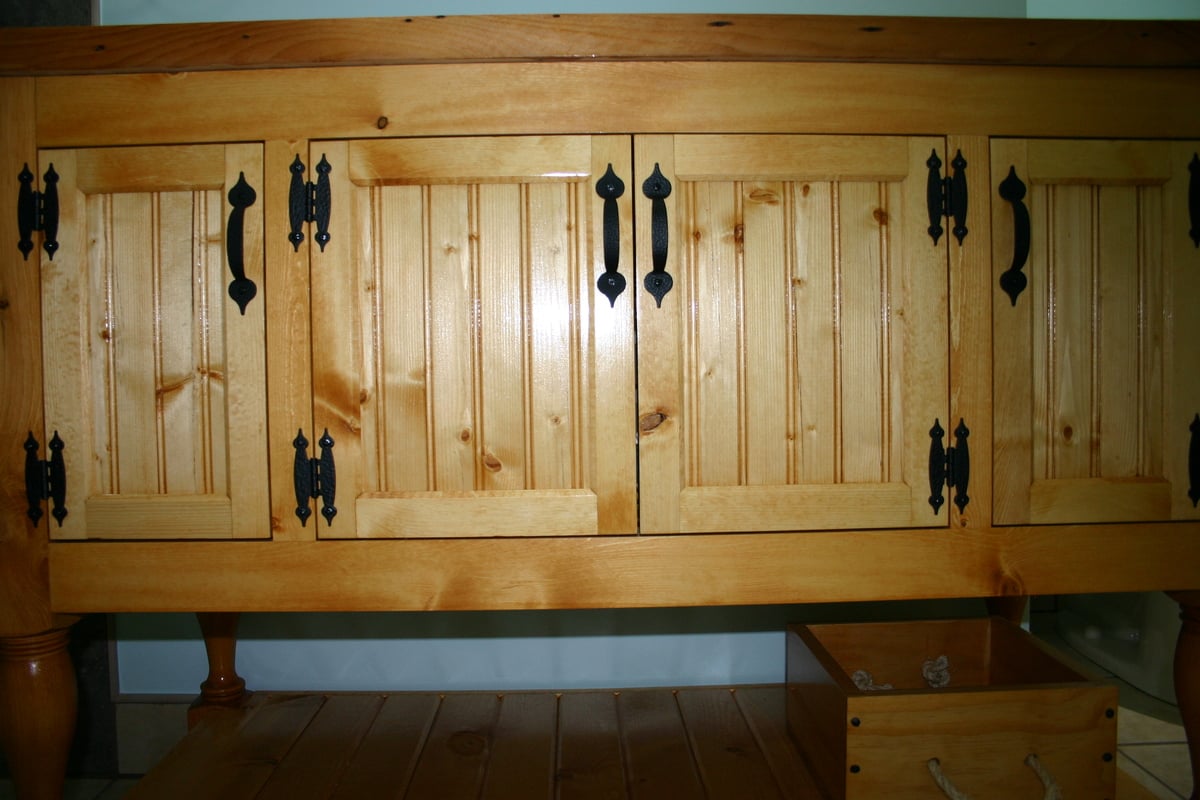
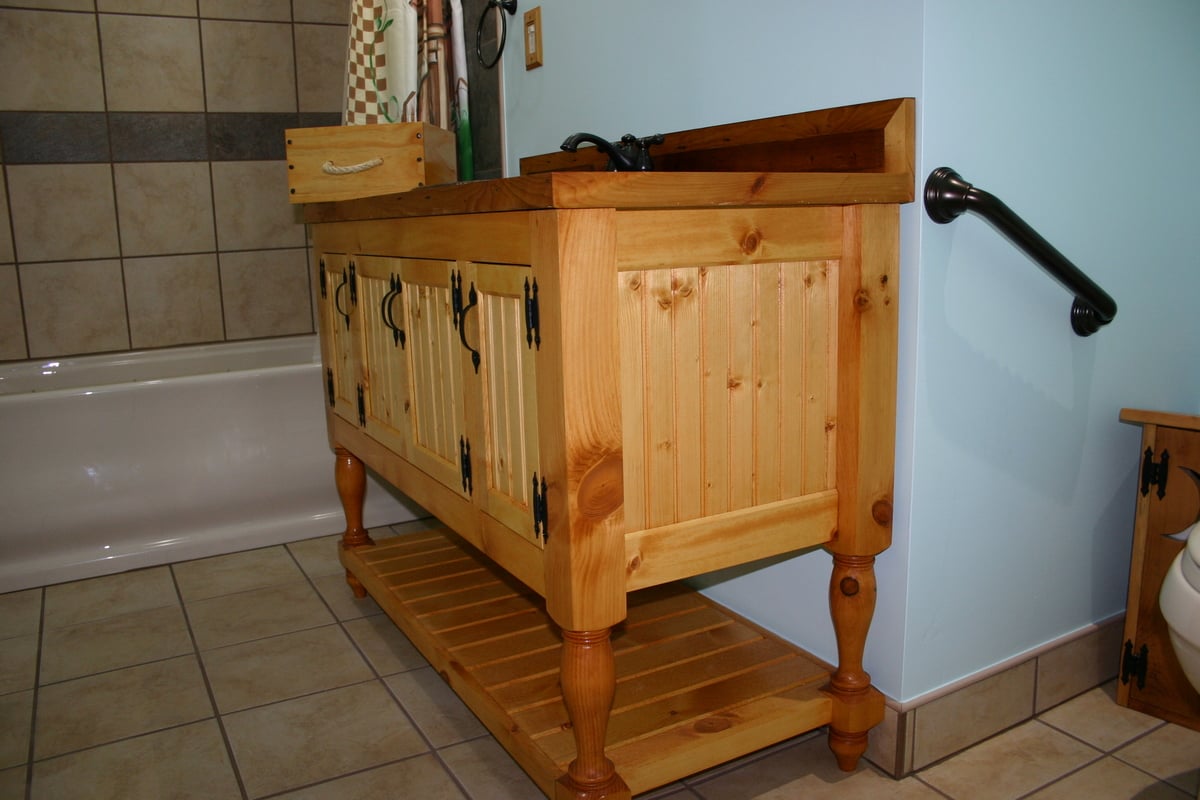
Bathroom Vanity I did for my mom Based on the Momplex vanity
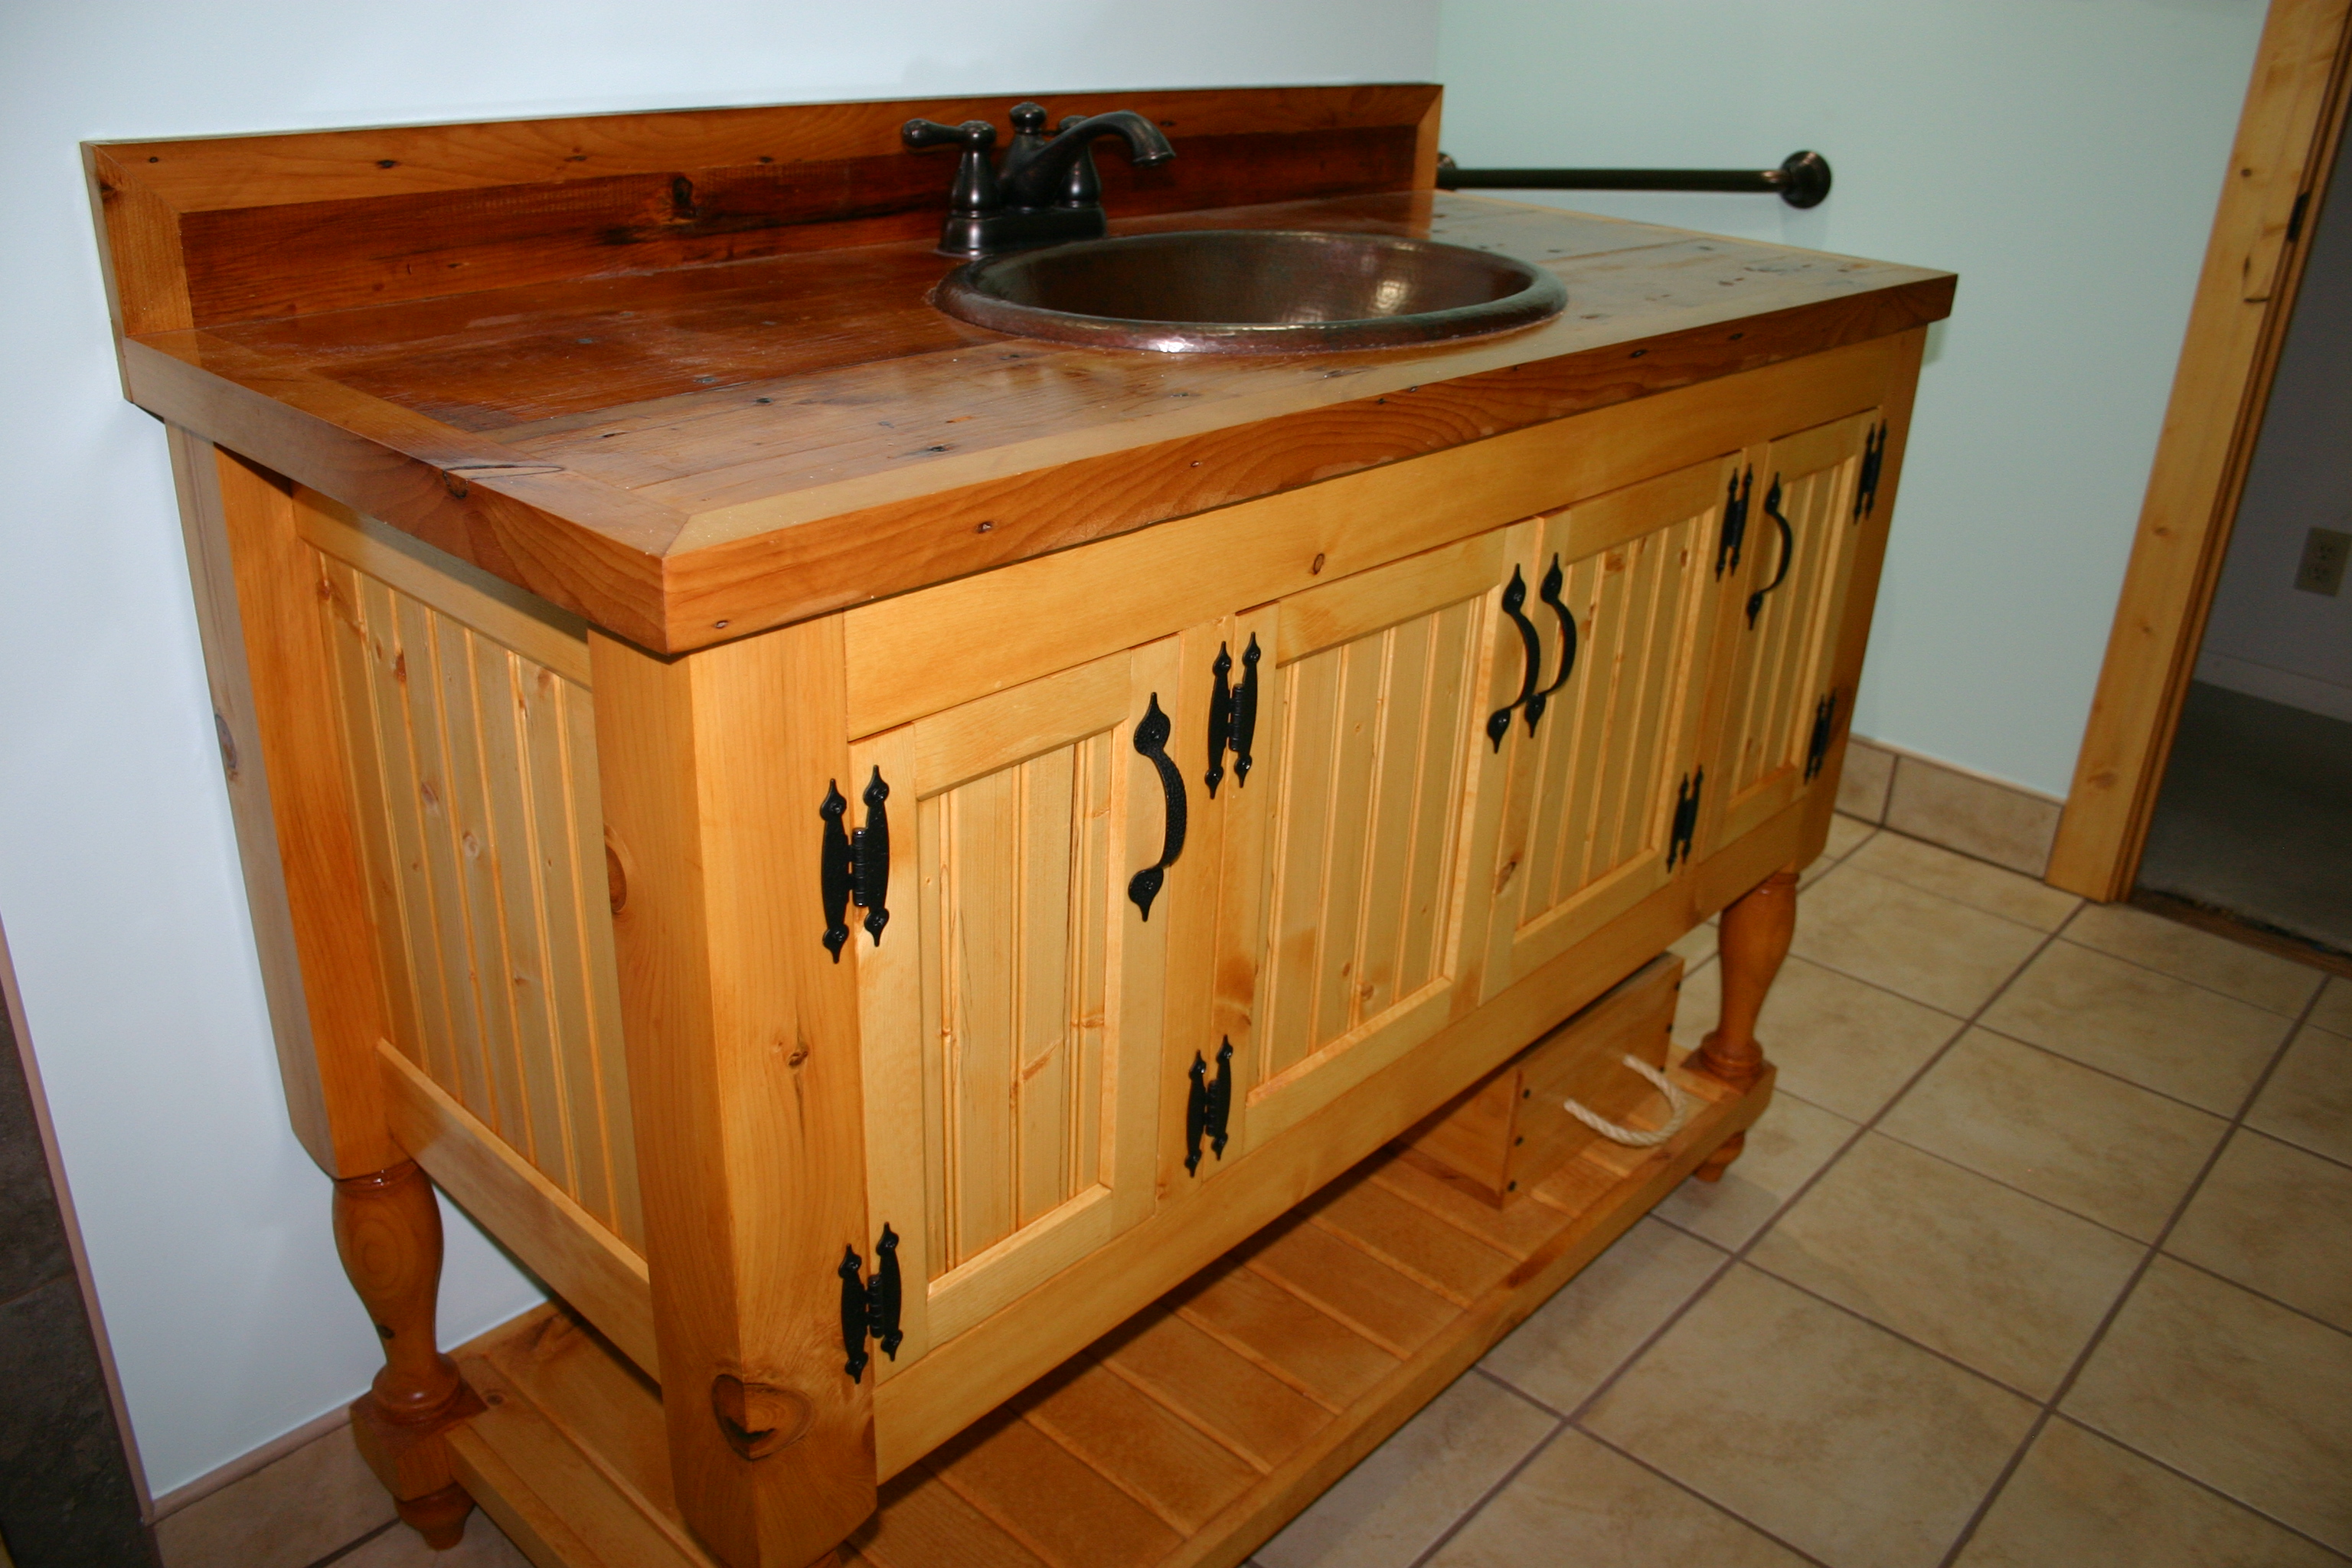
I remodeled the main floor bathroom for my parents. My mom had seen a vanity she like at a home center. Then she thought about doing an open vanity. Then I showed her the one Ana did for the Momplex (48" Turned Leg Vanity). and she loved it. This is what we came up with.
It has bead board panels on the ends and the doors. V-grove planks for the bottom shelf.
The top is made from 100 year old ship lap siding from my brother house. The sink is hand hammered copper with a venetian bronze faucet.
Built from Plan(s)
Estimated Time Investment
Week Long Project (20 Hours or More)
Finish Used
The vanity was finished using Rust-o-leum Ultimate wood stain in summer oak with several coats of a marine varnish to protect it in the bathroom. The top was only finished in the marine varnish.
Recommended Skill Level
Intermediate
Comments
Mudroom with Boot Storage and Hooks
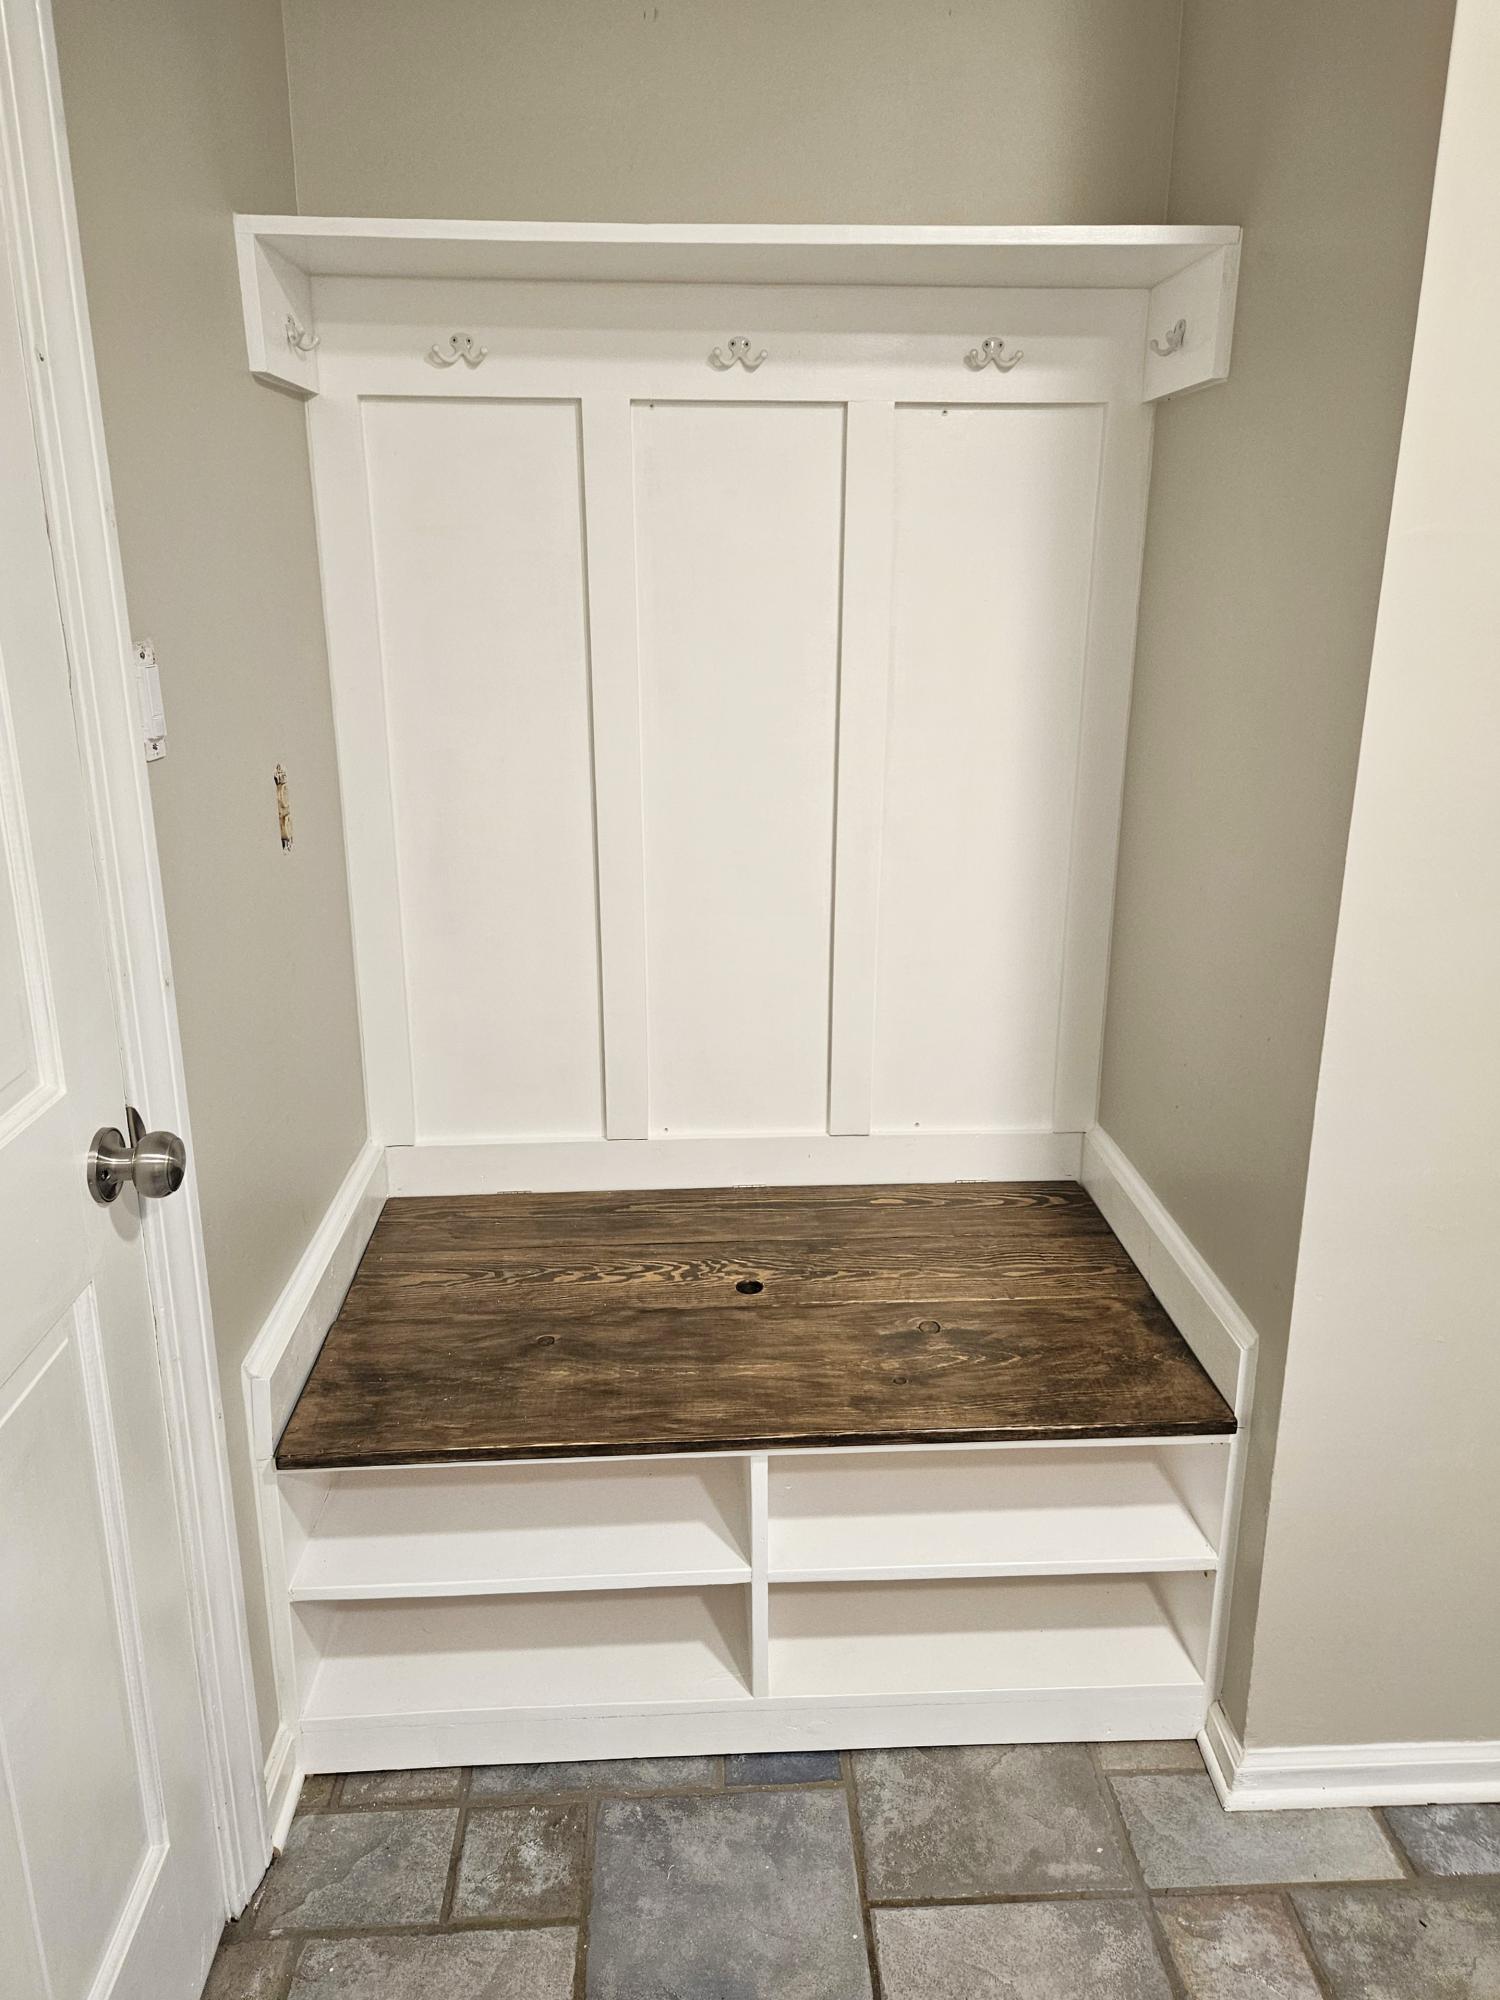
Built the drop zone bench with hidden storage in the laundry room. Modified to fit in 45 inch space where a built-in desk was. A fun and easy build. Thanks Ana for the great ideas and plans.
Don Toy
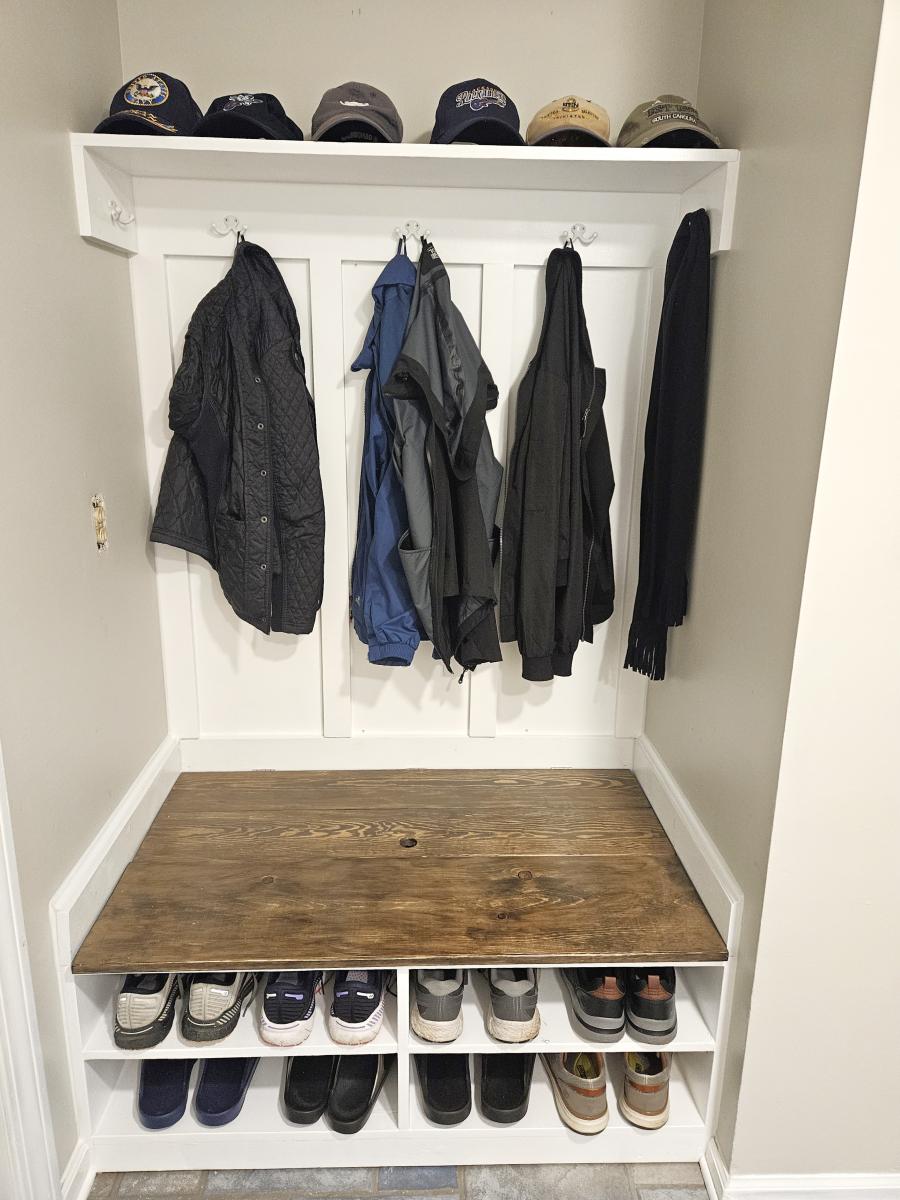
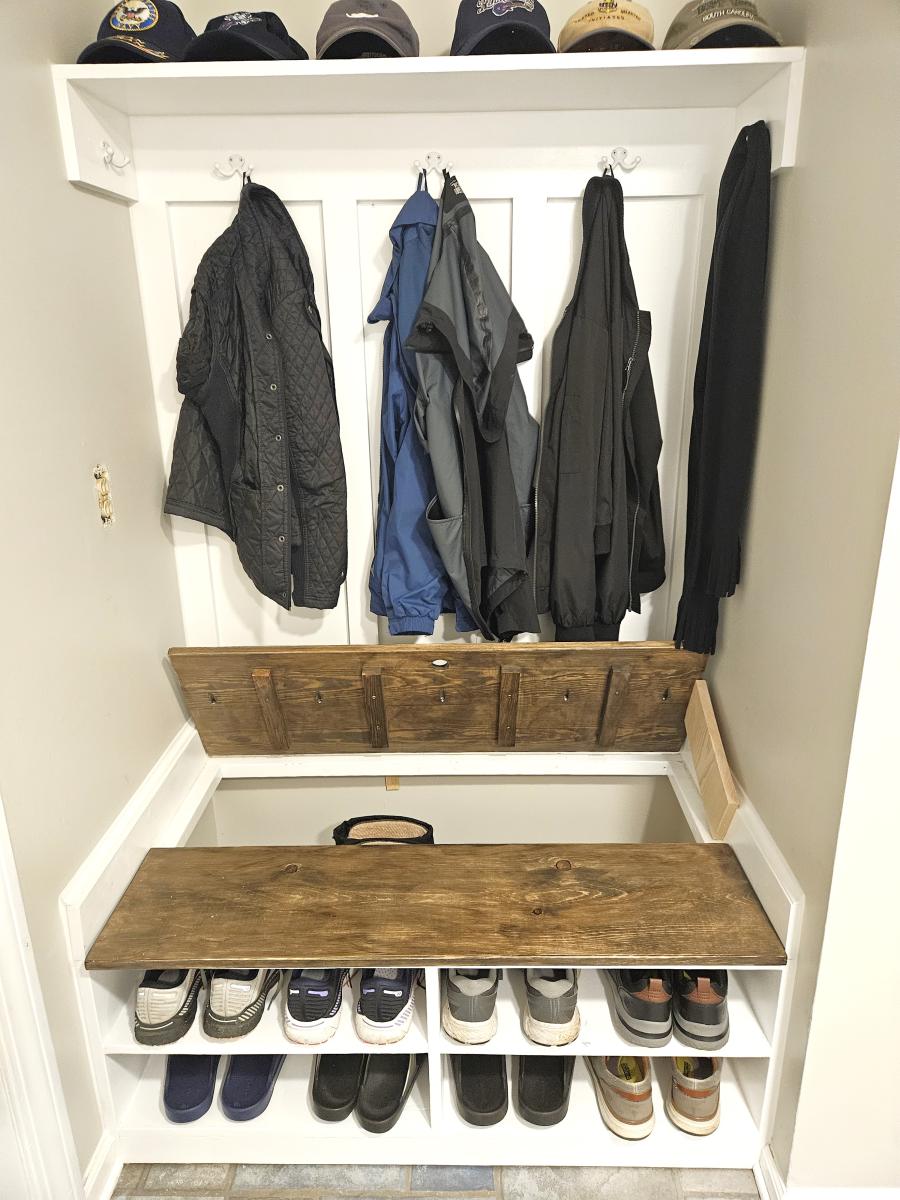
Built from Plan(s)
Wood Storage Mantle
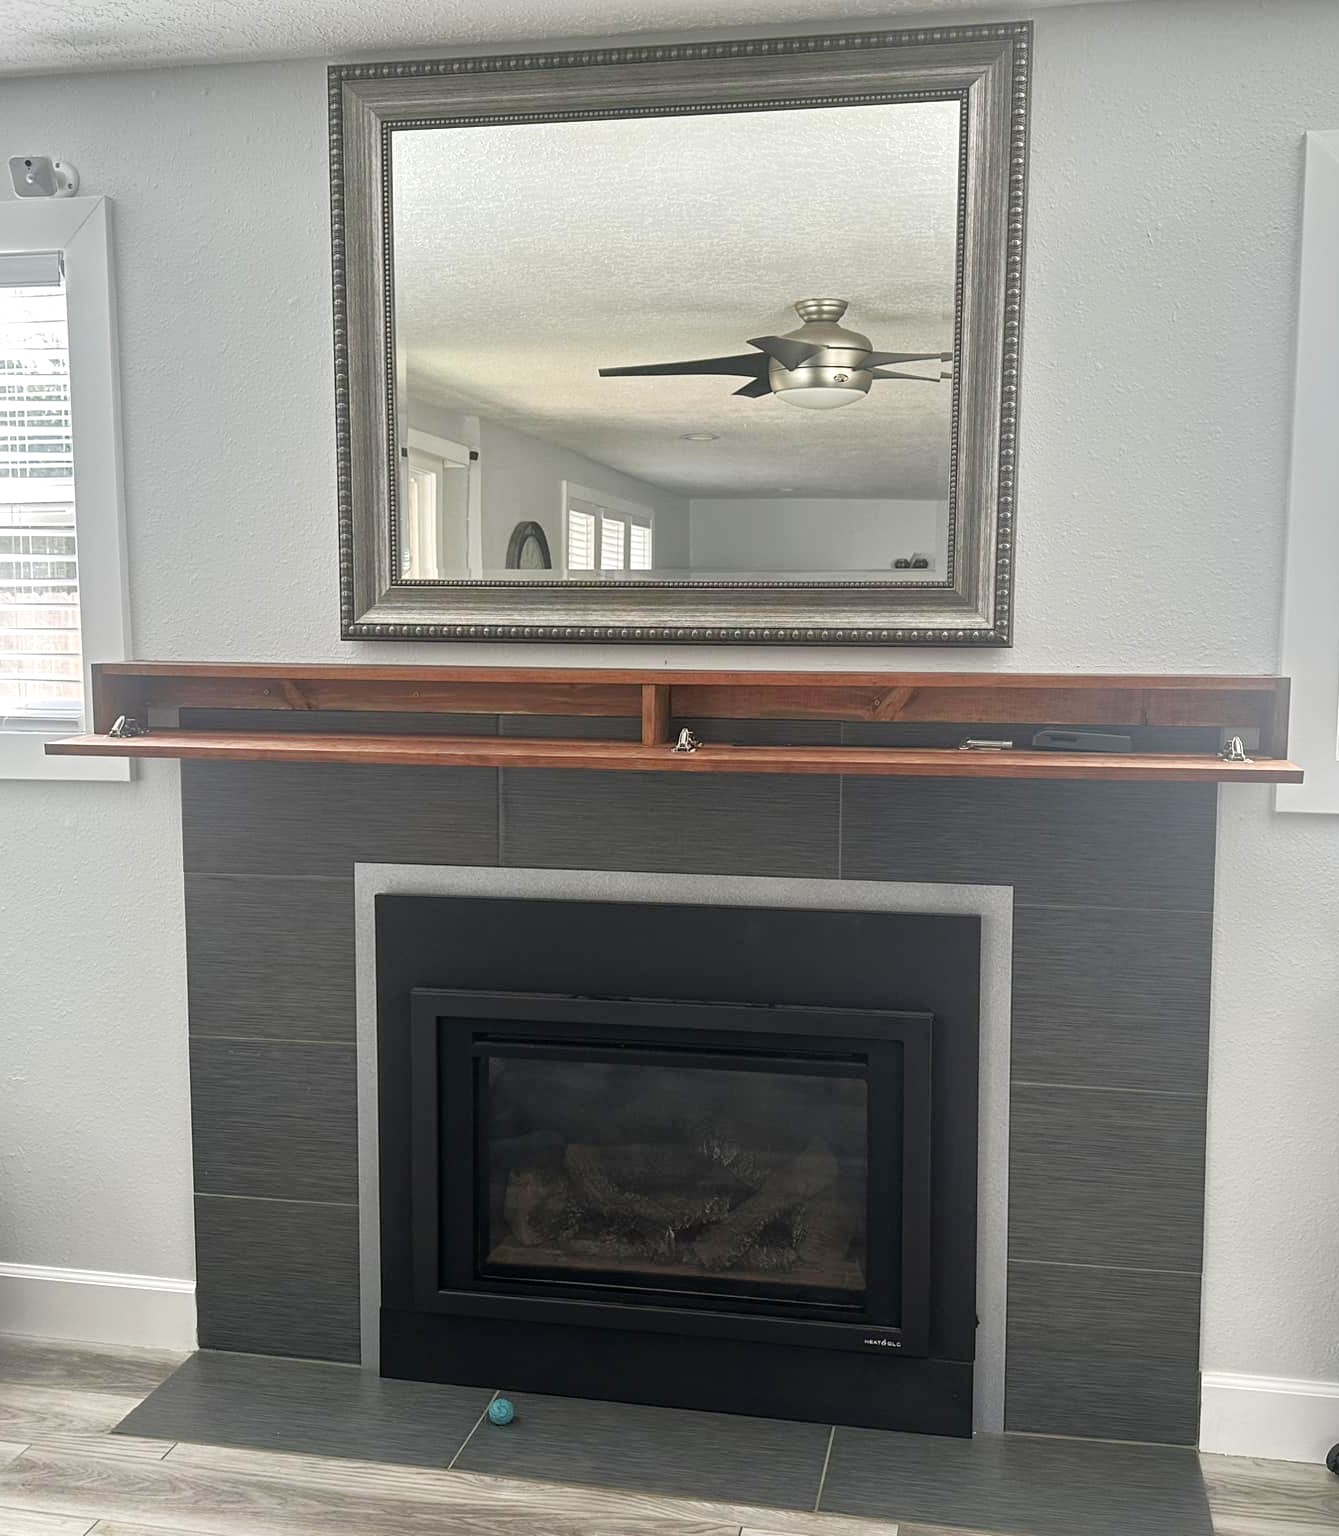
I had been wanting to build a mantle for quite a while but couldn't decide what I wanted it to look like, then I saw the wood mantle with hidden storage plans on Ana's website. I used a steel wool\vinegar mixture as a stain, 3 coats making sure it dried completely before applying the next coat. I finished it off with a beeswax & orange oil wood polish & conditioner. So far I'm storing the remote for the fireplace, the key to the gas for the fireplace and the tool that helps remove the front of the fireplace in there. I'm not sure what else will find it's way in there. I'm very happy with how it turned out.
Julie V.
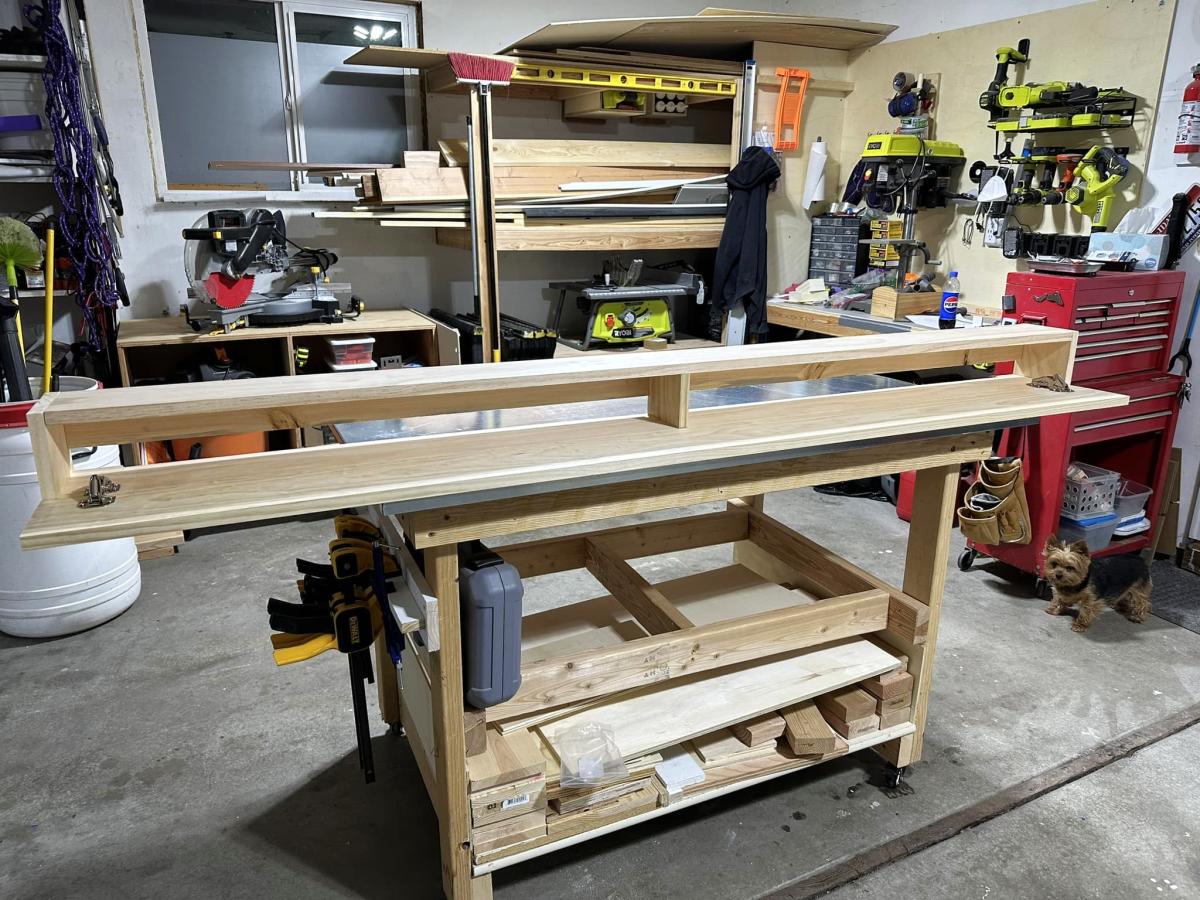
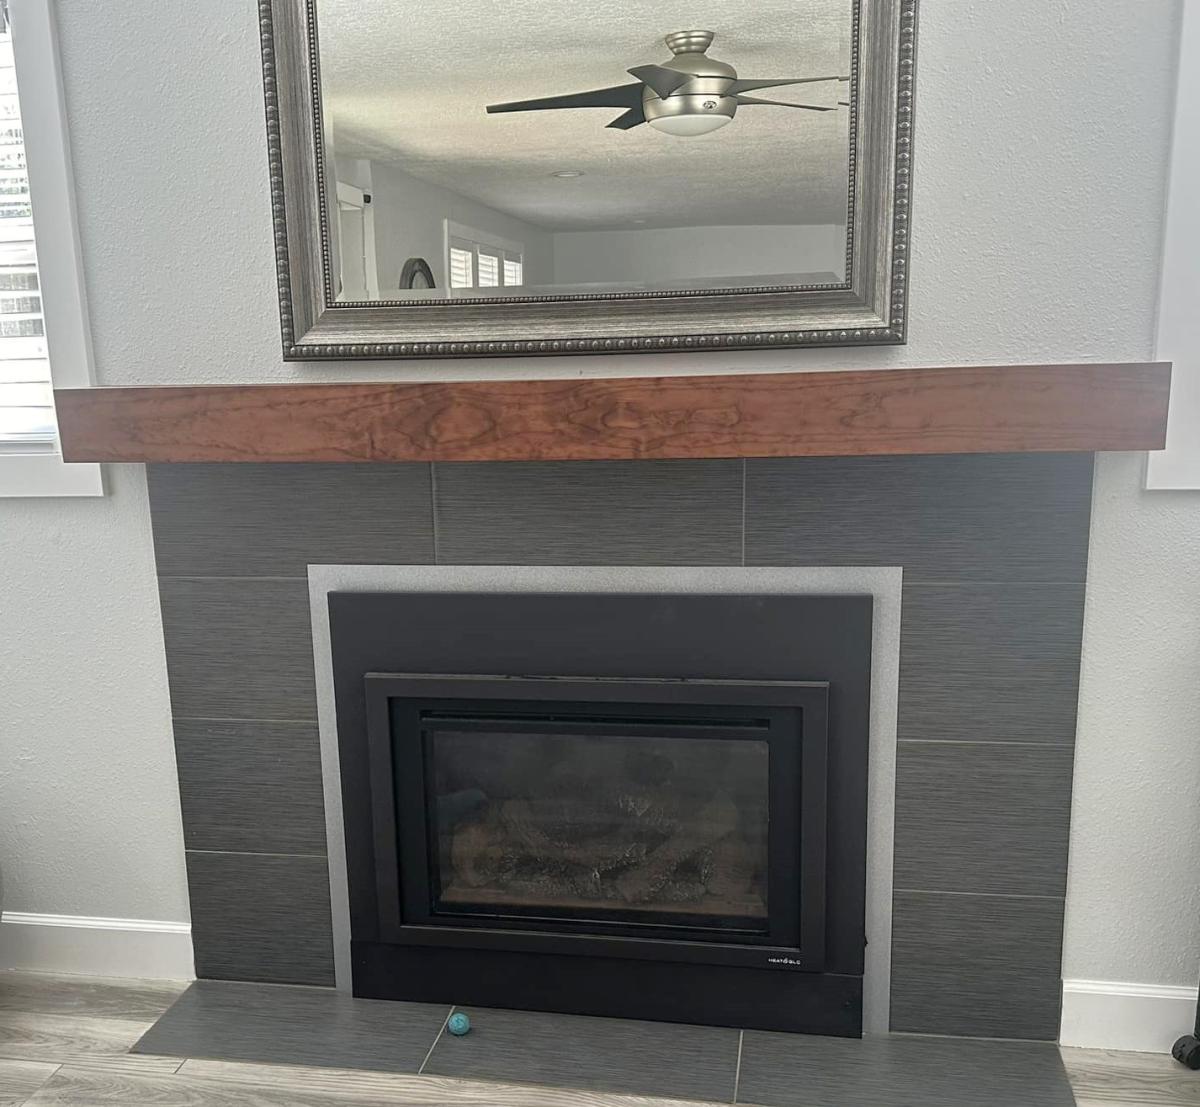
Built from Plan(s)
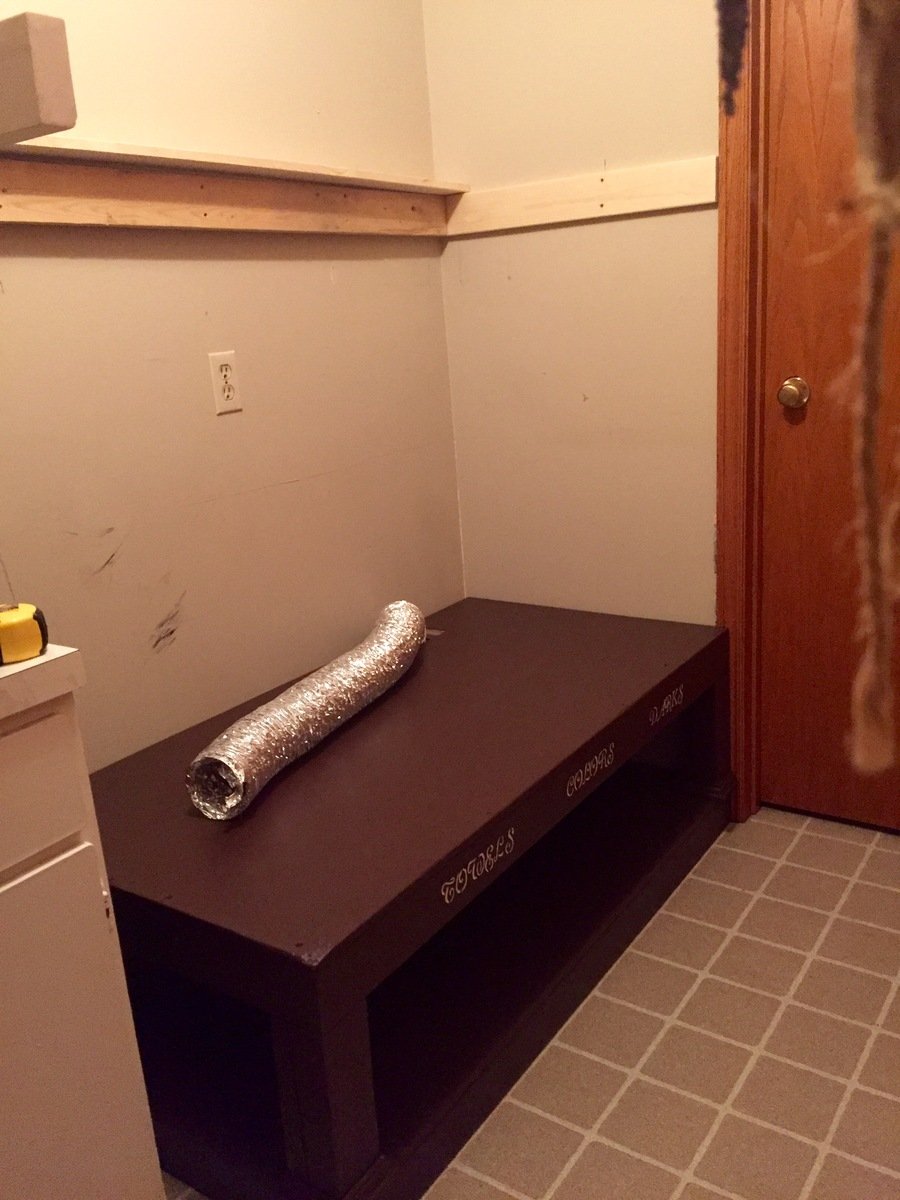
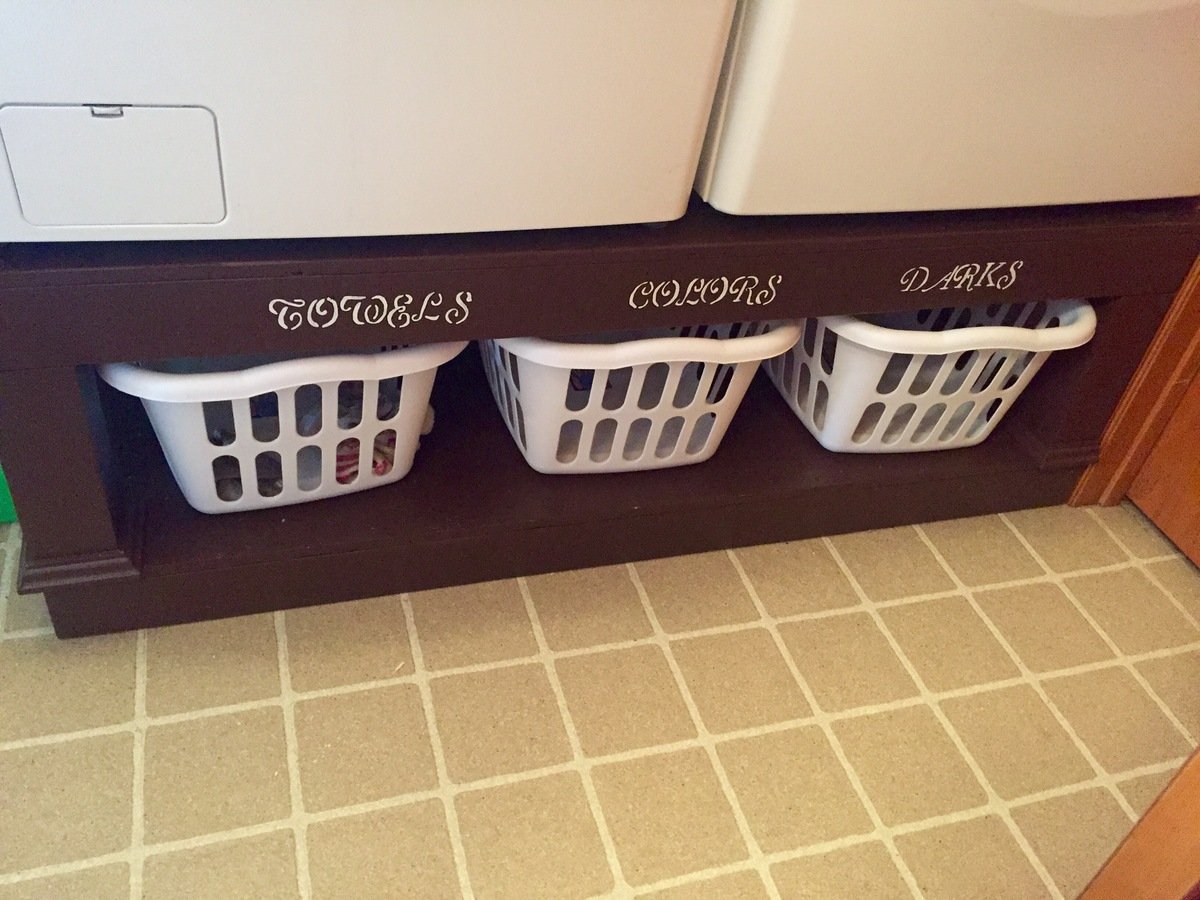
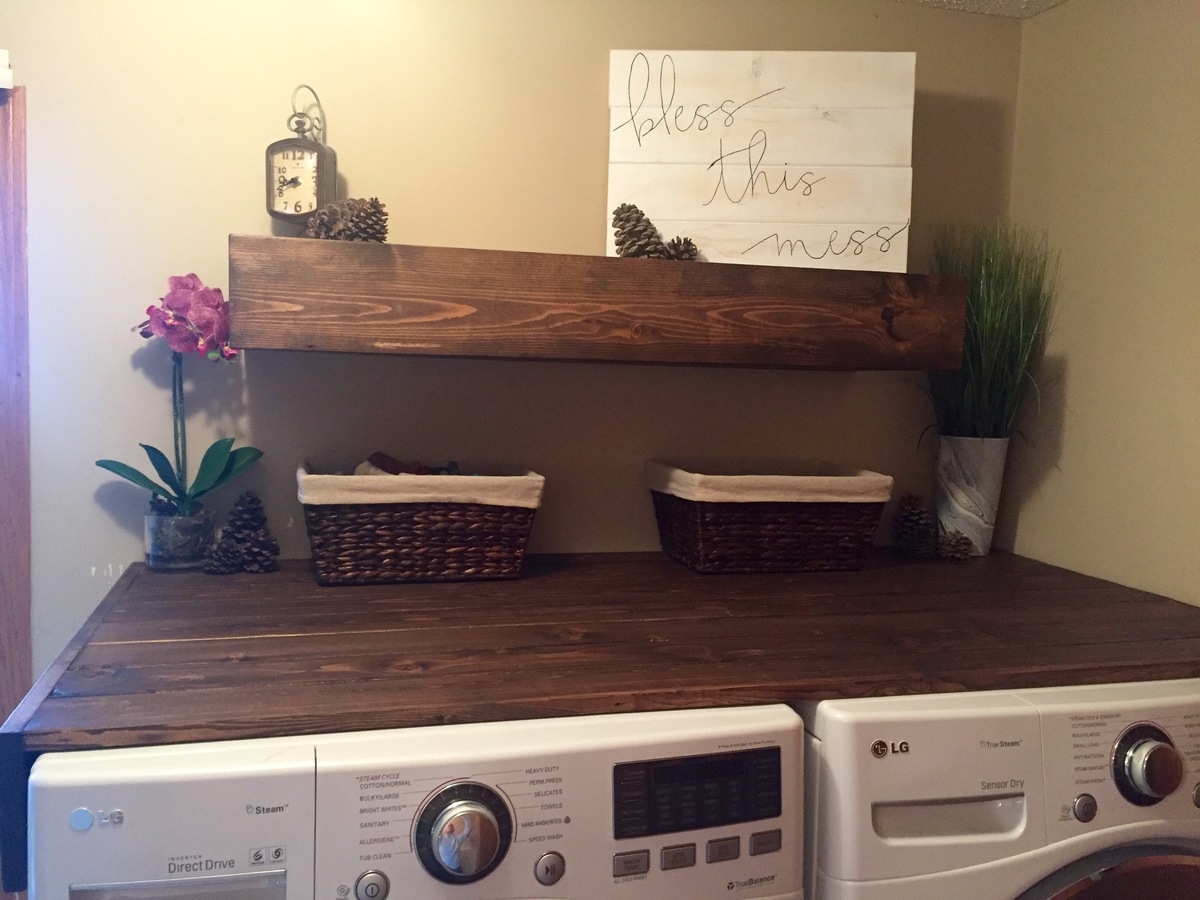
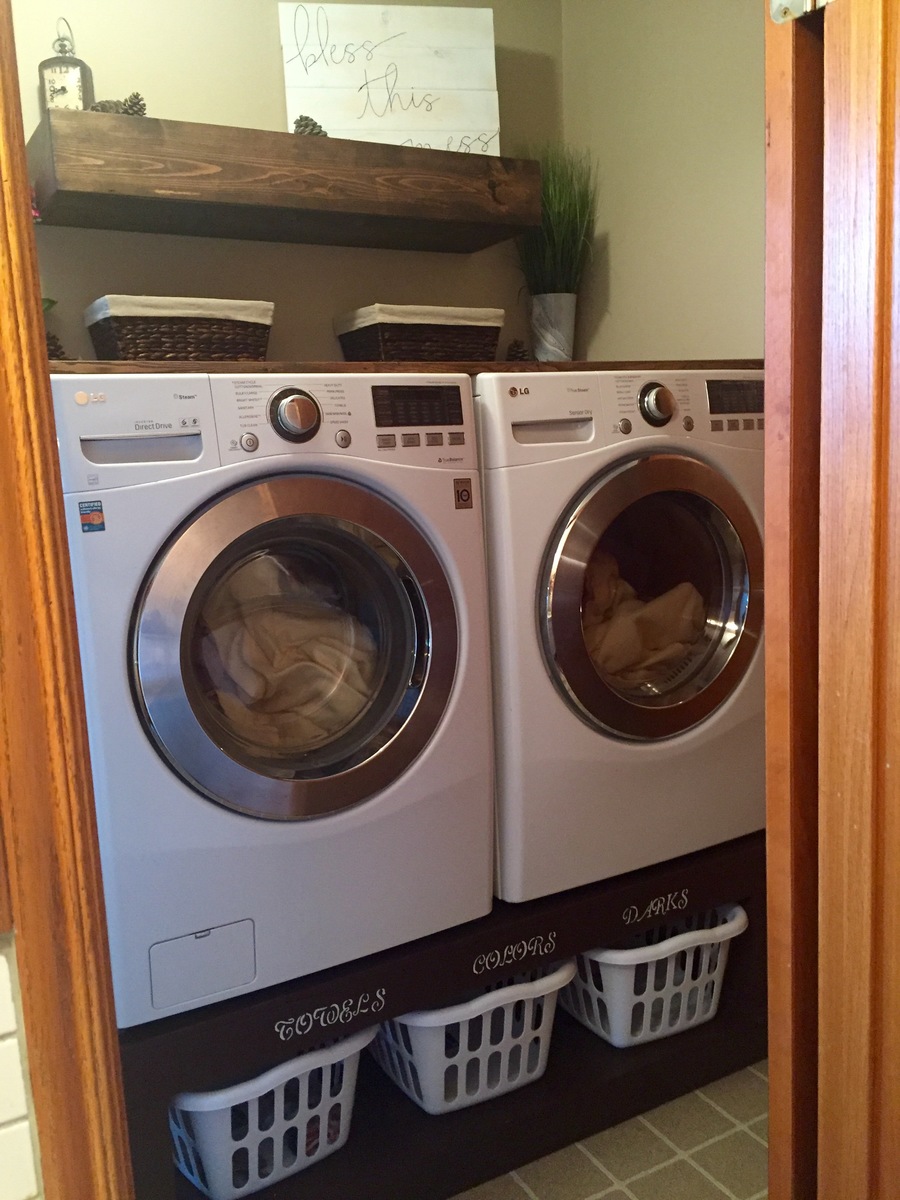
Washer and Dryer Pedestal
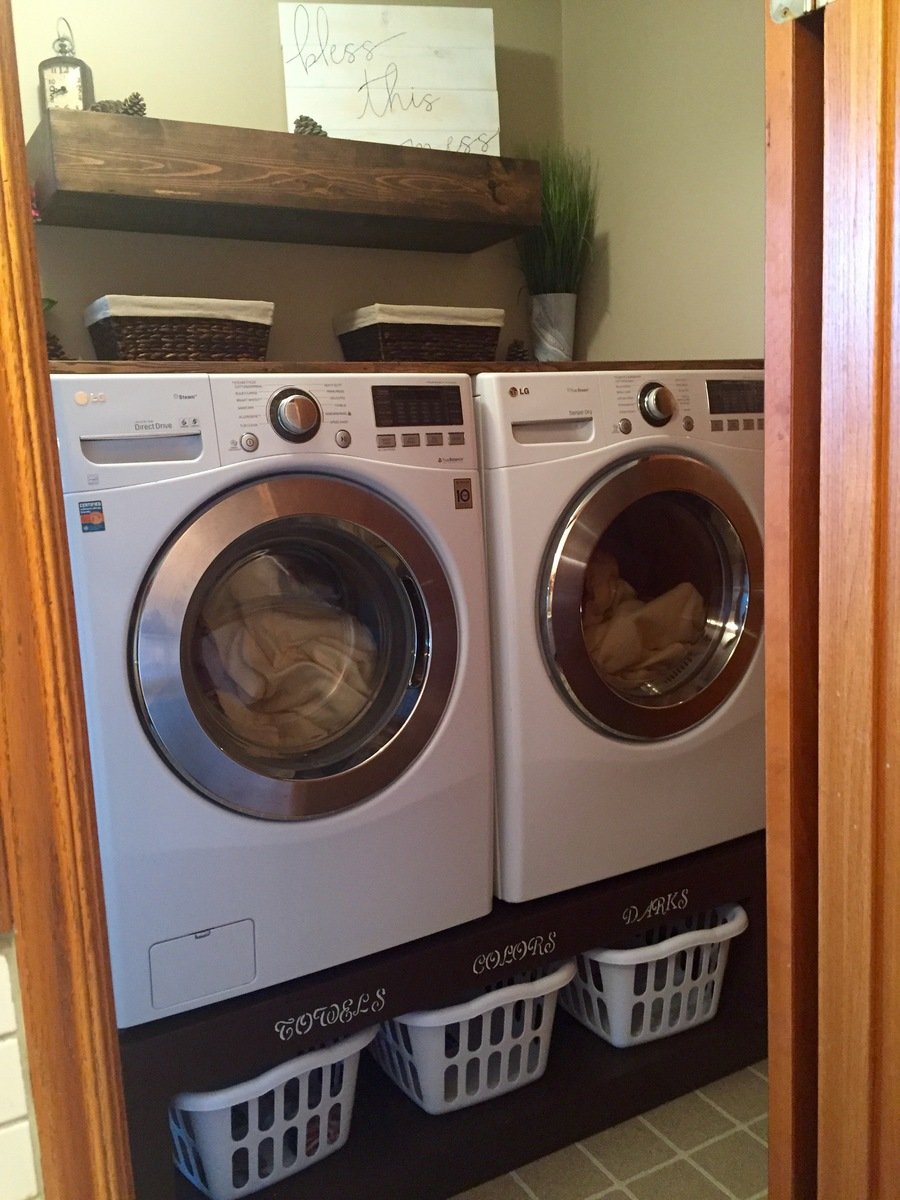
Found these awesome plans from Ana's site here and thought I could definitley make that! My mother needed a new laundry room makeover so it was the perfect opportunity. I made my stand only 56" long to fit perfectly into the spot. Which still allowed enough room for washer and dryer to be on there and enough room if they shook a little. I had to adjust my plans as I wanted it to fit snug against the wall but needed to allow for the dryer hose to connect to wall so I cut out a 4.5"x 5" spot on both the bottom and top platforms to allow for hose and cord to plug in. I put in extra supports going vertically and horizontally to replace the strength for the holes being cut. The result was perfect!
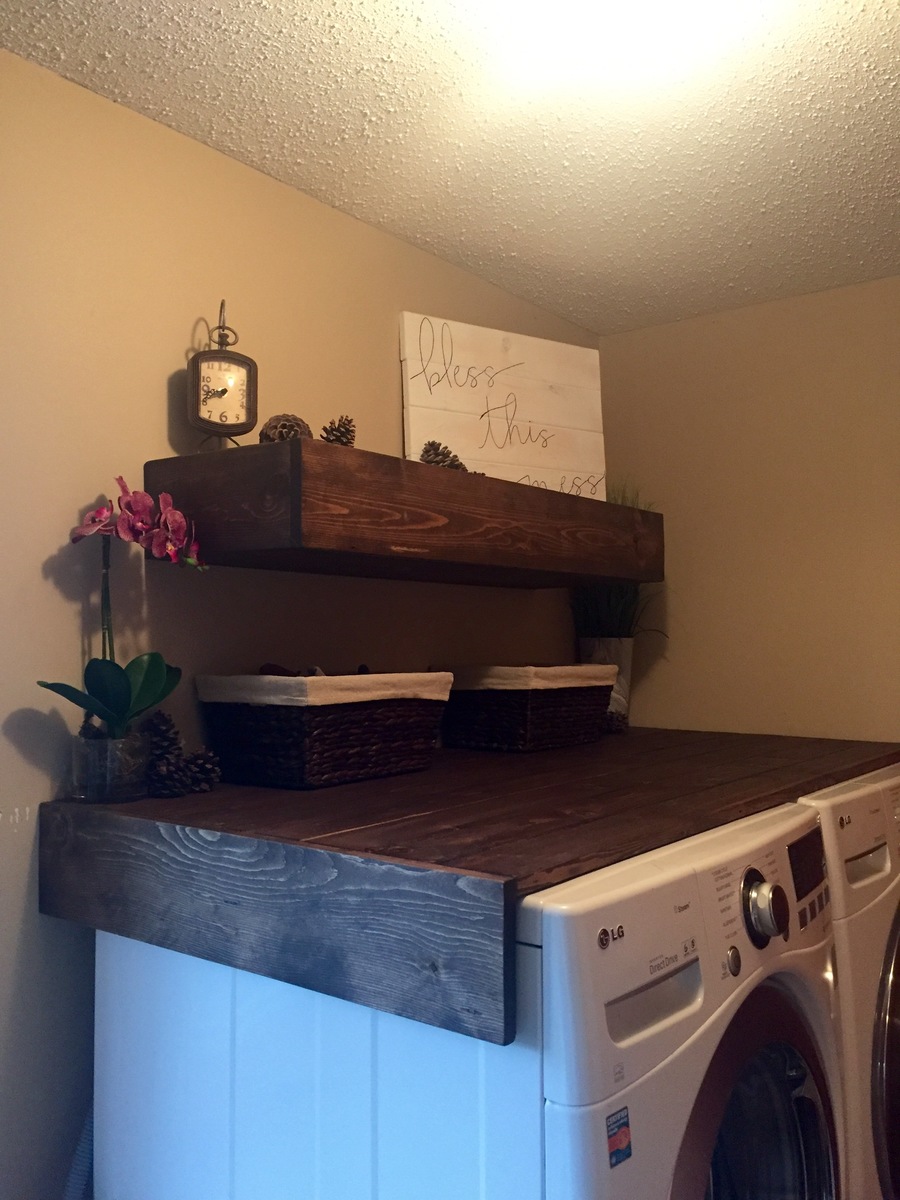
I got creative and added a floating rustic tabletop to the washer and dryer to make the space useful and also added a floating shelf above that. Both stained in a dark walnut.
Happy builder right here!!!
Built from Plan(s)
Estimated Cost
$150
Estimated Time Investment
Weekend Project (10-20 Hours)
Finish Used
Painted a dark chocolate brown and sealed with
Recommended Skill Level
Beginner
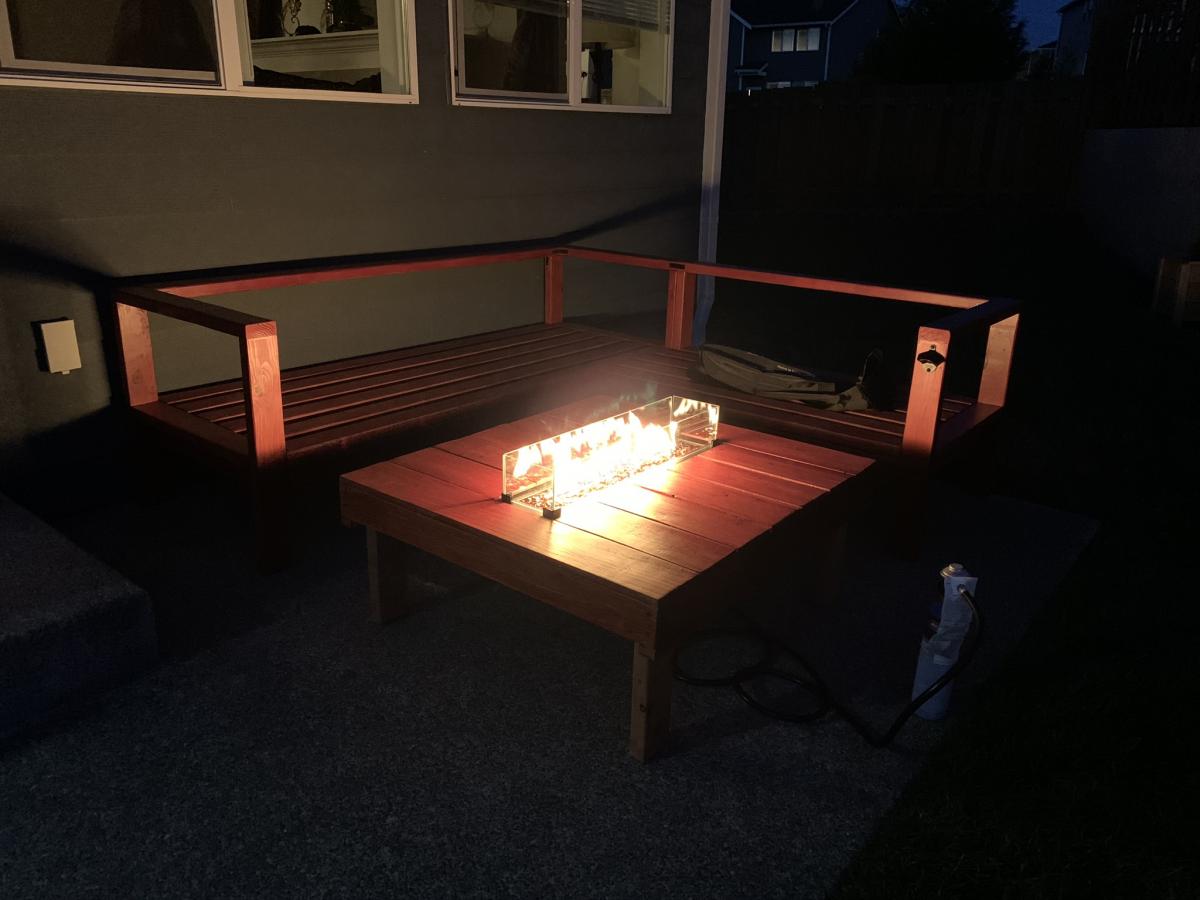
Outdoor sofa/sectional
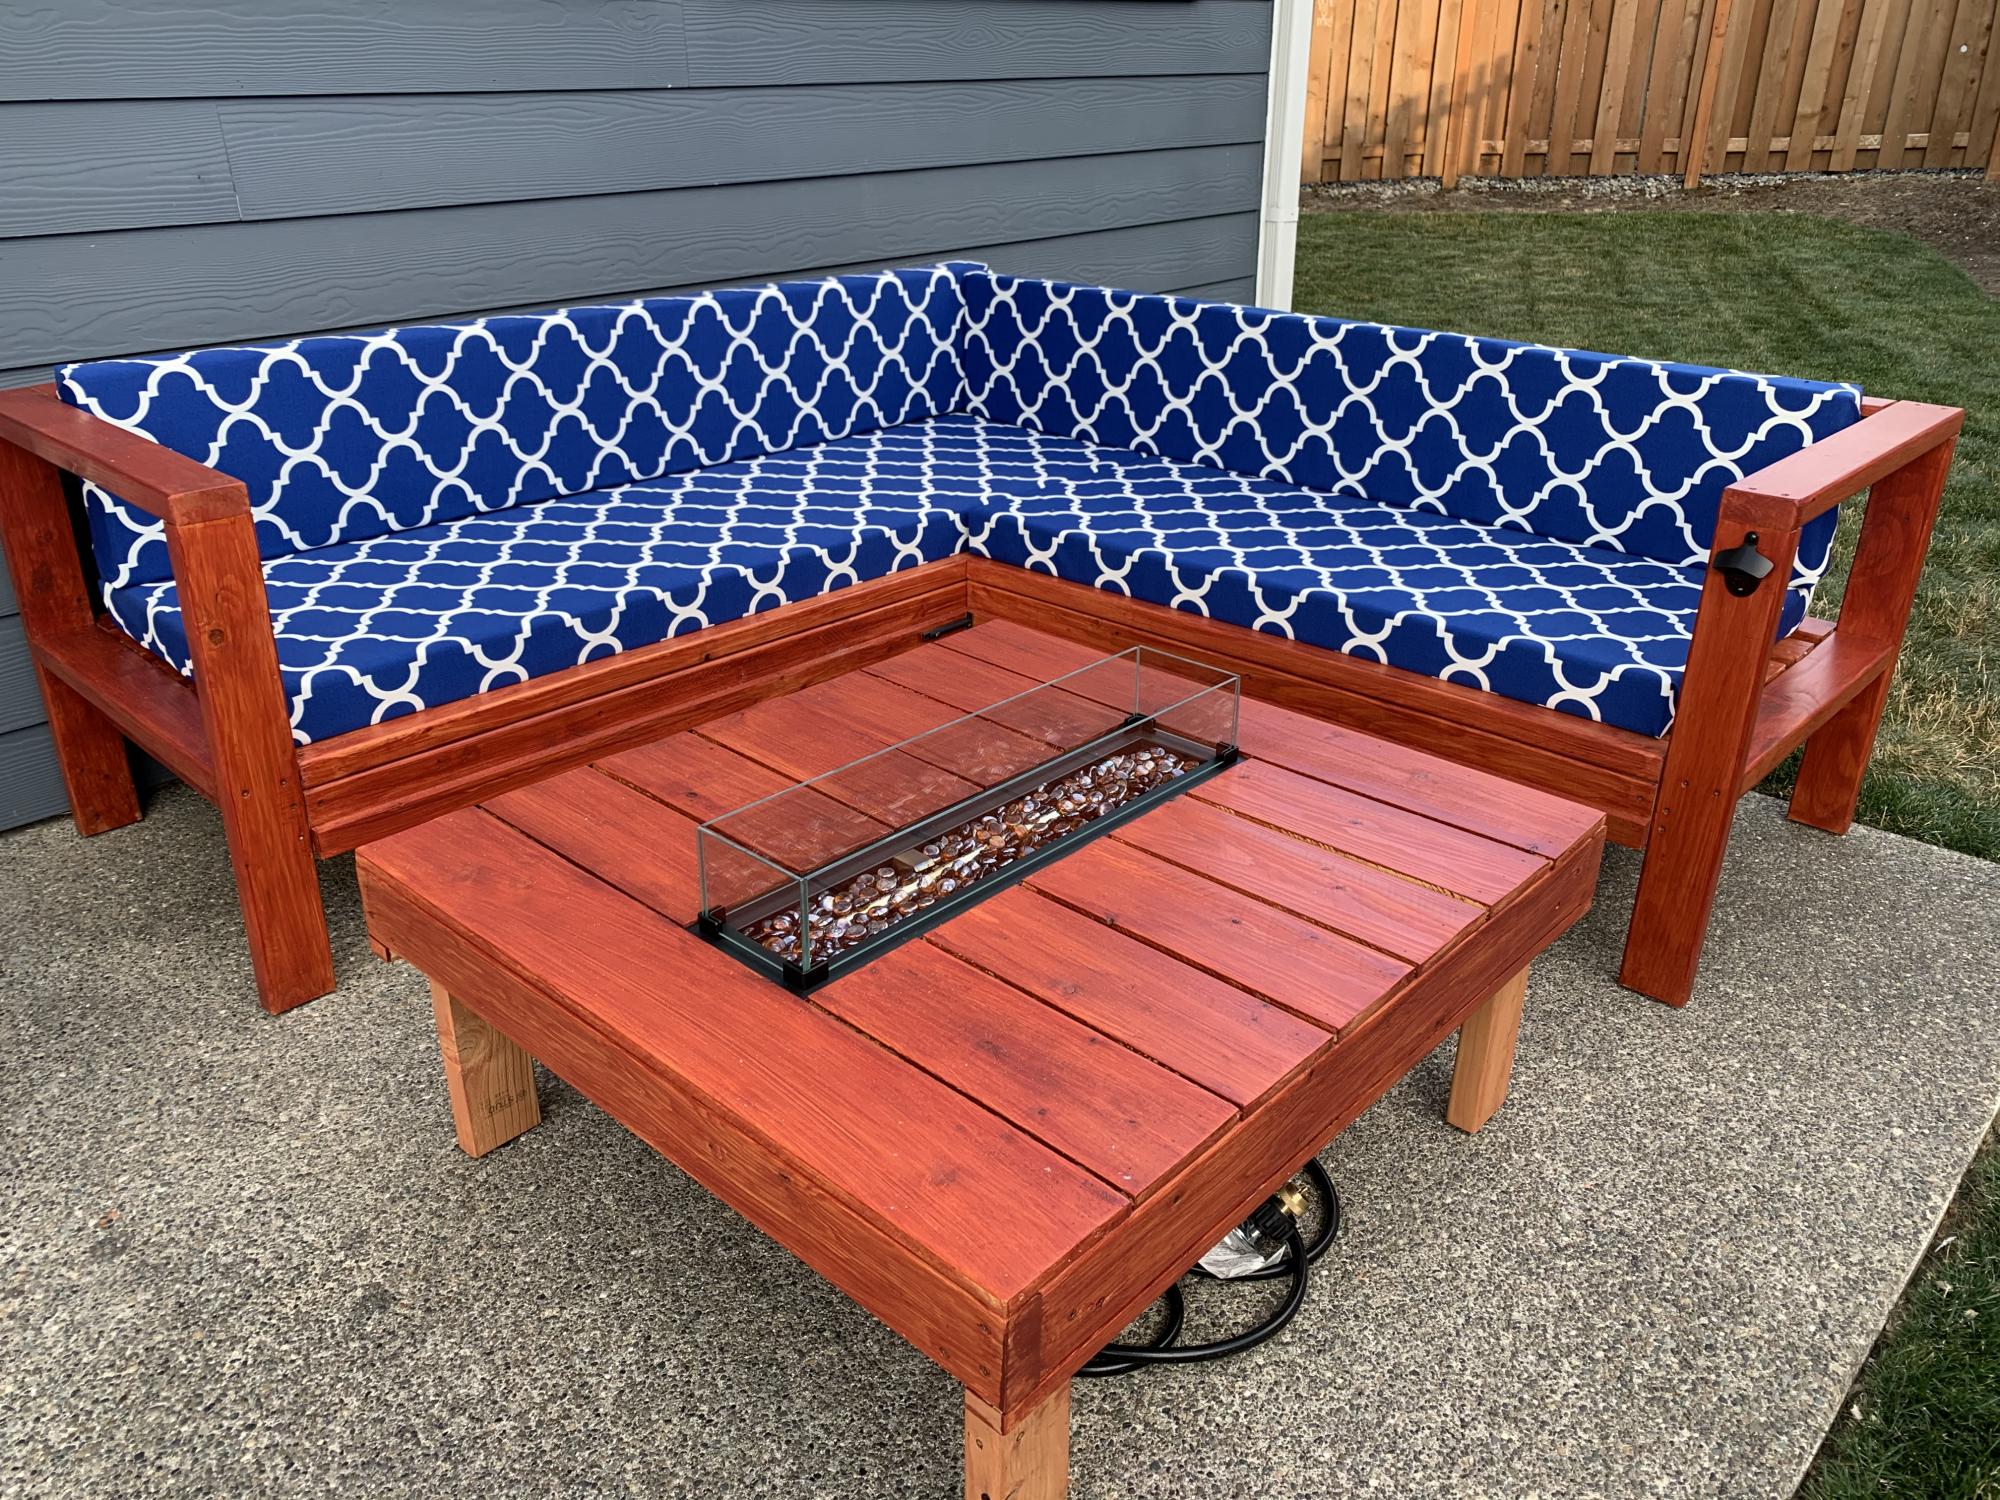
This project was fun! My kids help me! We still got to stain the table legs. Thank you Ana for everything! We got are cushions from home Depot $25 each 6x25x3
Built from Plan(s)
Estimated Cost
$100 we had the wood, fire pit and material
Estimated Time Investment
Day Project (6-9 Hours)
Finish Used
Redwood transparent stain
Polyurethane cushions from Home Depot
Fabric from Walmart
Fire pit from lowes
Polyurethane cushions from Home Depot
Fabric from Walmart
Fire pit from lowes
Recommended Skill Level
Beginner
Wooden Cooler Stand
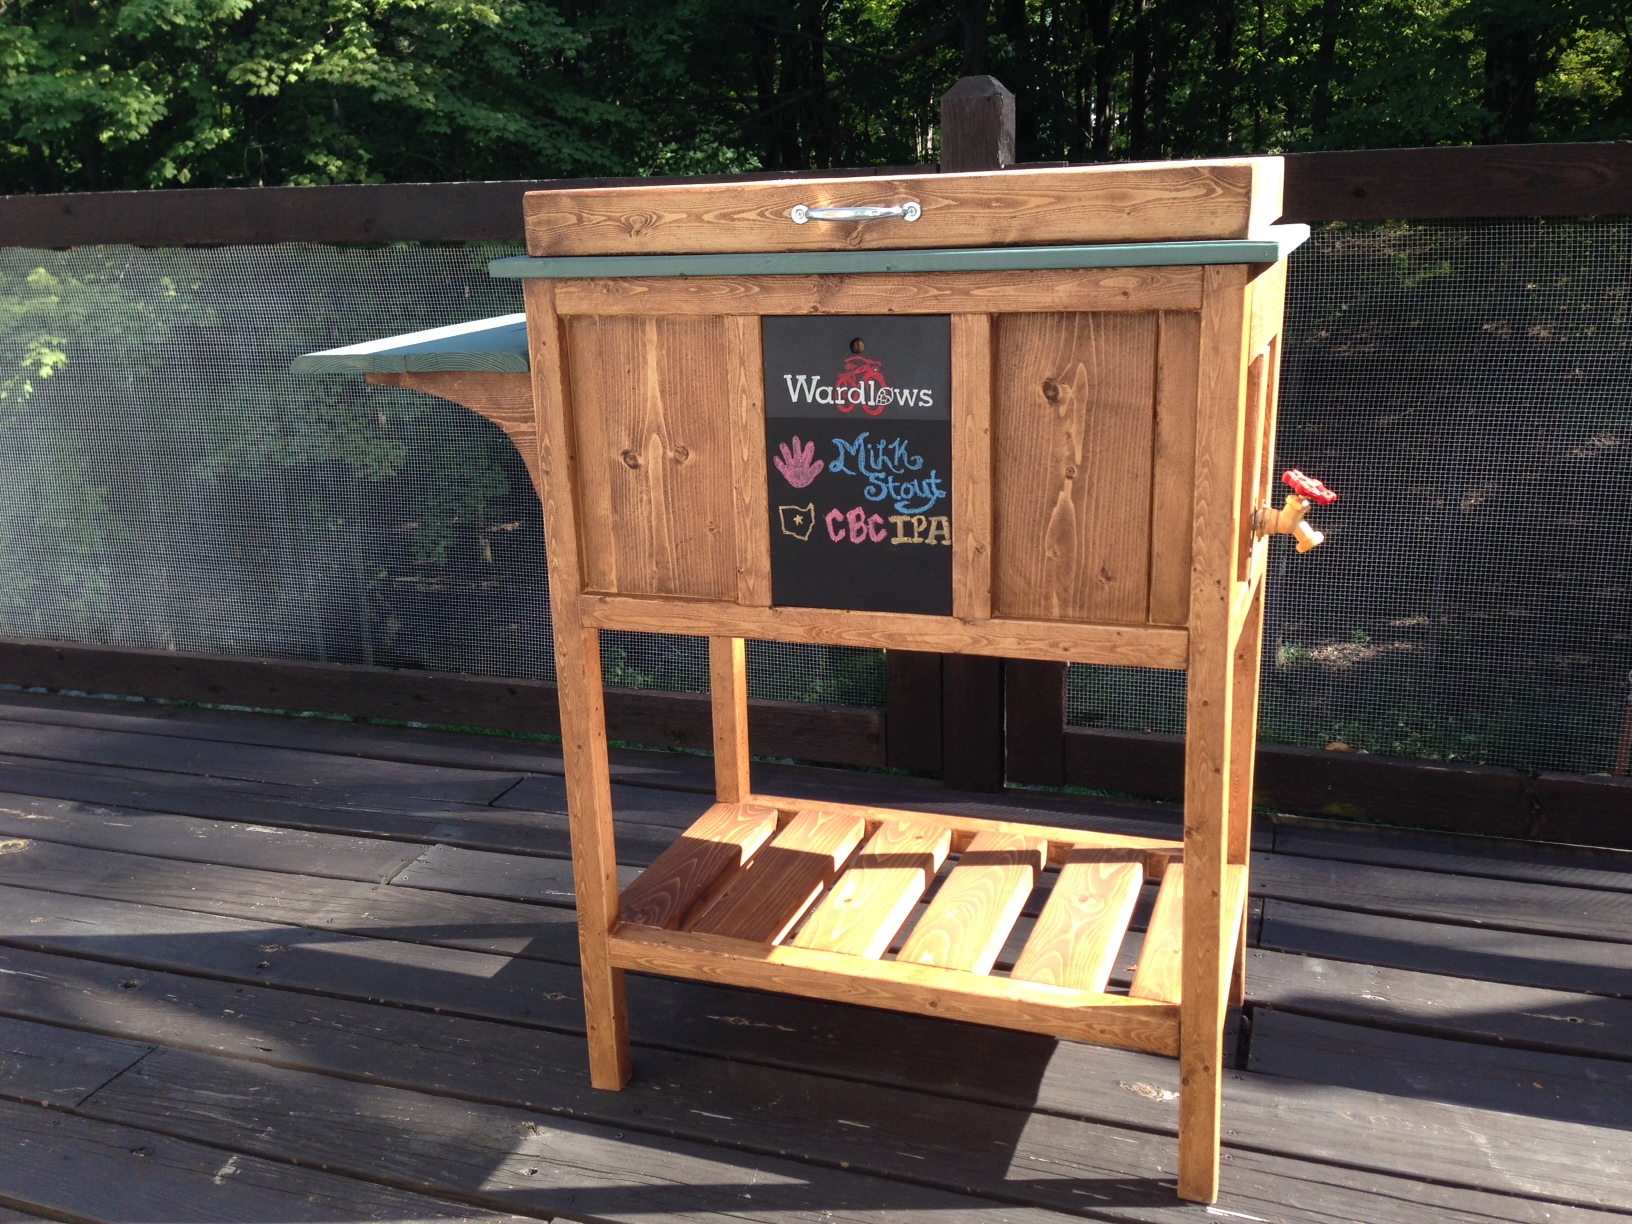
We built this as a birthday gift for family members and boy were they excited. We, though, were not excited to let it go. So happy with how it turned out. The plans are good for reference but make sure to make your own measurements when using milled lumber from a big box store. Some of the the changes we had to make on the fly were to the back and front panels having to use a different combination of board sizes to fill it in without massive gaps. Its recommended that you lay them out first before attaching them to the frames. Also the measurements on the cooler lid were smaller by 1/4" to 1/2" of what's listed in order to get a snug fit. The shelf on ours is two 1x6's cut to the width of the whole project (around 16.5") and then the shelf brackets were also 1x6's cut to a length of 10". Brackets are mounted inside the legs using wood glue and three 2.5" screws through the backside/inside of the cooler box to hide (obviously done before the cooler was inserted). For drainage we attached a 2" piece of 1/2" inside diameter clear tubing that was fed/jammed through the cooler drain and pulled through the other side and then a 1/2" push on adapter, threaded on the other end screwed unto a 1/2" faucet head. Drilled a 3/4" hole about 2.5" (center mass) from the 2x4 cooler base through the middle piece on the side. We placed the cooler in first and used a pair of pliers to grab the clear tube and line it up with the hole and then pushed a long screw driver through the tube from inside the cooler in order to guide the faucet head/adapter combo into the tube and stiffening the tube so it didn't collapse when pushing it on. We couldn't decide what do to with the center display piece and then remembered we had a can of chalkboard spray paint left over from another project. We spray painted the whole menu board and then painted the "logo" at the top before clear-coating it with a protective enamel. Its a snug fit so the pressure holds it in place but you could also use velcro strips on the back if that tickles your fancy. We took the snug fit route that way if they didn't want the menu board in. A 1/2' hole was drilled towards the top so they can use a finger to pull the board out.
Built from Plan(s)
Estimated Cost
$70 + the cost of beer to fill it
Estimated Time Investment
Weekend Project (10-20 Hours)
Finish Used
Custom mix of Minwax American Pine and Rustoleum Kona. Paint
Recommended Skill Level
Beginner
Saddle Seat Stools

After a lot of cutting, screwing, chiseling and sanding... oh and a lick of paint! My new little Saddle Seat Stools are complete. Time will only tell whether they will hold up to the abuse the boys give them especially Brodie! These new stools only cost me $48 to make the pair and I got all the timber from Bunnings
Built from Plan(s)
Estimated Cost
$48
Estimated Time Investment
Weekend Project (10-20 Hours)
Finish Used
Teak and White Enamel Paint
Recommended Skill Level
Beginner
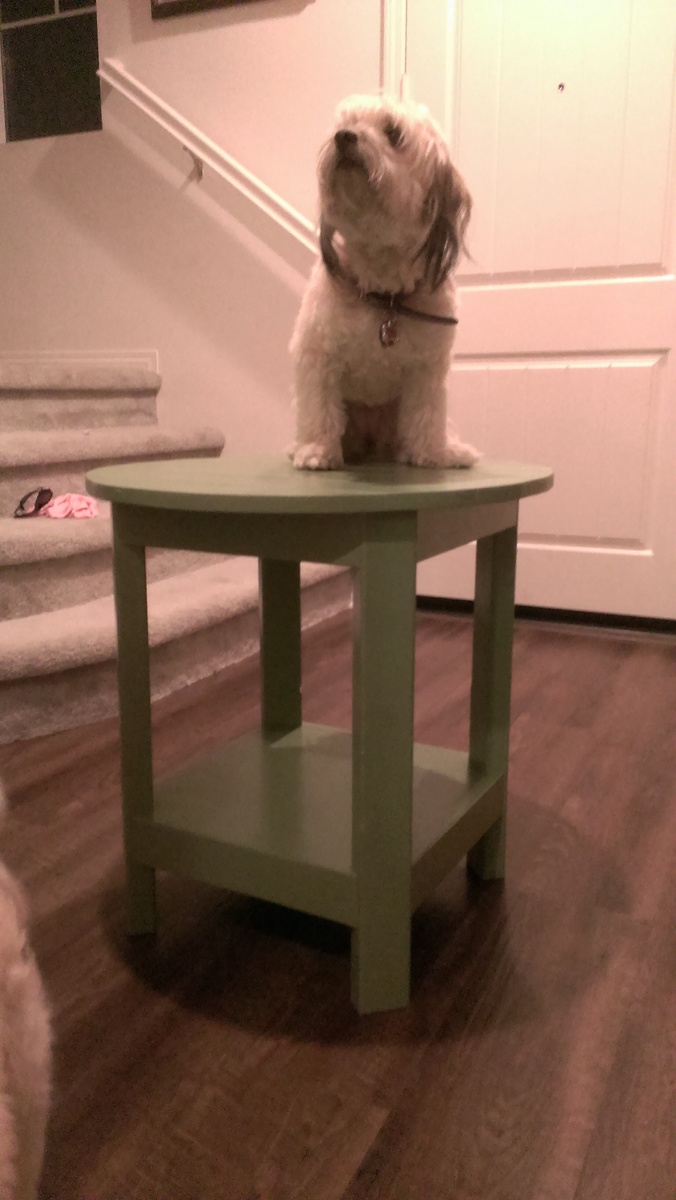
Benchright Round End Tables
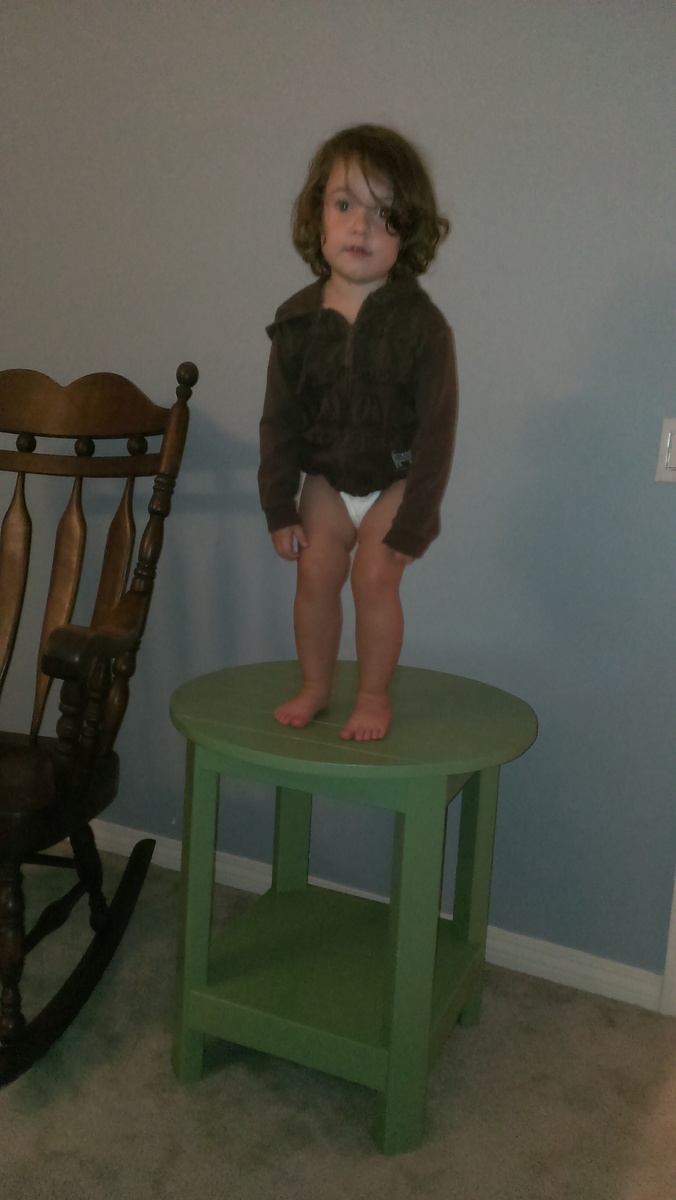
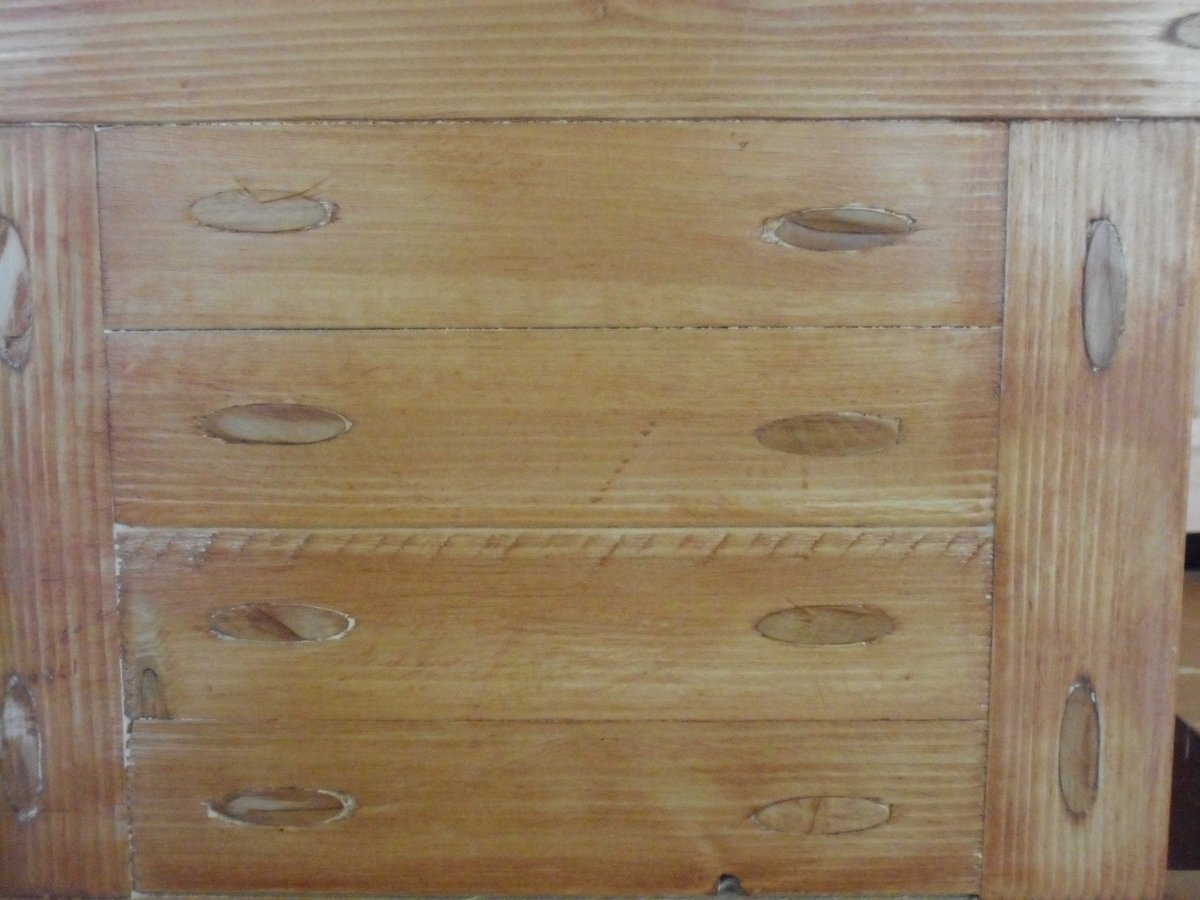
This project was a challenge because of the instructions regarding the "recommended" pocket holes for the aprons. I soon realized you can't put a 3/4 pocket hole on a 45 degree mitred edge, and when I adjusted the depth of the pocket hole, I could not for the life of me screw it into the legs without the apron getting sucked past the edge of the legs. I ended up putting the pocket screws on the outside which I know is a major faux pas for wood workers, but because I used Kreg wood plugs and painted it, you can't see the little ovals where the screws are.
The photos are just for scale. The little girl is a big 2 1/2 year old, and the dog is not a St. Bernard.
We love the table and it works great for baby brother's room.
Thank you Ana for another great project!
Built from Plan(s)
Estimated Cost
$50
Estimated Time Investment
Day Project (6-9 Hours)
Finish Used
Gripper primer and Semi-gloss paint
Recommended Skill Level
Beginner