John Deere Tractor Bunk Bed

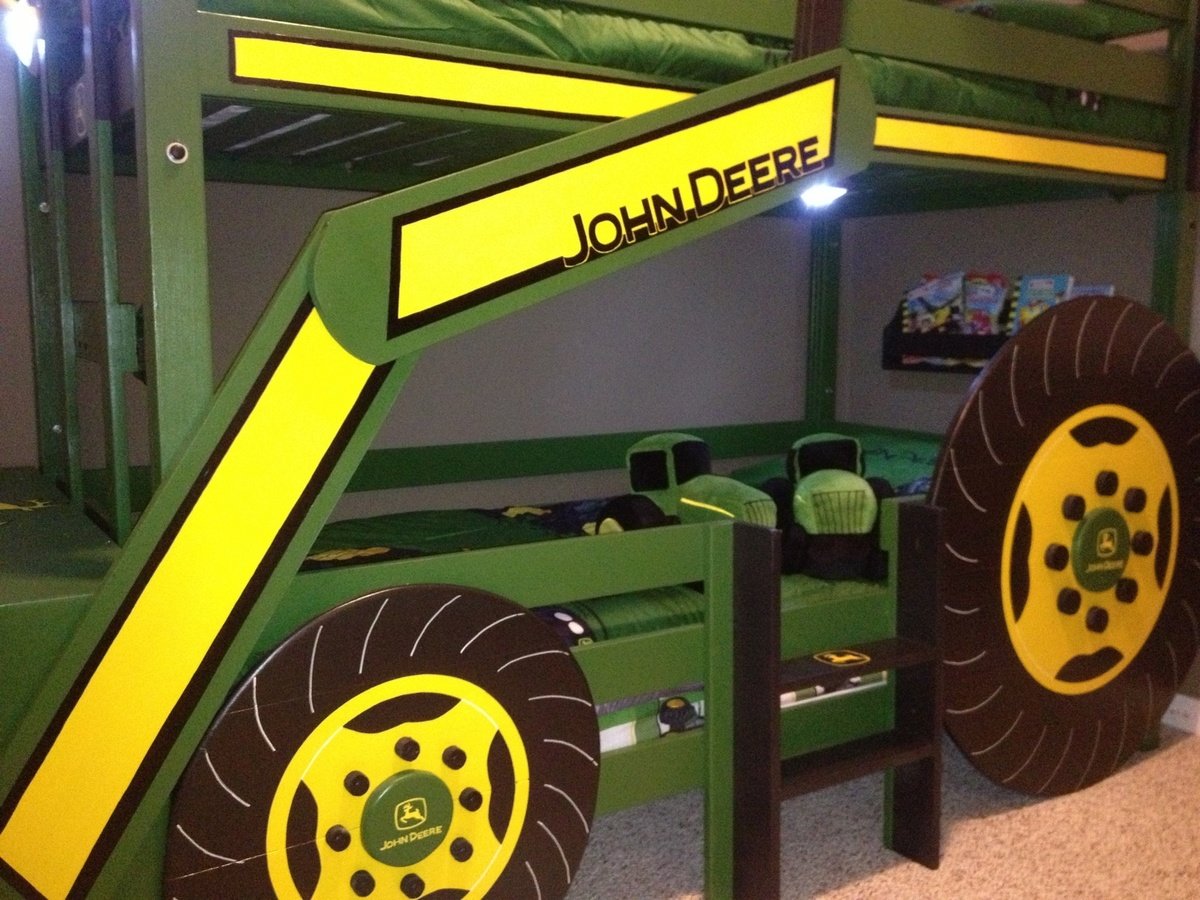
With another baby boy arriving in August, my one and three year olds are moving to a "big boy" room. My oldest decided he wanted a bunk bed and as they both are obsessed with tractors, when I saw the "John Deere Tractor Bunk Bed" plan, I was sold.
We would be needing a twin sized bunk bed though not a toddler. I used the classic bunk bed plans and simply modified them to suit our needs. I moved the ladder to the front, added a rail on the bottom bunk and added a small ladder to the side for my one year old to climb into the bottom bunk.
Once the the frame of the bed was complete, I added the tractor accessories. A couple of storage cubby shelves with fabric baskets for toy tractors which act as stairs up to the ladder and make the tractor bucket at the front. Also, the wheels which are made from joined 1x6s as I find plywood hard to sand and paint to the quality of finish I like. A cab & roof from 1x4s framed together. A side mirror that I decoupaged a picture of another tractor on. I used push lights for the headlights as well as a reading light above each bed (they're on timers so they'll turn themselves off). A steering wheel (play equipment access from toys r us). Also, I built and mounted by the head of both beds a "flat wall book holder" so they would have somewhere to store a few books.
My boys and I are fairly new to building so I spent a lot of time planning and measuring to ensure it would all come together in the end. It paid off because it all went smoothly (even with "help" from my boys). It's not perfect but they're very happy with the result. We also built a John Deere themed "Just my size closet" and even finished with over a month to spare before the new baby arrives! :)
Just want to say a quick thank you to Ana both for the amazing plans and also the inspiration to take on these projects. The time spent with my boys building as well as the resulting treasures are priceless and I would have never realized what we were capable of had I not stumbled upon your website and been so inspired by you and everything you've accomplished. Thank you!








Comments
ThriftyGirl
Mon, 07/07/2014 - 04:44
Awesome!
Love all of the details!
Ana White Admin
Mon, 07/07/2014 - 12:13
WOW!!!
I love this, such a great build and eveything came together perfectly! Thanks for sharing!
spiceylg
Thu, 07/10/2014 - 19:12
Amazing!
What an incredible build! I agree with Thriftygirl, I love all of the details!
carongirls
Tue, 09/30/2014 - 05:35
Awesome
I am in the process of copying your bed right now. Just mine will be a toddler loft bed. Thank you for the ideas!
busymomof3
Thu, 10/09/2014 - 14:12
This is amazing!!
I am new to this and I was wondering were to find the measurements for the twin size bed? I would love to make this for my boys!!
AmandaHanson0321
Mon, 10/20/2014 - 13:10
Plans Please
HI! You did an amazing job with this! Is there any way you can post the plans or send them to me? Thanks in advance.
Veronica P
Mon, 11/03/2014 - 07:48
Plan Request
Sorry for the slow response to those requesting plans. For main structure of the bunk bed, I used Ana's "Classic Bunk Bed" plans. For all of the add-ons, I made up my own plans. I'm pretty low tech so unfortunately they're just pencil & paper plans but I'd be happy to scan and email them to you if you're interested. Just message me and I'll send them your way. :)
aaronkesler
Fri, 11/21/2014 - 13:26
Love your plan
Can you please email me your plans? [email protected]. Thanks!
bkohler12
Thu, 07/09/2015 - 19:48
Did you get tree bunk bed plan?
I was just wondering if you by chance got three bunk bed plans?? If so would you be willing too send them my way??? [email protected] thanks so much
kerrihicken
Thu, 05/26/2016 - 14:54
Plans please!
I know that it has been a while, but did you ever get plans for this bed? If so, will you please forward them to me at [email protected]? Thank you!
In reply to Plans please! by kerrihicken
timburke40
Sun, 02/12/2017 - 07:36
plans
if you recieved plans for this can you please forward them to me [email protected]
brenneman826
Fri, 01/02/2015 - 12:36
If you wouldn't mind sharing
If you wouldn't mind sharing with me also I would love a copy. Email ... [email protected] This is by far the BEST tractor bed I have seen online! You did an awesome job!!!!! Hopefully I can recreate!!!!
ericaelijah08
Mon, 01/05/2015 - 08:44
AWESOME!!!!
I love this! You did an amazing job! Could you please send the plans to [email protected]
Thank you so much!!
MartyC
Wed, 01/28/2015 - 14:08
Plans Please
Hi Veronica, Well done fantastic job! Two little men who want to move in together because of a new addition on the way. Their request though is a John Deere Bunk Bed! would be grateful if you could forward on your plans if you have time, Kindest regards.
MartyC
Wed, 01/28/2015 - 15:30
Plans Please
[email protected]
In reply to Plan Request by Veronica P
diana pritchard
Thu, 01/29/2015 - 07:18
Plans for making this John Deere Bunk Bed
Hi, I would love to get a copy of the plans used to make this bunk bed for my grand kids. Have two grandkids and a third one due the middle of February so got to get a bed made quickly for them to have a great bed to sleep in when staying with nana and pa. Plans can be emailed to me at [email protected] 731-415-9666. Thanks Diana
frank-scott
Mon, 02/02/2015 - 07:31
This looks so great. Could I
This looks so great. Could I get a copy of your plans? Thanks [email protected]
Melonman
Mon, 02/09/2015 - 21:06
John Deere bunk bed plans
I would love to receive a copy of of the Plans for the John Deere bunk bed. My email is [email protected]
Jakester22
Tue, 03/03/2015 - 10:43
Tracktor Bunk Bed
Can you please email me the plans. I have a 4yr old that is obsessed with John Deere. We would like to make this for his birthday. [email protected]
lilmiscena
Thu, 03/05/2015 - 22:31
Love the jd bed
Just love the whole thing very beautiful & I was wondering if you could send me the plans for the whole set up. My email is [email protected] thanks
Jbarr002
Mon, 04/06/2015 - 21:04
Bunk Bed
Hi Veronica, like everyone else i love your plans, could you possibly email them to me? Thanks in advance.
[email protected]
tkdiver1
Tue, 05/26/2015 - 18:13
bunkbeds
These are just what my grandsons need. I would love your plans.
Thank you
tkdiver1
Tue, 05/26/2015 - 18:14
bunkbeds
These are just what my grandsons need. I would love your plans.
Thank you
Ltzak
Thu, 05/28/2015 - 10:35
John deere bunk
Please send me the plans for the John Deere Bunk Bed. I love it.
Ltzak
Thu, 05/28/2015 - 10:36
John deere bunk plans
Please send the plans to [email protected]
nhobbs
Fri, 05/29/2015 - 09:06
Plans
Please send me your plans for the John Deere Bunk Bed in the twin size. [email protected]
krystalclark
Sun, 05/31/2015 - 23:36
plan request
Will you please email me the plans for the John Deere tractor bunk bed? Thank you. You did awesome
krystalclark
Sun, 05/31/2015 - 23:38
My email address
[email protected]. please email me asap
nhobbs
Mon, 06/01/2015 - 06:10
plans
can I please get a copy sent to [email protected]
linszt3
Tue, 06/09/2015 - 08:06
Plans for tractor bed
Hi! Can you please forward me your plans for the john deere tractor bed to [email protected]?
Thank you so much and awesome idea!
In reply to Plan Request by Veronica P
aprilnave
Fri, 06/12/2015 - 19:31
John Deere Bunk Bed Plans
Please, please email these plans to me! My son will love this!!!! Email is [email protected]. Thank you!!!
mdemary22
Thu, 06/18/2015 - 14:04
Tractor Bunk Bed Plans
Thanks for being willing to share your plans. Your tractor bed is amazing. I have 2 boys who would LOVE a bed like this. Could you please send your plans to [email protected]?
Thank you so much
bkohler12
Thu, 07/09/2015 - 19:22
please asap
could i plans get your plan emailed to me [email protected]
Mimi64
Sun, 09/06/2015 - 10:06
John Deere bunk bed plans
Dear Veronica,
Our grandson, 6 years old, will absolutely adore this bed. He loved riding on Grandpa's real JD tractor. Please send me your plans for the attachments. They are just darling and I could not do any better. Thanks for your generosity!
Denisestutler
Fri, 01/15/2016 - 10:52
Can you please send me your
Can you please send me your plans? i am stumped on the arms of the tractor
Kallie
Wed, 07/13/2016 - 12:12
Plans
Veronica P this bunk bed is amazing! Could you email me your low tech paper and pencil plans please? :) [email protected]
bmeche
Fri, 09/13/2019 - 21:11
Tractor bunk beds
Hi Veronica. My 3 year old just loves the tractor bunk bed. I was wondering if you would mind sending me the plans you have. It would be greatly appreciated. My email is [email protected]
Thanks in advance
MyMaw
Wed, 10/16/2019 - 17:56
Plan Request
If you're still sharing, we would love a copy of your add-ons plans.
Thanks,
MyMaw and PawPaw
mluedeman
Sun, 08/23/2020 - 11:32
tractor bunk bed
What an awesome build! We would love a copy of your plans if you could please share. Thanks!
[email protected]
holscher
Mon, 12/15/2014 - 20:19
would love to have this plan
Would you please email me these plans for your bunk bed? Thanks A lot!!! email to [email protected]
Veronica P
Tue, 12/16/2014 - 07:21
Holscher,
I just emailed those plans. There should be nine attachments. Please let me know if you don't receive any of them.
kerrihicken
Thu, 05/26/2016 - 15:00
Tractor Bunk Bed Plans
Hi! I know that it has been a while, but I see a message where Veronica says she emailed you the plans. If you still have them, will you please send them to [email protected]. Thank you!
cat335
Tue, 12/16/2014 - 19:22
Is there any way I could have
Is there any way I could have email plans? [email protected] . Thank you.
cnejones
Thu, 12/18/2014 - 21:51
plans
Could you please email me the plans for this project my son would love this
davevisentin
Sun, 12/21/2014 - 00:35
Plans
Please email the plans for this to [email protected]
Thank you in advance!
Queenhcb
Tue, 12/23/2014 - 07:33
Bunk Bed Plans Request
Hi Veronica! I would love an email of the plans to make this bed. My sons thinks it is out of this world!!! Thanks for all you effort and wonderful job.
[email protected]
Alwardt2708
Sat, 12/27/2014 - 15:12
Would you please consider
Would you please consider emailing the plans to me? We have started this for my son today and would love your insight on some measurements. Such a wonderful idea, thank you for sharing! [email protected]
Veronica P
Tue, 01/06/2015 - 08:21
Plans Emailed
Hello all. I've tried emailing plans to all those who've requested them. I had some trouble attaching the files as they were large so if you didn't receive them, please let me know and I can resend. Thanks
Alwardt2708
Tue, 01/06/2015 - 11:53
Hi Veronica. I did not
Hi Veronica. I did not receive an email. Woul you have time to try again? If you email me your address I can send you my fax number if that's easier too. Thank you so much! I can not tell you how much I appreciate your dedication to this! [email protected]
jaybeed242
Sun, 11/01/2015 - 16:58
John Deere plans
Hi
I didnt receive any plans. couldyou send methem please
Thanks
Jason