Community Brag Posts
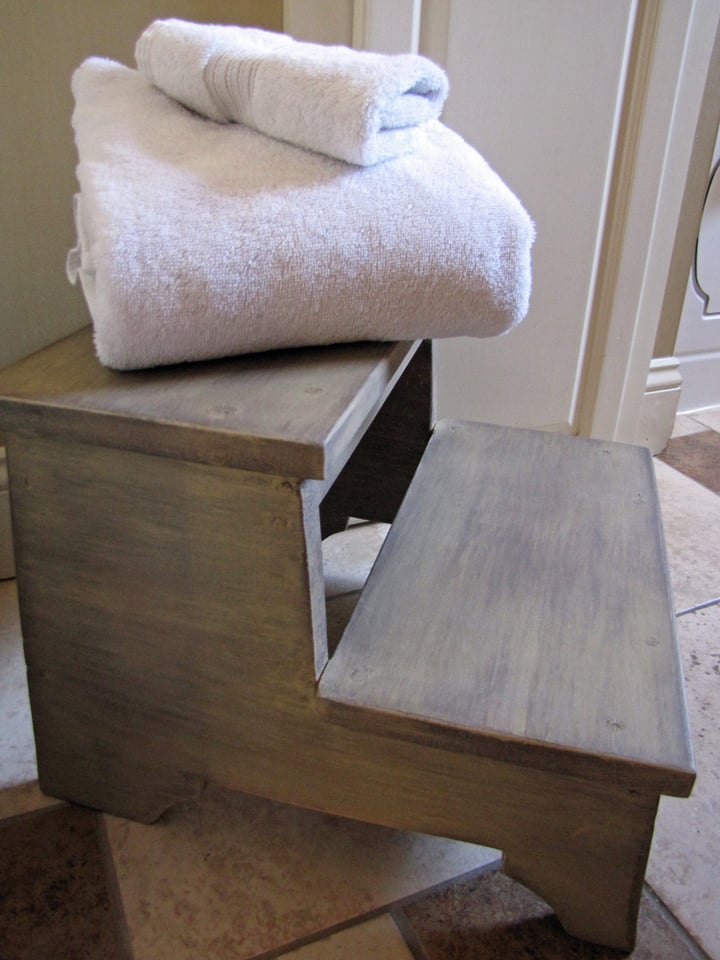
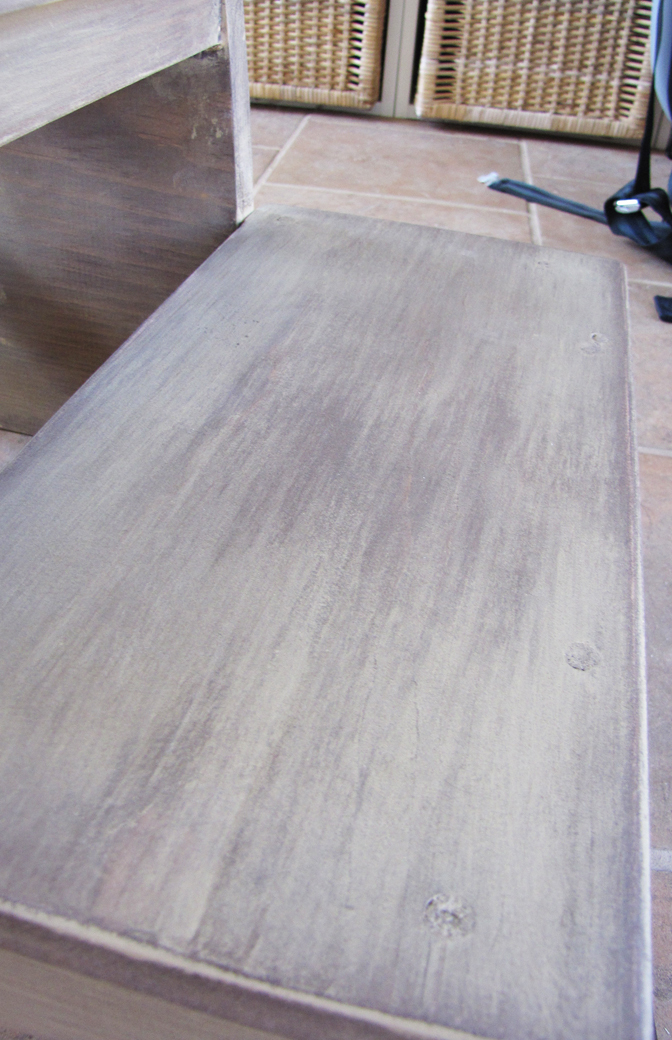
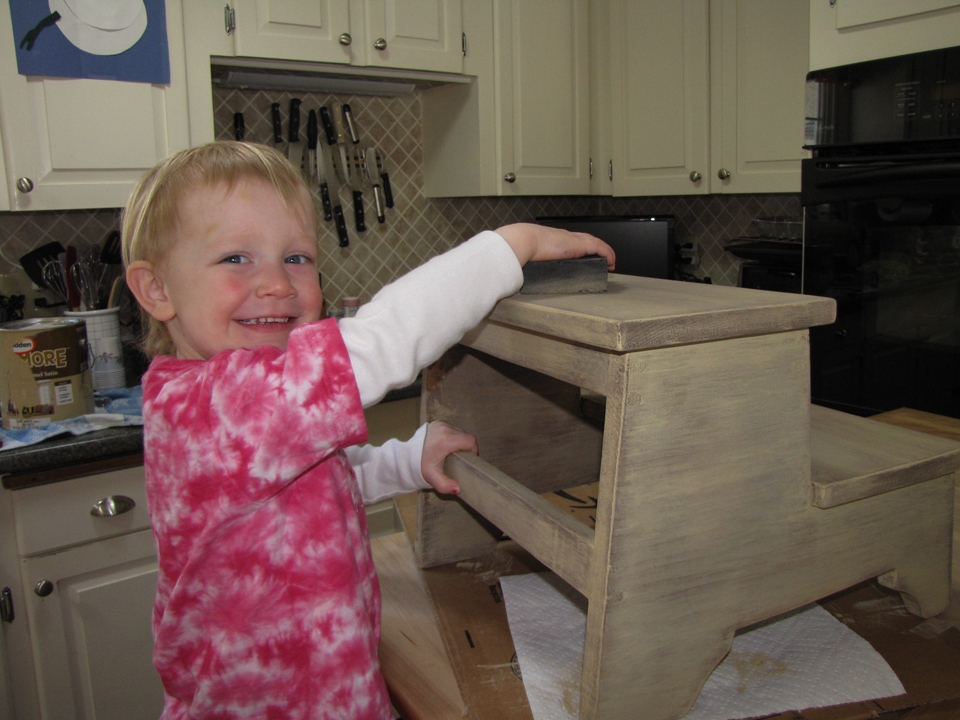
Our bathroom step stool
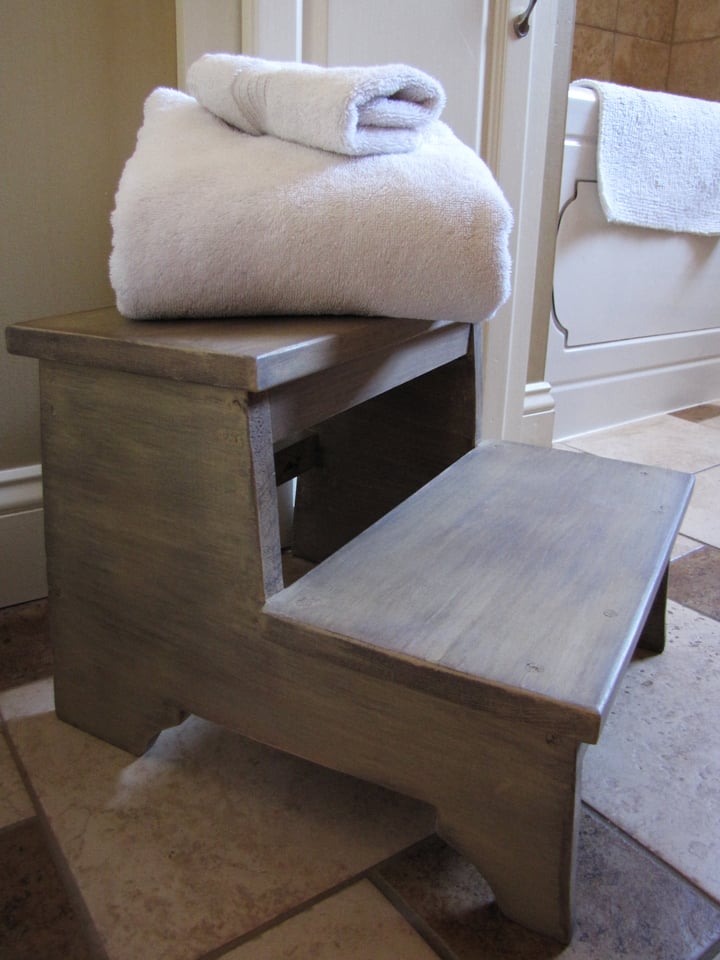
I looked everywhere for a two-step wooden step stool and just could not find one. The ones the kids were using to try and reach the sink to wash their hands, just wasn't cutting it. I have tons of scraps (from many other Ana projects), so I thought I would make my own little stool.
The building part was pretty straight forward and I'm glad to have a stool that doesn't wobble. I sanded all the edges down so it looked worn. I decided to experiment with the finish as I have a big cabinet that I'm getting ready to finish and I don't want to experiment on that one. :) I recently downloaded the recommended "Creating Your Masterpiece" by Shaunna West (see the ad to the right of this post) and was inspired to try something out of my comfort zone.
So, for the finish, I first used Miniwax Hickory gel stain. After that was dry, I used the Behr paint I had leftover from my bathroom walls and dry brushed it on. I had never done this technique before, so I started on the underside of the stool. I'm glad I did because I got much better at the dry brushing as I went on. It is definitely a tough technique to use in corners and where the wood meets at a 90 degree angle. That's why it looks so much better on the treads and flat side of the stool. After the paint dried (about 10-20 minutes), I took a medium to finer grit sanding block and sanded in a circular motion. I even had little hands helping (note picture). Finally, I used the Miniwax Paste Finishing Wax. I was unsure that I was using it correctly as it goes on very thin and it was hard to see where I applied it. After letting that dry for about 15 minutes, I buffed it out with a clean cloth. I could really see it start to shine up (just like a car wax). I love the feel of the wax and I hope it holds up over time. I do realize that I will need to re-coat on the stool treads, but that's fine with me.

Estimated Cost
Scraps used . . . . estimated at less than $10
Estimated Time Investment
An Hour or Two (0-2 Hours)
Finish Used
See notes in the summary
Recommended Skill Level
Starter Project
Rustic X end table to cover up dog kennel
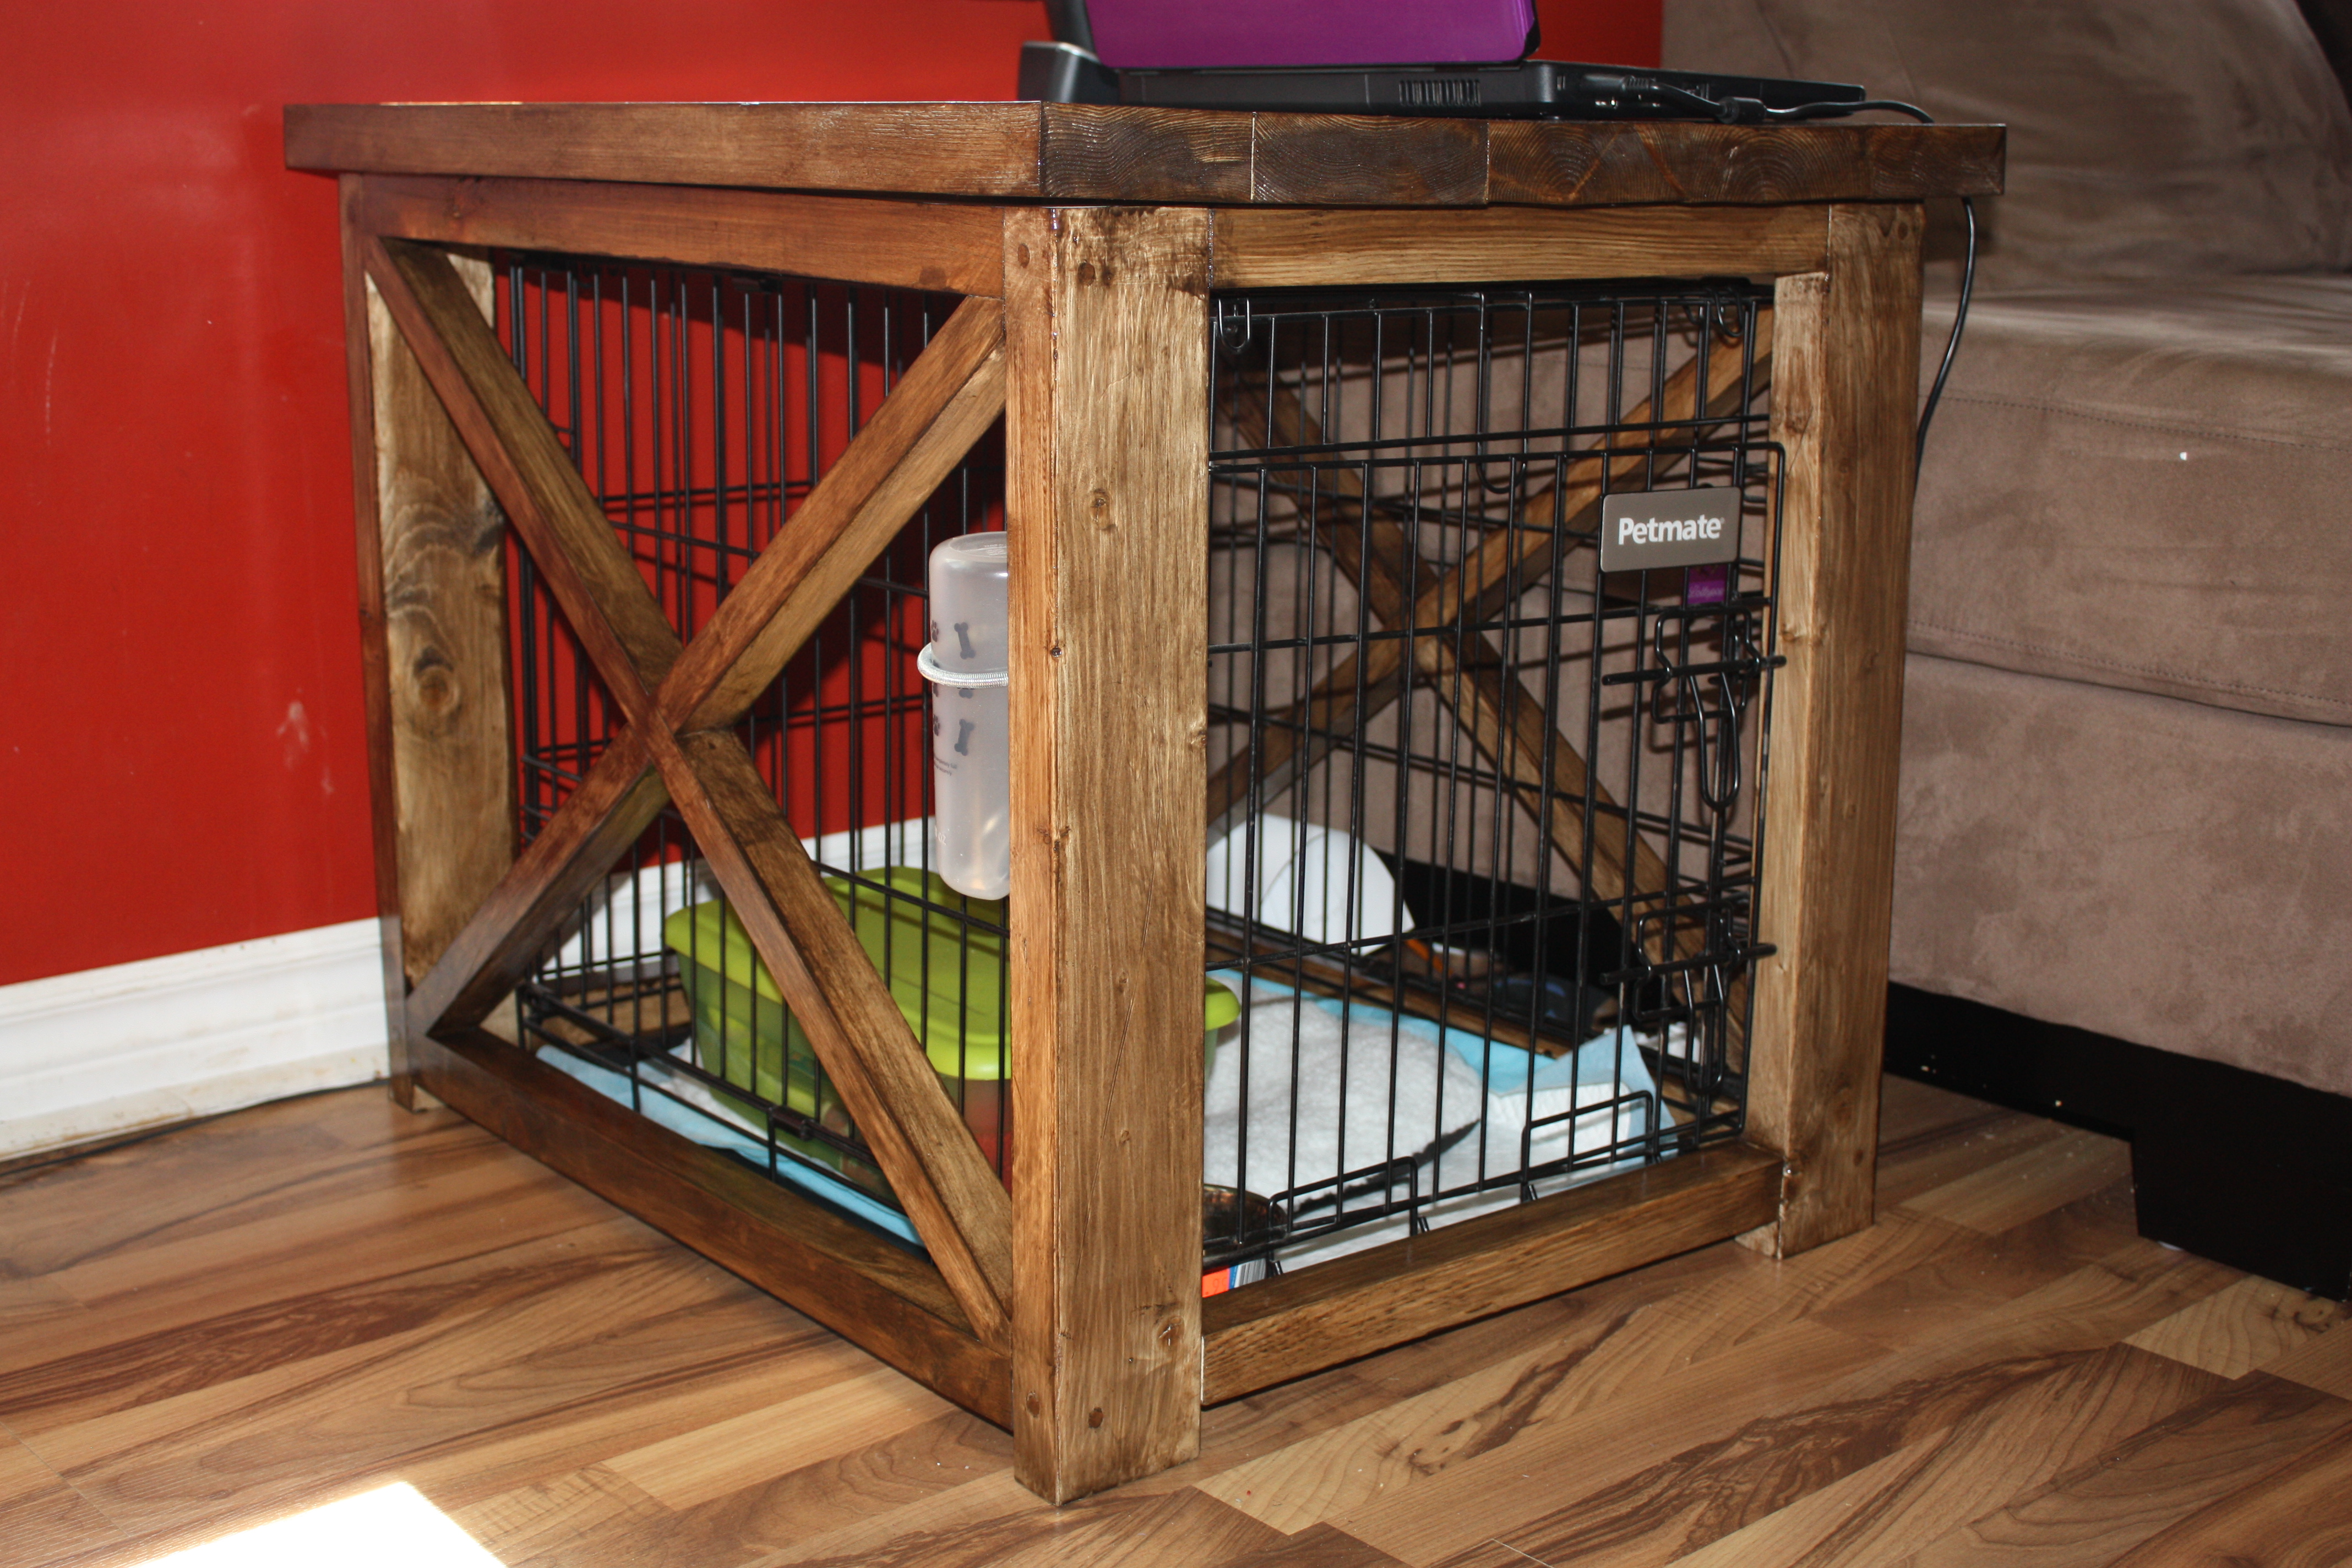
We are getting a puppy in a couple weeks and we want to crate train her. We have a small house so the only place we have to put the crate is in the living room. Needless to say, we needed a way to make the crate look good in our living room. That's when I found the plans for the rustic x-end table. The dimensions were almost the same as the dog crate. I only had to change the dimensions by a couple inches and wallah! Now the crate doesn't look out of place and I have a place to put my laptop and phone! I ended up ripping the 2x6's just a saw blade width down to get rid of the rounded edges and that made the top come together smoother. I also planed down the top a bit as well. In some spots, you can hardly tell they were 2x6's laminated together! I used two different stains on it. The first coat was a tudor stain but I wanted to warm it up a bit so I put a coat of antique walnut on it as well. I am very very happy with how this turned out. Now my husband would like me to build a coffee table to match!
Estimated Time Investment
Day Project (6-9 Hours)
Recommended Skill Level
Beginner
Comments

Thu, 02/25/2016 - 08:59
Click Bait
This entire site is click bait. yet to see one actual plan. its like all stolen data from pinterist. which is equally as bad
Ana White Greenhouse
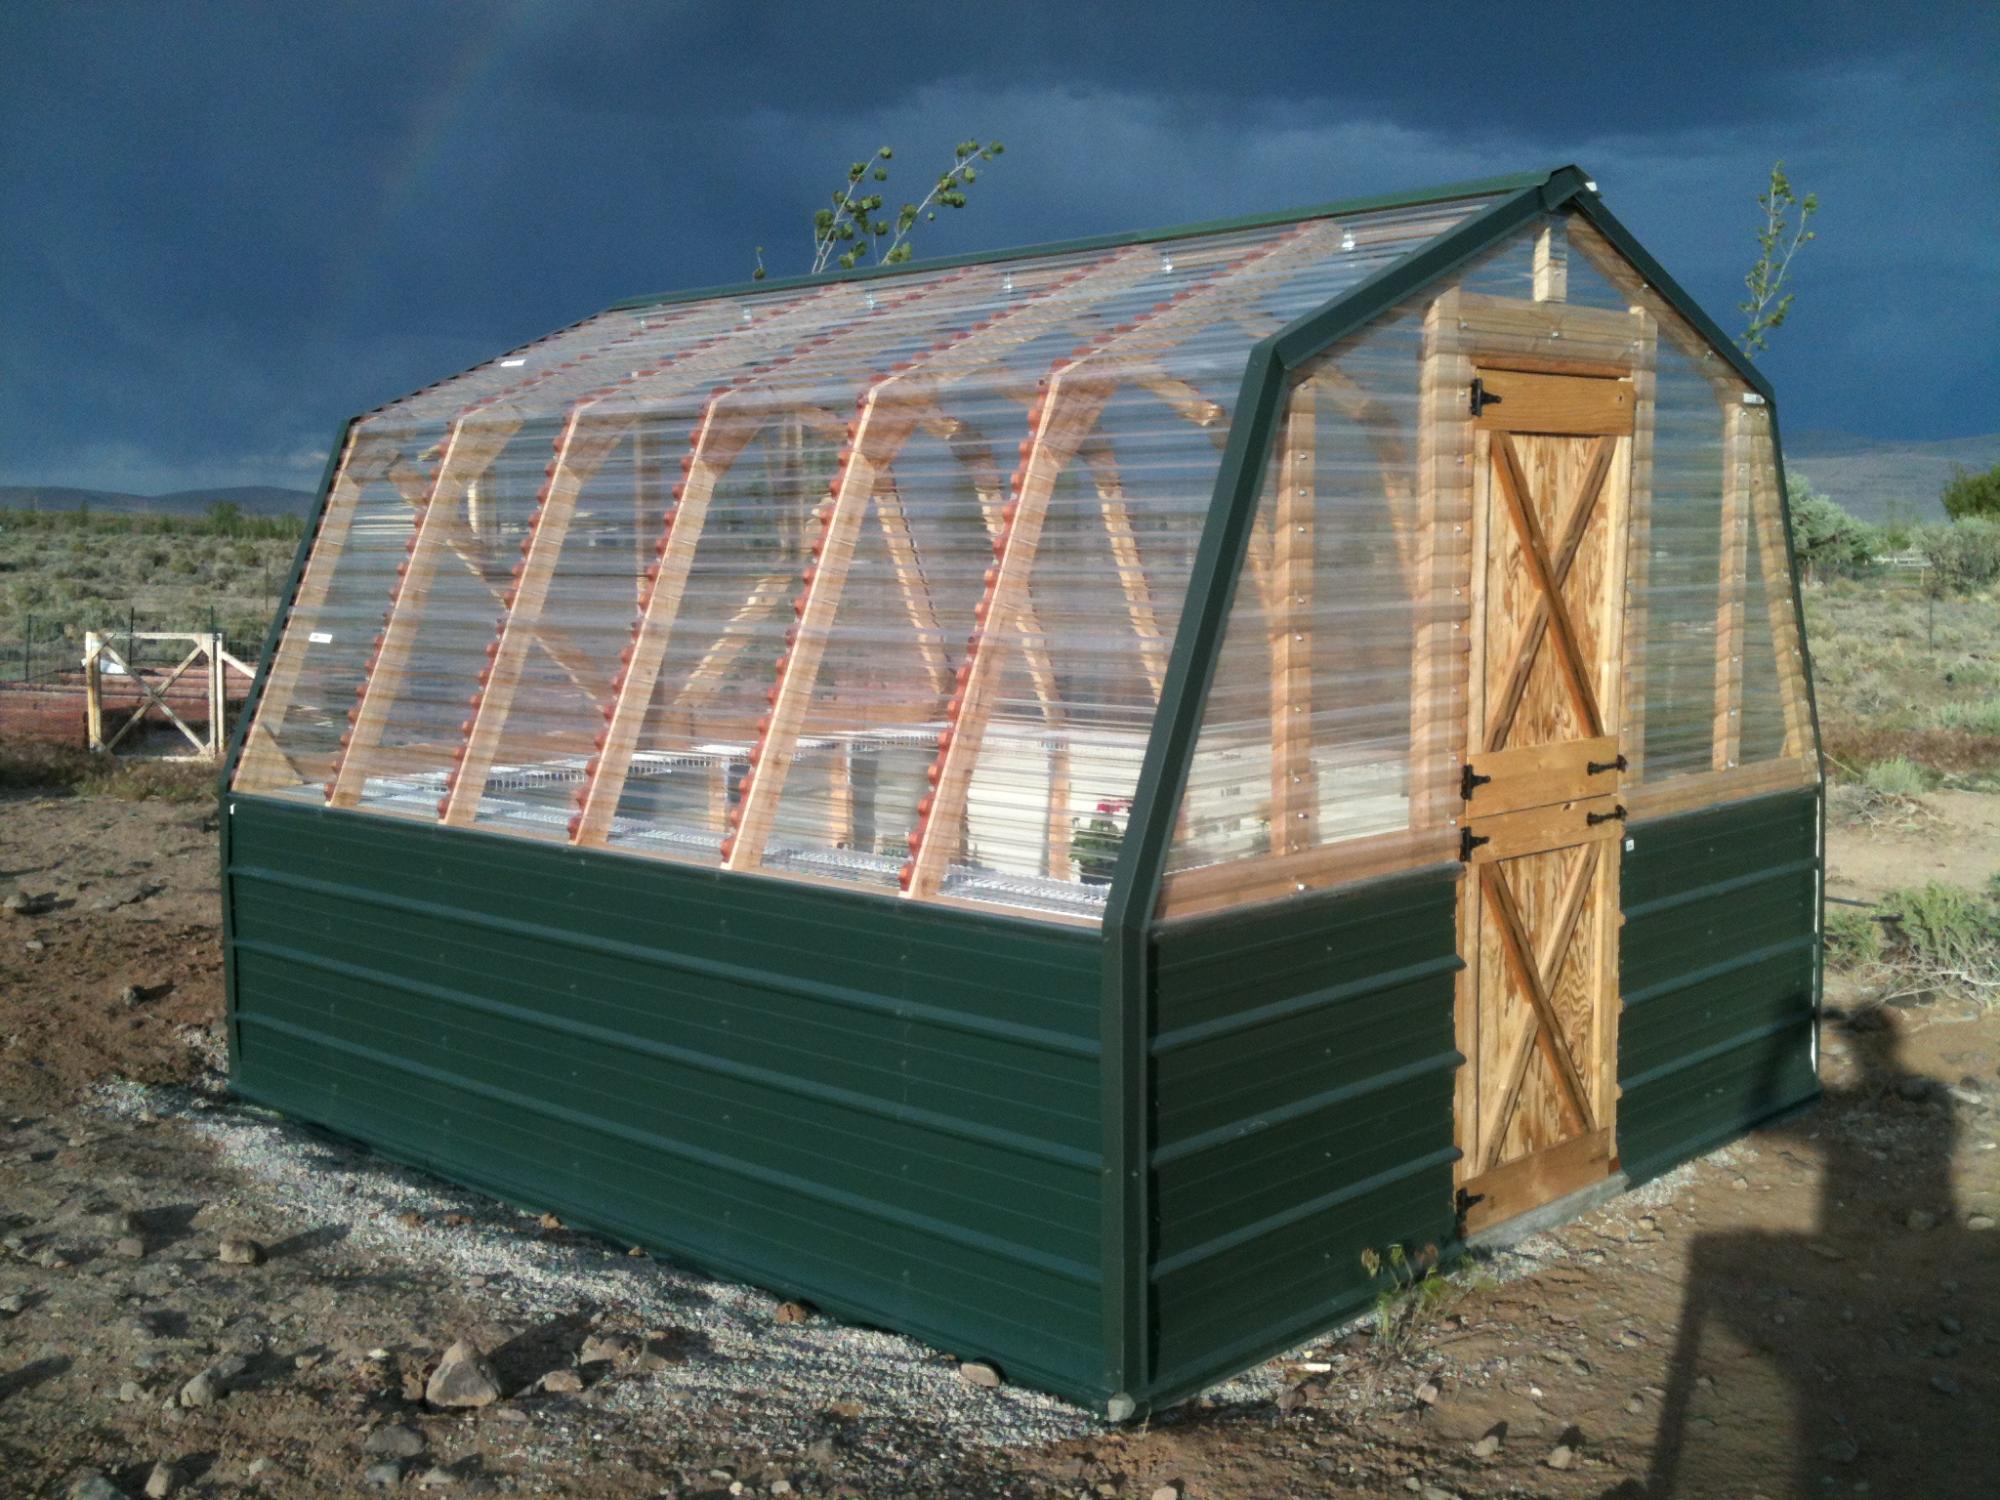
We built the first one about 8 years ago, and then the wind flipped it over and scattered it all over the back part of the property. I then dug footings and anchored the second one down; I was able to save the Dutch Door I made for the first one. Thanks for the plans!!!
Built from Plan(s)
Comments
Fri, 04/08/2022 - 10:35
Beautiful Greenhouse!
That's not going anywhere! Thanks for sharing, it looks amazing!
Seasonal And Holiday
Special Teacher Gifts
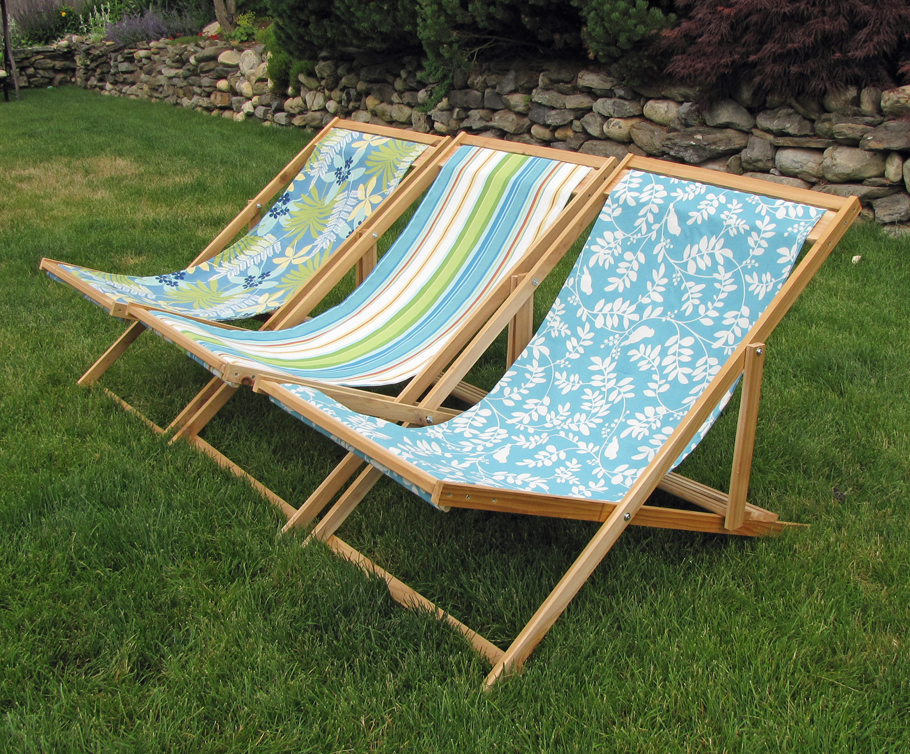
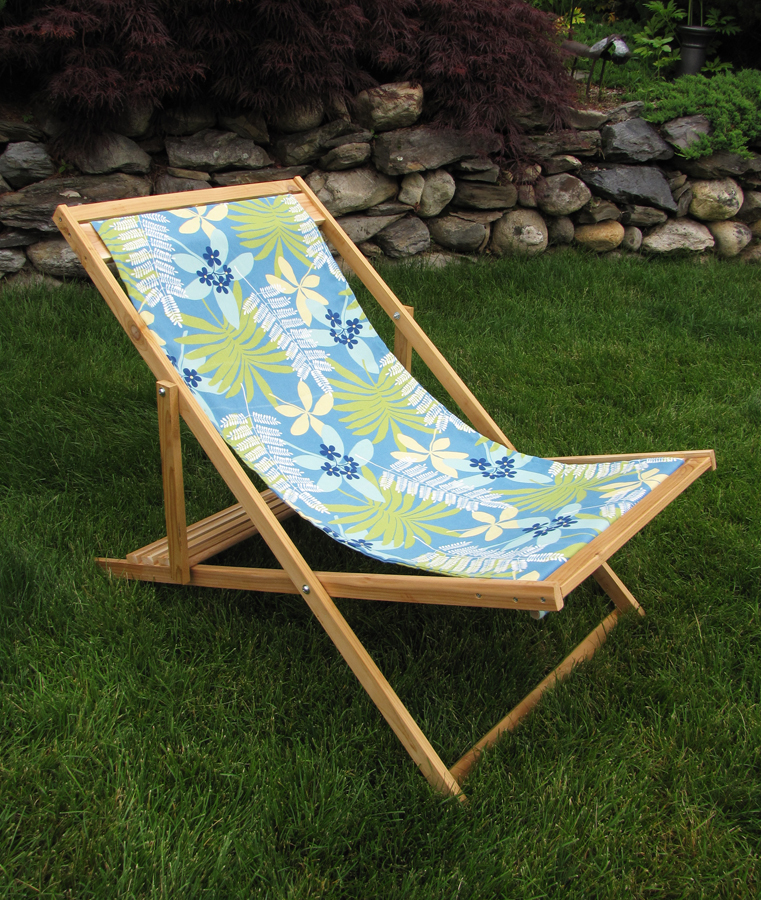
My son Jack, has Down syndrome. He's had the same preschool teacher for the last 3 years, and now it's time to move on to kindergarten. Not only does he have a dedicated teacher, but he has two paraprofessionals (teacher's aides) that take turns in helping him 1:1 all day long. I figured that it was time for all three of them to relax this summer. So, in appreciation, I made three of the adult sling chairs so they can enjoy their much deserved relaxation.
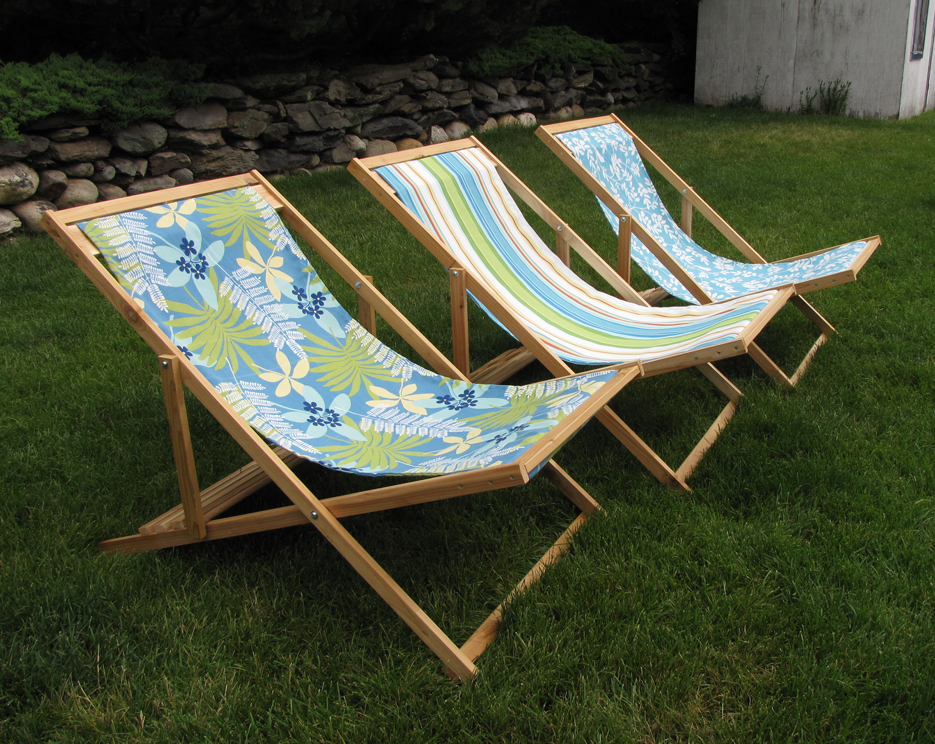
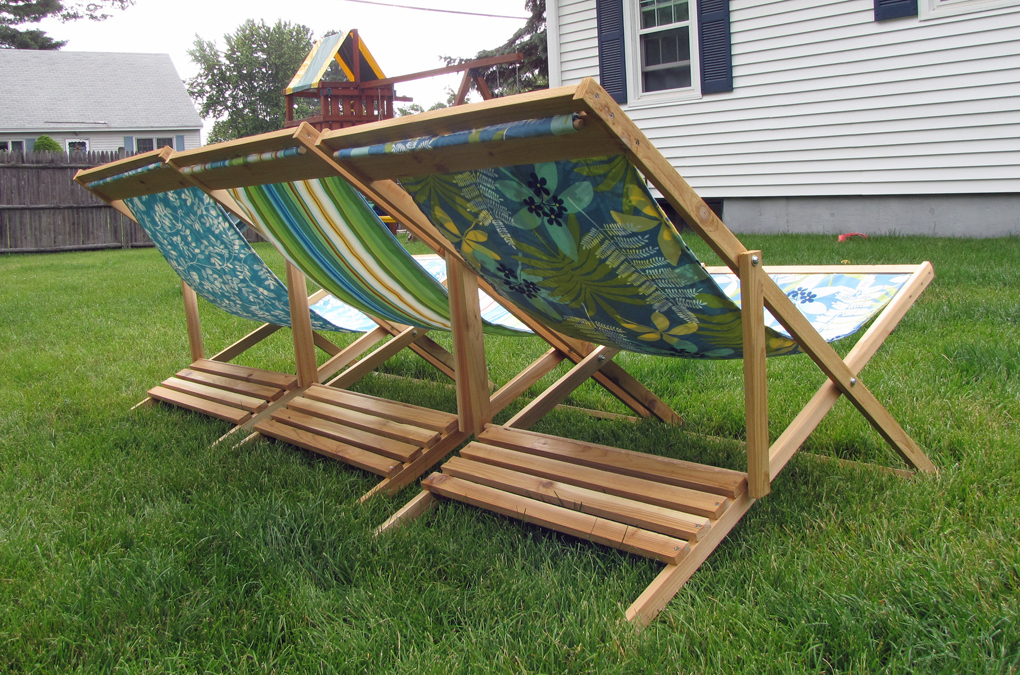
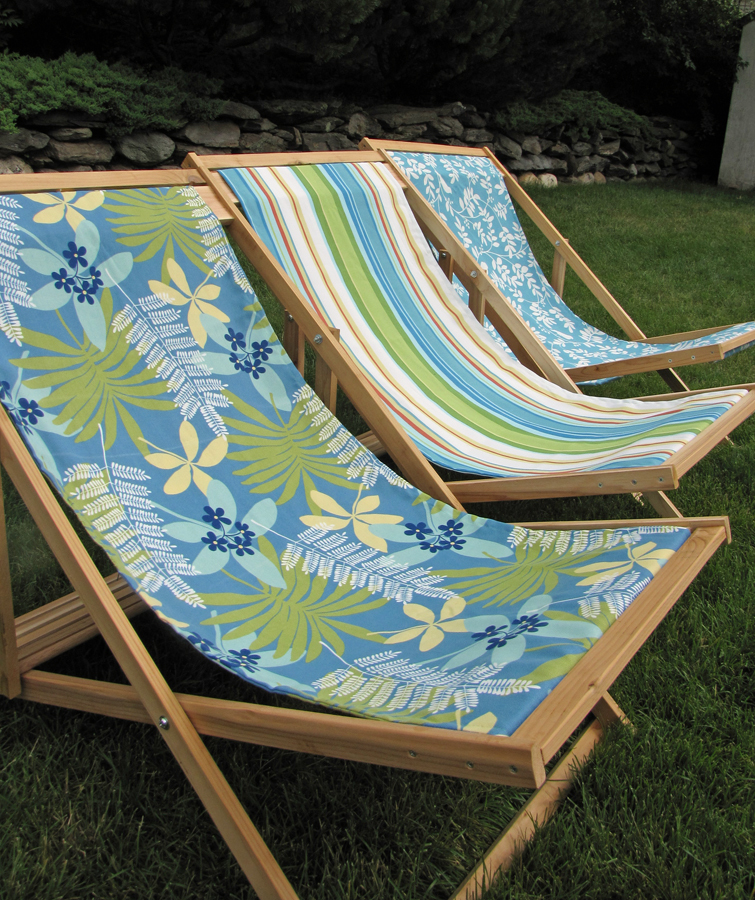
Built from Plan(s)
Estimated Cost
$25 - $30
Estimated Time Investment
Afternoon Project (3-6 Hours)
Finish Used
Since I used cedar, I didn't want to do anything to it except put a coat of Thompson's water sealer on it.
Recommended Skill Level
Beginner
Comments

Tue, 06/21/2011 - 00:00
As an OT in the schools, I
As an OT in the schools, I can understand your connection to the dedicated teacher and staff that work for your son. I'm sure that these gorgeous chairs will show your appreciation! What great choices in fabric, too!

Tue, 06/21/2011 - 15:18
What a fantastic gift!!!
Seriously so thoughtful! I love how they turned out!!!
Tue, 06/21/2011 - 18:20
I got my fabric at JoAnn's too!
I made this same chair for my husband and I got my fabric at JoAnn on sale! They have a great selection of outdoor fabric. :)
Fri, 09/23/2011 - 19:31
instructions
Would you mind sending the instructions for these chairs. I think this is something that I could do and would love to make a set for my husband for Christmas. We are all about homemade. That would be so great!

Wed, 09/28/2011 - 20:05
Instructions
Hi Sherry. To find the page where I got the plans, just click on the words "Wood folding sling chair - adult" next to the bolded "From Plan" listed above. That will take you directly to Ana's plan.
Fri, 02/10/2012 - 03:45
instuction for sling chair
would love to make could i get these instuction thanks
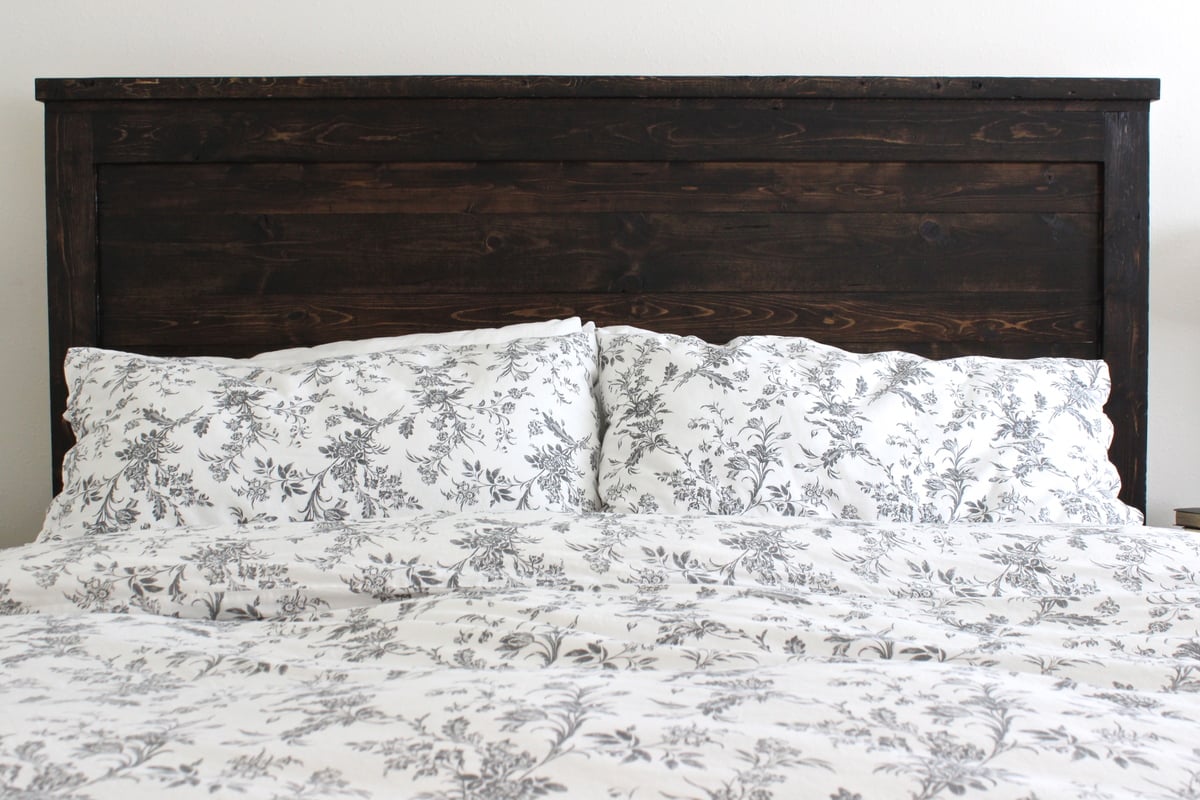
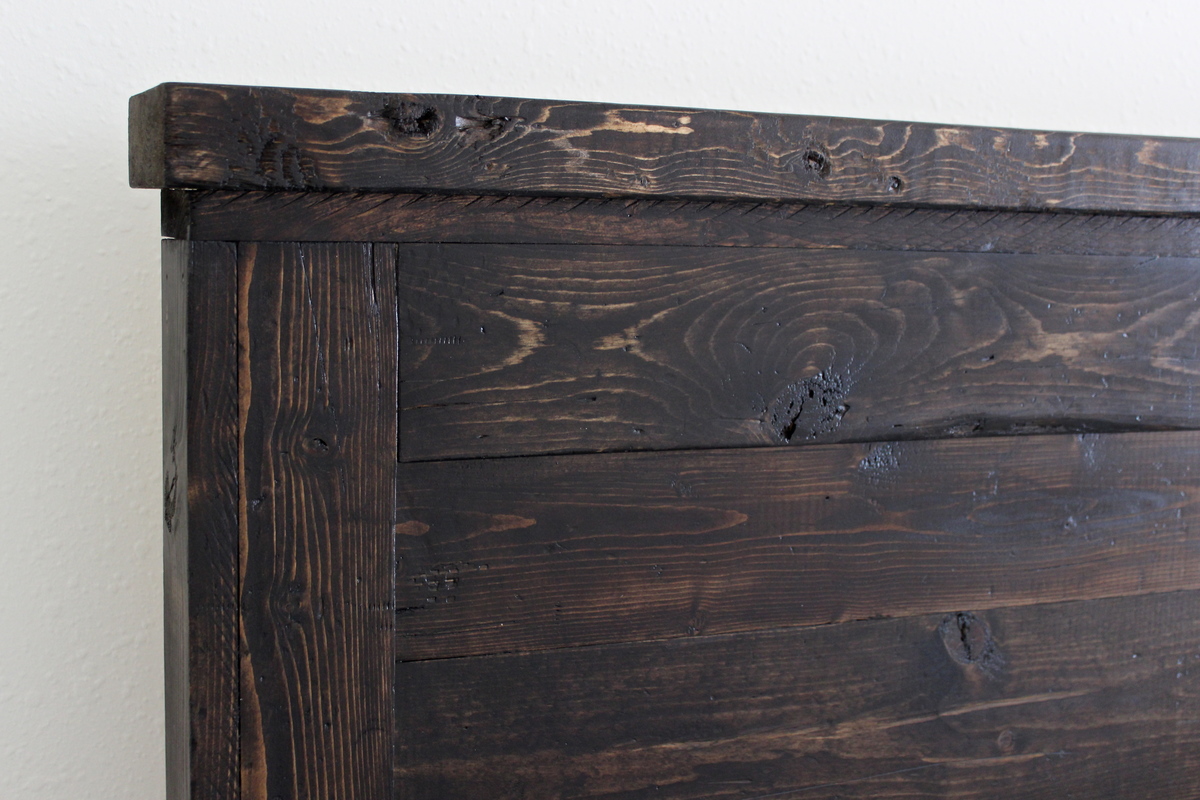
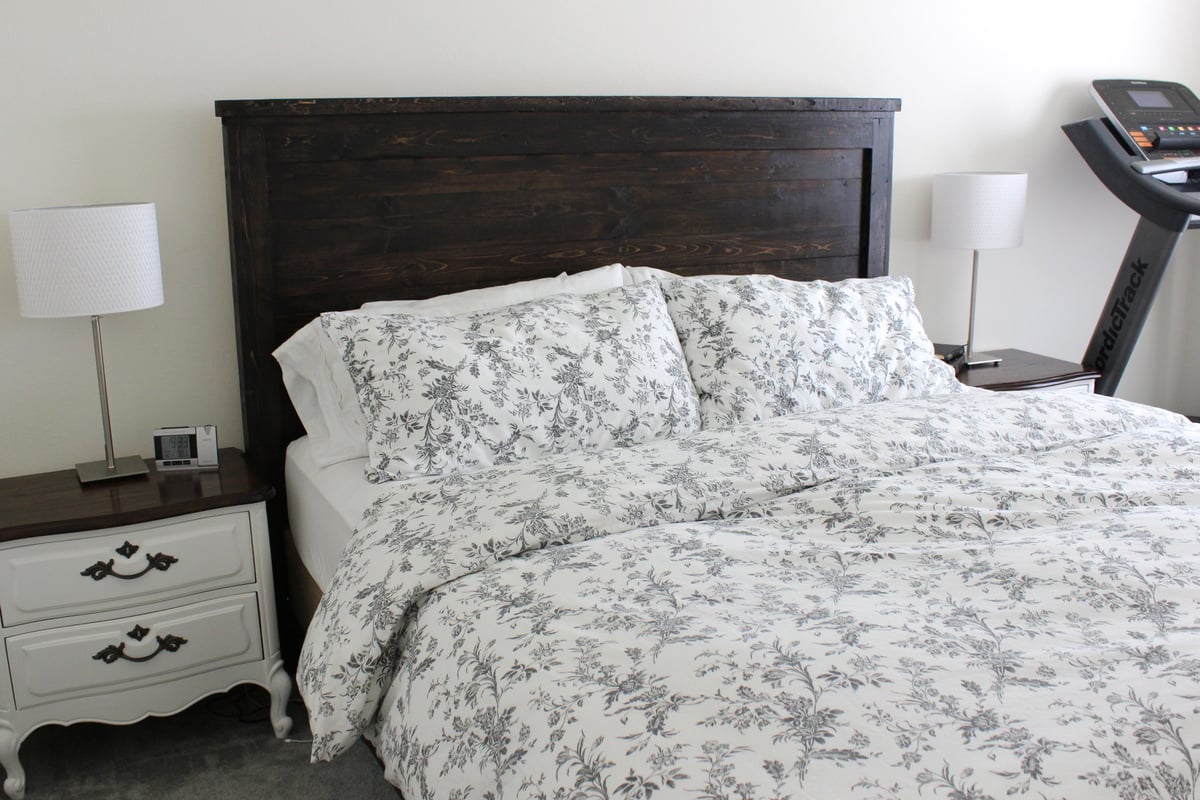
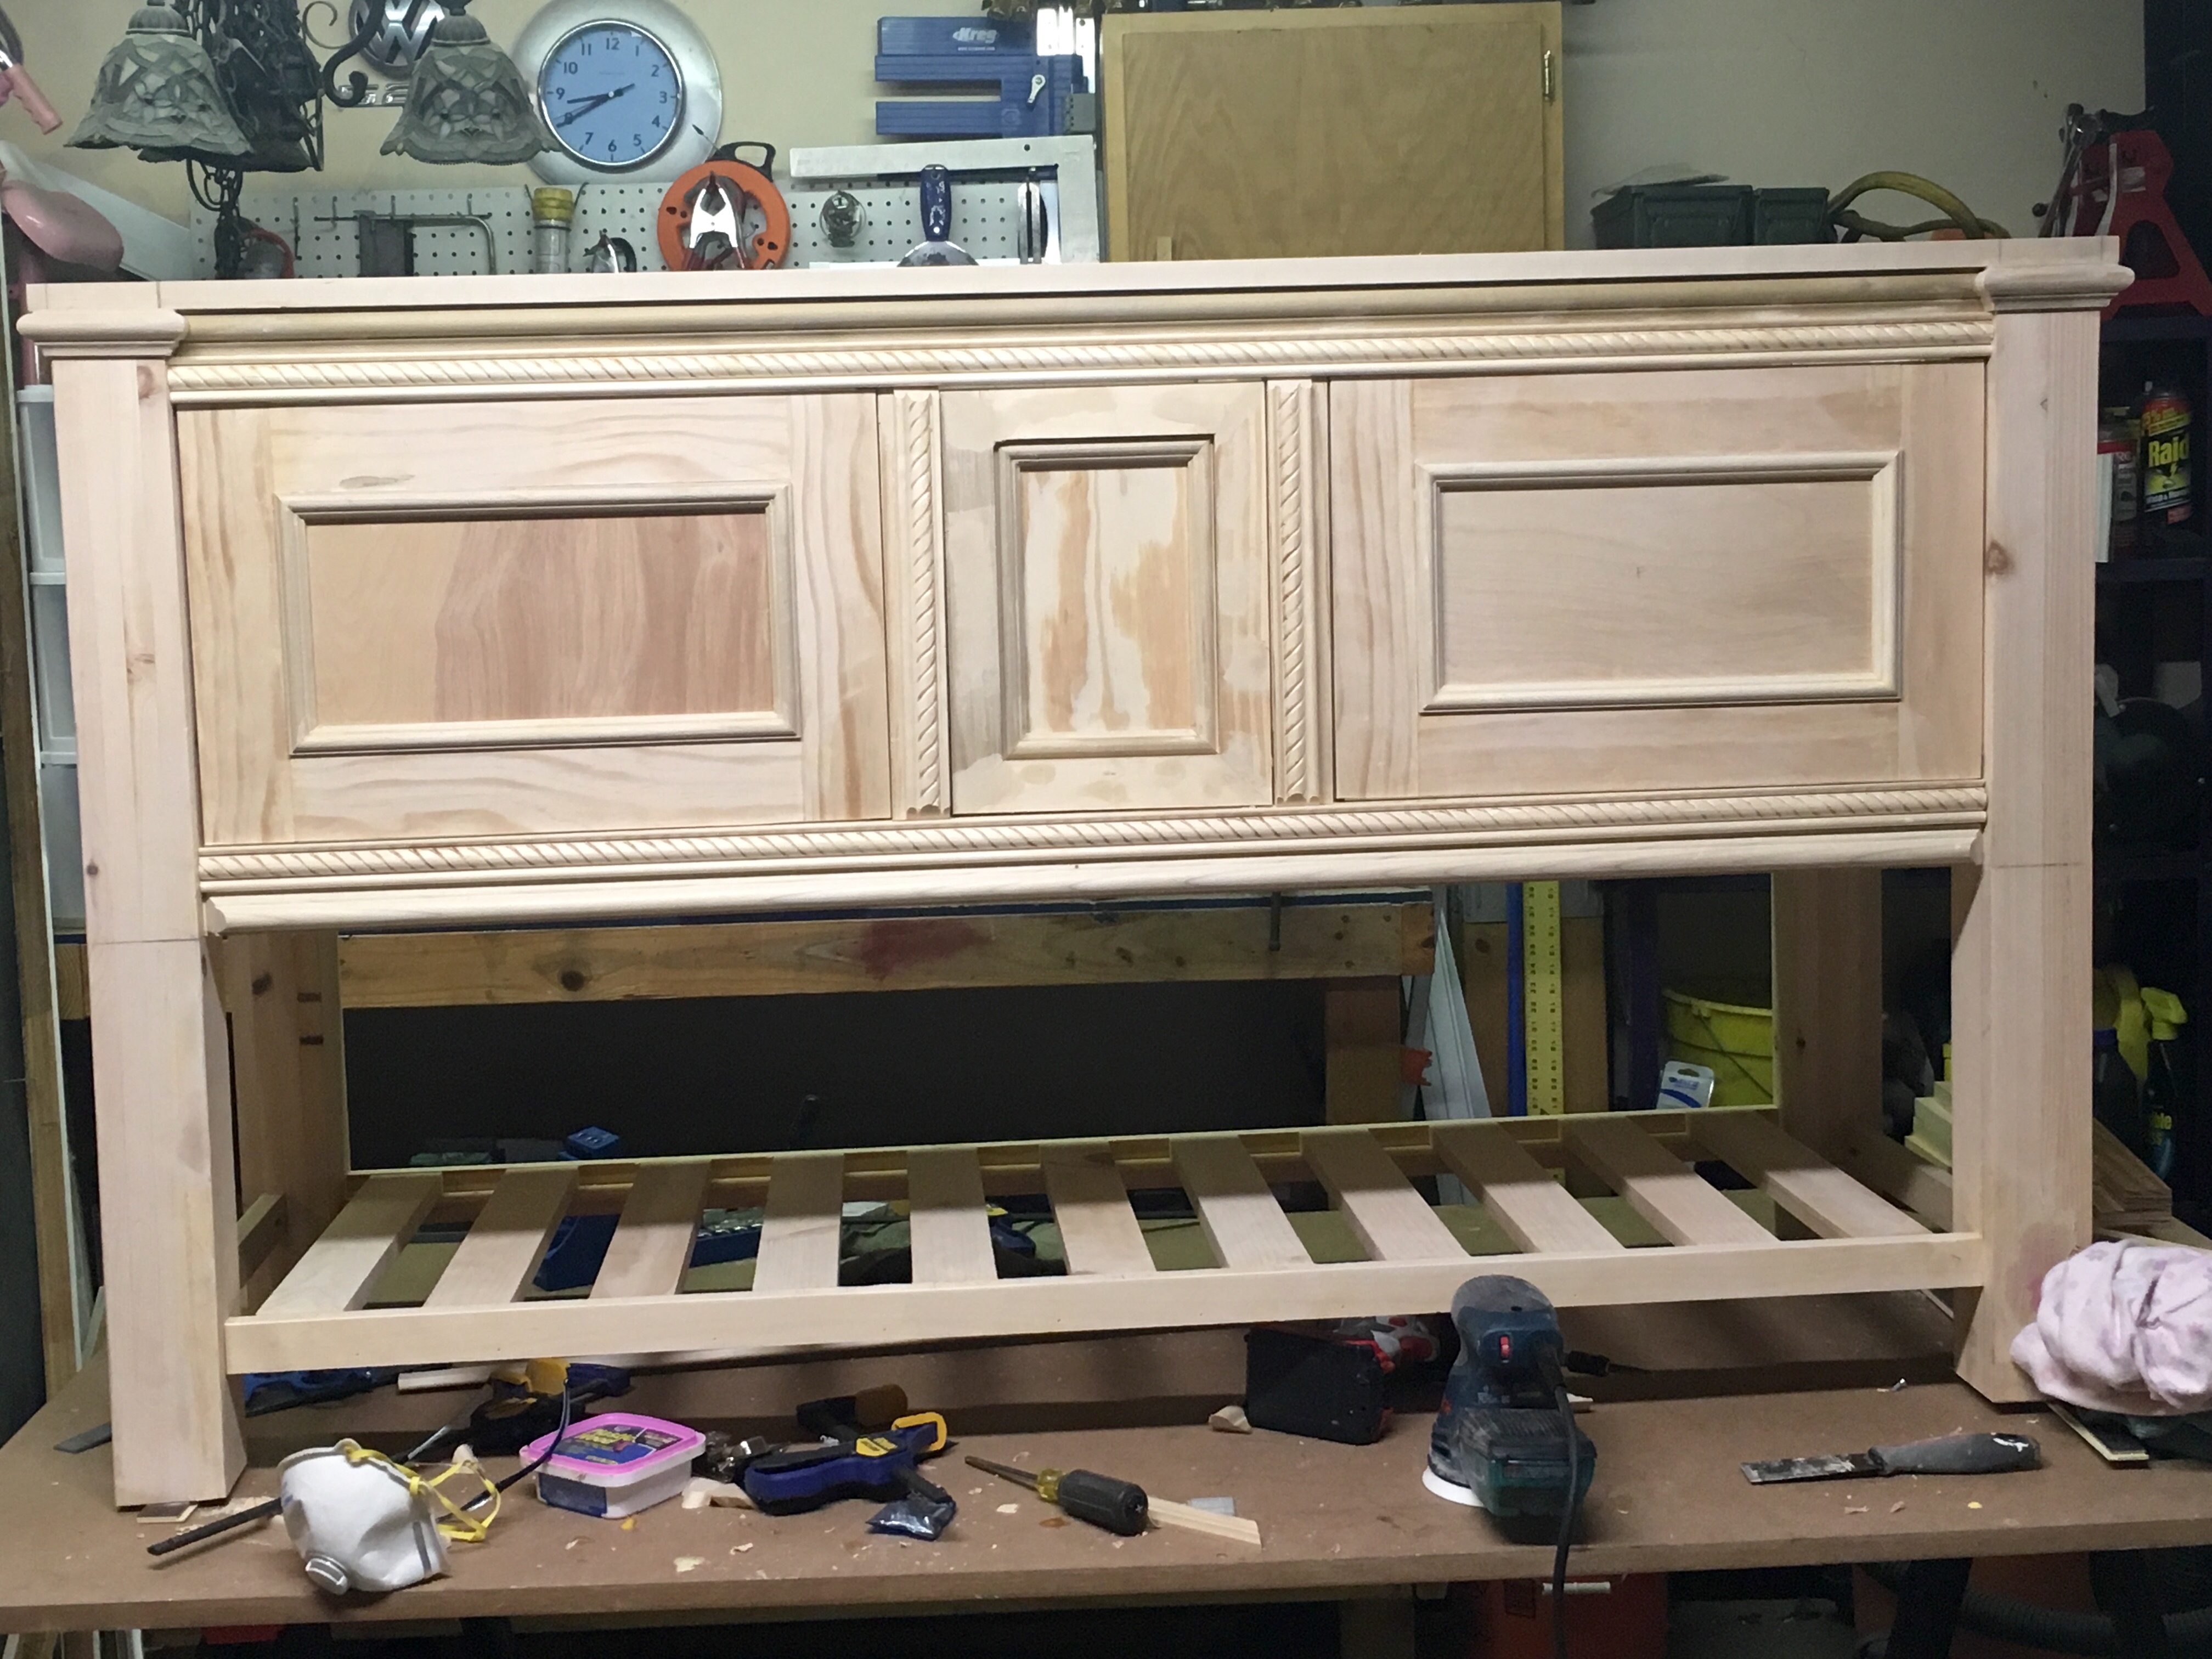
Easy Build Wood Headboard, Cal King
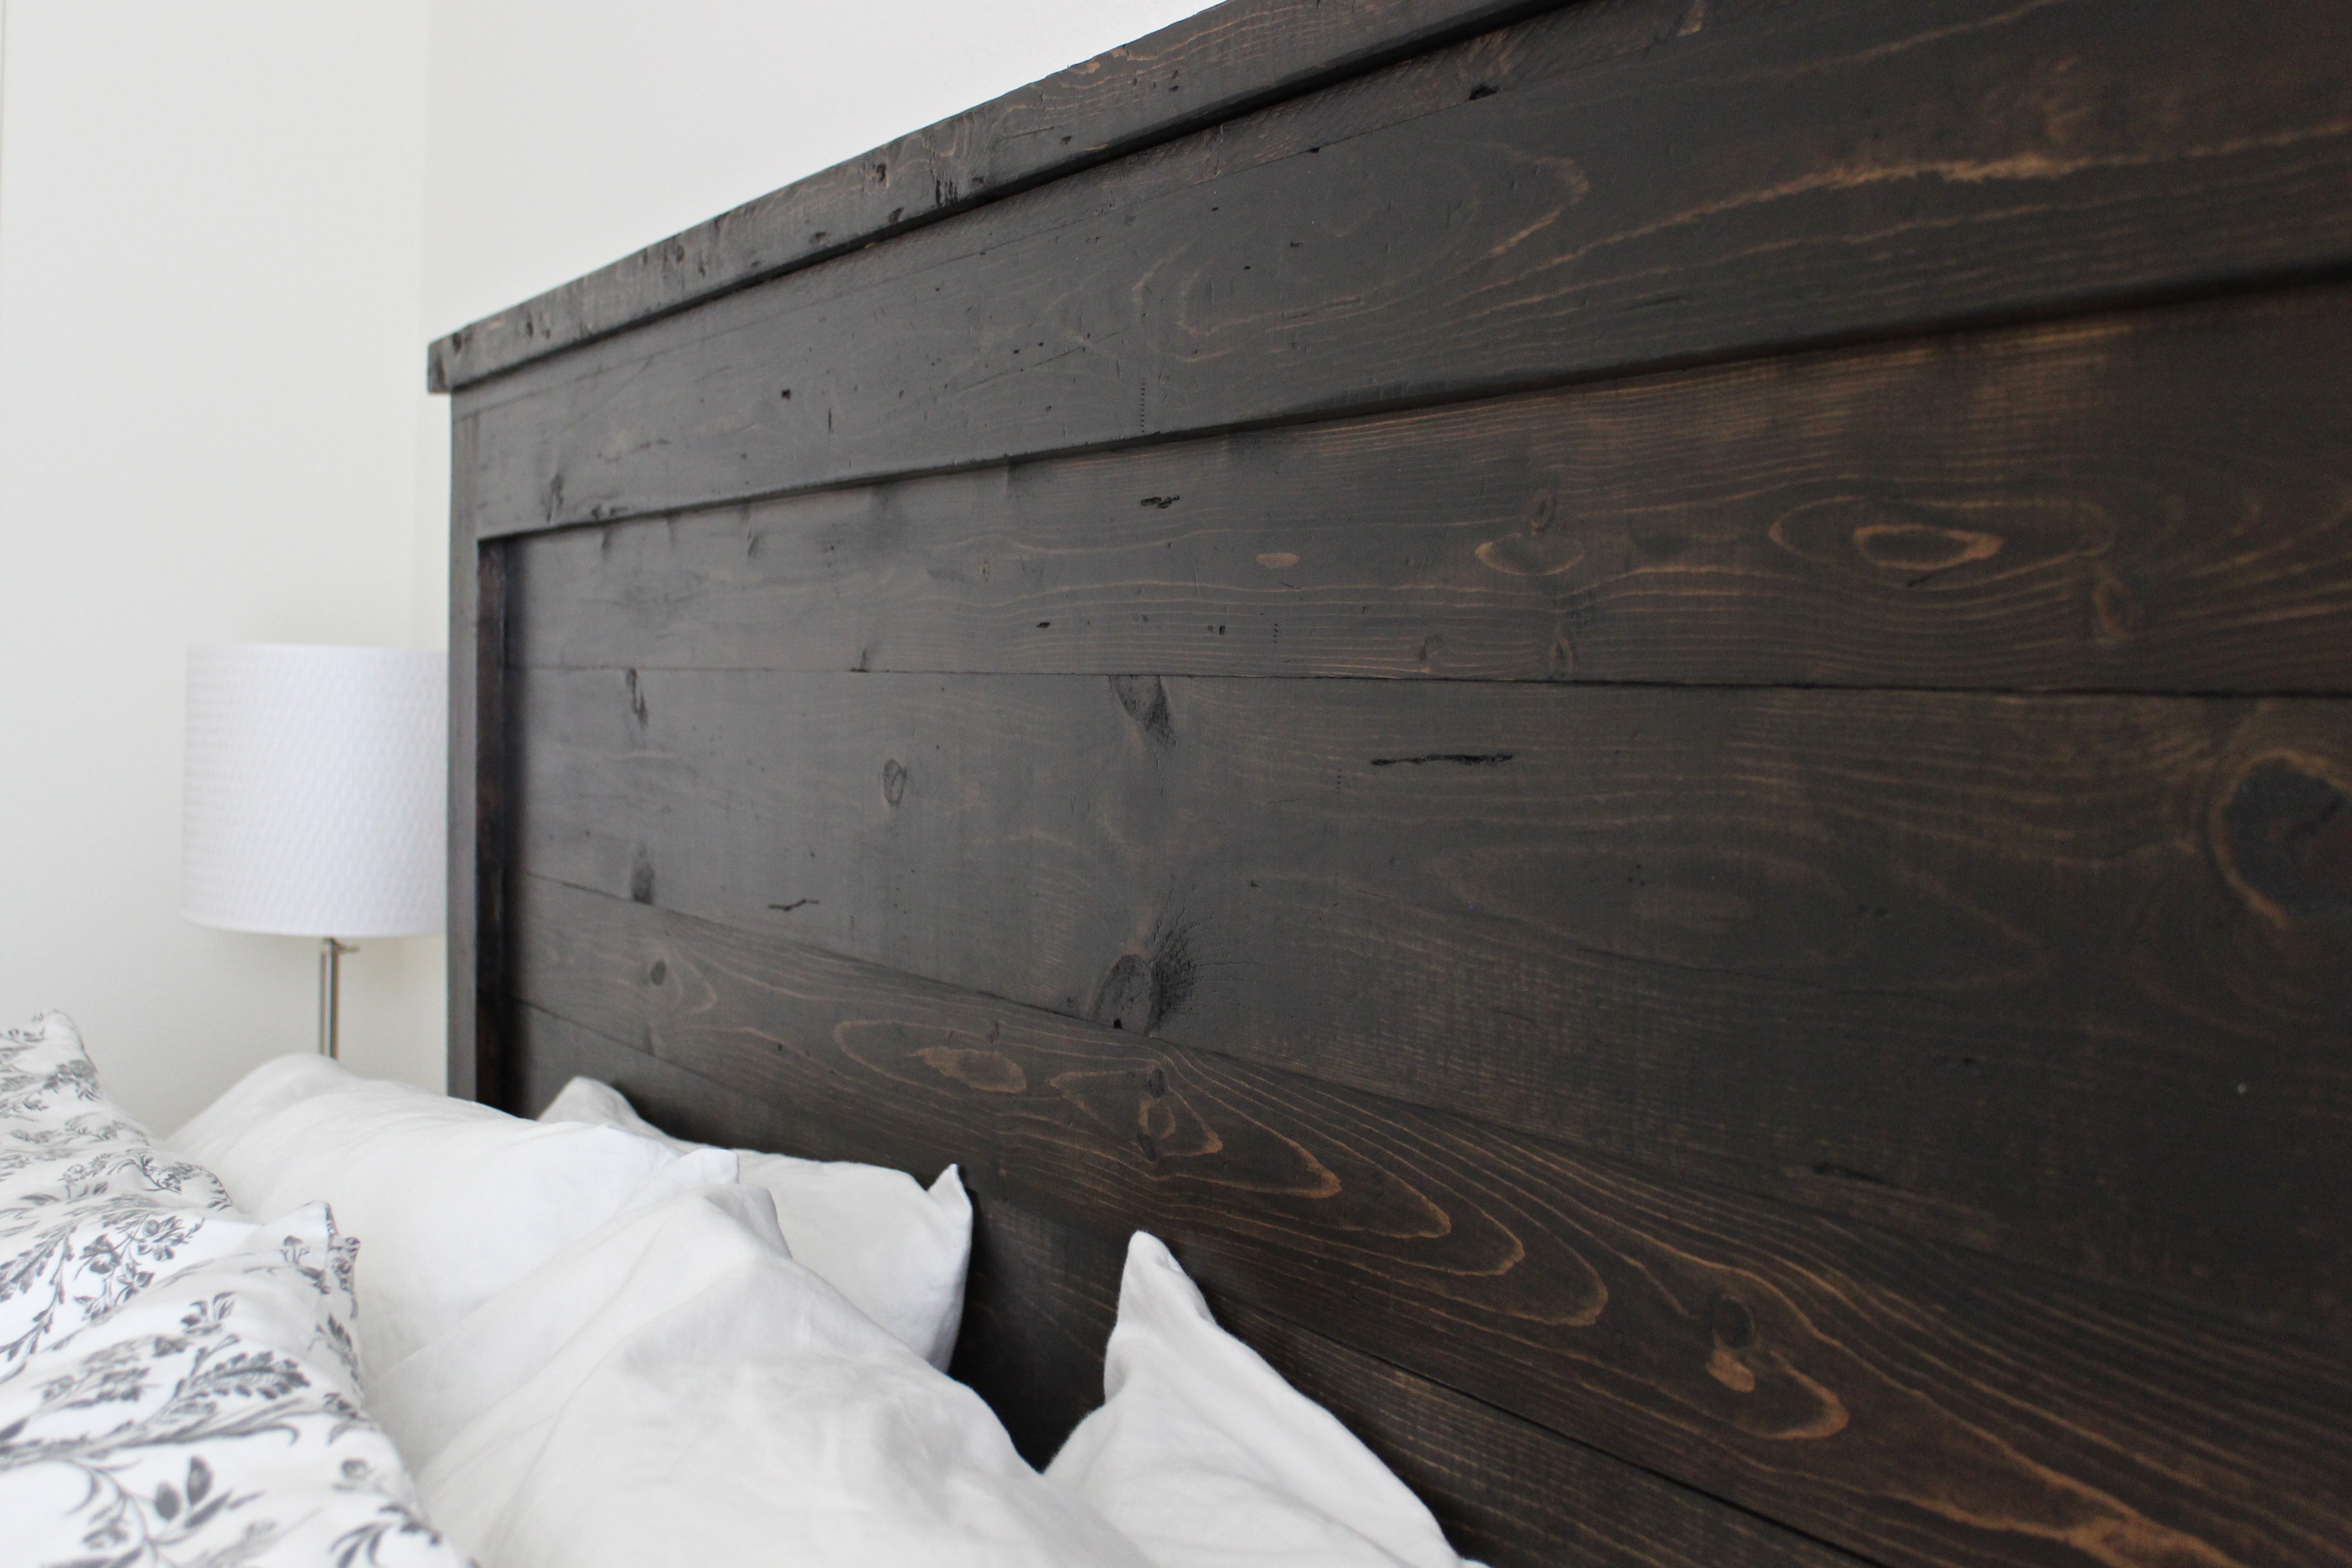
This was my first project and I loved every second of it. I did the whole thing by myself (with the "help" of my two-year-old) and I'm 5 months pregnant! THAT is how easy it is.
Built from Plan(s)
Estimated Cost
80 bucks
Estimated Time Investment
Weekend Project (10-20 Hours)
Finish Used
I distressed it a little before staining so it didn't look too brand new. I filled a sock with bolts and screws and beat it up and scratched it with a steak knife to make fake cracks.I did one coat of Minwax Jacobean and it was really blotchy. I should've conditioned my wood, so I lightly sanded the whole thing and added a second coat and it evened out the blotchiness a lot, but it did turn out darker than I wanted. I added only one coat of Minwax Polycrylic Finish in satin because I wanted it to look rustic and not glossy. The cutting and assembly only took about 4-6 hours. The staining and sanding and distressing and finishing took a couple days.
Recommended Skill Level
Starter Project
Comments

Sun, 08/11/2013 - 20:41
Power to the mama!
How awesome is that? =D It looks gorgeous, and I applaud you for tackling it with your 2 year old and baby on the way. =D When I was pregnant, the only thing I considered doing was putting furniture together. Now that I've built furniture, I now realize how much harder it was to follow the assembly directions than it is to make your own assembly directions. Keep it up!
Easy Peasy Garage Shelves
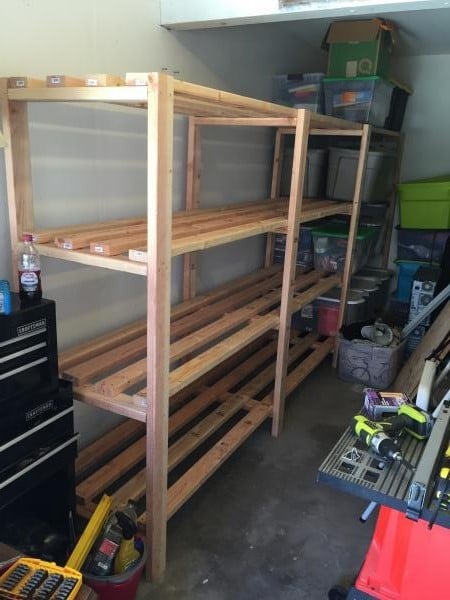
This was such an easy project to complete although it did take some time to measure and cut all the boards. I could only transport 2x4s at 8' so after cutting the height to 6' for the braces I used the extra 2' for the shelf width. The extra width really helped with some of my storage totes. I made the first section at 5' in length to handle the heavier totes, and the second section I used the full 8' board with a brace in the middle. I wish my garage was a little deeper to handle 16' of shelves as it would have saved me a good bit of time. I'm also glad I have an extra ryobi battery to charge while I assemble. Gotta love how fast those things charge. Can't wait to try another one of your plans.
Built from Plan(s)
Estimated Cost
Around $130 from the Depot. 2x4 at 8' $2.73 a piece and two boxes of screws.
Estimated Time Investment
Day Project (6-9 Hours)
Finish Used
none
Recommended Skill Level
Beginner
Comments
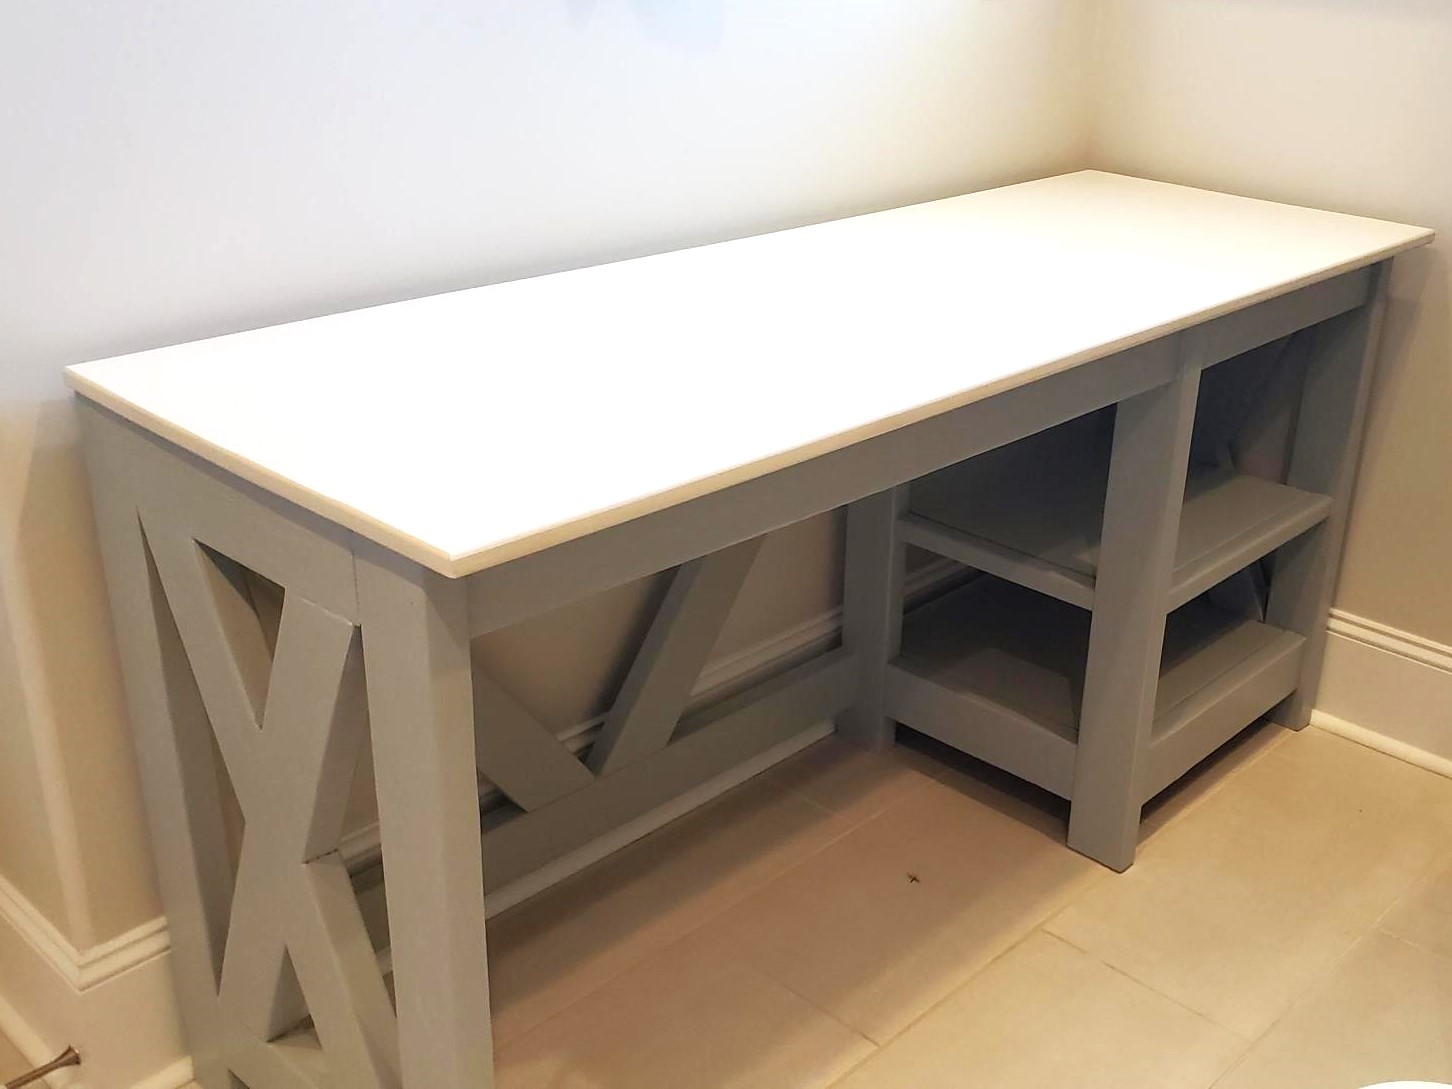
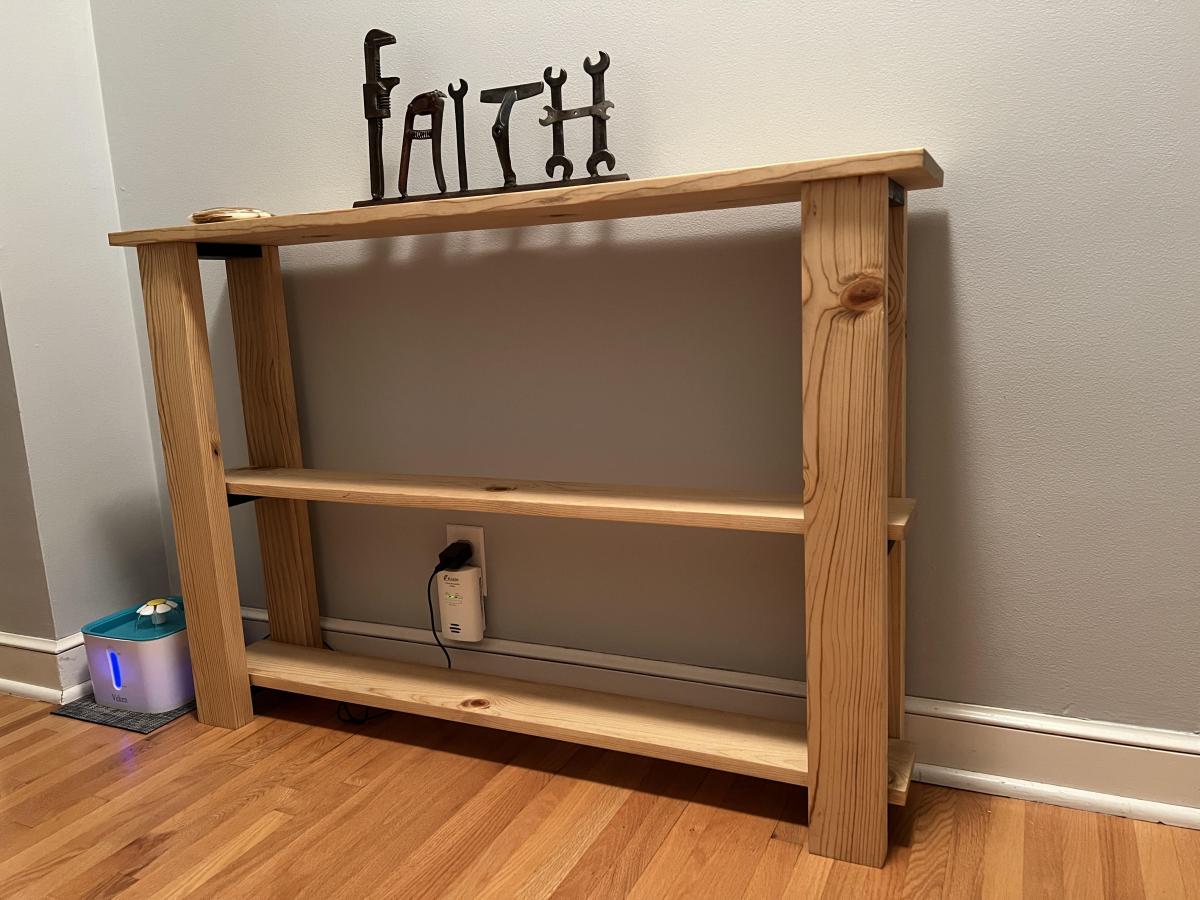
Simple Console Table
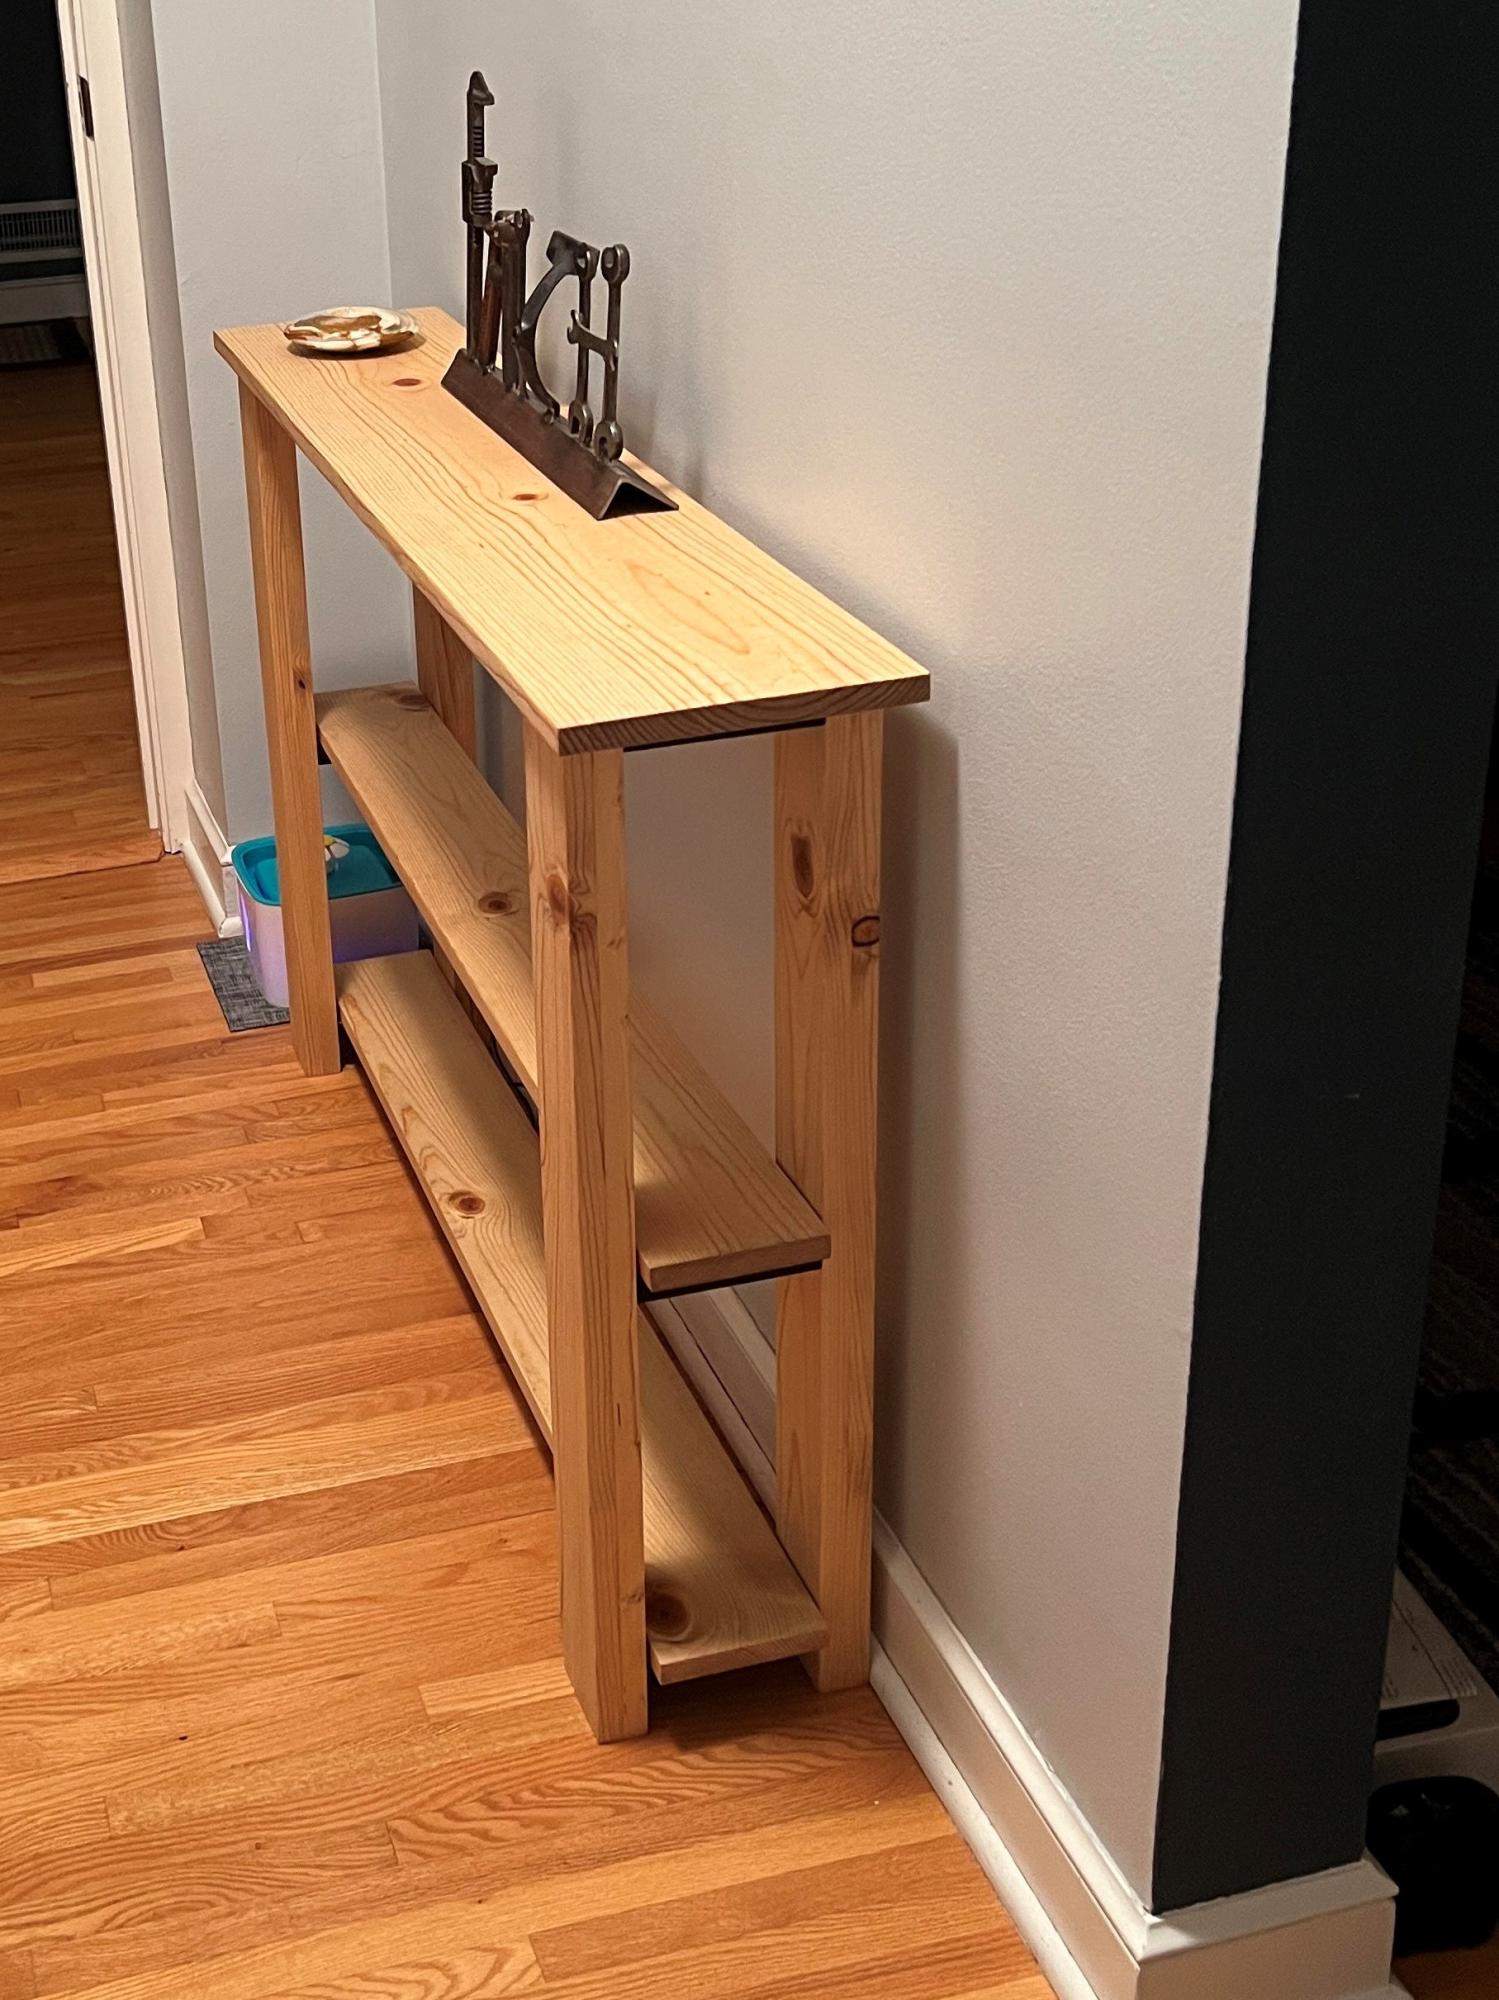
I used dimensional lumber for a little nicer look and laminated two boards for the legs. I used light walnut danish oil to finish. I adjusted the width and got It the perfect width for my hallway.
Built from Plan(s)
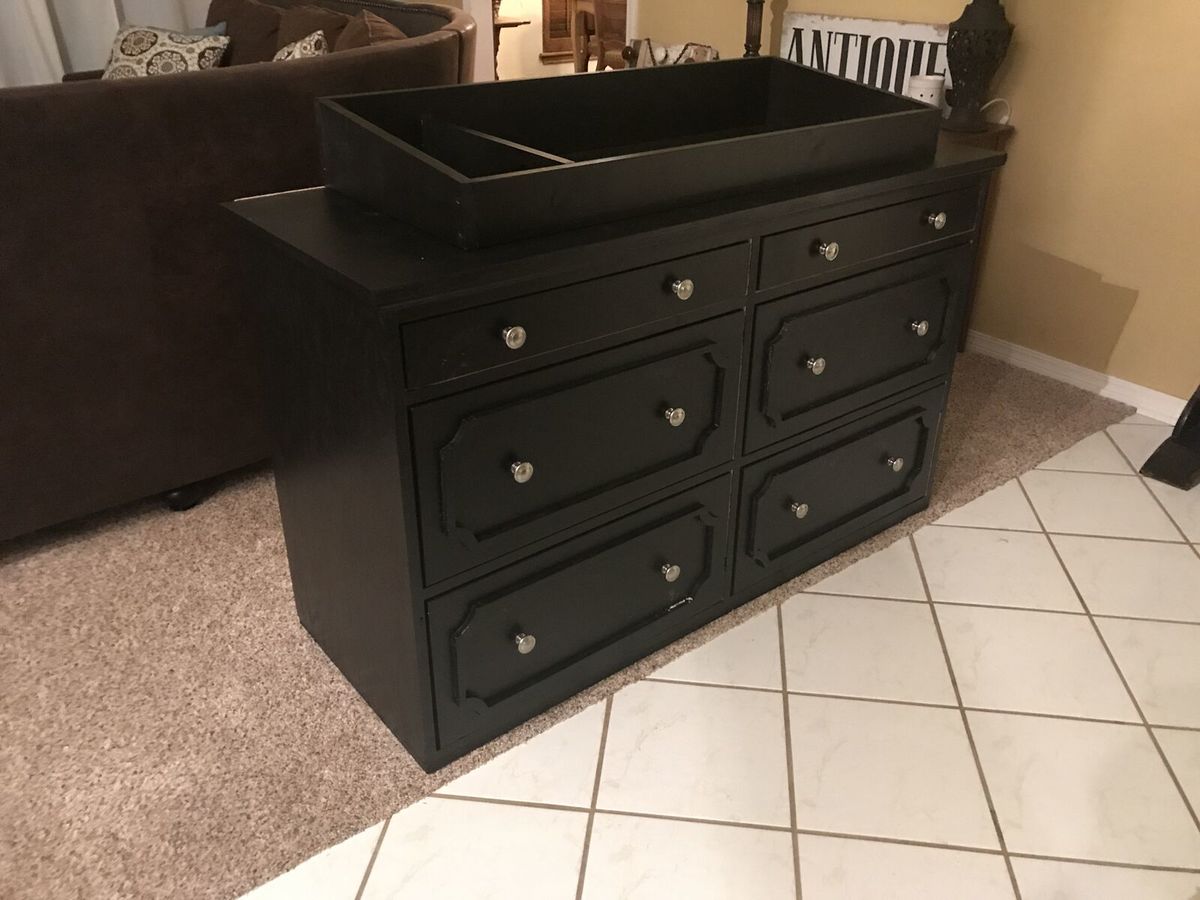
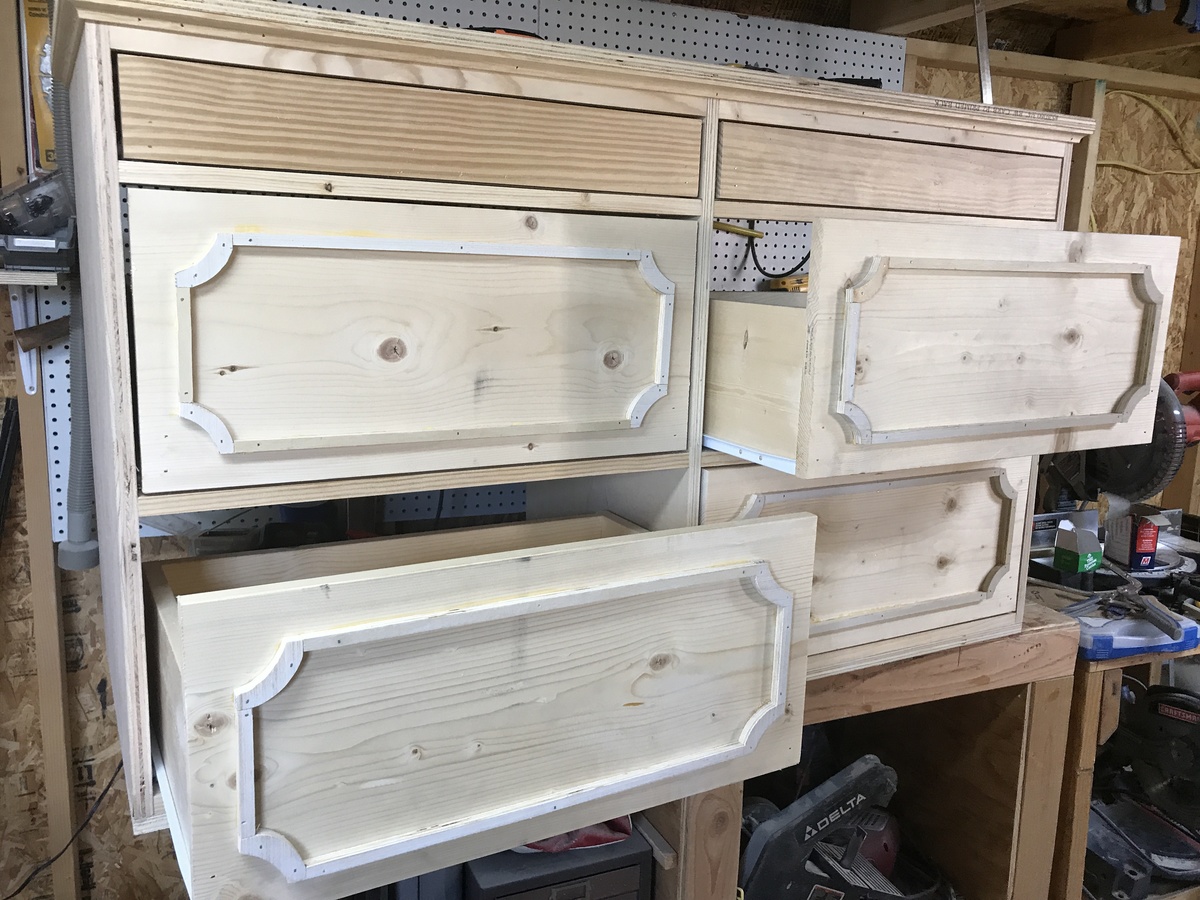
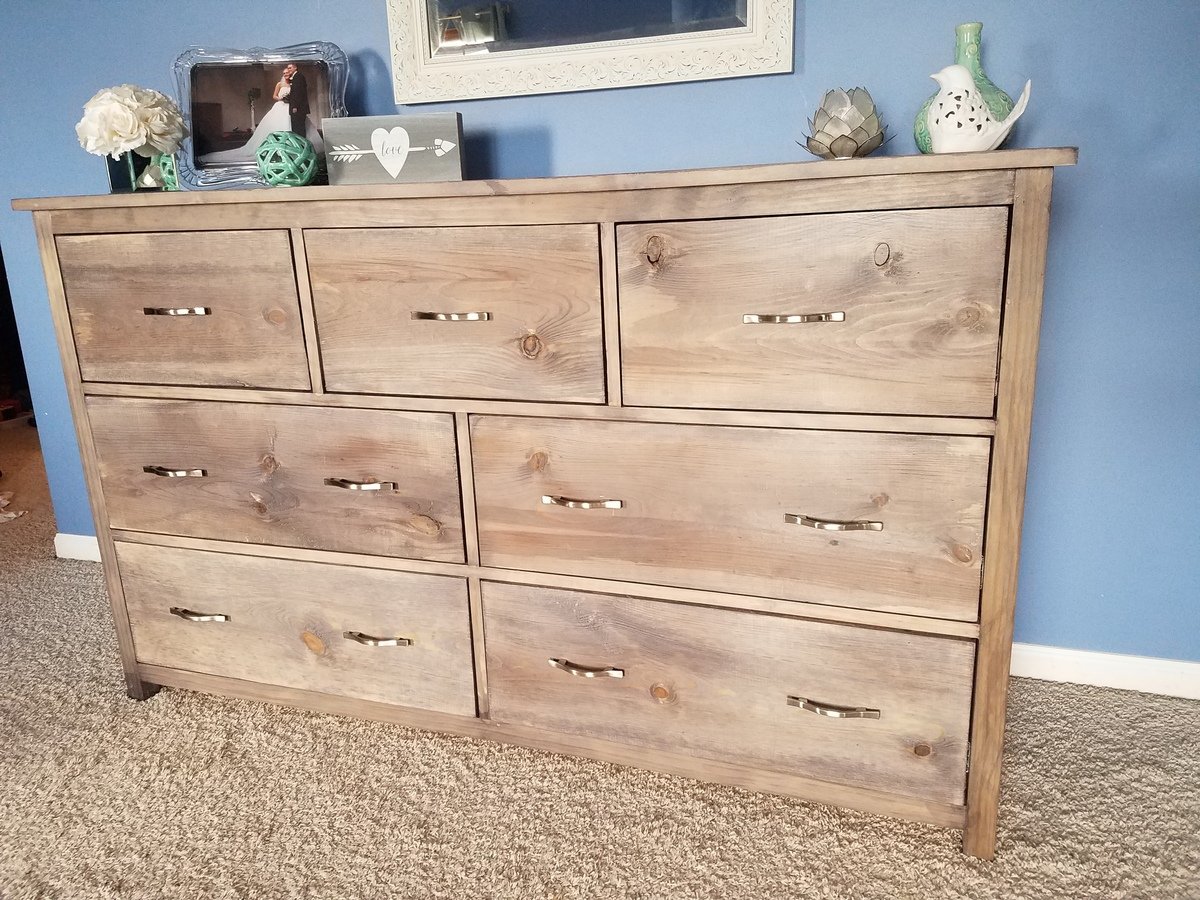
Bedroom Dresser
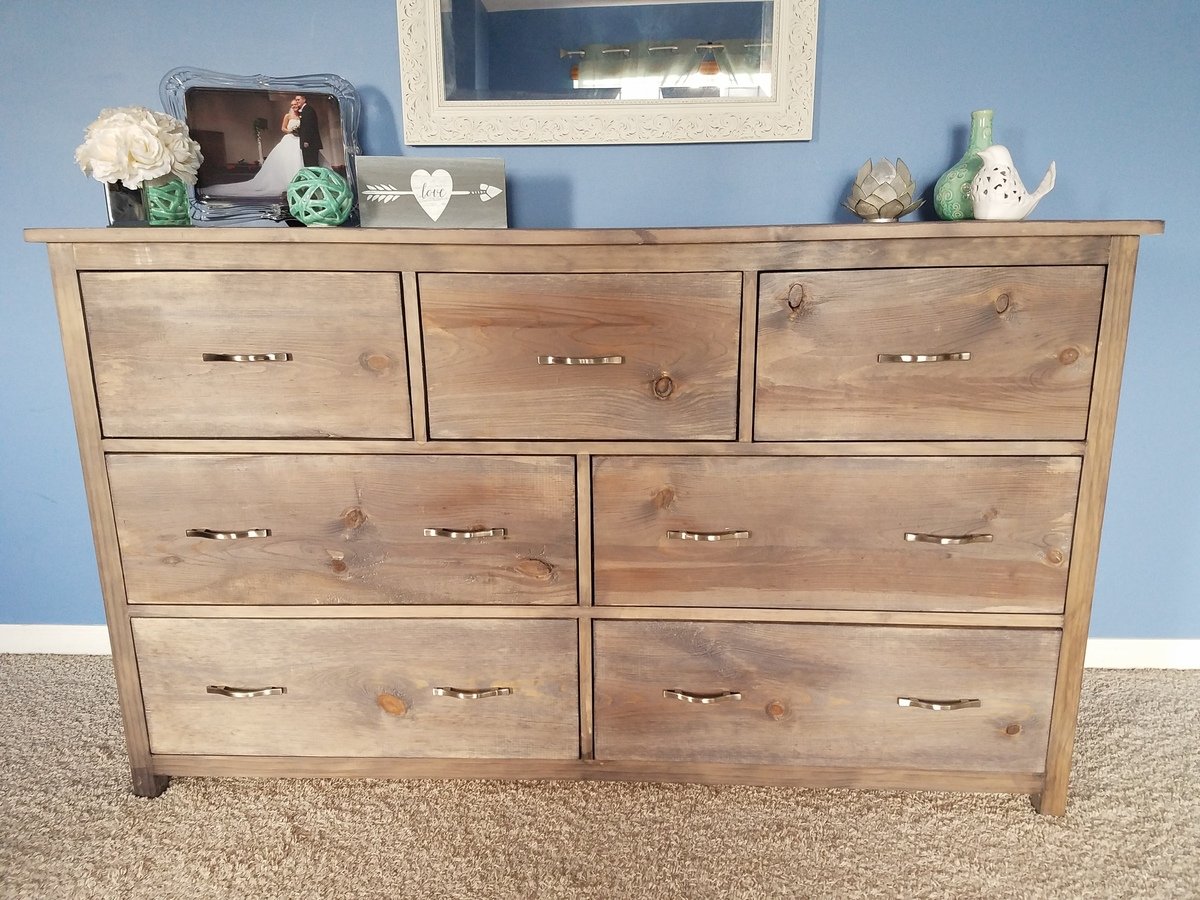
First time using drawer slides, and what a learning curve it was! The color is Varathane Weathered Wood Accelerator. This piece is huge and heavy! Absolutely love it and rebuilding other bedroom pieces to match this color. I also built a matching dresser which is taller and much more narrow. It can be found here: http://www.ana-white.com/2018/08/DIY_furniture/tall-bedroom-dresser
Built from Plan(s)
Estimated Cost
$200-$250
Estimated Time Investment
Weekend Project (10-20 Hours)
Finish Used
Varathane Weathered Wood Accelerator, Varathane Poly
Recommended Skill Level
Advanced
Comments
Mon, 03/01/2021 - 12:41
Are there plans for this…
Are there plans for this dress, or the tall matching one?
Craftsman playhouse - in shades of blue

I’ve been working on building up to this playhouse for a while. Just got the doors on and am pretty pleased with what’s my first project of any size. Built on top of a modified version of the playhouse deck with a to be added (hopefully) swing in front. Color selection by the end customer (who’s 8). Modified to add 12 inches for a 5’ doorway. Thankfully I caught that at the last minute for the kiddo. Still a menace if I forget to duck. But super roomy once inside.
Built from Plan(s)
Comments
Sun, 06/12/2022 - 09:04
Bright and inviting!
Love the shades of blue, thank you for sharing your awesome creation!
Pantry Solutions and Storage
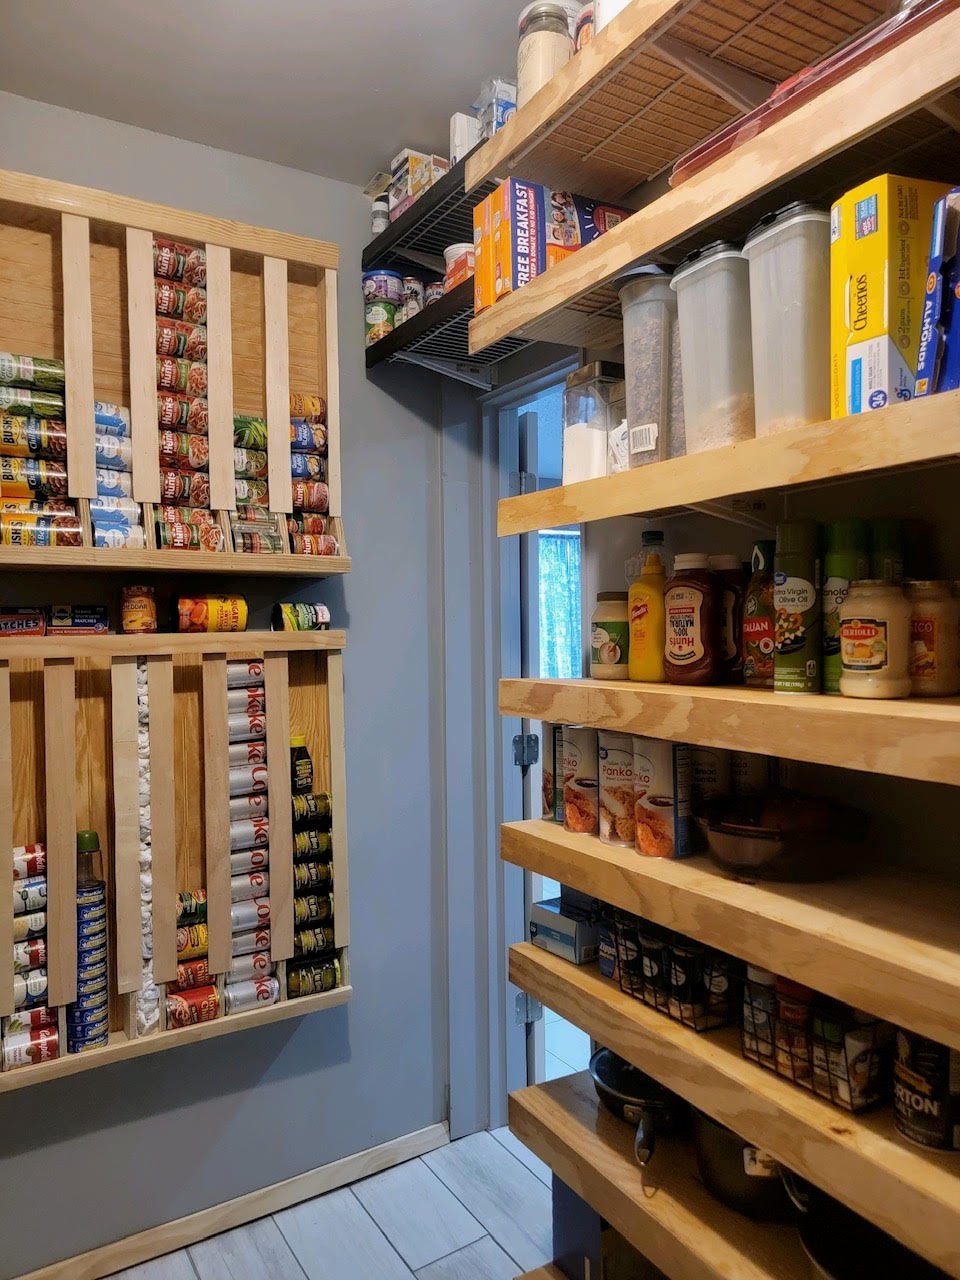
"Here are some pictures of a pantry organizer that my friend Belinda built."
-Bubba
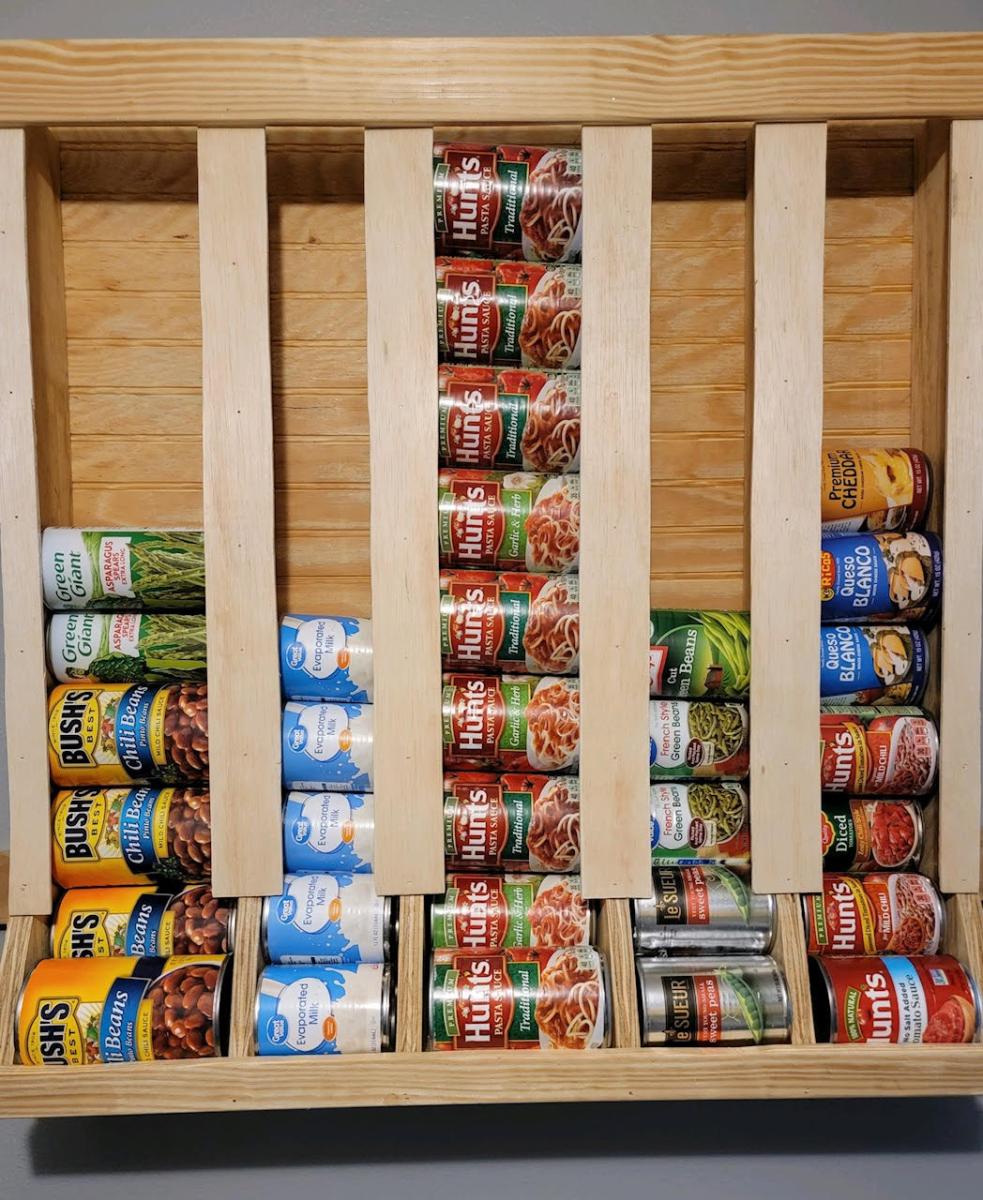
Built from Plan(s)
Picnic Table and Benches
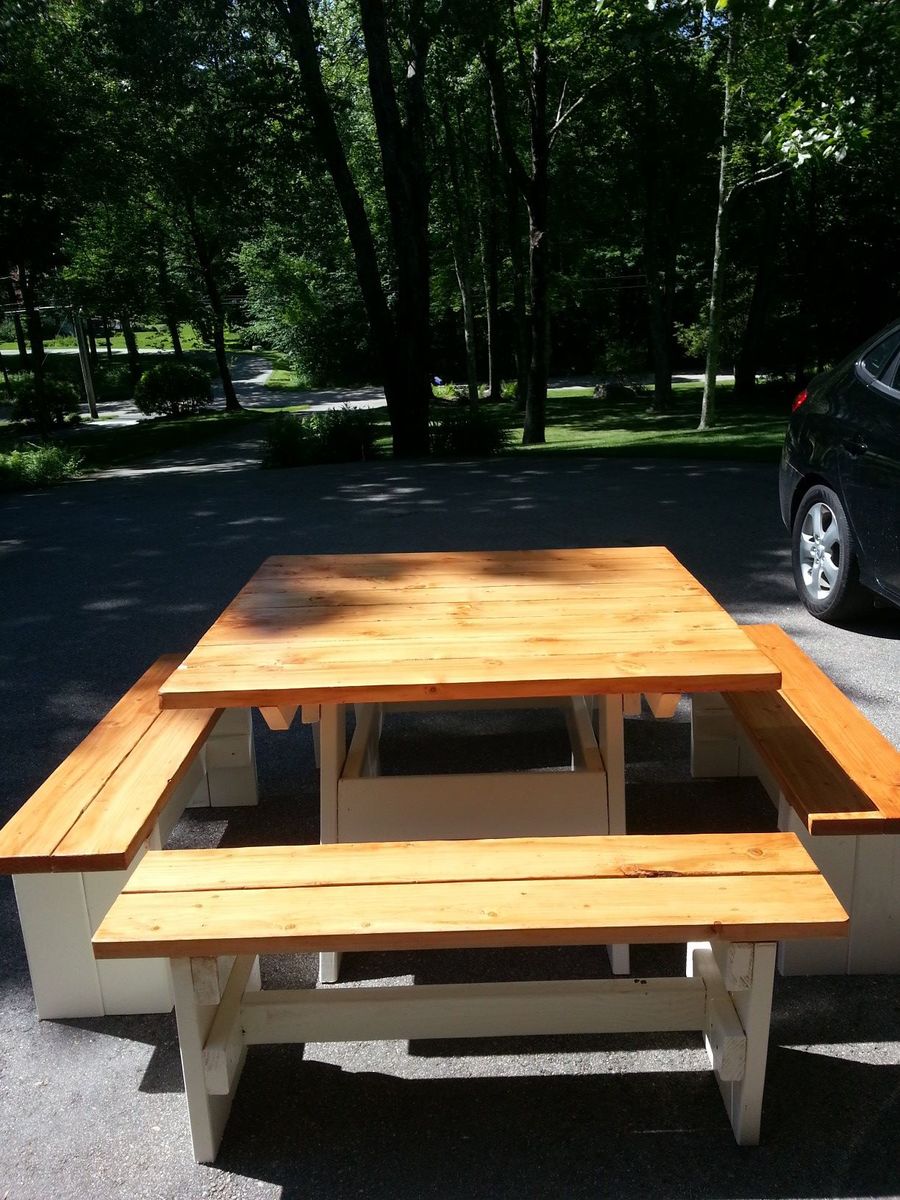
Picnic table and benches from an original (as far as I know) design I copied from my father-in-law. It is roughly 4'x4' and can comfortably seat 8 people, and is very sturdy.
Estimated Cost
$200
Estimated Time Investment
Weekend Project (10-20 Hours)
Recommended Skill Level
Intermediate
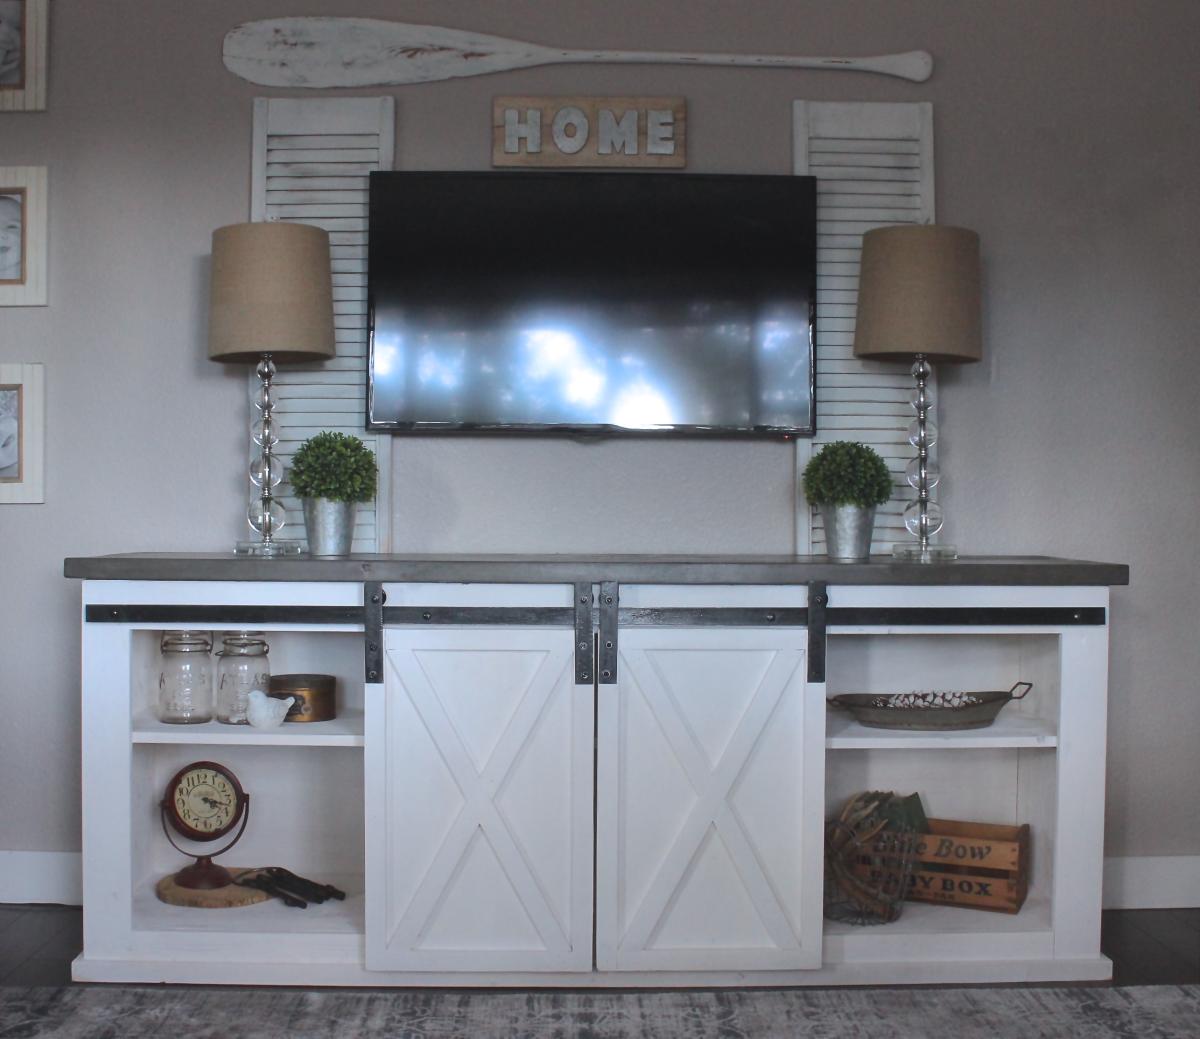
Sliding Barn Door Console
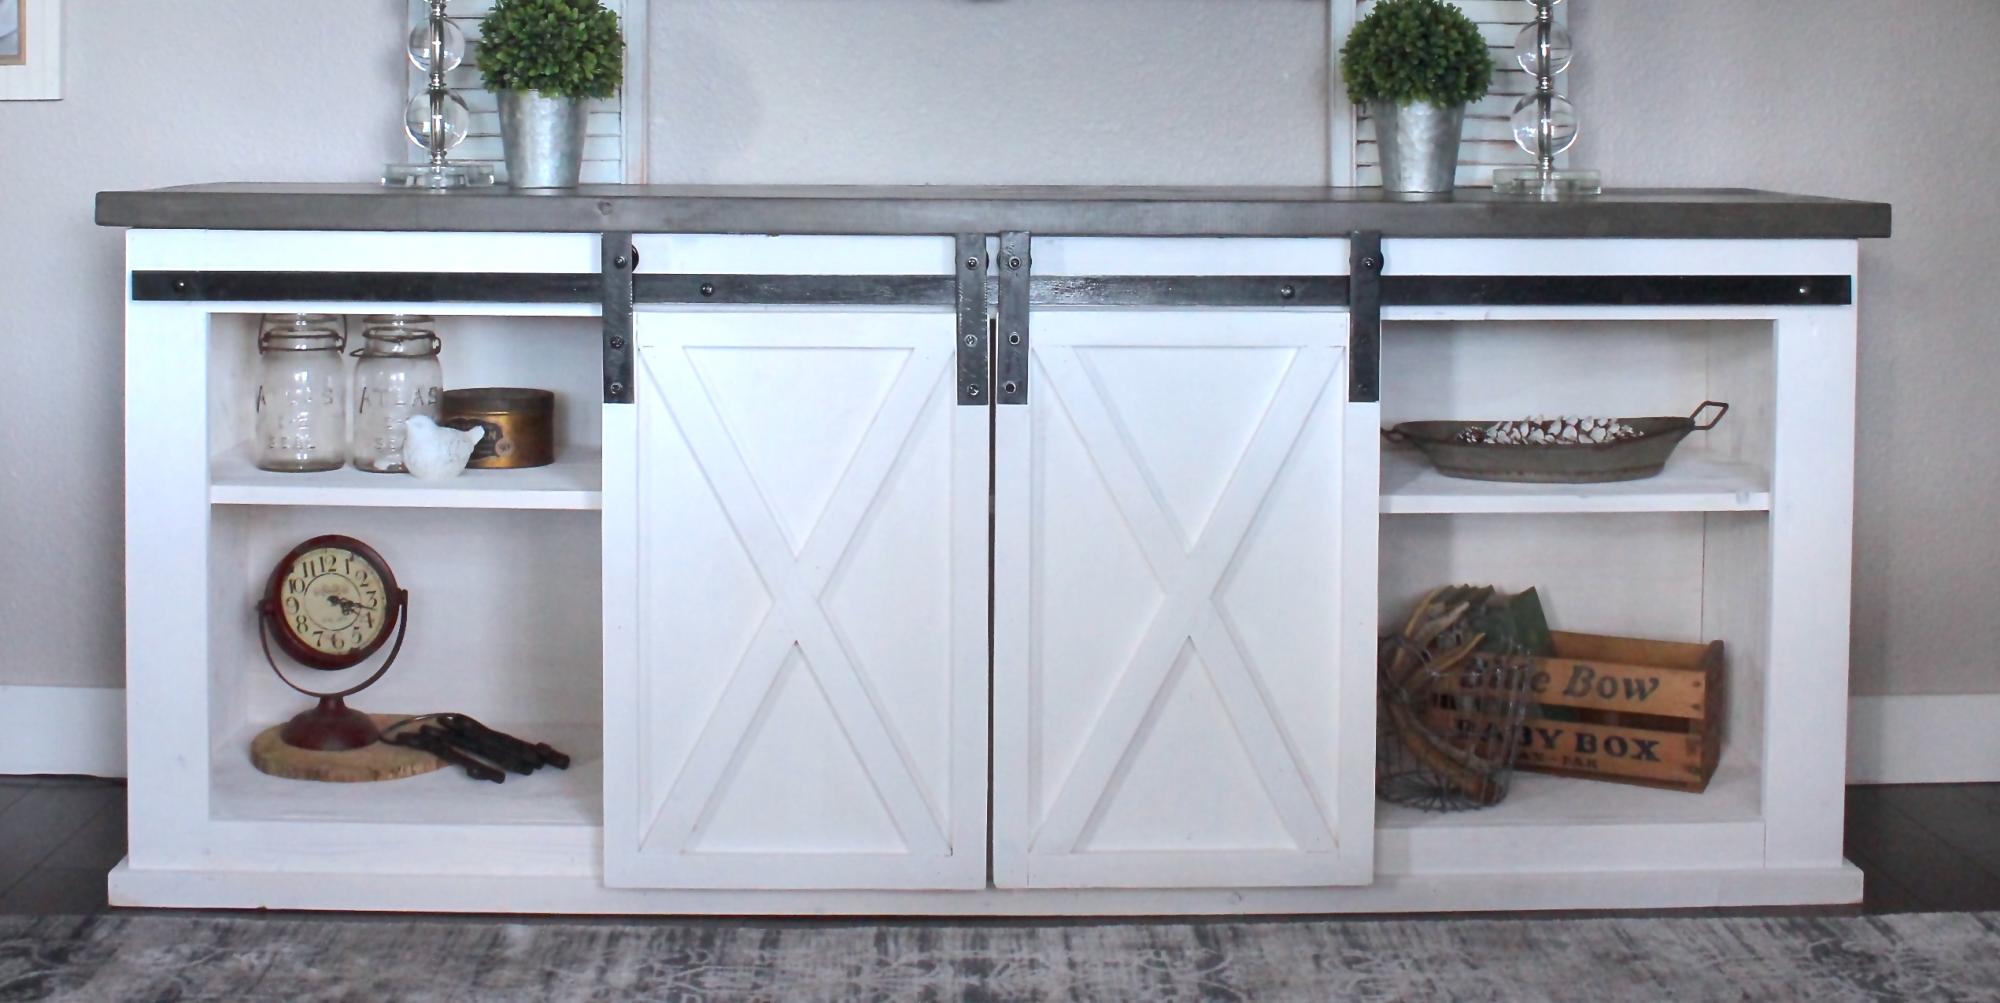
We wanted to build this piece for so long, but couldn't find 1/2" metal anywhere. Mind you, we live in a pretty small town. We finally just decided to use 1/8" Metal, which works just fine in my opinion. We followed the rest of the tutorial, but I find that they don't go over how to install the metal at all. That needs a tutorial all on its own. We improvised with what we had here in our small town. We ideally wanted to find old metal, but that didn't happen. So we bought new steel, spray painted it & then beat it up so it looked more vintage.
I'd say hanging the barn doors & the track is the longest part for sure.
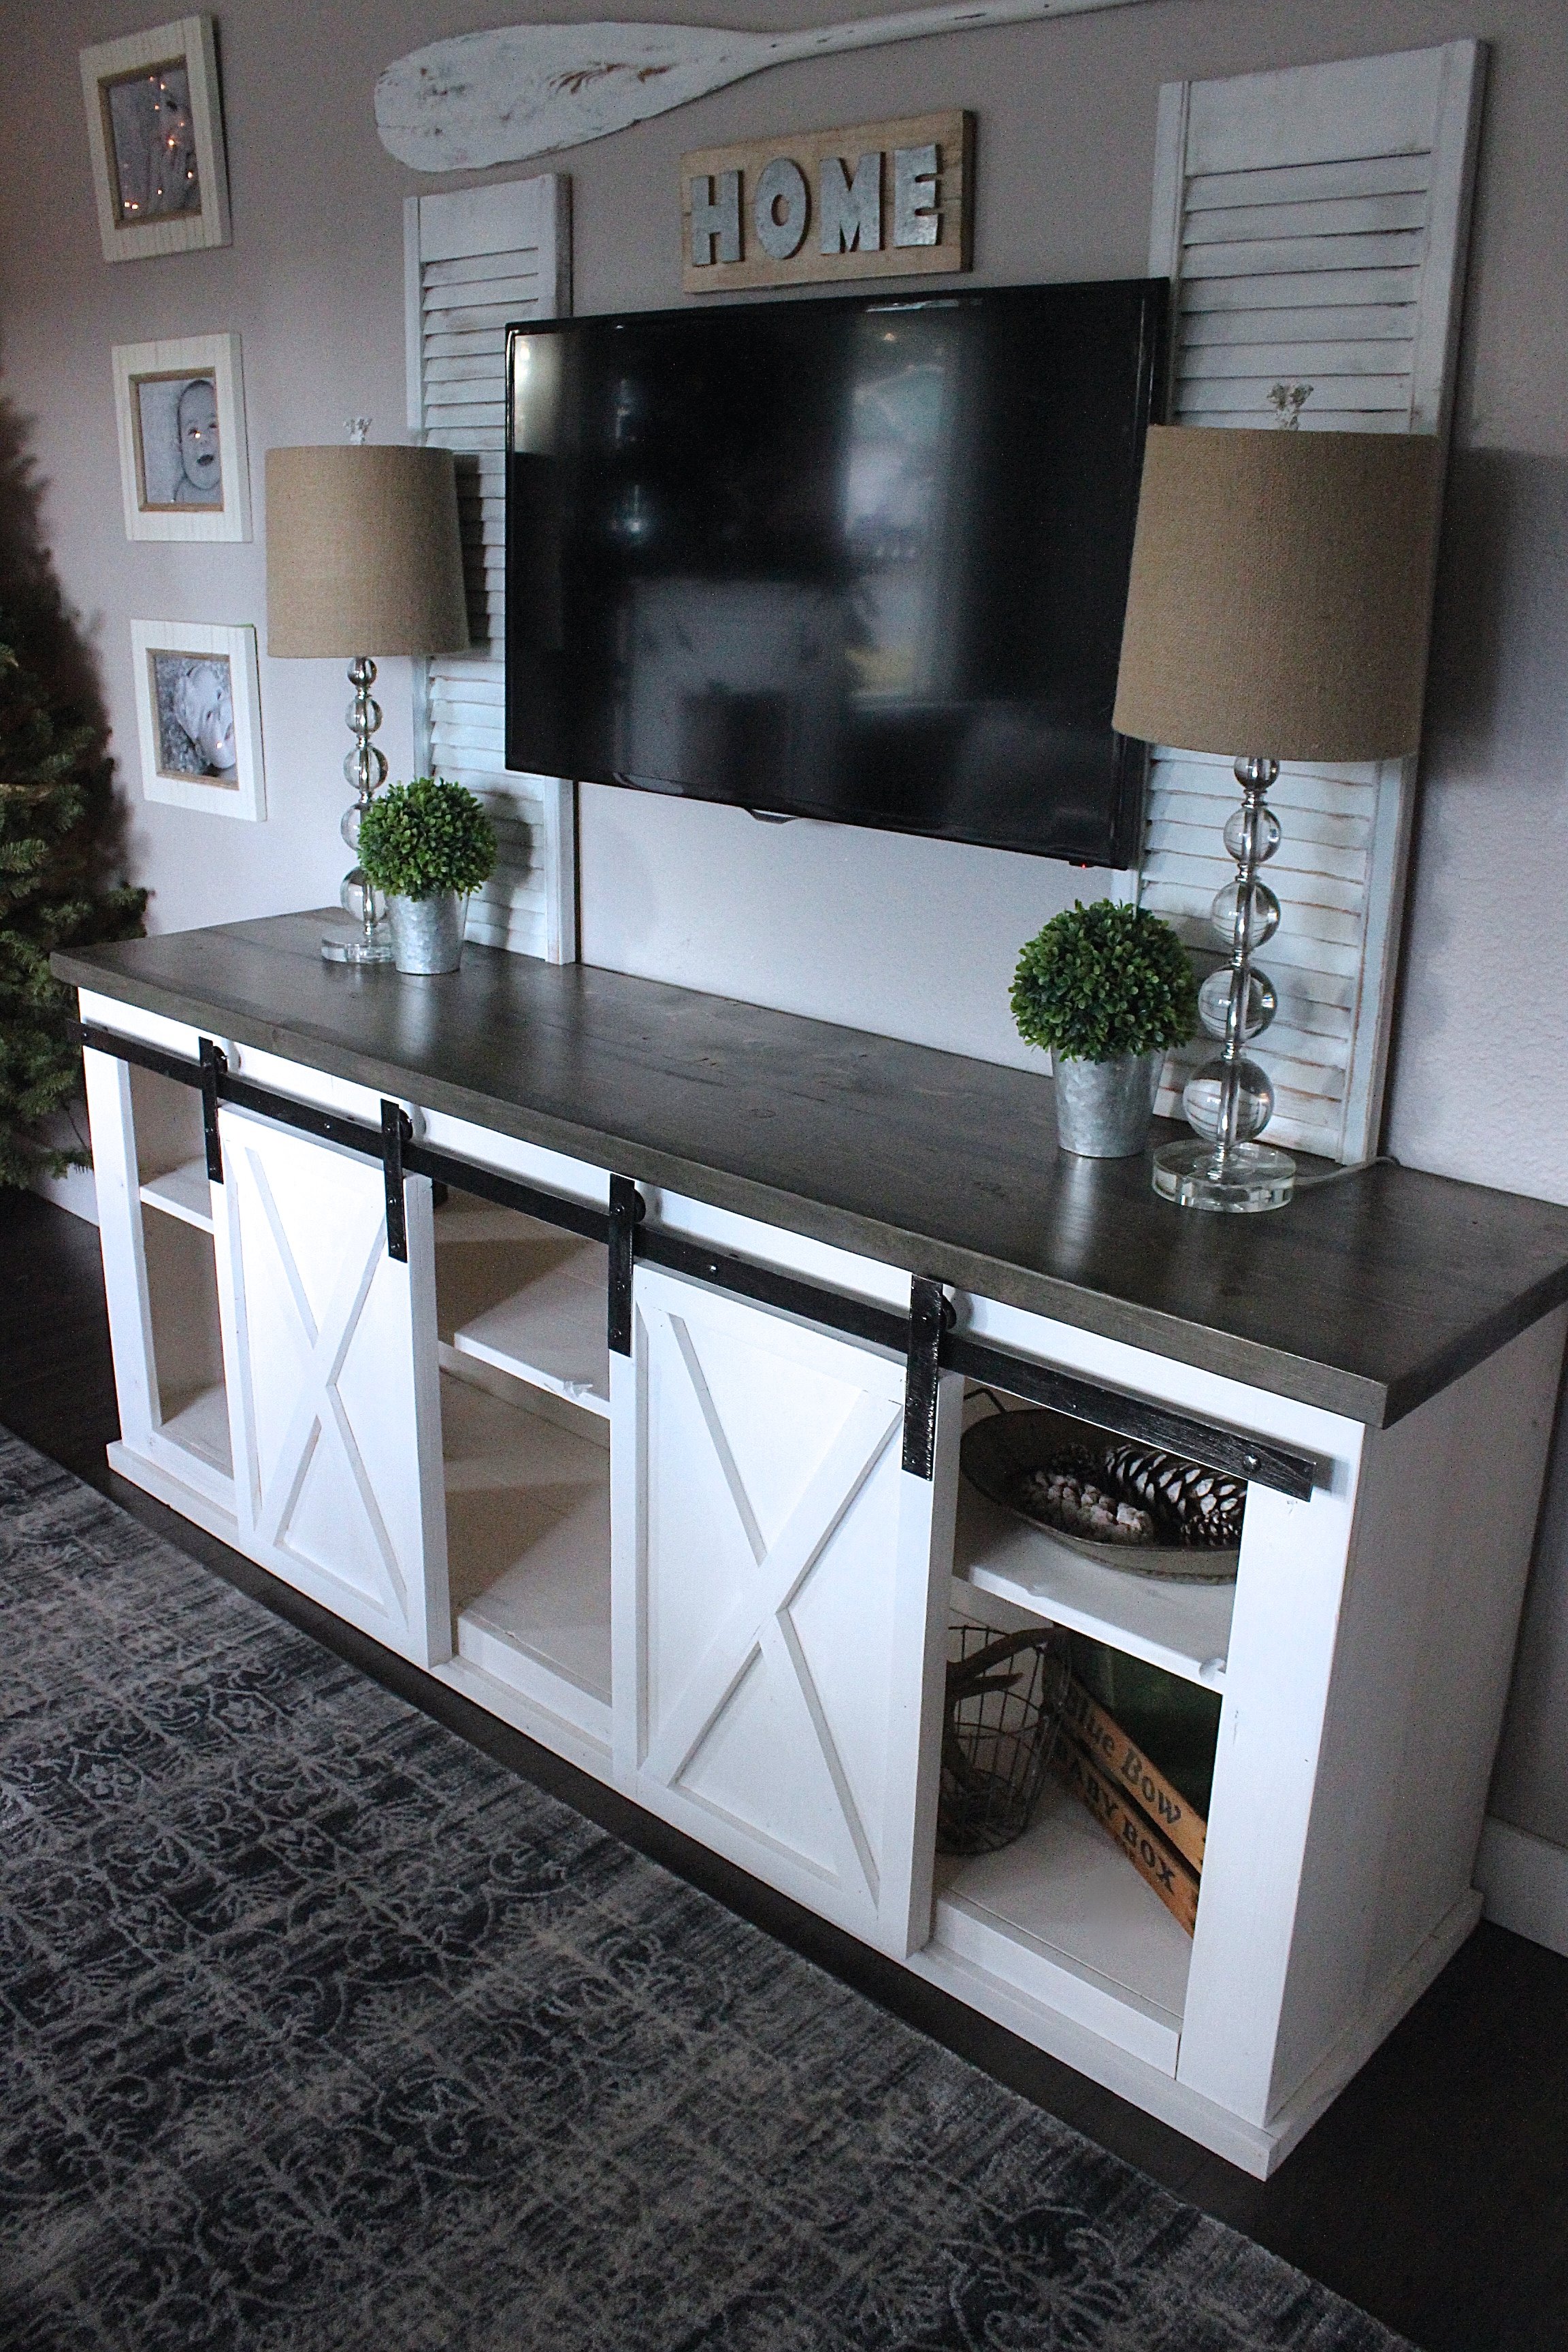
Built from Plan(s)
Estimated Cost
300 ( We live in Canada, so everything is much more expensive here )
Estimated Time Investment
Day Project (6-9 Hours)
Finish Used
Top is stained in our Beachwood ( colors mixed from the Minwax stains ) Bottom is painted in pure white. Hardware is black & beaten up
Matte Polyurethane finish.
Matte Polyurethane finish.
Recommended Skill Level
Intermediate
Comments
Fri, 11/04/2016 - 10:08
Very nice! Love the top!
Very nice! Love the top!
Can you give some details as to your magical mix of stain for "Beachwood" ?
Thank you!
Sat, 09/02/2017 - 12:16
Beachwood mixture?
Does anyone know what minwax mixture was used for the Beachwood on the top piece?
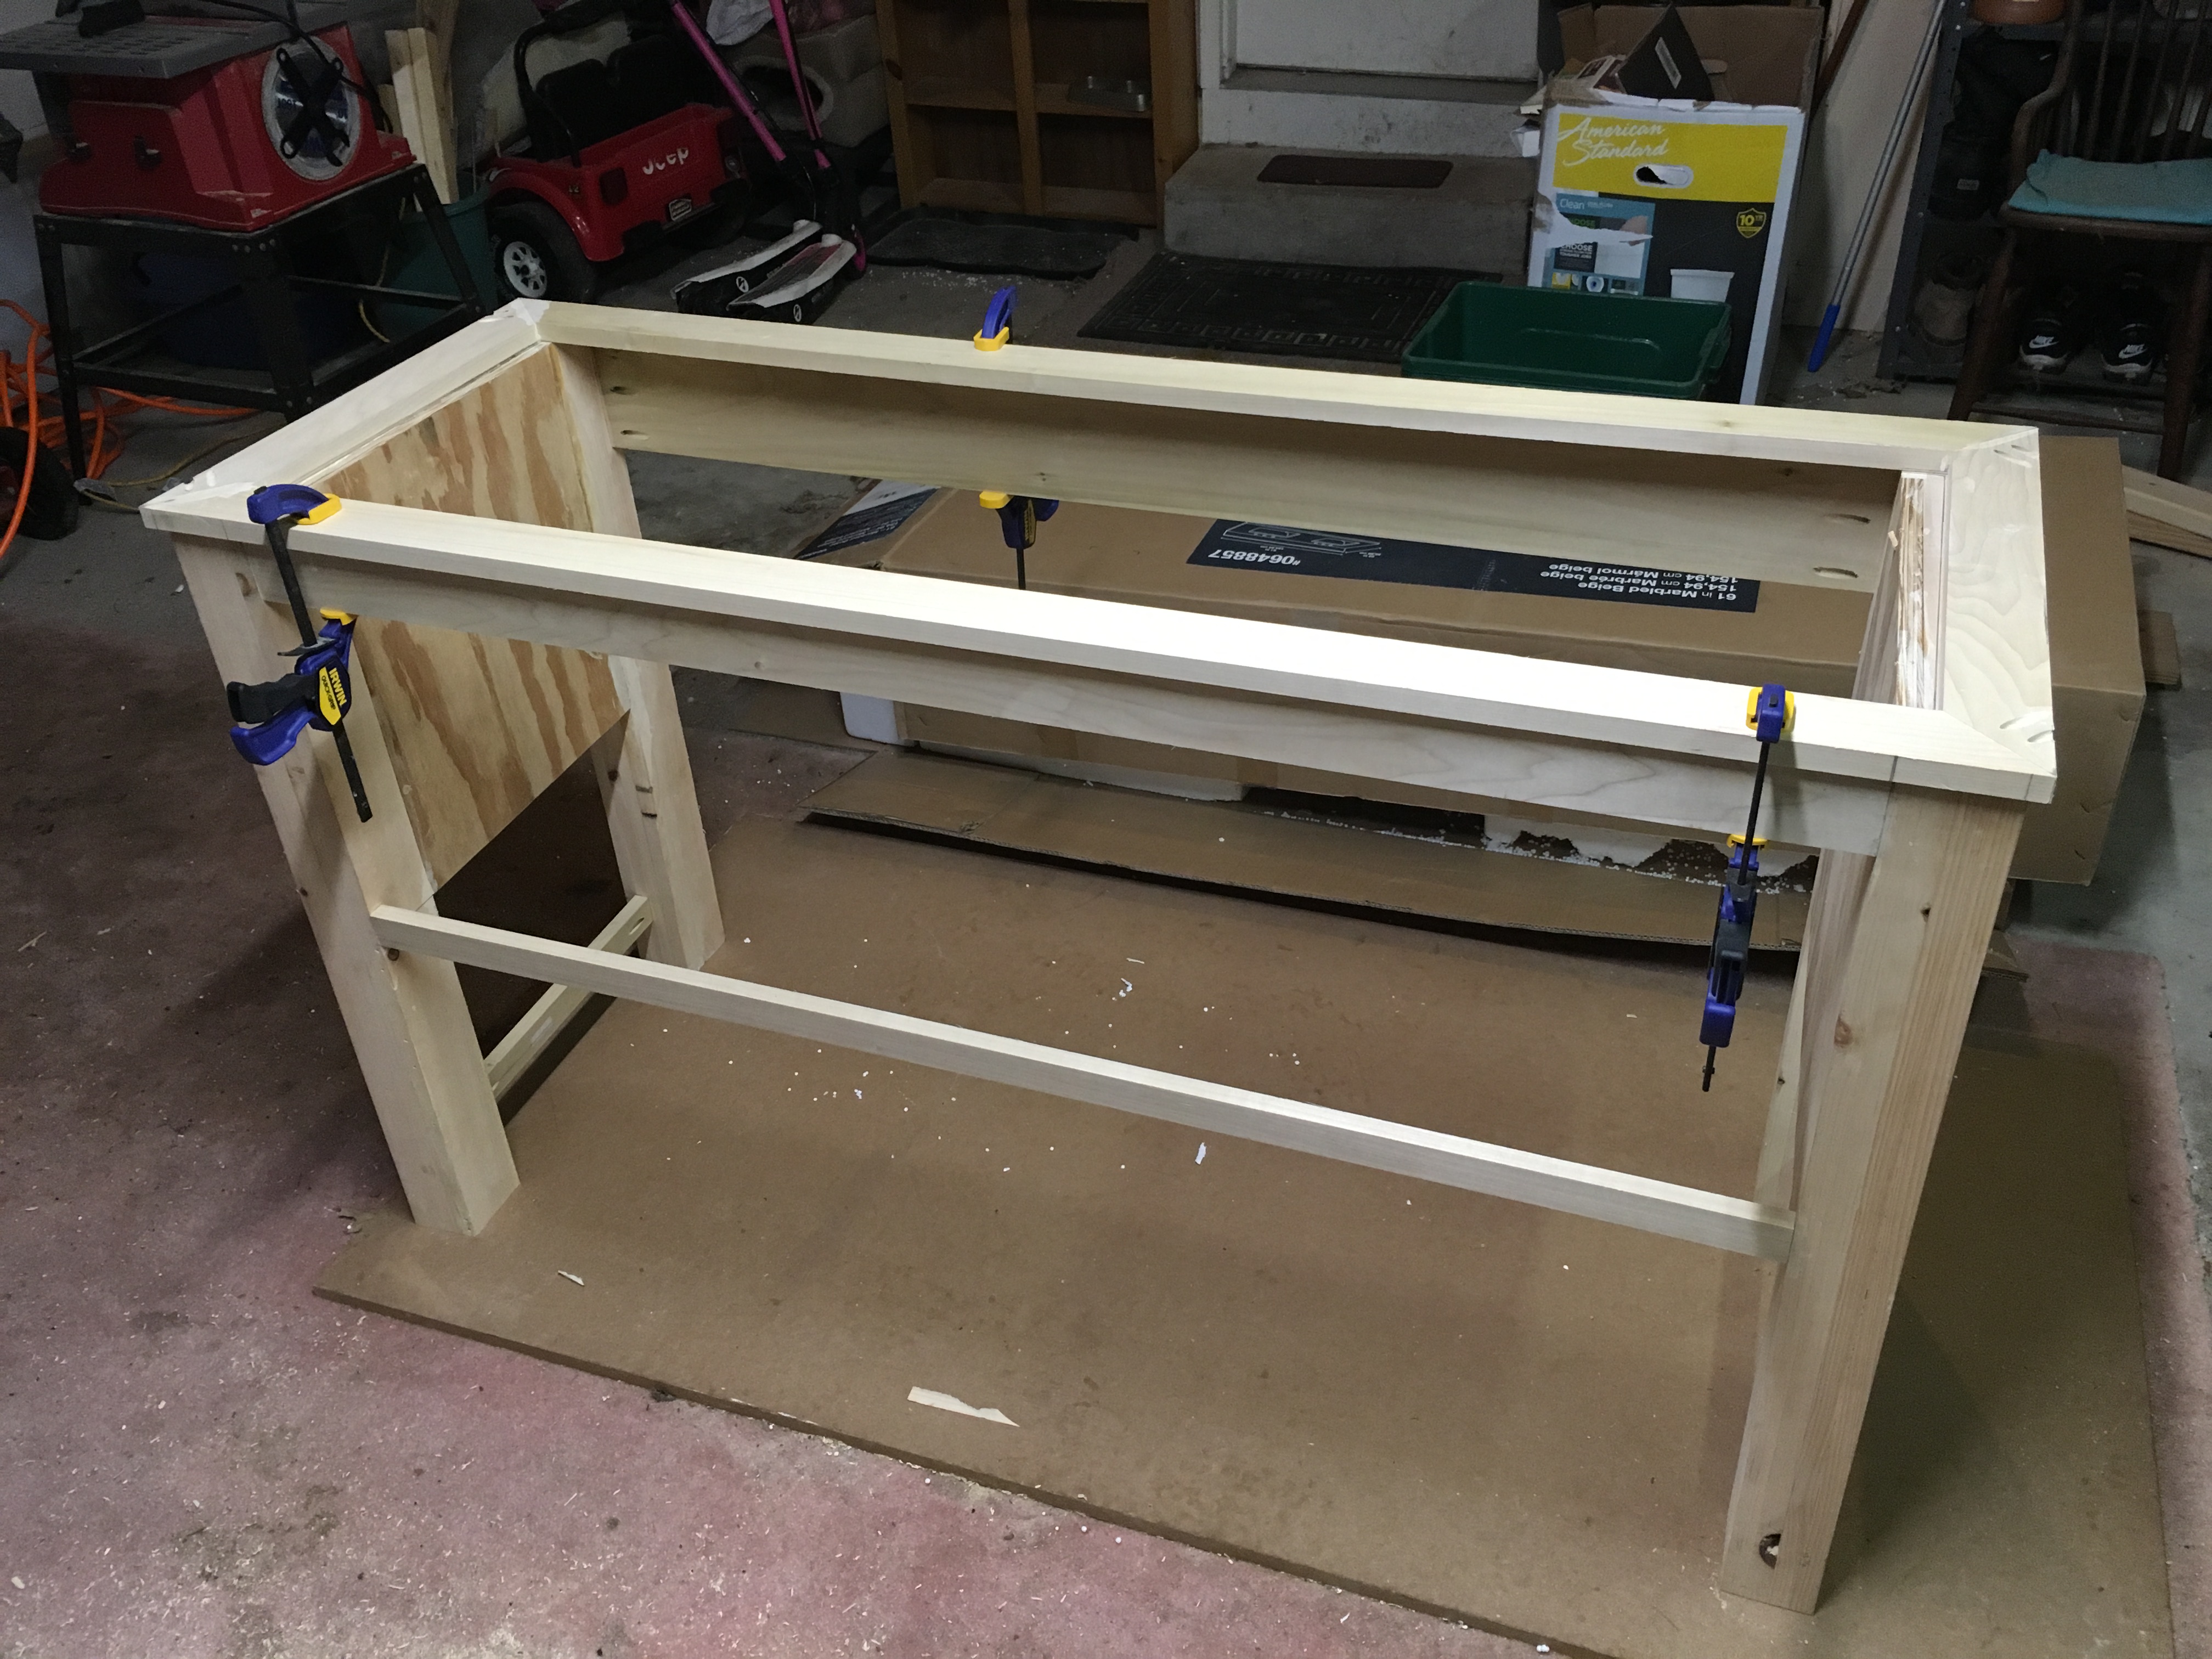
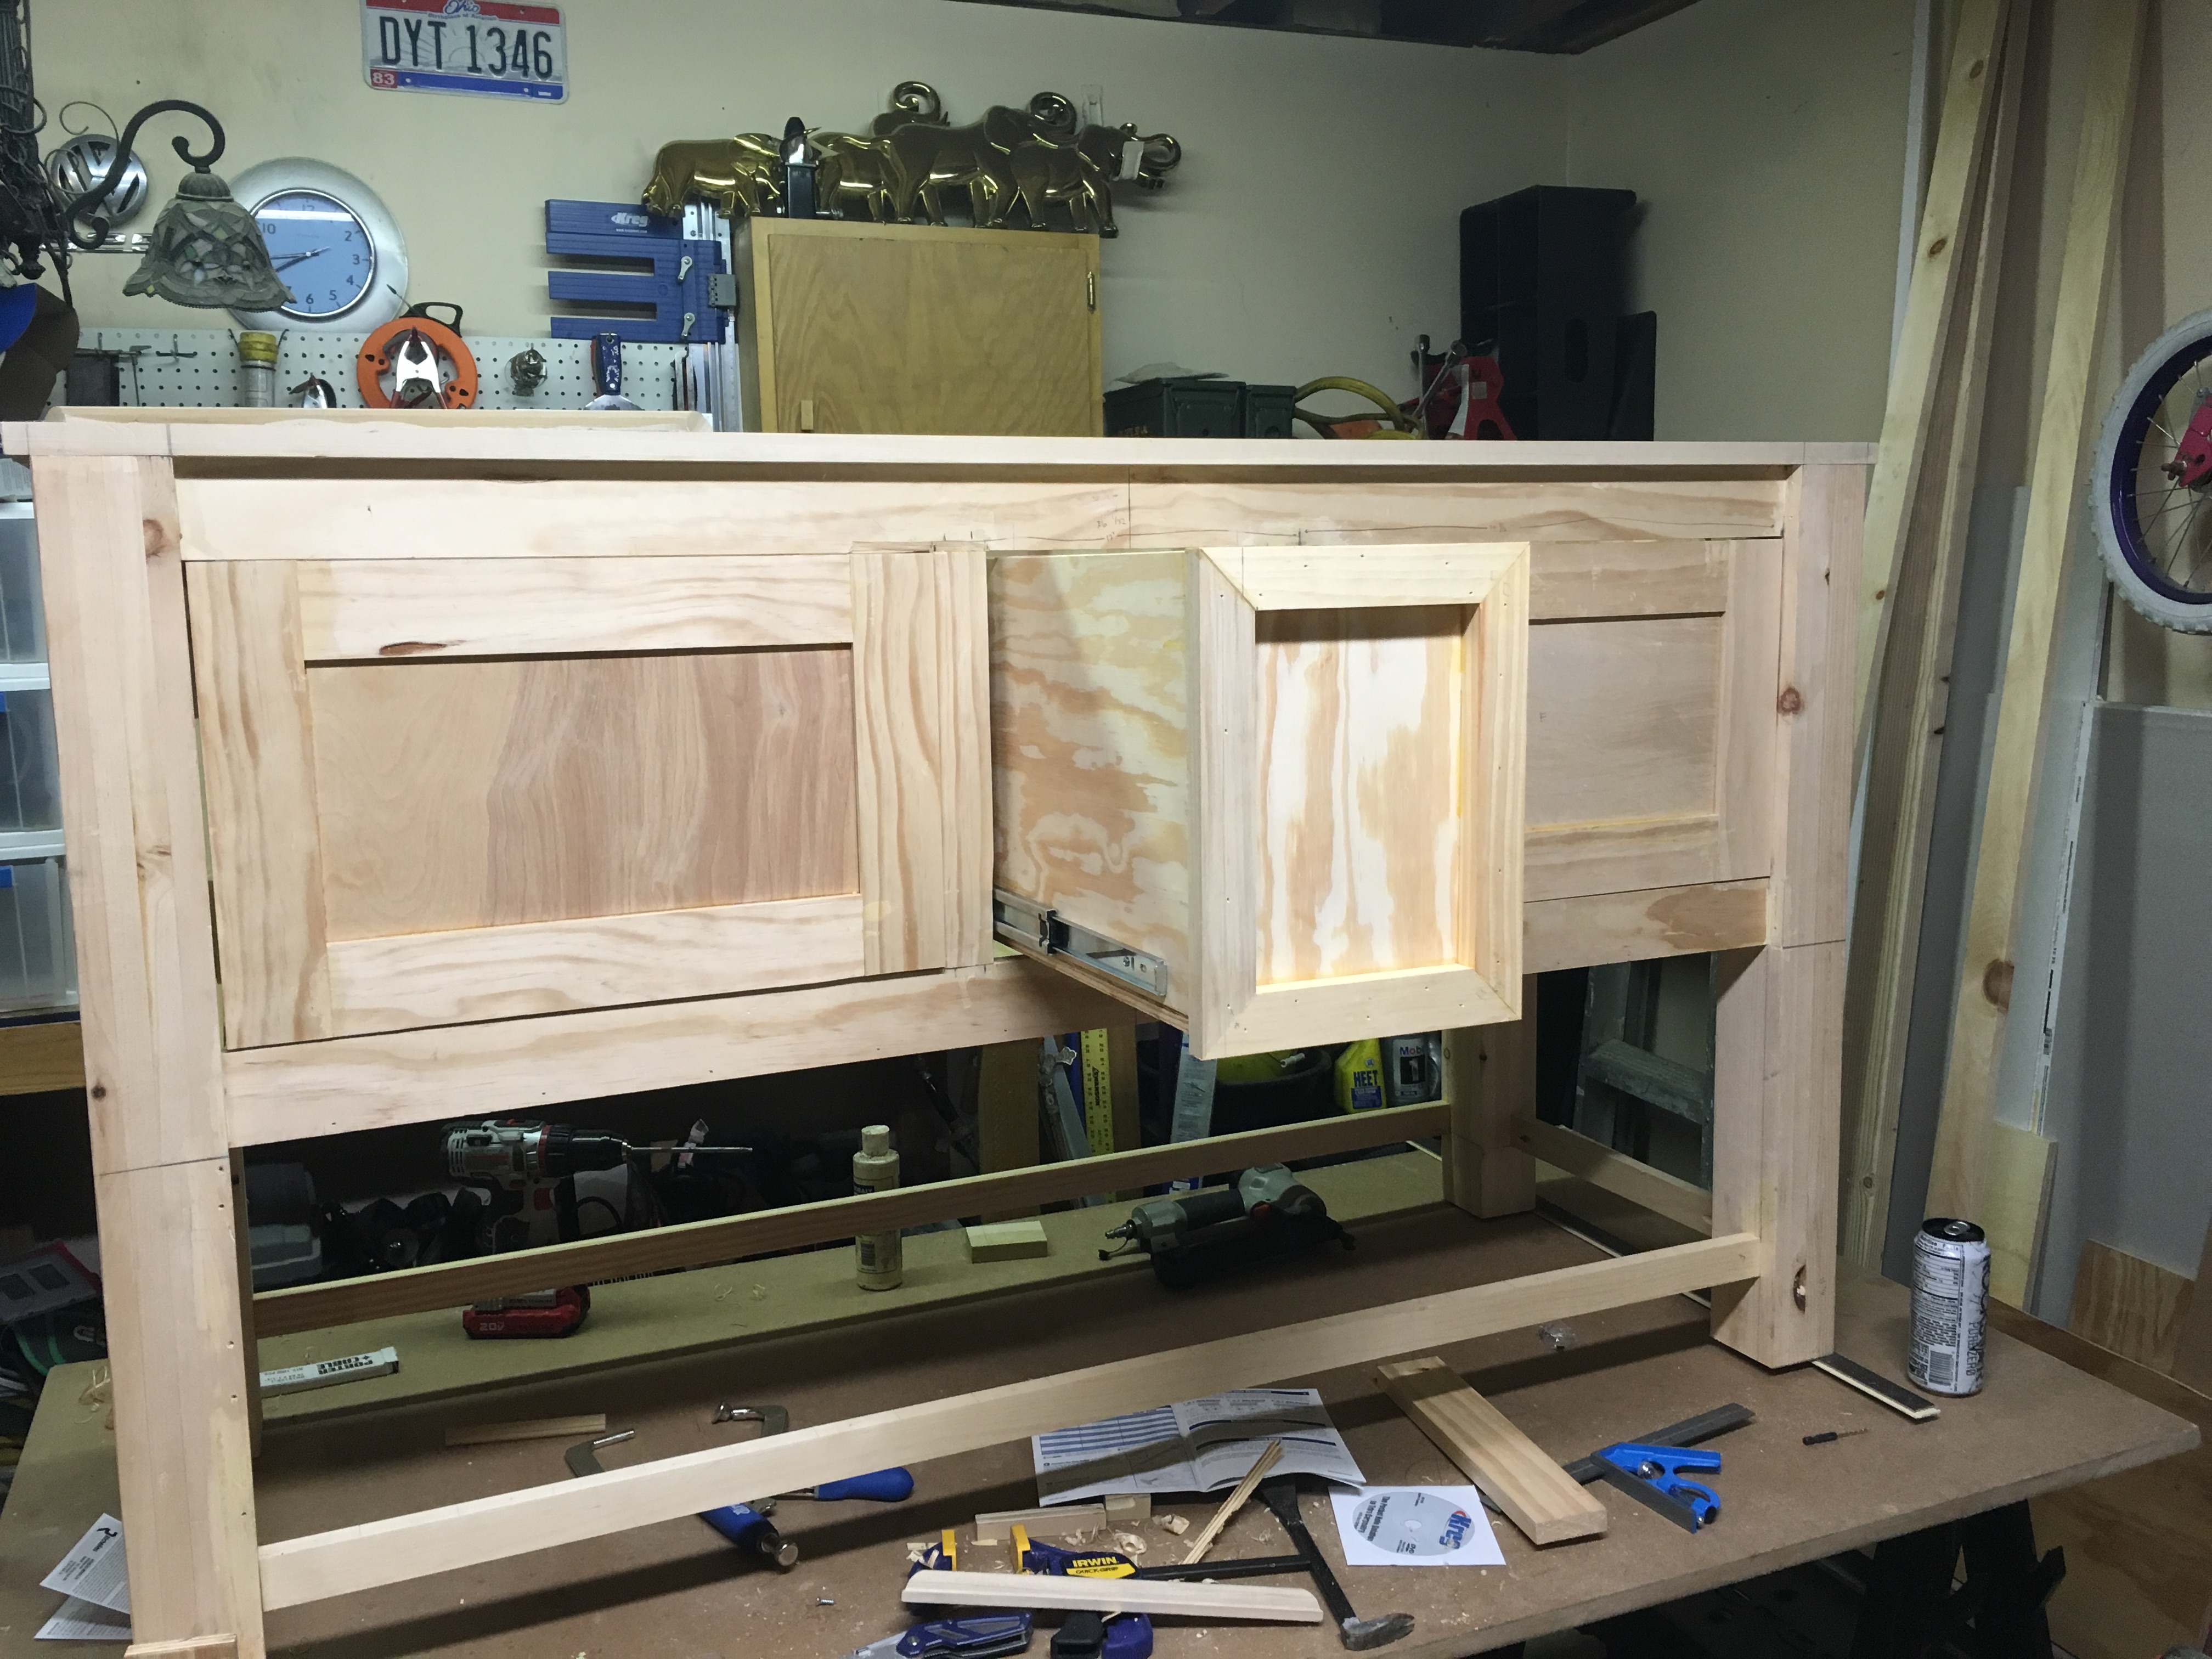
Double Vanity
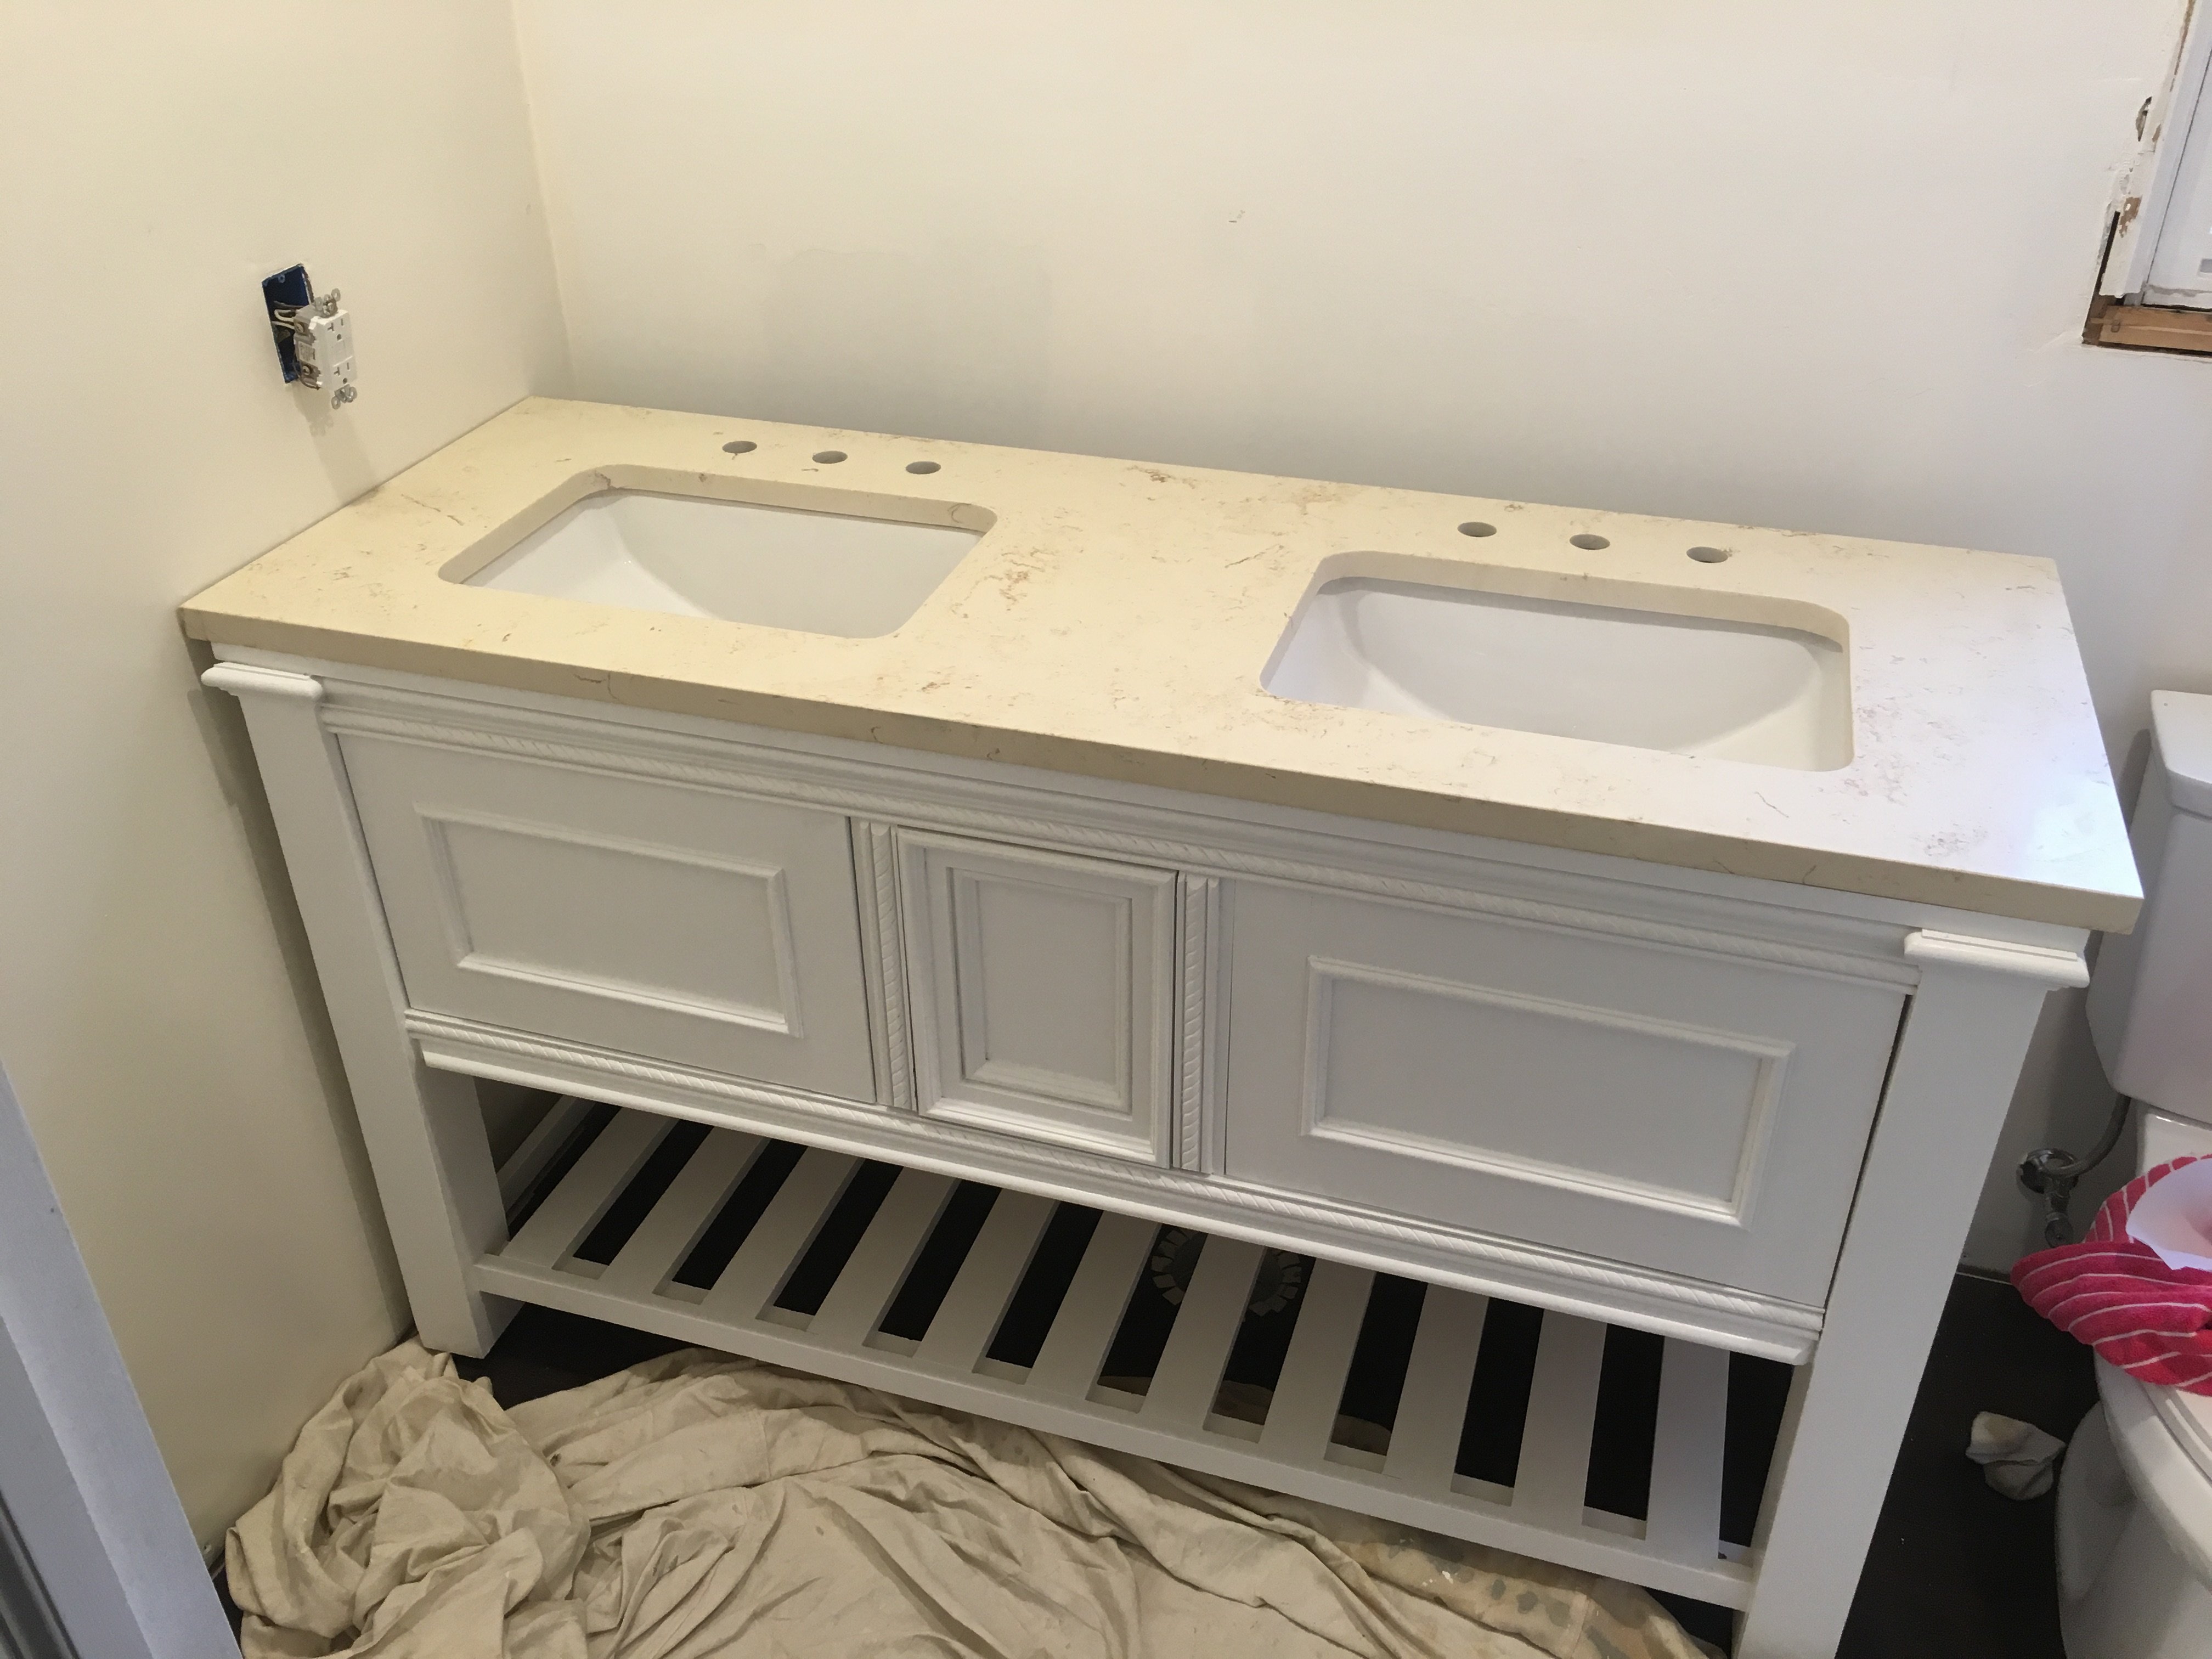
Well to make a long story short I started out just replacing an old tub in the bathroom which turned into a whole remodel!! I’m talking new toilet, floor, lighting and heck while I was at it lets knock down a wall and make some room for a double vanity. After all in a few years three teenage girls will be fighting for sink space!!! Honestly I just didn’t want to spend $800 - $1,000 on a double vanity so I decided to take matters into my own hands. This was my first time building any type of functional furniture. I made a ton of mistakes but I also learned many valuable lessons. I really took my time....about 3 weeks...ok, maybe 4. Building this vanity was like cutting 101 for me. #1 lesson I learned, MAKE SURE YOUR CUTS ARE STRAIGHT!!! I also learned the value in test cuts and having a lot of patience and extra wood on hand. Anyone can do this, just be willing to put the time and effort in…and do lots of research.
Built from Plan(s)
Estimated Time Investment
Week Long Project (20 Hours or More)
Finish Used
Paint
Recommended Skill Level
Beginner
Comments

Wed, 08/24/2016 - 19:41
Love the detail! Well done...
Love this! Especially the square legs and filigree. Do you have any tips or detailed plans? I am working on a similar vanity with an IKEA top. Thanks!
Poster bed and x-end tables

Built end tables based on coffee table
Built from Plan(s)
Finish Used
Grey base and express top coat
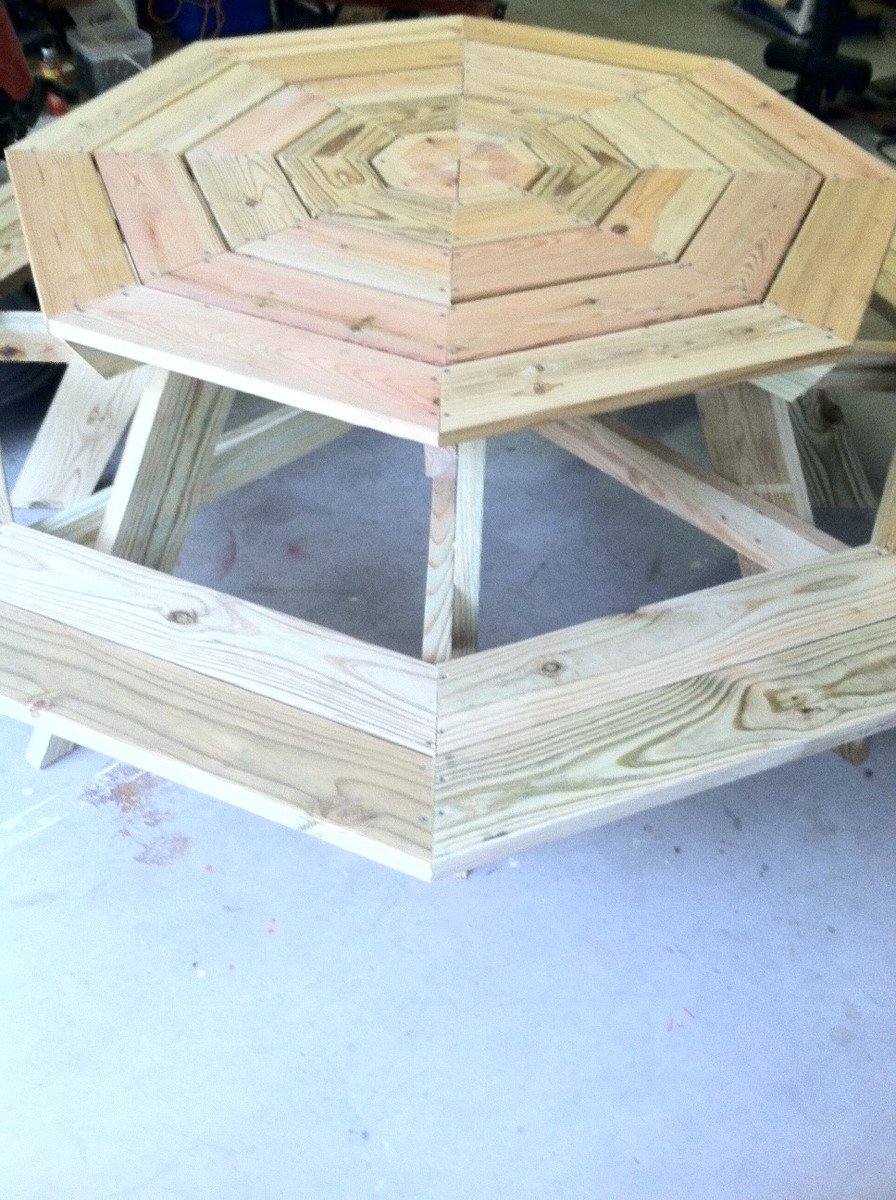
OCTAGON PICNIC TABLE
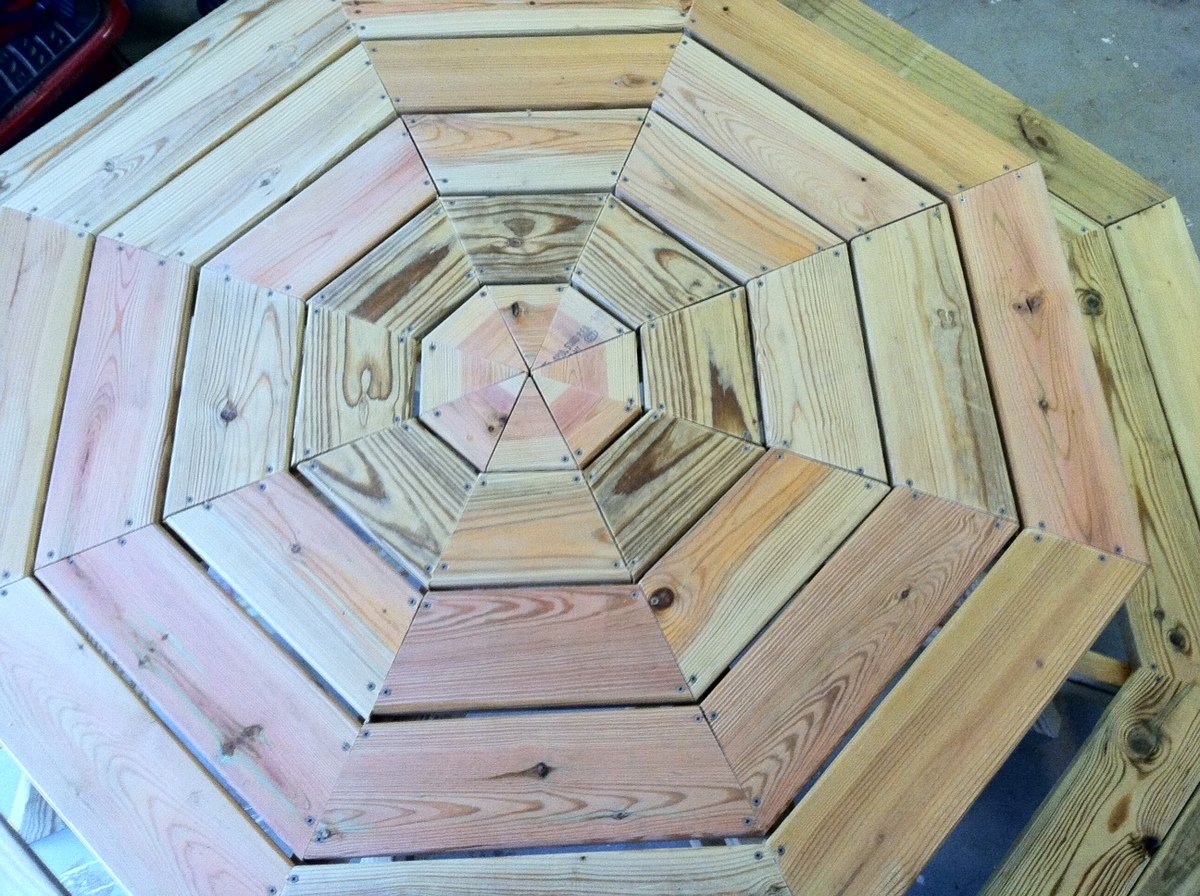
My son and I had a blast building this table last October. I have been meaning to write and thank you for the great plans. We took the suggestion of staggering the legs for better access and it turned out great. I also used deck boards for the top to help reduce weight and they were already slightly curved on the sides which made sanding easier. Thank you!
My cost includes a nice Kreg Jig set up (approx $100)
Built from Plan(s)
Estimated Cost
$220
Estimated Time Investment
Weekend Project (10-20 Hours)
Recommended Skill Level
Intermediate
Reading Loft
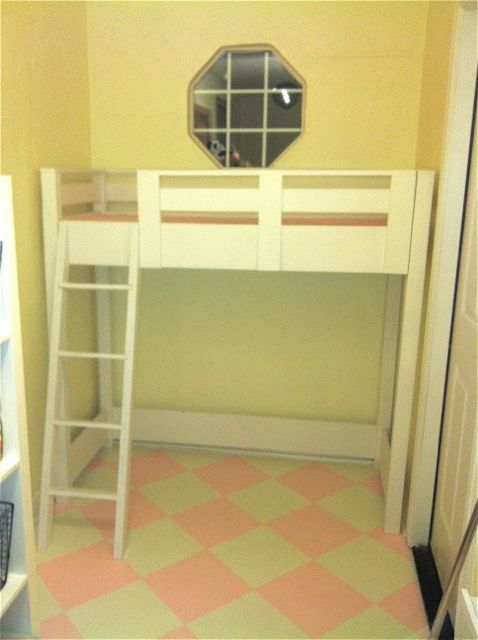
We converted our mud (junk) room into our daughter's playroom. The room is awkward (5' X 12'), but I knew I wanted a reading loft by the window. The area we were working with was 63" wide and 23" deep. I wanted the loft to come right up to the window which is exactly 5'. This is obviously not a standard bed size so we couldn't just buy something. I came across your site (love it!) and found the loft bed plan. I reconfigured the loft using our measurements and my husband is the one who actually built it. It turned out so well! I still have some pillows to make, but my daughter and her friends have already been spending a ton of time up there!
Built from Plan(s)
Estimated Cost
$175
Estimated Time Investment
Weekend Project (10-20 Hours)
Finish Used
Glidden Swiss Coffee Satin Paint. I used two coats with a roller.
Recommended Skill Level
Beginner
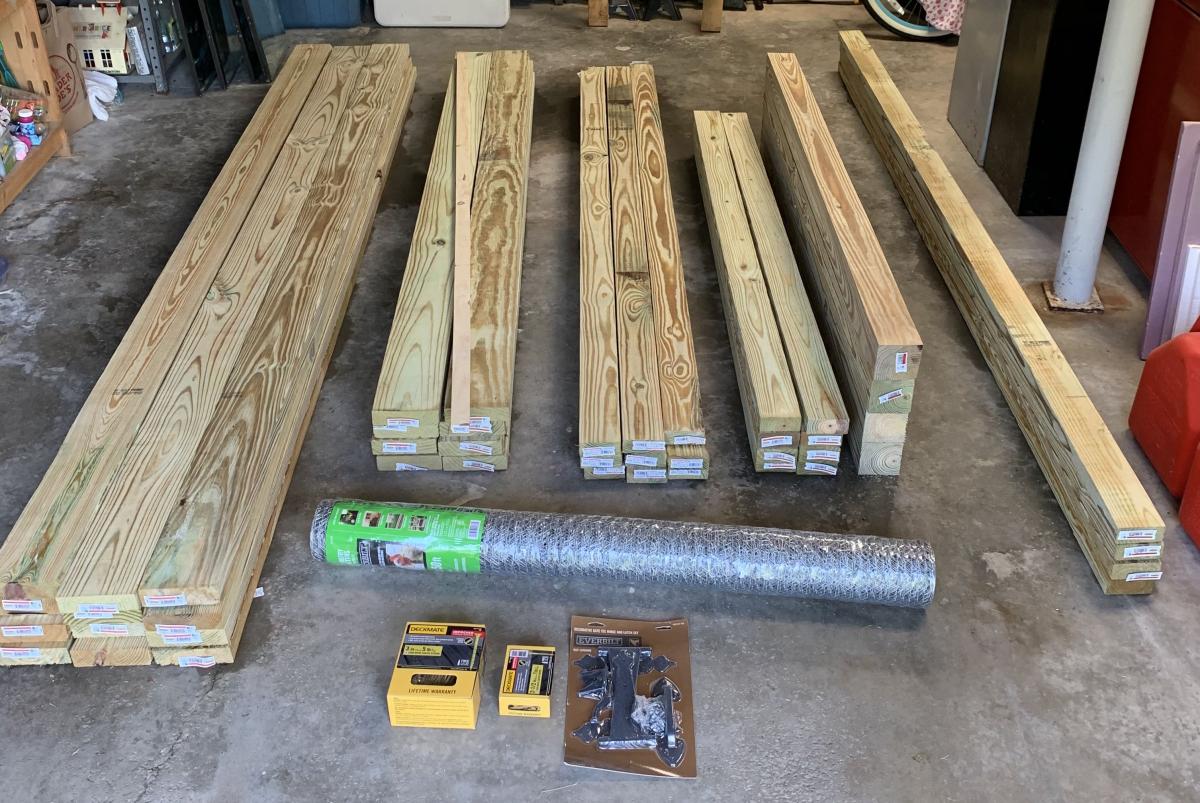
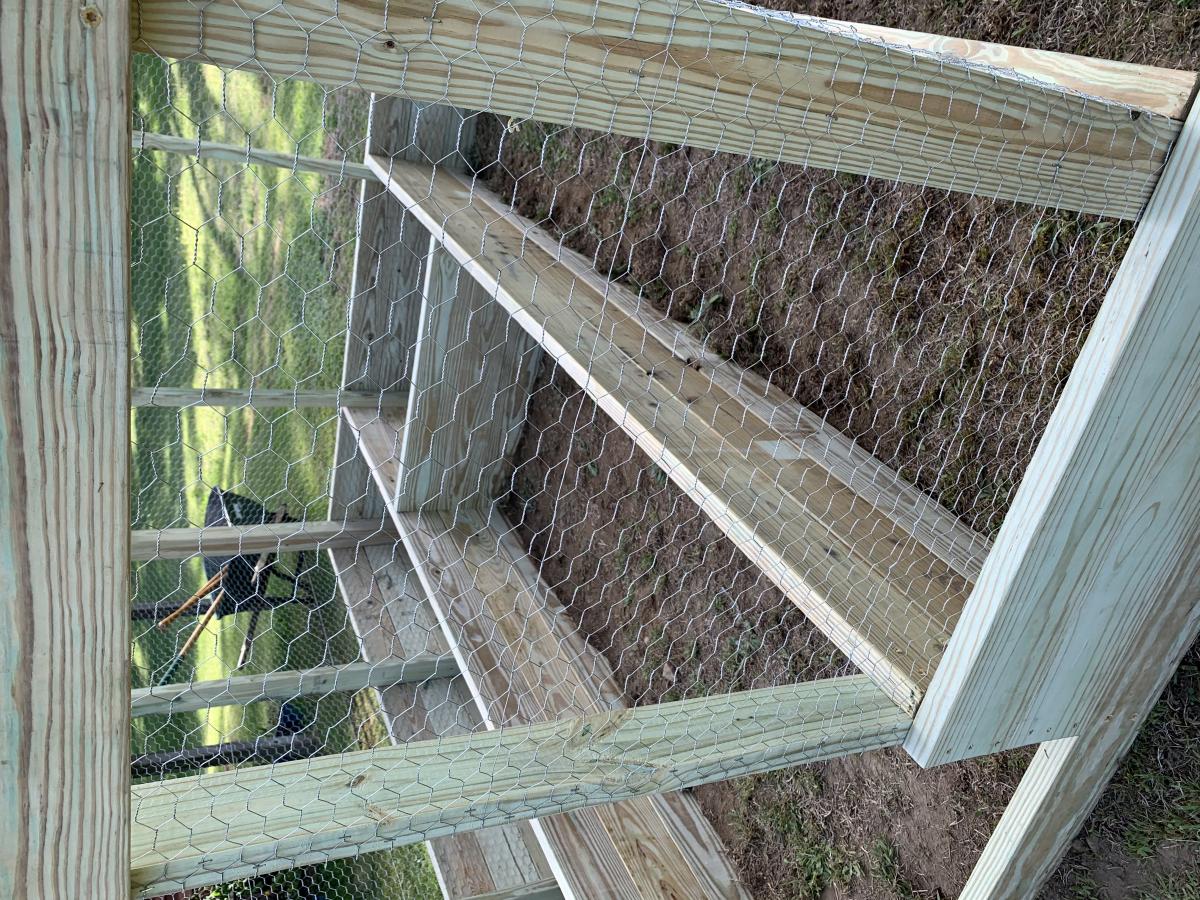
Raised Bed Garden Enclosure
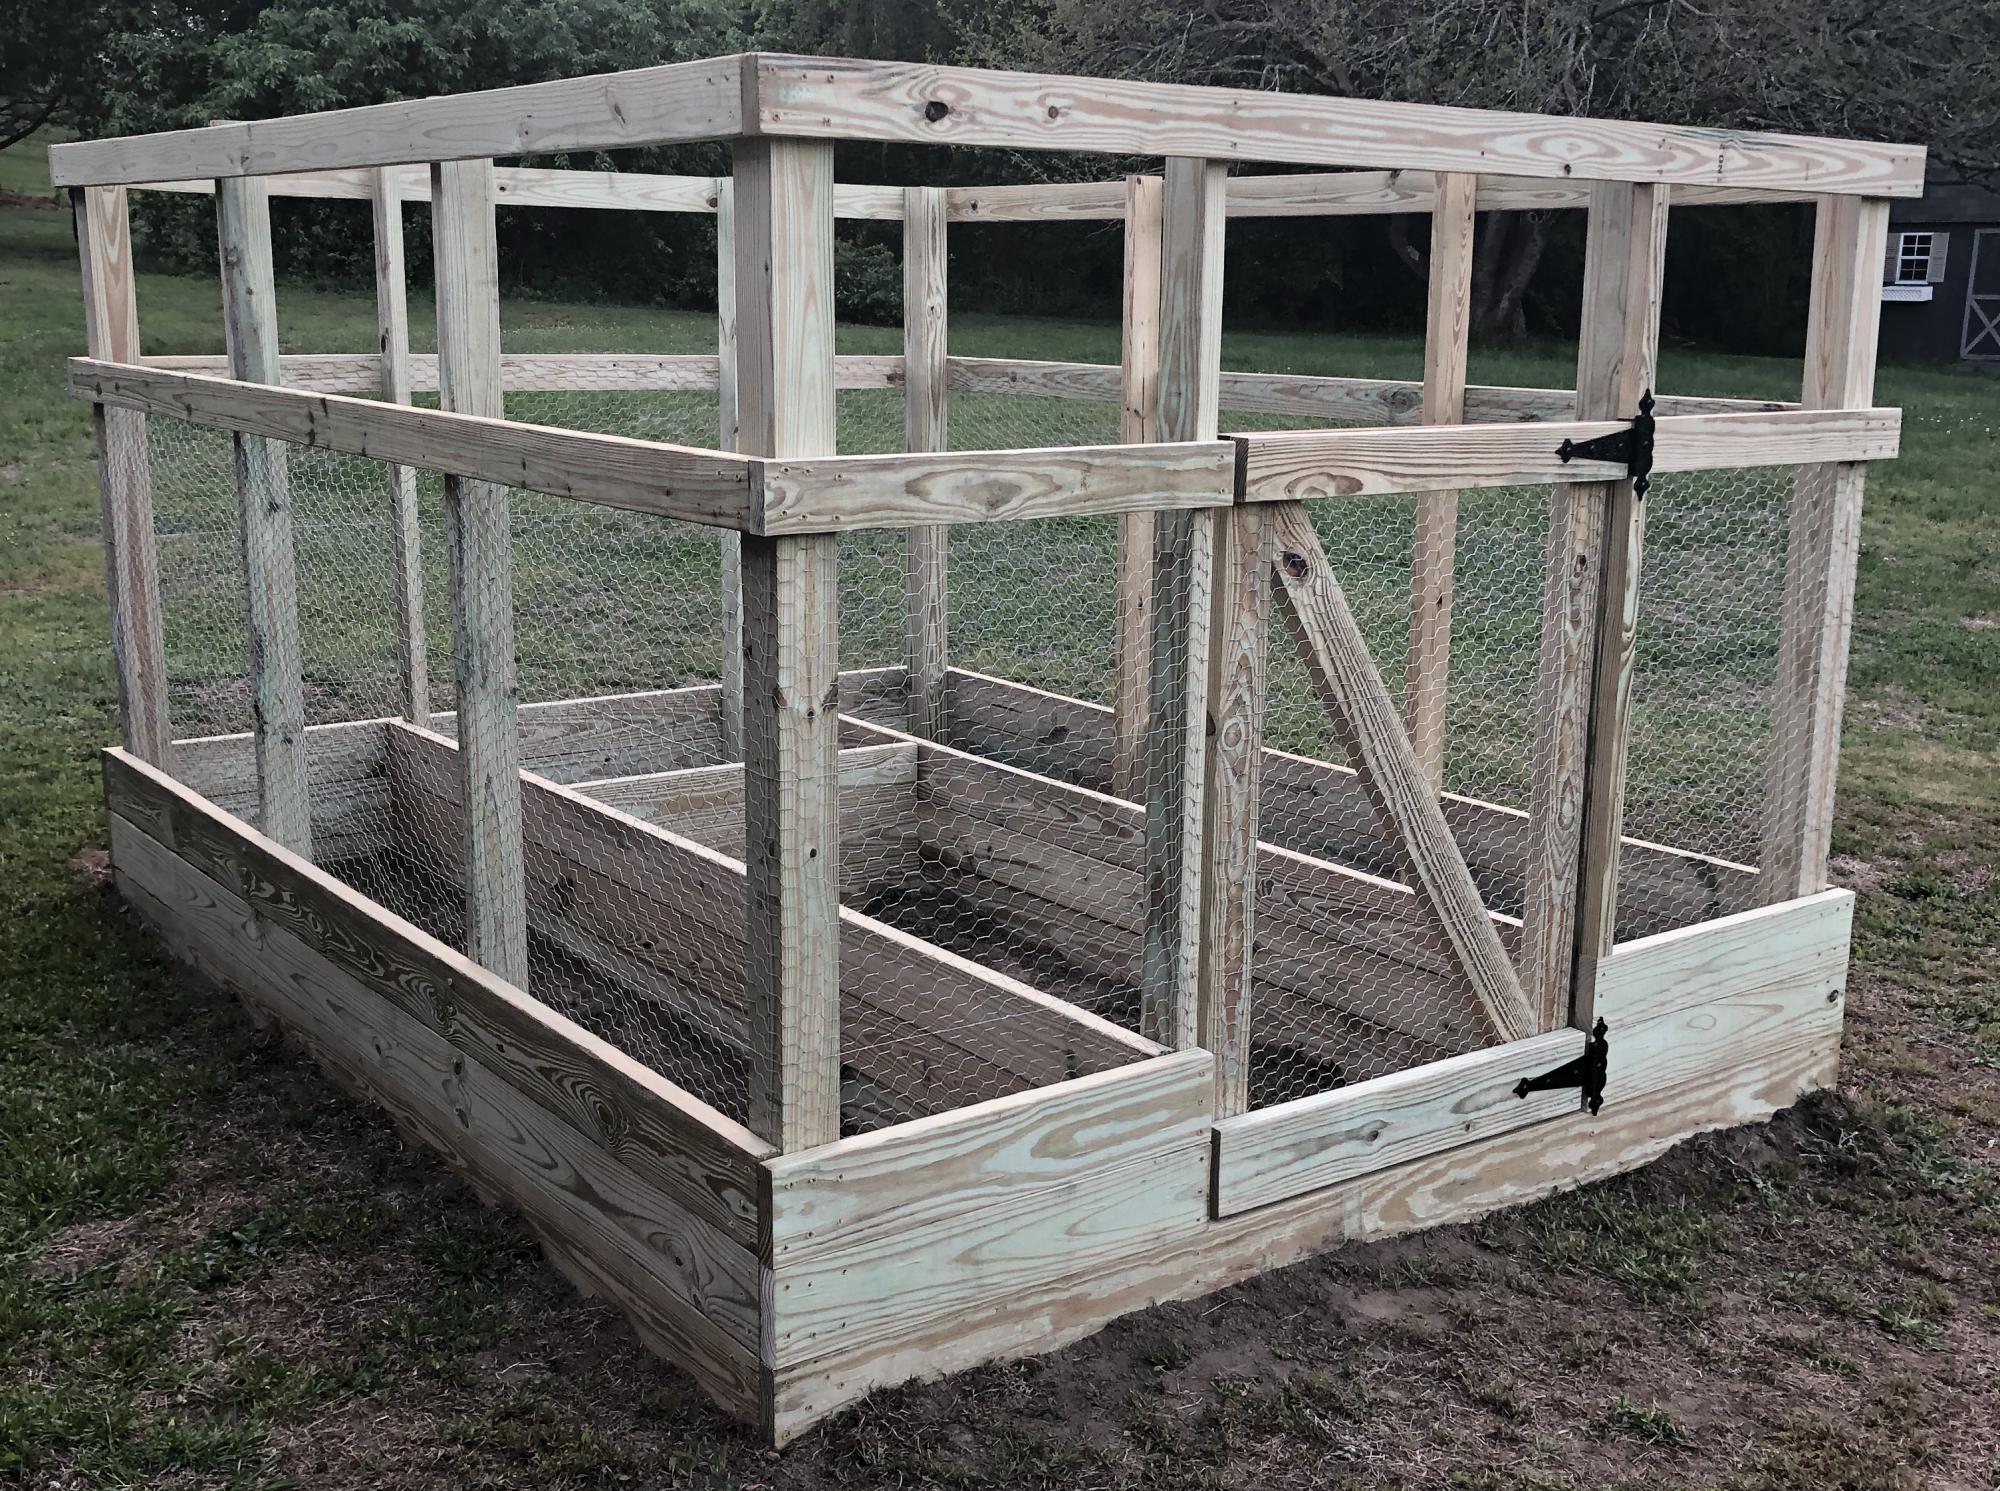
We perviously had a larger garden farther back in the yard, it was on the ground which is very hard and rocky. It was tough to till and maintain, so it was taken down a few years ago.
My wife and teenage daughter have green thumbs and have planted herbs and tomatoes in pots over the past few years, but this year they wanted something more substantial. After an online search we found this plan.
It was a bit small for what the girls had planned, so with a little bit of tweaking, we changed the depth of the enclosure to 10'. It was pretty easy to do. Also the girls wanted the beds to be a bit deeper, so we made them three 2x6's deep instead of two
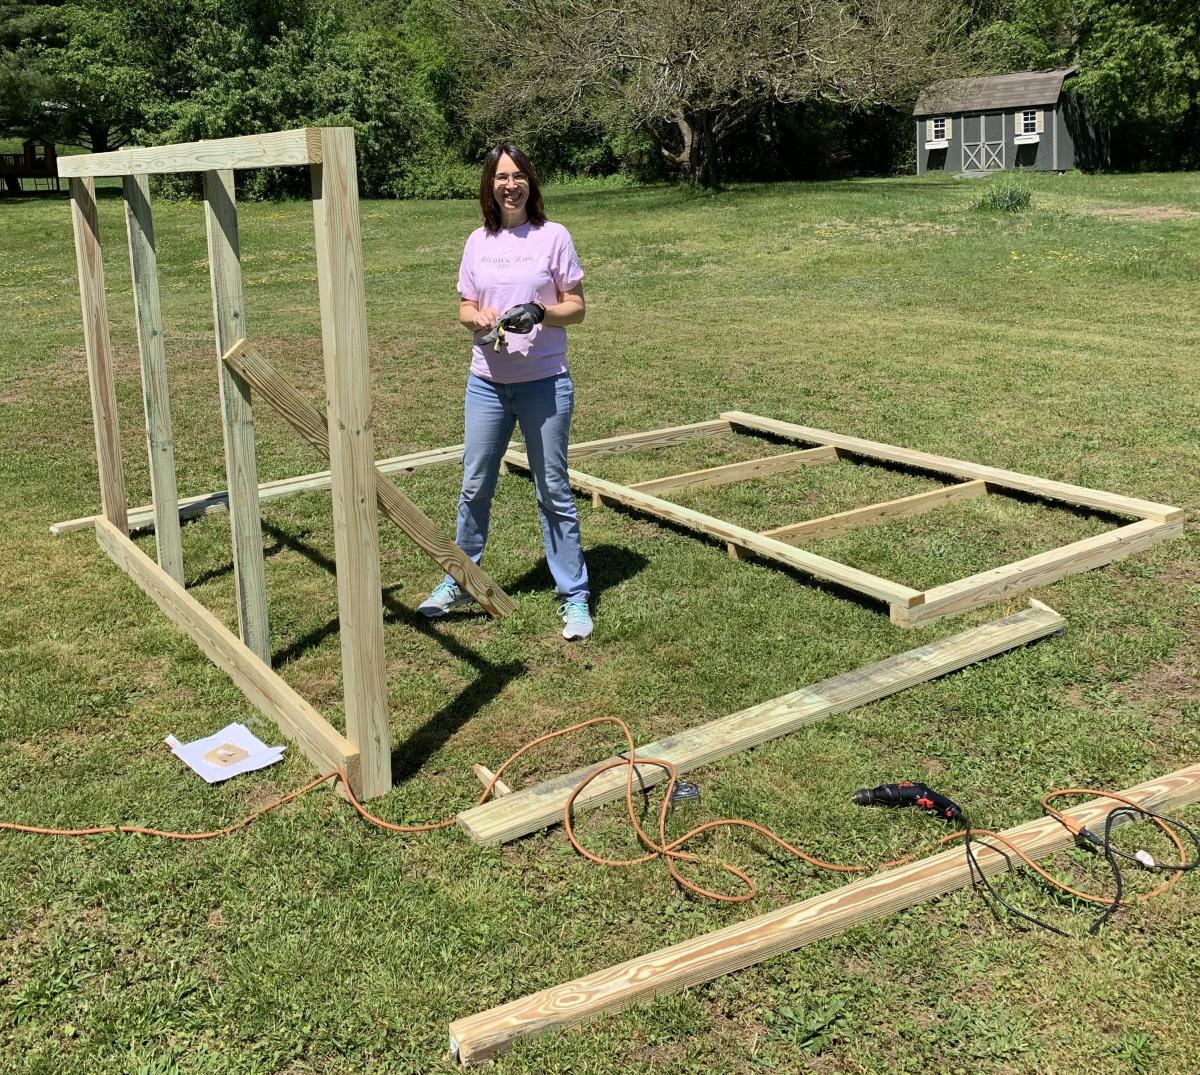
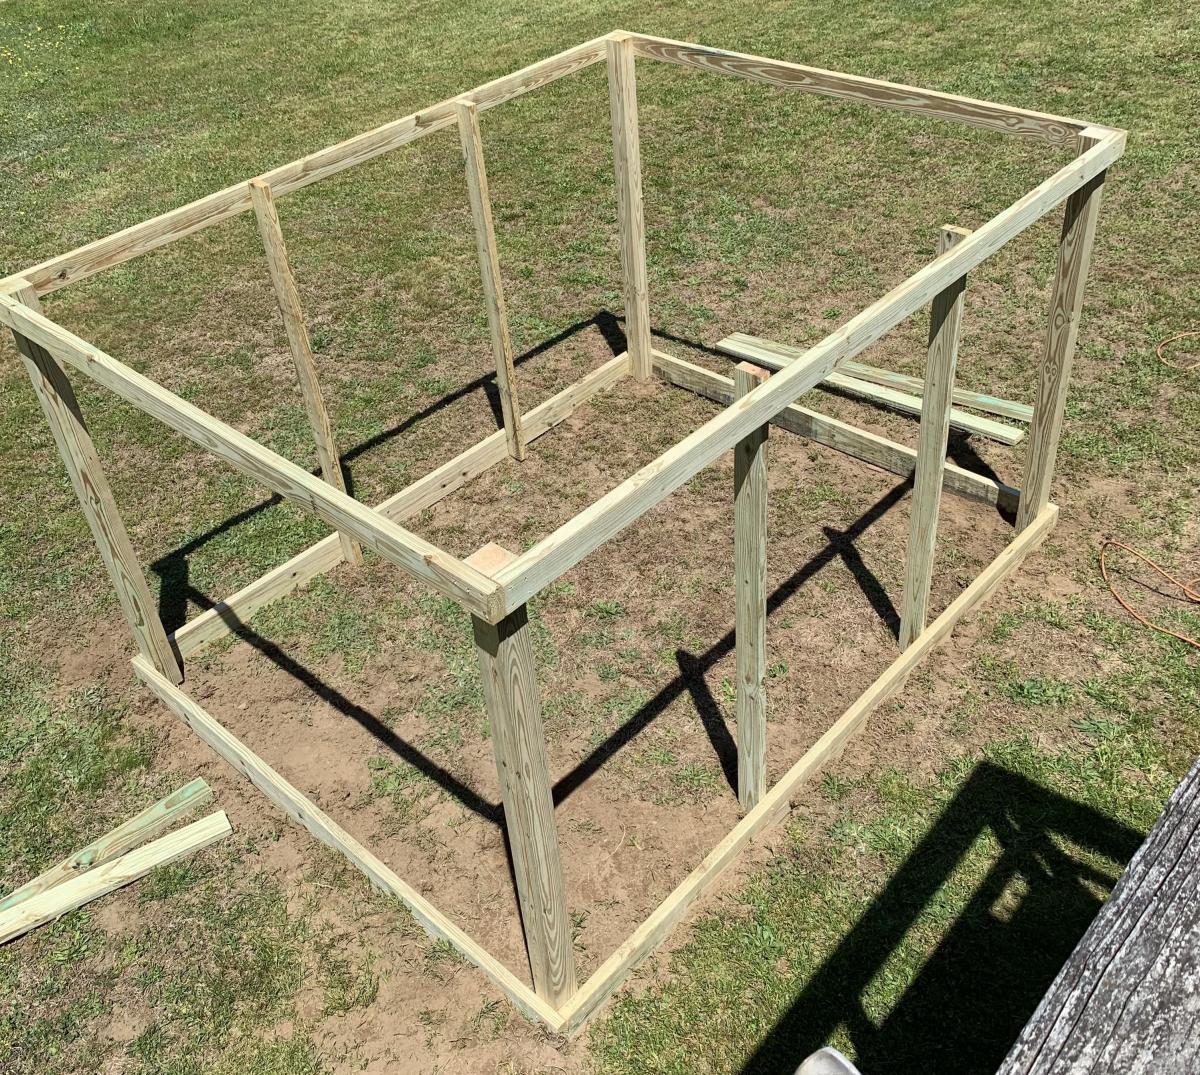
It was built by my wife and I in one weekend, well actually the truth is we built the entire enclosure, minus the door on Saturday about 10am and finish up about 5:30pm. I built the door the next day and we hung it together.
Just an FYI, I have quite a bit of woodworking experience and have a workshop with table saw, band saw and much, much more. I did use the table saw for most of the cuts, with the exception of the gate support which I cut using the band saw.
One caveat, if you have the lumber yard cut any pieces for you, make sure all the lumber is the same length. It's kind os a nit picky thing, but none of the lumber was exactly the length shown on the labels. If you want all the joints to be "perfect" I suggest measuring and cutting all the pieces to the correct length to match the plans.
We also used an industrial hand held staple gun to fasten the chicken wire.
The cost of all the materials, including two sets of work gloves came out to $447.92 from Home Depot in 2020.
We are now waiting for a delivery of the top soil to fill the beds. Since we used weatherguard lumber, we are going to gat plastic sheeting and line the beds.
It was a fun project and my girls are looking forward to planting all their seedlings.
For fun we made a time lapse video, which I have uploaded to Youtube. If you watch closely, you will see that we started the build in one area of the yard and moved it because the ground sloped much more than we originally thought.
https://www.youtube.com/watch?v=h7vvBLy034U&list=WL&index=112&t=0s
I hope that our experience may help others in some small way.
Thank you Ana for making these plans available!!

Built from Plan(s)
Estimated Cost
$447.92
Estimated Time Investment
Weekend Project (10-20 Hours)
Finish Used
None.
Recommended Skill Level
Intermediate
Comments

Sat, 05/30/2020 - 18:27
Love the added length! …
Love the added length! Thanks so much for sharing photos of your build!
$1.18 Bird Feeder
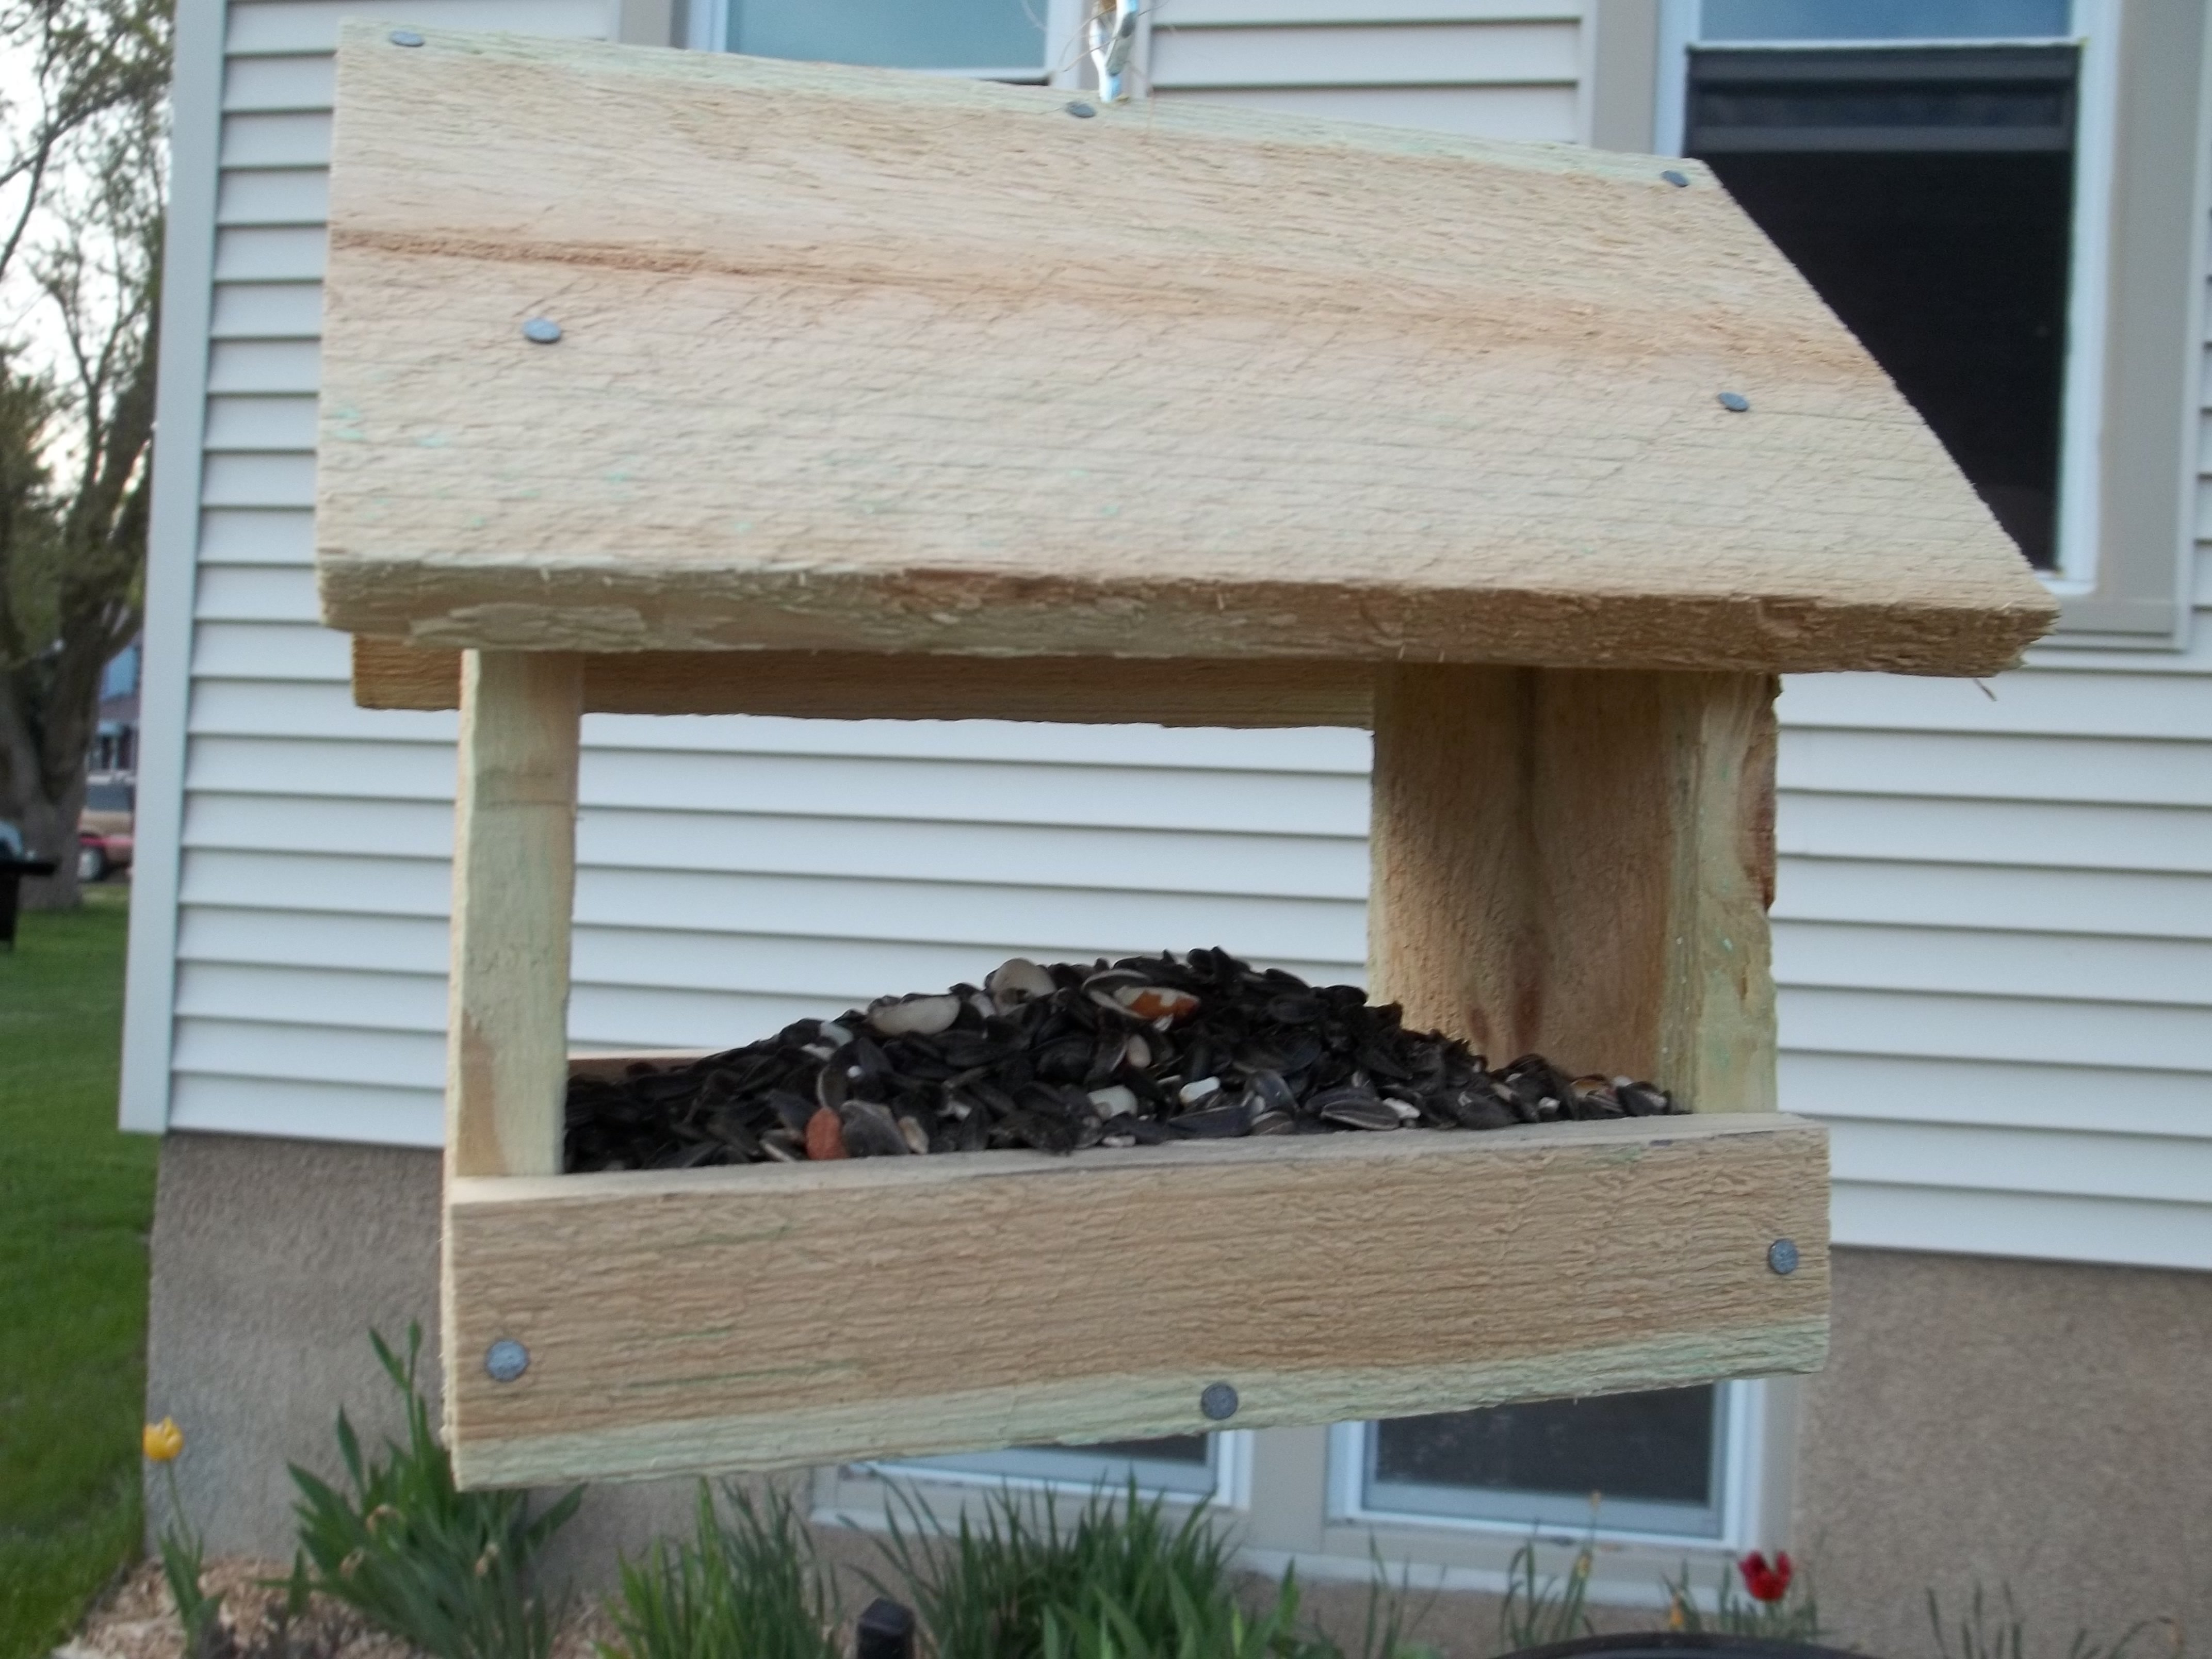
I have been trying to attract more birds. I built and put up some more birdhouses, added a bird bath, and wanted to add some more feeders. I found this quick and easy plan and I had to build it.
This took me less than an hour to build. I bought my picket from Menards when it was on sale for $1.18. That's not a bad price for a bird feeder!
You can see the steps I took to build this on my blog.
http://jaimeofalltrades.blogspot.com/2014/05/make-bird-feeder-for-under…

Built from Plan(s)
Estimated Cost
2.00
Estimated Time Investment
An Hour or Two (0-2 Hours)
Recommended Skill Level
Starter Project
Comments
Sun, 03/01/2020 - 17:05
Cute idea, check the wood treatment.
I can tell just from looking at this wood it was treated with a copper based chemical (note the green/blue blotches) while cedar is a good natural resistant wood these can sometimes be treated a well check for those greenish blotches around the Heartwood lines, chemical won't penetrate the tree sap in the wood and builds up along these lines. *I've worked in the pressure treated industry as a chemical tech for 3 years, and industry as a whole for more than 7.
Breakfast Bar Conversion to Storage Shelving
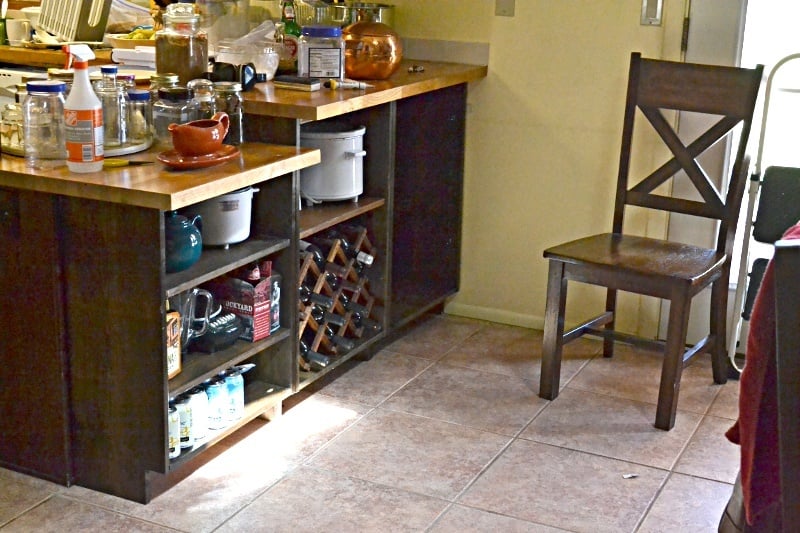
Added kitchen and dining room storage by building bookcases / shelf units to fit under the peninsula breakfast bar overhang. It's the simplest possible "box with a toe-kick", loosely based on Ana's plans for a bookshelf and the closet master system.
Much of the "working time" was stain and finishing time. Actual cutting and assembly time was under 3 hours.
No dimensions: every breakfast bar is different.
1 - The boards were cut to fit under the overhang, with 1/8 or less clearance. Top and bottom of unit is between the upright pieces.
2 - Width of units was also cut to fit. One unit is the width of the lower section of countertop (appx 23 in), the taller section was divided into 2 equal units (appx 21 in)
Shelves were cut about 1/4" narrower than the insiude dimension of the unit, to allow for insertion and the shelf pegs.
3 - Toekick space cut to match the cabinet on the far side of the peninsula. Used a circular saw and then a hand saw to finish the corners.
4 - Drilled pocketholes in the top and bottom boards.
5 - Used Rockler's jig for drilling shelf pin holes in the 6 uprights. Oops! I should have drilled every possible hole. I drilled every other hole and don't have the shelf flexibility I really need.
6 - Stained and topcoated everything, let it dry.
7 - Assembled each shelf unit, using corner clamps and a carpenter's square to make sure it was square. The bottom shelf is screwed at the same level as the toe-kick.
8 - Slid units under the overhang, shimmed them firmly under the countertop.
9 - Added shelf pegs and shelves
DONE!
Doors could be added, using the hinges for inset doors on frameless cabinets.
==========
NOTES:
The units are backless. I considered nailing a 1/8 hardboard back onto them, but because the finished back of the peninsula is visible behind them, and they are shimmed into place to prevent slouching it was not needed.
Cost is low because we had some 1x12 boards in the attic. Already had the tools and stain from earlier projects. 3 1x12 x 6ft boards were new, the rest were salvage.
Built from Plan(s)
Estimated Cost
$100
Estimated Time Investment
Week Long Project (20 Hours or More)
Finish Used
Minwax Jacobean oil stain - one coat wiped on after light sanding
General Finishes gel topcoat - one coat wiped on
General Finishes gel topcoat - one coat wiped on
Recommended Skill Level
Beginner