Community Brag Posts

Modified Miter Saw Cart

Submitted by DavidH on Fri, 01/19/2018 - 20:56

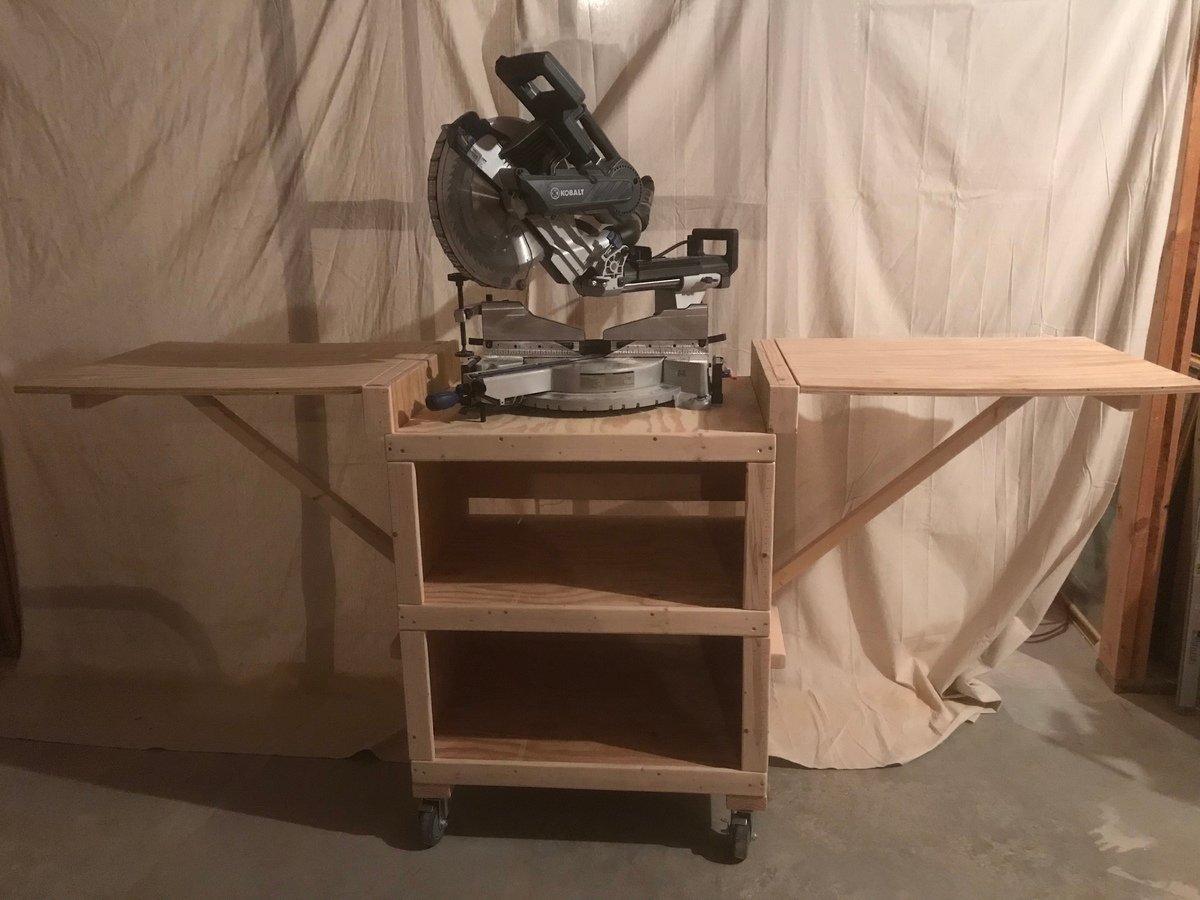
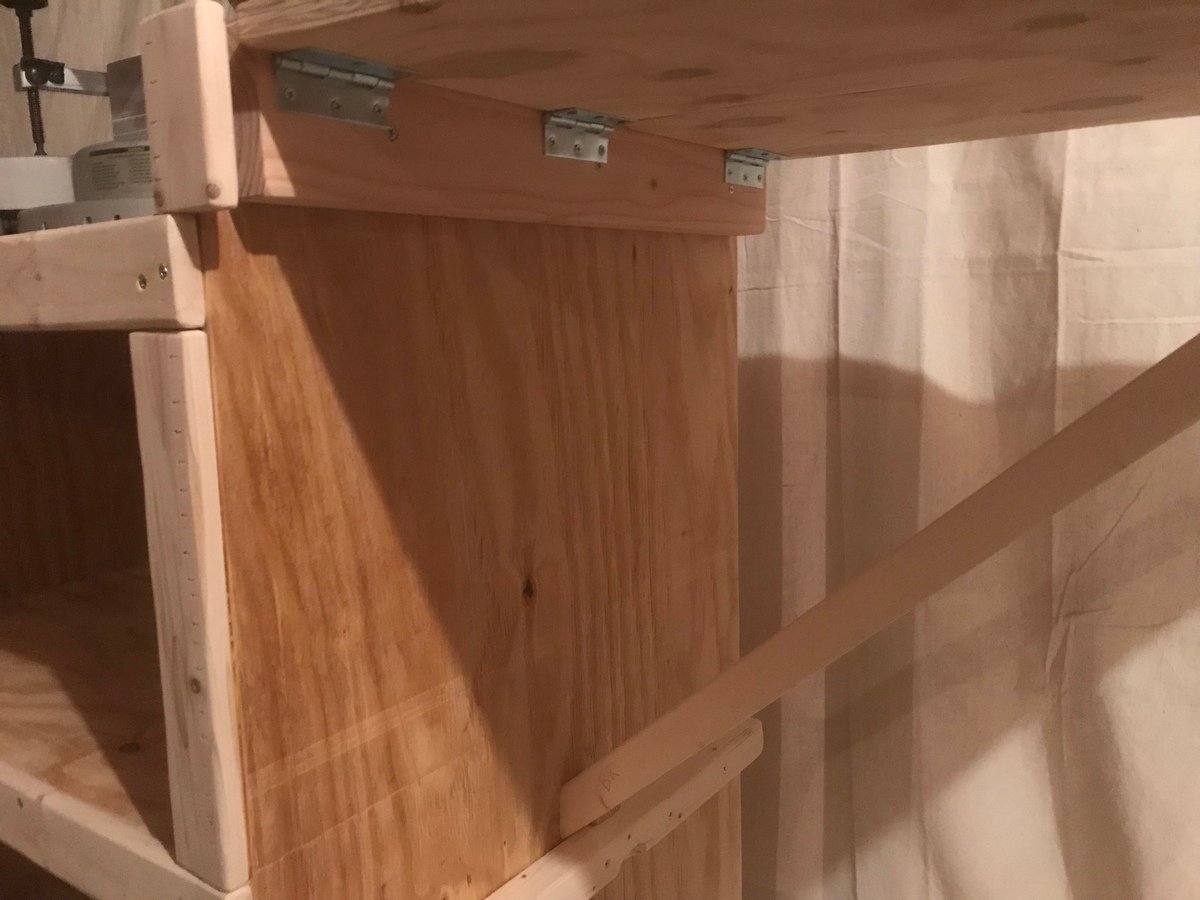
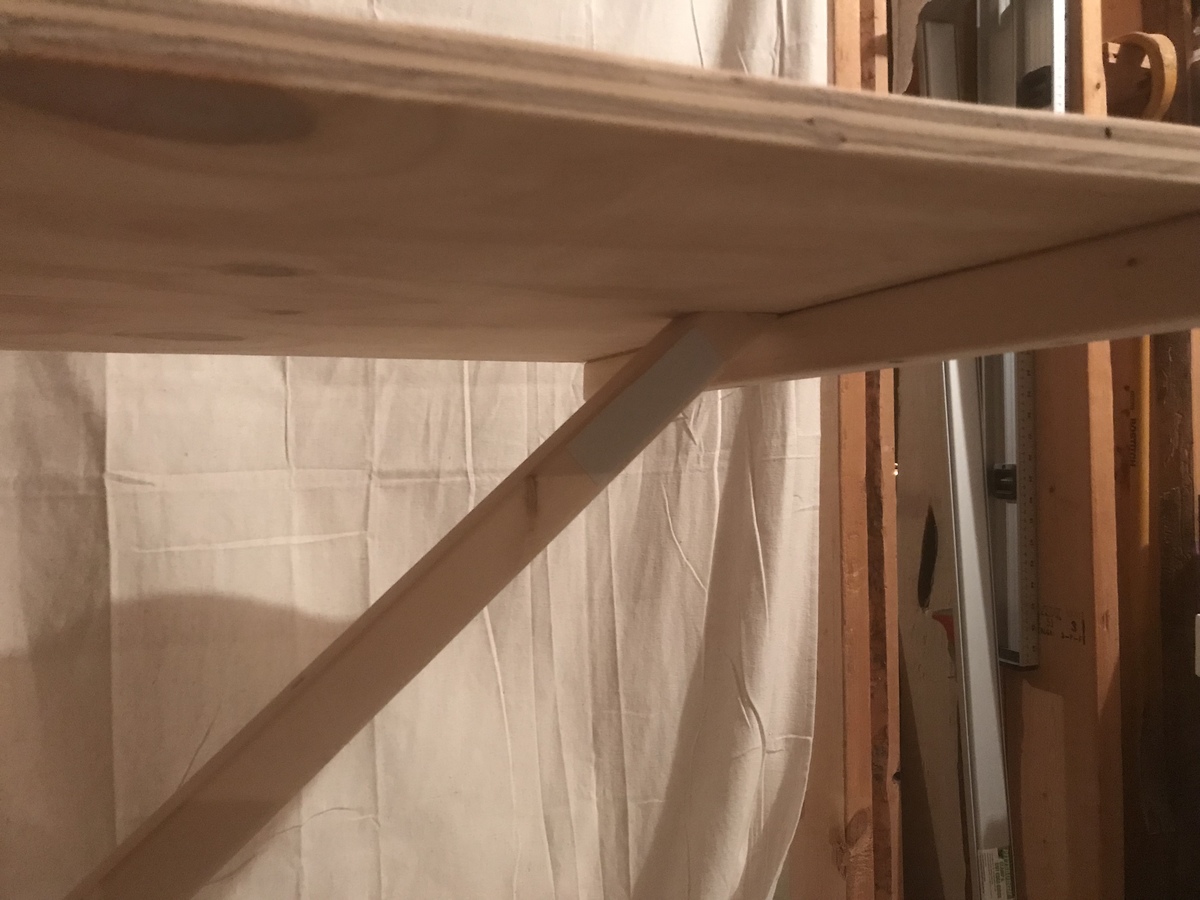
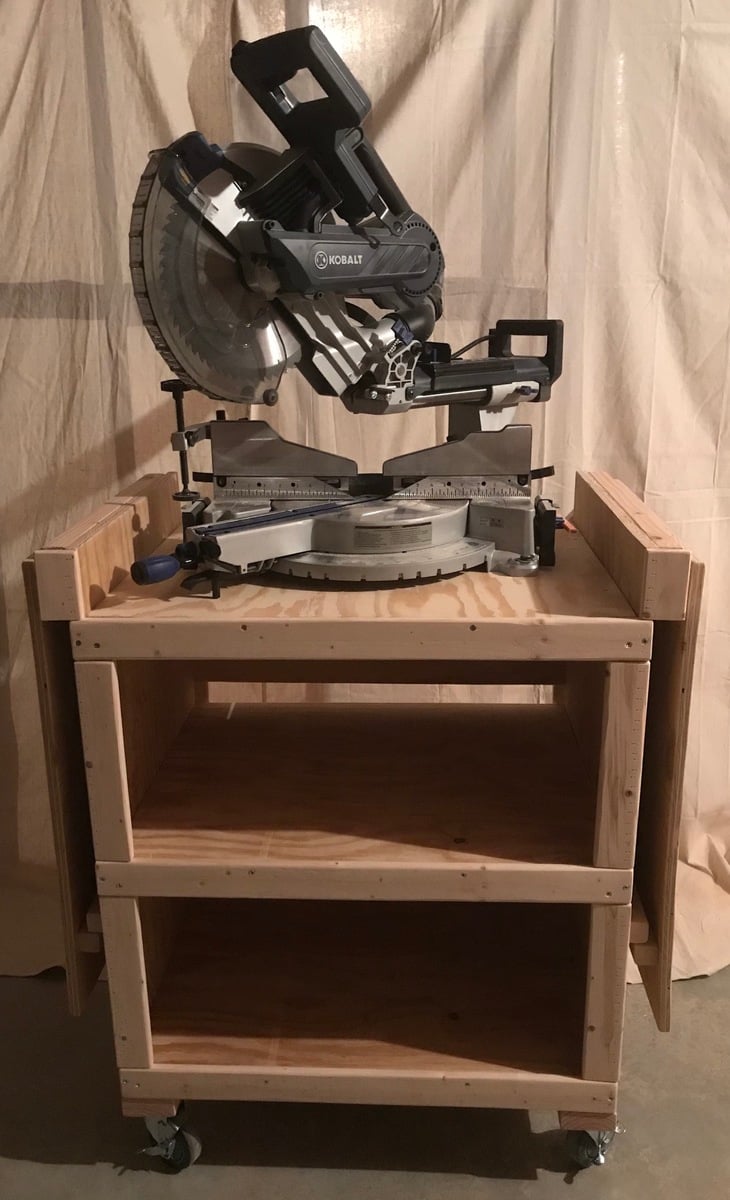
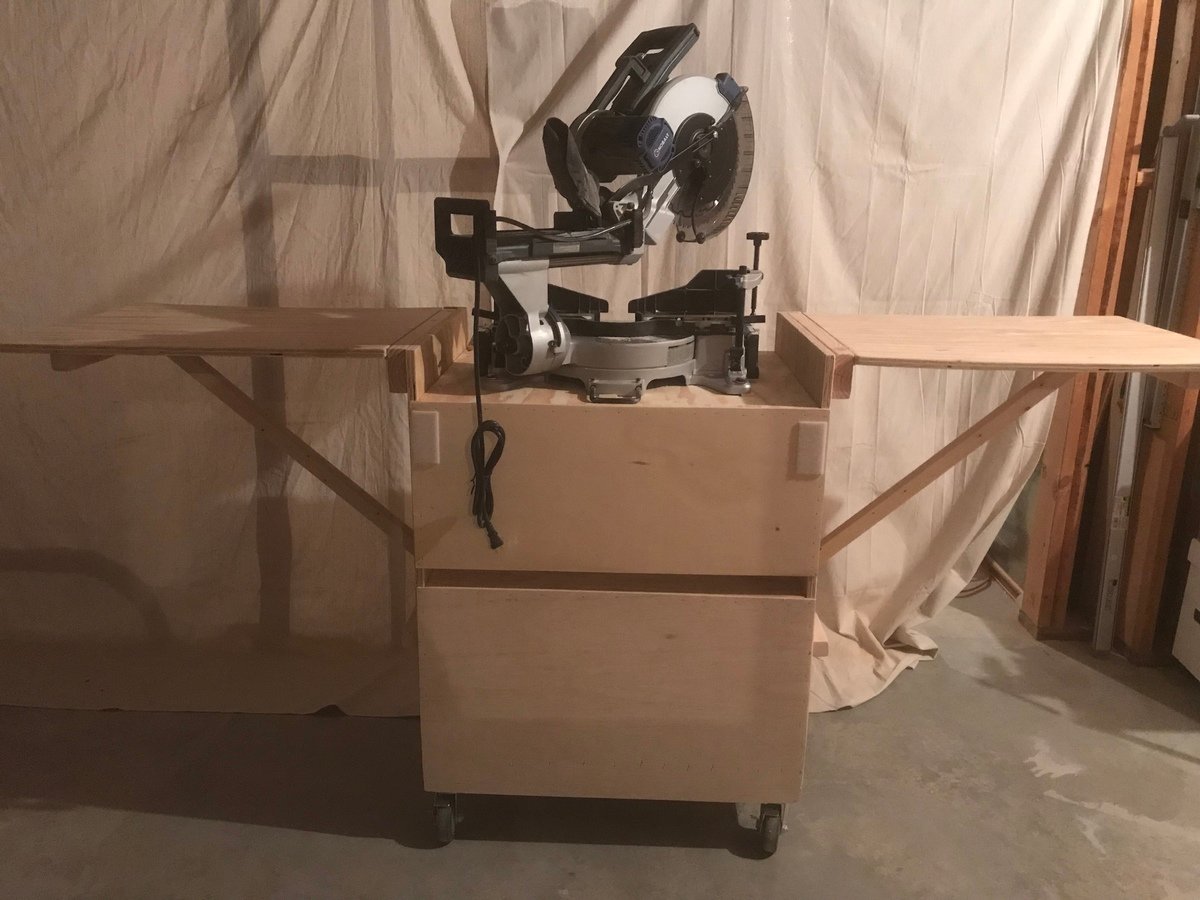
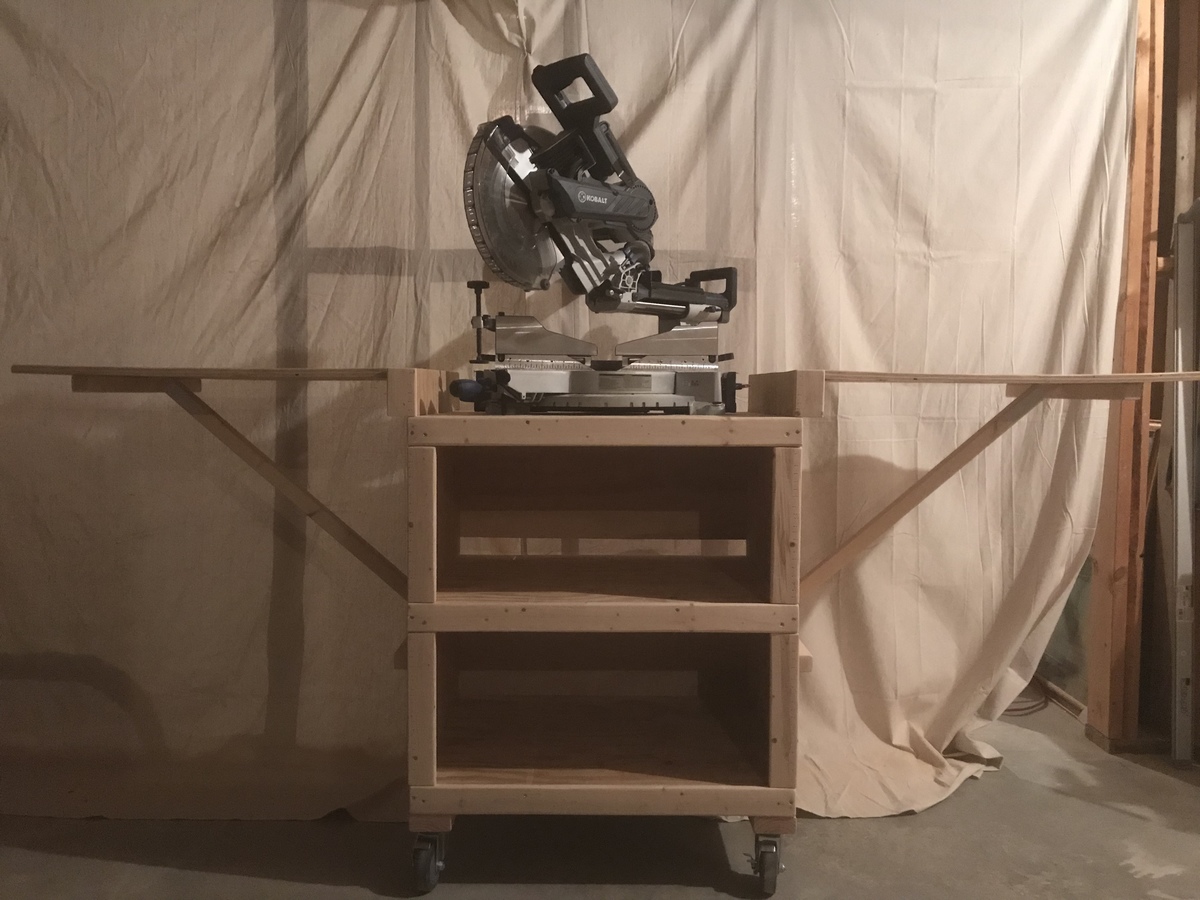
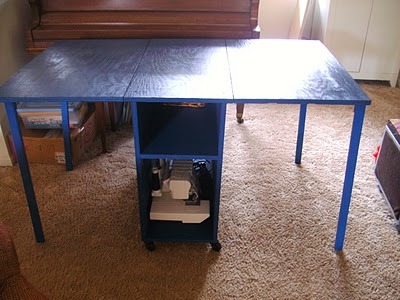
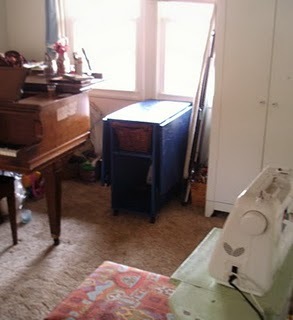
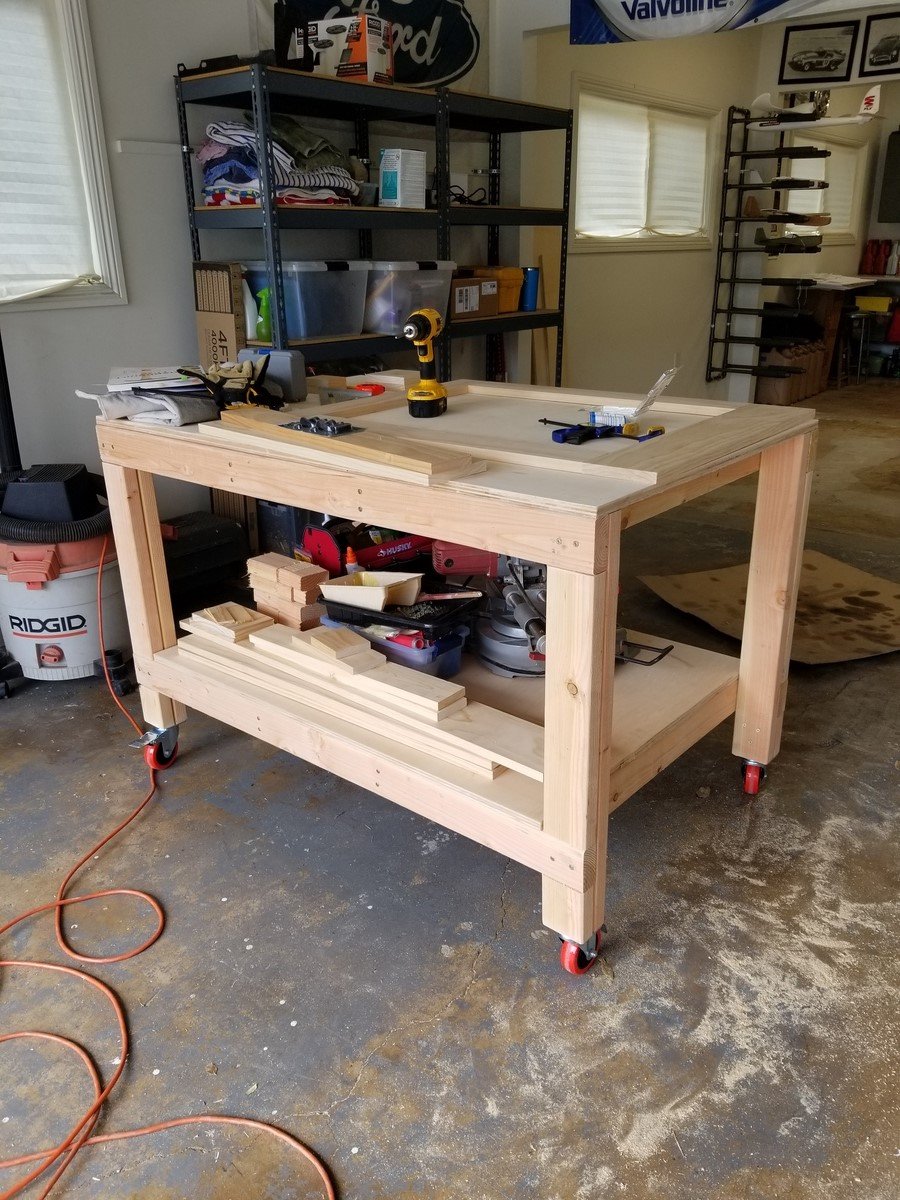
I started with the basic plans and dimensions, then made it my own from there. I added a center shelf, used regular (cheap) hinges and a removable brace instead of the shelf brackets, with stop blocks on the brace cleats to help easily center them. Added 2x4s on the sides to mount the hinges and let the wings fall flush, 2x4s on the bottom to mount 4” casters, 1/4” plywood backing, and 1x3 trim on the front for aesthetics and as a lip to hold items in place. The backing completely covers the lower shelf, and I left a gap to run cables through in the upper shelf backing. Velcro strips on the back hold the wing braces when they’re not in use.  Even though it’s plywood, I sanded everything thoroughly to reduce splinters and snags. 


Built from Plan(s)
Estimated Cost
$100-$125
Estimated Time Investment
Weekend Project (10-20 Hours)
Finish Used
Unfinished
Recommended Skill Level
Beginner

Comments

nzmitchell11

Sat, 02/03/2018 - 08:22

Hi there. I’m planning to use Ana White’s plan to build this miter saw cart but I like some of your alterations like with adding the 2x4s to allow the leaves to fall flush and the 2x4s at the bottom to attach the casters. How did you attach the casters? I have ones similar to yours- plate casters with 4 holes. Did you use bolts or screws? 

Coffee Bar with diy barn door

Submitted by dnieves33 on Tue, 01/11/2022 - 08:57

Built this coffee bar with the diy barn door hardware. Wife loves it. This is made of about 80% reused / repurposed wood. Thank you Ana for the great videos and simple to follow plans.

Comments

Pantry Bin Storage

Submitted by vendo on Tue, 01/18/2022 - 10:21

I used Shelf Help for the plywood pieces, then planked the sides with some 1x's, and added a face frame for the top edge. Casters allow for it to be moved easily and cleaned under. This is a great way to add extra storage under the pantry shelves and this design is super easy to modify for any size and height!

Comments

Sewing Table for small spaces

I loaded this project months ago, but somehow it was removed I believe during one of the websit updates. So far in my wife's crafting life she generally cuts things out on the floor. It's not so good. Our dining room table is usually covered in food or playdough so she generally just spreads things out on the floor. I realized how much she needed a table, and armed with new power tools from Christmas and my birthday, I set out to make me a crafting table. This was my first project.

Built from Plan(s)
Estimated Cost
$40
Estimated Time Investment
Afternoon Project (3-6 Hours)
Finish Used
Minwax blue rub on stain and sealer
Recommended Skill Level
Starter Project

Comments

x table and benches

Submitted by kcaldes on Tue, 06/28/2011 - 15:49

Good plans and easy to follow directions.

Built from Plan(s)
Estimated Cost
$110
Estimated Time Investment
Afternoon Project (3-6 Hours)
Finish Used
None yet.
Recommended Skill Level
Beginner

Single Sink, Double Vanity

I started by searching Ana’s website for a vanity plan, and found a really great jumping off point with this plan. The problem was that it was for a single sink in cabinet size. But I was looking for something about five feet long that would incorporate a drawer and countertop area so my little miss will have lots of space for makeup and hair products and all those other girly things. I added a shelf to the cabinet, made the top 66" long and added a drawer and some spindle legs to give it the extra length it needed as well as a vanity area. I also incorporated Ana's genius idea to make the kickplate into a pull out step stool with drawer slides and some scraps. My blog post features the modified cut list as well as my step by step assembly for it. I love this vanity and am so proud to say I built it all by myself!

Estimated Cost
$75
Estimated Time Investment
Afternoon Project (3-6 Hours)
Finish Used
Minwax Golden Oak stain and three coats of Rustoleum Spar Varnish (an outdoor varnish as this is a humid and wet environment) to the base and five on the top.
Recommended Skill Level
Beginner

Comments

Altered Camp Loft Bed w/ stairs

Started with the basic loft plans. Changed out the 2x4 post for some sturdy 4x4's and added a bottom bunk to build this set for my two boys. I also deviated from the plans by using carriage bolts to connect the landing for the steps and the side rails to those post so the bed can easily be disassembled and moved in the future. Finally I placed the steps themselves on a set of hinges so I could easily access the area underneath the landing if needed. This has the added bonus of allowing me to lock the steps in the up position to restrict access to the top bunk during visits with younger family and friends. Now just need to stain it, seal it, and put inside.

Estimated Cost
200.00
Estimated Time Investment
Weekend Project (10-20 Hours)
Recommended Skill Level
Beginner

Comments

Tall Bedroom Dresser

Had a blast with this project and am getting more confident with drawer slides. I built a matching dresser that is much shorter and wider. It can be found here: http://www.ana-white.com/2018/08/DIY_furniture/bedroom-dresser

Estimated Cost
$150-$200
Estimated Time Investment
Weekend Project (10-20 Hours)
Finish Used
Varathane Weathered Wood Accelerator, Varathane Poly
Recommended Skill Level
Advanced

Comments

hutchingslv

Thu, 08/12/2021 - 15:35

Any way to get a copy of these plans? I really like the look and want to give it a shot. Have to make a few of these if all goes well for all my boys.
Thanks

DIY SLIDING BARN DOOR

To date this has been my favorite and fullfilling DIY project!! Skills were learned, $$ was saved and it looks fabulous!!!   It wasnt easy but it wasn't impossible.  April WIlkerson provides a detailed tutorial on her website along with a fantastic youtube video on her channell. I hope this inspires someone else to take on this challenge!!  If you have any any questions please feel free to ask me!!  Enjoy.

Estimated Cost
$100
Estimated Time Investment
Week Long Project (20 Hours or More)
Finish Used
Minwax Special Walnut, Minwax gray, ragged white followed with a satin poly.
Recommended Skill Level
Intermediate

For a co worker...

A co worker reeeeally wanted this and asked me to build it. It is only my second build.

Built from Plan(s)
Estimated Cost
150-200
Finish Used
Varathane Spar Varnish in satin, Varathane Dark Walnut
Recommended Skill Level
Beginner

Just A Bench

Submitted by Jake on Fri, 08/30/2013 - 18:38

I had a request from a friend to build her a bench, preferably one with a back on it. The plans for the Woven Back Bench were perfect. But as you can see in the picture I moved away from the plans a little bit. The woven back is beautiful but I was sure it would become frustrating to get it right so I went with the vertical posts. It worked out well.

It is not visible in the picture but I added a cross-member to the middle of the seat to give it more strength and stability.

I avoided pocket holes to hold the back together by using the Kreg drill and drilling vertically down about 3/4 the way and inserting 2" pocket hole screws and then capping them off. The caps are visible in the picture. I did the same from the bottom of the back.

In a couple of places that called for 2x2s I used re-sawed 2x4s that I think added strength to the bench. I only used pocket holes where they would not be directly visible. Also I used a router to soften many of the edges and to add interest to the arms.

Built from Plan(s)
Estimated Cost
$50 not including primer or paint
Estimated Time Investment
Weekend Project (10-20 Hours)
Finish Used
The finish will be applied by the recipient but I am recommending that she prime and paint. Once a year she should check for any rotting.
Recommended Skill Level
Intermediate

Kids Play Table and Stackable Chairs

I used Ana's plan for the Clara table and the $4 stackable chairs for this project. I spent a total of $30. I used furring strips to save money. My kiddos love it! You can see more details at http://www.shanty-2-chic.com/2011/08/table-and-chairs-for-the-playroom… !!

Built from Plan(s)
Estimated Cost
$30
Estimated Time Investment
Afternoon Project (3-6 Hours)
Finish Used
Rust-Oleum Colonial Red Spray Paint and Minwax Dark Walnut Stain
Recommended Skill Level
Beginner

Cabin Bed

Submitted by coskam14 on Fri, 11/18/2022 - 17:29

Cabin Bed for toddler. Alternate take on the Jen Woodhouse bed. Built to fit the space

Built from Plan(s)

Comments

Fireplace with hidden Mantle storage and side bookshelves

Submitted by ibseenu on Thu, 12/01/2022 - 14:30

Thank you Ana for you Fireplace design as it was exactly what I needed! We’ve lived in our house for 3 years now and I’ve wanted a fireplace ever since. Your plan was perfect and with a few modifications I made it come to life. My 9yr daughter as I was almost done building thought there should be a shelf for books and movies below the fire place. It gave me the idea of adding storage on the sides. I had already had the idea of the mantle storage and just used a floating shelf idea and made that. This was a lot of fun!! It took me a little over a week to build. But can’t wait to build something else for our house… like the mudroom!

Amy

Comments

jtemperley

Sun, 01/08/2023 - 19:02

That looks awesome! My husband and I are planning on doing this as well. I do have a question, as I see you have carpet just like us. Did you cut out the carpet where you built out, and if so how did you go about that, or did you just build on top of it?

Dollhouse

Submitted by samueldodd on Mon, 12/21/2015 - 06:04

The house is 48" high and 36" wide and 28" deep. It has 3 floors with a total of 10 rooms. Floors were made to look like hardwood floors and stained. Was fun to build and my granddaughter cried when she saw it. Due to the size of it, I installed wheels on it also. I made it from a picture on Ana White of Kidkraft Chic Dollhouse 2011-12-06 Paint all your pieces before you assemble. It makes it a lot easier than trying to paint afterwards.

Estimated Cost
$100,00
Estimated Time Investment
Week Long Project (20 Hours or More)
Finish Used
Roof was painted with oil based Red( because that is what I had on hand. The frame and walls and ceiling were painted white. The floor was made to look like a hardwood or plank floor and was stained with minwax Special Walnut
Recommended Skill Level
Intermediate

Indoor Playhouse

Submitted by Alaskagirl on Thu, 02/28/2019 - 12:47

Husband and I built this beauty over a rainy weekend. He had cut the wood a few weeks before, then we had to wait for a free weekend to assemble. We switched the placement of the walls around so the bed wouldn’t go over a heat vent and had to trim a few inches off the legs to fit with our lowers ceiling. I painted the back wall with chalkboard paint and we added shelves to the side like shown in the blogpost linked on the build page. We added a light above and Christmas lights below to brighten things up. A book sling and pulley with basket added the perfect finishing touches. All our boys love this magical new addition to our youngest son’s room and gave already spent many hours playing there. 

Built from Plan(s)
Estimated Cost
$200
Estimated Time Investment
Weekend Project (10-20 Hours)
Finish Used
Haven’t finished yet, waiting for drier weather, then will add two coats clear polyurethane to keep the natural look.
Recommended Skill Level
Intermediate

Christmas gift for parents

This bench wowed my parents when they saw me pull up on Christmas Day when I came to visit. Also, this was my first time using the kreg pocket jig. They love sitting outside with their cats and this couldn’t have been easier than I thought. I’m 5’2” and this is a big bench and look forward to building one for myself.

Comments

Workbench modified with casters

Submitted by ogie287 on Tue, 04/02/2019 - 20:06

I love this workbench! I added casters so I can move it around the garage, outside, wherever it's needed. I just took 4 inches off the bottom of the legs. My hubby is admiring my handy work and planning on making one for himself.

Estimated Cost
$130
Estimated Time Investment
Afternoon Project (3-6 Hours)
Finish Used
None
Recommended Skill Level
Beginner

Comments

JBeecher

Wed, 01/25/2023 - 14:31

Love this with the casters! So beautiful. I'm new here and wondering at what point you took 4 inches off the legs. Did you build the table and then just cut off the legs? Or did you adjust the measurements of the cuts? Thanks in advance! :)

JimCoz516

Mon, 01/30/2023 - 02:32

The overall height of a 4-inch caster wheel is a little over 5 inches with the mounting bracket, so that also needs to be taken in to consideration. 2nd photo shows the overall dimensions, but to me the bracket and brake area appear to be a bit more than 1.03 inches. https://amzn.to/3DkMKzB
I think the best bet would be to have and measure the overall wheel height, prior to measuring and cutting the lumber.

Pantry Shelf

Submitted by Anonymous (not verified) on Sat, 03/04/2023 - 13:03

I have a small kitchen. I found this plan on Ana's site to turn it into a pantry shelf. Initially, I was going to have wheels. That way, I could roll it to sweep. I took measurements to match the height of my upper cabinets and width so my door would clear. I put this shelf up to the side on my fridge. I didn't account for the height difference adding wheels. I still can add wheels if I change my mind. I did differing spacing, considering spices and cereal boxes and items between. I haven't quite figured out the end placement for items. I also am considering appliances to be placed on the bottom. I purchased baskets and spice drawers so I can visually organize and see what works. I used odd and end prices of wood and adjusted the measurements to fit my space. I love my corner 2x4s! They are dark and once planes, have these dark brown ribbons revealing the growth rings. We think they might be brown treated boards. Some of the shelves have a darker brown edge, 5 total. I purposely wanted the dark edge facing out. But I didn't have enough so I used different looking boards (same thickness) and played around with assign them their spot. My friend had copper pipes laying around, so I used those in the back to stop my items from falling off the backside. I polyurethaned to keep the natural wood colors. I really love it and am excited to do more projects!!

Built from Plan(s)

Comments

DIY Dust Collector

I have allergies to wood dust, which can make working in my shop a challenge. To help deal with the large amount of dust I've been kicking up lately with my table saw, I built my own dust collection system. It's not as good as a professional dust collector, but it's pretty good, and it was really easy to build.

Estimated Cost
$20
Estimated Time Investment
An Hour or Two (0-2 Hours)
Recommended Skill Level
Beginner

Comments

claydowling

Sun, 12/04/2011 - 07:13

On facebook somebody suggested that putting the port for the vacuum in the center would improve the vortex action. That would match the configuration of the vortex collectors, which draw from the center as well.

StacieM

Wed, 12/07/2011 - 16:23

I have got to try this! My boyfriend complains about the sawdust EVERY time I make something and this would really reduce the justification for complaining :-) Thanks for the plans!