Community Brag Posts

Claras Table and $4 stackable chairs sized for 18" Dolls.

Submitted by pjhaan on Mon, 12/26/2011 - 07:48

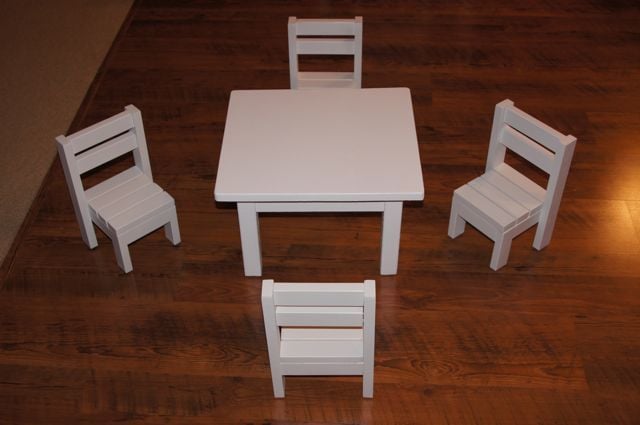
I decided to make the Clara table and the $4 stackable chairs for my daughters for Christmas. They were not for them though but rather for their American Girl dolls. I had to modify the plans to work for standard 18" dolls.

The Table:
It is a little taller than it should be but it allows the doll to fit under the table/apron while sitting in an appropriately sized chair (5" seat).

I also changed the length from 18" to 15 1/2" so the cuts could be made from a 4ft board.

3 - 1 x 6 @ 15 1/2" (Top) (1 @ 4ft)
4 - 2 x 2 @ 10" (Legs) (1 @ 4ft)
2 - 1 x 3 @ 10 1/2" (End Apron) (1 @ 4ft)
2 - 1 x 3 @ 9" (Side Aprons)

The apron is 1 1/2 inches. a 1x2 would probably work for the aprons too. You could then shorten the table legs by about an inch.

The Chairs:
The over all dimensions are now 12" H (back), 5 1/2" H (seat) X 6" W X 6 1/2" D

Cut List:
2 - 1×2 @ 4 1/4" (Side Aprons)
2 - 1×2 @ 5" (Side Supports)
3 - 1×2 @ 4 1/2" (Front Legs and Front Apron)
7 - 1×2 @ 6" (4 Seat Slats, 2 Back Slats and Back Apron)
2 - 1×2 @ 12" (Back Legs)

Built from Plan(s)
Estimated Time Investment
Week Long Project (20 Hours or More)
Finish Used
White paint. I used some Valspar paint on the table and one chair then decided it would take too long to get all the cracks and crevices. On the other three chairs, I used Krylon Spray paint. I put two coats of the spray paint on the first chair for better coverage.
Recommended Skill Level
Beginner

Comments

KAD050209 (not verified)

Tue, 10/09/2012 - 17:19

For the dimensions you have for the chairs... Is that to make one chair only? I so0o0o wanna make this for my DD! She'll love it!

Beginner Farm coffee table

Submitted by Anonymous (not verified) on Fri, 05/05/2023 - 05:27

I haven't done much wood working but I found Ana White's plan and followed along with her video. Was able to easily assemble this beautiful table in one afternoon. Next step, sanding and finishing. I'm definitely going to try more projects.

Comments

Corner Cabinet

Submitted by Chuck1522 on Mon, 01/13/2014 - 10:32

This was a corner cabinet I made. The purpose of this cabinet is to be used as a pantry. My kitchen is quite small, and in turn I was always having to sacrifice cabinet space for pantry items. Total man hours was about 20 give or take the occasional trip to HD or Lowes.

I found this project quite enjoyable. I don't have much of a workshop area so space was tight. I had to constantly move my tools around to make room for the cabinet while I built it.

The plans supplied by this website were simple and straight-forward. I didn't need any specialty tools or have to use any weird joinery. All in all I would give this project an 8 out of 10. There were a couple of areas I feel I can improve on.

After having posted this picture on several social media sites my friends took notice, Now I'm getting all kinds of requests. Not sure if I will entertain any. It's just nice to see a vision come to life.

Thanks for the taking a gander at my work.

Built from Plan(s)
Estimated Time Investment
Weekend Project (10-20 Hours)
Finish Used
Following the instruction on the bottle. I first applied three coats of wipe-on Teak Oil finish (Found at your local HD or big box retailer). Sanding with 220 between each coat. After all those coats were dry, about 72 hours, I applied two coats of wipe-on Polyurethane (again, found at your local HD). Before applying the last coat of wipe-on Poly I lightly rubbed the surface down with 0000 steel wool. This rubbing was done again after the last coat of wipe-on Poly was applied. I really feel this set the piece off and made it that much better. Be advised...I also used a tack cloth to remove any dust and debris between each coat of finish applied.
Recommended Skill Level
Intermediate

Comments

Jake

Mon, 01/13/2014 - 15:50

I also built a corner cabinet from the same plans and yours is by far the best. You obviously have the patience it takes to get the best out of your project. Looking for more from you.

Ill Just Paint It

Tue, 04/08/2014 - 18:33

Thank you so much for your vision! I've been looking for the perfect corner cabinet for at least a year! All the other plans within these plans are ok and would've worked, but I just felt like I wanted something more. I am in love with your doors! They look great! I may make mine a bit larger, but will most definitely add doors the same way you did. Unfortunately, it's not on the top of my priority list, but it will be this summer!!! Great work!

Rachel
www.illjustpaintit.com

balloongal247

Wed, 04/09/2014 - 06:30

This cabinet is beautiful! I love the natural wood look, and I too think the doors looks great.

Herb & Flower Ladder

Submitted by Anonymous (not verified) on Mon, 05/09/2016 - 15:06

Living on a small city plot, this vertical ladder planter was just what I was looking for to grow my herbs and flowers. I am not an experienced builder but the plans were easy to follow. It didn't take me much time at all to complete this project. Now I am looking forward to fresh herbs and flowers all summer.

Recommended Skill Level
Beginner

Comments

Corner Media Console

Submitted by craw4dz on Thu, 02/27/2020 - 10:39

We had just moved into our new house and were using an end table for our TV stand I just didn't like it.  I found this and modified it so it's shorter and fits in our room better.  I also opted to not put doors on it and use it to display items instead.  This was a relatively easy build and I'm learning new things with every build I make.  It took about 2 days to complete not including filling holes/paint/stain.  I love it, it looks so great in our room and I am planning on building end tables to match as well as replacing our buffet with movies in it to match also.  Thanks for the easy-to-follow plans!

Built from Plan(s)
Estimated Cost
$45
Estimated Time Investment
Weekend Project (10-20 Hours)
Finish Used
Whatever white paint I had on hand (haha) and Varathane Kona with a satin poly for the top.
Recommended Skill Level
Beginner

Colorful Custom Bedford Corner Desk with Live Edge Desktop

Submitted by Anonymous (not verified) on Fri, 06/28/2019 - 20:41

I followed the plans pretty closely. I added dividers to make 3 drawer units but I didn't find it necessary to have the top shelf go all the way to the back since it would never function as a shelf. I used scrap pieces for that and they weren't big enough to be full shelves.

I used 1/2" MDF for the bottom, sides, and backs of the drawers to cut down on weight, cost, and general bulkiness. I used this free app called Cut List to figure out the easiest way to have the guys at Home Depot cut all the drawer panels after I learned I'm not that good with a circular saw. I used a hack saw to cut aluminum bars for hanging files and used scrap wood to make the little brackets to hold the bars upright in the drawer. The full extension drawer slides are functionally and asthetically better but it would have been so much easier to put in basic bottom mount slides. 

I wanted a wood grain top and ended up with common pine boards over more expensive poplar or oak and I would use pine again without hesitation. I used Google SketchUp to figure out the widths of boards I needed to make the top with minimal cuts. Then joined them with glue and mending plates and sanded the hell out of them. I altered the dimensions slightly to make it the same size desktop as the Bedford desk. My two wing sections are 23" x 23" but I should have made them 23" deep by more like 24" or 25" long. I had to hack the bottom bracing to make a spot for the drawer units to slide into. If you alter the dimensions make sure you can secure a brace between the main body and the wing of the desktop and still have room for the brace at the edge of the wing. 

My cost includes things like a Kreg jig, saw blade, clamps, paint brushes etc. so you may be able to do this for less. I could have gone with a middle of the line paint I think. This project was a beast for me because a) I'm not a furniture maker b) I don't own a table saw which would have been amazing c) I picked the hardest way to make the desktop and d) I modified some of the dimensions from the basic plans. I worked on this thing for weeks (granted sometimes I didn't touch it for several days or a week). But it was a fun and rewarding project. 

Estimated Cost
$500-$600
Estimated Time Investment
Week Long Project (20 Hours or More)
Finish Used
Behr Marquee, Minwax wood conditioner, stain (honey) and stain poly
Recommended Skill Level
Intermediate

Comments

Traditional Wood Toddler Bed with a Twist

Submitted by mikekmikek on Thu, 04/30/2020 - 10:34

I made the Traditional Wood Toddler Bed in a weekend and it turned out great! I did add a twist though: A chalkboard replaces the wainscot!

Built from Plan(s)
Estimated Time Investment
Weekend Project (10-20 Hours)
Finish Used
Used a chalkboark panel from Home Depot instead of the wainscot.
Used a hand router to round all of the edges to give it a softer feel.
Had to extend the length of the bed by 1/2" to accomodate a Greco toddler mattress. (Check your mattress size before you build!)
Recommended Skill Level
Intermediate

Truss Style Coffee Table

Submitted by Anonymous (not verified) on Wed, 04/03/2024 - 10:52

I saw the Truss Coffee table and HAD to make it!
I couldn’t find 2x3 at my hardware store so I ripped 2x6’s for the base. I also ripped 2x4 for the top end pieces. I used the color Provincial to stain and covered it in Polyurethane. I just love it.

Mélanie S.

Built from Plan(s)
Seasonal And Holiday

Queen Farmhouse Guest Bed

Submitted by Anonymous (not verified) on Wed, 05/08/2024 - 09:33

Ana - built this Queen Farmhouse Bed from your plans and videos. Really a warm, guest room that I built inspired from your work and detailed plans — thanks again!

Chris K

Built from Plan(s)

Farmhouse Table

My husband created this table as an anniversary present to me! I painted my present with a creamy white for the base and he stained the top with ebony.

Estimated Cost
$245
Estimated Time Investment
Week Long Project (20 Hours or More)
Finish Used
Creamy white behr paint and poly for the base, ebony stain for the top with a hand rubbed poly.
Recommended Skill Level
Beginner

Ultimate roll away workbench

Submitted by maker4510 on Sat, 08/01/2020 - 05:22

NINE MONTH UPDATE: After using the bench for almost nine months, we’ve made some changes. The first is that our table saw, a Dewalt 7491 didn’t fit in the way the plans called for because of the fence. We ended up cutting down and rebuilding the table to make a platform for the saw, then we built three “tables” around it to leave a gap for the fence operation. We also added a curved piece that can be removed to access the riving knife lever.

The other change we made was to take out the clamp storage that was in one of the cart ends. When we rolled the cart in and out, the clamps would catch and fall off. We put in another shelf instead.

Otherwise, we love the bench. Having the two rolling carts that we can reposition based on where we need a table extension is great. The miter saw stand works perfectly, and our dust collection setup rolls right underneath. We’re also in the process of building a router table that fits in the removable bench room area.

ALSO, sorry for the upside down/sideways pics. It won’t let me remove or fix them.

We made the ultimate roll away workbench with very few changes. Added the clamp hanger on one end as pictured. We didn’t add the shelf under the miter saw, as well be putting a dust collection cart.

We absolutely love the cart.M, now to save up for a table saw. The only change I would like is that I wish the side shelves were a little deeper, more like 10” instead of 8”, so more tools would fit.

Estimated Cost
380
Estimated Time Investment
Weekend Project (10-20 Hours)
Finish Used
None
Recommended Skill Level
Beginner

My version of the SMALL CEDAR FENCE PICKET STORAGE SHED

Submitted by dalbrough on Wed, 08/13/2014 - 08:53

We needed something to hold our garbage cans and recycling.
We made this little shed with fence board floor and fence board roof a lot shorter in depth and height - We also used 2x4's as we already had them - fits perfect and was amazingly easy to do.

Looks fantastic in our yard - we are still working on the yard so ignore the extra fence boards and 2*4s laying next to it.

Thanks so much for the great plans.

Estimated Time Investment
Weekend Project (10-20 Hours)
Recommended Skill Level
Beginner

Loft Bed w/desk

Submitted by Anonymous (not verified) on Sat, 08/29/2020 - 09:05

Our daughter has been asking us to build her a bed for months now. When eLearning became a reality for our household, we knew it was time to get to work. We usually do two to three big DIY projects a year, and have built from many of Ana White's plans. We often refer our the time together DIYing as "couples therapy".

We used Ana's plans for the Loft Bed and included the tall bookcase and desk system, with a few of our own modifiations and personal touches, such as:
- elimated the plywood backing on the bottom shelves of the tall bookcase
- only used one (1) bookshelf for desk system
- used toungue and groove paneling for back of small bookshelf, adding it to the sides as well
- made the desktop 19" wide
- added a framed magnet board
- added a sliding keyboard tray

Estimated Cost
$600
Estimated Time Investment
Week Long Project (20 Hours or More)
Finish Used
Desktop: Minwax Ebony stain
Everything Else: Zinsser 123 primer & Valspar Cabinet & Furniture Enamel (Snowbound Semigloss)
Recommended Skill Level
Beginner

Comments

Ana White Admin

Mon, 09/07/2020 - 20:33

This is so cool, I'm sure it's a dream come true for your lucky girl!

Building is our couples therapy, sounds like a t-shirt in the making:)

Seesaw aka "Blue Blade"

My husband and I made the boys a seesaw a few months ago. We had been spending a lot of time working on our chicken coop and I snuck around to make something for the boys as a surprise. They named it Blue Blade and it has been a fun new addition to their playground. It was straightforward to make. I used 2x3s instead of 2x4s since they were so much cheaper, and it worked really well. I love how it has the extra hole so we can make it taller as they grow.

Built from Plan(s)
Estimated Cost
$30
Estimated Time Investment
Afternoon Project (3-6 Hours)
Recommended Skill Level
Beginner

Twin Over Full Simple Bunk-Bed

Submitted by Ksavtech on Wed, 01/02/2013 - 10:16

The twin beds that my boys were using took up way too much space in their small room so after much looking I found the Ana White site and this plan. The bed I made is per plan except for the addition of the side rails that slip fit onto the sides. When we change the sheets on the top bunk we just slip off the rail and stand on the lower bunk. We've had my two boys and three nephews all on the bed playing Xbox and it is rock solid!

Estimated Cost
$150
Estimated Time Investment
Week Long Project (20 Hours or More)
Finish Used
Minwax Classic Grey and matte polyurethane
Recommended Skill Level
Intermediate

I used old fence panels

Submitted by Anonymous (not verified) on Mon, 10/26/2020 - 10:12

I love these chairs. I have made about 10 of them. I have several orders for 16 more. I use old fence planks for the seat and back. I also changed the back supports to 35 in. My husband is 6ft and he wanted to be able to rest his head back when he sits. Cutting the legs is the hardest part. I also changed the arms to jig holes so the Screws would not show.

Estimated Cost
$20
Estimated Time Investment
An Hour or Two (0-2 Hours)
Finish Used
If you are going to leave outside in the weather you should apply some sort of sealant.
Recommended Skill Level
Beginner

Counter Height Pub Table

Submitted by adecesare4 on Mon, 02/18/2013 - 10:59

After searching for a table i liked in stores the ridiculous prices for real quality tables made me just resolve it by building one myself. I have three boys under 10 so i knew I also wanted it to be sturdy and resistant to as much wear and tear as possible. Therefore I chose to use oak for this project...although more expensive it is so much harder and will hopefully last longer :)

ok, so I used some examples that Ana posted and some customer projects and combined them to create this table. I also made stools to match and so thankful I did (another brag post) because they are very sturdy with no tipping factor like regular store bought stools.

I probably spend a total of $600 on the table and 6 stools, but it was swell worth it and you cant buy a table like this in the stores for less than $1200 and that is with crap laminate wood that chips and then its ruined. So I feel this was a smart investment (plus I get the enjoyment and fulfillment of making it )

I did not finish painting the leg portion yet, but love the way it is turning out...I did by the Kreg jig finally as well and it is well worth the investment! so much easy, and secure joints.

Estimated Time Investment
Weekend Project (10-20 Hours)
Finish Used
Rustoleum Traditional Cherry
Minwax Polyacrylic
Recommended Skill Level
Intermediate

American flag rustic coffee table

Thanks so much for the plan!

Built from Plan(s)
Estimated Time Investment
Weekend Project (10-20 Hours)
Recommended Skill Level
Beginner

Comments

Stonewall711

Fri, 02/20/2015 - 09:35

This looks INCREDIBLE!!!!! I was hoping you could possibly share how you painted on the American Flag, and gave it the rustic look to match the coffee table? I'm new to this site, so I'm not sure if you can reply directly to this comment or not. If you can't, would you mind emailing me at [email protected]?

Thank you so much!

cristy118

Wed, 10/07/2015 - 13:59

Hi.  I love this coffee table.  I have read through all the directions.  I have one quick question.  After I have built the coffee table and then oxidize the wood, do I then paint the flag with regular red white and blue paint and then seal it with the wax?  Thank you 

Console Table

Submitted by wangbw on Sun, 06/11/2017 - 15:32

Quick and easy to follow plans.  Only issue I ran into was that my miter saw only cuts up to a 50° angle.  I set up a jig to hold the 2x2 perpendicular to the saw and set the miter to 30°.  Viola, easy 60° angles!  Pic attached for reference.


Built from Plan(s)
Estimated Cost
$80
Estimated Time Investment
Afternoon Project (3-6 Hours)
Recommended Skill Level
Beginner

My first DIY project!

Submitted by Celeste808 on Sun, 05/05/2013 - 10:30

Finally Completed!!! Thank you rainy Saturday! So I wanted a new entertainment center of sorts... couldn't find one that was just what I wanted..... so why not just build what I want! Just DIY it. ;)

I used the faux fireplace plan and modified it to have attached shelves on the sides. I also added an extra strip at the top of the fireplace opening so I could mount an LED bar light.

I used 1/4 plywood to make a tile base, penny tile, and 1/2 quarter round to finish out around the entire bottom.

Total project cost was less than $200 including the tile and light!

Best part is the whole thing is movable!

Thanks Anna White for such an awesome plan to start with!

Estimated Time Investment
Week Long Project (20 Hours or More)
Finish Used
MDF & plywood
Recommended Skill Level
Beginner

Comments

spkramer

Wed, 07/03/2013 - 10:24

This whole unit is great. My wife LOVES it, which means I will be building it! Did you purchase the two shelf units or build them yourself? Did you use a pattern or plan? Thanks!

Alisonwunderland

Wed, 07/31/2013 - 13:09

This is amazing! Exactly what I'm looking for! Did you change the depth of the mantel to make sure the shelves would be deep enough to hold things?

Celeste808

Sat, 08/03/2013 - 18:25

I did make the depth of the fireplace deeper so I could have room for the halves on the side. I just sketched out the dimensions I wanted the side shelves and built them along the same lines as the fireplace. Wasn't hard to figure out and just made it to fit the size I needed. The inset of the fireplace does not go all the way back to the wall either, that way the power strip can fit on the floor behind it. Glad you like it and thanks for the compliments!

EAnne

Wed, 07/23/2014 - 14:54

Hi Celeste 808, What a wonderful faux fireplace WITH the bookcases, especially. I'm hoping I can try this in our space challenged bedroom. Did you by any change reply to the chap who asked if you had some kind of dimensions or plans you could pass along to us? I would love to see if we can make it work in the space we have available.
Thanks again for the inspiration,
e

jrybolt26

Mon, 10/28/2013 - 18:25

I absolutely love what you did with this. I am going to have my fiance help me make this for our house. If you still have the dimensions and details of how you built the whole unit I would greatly appreciate it if you could post it.

mommyof2cuties

Sun, 04/13/2014 - 13:00

This is gorgeous & I can't believe it's your 1st project. I would love to build this too. Did you use any particular plans for the side units? If you have any tips or information to share, that would be great! I've actually been trying to make up my own plans using Sketch Up, but that's not working too good, lol. Again, great job & thank you.
Lynda

emswave

Sun, 02/08/2015 - 12:31

I'm dying to know the dimensions you added to the width. Also, the dimensions of the book shelf. I have been trying to draw up plans for the last week and I'm stuck with trying to figure it out by looking at your pictures.

PLEASE HELP!

Thanks!!

mrittgers1

Mon, 07/27/2015 - 09:15

Do you have the blue print of how you built the mantel and side book shelves? I am wanting to go buy supplies to build this tonight!!!


Thank you!

Back