Community Brag Posts

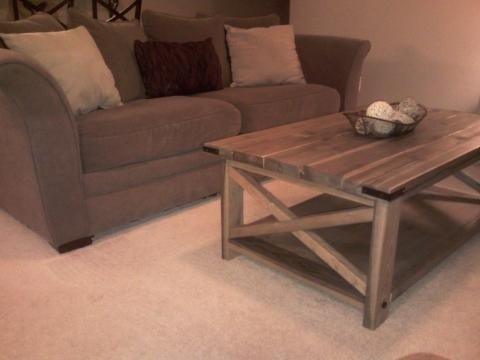
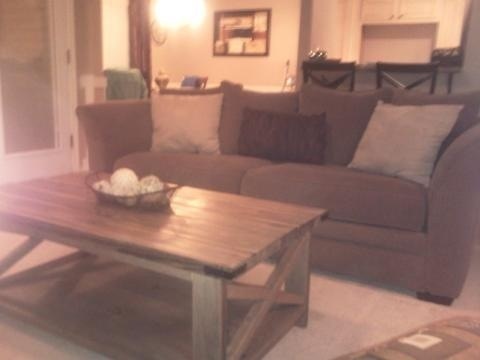
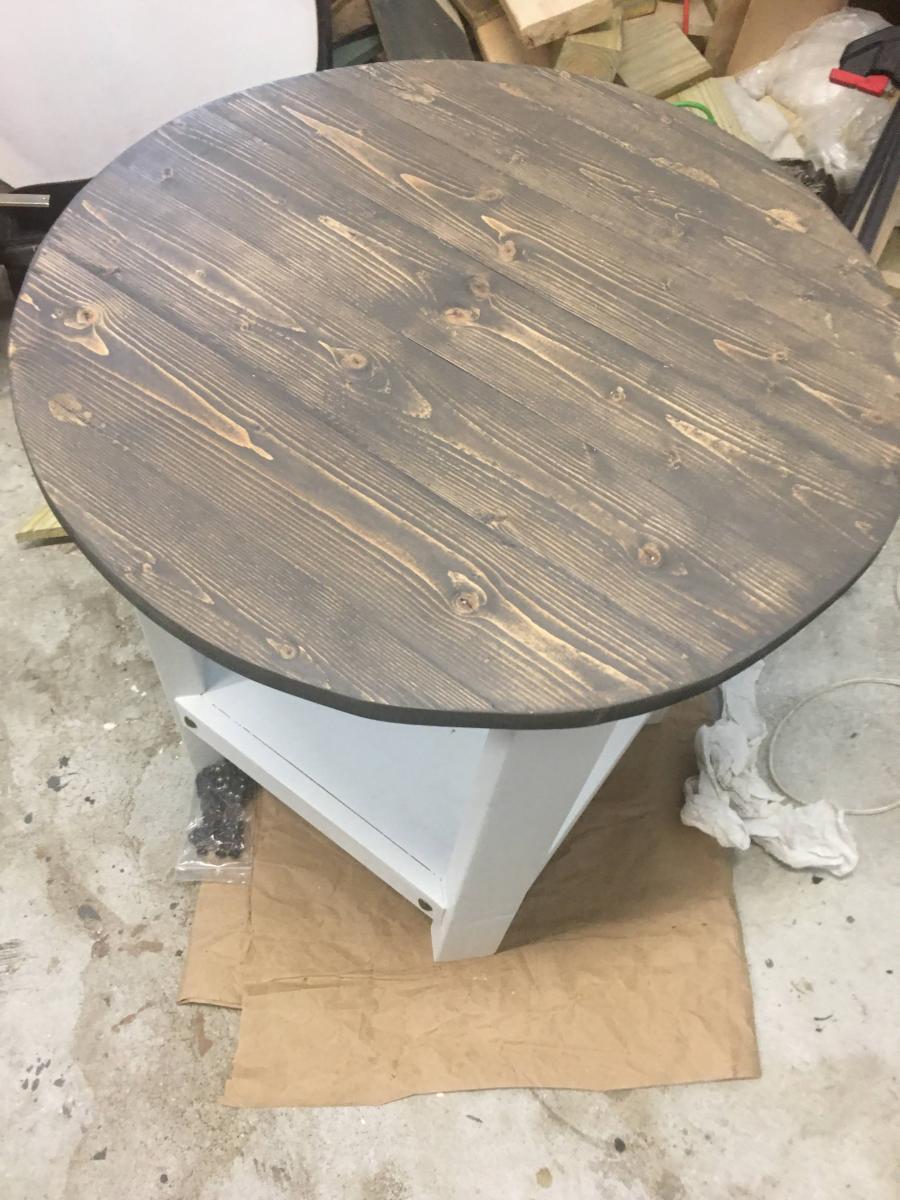
Flared Leg Coffee Table

Submitted by DangerDad on Fri, 01/09/2015 - 11:58

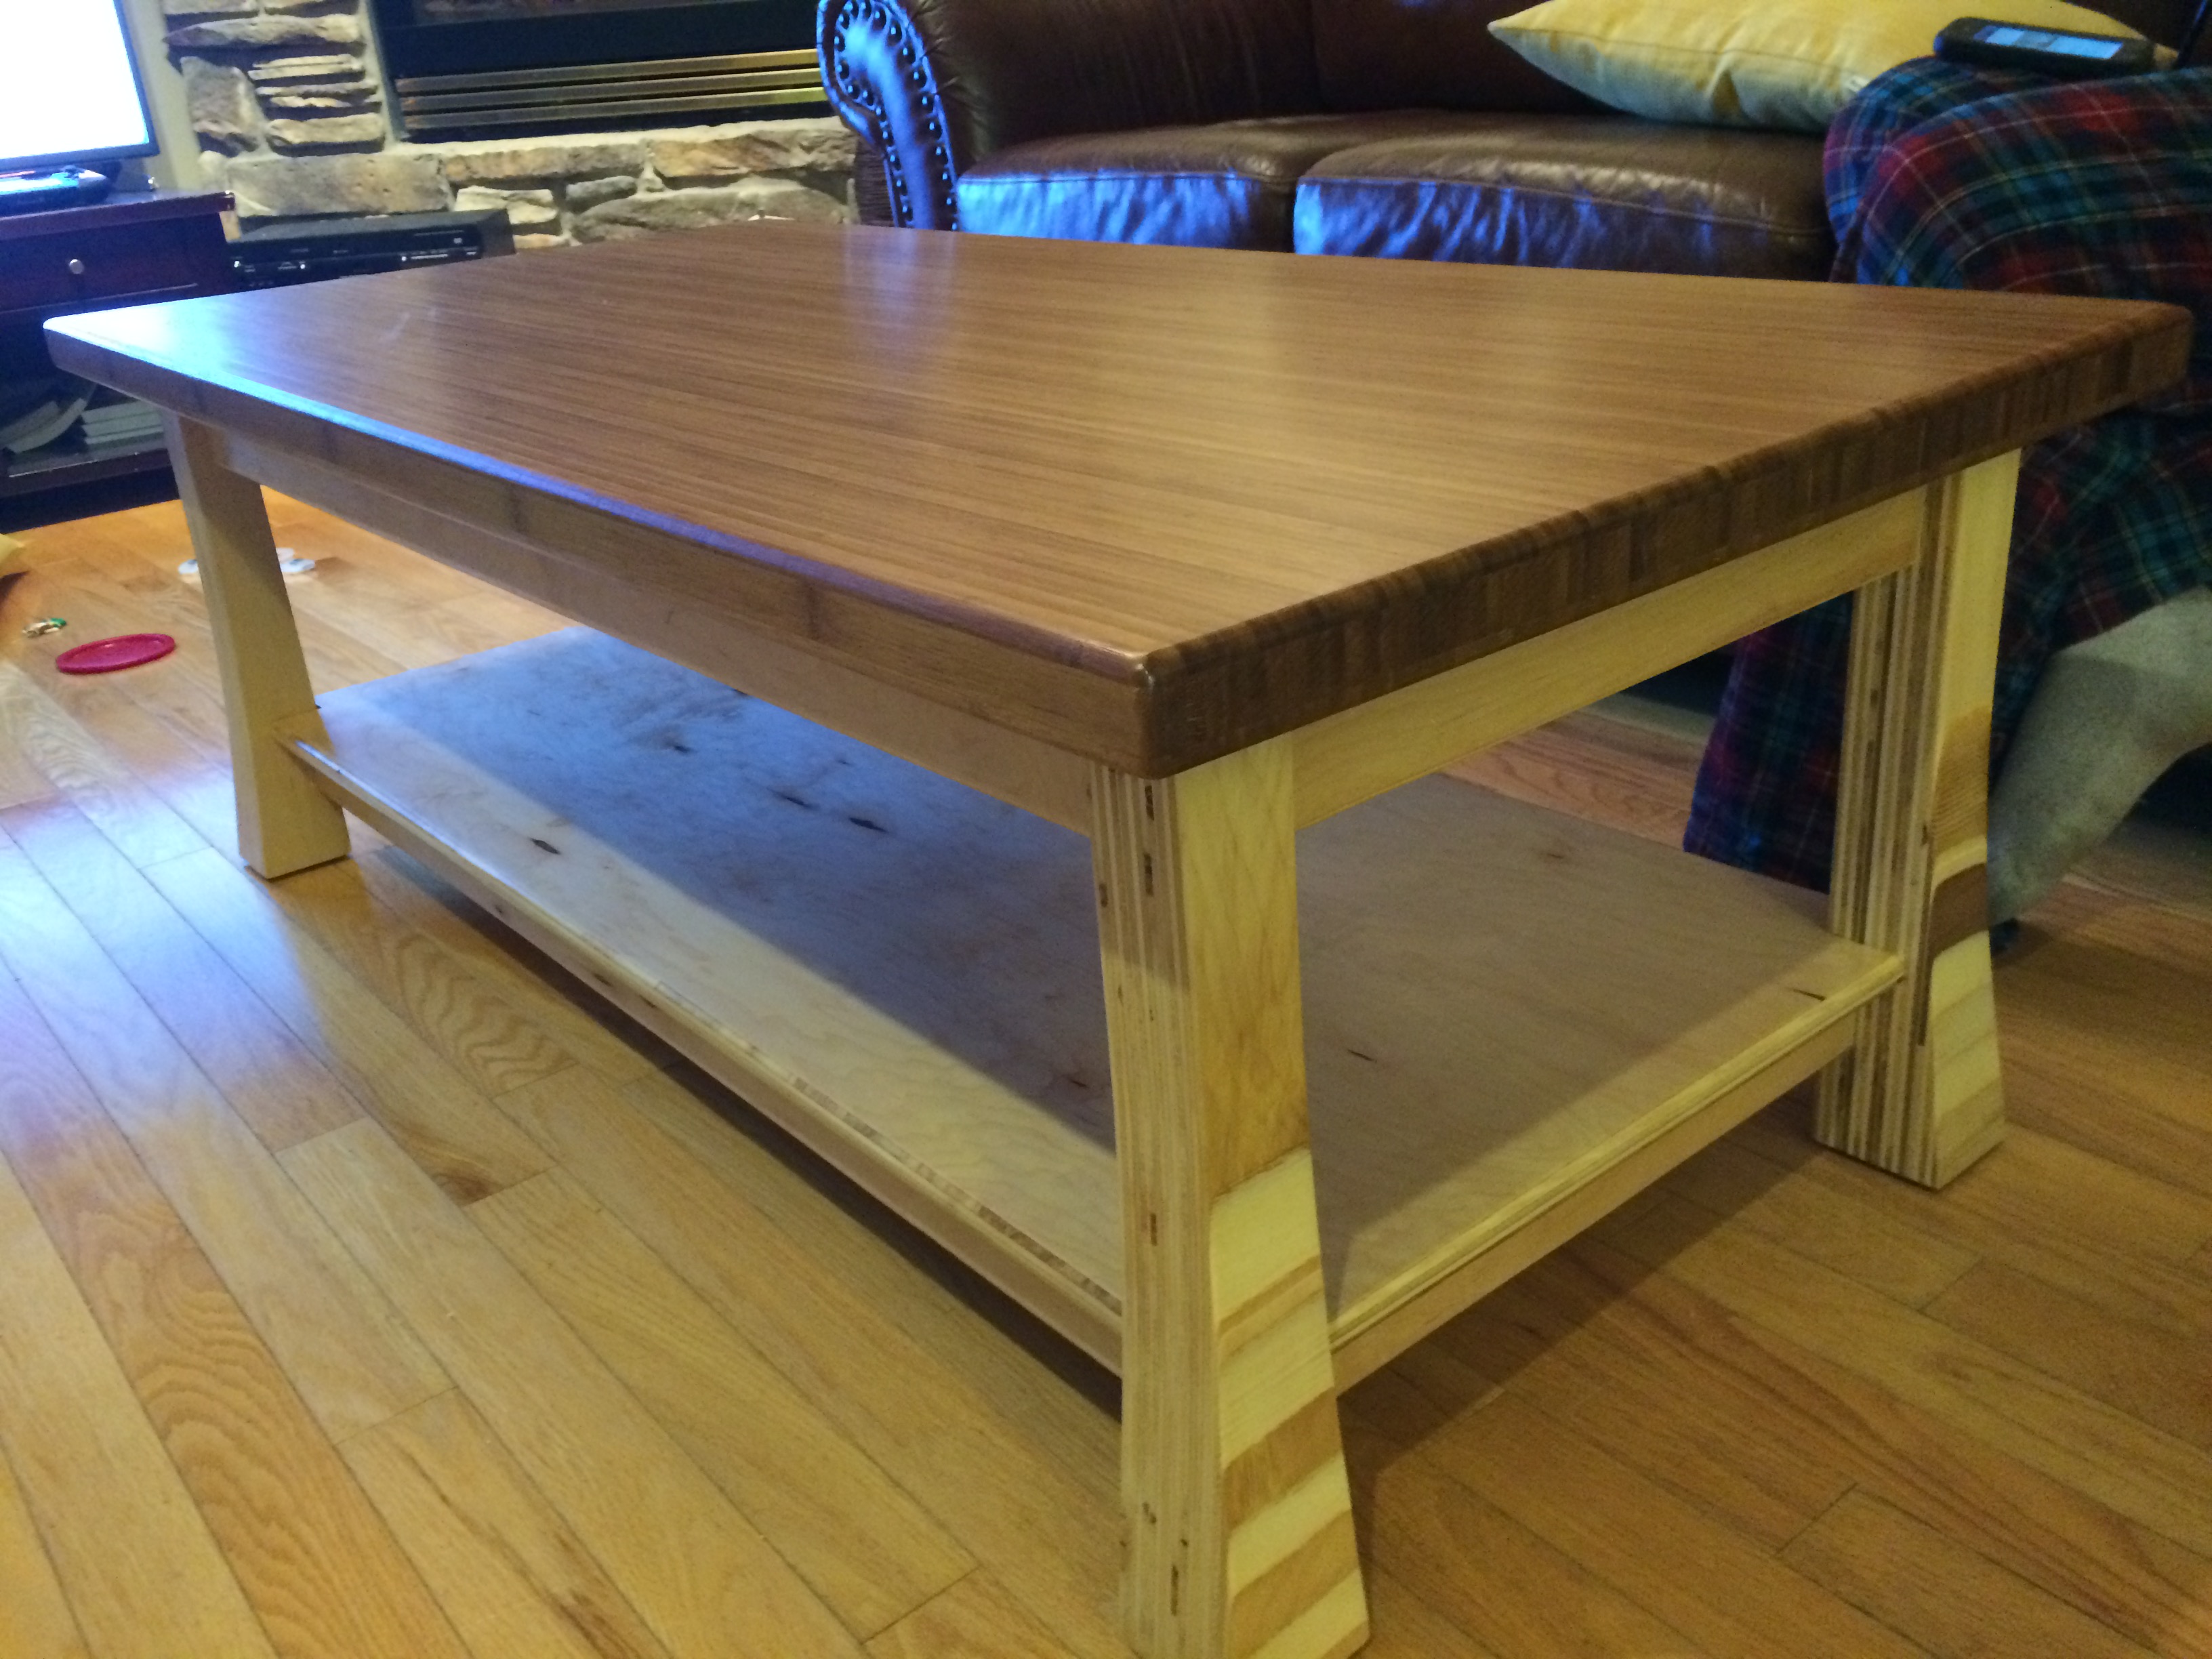
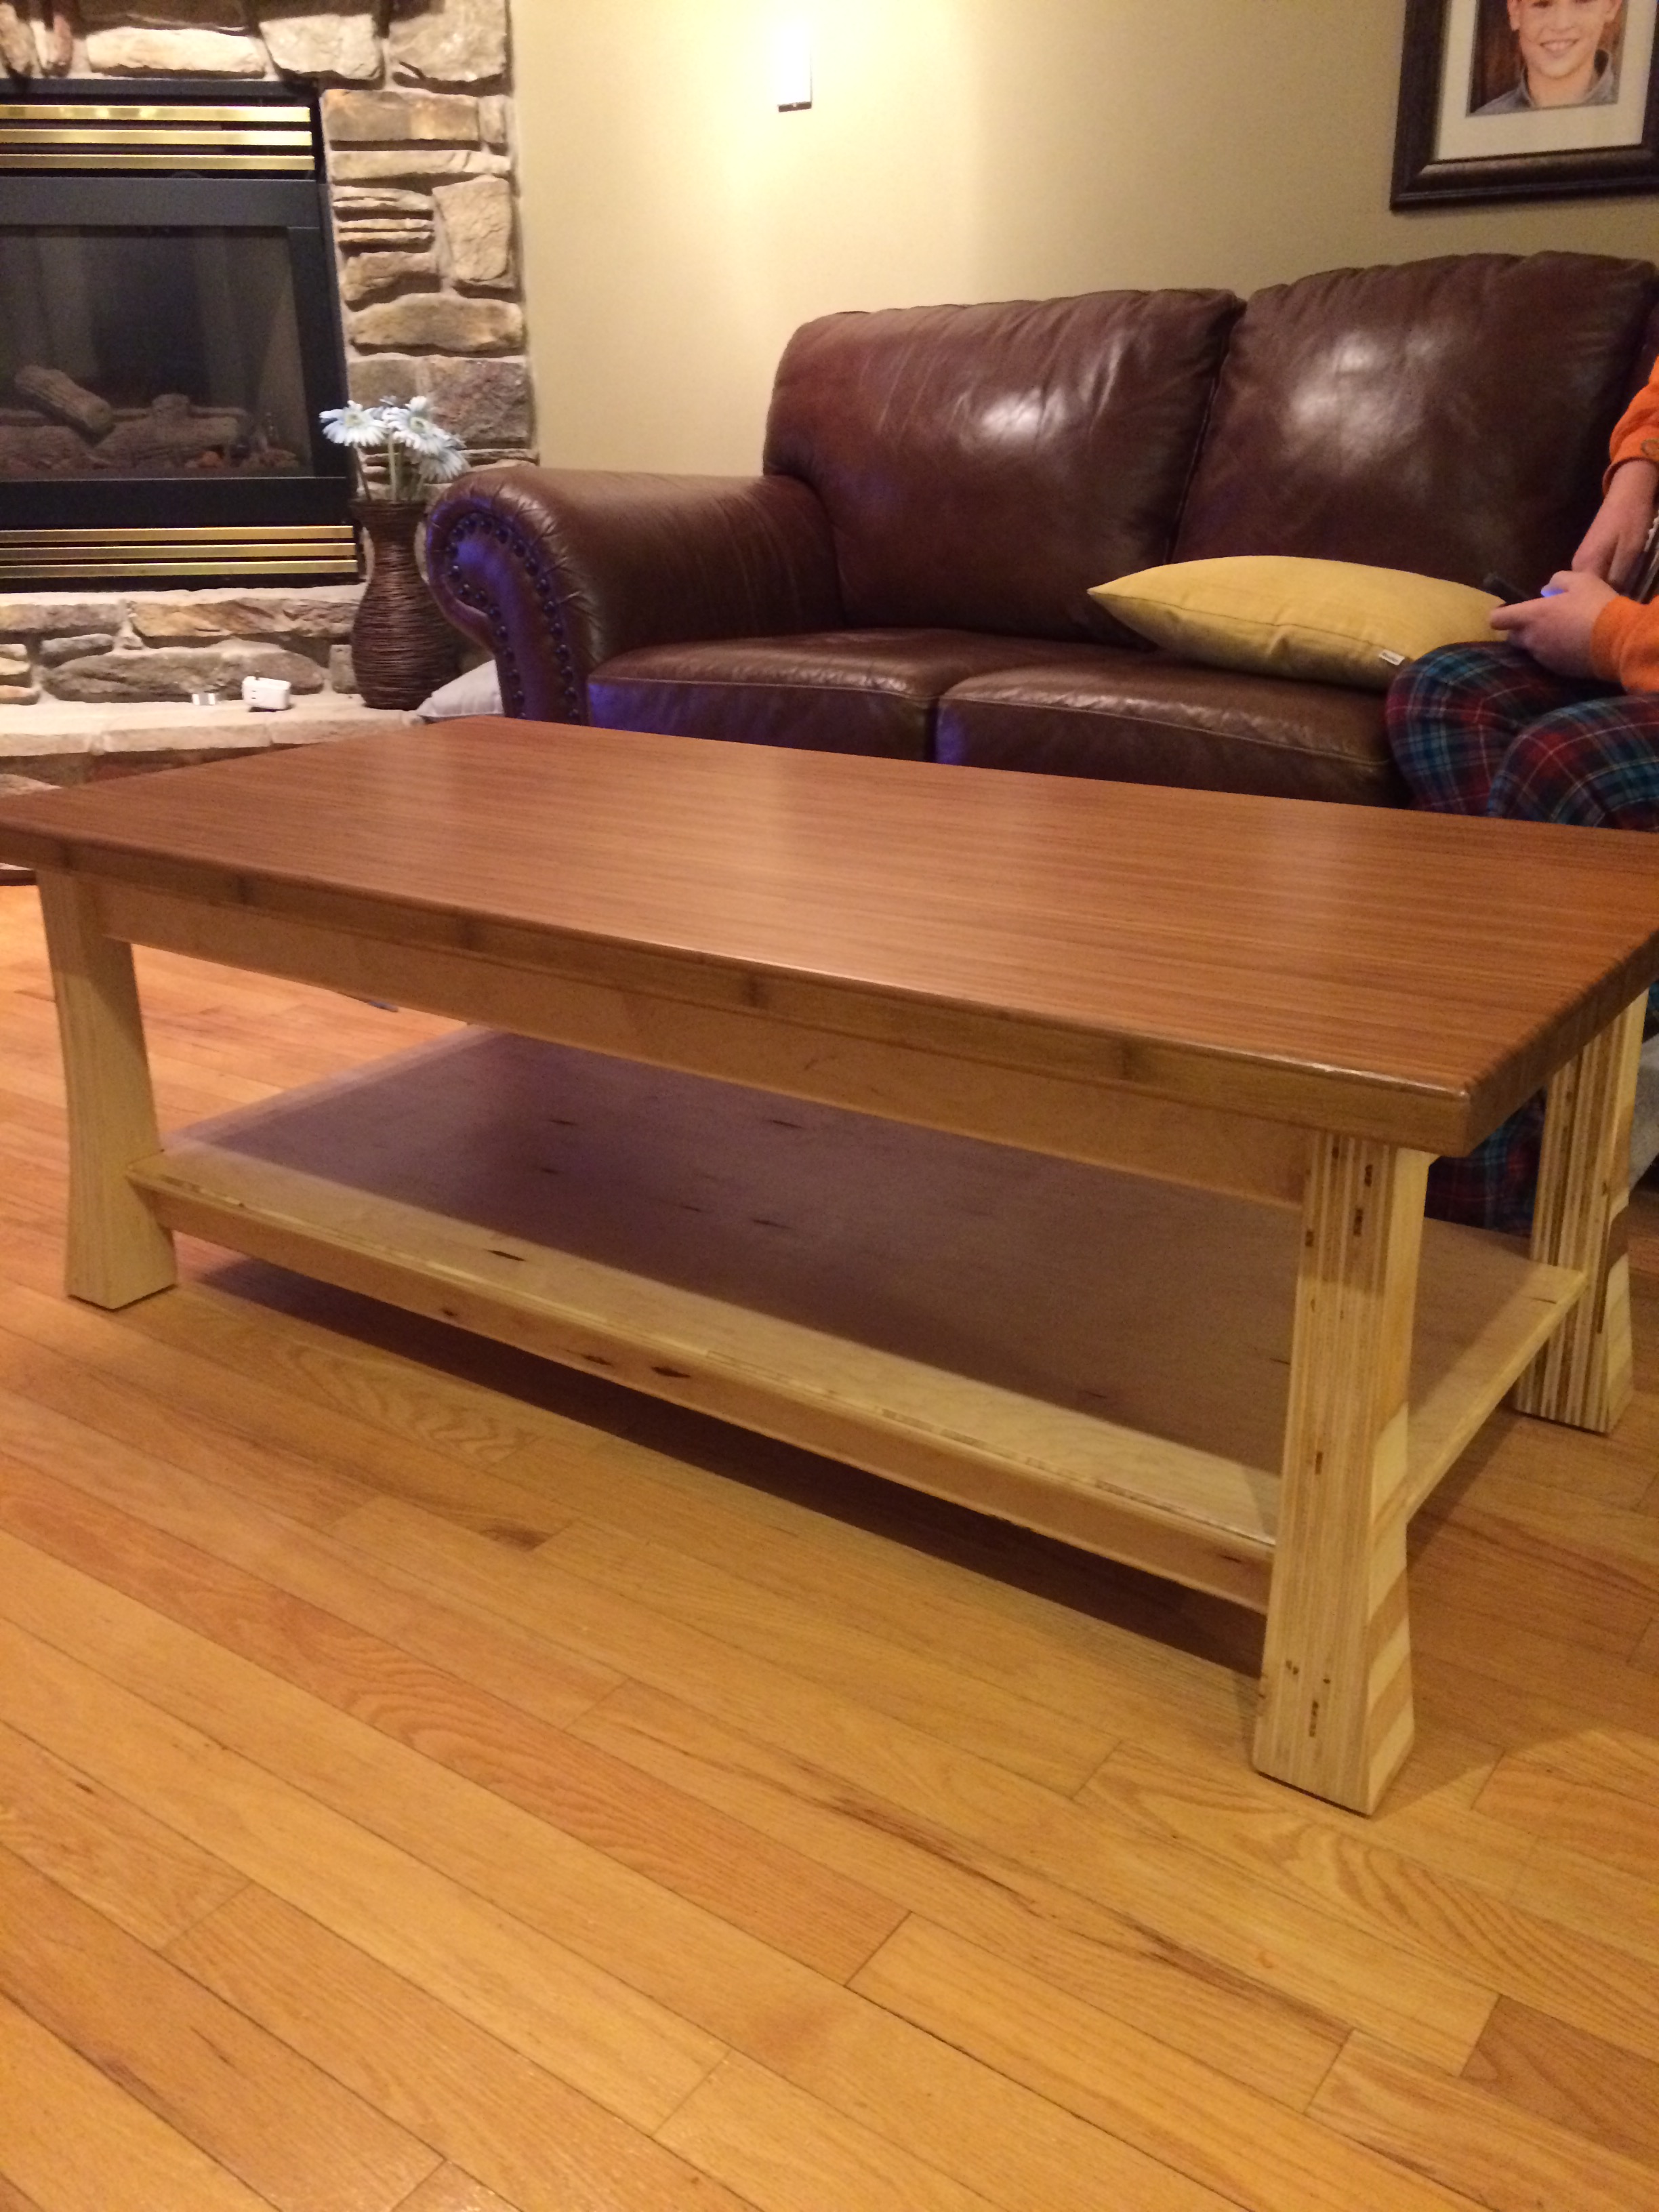
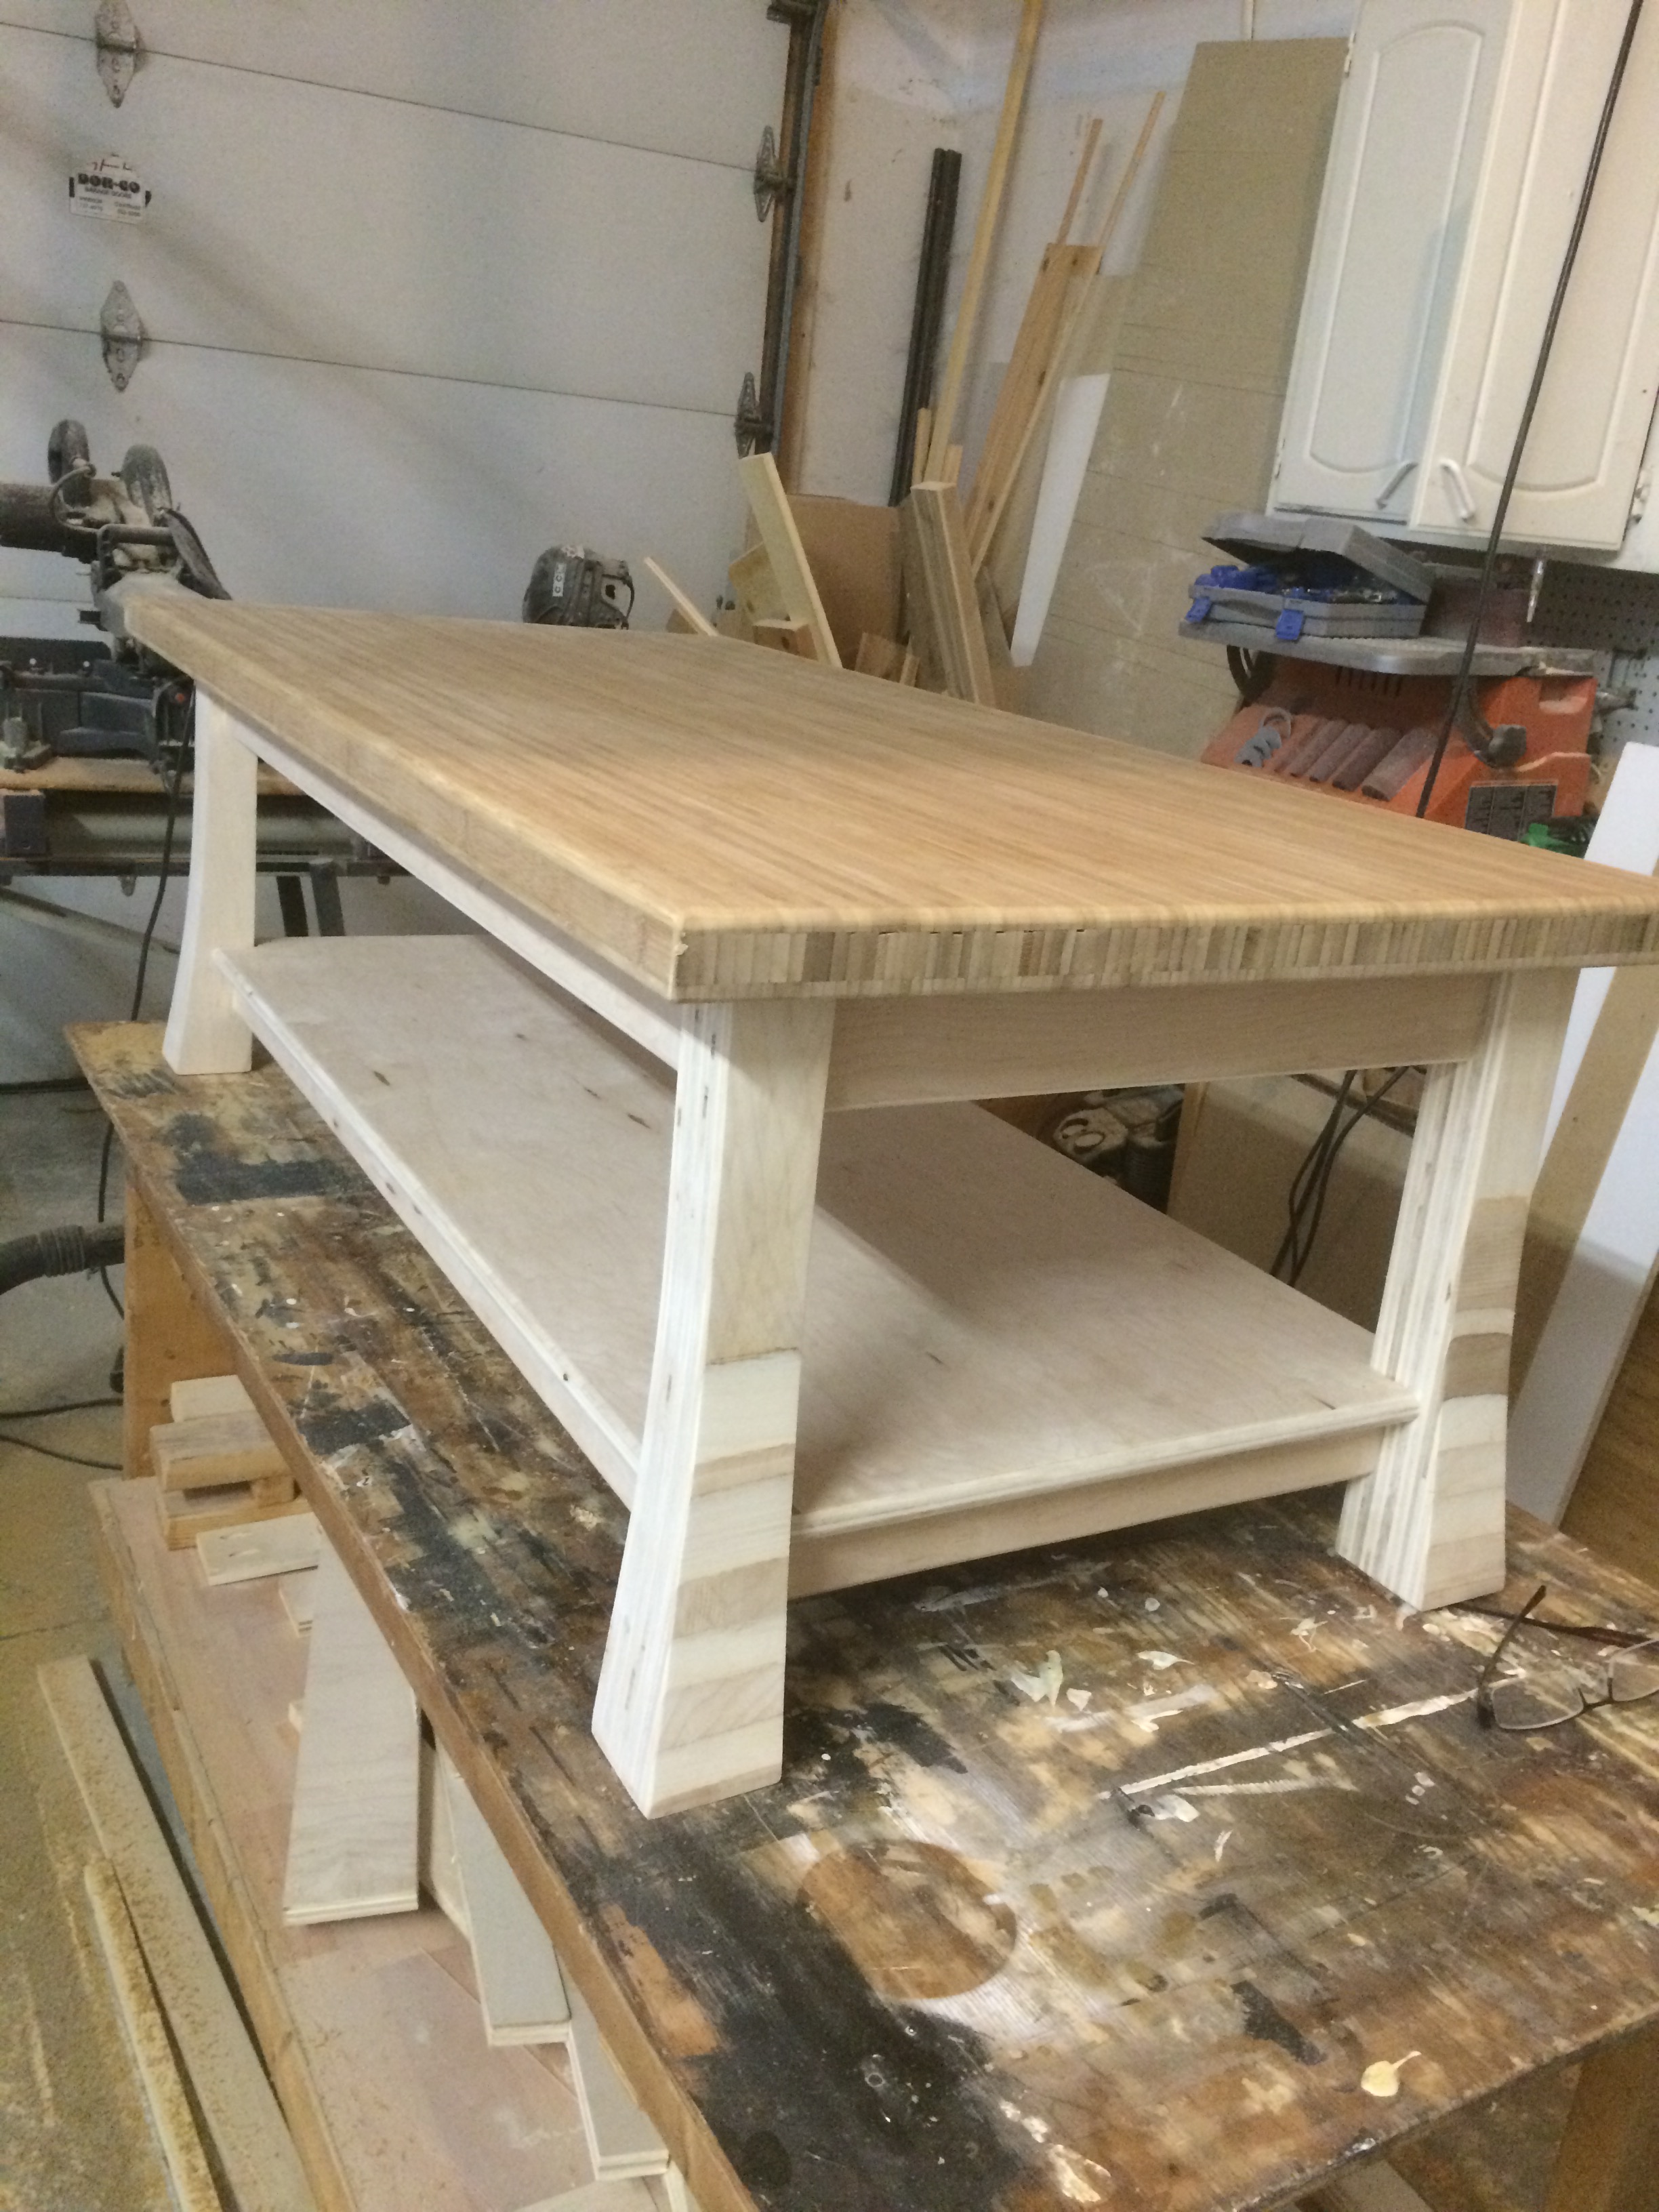
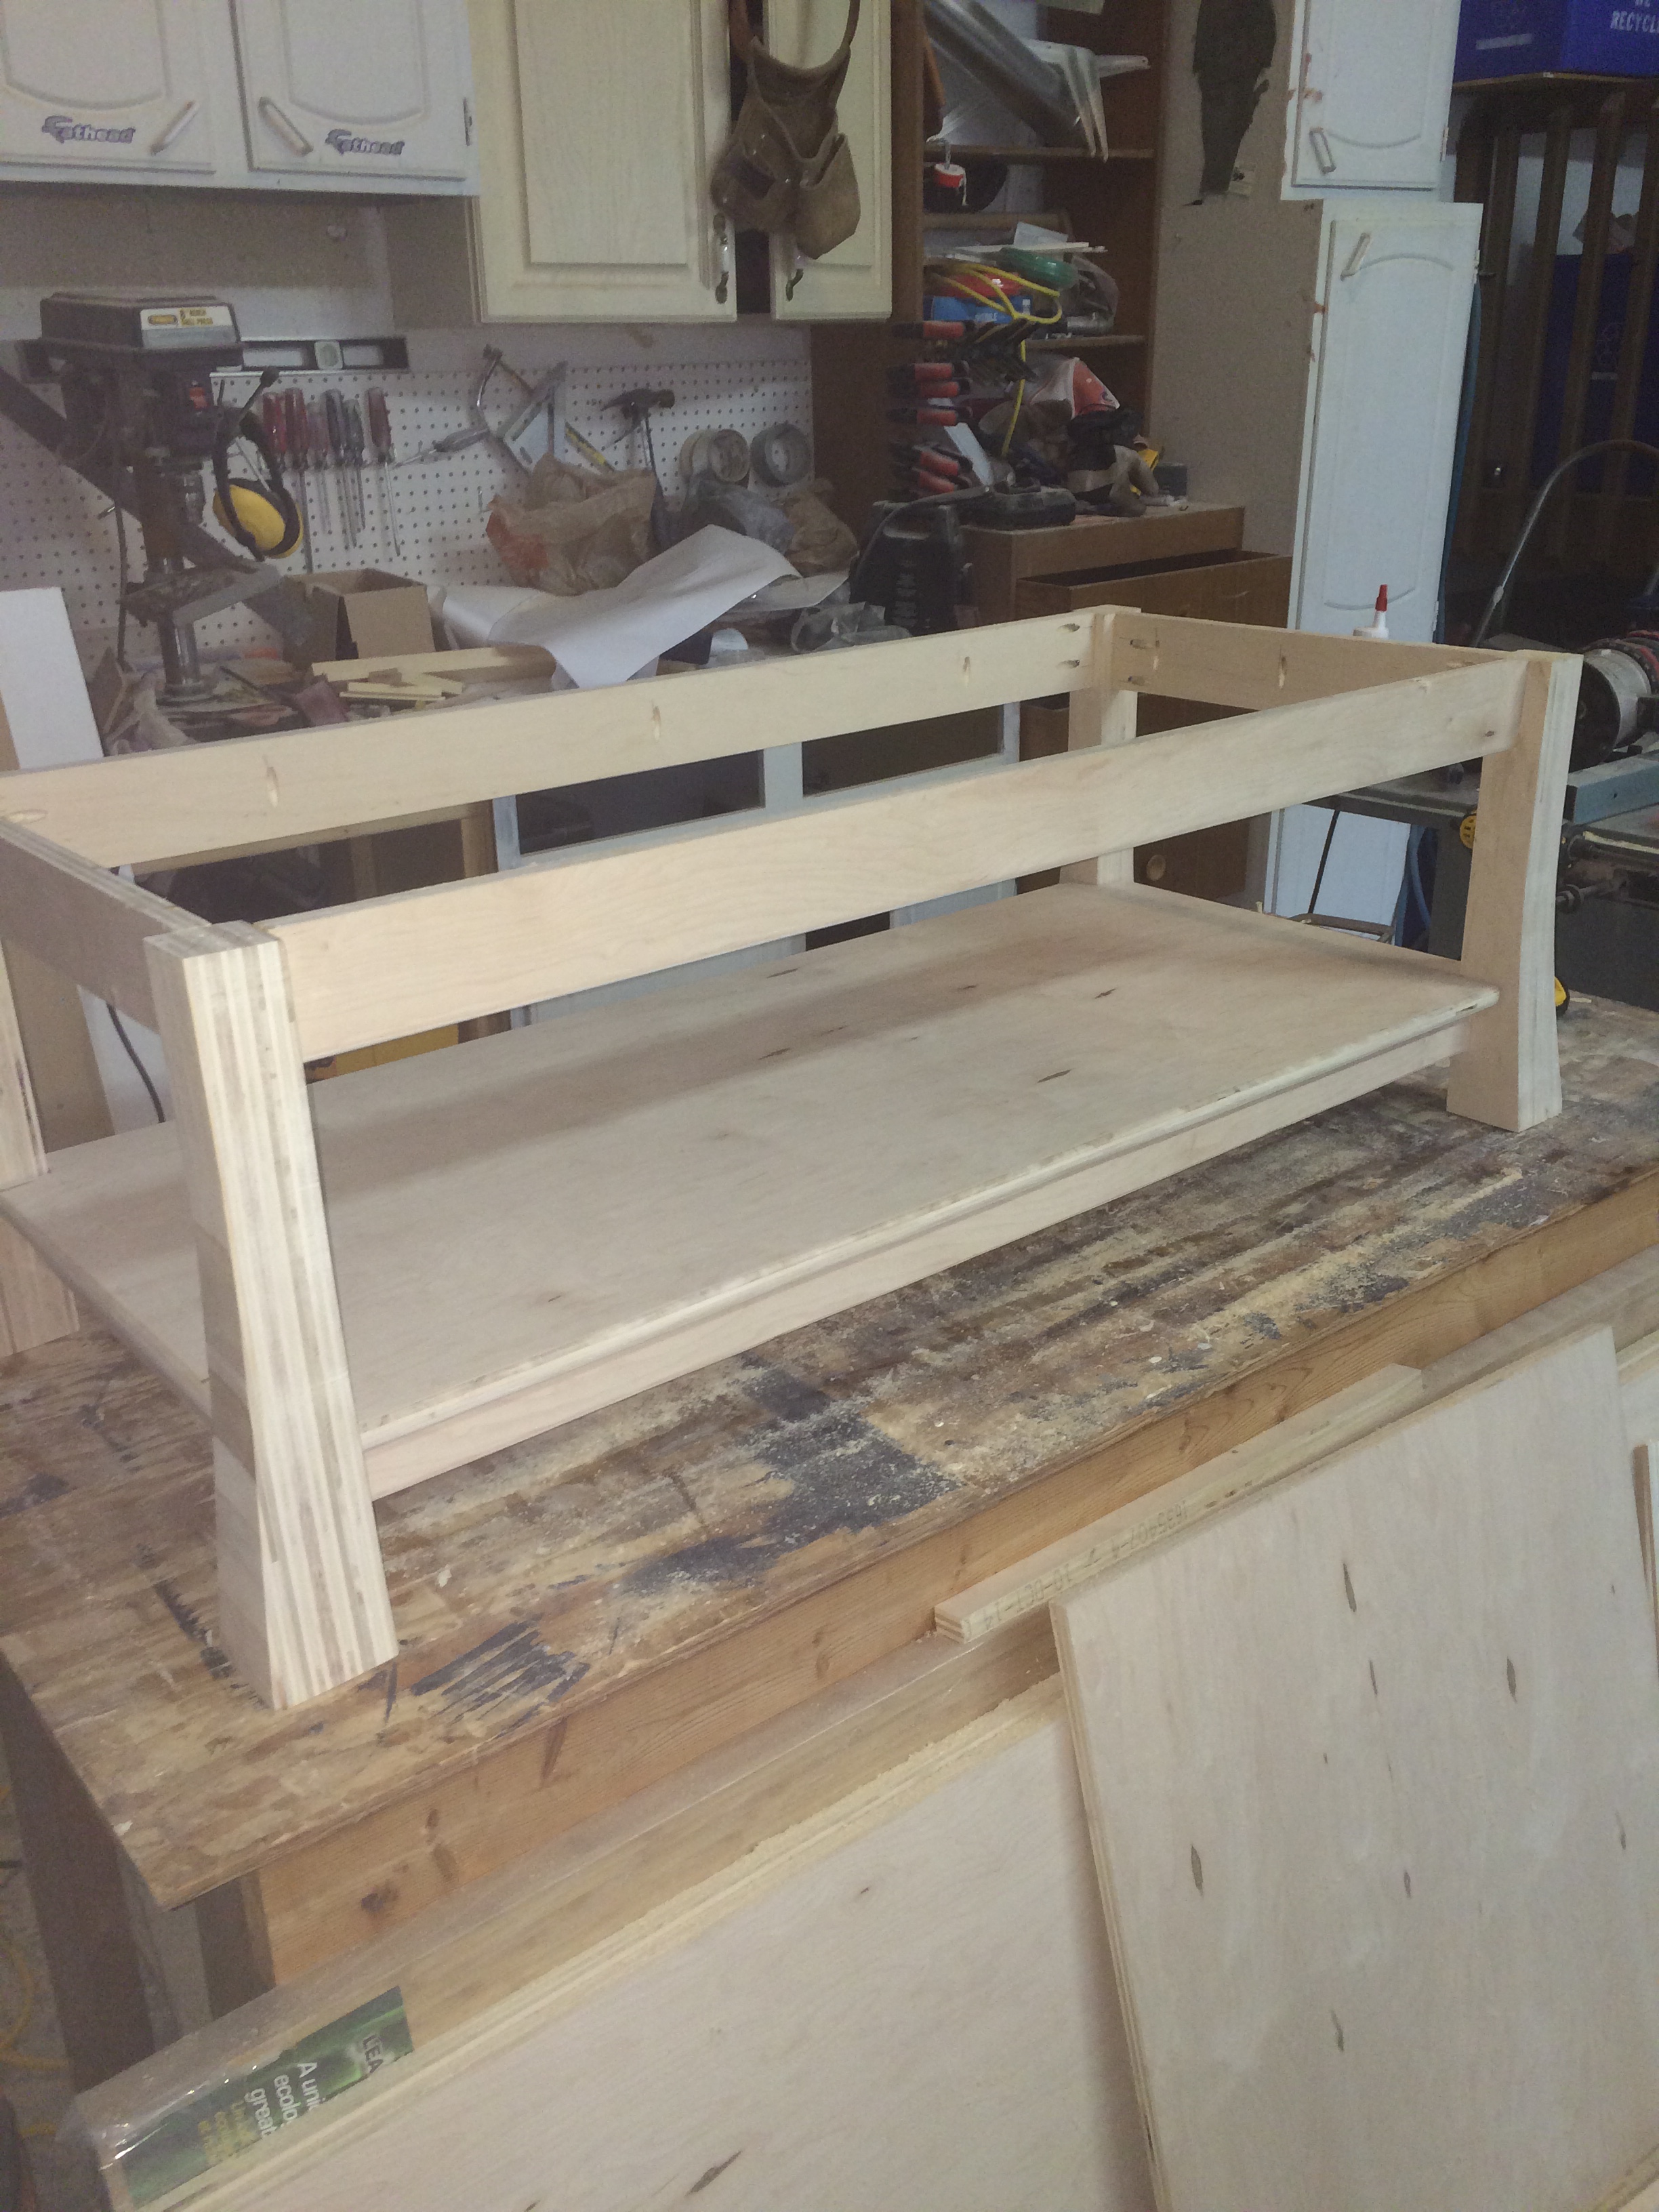
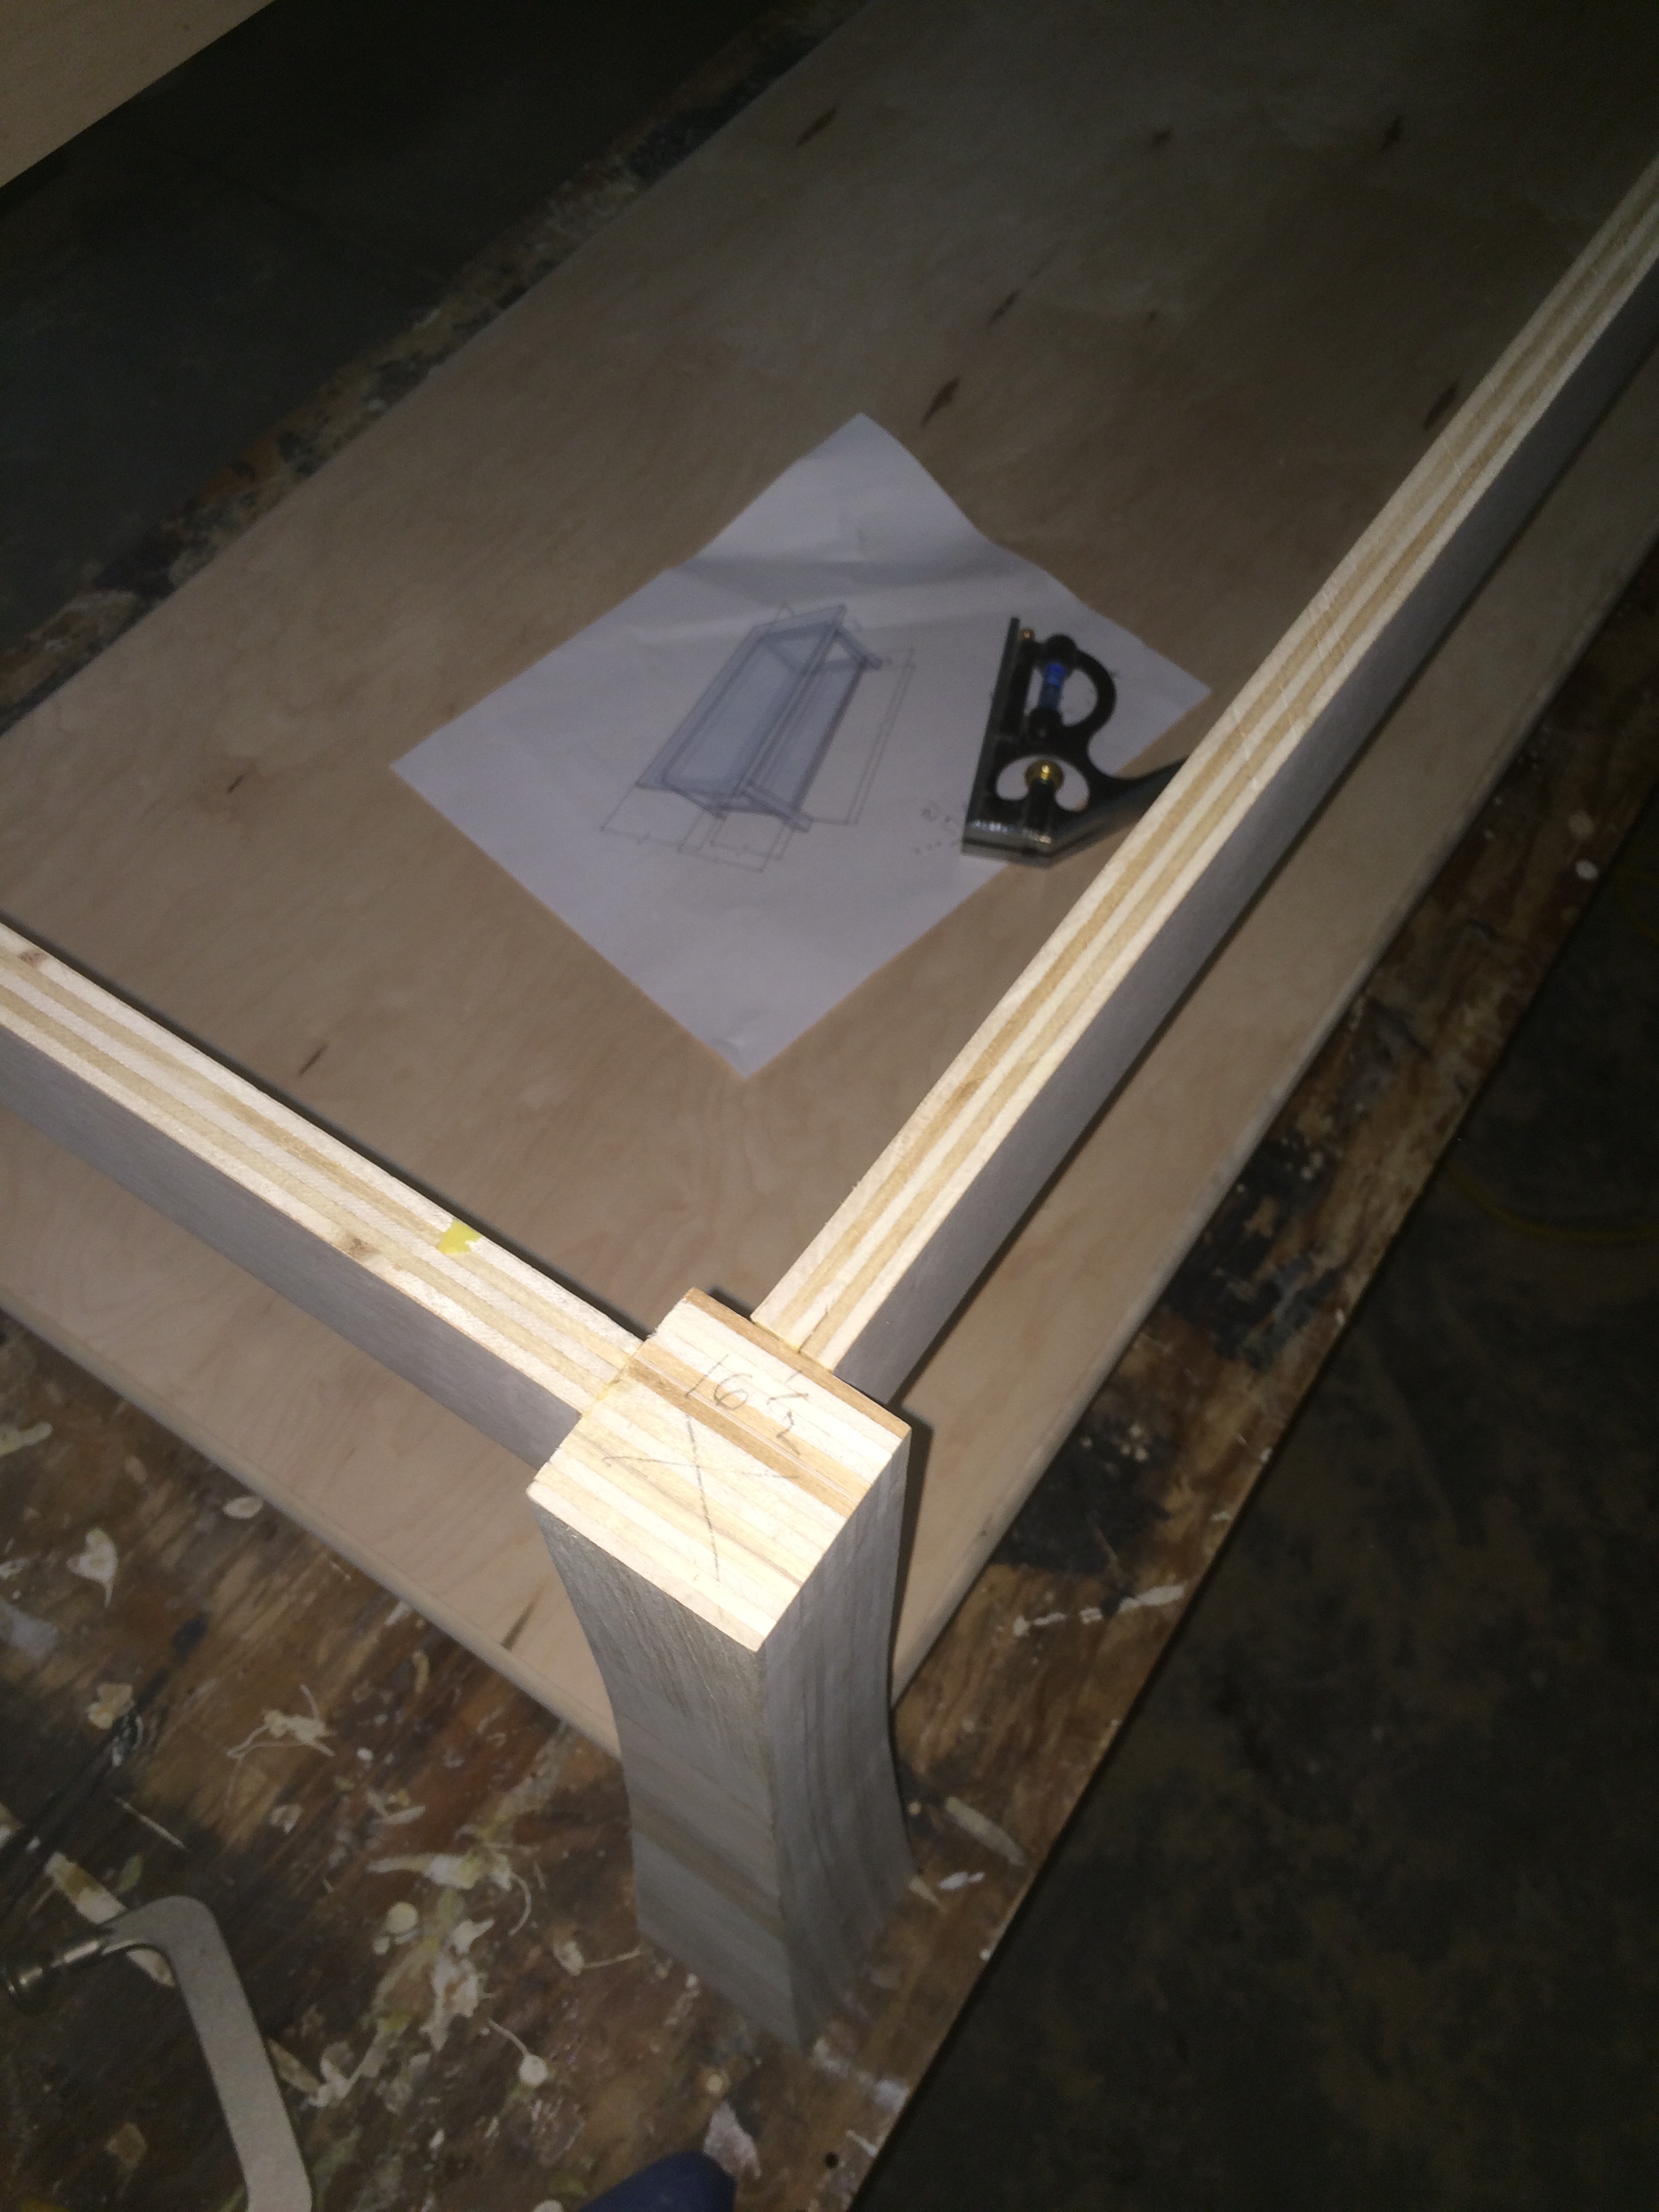
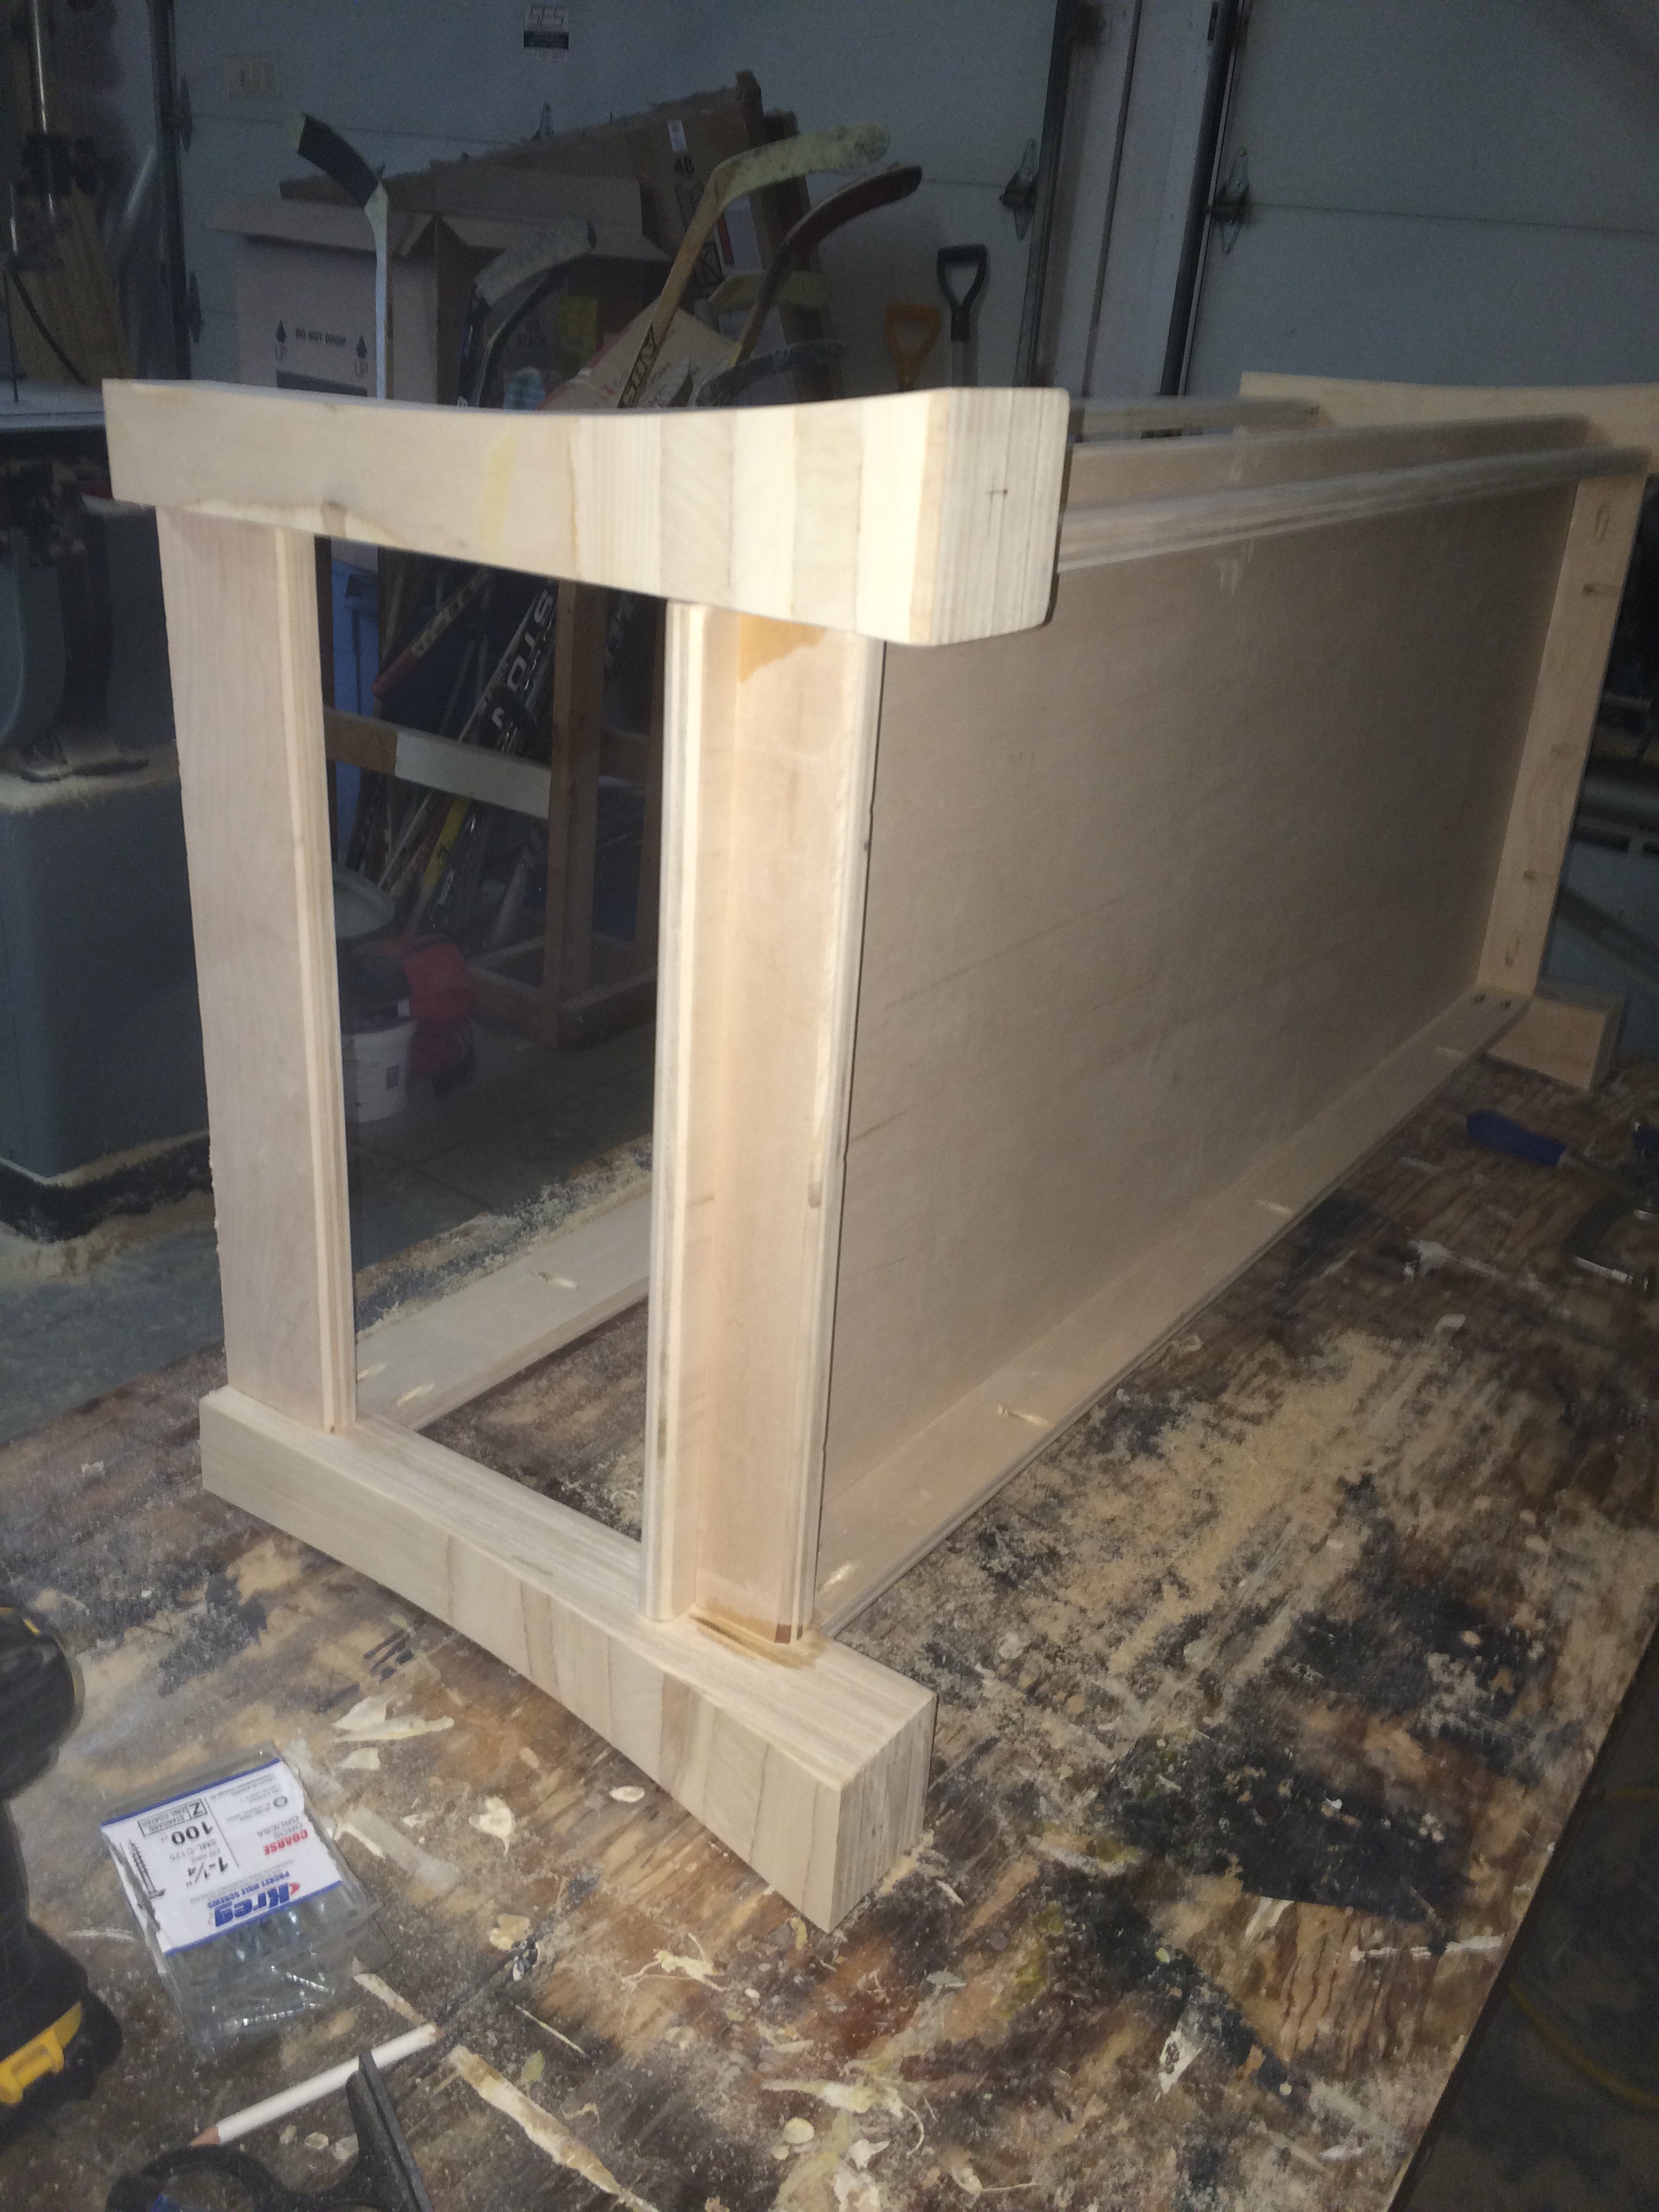
For some time I've wanted to build a sturdy coffee table for our family room.  I've also been experimenting with and bulidng lots of furniture for the kids rooms with low cost, paint grade, maple veneer plywood.  I love the ease of working with this material and results have been great.  I never thought that raw edged plywood furniture would have a place outside of the kid's bedrooms until I saw this slab of bamboo counter top at our local big box store and I got the idea for this piece.  Although I still would'nt consider this "fine furniture", I think it turned out pretty cool.  The design is my own, and it's the first time I've tried flaring legs in two directions which was real easy to do with a bandsaw.  I have the plan drawn up in sketchup if anyone is interested.

Estimated Cost
$120 for the bamboo slab (with some left over for an end table)
Less than 1/2 a sheet of plywood at $50/sheet.
Estimated Time Investment
Weekend Project (10-20 Hours)
Finish Used
Minwax Early American on the top
Minwax Satin finish poly (3 coats)
Recommended Skill Level
Intermediate

Comments

JoanneS

Fri, 01/09/2015 - 13:33

What a cool project! Love the bamboo top! To do your table legs, did you glue the plywood pieces into a block and then cut with the band saw? Beautiful job!

A lot of work but worth it!

Submitted by Anonymous (not verified) on Mon, 04/10/2017 - 18:09

A few things that would be helpful - power tools! Nail gun, drill and table/miter saw would all be helpful. I also would stain the pieces beforehand and touch up after. But overall, SO pleased with the final result.

Estimated Cost
$100 for 2 single loungers.
Estimated Time Investment
Weekend Project (10-20 Hours)
Finish Used
Deck stain
Recommended Skill Level
Intermediate

Planter Boxes

Submitted by Doc54 on Tue, 03/09/2021 - 22:31

Hi,
I made these planter boxes from Ana's plans. The plans made it an easy project and we also decided to paint them white.

Cheap and very effective in the garden.

Thanks Ana...

Estimated Cost
Approx. AUD $40 per box
Estimated Time Investment
Afternoon Project (3-6 Hours)
Finish Used
We simply used an outddoor paint - low sheen - white and applied 3 coats to each box.
Recommended Skill Level
Beginner

Comments

Rustic X Coffee Table

Submitted by stina7186 on Thu, 03/07/2013 - 05:47

Very easy to put together... Only hard cuts were the X's. we ended up doing it like the pictures, not the plan. Stain is tricky, make sure to practice! We ended up having to resand and restain the tabletop.

Built from Plan(s)
Estimated Cost
$50
Estimated Time Investment
Day Project (6-9 Hours)
Finish Used
Oxidized wood
Recommended Skill Level
Intermediate

Comments

Kentwood Bed

My son used to have a flimsy headboard and frame that drove me crazy so I decided to build him a bed from these plans. I couldn't be happier with his bed. I used pocket holes and everything has been holding up quite nicely. Love these plans.

Built from Plan(s)
Estimated Cost
$100
Estimated Time Investment
Afternoon Project (3-6 Hours)
Finish Used
Apply 2 coats of Miss Mustard Seed's Typewriter milk paint mixed one part paint to one part water. Sand with a fine grit sanding sponge then seal with Miss Mustard Seed's Hemp Oil. Wipe off any excess oil.
Recommended Skill Level
Intermediate

Comments

Wood Easter Basket Bunny Shaped Trug

Submitted by Hardware on Fri, 04/14/2017 - 12:32

Check it out on iamhardware.com ! Thanks Ana for the plans!

Estimated Time Investment
An Hour or Two (0-2 Hours)
Finish Used
spray paint
Recommended Skill Level
Starter Project

Comments

overbeckdaren@…

Sun, 03/08/2020 - 20:58

This is  great starter project for the diyer I want to personally thank you ana for this plan I'm a modest wood worker and sell my stuff for profit I will say these were a big hit in my area with selling 50+ baskets which is the most I've built of one thing in all my 7 years of woodworking these are the cutest little baskets thanks again

Farmhouse Queen Bed

Submitted by Dudley193 on Mon, 03/15/2021 - 11:06

I got this bright idea that we should change the basement into a master suite. However, we could not get a box spring down the stairs. This gave me the perfect opportunity to take on the biggest project of my woodworking life. I absolutely love how this bed frame turned out and it looks so great lined up here next to the fireplace!

Built from Plan(s)
Estimated Cost
180
Estimated Time Investment
Weekend Project (10-20 Hours)
Finish Used
Weathered Grey Thompson's Water Seal

Comments

Corner Door Cabinet

Submitted by searcyb on Sun, 03/10/2013 - 13:10

My wife came to me a couple of months ago and asked me to build a corner cabinet for our family room. She had found inspiration through a picture on pinterest that she "had to have." I found a couple of old doors through a resale shop near our house and this is what I was able to make with them.

This was a little tougher than I thought it would have been. I have done crown molding before, however, I have never done a floating crown (no support on the top). I was able to use my nail gun and get a solid fit on the bottom of the crown and then glued a support strip behind the crown.

The shelves are made out of 3/4" ply with a birch veneer facing. Surprisingly easy to use with just a little measuring and a hot iron set to the cotton setting.

Again, another project that would have been made infinitely harder without my kreg jig.

Let me know what you guys think!

Bryan

Estimated Time Investment
Weekend Project (10-20 Hours)
Finish Used
General Finishes Brown Mahogany gel stain
Recommended Skill Level
Intermediate

Comments

Rustic Kitchen Island DIY

Submitted by kstruthers on Fri, 01/16/2015 - 07:57

Modified the plan in order to use 12 inch drawer slides and to fit the 1X24x48 project panel found at Lowes. The 2 inch swivel casters and drawer hardware were found at Home Depot.

Built from Plan(s)
Estimated Cost
$150-$200
Estimated Time Investment
Weekend Project (10-20 Hours)
Finish Used
Behr Premium Plus Ultra in snowfall with Minwax dark walnut stain for top. Sealed with General Finishes High Performance topcoat in flat.
Recommended Skill Level
Intermediate

Comments

Grandkids LOVE IT!

Submitted by Anonymous (not verified) on Tue, 04/18/2017 - 05:31

Simple to build, took longer to paint it than it did to build it!

Built from Plan(s)
Estimated Cost
65 dollars (45 was paint).
Estimated Time Investment
Weekend Project (10-20 Hours)
Finish Used
primed with Kilz, painted with Glidden. Harley symbols were hand painted.
Recommended Skill Level
Beginner

Pottery barn benchright end tables

Submitted by Lilbitmojo on Fri, 03/19/2021 - 05:45

My daughter and son in law needed a small table for the babies room and this ended up being the perfect solution!! Absolutely love it!!

Built from Plan(s)

Comments

Washer & Dryer Pedestal / Platform with Drawers

Submitted by dmccoy on Tue, 03/12/2013 - 10:26

Platform (Pedestal) with Drawers for front-loader Washer & Dryer. Cheaper than buying the manufacturer's plastic pedestals and more fun to build anyway! The drawers are also much wider and deeper than the manufacturer's pedestals. We can usually fit about 3 full loads of laundry in each drawer. (That's 6 loads of laundry before we have to start folding!) It's a very easy and basic DIY project. I made a 2nd one for my brother using these plans (sans the drawers). I gotta say, the drawers are SO nice to have though. But you could just leave the front open, without drawers, and slide some laundry baskets underneath for an even quicker project. We've been using this platform now for over 2 years and there is still no squeaking or rattling. The washer & dryer haven't moved from the vibration even in the slightest. They're exactly where I placed them on the pedestal 2 years ago. There's also zero problem with the weight of the washer either...it really is a strong frame. (After finishing, I jumped up and down on it!) A couple small tweaks I would make doing it over is raising the drawers a 1/2" in. off the floor to tuck a rug underneath (as is, they sit about 1/8" in. off the floor). Also, I would cut out a couple of square holes in the back panel to access those socks that fall behind (I can't access the sides of my W&D in our particular laundry room). Lastly, I would have painted with a quality paint (I just used a few cans of white spray paint to be quicker). Step-by-Step Plans and Materials List (PDF) and many more photos found at the Blog Link below...I'm certainly no professional "Plans Writer" so email if you have questions! Happy DIY-ing! Estimated Cost: ~$200 (2x6 lumber, plywood, drawer trim, nails, screws, paint)

Estimated Time Investment
Weekend Project (10-20 Hours)
Finish Used
White spray paint
Recommended Skill Level
Beginner

Comments

nikolegraves@h…

Wed, 03/13/2013 - 10:12

I have wanted to do the pedestal project for quite a while. I am so glad I held off though. Yours are fantastic! I would never have thought of drawers to hide the dirty laundry! Love it!

gmccoy20

Tue, 04/02/2013 - 11:06

Really appreciate the help with mine brotha! We really like them (even without the drawers) and are glad you had these plans to go off of for ours.

I'll be calling you for our next project!

strahmers8

Fri, 02/07/2014 - 17:05

Hello this looks great and for the amateur carpenter I am but one item I need clarified "the top measurement at 64" is .25" greater than the bottom at 63.75"

Please explain if I am missing something
Thanks

dwm22

Mon, 02/10/2014 - 15:33

Not sure what measurement you mean that's 63.75" since there's no "bottom" to the pedestals. Or do you mean 1/4" wider than the sides? The top panel should overhang both sides by 1/4" each so that when the side plywood is attached, it will be flush. Hopefully that helps? (If I'm understanding the question correctly)

jmkc

Mon, 02/24/2014 - 10:29

Could leave the back panel of plywood out so you could reach what may fall behind? Then you would just have to pull the drawers out?

heverest

Wed, 06/22/2016 - 16:35

Back panel is very very structural and provides lot of strength. If i wanted more access than the 5-7 inch of duct space behind the pedestal gives me, then i would replace the back panel with a long 2x6, that holds the three legs from going in different directions due to all that weight.

dmccoy

Mon, 12/12/2016 - 14:58

This is the one modification I could make if i could redo these plans...I would still put on the back panel of plywood as it stabilizes the pedestal, I would just have cut out a rectangle (behind each drawer) so that I could remove the drawers and stick my hand/arm through to grab fallen clothes or vacuum the lint.

dachiri

Mon, 12/18/2017 - 19:17

Rather than cut holes in the back, I just cut the back and side boards a little small and left a gap around the bottom the whole way around.  That way I can get a vaccuum hose in there or reach through and get lost items.  Because my washer and dryer seem to be deeper than yours (I needed at least 33" depth, so I went with 3'), that also worked out well in getting the most out of the boards.  I could do the top, back, and sides out of one single sheet of good 3/4" plywood just leaving those small gaps at the bottom for clean-up and retreival.

Jperera

Fri, 11/20/2015 - 05:23

Hello,

I downloaded the pdf but have exactly the same information that the website html, where can I find a solution step by step guide?

Thank you for all the interesting posts.

Farmhouse Table

Fun and challenging build, be sure to square the edges of lumber before assembly to get a better fit

Built from Plan(s)
Estimated Time Investment
Week Long Project (20 Hours or More)
Recommended Skill Level
Intermediate

Comments

Fancy X farmhouse table

Submitted by Anonymous (not verified) on Wed, 04/19/2017 - 19:09

Built this table using the Ana White plans everything worked great.

Built from Plan(s)
Estimated Cost
NA had the wood already
Estimated Time Investment
Week Long Project (20 Hours or More)
Finish Used
Used Minwax espresso stain and polyurethane
Recommended Skill Level
Intermediate

Comments

First Extra Long King Farmhouse Bed

Submitted by Anonymous (not verified) on Fri, 03/26/2021 - 19:06

I ran across your website and decided to build my first ever extra long king size bed. I followed the plans of the farmhouse king size bed. Instead of using the square 4x4 post I used porch post and cut them down to size plus I stretched the bed to 88 inches long. My wife is super happy I did because we saved a bunch of money doing so and got a more durable bed.

Estimated Cost
250.00
Estimated Time Investment
Afternoon Project (3-6 Hours)
Finish Used
Behr gray paint and minwax polyurethane finish
Recommended Skill Level
Intermediate

Comments

DIY Queen Headboard

This is one of the coolest things I've ever built! My husband was so proud of me. :) I recently completed built-in bookcases in our 3rd bedroom/office and those were neat and much more complicated, but I think he likes this better because he sleeps next to it every night. This only took about 2 hours to build, but the staining made for a weekend project by the time it was completed and dry. We've gotten a TON of compliments on this and even had friends ask for me to make them one! Thanks, Ana!

Estimated Cost
$150
Estimated Time Investment
Weekend Project (10-20 Hours)
Finish Used
Medium Walnut Stain - Minwax, even coats, 2 applications, ample dry time between each (6-8 hours).
Recommended Skill Level
Beginner

Mason Bee House

Submitted by mtairymd on Wed, 01/21/2015 - 16:32

Video of Build:

https://www.youtube.com/watch?v=yDwXPVC4m58

Build Instructions:

http://www.instructables.com/id/Mason-Bee-House/


Native mason bees can be housed to protect them from pests, diseases and predators. They are excellent early season pollinators for orchards and other early season fruit crops. Mason bees can do more work than non-native honey bees, even on a cloudy rainy day. Also, mason bees are solitary non-aggressive bees, which makes them ideal for folks with pets or children. The initial step for the care of mason bees is to build a nest block or mason bee house.

Estimated Cost
$10
Estimated Time Investment
Afternoon Project (3-6 Hours)
Finish Used
Paint (roof)
Natural stain (body)
Recommended Skill Level
Beginner

Shoe Dresser

Submitted by Anonymous (not verified) on Sat, 04/22/2017 - 13:54

Loved this project!  We had an old headboard so my wife came up with the idea to cut off the top posts and use them as legs.  

Built from Plan(s)
Estimated Cost
125
Estimated Time Investment
Day Project (6-9 Hours)
Recommended Skill Level
Intermediate

Mr and Mrs wedding presents!

Submitted by emilacious on Wed, 03/31/2021 - 12:59

My friends were getting married so I chose these as their wedding presents due to them having fold out chairs for their new home. Wood burned the mr and Mrs. Used wood conditioning and stained with the rust oleum Kona. Then used the rust oleum glossy polyurethane x3 coats.

Estimated Time Investment
Afternoon Project (3-6 Hours)
Finish Used
Rustoleum Clear Gloss Polyeurethane over Rustoleum Kona Stain
Recommended Skill Level
Beginner

Comments

Monika

Thu, 03/28/2024 - 08:43

Our friends are tying the knot soon! It's such an exciting time for them, and I've gained a newfound respect for platforms like https://myeden.me/ They've met each other there. Now, my husband and I are brainstorming the perfect wedding gift. We want something unique, something that truly reflects their love story and will be cherished for years to come. Any ideas for Mr and Mrs wedding presents that will make a lasting impression? We will be glad to have a good recommendation.

Rustic Cabin Bunk Bed

Submitted by Sticks1983 on Sun, 03/17/2013 - 13:19

This took me and my father a few weekends to complete simply because that is all the time I had to work on it (was the weekends). We put a lot of effort into it and made sure everything was neat and safe. We modified the original plan a bit to give some more boy feel to this bed, and we added window bars to keep my children from climbing out of them. You know boys! We also added a window on the far side of the top bunk. We should have added one to the bottom too since it is so dark, but he likes it anyway! If you want to see some step by step photos, you can go to http://www.facebook.com/media/set/?set=a.10151477424866465.1073741825.5…

P.S. The estimated cost was for the bed only, not the mattresses or stain

Built from Plan(s)
Estimated Cost
$365
Estimated Time Investment
Week Long Project (20 Hours or More)
Finish Used
Varthane (stain and polyurethane mix) Water-Based "Early American"
Recommended Skill Level
Intermediate

Comments

King Farmhouse Bed

Submitted by kabbey1901 on Sat, 01/24/2015 - 17:29

This was my first project and I had a ton of fun working on it. My grandpa has a professional wood shop, but as he has gotten older it hasn't been used as frequently. Most of my time was spent fixing broken equipment. I made a couple wrong cuts and had to go back to the store. All in all I love my new bed, I spent quality time with my grandpa, and it is a solid piece of furniture built for a fraction of what a bed should cost.

Estimated Cost
$180
Estimated Time Investment
Weekend Project (10-20 Hours)
Finish Used
White latex Paint base, Walnut Stain. I painted the base on and then sanded the base paint a little bit, then put the stain on and wiped as much as I could off.
Recommended Skill Level
Beginner

Comments