Community Brag Posts

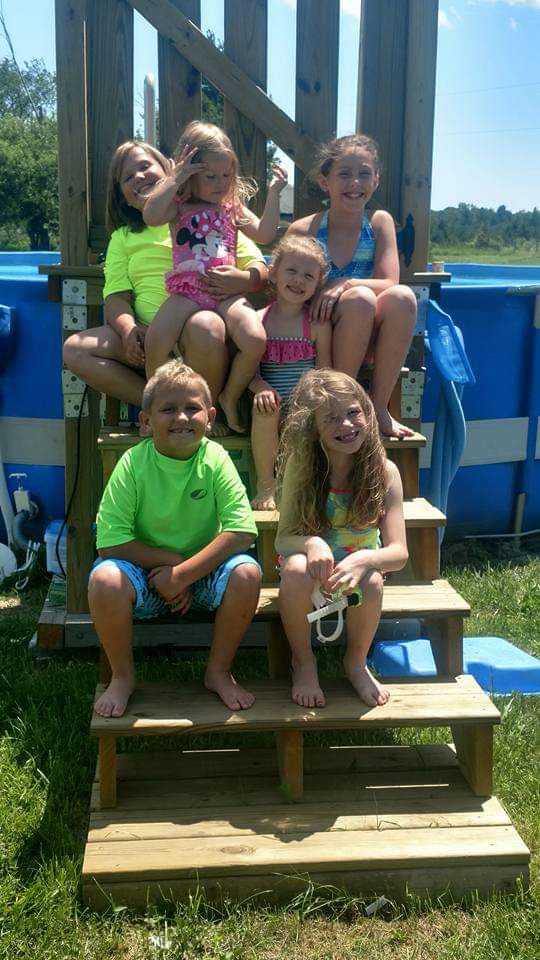
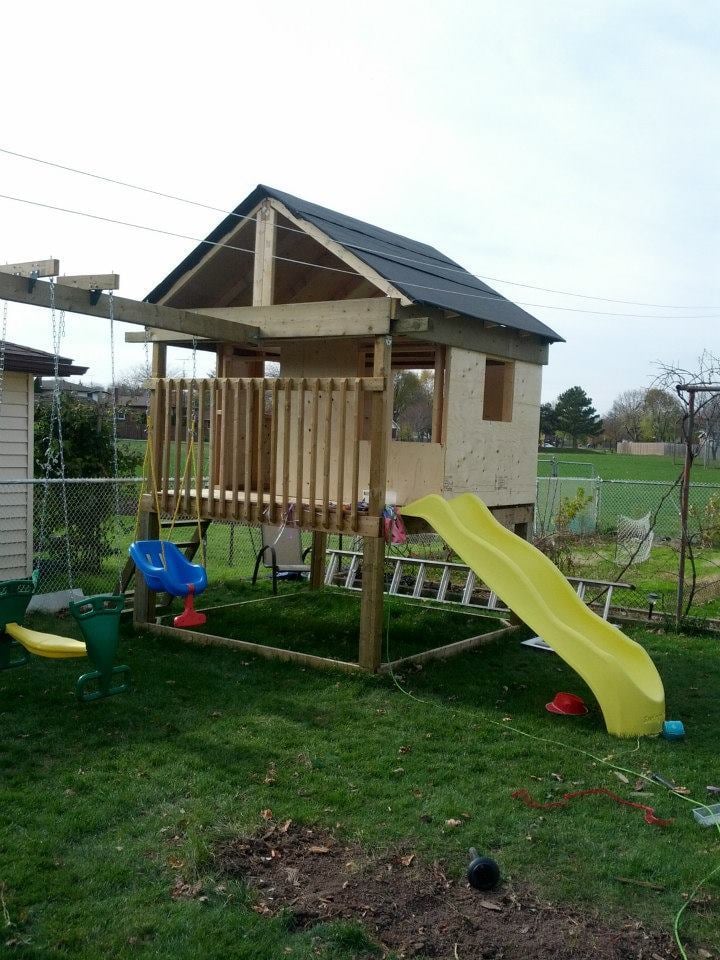
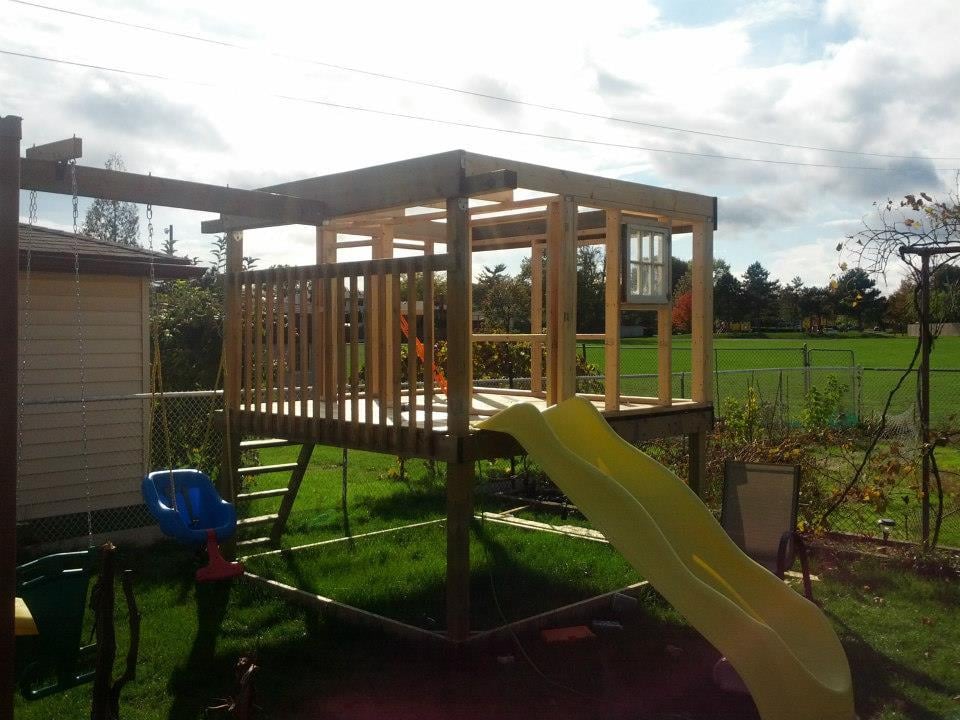
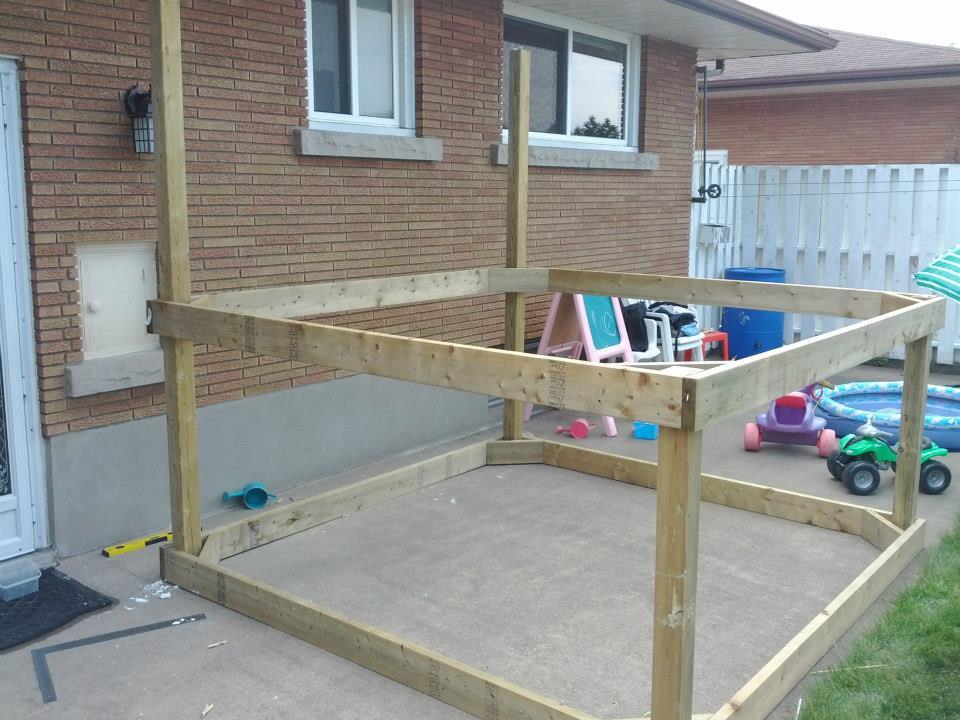
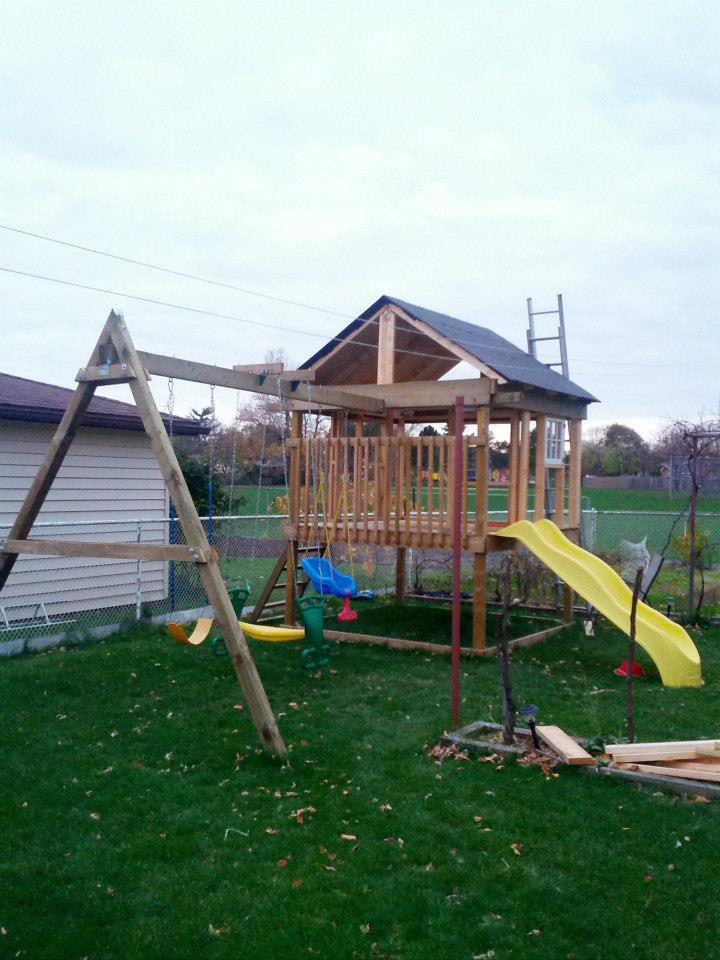
Playhouse with swingset

Submitted by GreenEnvy on Tue, 02/25/2014 - 21:58

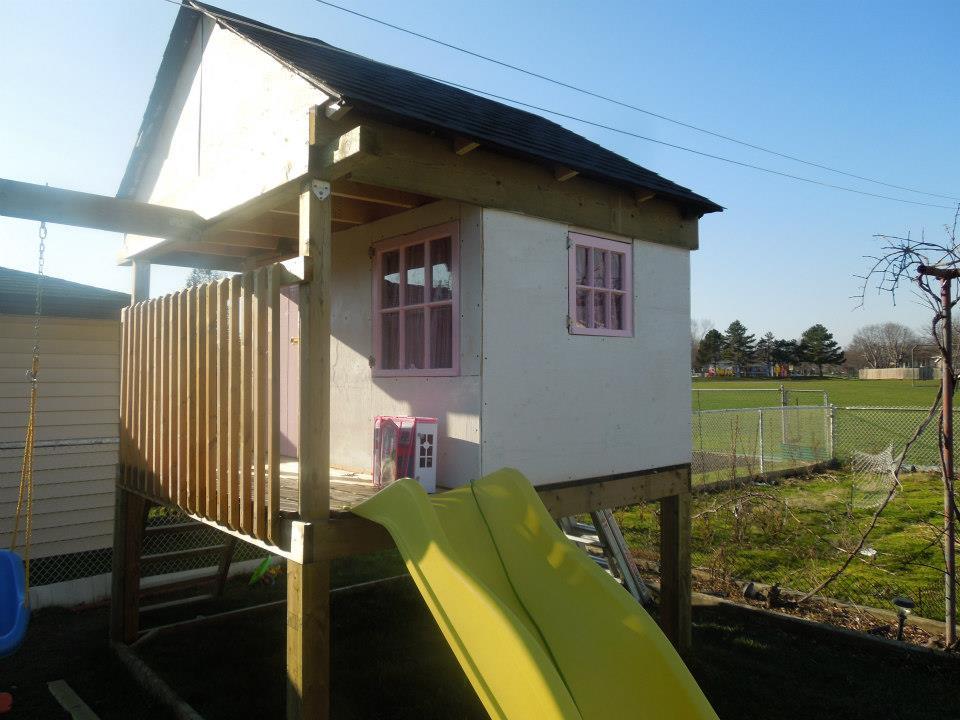
I combined a few different plans here, mostly the Playhouse deck, swingset.

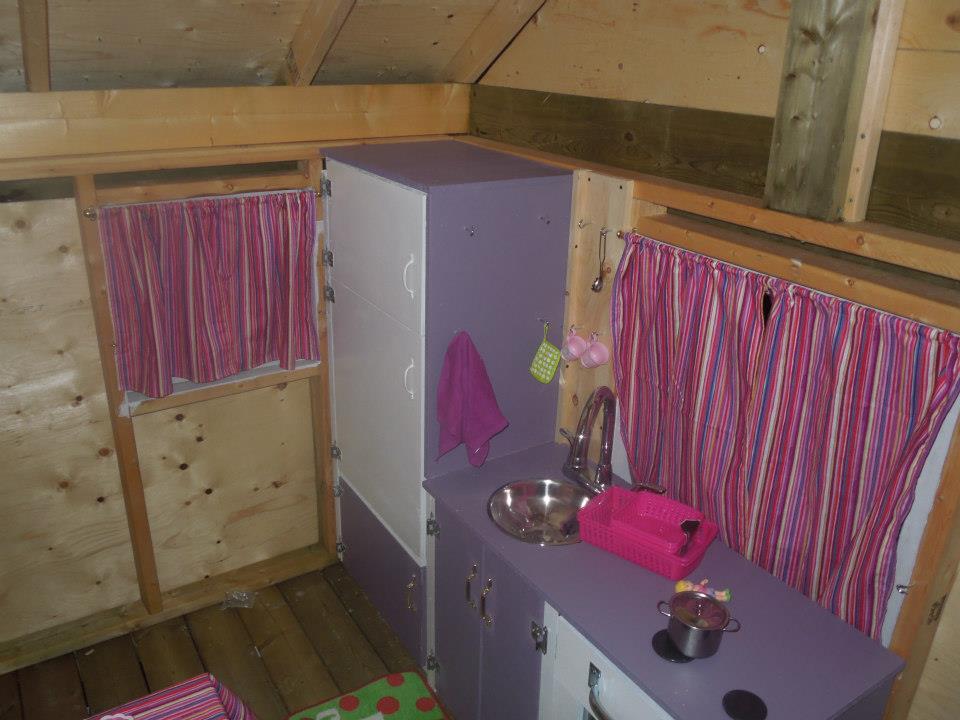
I haven't finished it yet, this spring I want to finish the exterior as it's just primed plywood right now. Still going to add a window above the balcony (there is a loft up there).

I insulated the roof/ceiling and will insulate the walls when we finish it. In the bottom we'll be putting in a sandbox with a cover that folds up into benches.

It was a fun project and should give our girls many years of fun.

Estimated Cost
$1000
Estimated Time Investment
Week Long Project (20 Hours or More)
Finish Used
Right now the plywood is just primed, we'll be putting some sort of siding or other exterior sheets to finish it.
Recommended Skill Level
Advanced

Single picket recycle friendly bird feeder

Submitted by sxewhodey on Fri, 03/13/2020 - 06:45

I deviated unknowingly from the plan, lol. The top is wrong. I trimmed a half inch off one side to make the two lengs even, but you aren't supposed to use the lengths to go all the way down, but rather the lengths going accross as an overhang. Our project still came out nice, and my little girl will put hers together tomorrow.

I am getting ready to do a privacy fence project and I was debating between pine and cedar....this project actually seems to have confirmed I am allergic to cedar, so it was very useful in plans for a bigger project and saved years of sneezing.

Estimated Cost
$5
Estimated Time Investment
An Hour or Two (0-2 Hours)
Recommended Skill Level
Starter Project

Scrapwood Potting Bench

Submitted by Anonymous (not verified) on Mon, 03/23/2020 - 15:51

I wanted to plant some herbs and have them easily accessible from my kitchen, plus I had a ton of scrap wood lying around the garage. Hence, my scrap-wood planting bench. No cost to build and only a couple of days. It's not as deep as the original post due to where it will be located. The size is 39 in.x10.5 in.x48 in.

Built from Plan(s)
Estimated Cost
$0
Estimated Time Investment
Week Long Project (20 Hours or More)
Recommended Skill Level
Starter Project

Pool Steps & Safety Gate

Needed a safety gate and steps to get into the pool. Even provided shelter for the pump and filter.

Estimated Cost
$100
Estimated Time Investment
Day Project (6-9 Hours)
Finish Used
None
Recommended Skill Level
Beginner

Workbench

Wasn’t too awful bad. The cuts were basic and easy to duplicate. I would recommend having some clamps to hold the supports in place while you try to screw them together. Otherwise, this table is pretty heavy duty and a lot bigger than I thought it would be. I sprung for a more durable and harder wood top, oak so the cost was about $25 more.

Estimated Cost
100
Estimated Time Investment
Day Project (6-9 Hours)
Finish Used
None
Recommended Skill Level
Beginner

Providence Picnic Table by Falafel and the Bee

This is my second large wood project...and both from this blog! The plans were fabulously easy. This was the first time I used my miter saw, and it was a great way to break it in.


Estimated Cost
Under $120.00
Estimated Time Investment
Weekend Project (10-20 Hours)
Finish Used
Benjamin Moore Arborcoat Transparent Teak
Recommended Skill Level
Intermediate
Seasonal And Holiday

Rustic X Coffee Table in Cedar

Submitted by daveJay on Fri, 04/11/2014 - 07:16

This is my first real piece of furniture I've built. We decided to build it in Western Red Cedar because our local home improvement store had a good selection of it. It was pricier than pine, but it holds stain really well and is really beautiful.

I modified the plan and bought a 4x4 for the legs, then I cut that down to 3" x 3" exactly with my table saw. That way it doesn't look like a standard cut of wood, but something more custom. As a result I had to put corner notches in my bottom piece so that it would fit in with the legs. That was tricky to do, but would have been easier if I had a jigsaw

I made a few measuring errors and had to correct it by trimming down the table top so there was only an inch overhang on the edges. So this is actually a few inches less deep than the plan called for, but it worked out ok I think.

With the X's I laid them on top of the legs and traced a line to cut rather than trying to cut an exact miter. I also traced it so that I'd cut a bit off of the top and side of the corner so that it fits in nice and snug on both edges.

I also traced the intersection lines. Then I set my table saw (don't have a circular saw) to 1/2 an inch and just cut out several notches in between the intersection lines so the to X pieces could overlap each other. A "halved joint" I believe it's called.

Built from Plan(s)
Estimated Cost
$120
Finish Used
I finished it with a coat of Minwax Honey Maple gel stain followed by some Minwax Paste Finishing Wax. Just put a thin layer of wax on, wait for it to dry several minutes and then buff it out with a clean rag till it's got a nice shine.
Recommended Skill Level
Beginner

chicken coop

Submitted by namaste7 on Mon, 05/11/2020 - 22:10

Modified to make the coop bigger and the planter smaller. Added 1" foam insulation on the inside and changed the design to use the "deep litter" method. This means the coop bottom goes all the way to the bottom of the support beam rather than using a removable tray. Added a steel roof with a ridge vent at the top. The chicken run under the coop is lined with buried hardware cloth so no animals can dig under the coop. All hinges are mortised and doors flush mounted. The coop is wired for power for a heat lamp. The planter is lined with a metal tray. The coop can be separated into two pieces so you can move it or rotate the top 180 deg if needed (so you can get to the eggs from the left or right side). Great plans, thanks Ana!

Estimated Time Investment
Week Long Project (20 Hours or More)
Finish Used
cedar deck stain. Olympic. brand
Recommended Skill Level
Advanced

Comments

Seasonal And Holiday

Turned Leg Dining Table

I made another turned leg table... this time on accident! Lots of finishing details on my blog. http://whitneysworkshop.blogspot.com/2012/07/the-accidental-table.html

Built from Plan(s)
Estimated Cost
Under $100
Estimated Time Investment
Weekend Project (10-20 Hours)
Recommended Skill Level
Intermediate

Comments

Outdoor patio couches

Submitted by Chrisann on Tue, 05/27/2014 - 11:06

Love this design! We had to adjust the plans to fit a different cushion from Restoration Hardware. The couches turned out great and we had a party the day after the paint dried! Thx Ana-white!

Estimated Cost
Material $200, cushions $700
Estimated Time Investment
Week Long Project (20 Hours or More)
Finish Used
Valspar outdoor paint "frontier road"
Recommended Skill Level
Intermediate

Modified Shepard Kitchen Island

I built this butcher block kitchen island from Ana's shepard kitchen island plans. I did however modify the dimensions and design to fit my needs.

Instead of cabinet doors I wanted an open design so I built adjustable shelves. The drawers are slightly smaller than the plans give to allow extra shelf room. I used full extension drawer slides. The plans have the total kitchen island height at 42" which I felt was a little to tall for the average person so I built this island at 37" tall. The top is an edge grain butcher block top built out of hard maple and sealed with mineral oil. http://timberandsoul.wix.com/timberandsoul#

Built from Plan(s)
Estimated Cost
$250.00
Estimated Time Investment
Week Long Project (20 Hours or More)
Finish Used
Tuscan red by Benjamin Moore and kona stain.
Recommended Skill Level
Advanced

Comments

$55 Fancy X Desk

This was probably my favorite build yet! Love how it turned out

Built from Plan(s)
Estimated Cost
$80
Estimated Time Investment
Day Project (6-9 Hours)
Finish Used
Minwax walnut polyshades
Recommended Skill Level
Intermediate

Leaning Bathroom Shelf

This was a perfect Labor Day weekend project and solved a storage problem in my cramped bathroom. I plan on getting some wicker baskets or bins to store toiletries on the shelves. It's also a great spot to store fresh towels so guests have easy access. The shelf feels very stable when leaning against the wall. I curved/rounded the front,  top corners of the shells using 40 grit sandpaper. 

Estimated Cost
I had a lot of the lumber on hand from other projects but I would guess about $20-25
Estimated Time Investment
Day Project (6-9 Hours)
Finish Used
Paint & wipe on poly
Recommended Skill Level
Beginner

Cedar Outdoor Dining Table and Benches

My wife and I loved the version that Finns-Dad made but we wanted it to be rectangular. The top is 1x6s around the edges with 1x4s in between. The frame is 1x4s. The bench tops are all 1x4s with 4x4 legs. There are 3/8 inch lag bolts in the legs. We did 4 coats of the urethane.

This was my first major project, and while there are many things that I would do differently if given the opportunity, we're still very pleased with it.

Built from Plan(s)
Estimated Cost
$350
Estimated Time Investment
Weekend Project (10-20 Hours)
Finish Used
Rust-Oleum Varathane Classic Clear Water Based Outdoor Spar Urethane Semi Gloss
Recommended Skill Level
Beginner

Comments

Raised planter boxes

Submitted by SandraVee on Thu, 07/23/2020 - 06:55

My first ever build! I made two of these planters for my deck. They were easy and the cucumbers and runner beans I grew from seed loved the deep soil in them! They make my little space feel like an oasis.

Built from Plan(s)

Pallet Wood Chalk Board, Shower Wall and Shower Mat

Submitted by kdins31 on Tue, 08/05/2014 - 06:13

As part of my backyard overhaul I've added an outdoor shower and chalkboard against the wall of the house. There's also a small sand pit and deck area, so the shower comes in handy to wash the dirty feet. I had a few pallets sitting under the deck for years and finally put them to use. Some cuts here and there and some sanding and they look great. For the floor mat I just cut the pallet piece you can see in one of the photos in half and framed it with treated 2x4". The chalkboard is a plain sheet of 2x4' project board primed and painted several coats with flat black exterior paint. I used this over the 'chalkboard' paint because it's exterior grade. It works great, even better than chalkboard paint imo. The frame is made of the cut slats of the pallet, just glued and nailed on. The fence also is a cut pallet. I just made random cuts about half way through on varying angles which resulted in two mirrored halves of the pallet. They fit the space perfectly. I love the random look of it and may give it some paint eventually.

Estimated Time Investment
Afternoon Project (3-6 Hours)
Finish Used
I used flat black exterior paint for chalkboard, over several coats of primer to protect the wood in the elements.
Recommended Skill Level
Beginner

DIY Easy Build Wood Headboard Twin Size

A fun project we did with my 12 y/o niece and husband. It was fun and fairly easy. We distressed the wood by using a copper brushalong the grain and used nails to make holes. We chose rustoleum sunbleached stain hoping to create and washed out gray driftwood look. It took about an hour to put together. The next day I sanded and stained , left it dry for the rest of the day then sealed it with polycrylic spray. The hardest part was getting up 2 flights of stairs, solid wood, it was heavy. The headboard was a little tall we thought. Plans are originally for Full so as bed gets more narrow the height becomes more noticeable. I thought about cutting down the legs a bit but after we got it in the room we thought it looked fanastic. We love love love it.

Estimated Cost
65.00$
Estimated Time Investment
An Hour or Two (0-2 Hours)
Finish Used
Rustoleum " Sunbleached" stain

After I finished sanding the entire headboard with about 150 grit sandpaper I starting distressing it. Hoping that the stain would sink further into crevices and give my headboard and varied look. I distressed by poking holes with a nail in random groupings. I then followed up with that copper wire brush you see. I took the brush and with some force and went horizontally across the surface following the wood grain. The put lots of grooves into the wood, again hoping that stain will sink into crevices. I chose Rustoleum "Sunbleached" stain for this headboard going with the driftwood theme. Rustoleum does not require a wood condtioner so I save myself a step here. But really I chose it because of this great color. The best way to put on stain is with a rag. The box of rags you see in the image are the absolute best. They stay together. Much stronger than a paper towel. You just throw them away when you are done. Applying stain in this manner is the best way in my opinion. Wood is porous so applying the stain with a rag forces the stain into the fibers of the wood. Using a paint brush will not achieve the same results. It also takes alot longer with a brush and then you have to wash the brush out... ugh. Staining this headboard took me 10 minutes. That's right 10 minutes. So much easier with a rag, it's like you are just wiping it down. Because I can force the stain into the wood fiber I can put the stain on a little thicker and the wood absorbs more negating the need for 2 coats. Try it and see. Of course wear gloves. Do not soak the paper towel dripping wet. As much of the towel wet as possible without dripping all over. Wipe it on with the grain paying special attention to knots in the wood. Let it dry thoroughly for a day or so. Spray with Polycrylic which also only takes a few minutes. Polycrylic recommends then lightly sanding and spraying again 3 times. We did it twice. Seems fine to me. I'm Done.
Recommended Skill Level
Intermediate

Comments

Fancy Jewelry Box

Submitted by JoanneS on Sun, 11/11/2012 - 17:37

12/16/14 UPDATE:  Posted a plan for this project, linked in this brag post

This is a variation of the Easy Jewelry Box plan. The completed measurement is 11” wide, 14 ½” high, and 7 ½” deep. This one has a center “tower” with 5 drawers 5 ½” wide, and a wide overhang on the top and bottom, which covers the 2 side doors that open out for hanging necklaces. The drawers are lined with embossed felt, and the drawer bottoms and insides of doors are covered with sticky-back felt. The 2 removable ring drawer inserts are some scraps of 1” foam, covered with scraps of the sticky-back felt, with slits cut into the foam with a utility knife (cut the slits into the felt first, attach it to the foam, then cut the slits into the foam). Cost breakdown: antique brass knobs: $28, sticky back & embossed felt: $14, hooks: $15, wood: $35, hinges: $7, paint: $5. (already on hand: finish nails, glue, sandpaper, left over stain & poly) . I worked on this a few hours a day over a long weekend, probably about 12 hours total. Finishing took most of this time, the build was actually only a couple of hours.

Built from Plan(s)
Estimated Cost
$104
Estimated Time Investment
Weekend Project (10-20 Hours)
Finish Used
Box and doors: 3 coats Benjamin Moore “Harmony”, sanded between coats, and 1 coat Minwax water based wipe on poly. Top and drawer fronts: 1 coat Minwax Express Color in Walnut, and 1 coat Minwax water based wipe on poly.
Recommended Skill Level
Beginner

Comments

jgg2006

Tue, 12/16/2014 - 00:43

Hello,

Can you please email these plans even if it is just a sketch up drawing

Back