Community Brag Posts

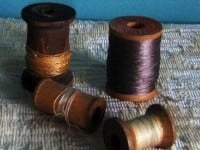
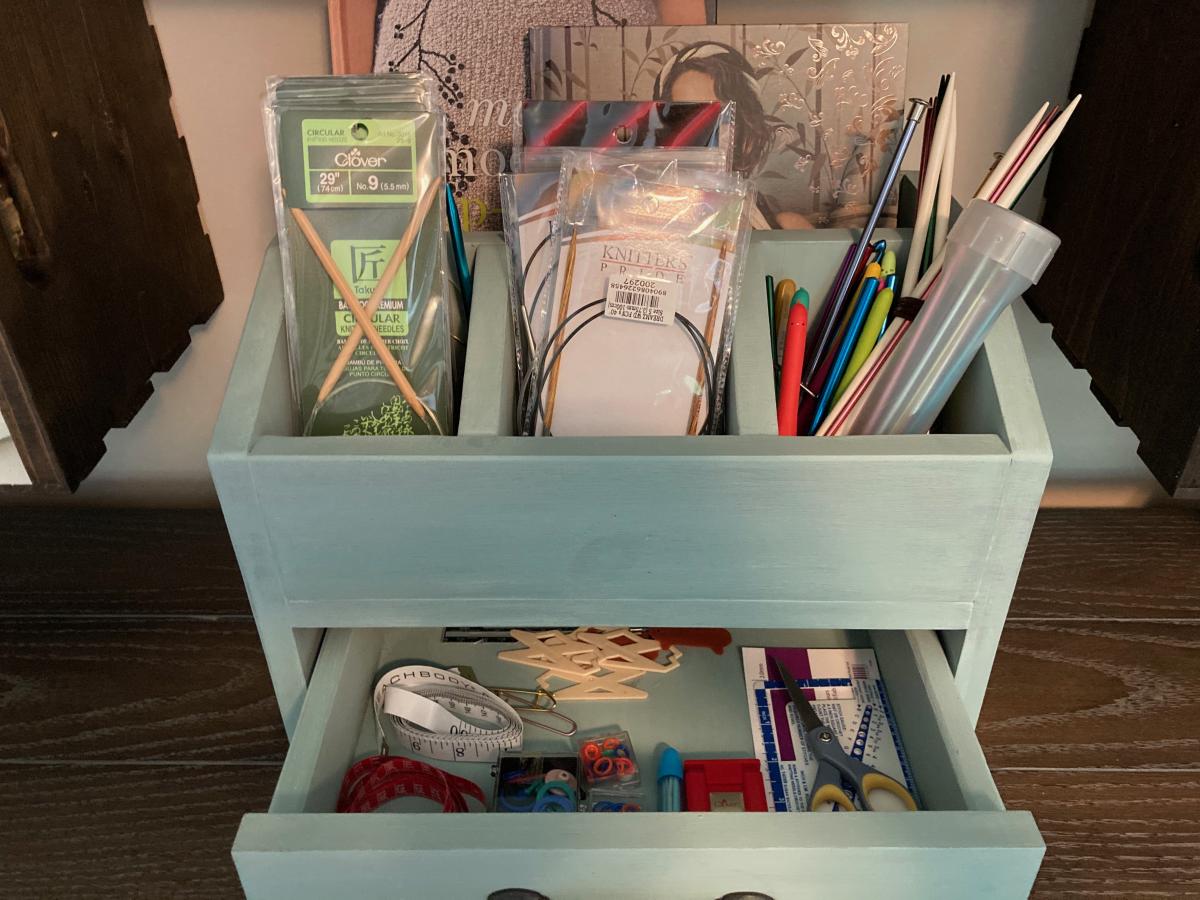
Organizer for knitting needles & crochet hooks

Submitted by Wendy KT on Wed, 06/24/2020 - 13:47

I used Ana and Jaime's desk organizer plans to build this, but I'm using it in my craft room instead for my needles/hooks/small accessories. This plan was part of Ana's Handbuilt Holiday plans found here: https://ana-white.com/woodworking-projects/desktop-office-or-vanity-bea…

Estimated Cost
10.00
Estimated Time Investment
Afternoon Project (3-6 Hours)
Finish Used
Duck egg blue chalk paint and clear wax.
Recommended Skill Level
Beginner

Laundry Pedestal

Submitted by Kamoanui on Tue, 06/30/2020 - 09:42

This was quick build. First time for us using trim, so we wasted a few feet getting the angles right. We attached the legs directly to the frame, and did not use the metal brackets. We also did not build the floor frame. We measured how high/wide the laundry baskets ($3/piece at Target!) were, and made it to fit them. We added a piece of rubber mat to the top (bought at Lowe's). A few weeks later we helped our daughter and son in law build one for their new house!

Estimated Cost
$40
Estimated Time Investment
Afternoon Project (3-6 Hours)
Finish Used
White satin paint
Recommended Skill Level
Beginner

2x4 modern Adirondack Chair (modified)

Submitted by Anonymous (not verified) on Thu, 07/02/2020 - 17:45

I was so excited to find the plans for these awesome chairs, I’ve built 7 this season already—the modification happened as an accident, but I loved the result !

Estimated Cost
$30
Estimated Time Investment
An Hour or Two (0-2 Hours)
Finish Used
MinWax Aged Oak and Black paint
Recommended Skill Level
Intermediate

Comments

Seasonal And Holiday

DIY Indoor Playground

Submitted by Leann on Sat, 11/12/2016 - 08:45

I built this project by myself.  My husband helped move the large pieces when I connected them, so one person really can tackle this project!   I had a combination of scrap wood from new home construction on hand and store bought lumber.  Most of my time was spent sanding, sanding, and more sanding, especially with the construciton grade lumber.  Yes, it was worth it!   I used tongue and groove wood for  upper level flooring and bridge.  It really made it easier to put the floors together.  I connected all the tongue and groove pieces with a snug fit and used my brad nailer to secure it down on the perimeter of the floor.   Therefore, not every peice had to be screwed down.

Estimated Time Investment
Week Long Project (20 Hours or More)
Finish Used
All the green paint is chalkboard paint! It seems to be working out quite well. I added inexpensive wood drawer pulls (as hooks to prevent poking an eye out!)) to hang costumes inside. I also cut the ends of the wood at an angle and sanded it to prevent sharp and pointed corners. Spacing around windows and the bridge was intentional to have that rustic look, yet allow for feet and hands to get in there for climbing. I need to add the monkey bars but definitely need help.
Recommended Skill Level
Intermediate

Comments

DIY Octagon Table

Why an octagon shape? I wanted a round table and my husband wanted square, so we met in the middle and built this! Very easy and fun to build!

Estimated Cost
$100
Estimated Time Investment
Afternoon Project (3-6 Hours)
Finish Used
Stain color Dark Walnut and polyurethane in matte finish. I applied one coat of stain with a sponge applicator and worked it in with a cotton cloth. I applied 4 coats of poly on the top and 2 coats on the base and legs.
Recommended Skill Level
Intermediate

Comments

booksnotbombs

Thu, 08/21/2014 - 07:40

Thank you for the reply! We have a beautiful old solid wood turned-leg farmhouse table (and matching chairs) that has been in my family since the 60's that needs to be refinished, but it just isn't our style. So we're thinking of building our own in our more modern style but would have to get chairs to accompany it. I LOVE these, so I think we've found our new chairs! I hope our table turns out as beautiful as yours.

I still have plans to refinish the old table and pass it along to someone who will show it as much love (aka abuse) as it received in my childhood...

Work Bench and Carts

I finally finished my workbench this summer. I started the bench 2 years ago for my miter saw. Got busy with other builds, things for family, clients, etc. I still had most of the wood cut for the carts. Here it is in all its glory!!! Finally organization and I can actually park my car in my garage. Thanks Ana for all of your plans.

Estimated Time Investment
Week Long Project (20 Hours or More)
Finish Used
primer

Puppet theater

Submitted by petera on Fri, 12/28/2012 - 12:03

I was able to use the lemonade stand plans for GRACE'S TOWN to make a puppet theater for my kids.

Estimated Cost
$50
Estimated Time Investment
Weekend Project (10-20 Hours)
Finish Used
Minwax golden oak stain
Recommended Skill Level
Beginner

Outhouse

Submitted by Speedbump on Fri, 10/16/2020 - 21:04

I built this outhouse for beside our barn. My first large project and I’m really pleased with how it turned out!

Built from Plan(s)
Estimated Time Investment
Week Long Project (20 Hours or More)
Recommended Skill Level
Intermediate

Comments

Sand Box with Built-In Seats using Cedar Wood and 1 Seat

Followed the original plan except below changes:
- Only one seat to make it more spacious
- Made 2 groups of 3 planks each and connected both using hinges so it can cover the end without seat
- Stapled Hardware Cloth with landscape fabric

Cedar wood was the most expensive thing in this project, since I would want it to last long.

Built from Plan(s)
Estimated Cost
150
Estimated Time Investment
Weekend Project (10-20 Hours)
Finish Used
Thompson's WaterSeal Stain & Sealer
Recommended Skill Level
Starter Project

Potting bench

Submitted by Anonymous (not verified) on Tue, 01/12/2021 - 10:46

I used redwood lumber, 2x4s and 1x6s only. I wanted the bench to be a little taller so I used 2x4x10s for the legs to make work surface 38” high and total height 66”. To get the most out of the 8’ 1x6s I made the bench 48” wide. I also had to adjust the depth since I did not use 1x4s. And finally, I sanded the 1x6s because they were rough sawn.
Very fun project! Once I figured out the adjusted cut list the whole project came together in a matter of a few hours.

Estimated Cost
$100
Estimated Time Investment
Afternoon Project (3-6 Hours)
Finish Used
Light sanding, No finish.
Recommended Skill Level
Beginner

Drop Zone/mudroom

Submitted by Anonymous (not verified) on Tue, 03/09/2021 - 07:10

I used ShelfHelpNow which I LOVED! Got it delivered at the start of a snowstorm! Would never have made it then if I had to go get the wood myself!
Got so many compliments and requests
To build this.
Thank you for your easy plans and wonderful ideas!
In hindsight I would have either connected the two units or separated them more. I’m more a wing it/see how it goes type of builder for myself rather than a planner. 🤣
Diane

Estimated Cost
600 for carcass
Estimated Time Investment
Weekend Project (10-20 Hours)
Finish Used
Putting it together took a couple hours. Painting and waiting for things to dry took a lot longer!
Hopefully this will free up some room in my house for more utilitarian closet/pantry.
Recommended Skill Level
Intermediate

Recycle Twin Bed

Submitted by LARMO on Thu, 03/14/2013 - 09:16

This was my bed handed down by two other siblings growing up a number of years ago. It is a Jenny Lind which I cut the foot board in half, attached to the head board, used the side rails for the frame on the front and sides and attached with my Kreg Jig. The underside frame was from left over pine trim from a window project and the seat was from leftover paneling from a bathroom remodel. I painted the bed with a satin black spray paint and left the seat as is.

Estimated Cost
1 can of spray paint 3.99 all other material left from previous remodels
Estimated Time Investment
Afternoon Project (3-6 Hours)
Finish Used
satin black spray paint
Recommended Skill Level
Intermediate

Comments

spiceylg

Thu, 03/14/2013 - 10:47

I have a twin head and foot board I got at Savers (thrift store) a few months ago to do just this. Just have to get my other projects out of the way (and out of the hubby's way as well) first. Great job!

agarrigan

Thu, 03/14/2013 - 13:28

I also have this type of project on my TTB list, using an old waterfall style bed frame. I already cut it apart and everything. Seeing how well your's turned out might just give me that little push I need to get mine finished. Thanks for sharing!

birdsandsoap

Sat, 03/16/2013 - 16:51

This turned out great. I did my first curbside stop and pulled an old crib out of someone's trash pile last summer. I just happened to be borrowing my mom's truck at the time...If I owned a truck, there would be no stopping my hoarding! Your bench turned out excellent. I plan on making mine a bench too. My husband has been complaining about the old crib leaning against the house in the driveway for a while now. Yep, better get started.

Rustic X TV Console modified to 42" Dry Bar

Submitted by Anonymous (not verified) on Sat, 04/22/2017 - 08:34

My wonderful husband and father built this dry bar for me using the Rustice X TV console plans.  They modified plans to so it is 42" tall, 6-1/2' long, and shelving is wider and centered.  I love it.  Thank you for sharing your plans.

Estimated Cost
$175
Estimated Time Investment
Weekend Project (10-20 Hours)
Finish Used
Paint and polyurethane finish.
Recommended Skill Level
Beginner

Cedar Planters

Built these for Christmas presents for the family. Used the 5 1/2 in wide pickets for the big ones. Used the 3 in wide pickets for the small ones, and cut everything else to scale. I don't have a kregg jig so I just screwed them in from the sides. Doesn't look quite as nice, but is plenty sturdy. I also added the mitered top like many others have.


The dark ones are Java Bean stain, the one is raw (obviously), and the other is Red Mahogany stain.

Built from Plan(s)
Estimated Cost
~$20 a piece, the smaller ones were slightly less
Estimated Time Investment
An Hour or Two (0-2 Hours)
Recommended Skill Level
Beginner

Emma's cabin bed

Submitted by jiffyone on Sat, 05/13/2017 - 18:38

Made this for my granddaughter and worked on it 40+ hours. I borrowed the removable window boxes and shutters off another plan to girlie it up. If I were to make it again, then I would add an extra 2 inches on the sides, front and back to make it easier to make up the bed. It's so adorable and I can't wait for her to see it. 

Built from Plan(s)
Estimated Cost
$400.+
Estimated Time Investment
Week Long Project (20 Hours or More)
Finish Used
Paint from the big blue store.
Recommended Skill Level
Intermediate

Dining Room/ Home Office

Submitted by kristen on Sat, 02/21/2015 - 11:33

I didn't really follow any specific plan from Ana to build this project (I've become better at creating my own plans after putting together several of Ana's project plans--I owe Ana big time for getting me started in building!), but I did study her kitchen cabinet plans in order to put this together.  Up until now I've done mostly stand-alone projects and this was more like a small kitchen plan than anything I've done before.  This took a LOT of time to complete, but it has been a fantastic addition to our home for organization and aesthetic appeal. 

It is constructed of plywood and pine faceframes.  I used a Kreg Jig to construct most of it, including the drawer and door fronts.  The desktop has a 3/4" plywood base with a pine edge-glued panel on top of that with a pine edging. 

The estimated time investment was way more than 20 hours!  It took every minute of free time for 2.5 months to complete this.  But I was working alone, so you can cut that down significantly with help ;)

The link to my blog about this project contains links to all the posts I wrote up during this build. 

Estimated Cost
Approximately $900
Estimated Time Investment
Week Long Project (20 Hours or More)
Finish Used
White paint with a satin polycrylic topcoat. Sand well before the first coat and then with 220 grit sandpaper between each coat of paint (1 coat primer, 2 coats white paint). Sand with 320 grit between each coat of topcoat for 3 coats. I did use a HVLP sprayer (Woodcraft's $35 version with a large air compressor) but I have finished other projects using a foam roller and foam brush that gets really close to the spray finish--it just takes longer.
Recommended Skill Level
Advanced

Comments

Michael K

Mon, 02/23/2015 - 03:52

The time and effort you put in to this project was well worth it! I'm inspired.

Hanging daybed

Submitted by hponce28 on Sun, 04/14/2013 - 14:24

I wanted to make a large porch swing but just couldn't find the exact design. I wanted to be able to stretch out and take a nap but also be able to have a back to lean against. Most plans that I found were just basically a box you could put a mattress in and then hang. So I found Ana's plan for a basic daybed and chopped off the legs and raised the back just a little. It's perfect!! Thanks Ana. The plans were very simple to follow. This is my first project and I think it turned out great.

Built from Plan(s)
Estimated Cost
$250
Estimated Time Investment
Weekend Project (10-20 Hours)
Finish Used
Colored stain in cocoa. Applied two coats.
Recommended Skill Level
Starter Project

Comments

melimew

Sat, 07/26/2014 - 07:37

Looking forward to do one like this !
Do you still have the measurement for the back you have raised ?
Really nice !

Thanks :-)

jdaybama

Tue, 11/18/2014 - 17:38

We made the bed and it looks awesome!  Thanks for making the plans easy to follow and providing the picture, which was a fantastic reference.  I do have a question for you in regard to how you hung the beg.  We would like to hang this from our porch, but can see that we simply have 2x4 roof trusses.  We are concerned that the weight of the bed (pretty heavy) plus mattress and support plus a person may be too much.  Any additional information you could provide on how you hung the swing would be greatly appreciated!  Thanks!

Standing/Walking Desk w/ Bookshelves

Submitted by SaraLodise on Sun, 06/04/2017 - 15:34

Standing/Walking desk with side bookshelves built in. Desktop folds up and out so keyboard is at correct level for my height while walking on treadmill. When folded down, keyboard is at acceptible level for standing on ground. Desk designed so that the small walking treadmill can slide under and be out of the way when not in use.


Lifting Hinges used are Woodtek Coffee Table Lift Mechanism:  https://woodworker.com/coffee-table-top-lift-mechanism-lr-mssu-164-228…


Estimated Cost
Lumber: (1) 23/32 Plywood 4x8, (1) 23/32 Plywood 4x4 = $45...Lifting Hinges: $57...Finishing: 2 pints of General Finishes Milk Paint + Acrylic Topcoat = $56...TOTAL = $160
Estimated Time Investment
Weekend Project (10-20 Hours)
Finish Used
1 coat of General Finishes 'Lamp Black' Milk Paint...
2 coats of General Finishes 'Basil' Milk Paint...
Sanded w/ 120 grit to achieve a distressed look...
1 coat of General Finishes 'Yellow Ocher' Glaze Effect for patina...
1 coat of General Finishes 'Flat on Flat' Acrylic Topcoat on high traffic areas
Recommended Skill Level
Intermediate

Small Chicken coop

Submitted by Anonymous (not verified) on Wed, 06/07/2017 - 12:04

We built this to go right next to our stairs. The run has hardware cloth on 3 sides and then the side touching the stairs opens up to under the stairs so they have a bigger run.

We extended the floor so that it went all the way to the nesting box. We will be adding a nesting box to the wall by the cleanout doors rather than where the plans put the nesting box. We like that this gave us more square foot per chicken on floor space. Due to this change though we had to use interier hinges so the floor could slide in and out easily. We also added a door to the bottom so the coop could be locked seperately from the run. 

I wanted to turn the space where the planter box is into a storage space and may still do that later to store food, clean out supplies, and first aid supplies. We'll see! 

Estimated Cost
$500 This includes Cedar wood for all exterior wood, hardware cloth to cover everything and have a 12 inch apron under the coop, two colors of stain, shingles, big boxes of screws (we had a million leftover), hinges and locks with keys. We definitely went the expensive route but I think it will last us a long time and hopefully we've created a Fort Knox!
Estimated Time Investment
Weekend Project (10-20 Hours)
Finish Used
Cabot Stain Newberry Blue and Navajo White
Recommended Skill Level
Intermediate

Farmhouse Dining Set

Submitted by Nor7 on Wed, 03/18/2015 - 10:22

This was a bit more work than I anticipated but I think it turned out great. The quoted buy list was a little off so I had to make an additional trip to the hardware store.

I used the Fancy X Table plan and the Fancy X Bench plan to make this set. Since I wanted it only 6' long I had to do some modification to the plan but not much.

I also designed the table top into two pieces that fastened together through the center piece so I could take it apart easily and fit it though a standard door.

Estimated Cost
$120 (since there were two benches and the table). I found the wood in my area to be a little more expensive than quoted on the plan. Particularly the 2x10's.
Estimated Time Investment
Week Long Project (20 Hours or More)
Finish Used
MinWax - Dark Walnut. To get the finish even I had to invest ALOT of time into sanding. I had to use 60 grit in some spots to even out the factory cuts but most of it I was able to go over with just 220 grit. DON'T FORGET TO SAND THE ENDS!
Recommended Skill Level
Intermediate

Comments

MrCoffee

Wed, 03/18/2015 - 13:35

Wow, this table and bench set came out awesome. I love the finish. What you ended up creating having only spent $120 is incredible when you think about how much these things cost in a furniture store. Good work.