Square x base breakfast nook
Made from the square x table breakfast nook plans and then altered the table top a bit.
I made this car and truck for my nephew. They were super easy to make and he loves them!
Check out the blog link for more details.
I built this after going dumpster diving for pallets. We went through and broke up all of the pallets and basically made this entire big piece for the cost of the stain, nails, and backing.
This is my take on Ana's Narrow Farmhouse Table project. I plan on adding a bench to one side and random color matched chairs to the other.
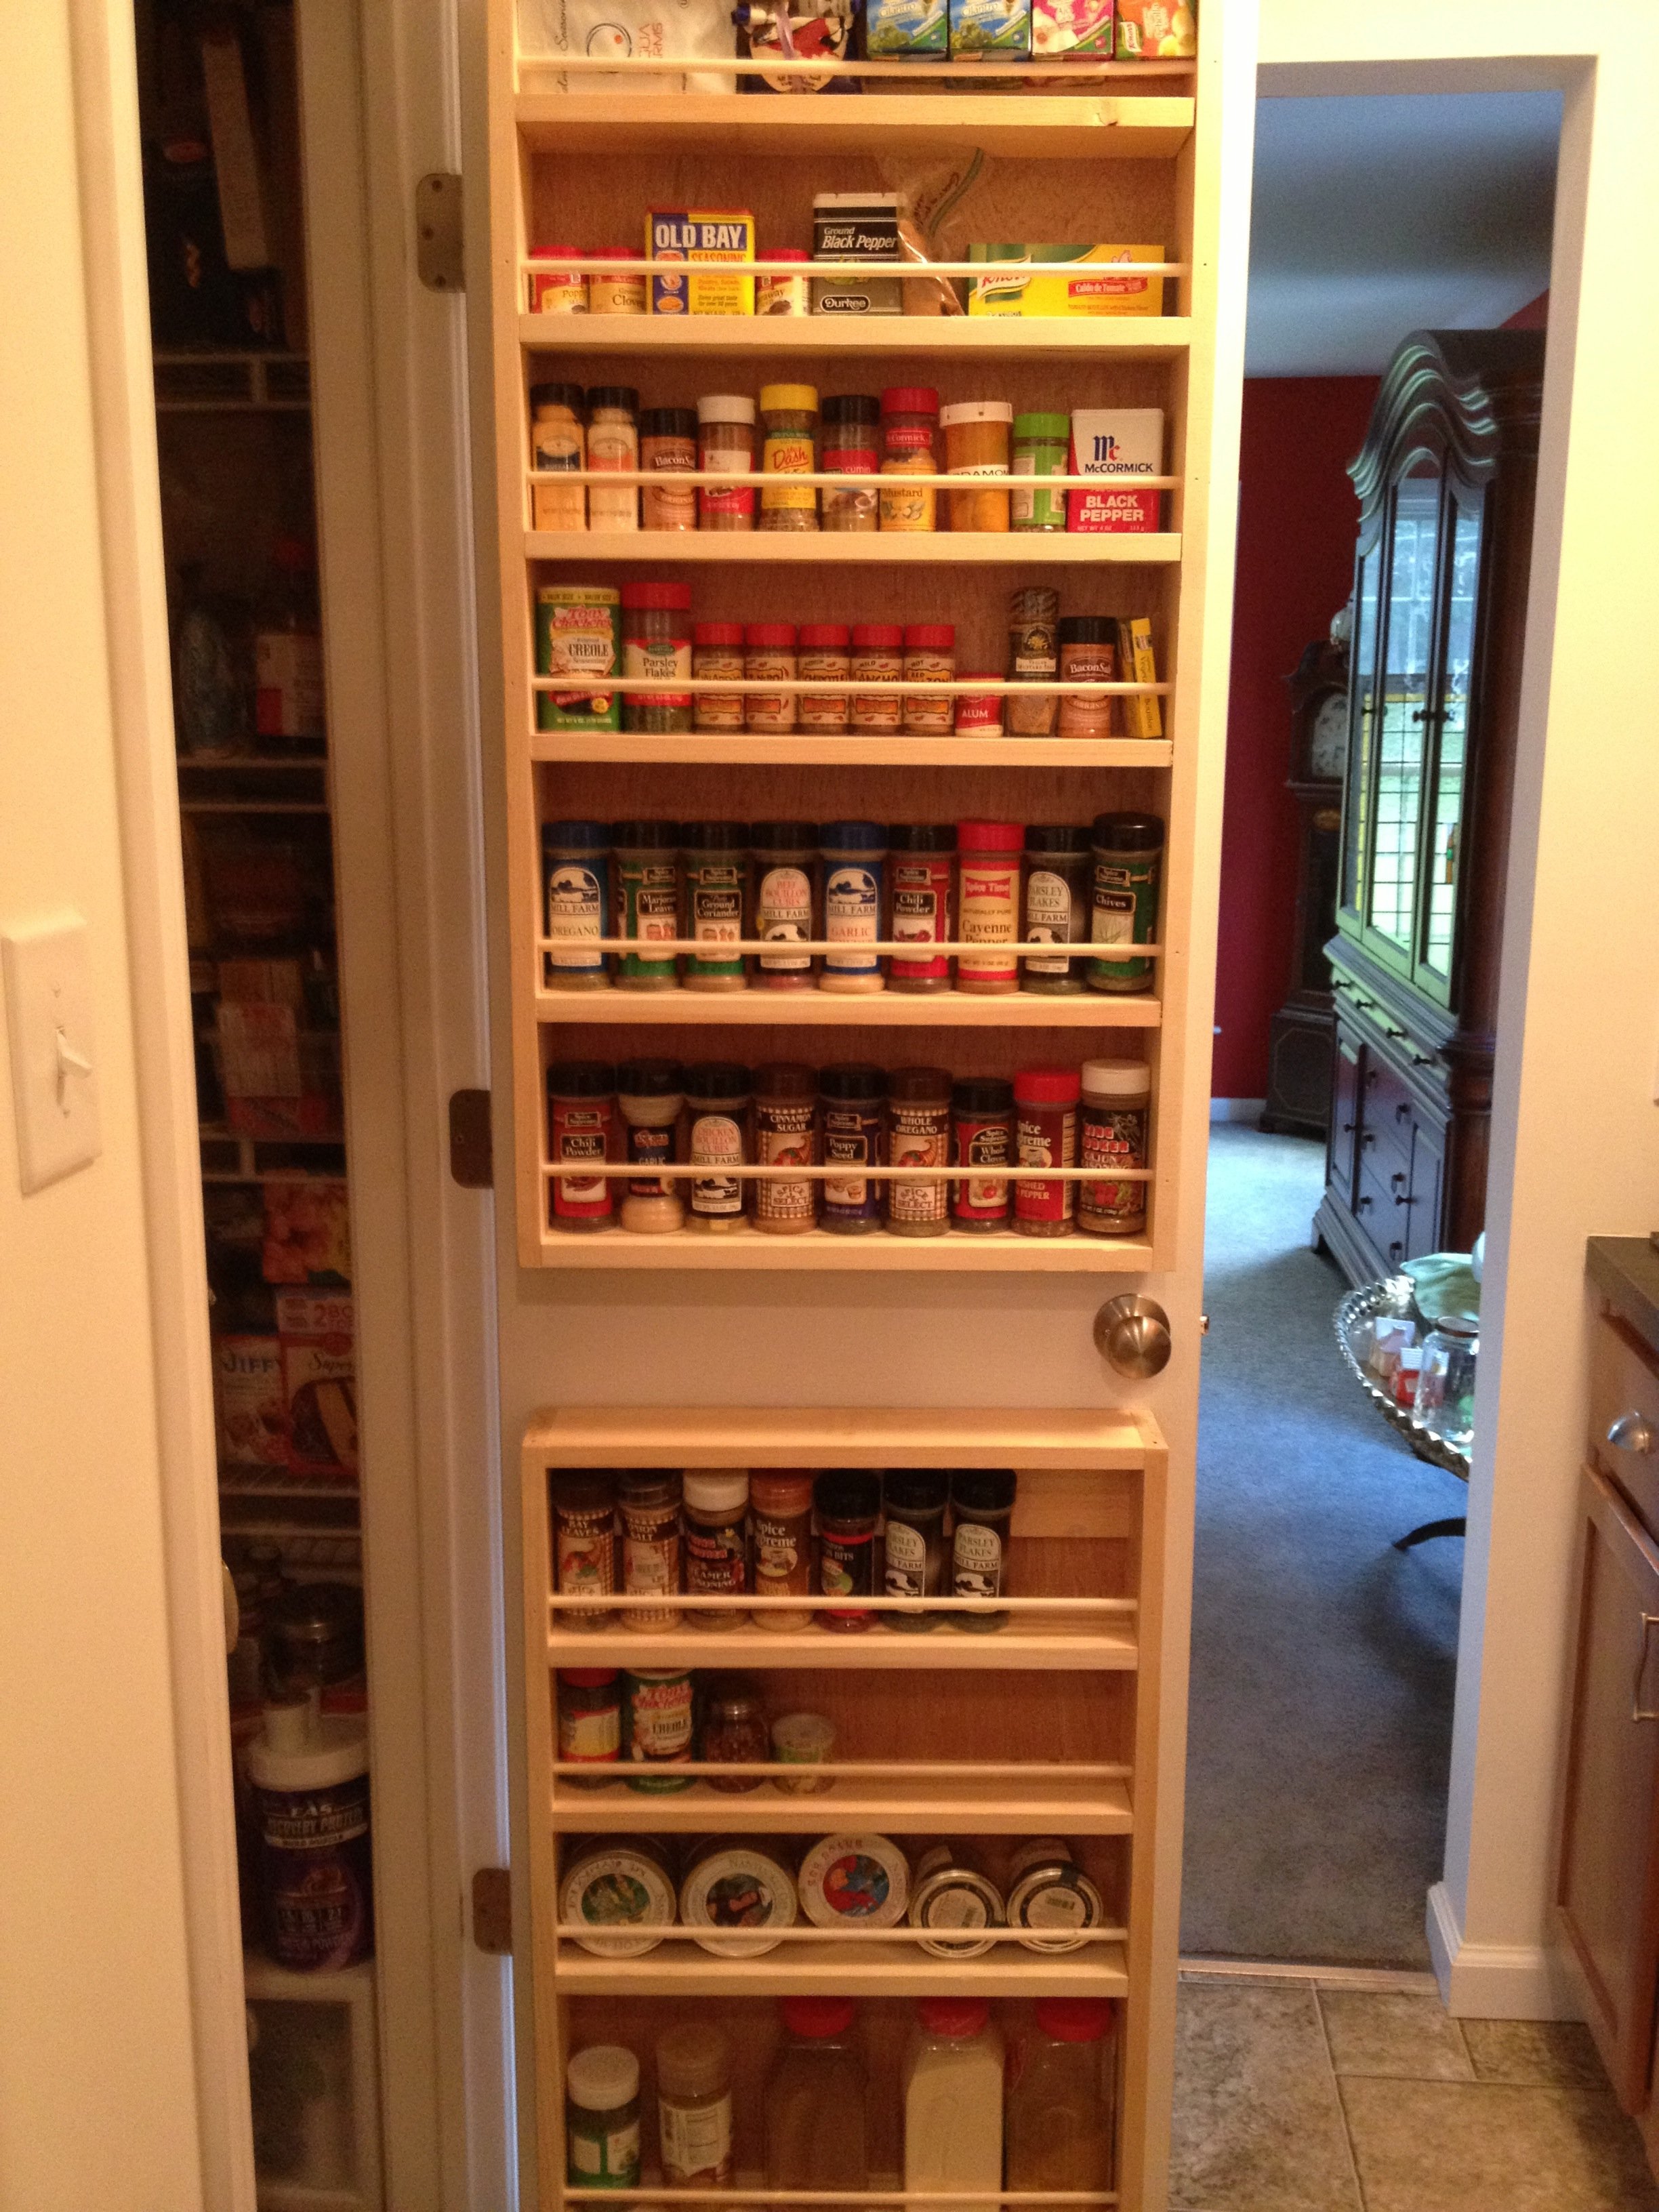
We had these spices in a cabinet, which were impossible to see stuff in the back. This was a perfect solution.
Now, we also had more spices then we know what to do with, so we added a second rack at the bottom of the door as well. I just adapted the plans to be 30 inches tall to accommodate the size of the lower portion of the door. This was accomplished by removing the 1st and 3rd measurements for shelves, and using the remaining for an extra tall shelf.
I also only used a finish nailer (and wood glue),to assemble, in combination with a brad nailer to hold the back plywood on.
I also chose not to include the dowel buttons on the end, and did not cut the dowels to length; they were inserted all the way through and trimmed off with a Japanese pull saw (get one, you will LOVE it), then fastened through the front with the finish nailer, then sanded flush.
I also elected not to paint to finish the piece and leave the natural wood.
Christmas 2010 gift!
Planter box by Harvey!
My husband built the Planter Box with Trellis for his mother for her birthday. We planted one of our rose bushes in it. They are pink teacup roses and should look fantastic against this bright white backdrop once the buds blossom.
This was a great project that was easy to cut up beforehand and put together the next afternoon. I think I want one!
Tue, 06/14/2011 - 06:21
I am SO PLEASED that that design came out so beautifully! THANK YOU for using my plan!!! You did a wonderful job! =) I hope your husband's mom loves it!
~Tina
In reply to I wish you could see my happy dance right now! by biz_kid1
Tue, 07/12/2011 - 03:59
Thank YOU, Tina! The plan was so easy to follow and we were just amazed that this thing came out looking almost exactly like the picture. Often times, we are not so lucky and "modify" the project at the time, or "modify" our expectations when it looks a little different. Not so with this one. It's perfect!
Projects by Michael!
Modern Farmhouse Dining Room Table (with pocket hole) and 2x4 chairs with plans reposted from morelikehome.net.
Surfed the site for the right plans and dove right in. Thank you for the inspiration all!
Mon, 09/10/2018 - 11:05
I have clicked on the link the plans are not there.
I love this table and bench set! Very easy to build and didn't take too much time. We made it a family build. My kids helped put together the benches and table. My wife and kids did all the staining.
Inspiration for this project came from the original Restoration Hardware table's price, which was way out of our budget. We found the plans on this site, and then the brag post from http://tommyandellie.com/?p=2582, which convinced me to give it a try when we moved to our new house.
I pulled some ideas and techniques from a couple of different areas - one was the idea from American Woodworker to use a straight-edge and a router to joint the edges of adjacent boards so they match perfectly, or as close to perfect as possible (see one of the pictures). After a few false starts it worked out very well.
One other big change was to use 4x4 pieces for the legs and cross-braces - especially on the long cross-brace. With two kids (6 and 3) and a third on the way, I knew they would want to crawl under the table to play, and sit on the beams - and I was afraid a 2x4 wouldn't hold up to their weights. I've VERY happy with the result - that base is not moving or flexing at all.
Finally, I learned a TON about what NOT to do! Apparently after doing the dry fit and having everything fit well, you should not sand the parts of the boards that fit together or suddenly they will be loose! Also, wiping off the stain after the suggested amount of time IS a good idea, after all! Finally, we ended up using pine boards with fir 4x4's, and I wish we had used all fir as I think the grain pattern was nicer.
All in all, though, it was a great experience and I can't wait to tackle another project!
Mon, 08/05/2013 - 14:52
Thanks Rob, good luck! Below is the link to the original source for the technique I used (#8 in the list). Just be VERY sure you have the boards (and the straightedge) clamped tightly so there's no wiggling. The first time I did it I didn't have the straightedge tight enough and it wiggled loose at one end, so the router started biting into one board more than the other, making a curve. Once I got the layout figured out, however, it worked very well and I was very pleased with it - I even did it again with the ends of the long boards (after they were glued/screwed together) and the inside edge of the breadboards before attaching them.
http://americanwoodworker.com/blogs/techniques/archive/2009/08/26/10-tr…
Fri, 08/09/2013 - 07:11
Good call on using 4x4's. They look much better then a builders grade 2x4. Looks great!
Fri, 08/16/2013 - 08:05
If your using a hand planer your going to get more of a worn uneven look, it's nearly impossible to get a perfect straight board after using a hand planer. IF you run it through a floor standing planer whatever bend in the board will still be there since it follows the contour of the board. If you want a straight board regardless of size you need to straighten it with a tablesaw. I am sure you can find a million how to's by just googling "how to straighten a board with a tablesaw". When your using building lumber you will always have an issue with things not being straight and looking "rough". It may be easier to just goto a actual lumber store and buy something that isn't Pine. Pine is a soft wood which is likely to dent easily after being used. But regardless, if you want a straight board use a tablesaw. I bought a bosch table saw at lowes and its awesome. folds up against my wall and is probably the best tool i have bought. Decent ones run about 400 bucks but its well worth it with what it allows you to do.
Fri, 08/16/2013 - 07:53
Not beforehand... (just to be clear, my 2x's were all white pine, only the 4x4's were Fir - unfortunately, the local Menards only had pine 2x's and fir 4x's) - I spent a lot of time at the store picking out the straightest, least cupped/curved boards I could find, and then spent more time at home arranging them to make sure the boards with the longest straightness (is that a term?) were used for the long pieces. Once the top was put together, I used a straightedge to find the humps and valleys in the top and used a hand plane to level them out a bit (see the background of the picture with the completed base, you can see the shavings on the top). I would suggest, if you do the hand plane route and aren't familiar with the tool or don't own one, to either borrow a well-tuned one from someone who would show you how to use it, or prepare to spend money to get a good one. You probably don't want to do what I did, which was buy a cheapo Stanley from Menards and then spend probably 8-10 hours over the course of a week or so trying to get it setup properly. I finally got it useable, but it was a very frustrating process and it didn't take long before the newly-sharpened edge was dull again. I did finally get it smooth enough so that it was easy to slide a plate or dish from one side of the table to the other without it rocking or hitting an edge/bump, but if I had it to do over again I would have saved the time and spent the money on a good older Stanley or a newer Lie-Nielsen or Lee Valley, etc., and then spent a lot less time getting the plane ready to go.
One thing that helped my mind-set as I went through the process was to remember that the beauty of this style is that it is not supposed to be perfect - a farmhouse table is supposed to look a little rough and worn, and the little defects are part of it's charm. It's an important point to remember especially if you are a bit of a perfectionist as I am!
I made this buffet, serving table to go with a large gathering farmhouse table I made. I loosely used the farmhouse table plans but did some designing of my own based on a picture my friends had of what she wanted.
Made these for my guest bedroom!
Thu, 06/30/2011 - 08:04
They came out great, and your guest room looks LOVELY!!
I followed the X-table plans for the base and then went a little nutty on the table top. I also beefed up the bottom stretcher on the base as I felt it complemented the 4x4s used for the feet well. I left off the diagonal braces as I liked the contrast of the beefy legs and stretcher and the open airy appearance between the base and tabletop. There were several blogs/ideas on Pinterest about a Chevron style table top. I took pieces from all of them for my design. The table measures 99.75 inches long by 41 inches wide. I thought being a quarter inch under 100 was a bit quirky and did it merely for that reason. Oh and please forgive the photo bomb by my daughters. I could not take a picture without getting at least one of them in the frame. My oldest is being a little silly in the pic trying to show the detail of the Chevron design--or split Chevron as I'm calling it.
Sun, 04/29/2018 - 07:22
your table looms beautiful. I hope your finish holds up on this one.
Thanks for the plans Ana!
I stuck to the design but changed the dimensions to suit the space and the boxes we intend to store. This made the shelves 7.5 feet high by 8.5 feet wide. The timber was supplied in 17’ lengths so this also meant very little wastage. The frame is composed of 2x4’s, the shelves are 4.5 x 1.5’s - as I wanted the shelves slightly shallower this meant I could get away with three boards for each shelf instead of 4 as on the plans.
For the short cross pieces I used woodglue and screws – to attach the long shelf pieces I just used screws. I predrilled holes in the first piece for each of the screws, but I didn’t drill a pilot hole in the next piece, the screws were self-tapping and didn’t need one.
The back wall is concrete block and I screwed each upright to the wall using wall plugs and screws. I’ve 2 young children and as the shelves are quite high I was afraid they might climb on them and tip them over otherwise. The attachment to the wall definitely makes the whole thing feel much sturdier – the structure is completely rigid.
The only real issue I encountered was that some of the boards were slightly twisted or warped – and I had to apply some force to keep everything square when I was gluing up. Overall I’m very happy with the end product, and found it reasonably easy to put together. Now its time to put the shelves to good use and start tidying up the garage!
I recently built this for a fundraiser for a friend, who suffered from a stroke, people loved it.
Brightly Painted chairs are popular here. I made two unpainted chairs in an afternoon. I would paint the pieces before putting them together if I made them again. Very comfortable!
I made this for my mom for her birthday. I just modified the measurements to accommodate the window and added some cool hardware.
Made a 4 foot version of the farmhouse bench. I also used 4x4s for the legs instead of 2x4s. They work great, just makes the bench a little heavy.
We built the Farmhouse queen bed and fancy X desk for our bedroom. It was relatively easy and looks so great! The bed is made of pine and cedar. (It is really really hard to find pine 4x4 posts that aren't pressure treated around here.) We used pine for the desk. Paint color on the bed and base of the desk is Behr "Polar bear" with a coffee stain distress. The desk top is Benjamin Moore "Dash of pepper." The bed cost about $175 to build and the desk cost $30. (We used a lot of scraps for the desk.)
Thu, 09/05/2013 - 17:03
Your bed and desk are beautiful! Great job on this build, and I love the colors!