Community Brag Posts

Rustic Vanity

Submitted by Anonymous (not verified) on Sun, 01/15/2017 - 23:26

Ana, we saw your plans for the barn door cabinet that was pinned in pinterest and absolutely loved it and felt we had to build it but we had to completely modify  the plans to have it custom fit our bathroom. It was a trial and error experience never having built anything before. Thank you for giving us the idea.

Estimated Cost
$275
Estimated Time Investment
Weekend Project (10-20 Hours)
Finish Used
Lacquer and Early American stain
Recommended Skill Level
Beginner

Comments

Rustic X coffee table

Submitted by MandyM on Tue, 09/29/2020 - 16:55

This completes our living room Rustic X collection. Made the top slightly longer (52.5") and dado'd the exes. I also used 2x12 boards and cut them down so the top is completely flush.

Built from Plan(s)
Estimated Cost
$75
Estimated Time Investment
Day Project (6-9 Hours)
Finish Used
Charcoal grey stain
Recommended Skill Level
Intermediate

Comments

rustic dresser

Submitted by marino on Mon, 10/06/2014 - 12:01

my daughter needed a new bedroom set... i refused to spend thousands of dollars on a new dresser and a bed. with a little hard work and help from Ana's plans... i was able to put these together and they turned out AWESOME!

Estimated Cost
$600
Estimated Time Investment
Week Long Project (20 Hours or More)
Finish Used
dark walnut stain and white latex paint
Recommended Skill Level
Intermediate

Our closet

Submitted by Anonymous (not verified) on Wed, 01/18/2017 - 20:19

We made smaller ones for each side of the closet. Love it!

Built from Plan(s)
Estimated Cost
$300
Estimated Time Investment
Weekend Project (10-20 Hours)
Finish Used
Early American
Recommended Skill Level
Intermediate

Rustic x hall tree

Submitted by Takoravi on Mon, 10/05/2020 - 08:50

first furniture build from scratch. A few minor differences. I decided to distress by staining entire piece with minwax espresso stain, then painting over with white chalk paint and sanding through. Decided to leave bench and to molding stained for effect. Love the piece and so does my wife.

Built from Plan(s)

Comments

My dream Modern Farm Table with Benches!

Submitted by mitchejl on Fri, 12/28/2012 - 17:52

My ex-marine uncle helped me build the modern farm table and benches. We bought pine from Lowe's. Not all of the pre-cut pine slabs fit the exact dimensions from the modern farm table and benches plans. We knew some of the wood would have to be cut again. A Lowe's worker was kind enough to use the store saw to cut some of the wood into the dimensions needed for the table and benches. He measured and remeasured.

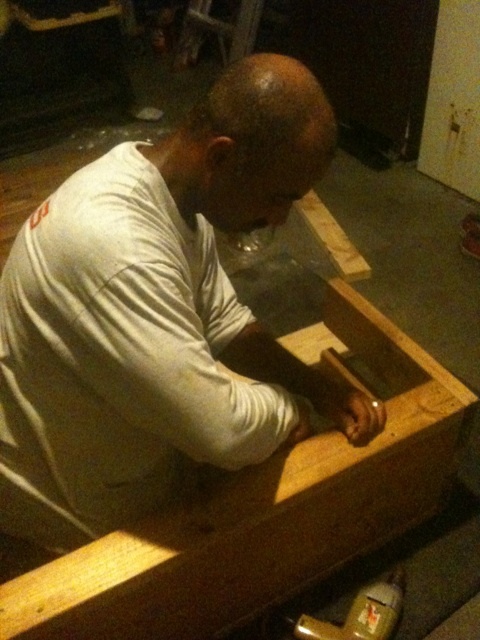
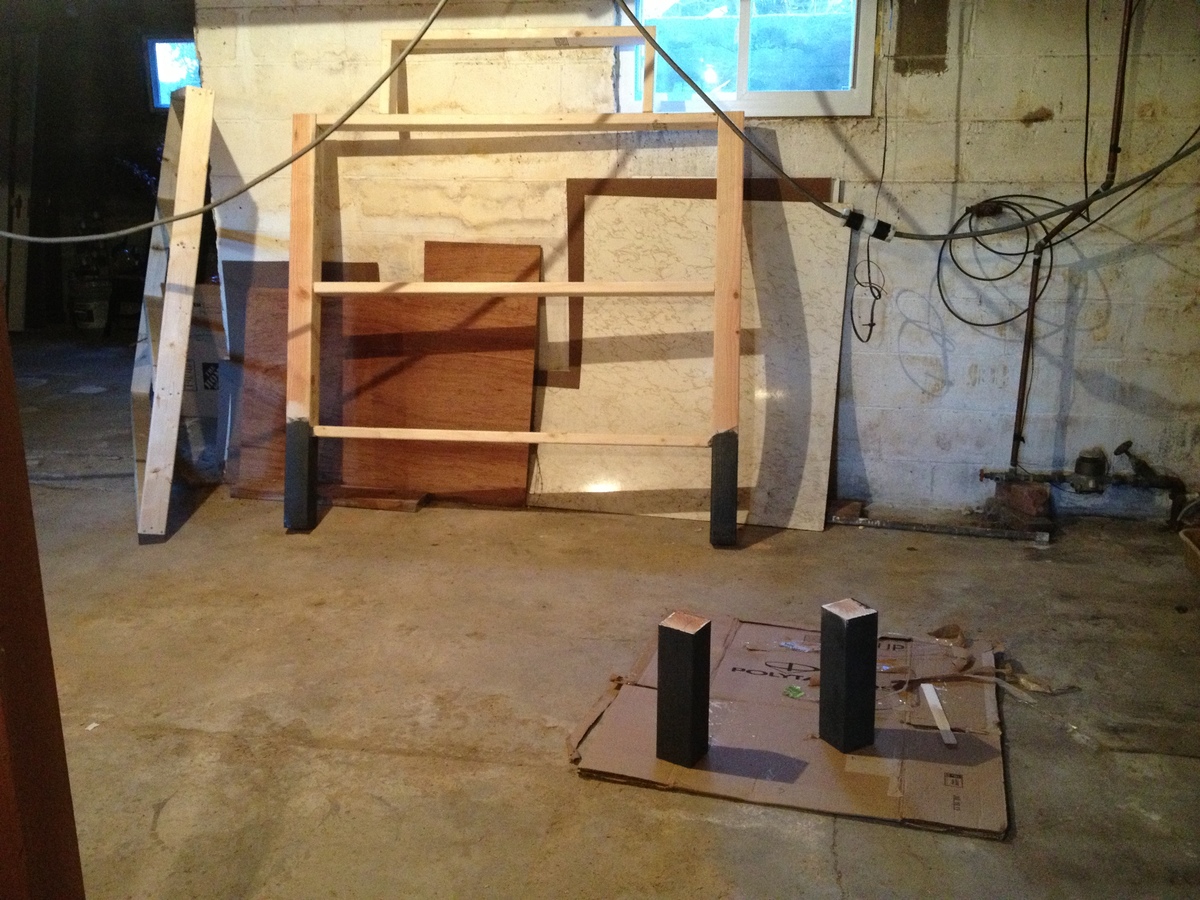
Once in my uncle's garage, we first dry fit the furniture. My uncle started with the table. We dry fit the table on its back (in other words - we assembled the table upside down without drilling the table together). He then remeasured all of the wood for the table (while on its back). He wanted to be sure that all pieces would fit, once we started to actually assemble the table with drills. We did the same for each of the two benches.

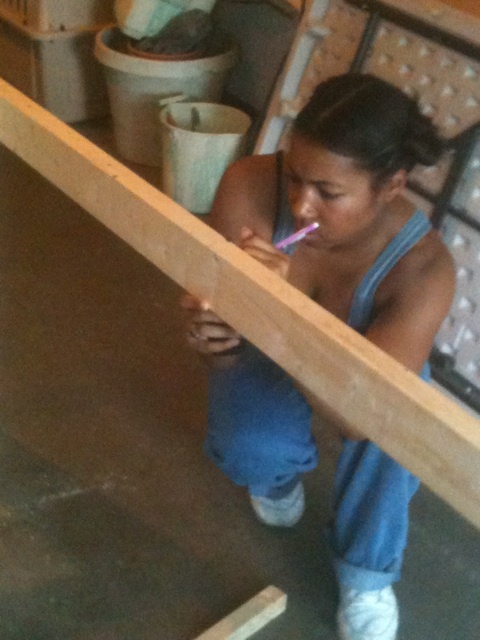
Then we buffed out any dark marks or stamps on the individual pieces of wood. We did this by hand and not with an automatic tool. That part was BRUTAL.

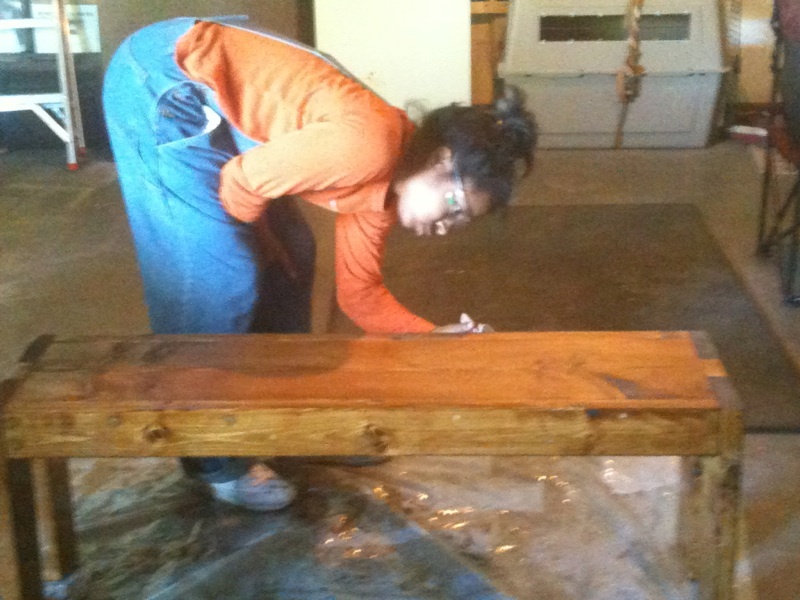
Next we conditioned the wood. Wood conditioning is necessary, because pine stains unevenly. We waited 3 hours before applying the first coat of stain.

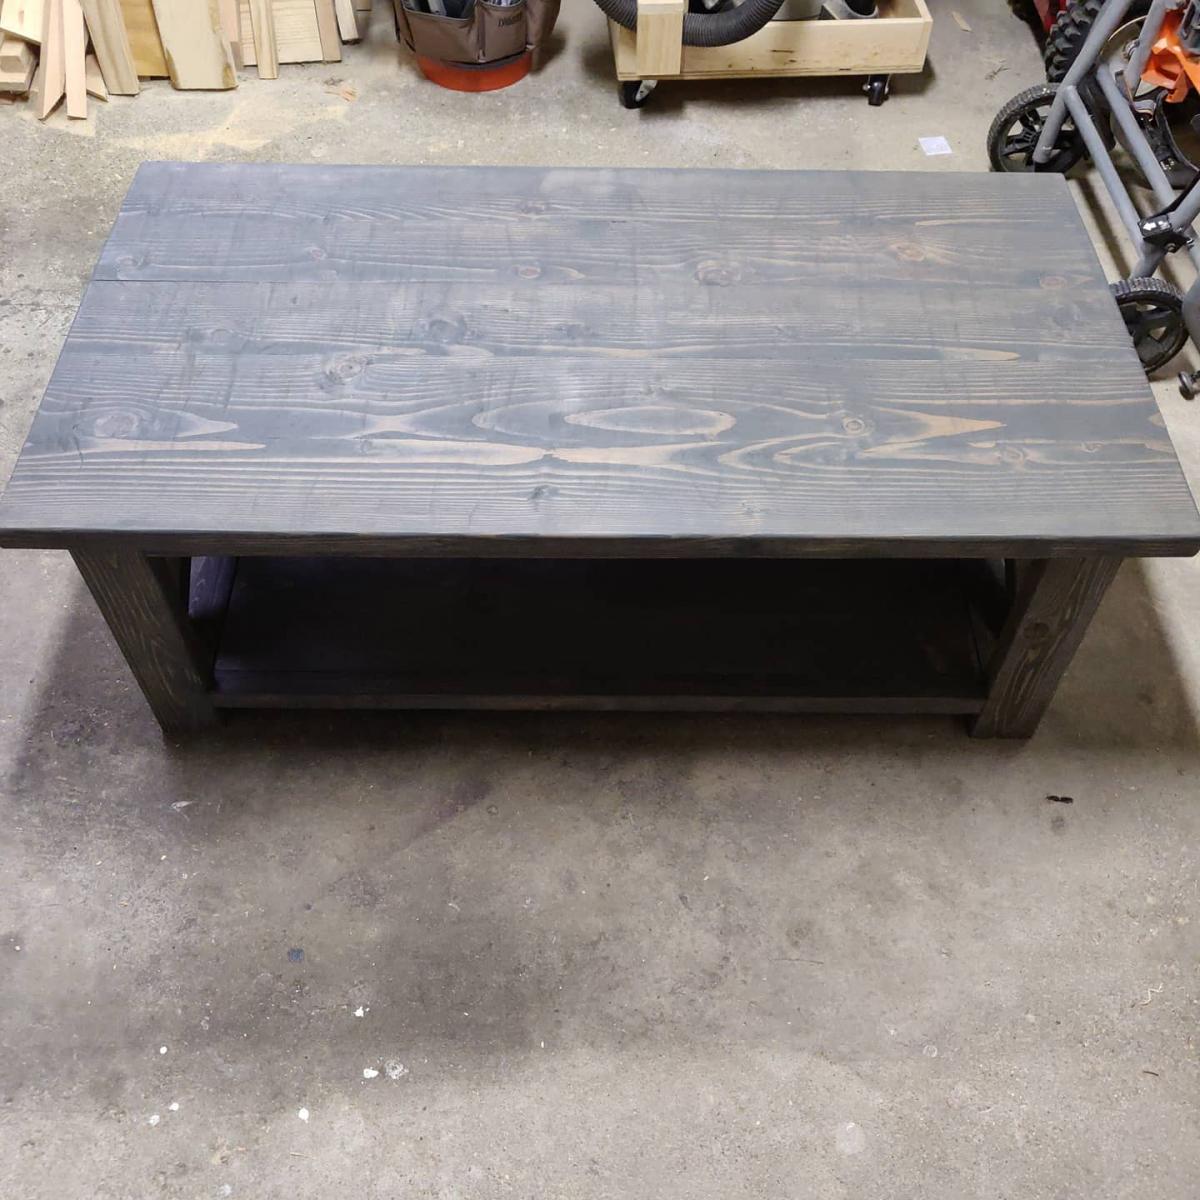
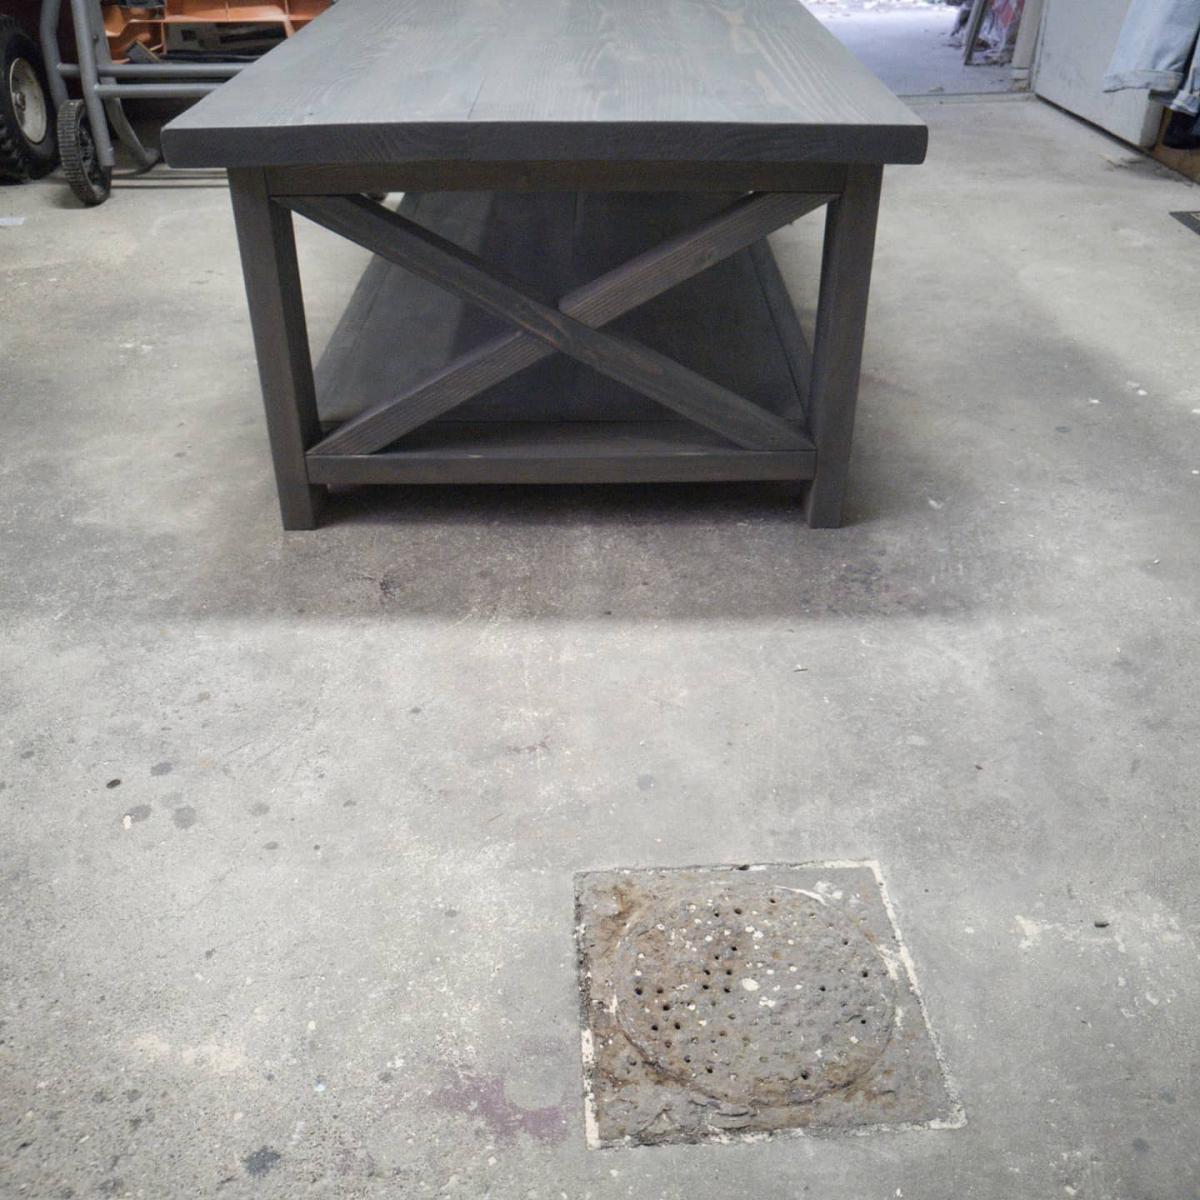
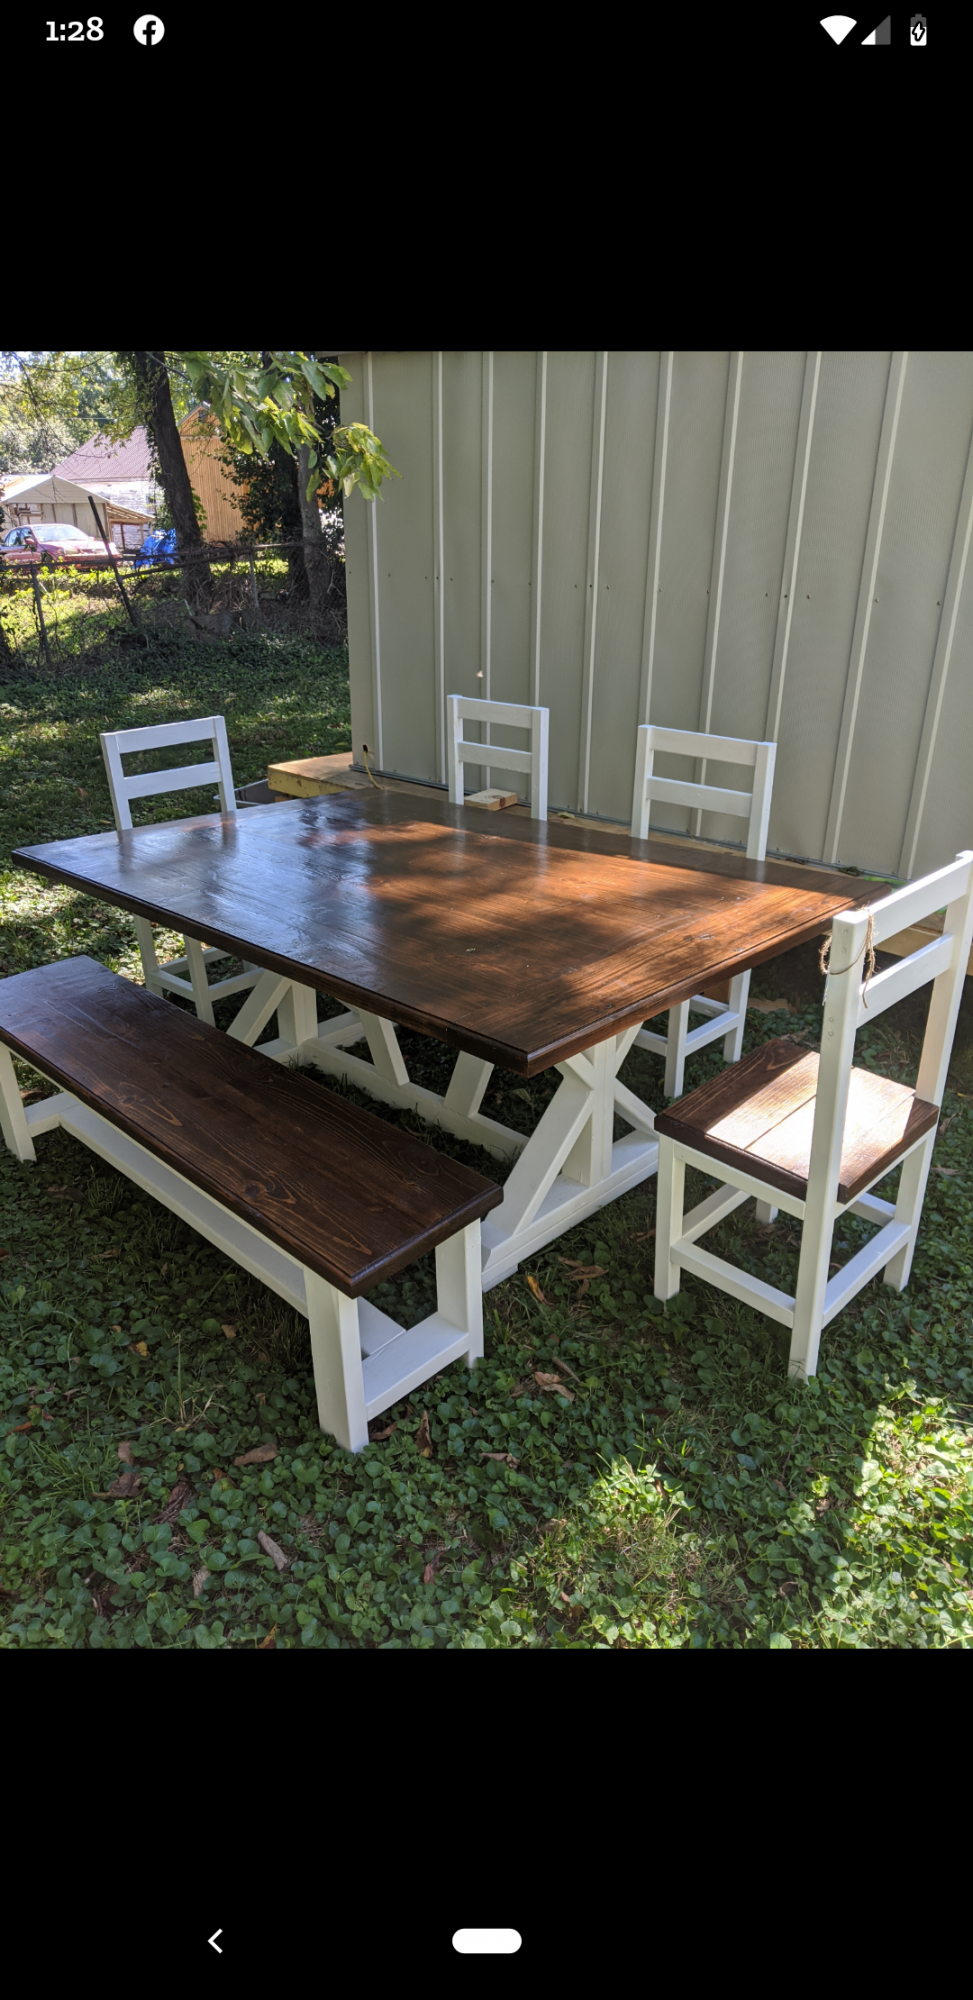
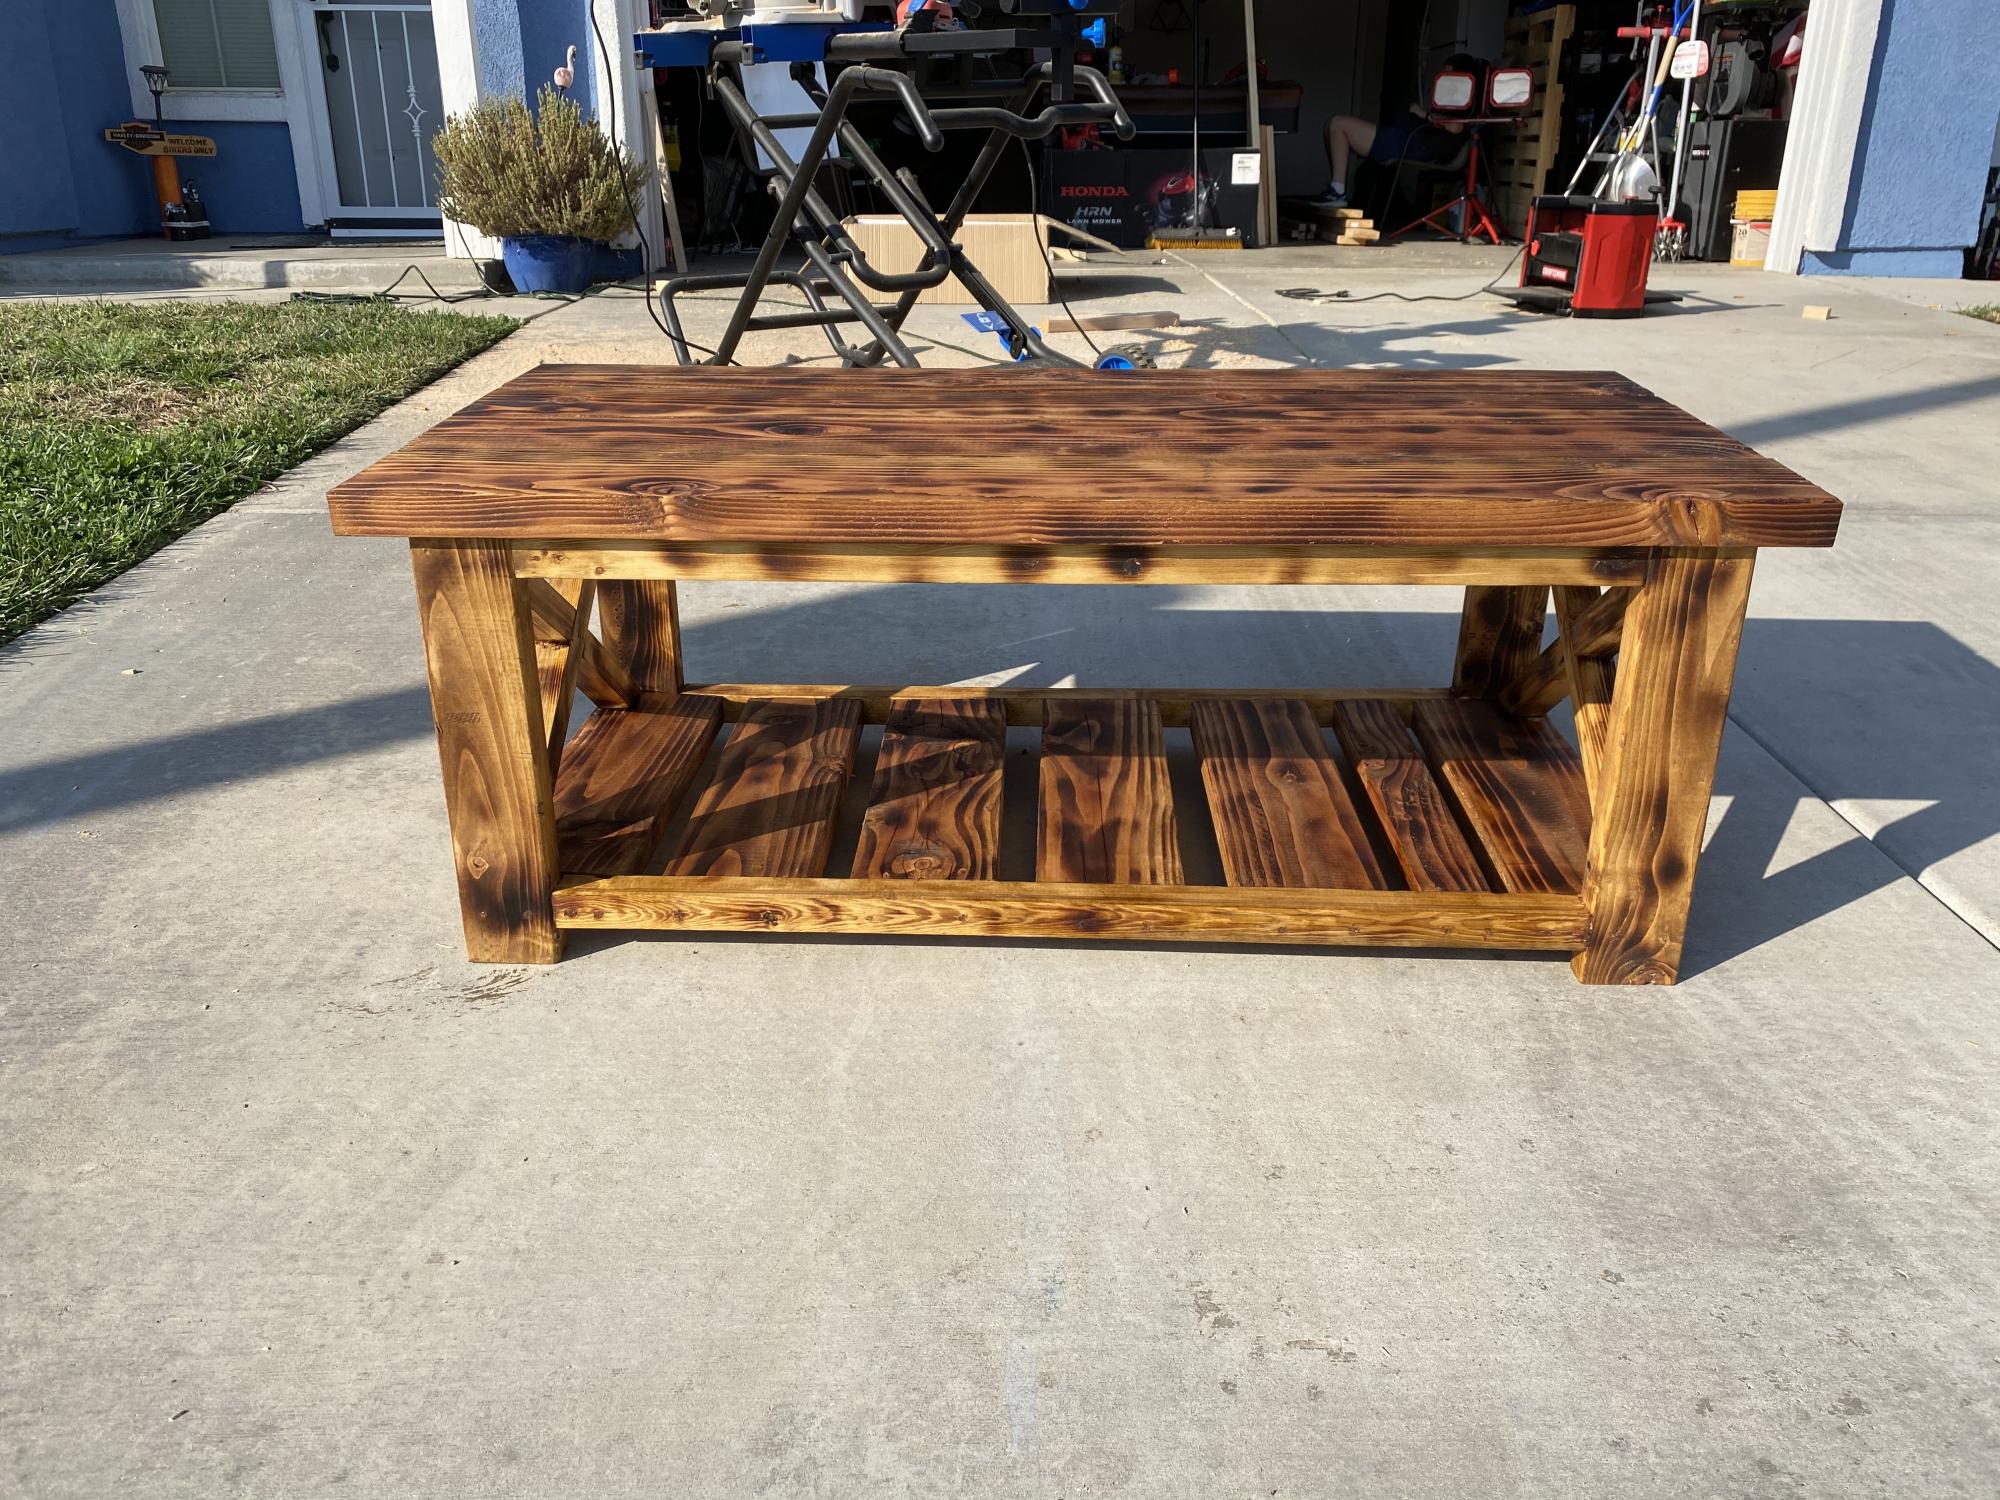
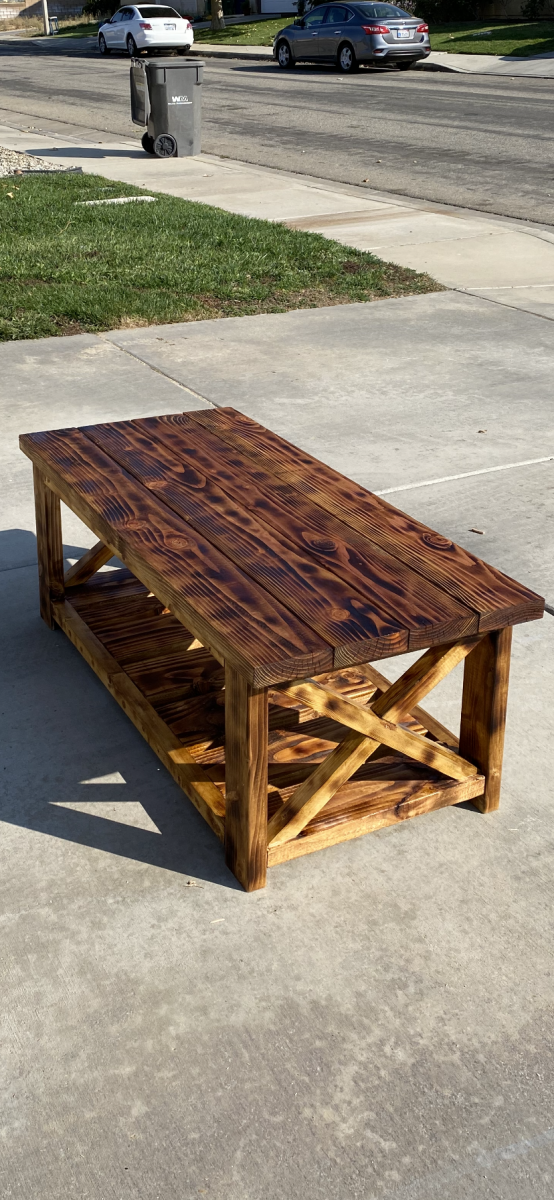
We applied the first coat of stain. Our stain was a mix of early american and golden oak. I did not intend for the table to come out as dark as it did. We mixed more of the early American stain than I had intended, because the table came out darker than I expected.

We waited in beween coats and we assembled the table and benches in between the first and second coat of stain.

We applied a second coat of stain to the assembled table and benches.

Then we applied polyurethane to seal and protect the stain.

After the polyurethane, we used wool to sand out any bubbles.

After the table and benches were assembled and everything drilled in place, we put wood putty in the places where holes were drilled.

Then, we stained the wood putty. The wood putty accepted the stain very well.

Duration

We built this table during the second week of August 2011. The project lasted between 28-30 hours over 5 days.

Make sure your boards of wood are fairly free from cracks. After inspecting them we put several boards back.

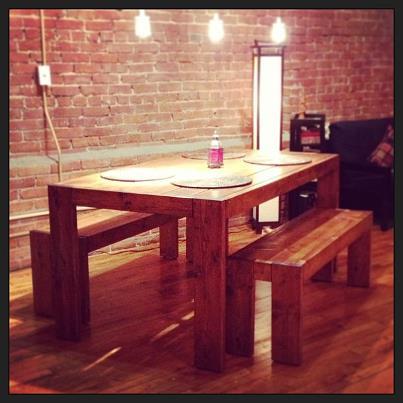
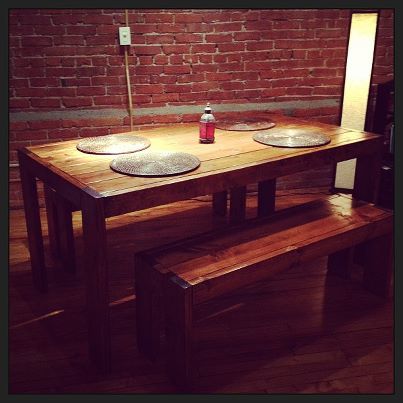
I love my table! I'm always complimented on its beauty. My materials cost around $230.00. I built this table, because the farm table and matching benches I wished to purchase totaled $2,000.00. Thanks to my ex-marine uncle, I have a fabulous table to last a lifetime. I mention his ex-marine status, because the military taught him perfectionism. Building a table with in 100 degree heat with a perfectionist was tedious and hard work. However, it clearly paid off in the end! Thank you Uncle!

Estimated Cost
$230.00
Estimated Time Investment
Week Long Project (20 Hours or More)
Finish Used
two stains: Early American and Golden Oak
Recommended Skill Level
Beginner

Comments

great project

Submitted by Hudsonic on Thu, 10/09/2014 - 16:01

Great site and projects! I had to add glass doors after I thought I was finshed. Then it was strongly suggested to add doors to keep gglassware safe from our four cats.

Built from Plan(s)
Estimated Cost
Actually I reclaimed the shelving boards from shelves in a spare room that we were getting rid of. Probably about $100 as the 1/4 " glass ran about $50.
Estimated Time Investment
Weekend Project (10-20 Hours)
Finish Used
Some behr paint+primer.
Recommended Skill Level
Intermediate

Comments

booksnotbombs

Fri, 10/10/2014 - 07:11

I think adding doors to the top was a GREAT idea, as an owner of two cats myself. ;) It also adds a great look to the project. I think I prefer it to the ones without the doors. :) You did a wonderful job. It's beautiful.

Hudsonic

Sat, 10/11/2014 - 04:39

While the glass doors were an after thought, they do add something nice to the end result which I really like. Thank you for your comments.

Seesaw aka "Blue Blade"

My husband and I made the boys a seesaw a few months ago. We had been spending a lot of time working on our chicken coop and I snuck around to make something for the boys as a surprise. They named it Blue Blade and it has been a fun new addition to their playground. It was straightforward to make. I used 2x3s instead of 2x4s since they were so much cheaper, and it worked really well. I love how it has the extra hole so we can make it taller as they grow.

Built from Plan(s)
Estimated Cost
$30
Estimated Time Investment
Afternoon Project (3-6 Hours)
Recommended Skill Level
Beginner

No-Sew Upholstered Bed

Submitted by a_wolfe on Sun, 12/30/2012 - 16:34

Ok, so I was looking for a new headboard and stumbled on the plans for this Upholstered Bed.

Being without my full compliment of work this winter, I figured, what the heck. I'll try it.

Off I went to Home Depot, bought the supplies and got started.

I should mention that this was my first time doing any sort of carpentry, I have never used a jigsaw, and I had to borrow all the tools.

I found this SUPER easy! I had the headboard support finished in under an hour. Then I took my time cutting the plywood, just to make sure I didn't make any mistakes.

**I should mention right now, if you are planning on using a heavy upholstery fabric like I did, when you cut out the headboard insert, make 2 cuts! I wasn't able to get the insert to lay flush because the fabric was so thick! (I have since taking the picture added decorative trim to hide the little gaps)***

Once I had my plywood cut, I had no problem attaching it to the frame. The upholstery was a 2 person job that took a little time and a lot of staples, but not difficult.

I chose to tuft the headboard insert, and am so happy I did. It was time consuming, but worth it in the end.

All said and done, this took me a little over a week to complete. I had the construction done within a day or two, but the upholstery was very time consuming.

I love my new bed!

Estimated Cost
$275.00
Estimated Time Investment
Weekend Project (10-20 Hours)
Finish Used
Heavy Upholstery Fabric:

DAWSON: OATMEAL

WIDTH: 55"

FIBER CONTENT: 43% Olefin, 42% Cotton, 10% Eco Cloth, 5% Acrylic


Painted legs with Annie Sloan Chalk Paint
Recommended Skill Level
Intermediate

Vintage step stool

Submitted by jaderae on Mon, 10/13/2014 - 17:59

This project was wonderfully easy to build and it is a sturdy step stool I feel will last for a long time.  I was able to build it very quickly, with minimal assistance. Painting and finishing adds to the time but it's beautiful.

Built from Plan(s)
Estimated Cost
$25 including paint, and primer, and there are scraps left over
Estimated Time Investment
Afternoon Project (3-6 Hours)
Finish Used
This is in my kitchen for my 2.5 year old to "help" me
Recommended Skill Level
Beginner

Sliding Door Console

Submitted by Anonymous (not verified) on Tue, 01/24/2017 - 07:16

My take on the Grandy Sliding Door Console. I adjusted the size to fit under our 70inch TV and used old wooden windows as my door. I also added wooden furniture feet. Approximate dimensions are 66LX38HX23D.

Built from Plan(s)
Estimated Cost
$350
Estimated Time Investment
Week Long Project (20 Hours or More)
Finish Used
Rustoleum chaulk paint in Linen White, Dark antiquing glaze, Minwax gel stain in walnut, Minwax wipe on poly.
Recommended Skill Level
Intermediate

Fancy X Farmhouse Table

Submitted by Hartke22 on Mon, 10/12/2020 - 22:33

Just a few of our Fancy X farmhouse tables. Along the way, we where able to put our own spin on the original plans by Ana White.

Estimated Cost
100
Estimated Time Investment
Weekend Project (10-20 Hours)
Finish Used
Minwax Dark Walnut
Minwax Satin clear Polly

Comments

Outdoor bar and stools

Submitted by stevendaun on Tue, 01/01/2013 - 09:34

I built a 15" wide by 8' long outdoor patio bar with locking casters. I modified the stool design on Ana's website and stained both to match. I finished the top with stone tile and grout. This area has become the main gathering point in our backyard when entertaining.

Estimated Cost
$250
Estimated Time Investment
Weekend Project (10-20 Hours)
Finish Used
Baer outdoor brown stain
Recommended Skill Level
Intermediate

Comments

My first furniture project

Submitted by BenjiRPX on Sat, 10/18/2014 - 04:08

My first project using Ana-white drawings, and also my first project of furniture. I am really happy with the results ! Thanks Ana !


Built from Plan(s)
Estimated Cost
About 30 euros (including recuperation items). Unfortunately lumber seems to be more expensive in Europe !
Estimated Time Investment
Weekend Project (10-20 Hours)
Finish Used
Primer (1 layer)
Paint (2 layers)
Varnish (2 layers)
Recommended Skill Level
Beginner

Shoe cabinet!

Submitted by JMasters on Thu, 01/26/2017 - 13:43

Created my own version out this plan. 

Built from Plan(s)
Estimated Cost
$80
Estimated Time Investment
Weekend Project (10-20 Hours)
Recommended Skill Level
Intermediate

How fun was that?!

Submitted by lmoranti on Sat, 10/17/2020 - 16:43

This is Ana’s beginner farmhouse coffee table. Was a blast to make and really enjoyed my first project

Estimated Cost
65.00
Estimated Time Investment
Afternoon Project (3-6 Hours)
Finish Used
Burned with a torch and the golden oak stain. Finished of with a clear coat sealer
Recommended Skill Level
Beginner

Twin Over Full Simple Bunk-Bed

Submitted by Ksavtech on Wed, 01/02/2013 - 10:16

The twin beds that my boys were using took up way too much space in their small room so after much looking I found the Ana White site and this plan. The bed I made is per plan except for the addition of the side rails that slip fit onto the sides. When we change the sheets on the top bunk we just slip off the rail and stand on the lower bunk. We've had my two boys and three nephews all on the bed playing Xbox and it is rock solid!

Estimated Cost
$150
Estimated Time Investment
Week Long Project (20 Hours or More)
Finish Used
Minwax Classic Grey and matte polyurethane
Recommended Skill Level
Intermediate