Corner Storage Banquette
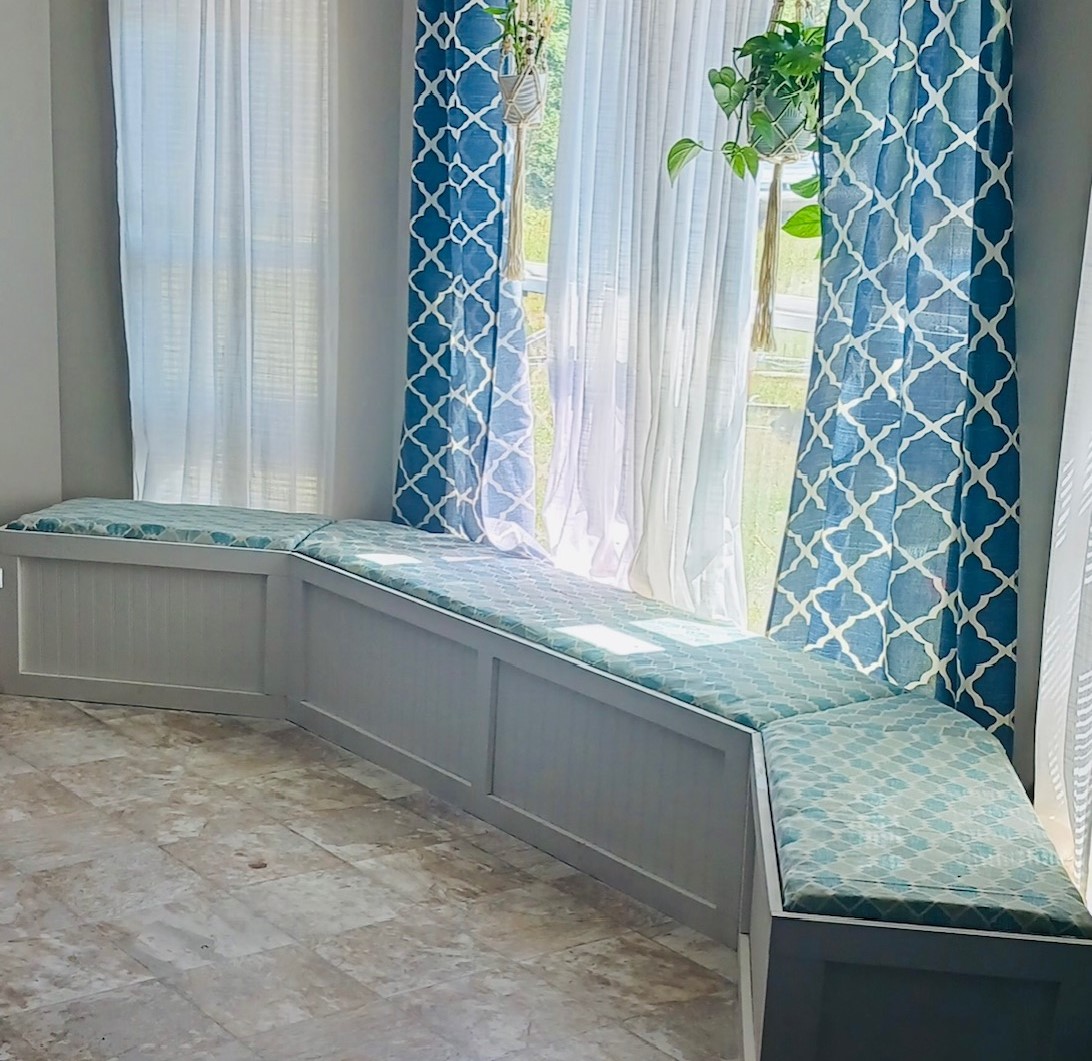
"Thank you Ana White for your plans I'm in love!"
Tarryn Leigh Curlee
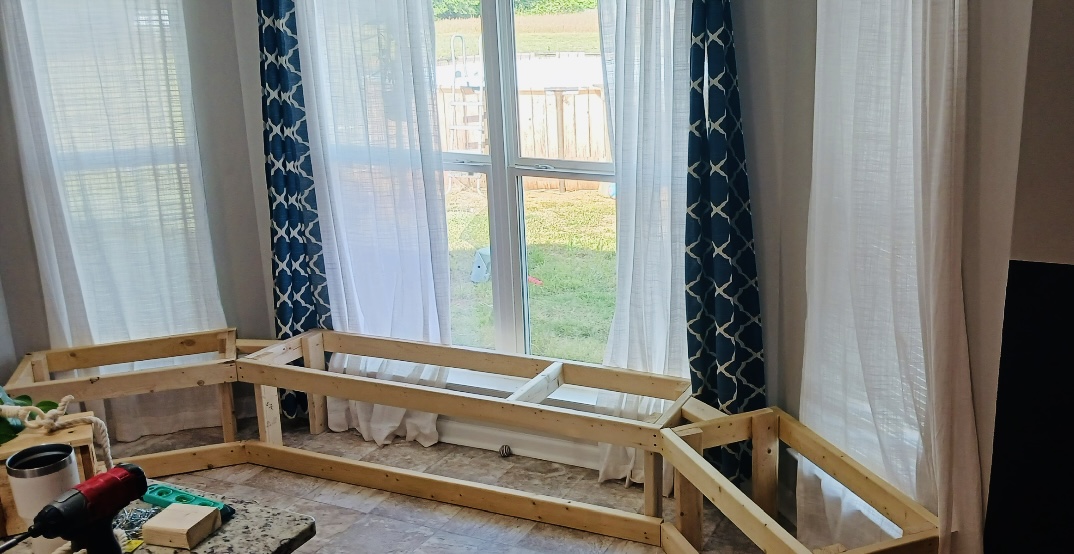

Built from Plan(s)
"Thank you Ana White for your plans I'm in love!"
Tarryn Leigh Curlee
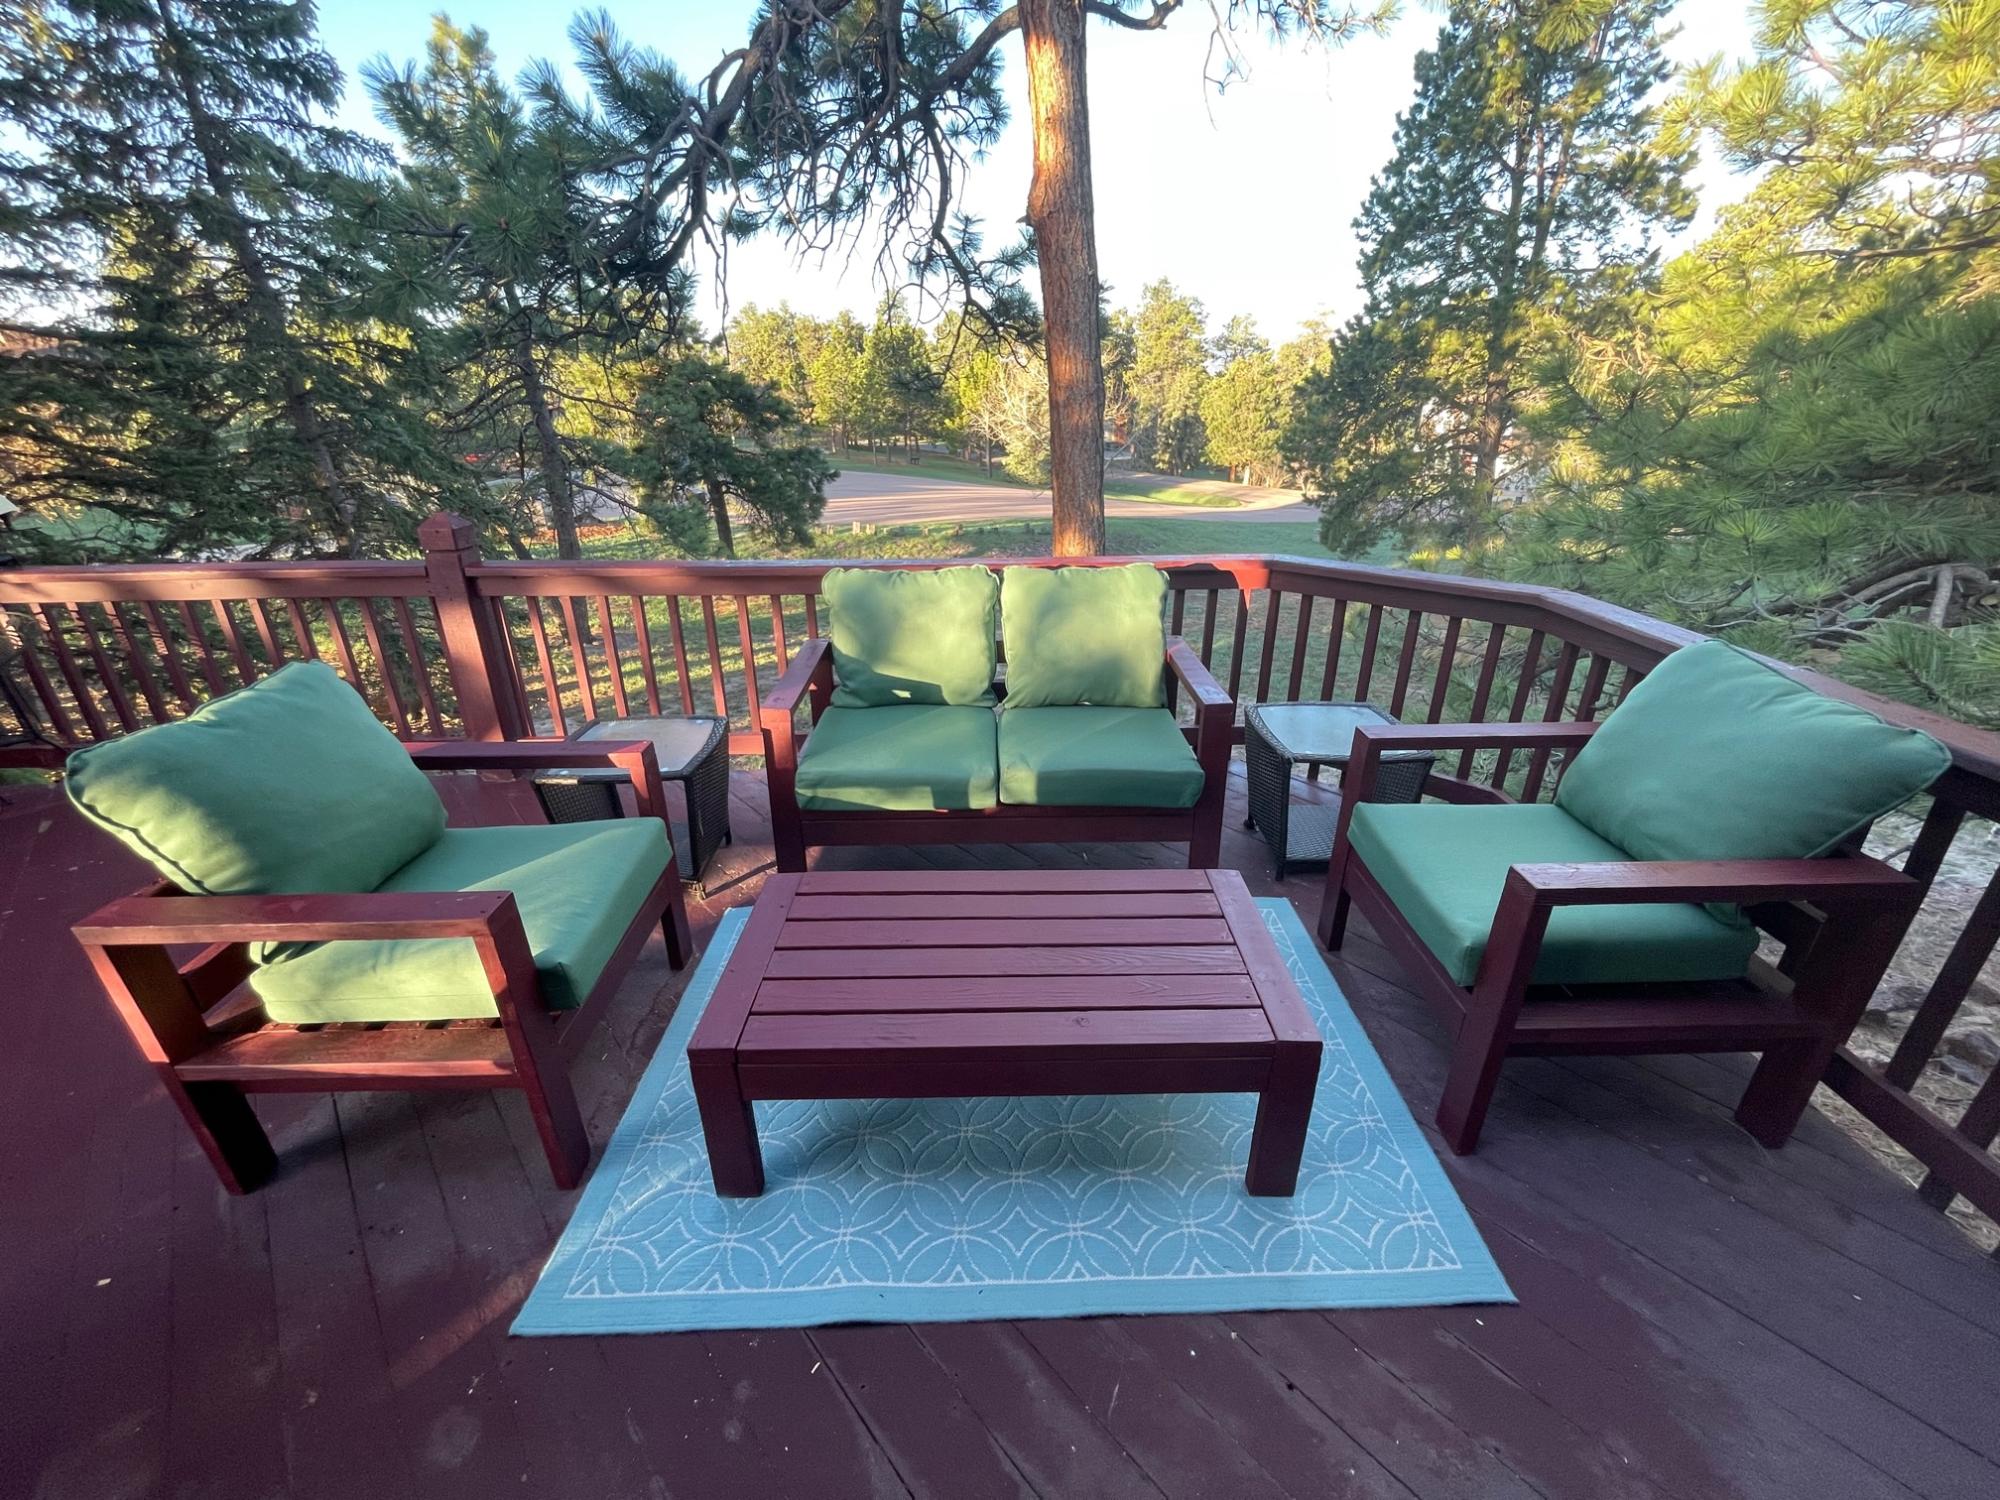
We have gone through several sets of deck furniture at our home in Monument, Colorado. We like wicker, but so do the squirrels! Inspired by an article in the Wall Street Journal where the author used his wood shop experience to make outdoor furniture and avoid "astronomical prices," I found this site. I thought, "Even I can build something out of 2x4s." I borrowed my neighbor's high-end chop saw and made two chairs, a love seat (by cutting the dimensions of the 79" sofa - three cushions - down to 55" - two cushions, and the coffee table, cut down from 55" to 47". Construction took less than two weeks from purchasing the wood to finishing. Everyone who has seen the finished set loves it.
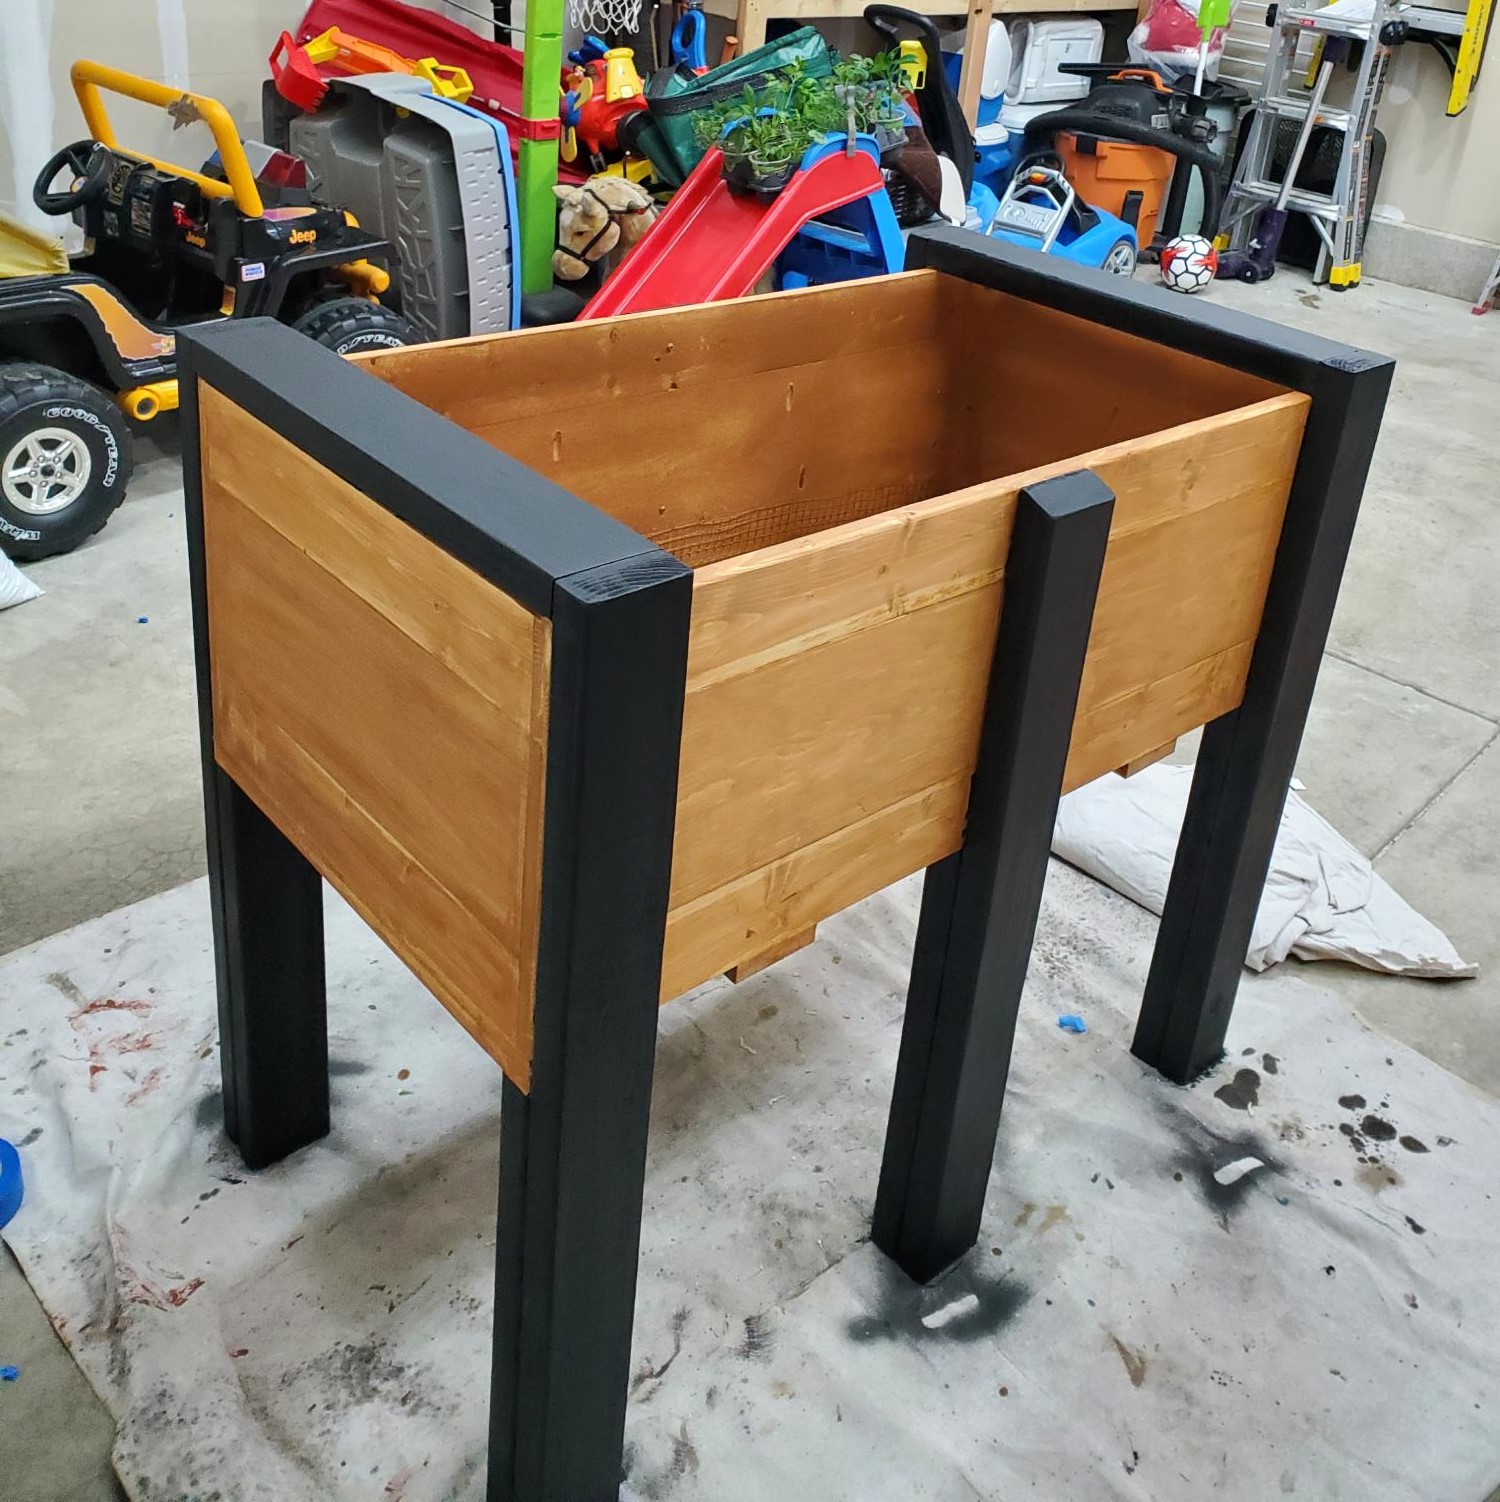
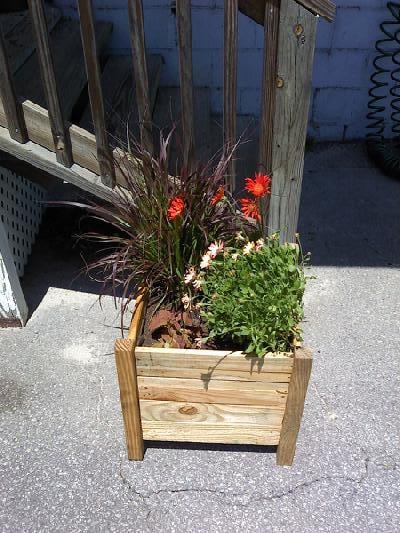
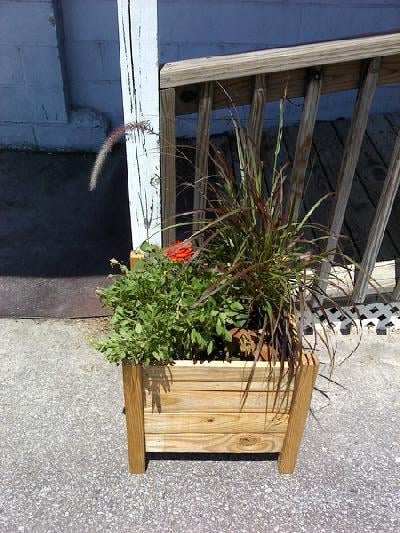
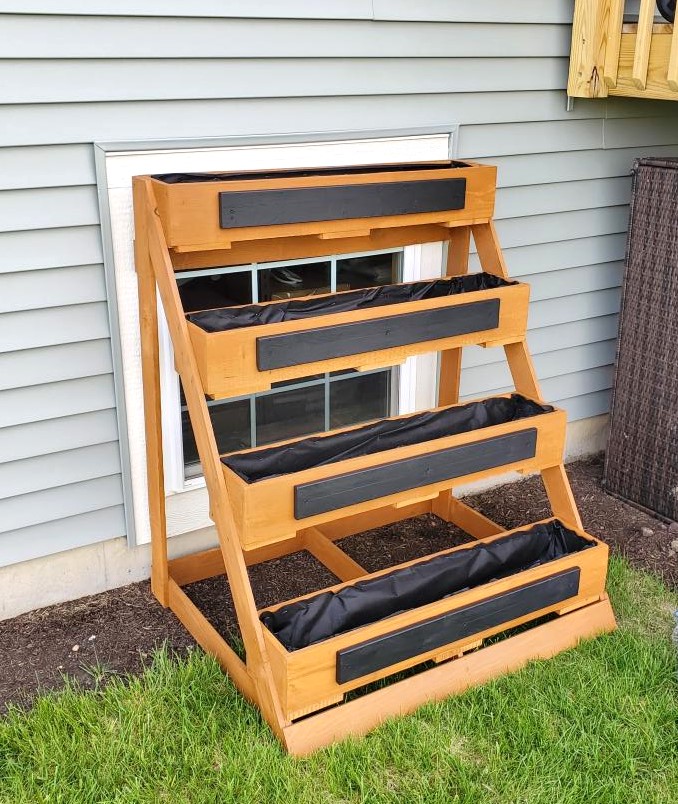
Hi Ana. Been a fan of yours. My name is Ed. Wood working is my hobby. And its always nice to look at your plans, and put my own spin on it. My wife wanted a planter for our deck. So I tweaked your plans and made them a little bigger. I Also built her a herb garden too. With these new planters; it should put a stop to the rabbits eating everything.
Thanks for your inspiration.
Fri, 05/26/2023 - 19:41
Thanks for taking the time to share Ed, these look fantastic!
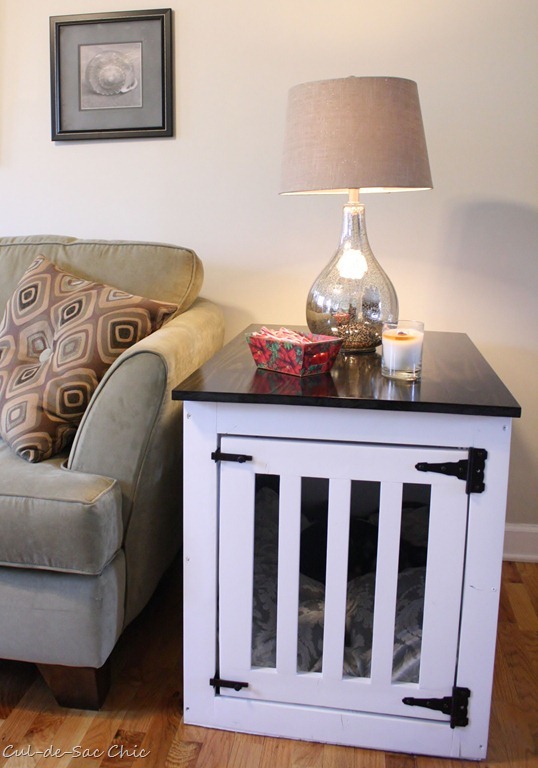
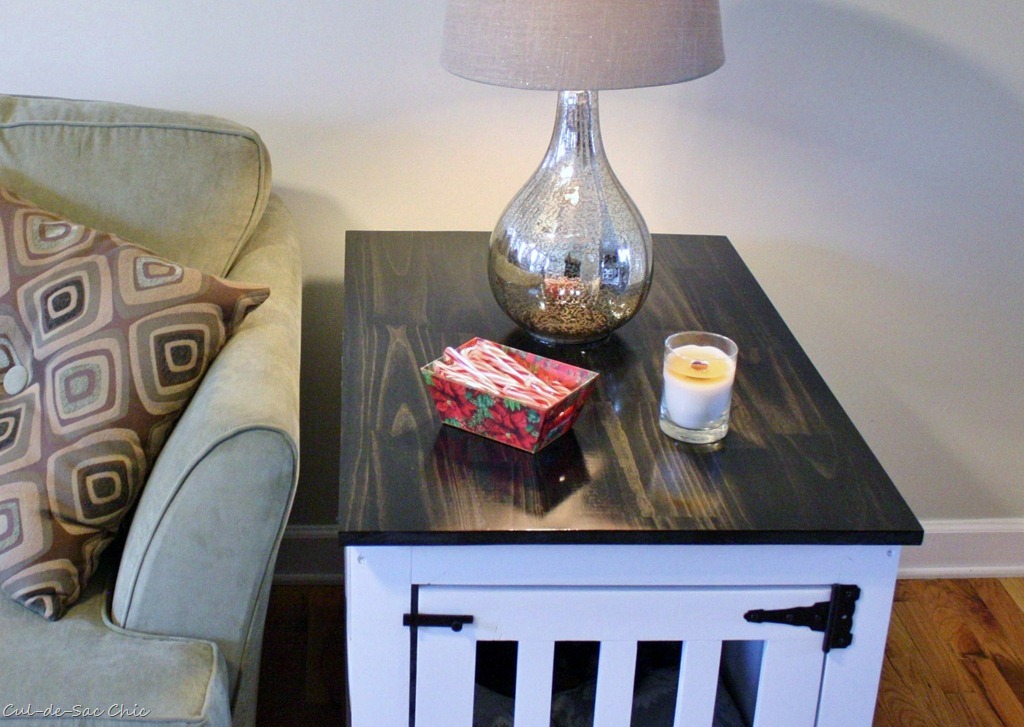
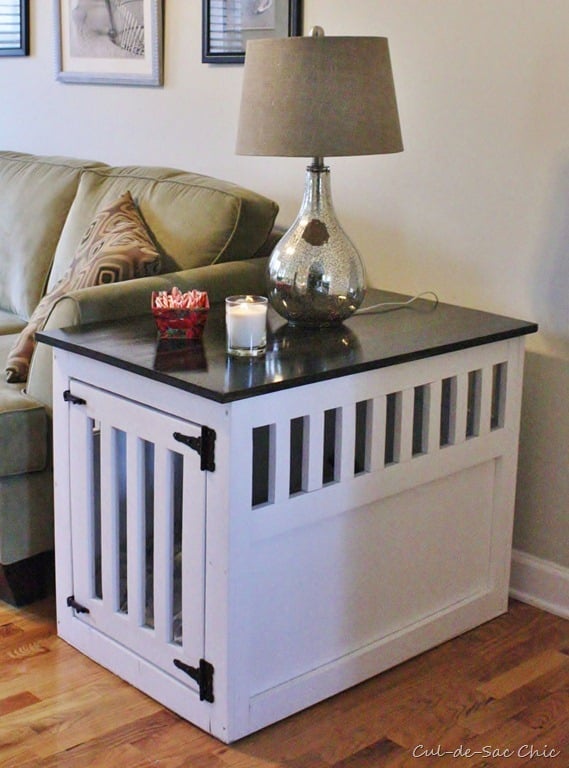
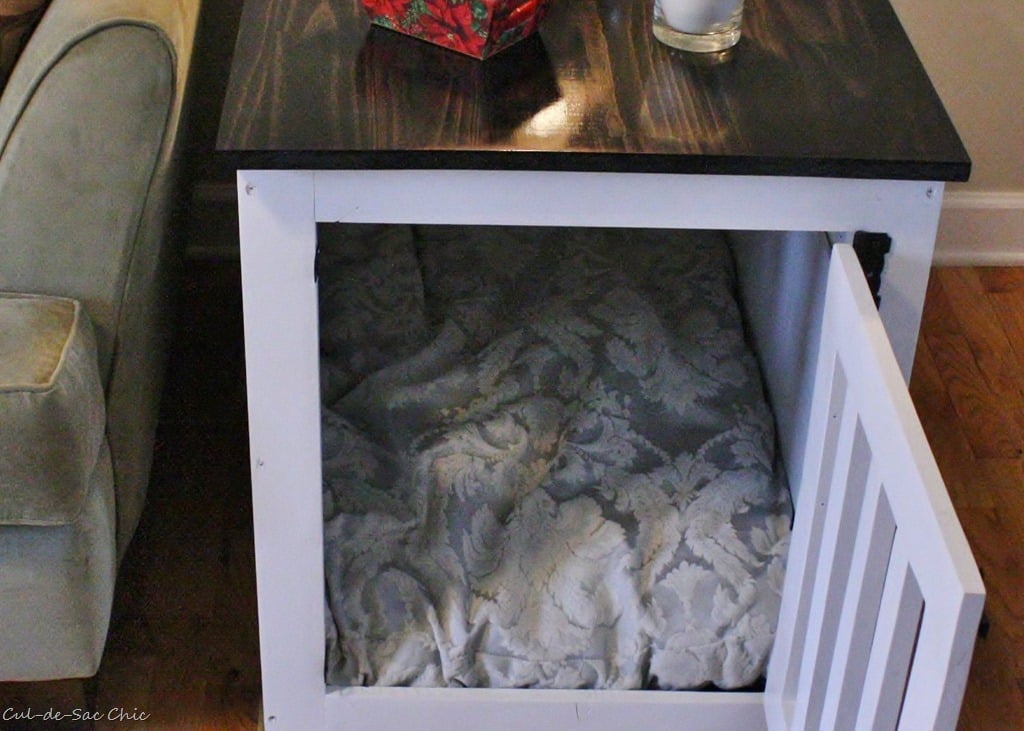
I love this project. My dogs Goldie and Chloe love their new house. They are sisters who just have to sleep with each other. They had their own metal crates but when Chloe was a puppy she would always go in with Goldie and they would snuggle. It was a tight fit for them as Chloe got older but they still had to snuggle. Now they are in heaven with their new bedding and house.

Thu, 02/09/2012 - 09:42
This is beautiful! Trying to convince my husband that we should do this so I can get that grey plastic dog crate out of our living room. Maybe this will show him how much better it would be to build one.

In reply to Plans by Guest (not verified)
Wed, 02/22/2012 - 16:34
Click above where it says "From plans" - that is a link.
Thu, 07/03/2014 - 12:43
Your post inspired me to pursue this project with some left over walnut and it turned out great! I think my post is on page 10 if you're curious. Thanks.
Thu, 07/31/2014 - 03:41
I'm going to try to make mine larger as my fur baby is Grt Dane/Lab mix & needs a bit more room. My idea is to put it at end of my king size bed like you would a cedar chest/hope chest. Wish me luck!
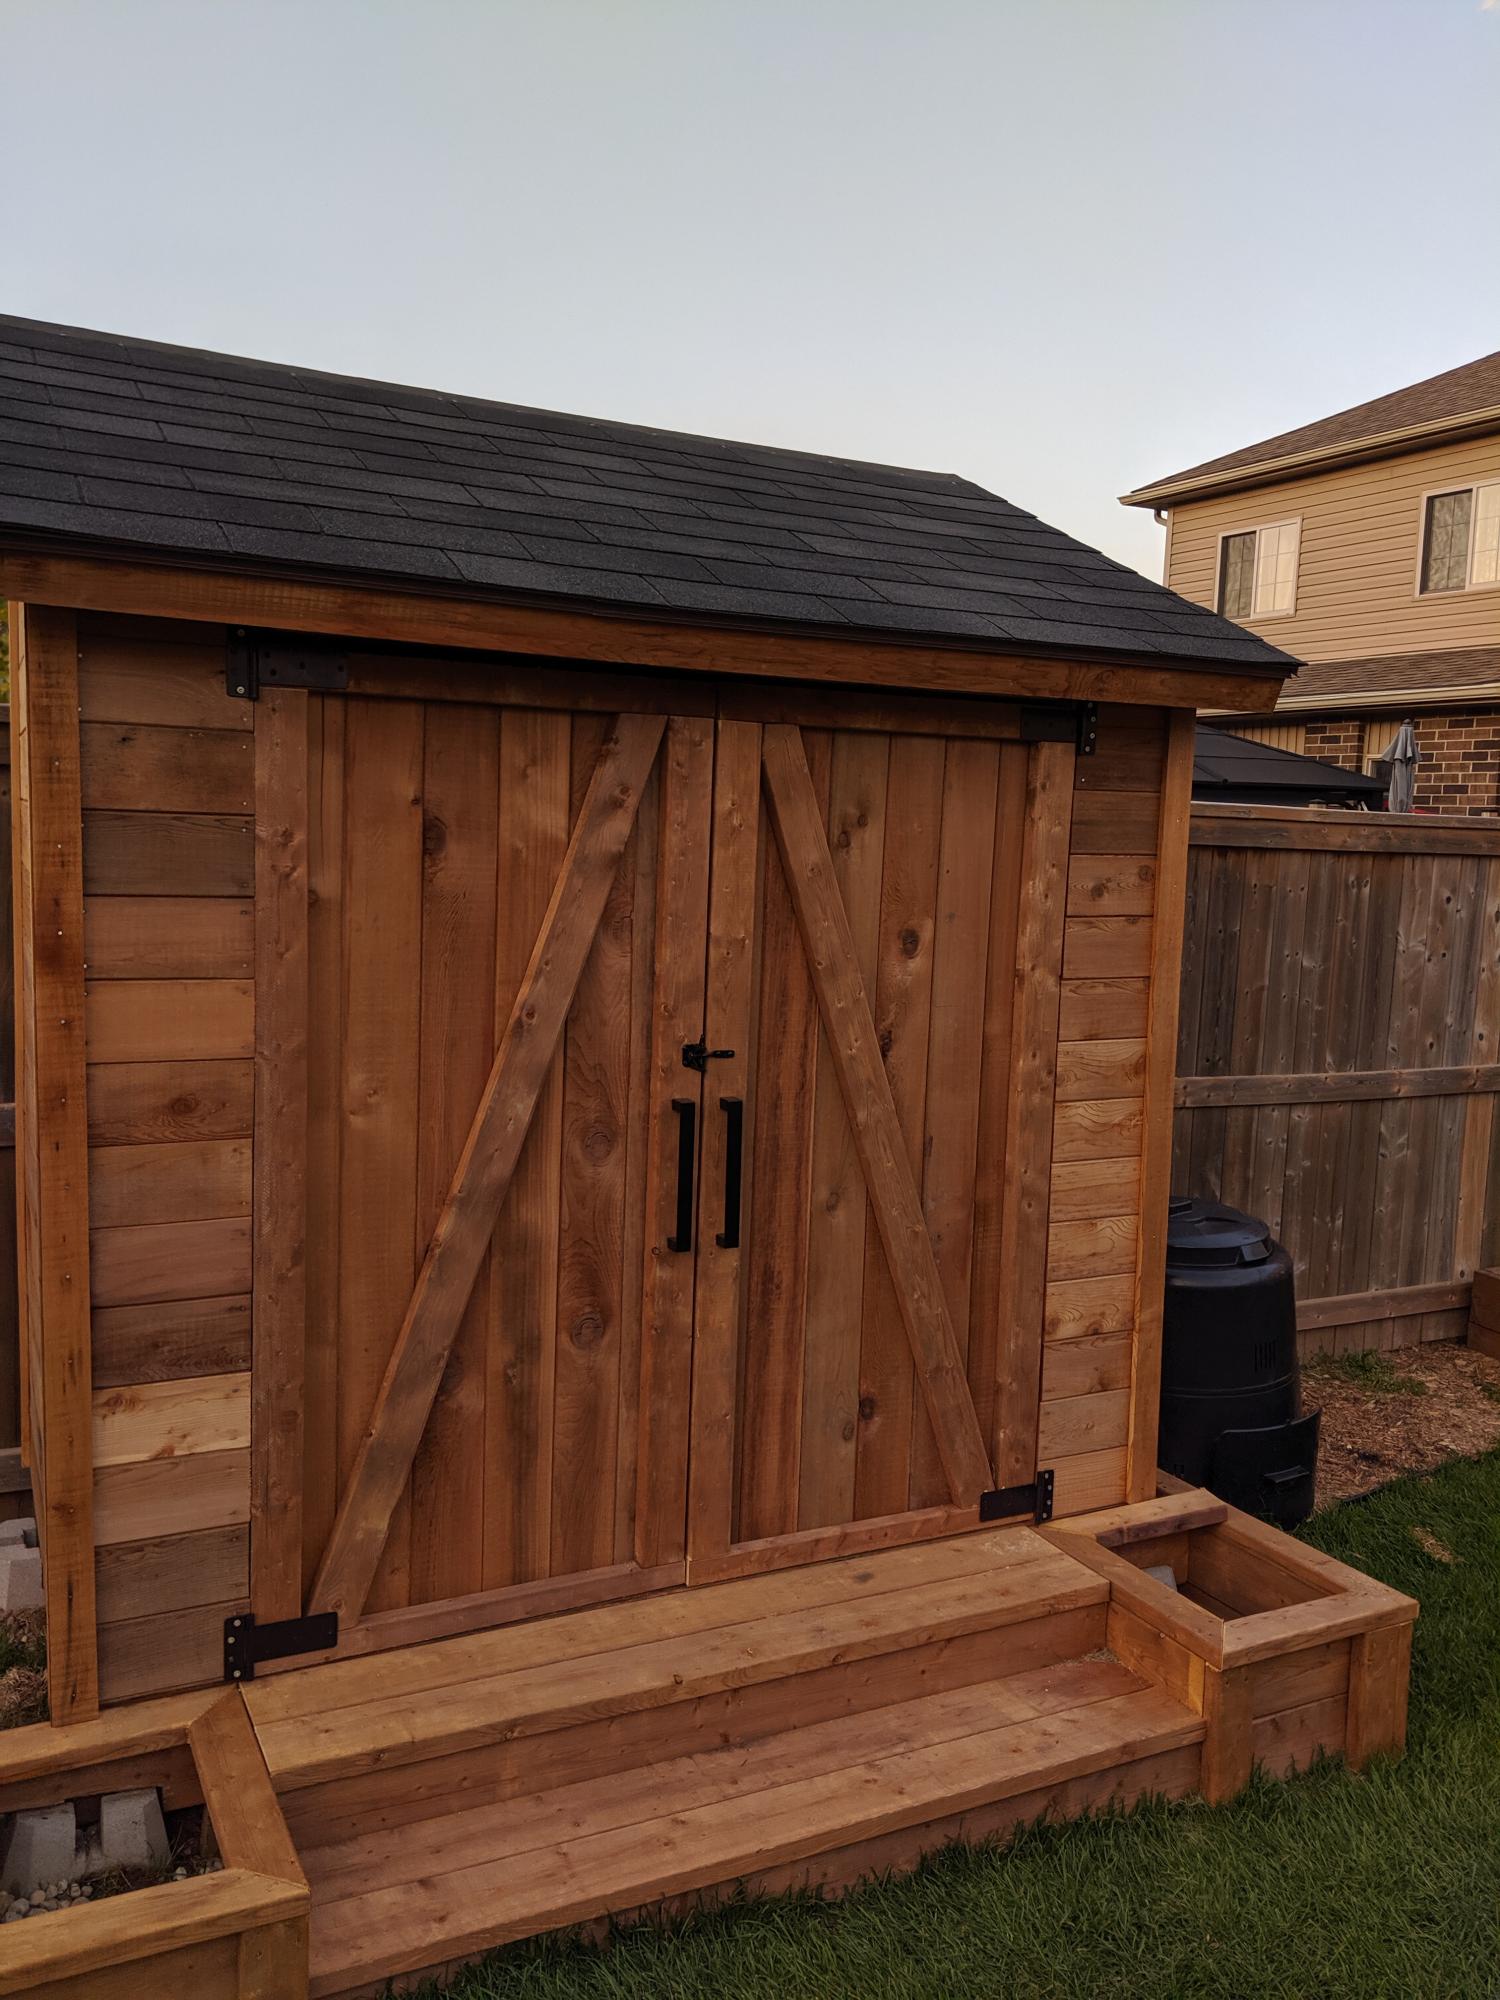
Cedar shed with planter box stairs. Both plans modified slightly to fit my needs. Siding is tongue and groove cedar. All other wood is brown pressure treat. Planter box stairs were sized and positioned to hide cement posts. Sorry for only one photo. Finally finished and ran out of time with good weather here in Canada. Will post more with weather permits. Thanks again for your plans. I've also built night stands and a farmhouse dining table.
Not sure if I linked the proper stairs plan. Was https://www.ana-white.com/woodworking-projects/outdoor-planter-steps-or…

Sat, 11/21/2020 - 18:14
This shed is beautiful! what were the end dimensions of your shed?
Thanks Ana! Appreciate all the plans and how much I’m learning.
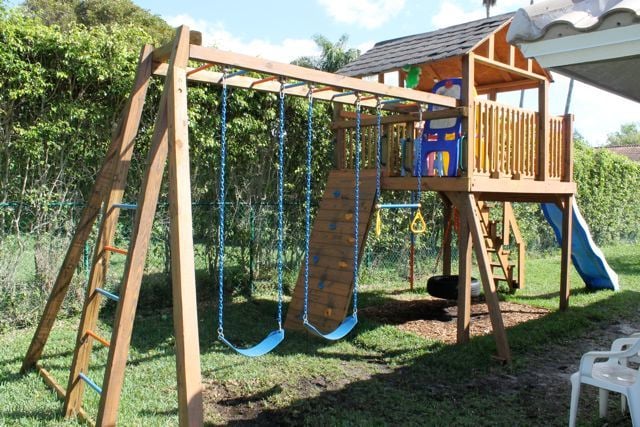
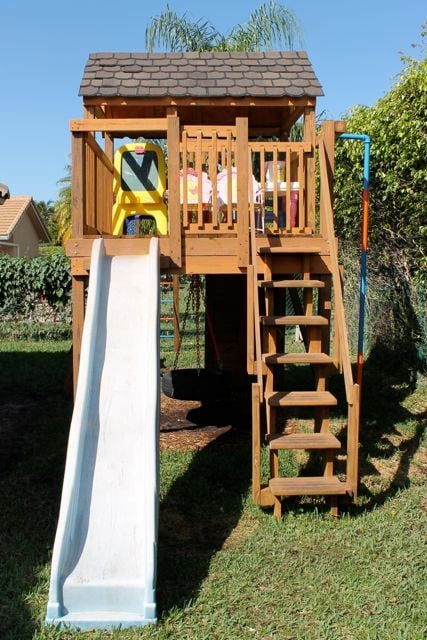
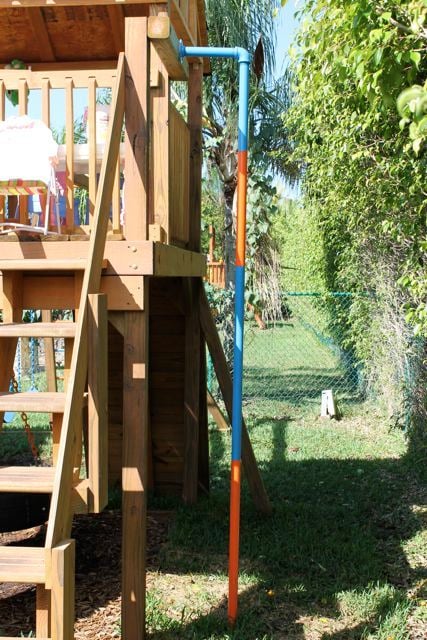
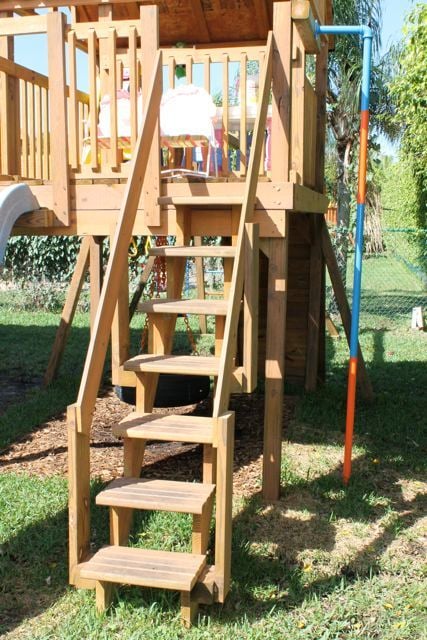
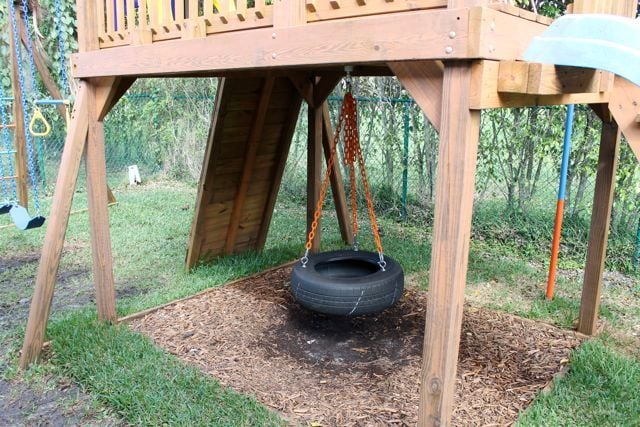
My husband Jon recently built this playhouse with/for a friend of his from work. It took them two months to complete and it's awesome! Jon's friend is also a die hard Gators fan so they made sure to add blue and orange as much as they could. Thanks Ana for giving them the courage to take on such a feat!


Wed, 03/21/2012 - 01:51
Great Job! All this says is "GO BRONCOS!" I'm an Idaho girl and I love the BOise State colors, lol! "Playhouse" is an understatement. This is a jungle. This is a huge play structure! and it is awesome.

In reply to Great Job! All this says is by birdsandsoap
Sat, 04/14/2012 - 07:08
Haha! Thanks birdsandsoap! I think it's awesome that you saw something special in a totally different way. Glad you liked our color scheme and project! ;)
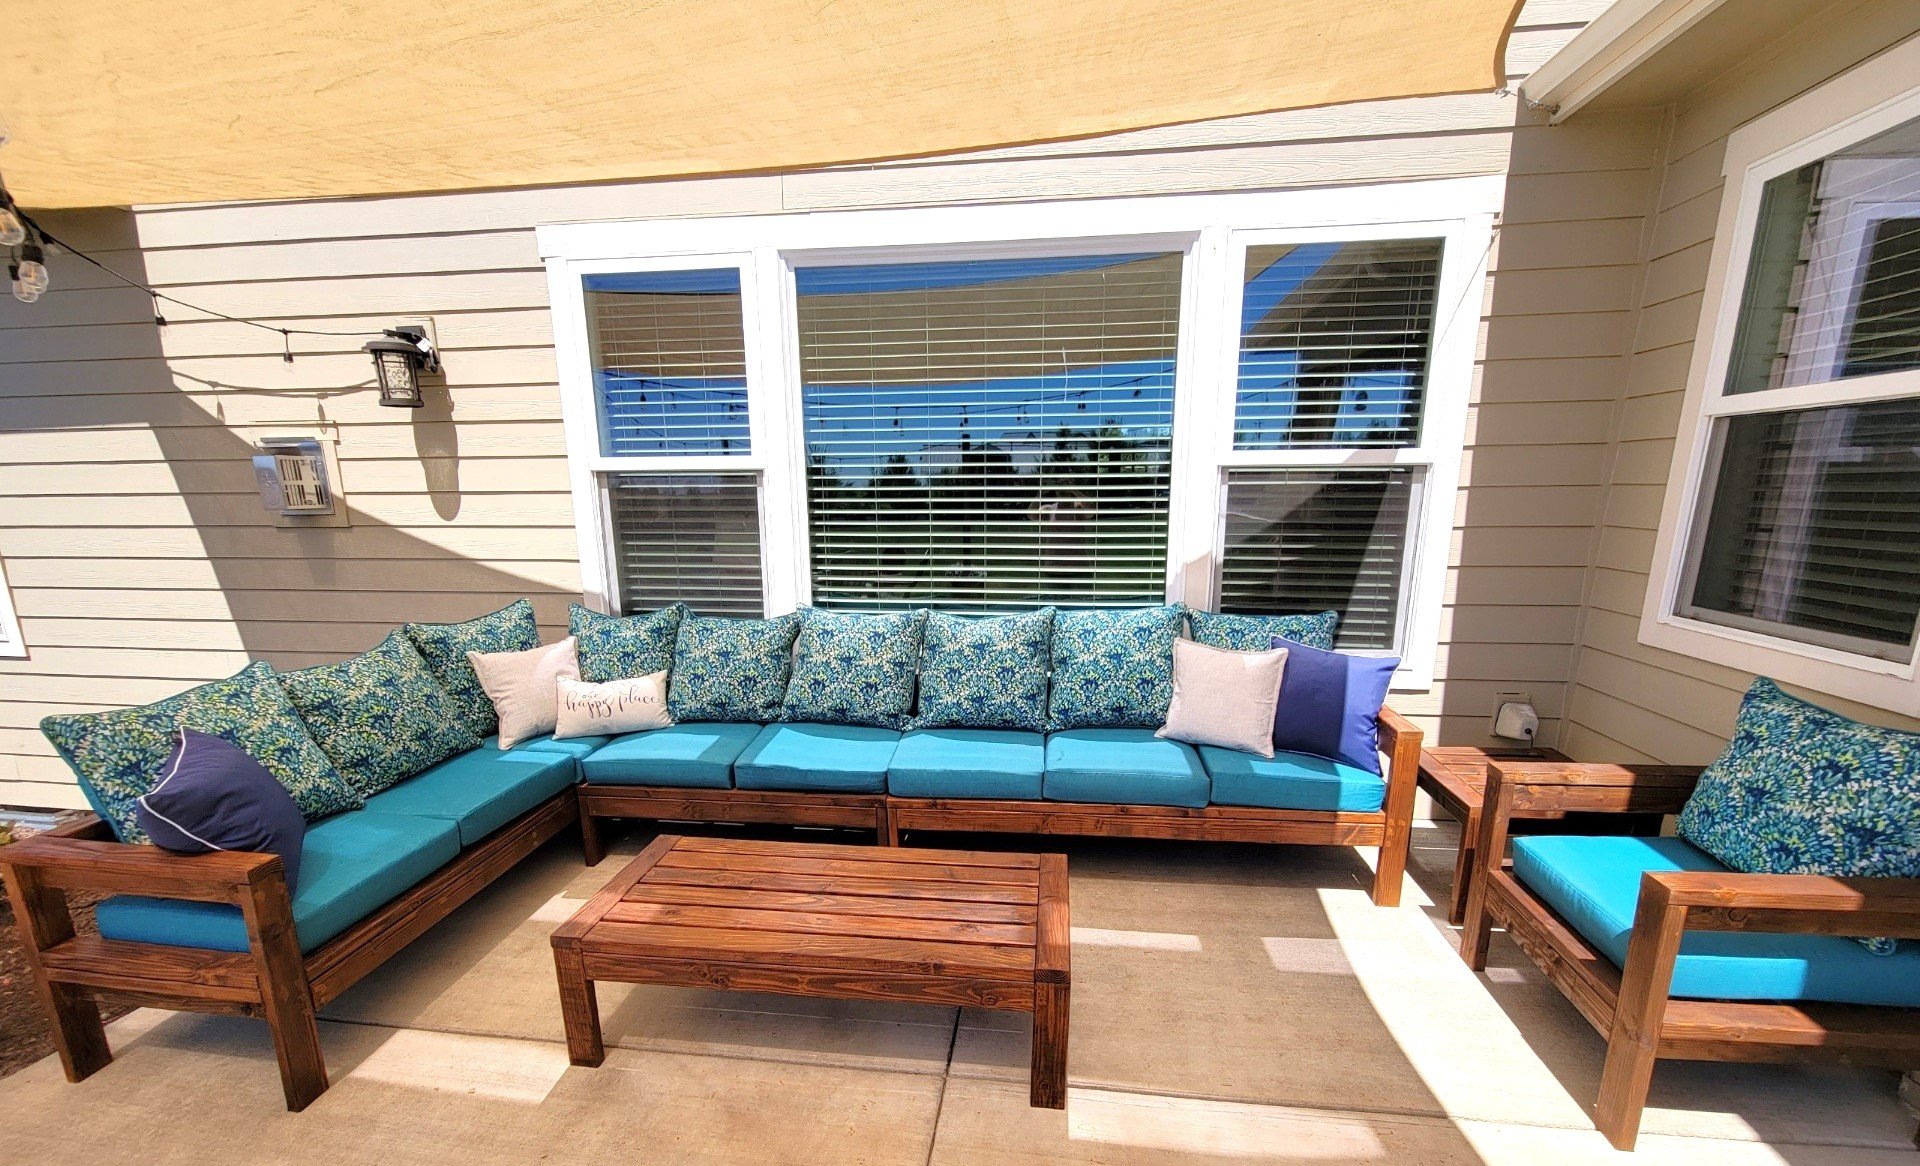
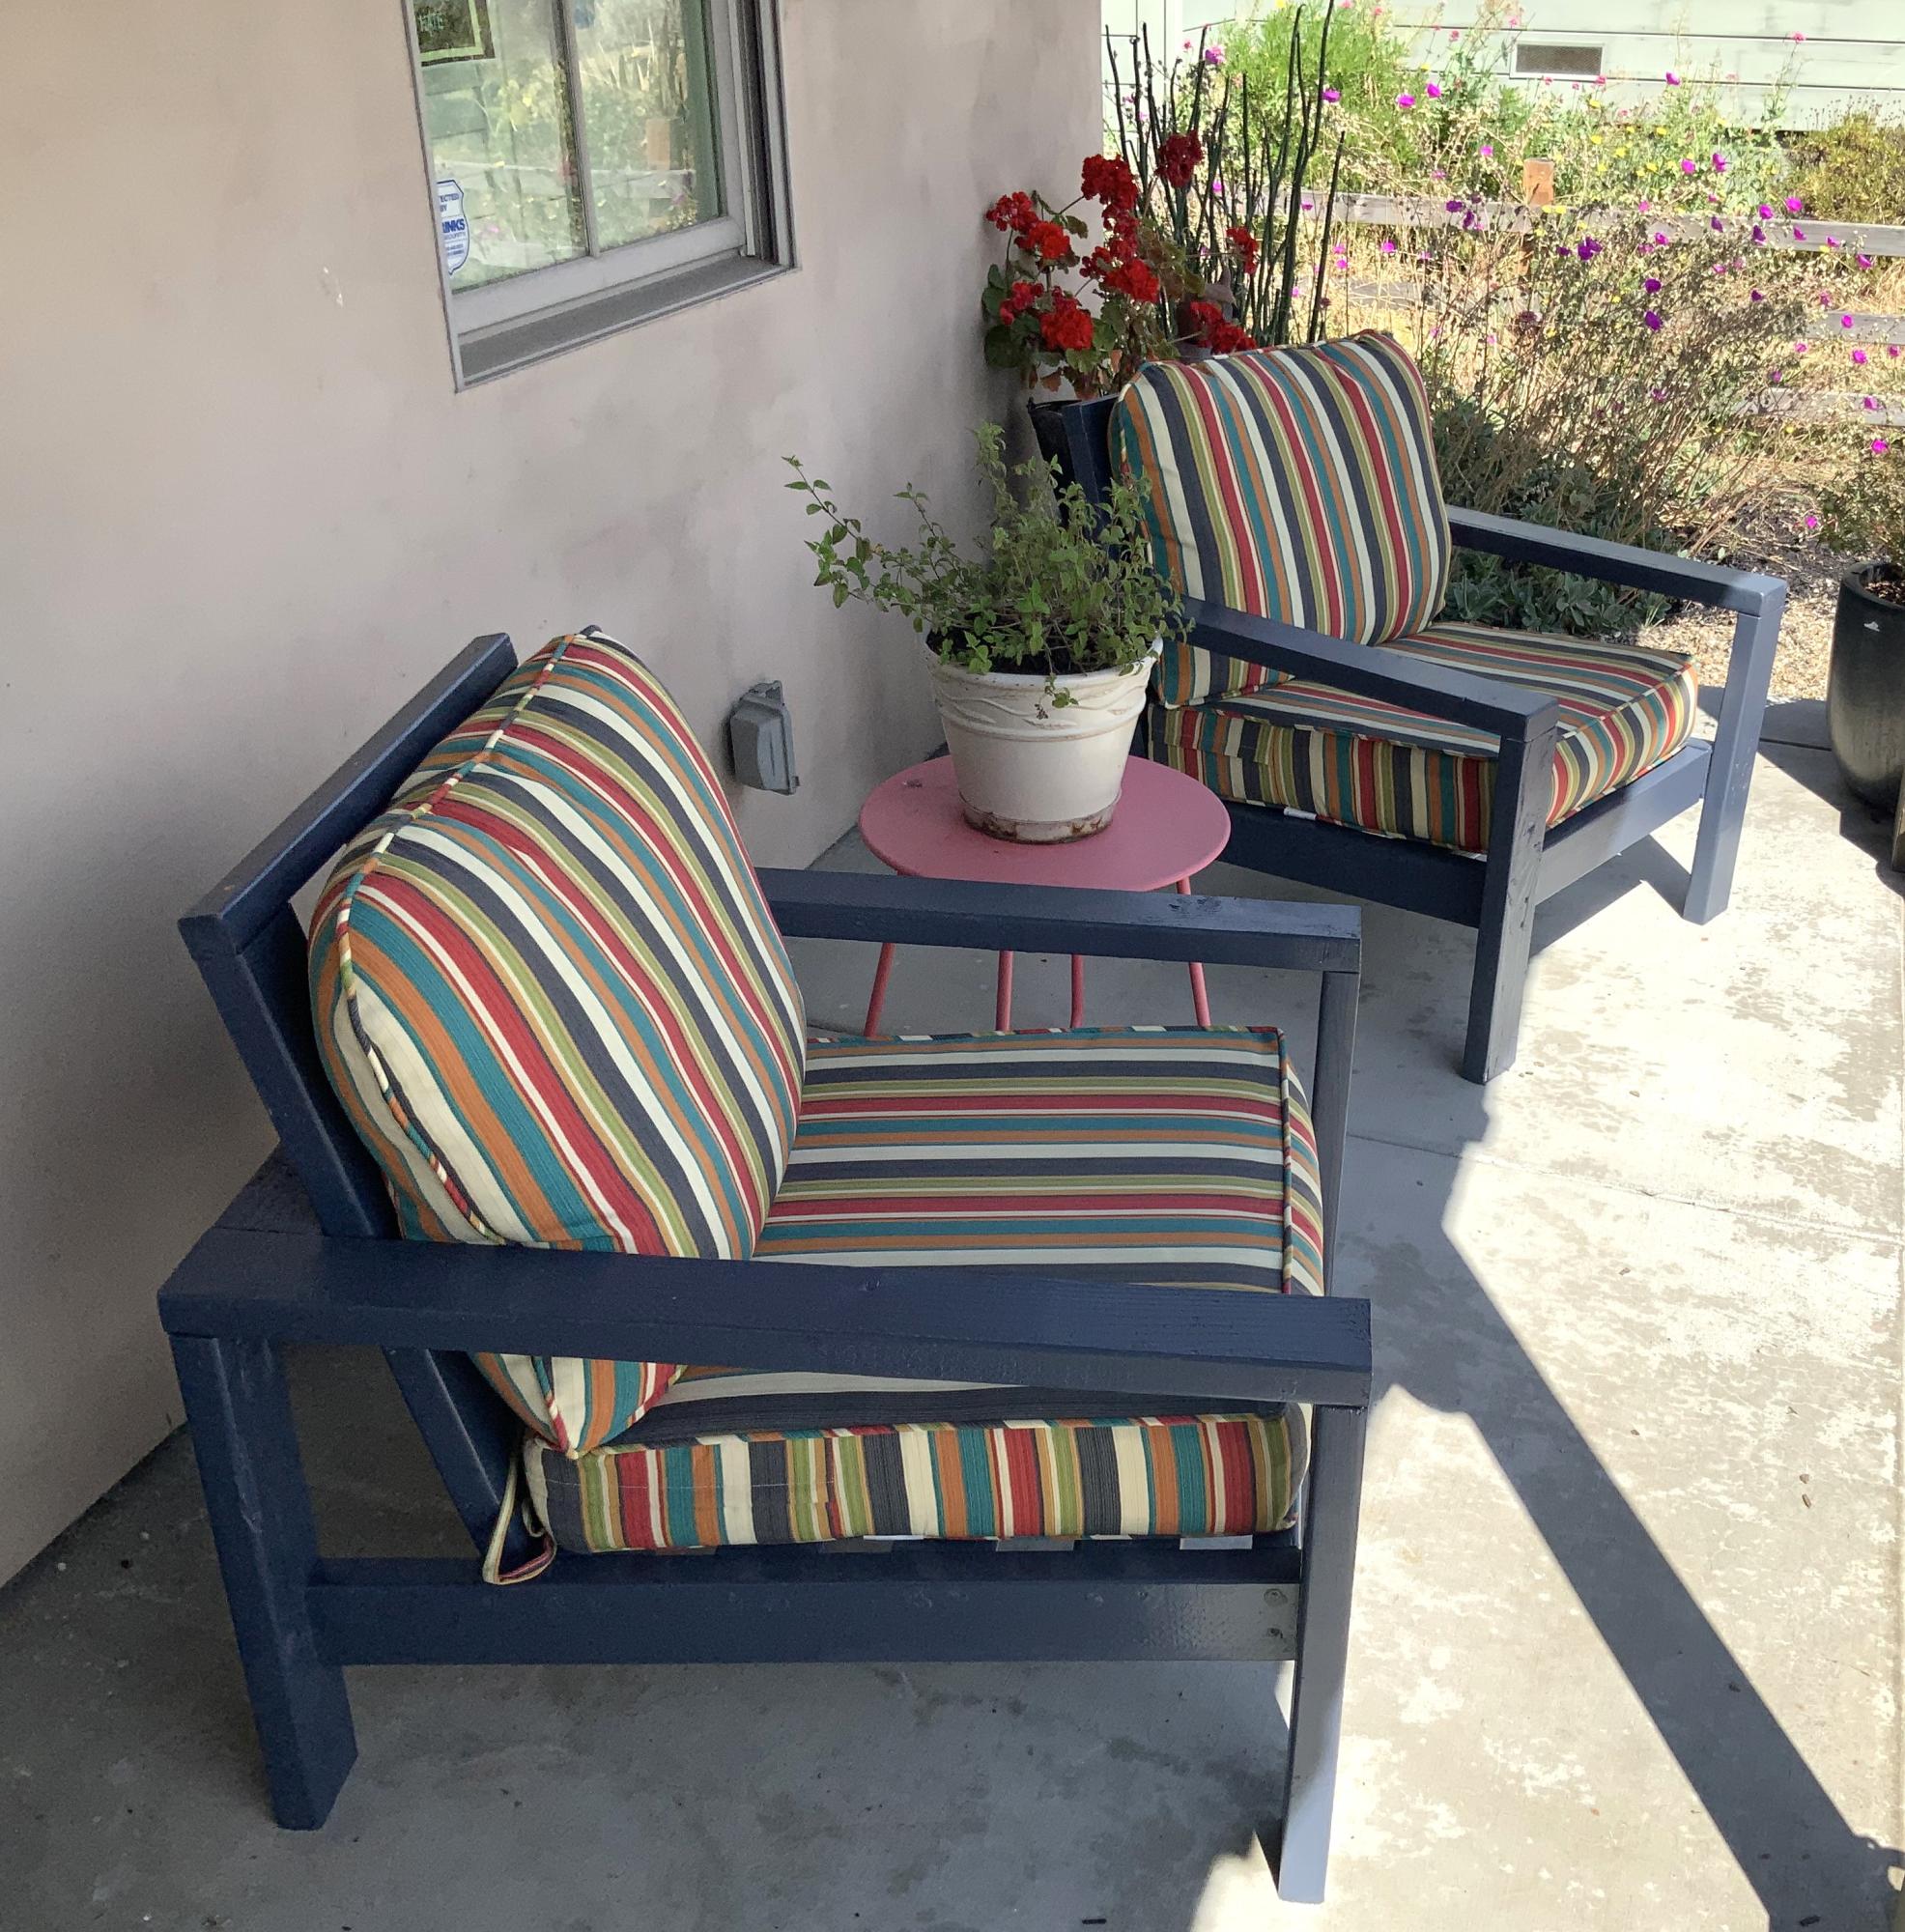
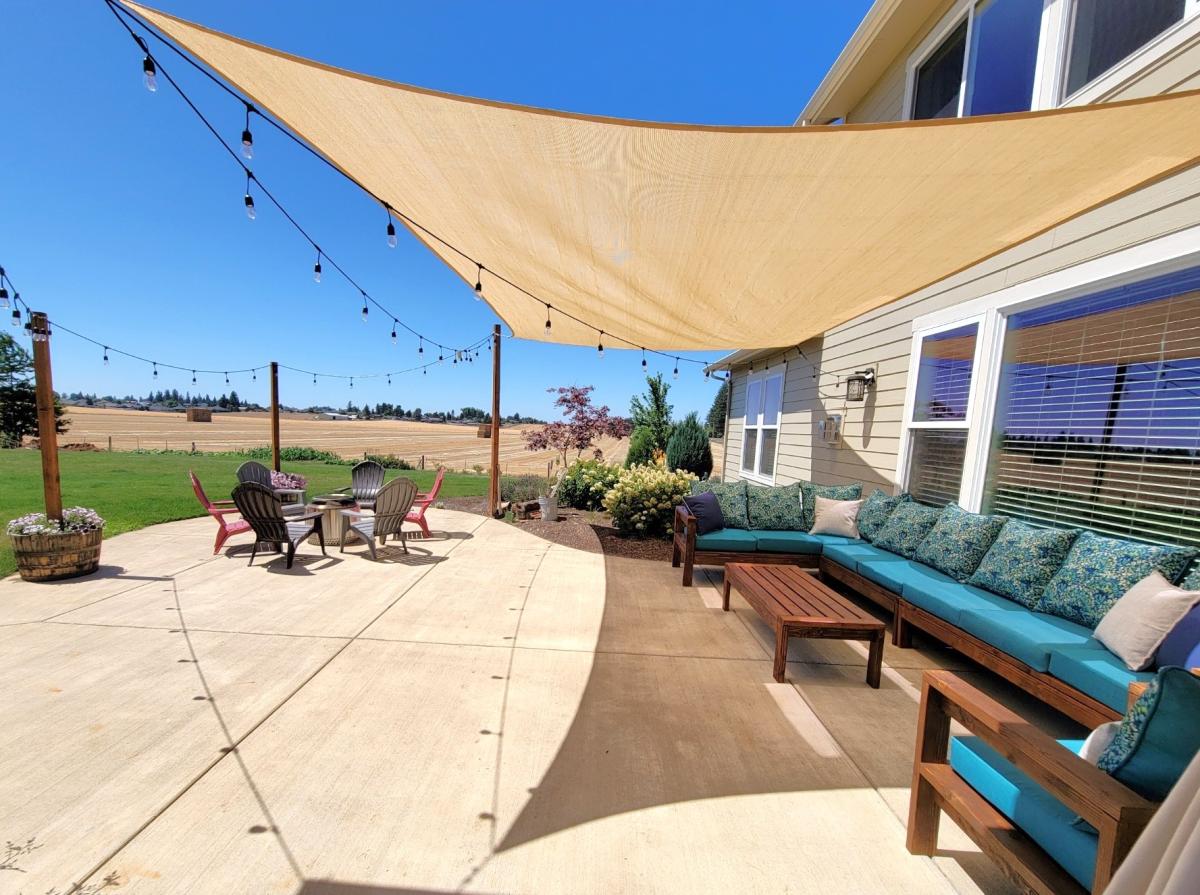
My wife used you patio sectional and table plans to make herself a summer oasis. She built it specifically to fit a corner of our patio that we were never using. Now it is used almost daily for reading, visiting or just sitting outside watching the birds.
Tony for Julie
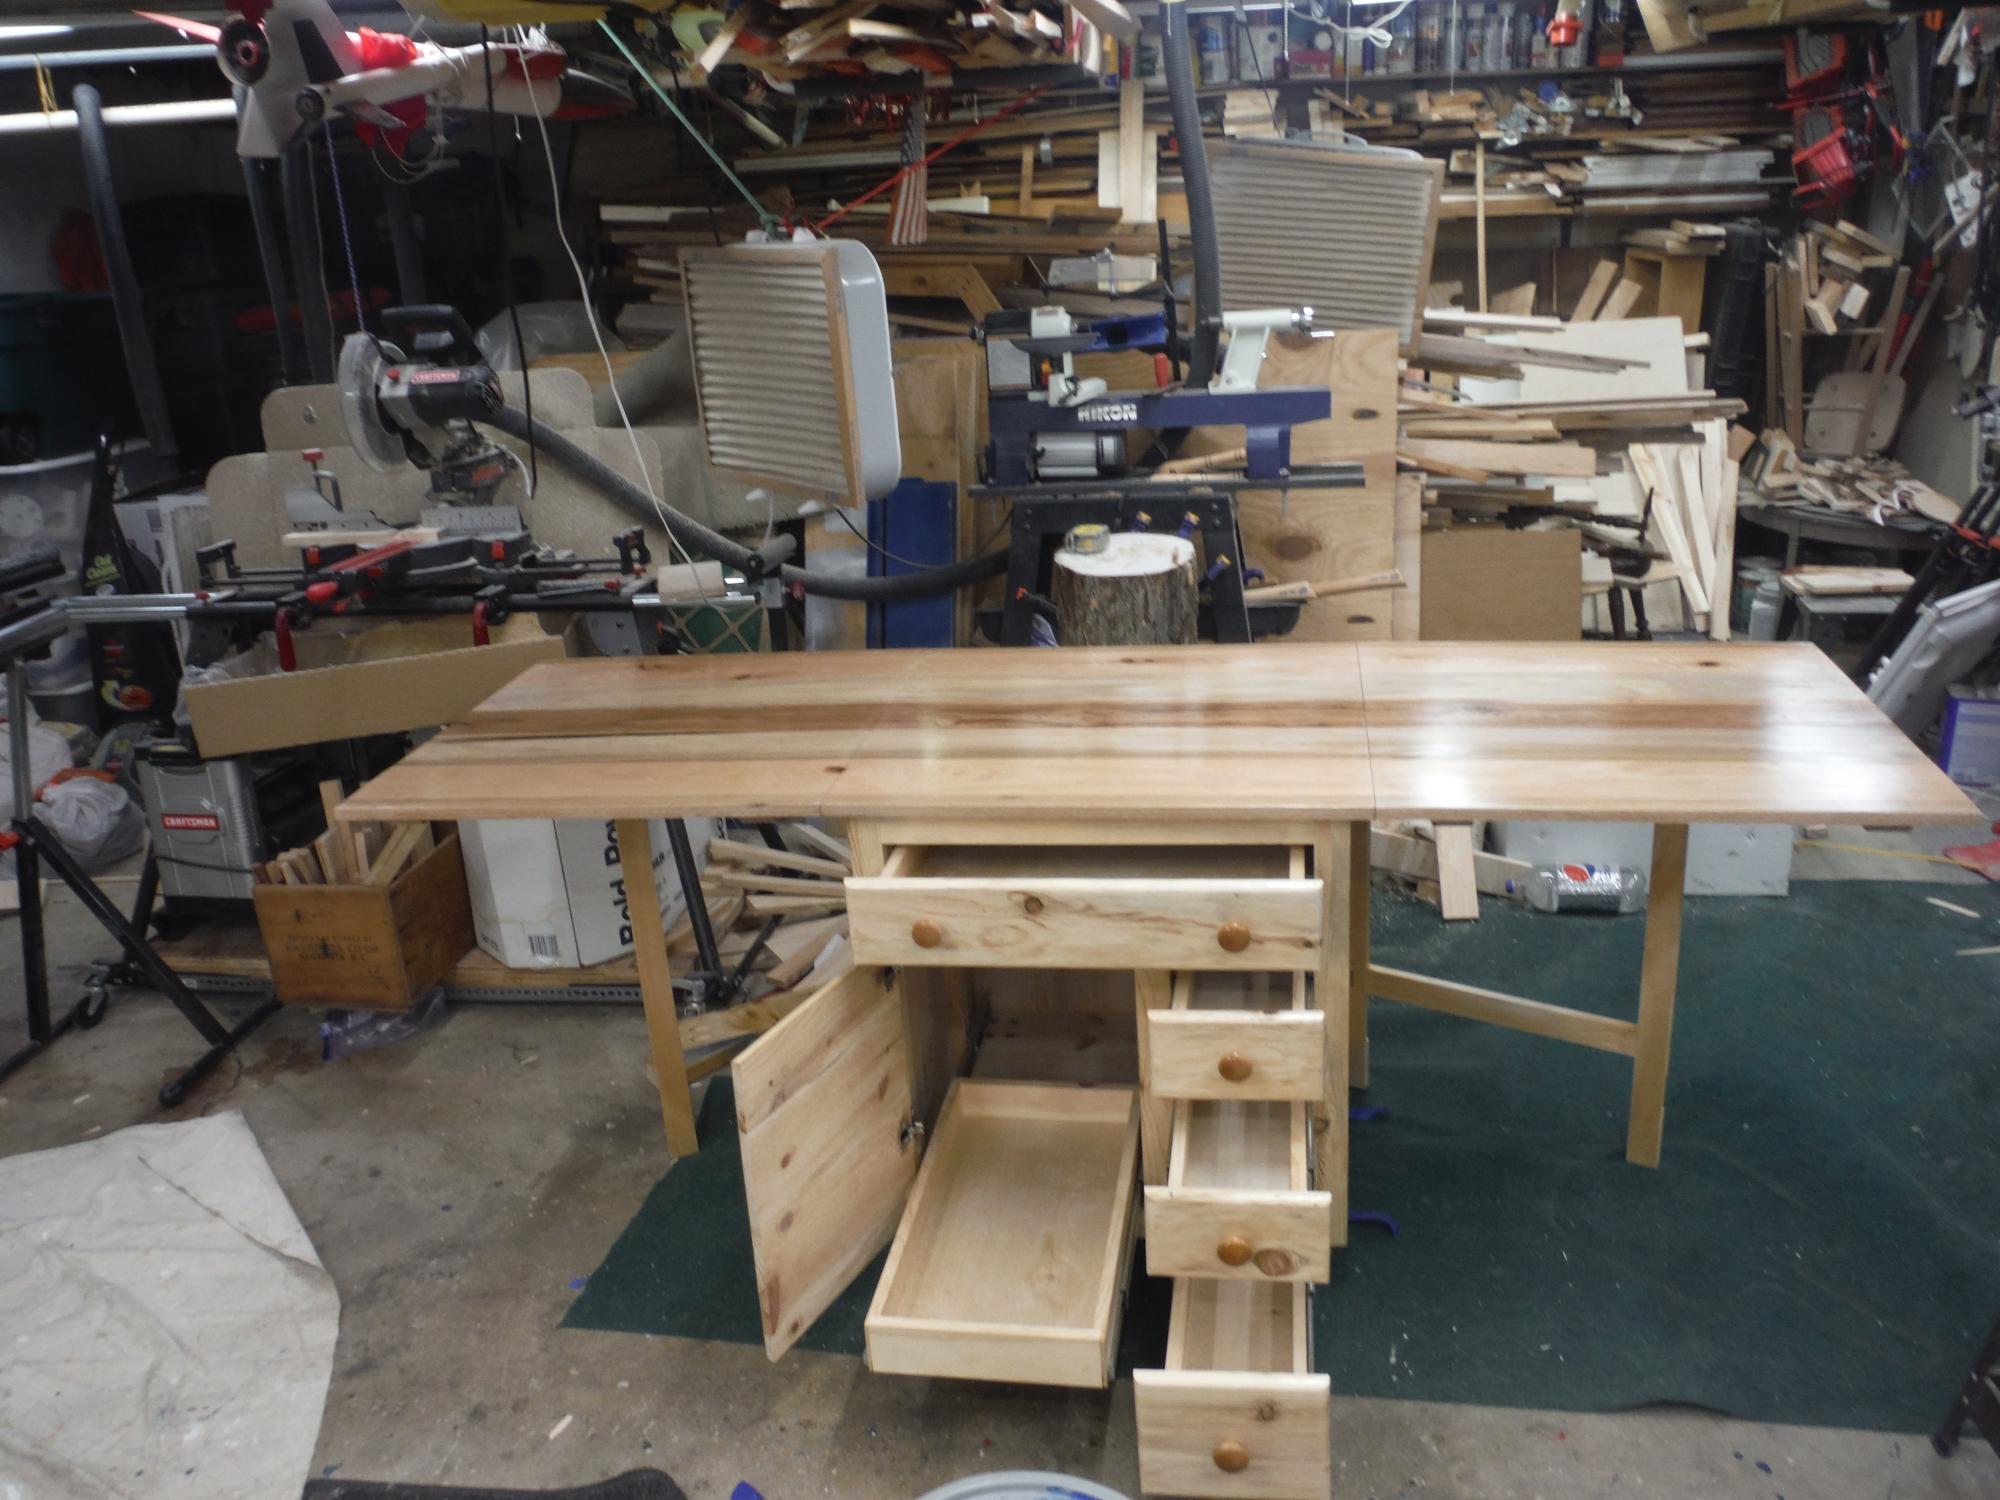
Built using your sewing table as the base idea. Pine cabinet, drawers and drawer fronts. The top is Hickory, poplar and red oak. base top dimension is 30x30 and folds out to 30x90. Mary will get this as a surprise on Christmas day. Cabinet and to is Varathane 3x. Casters are from Woodcraft and drawer slides are Hickory Hardware.
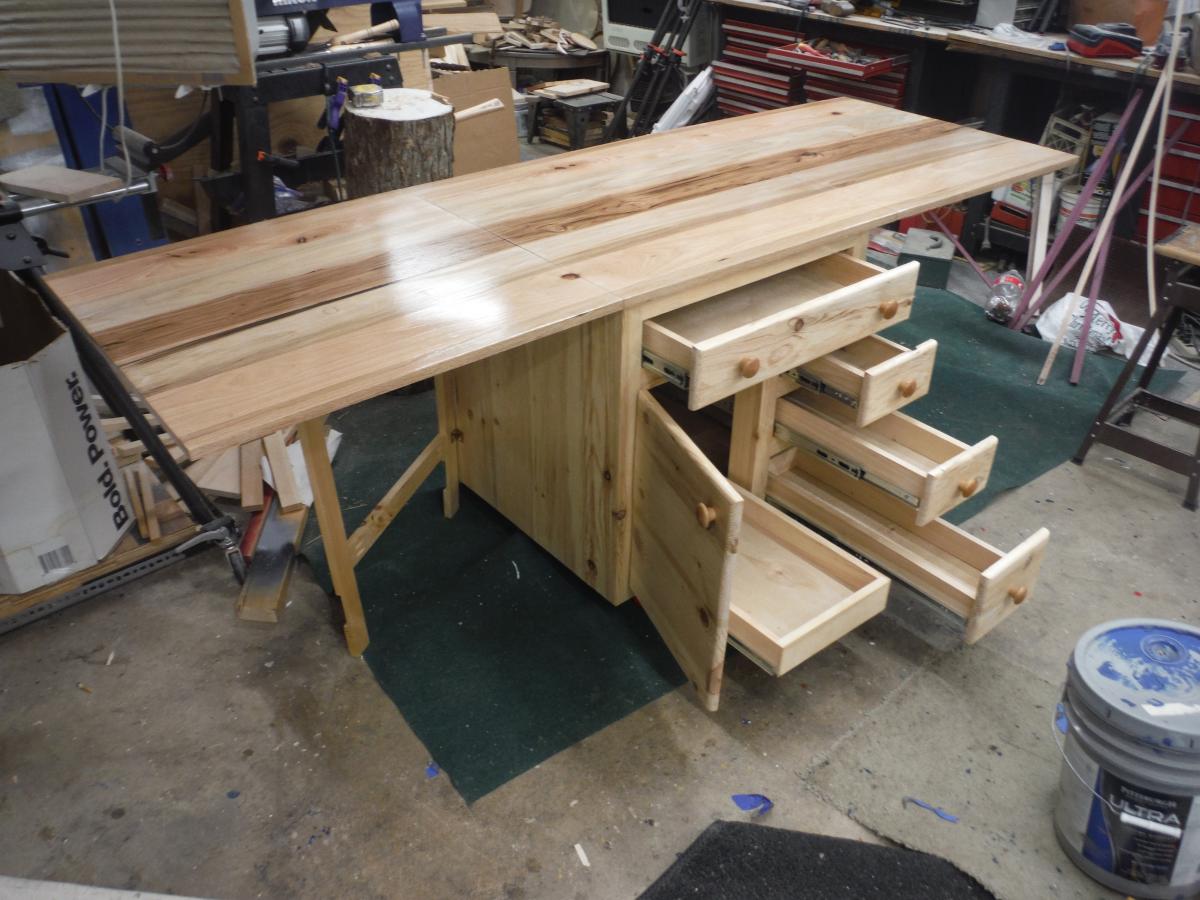
Mon, 12/28/2020 - 07:05
build the size of cutting mat. Add roller for fabric.
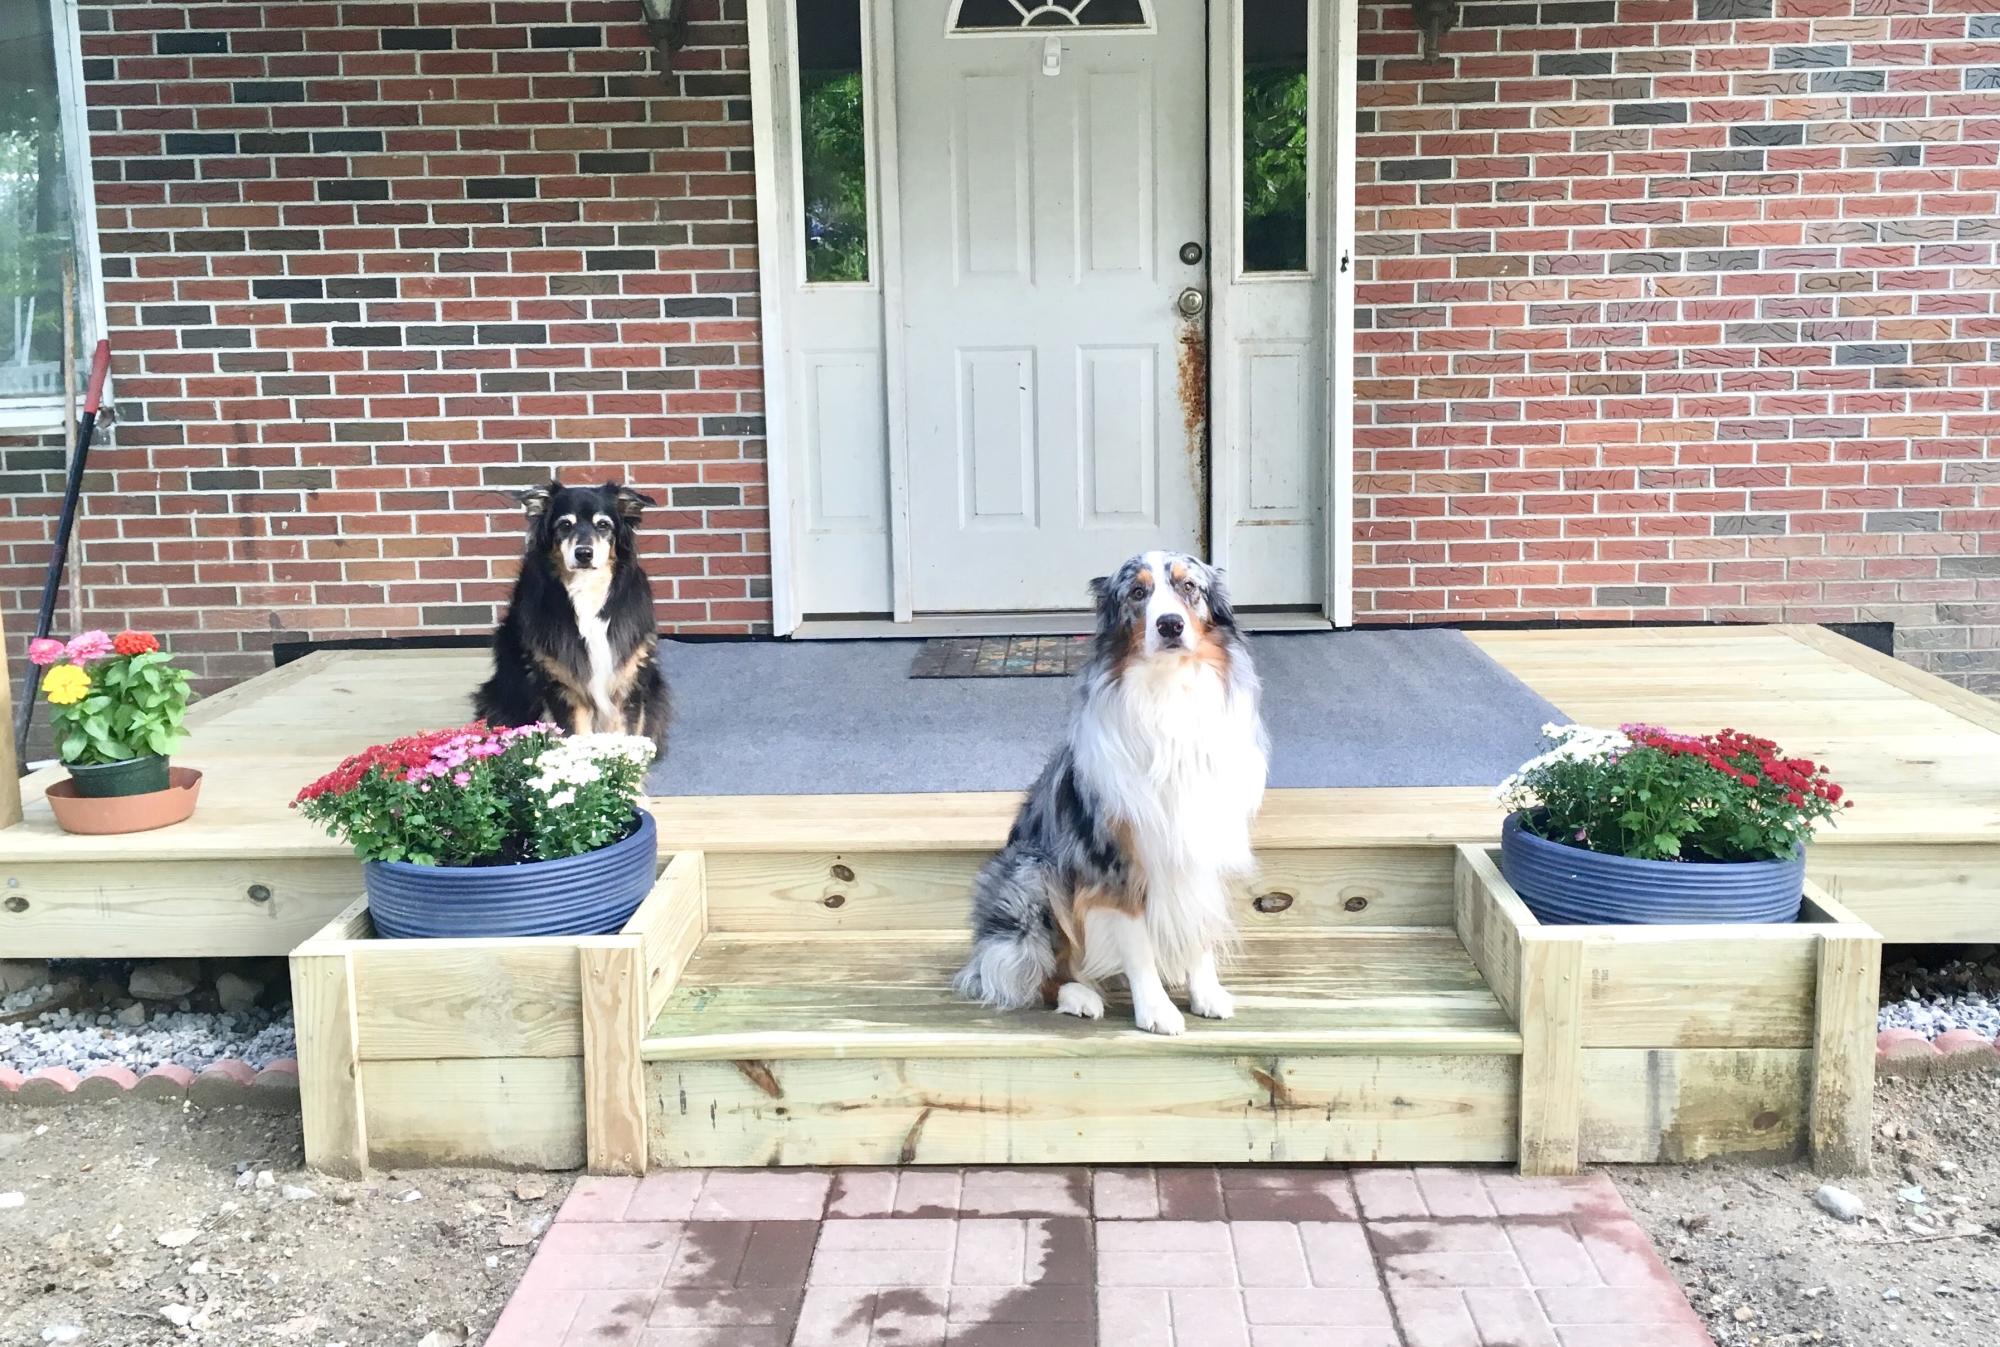
I love how sturdy and beautiful these planter steps turned out! They were easy to build and work perfectly with the new deck/front porch I built this summer. I only needed one step and I used the same 1x material for the top of the step as I did the deck. I just added a couple more supports for the 1x material, as it isn't as sturdy as 2x6's. Thank you so much for the wonderful plan!
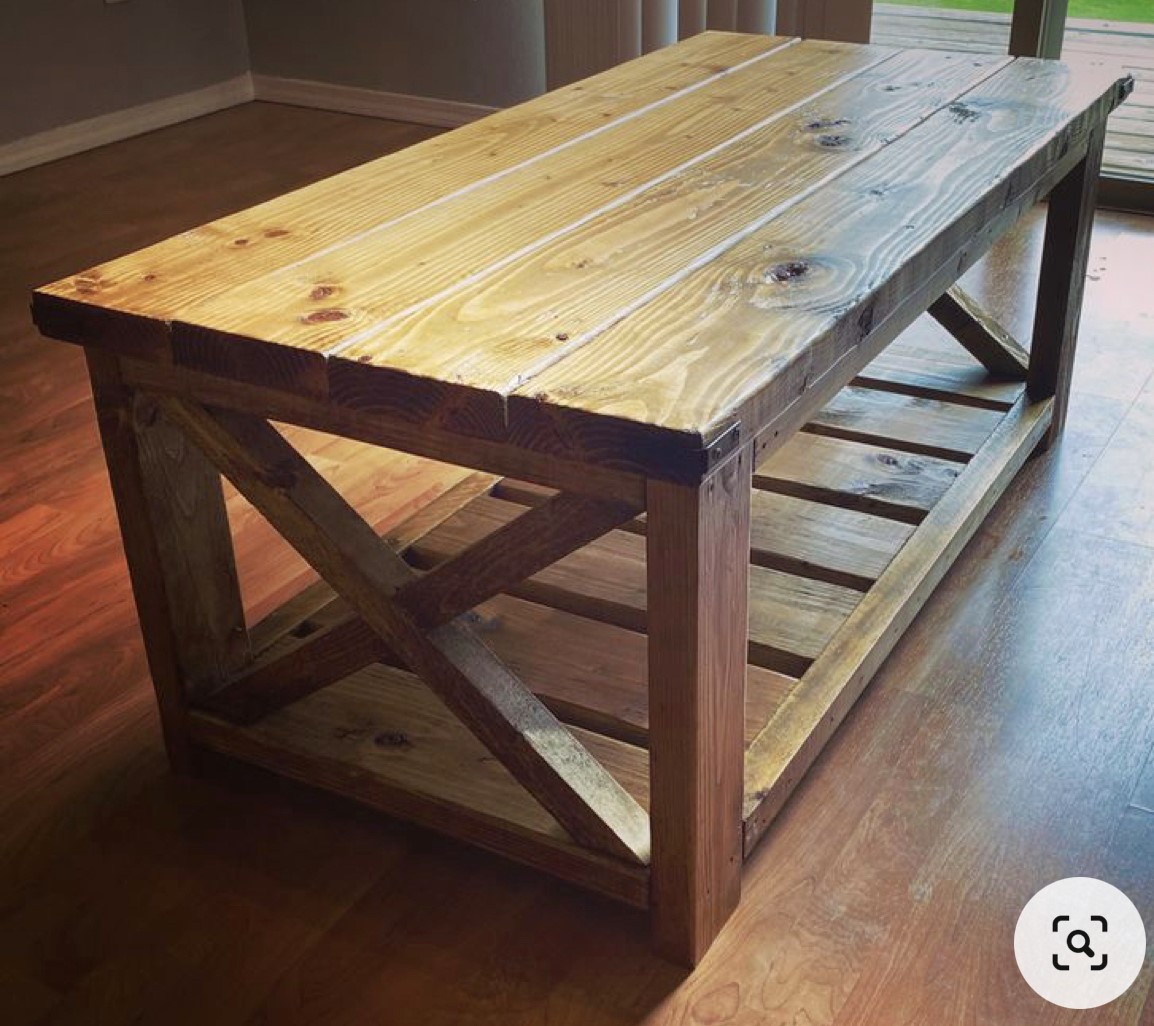
My sim went off to college and needed a coffee table for his apartment- so I made him the farmhouse coffee table! I just love your plans!
Terri M
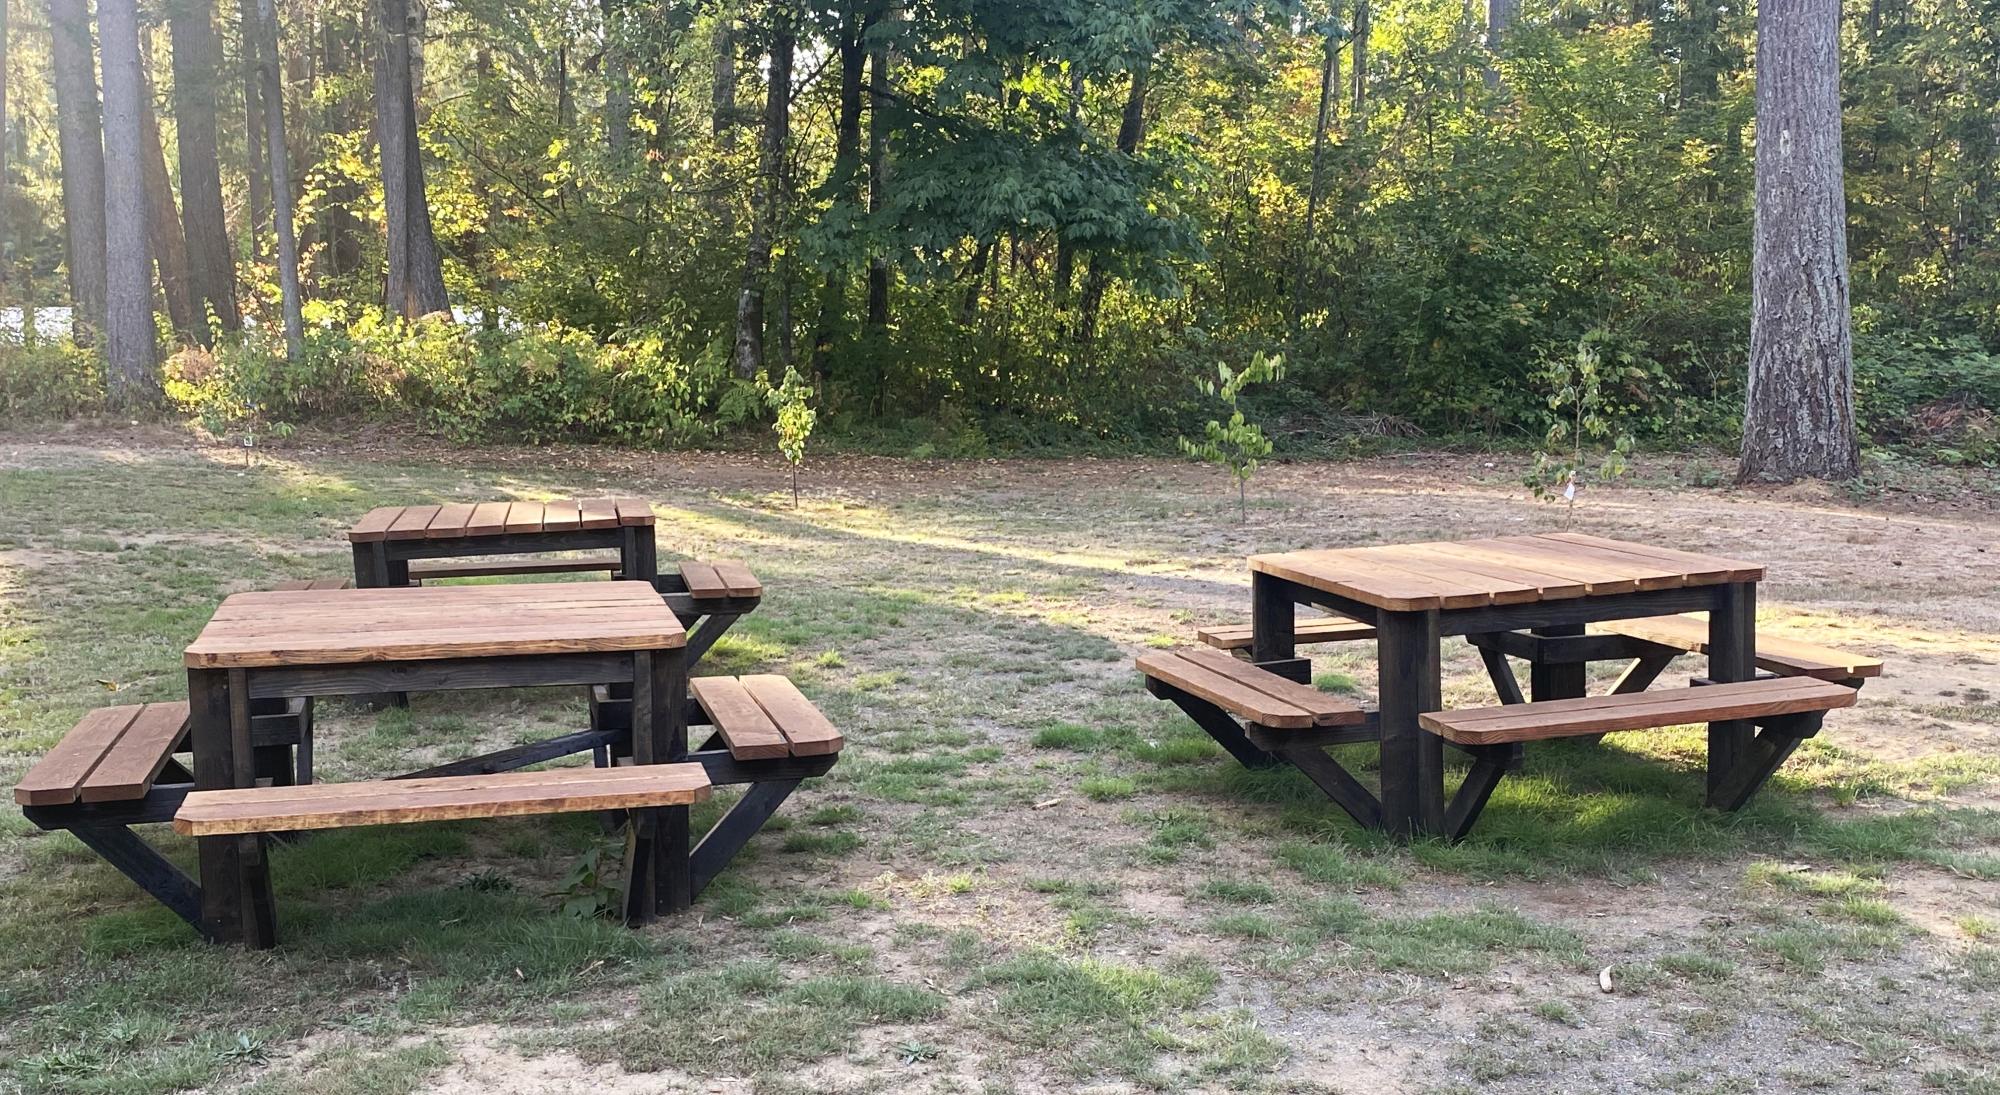
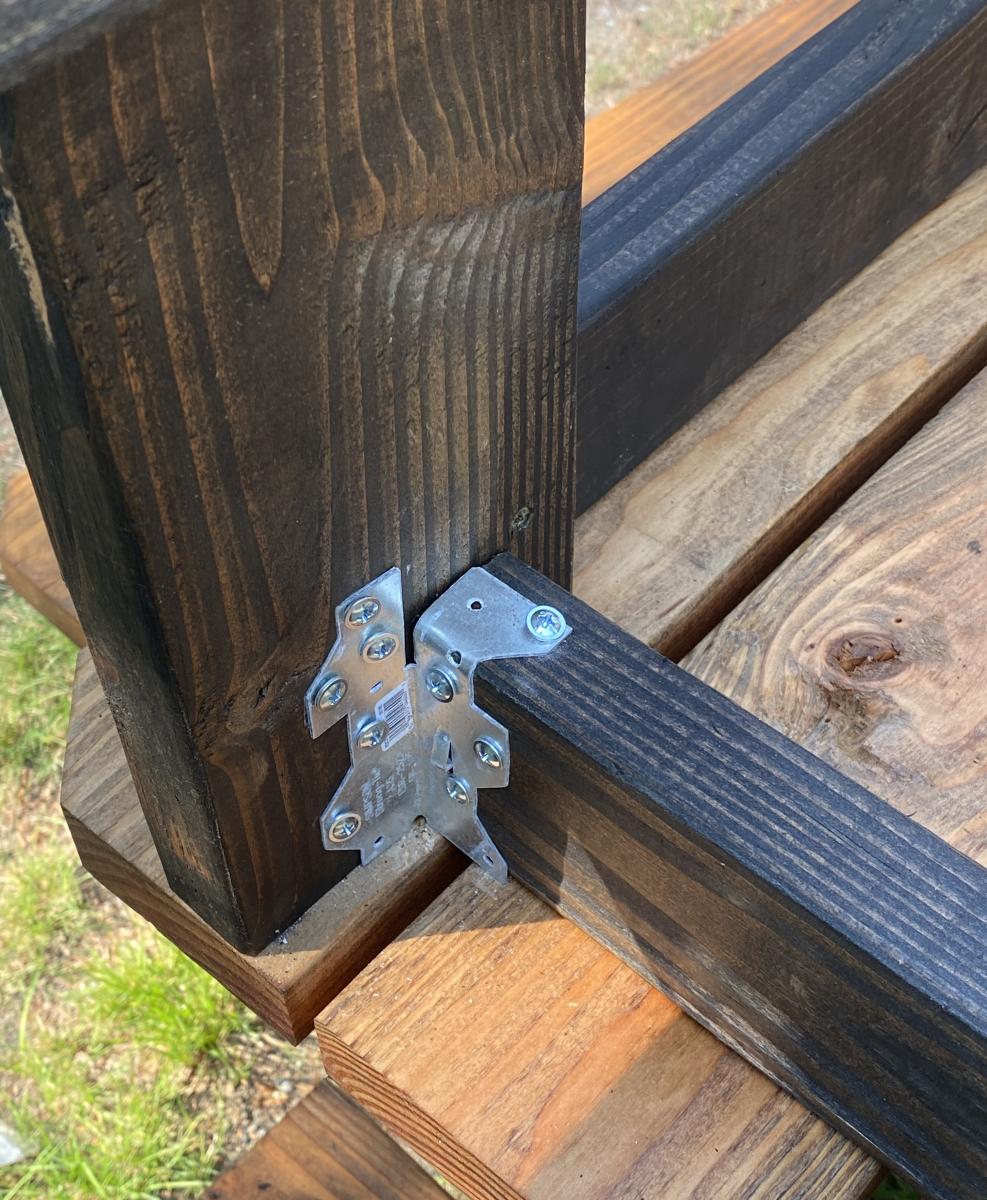
I built 3 of the square picnic tables, as we have a large extended family. I enjoyed the project and the results. I did end up adding a cross brace and some metal clips, they added a little more strength for the table when it was full of people.
Thank you for sharing your plans.
Rick

This was my first table, so there were a few hiccups, but I was pretty content with it.
I recently made the bench that you see in the picture as well. I made it to match the table, so I pretended I was making a mini table. Used plywood for the top, padding, and wrapped it with fabric. I was trying to match the charis as much as possible. Finished it by making the buttons and tufting it.


Had a bit off a mate doing this project due to damaged deliveries but looks good and is solid. Used 3 x2 for the rafters and bitumen sheets for the bottom. Two 3x2 strangers on the top rafters has it's seriously open too the wind. Misses loves it.
Welshsmoker


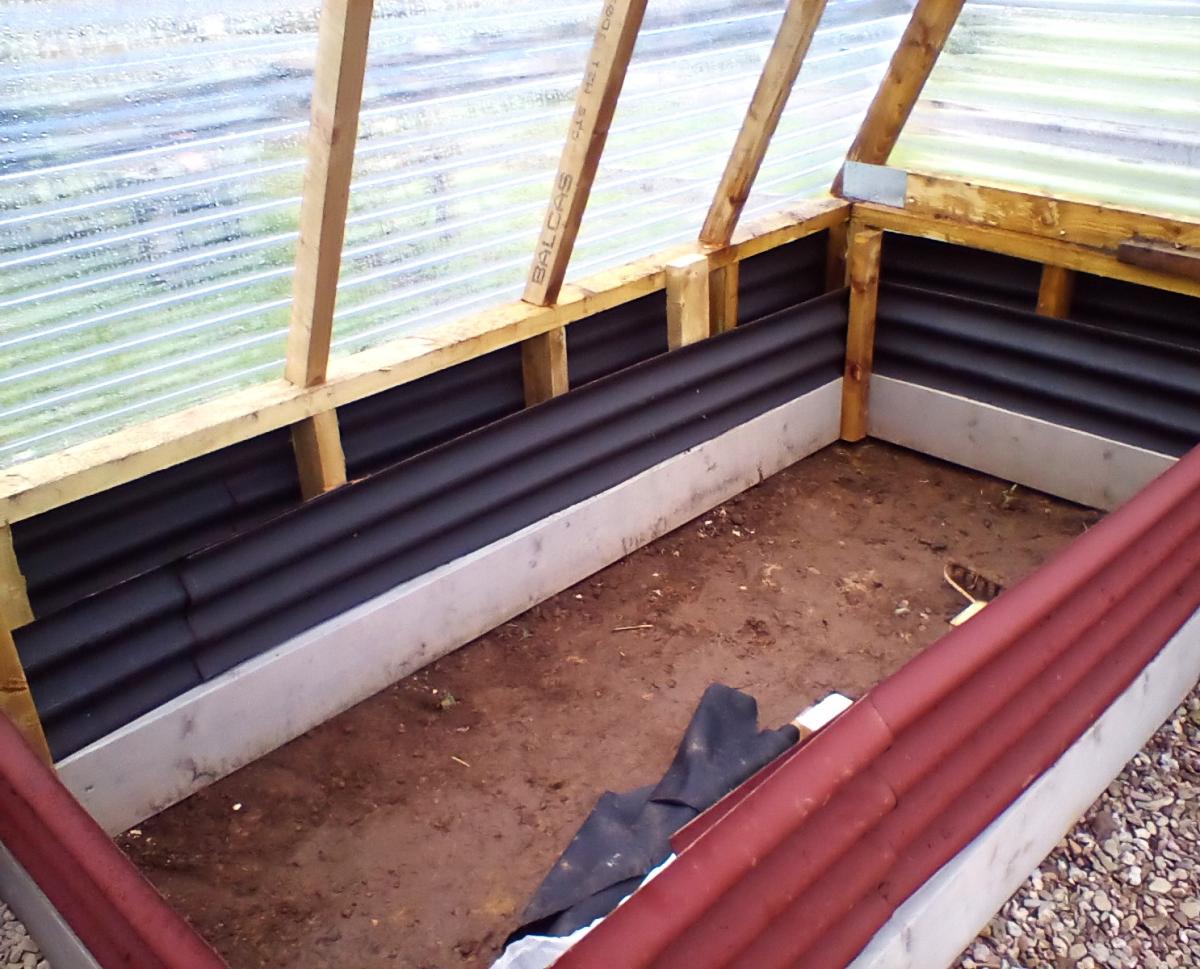

Fri, 10/20/2023 - 08:12
I can see all the work that went into it, looks wonderful! Thanks for sharing.
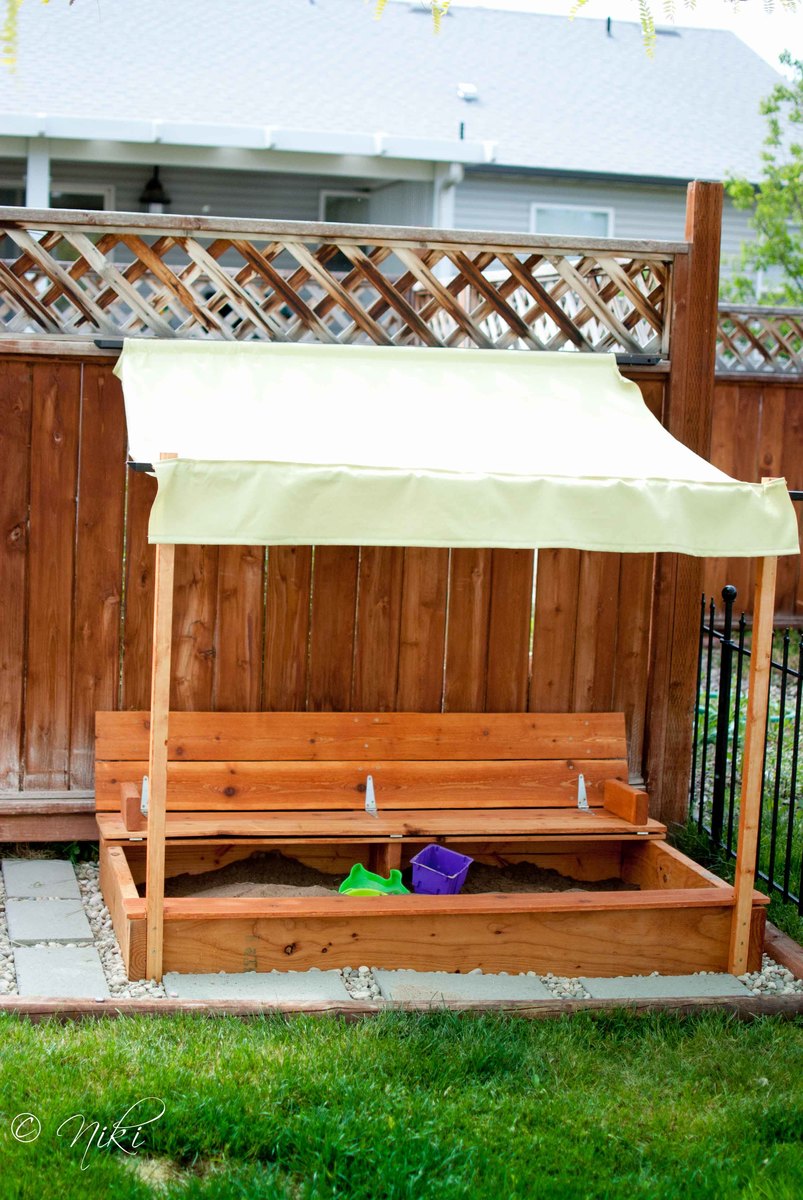
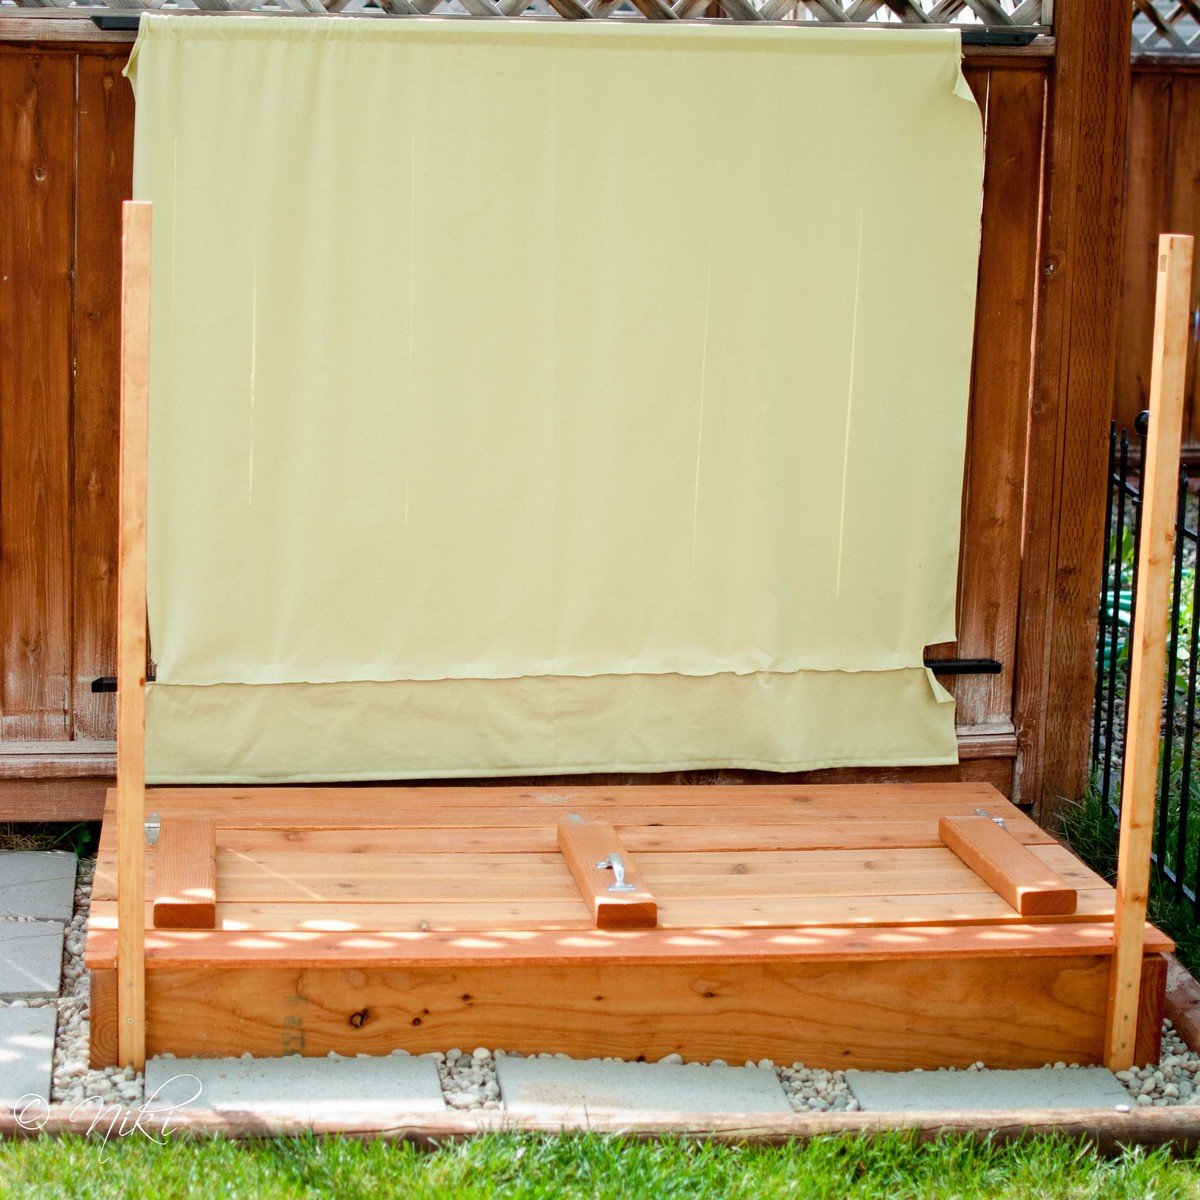
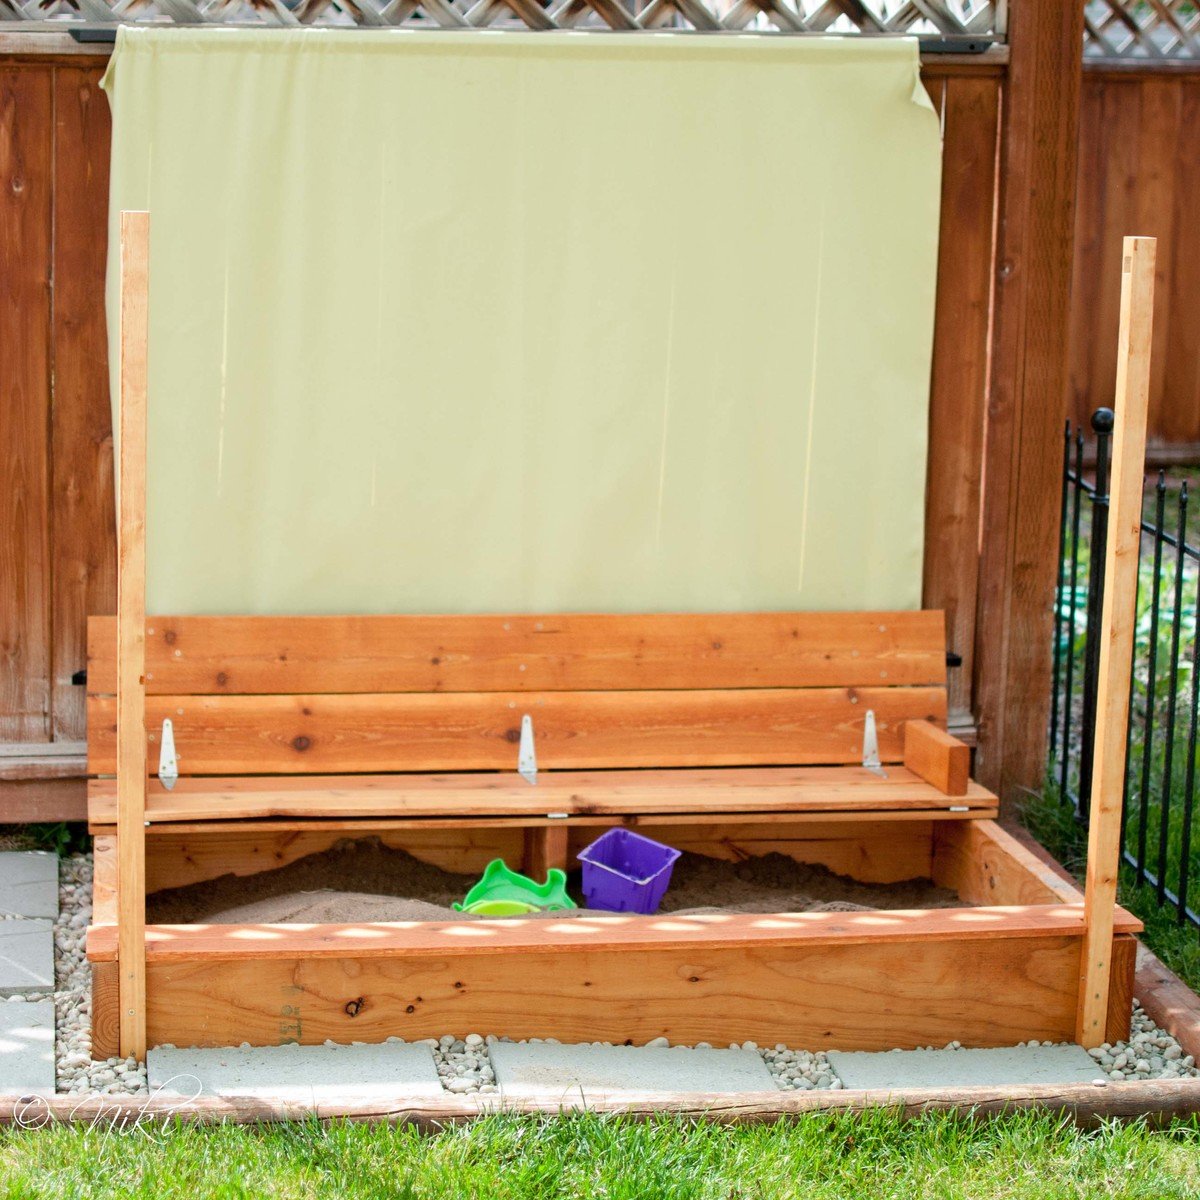
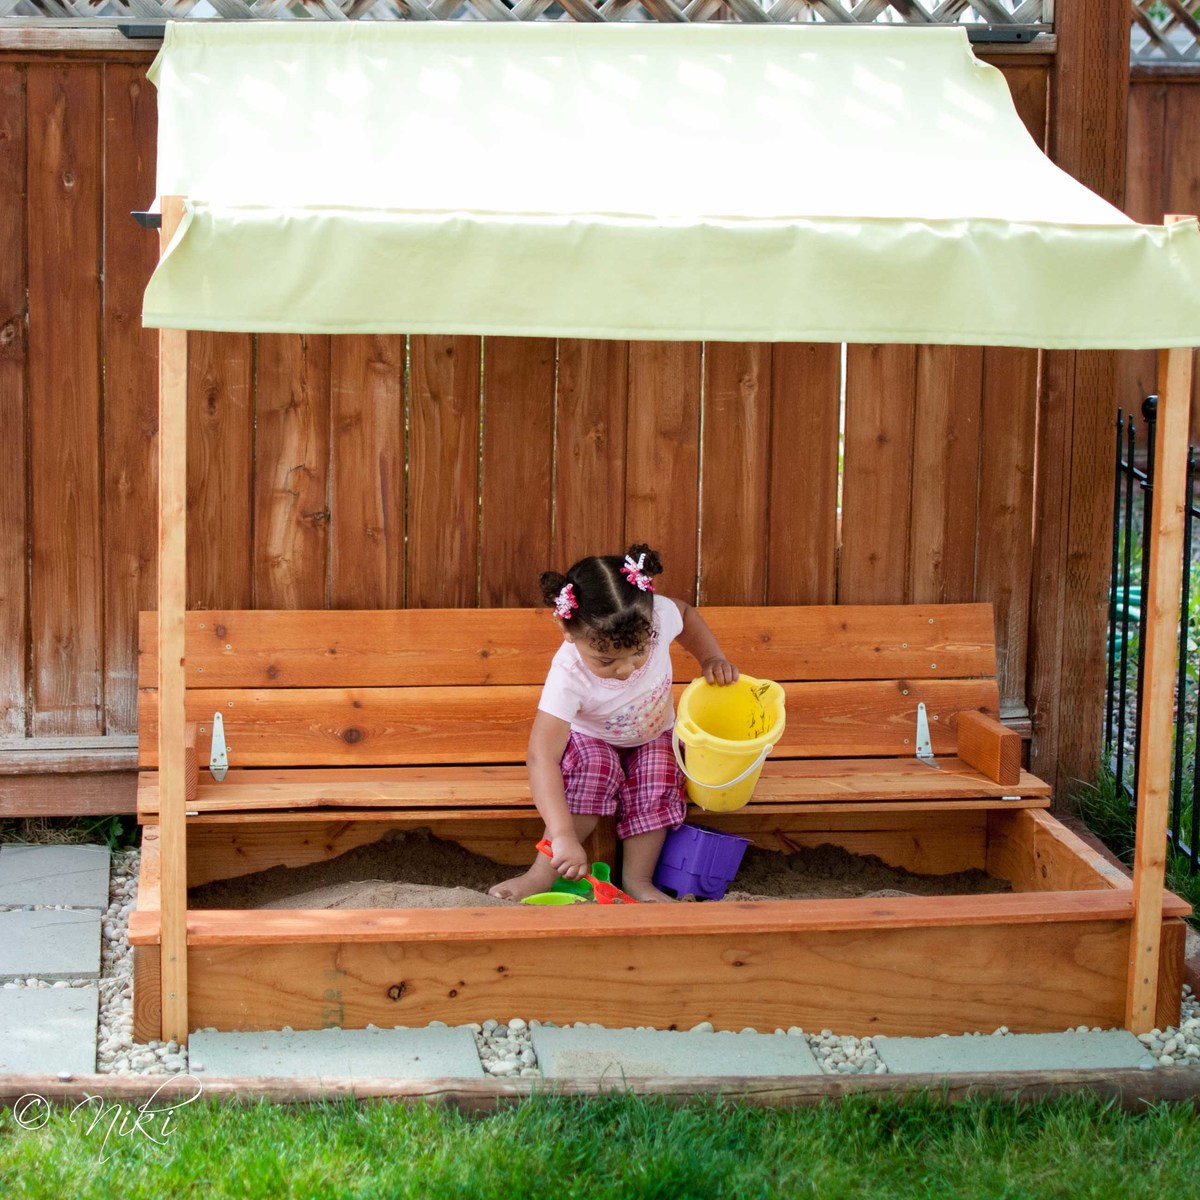
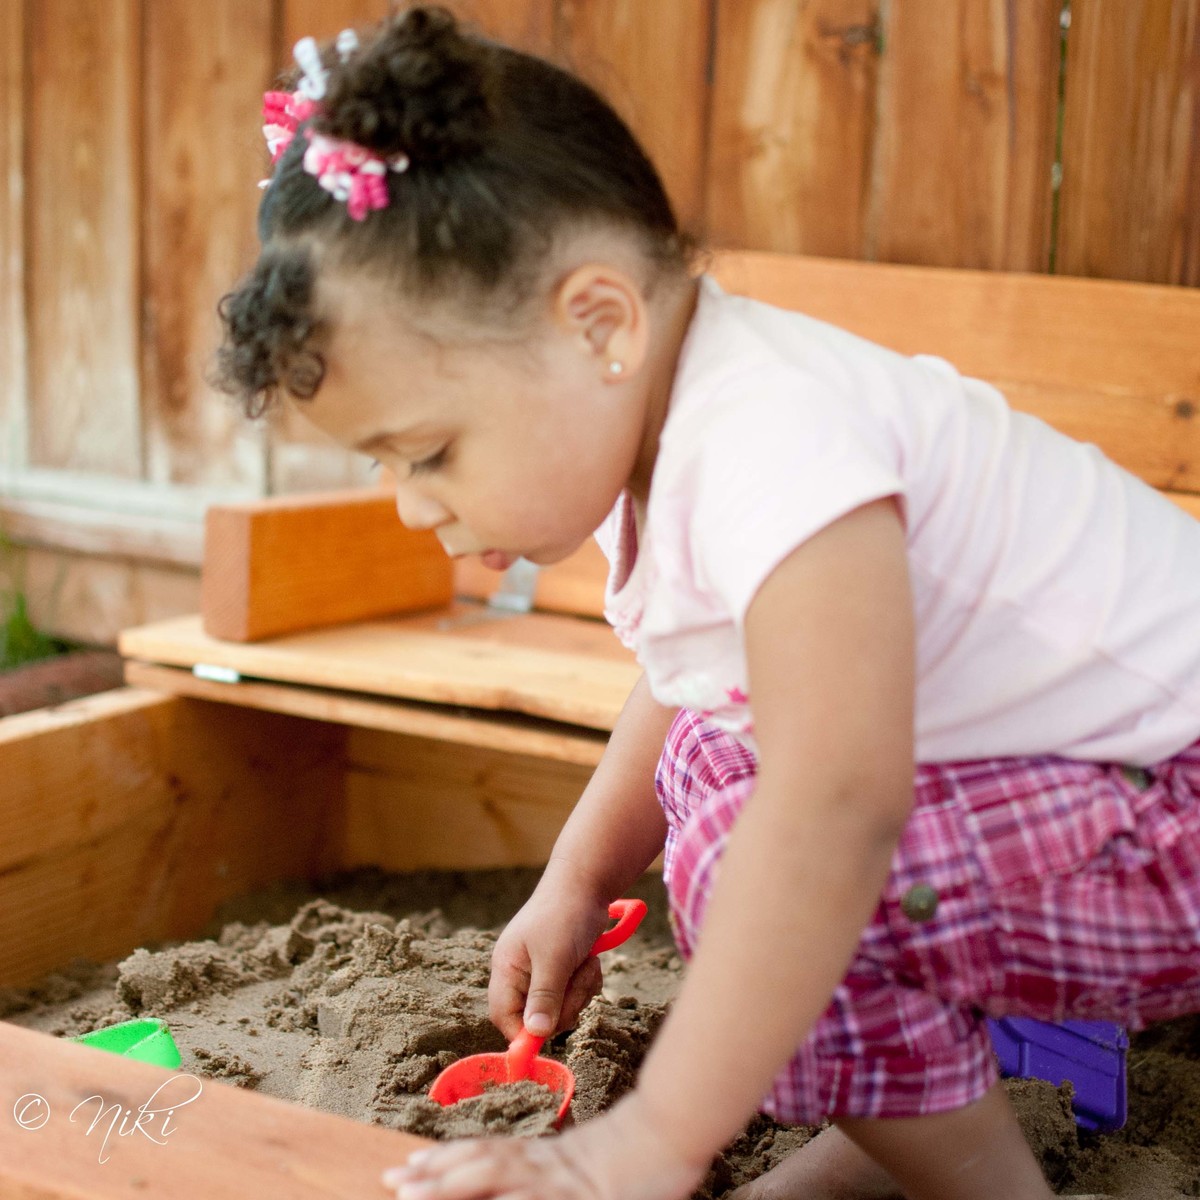
"Cellar? What cellar? We don't have a cellar... Oh, you mean the new sand box! Here, let me get some shade too."
I'm not sure why, but I can never seem to follow plans exactly. I guess that's not entirely true. I CAN follow plans exactly, but I almost never do. Maybe it's some sort of passive rebellion or something, but I usually have to put my own spin on the things that I build. Sometimes it works out in my favor. Sometimes not. This build was a little of both.
I decided to only build one bench in our sand box. This cut down on a lot of supplies. By making it longer a single bench and making it longer, it covers about the same amount of square feet, just in a rectangle instead of a square. When pricing lumber, I noticed that 2x8's were cheaper than 1x8's. So I went with those instead. It can't hurt to beef up the sides a little, right? This required some easy calculations on the cut list. I also decided to use 1x6 fence planks instead of 1x4 whitewood or pine. The fence planks were cheap, and I figured they would look nice in the back yard. They are also naturally pest and rot resistant. They required extra sanding to take the rough off. However, this is one place that I'm thinking the modification didn't work in my favor. The fence planks are not as thick as the whitewood. This combined with the increased length makes the the top pieces feel pretty weak. I put a little support piece under the bench. I'm quite sure the bench would not have held up well without the support.
Because this is an outdoor piece, I dry fit everything, and then stained everything before assembling it, to make sure all of the edges were well protected.
Cost breakdown (not including canopy)
Fence planks $14
2x8x8 $11
hinges $9
handle $2
stain $10

Thu, 03/07/2013 - 08:49
I just love the changes you made to this sandbox! Can you tell me what you used for the construction of the canopy? Thanks!
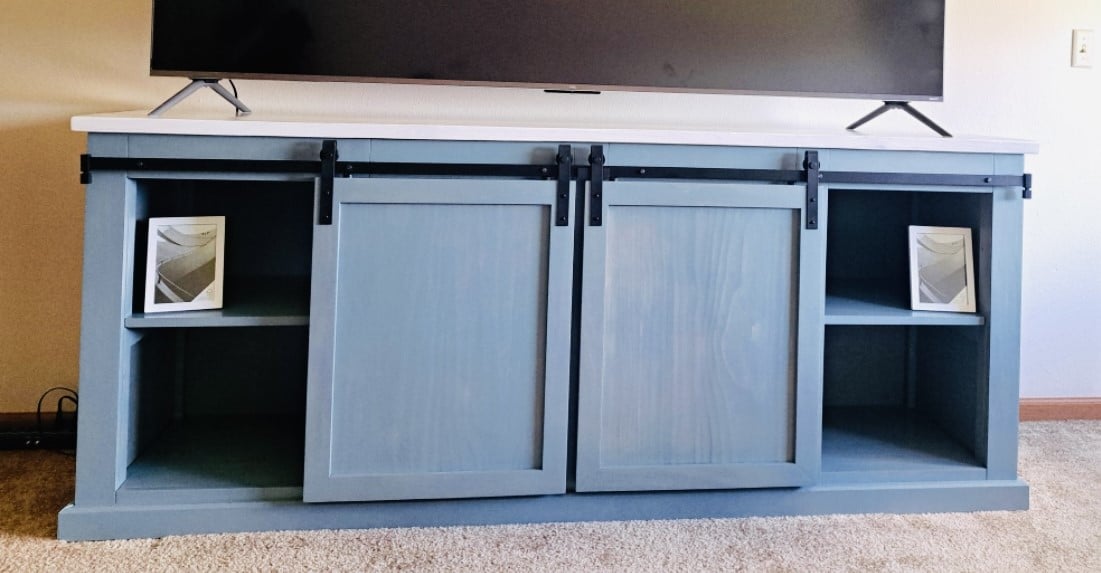
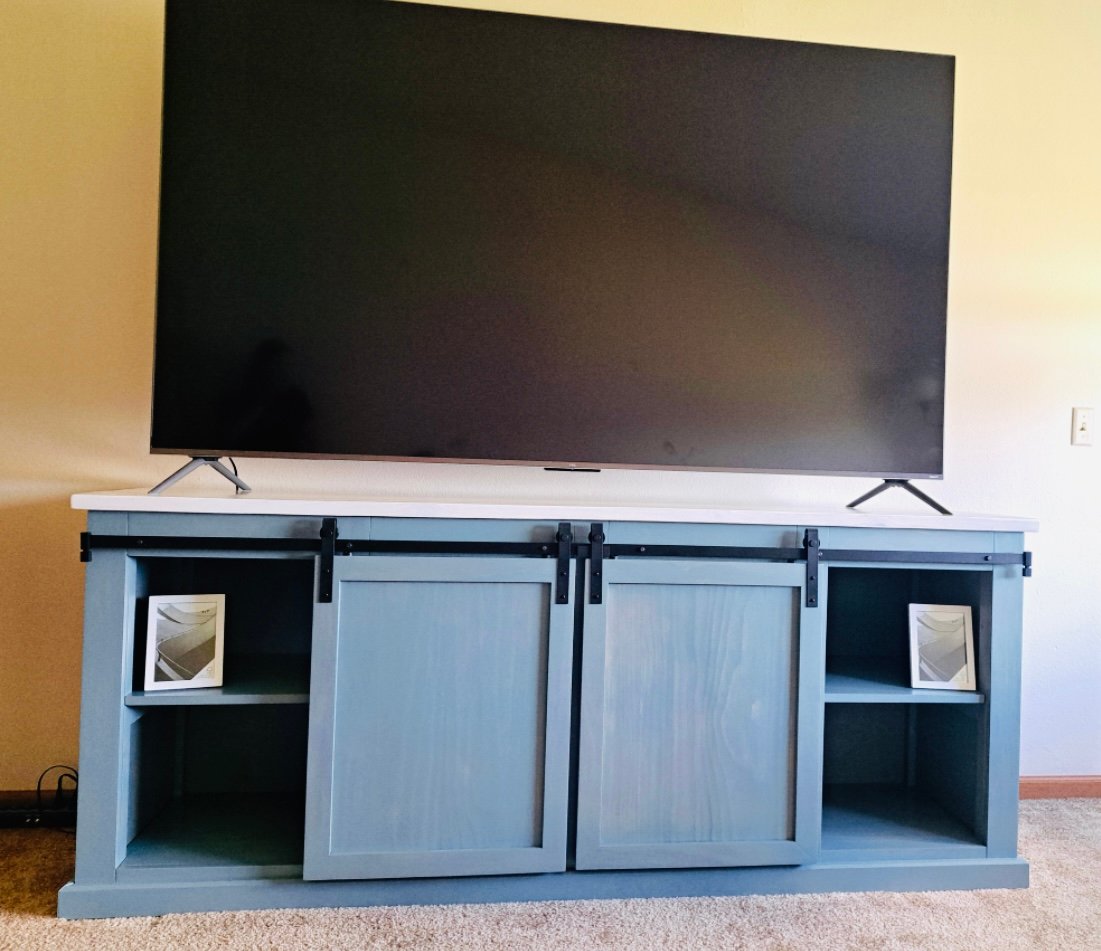
Our grandson needed a tv stand for his new apartment. They liked the plan from your website and this is our version.
Steve Mawhorter
Sat, 11/18/2023 - 13:31
Love your finish choice, it looks amazing! Thanks for sharing.
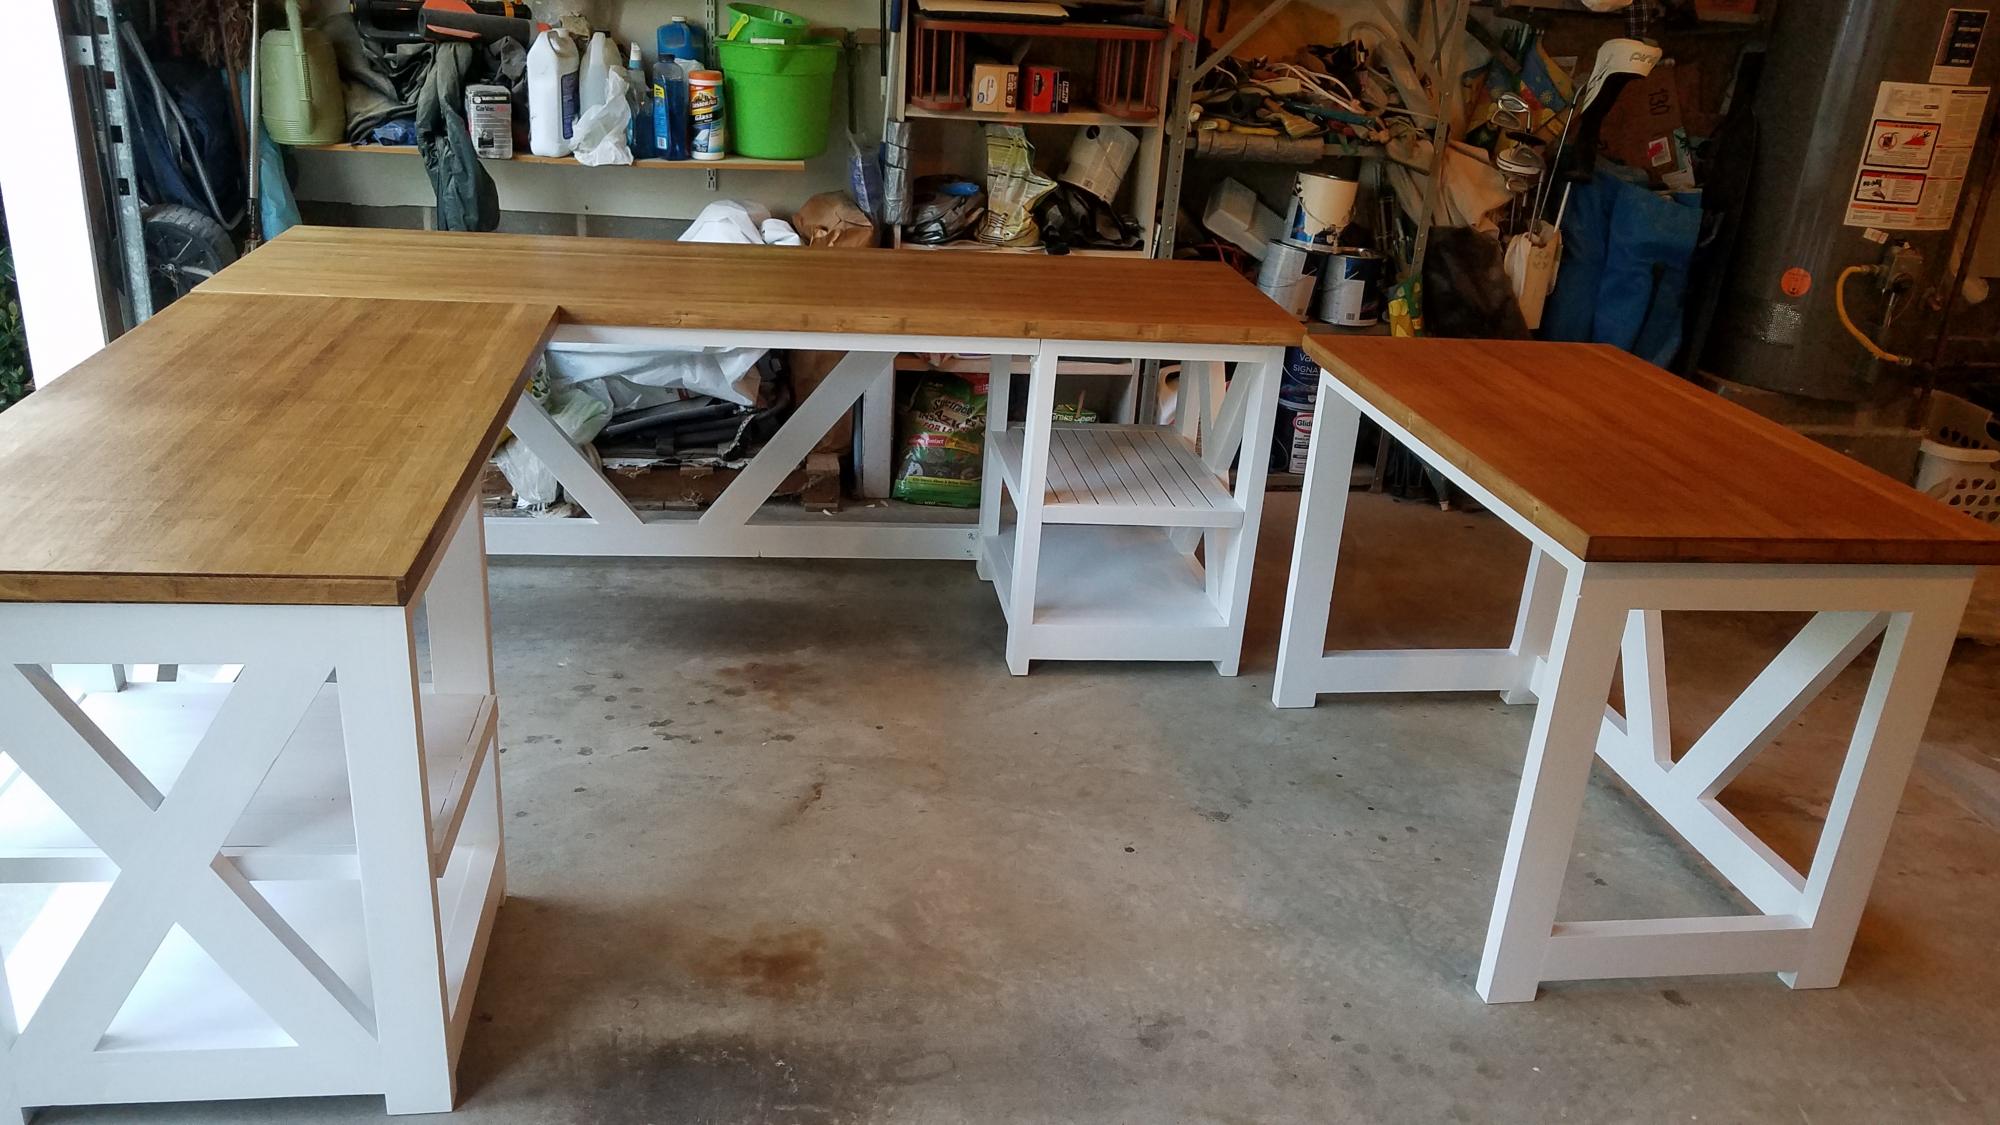
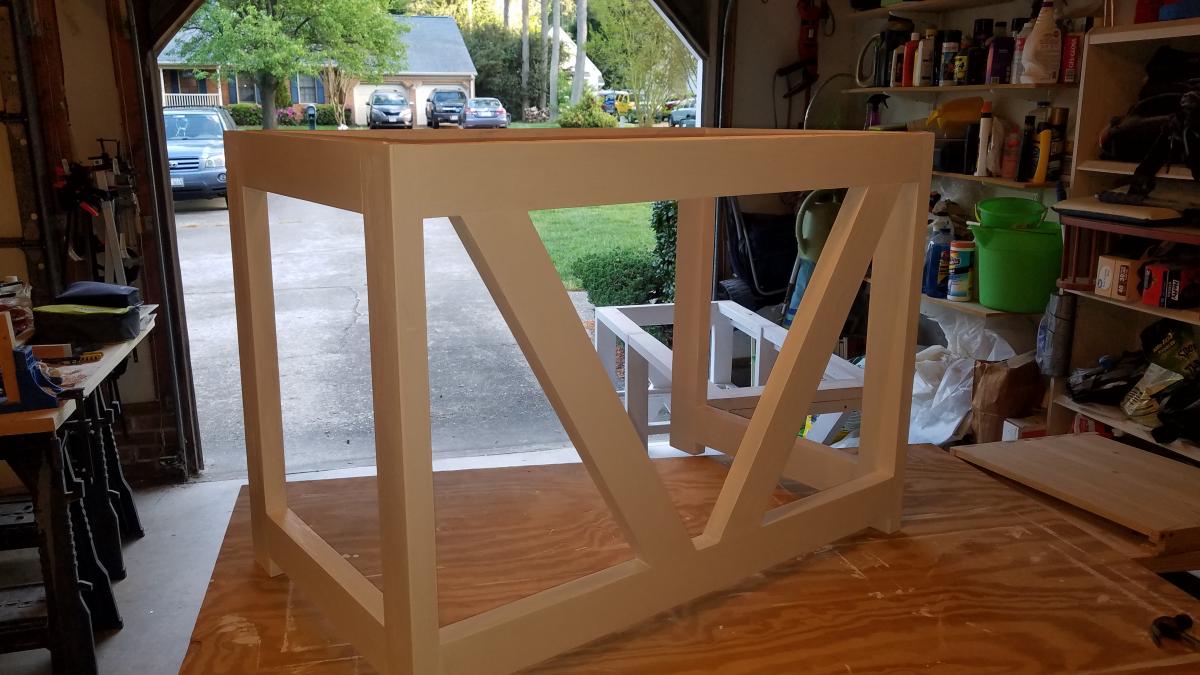
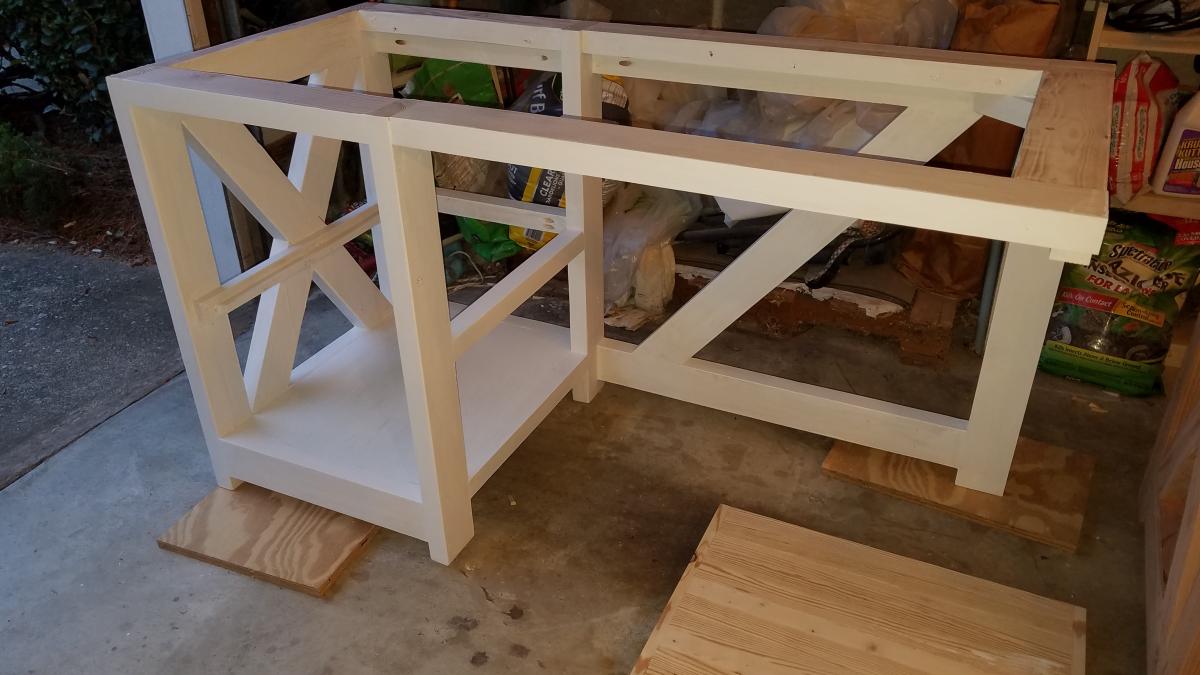
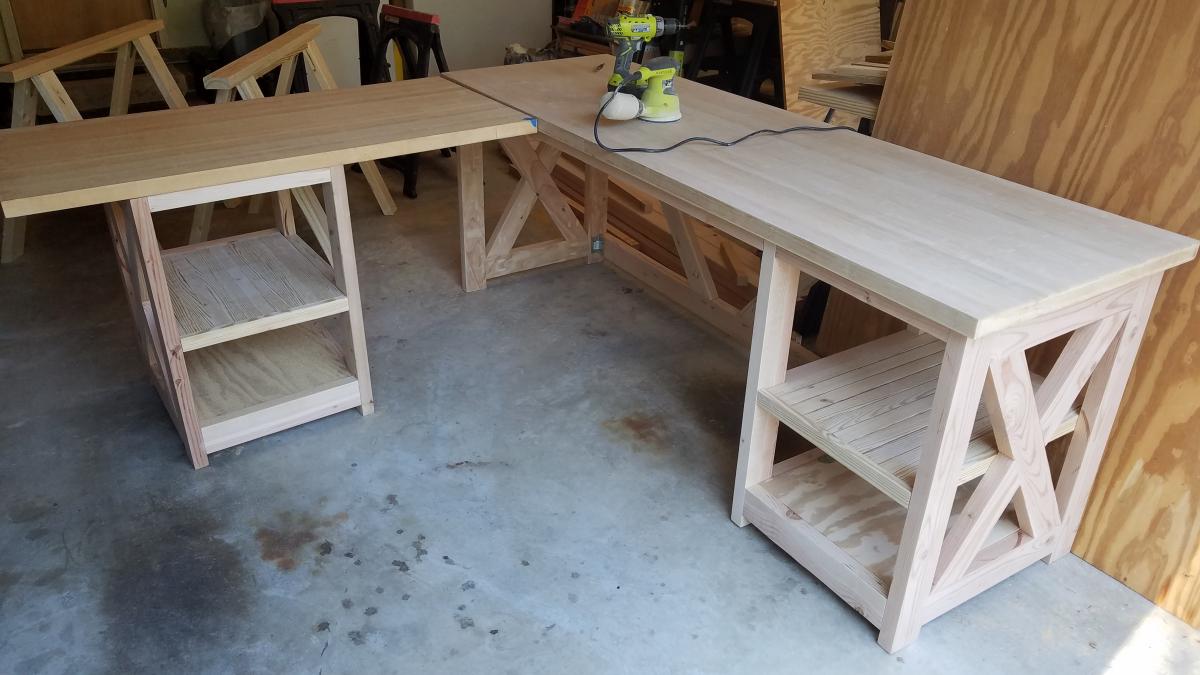
I built this L shape desk based on Ana White's rustic X desk plan. I would not have attempted this without her guidance. Love how this turned out, probably the nicest project I've ever done. Thanks Ana!
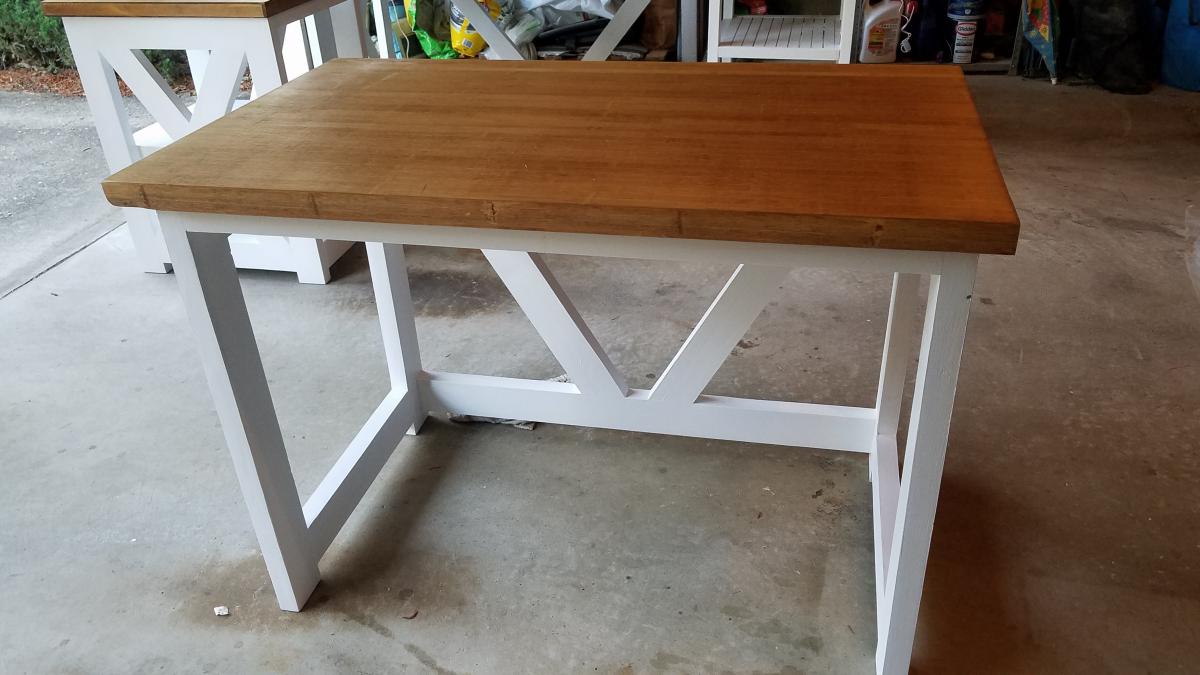
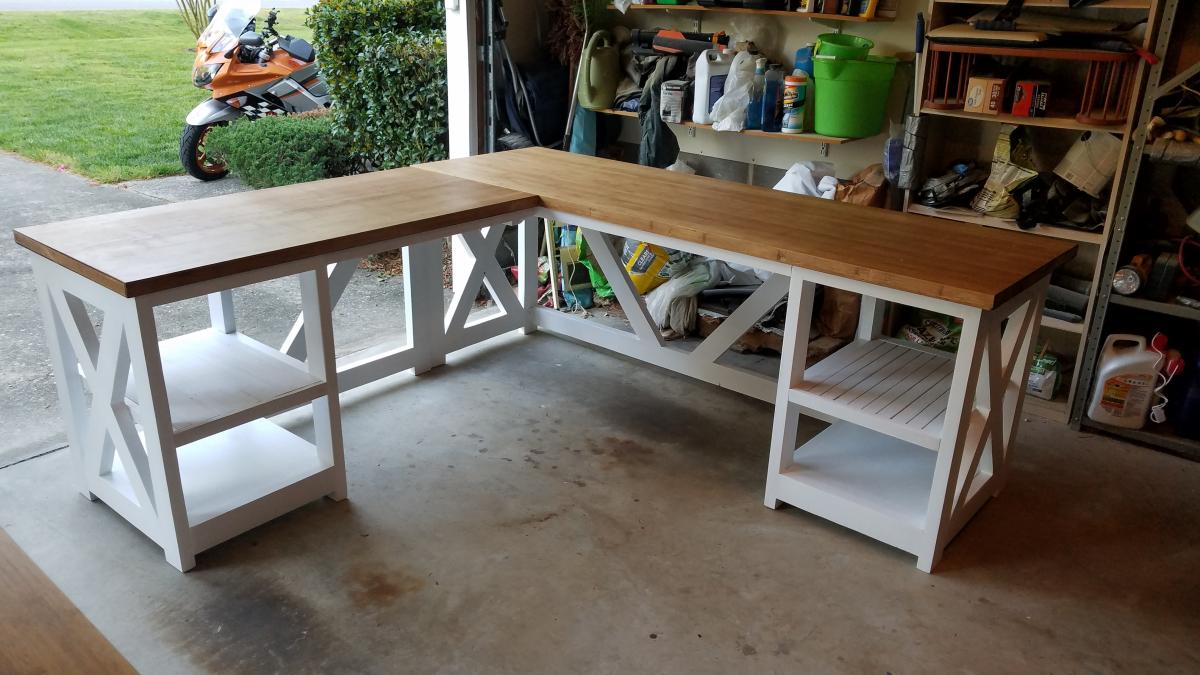
Tue, 05/26/2020 - 09:34
This is awesome! My son and I are looking to build an L shaped desk for him and this looks to be the one. Any thoughts on how I would mount a computer tray beneath? Think there is enough clearance below the 2x4 without hitting knees?
Thanks!
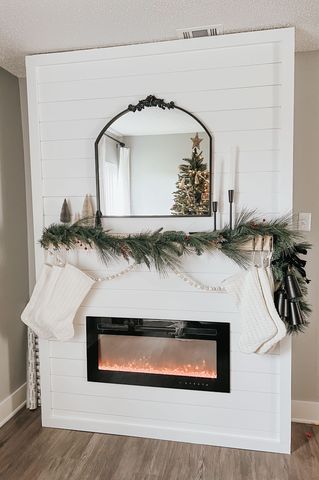
"I still can’t believe my mom and I built this beautiful fireplace.” - Megan Shaffer on Instagram
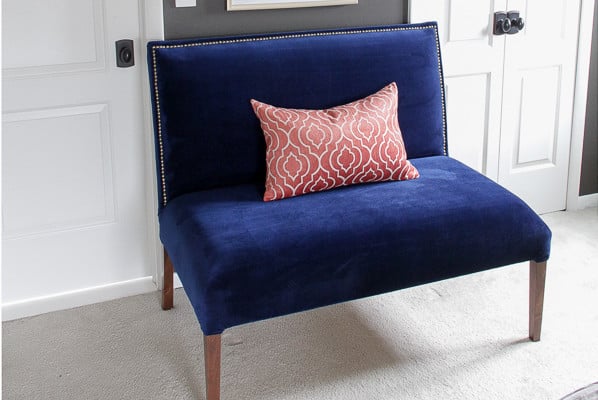
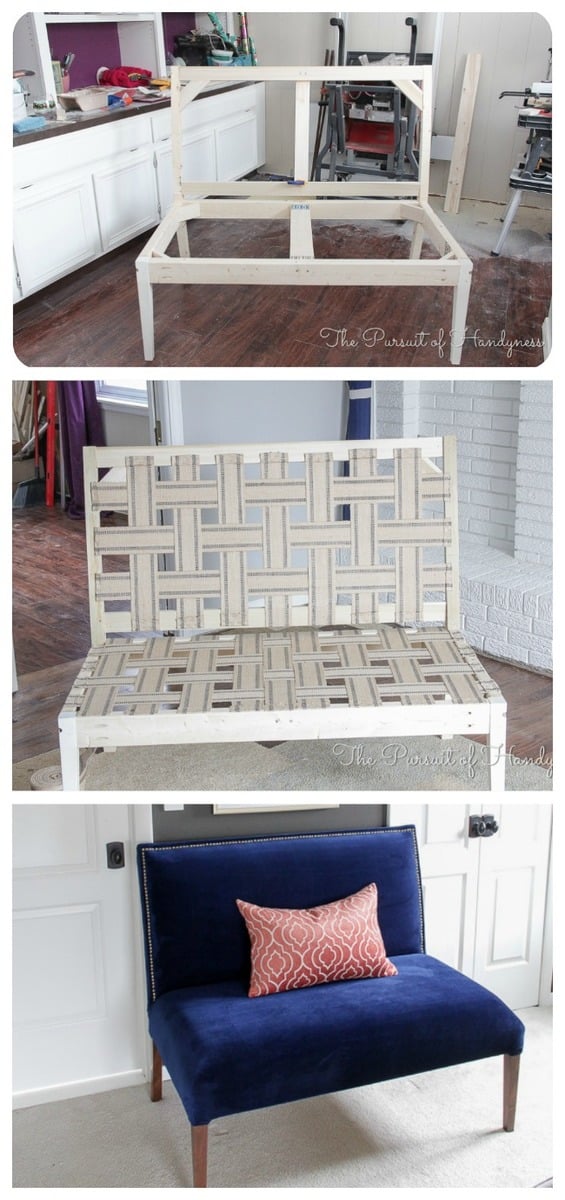
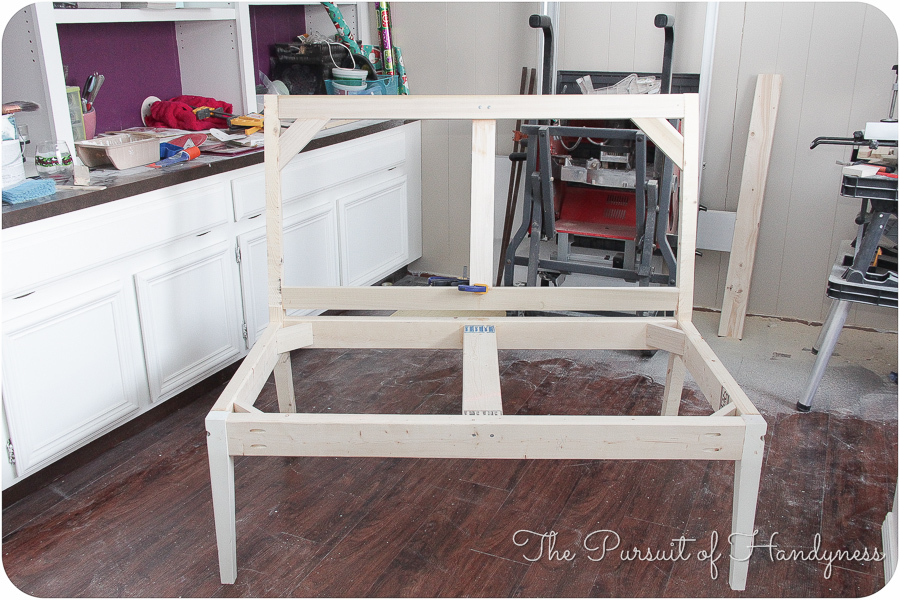
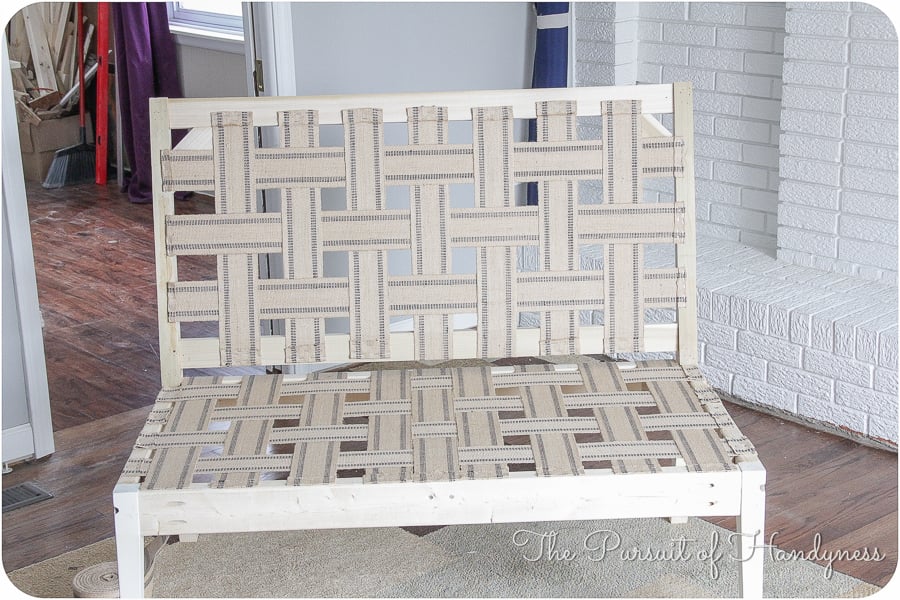
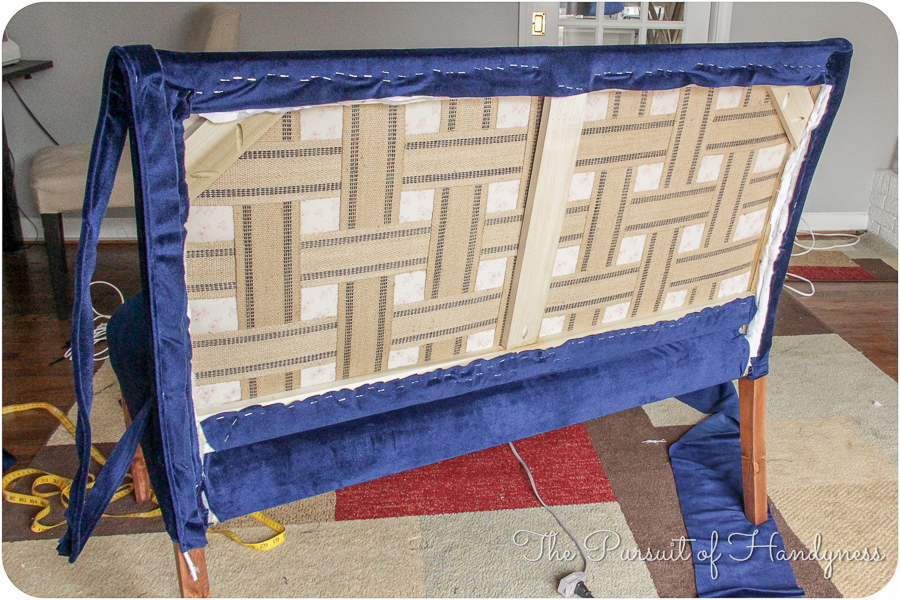
I started off with Ana's plans and kinda went rogue from there. The idea of creating those curved back legs scared me so I thought I'd sacrifice an Ikea dining chair and use it as the legs. When I ruined one of the legs I decided that I'd come too far to back out and that I must continue. I adapted many conventional methods to make the settee but I'm super pleased with the outcome. For the full step by step on how I completed the settee, please check it out here Part 1 Part 2 Part 3
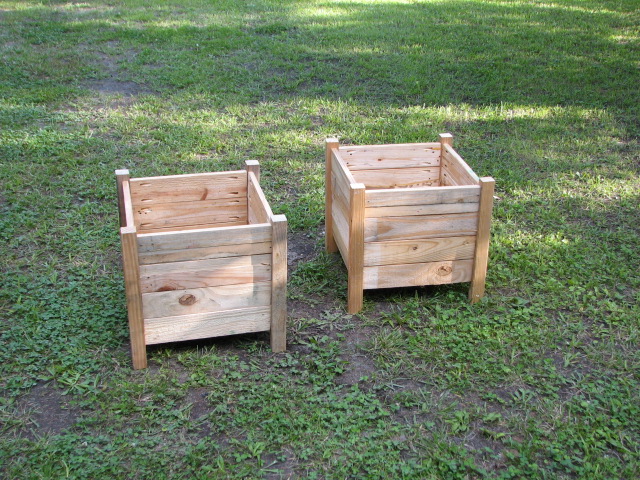
My co-worker and I built these planters from pallets that we had lying around at work. The only expense we had was the Kreg Jig I purchased (and love). It took us about 5 hours to put them together, including the time it took to cut the lumber to size. Then we used Thompson's water seal and stapled commercial grade landscaping cloth inside the planter. We made them for work and hope they will just naturally age. This was an easy project and we will definitely make more of these.
We had leftover screws, landscaping fabric and water seal from other projects.