Community Brag Posts

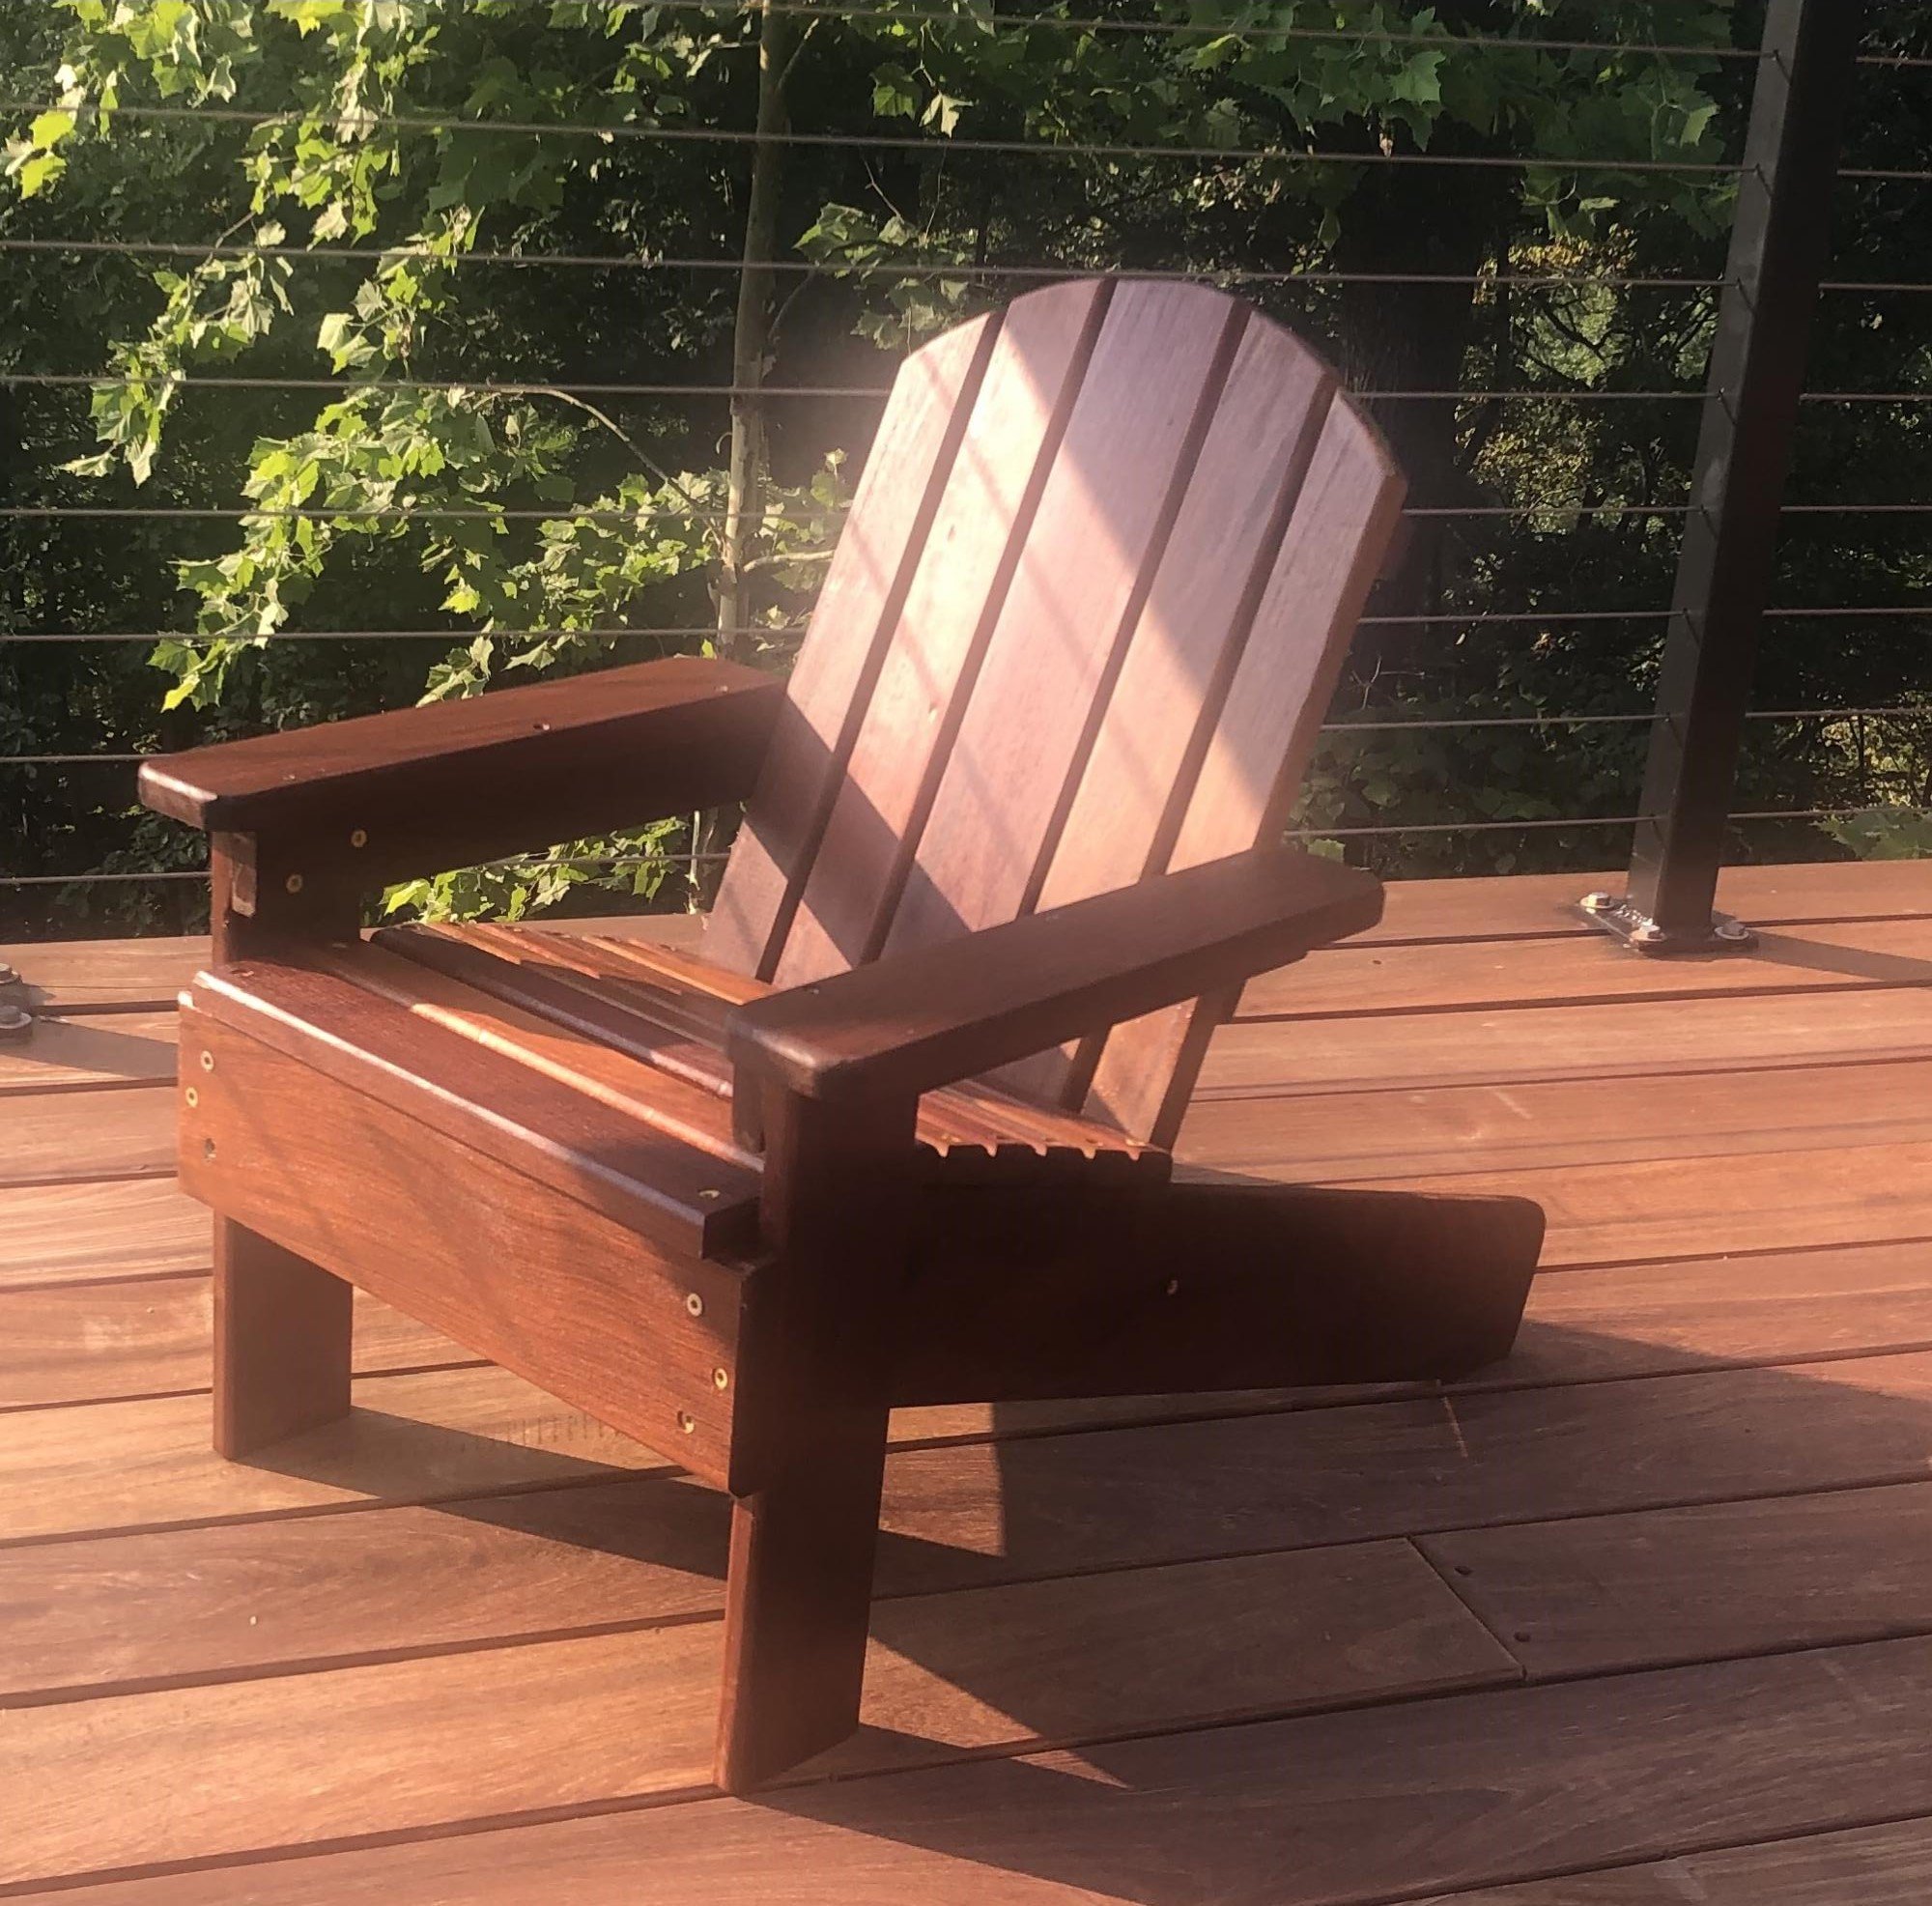
Modern Adirondack Chairs

Submitted by frmoody on Mon, 05/03/2021 - 17:35

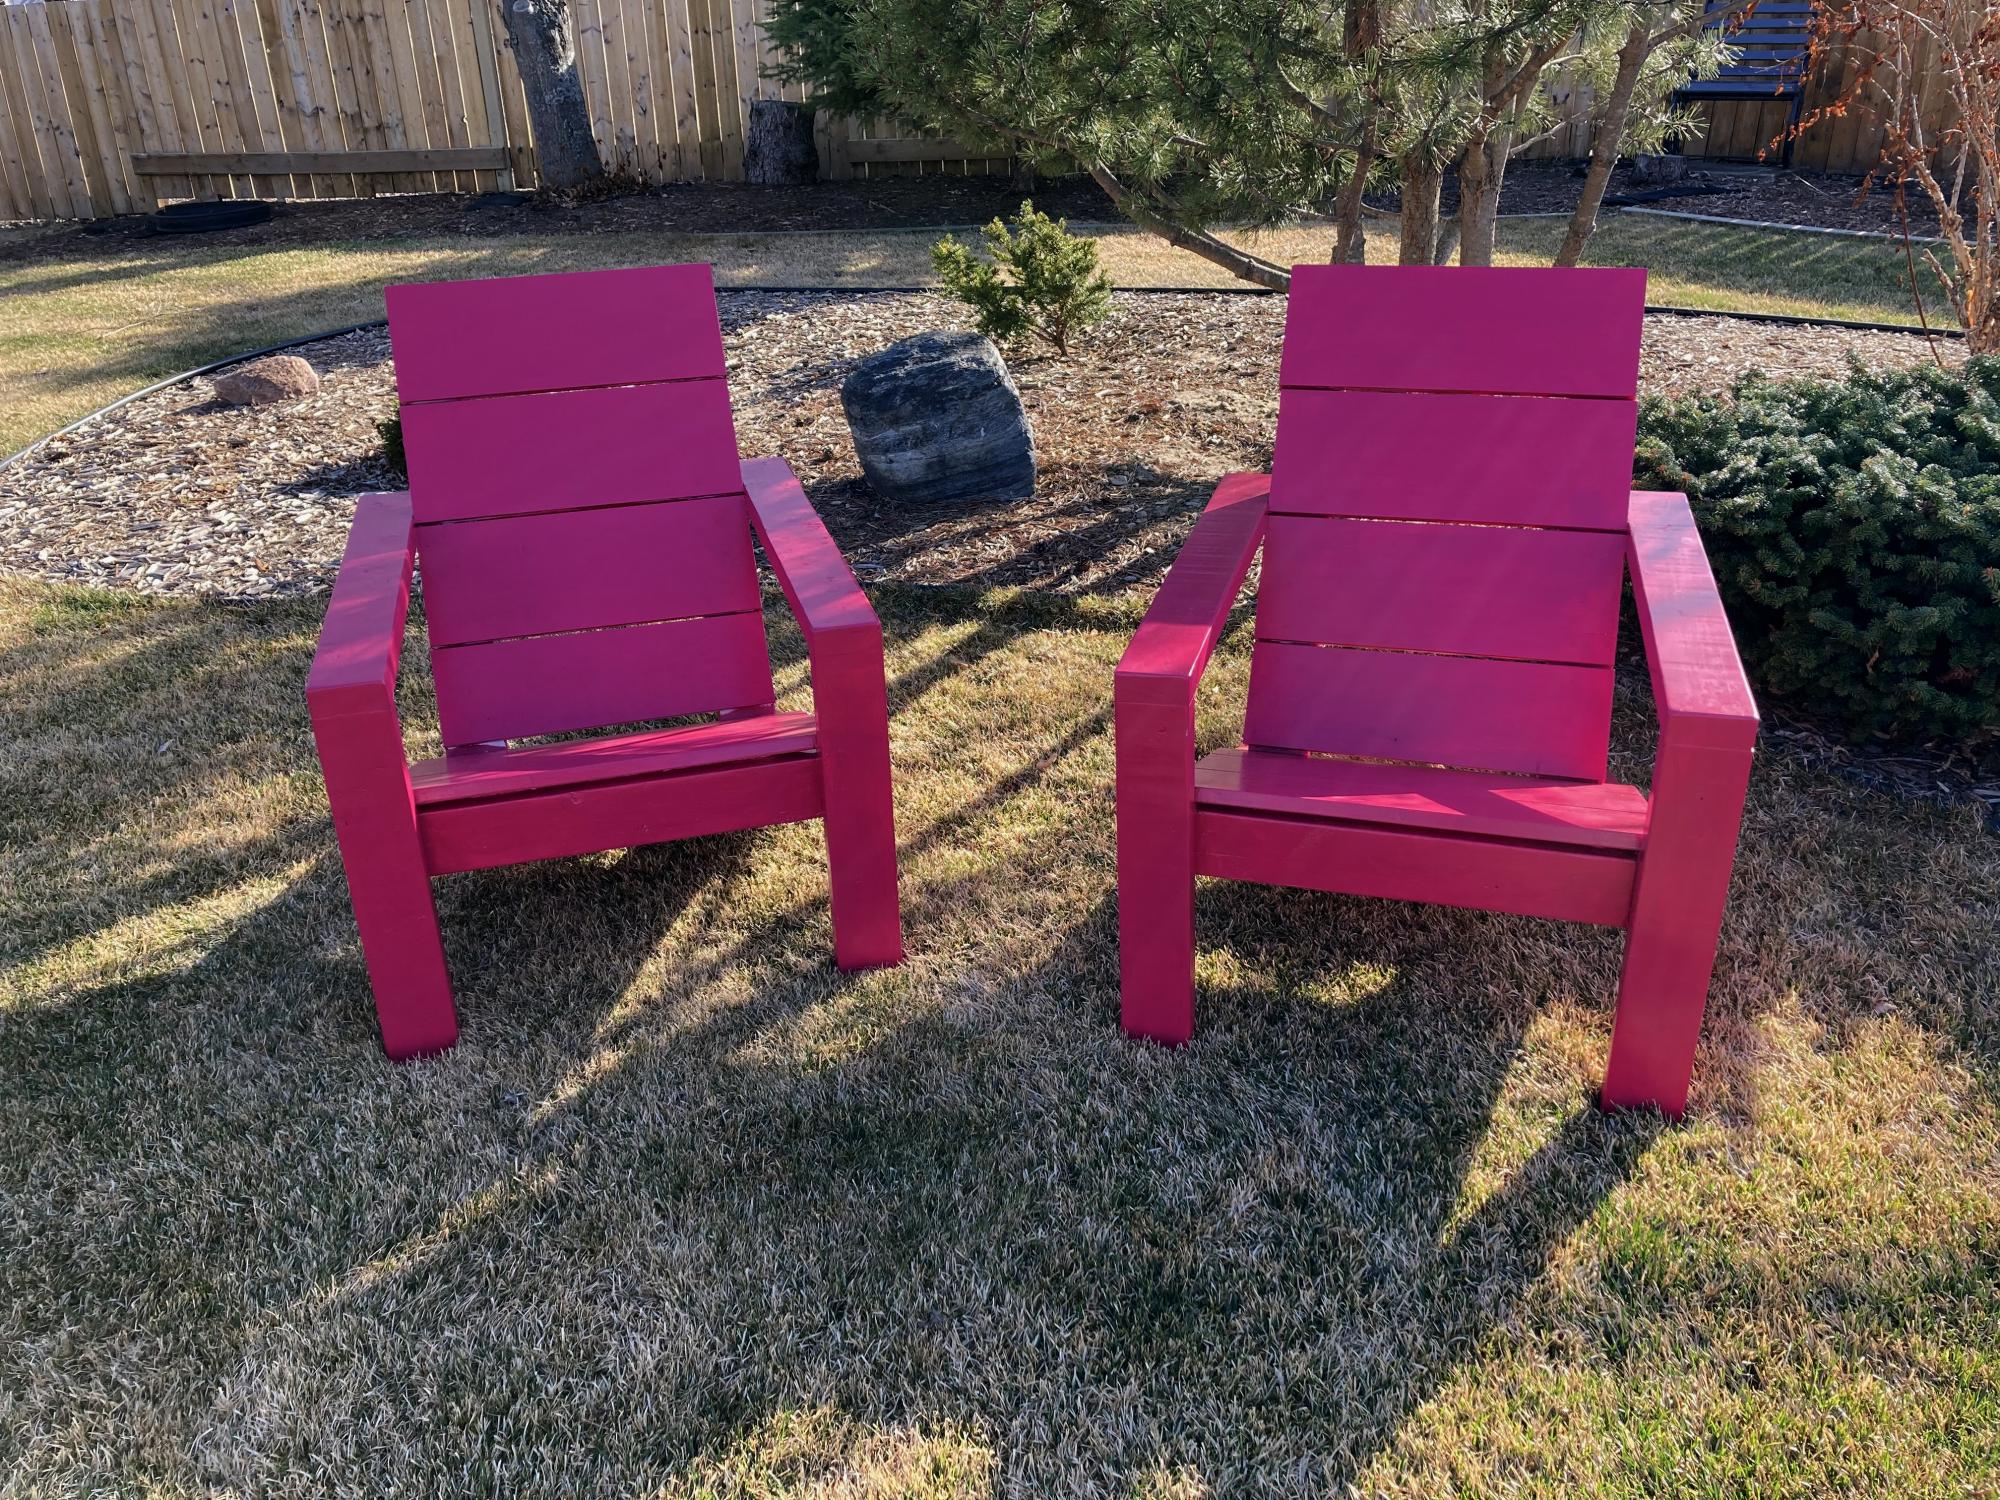
This was a nice simple build. The only problem where I live (near Edmonton, Alberta) is that the price of lumber has gone crazy. I think it is the same everywhere. 2 x 4's are running about $8.50 (CAD) each. I can see myself building a few more of these as the neighbours like them. Chose to go with a funky magenta colour to add some colour to the backyard. Very comfortable to sit in but I think I will add some cushions. I should have taken Ana's advice and painted the boards (especially back and seat) first. Once assembled I had to go in with a small brush to get the sides.

Estimated Cost
$40 each
Estimated Time Investment
Day Project (6-9 Hours)
Finish Used
Exterior semi gloss paint.
Recommended Skill Level
Beginner

Comments

Simple 2x4 Potting Bench - Modified

I was intrigued by Ana’s Simple 2x4 Potting Bench. The project seemed simple enough and it would be used as a means to clean up clutter in the garage. My main focus was to make it semi-portable and weather resistant. Instead of using 2x4’s for the corner posts, I used 4x4’s to accommodate casters. I also shorted the length of the posts by 4 inches to compensate for the height of the casters. To provide extra rigidity I did a dado for the 2x4’s that connect the front and rear legs. In retrospect, I wish that I did not dado the legs because it made it more difficult to attach some of the shelf planks. I painted the frame green and left the shelves and backboards clear for beautiful contrast. My wife is ecstatic with the result.

Estimated Time Investment
Weekend Project (10-20 Hours)
Finish Used
Benjamin Moore Environ Green paint for the frame and Minwax Polycrylic for the poplar shelves and backboards.
Recommended Skill Level
Intermediate

Comments

Seasonal And Holiday

Cedar planters

Submitted by mdesroc on Sun, 04/07/2013 - 15:30

The cedar planters are ready and waiting for spring to arrive. I made three of these planters and absolutely love them. Thanks Ana for inspiring me to build. I love the third one but have to admit that it was a mistake. I made it for my father-in-law's 76th birthday. He loves gardening and shiny wood. So I used a polyurathane on it but it didn't look nice (my nail holes were very visible). So I sanded it with 220 grit sand paper and then used the steel wool/vinegar solution that I used on the first two. It turned out so different so I sanded again, then tried the solution again. I love it! It looks so old. I will be keeping that one and giving him one of the other two.

Estimated Cost
$8.00 each for the wood
Estimated Time Investment
An Hour or Two (0-2 Hours)
Finish Used
Tea and steel wool/vinegar solution followed by Minwax finishing wax. I love the feel of the wax but I don't think it will stand up to the rain and our Canadian summer.
Recommended Skill Level
Starter Project

Comments

Patio sectional

Submitted by Anonymous (not verified) on Thu, 05/25/2017 - 18:21

Patio sectional 

Estimated Time Investment
Week Long Project (20 Hours or More)
Finish Used
Tinted weather proof stain

Made my own cushions - was the longest part of project (I'm not great on a sewing machine... better with a drill haha) Actual cutting wood, building and weather proofing done in a few days
Recommended Skill Level
Intermediate

Kid’s Adirondack Chair Project

Submitted by David_1962 on Tue, 07/20/2021 - 07:54

This little chair turned out really well. The only significant changes I made to the plans were to cut the back slats in an arch, round the corners on the arm pieces, and round-over all of the exposed edges.

Built from Plan(s)
Estimated Cost
None, built from scrap deck boards
Estimated Time Investment
Day Project (6-9 Hours)
Finish Used
Ipe is an extremely heavy, dense tropical hardwood. It’s primarily used for making decks but is also excellent for outdoor furniture. I just sanded lightly, and applied a penetrating oil branded “Ipe Oil.”
Recommended Skill Level
Beginner

Comments

Library ledges

Submitted by TBENNE on Fri, 04/19/2013 - 19:06

I really enjoyed this project. I would suggest painting as much as possible before assembly. I used pocket screws to hide which are hidden on the back side and a nail gun to attach the front 1x2s. I made a total of 8 ledges.

One thing I did different from the project plan is that I connected the bottom board on top of the back board to give me a little more space on the bottom for layering my books.

Built from Plan(s)
Estimated Cost
$10
Estimated Time Investment
An Hour or Two (0-2 Hours)
Finish Used
Valspar in Swiss Coffee. Top coat of Minwax Polyacrylic in Gloss.
Recommended Skill Level
Starter Project

Fancy X

Submitted by Anonymous (not verified) on Tue, 06/13/2017 - 21:10

Second time building this table. Made it smaller, cutting support pieces to 45 rather than 60. Also tried 1X10 for the top.

Built from Plan(s)
Estimated Cost
$70
Estimated Time Investment
Day Project (6-9 Hours)
Finish Used
Swiss coffee white on base, lightly distressed. Top is Mix Wax Weathered Oak then watered down layer of Briarsmoke.
Recommended Skill Level
Beginner

Outdoor Recording Studio Shed Build

Submitted by brittanyj on Wed, 09/01/2021 - 10:48

As an on camera actor, I found myself with zero work during the pandemic. All productions were shut down and my day job no longer existed. It was time to get creative.
Voice over work started booming, particularly for actors who could record from home, because recording studios were shut down. I've dabbled a bit in voice over and had been interested in diving in and took my first step by buying a sound reducing booth called a whisper room.

The problem? There was nowhere in our house to to put the 6'x8' booth. So it sat on the back porch for months, covered by a tarp.
For a woodworker, this just wouldn't do! It was time to build an out building to house the booth and have my own outdoor recording studio. I read endless books and watched videos on building recording studios and made my plans over a few months.

Finally, in March, I excavated the land and prepped it for a pour. We had a concrete guy come in and pour the slab.

As soon as that set, I began work from the ground up in building this fancy shed. It took me 3 months, but I learned so much about the basics of building a house, and now I am auditioning for professional projects in my beautiful studio. I couldn't be prouder.

I ran electric, ethernet, I put in flooring, I roofed, drywalled, made a custom door threshold, inserted a window and framed every last bit of this building. There were bumps along the way- to be expected in a one person build- but she's done and ready for work.

I documented the build from start to finish here: https://www.youtube.com/watch?v=yPcEW6cqhcQ

Comments

Modern Farmhouse Table and Bench

Submitted by sherm917 on Mon, 04/29/2013 - 19:56

This was my first project. It took me a longer time than planned because I kept making mistakes and kept going back and trying to fix them. The plan was simple enough and I learned alot from this project. I can't wait to start my next one!

Built from Plan(s)
Estimated Time Investment
Week Long Project (20 Hours or More)
Finish Used
MINWAX POLYSHADES Mission Oak Satin, 2 coats
Recommended Skill Level
Starter Project

3 sided square picnic table

Submitted by Anonymous (not verified) on Mon, 10/04/2021 - 13:08

We built 2 of these tables for the McDonald’s in our area for the front of their building. With a few modifications to fit the space. We made the top of the table a foot smaller so it’s 3 x 4 feet. We also put extra bracing on the legs so the table would not tip over if one person was to sit on it. I love this table and will be making one for myself

Built from Plan(s)

Comments

Danielle's Shoe Crates

Submitted by zigmommy on Wed, 03/09/2011 - 14:54

We went a little crazy bringing pallets home once I got the idea that we could build something so cool and functional out of only a small amount of new lumber! We've had these about 6 months now and they still look great and serve our family in a very real and functional way! My boys have been WONDERFUL about keeping all their shoes in their crates!

Estimated Cost
About $10 per cart
Estimated Time Investment
An Hour or Two (0-2 Hours)
Finish Used
Just lots of sanding and Mod Podge to seal the customizations!
Recommended Skill Level
Starter Project

Printer's Coffee Table

Submitted by jbolson21 on Tue, 04/07/2015 - 16:09

Coffee Table

Estimated Cost
Can't remember
Estimated Time Investment
Week Long Project (20 Hours or More)
Finish Used
poly
Recommended Skill Level
Intermediate

Comments

Bright red sawhorses!

Submitted by ferbit on Thu, 03/10/2011 - 08:50

Not too much to say here! We badly needed sturdy sawhorses for our garage. I've used them on almost every Ana White project I've made and they are fabulous! They are covered in drips, spots, nicks and stains from all of my projects, but that's what I love most. Each splotch reminds me of that particular project. Sounds silly, but it gives them character! :)

Built from Plan(s)
Estimated Cost
$20
Estimated Time Investment
An Hour or Two (0-2 Hours)
Finish Used
Red semi-gloss paint that I had on hand.
Recommended Skill Level
Beginner

Day bed

Submitted by Christinna on Thu, 09/07/2017 - 17:05

My sister needed a day bed for her guest room.  I modified the Modern Outdoor Chair plans to fit her needs.  We used an old door she found, even using the hinges as a means to attach the door to the bed frame.  This was my first real project.


Estimated Time Investment
Weekend Project (10-20 Hours)
Finish Used
Paint
Recommended Skill Level
Beginner

Kids Country Bench Modified: First Build

Submitted by EllenFitz on Sun, 03/13/2011 - 19:20

My husband and I put this together to fit a spot that was just slightly off of what standard furniture would accomodate. Looking for something simple as a first build, we went with the Kids Country Bench and made some changes along the way.
We made 3 cubbies on the bottom shelf for extra storage and a little extra stability, since our boards were more bowed than we preferred. We also removed the front and back aprons. In the front we just attached a 1x2 that we ripped into a 1x1 as a trim piece. In the back, we centered a 1x2 to give a slight lip in the back.
I don't have a jigsaw, so we used my FIL's Scroll Saw. That was interesting ... but the sides turned out ok. Not perfect, but ok.
I was hoping to finish this with a high gloss product, but since the boards we ended up with more 'rustic' than I anticipated, I decided to embrace that and go with a distressed finish. I used a spray primer, and then one coat of Sherwin Williams yellow, covered with a dry brush of Sherwin Williams blue. I then sanded the corners and edges and finished with a spray top coat.
We had lots of fun, although it took us a long time. We were only working in small shifts, in between naps. If we had managed to get, say, 3 straight hours to build, I think we could have finished in in that time period.
This was a great starter project, and it's nice to know that we can make MINOR modifications to a plan and not have it fall apart on us :)
Thanks for the inspiration Ana!

Built from Plan(s)
Estimated Cost
$50
Estimated Time Investment
Afternoon Project (3-6 Hours)
Finish Used
Distressed/Dry Brush paint
Recommended Skill Level
Starter Project

Cabinet Doors

Submitted by Anonymous (not verified) on Fri, 10/08/2021 - 07:58

I made these cabinet doors based on your Entryway Console with Open Shelves. I wanted something to hide the clutter from the cables, modems and hubs for all our smart devices as well as the circuit box. I modified these with open grills in the bottom half to allow for the Wi-Fi signal to travel without being blocked. I love them and am so surprised at how nice they turned out. I am not used to working with wood routers or table saws but found that it was not as difficult as I thought it would be. I used pocket wholes to join the stiles and rails and did use glue also due to the expected high usage.

Comments

James & Libby's Library

My first project! It turned out pretty well, although I had some trouble hammering the nails in straight! It cost me a little more because I used fir instead of pine - there weren't any straight pine boards. I also used a 1x3 for the bottom, becuase it's along James' bed and I didn't want him banging his head if they stuck out too much. Perfect for his Thomas trains!


The wall I wanted them on is a little less than 8', so I cut 18" off both and now have two more little shelves to go somewhere, yay!

Built from Plan(s)
Estimated Cost
$25 for both
Estimated Time Investment
An Hour or Two (0-2 Hours)
Finish Used
Some random white trim paint
Recommended Skill Level
Starter Project

Small Dog Bed

My mom really wanted me to build her a bed for her dog and was coming to visit in a week, so I jumped on the project immediately.  (Although it is for her pup, mine is modeling the bed:-).)  I took the Farmhouse Doll Bed plan and used that as a base for a modified version.  I went to Joanns and grabbed a standard 15"x17" piece of 2" medium density foam for about $5 and built around it.  Instead of using the 1x3s for the headboard, I used 9 1x2s to even out the space.  This was also my first time ever sewing, so that was probably the most time consuming part of the project!  (That's what took it over the edge from being an "hour or two project" to an "afternoon project".)  I also modified the plans for Ana's Outdoor Cushions to fit the smaller piece of foam.  (I fell in love with the dog fabric from Tonic Living, so I HAD to make my own!)  I finished it off with 2 coats of spray paint.

Estimated Cost
$25 - including foam and fabric for cushion
Estimated Time Investment
Afternoon Project (3-6 Hours)
Finish Used
2 cans of Rustoleum Spray Paint in Antique White
Recommended Skill Level
Beginner

Sideboard and floating shelves

Submitted by knollgf on Tue, 12/05/2017 - 20:35

My wife wanted a piece for our dining room. This was a easy weekend project. I had to modify the size to fit my space. I decided to use red oak for the top. It was more expensive but is a much harder wood with a nicer finish. I made the hardware myself from aluminum flat bar. 

Estimated Cost
$200-$300
Estimated Time Investment
Weekend Project (10-20 Hours)
Finish Used
Flat white base
Espresso top
Recommended Skill Level
Beginner

Comments

Seasonal And Holiday

Full Farmhouse Bed with mods

Submitted by Kingsamui on Thu, 12/14/2017 - 16:29

Made the standard full farmhouse bed with storage, but did a couple modifications. 1) Didn’t use drawers, but wanted closed, not open cubbies. I made the drawer fronts and then attached with full overlay hinges and magnetic catches do they open from top down like a horizontal cabinet. 2) built the slats as two, one piece slat frames which sit on the cleat so that they can easily be removed for the extra long term storage between the cubby boxes. Just lift mattress and the two pieces of slats and lots more space. 

Estimated Time Investment
Week Long Project (20 Hours or More)
Finish Used
Red Mahogany Stain and semi-gloss polyurethane
Recommended Skill Level
Intermediate