Ana-white outdoor sofa
I made this outdoor sofa on a weekend.
Loved this plan! I felt it needed one extra 2x4 for a slat, but the rest was great!
I really loved the modern farm table, but we wanted something to fit our square-ish dining room space and still fit 8-12 people to fit our famiy of 8+ company. What we ended up with was a unique statement piece that we absolutely adore. We made some minor changes to the plans to accomodate the changes in size, primarily by using 4x4 posts for the legs and attaching them differently. The table is very sturdy with no wobble. It is very heavy, though! Please see our blog post for details on size, cut list and our building modifications!
This was my first ever project! I built the skyscraper bookcase and then built a second one, only modifying it to make a locker style cabinet for backpacks!
This was mine and my wife's very first woodworking project. Overall, it wasn't bad at all. I thoroughly enjoyed the actual process of cutting the wood and putting everything together. As far as the painting goes, I'd much rather just go on to another woodworking project, but I have to say that all the hard work paid off. Anna's plans helped tremendously. I tweaked slightly just because we wanted our center piece to be a little taller and slightly more narrow. We also added two shelves on each side, for a total of four. For our small reach-in closet, this was by far the best way to go about everything. We definitely have much more room and overall it is a much better use of the space.
I threw in a "before" picture just for fun.
We also just finished the Farmhouse Queen Bed that Anna has plans for, and we will be putting up a brag post on it very shortly.
We recently moved to across country and couldn't fit all our belongings in our moving van so I am on a slow but steady quest to my own "hand built home"! While my husband works with his computer genius types, I am pulling out my tools......rather basic and simple tools because none of my good ones fit in the truck either!
I built this for use as an outdoor patio table suitable for an umbrella by eliminating the center truss below the table. Instead, I used my Kreg Jig to join the two sets of legs with 2 2x4s each set about 6 inches off center directly under table top. (See picture). I used Douglas Fir for most of this build. I also added a 1x2 cap to the bread board ends of the table top to help stabilize it against warping. I secured the table top to the frame with countersunk screws under glued wood plugs since I needed to allow a gap between boards for water drainage. I used the Varathane wood weathering product to soften the “new wood” look. I helped preserve the wood with a coat of Benjamin Moore’s clear Arborcoat. This acrylic product will allow the wood to continue to gray naturally. I recommend this as an intermediate project due to the awkwardness of joining the 45 degree angle cuts. Having a second set of hands here would have been very helpful.
Using Ana's Rustic X Hall tree - I modified the size to fit this small space in the cottage in my backyard. It was impossible to find something to fit this space -- and this is one of my first indoor projects; I am a beginner. It was so much fun building! I used pine from a big box store mostly but opted for Bead board for the backing to achieve a farmhouse type look. My daughter lives in the cottage and loves it!! Thanks Ana for the sweet plans!!
I present the "Castle Loft Bed" with minor modifications. Finished in a "Frozen" theme.
It was time to upgrade my youngest to a "big kid bed" and she was insistent on a frozen bed. After searching for various options we settled on the "Castle Loft Bed" from the Ana White catalog of plans.
We left the slide off, due to available space. Also we changed the steps to be more of a usable toy box/storage and hamper area. I also modified the internal bookcase to have a small "secret" cubby for her "valuables". We also added color changing LEDs to fit the little princess's mood.
I hope you like my rendition and keeps in spirit the DIYers quality.
I wanted to switch things up. I have made and sold many of the Grandy consoles with barn doors but my current new (to us) home was more modern traditional, definitely not very farm house. The Grandy plan makes a solid piece of furniture which is exactly what I need for it to survive amongst the giant teenagers that we are raising BUT I wanted to switch up the doors and add some traditional elements with a pop of modernish hardware. Make sure that your face frame openings are square. Add some non-mortise hinges, latch bolts and L brackets and this plan appears transformed!
Sat, 11/28/2020 - 10:29
Love the added elements for a traditional look! Stunning:)
Built this guitar stand basically by using on-hand materials left over from another project. Used 1x12's; 18" tall fir for sides and back braces (cut at 5 degrees on each side). Added felt strips to protect the instrument.
Thu, 05/28/2020 - 17:37
Very nice and well designed. Thanks for some ideas!
This is a miniature version of the Man Crate, measuring 6” x 6” x 4 ¾” tall, made from 1/2" and 1/4" scrap birch plywood, with added hinges to make a lift-up top.
This is going to be a gift - - I’m going to send it filled with candy.
I zigzag stitched vintage neckties to plain canvas and used these directions to construct the stool frame. I used 1 5/8" screws.
Fri, 02/15/2013 - 19:23
Cool idea! Now I'm going to be looking for ties at rummage sales!
Based this wagon on plans found on Ana White's site. I built this for a 2 year old girl of a co-worker. She is right now using it to pull around her dolls.
This was so easy and fun! We splurged a bit on nice cedar because apparently the cedar mills are down due to covid so the less expensive fencing isn’t so readily available. The hubs helped me rip down the larger boards, then I cut and assembled it all. Not including the buying and ripping, this took me maybe 4 hours to complete and we ended up with a beautiful kitchen for my daughter’s 5th birthday! Thanks for these super easy to follow plans!
I decided to go with Oak boards for the table top for a little more durability. Simply fastened together with dowels and glue and clamped to dry. Then I added extra supports to the bottom. The top looked a little thin compared to the base so I added the accents pieces out of 1x2 for a table skirting of sorts.
This is my take on the Rolling Rustic Wooden Dresser. I did not use the wheel and extended the sides to increase the height.
Used the edge glued project panels from Lowe’s for the Top, Side and Drawer Faces.
Biggest cost increase is the inclusion of the much more expensive drawer hardware. My wife likes the self closing under drawer mounts that run $25-$30 a pop.
With lots of leftover wood from previous projects (farmhouse table and sideboard), I decided it was time to start another project. (I did head out to Lowes to get a piece of 4x4 for the legs...they only had Cedar. My friend found some Fir at Home Depot for a buck more).
Found the plans for the Farmhouse Bench, looked at other brag posts and their suggestions...then got to work!
Cutting the pieces was fast and relatively easy. Predrilling the pocket holes also went quick. Putting the pieces together was also very fast (though I did have to add extra pocket holes here-and-there so that the legs and two end-aprons were more sturdy).
Sanded the piece, then added a coat of Rustoleum Dark Walnut Stain, and then a couple coats of Deft Satin varnish.
I desperately needed some storage in my workroom and finally decided to make this! It's from the 6 Cube Bookshelf plan and it works perfectly in this space I've got in my workroom.
I would've rather used real wood throughout, but this is my first proper project and to keep the cost down I used MDF for the main boards (all cut to size by my local B&Q, yay!) and planed whitewood 1x2s.
I definitely learnt a lot on this project, but most of the mistakes are hidden under the paint :-) and in the end I'm really pleased.
I wanted an off-white finish and, after a baffling time in the paint aisle, chose a very pale grey, it sits in the room perfectly! I'm hoping to make some fabric boxes for it, but not sure what colours I want yet.
Now for the next project...
Tue, 03/26/2013 - 03:35
Great work on your first project. :) Light grey lends itself to all color possibilities, so I understand how it will be tricky to choose your fabric. :)
I have a good size bedroom, but things kept cluttering. I needed somthing small where i could store a few thing's like, movies, x-box, and cable box. So decided on the bookshelf. It's the perfect addition to my bedroom set. Thanks Anna for your awesome projects.
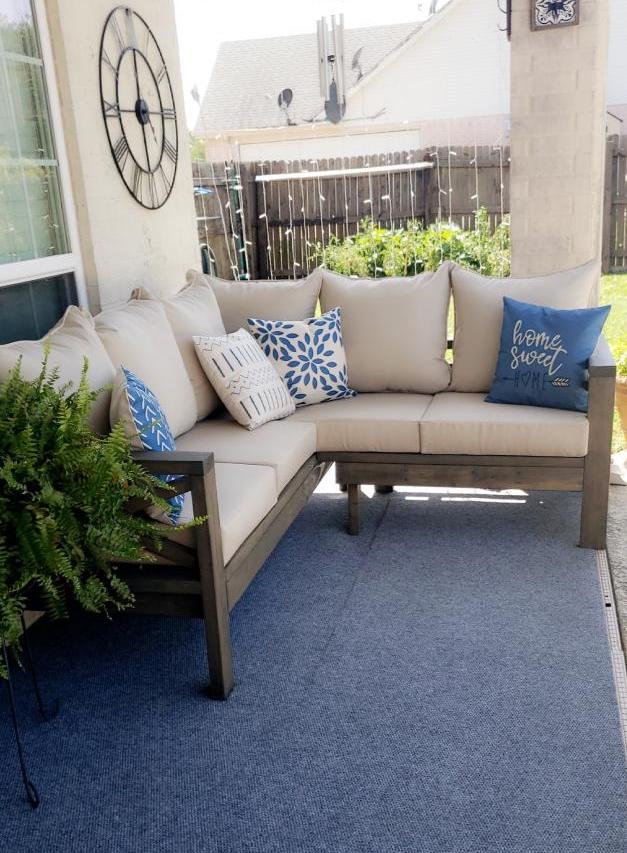
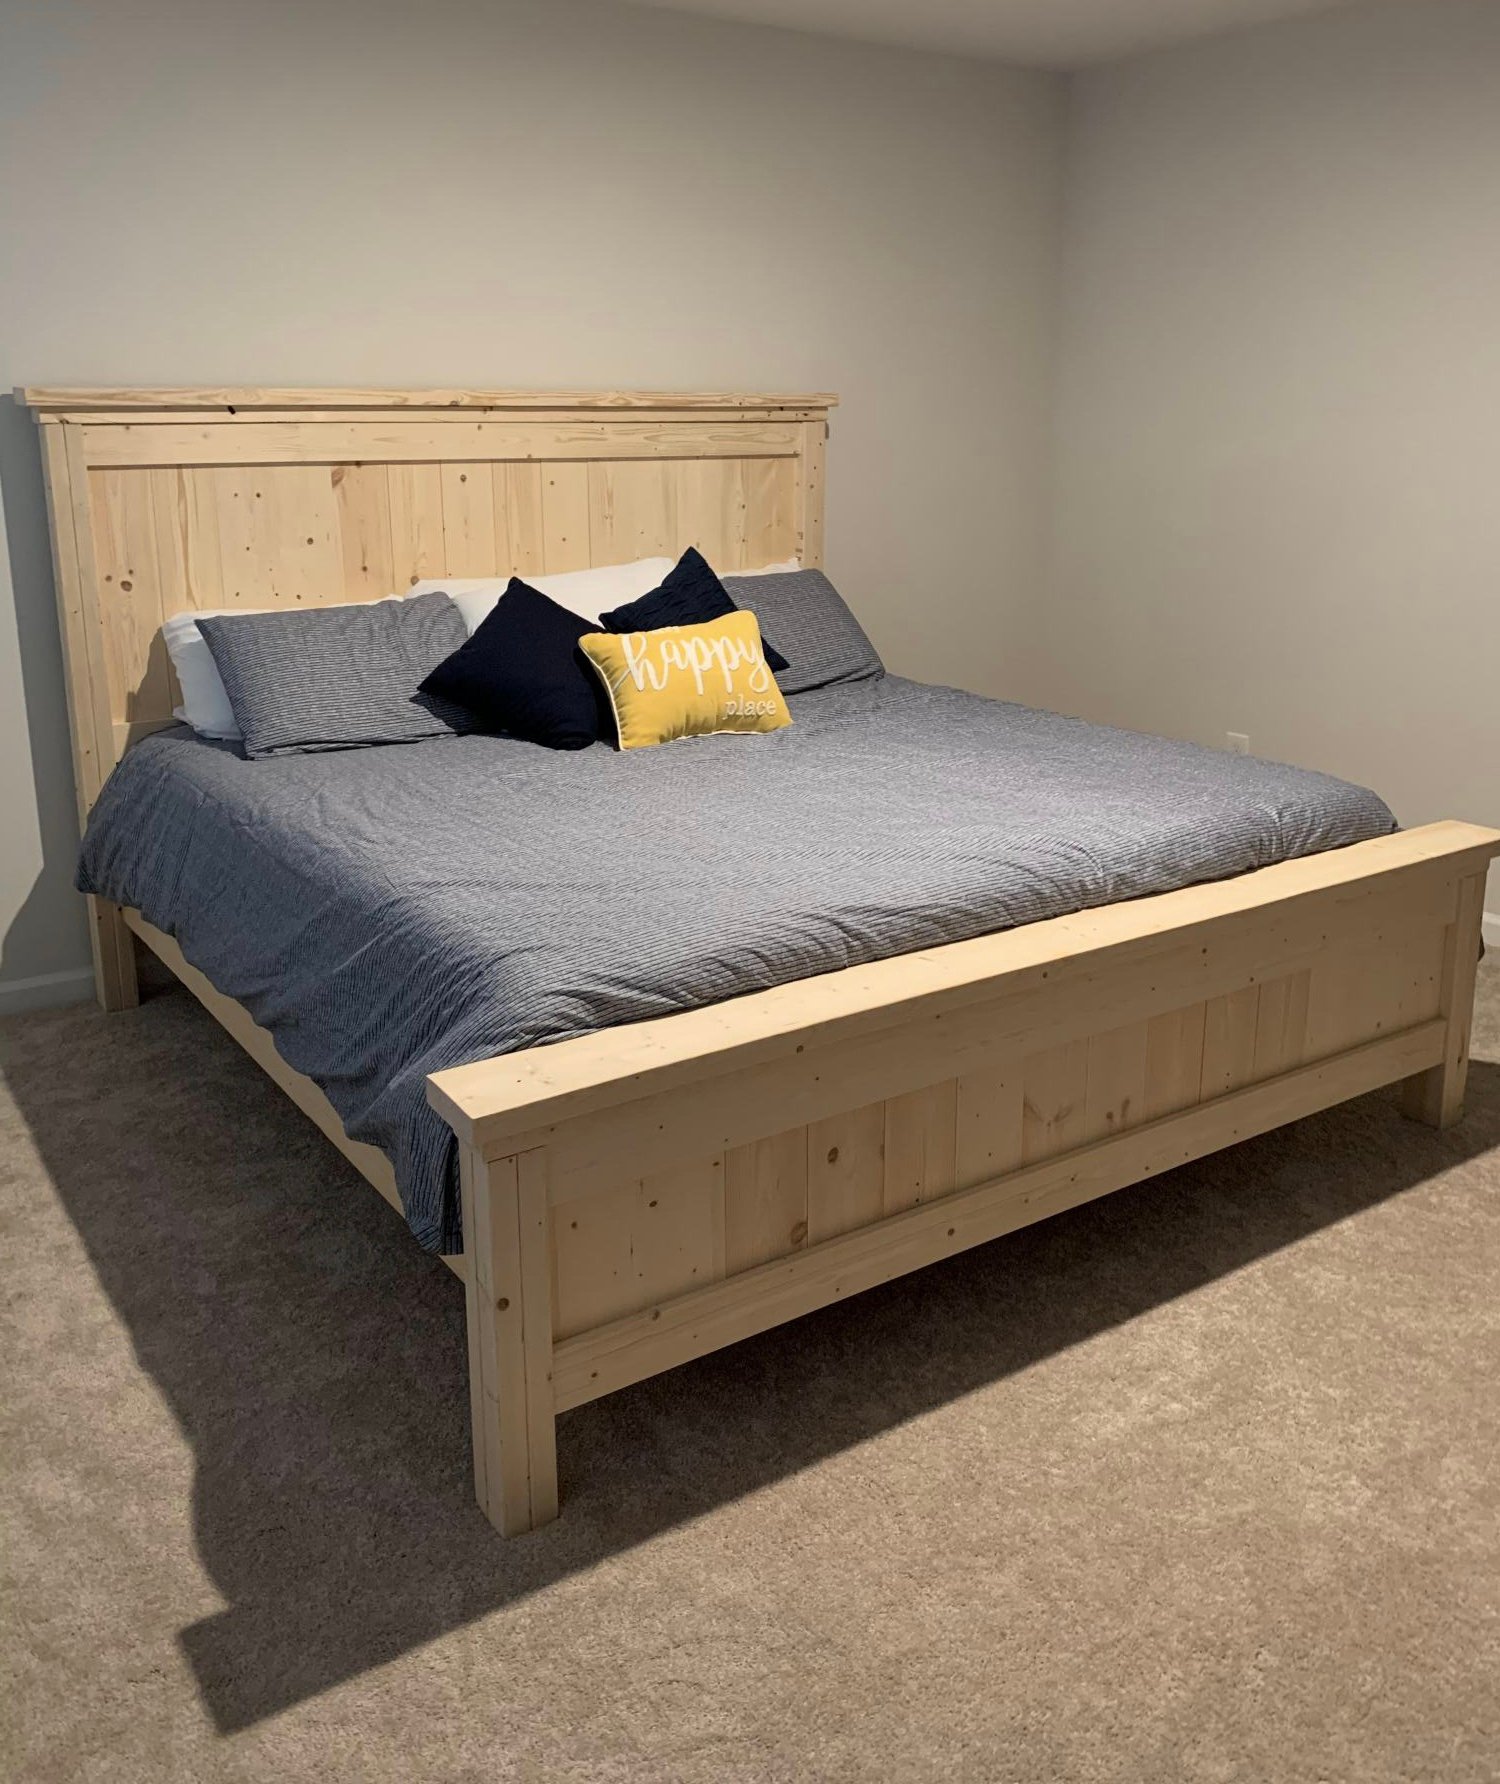
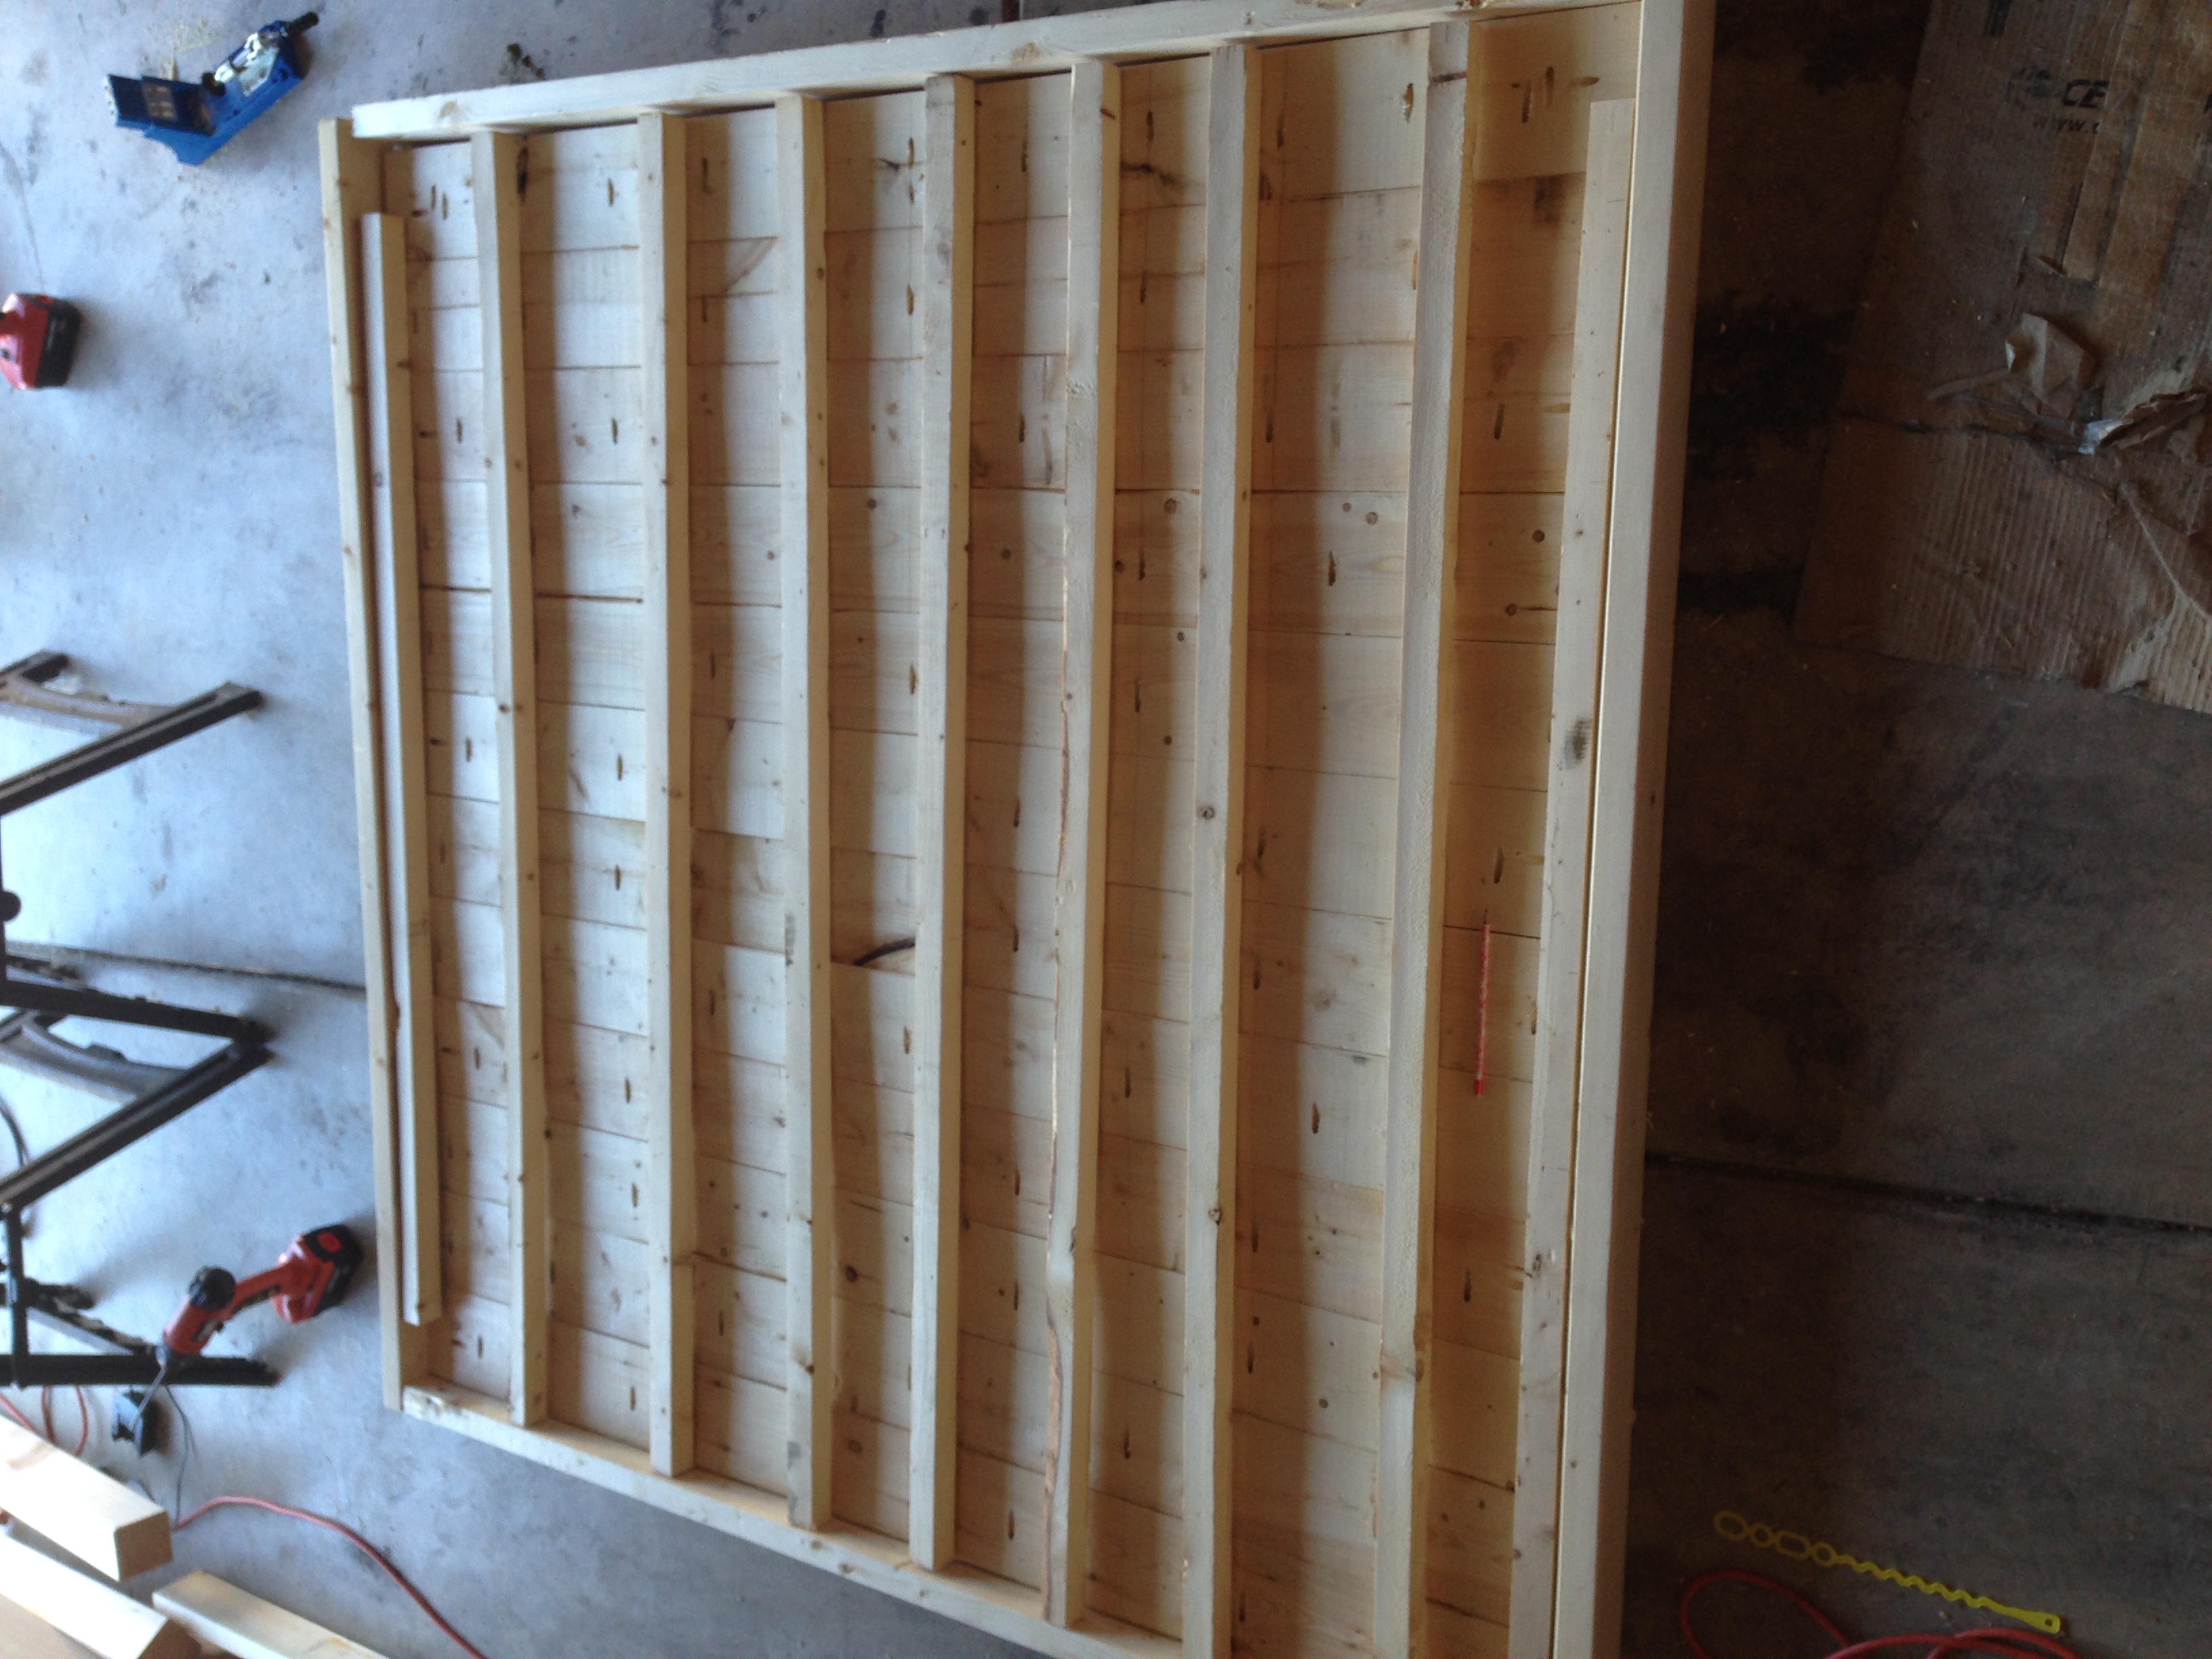
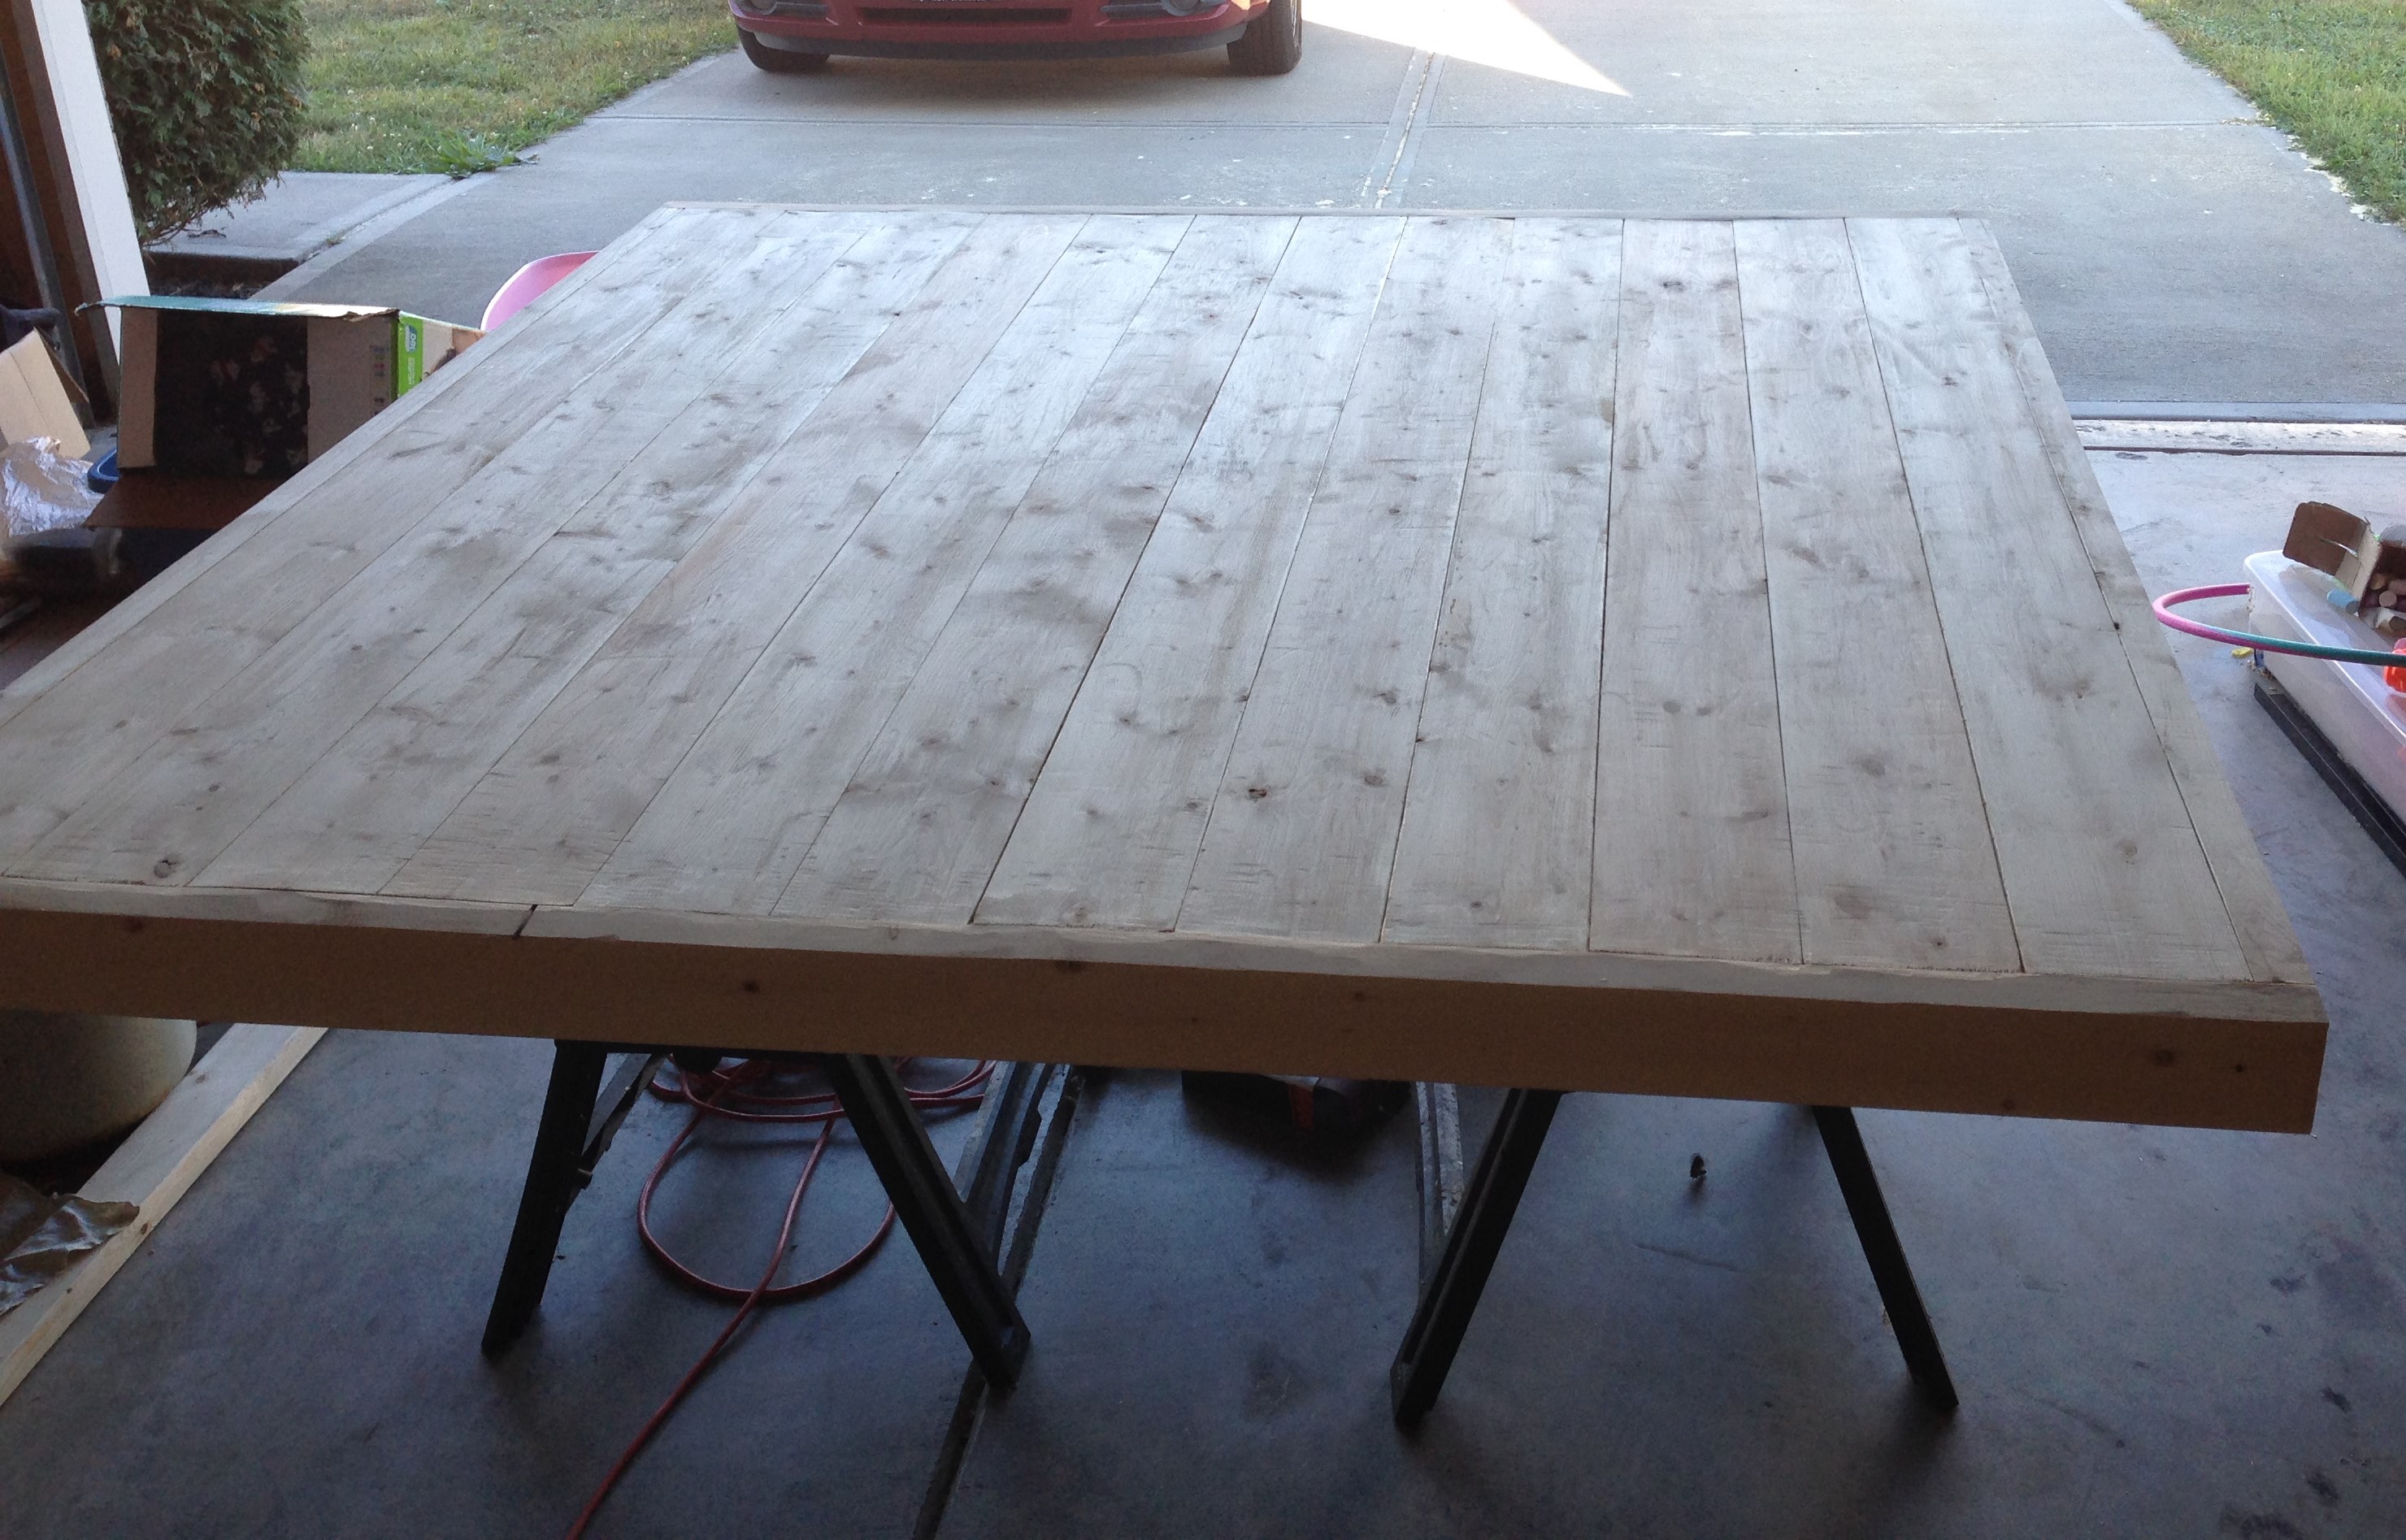
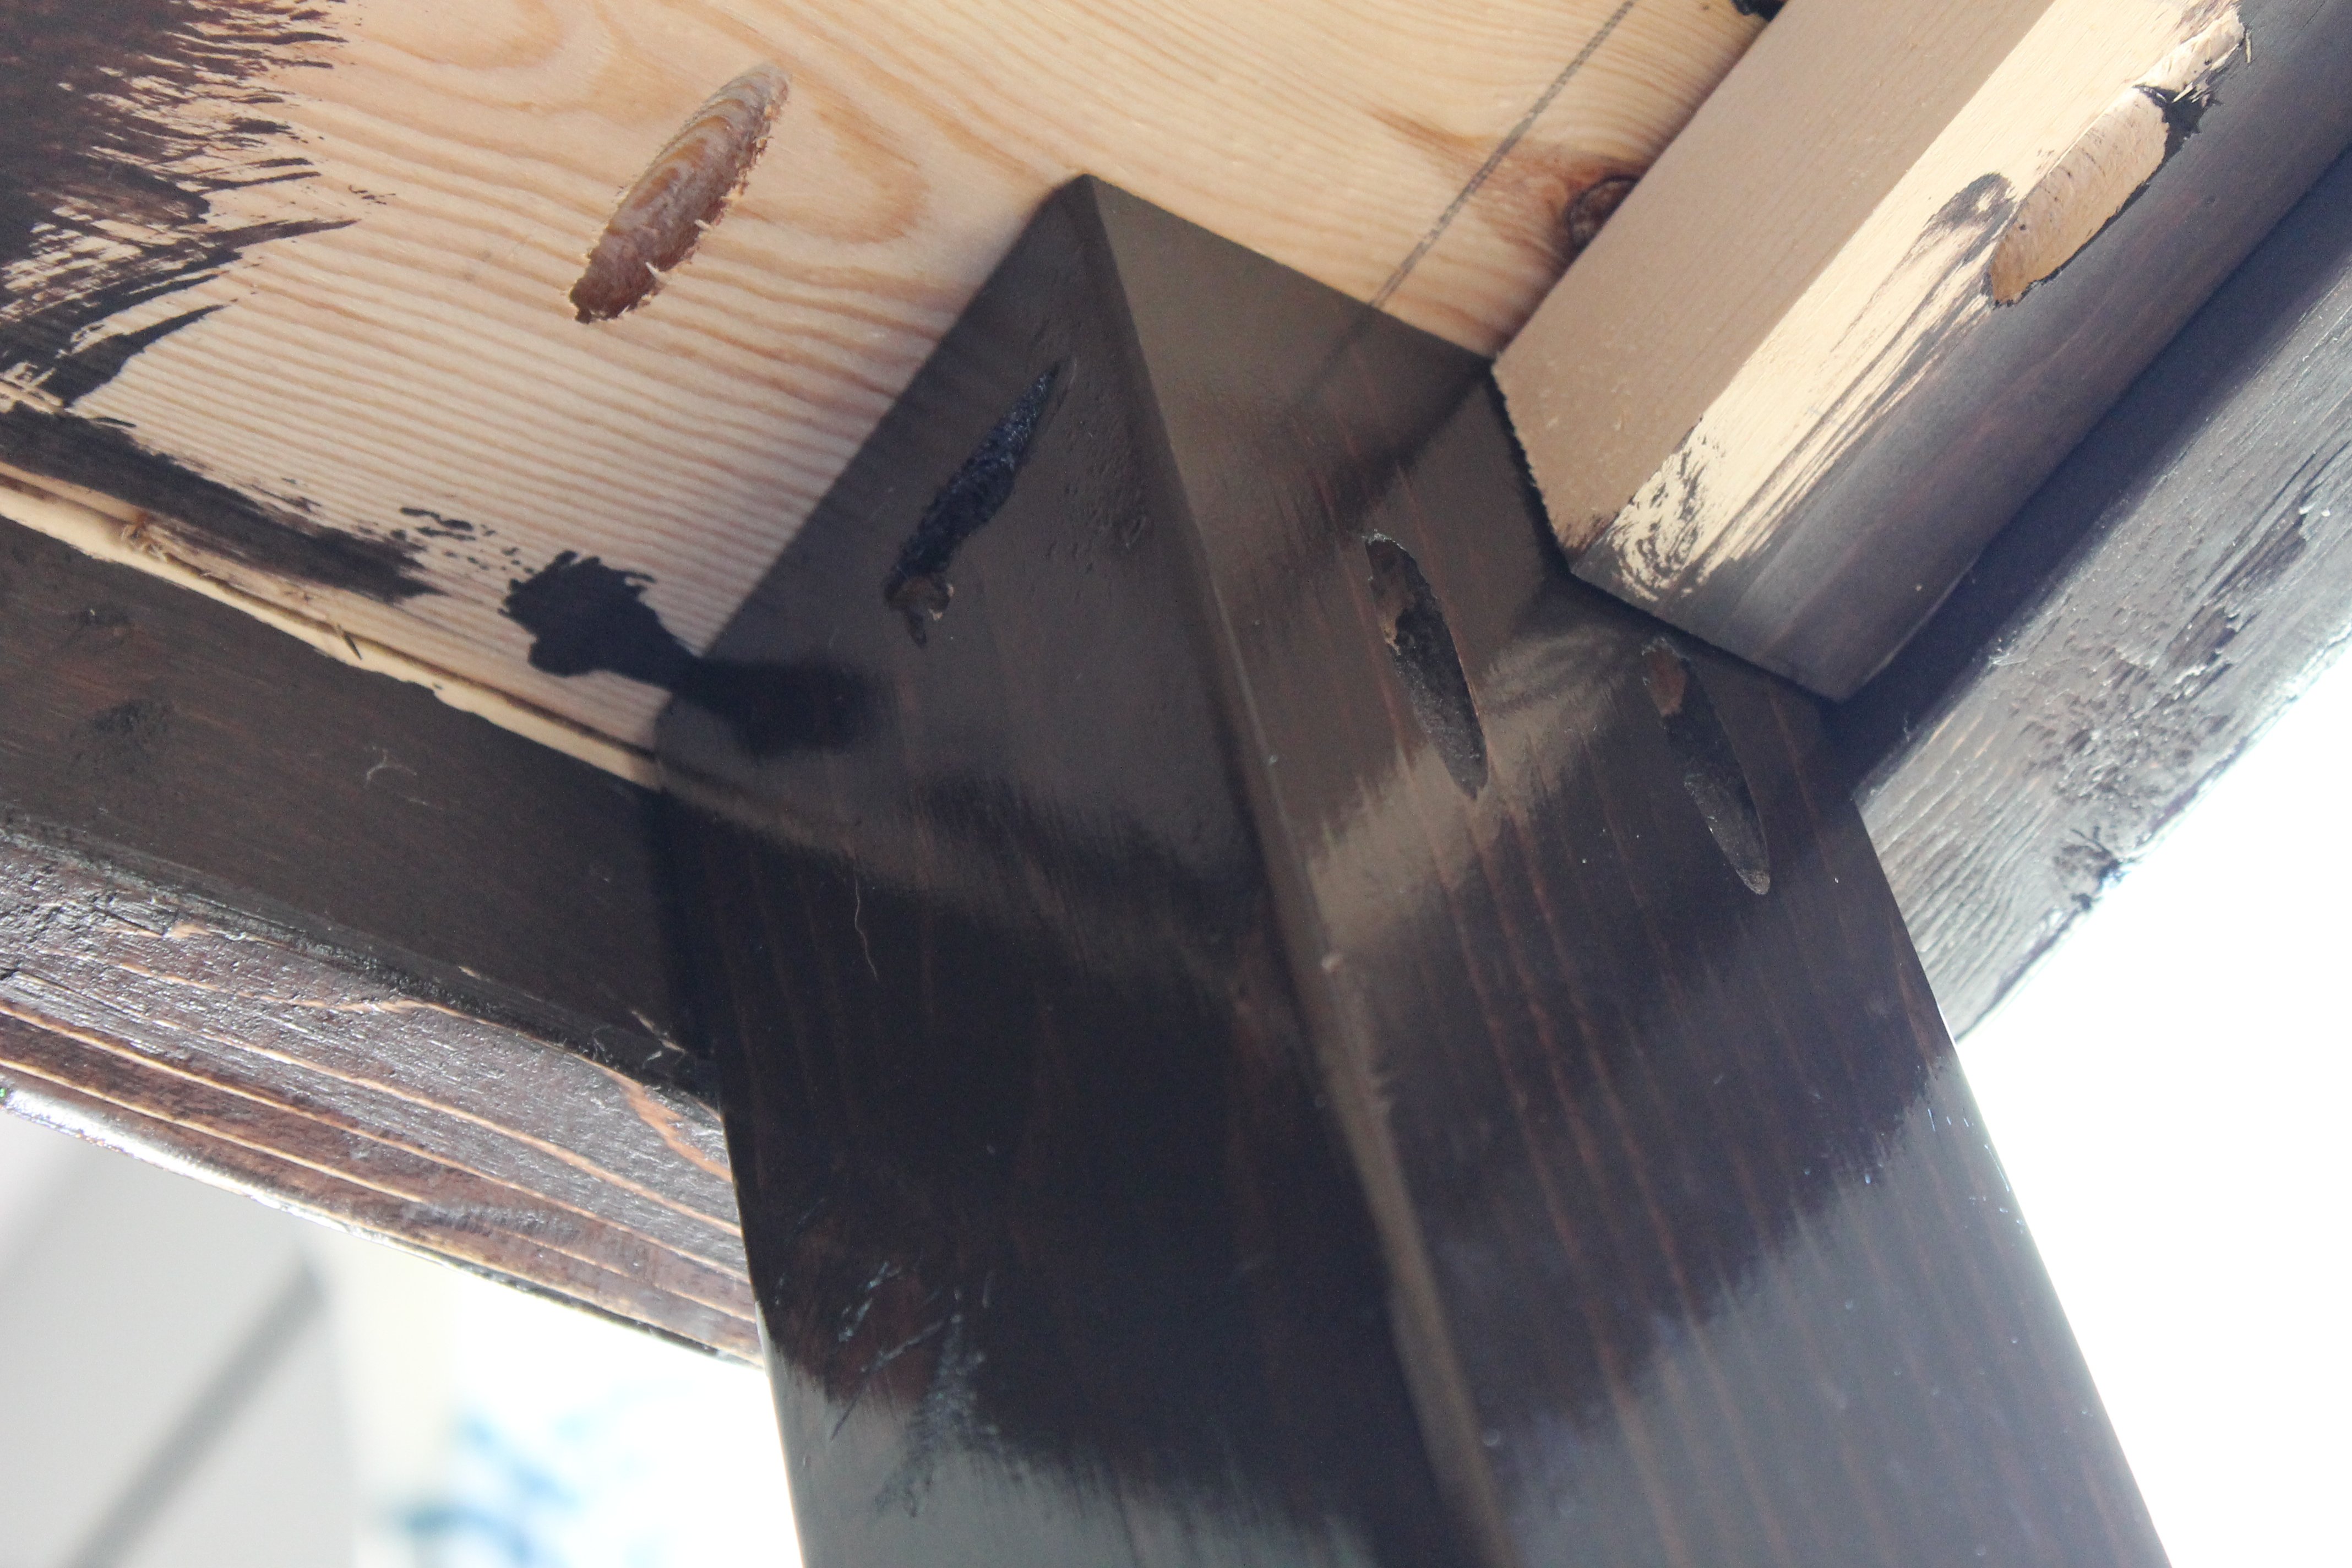
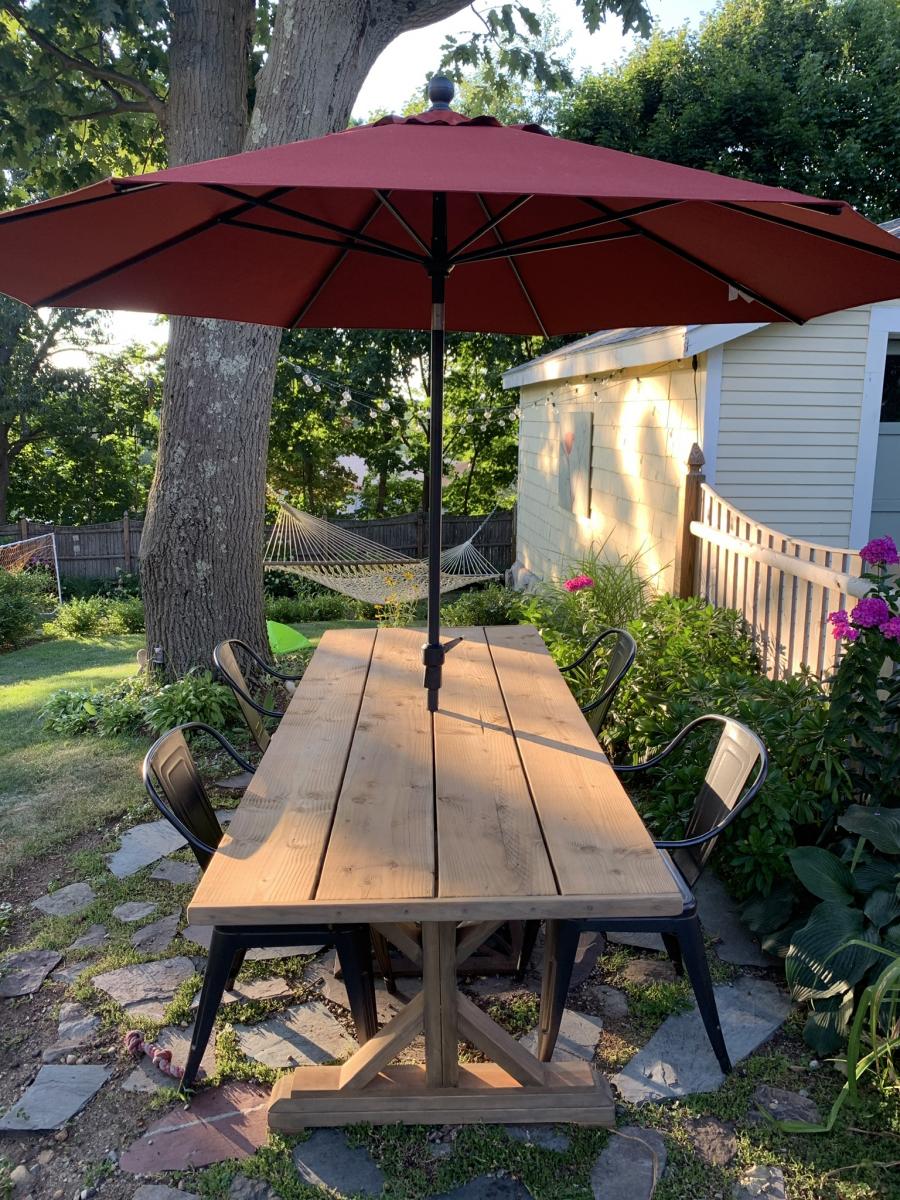
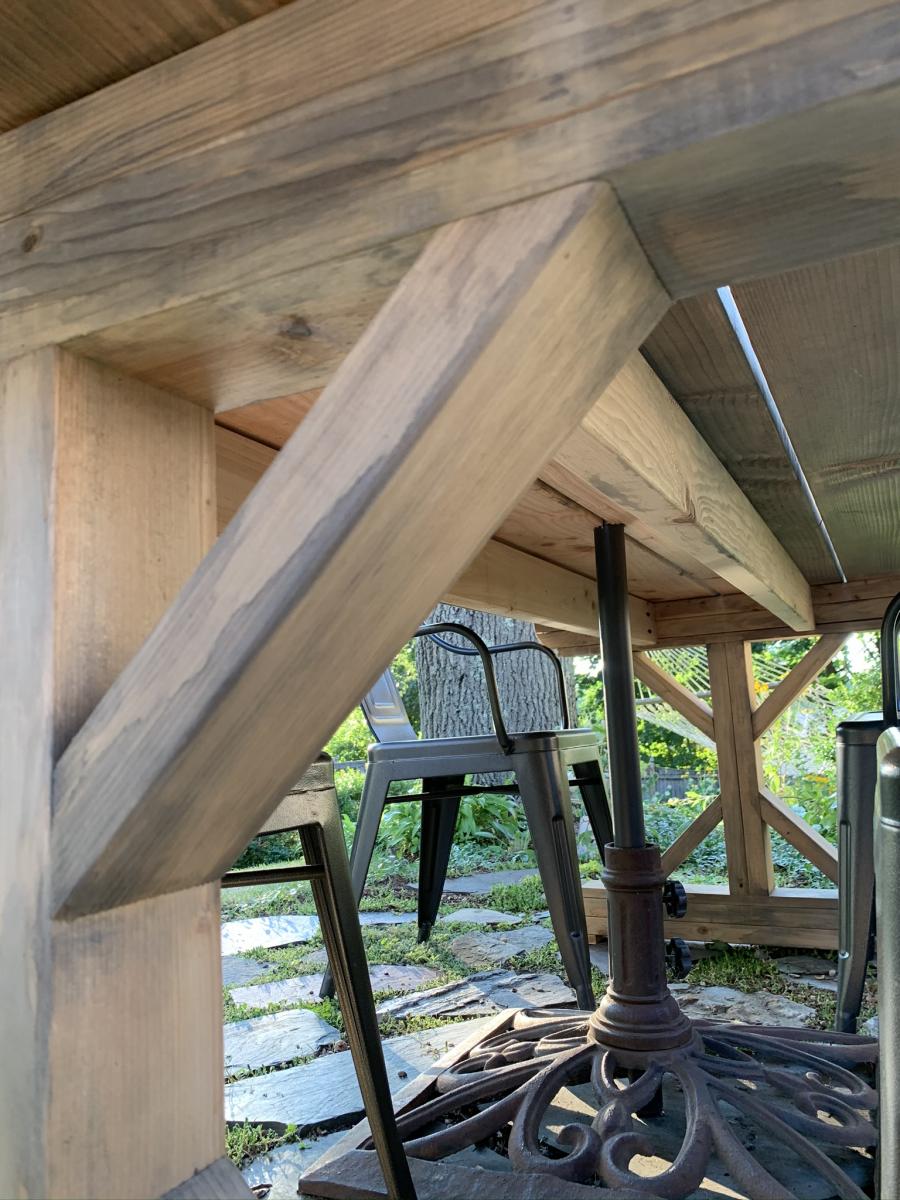
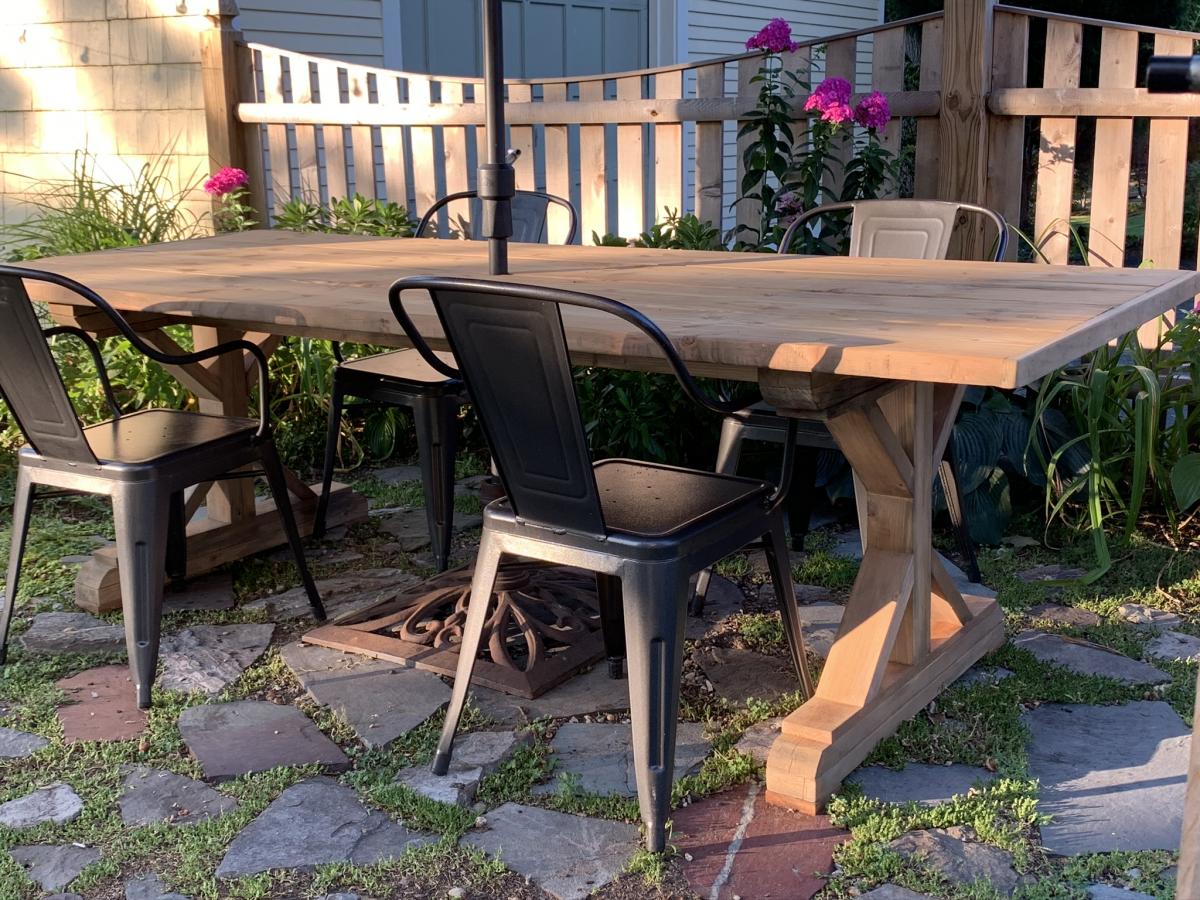
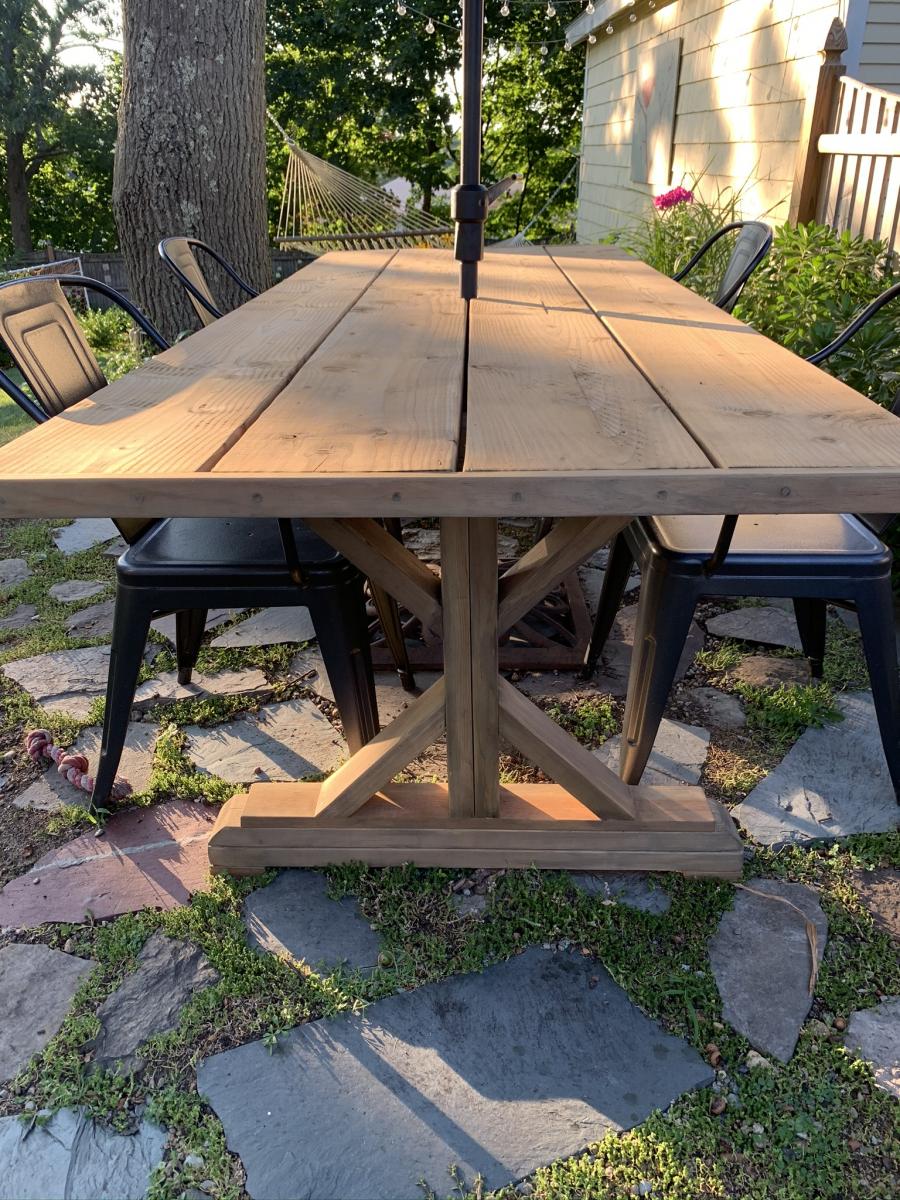
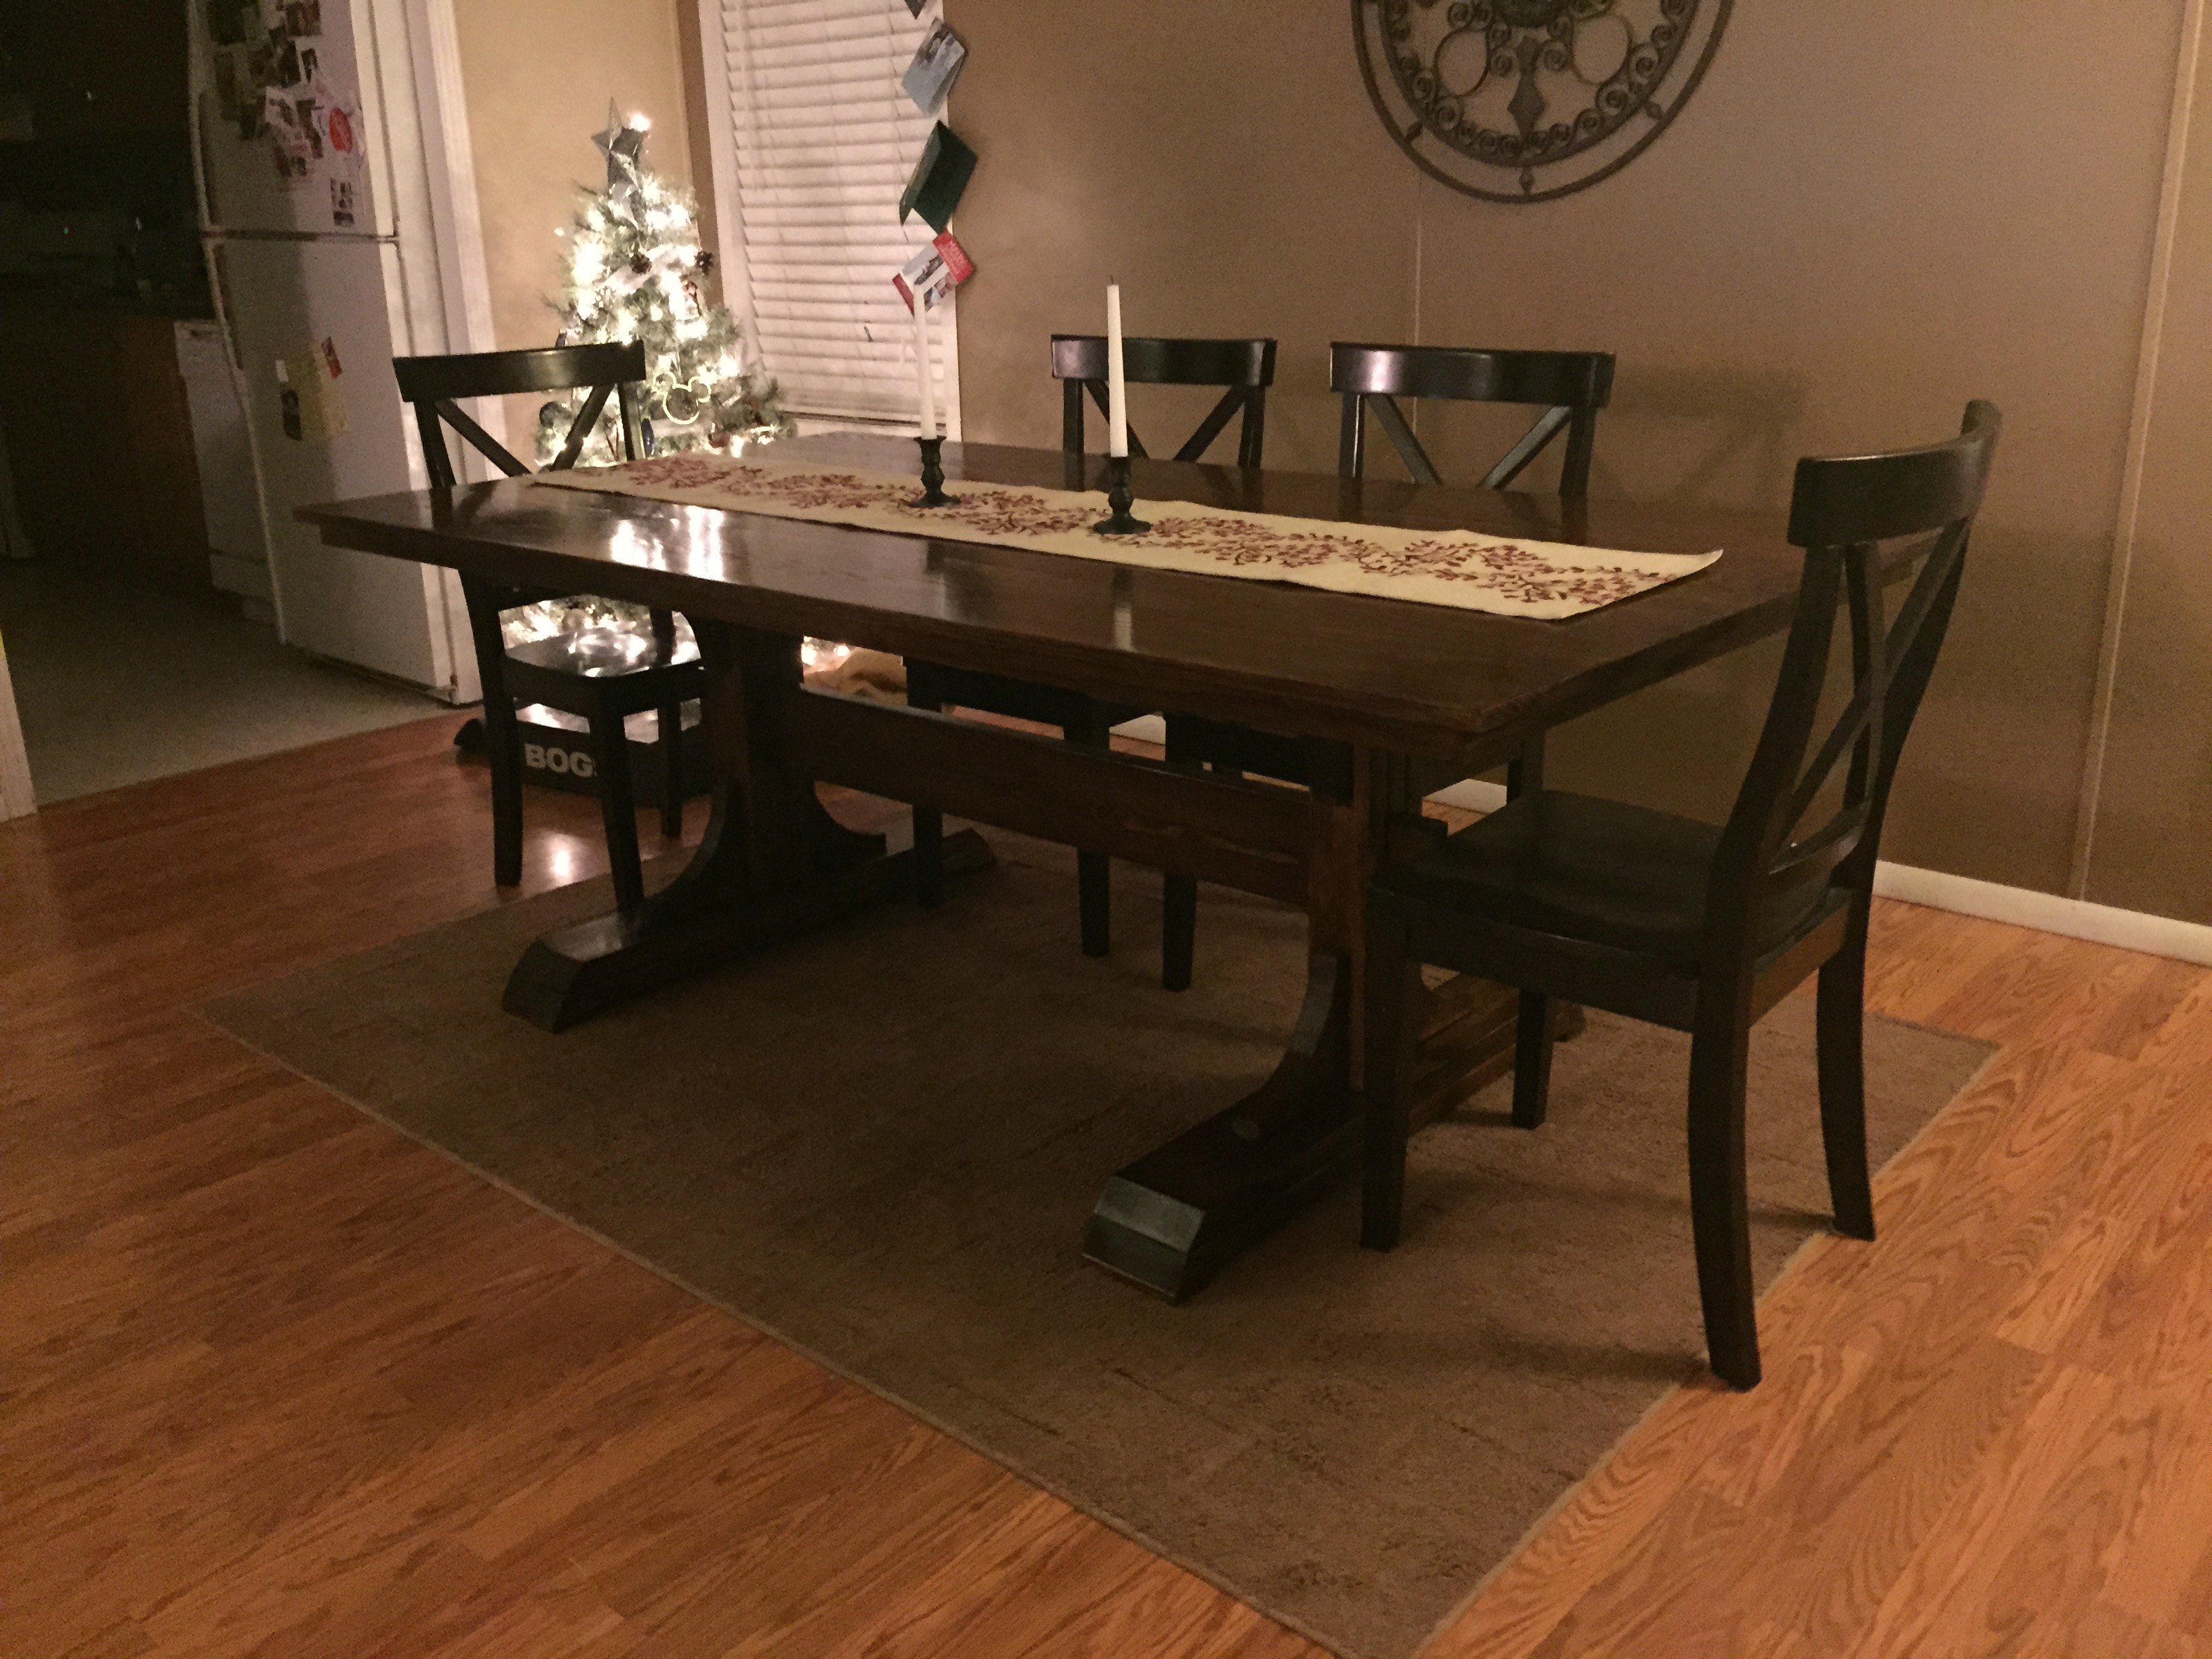
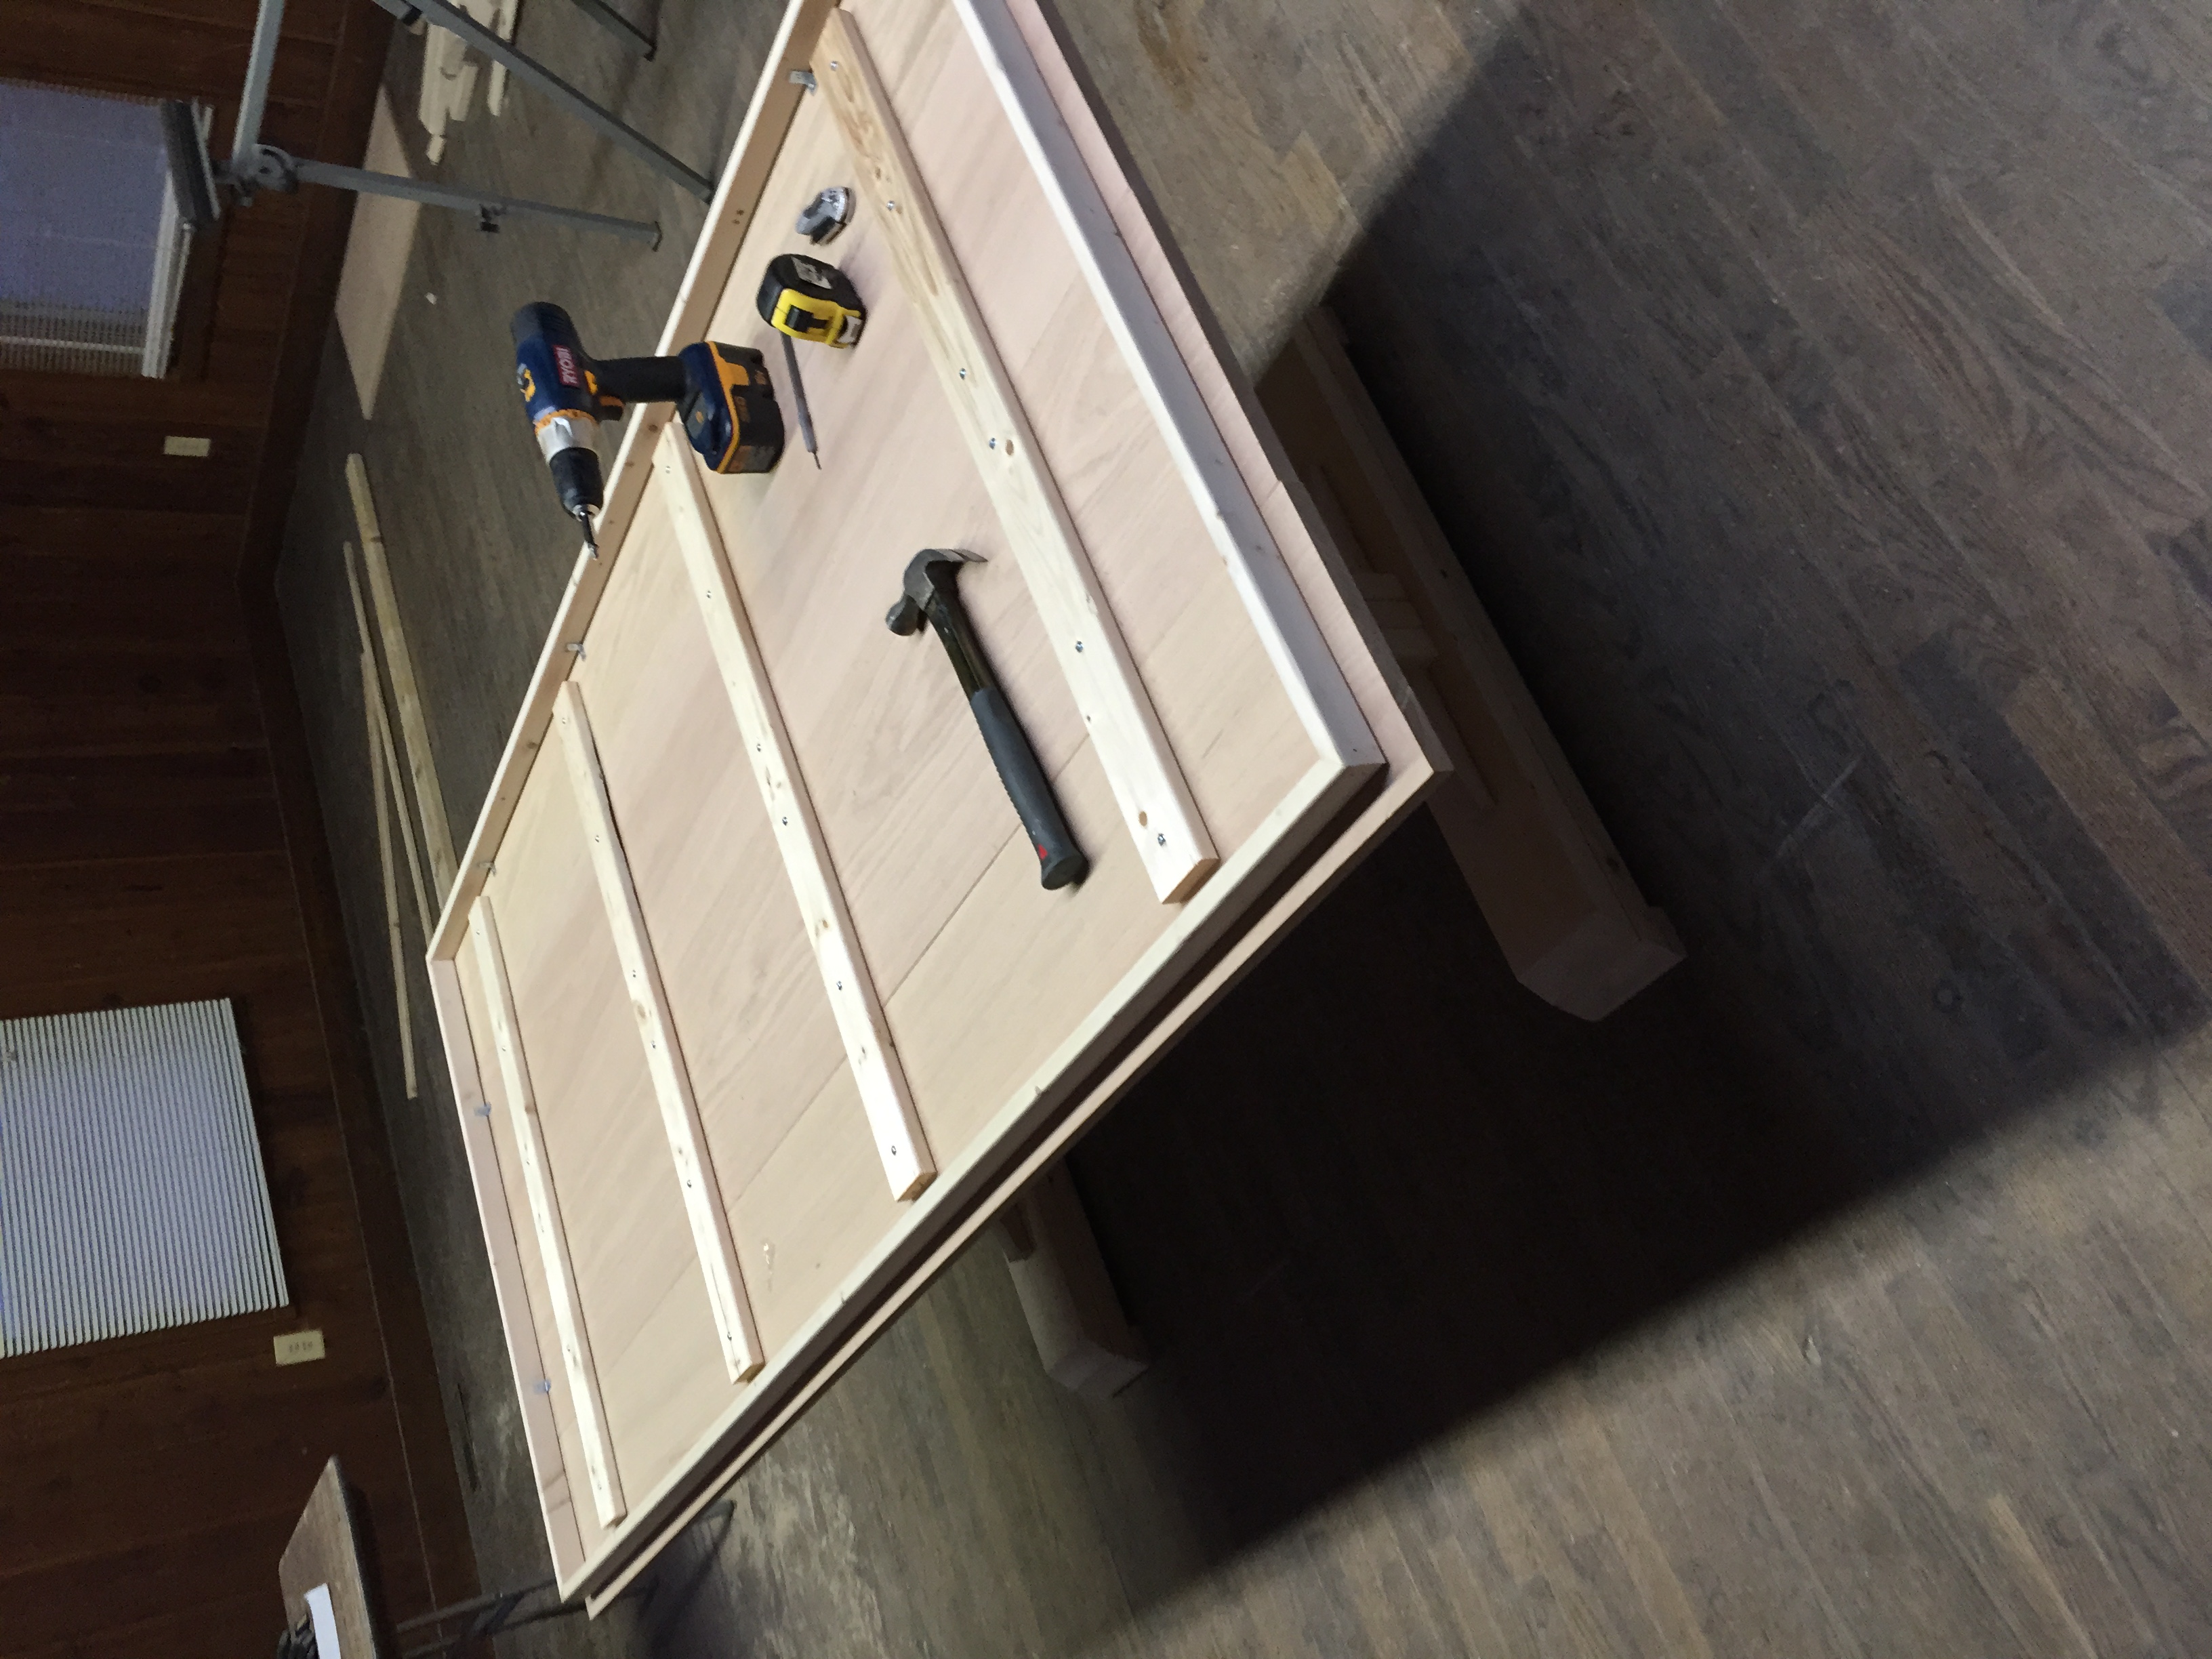
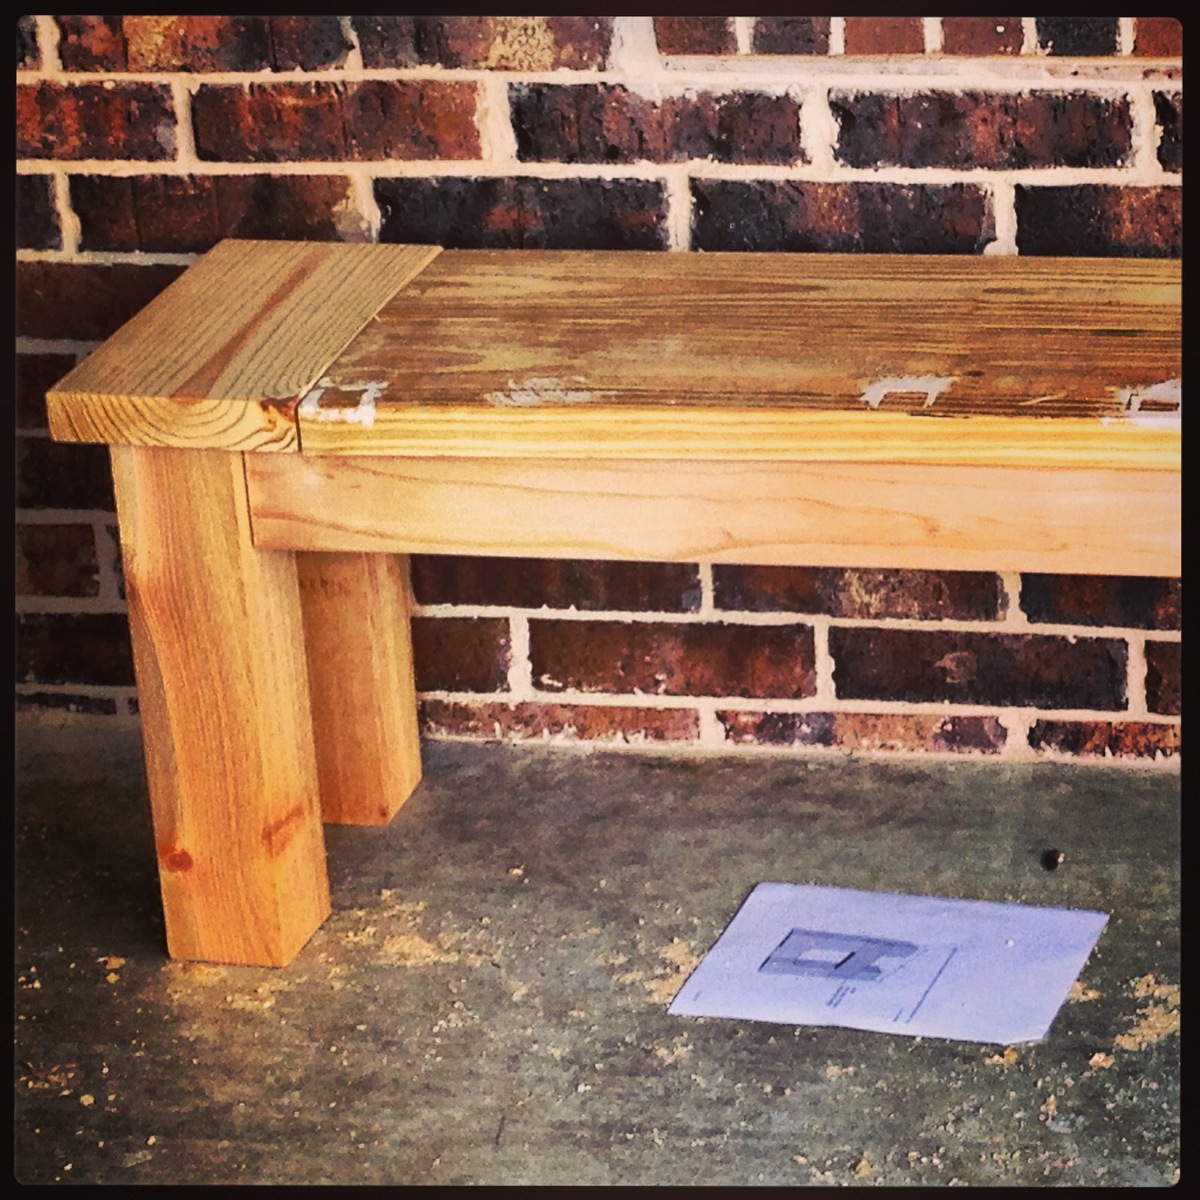
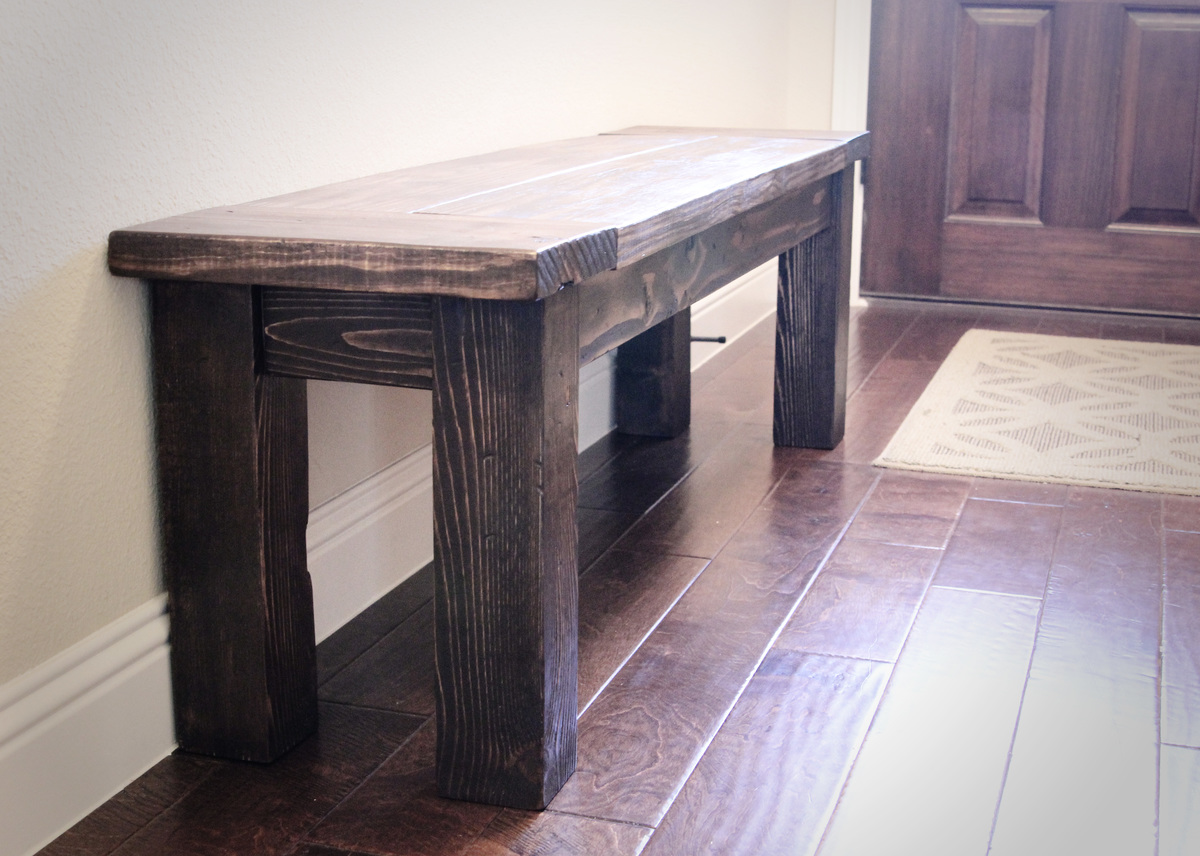
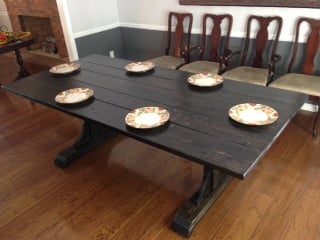
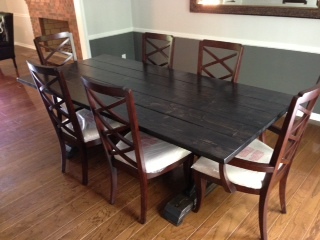
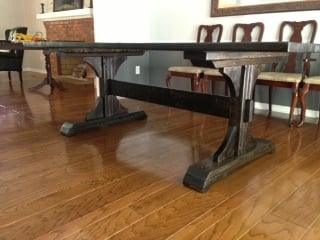
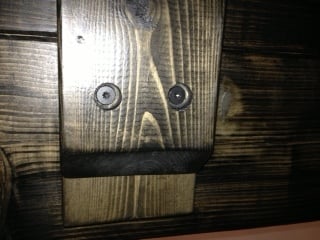
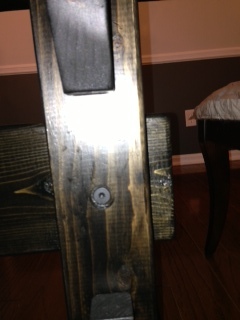
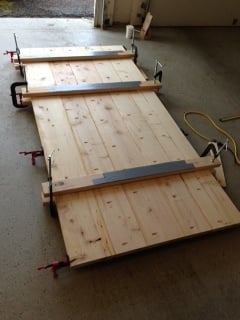
This was my first build and I had a blast! Let me say at the outset that if I can build this table with limited tools and expertise, then so can you! What I lack in know-how, I made up for by not being afraid to try something new. If you do the same, you can sure build this table. This table combines Ana's Triple Pedestal Dining Room Table (pedestals from this plan) and her Farmhouse Table (tabletop modified from this plan). Because Ana's plans are so great and thorough, I will only make note of a few key areas where I either tried something different or where I recommend paying extra close attention. First, on the tabletop, I reduced the length to 90 inches to accommodate our space, and therefore eliminated the center pedestal. As you can see, I alternated 2x10's and 2x8's. I also eliminated the breadboards simply because my wife and I preferred the rustic plank style. I also moved the pedestals in to allow a full 15 inches for a chair to slide underneath. When constructing the tabletop, I used both glue (clamped) and pocket holes on the underside. Don't overdo the glue, as it will tend to drip down (which is the top of the table...I had some drip issues). I also strongly recommend buying/borrowing clamps to keep the top flush or making them from 2x4's as I did. I worked hard on this part, and I'm glad that I did. It was still hard to keep it flush. On the pedestals, I used slightly bulkier decorative pieces (I started the arcs 1.25" from the edge on both ends of the arc). I also attached the top plank directly to the underside of the tabletop rather than to the top of the pedestal in order to both bolster the tabletop and to more easily attach the pedestals precisely where I wanted them. Finally, I drilled shallow flat-bottom holes and used wood bolts to fasten both the pedestals and the crossbeam. This created a nice-looking, low-profile fastener that still enables disassembly should we ever need to move the table (it is HEAVY fully assembled!). The finish is two coats of Minwax Ebony Wood Finish (pre-treated with Minwax Wood Conditioner) and three coats of Minwax Fast-Drying Polyurethane (two coats on pedestals). Thank you, Ana, for the inspiration! Our family has a new table because of it! Thanks to all of you for sharing in our excitement, and I'm happy to share dimensions/details/etc should it be helpful to anyone.
Wed, 05/01/2013 - 09:16
Nice job! I really like all your modifications. I'm bookmarking this!
Wed, 05/01/2013 - 12:56
I love what you did with the "arcs" (gotta be careful with words synonymous with this - the word "arches" makes me cringe since I had to rip arches out of nearly all the doorways in my house ;-))! Not sure that I'll ever get around to using this idea, but I must say that I love it!
Thu, 07/18/2013 - 05:17
Beautifully done, I like the modifications. Could you please share the dimensions and any detail info please…much appreciated.
Mon, 08/19/2013 - 10:41
Thanks for the kind words. I think I included all of the measurements that differed from the two plans used, but is there a specific measurement(s) that you are looking for? If so, I'd be happy to provide it. Good luck!
Sun, 03/09/2014 - 17:23
Could you give me some sizes on the bottom posts? Cuts of 2x4's for the posts etc..
How far apart did you mount the 2 pedestals? We will be putting it in front of a corner bench.
Thanks
Sun, 03/09/2014 - 18:47
The uprights for the pedestals are 22". When you add in the tabletop, the four lateral pieces, and the feet, the table is 30 1/4" tall. As for the spacing of the pedestals, I chose to allow 15" from each end for the chairs to slide all the way under. But it's plenty stable and you really have plenty of freedom here, depending on how many chairs you want to use and how long your table will be.
Mon, 08/03/2020 - 07:25
I have used this plan to build 2 tables and they are both awesome!