Community Brag Posts

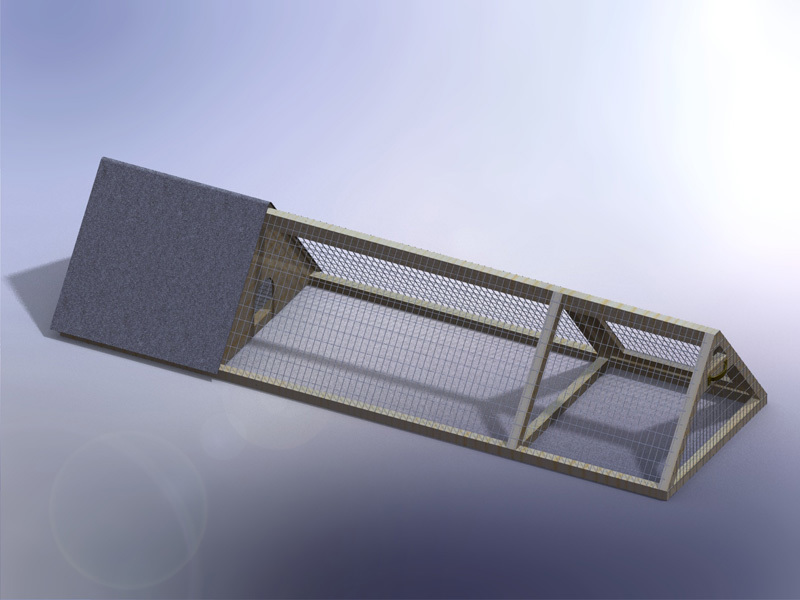
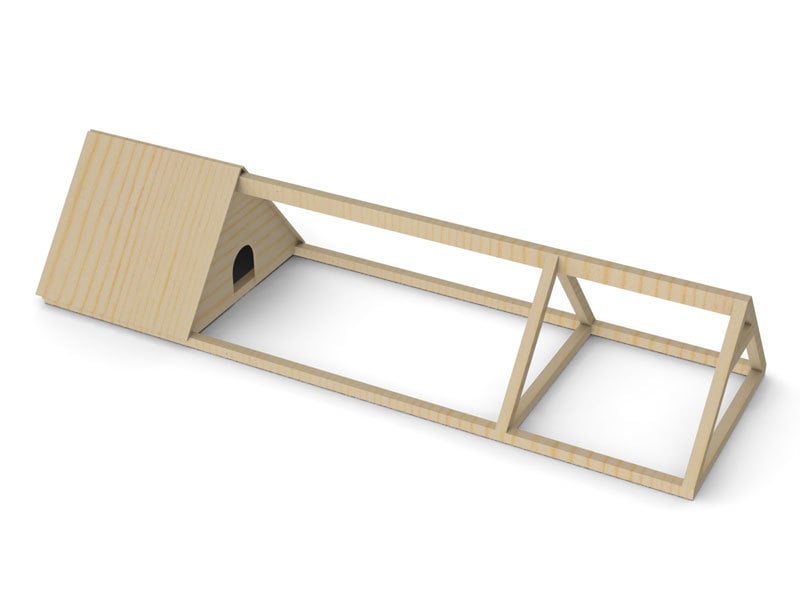
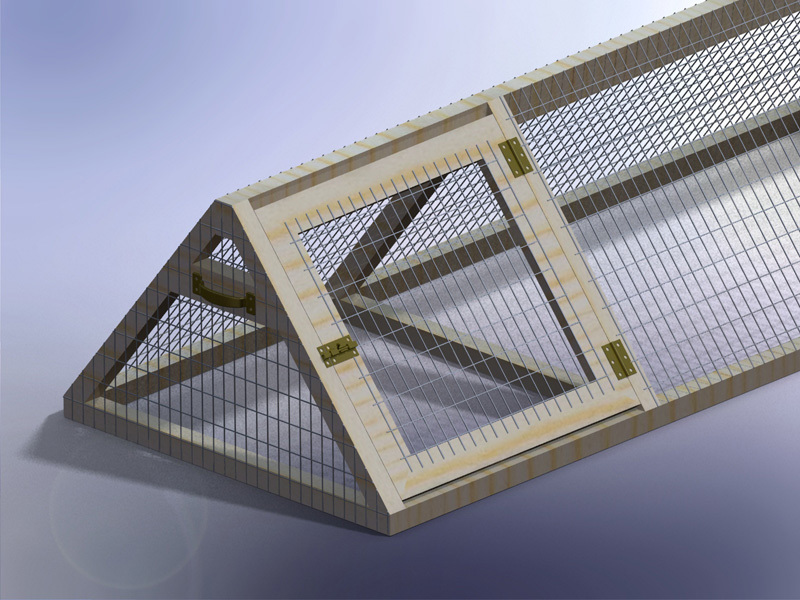
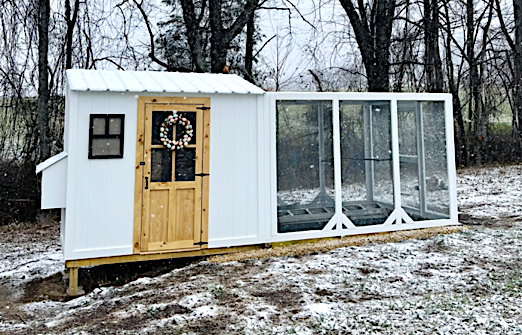
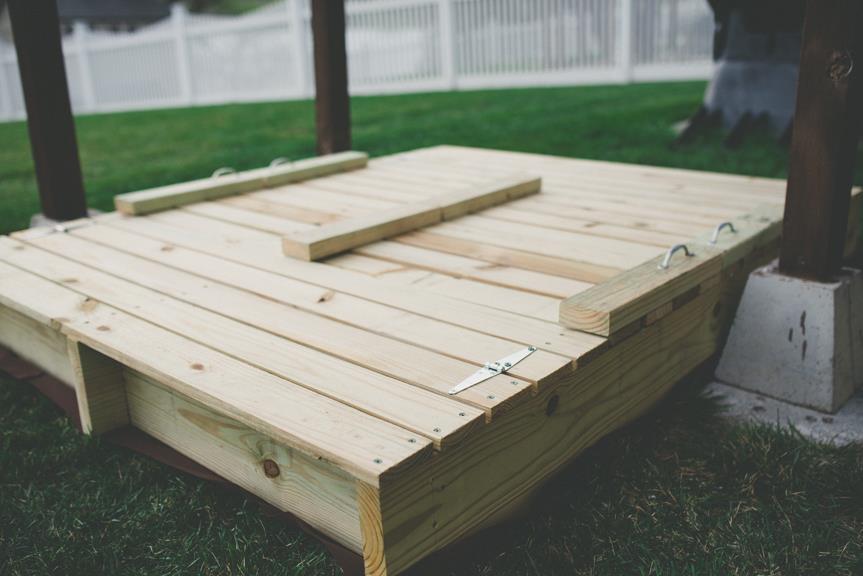
Triangular Rabbit Hutch

Submitted by Medeek on Fri, 05/03/2013 - 18:14

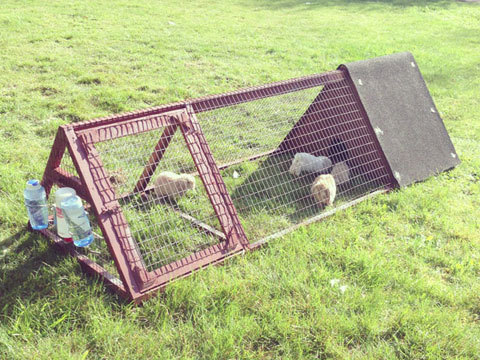
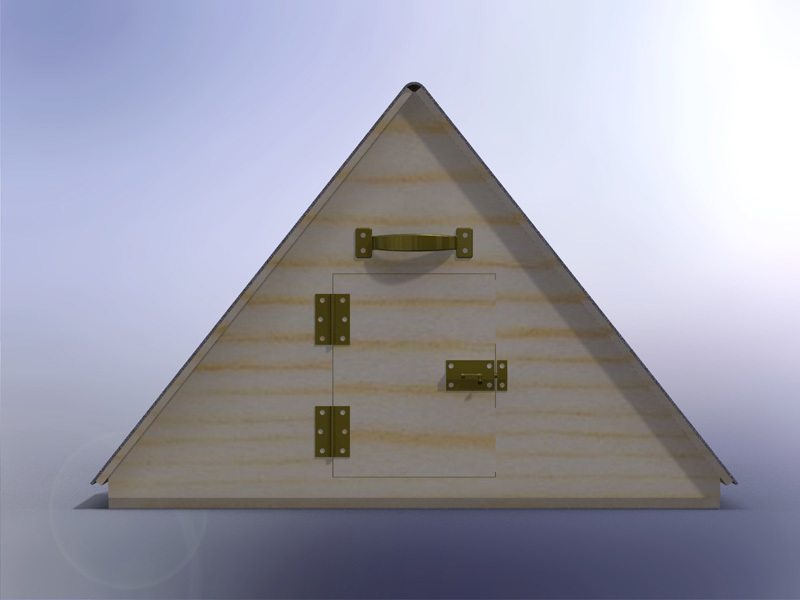
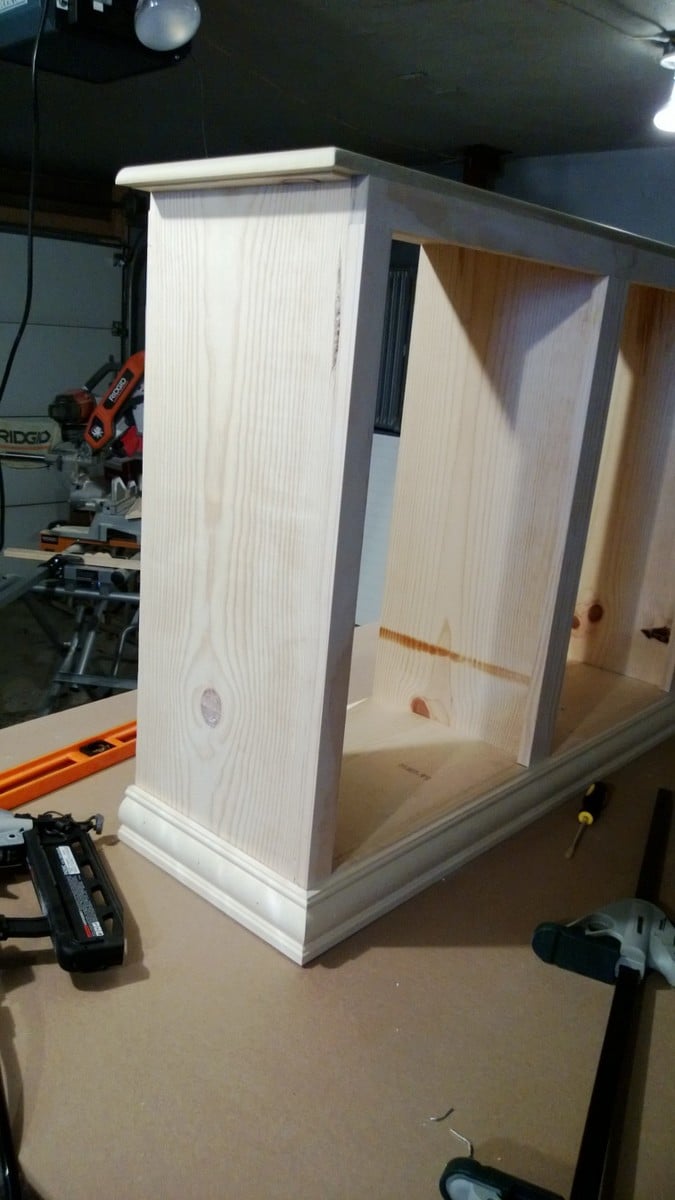
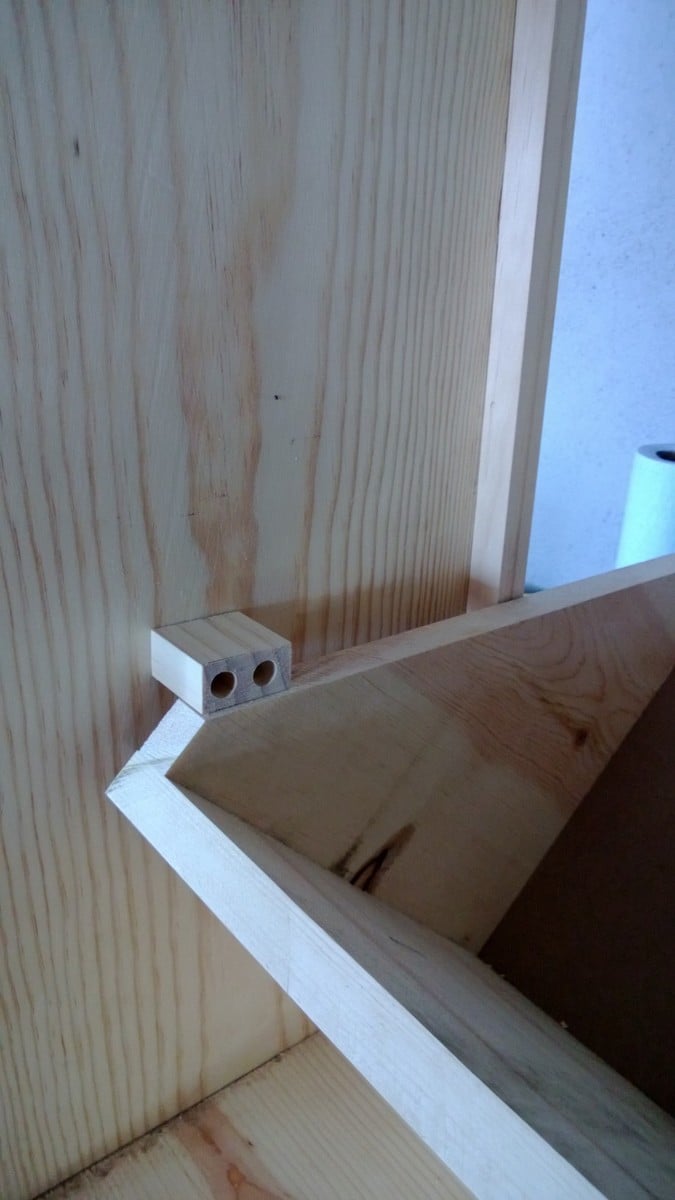
This is a rabbit hutch I created for my kids 5 rabbits. The thing that makes this hutch really nice is if you have a large lawn you can just move the hutch a little bit every day and the lawn gets mowed, fertilized and you don't have to worry about cleaning up all the rabbit droppings. I also mounted a rabbit feeder on the inside of the house door to keep the food dry, which has worked really well.

Here is a short blog of all the steps in its construction:
http://design.medeek.com/gallery/RH3080_COPALIS_2013/RH3080_COPALIS_201…

Estimated Cost
150
Estimated Time Investment
Day Project (6-9 Hours)
Finish Used
Exterior Paint brush or spray. Choose your color.
Recommended Skill Level
Beginner

Comments

Medeek

Sun, 05/05/2013 - 01:52

I apologize I haven't got the completed planset up for this project yet but I will try to get it up in the next couple of weeks as well as a very complete materials list. You will need to go to a farm/feed store to get the correct 1"x2" wire and 1/2"x1" wire for the floor. Do not go to Home Depot and use the cow wire they have or the hardware cloth for the floor, neither of which are the correct choice. Home Depot has the lumber but not the wire. If you have any questions or even improvements to my design I would be interested in hearing from you.

Medeek

Sun, 09/13/2015 - 19:18

Finally got around to uploading the plans.  I still need to create a material list for this plan but the basics are there now.   We've had rabbits in it for about a year but recently we've tried some guinea pigs and it works great for that as well.  The guinea pigs can pretty much live off just the grass and dandelions but you do need to move it daily to give them plenty to eat.

Twin Farmhouse Bed with Trundle

Took the farmhouse plan and added a Trundle.   Was initially going to build two farmhouse beds for my two girls, but thought adding the Trundle would free up some much needed floor space.  The girls love it!

Estimated Cost
$150
Estimated Time Investment
Day Project (6-9 Hours)
Finish Used
Latex paint
Recommended Skill Level
Intermediate

DIY outdoor chairs for our firepit

Here is one of the new chairs I'm building for our new fire pit.  They are made out of four pressure treated 2x6s (and one 2x4), and have a comfortable 18" seat depth, 19" seat width, and 110 degree angle for the backrest.  

More information, and a link to our plans are located on our blog, FamousArtisan.com

Estimated Cost
$50
Estimated Time Investment
Day Project (6-9 Hours)
Finish Used
None yet.
Recommended Skill Level
Intermediate

Comments

Simple jig to save time and increase accuracy

Submitted by Anonymous (not verified) on Thu, 06/15/2023 - 12:13

I downloaded the plans for the octagonal table. I have made several and used a few different woods, made a few minor design changes as well as creating a routine and using a jig or two. This jig fits in between the two boards that form the seat support frame. I used a large paint stick and a scrap piece of 2 x 4. Using a table saw, I cut a groove in the 2" edge, approximately 1/2" deep, this took two passes (pass it through, turn it and pass again), a slight adjustment and another two passes. Insert the paint stick and seat all the way down. Place jig between seat support frame, might be a little snug or use a clamp to hold in place. Adjust so just the paint stick sticks up enough to separate seat boards. With seat boards against the jig, it forms the perfect angle/guide to match cuts. I also used 1/2" spacers to create consistent spacing. Love the various plans you make available as well as your videos.

Comments

Barn Door Console with Drawers

Submitted by Anonymous (not verified) on Mon, 05/06/2024 - 13:27

Being a newby to woodworking, I wasn't sure if I could tackle this build. I saw pictures on your website and decided to give it a try. However, my wife wanted drawers so I made the doors a little shorter in order to add the 4 drawers but keep the height at 36". Thanks for your inspiration. I'm getting more comfortable everyday.
 

Louis Villarrubia


Daughters blue Playhouse

Submitted by rysos81 on Thu, 07/23/2020 - 08:55

I used the basic framing plan for the project, but extended roof overhangs, added engineered siding / trim and cedar shake roofing. I put 2x4 bracing on for the platform.

Estimated Time Investment
Week Long Project (20 Hours or More)
Recommended Skill Level
Intermediate
Seasonal And Holiday

Modern Outdoor Patio Set

Submitted by dlangford on Sat, 09/05/2020 - 16:08

Built this over the weekend for my girlfriends sister. It was a great project and the whole family was able to work together on it, sanding and waterproofing it before assembling. The loveseat plans need a little tweaking. We ran ran the slats the same direction as the chair plans call for so we added a middle support for extra stability. We also pitched the seating down towards the back by 5* to make a more natural sitting position.

Estimated Cost
$300
Estimated Time Investment
Weekend Project (10-20 Hours)
Finish Used
Behr Cedar Natural Tone Waterproofing Stain and Sealer
Recommended Skill Level
Beginner
Seasonal And Holiday

Media Cabinet

Submitted by scidster on Sun, 04/14/2013 - 10:35

Modified the size to be 42" (w) x 16" (d) x 19" (h). Used radiator covering grate for door inserts and left shelves open for horizontal component storage.

Built from Plan(s)
Estimated Cost
130
Estimated Time Investment
Week Long Project (20 Hours or More)
Finish Used
Behr Swiss Coffee and minwax polycrylic top coat. Applied using Wagner HVLP sprayer (#518080). Pulls from Hobby Lobby.
Recommended Skill Level
Beginner

Closet shelving for sloped ceiling.

Submitted by kellystern on Mon, 01/09/2023 - 16:22

I used Ana’s Shelf Help Configurator to build these shelves for a deeply sloped ceiling. None of those well known Closet Organizer Companies could come up with a decent plan for this closet and they charge a small fortune.

Comments

Industrial Bookshelves

Submitted by Jodiah on Thu, 10/31/2013 - 14:20

It took a long time to compile all if the parts for these shelves. I searched the Internet for affordable cast iron castors. I ordered all of the black plumbing fixtures from a local hardware store. I bought 2, 16 foot 2x12's and cut them up, sanded them and stained them.

Estimated Cost
$250./ shelf
Estimated Time Investment
Weekend Project (10-20 Hours)
Finish Used
Min wax Early American stain, min wax Polycrylic protective finish.
Recommended Skill Level
Intermediate

Comments

Three Bin Laundry Sorter

Submitted by Meyer1120 on Mon, 01/21/2013 - 21:10

Modified the original plan to meet our needs of a laundry sorter. Had problems with the hinges so ditched them. I used dowels with a combination of a chamfer cut on the bottom of the door. Dado-ed the trim on the doors and slide the bead board panels in. The face frame is all held together with pocket hole screws, which I highly recommend because it eliminates nail holes and keeps the face frame square. This was my first wood working project, took me a little long to get it done. Thanks for looking.

Modified January 28

So here are some more pictures of my project. I don't really have any good pictures of the dowels. But what I can tell you is, I drilled holes through the sides of the face frame and the trim pieces and then measured where the holes would be in relation to the "drawer". I then drilled holes in the drawers at those measurements, I was careful to not go to deep. I think I went in half an inch. After that I started at one end and placed the dowels in, then put each drawer in. It wasn't easy but with a little patience it worked. The key is to wax the dowels so they will last longer as well. I also am including pictures of the top and bottom trim. On the top the original plans called for an overhang piece and I didn't like the way that looked. I ran the top board an inch long on each side and then wrapped it in quarter round trim. I did this because I plan on adding the Mimi Hutch Top. The bottom was built per the plan, but I ran into a problem with my bottom trim not being level and you could tell. So I raised the whole unit on 1 1/2 legs then placed it on a level surface and again wrapped it in a decorative trim. The key on both trims was a nice miter joint. Last picture I added was of my stoppers. I took scrap from the 1x2 trim and cut them to an inch and a half or two (can't really remember), then using the Kreg Jig drill bit drilled recessed holes. I then opened the doors until the side 45s were level then mounted the blocks on each side. I feel that it is better than a chain or string catch. Again thanks for looking and I hope I answered all of your questions.

Estimated Time Investment
Week Long Project (20 Hours or More)
Finish Used
Primmer and paint
Recommended Skill Level
Intermediate

Comments

moosmani

Tue, 01/22/2013 - 11:29

Dowels! What a great idea! Would you mind sharing how you did it? Could you possibly add some pictures showing the dowels? You did a great job. It looks beautiful.

mullid1

Thu, 01/24/2013 - 09:27

I love what you have made! Could you post pictures of the top and the bottom trim? I'm very impressed that this is your first project!

mullid1

Tue, 01/29/2013 - 09:12

Thank you for the photos and new instructions! You're awesome!!!

VLT

Fri, 03/15/2013 - 12:05

This is lovely; I like the trim job you did. Is there a way to post the plans so we can all get to them. I cannot believe this was your first project!

Liz82

Sat, 11/16/2013 - 18:23

I am a little confused. I love the three bin laundry sorter, but everyone is mentioning plans. I am not finding plans for it on the site. Also, what goes in to hold the clothes? There may be obvious answers, but I am not seeing them. I'd appreciate any help you could give.

towering inferno

Tue, 12/02/2014 - 02:58

I've been thinking of working up one very similar to this, also with 3 bins, but I didn't want to use chain either.  Those stoppers will be ideal - do you put them on both sides or is one enough?  Thanks for the share!

Karahd

Sat, 01/24/2015 - 11:29

Hi-

Im not sure if you still have the plans to this awesome project, but if you do, would you be able to share them with me? Ive been looking to make something like this forever, but just couldnt find any help!

thanks,
karah
[email protected]

petemoore

Mon, 02/08/2016 - 07:46

hi im the same as everyone can you send me the build plans with dimensions etc

many thanks

virginie D.

Wed, 03/02/2016 - 14:49

Hi

It's exactely what i need. so amazing. Someone can send me the plan please? I'm so newbie to do tat all by myself without plans. Thanks you.

virginie D.

Wed, 03/02/2016 - 14:49

Hi

It's exactely what i need. so amazing. Someone can send me the plan please? I'm so newbie to do tat all by myself without plans. Thanks you.

ajbreaux

Mon, 05/02/2016 - 14:22

My wife loves this . if its possible could i get the plans and hopefully have time to build it to give to her for mothers day ? thanks 

Kimhubbell

Fri, 12/02/2016 - 11:01

I would also love to have the plans for the 3 bin sorter. I am barely an intermediate so more specifics would be a huge help! Thanks to anyone who could help.

lworthy

Mon, 07/10/2017 - 04:19

 I absolutely LOVE your laundry sorter!!!! You did a fabulous job and the TRIM, WOW amazing!!!! I've searched Ana's website and cant find the plans' could you please email me the plans to [email protected].  I started building my own furinture back in October 2016 and the reward is amazing... Keep up the good work.

Happy Building,

Lisa

woodmama

Tue, 01/16/2018 - 22:18

I'm too new at woodworking to be able to tackle this right now, but would love to download the plans for future. My most successful project so far is a pretty standard bookshelf. I got a free plan, with lots of guidelines and explanations, at https://tinyurl.com/ydeup8lo -- it came with a 440 page guide, "The Art of Woodworking" that has tips and techniques, and am plowing through that right now.

momto3

Wed, 02/28/2018 - 12:53

This is amazing.  I am very new to woodworking.  Could you send me the plans please?  I would be most appreciatative 

Ljohns

Wed, 03/11/2020 - 23:27

I would love to have the plans for the three bin laundry sorter to build for my laundry room. Are the plans available? Awesome work!

Sandbox with Benches

Submitted by cscottrun on Mon, 04/13/2015 - 10:33

We altered the original plan by enlarging the sandbox (approx 5' x 6') which made for wider benches that can comfortably seat an adult.  The benches and back rests are three boards deep instead of two.  We added 2x12 supports under the benches for additional support, as well as another 2x4 support in the middle of the backrest.

Built from Plan(s)
Estimated Time Investment
Day Project (6-9 Hours)
Finish Used
None
Recommended Skill Level
Beginner

Comments

Seasonal And Holiday

Bedside End Tables

Submitted by Grace734 on Mon, 02/05/2018 - 07:38

These are made from the three drawer plans but modified the size to meet our needs and used planks for shelves instead of drawers. Painted white and black gel stain. 


UPDATE FROM ANA - We have received MANY requests for this plan and have created a plan inspired by this post here.

Shopping List (for ONE bedside table) + Tools

  • 1 - 1x2 @ 6 feet long
  • 5 - 1x4 @ 8 feet long
  • 2 - 2x2 @ 8 feet long
  • 1-1/4" and 2-1/2" pocket hole screws
  • 1-1/4" brad nails
  • wood glue
  • Kreg Jig
  • Compound Miter saw
  • Drill
  • Brad Nailer (18 guage)

Cut List (for ONE bedside table)

  • 4 - 1x2 @ 14" - Side panel trim
  • 8 - 1x4 @ 23-1/4" - Side panels
  • 4 - 2x2 @ 27-1/4" - Legs
  • 6 - 2x2 @ 14" - Shelf support
  • 8 - 1x4 @ 17" - Shelves
  • 5 - 1x4 @ 18" - Top

Cut 1x4s and 1x2s with miter saw. Layout side panel 1x4s as shown above.  Measure and cut 1x2 to length.  Nail the 1x2 to the 1x4s, two nails per overlap with glue.  Make sure your side panels are square.  Build two.

Drill 3/4" pocket holes on inside edge of 1x4 ends as shown above.  Cut 2x2s with compound miter saw. Attach to the 2x2 legs with 1-1/4" pocket hole screws.

Set Kreg Jig to 1-1/2" setting.  Drill 1-1/2" pocket holes on end of each 2x2, one per end.  Attach to 2x2s with wood glue as shown above.

Cut 1x4 shelf boards with compound miter saw.  Nail and glue to the inside of the project as shown above.

Cut 1x4 top boards with compound miter saw.  Nail and glue to top with 1-1/4" nails and wood glue.

If you wish to add a back, measure and cut from 1/4" plywood and attach with 3/4" brad nails.

Estimated Cost
100.00 for both.
Estimated Time Investment
Weekend Project (10-20 Hours)
Finish Used
One coat of eggshell white PPG
Two coats of ebony gel stain
Recommended Skill Level
Beginner

Comments

Swing Slide Playset for Grandson

Submitted by shellyward on Wed, 05/20/2020 - 09:22

We are used to seeing our grandson every weekend but during the 2020 COVID quarantine we were unable to do so. Instead, we filled our time building him a swing set for our backyard. He loved it!! We are going to add more to the swing side but the hardware I want isn't available right now (apparently there is a lot of swing set building going on during this time). I look forward to many years of playing on this with our grandson and hopefully additional grandkids in the future... Our cost was pretty high mainly because our first round of lumber came from a local lumberyard that was willing to deliver within a few days (big box was going to take several weeks) and they had what is supposed to be higher end lumber (not sure I am convinced of that)....also, i chose some pretty expensive hardware (brackets) just for the added security.....

Estimated Cost
1800-2000
Estimated Time Investment
Week Long Project (20 Hours or More)
Finish Used
not done yet but will be staining/sealing when the wood is ready
Recommended Skill Level
Intermediate

Comments

Seasonal And Holiday

Rustic X end table

This project was similar to the Rustic X Console.  Recommend building the lower shelf halves before installing so that it's easier to make the bottom flush.  The X's were somewhat tricky....just take your time.  It's easier to cut the piece too big and trim than to add wood to a piece too short.  I stained the top with miniwax special walnut and used a satin poly.  For the bottom, I used the same stain and then painted over it with rustoleum heirloom white.  I lightly distressed it with 150 grit sandpaper so some of the stain would show through.  All in all I am very happy with it!

Built from Plan(s)
Estimated Cost
Approximately $50
Estimated Time Investment
Afternoon Project (3-6 Hours)
Finish Used
Top: special walnut stain and satin polyurethane. Bottom: same stain and painted over it with rustoleum heirloom white. Lightly distressed.
Recommended Skill Level
Beginner

Comments

Kitchen Island

The plans were easy to follow. I modified my island to fit my space and cut it down to 44 inches in length.

Built from Plan(s)
Estimated Cost
The entire project cost $47.00.
Estimated Time Investment
Day Project (6-9 Hours)
Finish Used
I stained the top and shelves with Watco Danish Oil in dark walnut and then used a satin finish varathane for only the top to protect it from spills, etc. The sides and legs were painted with an interior latex paint called "Sandbar" from Home Hardware.
Recommended Skill Level
Beginner

Comments

Emily Jo (not verified)

Mon, 10/31/2011 - 15:33

Your island is gorgeous, and I love the modification you made to the original plans on the shelving support! I would like to know what size the boards are that you used so that I can duplicate. Thank you!

Lisa Tamaye (not verified)

Sun, 02/05/2012 - 18:10

This is great! ANyone know how I could extend one side in order to put stools for an eating area?
Would love to do that!

Alice (not verified)

Tue, 02/07/2012 - 19:43

I would think it would be basically the same build, just add brackets to support the extra wood.

Guest (not verified)

Mon, 03/05/2012 - 15:20

I want to make this Kitchen Island but if can't find the Supply List. Would you mind posting it or emailing me please! This will work perfect in my Kitchen

Katia57

Mon, 03/05/2012 - 17:46

Wow! Just a wonderfully simple project! I can figure it out by looking at it. I have a piece of Rock Maple Counter Top 24"x6'that needs legs. I'll probably use 4x4' for legs, six of them. But the shelves will be just like this. Thank you!

Katia57

Mon, 03/05/2012 - 17:50

Wow! Just a wonderfully simple project! I can figure it out by looking at it. I have a piece of Rock Maple Counter Top, 24in.x6ft., that needs legs. I'll probably use 4x4s for legs, six of them. But the shelves will be just like this. Thank you!

Guest (not verified)

Wed, 04/04/2012 - 11:58

Just click on the link for the instructions. It's under the heading 'About This Project' titled as 'From Plan: Easy Kitchen Island Plans'.

Click where it says 'Easy Kitchen Island Plans'. When you hover your cursor over the words, you will see that is a hyperlink.

Lindsey Adams (not verified)

Sun, 05/20/2012 - 06:48

I love your island and I also have a small kitchen...would you happen to know the sizes of the boards you used? Thanks

??? (not verified)

Wed, 07/25/2012 - 14:31

Yours looks so different and so much better then the one that show how to make it, how did you do it? I really would love to build it but have no idea how...
Thanks so much!

CBsMama (not verified)

Wed, 08/15/2012 - 13:08

This island is perfect. I love the shelves and the size. Any chance you could send me the dimensions of this island and details on how you did the shelves? Great job!

lizzy1299

Mon, 02/04/2013 - 15:03

I'm SO glad I stumbled acrossed your website! I LOVE that island and getting ready to get all the stuff to make it. Did you use the Kreg Jig thing the original person used...? If not, how did you cover the screw heads?

Thanks!

ameliam

Wed, 12/31/2014 - 07:37

Hi, this is my first time building anything. I really like the modification made to the original plans. I like the legs facing the other way. I can't figure out how to modify the cuts on the sides and front and back supports for the top to adjust for turning the legs the other way. Are there modified plans. LOL I need instructions, I’m not quite there yet on doing it myself. Thank you

djbeenie

Wed, 02/04/2015 - 15:03

How did you mount the 1 x2s since its on the side of the 1 x 4s. Did you tac them in. I really like the way that looks. Thanks!

MBuckson

Mon, 03/16/2015 - 08:00

Amazing island! I am in the middle of building this and looking ahead to the finishing aspect of it and I have a question: What tool did you use to apply the oil on the counter top? A cloth or a certain type of brush?

wiri0302

Sat, 06/06/2015 - 18:33

Hello, i love this island but maybe i missed it. What kind of wood is everyone using? Frosting said $47 but that could only be for pine right? Are people using pine to build this? I would like it to look just like the picture. Any help would be appreciated! thanks!

Great Plan for Garage Shelf!

Submitted by edapina on Wed, 11/26/2014 - 07:35

This was an easy project to complete in an afternoon that does not require any advance woodworking skills

Estimated Cost
About a $120 bucks considering that I had to buy all the wood and a box of 2 1/2 In screws!
Estimated Time Investment
Afternoon Project (3-6 Hours)
Finish Used
No finish used.
Recommended Skill Level
Beginner

Comments

edapina

Wed, 12/10/2014 - 09:41

This is my second completed project with plans and ideas from your website. Thanks for your good work!

Modern Outdoor Chair - High Back Adirondack

Modified with a high back and modern adirondack arms.

The base of the chair is built exactly to the plan except that the arms are done in a modern adirondack style.

The back was made independently to fit inside the base and then attached to the plan base.

Very comfortable but very heavy chair even without the modified back.

Not stained yet obviously.

Cushions are hard to find I think I would make it slightly smaller next time and maybe even find the cushions first and alter the plan to fit.

Estimated Cost
$45 Can
Estimated Time Investment
Afternoon Project (3-6 Hours)
Finish Used
None yet
Recommended Skill Level
Beginner

Comments

Easy small space side table

Submitted by Dedavies3 on Mon, 07/07/2014 - 17:57

This was my first project. It was relatively easy but I did make some mistakes that are now design features

Estimated Cost
Reclaimed wood
Estimated Time Investment
Afternoon Project (3-6 Hours)
Finish Used
Minwax English chestnut
Recommended Skill Level
Beginner

Loft Bed w/desk

Submitted by Anonymous (not verified) on Sat, 08/29/2020 - 09:05

Our daughter has been asking us to build her a bed for months now. When eLearning became a reality for our household, we knew it was time to get to work. We usually do two to three big DIY projects a year, and have built from many of Ana White's plans. We often refer our the time together DIYing as "couples therapy".

We used Ana's plans for the Loft Bed and included the tall bookcase and desk system, with a few of our own modifiations and personal touches, such as:
- elimated the plywood backing on the bottom shelves of the tall bookcase
- only used one (1) bookshelf for desk system
- used toungue and groove paneling for back of small bookshelf, adding it to the sides as well
- made the desktop 19" wide
- added a framed magnet board
- added a sliding keyboard tray

Estimated Cost
$600
Estimated Time Investment
Week Long Project (20 Hours or More)
Finish Used
Desktop: Minwax Ebony stain
Everything Else: Zinsser 123 primer & Valspar Cabinet & Furniture Enamel (Snowbound Semigloss)
Recommended Skill Level
Beginner

Comments

Ana White Admin

Mon, 09/07/2020 - 20:33

This is so cool, I'm sure it's a dream come true for your lucky girl!

Building is our couples therapy, sounds like a t-shirt in the making:)

Back