Community Brag Posts
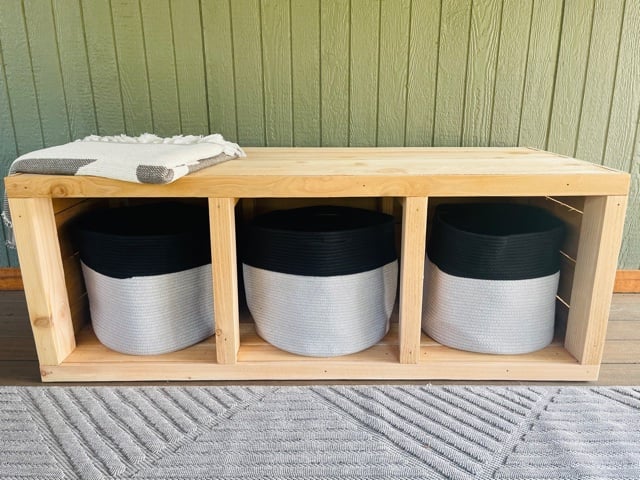
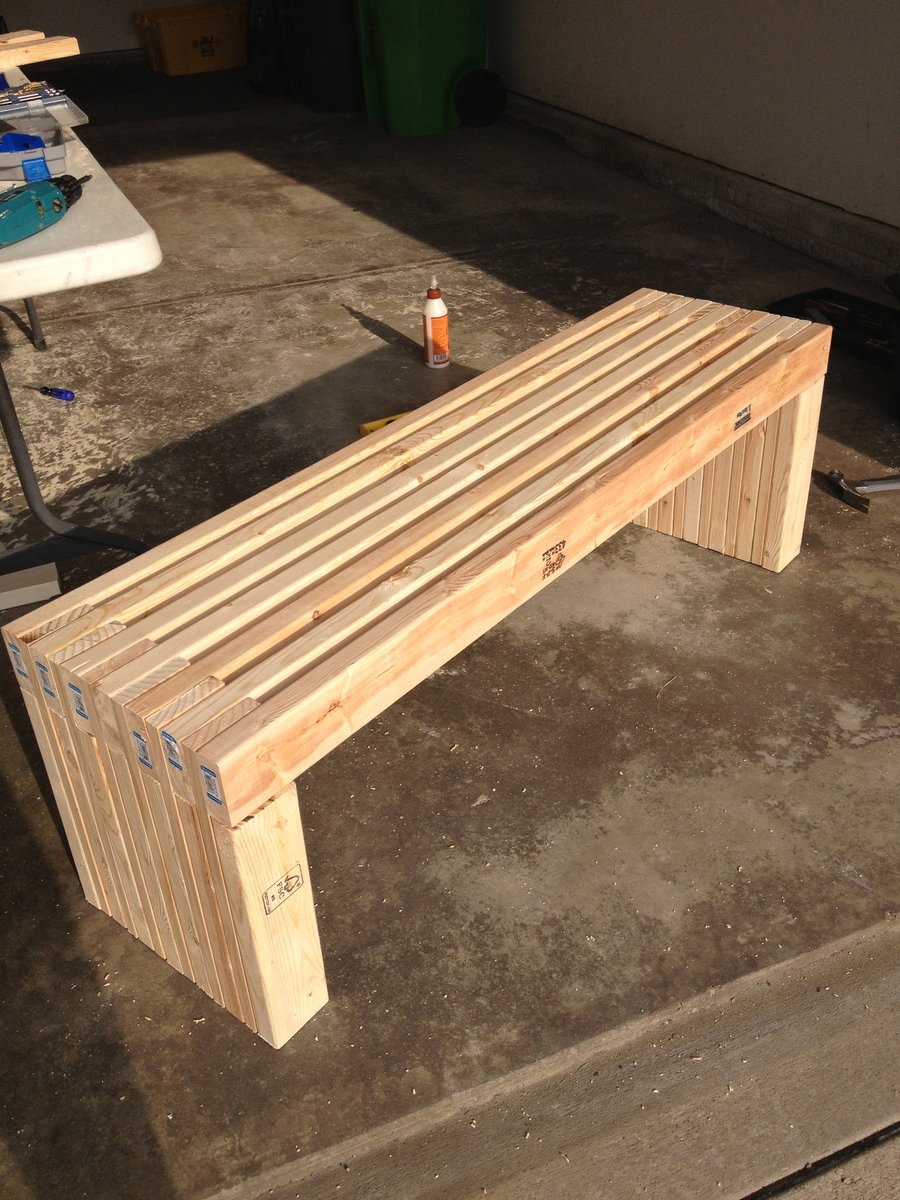
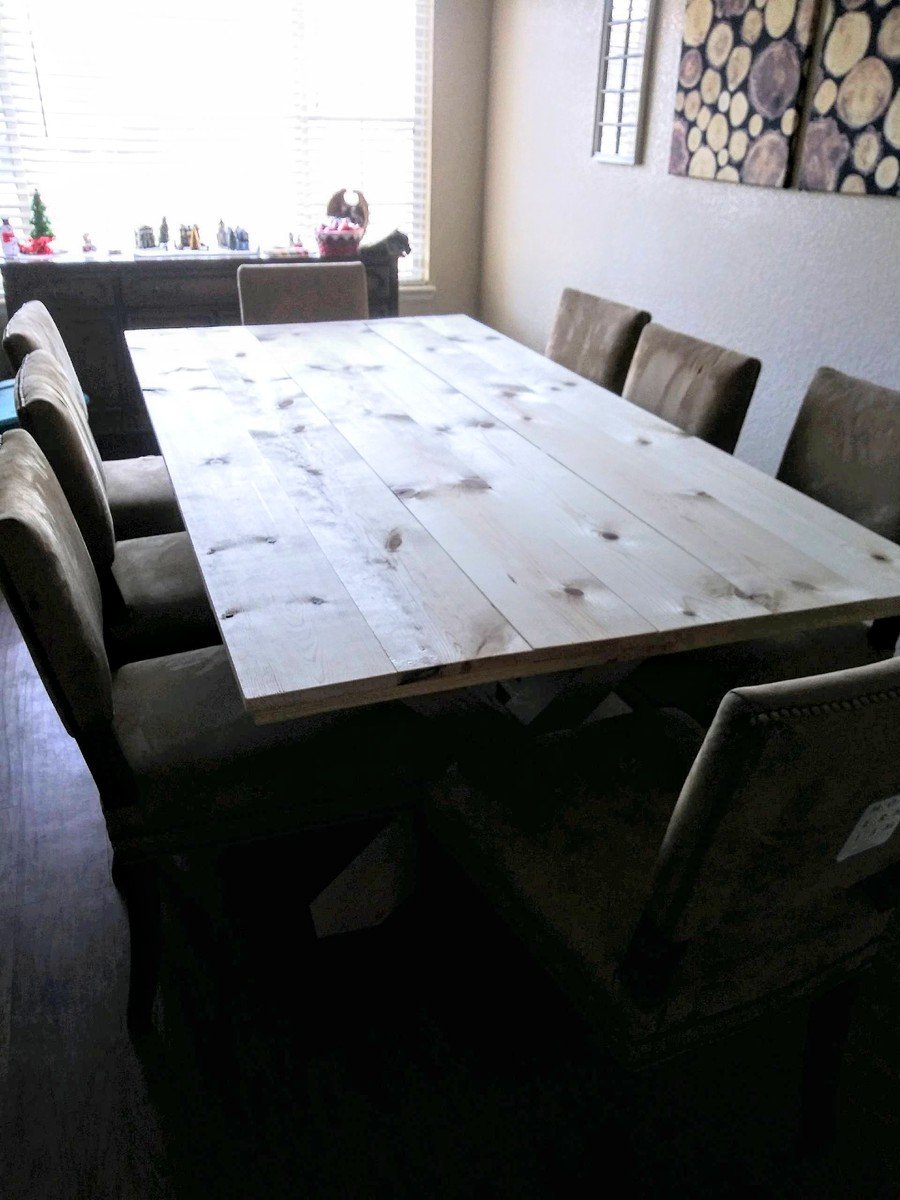
2x4 and Cedar Planked Bench
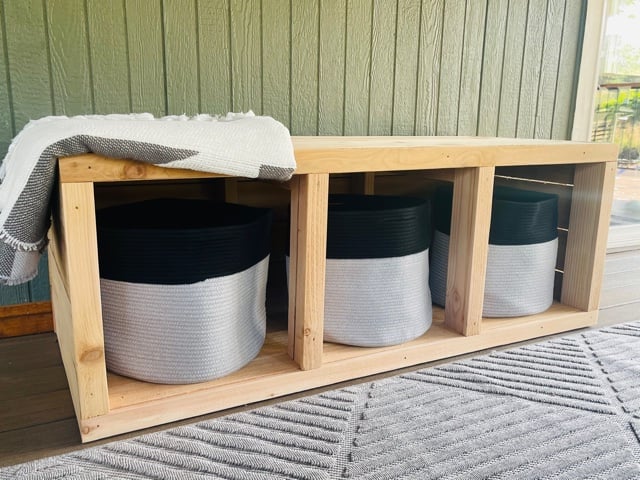
I needed some extra shoe storage just outside our sliding glass door on our deck. I used Ana's easiest 2x4 bench plan with drawers, just left the drawers out and did some extra 2x4 framing. Once the 2x4 frame was built, I wrapped it with cedar fence pickets. This thing is sturdy and pretty much weather proof!

Built from Plan(s)
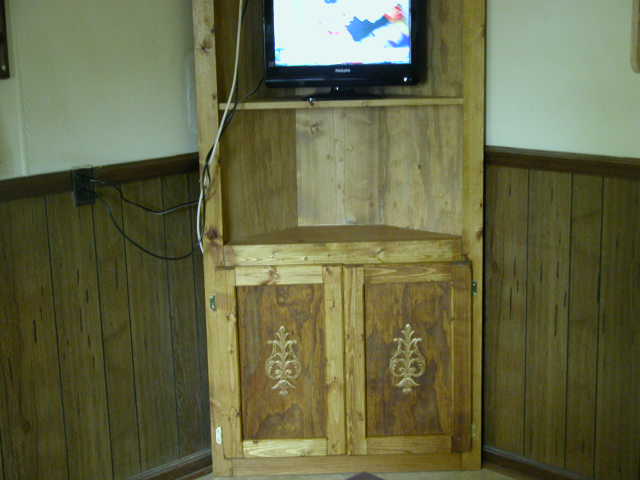
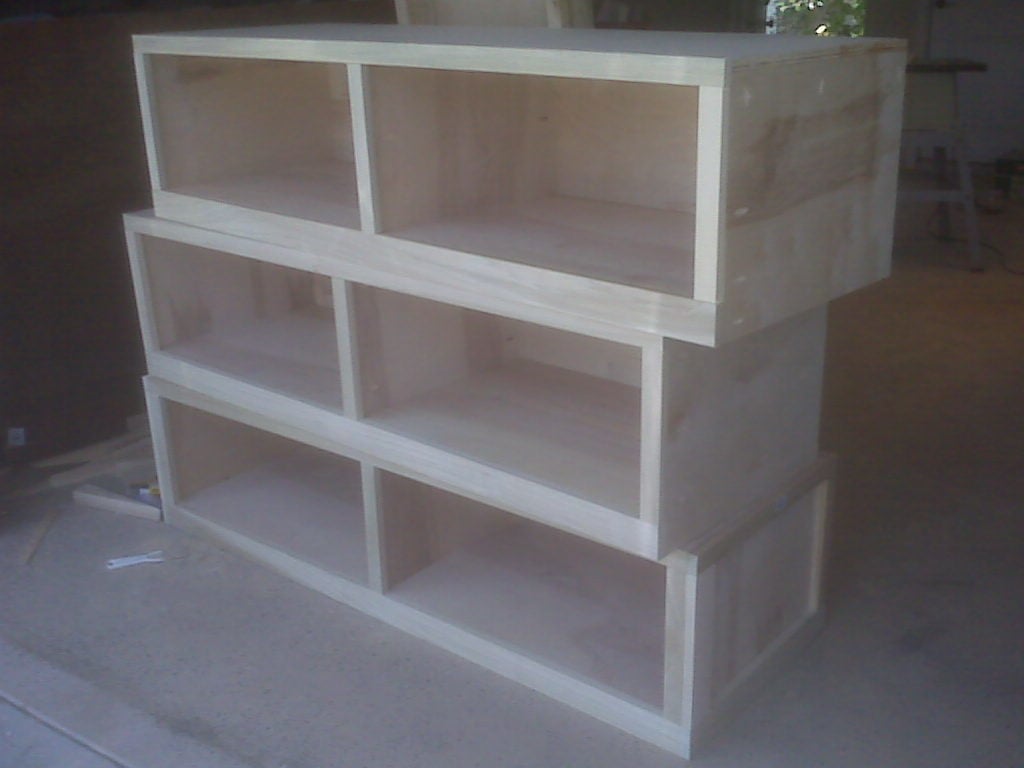
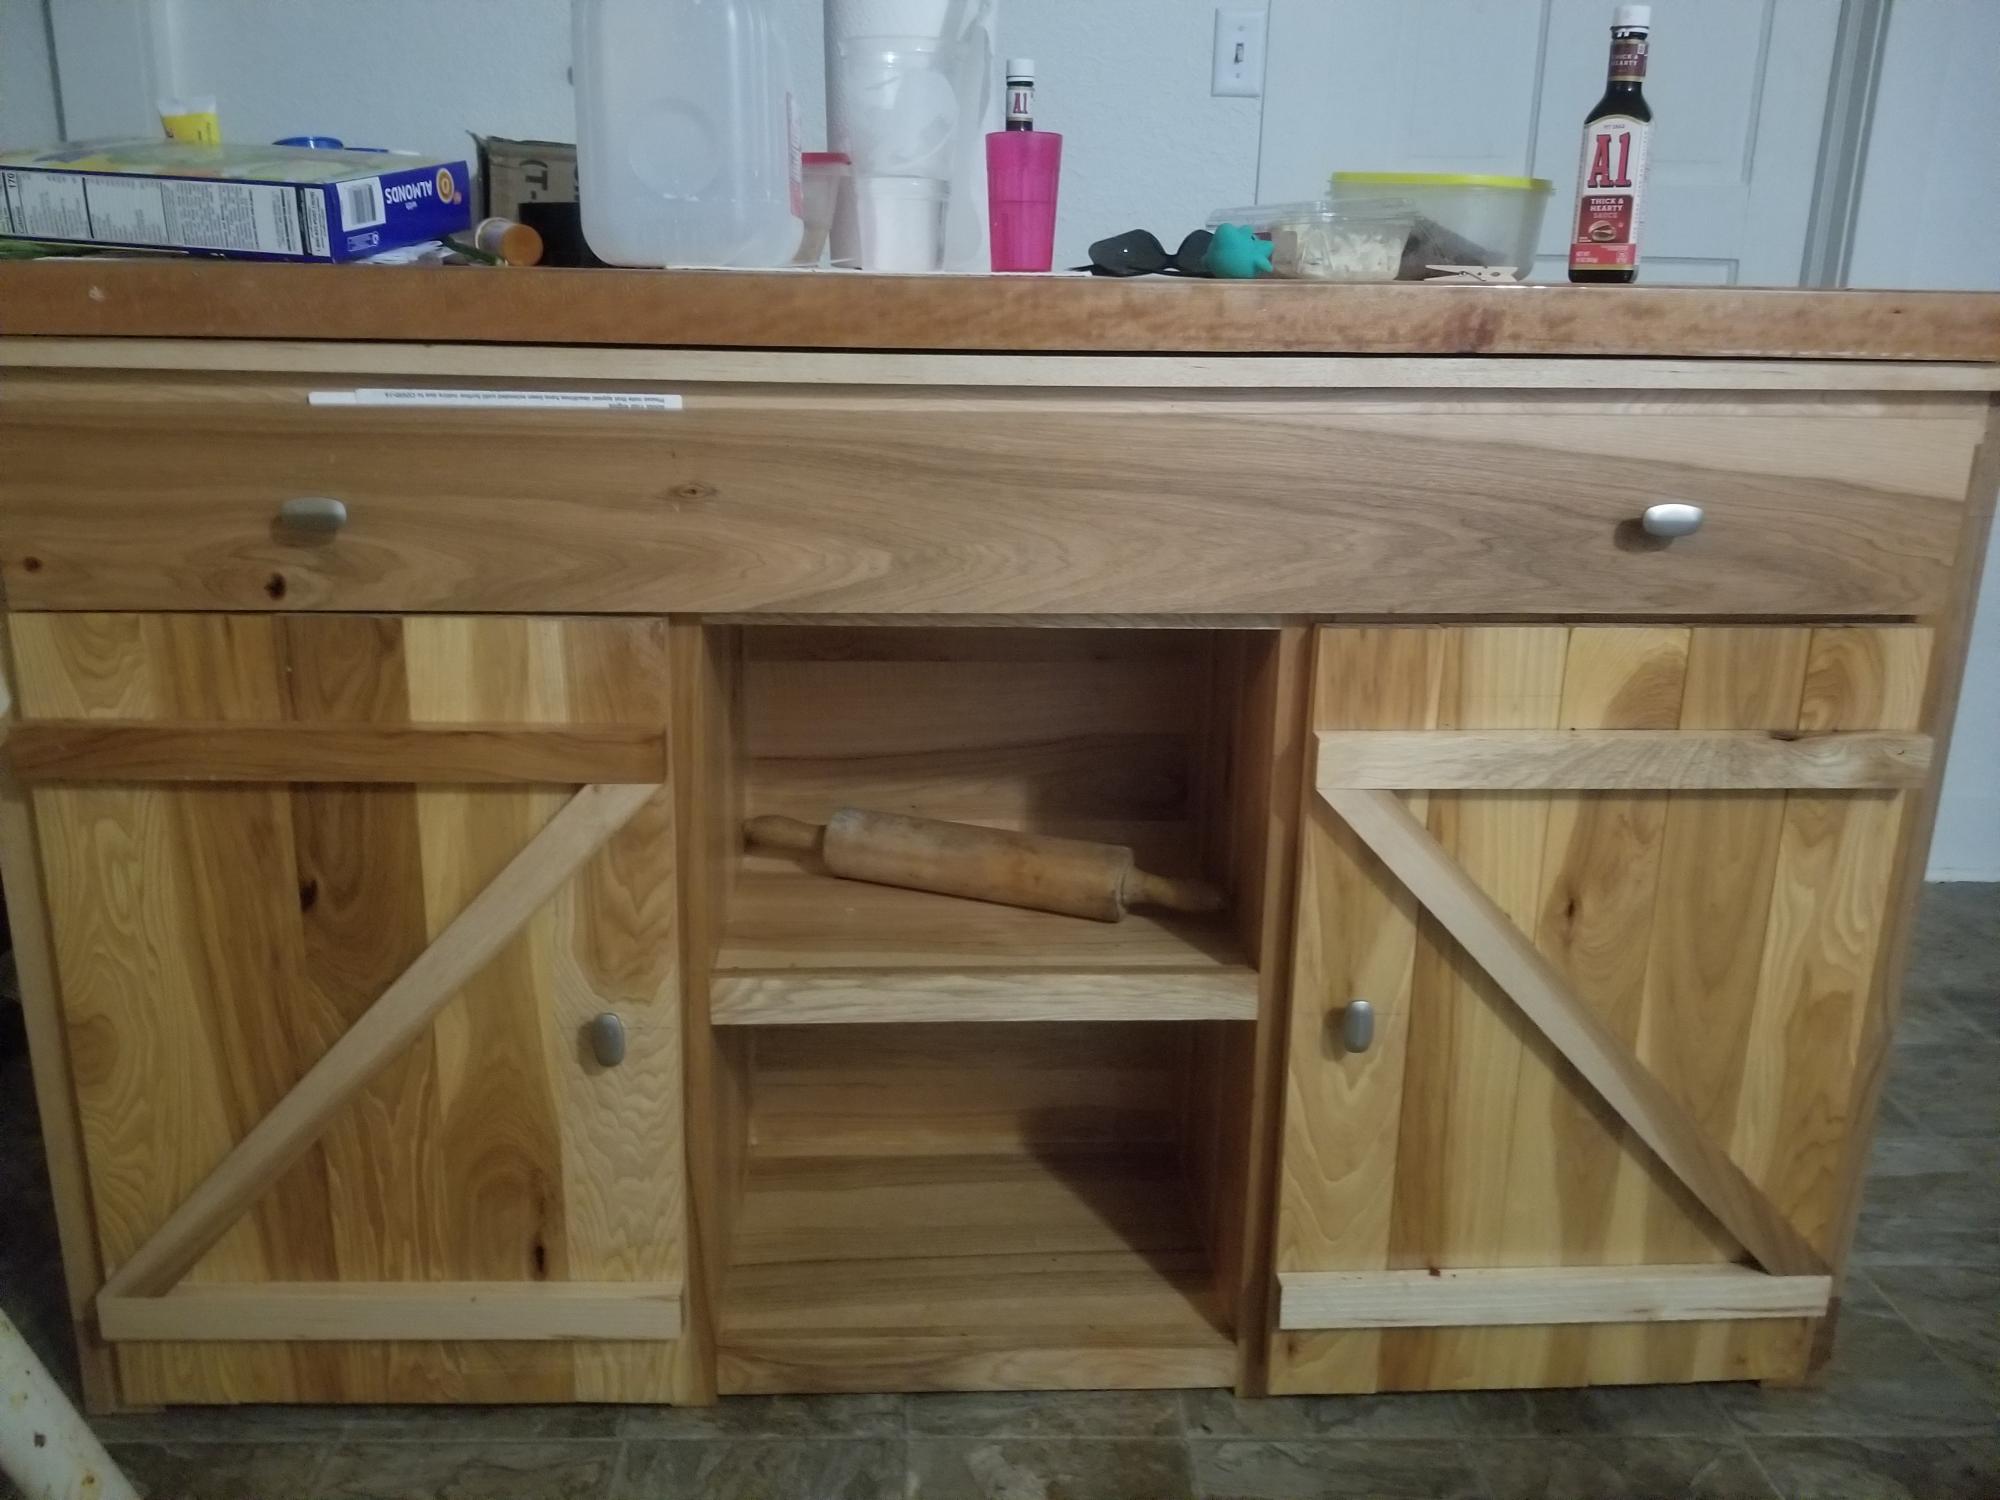
corner cupboard
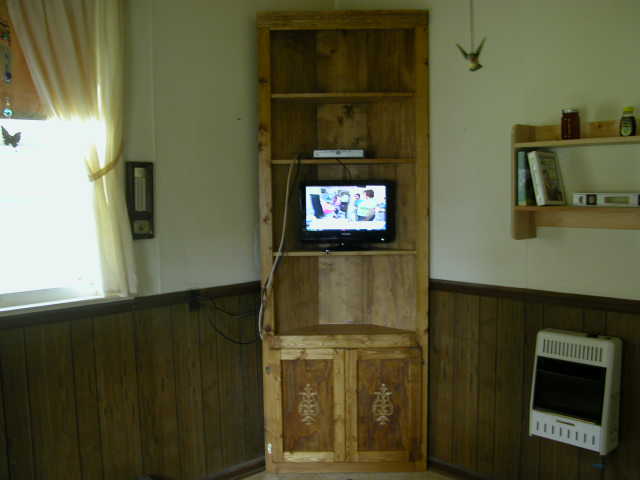
easy to follow instructions. I work in a hardwood sawmill as a sawfiler. I get a lot of wood from the mill. I bought a kreg pocket hole jig for the first time. Building the doors was easy. I'll never use mortise and tenon joints on small doors again. The door ornaments came from Lowes
Estimated Cost
$200
Estimated Time Investment
Weekend Project (10-20 Hours)
Finish Used
golden oak stain minwax nothing else just rub in one coat
Recommended Skill Level
Intermediate
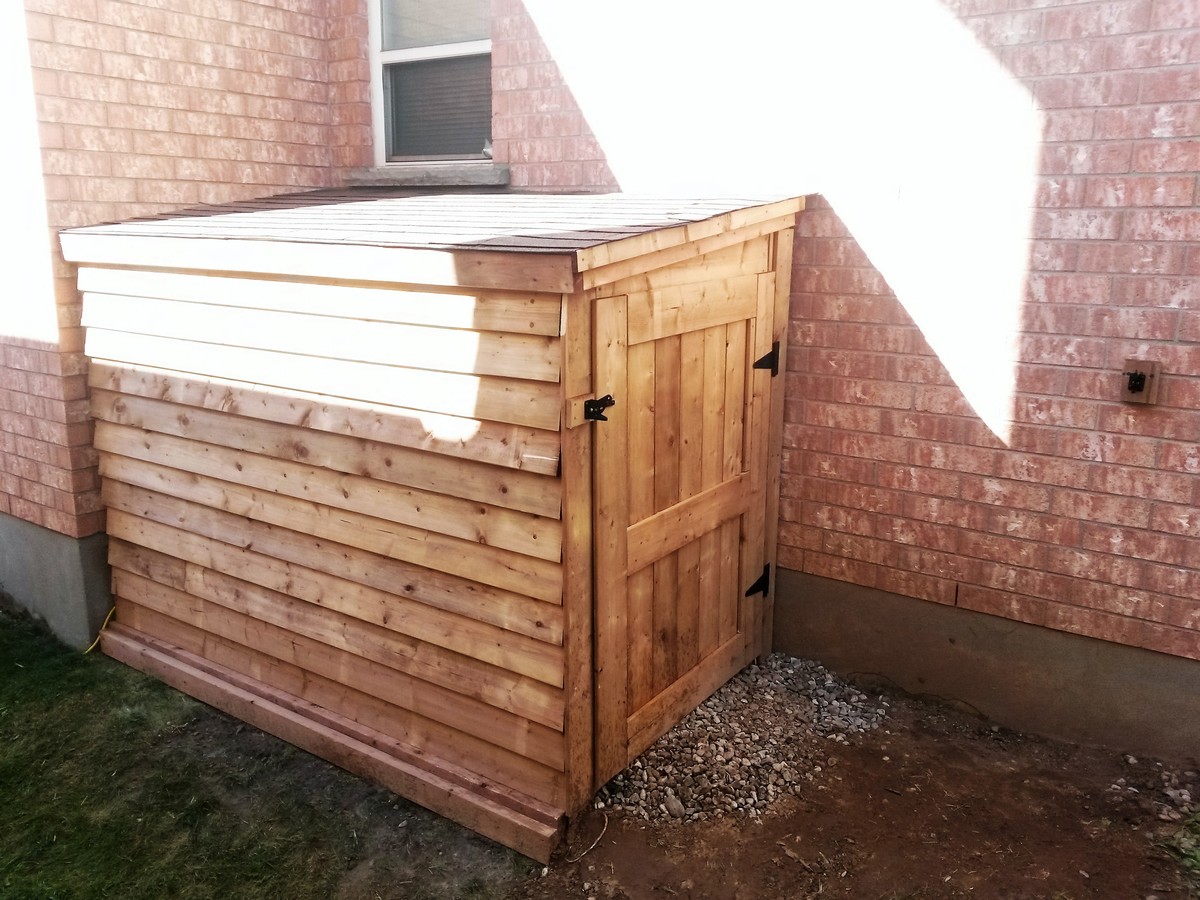
A Different Take on the Cedar Shed
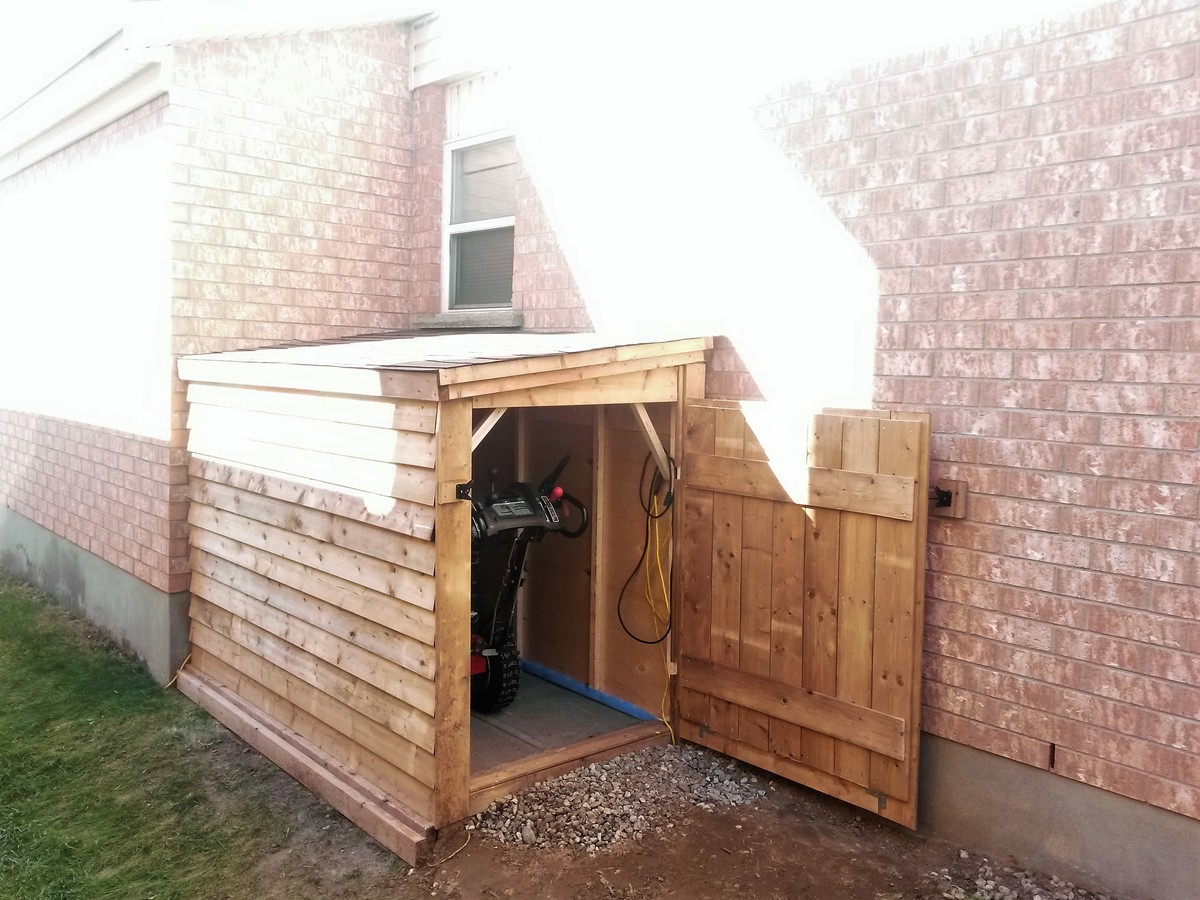
Loosely based on the small cedar fence picket storage shed plan, this was my first attempt at making a storage unit with a roof. There was only one unplanned trip to the store (to replace two 2x4's that I cut to the wrong length). Pro tip: "measure twice, cut once" doesn't work if you measure the wrong length twice. Also almost lost two fingertips because I'm an idiot and forgot the most basic of safety rules for power tools, namely the "don't put your fingers near the blade of a circular saw when it's in use" rule. Very lucky to only come out of it with a good scare and some wounds that will heal without permanent damage.
Built from Plan(s)
Estimated Cost
$500 (Canadian)
Estimated Time Investment
Weekend Project (10-20 Hours)
Recommended Skill Level
Beginner
Comments
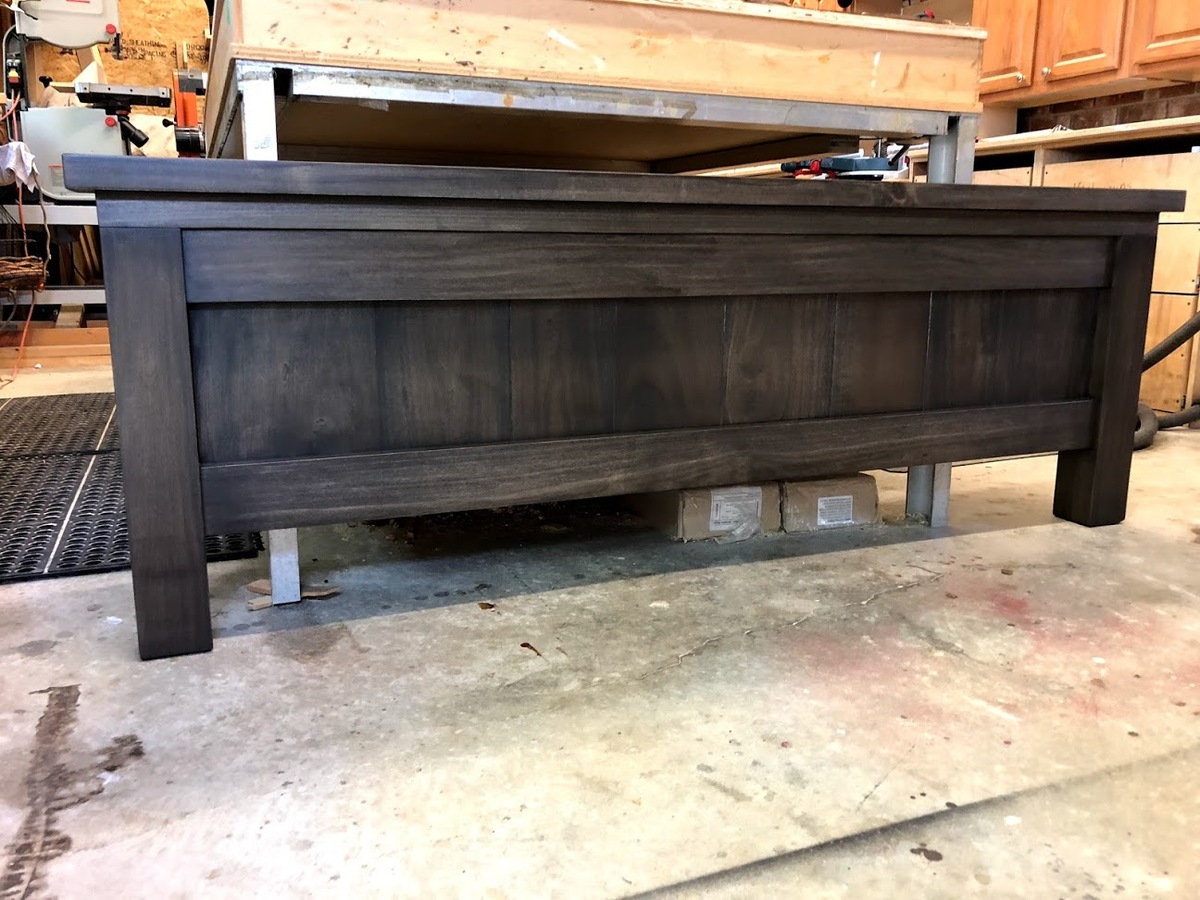
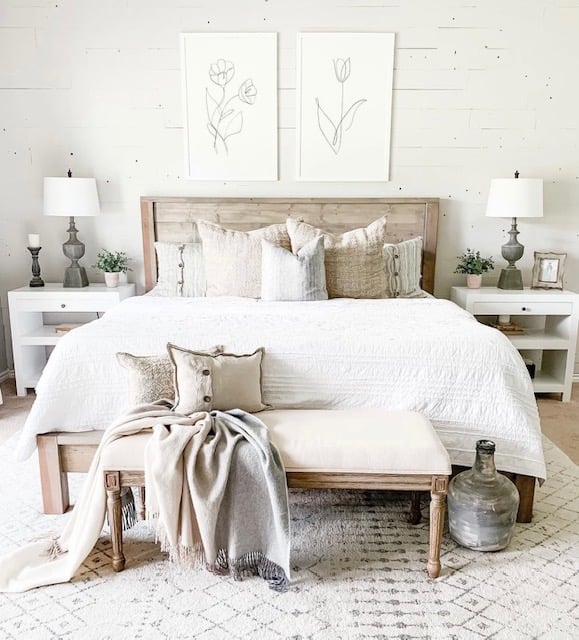
Queen Farmhouse bed
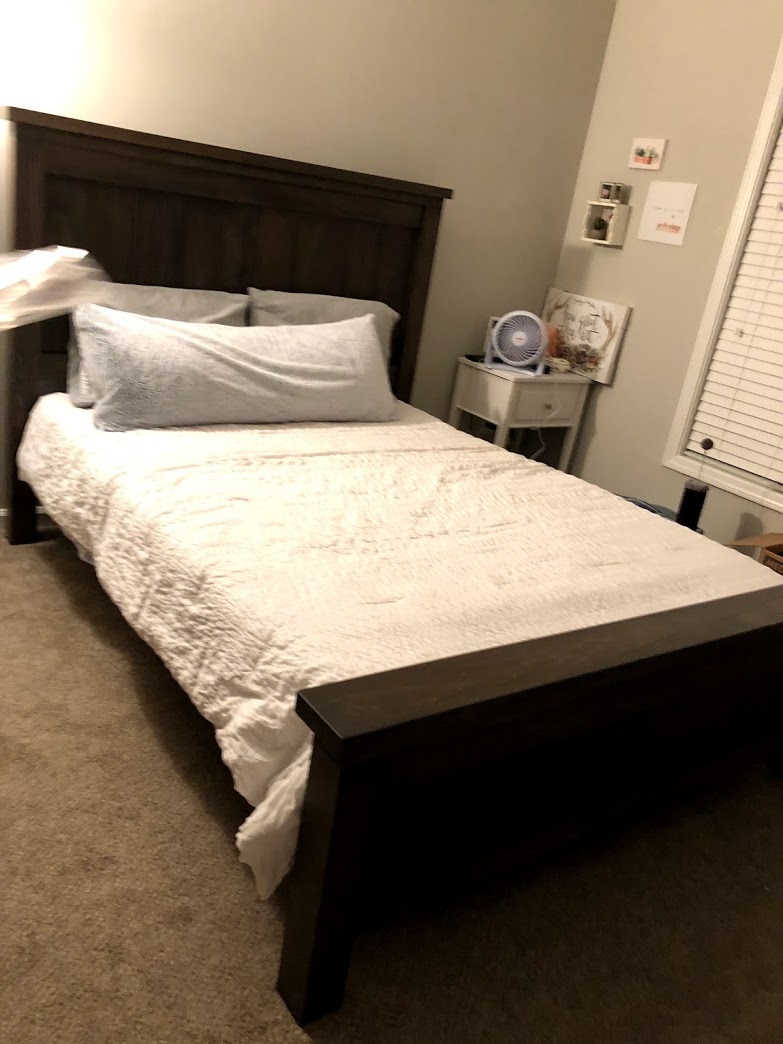
Queen Farmhouse Bedframe made from Poplar and stained with Carbon. Don't remember brand name of stain. Finish is by General Finishes Flat sheen.

Built from Plan(s)
Estimated Cost
$350
Estimated Time Investment
Week Long Project (20 Hours or More)
Finish Used
Sanded to 180. Pre-conditioned before stain with denatured alcohol
Stain - Carbon (Professional grade, but don't remember brand name)
General Finishes - Flat
Stain - Carbon (Professional grade, but don't remember brand name)
General Finishes - Flat
Recommended Skill Level
Intermediate
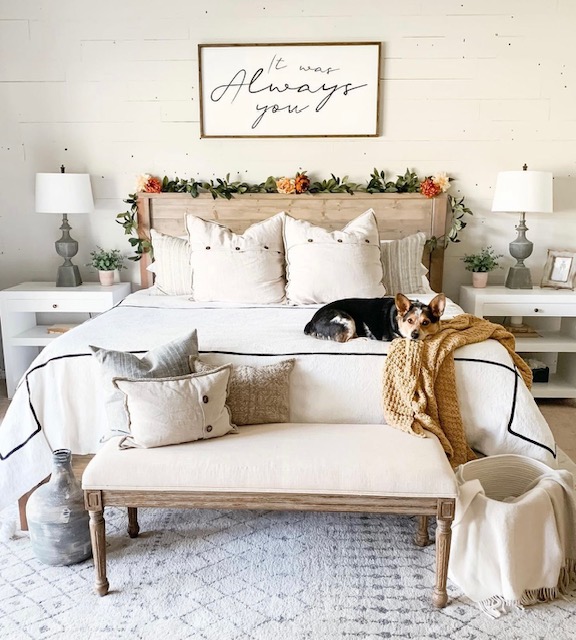
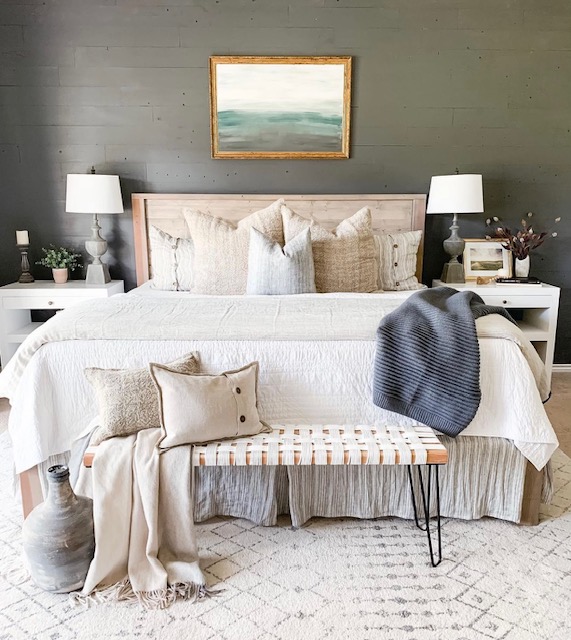
Modern Farmhouse Bed - Same Bed Different Look
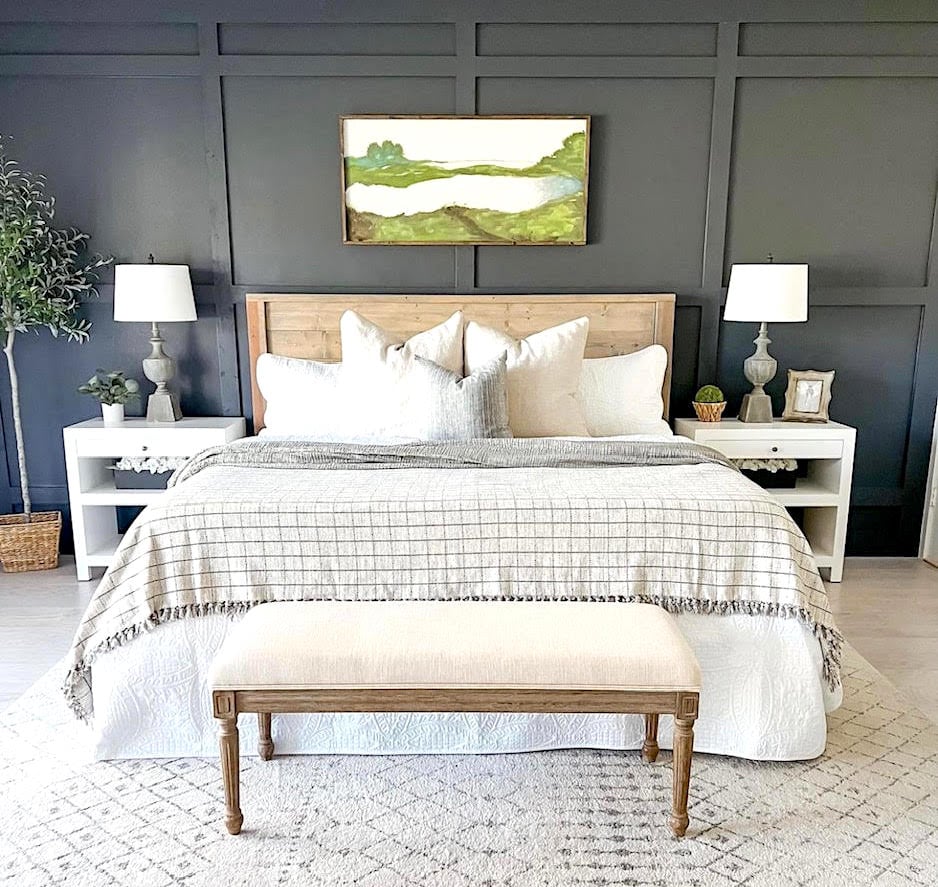
Same bed, so many beautiful options!
Built from Plan(s)
Queen Storage Bed - done!
I was so excited to start the Queen storage bed - but then I had all that lumber and the cuts weren't perfect, and my measuring skills need work, and I don't fit into 12 x 18" spaces, and my vision isn't great to begin with and I certainly can't see into those dark, dark spaces!
But, in the end, I had fun, and the drawers work, the finish turned out well, I still have all my fingers, my bruises are about gone (2 weeks later, for goodness sake!) and, most important, my son and his wife say it looks great, is sturdy, and the drawers work! Whew!
Next month I'm doing the twin sized version for my daughter - and no drawers, yeah!

Built from Plan(s)
Estimated Cost
$400
Estimated Time Investment
Week Long Project (20 Hours or More)
Finish Used
Valspar Espresso stain, 3-4 coats, sanded between first 2 coats, then just applied to darken the color. Light sanded before applying first coat of minwax poly, light sanded again, applied 2nd coat of poly, and then added a 3rd coat of poly (no sanding before)
Recommended Skill Level
Intermediate
Comments
Sat, 08/13/2011 - 19:34
Beautiful!
Well for all the problems with fitting into the spaces, seeing, and such, it turned out beautifully!! Well done! I
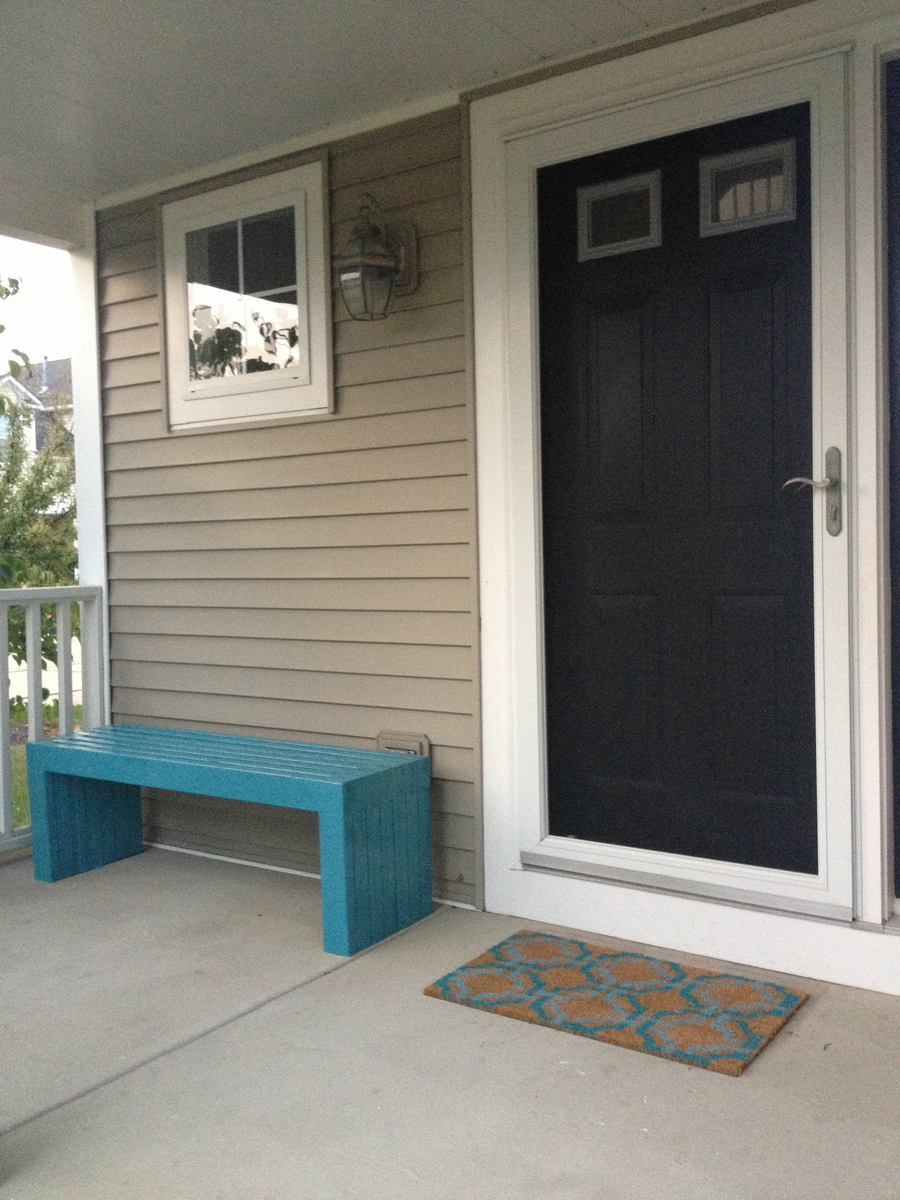
MODERN SLAT TOP OUTDOOR WOOD BENCH
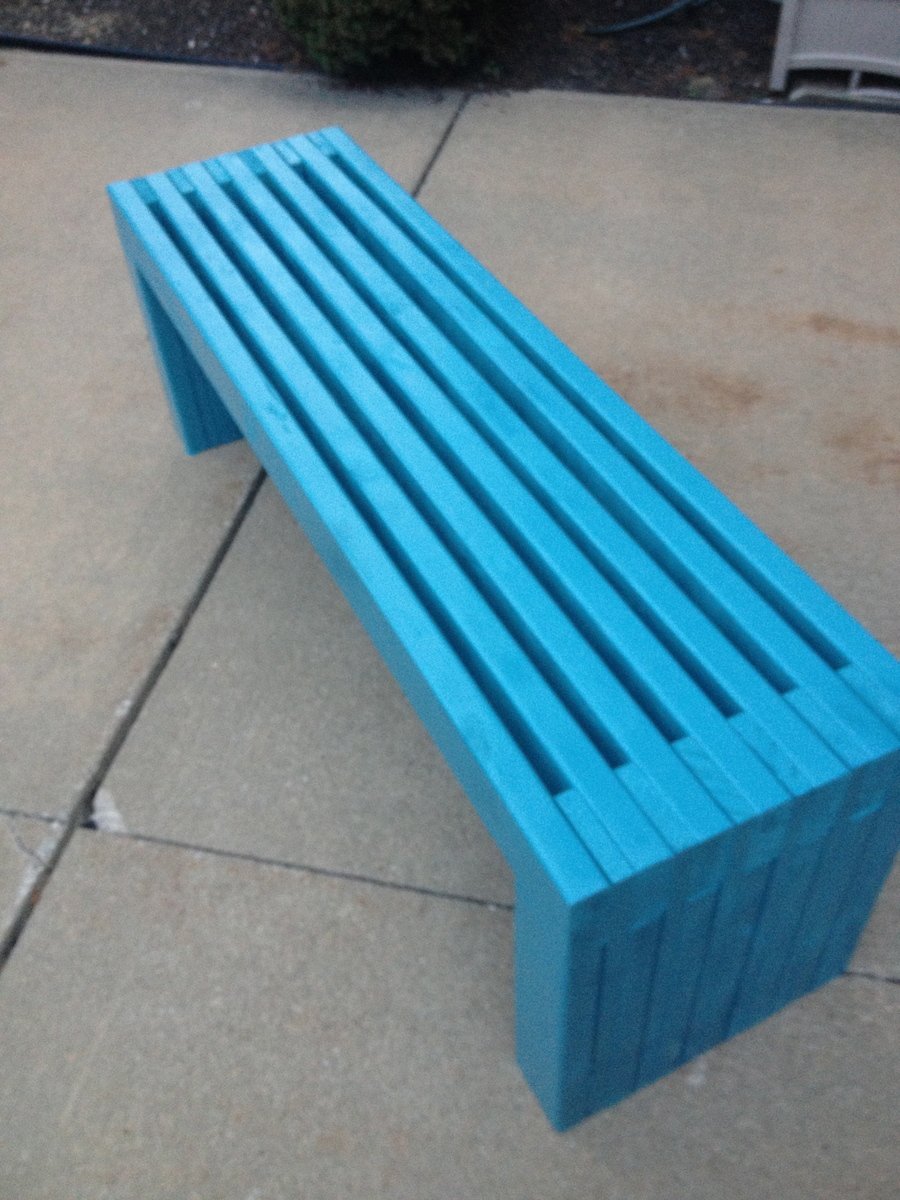
This was my first project. I am pretty excited how it turned out. If I did it again, I would recommend sanding and painting prior to building.
Built from Plan(s)
Estimated Cost
$60
Estimated Time Investment
Afternoon Project (3-6 Hours)
Finish Used
Valspar Spray Paint - Oasis
Recommended Skill Level
Beginner
Comments
Vintage simple bench nightstand
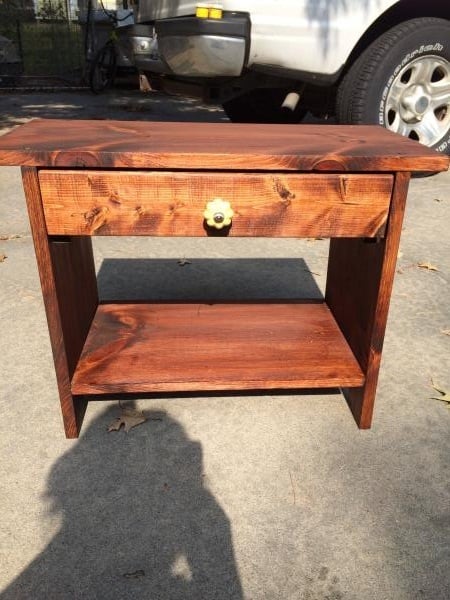
I followed the plan but added a drawer. I had a drawer that I had previously built but it didn't fit that project. It just happened to be the right width for this, I had to cut off some on the length, and that turned out to be easier than I thought it would be. I used wooden slides.
Built from Plan(s)
Estimated Cost
Less than 20.00
Estimated Time Investment
Afternoon Project (3-6 Hours)
Finish Used
Red oak and golden oak mixed. Wax finish.
Recommended Skill Level
Beginner

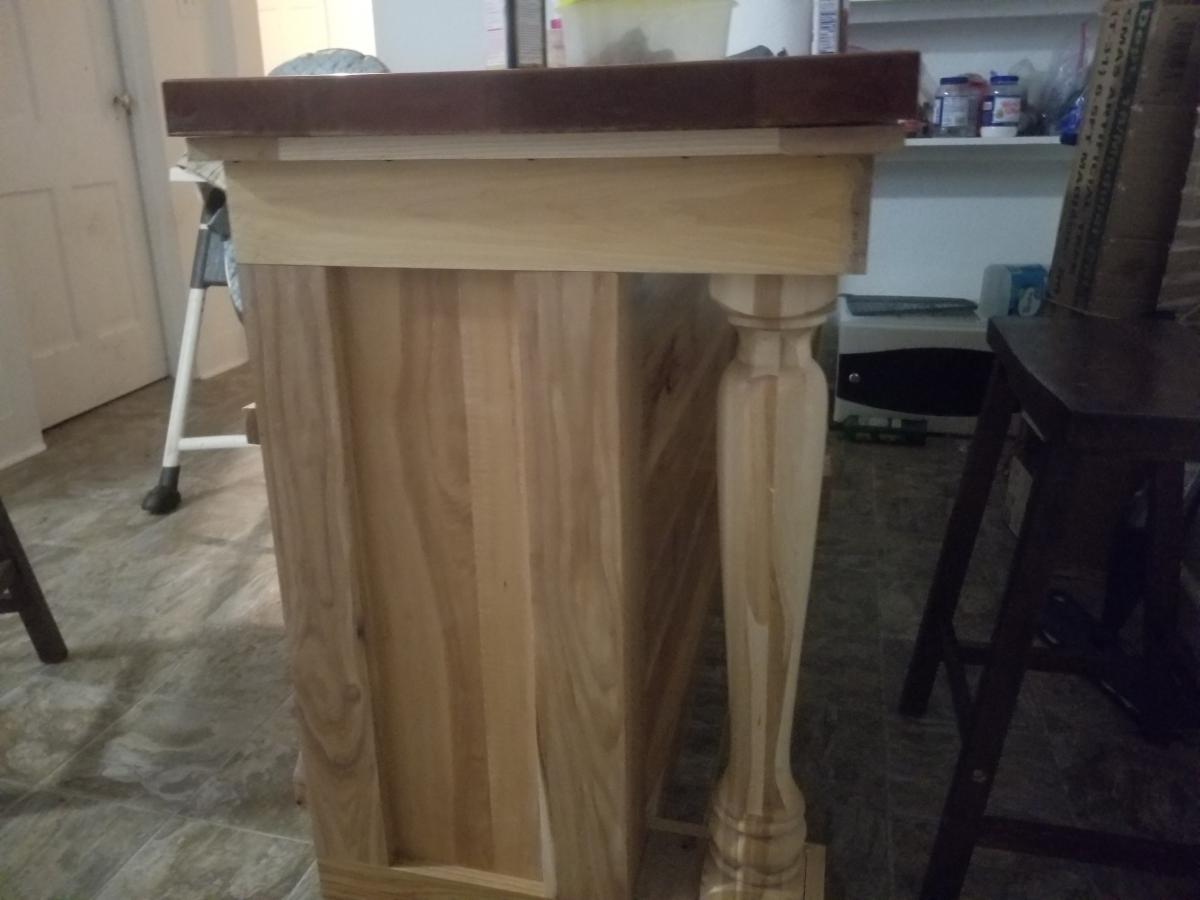
Farmhouse kitchen island
The kitchen island I built from your plans for my wife. I used hickory and for the top I used rustic cherry.
Built from Plan(s)
Comments
Flat Wall Bookcase

This was my very first Ana project. It probably took me three times as long as it would take anyone with any experience. That said, we love it! I have since made two more for friends! No need to look too close, there are plenty of mistakes.

Built from Plan(s)
Estimated Time Investment
Afternoon Project (3-6 Hours)
Finish Used
I used miniwax water-based red oak and topped with two coats of polycrylic.
Recommended Skill Level
Starter Project
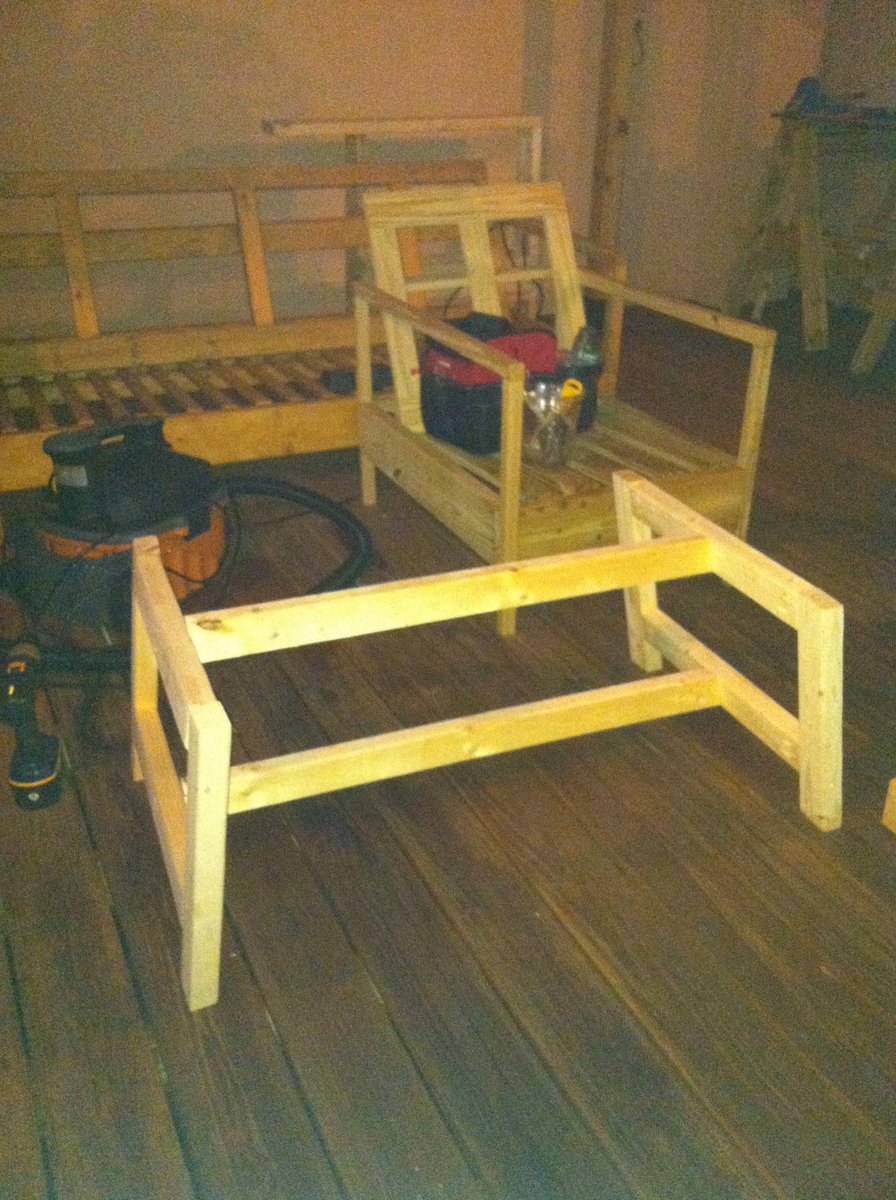
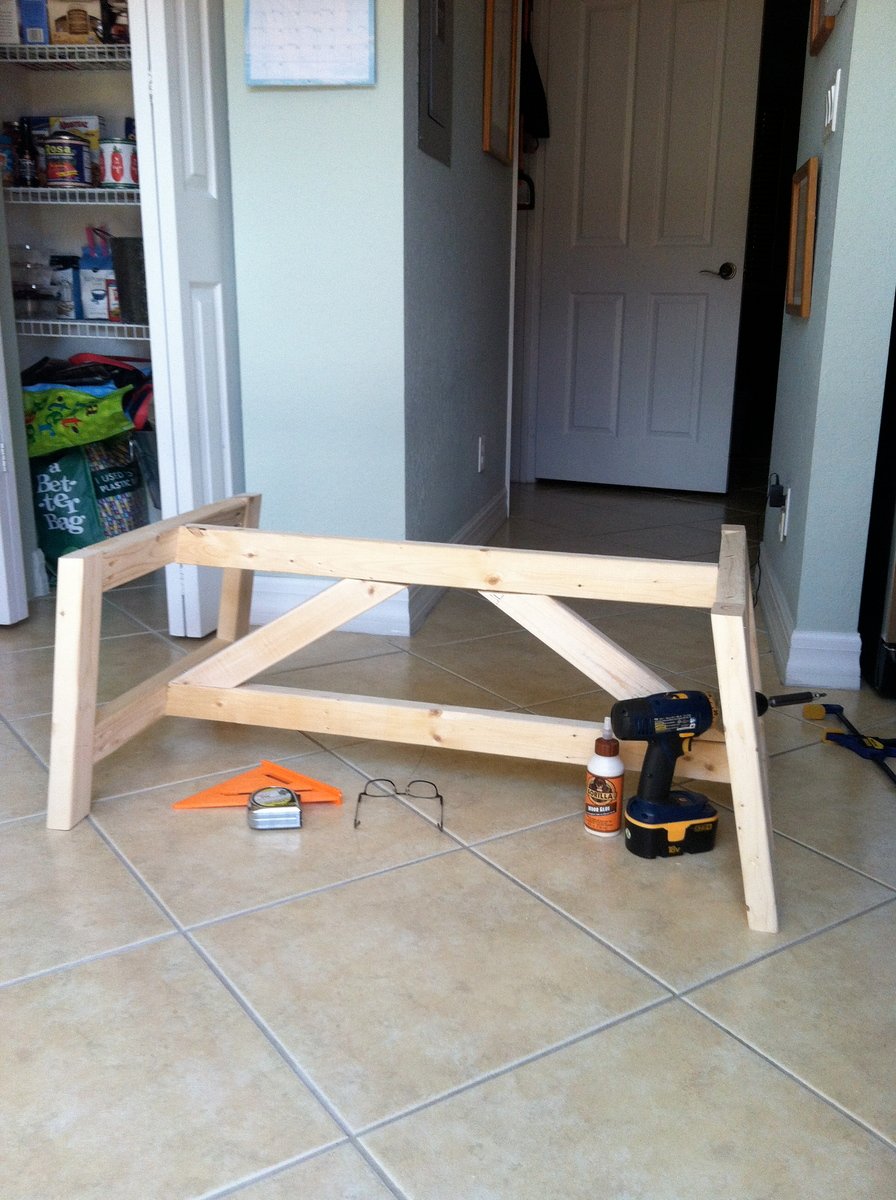
Truss Coffee Table Not quite finished

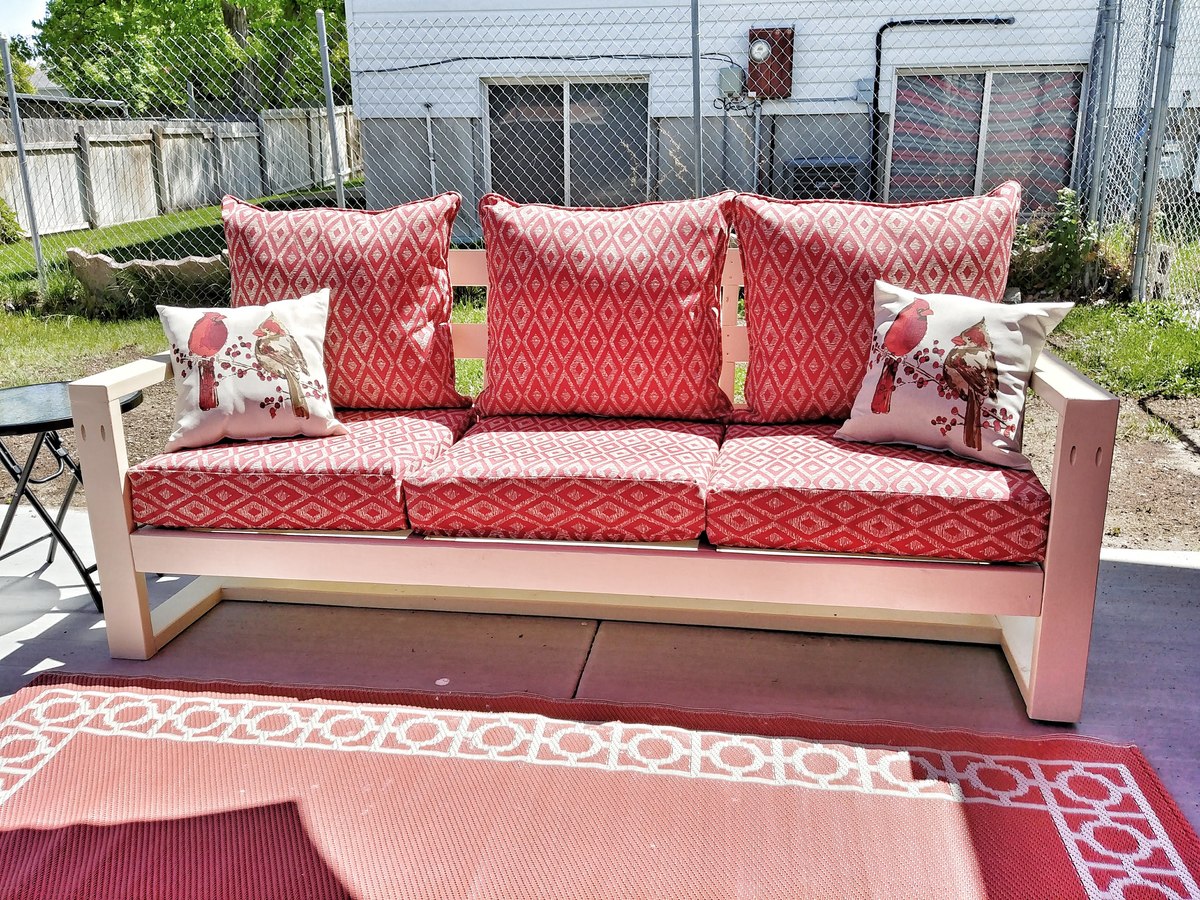
I made the Restoration Hardware couch and deck chair. I got really nice Sunbrella material cushions for $60 each at HD. I wanted to make a matching coffee table. I just threw it together. It's a little "jacked up".
Estimated Cost
$15
Estimated Time Investment
Afternoon Project (3-6 Hours)
Recommended Skill Level
Intermediate
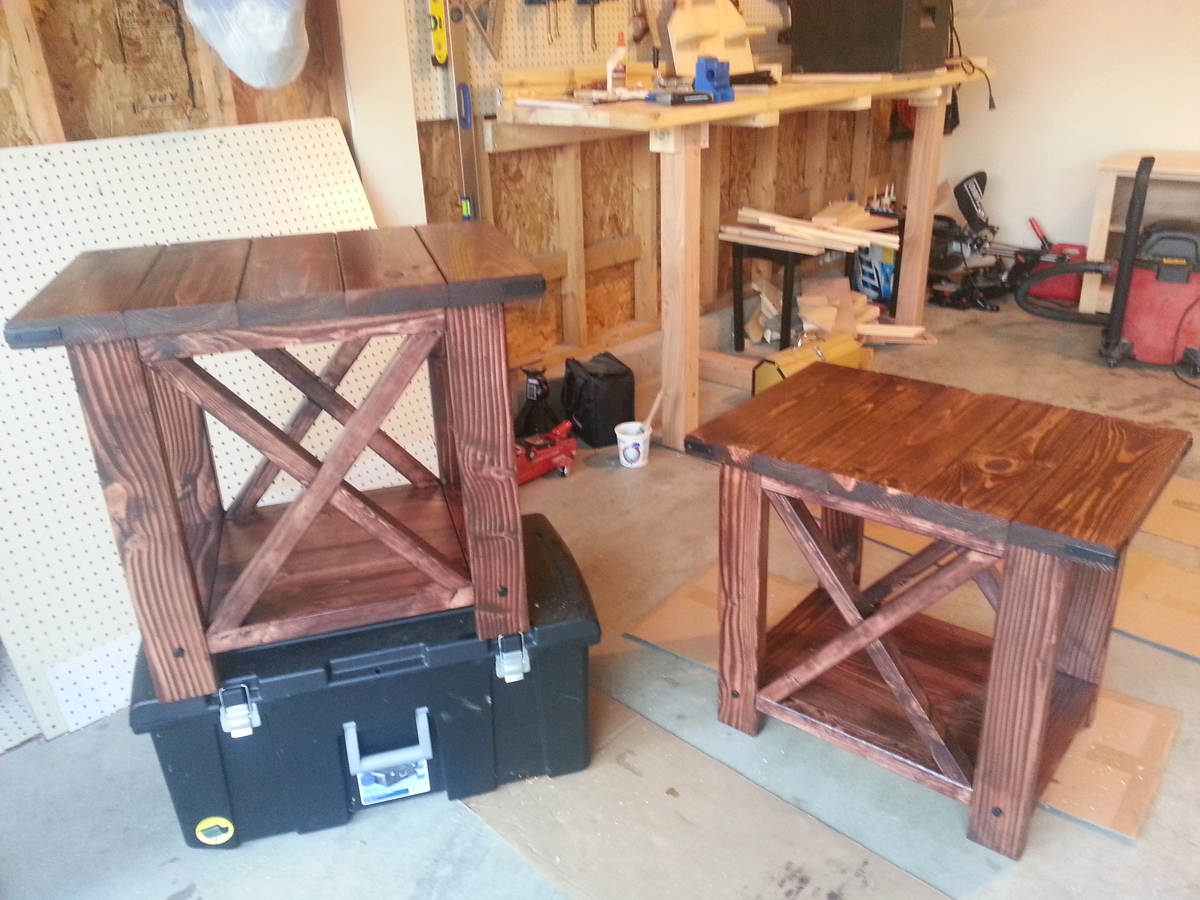
Richards Rustic x end table with chicken wire doors
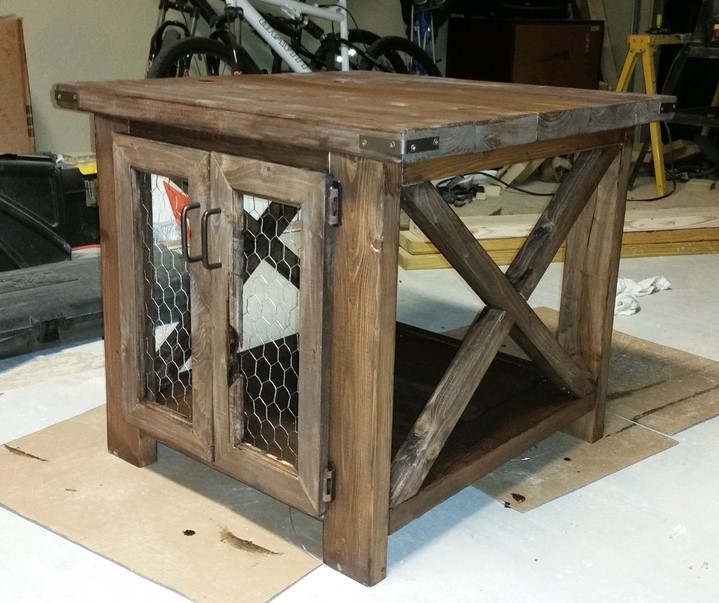
Built using Rustic x plans. Made the doors from scratch using some scrap 2x6's I had laying around. Stained with espresso, one coat. Needs another and maybe a gloss coat.
Built from Plan(s)
Recommended Skill Level
Intermediate
DIY Children's Adirondack Chair
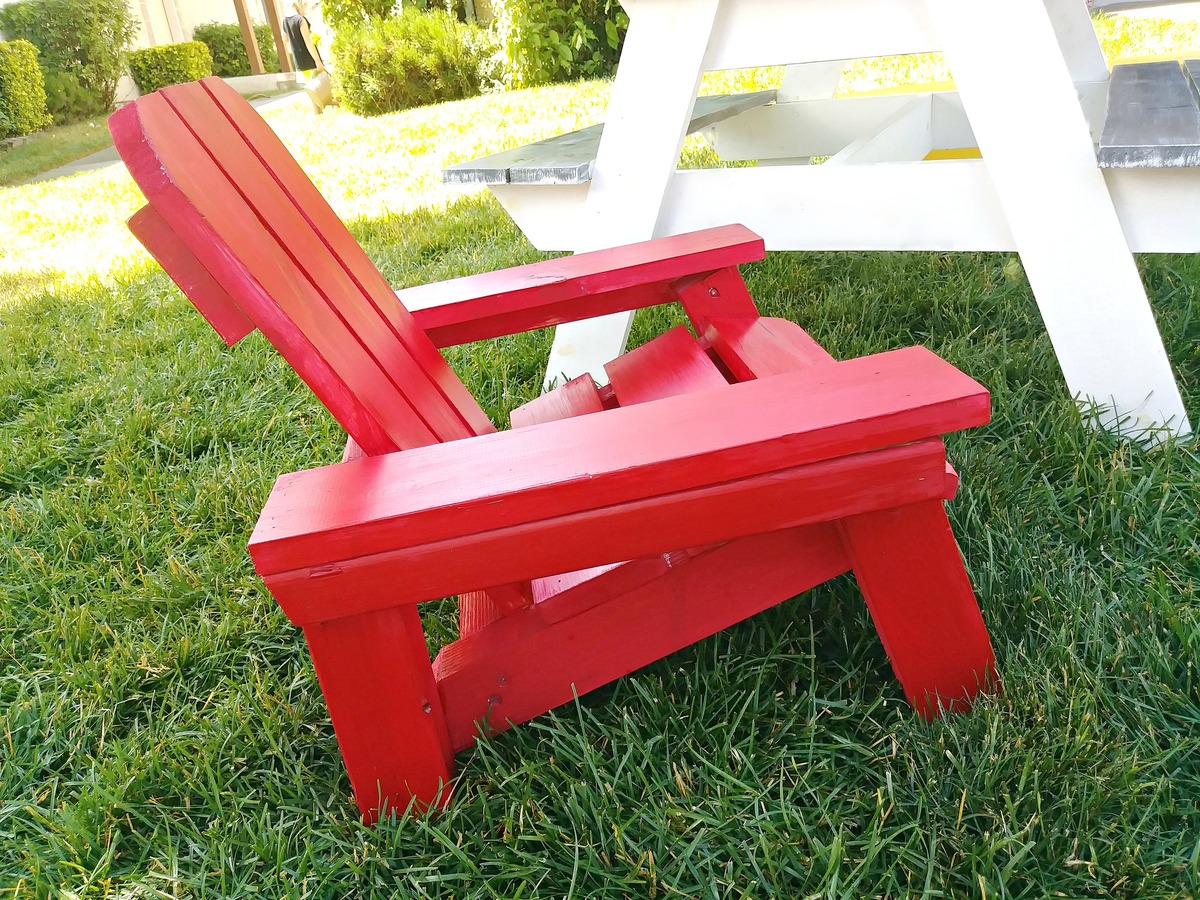
I needed a birthday gift for one of our sweet neighbor friends, so I dug through my scrap wood stash and decided a small adirondack chair would be the perfect little project!
Thanks to Ana for the plans!
Built from Plan(s)
Estimated Cost
I used scrap wood so this project was a freebie!
Estimated Time Investment
Afternoon Project (3-6 Hours)
Finish Used
Red paint
Recommended Skill Level
Beginner
Modern Adirondack chairs, foot stool, & table
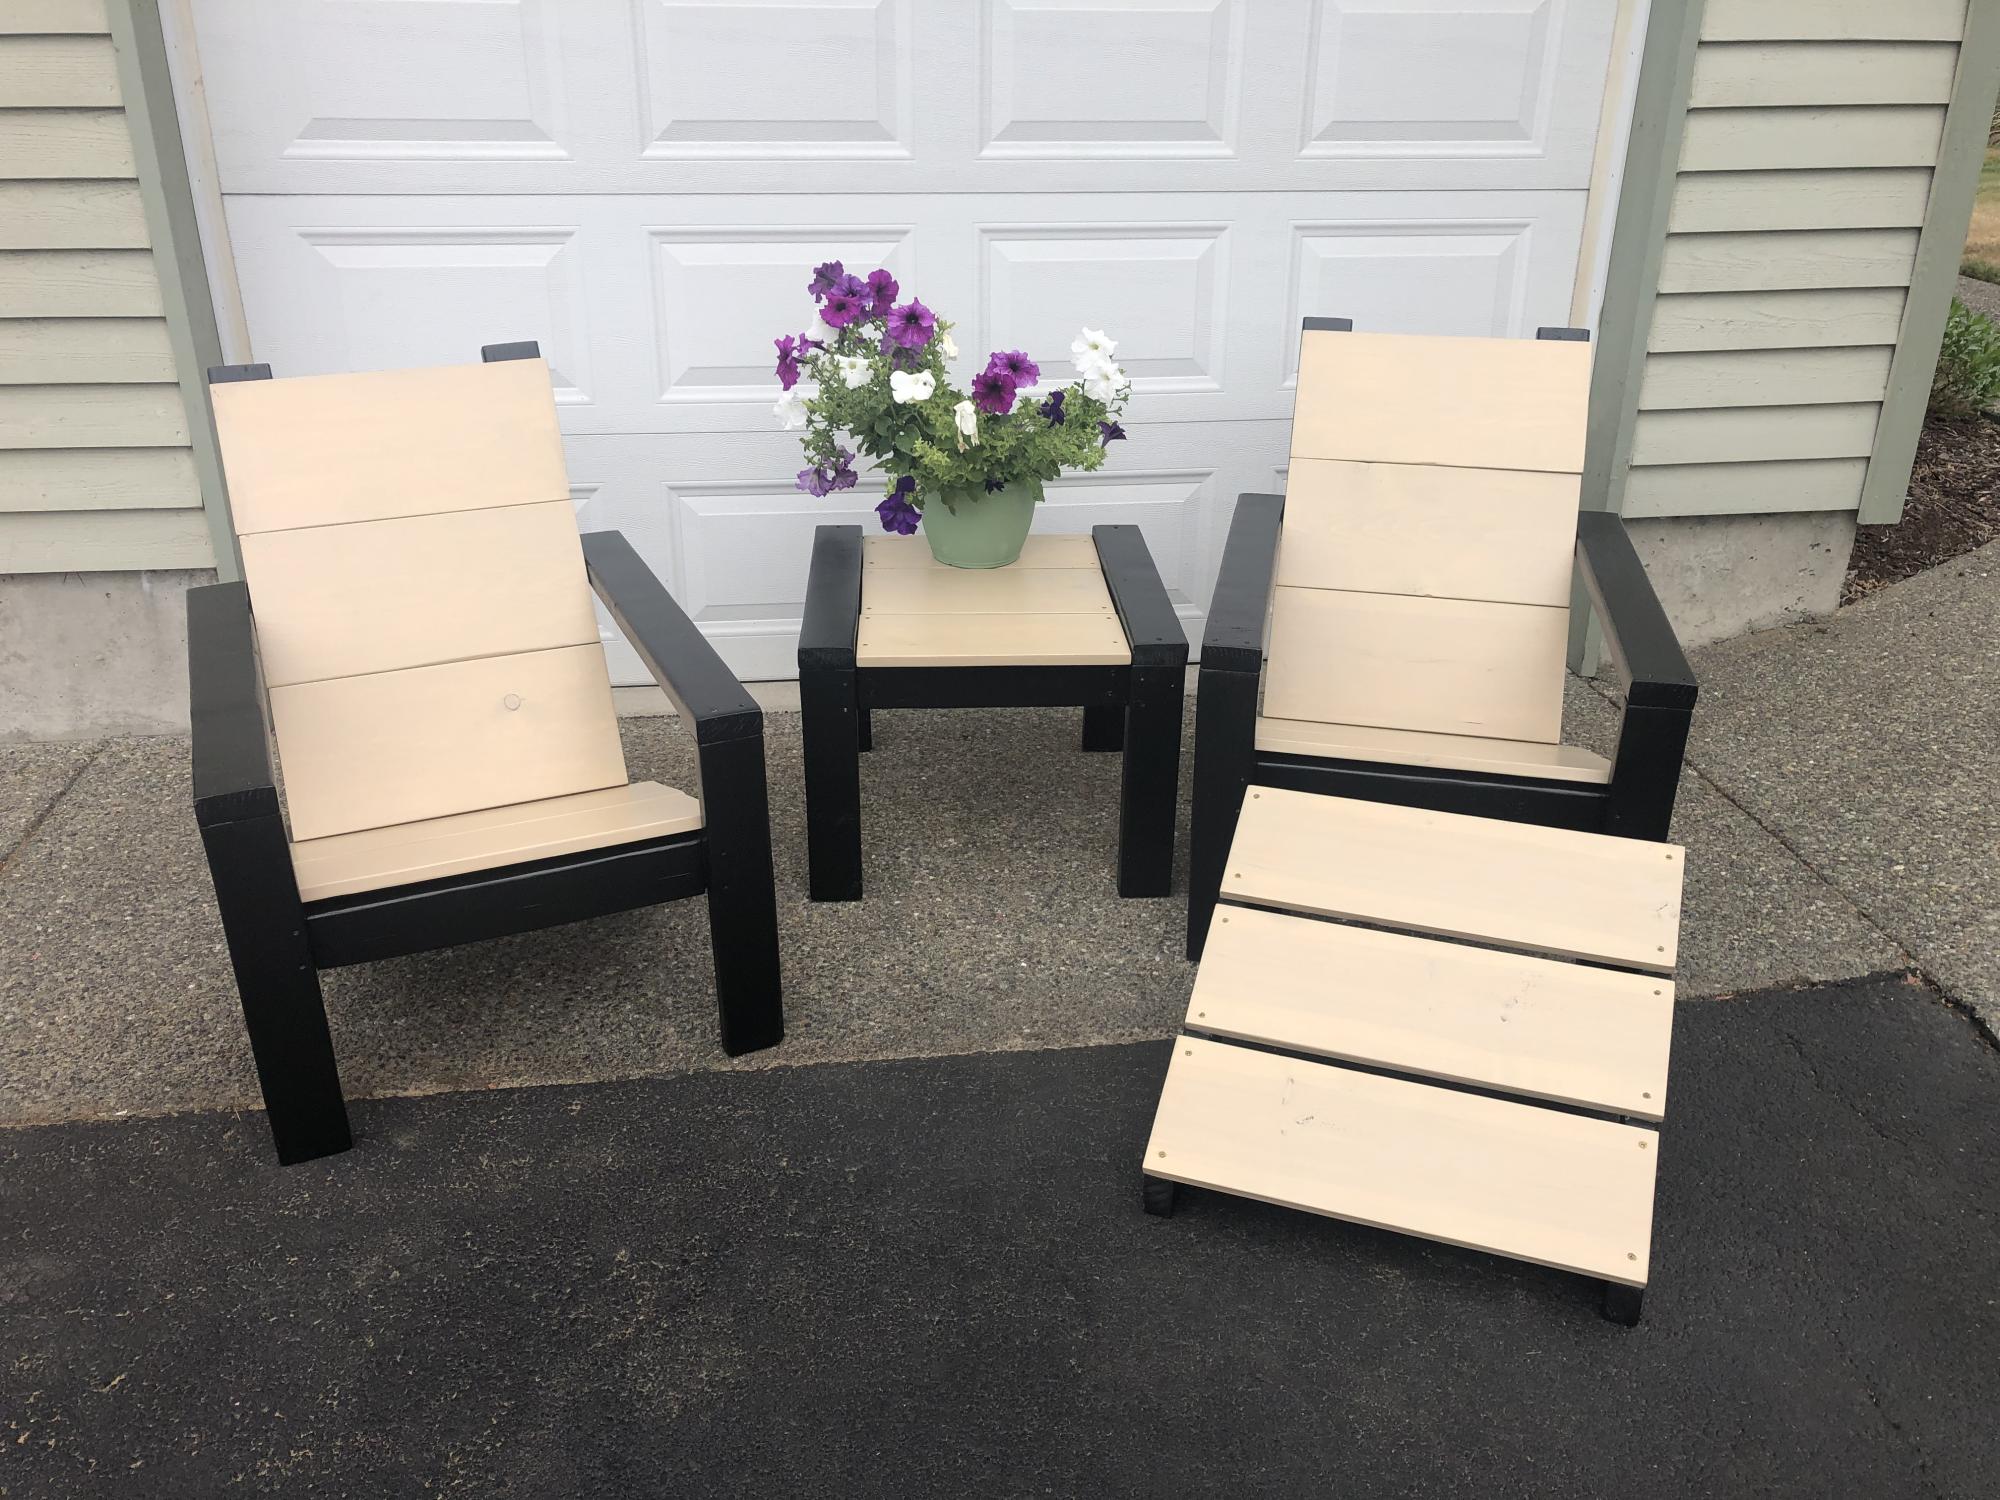
I did the chairs, table & footstool all from Ana's plans as a wedding gift for our friends' daughter. They turned out great and are so comfortable! I used 1x10 & 1x8 on the table & footstool so they would match the chairs.
Built from Plan(s)
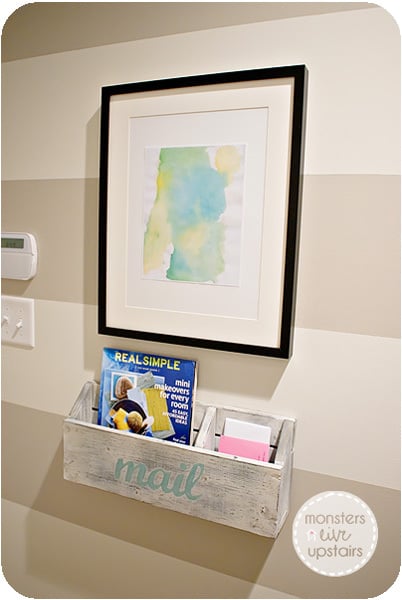
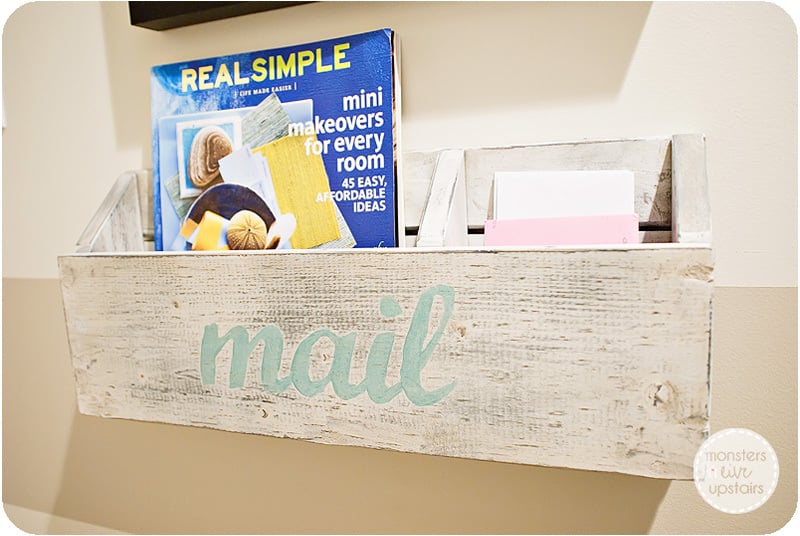
Mail Organizer - a modified version of the numbered cubbies
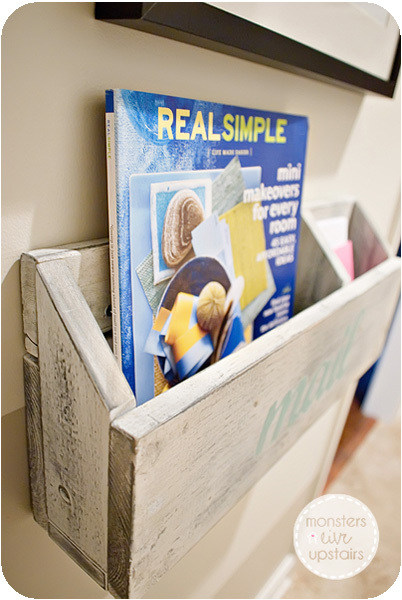
I was in desperate need of a mail organizer and knew when I saw the the plans for the numbered cubbies that it would be perfect with some modifications. The best part of this project was that it was free...all from scraps and done in less than a couple hours.
Built from Plan(s)
Estimated Cost
FREE - totally made from scraps and paint I had around the house
Estimated Time Investment
An Hour or Two (0-2 Hours)
Finish Used
A coat of black spray paint and then a coat of white. I painted on the letters and then sanded everything. I used a brown/gray glaze to tone down the white.
Recommended Skill Level
Starter Project
Comments

Fri, 08/19/2011 - 16:03
This is exactly what i've
This is exactly what i've been needing, thanks for the idea!
Sun, 08/28/2011 - 20:13
Dimensions
Kelli224 ~ This is so cute! How long did you make it and how tall in the back and front?

Wed, 08/31/2011 - 15:22
Thank you! This little box
Thank you! This little box has really been handy and keeps everything so tidy. EmileeA - It is 19" long, the back is 8", and the front is 5.5". The divider is 11.25" from the left side. Hope that helps!
Tue, 12/17/2013 - 17:31
Question
hi there! I ve been working on a small cubby shelf similar to this and was interested in seeing how /where you joined the boards- ex. The front board (5.5ft) to the dividers... I don't see and nails or screws! I'm guessing you applied wood filler atop the nailheads. But I'm having trouble joining my boards and if you can kindle let me know where you attached the front board to dividers w nails or was it just glue?!? Thanks so much!
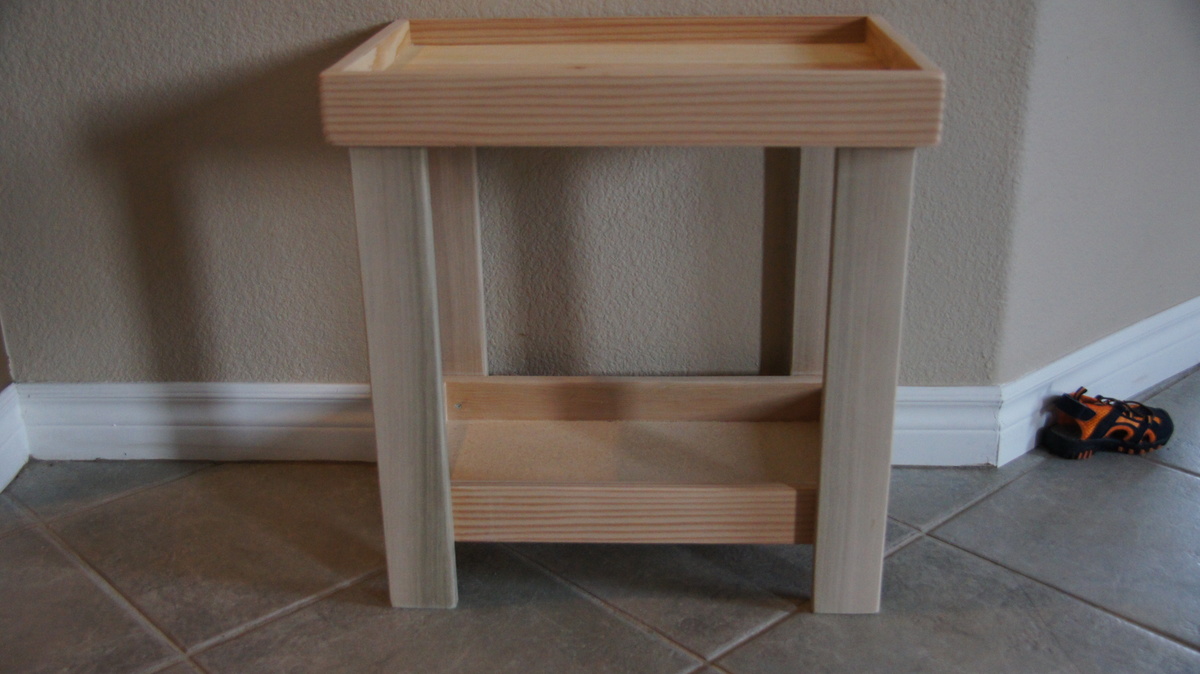
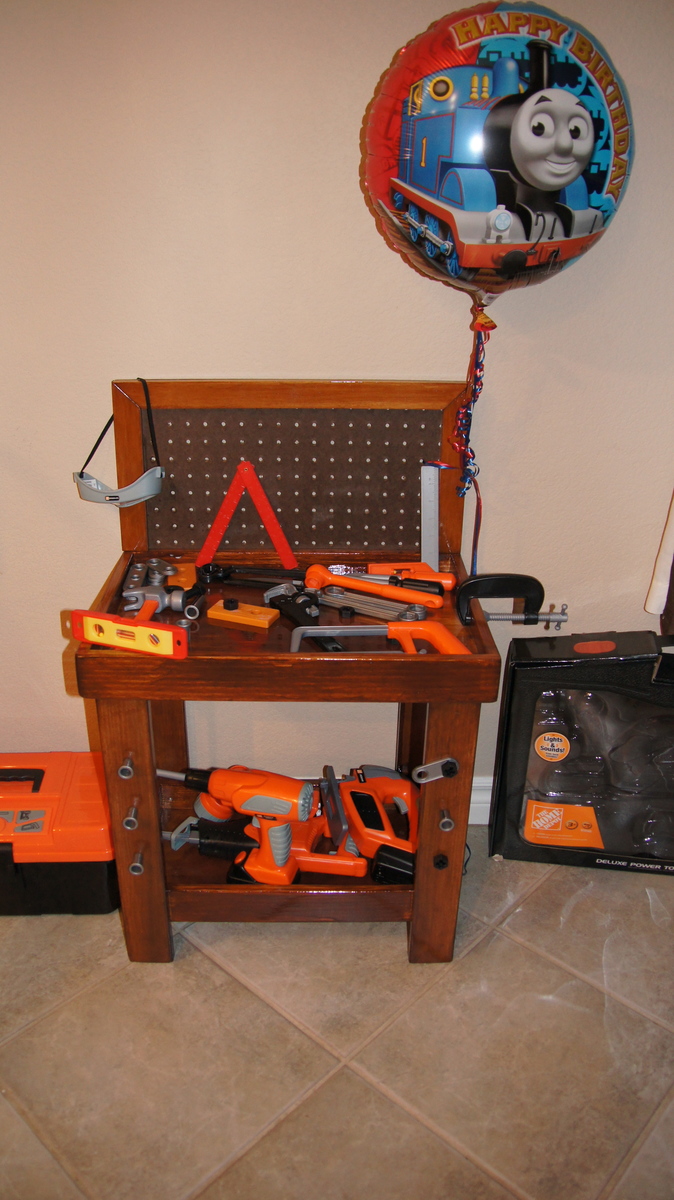
Toy Workbench
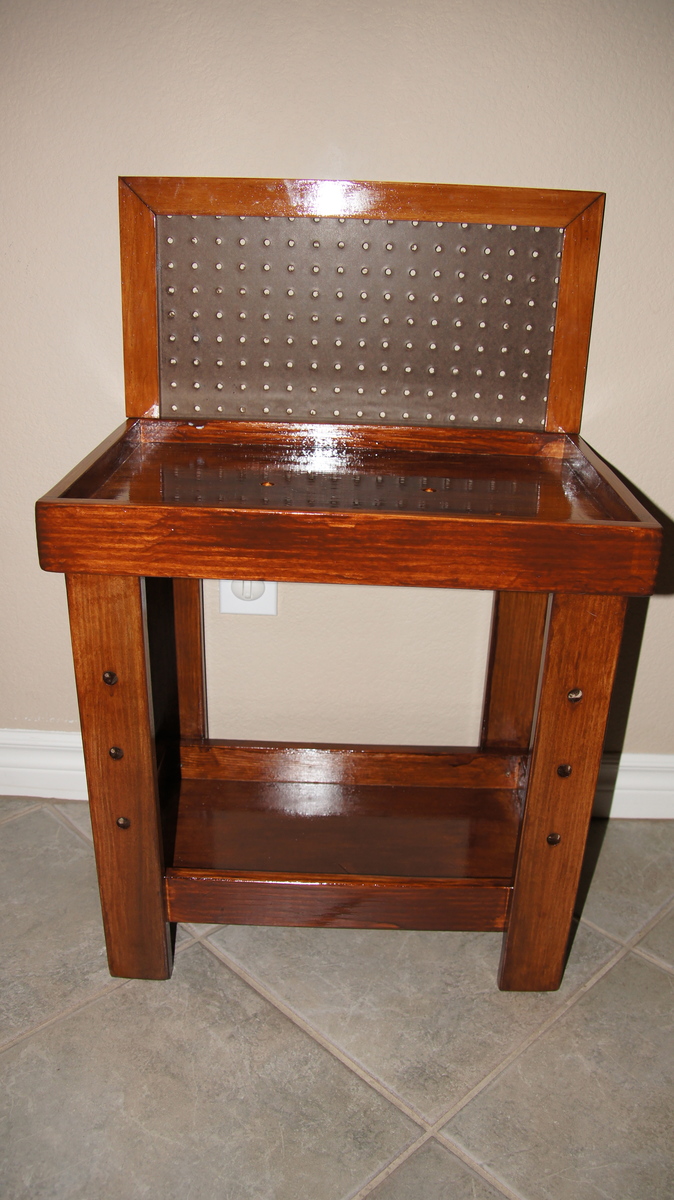
My Husband and I built this for our son's 2nd Birthday. This is our first finished project!
We drilled 1/2" holes for play nails and screws in the legs and top. We also modified the bottom to have a shelf for added storage, just measured the inside dimensions and cut to fit. We also opted for a peg board on the back to eventually hang tools and some baskets for the nails and screws. The peg board is attached to the base and trim with glue and staples. We taped off a section on the back before using the polyshade to allow the glue to adhere.
Built from Plan(s)
Estimated Cost
under $50
Estimated Time Investment
Afternoon Project (3-6 Hours)
Finish Used
Minwax Poly Shades in Dark Walnut, 2 coats
Recommended Skill Level
Starter Project
Comments

Unfinished tables
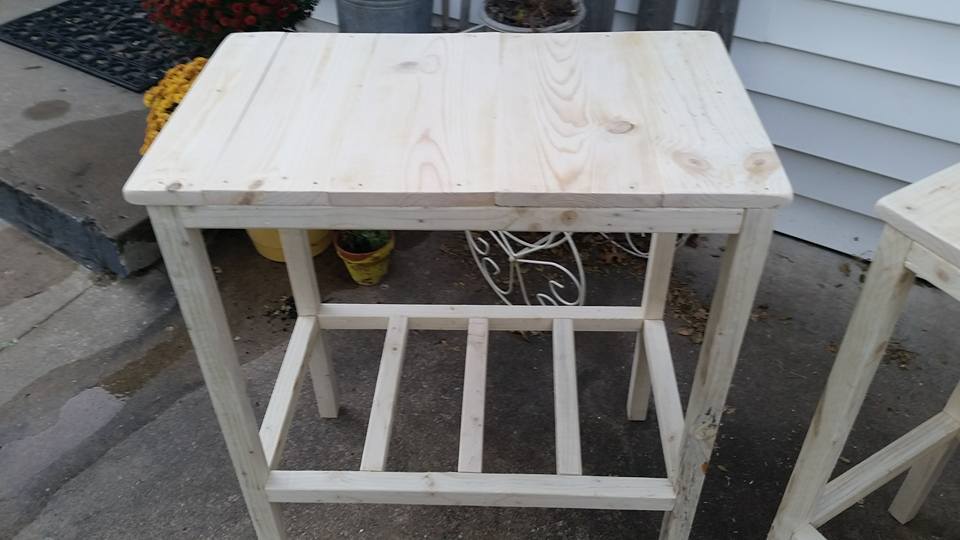
I built these three tables for my aunt. She had specific dimensions that I had to alter the plans to fit. All in all it was a pretty easy project.
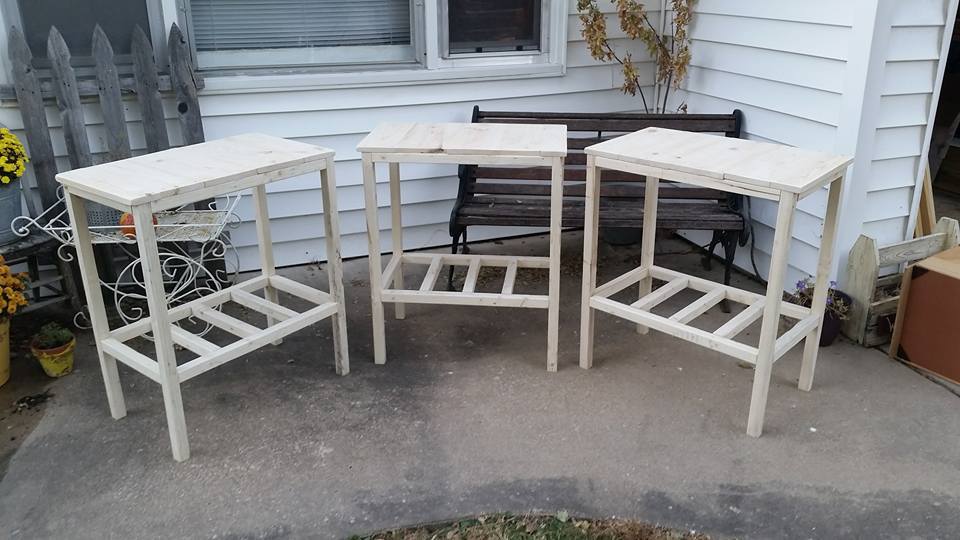
Estimated Cost
62 for all 3 tables.
Estimated Time Investment
Afternoon Project (3-6 Hours)
Recommended Skill Level
Beginner
Idaho History Halltree
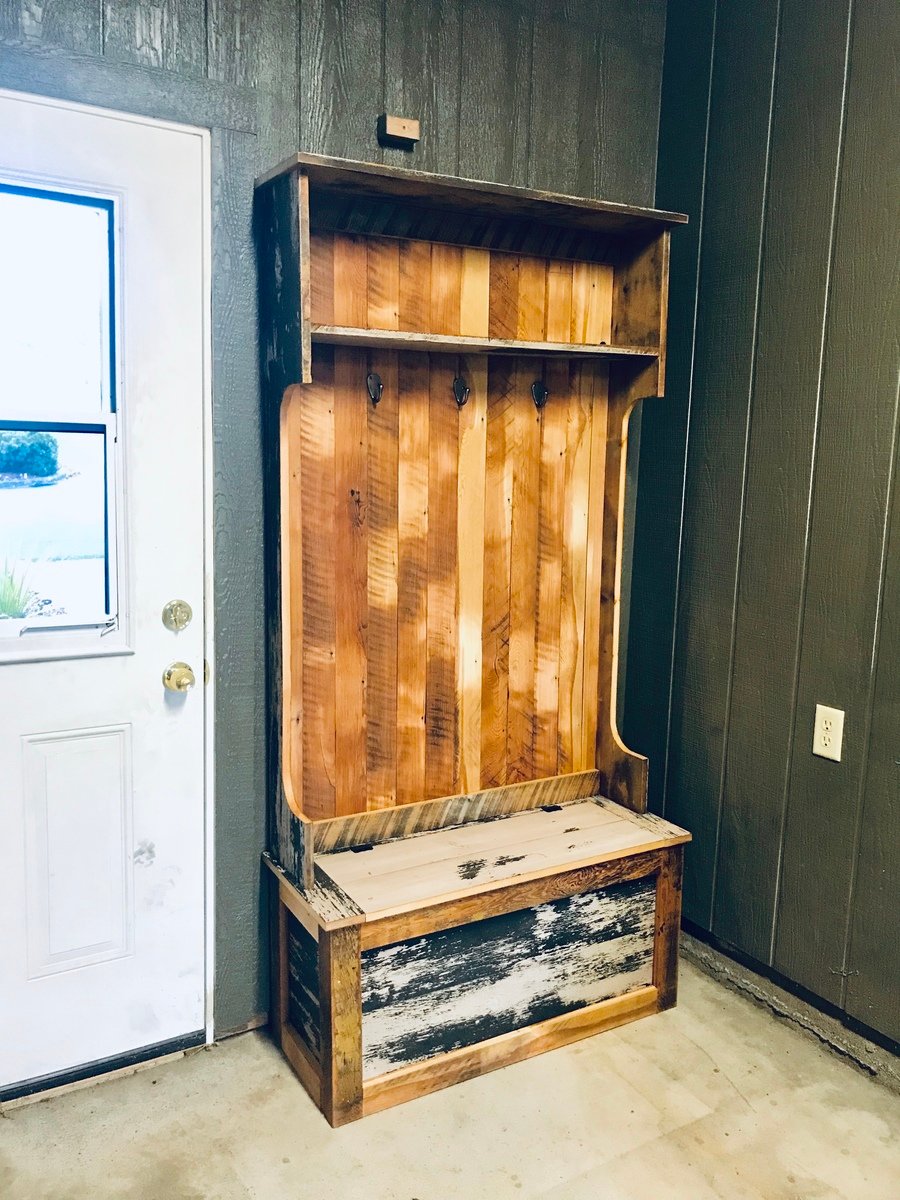
A piece of Palouse/Moscow/North Idaho History!
Hand-crafted by father and son from reclaimed materials native to the region, this is a one-of-kind piece of furniture of both substance and significance. The stock was sourced from the railroad depot that stood on the University of Idaho campus in Moscow for well over 100 years. The crops, forest products, and people of the Palouse passed through its doors and across its floors from the early days of westward expansion and settlement. Marked for demolition in 2017, the depot yielded lumber that had been harvested from old growth forests native to our region since time immemorial. The trees that produced the lumber-turned-dept-turned-halltree stood tall, proud, and mature at the time of the signing of the Declaration of Independence.
The halltree’s back panel and trim are crafted from the depot’s tongue and groove flooring, and still bear the marks of their original milling. The remainder of the piece is constructed from the ceiling planks. Twice painted during the course of the depot’s sentinel watch over the commerce and culture of our region, the cream surface coat is yielding to the forest green base layer, giving the finish a depth and patina that testify to its age. The history of the Palouse literally passed over, under, and between every square inch of wood in this halltree! It now stands ready to serve a family for generations to come while reminding them of our pioneer past.
Dimensions: 39” x 15-1/2” x 78-1/2”
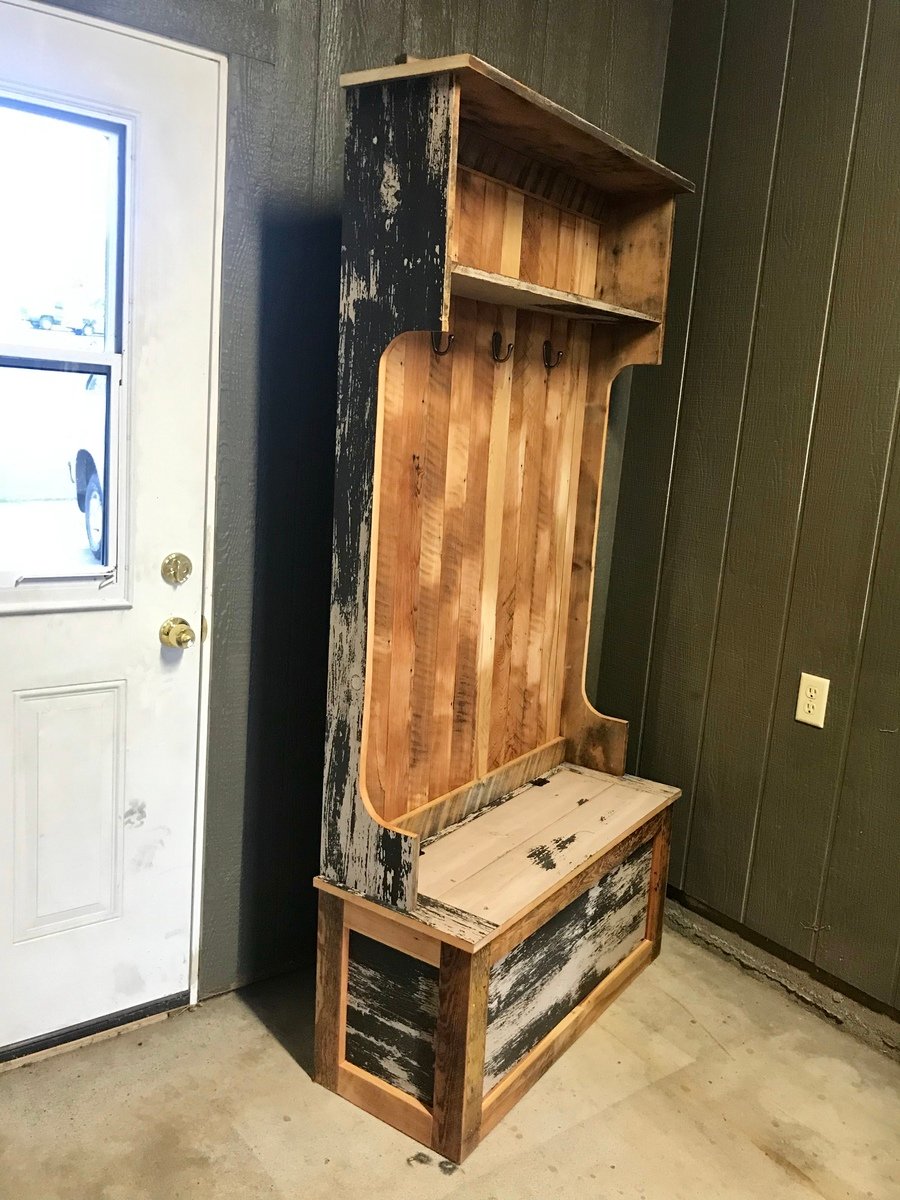
Estimated Cost
$40 for screws, finish nails, glue, hinges, and coat hooks. I sourced the lumber for free.
Estimated Time Investment
Weekend Project (10-20 Hours)
Finish Used
The back panel and trim were red fir tongue and groove flooring that was heavily scarred from a century of foot traffic in a railroad depot. It had to be surface planed to allow the color of the wood beneath to show through, but not so deep as to completely remove the milling marks and oxidation. The rest of the boards were pulled from the ceiling and show layers of white and green paint in varying states of disrepair. I applied Danish oil to fresh cut bare edges, then sprayed satin finish water-based polyurethane over the entire piece.
Recommended Skill Level
Intermediate
Comments
Ana White
Tue, 10/30/2018 - 11:01
Gorgeous! Love this modern
Gorgeous! Love this modern design!