Thank you for all the positive feedback on my new kitchen cabinet organizer. Man, do I love that little organizer! Sometimes I just open my kitchen cabinet to stare at her's truly Mrs. Organized, and bask in the reality that yes, under my kitchen sink IS tidy and neat!
I know this was a simple little project, but it’s really made a big difference in our kitchen! If you make a task easier, it’s just that much more likely to get done, right?
Cause you all do know I'd rather be building something than cleaning the kitchen, right?

We built this little kitchen cabinet door organizer (plans here) out of really nice pine boards (cheap and easy to work with). But I wanted the organizer to match the existing kitchen cabinets, and also to be sealed so the wood would be easy to wipe down and keep clean over years of use.
For a project this simple, I also wanted a finishing process just as simple!
So I turned to my friends at Minwax®, and what do you know, they have the PERFECT product - quick, easy, durable and beautiful!
Disclosure: I do work with Minwax on a regular basis, and appreciate that this tutorial is sponsored by them!
• 220 Grit Sandpaper
• Minwax® Pre-Stain Wood Conditioner
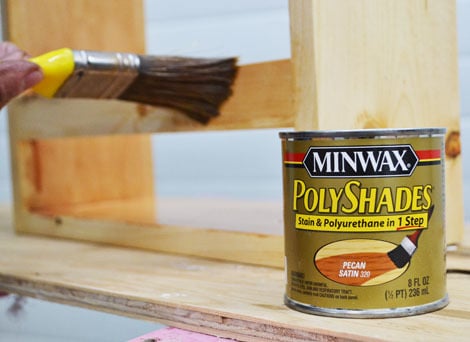
• Minwax® Polyshades Pecan in a satin sheen
• Natural Bristle Brush
Getting Started
Minwax® PolyShades® to the rescue! PolyShades® is a one-step stain and polyurethane in one product. I choose Pecan to match my cabinets.

Now I’m a little bit of a control freak when it comes to stain, and like to be able to adjust my stain as I go, so I normally turn to stain first, and then top coat when I’m absolutely happy with the stain color. With PolyShades®, you don’t have that option - it’s one step and you are done. So not necessarily the right product for every project, but when you just want a quick and easy stain for cabinet door organizers, maybe shelving or a closet system, this is the stuff!
For this project, it’s so small, I knew I’d have a terrible time sanding once it was built. So I sanded all of the boards before I put the project together, finishing with 220 grit fine sandpaper. Then I removed all sanding residue - this is crucial - we are putting the top coat on with the PolyShades®, so if there’s dust on the project … well it’s here to stay when the finish goes on.
With the project ready for stain, I mixed the PolyShades® up well. I also took a second to test a scrap piece of wood just to make sure the color took well. If the scrap appears blotchy, use Minwax® Pre-Stain Wood Conditioner first.
Finish Application

Then I just dipped about an inch or so of a natural bristle staining brush into the can, and then tapped the can to remove excess - kinda like I do with paint.

And then I just began applying a thin, even coat. The color is going to be perfect for my kitchen cupboard - I just know it!

Maintain a wet edge as you apply the PolyShades® with your brush. Once stained, I went over the project again by tipping off the surface with the brush. You do this by holding the brush at a 45° to the project, and lightly running the bristles over the entire length of the wood. This removes any start/stop marks and bubbles.
Once the first coat is on, let that dry for at least 6 hours. Then add one more coat (two coats are recommended for protection and beauty)

Before applying the second coat, sand with the 220 fine grit sanding paper - very lightly! And then remove sanding dust and apply the second thin coat as you did the first coat. Additional coats can be added to deepen the color.
If you love the color after two coats, but want to protect the wood even more, you can also add Minwax® Fast-Drying Polyurethane on top.
Brushes should be cleaned with mineral spirits following manufacturer’s safety recommendations.

I love how this simple finish both protects and color matches my little kitchen cabinet door organizer! Thank you Minwax for today’s finishing tutorial!
XO Ana
Comments
efmolly
Tue, 05/07/2013 - 14:53
My Experience with Polyshades