
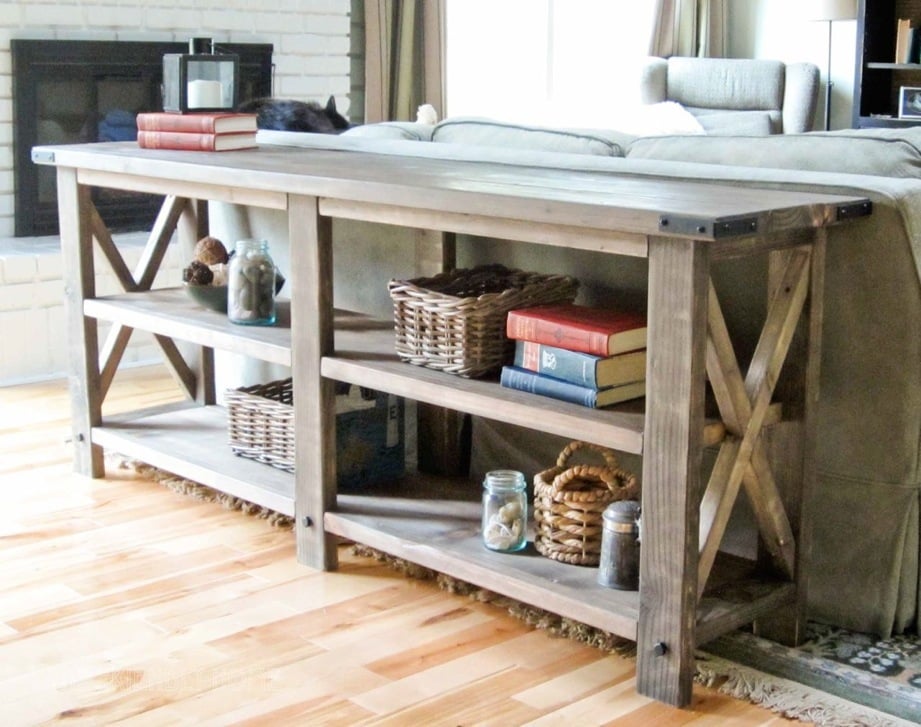

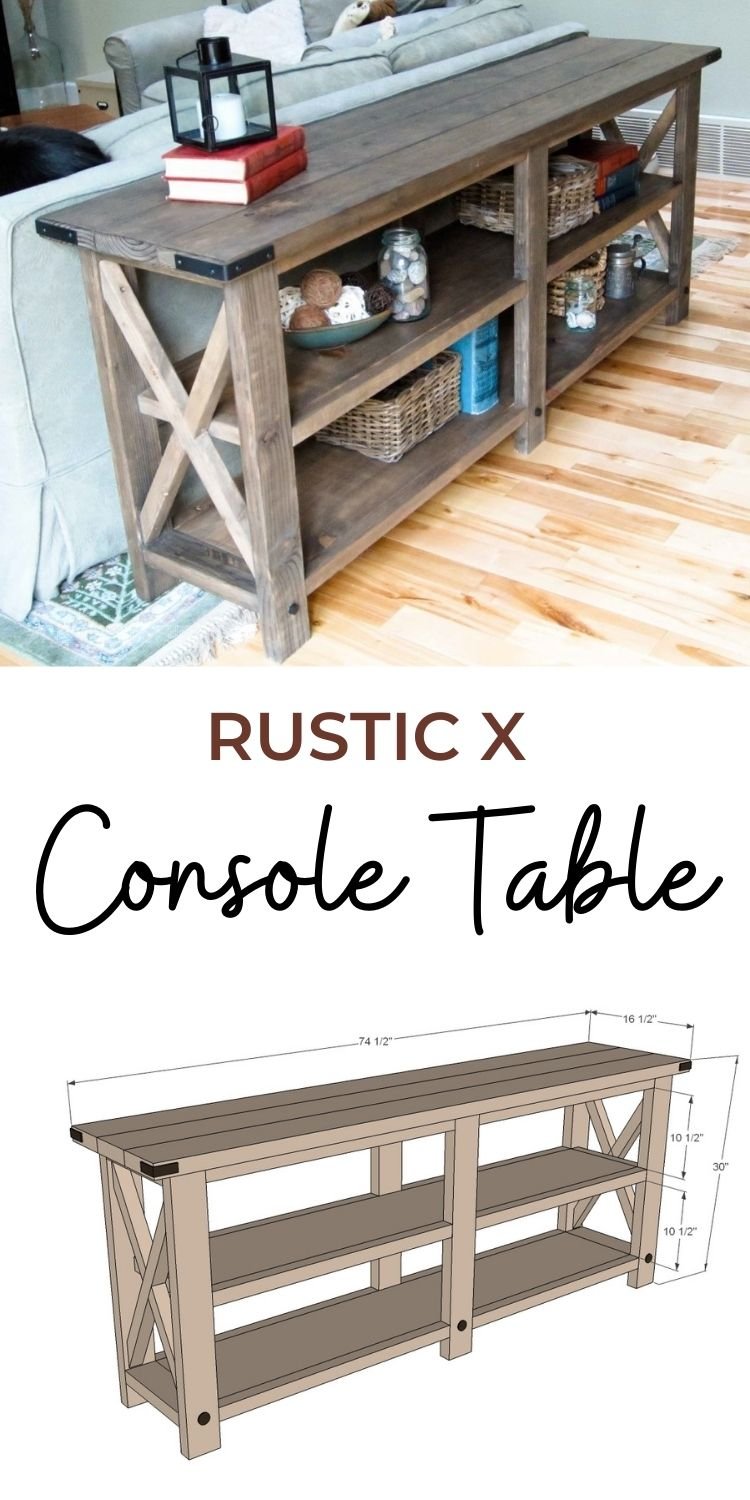
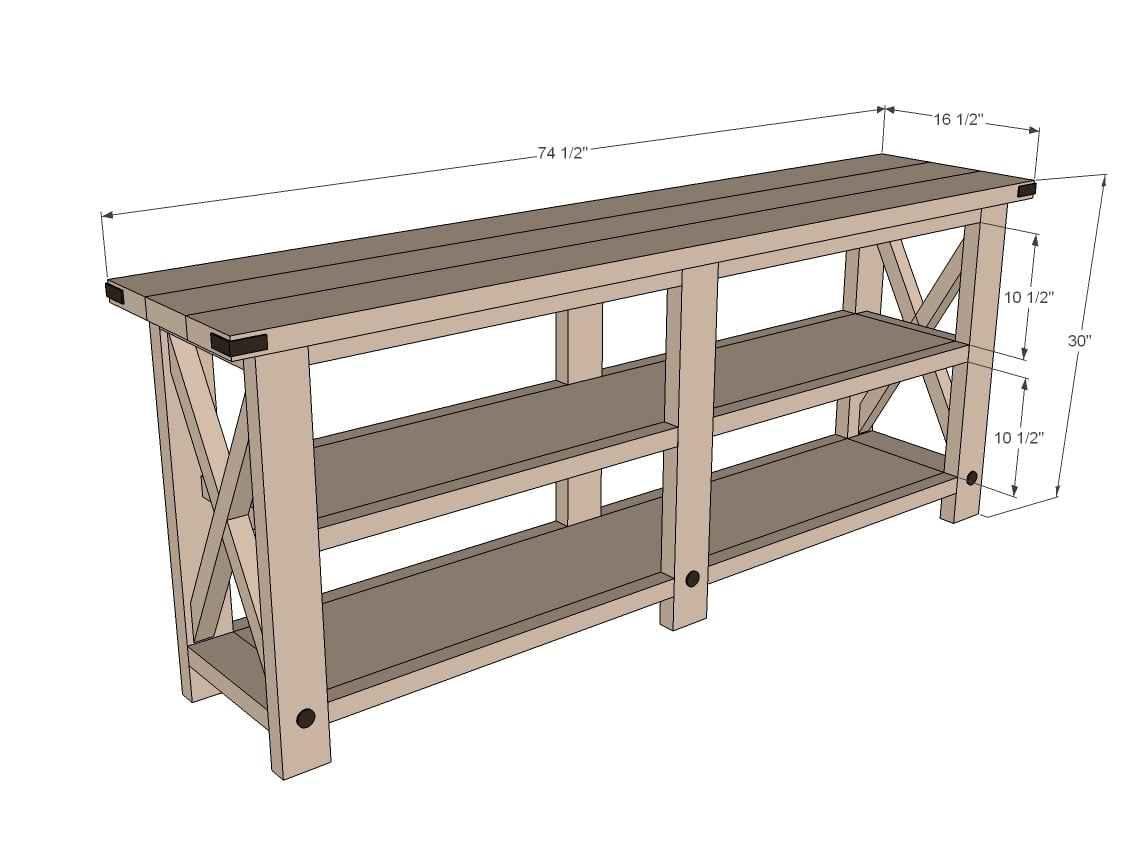
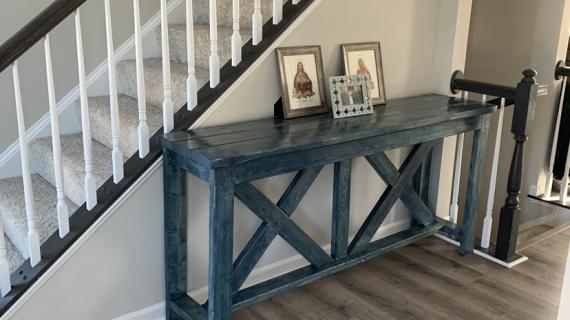
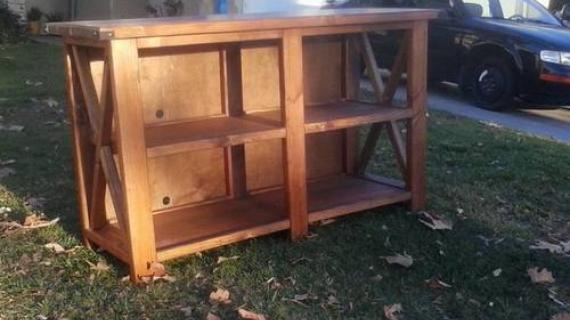
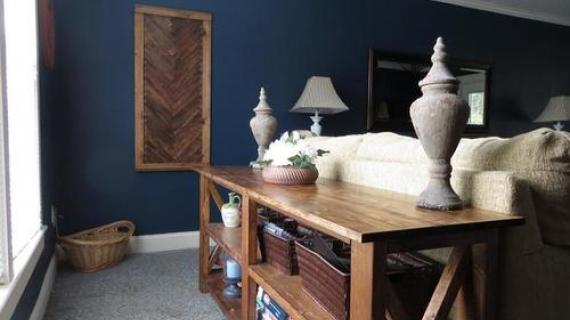
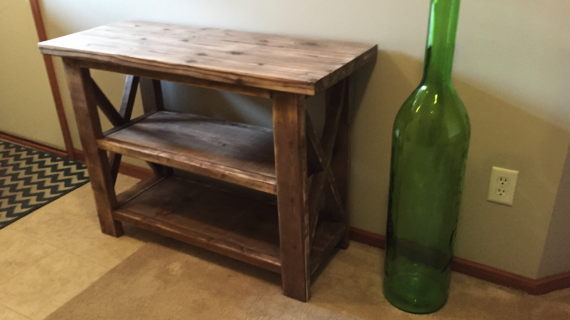
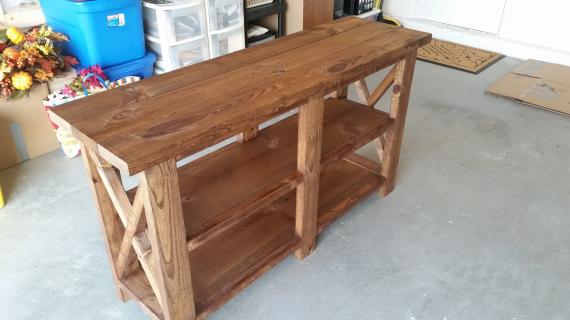
Build the super popular Rustic X Console Table with Ana White plans. This woodworking project has been built thousands of times and loved the world over. Its made of construction lumber (yes, 2x4s!) and the plans are easy to follow.
Also in this Collection: Rustic X Coffee Table Plans, Rustic X End Table Plans and Rustic X Bench Plans

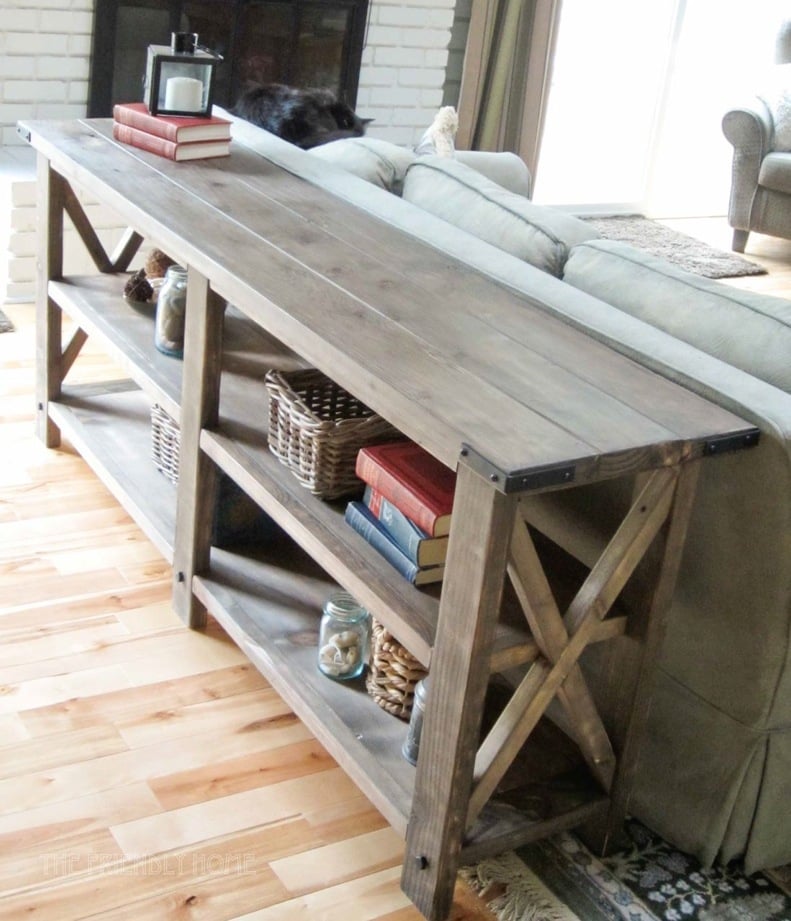
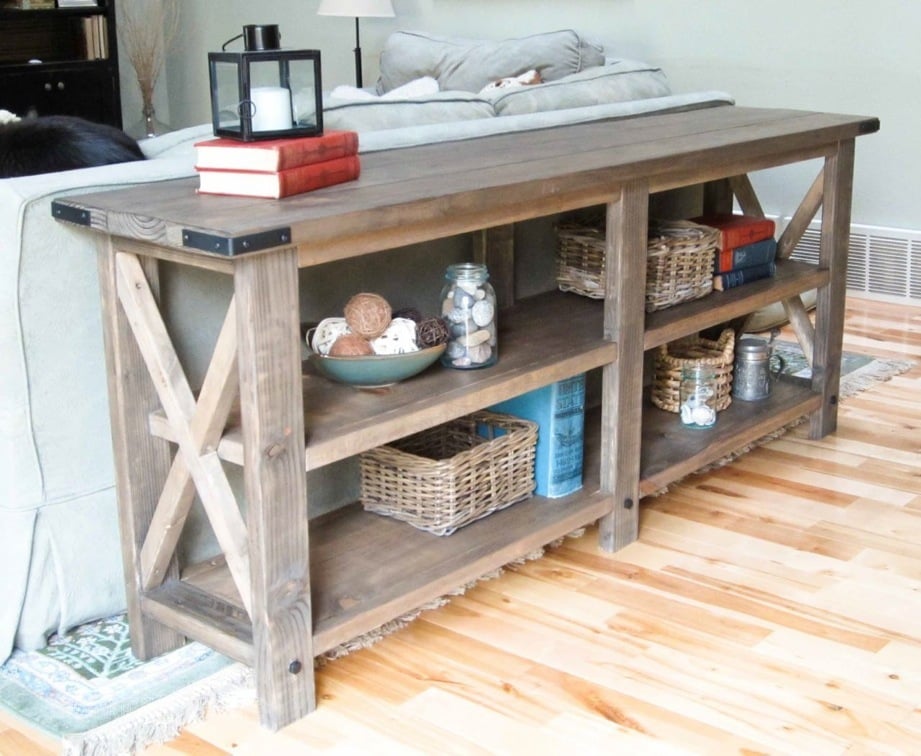
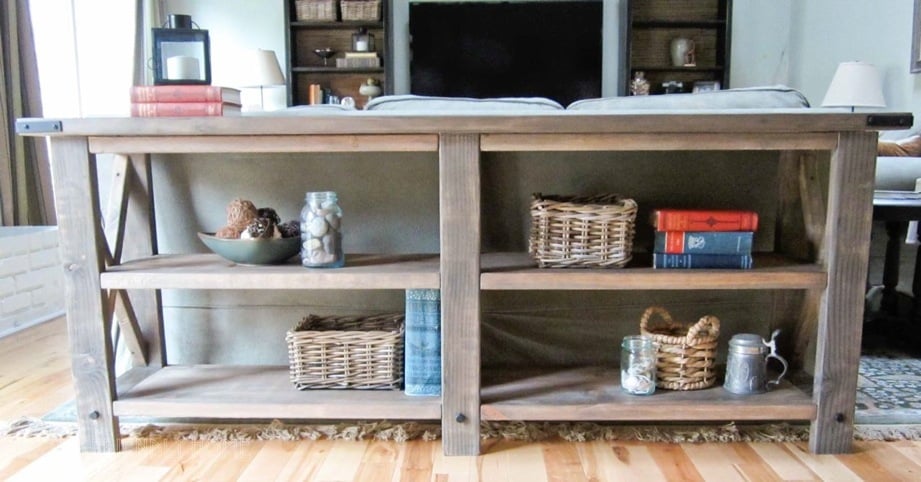

Rustic X Console Features
- Solid wood design accepts stain beautifully and paints up nicely
- Extra long length perfect behind sofas, sectionals, as a dining room buffet, or under the TV
- Storage shelves perfect for displaying and storing
- Storage shelves fit most standard baskets
- Beautiful planked top is full of texture
- Step by step plans have no exposed screw holes

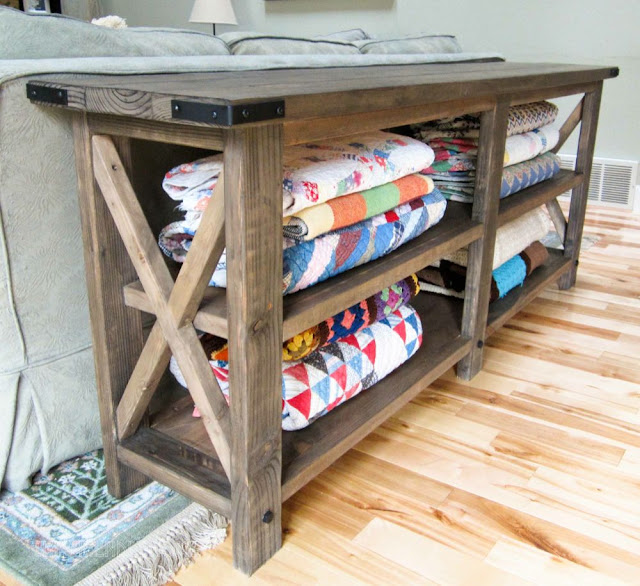
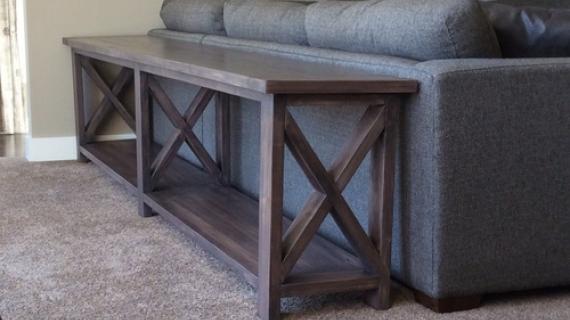
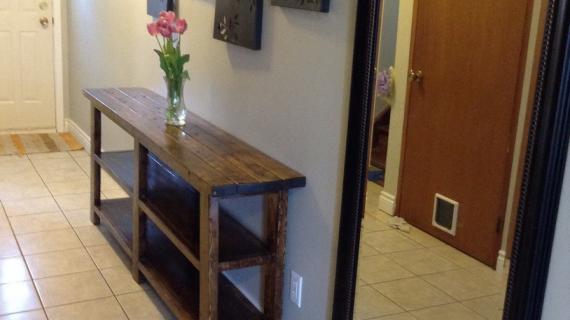
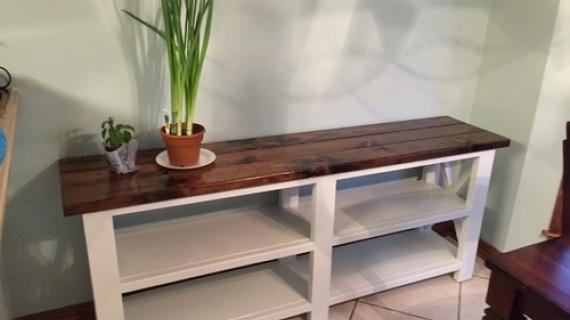
This beautiful Rustic X Console was built by Hillary from The Friendly Home. I encourage you to take a second to stop over to The Friendly Home and read more about Hillary building this console, the finish she used, and the story behind those beautiful quilts!
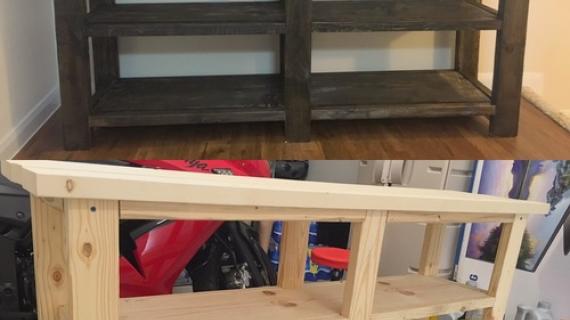
Easier to Build Option: Farmhouse Console Table Plans
For beginner or novice builders, we have added a easy to build option for this plan, the Farmhouse Console Table plans. It does NOT require pocket hole screws and is less expensive to build (but there is exposed screw holes). There is also a video tutorial to help with the build.
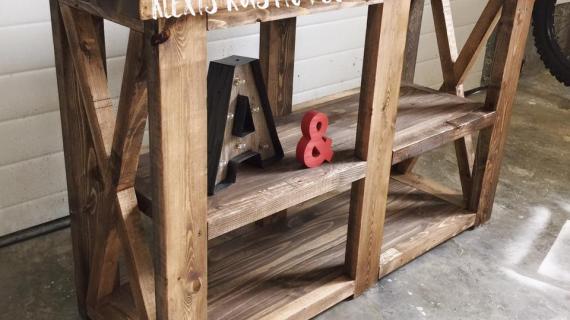
Pin For Later!
Preparation
- 6 – 2x2 @ 8 feet long
- 3 – 2x4 @ 8 feet long
- 1 – 1x12 @ 12 feet long
- 3 – 2x6 @ stud length or 8 feet
- Corner hardware/decorative bolts
- 1 1/4" and 2 1/2" pocket hole screws
- 2 1/2" screws
- 12 – 2x2 @ 30”
- 6 – 2x4 @ 28 1/2"
- 2 – 1x12 @ 63 1/2"
- 5 – 2x4 @ 11 1/4"
- 2 – 2x2 @ 11 1/4"
- 2 – 2x2 @ 22 1/2" (long point to short point, ends parallel, cut at 60 degrees off square)
- 4 – 2x2 @ 11 1/4" (longest point to shortest point, long end cut at 60 degrees off square, short point cut at 30 degrees off square, angles are in same direction)
- 3 – 2x6 @ 74 1/2"
NOTE: If your saw does not cut 60 degrees off square, you will need to mark cuts with an angle square or compass/protractor and cut angles with circular saw or jigsaw. Practice this cut first on scraps!


Please read through the entire plan and all comments before beginning this project. It is also advisable to review the Getting Started Section. Take all necessary precautions to build safely and smartly. Work on a clean level surface, free of imperfections or debris. Always use straight boards. Check for square after each step. Always predrill holes before attaching with screws. Use glue with finish nails for a stronger hold. Wipe excess glue off bare wood for stained projects, as dried glue will not take stain. Be safe, have fun, and ask for help if you need it. Good luck!
Instructions
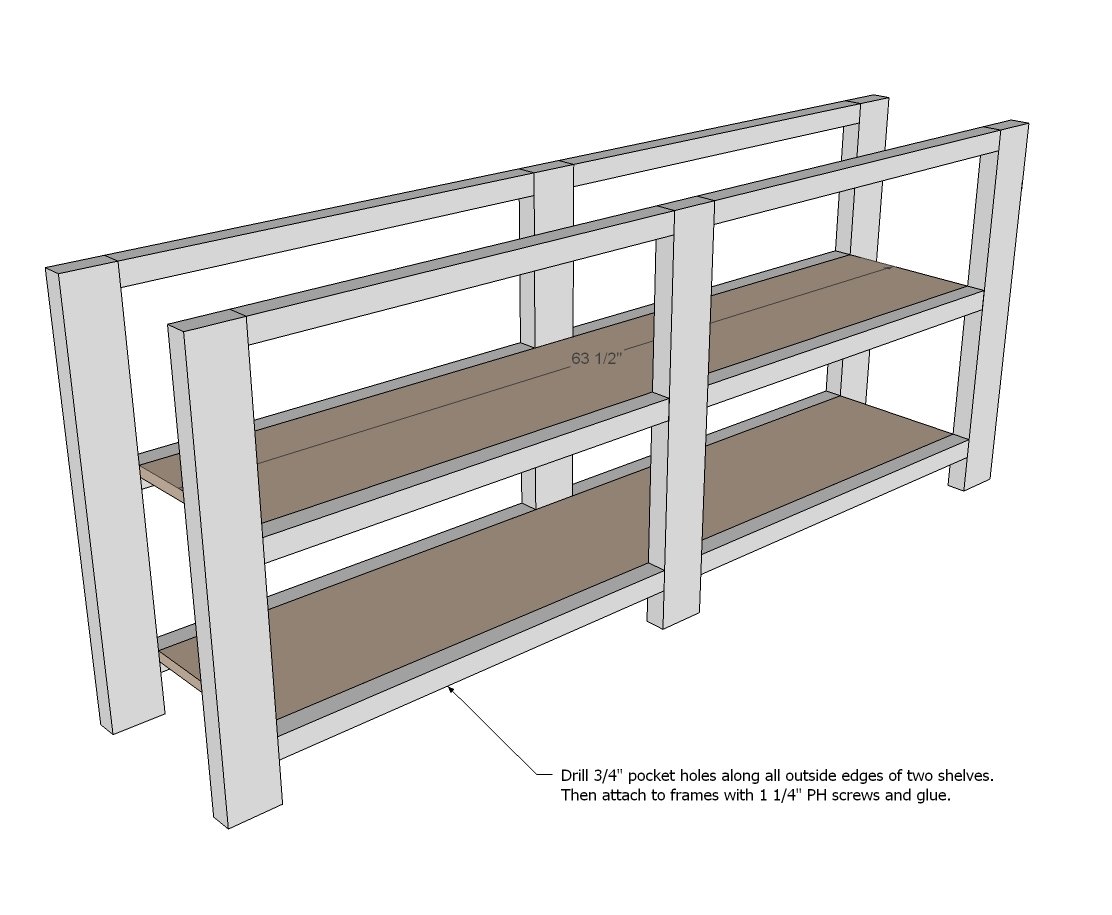
Step 1
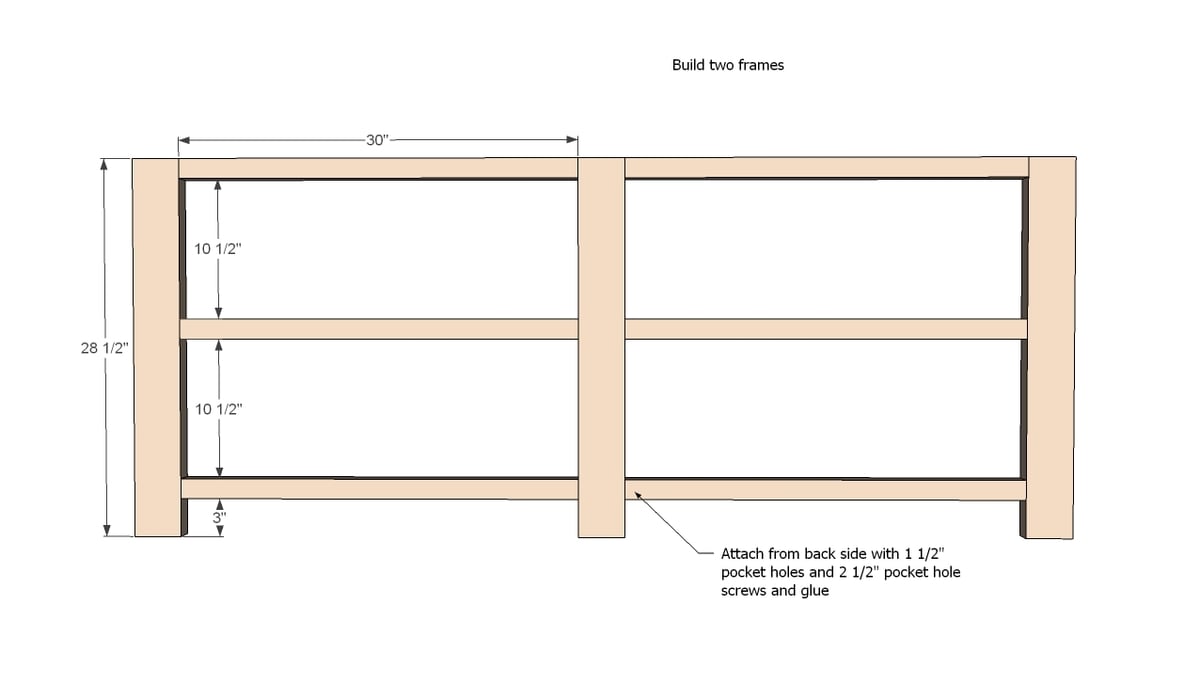
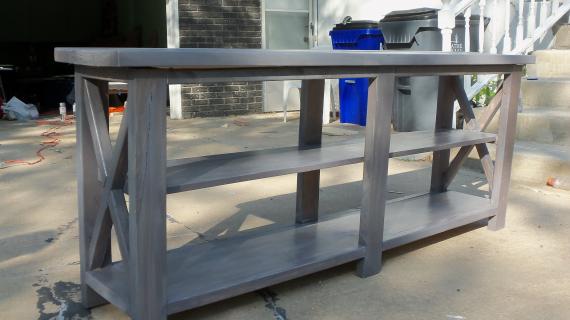
First build two frames as shown in diagram.
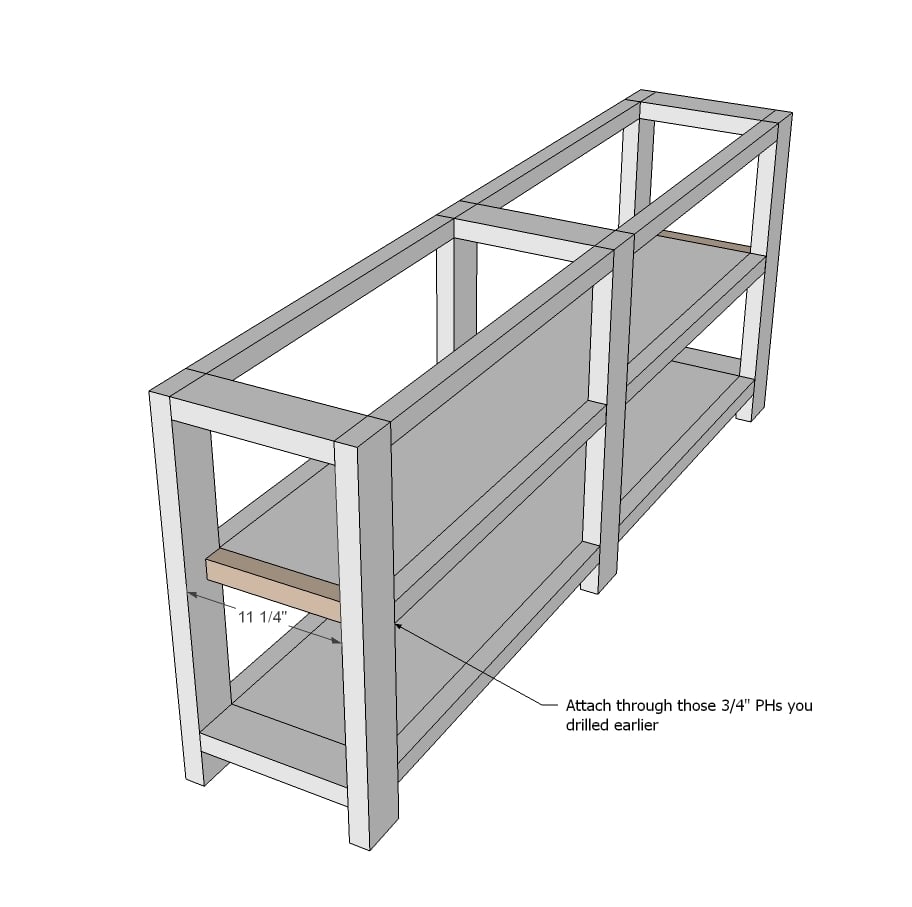
Step 2
Then attach frames to shelves. NOTE: I recommend drilling 3/4" pocket holess with Kreg Jig around all sides of each shelf for attaching all shelf trim with 1 1/4" Pocket Hole screws later on.
Step 3

2x4 end supports need to be the same width as your 1x12 boards - expected to be 11 1/4" wide. Measure the width of your 1x12s and cut the 2x4 supports to match this width.
Attach to frames and shelves. For attaching to frames, use 1-1/2" pocket holes with 2-1/2" pocket hole screws.
Step 4
Add trim to the shelf.
Step 5
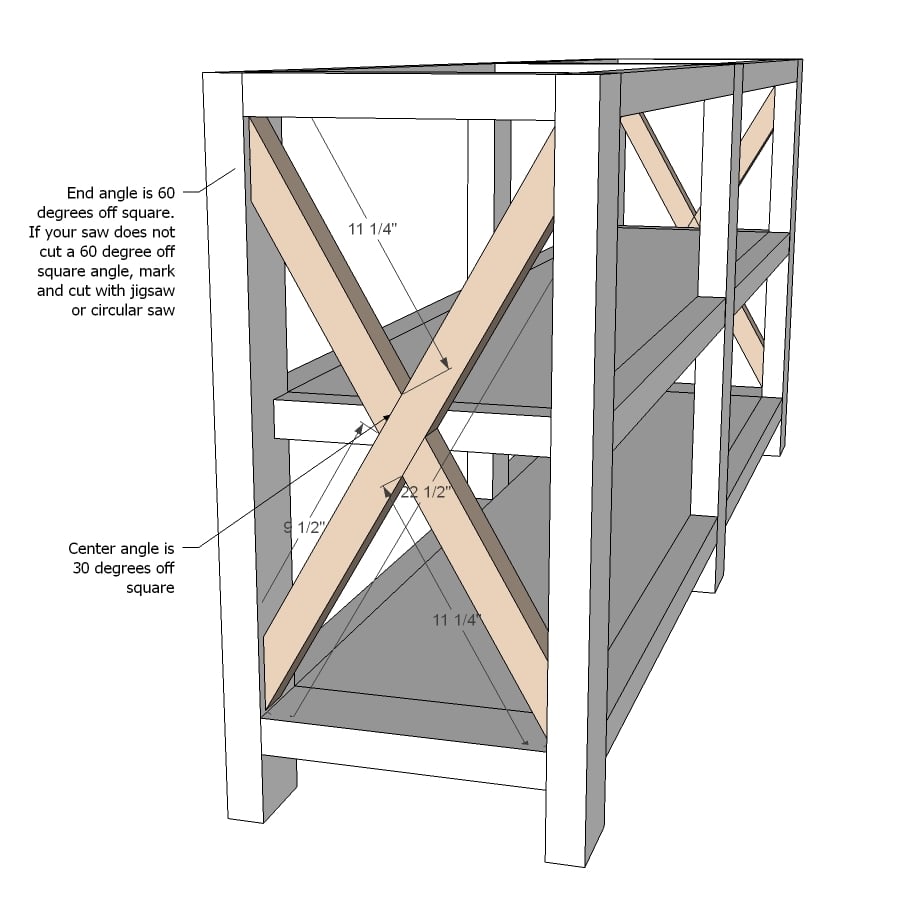
The X can be cut by just placing the uncut board alongside it's permanent position, and marking the overlap with a pencil, and then cutting the pencil lines with a circular saw or jigsaw.
First do the longer piece, then place inside the project, but don't attach yet.
The figure the smaller piece cuts and make those cuts.
Fit the smaller pieces in the project, and trace where they need to be joined to the larger piece.
Remove all pieces and attach the smaller pieces to the longer piece.
Then place the entire X inside the opening and attach.
Step 6
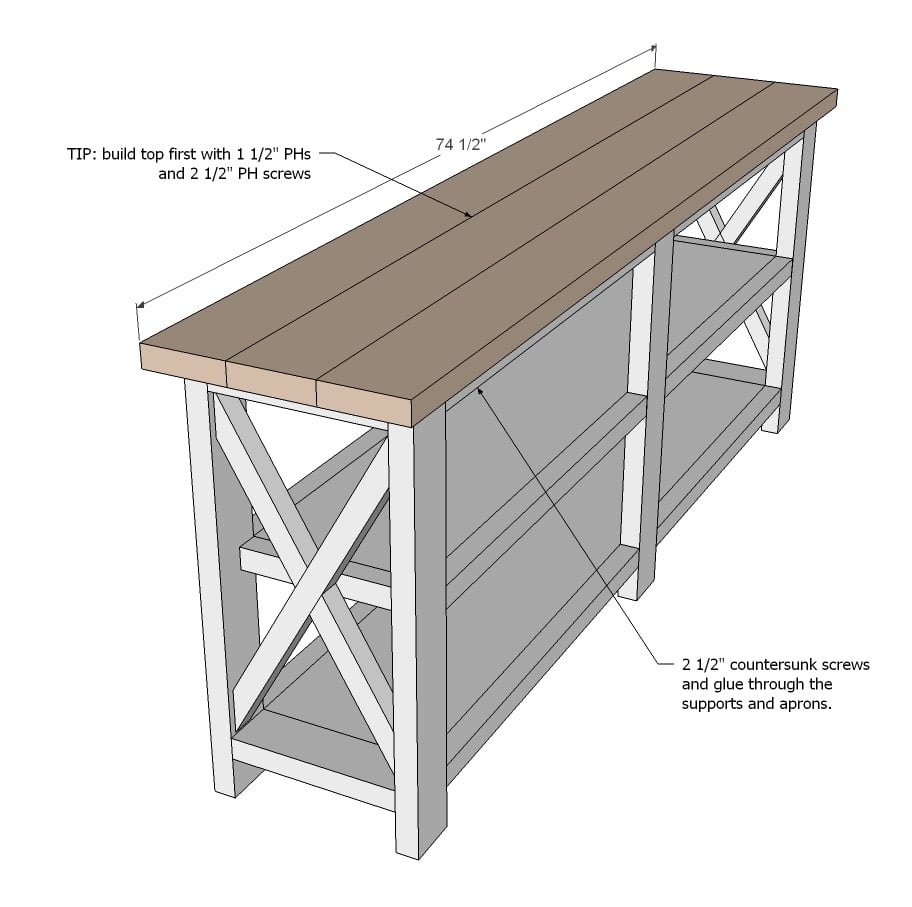
And then add the top. You can build top first with 1 1/2" pocket holes and 2 1/2" pocket hole screws and then attach to top through 2x4/2x2 aprons or just plank the top for a rustic look - it's up to you.
TIP: Just use your 2 1/2" pocket hole screws to attach the top so you don't have to go out and buy more 2 1/2" screws.
It is always recommended to apply a test coat on a hidden area or scrap piece to ensure color evenness and adhesion. Use primer or wood conditioner as needed.

Comments
snomii
Wed, 09/11/2013 - 12:13
Perfect! I was looking for something like this.
Owning my first home, I'm a real novice when it comes to wood-working. But I do have a knack for it, so I can't wait to give my hammer hands a go! This console is exactly what I was looking for for my newly renovated kitchen! Thank you for posting it. I can't wait to try it!! I'm blogging about my kitchen reno, and posted about this... that's how excited I am!!
somiskitchen.blogspot.com
Wade Arthur
Thu, 10/03/2013 - 08:48
Frames to Shelves
I have drilled out all of the PH 3/4 of an inch around the outside of the shelves. When I did a test on a 1x12 scrap piece of wood to see how far the 1 1/4 inch screw went though. The screw came out the other side of the wood less then 3/16. Any help on what i am doing wrong?
dfreedman
Sat, 11/02/2013 - 23:59
Decorative hardware
Ana, where can I pick up the decorative hardware such as the corner hardware and decorative bolts??? Very cool plan, looking to build the X console, two end tables, and the coffee table for our living room. Thanks in advance.
pdxbrit
Mon, 11/25/2013 - 08:54
Great article, my x-console
Great article, my x-console is now awaiting a coat of oxidizing solution before being sanded again and finished with PolyWhey. A quick tip for folks whose compound mitre saws cannot get the angle they want (I modified the plans slightly, so I needed to hit a 27° angle). Use your 45° metal quick square to offset the angle.
For example to get the 27° angle I would have used 63° on my mitre saw, but mine maxes out at 61.5°, so instead wedge your 45° quick square between the saw guide and the piece you're cutting and set your mitre saw to 63°-45°=18°. Bingo you end up with the cut you need.
Can't wait to have this one finished so I can start on your farmhouse bedroom tables next!
dfreedman
Sun, 12/01/2013 - 21:12
square, sanding, finishing
I've started my cuts and PH drilling to get things prepped for assembly when my 2.5" PH screws arrive (local HW store didn't have them).
It seems to me that given the few checks that I've made, not everything is perfectly square. I don't have a Kreg assembly table, I have a workbench (bench solutions) and some bar clamps. My intention is to try to clamp pieces to my bench as I assemble with PH screws to get the best joints. I've read that in building furniture having everything square is really important. I mean, of course I want the thing to sit FLAT on the floor when I'm done without it wobbling around. I took time to get the straightest boards I could find. I checked the miter saw I'm using and the fence is square and does not move. I cut all pieces using the same saw. Am I missing something? How do you get every angle on your piece of furniture perfectly square? Am I just being anal retentive? If I'm going to spend a couple of days at this, I just want to wind up with a good piece at the end.
OK, sanding. I bought 120 and 220 grit paper and I have a palm sander. How do I know when I've done a good sanding job? How much sanding is too much sanding? I'm not trying to change the dimensions of my board or go crazy, I've just not prepped for finishing before. I honestly just don't know what is "good enough" versus "not good enough" when it comes to sanding.
Last, finishing. I purchased several stains which I'll be trying on scraps from the same lumber I bought to build the project. I'm not so concerned about the staining process as finishing. I asked a guy at Home Depot about Poly Satin finish. I told him I didn't really want the piece to be shiny, more "matte" but protected, so he recommended a finishing wax so that's what I picked up. Any advice on how best to use this and get the best results? Any tutorials out there?
Sorry for all the questions and thanks in advance for anyone who takes the time to try to help me. Cheers.
In reply to square, sanding, finishing by dfreedman
Lady Goats
Mon, 12/02/2013 - 07:29
Let's try to answer your questions :o)
First, square. Cutting is the first place to screw this up and the most difficult to fix. The best way I've learned to check is to make a cut at the end of a board (should be done anyway since not all board'd ends are square) and see if it's cutting square. The fence on the saw may be squared, but the blades have a tendency to shift (and easily, in my case). If it's square, you're good to go. Just make sure to check often.
If it's not square, either google "How to square up a miter saw" (using your saws manufacturer or model number in the search will help with your particular saw) or, if you have your instruction manual still, check there. The first time may take a while, but it's a good thing to learn to do as miter saws come out of square often. After you get it squared up, make your cuts and check that it's square often.
When assembling, the method you described should work. Just make sure that you check for square at every joint.
Sanding. Ohhhh sanding. I hate sanding. Most of the time, sanding is best done before the piece is assembled. You may have to sand after it's assembled if the joints don't line up perfectly, but it's easier to do a final sanding than to do all of your sanding once it's assembled.
I don't ever take my own advice, however, and always end up sanding after it's assembled.
I would start with a lower sanding grit. Usually 60 or 80. I've started with 120 before, however. It took a little longer, but it got the job done. Go over each board thoroughly (if you're afraid you won't be thorough, you can draw over the entire board with a pencil before sanding, and you know you've done it well when there is no more pencil left on the board) with the lower number grit and then do the same with the higher number grit. The board should feel very smooth when you're finished with no splintering.
Finishing. I would suggest following the directions on the back of the can. People use furniture wax and paste with great results, but techniques vary with each brand (this is my way of not being very helpful :-p).
awilson
Sun, 12/15/2013 - 20:57
Decorative hardware
Where did everyone buy their decorative bolts and L straps?
dfreedman
Sun, 12/15/2013 - 22:08
Thanks + Feedback
Thanks for the response.
I checked my saw, everything is square. I double checked my boards since I didn't cut the ends of the boards I purchased, those were square too. I do have some warped boards which are presenting a bit of a challenge. I did my best to pick the best available but still wound up with some junk it seems. Almost everything fit together nearly perfectly except a couple of pieces. As an example, one of my 2x4s which connects the 'front frame' to the 'back frame' sticks out the side further than I'd like, it's not flush with the sides of the legs like it's supposed to be. So my shelf is just slightly too long. Grr. Can I use a hand plane or something to shave off some wood and fix this? Oh well, it's my first piece.
My 1-1/4" PH screws were poking through my 2x2s when attaching the shelves. Not desired. Had Kreg Jig set to proper settings so that's not supposed to happen but I saw nobody else post about that here. Also my Kreg Jig came with a 6" square bit for the PH screws, so that along with the size of my drill made it very difficult to get an angle on the pieces joining the front and back frames together.
Sanding. I agree, on the next project I will absolutely sand before assembly then do a final after assembly. Sanding while assembled is a pain.
I got several stains. I recommend taking some scrap and trying one or more coats of stain to see what depth of color can be acheived. Depending on the color, a second coat can make a big difference. Try layering multiple stain colors, you will be surprised how this doest always yield the color you thought it would. Also the longer the stain stays on the darker it gets. If you want to be really anal, time what you're doing so you can repeat your scrap results on your final piece. Highly recommend experimenting on scrap before attempting to stain your actual piece.
Tried the wax finish. Was looking for more of a matte / natural looking finish without the reflective type shine. The guy at Home Depot rexommended the wax even over the satin poly urethane finish for the look I'm going for. You can rub it on, it goes on very thin and it will dry in about 15min, let it dry longer though depending on ambient temperature. Then go back and polish it with a clean smooth cloth (I used a staining cloth). You can get a very mild shine by buffing out the wax... barely noticeable but slightly more shine than just the bare wood with the stain on it. Looks and feels great. No multiple coats needed with sanding in between each one. Much less work if you're impatient but still want to protect your wood. Annual upkeep will be necessary I assume but as this is a decorative piece for us I'm not too concerned about it taking a massive beating.
This is my first project (aside from simple step stool which I don't consider real furniture like this piece). I'm learning a lot. It's not rocket science but it is more difficult to make a 'perfectly fitted' piece of furniture out of cheap pine or in my case douglas fir than you think. The plans / instructions are great. For me the lack of the level of quality I'd like to acheive is definitely part lack of experience (zero woodshop classes / skills) along with probably lack of proper technique or tools to ensure precision cuts and measurements. I think proper fit is the first most important thing to make your piece look great. Others won't notice your mistakes so easily but you will always know where they are and they will bug you. Second, I think do not rush through sanding or prepping your wood with pre-stain conditioner. Finally, test your desired finish on scrap to ensure a satisfactory look on your final piece. Take your time. If there's one thing I've learned it's that making even just 'decent' furniture is not a rush job and making fine furniture will require tons of practice.
Cheers!
dfreedman
Sun, 12/15/2013 - 22:32
Decorative Hardware
Lots of people have asked (including myself) and then I realized this has been answered several times already.
I shopped around but couldn't really find what I wanted so I did what others on the forum have done.
I bought 1/2" (width) x 1" (length) coarse threaded stainless hex bolts at hime depot. Ask a clerk they will take you right to them. They only had 1" depth in stainless at my store which was annoying. I could have got 3/8" x 1" non-stainless instrad for half the price but on a piece this size I wanted the larger bolts as I think the 3/8" will look too small. I plan to pre-drill my holes. Spray paint flat black (I found a can for $0.99).
L-straps / brackets at Home Depot too. You COULD get 1-1/2" wide straps, technically these should be the same width as your 2x4s (which are really 1-1/2" wide), but I wouldn't go this wide on the straps unless you want your kids banging their heads on these sharp metal corners. I'd rather they bonk wood than metal. So I went with slightly less wide straps, maybe 1". This would leave 1/4" on top and bottom of the strap when mounted which also isn't a bad look to still see some of the wood there. Same, spray paint flat black.
Hope this helps.
Shamroxx
Sat, 12/28/2013 - 17:50
Clamping Question
Hello! I'm new to the site, and to building things in general. I was wondering if someone could give me some advice on something in Step 1 for this plan. I was wondering how everyone else goes about clamping their 2x2 and 2x4 in place when building their frames for this console. Is there a special clamp I would need to clamp them together so that I can screw them together without any shifting?
Also, am I under the right assumption that the actual dimensions of the 2x2 are 1 1/2 x 1 1/x2"? I purchased some earlier today, and noticed they're about 1/4" thinner than the 2x4's that I have. I was thinking this would create issues when trying to put the board for the shelf in since the 2x2 wouldn't be flush with the facing of the 2x4.
If anyone out there can help guide me along the way, I truly would appreciate it! Thank you to anyone who responds in advance!
dfreedman
Thu, 01/02/2014 - 08:44
Response: @Shamroxx
Clamping:
I have a workbench and some Irwin bar clamps (search Home Depot / Lowes). I put one side of the clamp on the underside of my workbench and the other side on top of one of the frame pieces (clamping a frame piece to the bench to hold it very still). I used a couple of clamps to hold the board very still. Then I just held the other pieces in place as I fasted my PH screws. The piece you are holding will 'pull away' from the other board at first, but once the PH joints tighten up, everything should be flush. This worked out well enough for me but it would have been nice to have a Kreg Right Angle Clamp (search Google).
Dimensions:
Most lumber is slightly short of the dimensions listed (nominal size). Google search 'commercial lumber sizes, engineers edge' they have a nice chart for you. The 2x2s should be just as thick as your 2x4s. Meaning if you look at the 'front frame' (for example) you should have (3) 2x4s (vertical) and (6) 2x2s (horizontal). The 2x2s should be the same thickness as the 2x4s... meaning that when assembled, the front of the 2x2 will be flush with the front of the 2x4 and the back of the 2x2 will also be flush with the back of the 2x4. I had no problems with this. Take a tape measure with you to the lumber yard when purchasing, know what you are getting before you buy when following plans. Also, the front and back frame 2x2s will be 'thicker' than the shelf board that you mount between them. I didn't see this as a problem really, I just flush mounted the shelf to the top side of the 2x2s and called it good. Pretty sure everyone else is doing the same.
Happy New Year
chlag
Thu, 01/02/2014 - 21:44
Bonjour!
Thanks for the X console plans. I have modified it to make a TV console and really does the work. It looks amazing.
ar377
Mon, 01/13/2014 - 13:57
Question
What happened to my question I asked last week? Weird.
Did anyone build theirs taller than 30 inches? 30 inches seems a little short to me.
tedgray86
Tue, 01/21/2014 - 11:57
Stain
What color stain was used on this project? We like the farmhouse/rustic look.
Thanks
Ted
Mommy_Wong_Wegs
Tue, 01/21/2014 - 22:29
Tools
I am new here, but I LOVE this site. It's the most inspirational and empowering thing I've come across in a long while. I love this console and many other projects and I love that there is a list of tools that are needed. On this project it says a compound miter saw is needed. What size? For this type of project what are the best tools to a girl should invest in? If everything can be done with a smaller, less expensive tool then I don't want to buy a bigger, higher priced tool. Do you have a link somewhere on the site that I might be missing that gives a list of tools that will be frequently used on these types of projects? Sorry for all the questions, I don't mean to be a pest. I am just really impressed with you girls and inspired to try some new things.
khuckaby
Sun, 02/09/2014 - 15:13
Donation Value for Auction
We are making this to donate for an auction for a non-profit I'm involved in. Any ideas on FMV (they need it for the program & tax deductions)?
Cindylee
Fri, 04/04/2014 - 23:21
Pls help
I will like to have the same color on my console what is the step by step to have this this result on my table! Thanks!!
lovinridgebacks
Wed, 04/30/2014 - 13:30
PH fillers
So, I'm wondering if people typically use the pocket hole fillers in all the holes or is that just for anal people. If so, what is the process in filling the holes?
balloongal247
Fri, 05/09/2014 - 12:36
Weight Limit
Does anyone know what the weight limit for this would be? I thought it would be nice to make this with a foam bench seat, as described by one of the chair posts, to put at my kitchen bar in place of old counter height stools currently used mostly as bag rests.
My question is, would it be strong enough for two or three smallish adults to sit on, should the occasion arise? (So, could it hold 300-400lb safely?) I'd probably just use the cheapest grade of lumber, since this might be my first project, and I don't want to invest too much with a bunch of beginners building it. I will buy a kreg jig before working on any projects, so it would be put together with pocket hole construction.
wthalin
Thu, 07/03/2014 - 07:28
X-Bench?
Hello,
Has anyone used these plans and shrunk them down to make a bench? I am planning on making a bench that doubles as a media cabinet. Dimensions will be 60Wx18Hx14D and I was wondering if this will be sturdy enough for 3 people to sit on it. I made the X-side table and that piece was very sturdy so I am hoping this turns out the same.
Thanks for any tips!
michele098
Sun, 09/21/2014 - 15:53
Side brackets
Anyone know where the side black iron brackets are from? I just love the look and want to re-create!
Thanks!!
In reply to Side brackets by michele098
Stephen Peters
Sun, 09/21/2014 - 21:14
They are a regular hardware
They are a regular hardware store item called "angle iron". Just about any hardware store will have them. You will need to paint them black ... dark bronze....dark gray...to get the look you want. I'm just full of ideas....just paint them black. :) You know what.....they are refered to as "L-brackets" also. Have fun with your project.
Angie Overton
Sun, 10/26/2014 - 15:28
Cant wait to make this
I love this table. I don't have the space for one this large so I plan on cutting down the dimensions and making a smaller one. Thanks for the design and the easy directions. Cant wait to make this!
BuckysMom
Thu, 11/06/2014 - 17:02
measurements
Okay, I'm a new builder and I need your help!! I need this to be 6 feet instead of 8. Can someone help me change the cut list so adjust for 6 foot vs 8 foot difference? Pretty please?
In reply to measurements by BuckysMom
Ke1ie
Tue, 10/02/2018 - 18:08
Need the same info!
I’m looking to make this the same size as you... did you ever get the measurements?
In reply to Need the same info! by Ke1ie
Ana White
Wed, 10/03/2018 - 18:51
6 Foot Version
Hi, this plan ends up being 74-1/2" - just 2-1/2" larger than 6 feet.
xiomi360
Thu, 11/20/2014 - 10:41
Kreg jig
Can I use a mini kreg jig for the rustic x console table?
CrpGus
Sun, 11/23/2014 - 11:52
decorative knobs and l brackets
Does anyone know where to find the decorative knobs and brackets?
CrpGus
Sun, 11/23/2014 - 11:52
decorative knobs and l brackets
Does anyone know where to find the decorative knobs and brackets?
In reply to decorative knobs and l brackets by CrpGus
adeath
Mon, 01/26/2015 - 10:38
I used bolts and corner
I used bolts and corner pieces from home depot. I used flat black spray paint from there as well. The corner hardware can be found near where they keep the latches for gates. I screwed the screws for those as well as the boost into a flattened cardboard box to hold them while I applied the paint. You can spray a little bit of the can into a film canister or medicine bottle if you need to do touch-ups once you apply it to the furniture.
jdubb
Thu, 12/04/2014 - 12:28
is this sturdy enough for a
is this sturdy enough for a 50" tv? to use as a media console. im sure it is but have to ask..Thanks!
In reply to is this sturdy enough for a by jdubb
adeath
Mon, 01/26/2015 - 10:41
I think if built properly
I think if built properly that should be no problem. I used fir to build mine and it is not only very sturdy but quite heavy as well. I plan on using it for my 50" set as well.
davis150
Mon, 12/08/2014 - 08:44
Warping
I know with larger tables, like the farm table, there is a concern for warping once the wood dries and acclimates to the environment it is being used in. Is there a concern with this table since it is much smaller? Has anyone here had this table longer than 1 year that knows if it will hold up?
Rolexosborne
Tue, 11/24/2015 - 11:44
No
Not sure if you ever got an answer on this. . I've asked similar questions but most diy-ers don't want to or know to account for wood movement they just use pocket screws and be done with it not knowing the potential problems down the road. . For the top of the table I'd recommend using "table fasteners" that would fit into a Kerf size groove on the "aprons" of this table. The bottom and middle shelves though small may still warp more than you think because they are one 12 inch wide piece. Since the piece is framed all around you could use plywood instead
davis150
Mon, 12/08/2014 - 08:55
Glue??
Also, do I glue the 3 2x6's for the top together or just pocket holes?
czieler
Tue, 12/09/2014 - 10:16
Pocket screw question
On step 1 when attaching the 2x2s to the 2x4 ... which piece does the screw go into and which piece receives it? Do you go from the 2x4 to the 2x2 ... or from the 2x2 to the 2.4?
emilyann
Mon, 01/05/2015 - 11:47
Kreg Jig
Can you do this project with the Mini Kreg Jig? Like this one:
https://www.kregtool.com/store/c13/kreg-jigsreg/p114/kreg-jigreg-mini/
Which jig do people use to make most of the projects on this site? There are so many products on the Kreg Jig site.
In reply to Kreg Jig by emilyann
Ana White
Mon, 01/05/2015 - 12:45
Here are a couple
Here are a couple recommendations
http://www.amazon.com/Kreg-K4-Pocket-Hole-System/dp/B001DYFISG/ref=sr_1…
or
http://www.amazon.com/Kreg-K5-Pocket-Hole-Jig/dp/B00EF3L9BM/ref=sr_1_1?…
Brittney Durkin
Mon, 01/26/2015 - 10:07
modification?
What angles would i use to cut the X at when making a 38" x 18" version of this table ???
Brittney Durkin
Mon, 01/26/2015 - 10:07
modification?
What angles would i use to cut the X at when making a 38" x 18" version of this table ???
In reply to modification? by Brittney Durkin
adeath
Mon, 01/26/2015 - 10:34
Re: Modifications
I have made two of the end table version and one of the console tables. I found that the angle might vary ever so slightly so I scribed my angles by hand. Once you have the base assembled but before you put the top on clamp, or get and extra set of hands, the 2x2 board over the opening at the end of the table. Scribe the angles in from the inside edge of the table. Use whatever kind of saw you have and cut the angle accordingly. Test fit as necessary. For the two smaller intersecting pieces, I put the first piece in place up against the outside edge of the opening and lay the other piece over the opening as before and scribe the 4 angles you need. Take extra care to make sure that the wood is right against the edges in the upper corners. Is you use this method you are almost guaranteed to get the inner angles to line up and give you a perfect X. You can see pictures of my console table here. http://ana-white.com/node/13823
Jared0611
Thu, 04/09/2015 - 07:36
Type of wood?
What type of wood have y'all used for this? I assume pine, but has anybody tried others kinds?
Ana White Admin
Fri, 04/10/2015 - 11:52
Wood
Pine or Douglas Fir are great!
daric127
Fri, 04/10/2015 - 07:48
Corner hardware/decorative bolts
Where did they come from? or where can I find these items?
Ana White Admin
Fri, 04/10/2015 - 11:52
Decorative hardware
Those are just regular L Brackets and Hex Bolts spray painted black.
AmyJ
Tue, 05/05/2015 - 14:08
Quick Question
I'm a newbie to DIY-ing, so I've enlisted my DIY-talented uncle to make sure I do things right. I thought I was following the plans by purchasing the boards listed for another project. However, he informed me that the 1x3, 2x4, etc are actually smaller than the actual dimensions listed. Are your projects based on wood cut down to the actual 1x3 (or other size) or am I safe in purchasing what the lumber yard lists at 1x3, 2x4, etc...? I hope I was able to explain well enough! Thanks in advance!!
stealth517
Tue, 05/05/2015 - 20:11
Board Dimensions
Normally, when you see a project, you will get a "cut sheet" that tells you how much and what size lumber to buy. A 2X4 that you buy at say, Lowes, is actually 1-1/2" X 3-1/2" because they plane the wood into these standardized dimensions. The plans, however, are using actual dimensions as specified.
In reply to Quick Question by AmyJ
Ana White
Wed, 05/06/2015 - 10:30
Hi, your uncle is correct,
Hi, your uncle is correct, here is the actual dimensions of the lumber you
will find in the store http://mistupid.com/homeimpr/lumber.htm
Sunny
Mon, 05/11/2015 - 16:43
plan
Hi I am having a trouble of downloading this plan. It is too big. Is there a way I can get a straight plan and a little smaller pictures?
Thank you
taralynn
Fri, 06/12/2015 - 14:34
Taller and thinner
I am trying to use this behind our sofa, but I need the table to stand taller (at least 33 inches) and not quite so deep (12-14 inches). Can anyone help me with the cut list?