


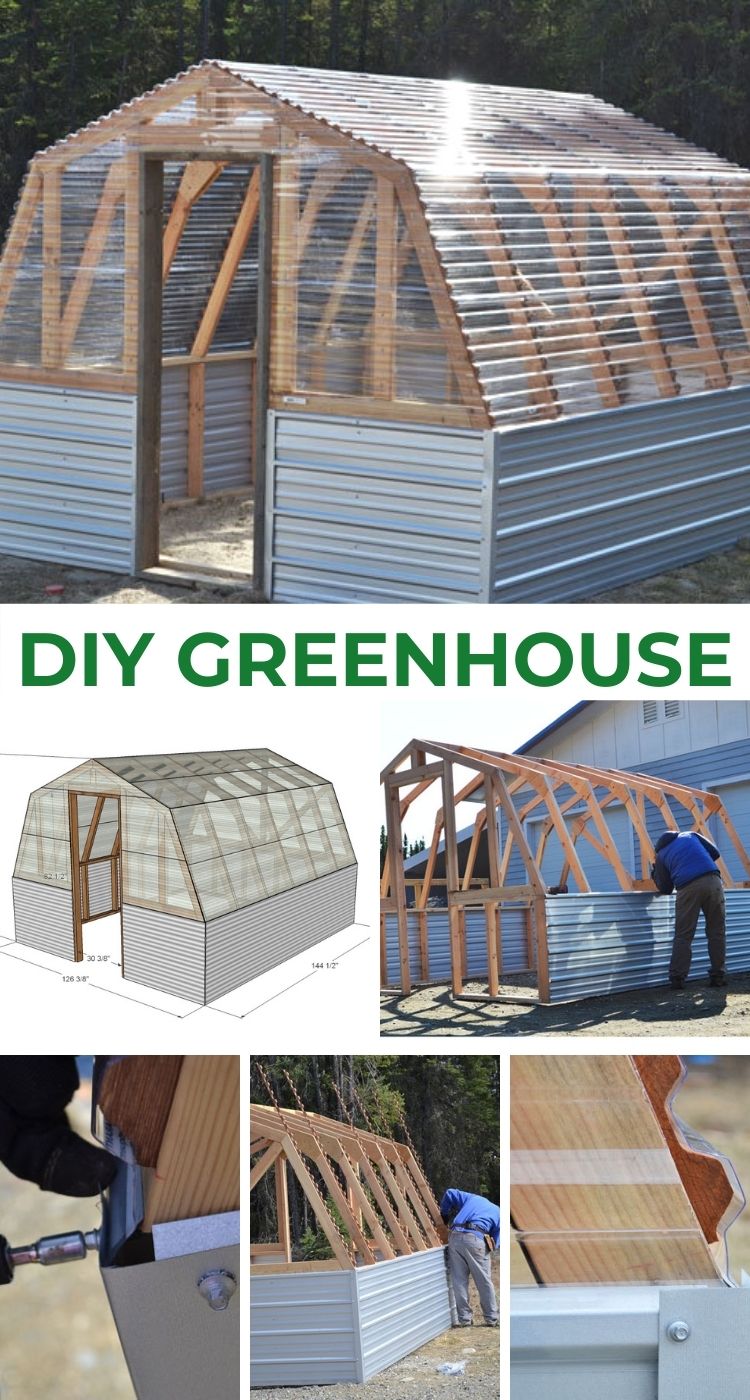
DIY Greenhouse plans - build your own DIY greenhouse, free step by step plans by ANA-WHITE.com
Building your own greenhouse is something you can tackle and save a ton. We built this greenhouse about six years ago, and it still looks brand new and is as sturdy as ever. We are happy to share our plans with you - see below.
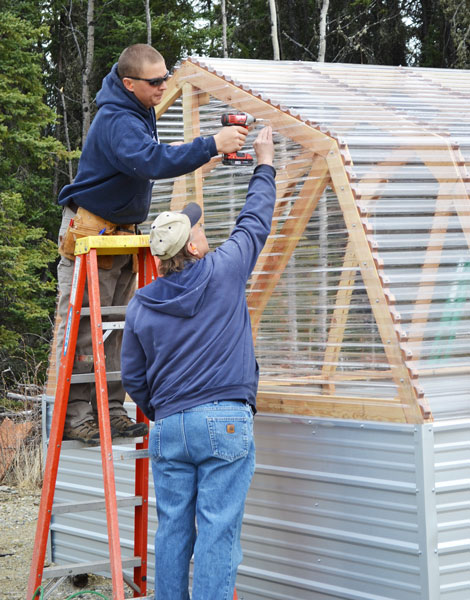
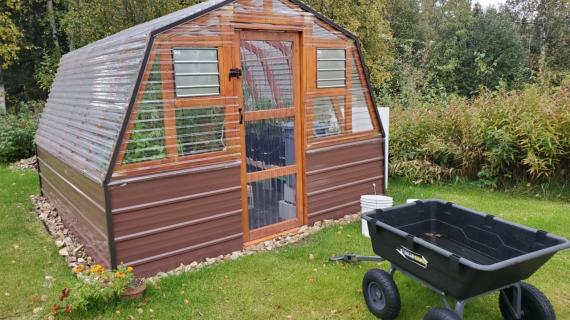
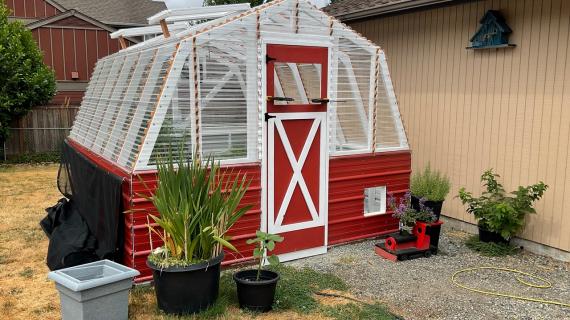
Here's some photos of the build -
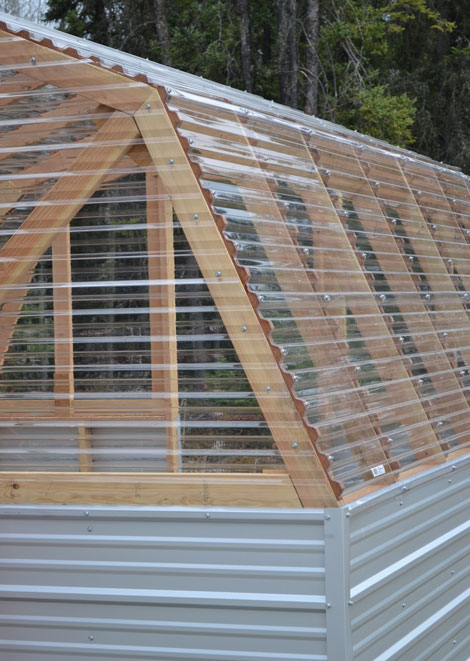
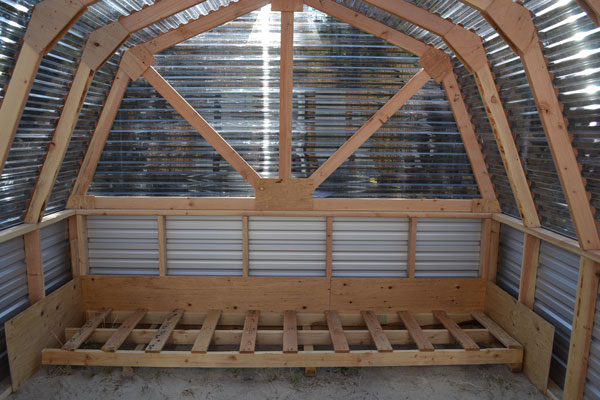
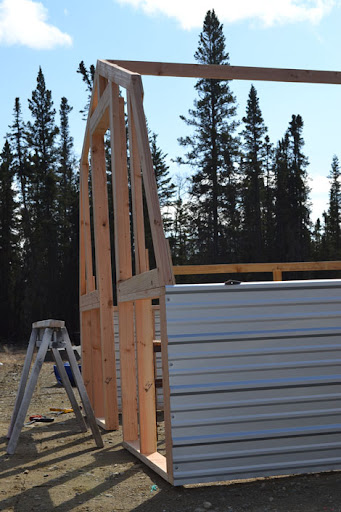
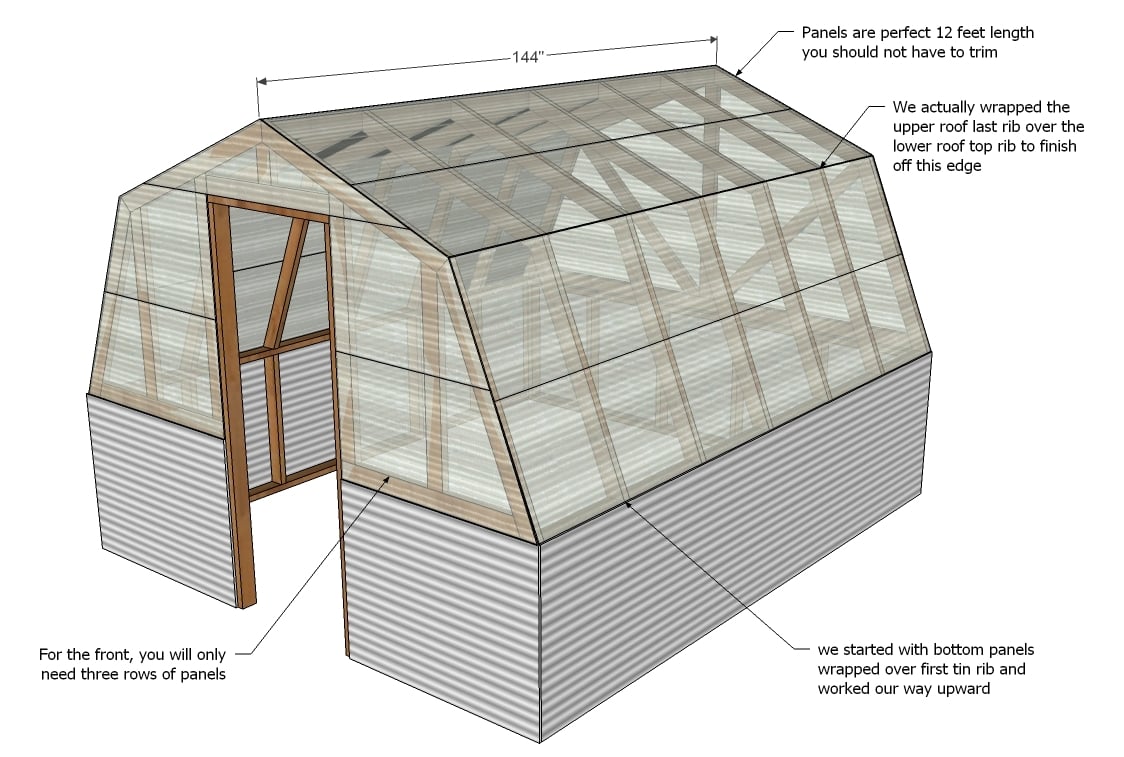
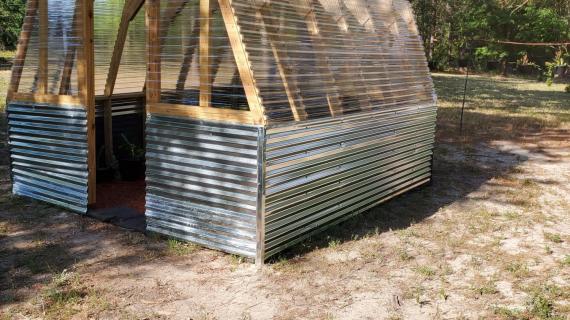
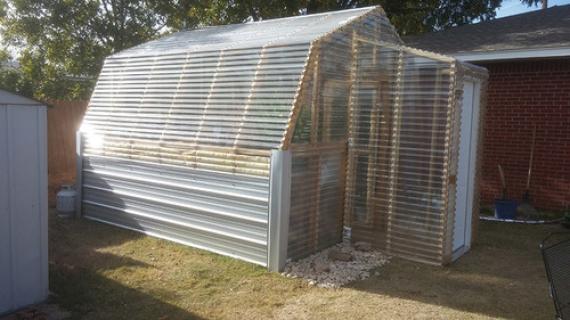
Near completion of the framing stage. We used 12' long pieces of corrugated metal roofing for the side walls.
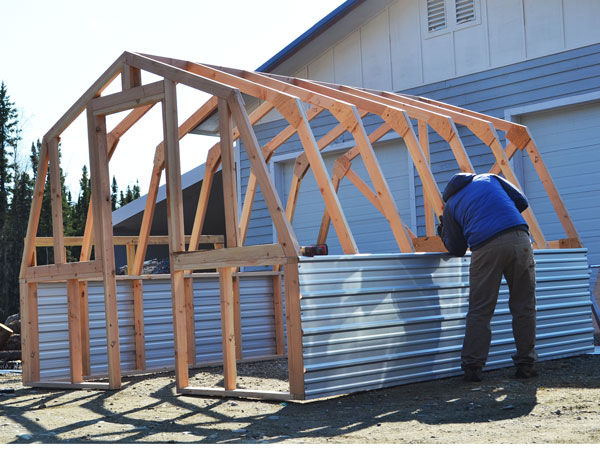
We ran the corrugated roofing horizontal. This was very easy to install and we have had zero issues with this design.
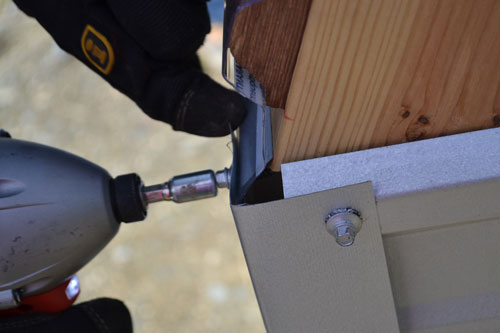
We also trimmed the corners out with metal flashing to make everything look nice and finished.
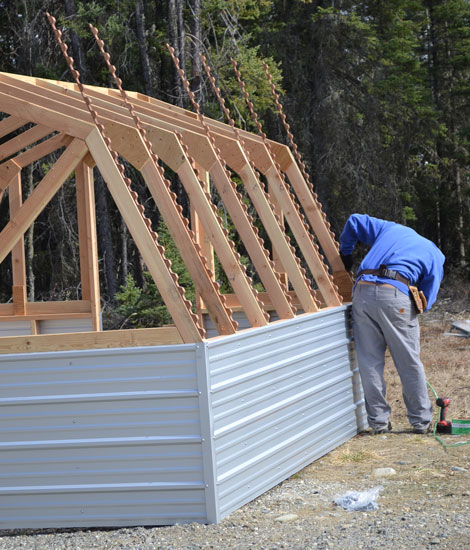
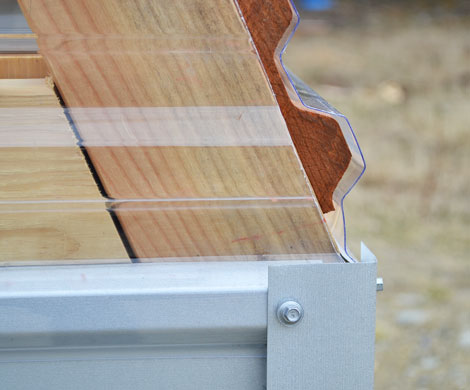
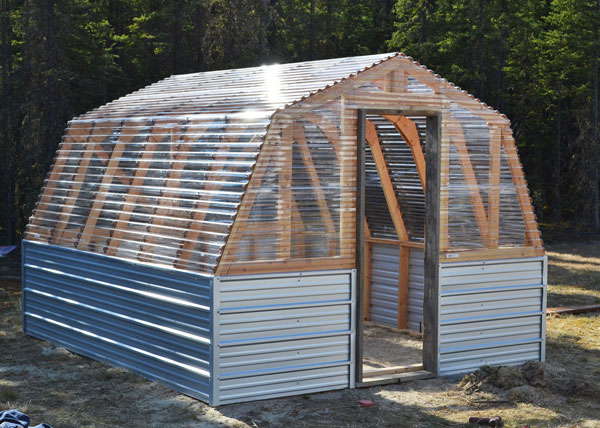
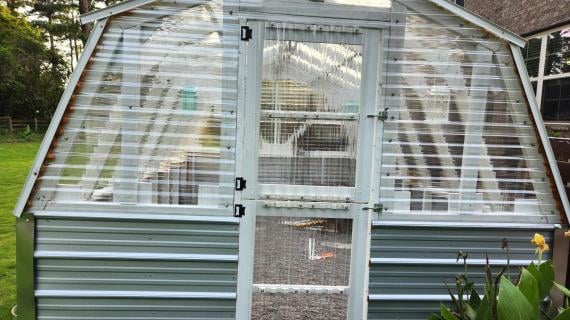
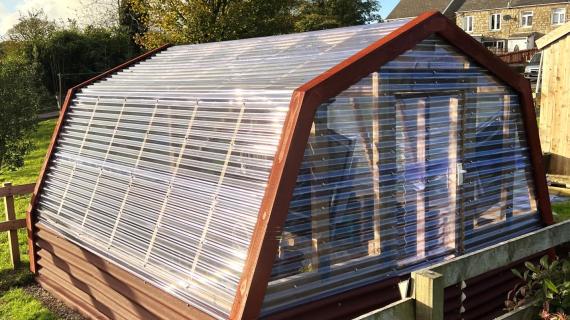
The greenhouse plastic wrapped right over the corrugated metal - like it was meant to be!
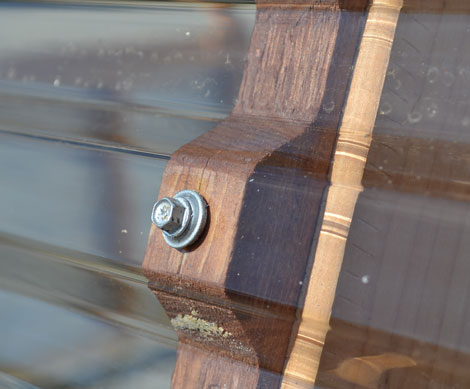
The only part that was slightly tricky was the ends - but really no big deal to add the greenhouse plastic panels.
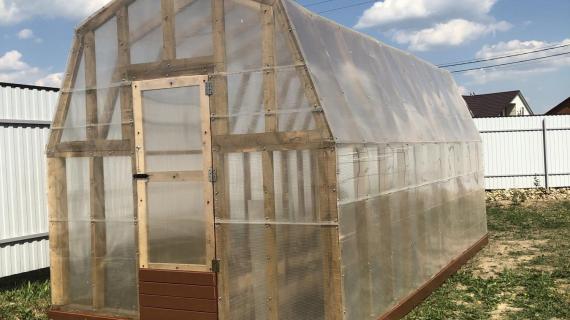
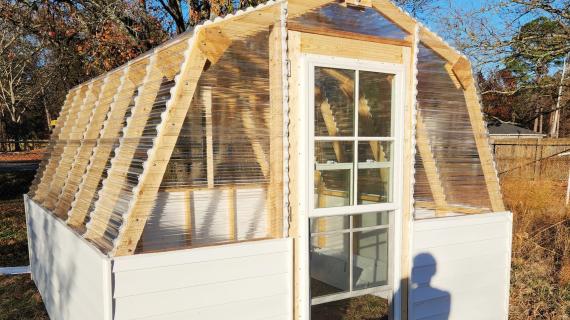
Our DIY greenhouse turned out great and we are so excited to share the plans with you.

Please post a pic or share if you build!
Pin For Later!
Preparation
- 3 - 2x4 @ 10 feet long - use on back wall
- 5 - 2x4 @ 12 feet long - use on sides/ridgepole DO NOT CUT
- 32 - 2x4 @ 8 feet long
- 11 - 12 foot x 26" standard corrugated plastic greenhouse panels
- 1 - 8 foot long x 26" wide standard corrugated plastic greenhouse panel (use on door side)
- 3 - 12 foot long tin panels (use on sides and back)
- 1 - 8 foot long tin panel (use on front)
- Tin screws
- 28 - 4' long ribbing strips
- L flashing (optional for the corners)
- You'll need either metal gussets for the trusses or to cut plywood ones from 1/2" plywood
Cut list is in plan at each step


Instructions
Step 1
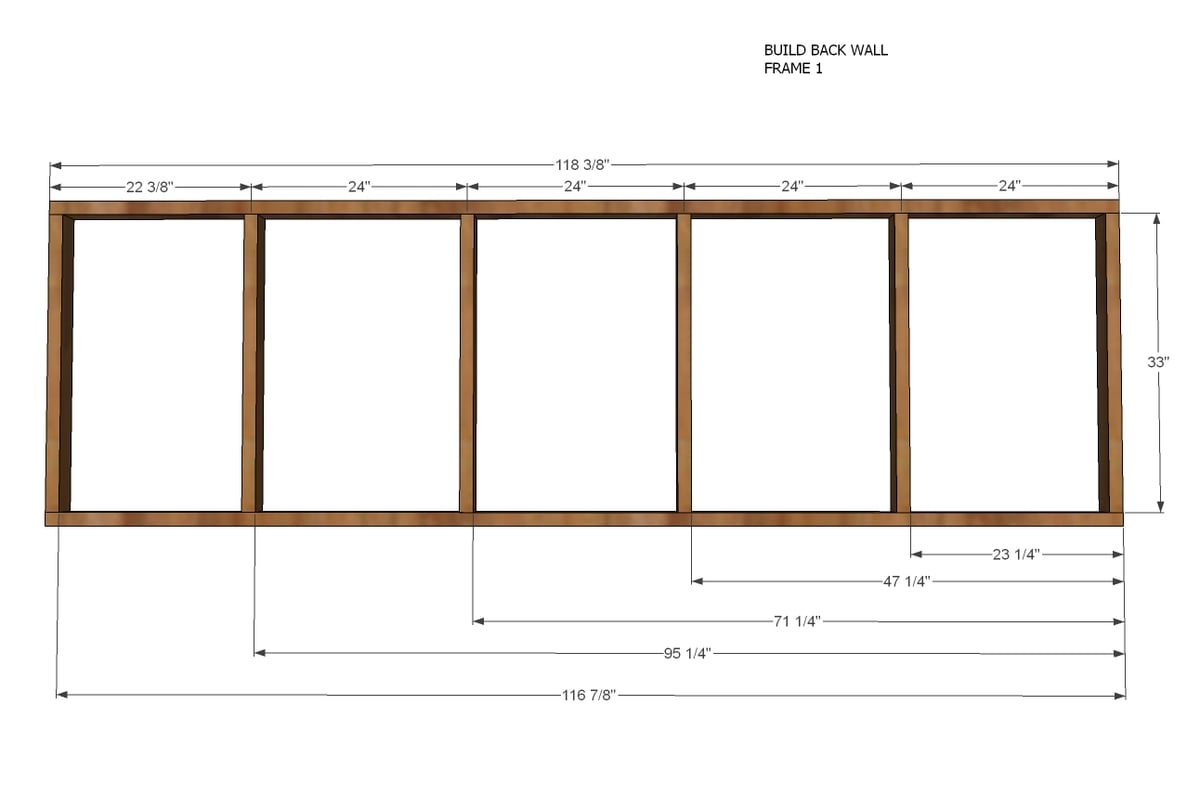
Back wall framing. Cut 2x4s as listed below. Screw together with 3" screws or nail together.
- 2 – 2x4 @ 118 3/8”
- 6 – 2X4 @ 32”
Step 2
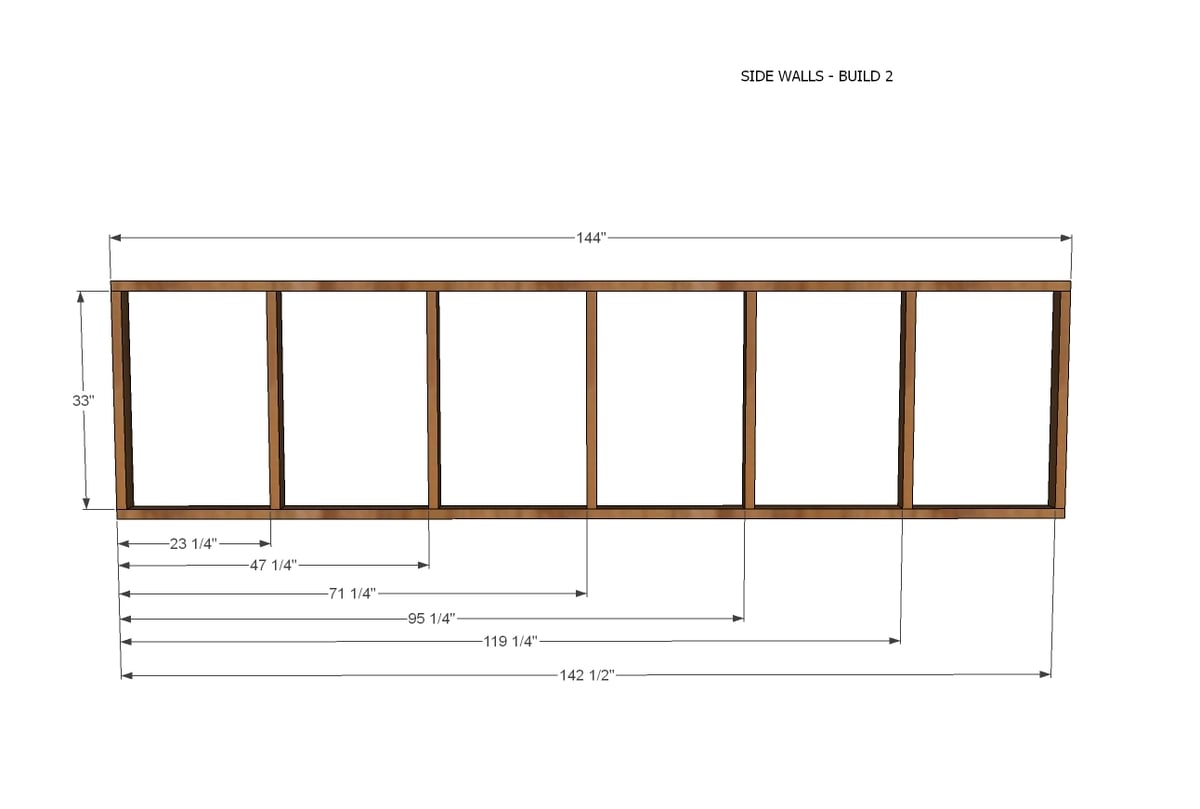
Side Wall Framing - Build TWO
- 4 – 2X4 @ 144”
- 14 – 2X4 @ 32”
Step 3
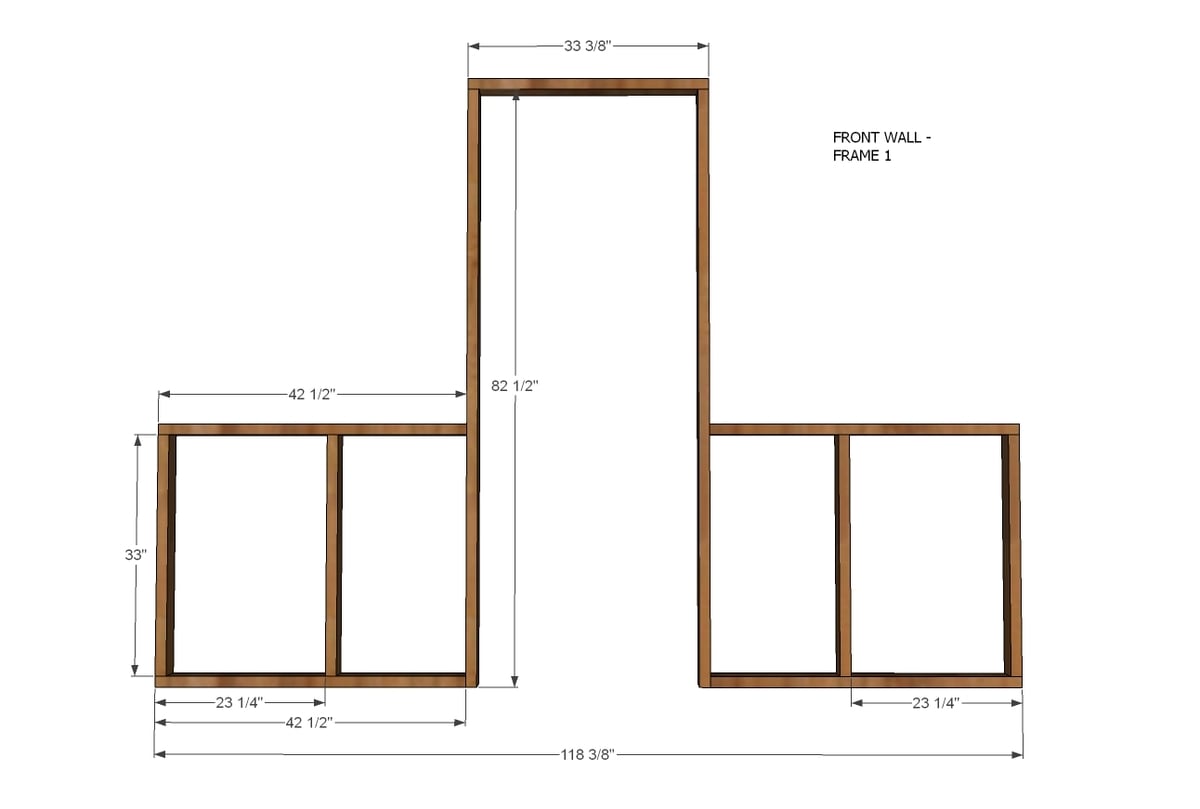
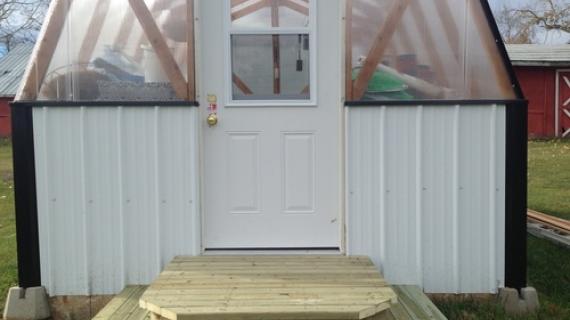
Front Wall Framing
- 4 – 2X4 @ 32”
- 4 – 2X4 @ 42 ½”
- 2 – 2X4 @ 81 ½”
- 1 – 2X4 @ 33 3/8”
Build the front walls as shown.
Step 4
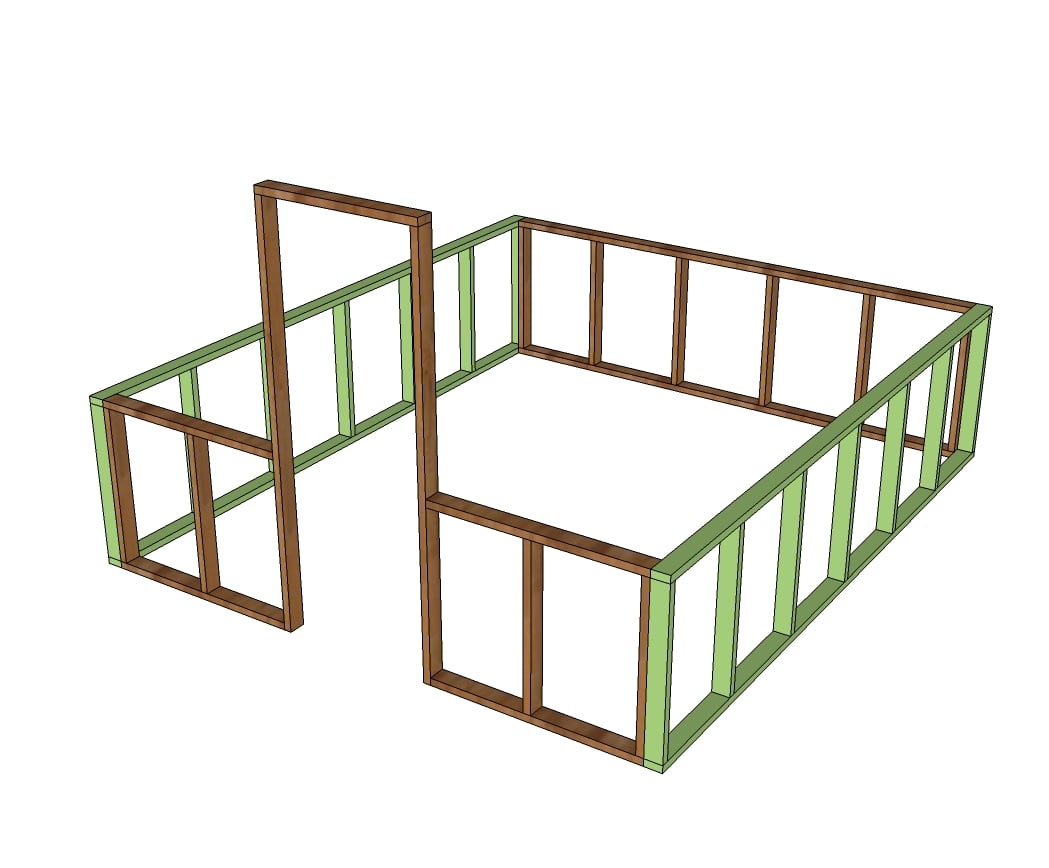
Attach the four walls together with 3" screws at corners.
Step 5
Step 6
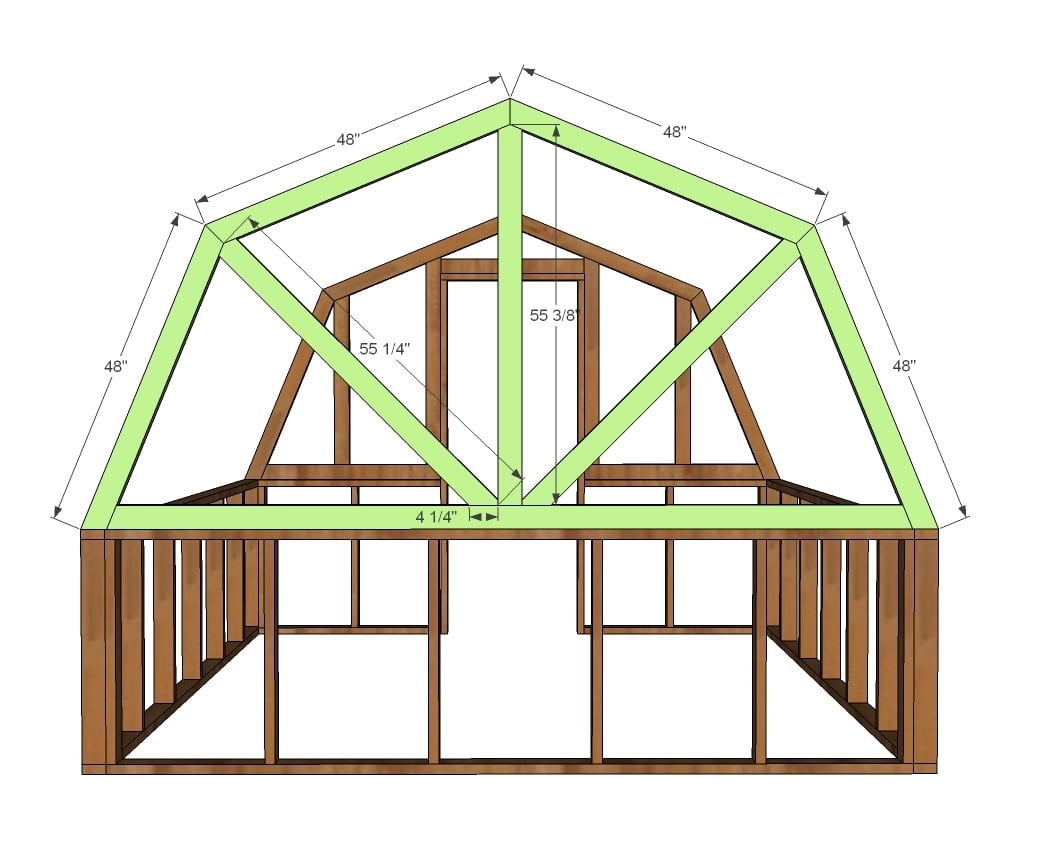
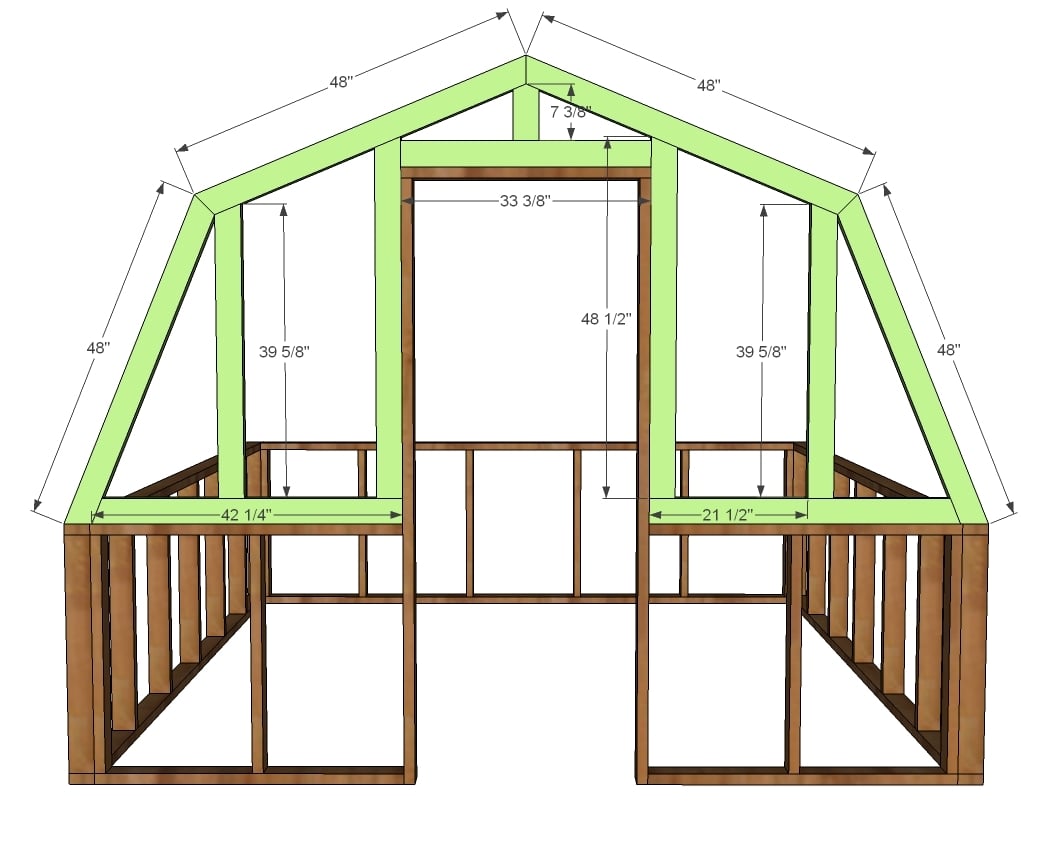
- 4 – 2X4 @ 48” (BOTH ENDS CUT AT 22 ½ DEGREES, ENDS NOT PARALLEL)
- 1 – 2X4 @ 117 7/8” (BOTH ENDS CUT AT 22 1/2" DEGREES, ENDS NOT PARALLEL)
- 1 – 2X4 @ 55 3/8 (TOP CUT TO DOGEARED POINT, 22 ½ DEGREES)
- 2 – 2X4 @ 55 ¼” (TOP CUT TO DOGREARED POINT, BOTTOM CUT 45 DEGREES OFF SQUARE, END CLIPPED)
The back truss is built same as front. See next step for close up of the center cuts
Step 7
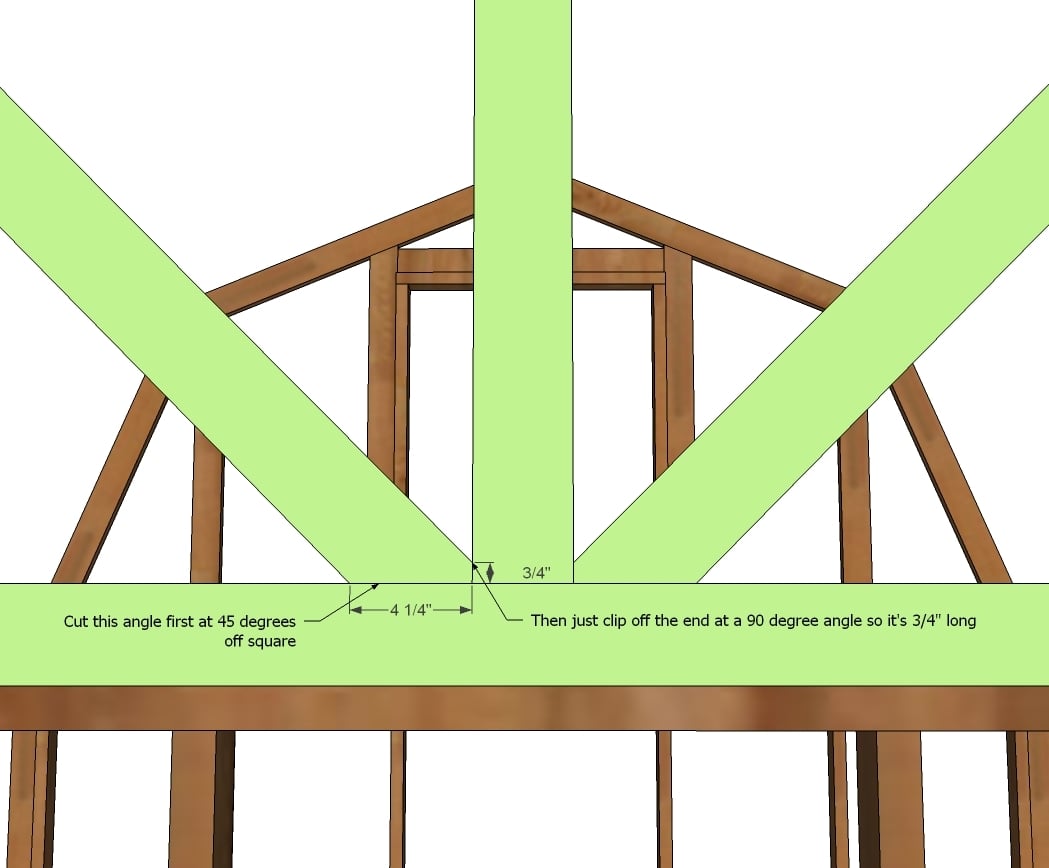
This board was a little tricky to cut - practice first!
Step 8
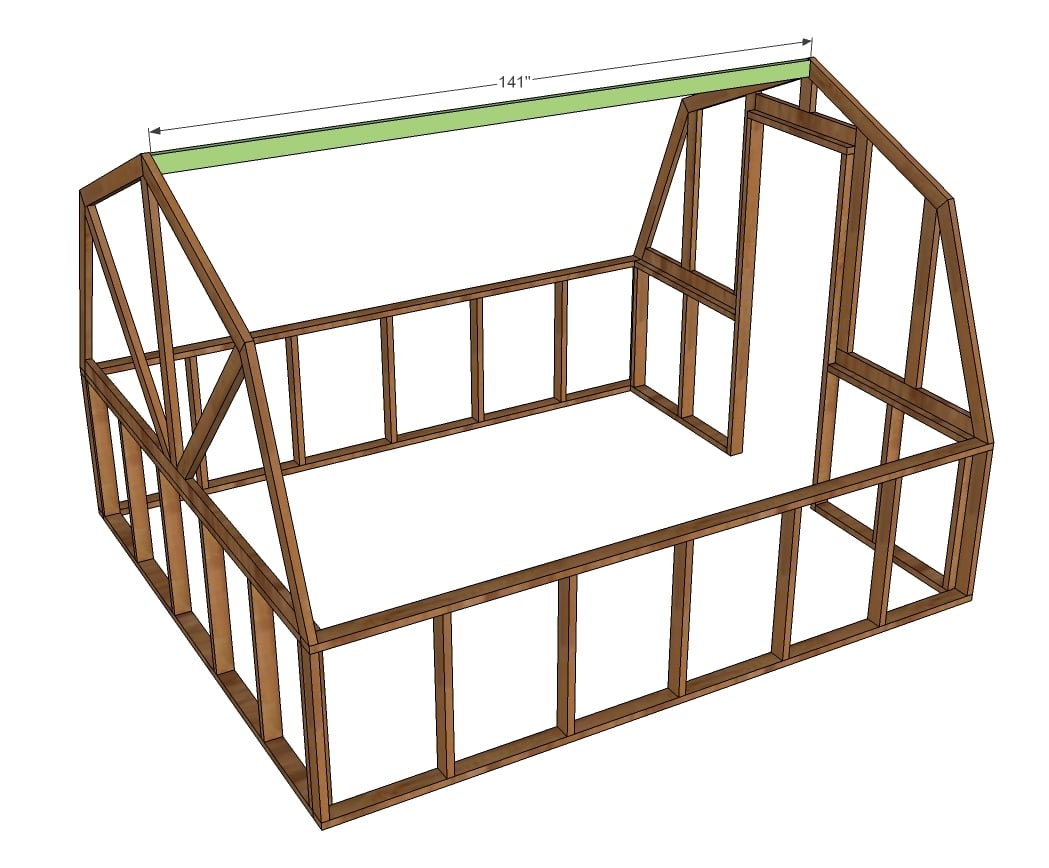
1 – 2X4 @ 141”
NOTE: If you use gussets - we used 1/2" plywood - this will affect your ridgepole length.
Step 9
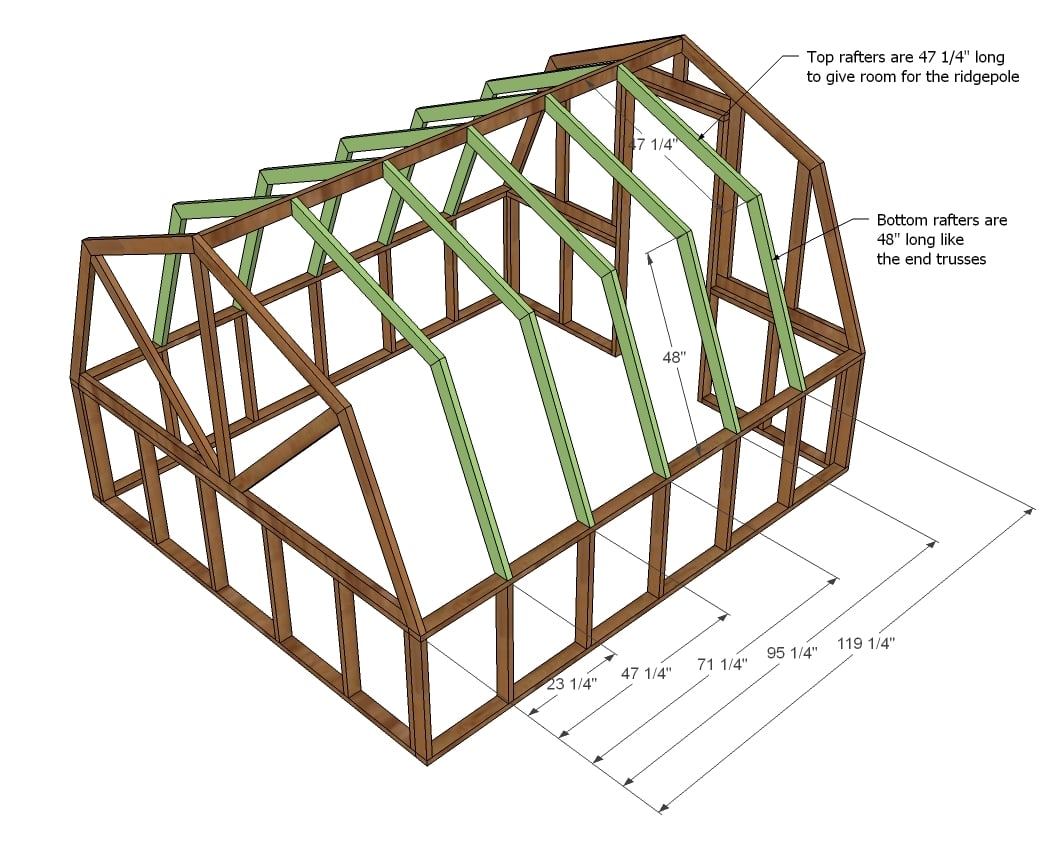
- 10 2X4 @ 48” (BOTH ENDS CUT AT 22 ½ DEGREES ENDS NOT PARALLEL)
- 10 2X4 @ 47 1/4” (BOTH ENDS CUT AT 22 ½ DEGREES ENDS NOT PARALLEL) - shorter rafters go up to meet the ridgepole. I marked all shorter rafters to avoid confusion.
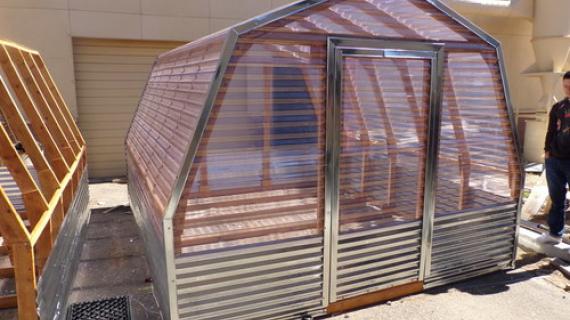
For the common rafters of this barn style greenhouse, we ended up using plywood gussets to save money. After cutting quite a few, I figured out how to cut gussets the super quick and easy way - got gusset cutting down to less than a minute each.
We put gussets on both sides of each rafter joint with glue and screws. We made all of the small trusses first on the ground, then it was just a matter of stacking them on the ridgepole and attaching to the studs. We used 8 screws per gusset. Common rafters are installed flush to top of ridgepole and flush to outside of side walls. We had to "toenail" the screws in - meaning they are screwed in at an angle. We used glue and 3" screws from both sides.
Step 10
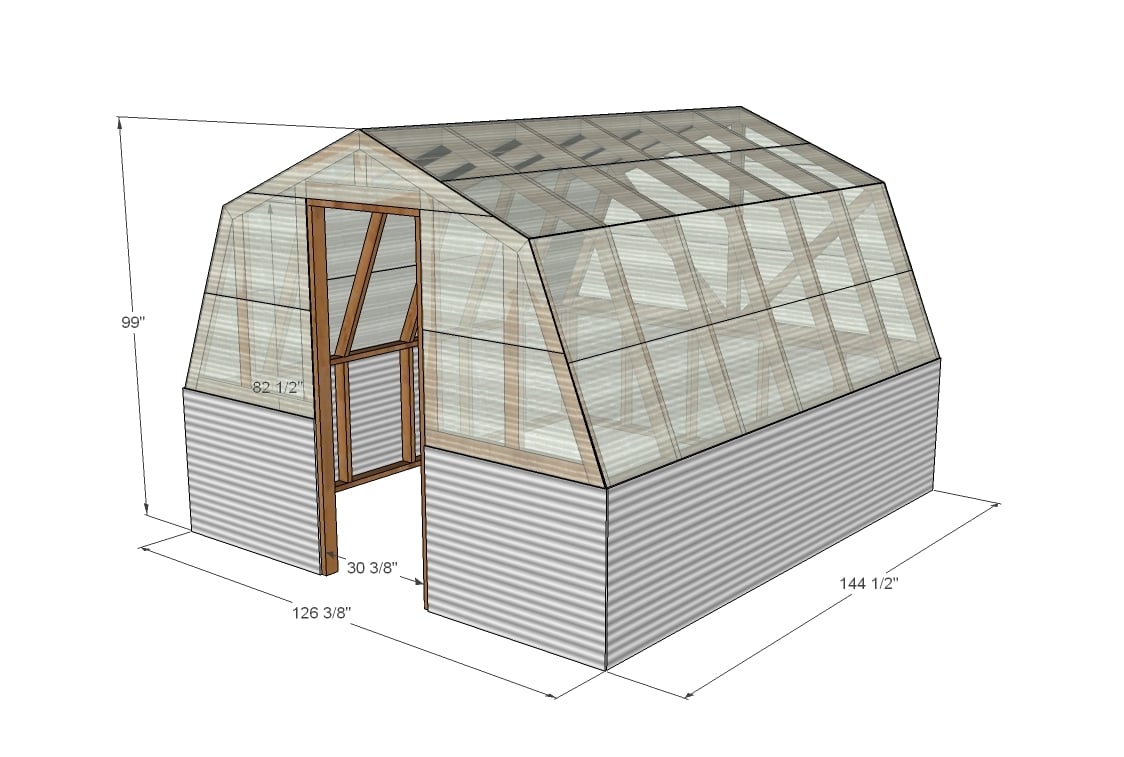
The plan will get you through the framing.
At this point, you could use plastic paper, lexan glass panels, you name it to seal the frame in.
We used the corrugated plastic panels detailed earlier for installation. IMPORTANT: If you do not use panels you will need some sort of lateral support to keep the greenhouse from swaying side to side. Try 12 foot long 2x4s.
It is always recommended to apply a test coat on a hidden area or scrap piece to ensure color evenness and adhesion. Use primer or wood conditioner as needed.


Comments
Amyah (not verified)
Tue, 01/15/2013 - 12:29
Your greenhouse
What a wonderful project. Where I live -- I rent -- there was a greenhouse, once upon a time, but it collapse as nobody took care of it. Sad! But, the huge ciment pad with drainage and else is still there as wel as the anchors all around. it would be a great idea to do something with this. Electricity, water is still there and working.
Hope you will post some photos of the wonder in full production! Will you? As for the inside, will you put just tables all around or make raised beds?
Other question... I see you put a metallic frming all around. Did you put some insulation also to go further in time in your production?
Looking forward to read about the evolution of your project
moosmani
Sun, 01/27/2013 - 10:59
Yes, Please!!
Ana,
I just discovered this plan. Yes, yes, please, oh, please on the shed plans. We really need a shed now that my newly found love of building has taken over the garage. I would really like to build a shed and I love this design, maybe with a few of the clear panels for skylights?
Thank you for everything you do and for inspiring me to learn the best hobby ever!
GardenerGirl
Fri, 03/01/2013 - 06:44
the barn greenhouse
Thank you so much for posting this, especially with the downloadable PDF!
sgrohome
Fri, 04/19/2013 - 12:13
Little Green House
For venting you could use an old storm door with screened window instead of a solid door if your door dimensions are standard.
JSTStorm
Mon, 05/13/2013 - 21:17
Poly Panels
Does any one have a link or the exact name and/or size of those poly panels?
FernDawg
Mon, 10/14/2013 - 13:20
Please warn folks about installing corrugated panels correctly
The Lexan / SunTuff Corrugated Panels need to be installed horizontally and foam gaskets / inserts used instead of wood. They are called the Greco Profile.
Rain or snow water and moisture eventually rot the wood because water will leak in. Also snow will pile up causing stress on the rafters, rain will not run off and will leak into the gable ends.
Here's a link for Lexan Corrugated Polycarbonate panel installation.
http://www.hobby-greenhouse.com/lexan.htm
Here's a video to help you:
http://youtu.be/DysihGdfmaM
Actually the metal side walls should be vertical as well but that is not as critical as the corrugated panels being propely installed.
The Gambrel frame is okay but I don't understand why they didn't use a waterproofing stain even on the interior,
It seems you get a lot of visitors so you need to tell them to do it correctly or your followers will be sorry they used your plans. I'm not trying to be a boor just trying to help. I build cedar greenhouses covered with Lexan Corrugated. Anna if you need advice or assistance you can email me [email protected]
MoonShadows
Sat, 04/26/2014 - 12:49
2 Years In - How's the Greenhouse doing.
I found this greenhouse last year when I was searching for plans. I added it to my list. Well, a year has come and gone, and I am going to build it this summer. I read the comments about the way you ran the Lexan, and I am just wondering...how has your greenhouse held up? I was going to follow your plans exactly, but if you have had any problems with it, I'll apply the Lexan vertically. It just looks easier to do it the way you have it in the plans. And, if it is doing well, why should I fix something that isn't broken. LOL
Rosetta
Mon, 06/16/2014 - 08:57
Barn Greenhouse
Curious to know if the open door is all you would need for ventilation, since it's a smaller greenhouse?
masmith38
Mon, 07/07/2014 - 13:40
Shed Conversion Plans
I know it was talked about at the beginning of this post regarding converting the plans for a shed. I know you've been busy creating life by way of baby and television show. Just wondering if this was something that was still in the works. If not I will fly by the seat of my pants since I've had a few builds and feel like I could. Thank you in advance.
In reply to Shed Conversion Plans by masmith38
Fern McDawg
Sun, 02/22/2015 - 10:54
conversion to shed
Hey,
Just replace the corrugated panels with plywood sheets and then shingle the roof. I'd add a rear window as this design does not allow for ventilation and you will need some light.
texasmimi
Sun, 09/21/2014 - 17:38
barn greenhouse
Absolutely LOVE the greenhouse, thanks for offering the plans! I've wanted one for a long time. Oh, the apron is adorable and looks great on you!
Scott Walker
Tue, 10/21/2014 - 11:24
Beautiful little greenhouse
I found your plans last summer and loved the design so I decided to build one for my wife for her birthday last August. I didn't get started until the weekend of her birthday in late August so there was little expectation to have it finished before winter. It is now 14 months later and I only have a few trim pieces left to install. We live in a harsh climate and I wanted to be able to use it through the winter so I made a few changes. I built a 2 x 12 base and insulated it with R40 and the bottom walls are 2 x 6 instead of 2 x 4 and are insulated with R20. I used twin wall polycarbonate instead of the corrugated lexan because of the superior R factor. The insulated walls are of course vapor barriered and I covered them with tongue & grove cedar. I also made raised benches out of cedar for growing potted plants on. The floor has ceramic tile on it and the exterior is colored metal. I also ran underground power to the building and installed a fluorescent grow light. Surprisingly a small 110 volt heater keeps the temperature above freezing even during our awesome -40 winter temperatures. If the daytime temperature is anywhere near or above freezing we have to keep the screen open in the door or it overheats inside. I have attached links to a few pictures of the almost finished product, ready for another winter full of flowers and veggies. You will notice that I initially used clear vapor barrier until the twin wall polycarbonate showed up. This worked rather well.
http://i246.photobucket.com/albums/gg90/Beecool/IMG_5955_zpsb36c30bf.jpg
http://i246.photobucket.com/albums/gg90/Beecool/IMG_5962_zps79bff579.jpg
http://i246.photobucket.com/albums/gg90/Beecool/IMG_5964_zpsecc28bd5.jpg
http://i246.photobucket.com/albums/gg90/Beecool/IMG_5847_zps939a6c5f.jpg
http://i246.photobucket.com/albums/gg90/Beecool/IMG_4777_zps7eb36d3d.jpg
http://i246.photobucket.com/albums/gg90/Beecool/IMG_4776_zps6d795ca7.jpg
http://i246.photobucket.com/albums/gg90/Beecool/IMG_4683_zps0d59fdc1.jpg
rz2828
Fri, 10/24/2014 - 06:01
Barn greenhouse - where to get ribbing strips?
Great artical, and awesome greenhouse. I want to build one in the spring!!
quick question......where did you buy the "ribbing strips" for the corregated clear panels. I tried searching the internet, but can't find anything.
thanks
Fern McDawg
Sun, 02/22/2015 - 08:55
Fatally Flawed Design
I hate to be the messenger here but it's time for a reality check. The design of this Ana-White greenhouse is flawed. First, the corrugated polycarbonate panels are attached horizontally, that's wrong. The panels should be attached vertically so the rain runs off and snow will eventually slide off when enough accumulates.
Proof I found this http://www.greenhouse-kits-plans.com/CorrugatedData.pdf
Corrugated covered greenhouse kit photos on Pinterest https://www.pinterest.com/FernMcDawg
Second and even more critical, where are the roof vents or knee wall louvers? None. This little greenhouse will heat up like a solar oven. No ventilation = high humidity and heat = plant diseases, stunted growth, mould and mildew. Why corrugated metal, wood has a higher insulation value for colder nites.
A redesign is needed here Ana people are being misled.
In reply to Fatally Flawed Design by Fern McDawg
Ana White
Sun, 02/22/2015 - 09:48
Hi Fern, thanks for reading
Hi Fern, thanks for reading and commenting.
We've been using and loving our greenhouse for a few years now, and it has worked perfectly for us, and we've had no maintenance issues or issues with rain. This design is actually inspired by a very popular greenhouse kit we have up here in Alaska, that works for many people. But we do live in a dry climate. We also did plan on adding venting on the opposite wall as the door, but haven't needed it yet.
Like all the plans available on this website for free, the plans can be modified to suit the users needs or climate. That is the greatest thing about building for yourself - you have the opportunity to customize your project to your needs.
Thanks for bringing up potential ways that this plan can be modified or improved.
Ana
In reply to Hi Fern, thanks for reading by Ana White
Fern McDawg
Sun, 02/22/2015 - 10:51
Barn Shaped or Gambrel Greenhouse Plans
Perhaps you should tell folks about the lack of ventilation and the need for roof vents. I don't see any modifications re: vents on any of the photos people have sent to you. It could only help folks if you tell them up front to align the sheets vertically and add vents. Even in Alaska you need to ventilate a greenhouse imagine how hot it would be in the lower 48.
It's not like you get only 50 hits a week, I imagine there are hundreds if not thousands of gardeners who have seen your plans and some probably spent $1000.00 or more just to build a greenhouse without ventilation and the corrugated panels attached incorrectly.
Fern
izzyb
Mon, 05/04/2015 - 09:12
Roof panel orientation
Hello, this is wonderful and I plan to build something similar, however I would suggest orienting the roof panels so the corrugation allows drainage. With the corrugation horizontal, water (snow/ice) will sit in the channel on the top which will block sunlight. Putting the channels at a vertical will allow it to slide off.
And if you wish to add a rain catch system, having the channels vertical will allow this. As is, the channels will only drain to the front or rear.
Ladydragonsrage
Wed, 08/05/2015 - 22:02
building permits
I really love coming to your site to find plans. I have made so many and all have turned out great.
My question is, do you need a building permit for this green house/shed?
In reply to building permits by Ladydragonsrage
Ana White
Thu, 08/06/2015 - 15:00
That would vary per location,
That would vary per location, you'll need to check your local building
codes.
big dreamer 2
Sat, 08/29/2015 - 17:13
Gratitude
Hi Ana, Thank you so much for sharing your gift of creating. I'm especially impressed with all the hard work you put into sharing these gifts! The best compliment I can give you is "you are like a breath of fresh air"! I truly mean that with all my heart! Not only do you GIVE (a rarity) but you accept some tuff criticism with such absolute grace that I feel blessed to have stumbled upon your site. Thank you for being a wonderful role model :)
Numbers 6:24-26
Fern McDawg
Sat, 09/19/2015 - 08:19
corrugated polycarbonate panel info source
Hi everyone,
Great plans for the framing, however this link may be of assistance when installing the corrugated polycarbonate panels. Folks you need to read this.
http://www.hobby-greenhouse.com/lexan.htm
windchaser
Tue, 06/14/2016 - 18:12
Great Greenhouse
How difficult would it be to modify the plans to make the greenhouse 8 fee wide instead of 10 fee wide?
redbroyer
Tue, 09/13/2016 - 16:05
Winter Growing
I understand the need for venting in order to not burn up the plants. I am wondering how viable this is though to grow year round? I live in Colorado and would like to use the greenhouse to grow leafy green, cukes, and herbs during the winter. does this greenhouse need to be insulated for the long cold nights or will the residual heat keep the plants from freezing?
rgrea
Sat, 01/27/2018 - 06:15
Love the greenhouse
I am going to the big box store and price out the greenhouse. I've been with this idea for 12 years and seeing the plans and not haveing to pay to get a kit got the action side of me moving.
Thanks
Crookedeyed
Fri, 03/02/2018 - 18:29
Trying to scale down to differnt size greenhouse
Was wondering what program u used to make the design for the green house. I would like to make a smaller one but cant figure out to get the right length rafters to fit my size, example 5x8. Or is there a simple equation to scale down the size. Im lost please help. Enjoy thw designs. Thank you
Jon Endonino
Wed, 05/22/2019 - 13:26
Greenhouse
I am building this for my wife and ran across a discrepancy between the cut list and diagram. The back and side wall diagram shows vertical 2x4's at 33" but the cut list shows 32". Which is correct?
sassnak
Wed, 05/29/2019 - 09:53
I was looking through the…
I was looking through the comments hoping to find an answer to the same question! In Step 8 it sort of looks like "32" is written on the pieces in the picture, but if you add up the known pieces to get overall vertical length from the back center (from Step 6) it works out to 33". 55 3/8 + 3.5 + 1.5 + 1.5 + ~4 (for top cut angle) = ~66", and the total height is given previously as 99" making the vertical 2x4s in the wall 33".
sassnak
Thu, 05/30/2019 - 21:11
I went with 32"
I started cutting today and I decided to go with 32" to reduce waste, since at 32" you can cut 3 per 8' 2x4. I made the door 1" shorter just in case but the short vertical piece above it should be the only thing possibly affected, everything else is relative to the trusses.
hshin0828
Mon, 11/18/2019 - 05:10
Enjoying this build very…
Enjoying this build very much thus far, except I am trying to modify and make bigger. Instead of 10X12, I am making it 12.5X16. I have done the bottom framing with the adjustments but I can’t figure the measurements for the top half of the barn house style. And also a door that would fit this build? Can you please help me? Thank you very much.
Mechtime68
Mon, 11/18/2019 - 14:00
Great Plans
These plans are magnificent. I built a greenhouse using them, with only minor modifications. What I would like to know is where you got the corner pieces to match the corrugated metal base?
smather
Tue, 11/26/2019 - 18:26
Help with gussets on green house
Thanks for this Greenhouse DIY project. I'm not familiar with building roofs and you say we need 30 gussets. First, the plan dose not show where they go. I'm going to take a guess. I'd buy metal gussets if I knew the specs for the ones needed. Please help.
In reply to Help with gussets on green house by smather
smather
Tue, 11/26/2019 - 18:31
Can I use one of these for…
Can I use one of these for gussets?
https://www.lowes.com/pd/USP-4-1-2-in-18-Gauge-G90-Galvanized-Steel-Raf…
https://www.lowes.com/pd/USP-3-7-8-in-18-Gauge-G90-Galvanized-Steel-Raf…
https://www.lowes.com/pd/USP-5-1-4-in-18-Gauge-Gold-Coat-Steel-Rafter-T…
https://www.lowes.com/pd/USP-5-1-4-in-18-Gauge-Triple-Zinc-Steel-Rafter…
twentythreered
Thu, 03/19/2020 - 20:22
Great Plan!
I really enjoyed building this greenhouse! I finished it in less than a week, only working a couple of hours per day. I ended up adding a heat sink in the middle and used PVC right down to the ground for more light.
I'll add some pictures if I can figure out how.
olio
Sat, 04/11/2020 - 12:05
Corrugated Plastic and UV
Does the corrugated plastic let UV in to the greenhouse or does it block it out (as with other options)?
olio
Sat, 04/11/2020 - 12:05
Corrugated Plastic and UV
Does the corrugated plastic let UV in to the greenhouse or does it block it out (as with other options)?
Suja
Wed, 04/22/2020 - 14:40
What was the cost of this …
What was the cost of this .
Thank you.
LindaGH
Thu, 04/23/2020 - 20:21
Great Greenhouse Plans
Great design on this greenhouse. I can't wait to build it. That means a BIGGER garden!!
jedstrom
Sun, 05/10/2020 - 06:09
I built this green house …
I built this green house but I can’t figure out how to post a picture. I love it!!! Such a cool thing to build. My family already has plants in it.
Nikki Bass
Thu, 05/14/2020 - 20:08
Need clarification on print
When making the back and side walls it says to cut 2x4's to 32" but the drawing shows it at 33". I wanted to inquire about this before we start building
rcfujczak
Sun, 05/17/2020 - 08:47
Awesome build.
Came across this plan and built it over the course of 2 days. I used 1/2 log siding on the bottom instead of tin and the finished greenhouse looks awesome. All measurements worked out perfect.
I will upload a picture once I figure out how. Haha.
Frederick_Anderson
Wed, 05/20/2020 - 09:56
High winds
I have a question if this greenhouse will withstand high winds?
Simplesy
Sun, 06/28/2020 - 06:01
great greenhouse
Love these plans - I had to modify the size to fit in local zoning rules (took out a single crossmember to take it to 10x10) but apart from that worked well - just a quick question - the corrugated panels on the sides are 'sealed' by the closures used - how do you seal the end panels to prevent water going in as the struts are at an angle and, therefore, the closures wont 'work'? - any suggestion welcome....
I will post images when it is complete...
Thanks
Colin
Brin
Tue, 07/07/2020 - 04:54
Metric Greenhouse
This looks perfect for our needs. Don’t suppose you have converted the measurements to metric?
jcalcote
Sun, 07/12/2020 - 13:58
roof snow shed
Hi Ana, this plan is perfect for my needs. Thanks for putting it together and making it available to everyone. I have one concern - I live in an area with pretty heavy snowfall. Should the roof panels not be placed vertically to allow snow to slide off more easily?
Thanks,
John
angelaincolor
Mon, 07/13/2020 - 13:14
Question
I have question: are the lower wall studs 33 inches or 32 inches? There seems to be a discrepancy on the instructions. One place says 32 inches and the other says 33. Thanks!
Baron Ravenswood
Fri, 07/17/2020 - 19:16
Gussets.
The photo of the gussets is missing, just a blank space. Where can we find that please?
john kehoe
Tue, 07/21/2020 - 02:28
How do you secure the green…
How do you secure the green house from blowing away ?
DapperVistaDIY
Mon, 08/10/2020 - 08:14
Build clarification
Question: Step 8 says that if you use gussets it can affect your ridge pole length. In what way? Will it need to be shorter or longer? Also, what is the short cut you found for making the gussets? And how do you install the gussets? Is there video on these in-between steps?
4sandgoddess
Wed, 10/21/2020 - 11:52
Everyone's questions are not getting a response....
Hello. I am new here. I absolutely LOVE everything you build Anna!! Thank You so much for sharing your talent with us all.....
I am just wondering if you or someone on your team still reads these comments? From reading all of them start to finish, I now have several questions myself, that others have asked, that have not been answered.
#1 Is it 32 inch or 33"?
#2 The ballets (I think I named that correctly?) The piece you can buy or make yourself to connect the joints? More info. Please?
#3 In respect to the corrugated plastic panels being attached horizontally verses vertically? Snow load, leaking inside from rain, etc.?
#4 Last but not least, how to adjust the plans correctly for a 10 x 18 Greenhouse?
Any response will be GREATLY APPRECIATED!!
Thank You....
romdos
Mon, 01/24/2022 - 22:34
Me too!
I noticed the same thing you did...the sketchup drawings show a different length than the cut list does. Very frustrating. She puts herself out there like this home do it yourselfer regular person but ZERO email responses to several very valid questions. Makes Ana look bad. I cut mine to 32" not 33" since I could get 4 out a of a single 2x4-8. Hope it turned out well for you...I'm just starting mine!