Hi Everyone!
A special treat for you today! A while back, my very creative and artistic friendJen Woodhouse of House of Wood built an amazing dining table. And I asked her if she would take photos of the finishing process and do a finish tutorial for us. Jen did an amazing job of documenting the entire process, and I'm so thrilled she's sharing it with us today! Enjoy!
XO Ana
---
It's no secret that I have a love/hate relationship with Restoration Hardware. How in the world do they pull off that rustic yet refined look so seamlessly? Their furniture finishes are TO.DIE.FOR. yet when I try to replicate it, it looks like I let my toddler loose with a can of stain. This time, I was determined to get it right. Or as close to right as I could, without spending $2-3k for the real thing so I partnered up with the folks at Minwax for this staining tutorial and am thrilled with the way it turned out.
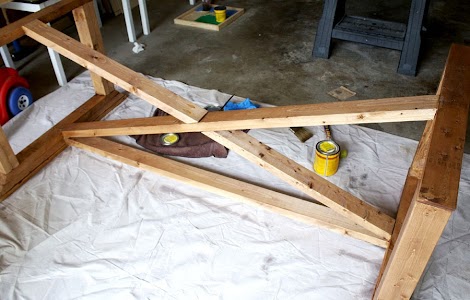
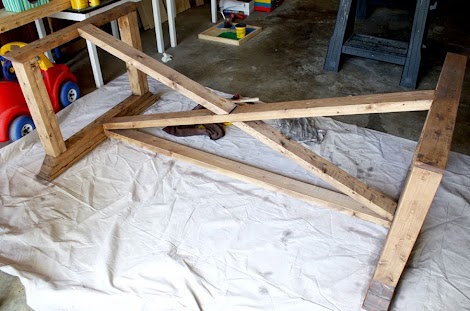
Remember the ZGallerie-inspired dining table I just built with the help of my talented friend, Ana White?
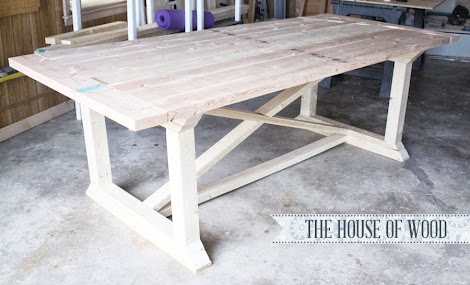
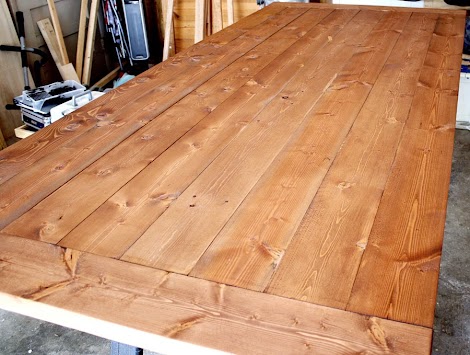
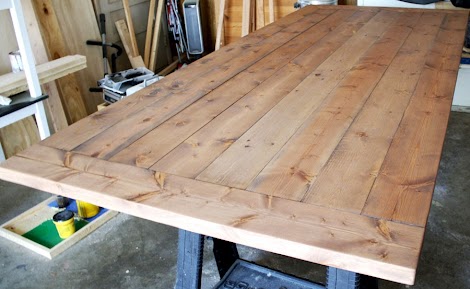
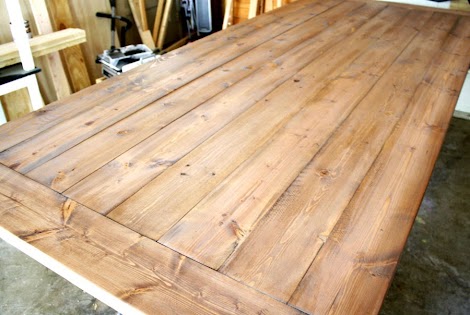
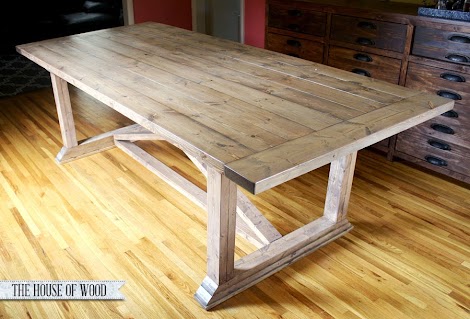
Well, here it is! All finished! (table building plans here)

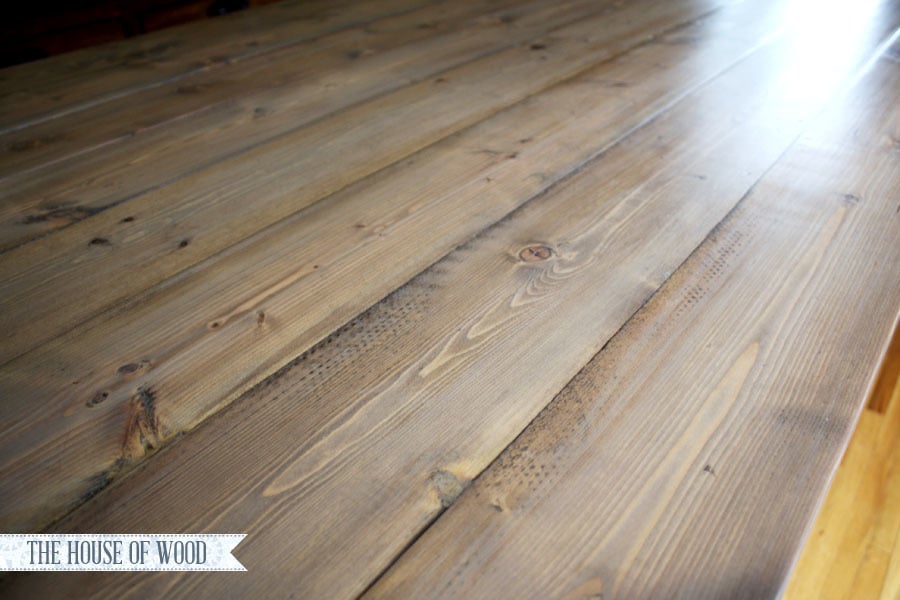
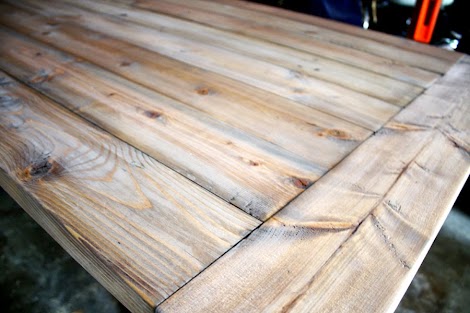
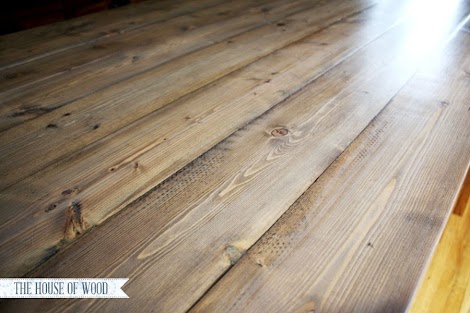
And here’s a close-up:

Yeah, baby. I'm excited! Let's get started!
First, I read A LOT about how to stain correctly. Minwax has a TON of useful information, so I highly recommend starting there. Prior to this project, I didn't realize I was making a lot of mistakes and how easily it is to fix them. For example, using a foam brush or roller when applying polyurethane causes some problems, like bubbles in the finish. Ask me how I know. Annoying. So, don't use foam when applying poly - you'll get better results if you use a good quality brush.
I also researched oil-based vs. water-based finishes. Ultimately, I chose to work with oil-based stains and finishes because it dries slower than its water-based counterparts. And because I was staining a large piece of furniture, I appreciated the extra drying time so I wouldn't have to worry about lap lines while I was working.
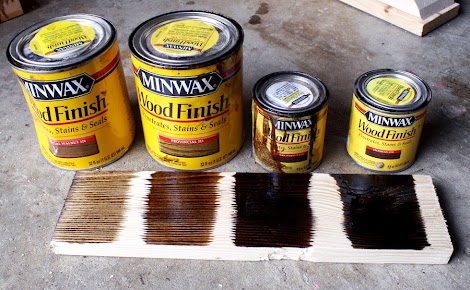
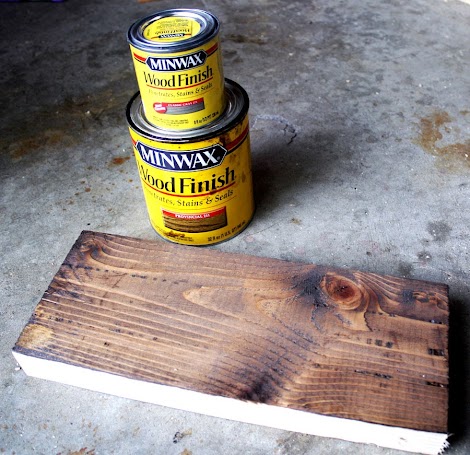
First, I wanted to see exactly what I was working with, so I tested a scrap of whitewood with swatches of (from left to right) Minwax Special Walnut, Provincial, Dark Walnut, and Jacobean oil-based stains:
Incidentally, I also tested stains on the garage floor, but that was less intentional; drop cloths are your (landlord's!) friends.
And this is a new Minwax color from Minwax called Weathered Oak by Minwax (can you tell who sponsored this tutorial?):
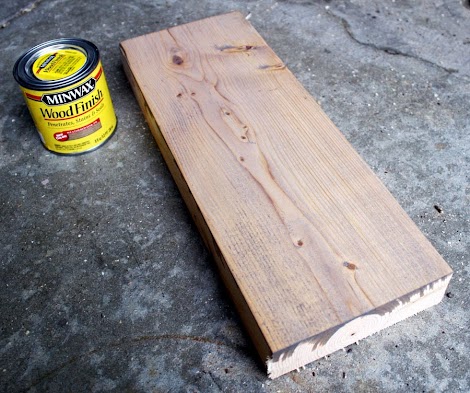
I love its greyish-brown tone, but it's too sheer for my taste. I think I'll need some sort of base color to give the stain more depth, so I started experimenting with layering different stains. First, I tried Classic Grey over Provincial:
I think Classic Grey has a blueish tone to it. Not right for this project. Moving on. Next, I tried Weathered Oak over Dark Walnut:
Too dark, I think. How about Weathered Oak over Special Walnut? Hmm... this just might work! So with all the different shades Minwax offers, I decided to mix them up to find the finish I wanted... I call it ‘Magnum.’ Alternately: ‘Le Tigre’ (name that movie. Anyone?):
So I rolled with it. Or more appropriately, brushed with it. (I’m sorry.) But first things first: I filled all the holes with stainable wood filler, let the wood filler harden, and then sanded for hours (yes, hours!). I looked like the abominable snow bunny by the time I was done. A mask and safety glasses were my saving grace. I also highly recommend moving your husband's Harley out of the garage before sanding. And removing your drop cloths. Sweeping the garage floor is much easier than vacuuming drop cloths. Just sayin'.
I started with a 180-grit sandpaper on my palm sander, then followed up with 220-grit. Then I vacuumed up the sawdust with a shop vac, and wiped everything down with a damp cloth. On soft woods like pine or fir, there’s no need to sand with sandpaper any coarser than 180-grit. Don’t use a belt sander; a palm sander is plenty powerful for furniture pieces like this one.
Next, I pre-treated the wood with pre-stain wood conditioner. This was the first time I’ve ever used pre-stain and I can’t believe the difference it made! No more blotchy staining jobs from here on out. I’m so excited. And here's a tip: you know how the end grains always end up darker than the rest of the wood? You can apply an extra coat of wood conditioner to the end grains to prevent them from absorbing too much stain, so you get a more even result.
Genius.
And I can’t stress this enough: don’t skip the pre-stain wood conditioner. Preparation is key. Just like you shouldn’t paint something without priming it first, you shouldn’t stain without first conditioning your wood.

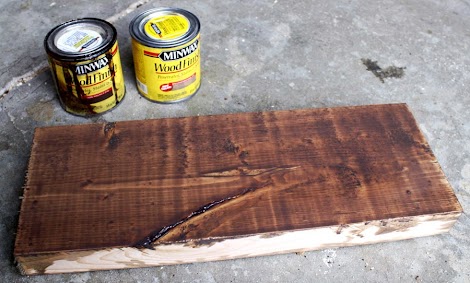
Here's the first coat of Special Walnut. I brushed it on with a good quality natural-bristled brush. I didn't want a very deep color, so I wiped it off with a clean cloth almost immediately after I brushed it on. I just wanted the stain to act as a base and to tone down the yellow color of the wood.
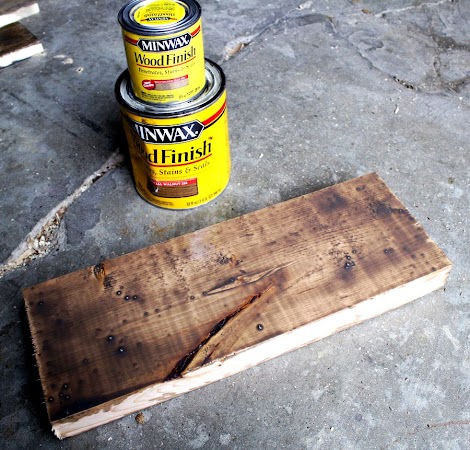
I let everything dry overnight. Then I brushed on a coat of Weathered Oak over the Special Walnut. It's very sheer, so I let the stain sit on the wood for about 5-8 minutes before wiping it off. It added just the right amount of grey tones to the wood.
Very good, getting closer...
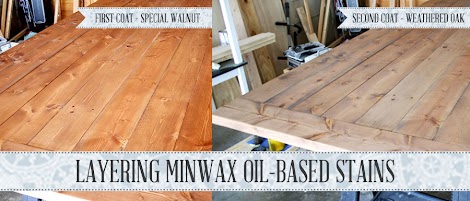
And here is a handy-dandy comparison photo of the two coats, so you can see the difference layering the two stains made:
Awesomesauce. Amazeballs. *Insert other ridiculously nonsensical adjective here* My husband prefers the term 'Adamtastic.'
Okay, so we’re getting closer, but I still think we need more cowbell depth. So I tried my hand at white-washing (this staining adventure was just chock-full of firsts!). I ragged on some white paint, then wiped the excess off, making sure to blend, blend, blend, so that there were no harsh, streaky edges. Here's how it turned out:
I think it definitely adds more interest, but the table is looking too chalky and flat now. Maybe if I went over it again with a mixture of Weathered Oak and Special Walnut, it'll warm things up ever so slightly? I'm game, let's try it!
I'm liking it, I'm liking it... it's so subtle, but I think it adds yet another layer of depth, don't you? I think I read somewhere that Restoration Hardware's finish is a 9-step process. Well, we're up to, what, 6 steps now (that's including the two coats of pre-stain), but who's counting (besides my husband, who is baby-wrangling over the weekend while I go all Bob Vila in the garage)?
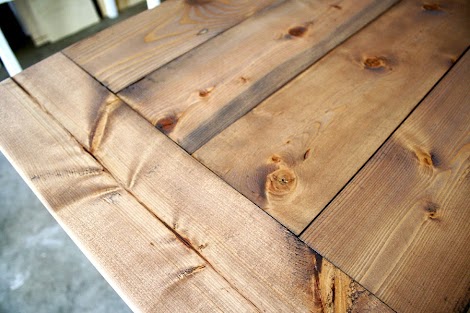
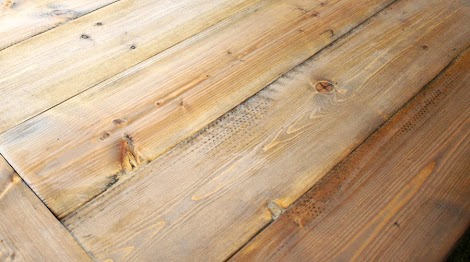
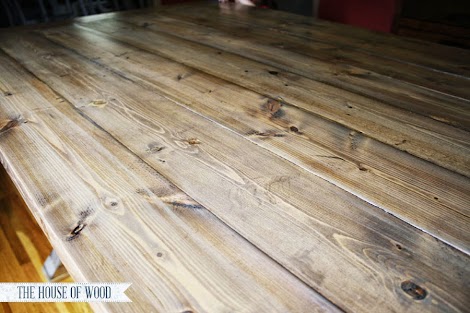
Ooh… and look at this close-up. I love those dark spots on the bottom two planks; I think they add so much character!
I don't know where else to go from here and I think it's pretty darn close to my inspiration pieces, so I think I'll quit while I'm ahead. Now, it's time to finish it! Because this is our dining table, I'm sure it'll see more spills than I care to clean up, so I chose to use Minwax Helmsman Spar Urethane in a satin sheen to protect it from everything toddlerdom and beyond. I brushed on 3 coats with a natural-bristled brush (NOT foam!), sanding with a 220-grit sanding block in between coats. I made sure to go slow and steady, so as not to overwork the urethane and cause bubbles, but fast enough that it didn't dry and leave lap lines. The consistency was thick and gorgeous – a little thinner than honey – and it seemed to level out after brushing it on, so the brush strokes disappeared completely. Beautiful. I let it cure in the garage for a couple days before bringing it into the house (stinky!).
Here she is, all finished!

Allow me to apologize for the wallpaper, salmon-pink walls, and mystery-colored trim. We're renting. This house has great bones and a lot of space, but the previous occupants’ design choices were, um… questionable. I mean, who paints trim this color? Blech.
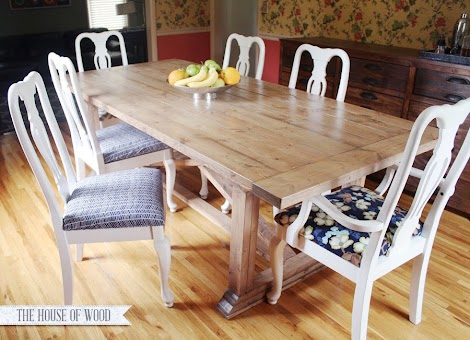
But let's focus on the positive and get back to the drool-worthy finish on this table:
Ahh... that's better. I just LOVE it. Someone alert the press. This is the first time I didn't blotch up the staining job! (See what I did there?) Hallelujah. I really enjoy the building part, but am was grossly intimidated by the finishing process. Mostly because sanding wood is the bane of my existence. And because I'm lazy and impatient.
If you want to build this ZGallerie-inspired dining table, be sure to visit download the free plans! Thank you so much, Ana!
And huge thanks to my homies at Minwax for allowing me to experiment and learn with their excellent products. I couldn’t be happier with how it all turned out.
Boom.

Comments
birdsandsoap
Wed, 08/07/2013 - 11:27
Beautiful finish! I totally
susanr
Wed, 08/07/2013 - 13:02
More cowbell!
Janna Hull
Wed, 08/07/2013 - 13:49
Love this!
tracysmith
Wed, 08/07/2013 - 14:18
Great Job Jen!!!
Reddawne
Wed, 08/07/2013 - 14:38
Love.
yurra-bazain
Thu, 08/08/2013 - 05:12
Patience
Juanita_r
Thu, 08/08/2013 - 19:25
amazing jen
tassietiger
Sun, 08/25/2013 - 02:09
Minwax stains in Australia
redhead_61
Tue, 09/17/2013 - 13:51
I am in love with this
MaryMurray
Sat, 09/21/2013 - 05:40
Minwax stains
JamesR
Sun, 12/08/2013 - 21:02
White Paint
laurenw37
Mon, 01/06/2014 - 13:07
Pre Stain
happymeal
Mon, 06/02/2014 - 03:58
Thanks for this great
Jaime weber
Mon, 07/14/2014 - 10:10
Awesome!!!
spitzmel
Mon, 09/01/2014 - 07:15
Difficult to read
I wanted to read the tutorial on the finishing of the table. Much of the code is visible and it makes it very difficult to read. Just wondering if it can be fixed?
Tsu Dho Nimh
Mon, 09/01/2014 - 11:46
try this
Try this ................
=========================
Hi Everyone!
A special treat for you today! A while back, my very creative and artistic friendJen Woodhouse of House of Wood built an amazing dining table. And I asked her if she would take photos of the finishing process and do a finish tutorial for us. Jen did an amazing job of documenting the entire process, and I'm so thrilled she's sharing it with us today! Enjoy!
XO Ana
---
It's no secret that I have a love/hate relationship with Restoration Hardware. How in the world do they pull off that rustic yet refined look so seamlessly? Their furniture finishes are TO.DIE.FOR. yet when I try to replicate it, it looks like I let my toddler loose with a can of stain. This time, I was determined to get it right. Or as close to right as I could, without spending $2-3k for the real thing so I partnered up with the folks at Minwax for this staining tutorial and am thrilled with the way it turned out.
Remember the ZGallerie-inspired dining table I just built with the help of my talented friend, Ana White?
Well, here it is! All finished! (table building plans here)
And here’s a close-up:
Yeah, baby. I'm excited! Let's get started!
First, I read A LOT about how to stain correctly. Minwax has a TON of useful information, so I highly recommend starting there. Prior to this project, I didn't realize I was making a lot of mistakes and how easily it is to fix them. For example, using a foam brush or roller when applying polyurethane causes some problems, like bubbles in the finish. Ask me how I know. Annoying. So, don't use foam when applying poly - you'll get better results if you use a good quality brush.
I also researched oil-based vs. water-based finishes. Ultimately, I chose to work with oil-based stains and finishes because it dries slower than its water-based counterparts. And because I was staining a large piece of furniture, I appreciated the extra drying time so I wouldn't have to worry about lap lines while I was working.
First, I wanted to see exactly what I was working with, so I tested a scrap of whitewood with swatches of (from left to right) Minwax Special Walnut, Provincial, Dark Walnut, and Jacobean oil-based stains:
Incidentally, I also tested stains on the garage floor, but that was less intentional; drop cloths are your (landlord's!) friends.
And this is a new Minwax color from Minwax called Weathered Oak by Minwax (can you tell who sponsored this tutorial?):
I love its greyish-brown tone, but it's too sheer for my taste. I think I'll need some sort of base color to give the stain more depth, so I started experimenting with layering different stains. First, I tried Classic Grey over Provincial:
I think Classic Grey has a blueish tone to it. Not right for this project. Moving on. Next, I tried Weathered Oak over Dark Walnut:
Too dark, I think. How about Weathered Oak over Special Walnut? Hmm... this just might work! So with all the different shades Minwax offers, I decided to mix them up to find the finish I wanted... I call it ‘Magnum.’ Alternately: ‘Le Tigre’ (name that movie. Anyone?):
So I rolled with it. Or more appropriately, brushed with it. (I’m sorry.) But first things first: I filled all the holes with stainable wood filler, let the wood filler harden, and then sanded for hours (yes, hours!). I looked like the abominable snow bunny by the time I was done. A mask and safety glasses were my saving grace. I also highly recommend moving your husband's Harley out of the garage before sanding. And removing your drop cloths. Sweeping the garage floor is much easier than vacuuming drop cloths. Just sayin'.
I started with a 180-grit sandpaper on my palm sander, then followed up with 220-grit. Then I vacuumed up the sawdust with a shop vac, and wiped everything down with a damp cloth. On soft woods like pine or fir, there’s no need to sand with sandpaper any coarser than 180-grit. Don’t use a belt sander; a palm sander is plenty powerful for furniture pieces like this one.
Next, I pre-treated the wood with pre-stain wood conditioner. This was the first time I’ve ever used pre-stain and I can’t believe the difference it made! No more blotchy staining jobs from here on out. I’m so excited. And here's a tip: you know how the end grains always end up darker than the rest of the wood? You can apply an extra coat of wood conditioner to the end grains to prevent them from absorbing too much stain, so you get a more even result.
Genius.
And I can’t stress this enough: don’t skip the pre-stain wood conditioner. Preparation is key. Just like you shouldn’t paint something without priming it first, you shouldn’t stain without first conditioning your wood.
Here's the first coat of Special Walnut. I brushed it on with a good quality natural-bristled brush. I didn't want a very deep color, so I wiped it off with a clean cloth almost immediately after I brushed it on. I just wanted the stain to act as a base and to tone down the yellow color of the wood.
I let everything dry overnight. Then I brushed on a coat of Weathered Oak over the Special Walnut. It's very sheer, so I let the stain sit on the wood for about 5-8 minutes before wiping it off. It added just the right amount of grey tones to the wood.
Very good, getting closer...
And here is a handy-dandy comparison photo of the two coats, so you can see the difference layering the two stains made:
Awesomesauce. Amazeballs. *Insert other ridiculously nonsensical adjective here* My husband prefers the term 'Adamtastic.'
Okay, so we’re getting closer, but I still think we need more cowbell depth. So I tried my hand at white-washing (this staining adventure was just chock-full of firsts!). I ragged on some white paint, then wiped the excess off, making sure to blend, blend, blend, so that there were no harsh, streaky edges. Here's how it turned out:
I think it definitely adds more interest, but the table is looking too chalky and flat now. Maybe if I went over it again with a mixture of Weathered Oak and Special Walnut, it'll warm things up ever so slightly? I'm game, let's try it!
I'm liking it, I'm liking it... it's so subtle, but I think it adds yet another layer of depth, don't you? I think I read somewhere that Restoration Hardware's finish is a 9-step process. Well, we're up to, what, 6 steps now (that's including the two coats of pre-stain), but who's counting (besides my husband, who is baby-wrangling over the weekend while I go all Bob Vila in the garage)?
Ooh… and look at this close-up. I love those dark spots on the bottom two planks; I think they add so much character!
I don't know where else to go from here and I think it's pretty darn close to my inspiration pieces, so I think I'll quit while I'm ahead. Now, it's time to finish it! Because this is our dining table, I'm sure it'll see more spills than I care to clean up, so I chose to use Minwax Helmsman Spar Urethane in a satin sheen to protect it from everything toddlerdom and beyond. I brushed on 3 coats with a natural-bristled brush (NOT foam!), sanding with a 220-grit sanding block in between coats. I made sure to go slow and steady, so as not to overwork the urethane and cause bubbles, but fast enough that it didn't dry and leave lap lines. The consistency was thick and gorgeous – a little thinner than honey – and it seemed to level out after brushing it on, so the brush strokes disappeared completely. Beautiful. I let it cure in the garage for a couple days before bringing it into the house (stinky!).
Here she is, all finished!
Allow me to apologize for the wallpaper, salmon-pink walls, and mystery-colored trim. We're renting. This house has great bones and a lot of space, but the previous occupants’ design choices were, um… questionable. I mean, who paints trim this color? Blech.
But let's focus on the positive and get back to the drool-worthy finish on this table:
Ahh... that's better. I just LOVE it. Someone alert the press. This is the first time I didn't blotch up the staining job! (See what I did there?) Hallelujah. I really enjoy the building part, but am was grossly intimidated by the finishing process. Mostly because sanding wood is the bane of my existence. And because I'm lazy and impatient.
If you want to build this ZGallerie-inspired dining table, be sure to visit download the free plans! Thank you so much, Ana!
And huge thanks to my homies at Minwax for allowing me to experiment and learn with their excellent products. I couldn’t be happier with how it all turned out.
Boom.
Artgirl1
Sat, 08/08/2015 - 06:19
Restoration hardware table
Thank you so much for this information! I just googled looking for finishes for an oak table my husband and I built using some reclaimed oak and some milled oak, basing our table design on the RH 'Russian Oak Parsons Table'. I wish I had found you sooner but we did a lot of the same things you did finally ending up with a beautiful white/grey stained finish and now wondering about the final finish. I am heading out to buy the min wax helmsman today thanks to you. Thank you for sharing your info!
Tsu Dho Nimh
Mon, 09/01/2014 - 11:50
Sorry 'bout the pictuires
I cold rescue the text , but the links went bye-bye.
bundaboy
Tue, 09/09/2014 - 03:26
The close up picture has
The close up picture has disappeared.
Cheers.
tylervining
Sat, 10/25/2014 - 07:07
Oil Based or Water Based Paint?
Did you use an oil based paint to whitewash or a water based? I would love to use a water based I have laying around the garage.
That Cable Guy
Mon, 11/03/2014 - 07:23
Wait time between oak stain and white wash?
Did you wait 8 hours on the oak stain to dry like you did on the walnut stain before you did the white wash? Or since this is a quick wipe off can you wait less time?
Katie McD
Sat, 05/23/2015 - 19:35
Wood type?
What type of wood was used for the table? The finish might look really different on a different wood...
In reply to Wood type? by Katie McD
Ana White
Sun, 05/24/2015 - 16:30
Take a look at this post http
Take a look at this post http://jenwoodhouse.com/diy-dining-table/
Katie McD
Sat, 05/23/2015 - 19:35
Wood type?
What type of wood was used for the table? The finish might look really different on a different wood...
nic_ames
Tue, 07/28/2015 - 19:56
Any chance you remember your
Any chance you remember your process for the classic gray over provincial? Im really looking to get that stain but not seeming like its coming out like what youve got posted.
stephaniesmith1214
Mon, 08/10/2015 - 08:33
Beautiful Table!
Hello! Just wondering if you think this would have the same effect on an oak table?
Mine only
Tue, 05/24/2016 - 04:31
Desk build/ buy
Could I pay you to build and assemble ( with a finish) if so could You just email me at. Plz reply
[email protected]
i will pay for all material and extra
Huon Shinn Rees
Wed, 05/25/2016 - 03:48
Wood type
Where did you buy the wood and what type of wood is it in the samples
smith8ar
Mon, 08/08/2016 - 07:12
Sanding in between
Did you sand in between every coat of stain?
Jimmy123
Mon, 08/08/2016 - 11:49
White Paint
Hi Ana. Thanks for the tutorial. I will be using it for wooden frames I will be using for my art. I am just wondering what kind of white paint you used? I bought some white wash pickling by MinWax but it is water based. Not sure if it will come out the same as yours. Thanks in advance!
Jim
momforlyf
Fri, 10/01/2021 - 21:01
Such a beautiful table! …
Such a beautiful table! After the white wash did you do the weathered oak or the special walnut first. How long did you let them stay on? Thank you so much for sharing your work!