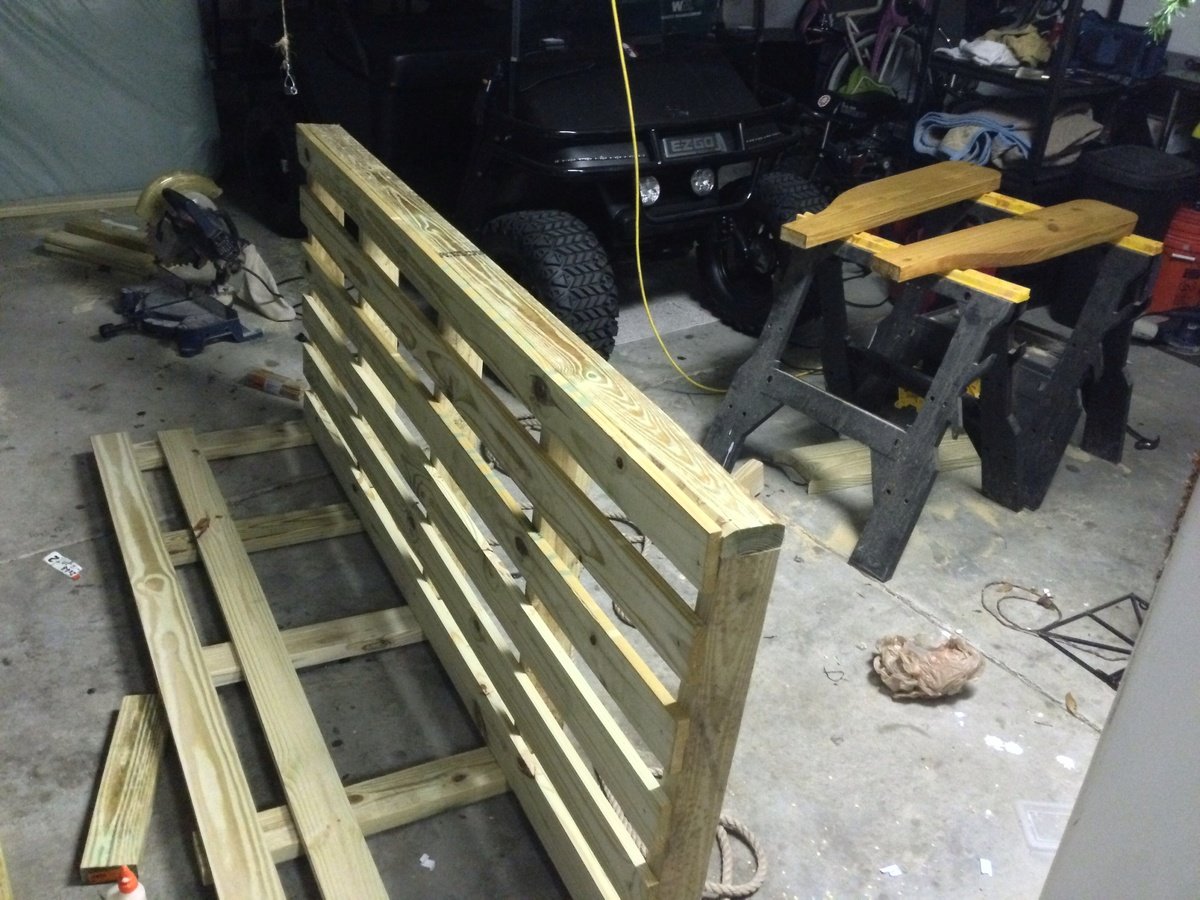
Tiny House Flip Sofa Bed - by Deirdre

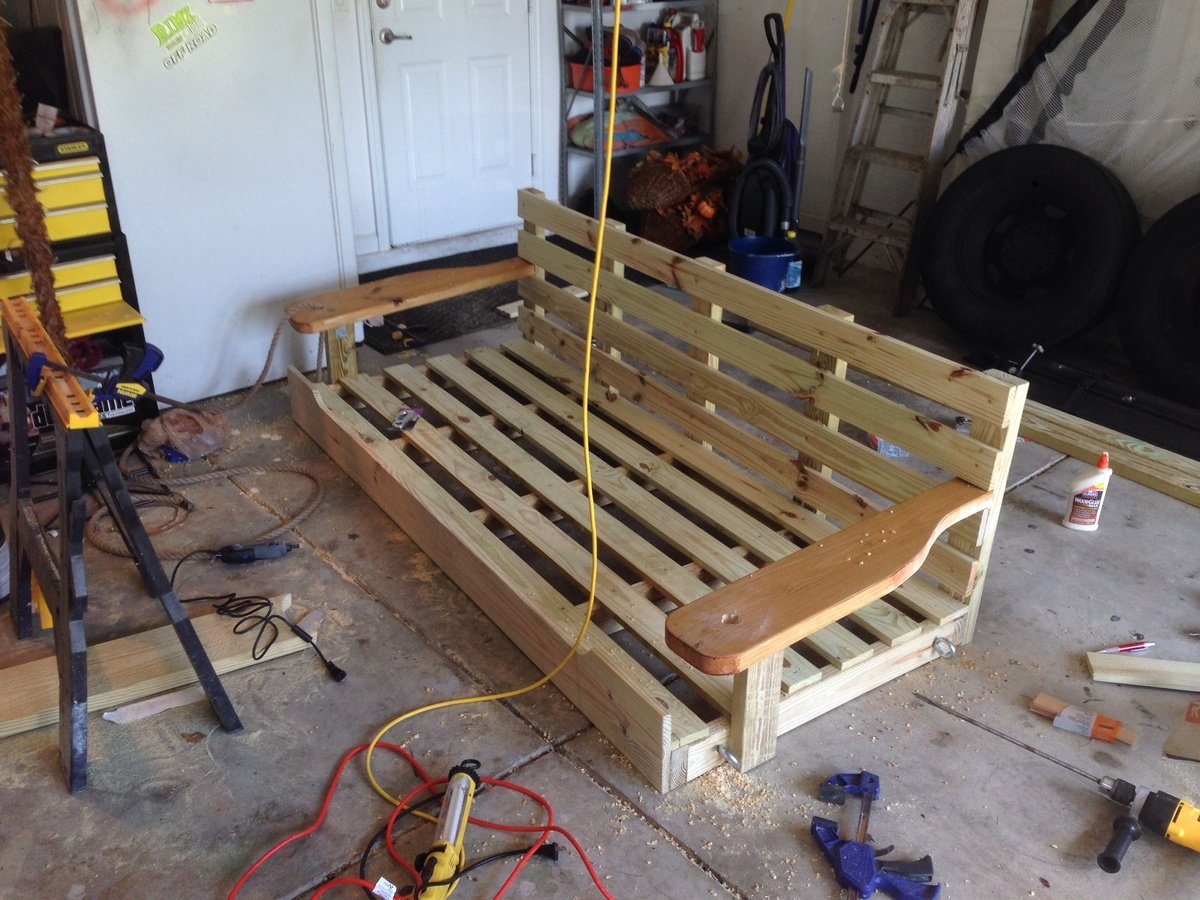
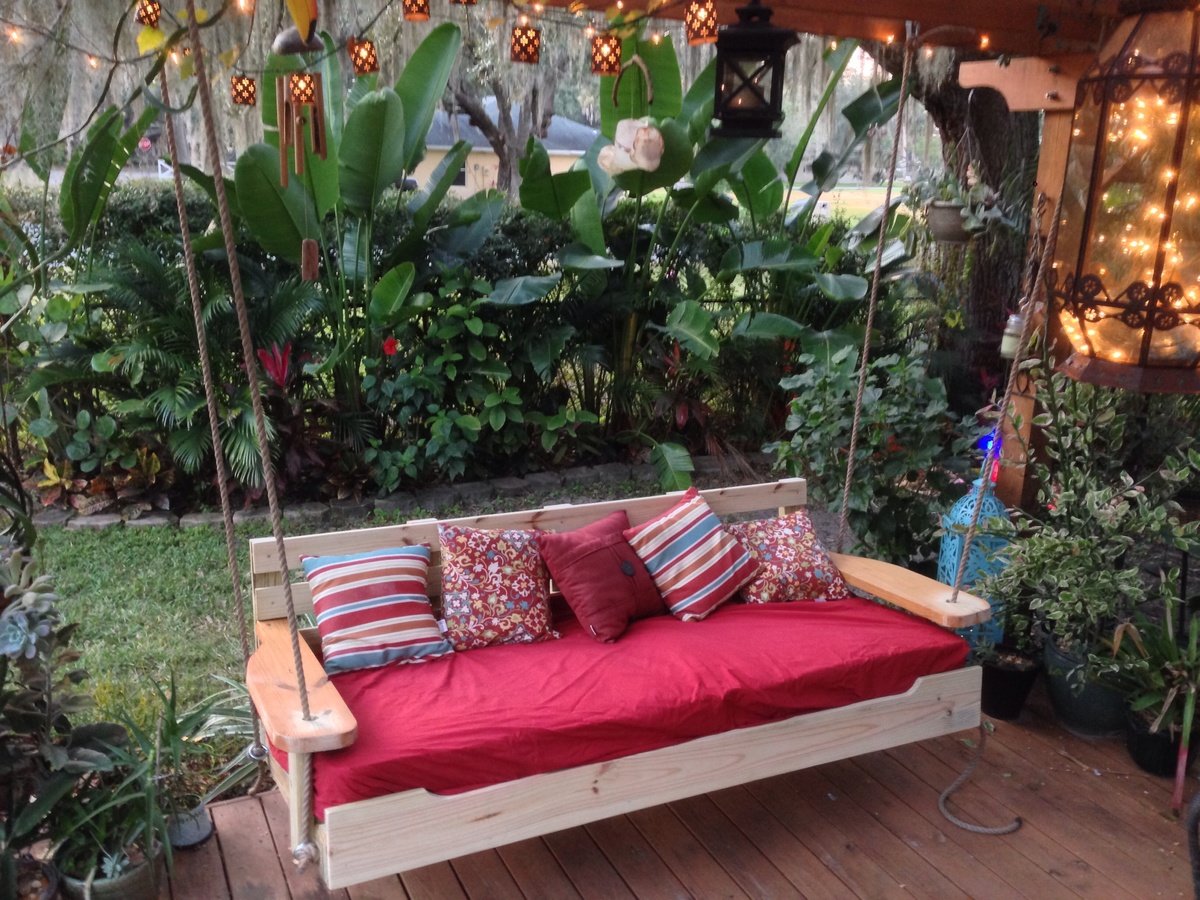
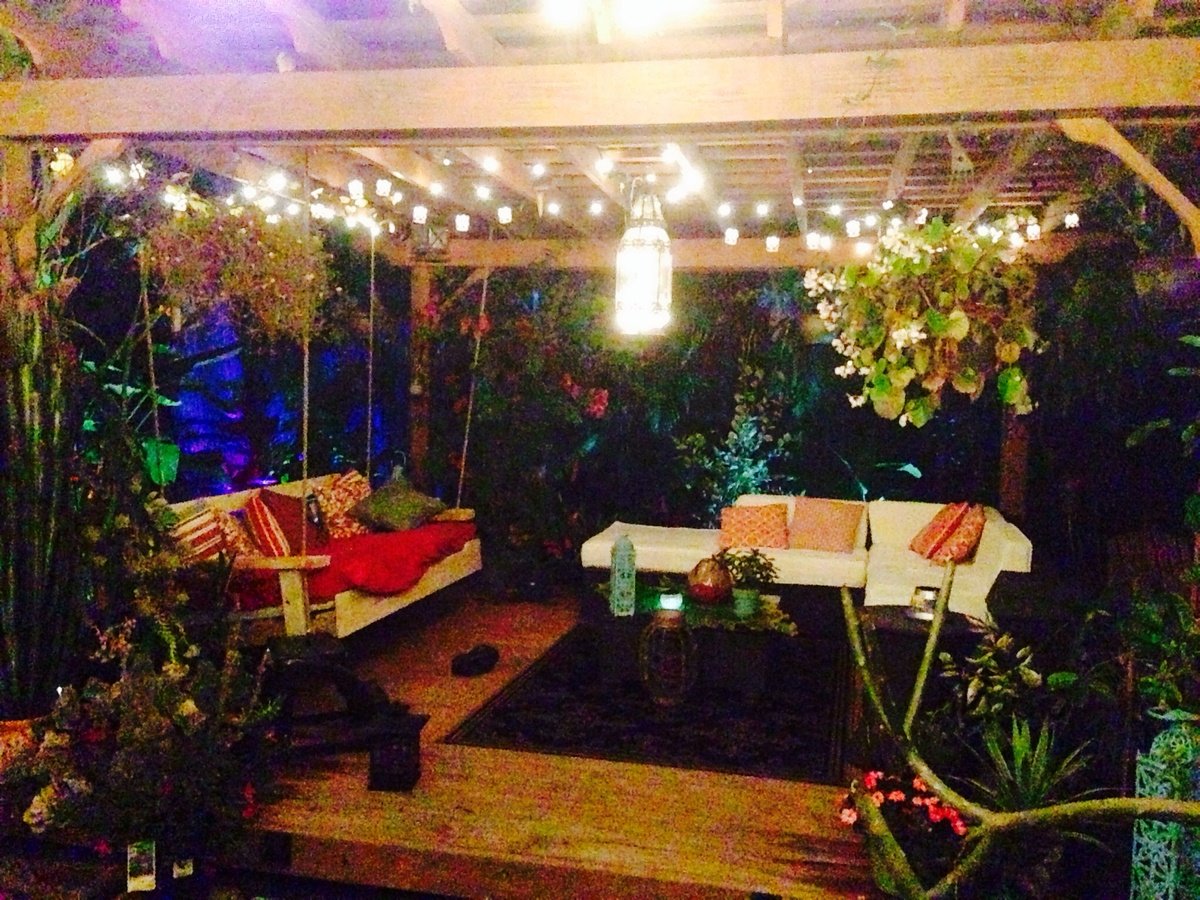
Modified from our twin sleeper chair plan, this amazing hinged sofa bed was built and shared by #tinybuilderau
Built from Plan(s)
Modified from our twin sleeper chair plan, this amazing hinged sofa bed was built and shared by #tinybuilderau
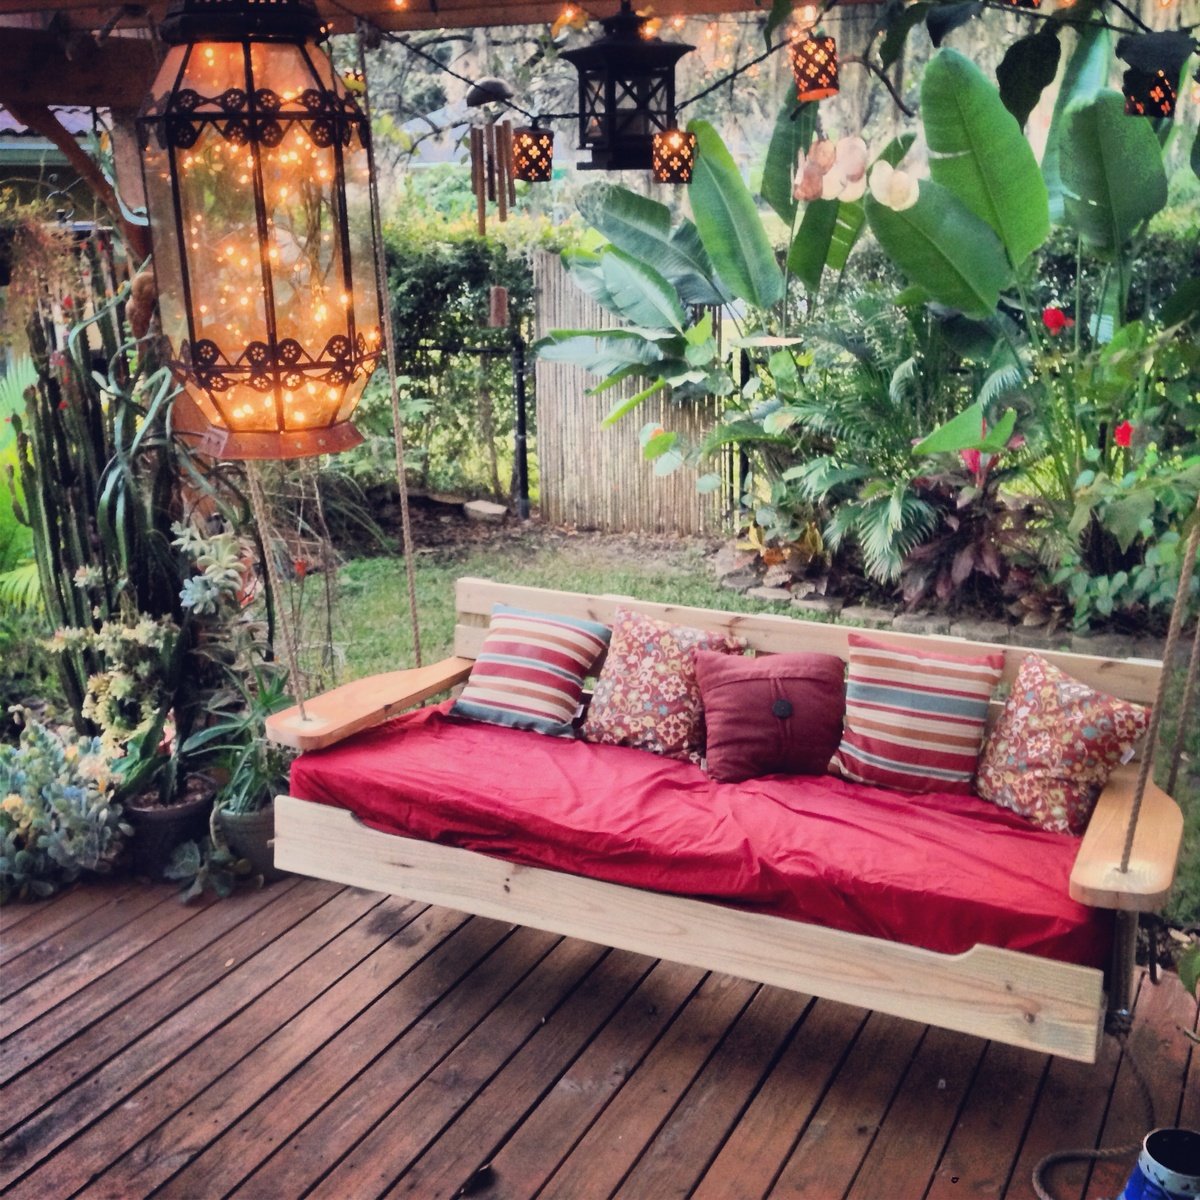
Started off with the original design but enlarged it to fit an oversize single mattress. The mattress cost me $35 from a local faith farm, while the materials came in around $200. I decided to hang under my backyard pergola. Fun and easy project.
Tue, 01/28/2014 - 21:10
Wow this looks so inviting I might just have to make one too! Nice work-- it looks great!
Mon, 04/07/2014 - 22:49
Really lovely! Great job! This will be one of your favorites spots all summer long.
Mon, 07/27/2015 - 22:45
I want this! I just made a couple of plant stands for my front porch. My husband asked me what my next project was, why, a swing bed. (This was only my second project!) I want to put cup holders in those big ole arms! We have a house at the beach in South Alabama, so, you gotta "hydrate." This is an awesome swing. I can't wait to do mine...pillows to rest on, one foot on the concrete pushing me in a slow swing. Cold beverage in my hand or in my cup holder. Yep, southern girl has a new project. Love it!
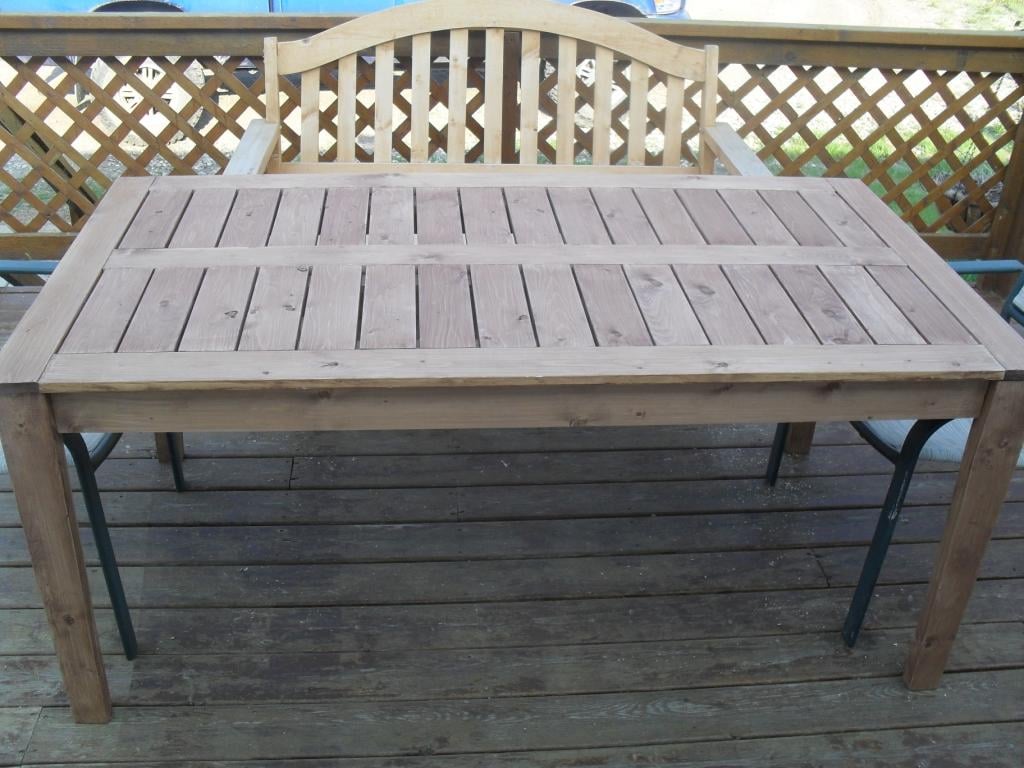
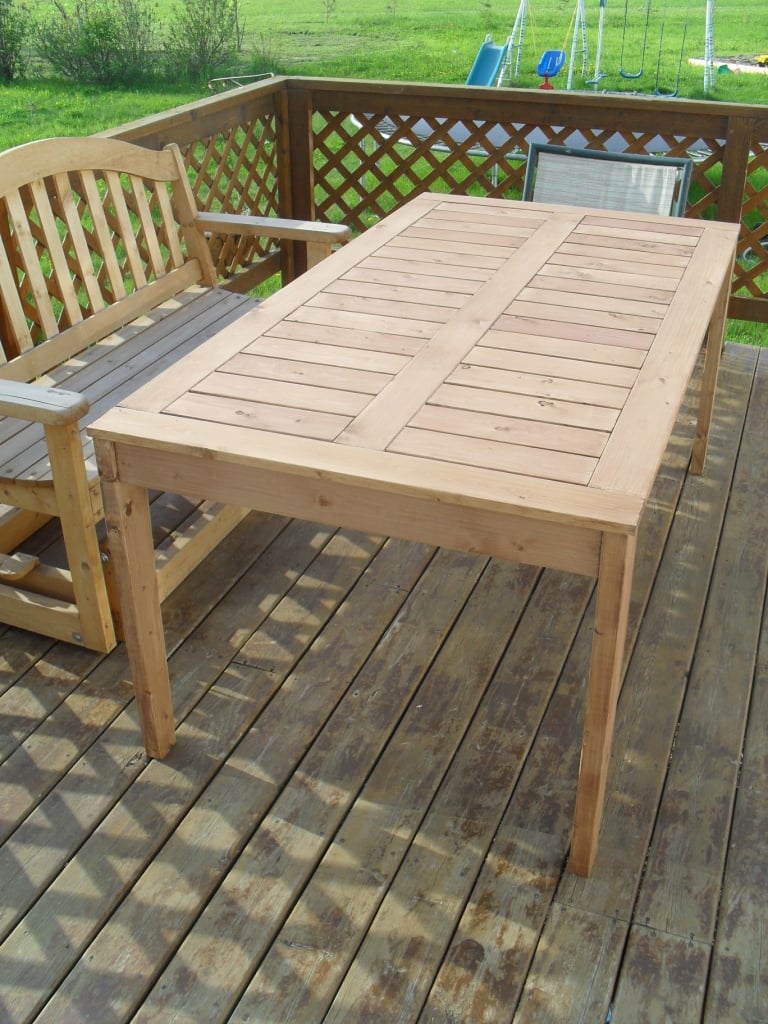
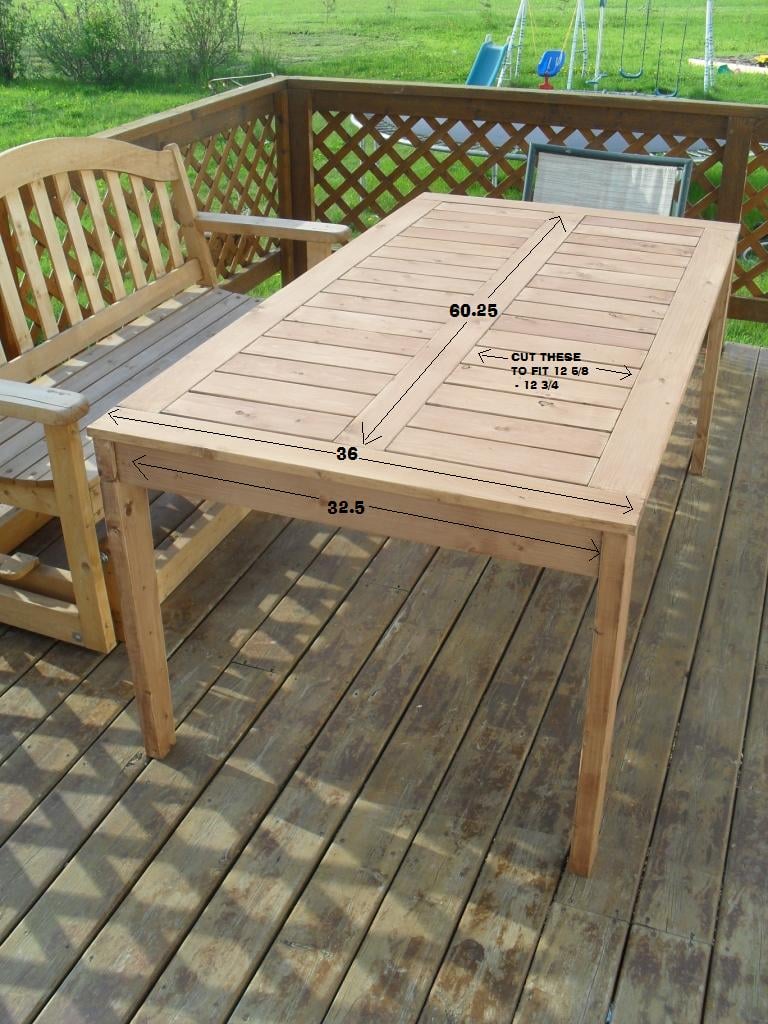
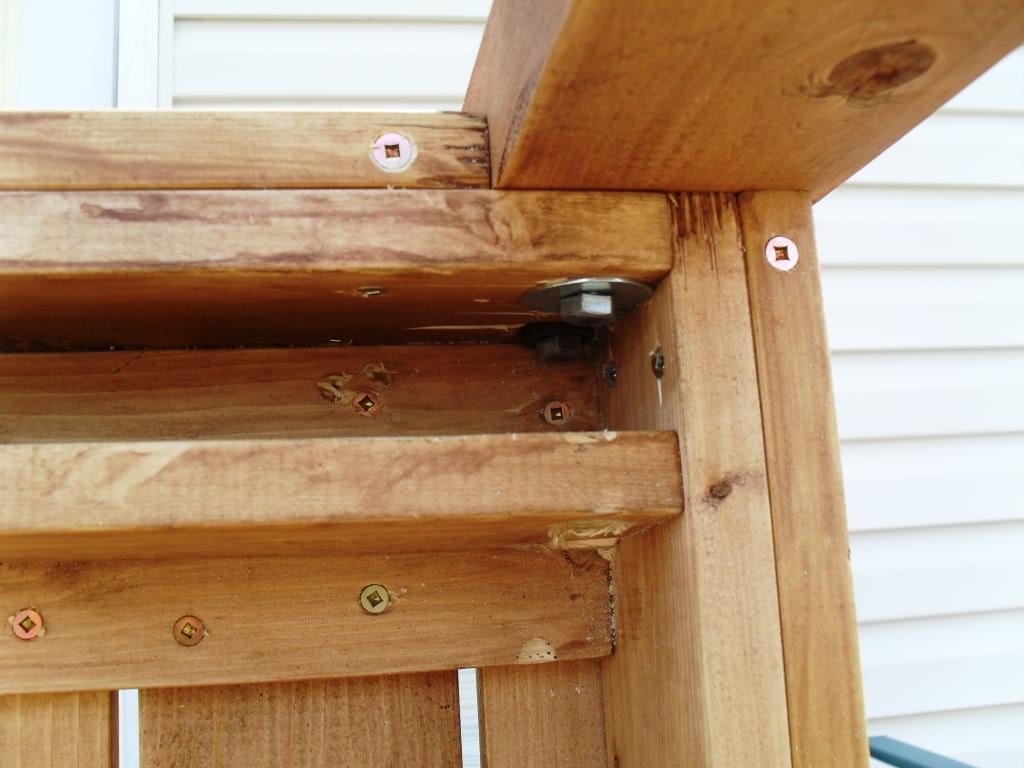
Wanted a Patio table and when I saw the plans on this site I really liked it; I just changed the plan a bit. Everything was screwed from the underside of the table, also I attached the legs with 2" lag screws.

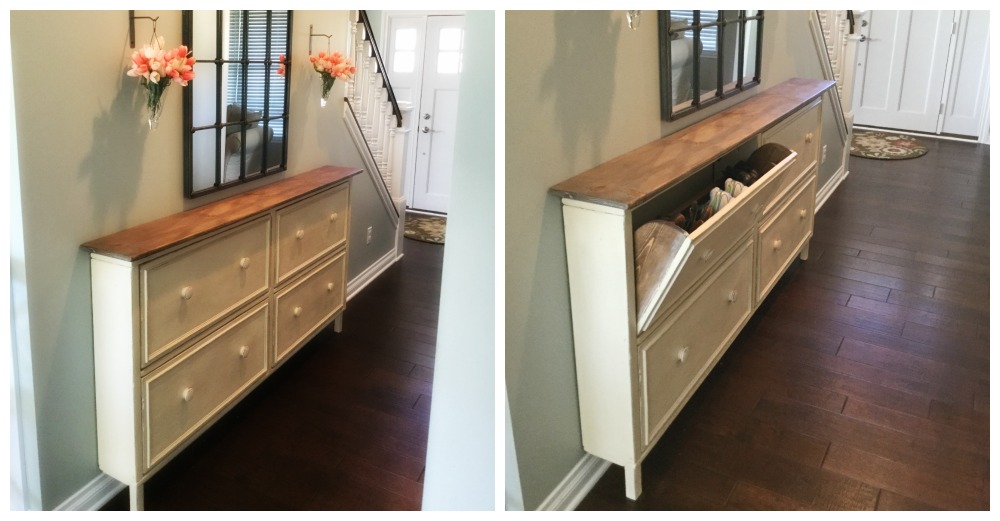
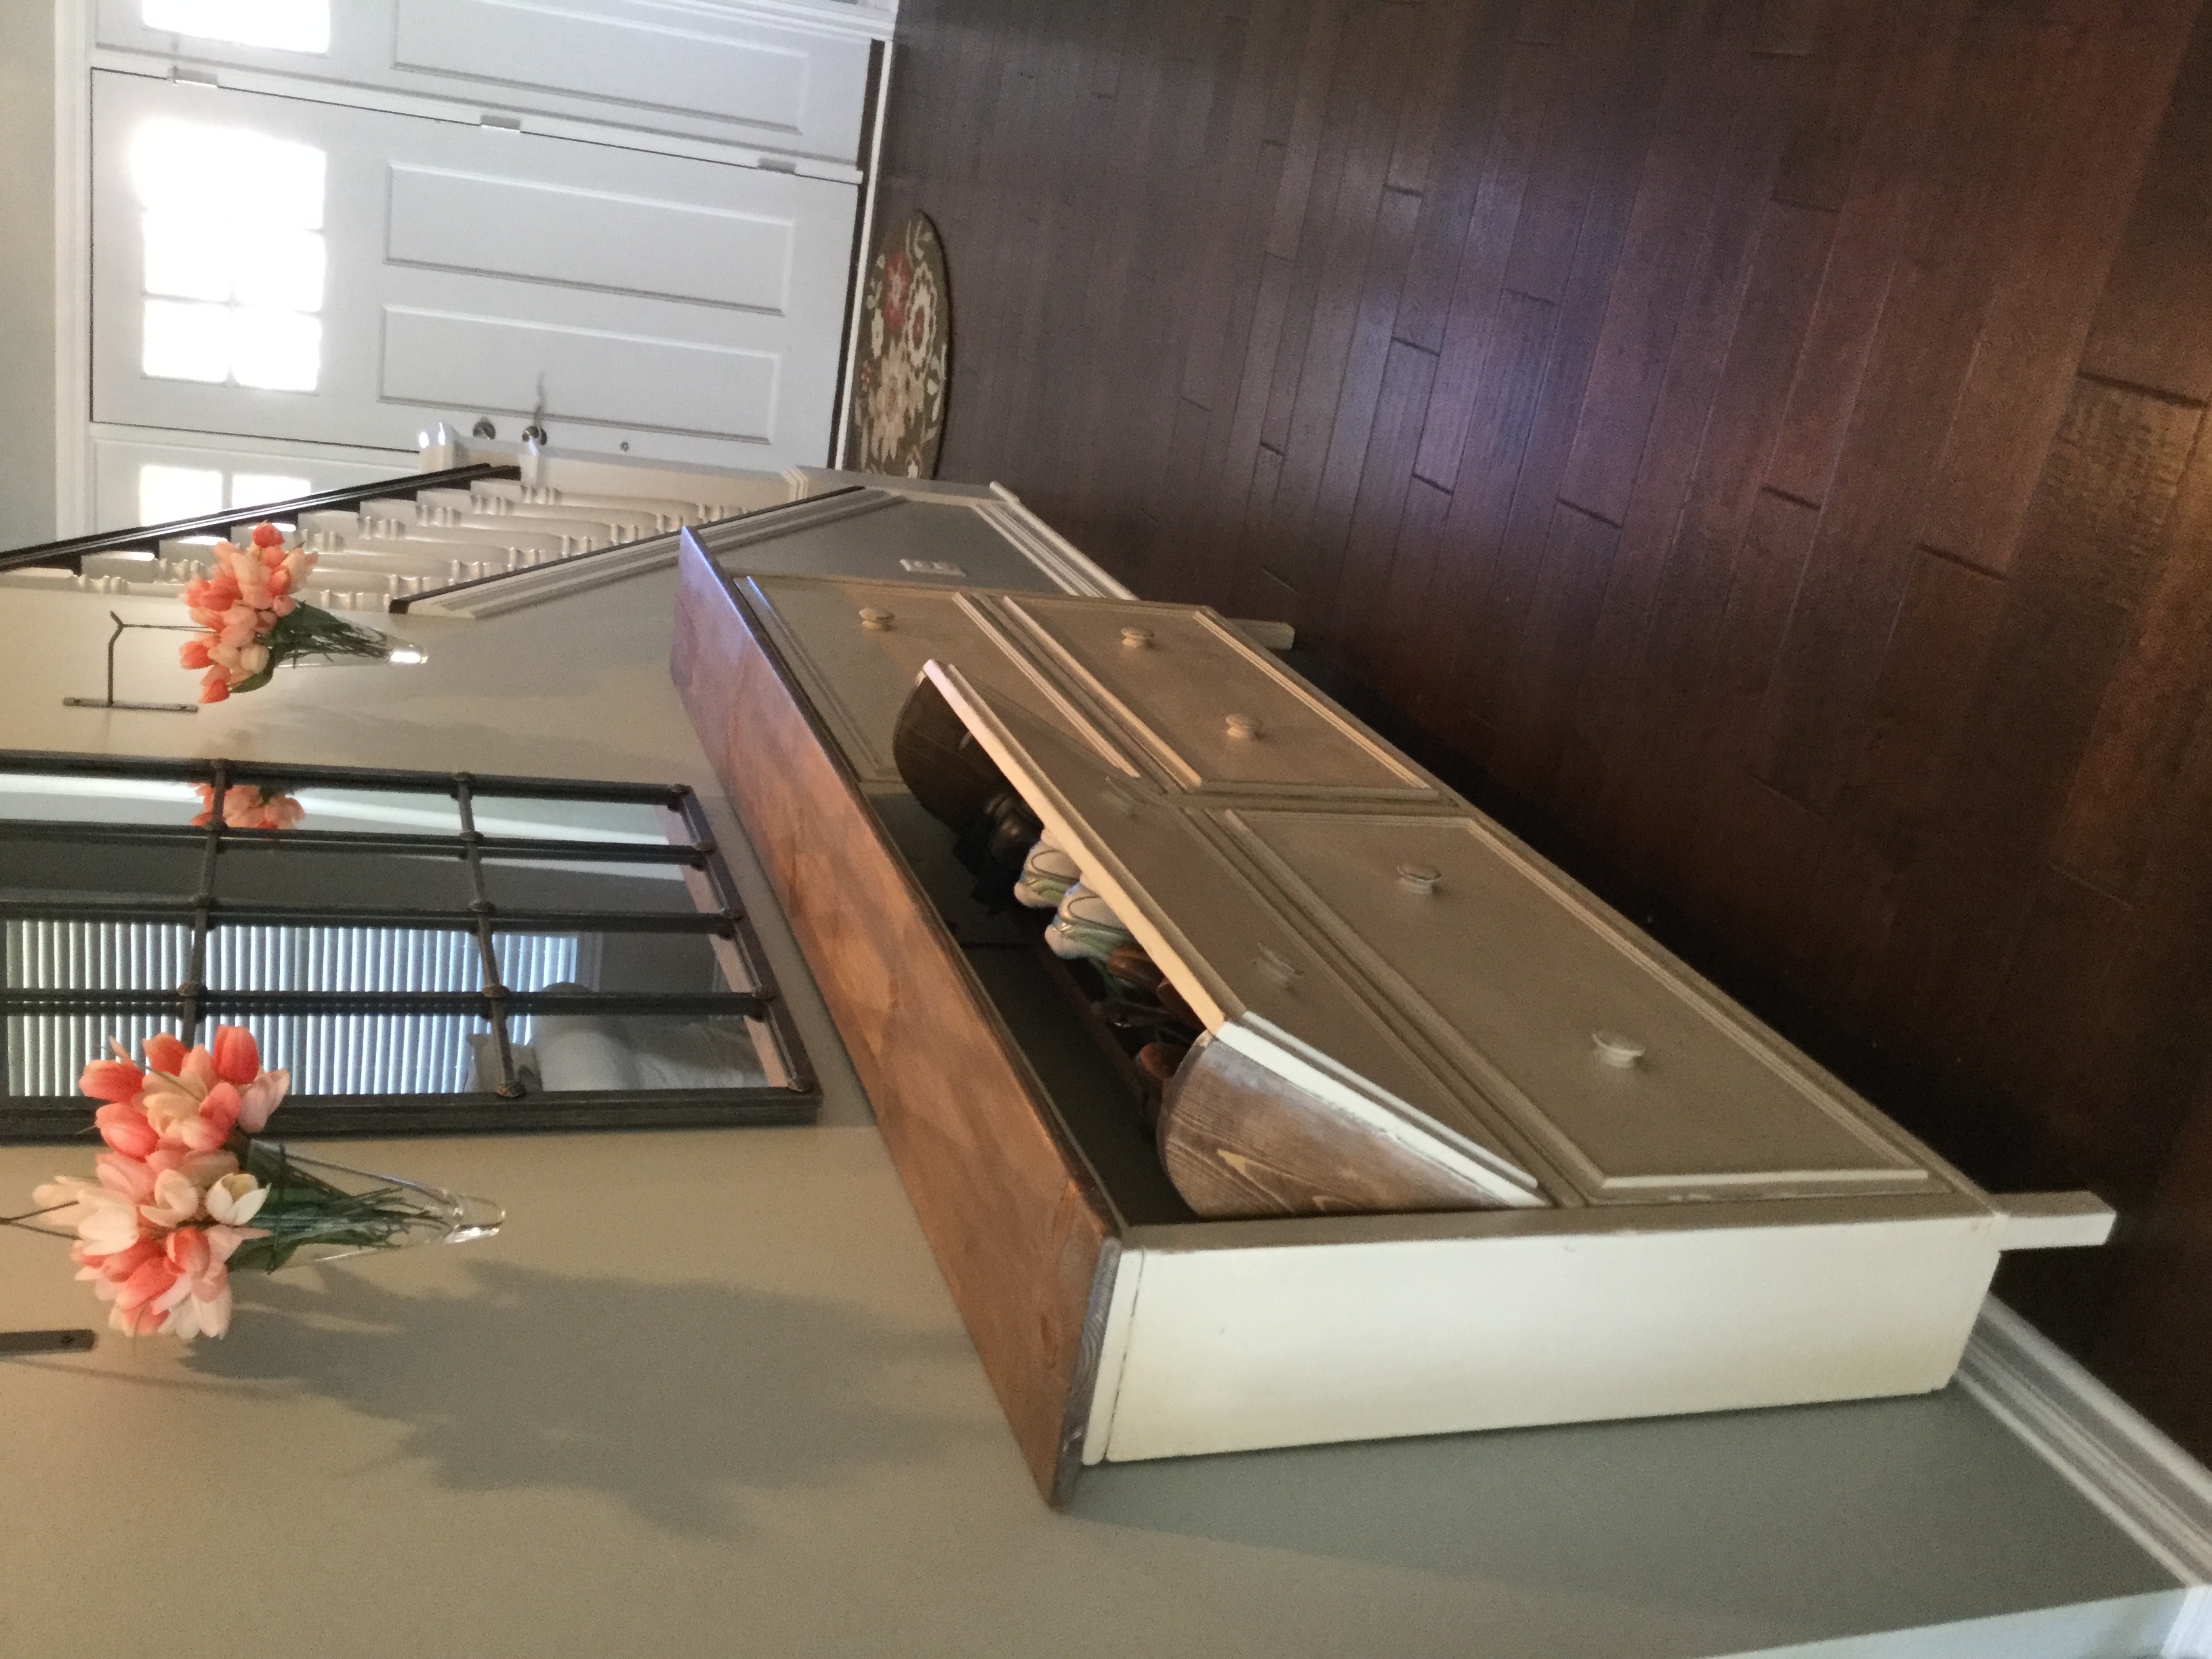
We used the shoe dresser instructions with some modifications to make it longer
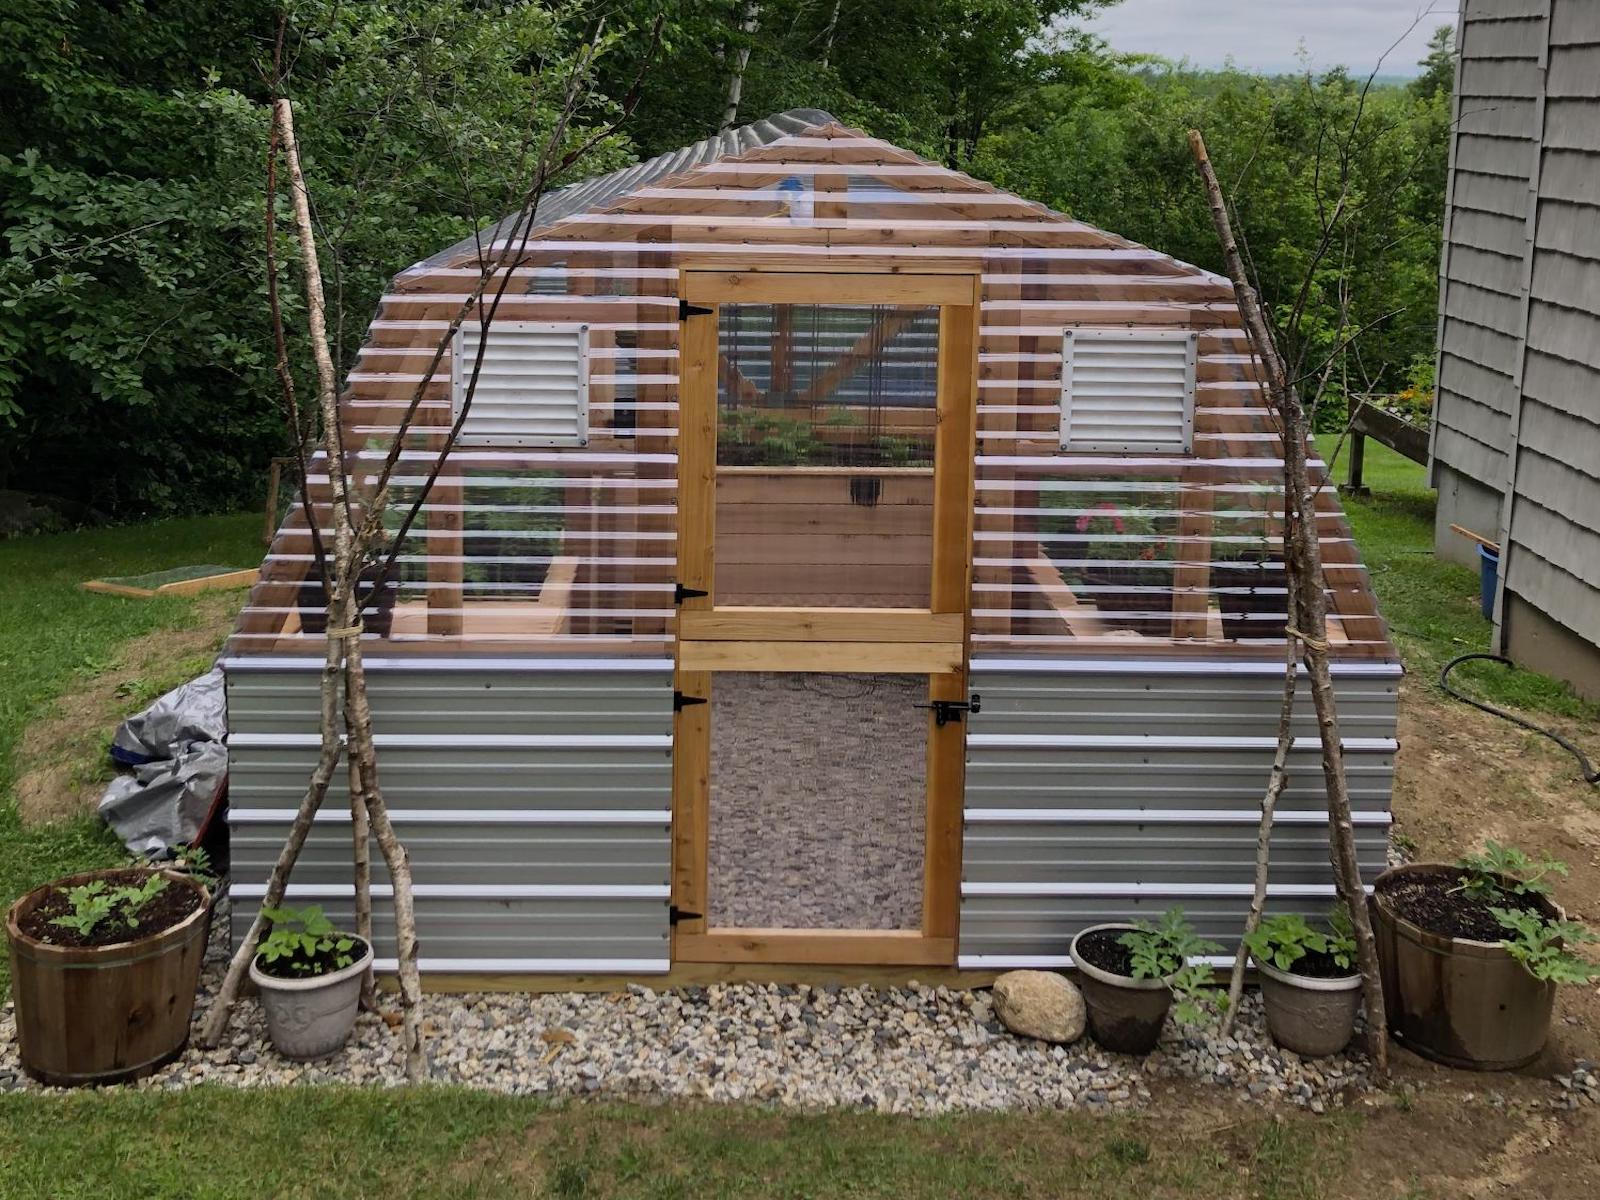
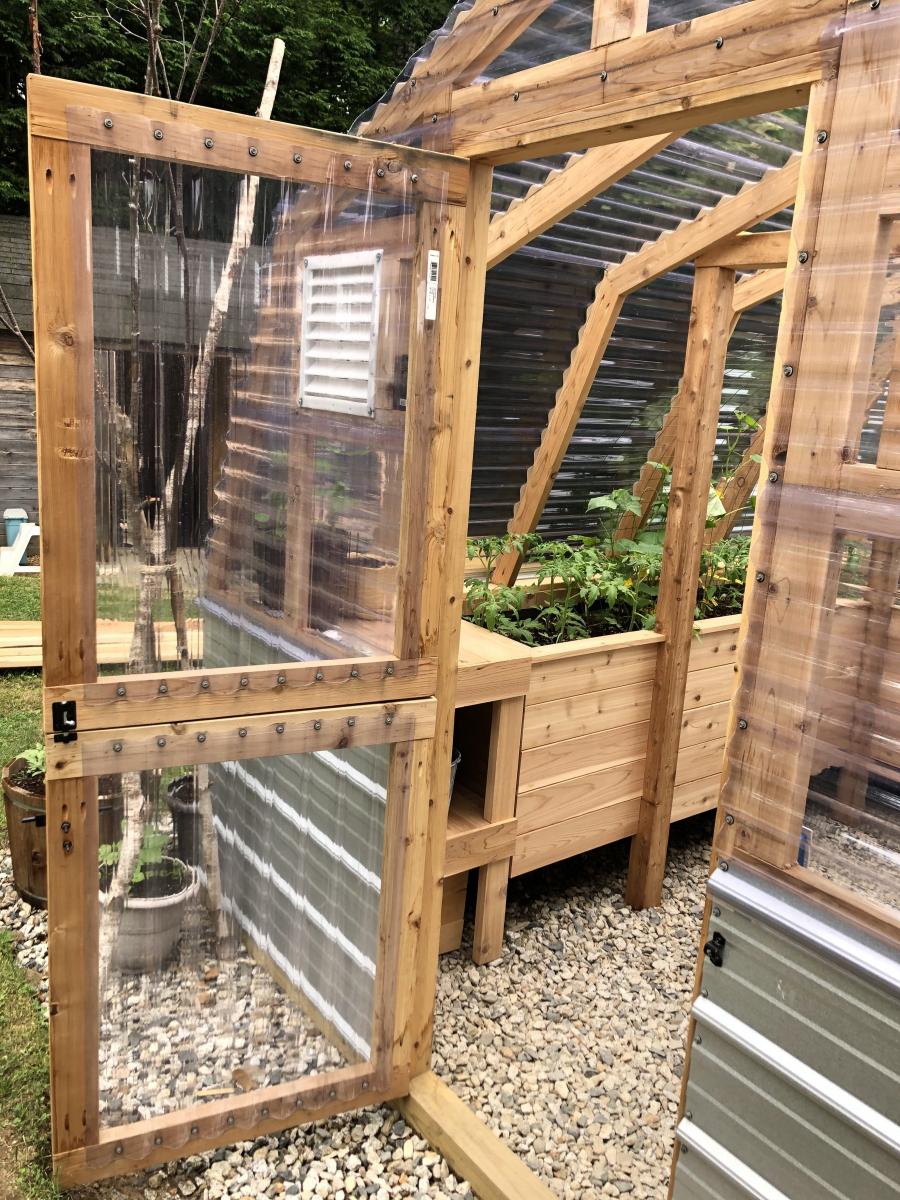
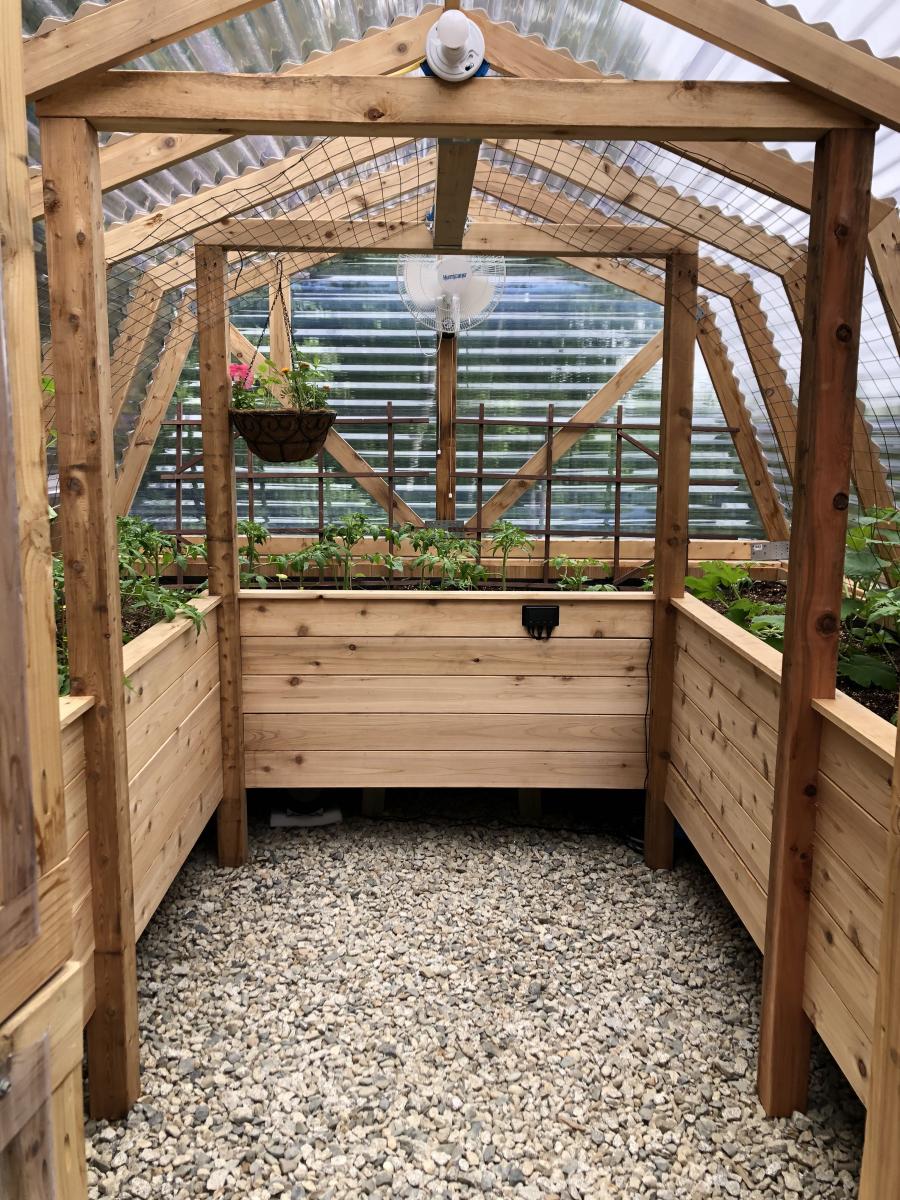
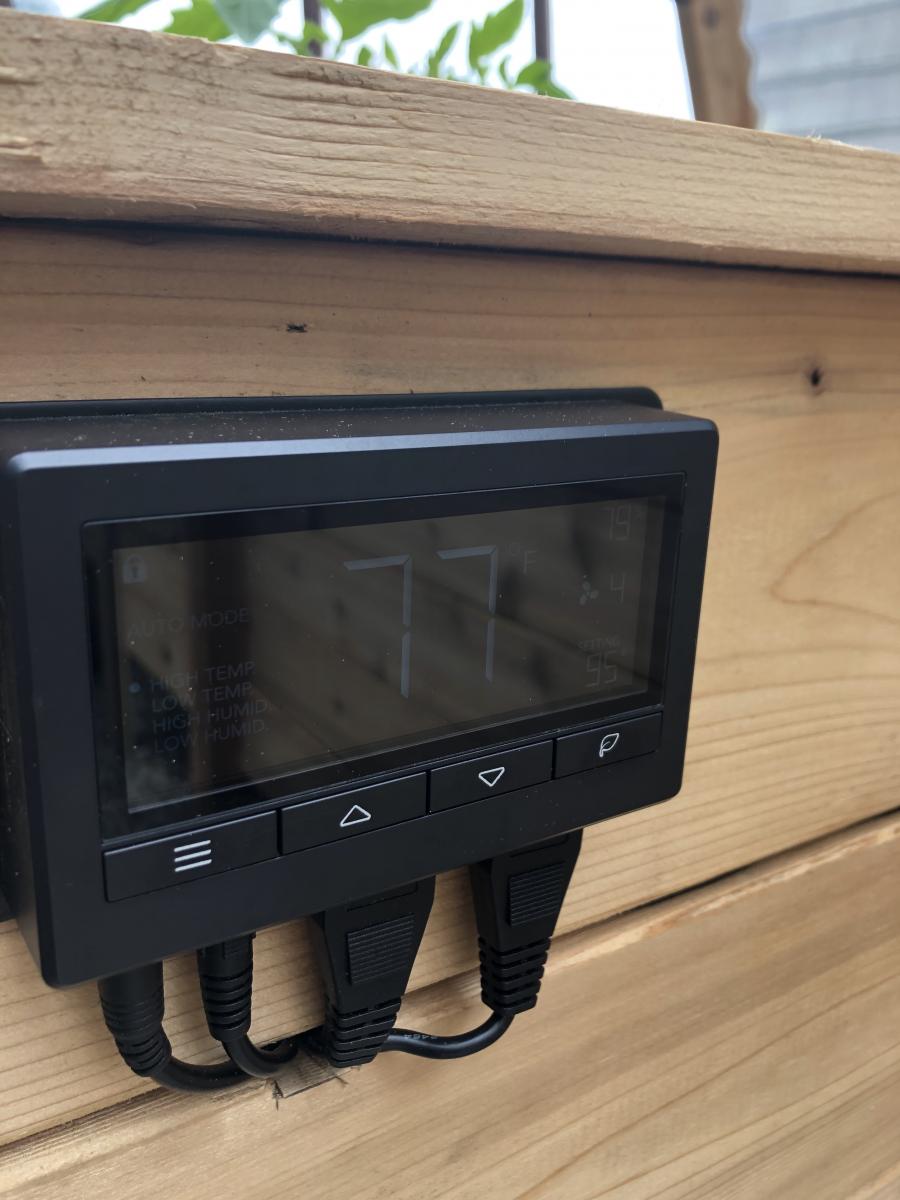
We loved this greenhouse plan from AnaWhite and wanted to be able to grow in 3 seasons so we modified the design to include humidity & temperature control & 18" deep elevated cedar beds inside with 4x4 posts for support and trellis option. We added electricity in order to have a lighted workspace and the ability to put in a circulating fan to control mold and fungus. We added 2 work tables (2x2') on the inside of the door left and right side door in order to do seed trays & store supplies. This was a wonderful project for my husband and my plants inside are doing incredibly well compared to my outside garden beds here in zone 5. Products used:
Foundation
We had a landscape company come and scape/dig a platform and then fill/compact with crushed rock
My husband then used rebar driven into a 4x4 frame in order to secure the frame to the ground and create a base upon which to build the greenhouse
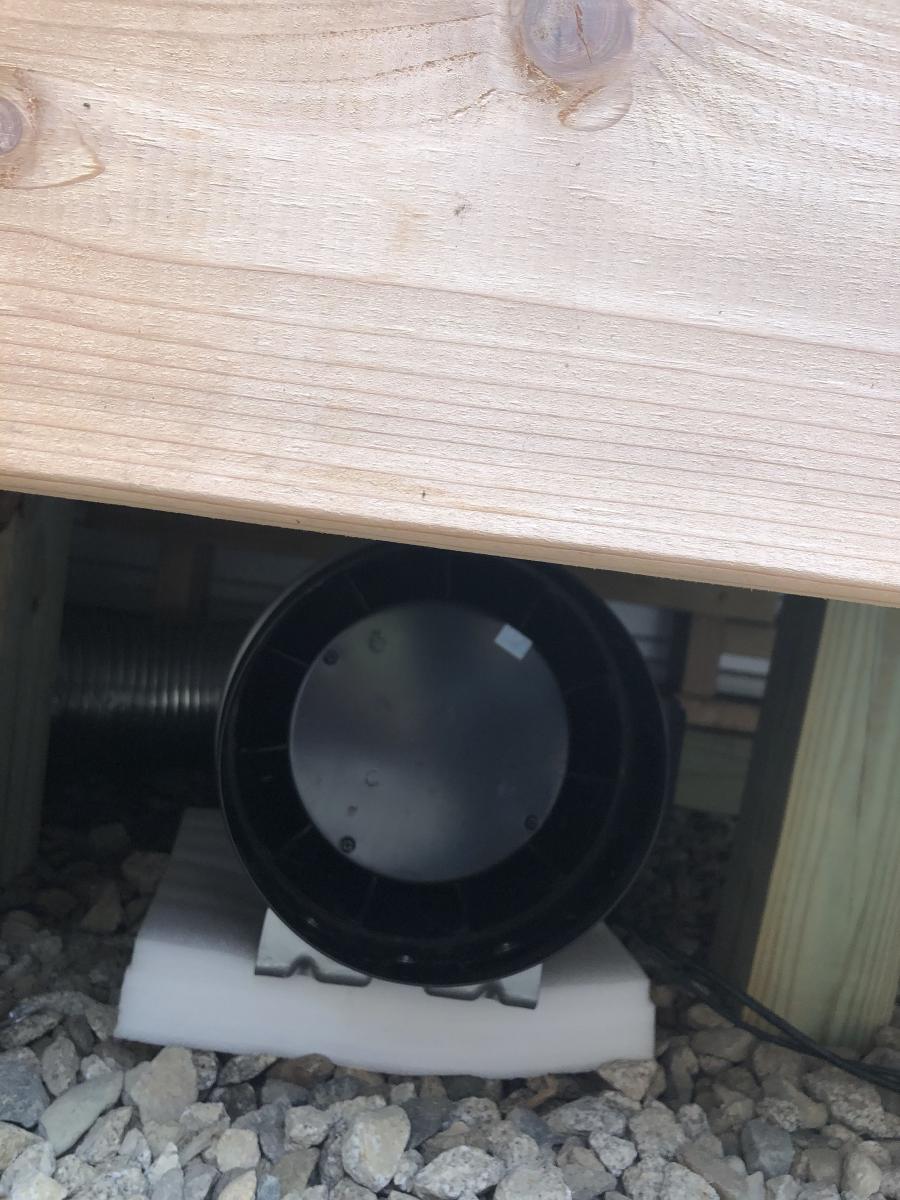
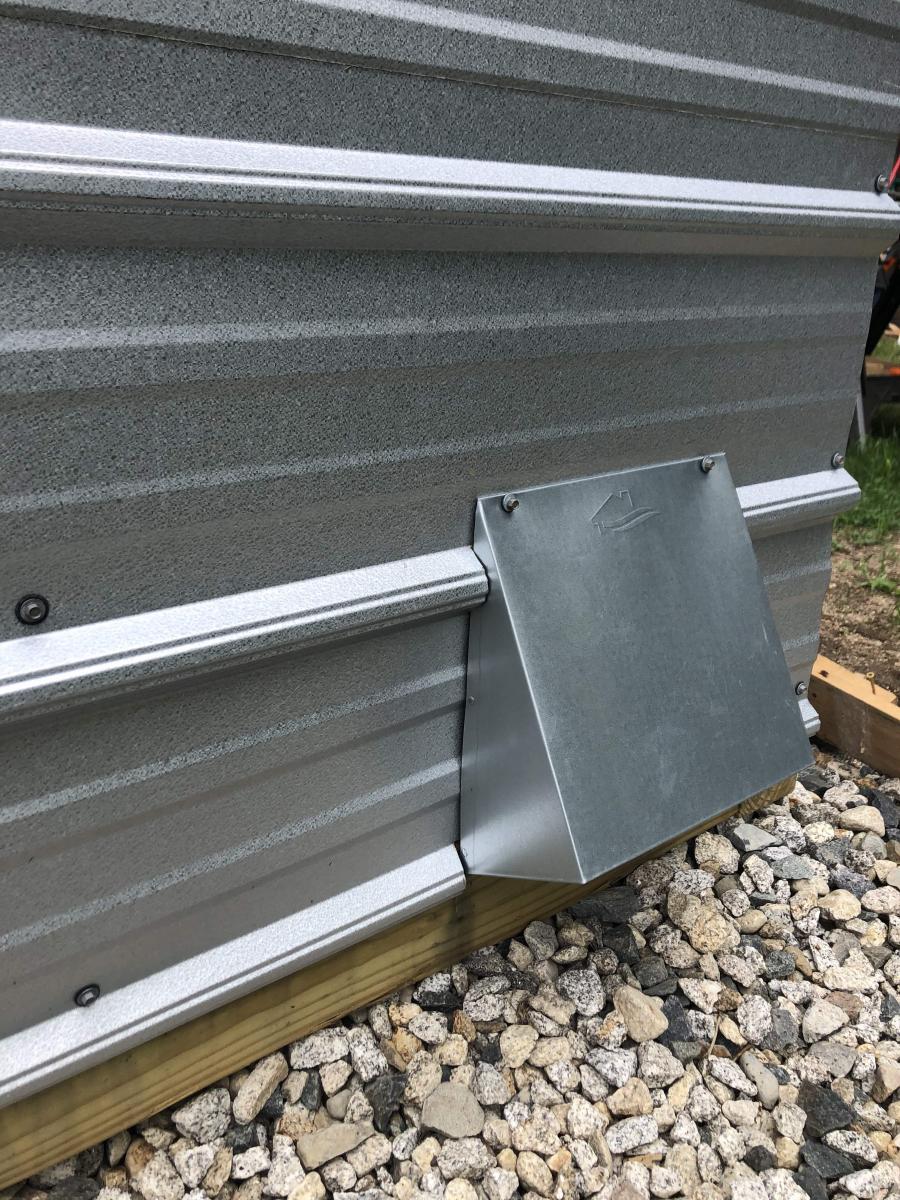
Active ventilation
AC Infinity Cloudline T8 Inline duct fan
Air king range hood wall cap 8" on the bottom outside of the greenhouse wall for air intake + flex 8" duct to the fan itself
Shelter logic autovent automatic shelter vent kits (1 on each side of the front wall) in order to allow air intake from the bottom back of the greenhouse under the elevated beds to flow to the front of the greenhouse and out
Circulating fan- Hurricane wall mount fan 16" - this fan has 3 speeds with tilt function and small mounting bracket
Soil - sourced 3 yards of 50/50 loam/compost from local landscaping supply
60% loam
30% organic compost
10% organic topsoil + perlite
Soil beds
-cedar frame 2 feet wide along sides, 3 feet wide on the back wall
-galvanized metal roofing with holes drilled into it for drainage
-landscape cloth lined
Wed, 09/09/2020 - 13:09
Thanks for that update! I was wondering how to vent this project, as Green houses need the ventilation. Good to know dollar amount also. Great photos.
Wed, 09/09/2020 - 13:09
Thanks for that update! I was wondering how to vent this project, as Green houses need the ventilation. Good to know dollar amount also. Great photos.
Wed, 09/09/2020 - 13:09
Thanks for that update! I was wondering how to vent this project, as Green houses need the ventilation. Good to know dollar amount also. Great photos.
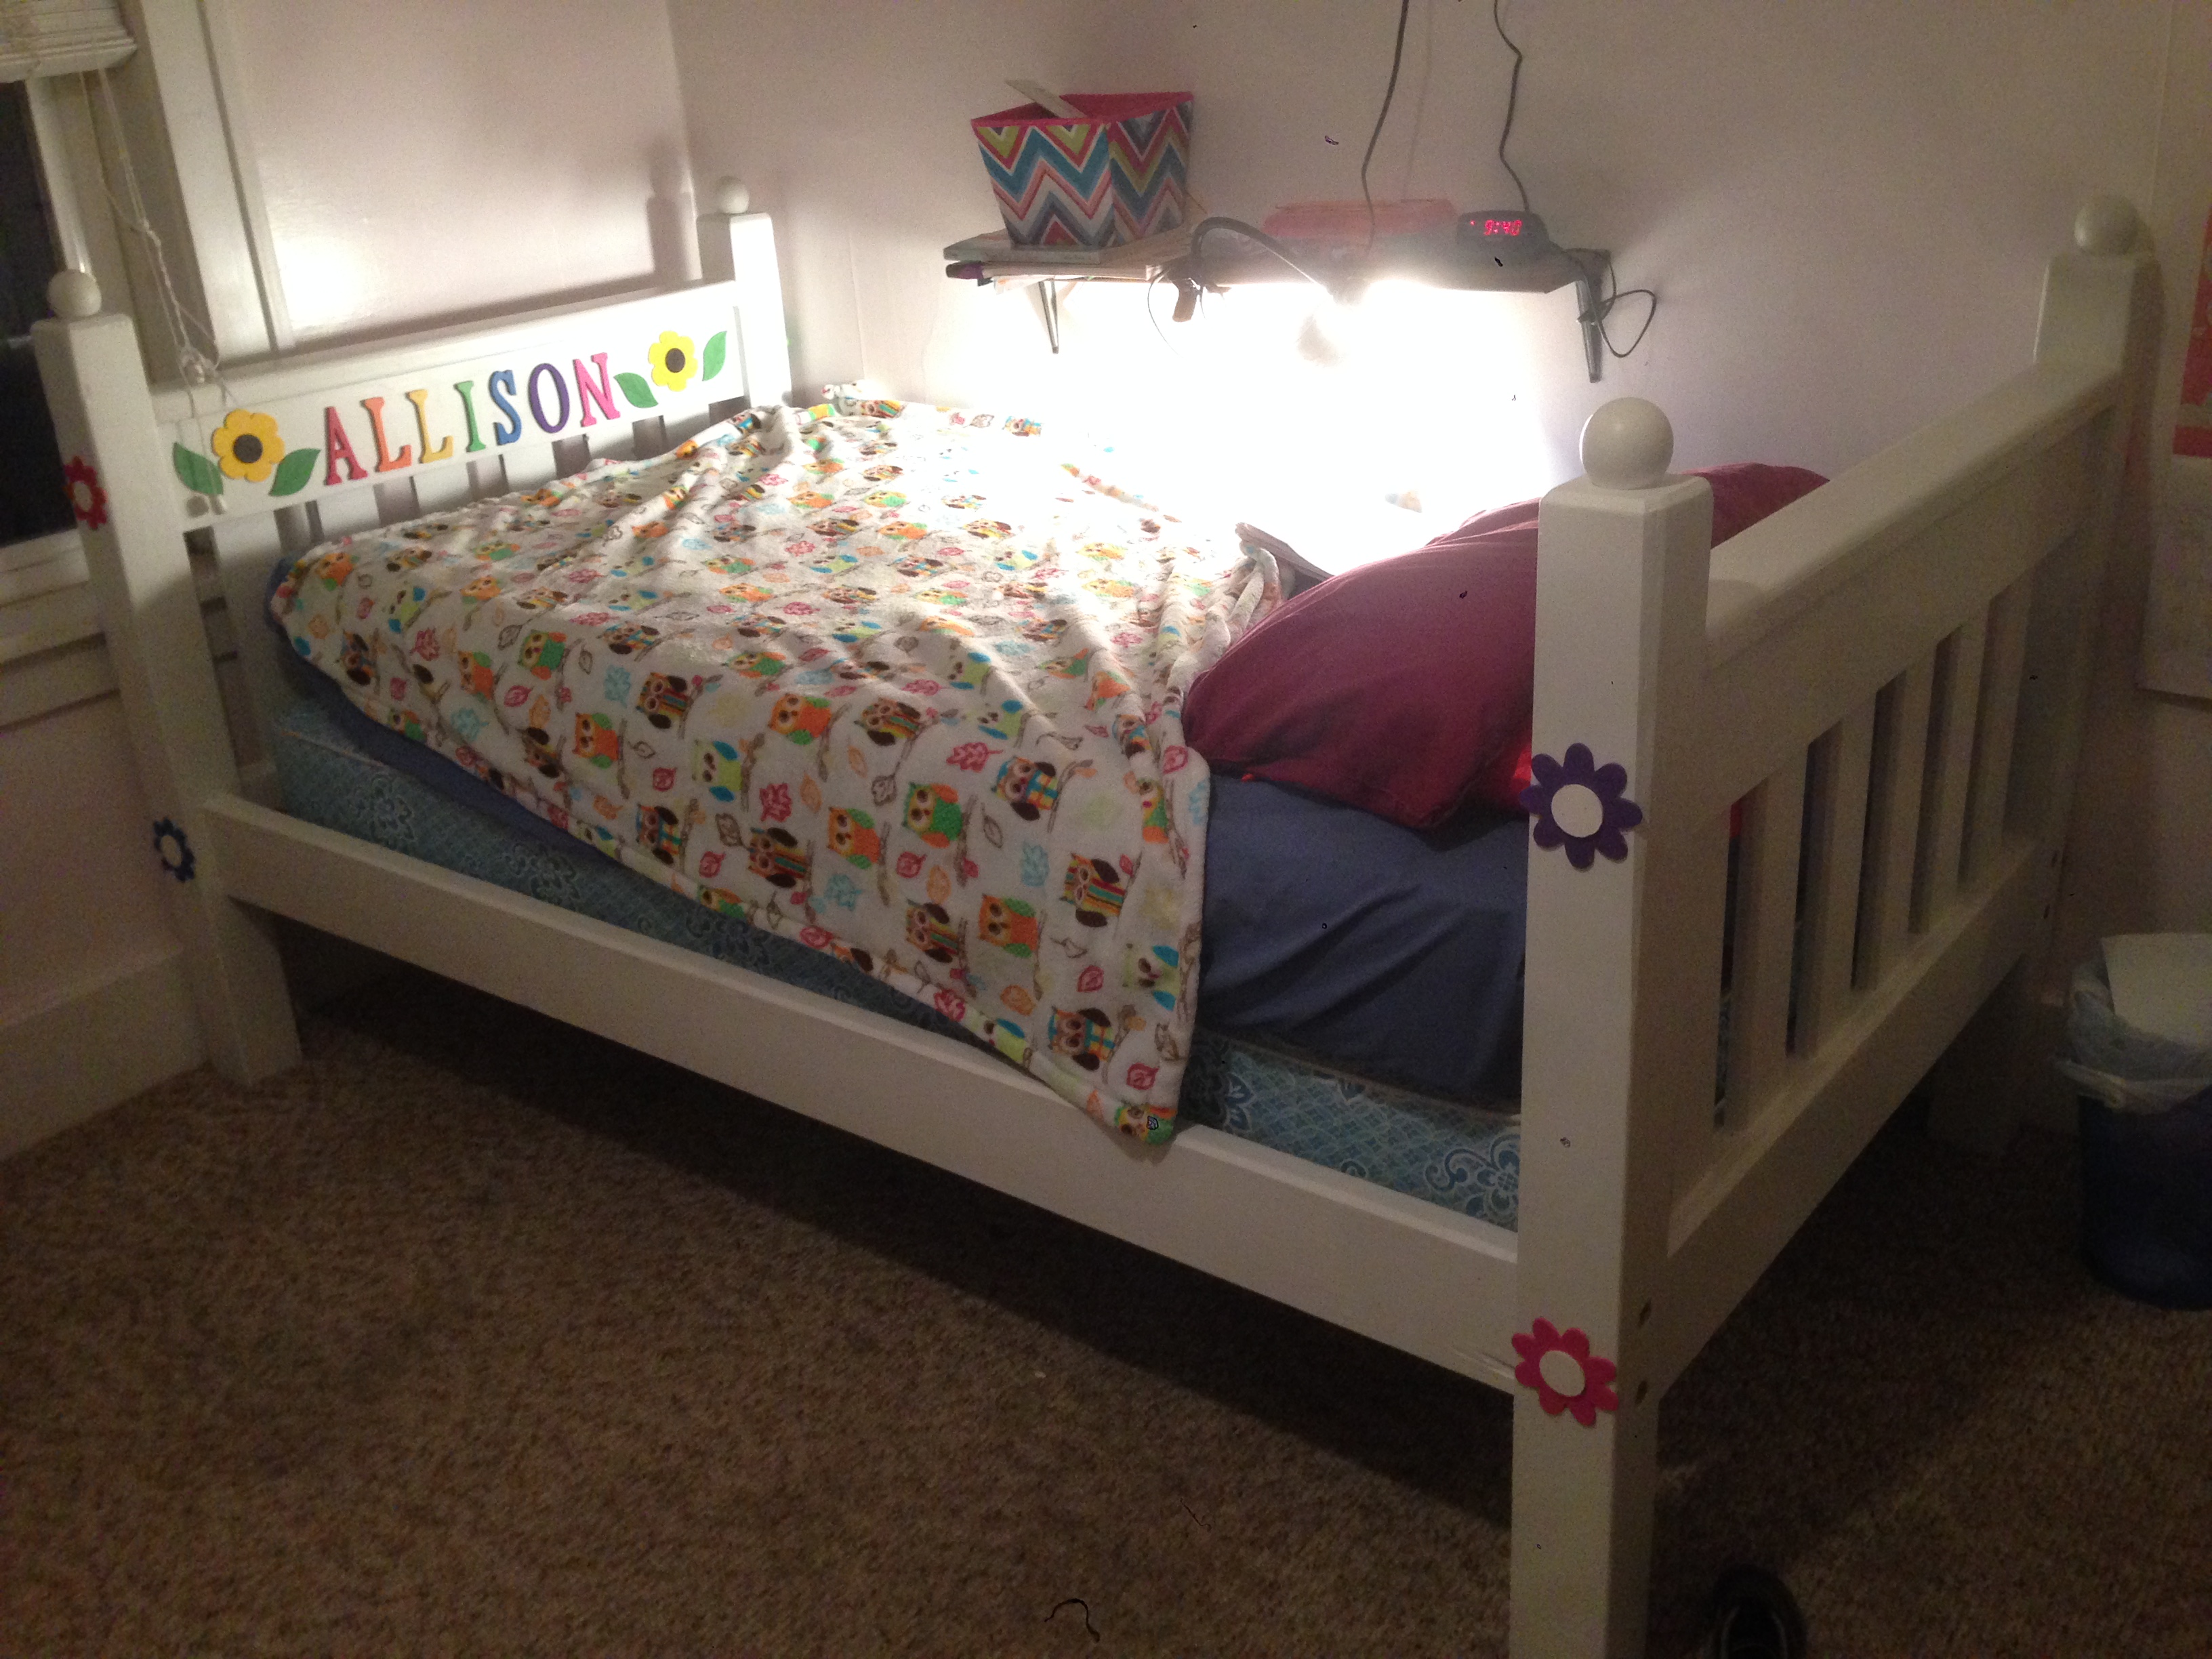
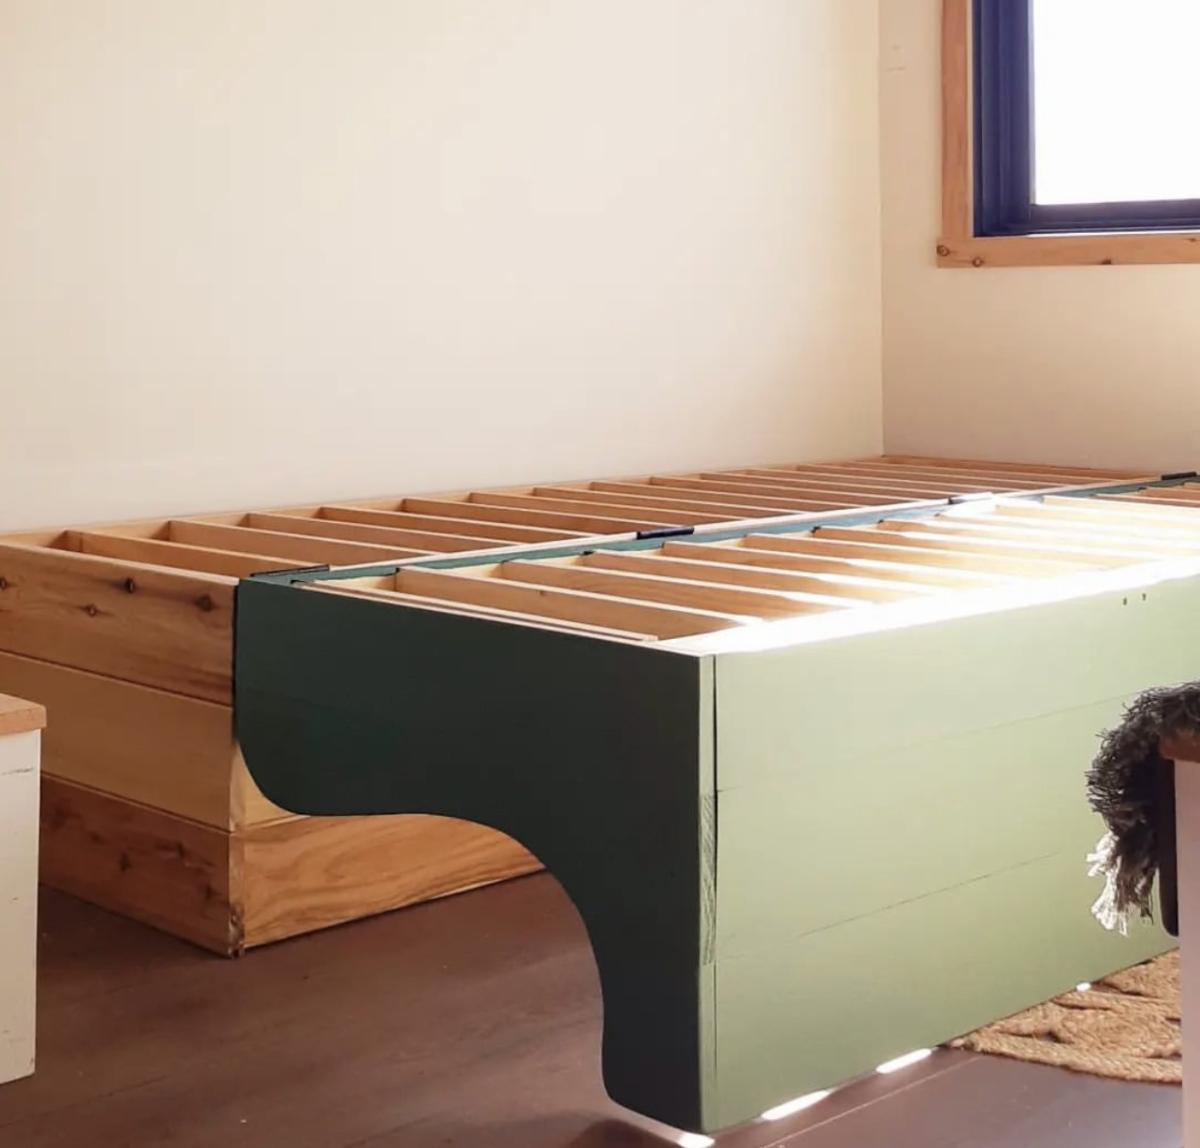
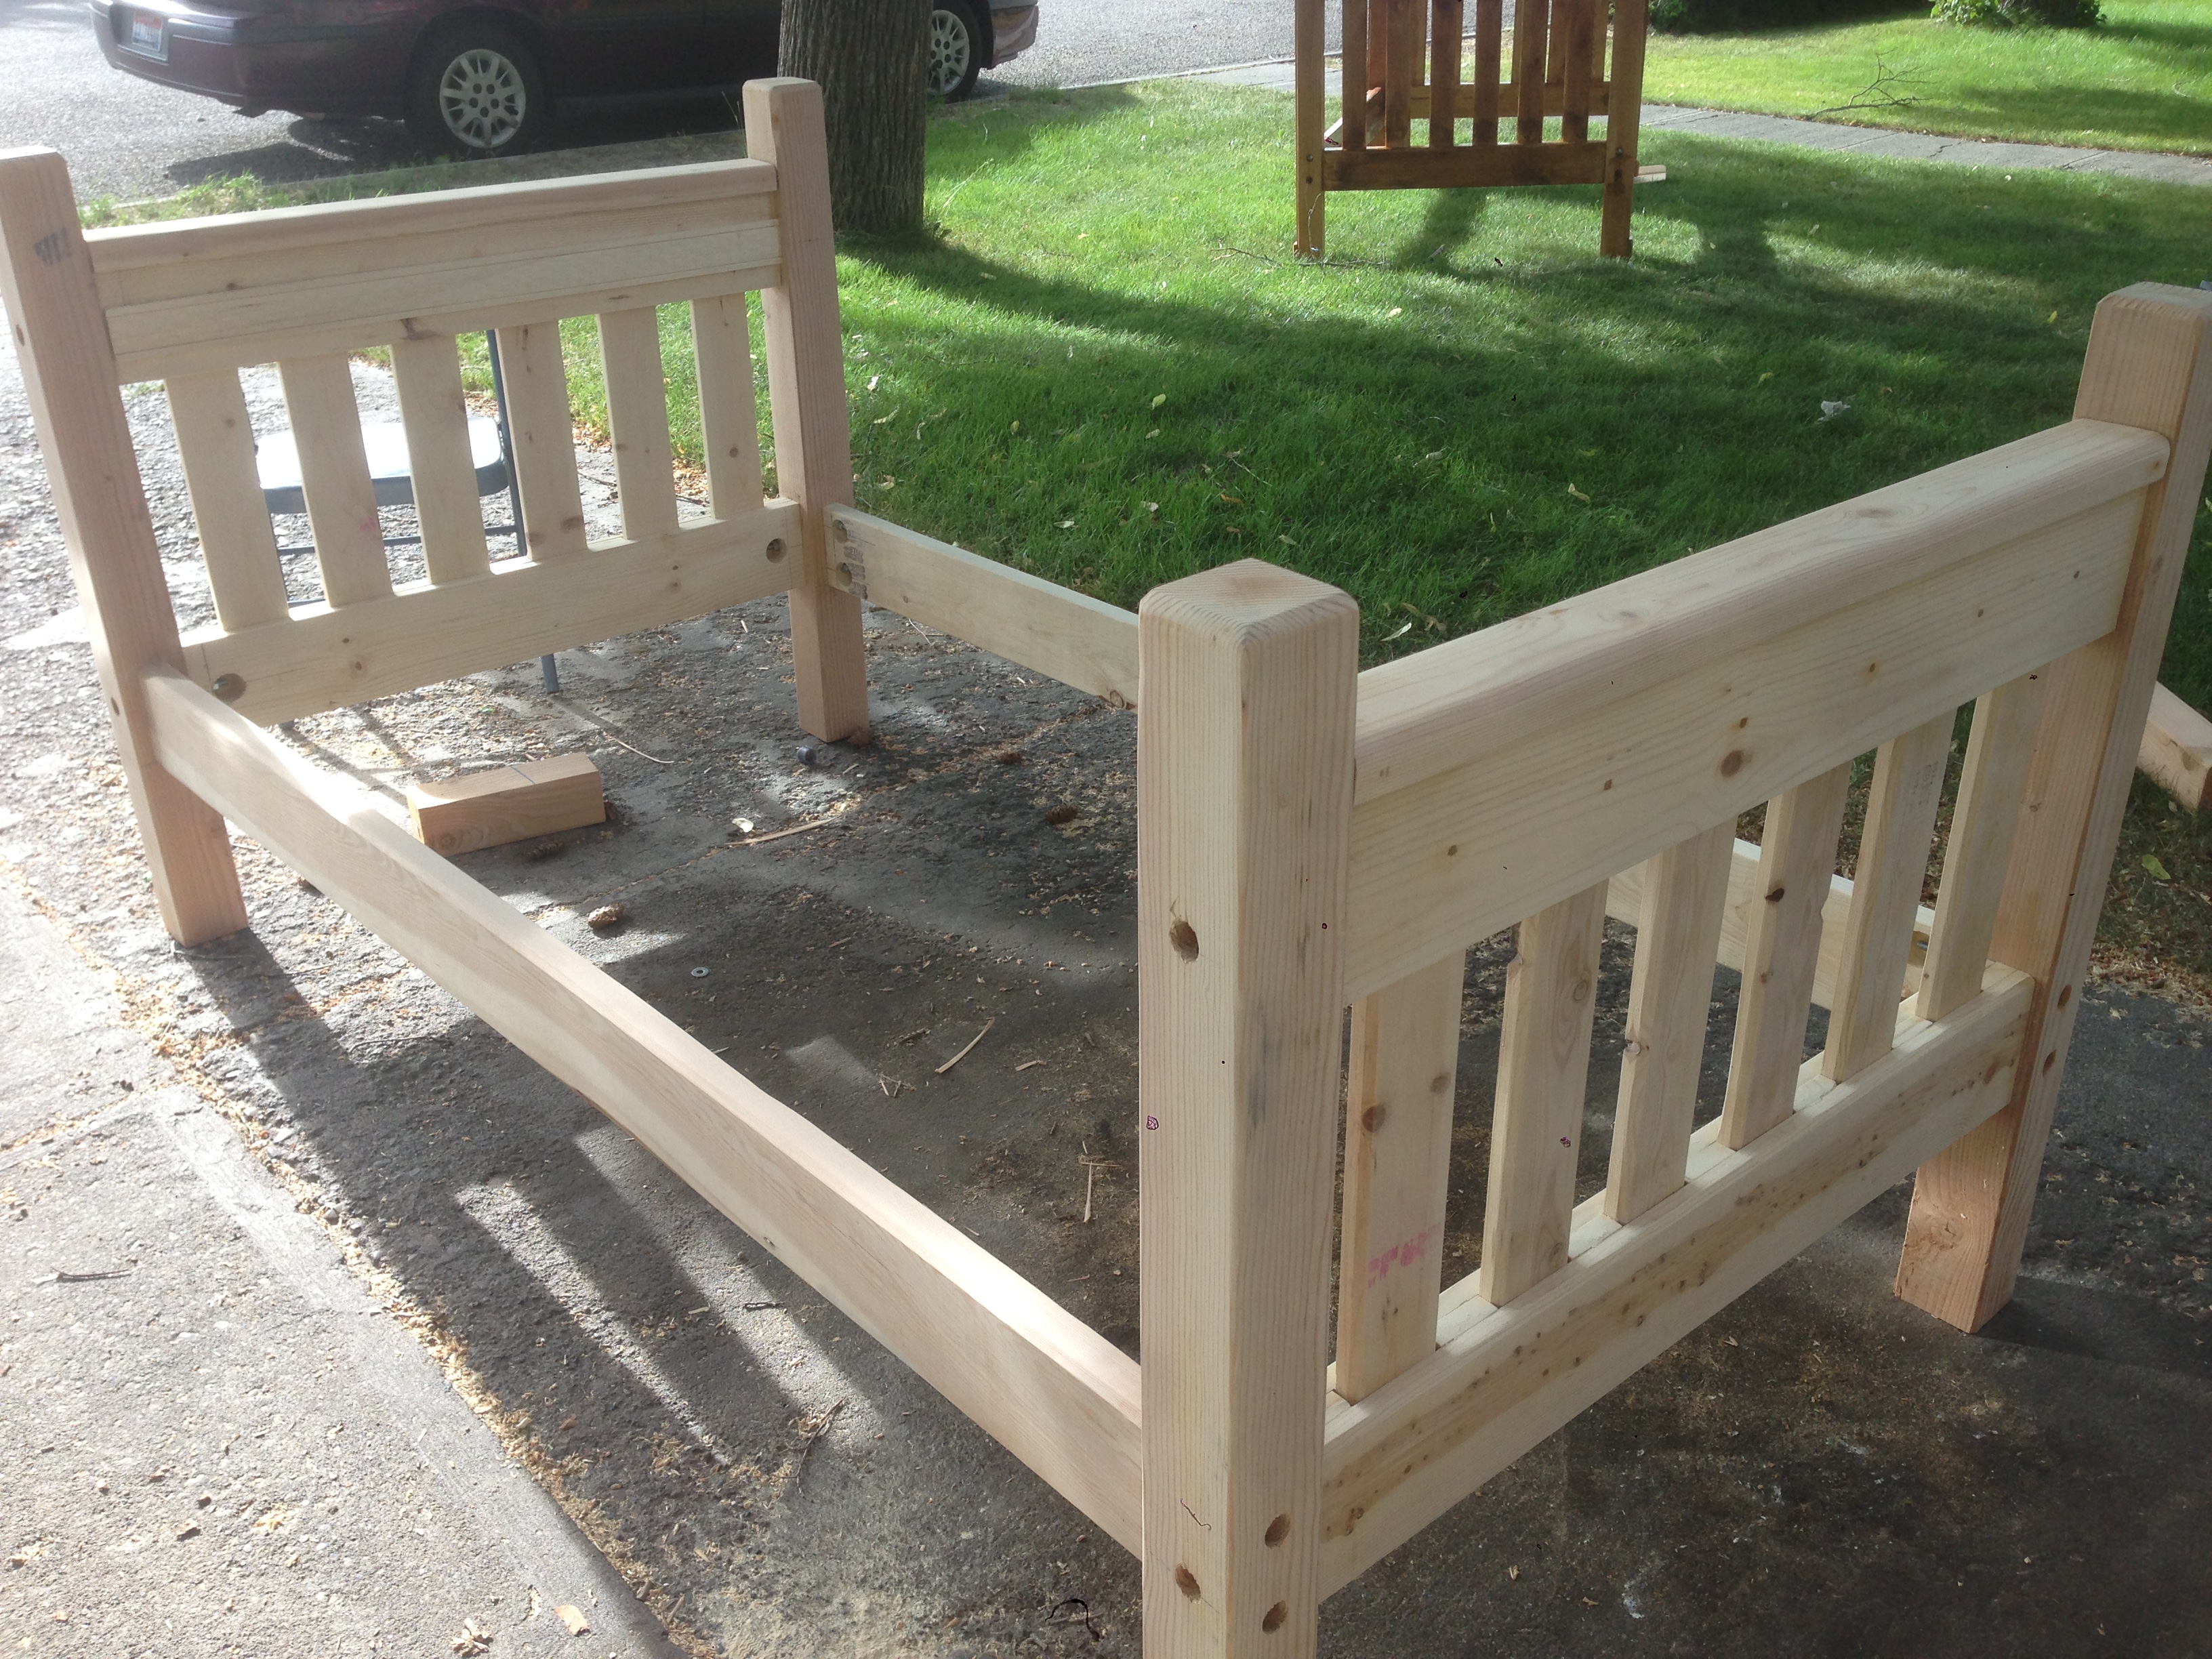
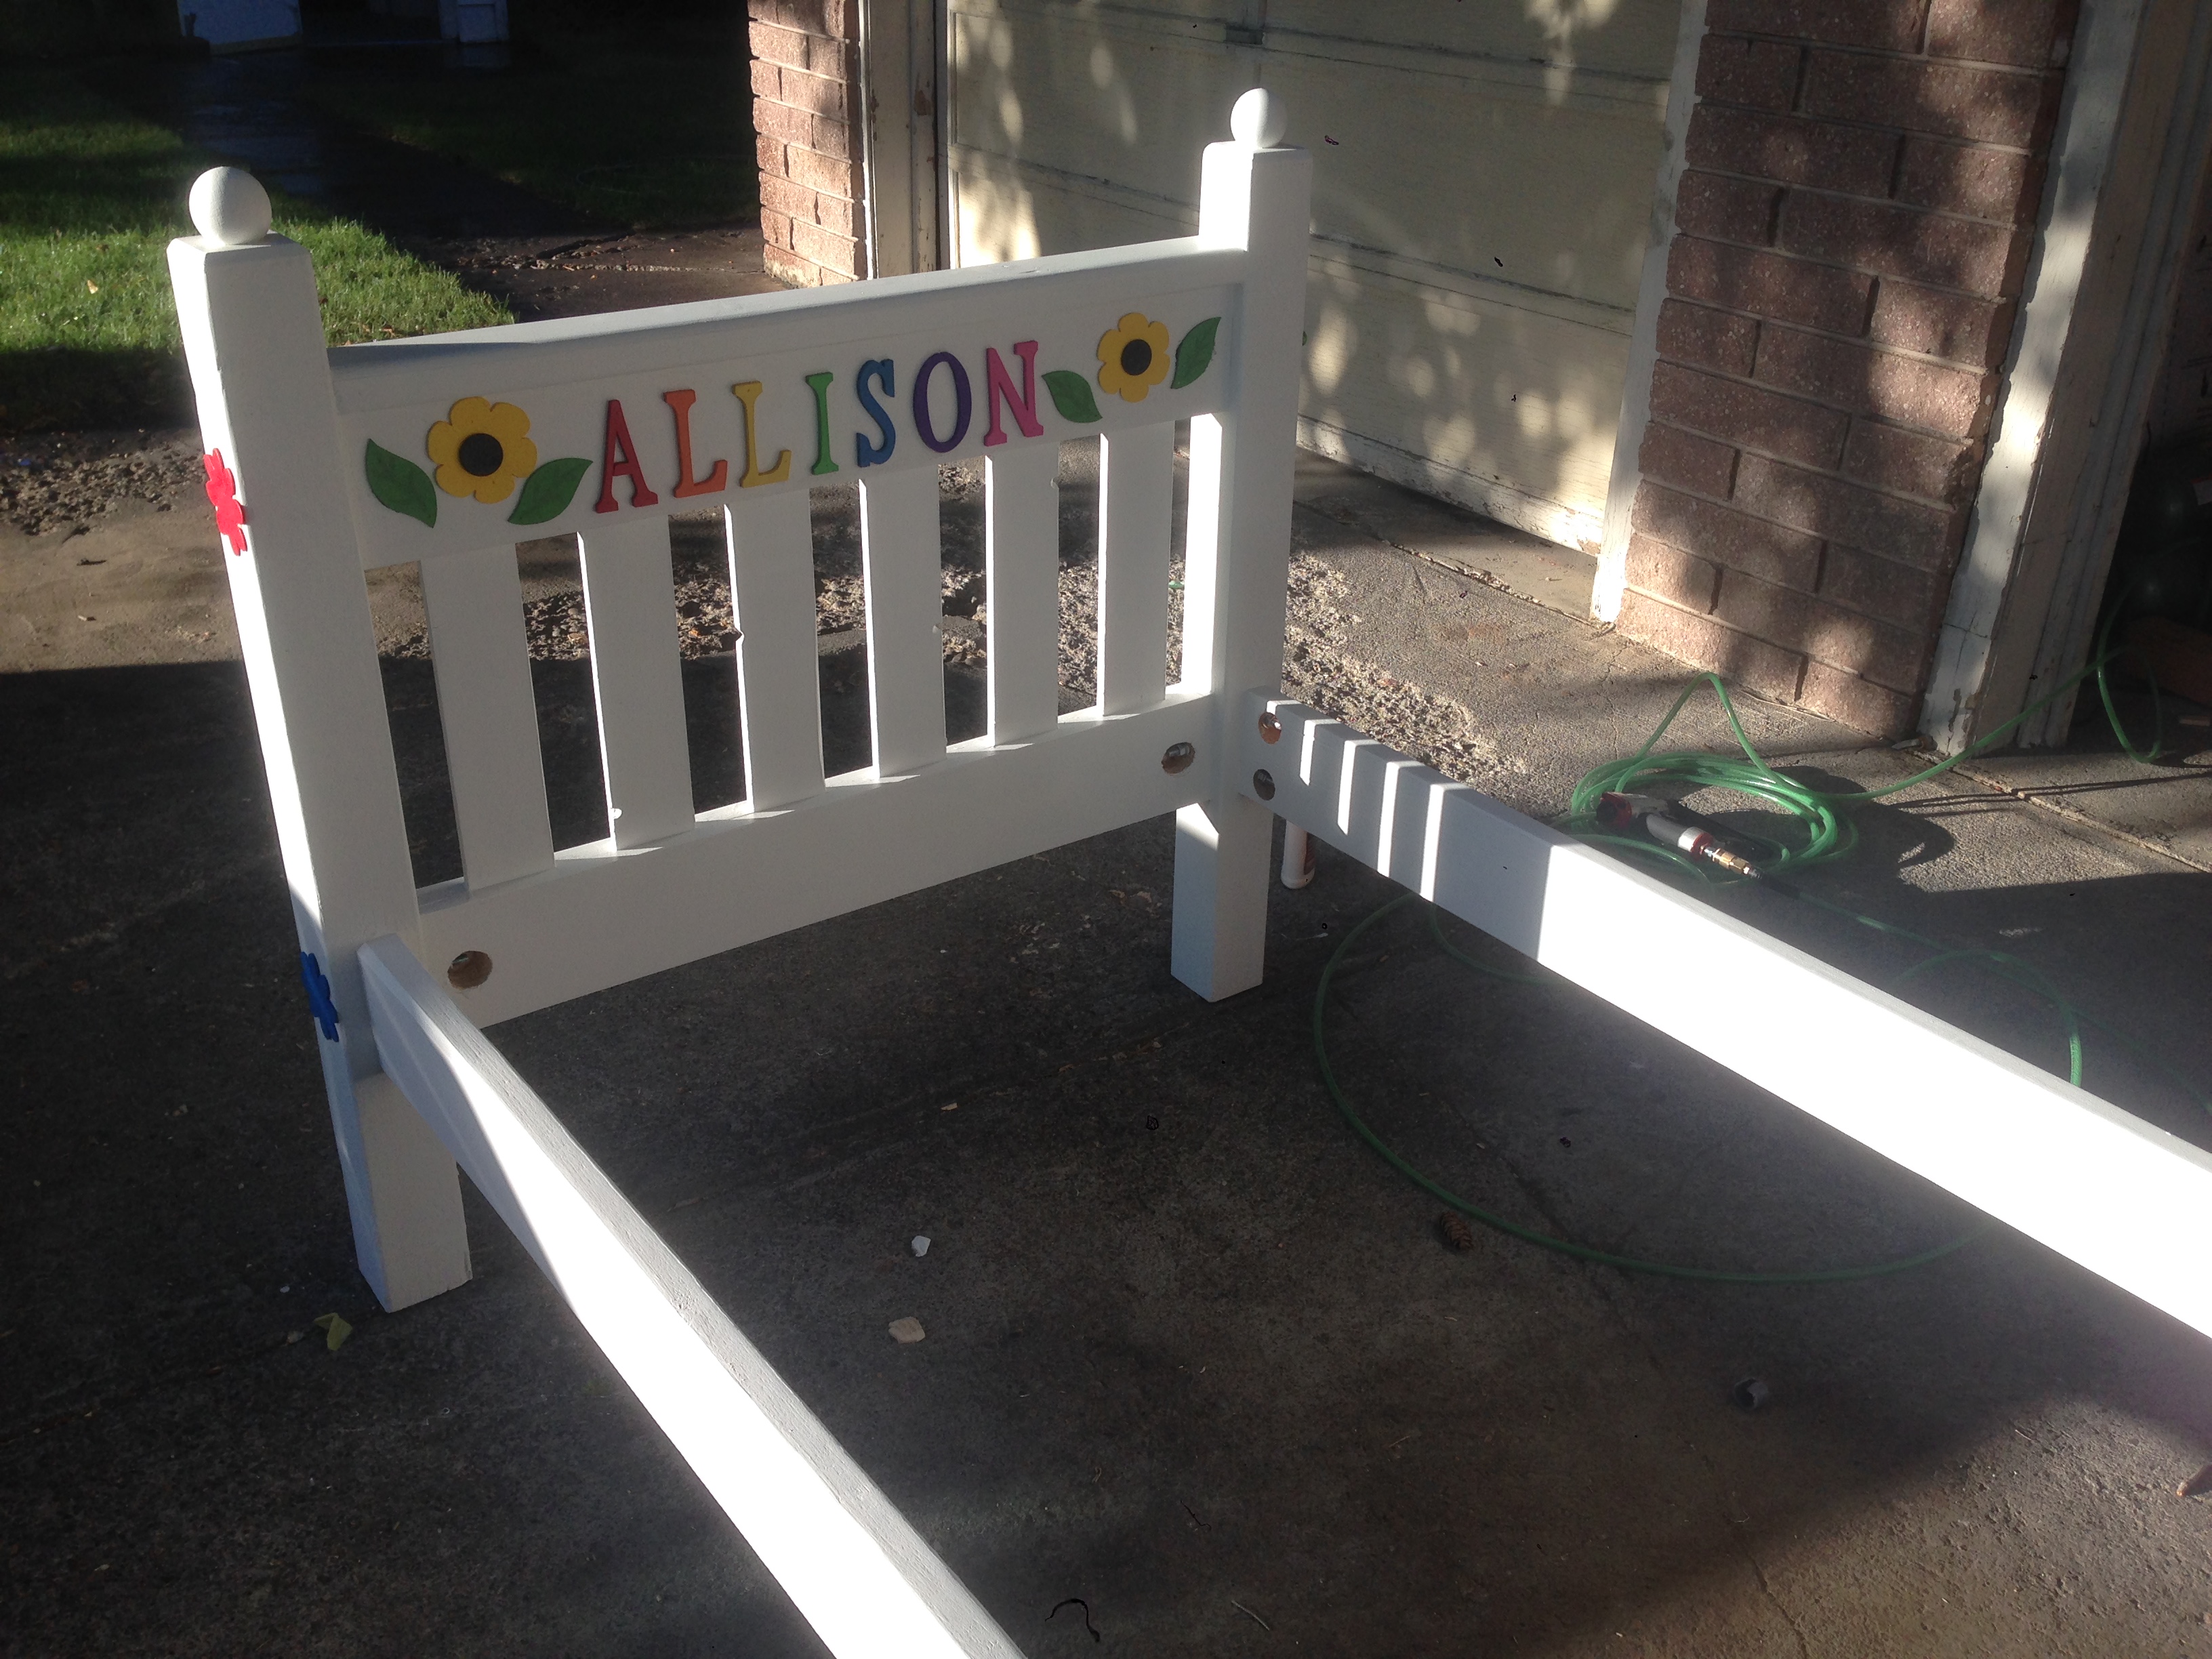
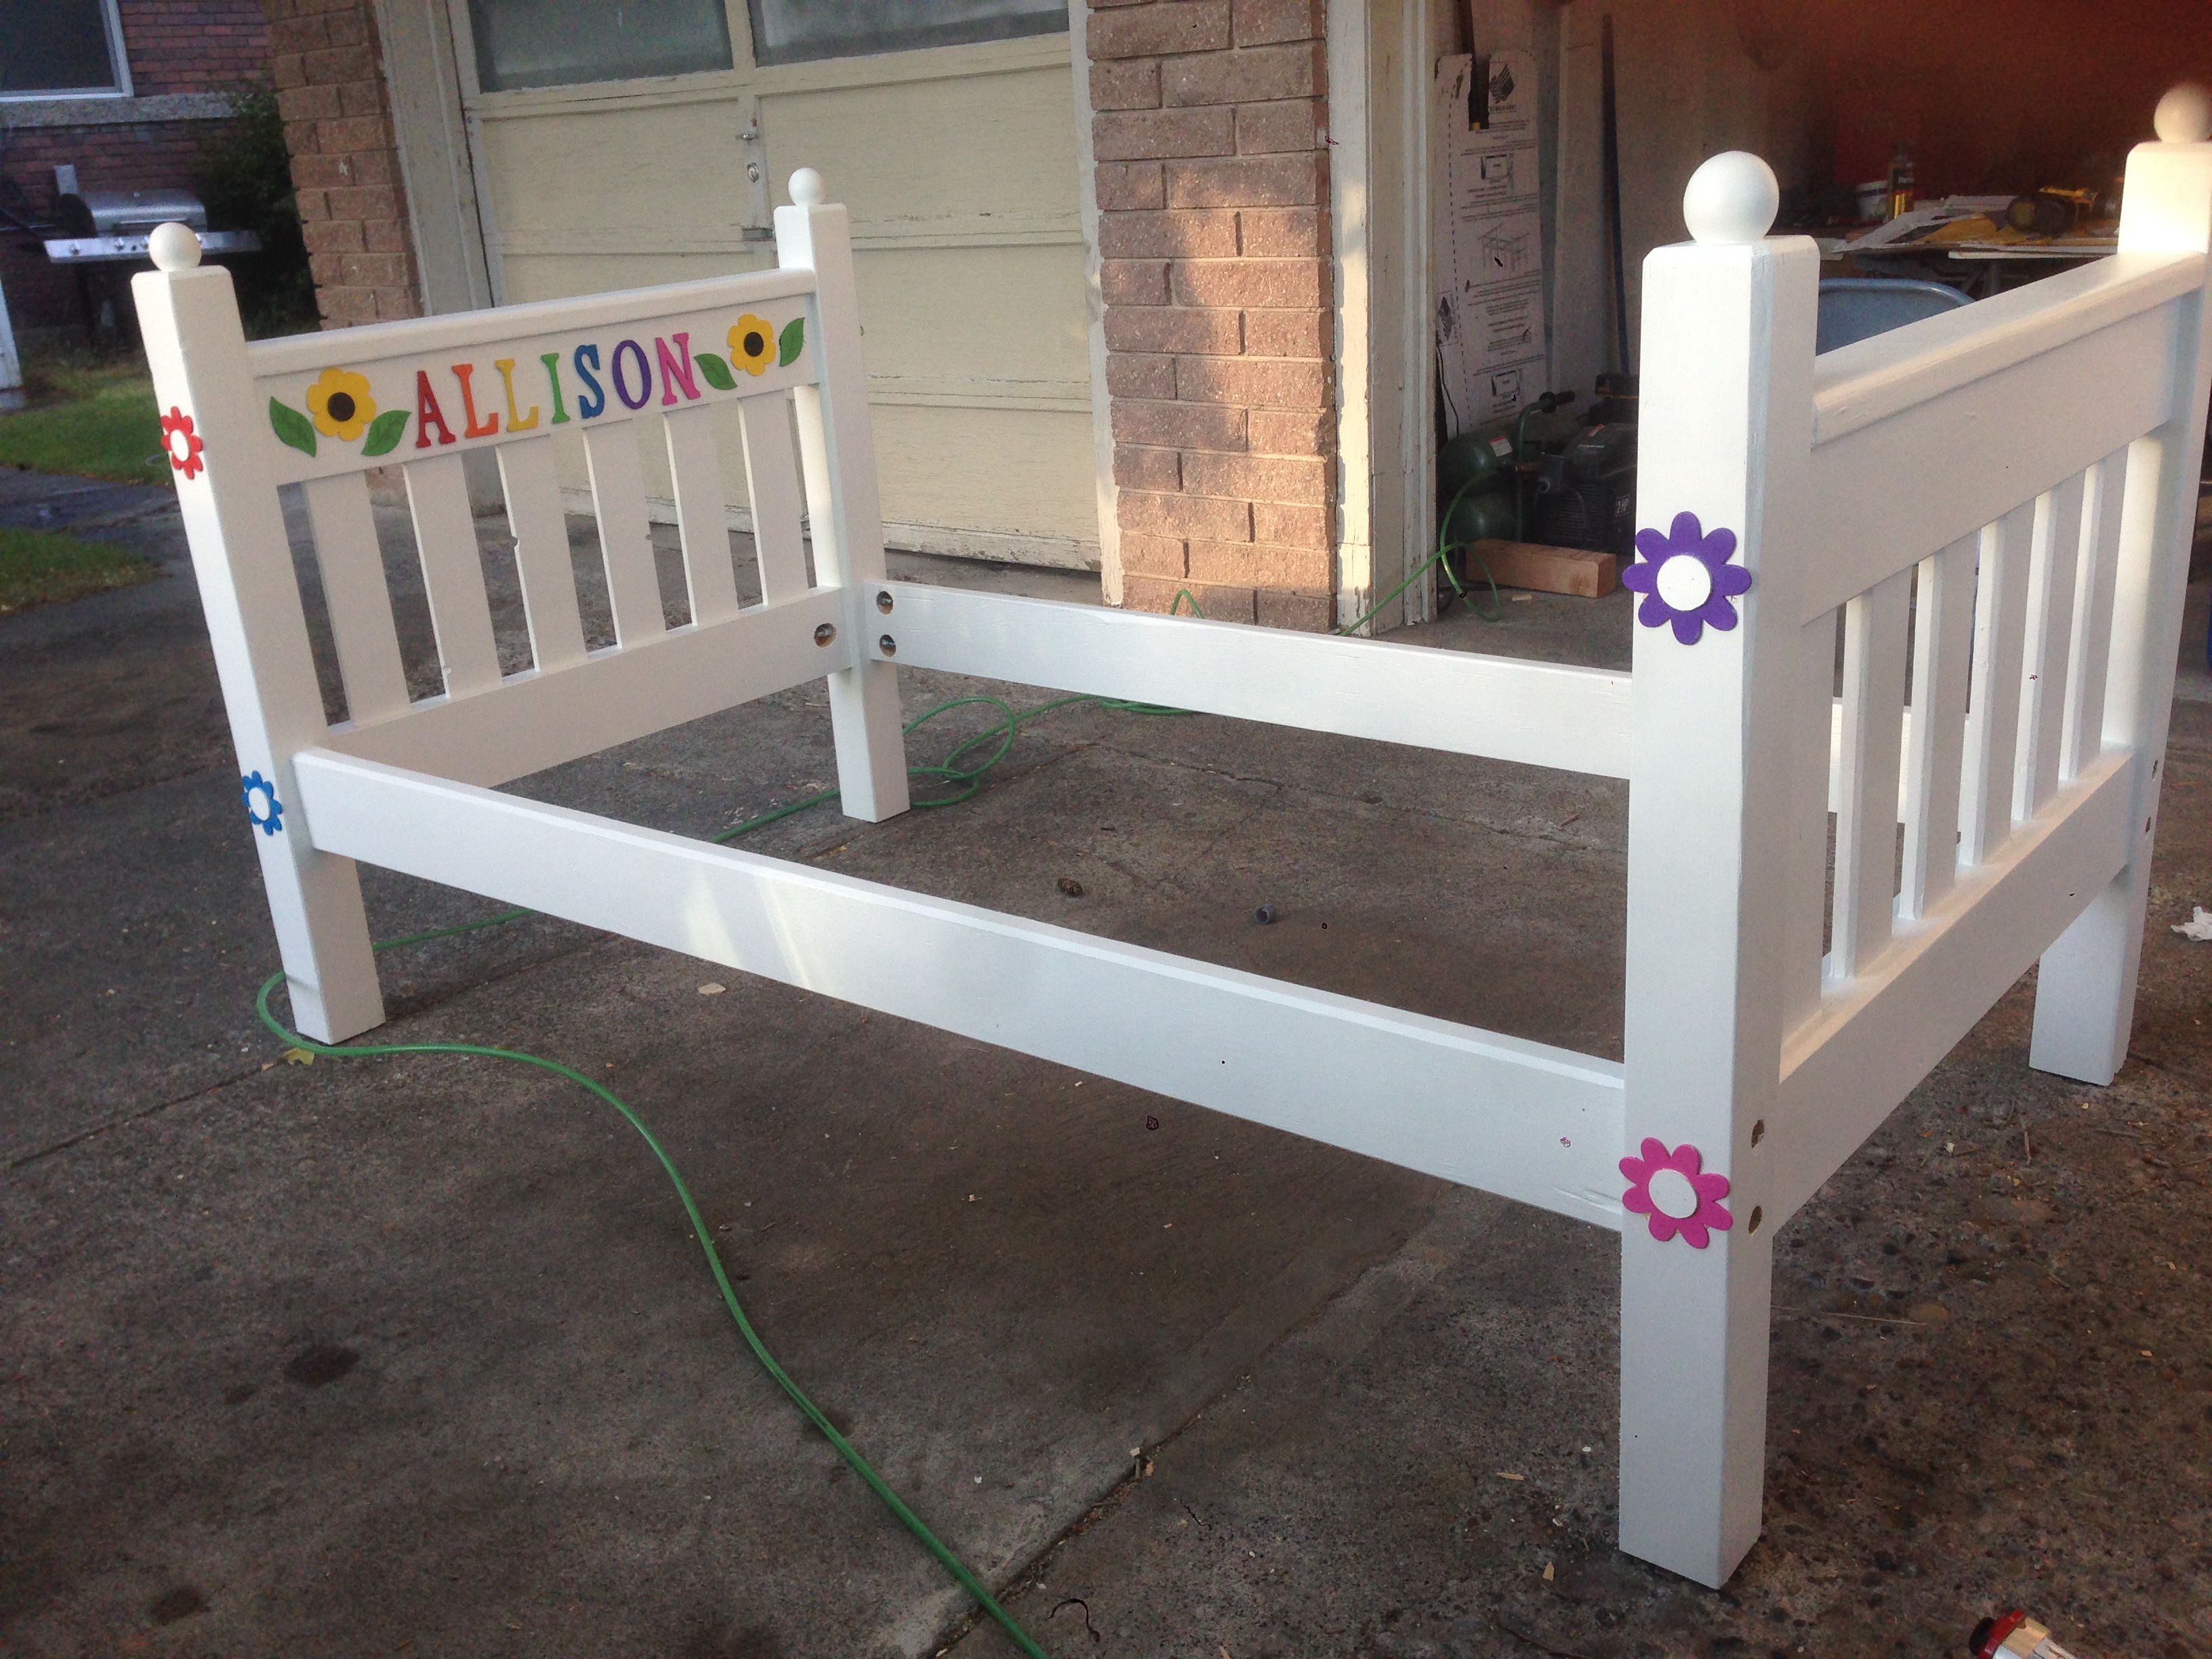
This is bed #2! Bed #1 can be found here: http://ana-white.com/2015/06/DIY_furniture/1st-time-project.
The original plan was to make our daughters bunk beds but during the construction of bed #1 we decided to put the oldest into her own room. This move prompted me to find a way to differentiate bed #2 from bed #1.
The headboard and foot board were again kept equal sizes although I did not make them as tall. They are taller than the footboard of the original plans. I used the headboard measurement of the headboard for the posts to make the post stand taller than the rest of the head and foot board giving it a slight 4-poster look.
I would also like to point out that I made the entire head and footboard an inch narrower. When I made the first bed, because of the way I attached the side rails to the 4x4 posts, it created a bed frame 3 inches wider than the plans called for. Because of this, the mattress on bed #1 has about an inch or so gap on either side when it sits in the frame. It's not a huge deal, but it was something I wanted to try and correct. So I loped an inch off the total width. I compensated by making the end filler pieces of the slat portion narrower. I would even go so far as to cut an even 3 inches off the entire width and the mattress would sit tight in the frame.
As with bed #1 I decided to use bolts instead of screws to hold the bed together. It makes for a much sturdier bed and it can be dis-assembled in a matter of minutes moved and reassembled without losing any structural integrity. The flowers on this bed hide the holes I had to drill to counter sink the bolts and the holes I drilled to access the bolts to attache the washer and nut. I was able to get just deep enough on the 2x6 side rail that I didn't need to drill all the way through as I had on bed #1. This was something I learned as I began to assemble bed #2 to get it ready for paint.
Fun build. Plans were easy to follow!


Easy to build, easy to customize, perfect for totes

I used the basic framing plan for the project, but extended roof overhangs, added engineered siding / trim and cedar shake roofing. I put 2x4 bracing on for the platform.
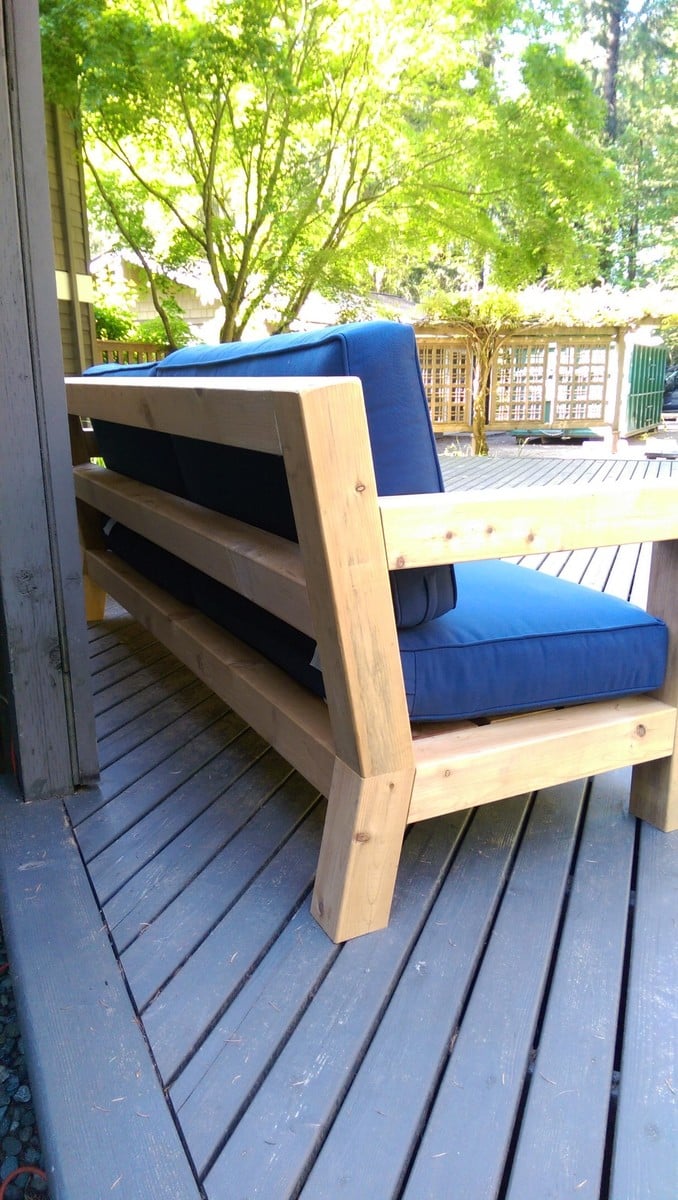
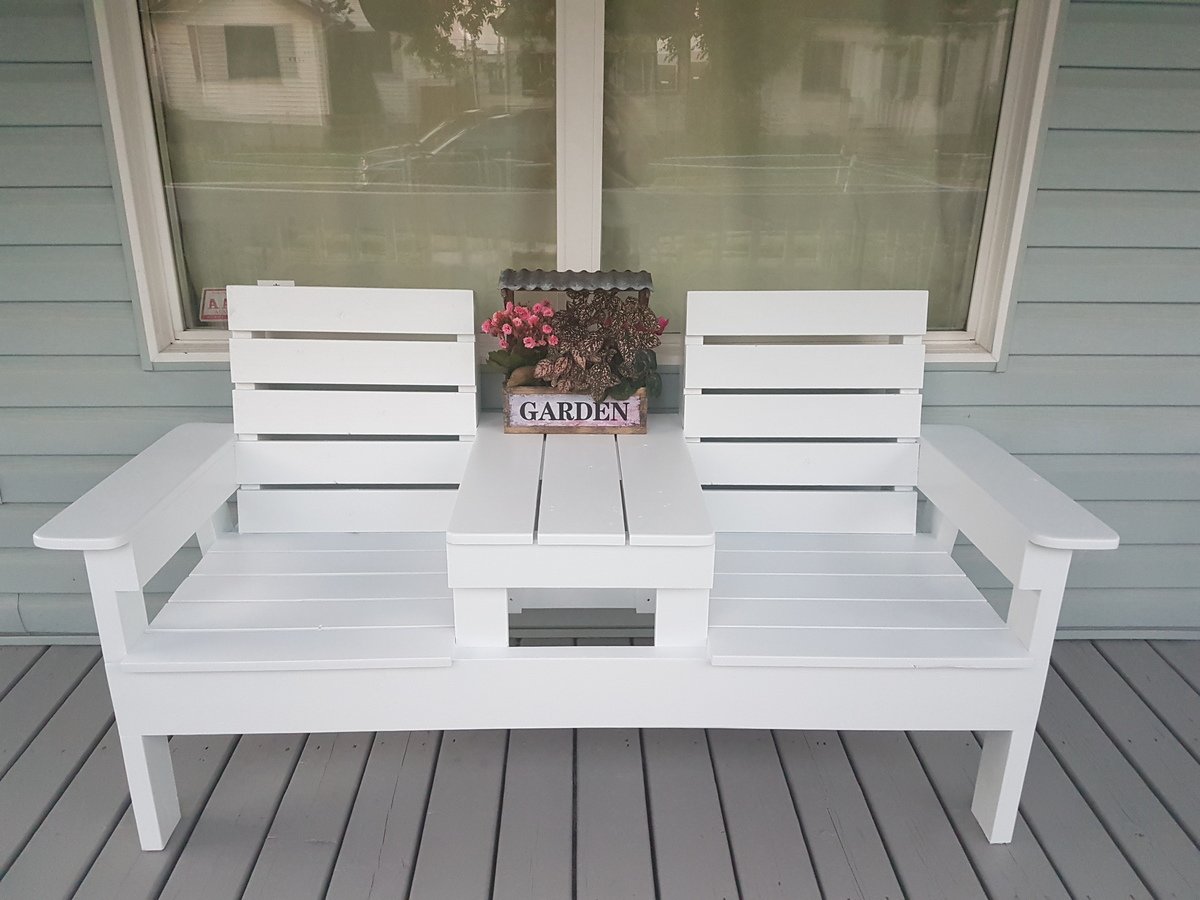
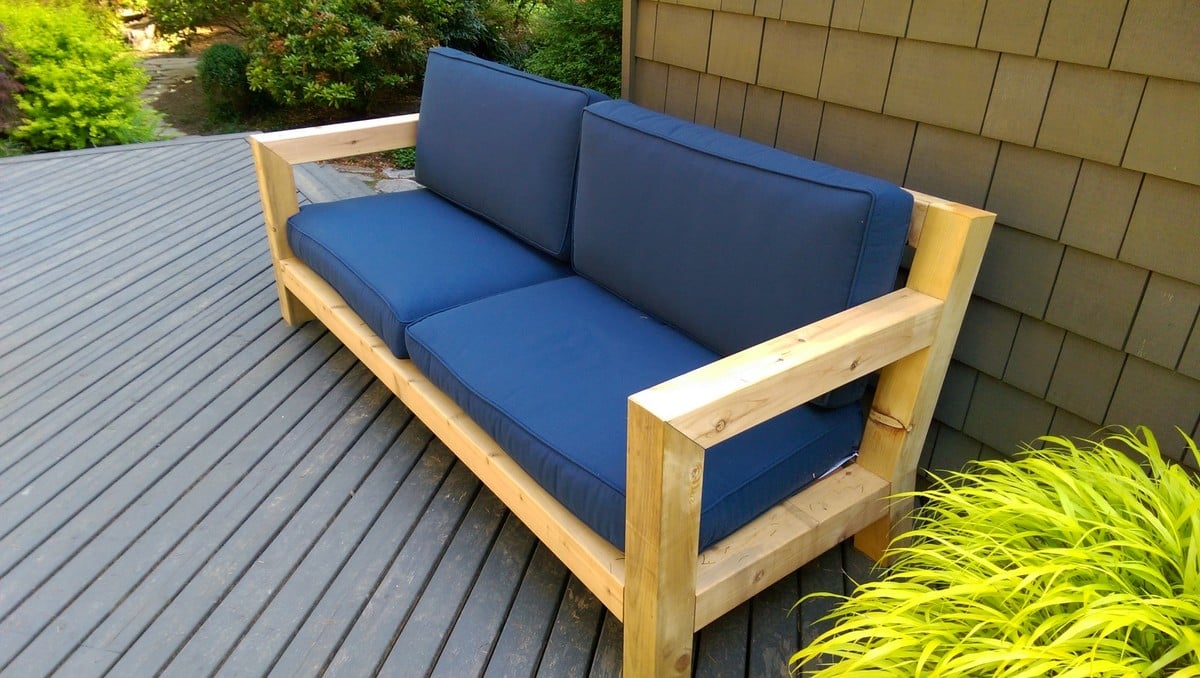
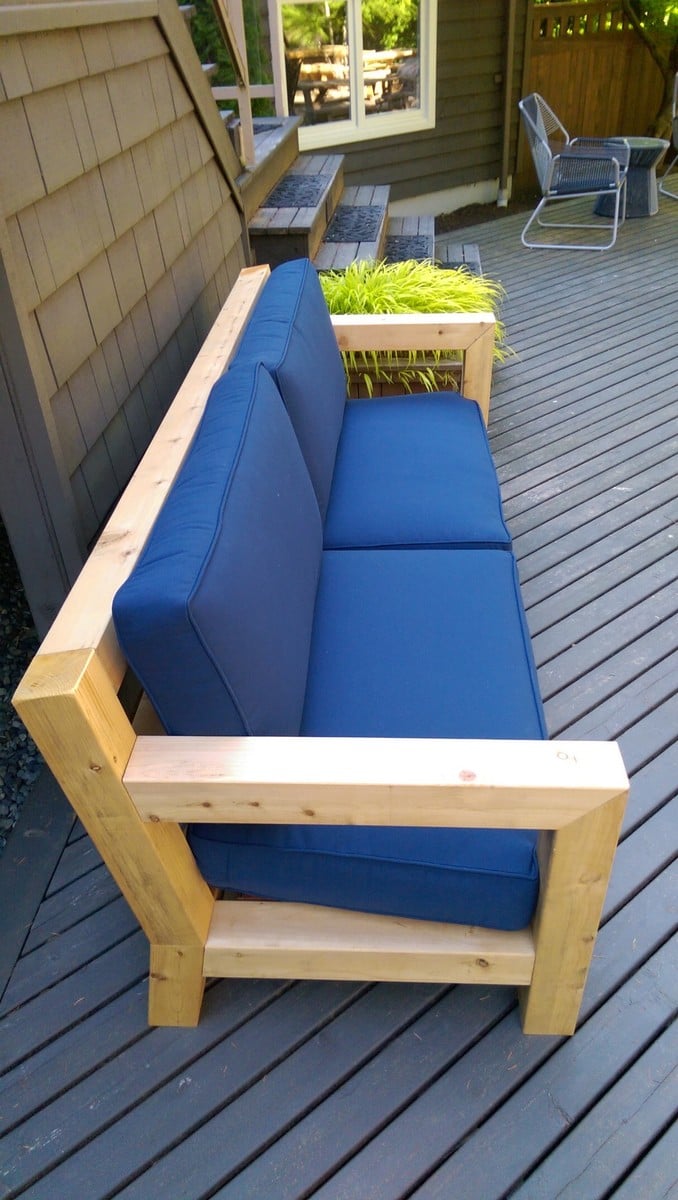
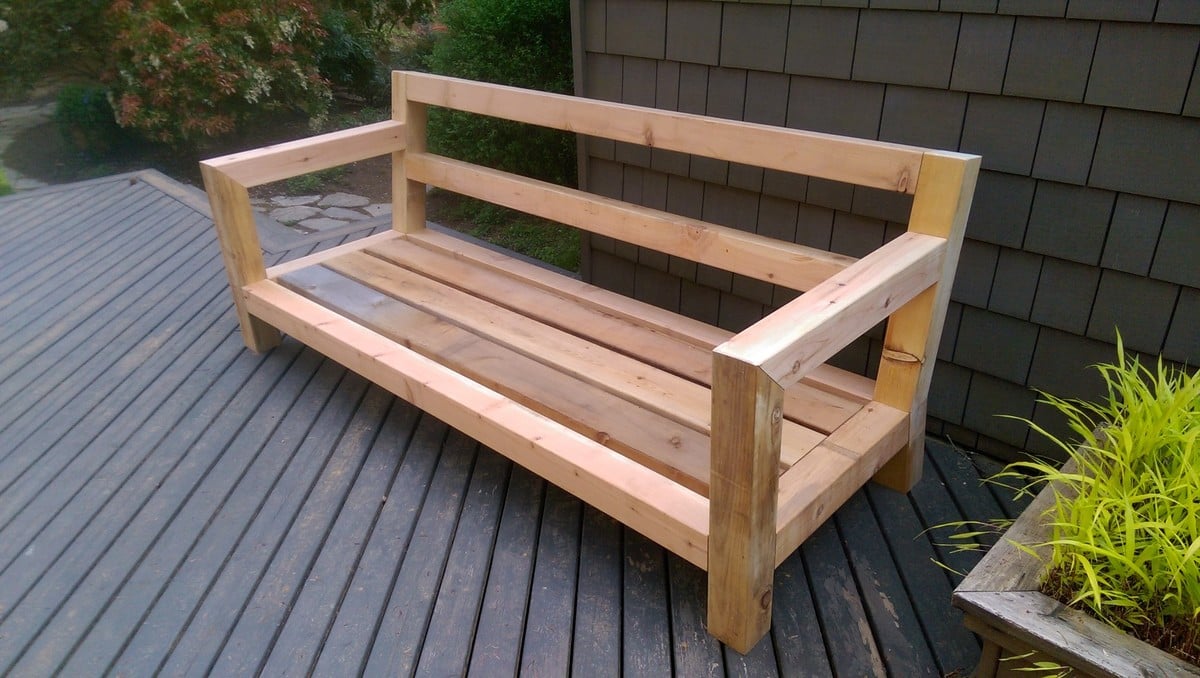
I was in love with the RH Merida set because of its clean lines and modern style. Also, the plan seemed simple enough that I could re-create it without a pattern. The only thing that I did not like about it is the lack of arms. I really like to have a place to put my arm or my beverage :) - so I added arms to the design.

Thu, 05/30/2019 - 18:45
It’s beautiful! Do you have a set of plans that you might be willing to share?
Wed, 05/20/2020 - 10:45
This is Awesome. I'm halfway in the middle as i thought I could complete without plans. Do you have any plans could share. Please....
Fri, 06/19/2020 - 15:54
were you able to get plans? I would LOVE plans too! we want to try and re-create this and would prefer NOT to get stuck!
Fri, 06/19/2020 - 15:55
Would LOVE to get plans, would even pay for them! Found rough drawings online but they are chicken scratch and hard to interpret!
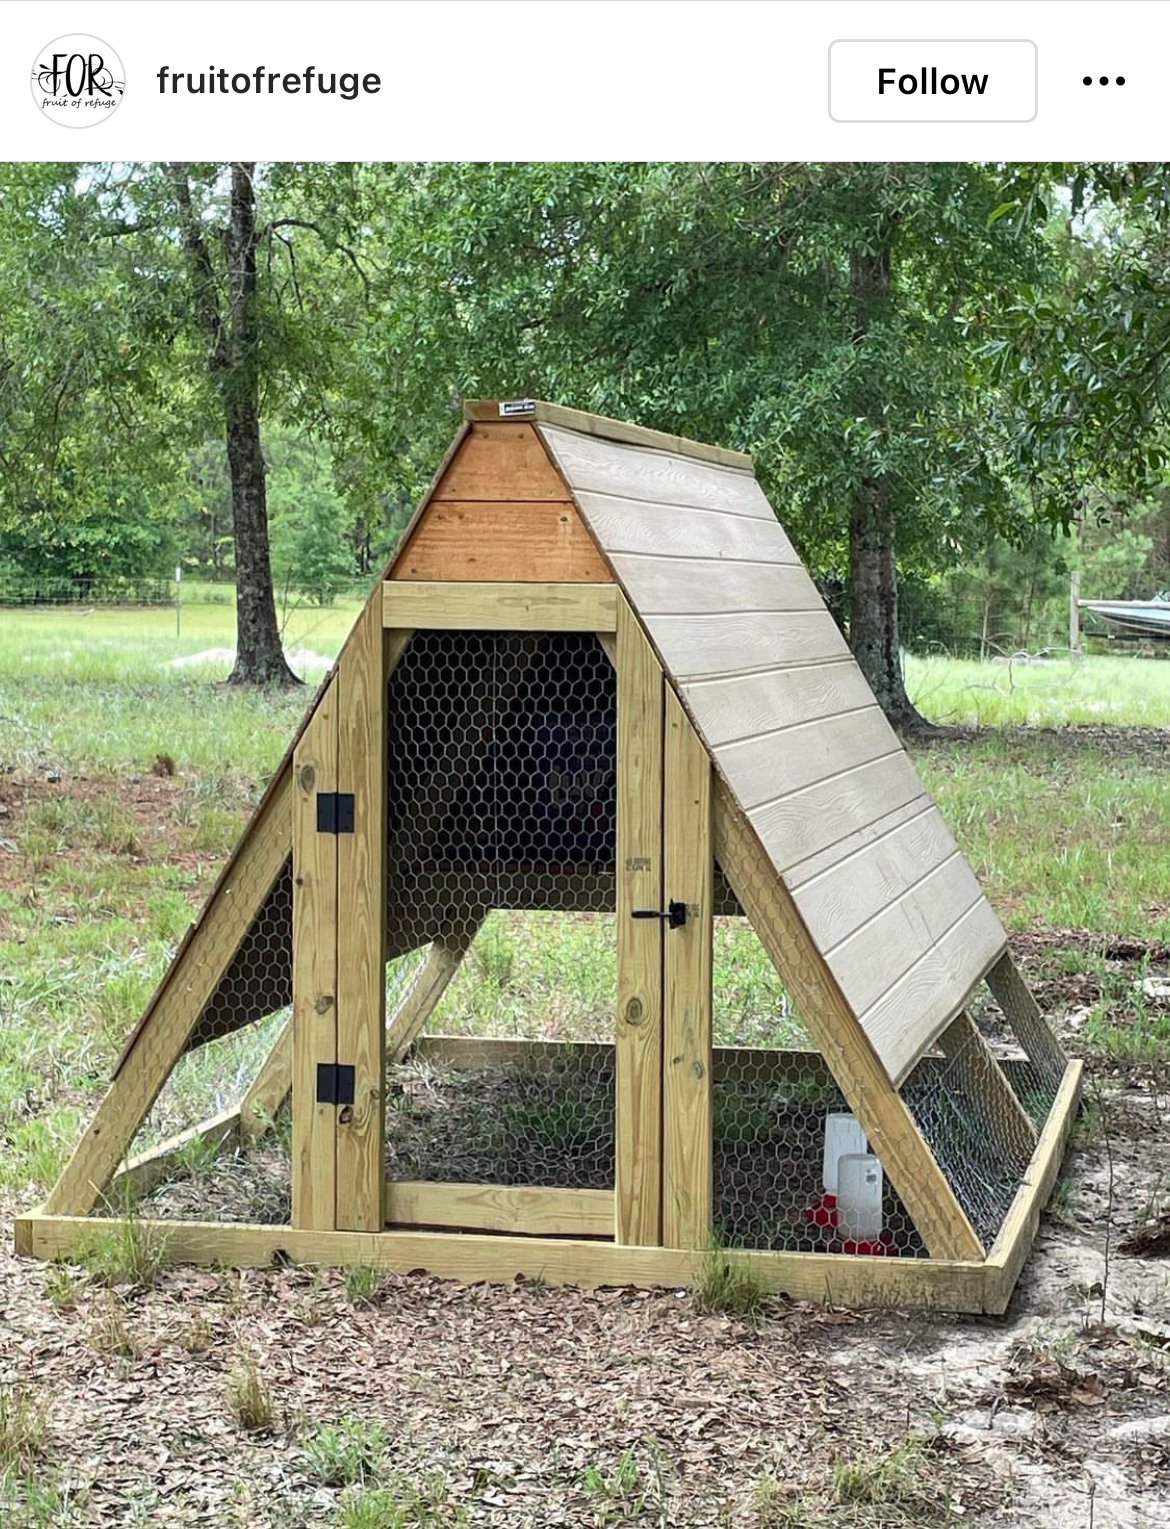
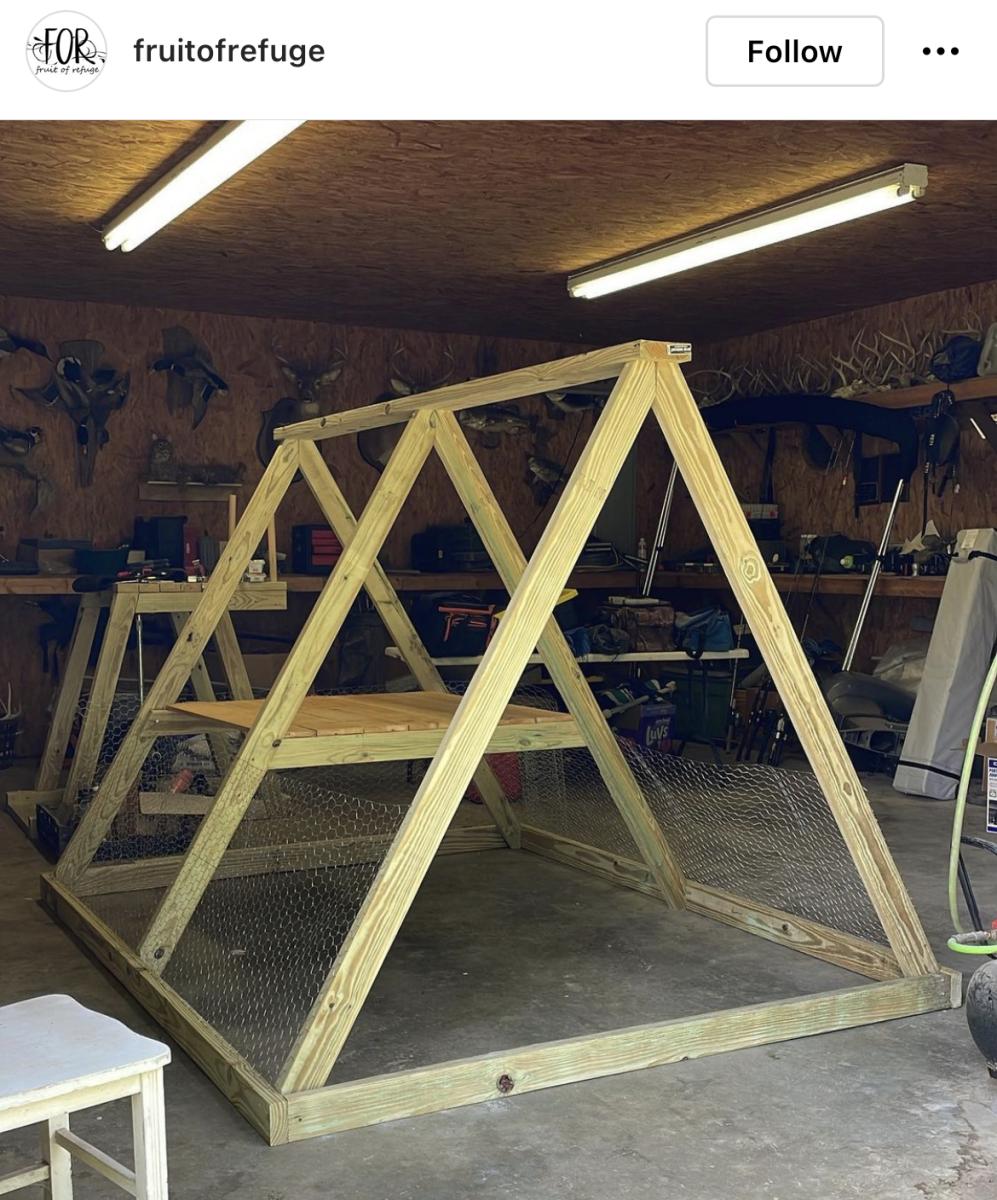
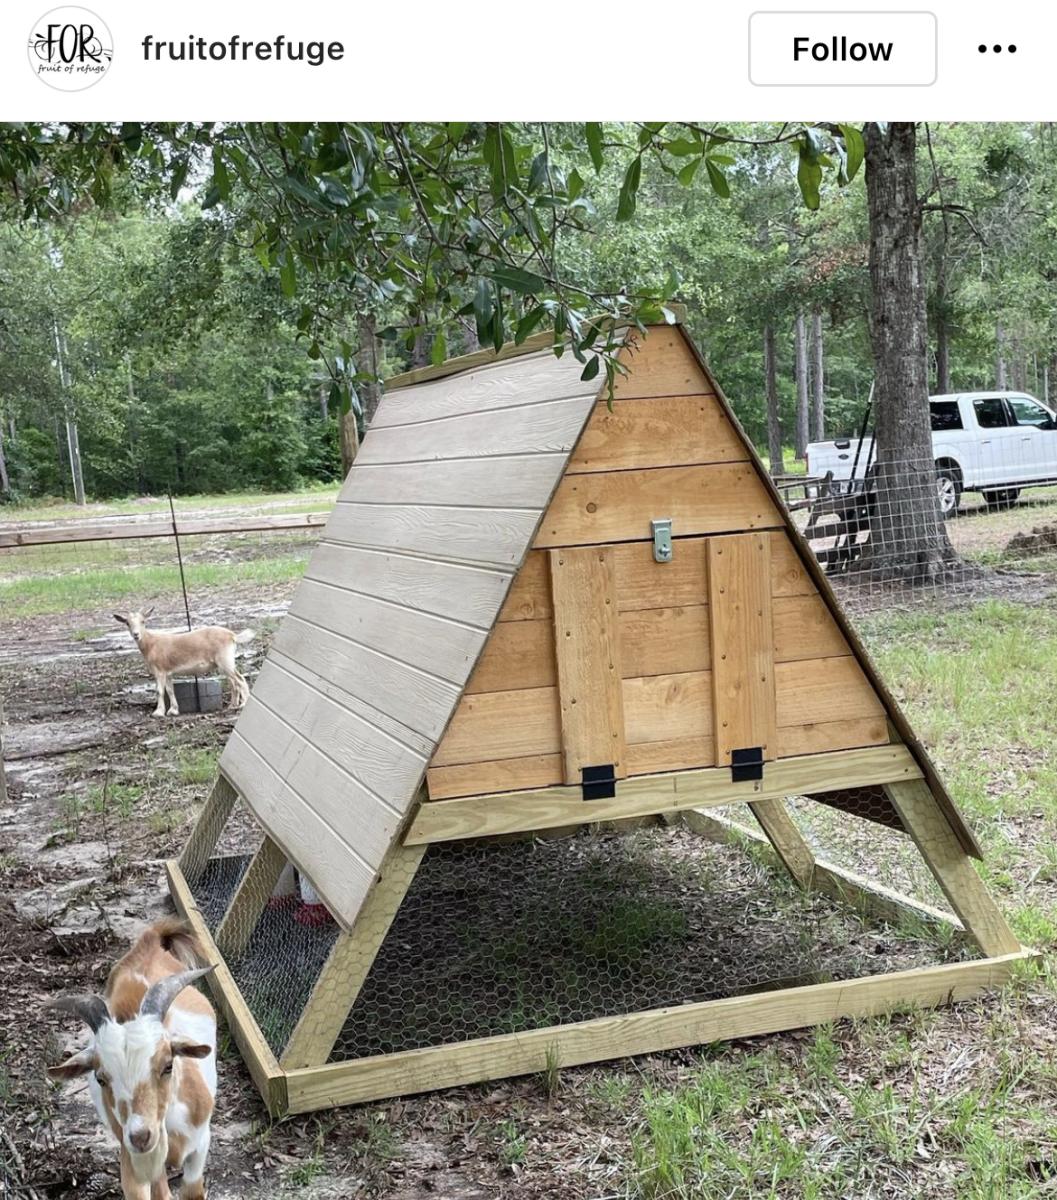
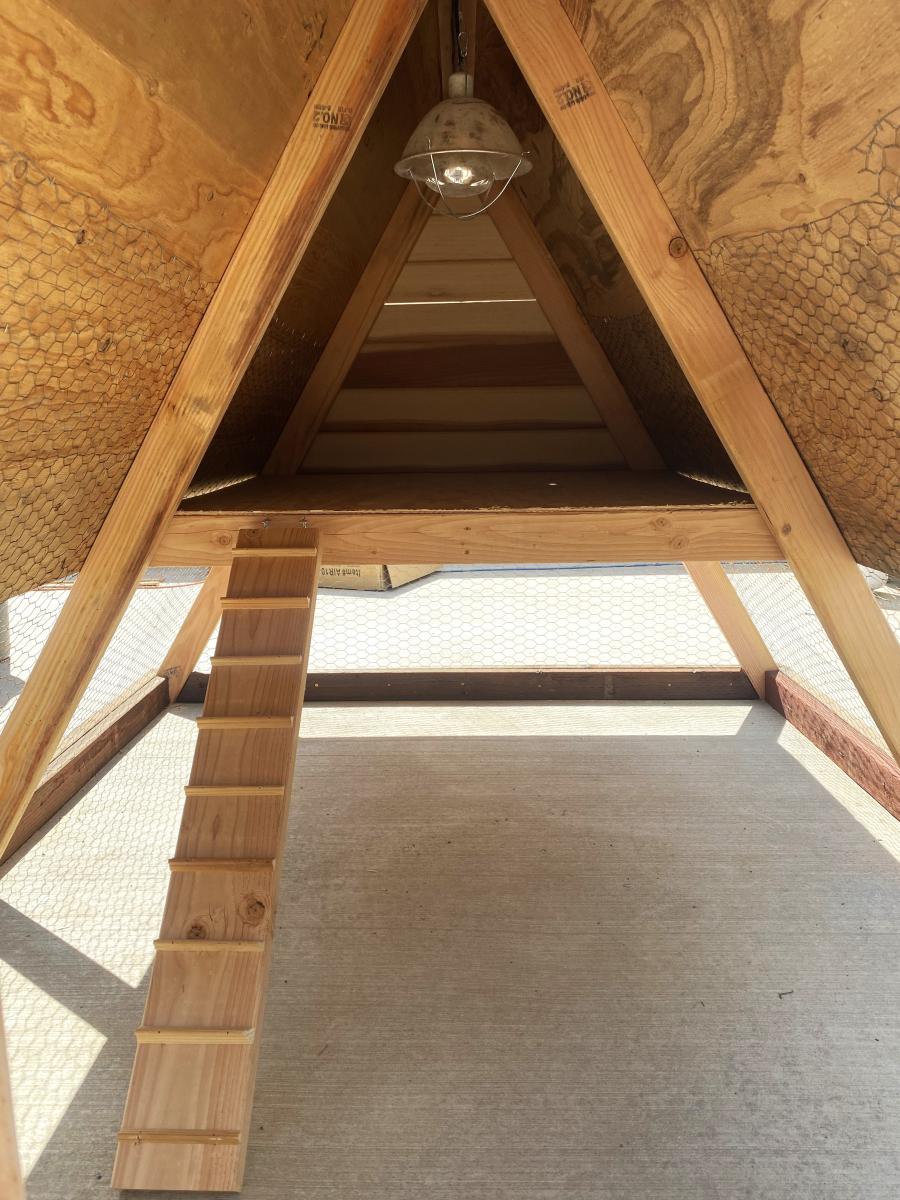
Great for a small flock of 5 or less.


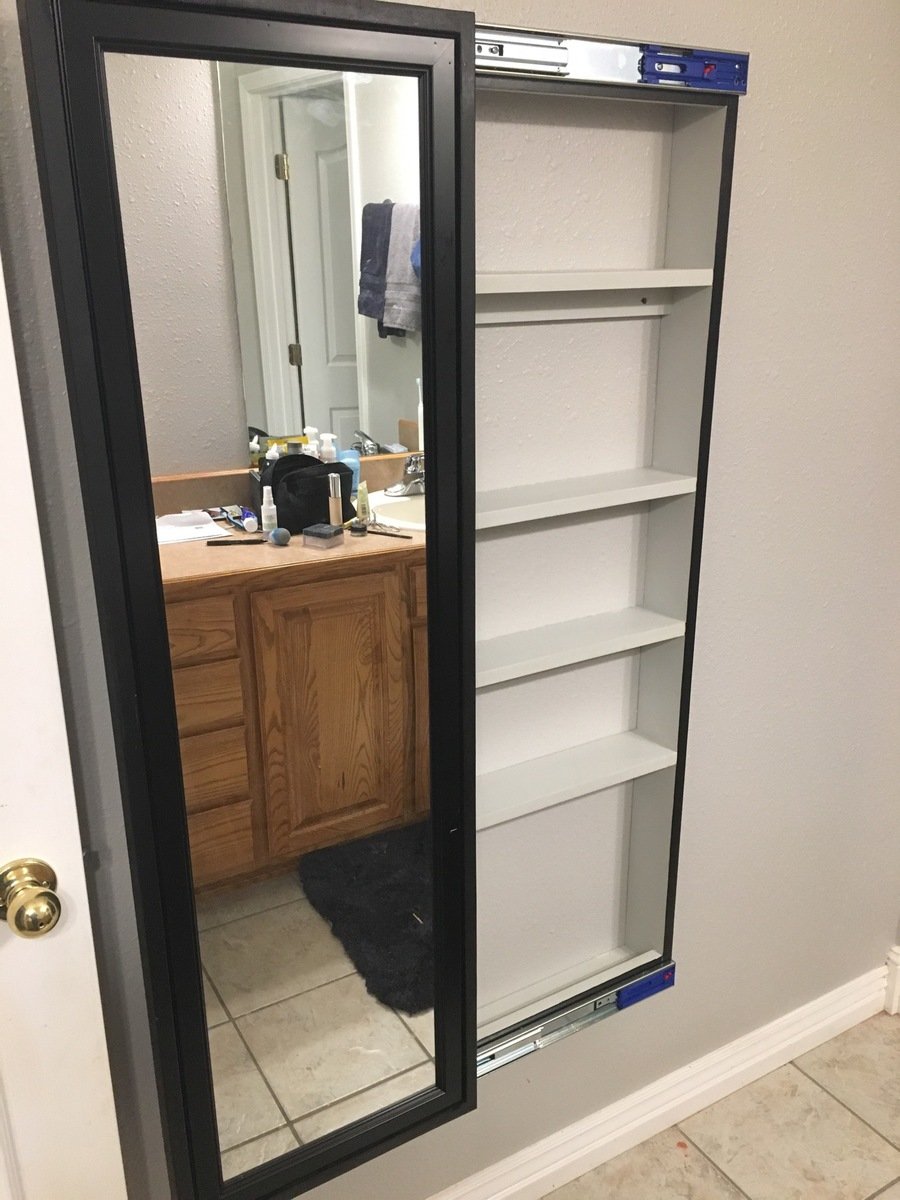
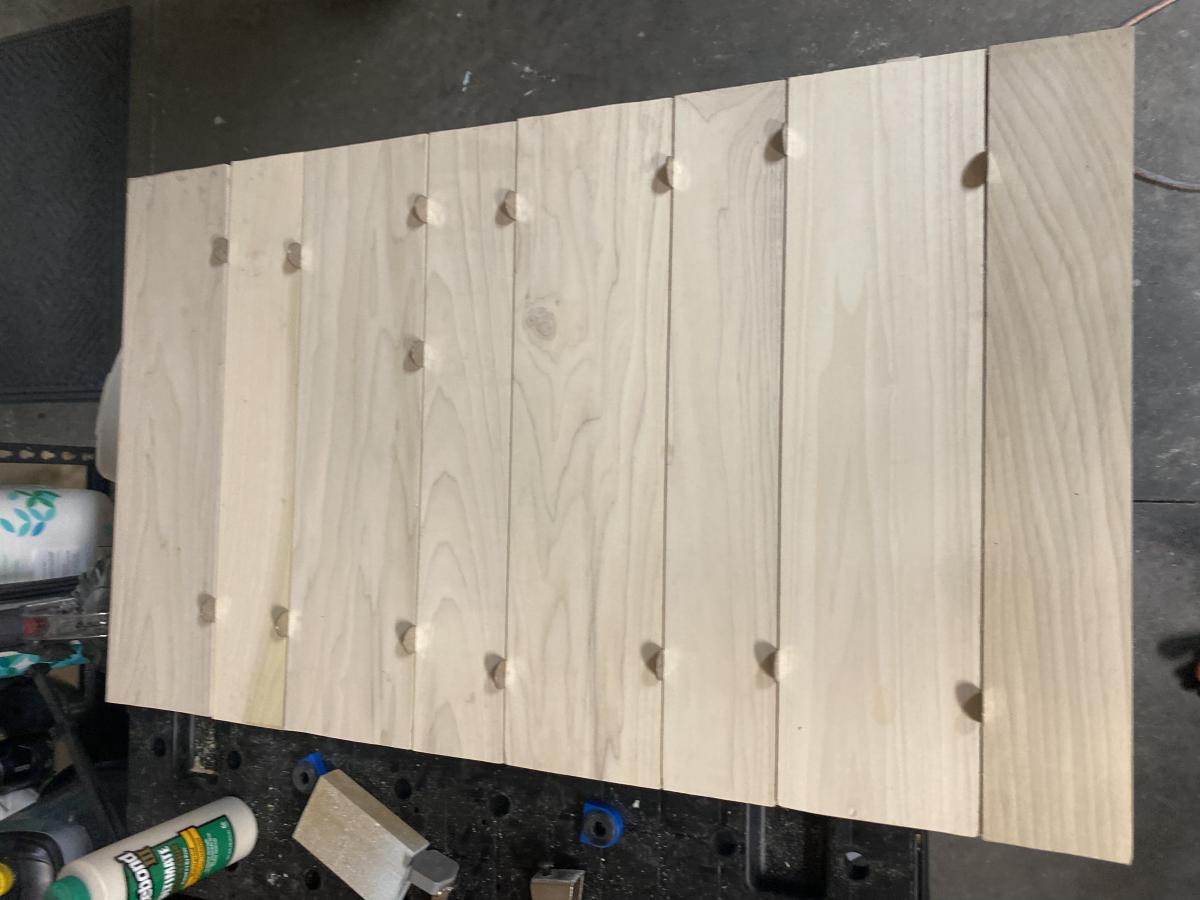
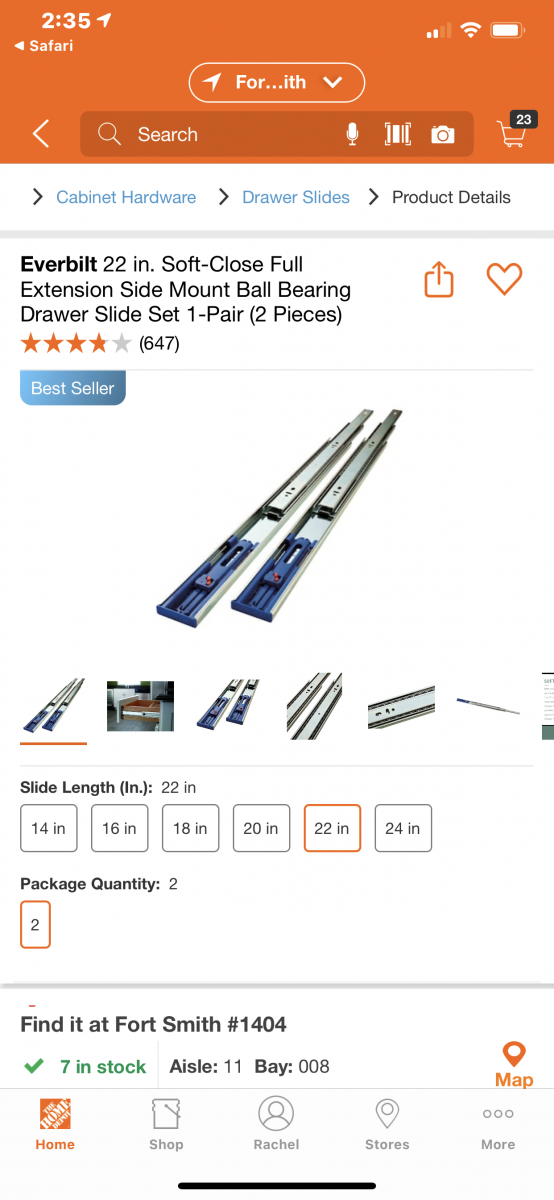
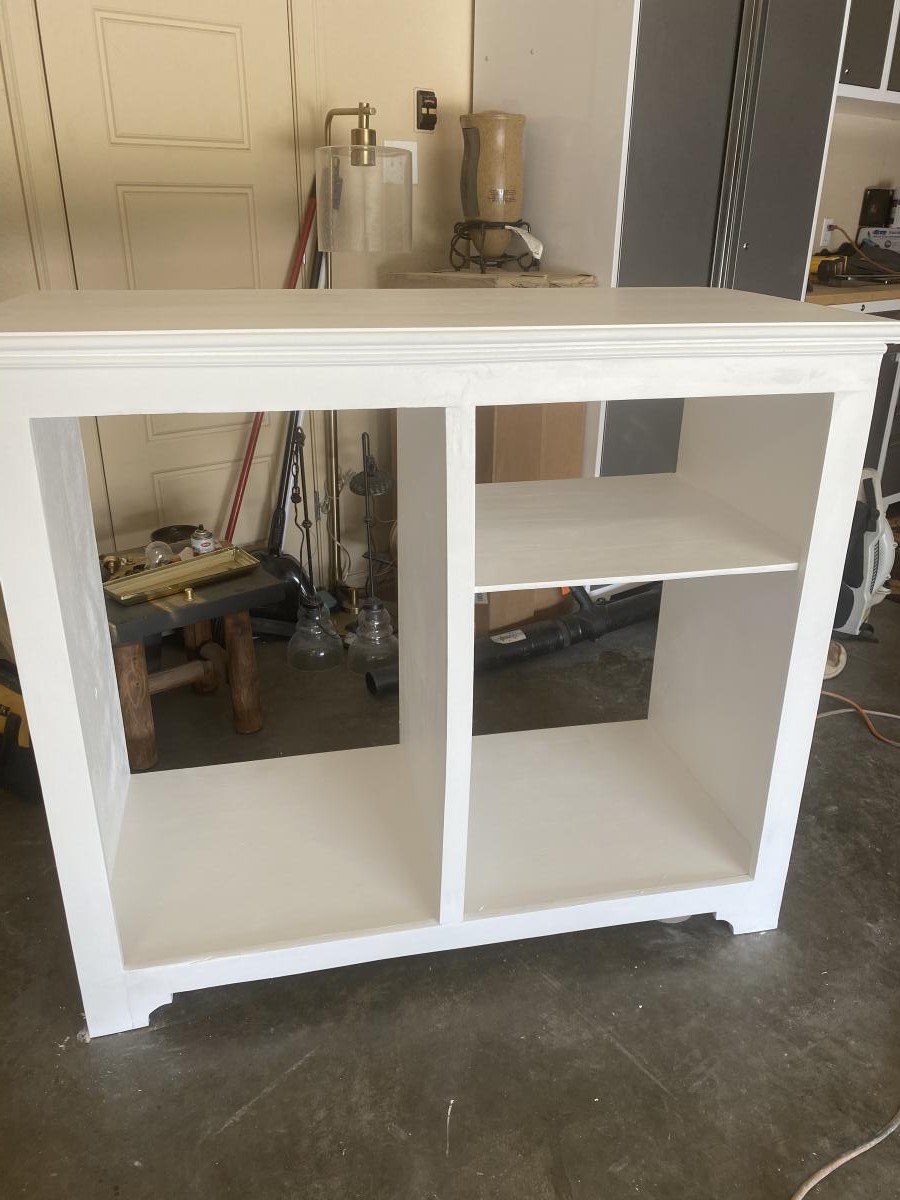
I built this for my daughter after building a ladder shelf for my kids bathroom. It took more time to install and adjust the drawer slides and paint the project.
Sat, 09/07/2019 - 03:32
Hi mltdblack
Really nice finish on the cabinet.
It looks like there’s molding on top of your mirror.
Did you buy a mirror with a frame or buy molding and put it on over the mirror?
What molding did you use an how did you secure it?
What size mirror did you use? Thanks
Fri, 01/07/2022 - 14:14
I am so sorry. This is the first I am seeing your question. The mirror came with a frame and I carefully nailed thru the frame to attach with my 18 gauge nailer. I bought the mirror at Lowe’s and I believe it was 15.5” x 50”. Also, I used full extension soft close drawer slides.
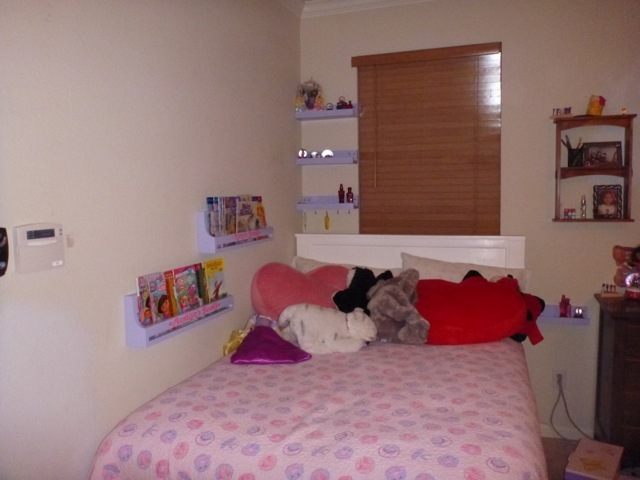
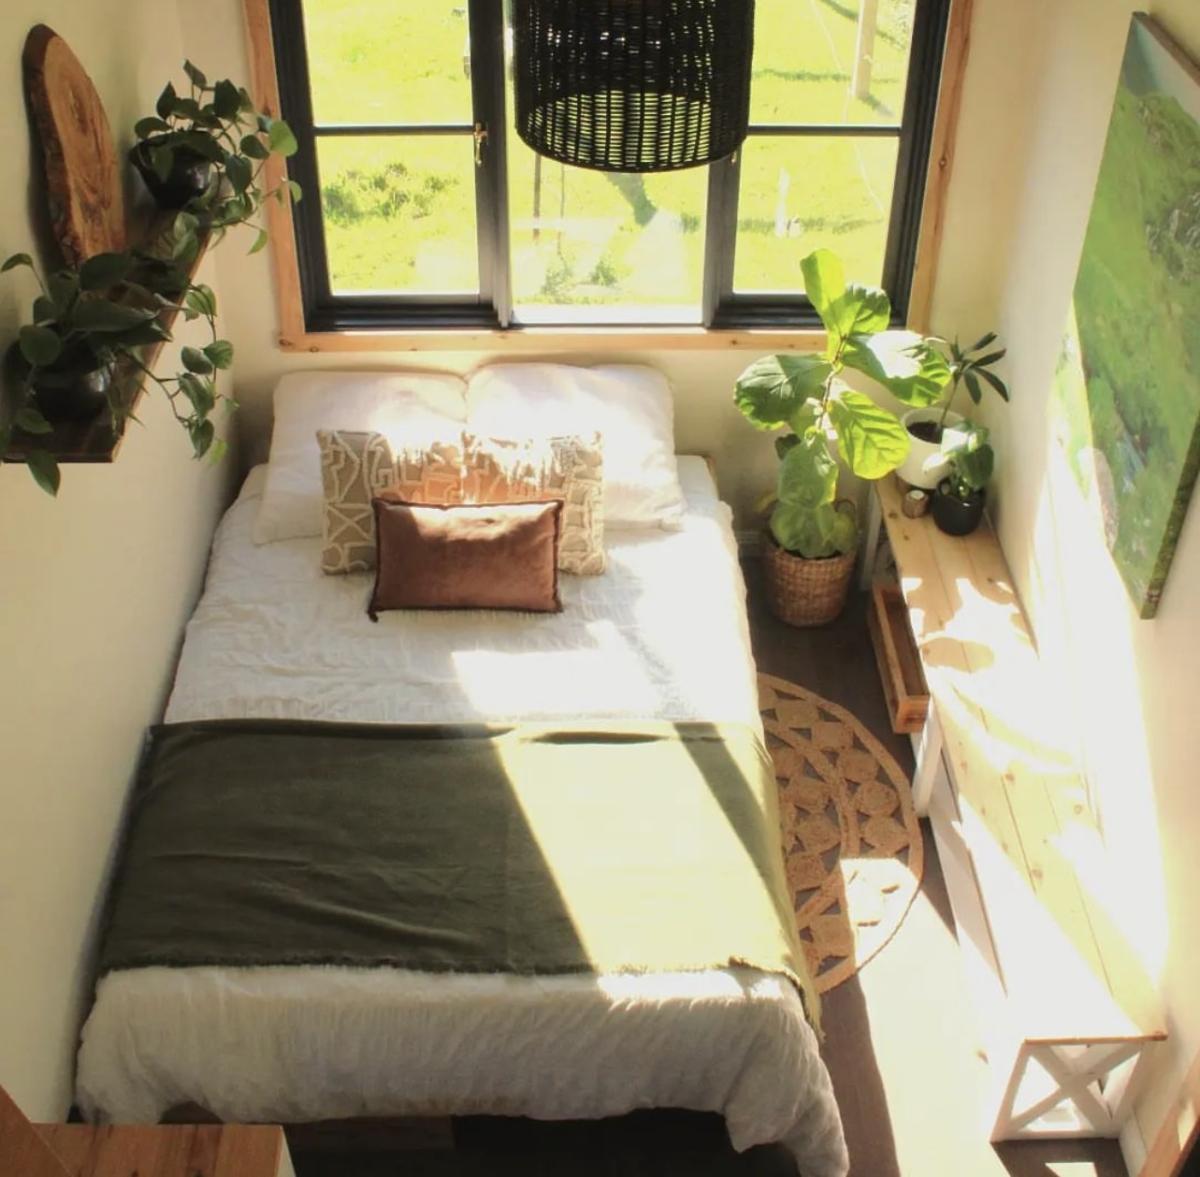
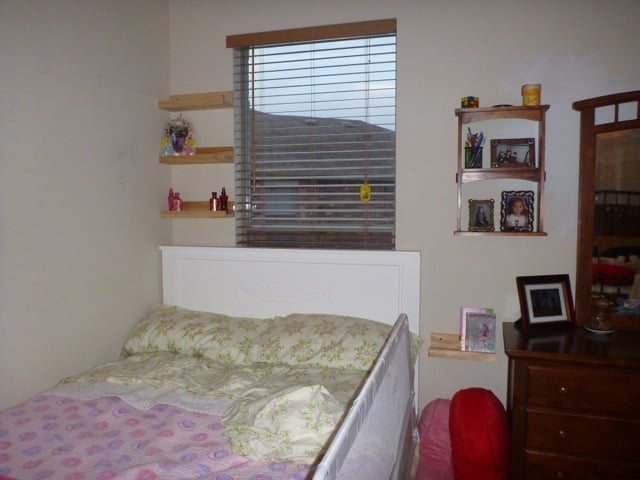
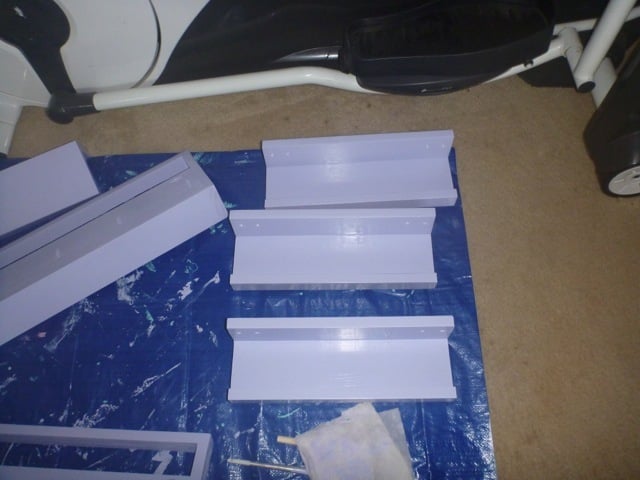
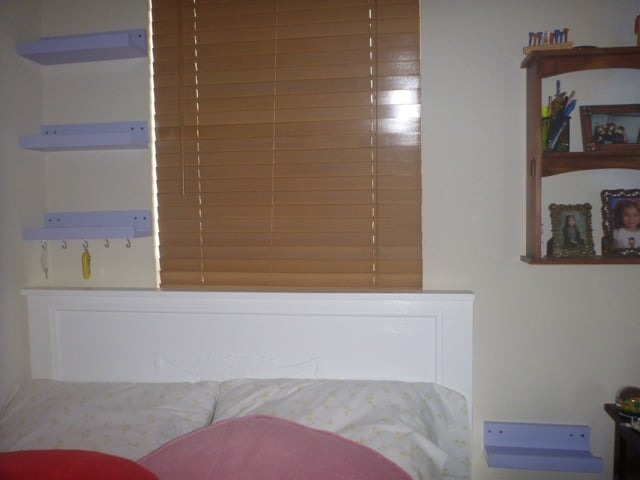
Here are a few of the ten dollar ledges we added around the girls bed. We had no room for tables so we thought we would give this a try. It's working beautifully. We hung the ledges in studs and they are standing up to constant use perfectly. The girls have space for their most cherished nik naks and a drink in case they wake thirsty in the night. We couldn't be more pleased. Now I'm seeing the possibility for ledges in every room.

Thu, 03/22/2012 - 00:34
nice post,thanks for sharing! BTW,check out my new android 4.0 tablet newfreeshipping.
Mon, 04/23/2012 - 22:14
It is nice that you posted something like this [url=http://www.pandawill.com/twilight-turtle-night-star-constellation-p3557… ] Twilight Turtle [/url] and I am quite lucky to read it. Thanks for posting this!
Mon, 10/22/2012 - 03:56
I like all your post. I will keep visiting this blog very often.
Tue, 06/26/2012 - 20:01
Your knowledge of this subject comes through clearly in this article. I love to read this kind of articles, I hope you will update it. Thank you for sharing it with me.
http://www.sbwire.com/press-releases/how-to-get-your-ex-back/magic-of-m…
Thu, 04/19/2012 - 19:01
If converting existing floor space into a half-bathroom, such a renovation can cost as little as a few thousand dollars, making the addition of a powder room one of the few home improvement projects where the value added to the home exceeds the cost of the renovation.water damage Pearland tx
Fri, 04/20/2012 - 02:14
You can also use vinegar to remove heat stains on stainless steel cutlery and pans, or remove streaks and heat stains by rubbing with club soda or olive oil.Basement water Atlanta GA
Sat, 04/21/2012 - 00:28
Before you go to use it...if it's been sitting for awhile...give it a good shake. As you can see in this picture...it does tend to separate a bit. But after a quick shake it's good to go. To use: spray on stains as you normally would. I usually let mine "soak in" for a few minutes at least. Then launder as usual.water damage Temecula CA
Mon, 04/23/2012 - 22:11
It is nice that you posted something like this [url=http://www.pandawill.com/mini-led-lcd-projection-clock-digital-keyring-…] Projection clock [/url] and I am quite lucky to read it. Thanks for posting this!
Fri, 04/27/2012 - 10:11
I have no experience to build a site like you said on this page. I need to learn to create a site and develop it, perhaps using new versions of Drupal could improve and make my blog more often visited by Internet users.water damage restoration Raleigh Durham NC
Fri, 04/27/2012 - 10:13
It is very fascinating, You’re a very professional blogger. I’ve joined your feed and look ahead to in search of more of your excellent post.water damage restoration Raleigh Durham NC
Fri, 05/11/2012 - 07:40
This blog is really very interesting and easy to understand the information provided in it. It is very nice to view this blog and it's nice to see the best information cited here.Water damage Lafayette LA
Fri, 05/18/2012 - 19:54
I used to be more than happy to seek out this internet-site.I wanted to thanks in your time for this glorious read!! I positively enjoying each little bit of it and I have you bookmarked to check out new stuff you weblog post. Water Damage Anaheim CA
Fri, 06/01/2012 - 04:59
Quite insightful submit. Never believed that it was this simple after all. I had spent a very good deal of my time looking for someone to explain this subject clearly and you're the only one that ever did that. Kudos to you! Keep it up. Water extraction Lakeline OH
Sun, 06/17/2012 - 20:37
I'm so excited that I have found this your post because I have been searching for some information about it almost three hours. You helped me a lot indeed and reading this your article I have found many new and useful information about this subject. Paint Contractor Glendale AZ
Mon, 06/25/2012 - 03:45
Your knowledge of this subject comes through clearly in this article. I love to read this kind of articles, I hope you will update it. Thank you for sharing it with me.
http://www.hcgrevival.com/
Wed, 06/27/2012 - 04:10
Sometimes it is so hard to find good and useful posts out there when doing research. Now I will send it to my colleagues as well. Thank you for being one of them.
http://www.reklama-internete.com/
Fri, 06/29/2012 - 01:15
Thanks for this exciting post. It is well written and has some great content. Do you have any others that I can go to about this subject?
http://www.californiahealthinsurancenow.com/Kaiser_Permanente.html
Tue, 07/03/2012 - 05:21
This information very useful! I've been looking for books of this nature for a way too long. I'm just glad that I found yours. Looking forward for your next post. water damage restoration Raleigh Durham NC
Tue, 07/10/2012 - 15:35
This is great stuff. Very handy these ledges are. lets see how many more can be added.
Nice, Thanks
Mon, 07/16/2012 - 22:55
The program is designed under the same model as new homes built for Habitat families where the veteran will repay the zero interest loan necessary for these repairs, which is then deposited into a revolving fund to assist additional families in need of decent housing. Mold Inspection Covington LA
Thu, 07/19/2012 - 04:32
I hope people listen, too, but I'll be surprised if they do. In all the years I've been in the business, we're still fighting the same battle we were when I first started - most folks want the lowest ... Water Damage Restoration Colorado Springs CO
Wed, 08/01/2012 - 22:13
If you're involved in a head-on crash, the windshield must stay in place to keep you inside the car and to keep flying debris out. If the windshield flies out, so too may you or your kids. Improperly installed windshields can easily be dislodged during a crash. Architectural Engineer NYC
Thu, 08/02/2012 - 03:41
This blog is really amazing due to its unique and outstanding post.
Fri, 08/17/2012 - 06:48
You have to put efforts in home maintenance to make sure everything is in right condition. If any part of your house needs repairing then have it repaired immediately. If you neglect the problem for too long then it might become even more complicated. Masonry contractor West Hartford CT
Mon, 09/03/2012 - 02:11
The girls have space for their most cherished nik naks and a drink in case they wake thirsty in the night. We couldn't be more pleased. Now I'm seeing the possibility for ledges in every room. http://www.genericviagratab.com/
Sat, 09/29/2012 - 09:29
I am very enjoyed for this site. Its year informative topic. It help me very much to solve Some Problems. Its so fantastic and Opportunity are working style so speedy.
Outdoor Lighting Batavia IL
Tue, 11/20/2012 - 00:17
This is represented partly in the significantly higher frequency and register neutrality of connectives such as tak or totiž when compared with the English so and therefore but primarily by the nature of the mental spaces set up by the Czech lexemes. water damage Anaheim CA
Fri, 11/30/2012 - 03:19
The contemporary strategy is often focused on the development of specific skills and abilities. As a result, it fails to provide with the broader education and, instead of the formation harmonious, balanced personalities, it breeds specialists trained to work in a specific field. This is a good example like the ones http://bestsamplepapers.com does. People prefer more broad basis.
Thu, 02/07/2013 - 02:08
Pretty good post...
I just stumbled upon your website and wanted to say that I have really enjoyed reading your blog posts. Any way I'll be subscribing to your feed and I hope you post again soon.
Thu, 02/14/2013 - 23:45
A lot of interesting things found on your blogs, like the topic! The author thanks and success in the blog. http://bbrencontresexe.com
Fri, 04/12/2013 - 05:55
As a Newbie, I am permanently exploring online for articles that can be of assistance to me. Thank you
http://healthpharma.blogsome.com/
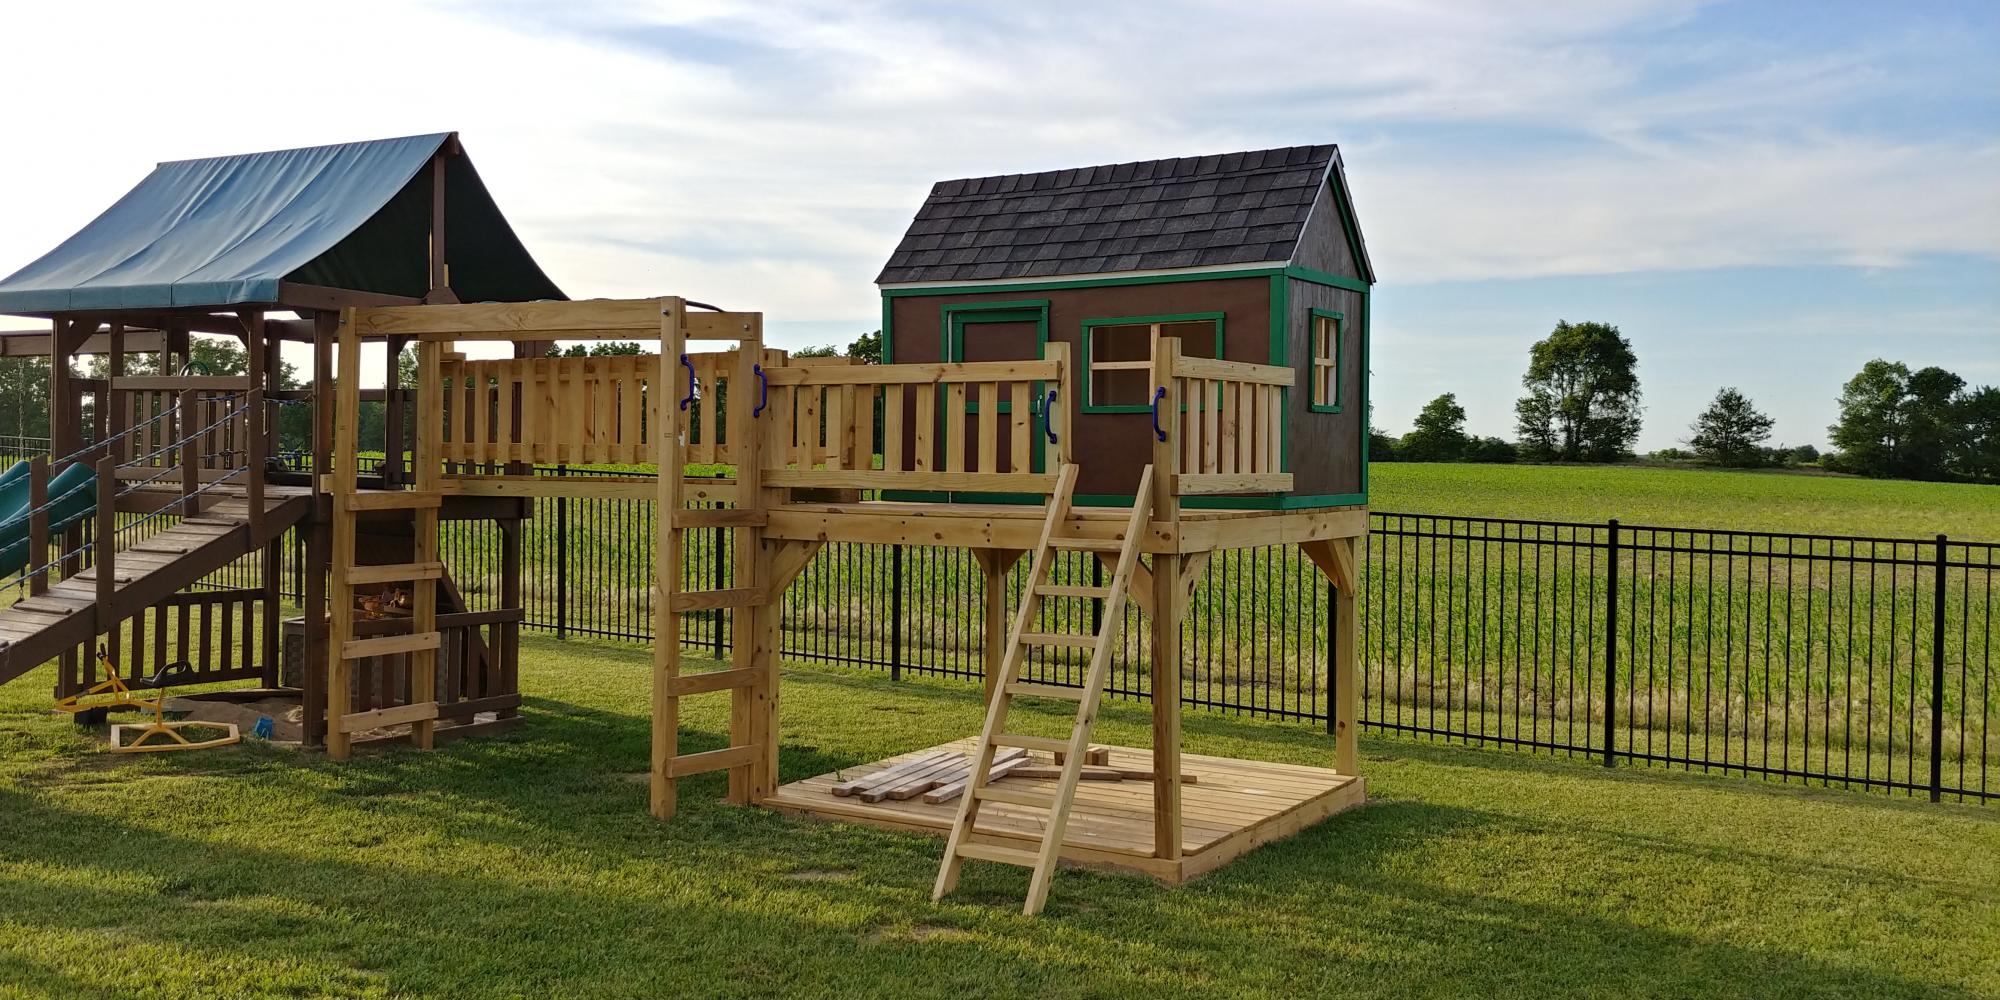
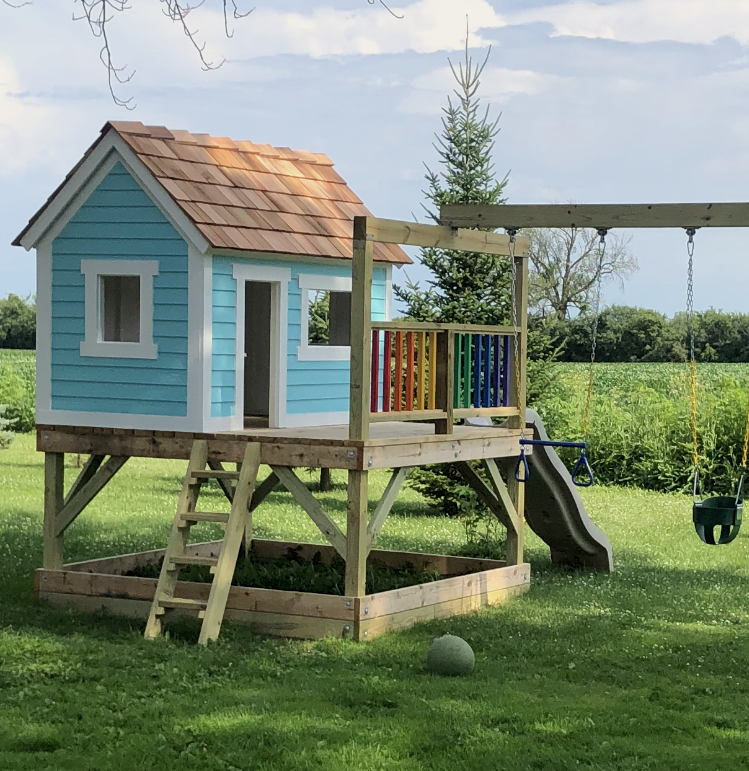
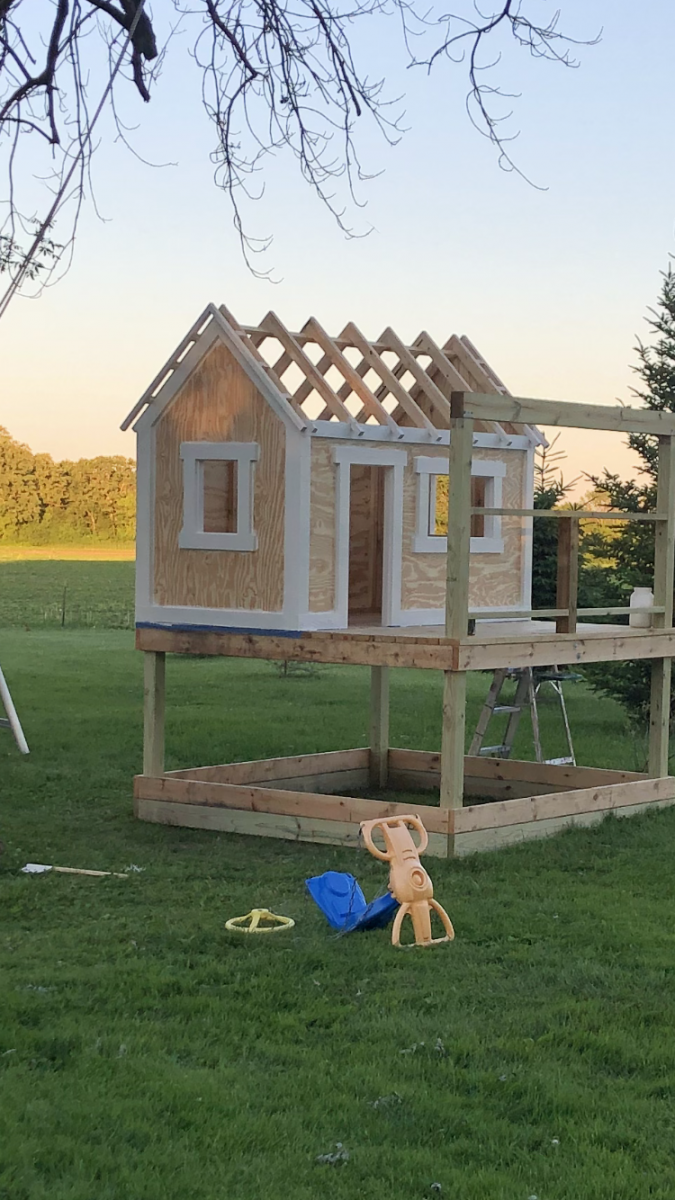
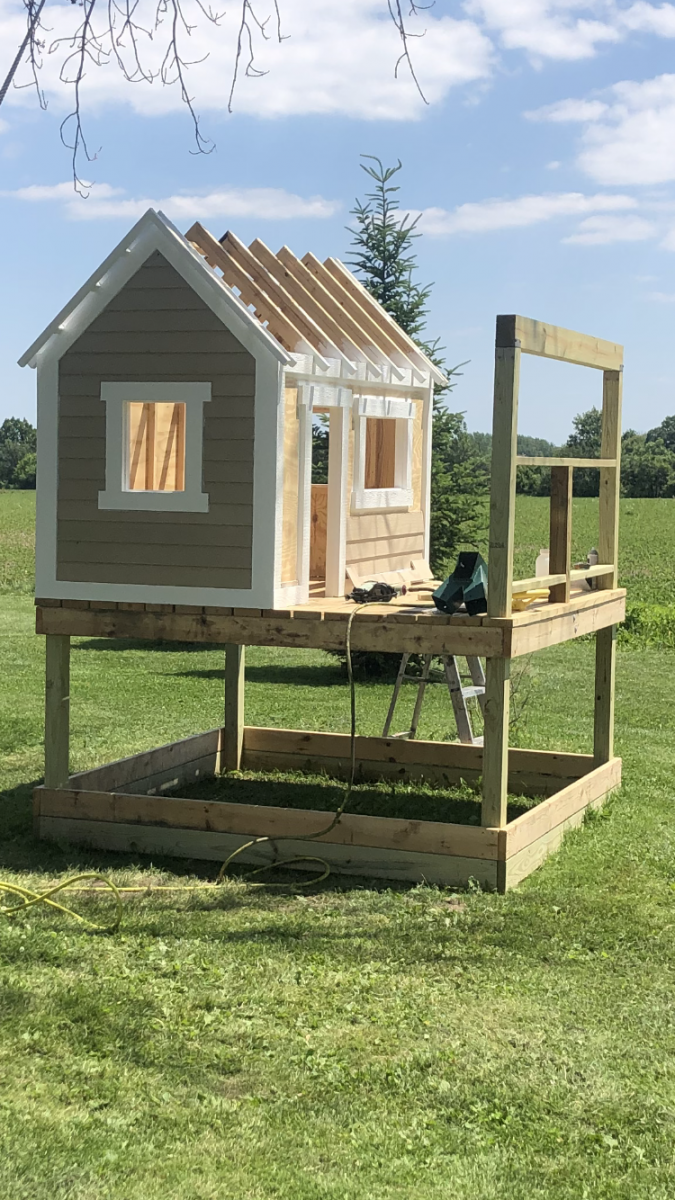
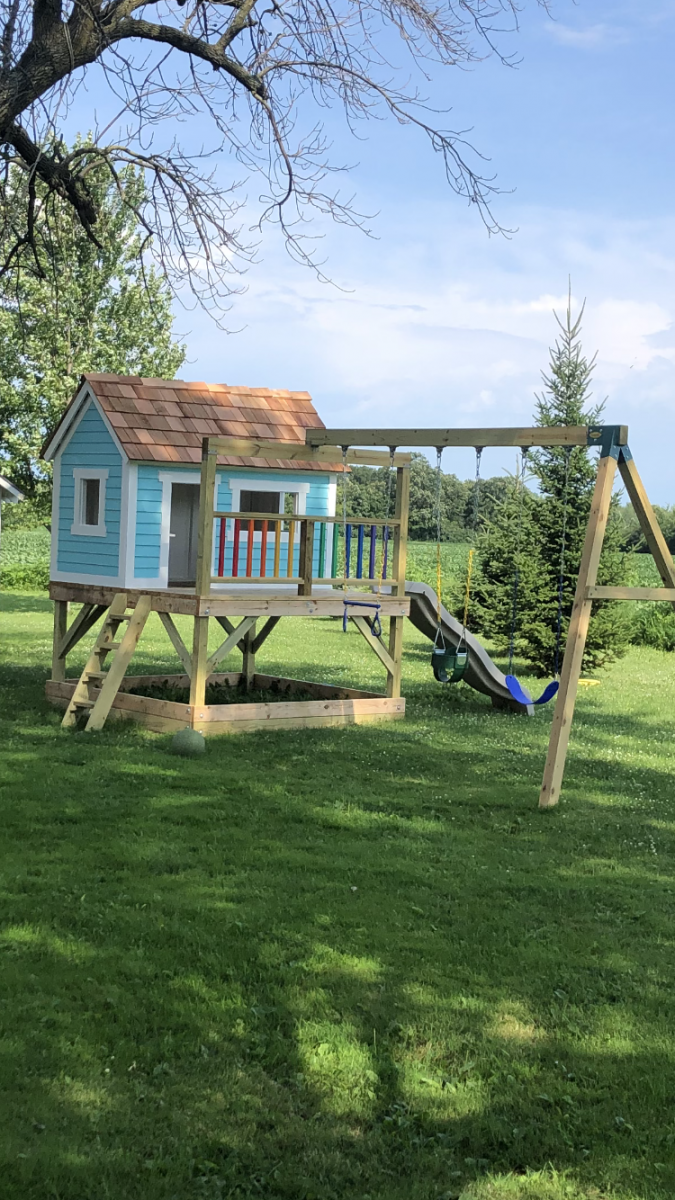
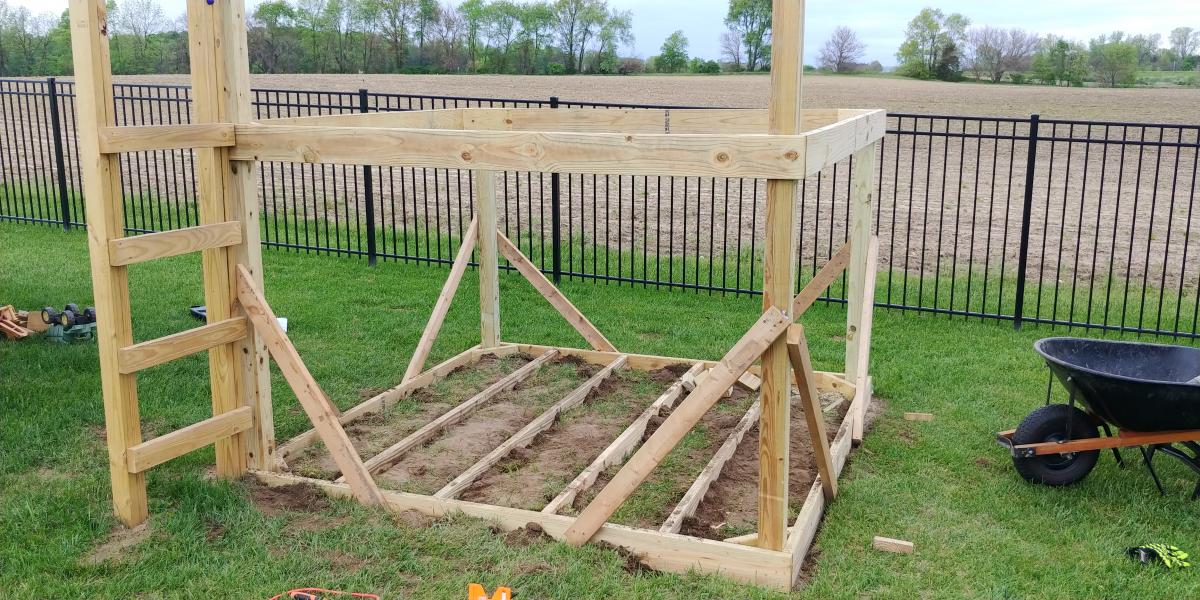
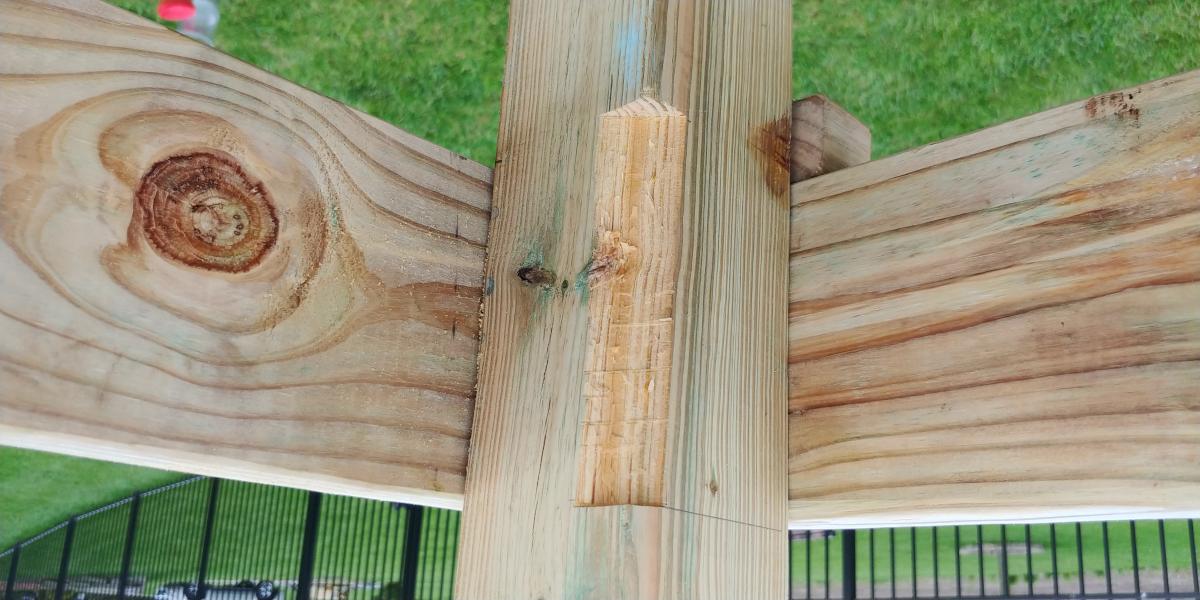
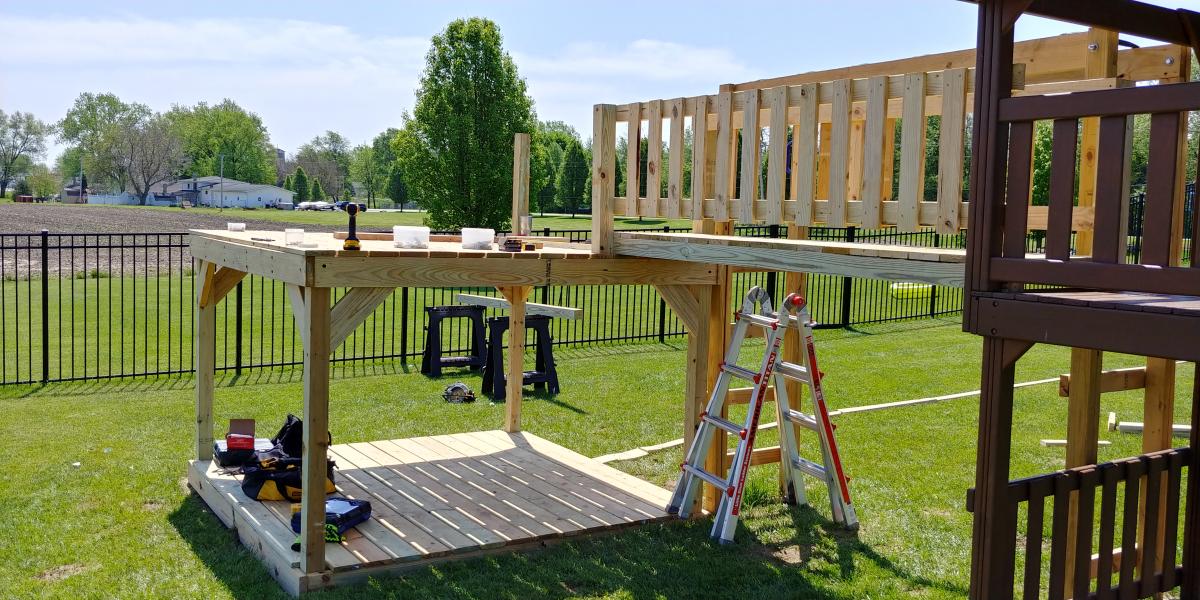
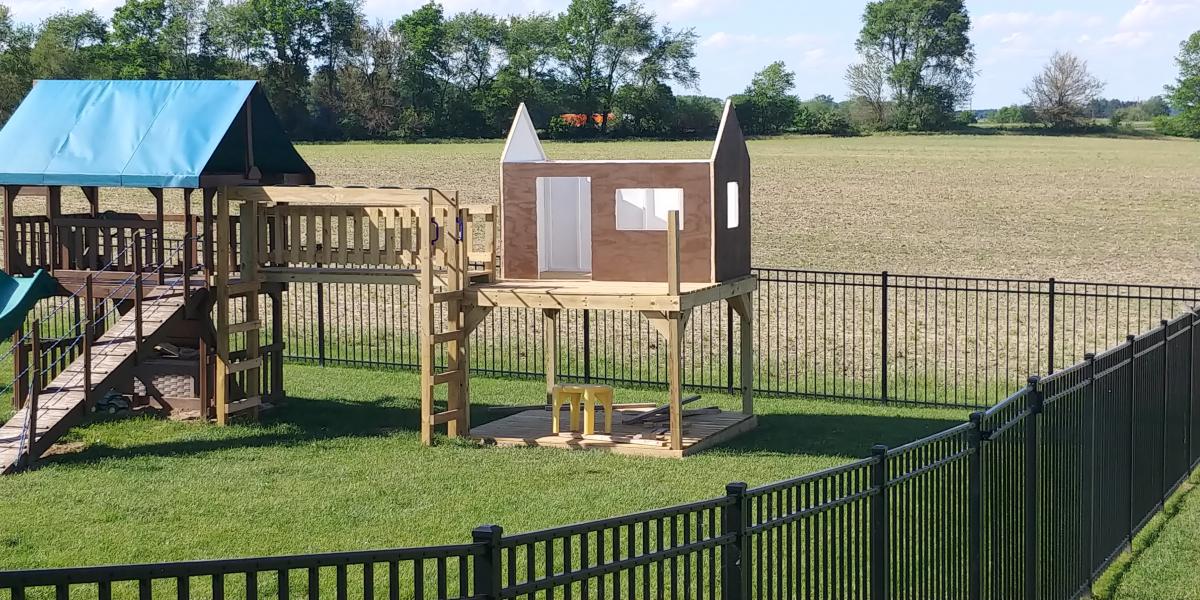
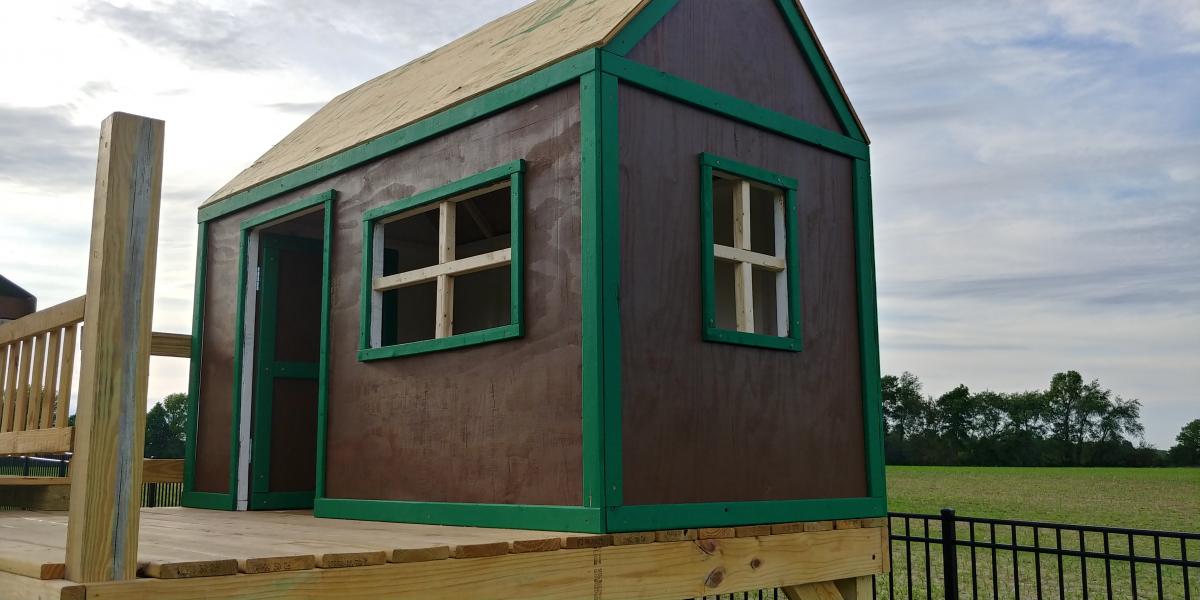
Decided our old play set needed an addition, landed on these plans of Ana's. Sat on them and mulled them over for months. Once the wife said something about adding on to it I made the purchases needed. Connected the two platforms with a bridge. I used 4"x4"x10' for the runners, same boards as the decking for the platform of the bridge(5/4"x6"), 2x4's and 1x4's for the railing. If you look at the 3rd photo, I had to chisel out the 4x4 post to get the 2"x6"x12" support to fit correctly. This should measure 2"x6"x13". Another change I made was to cut the bottom and top trim pieces longer on the front and back sections so that the trim would cover the framing of the gable end walls (see last photo). my son wanted windows so I faked in some windows with scrap 2x2's. I used 2x6's as supports from the 4x4's to the 2x6 framing (see photo 3) I added the monkey bars about a month before deciding to do the platform/deck and playhouse. The ladder is based loosely off of a couple of plans I found online. I was able to do all of this work myself except for the roof. Need my dads help to lift the plywood, he then helped me with the rest of the roof.
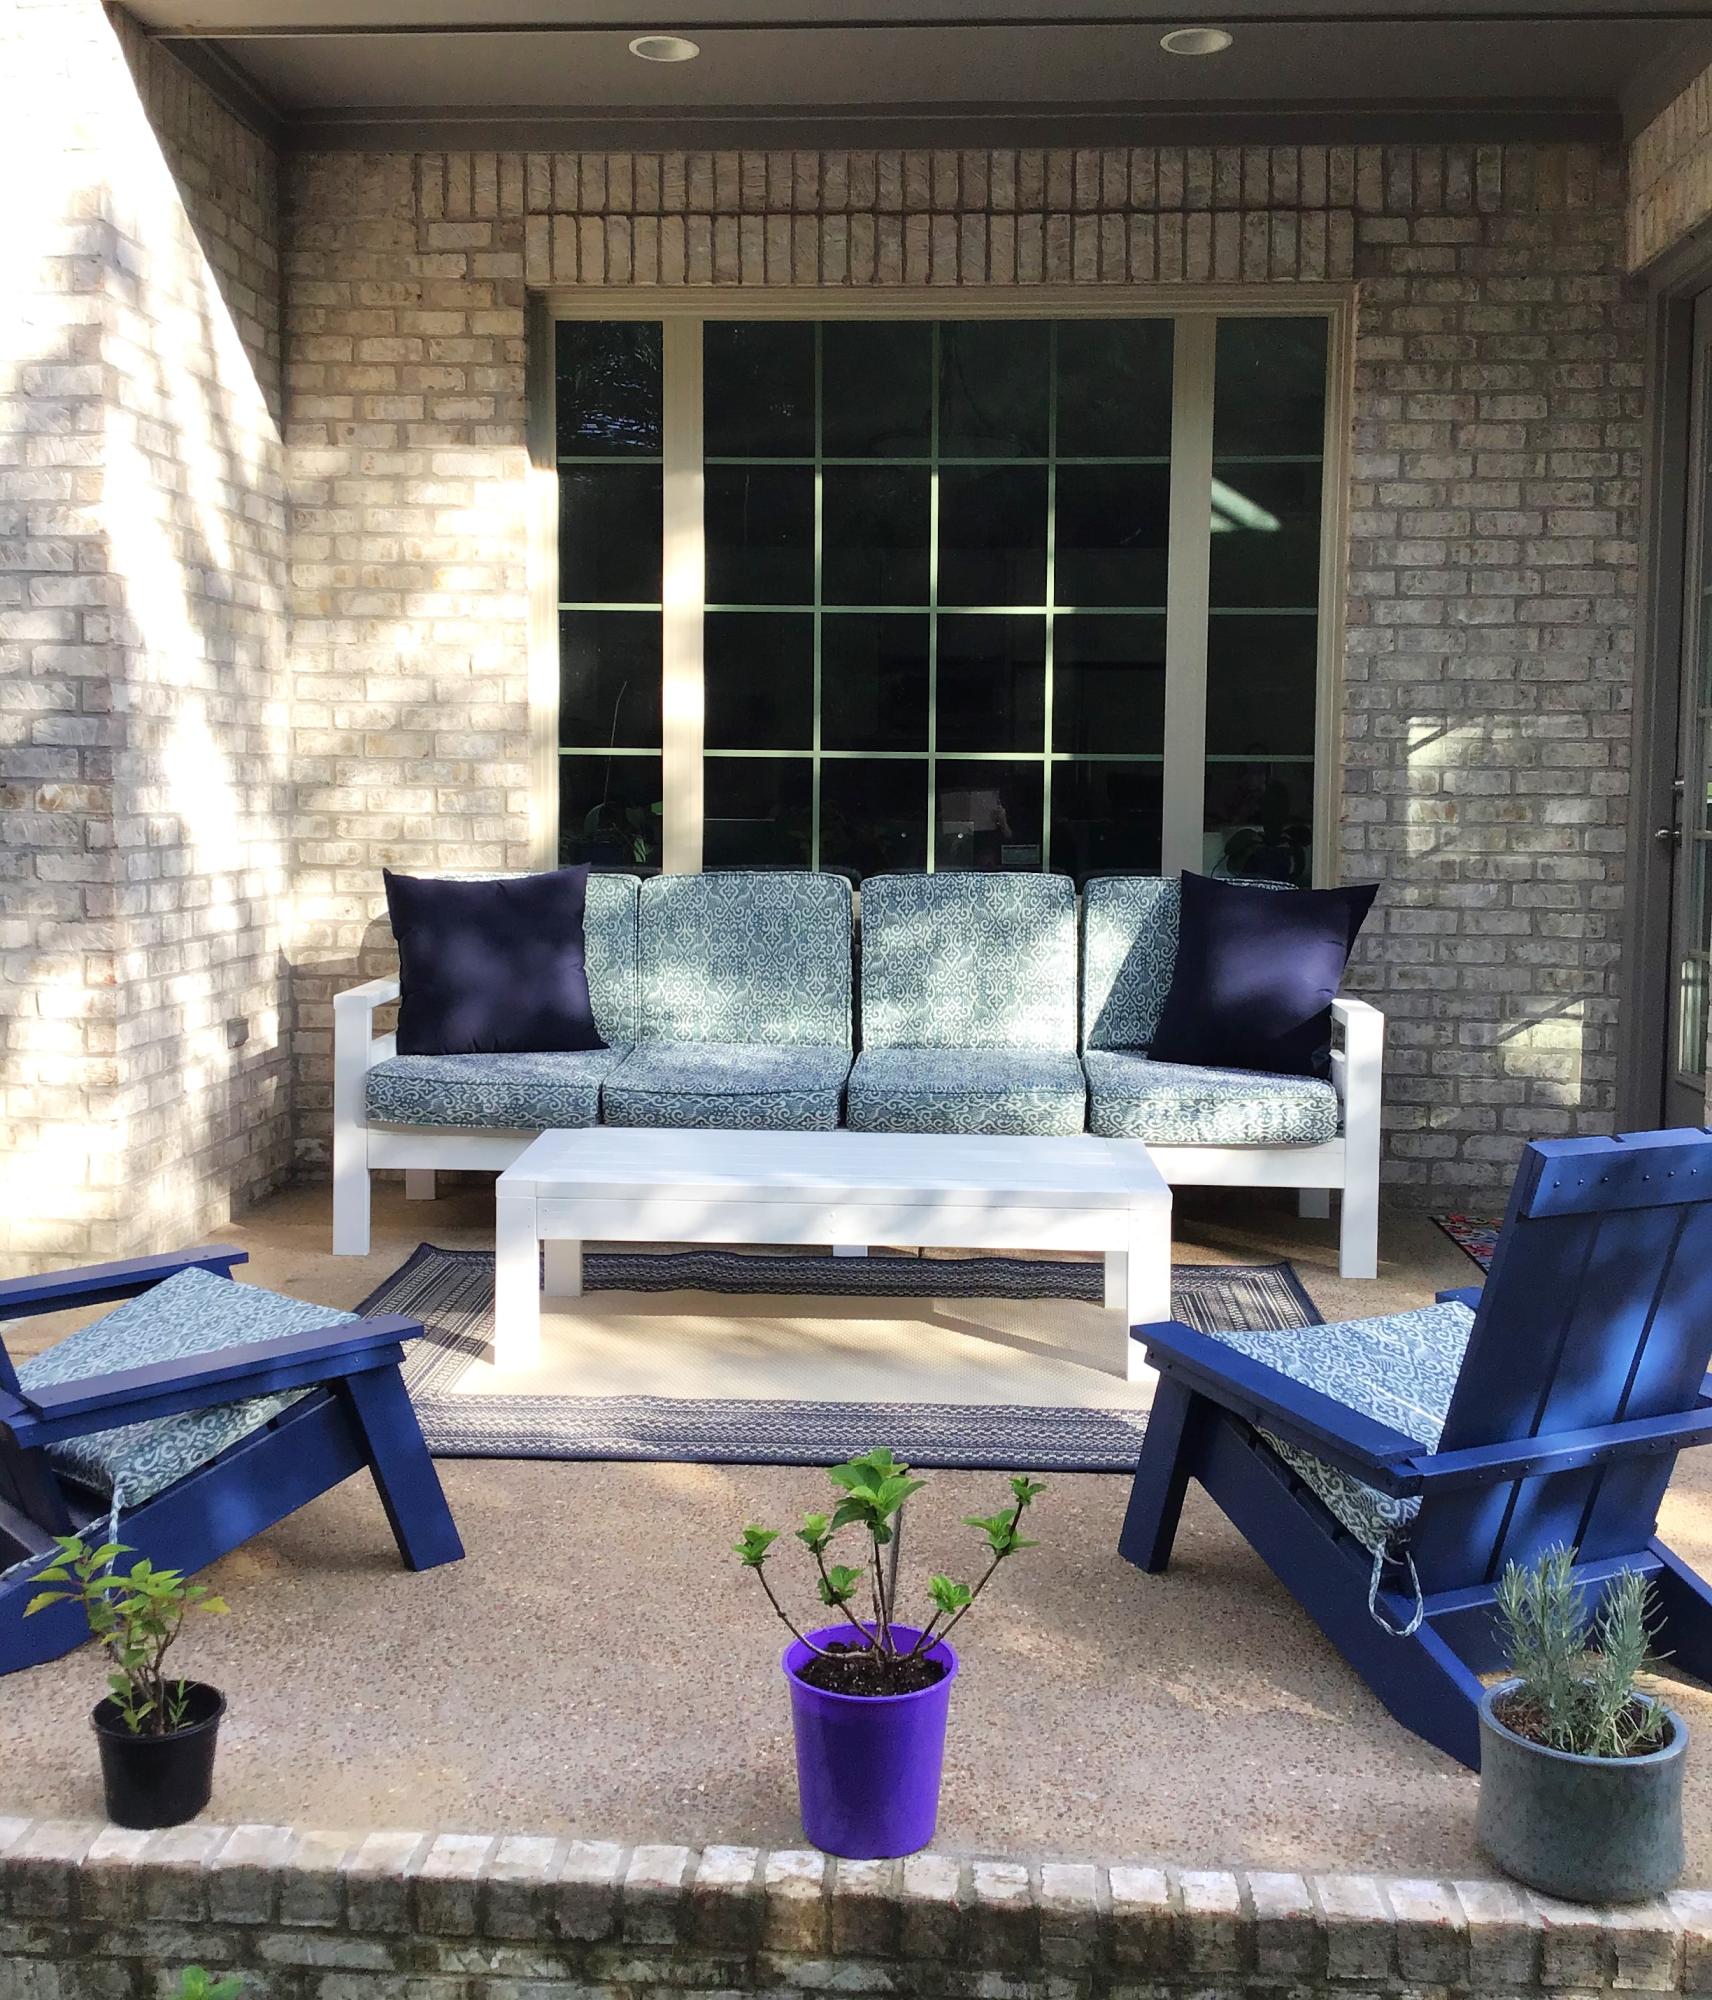
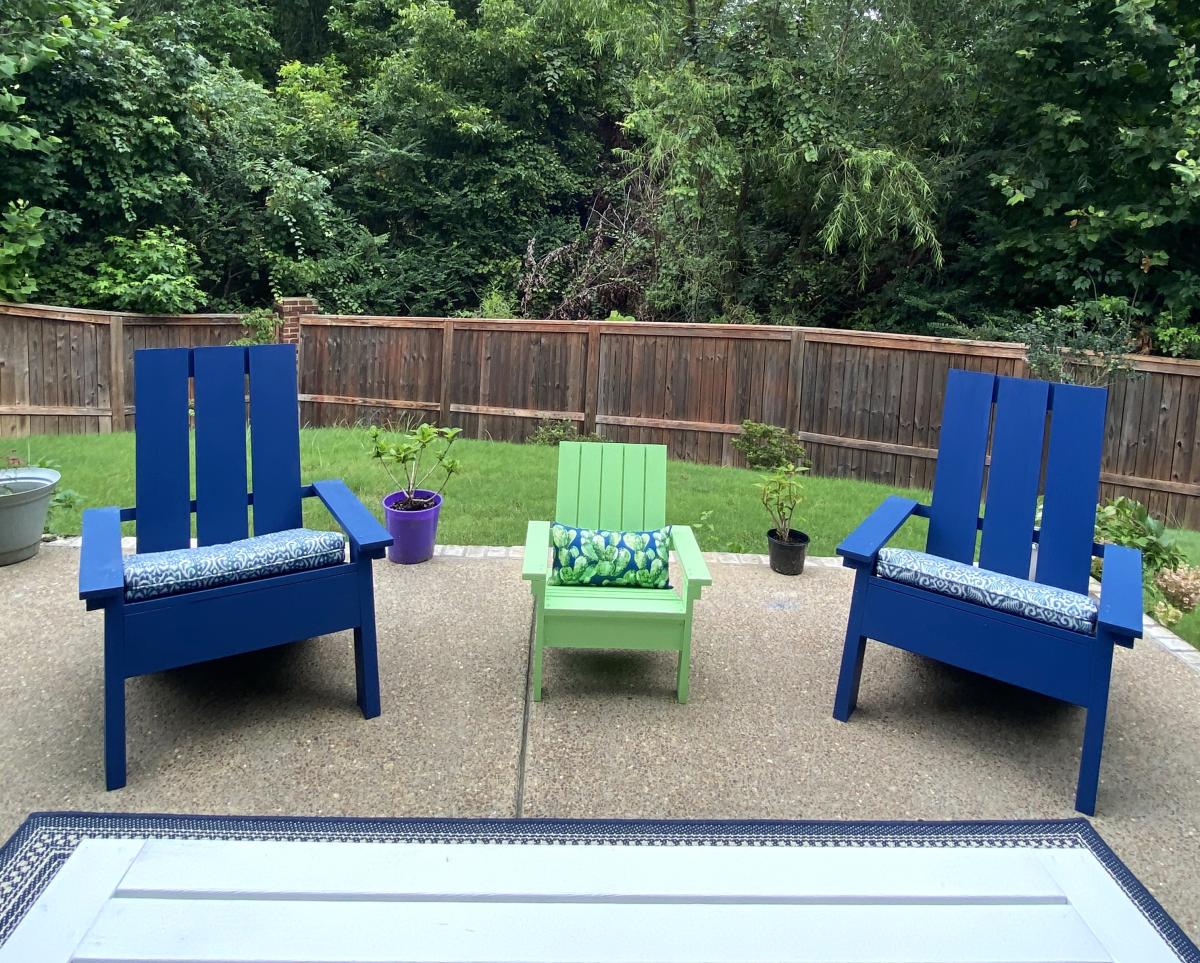
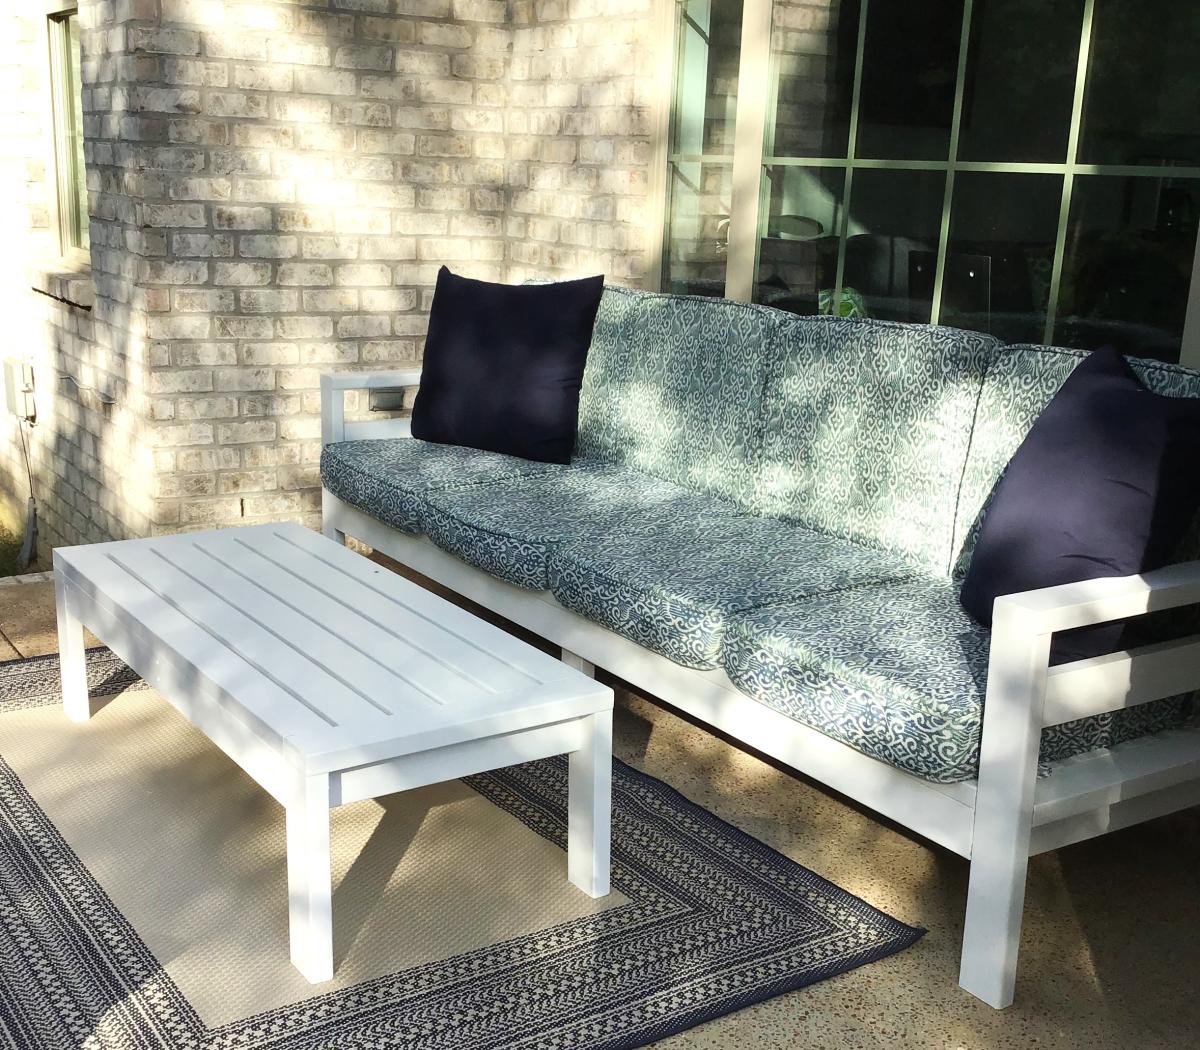
I decided to build my patio furniture and built a couch, with cushions, coffee table, 2 Adirondack adult chairs and one child’s Adirondack chair. It was so much fun to plan and build all of the furniture and so enjoy going out there on cool days! Thanks to Ana White for all of the plans! This is my 20th Ana White project! On to my next project! Plans were outdoor modern sofa, modern Adirondack chair, kids Adirondack chair, 2x4 outdoor coffee table.
JoAnne
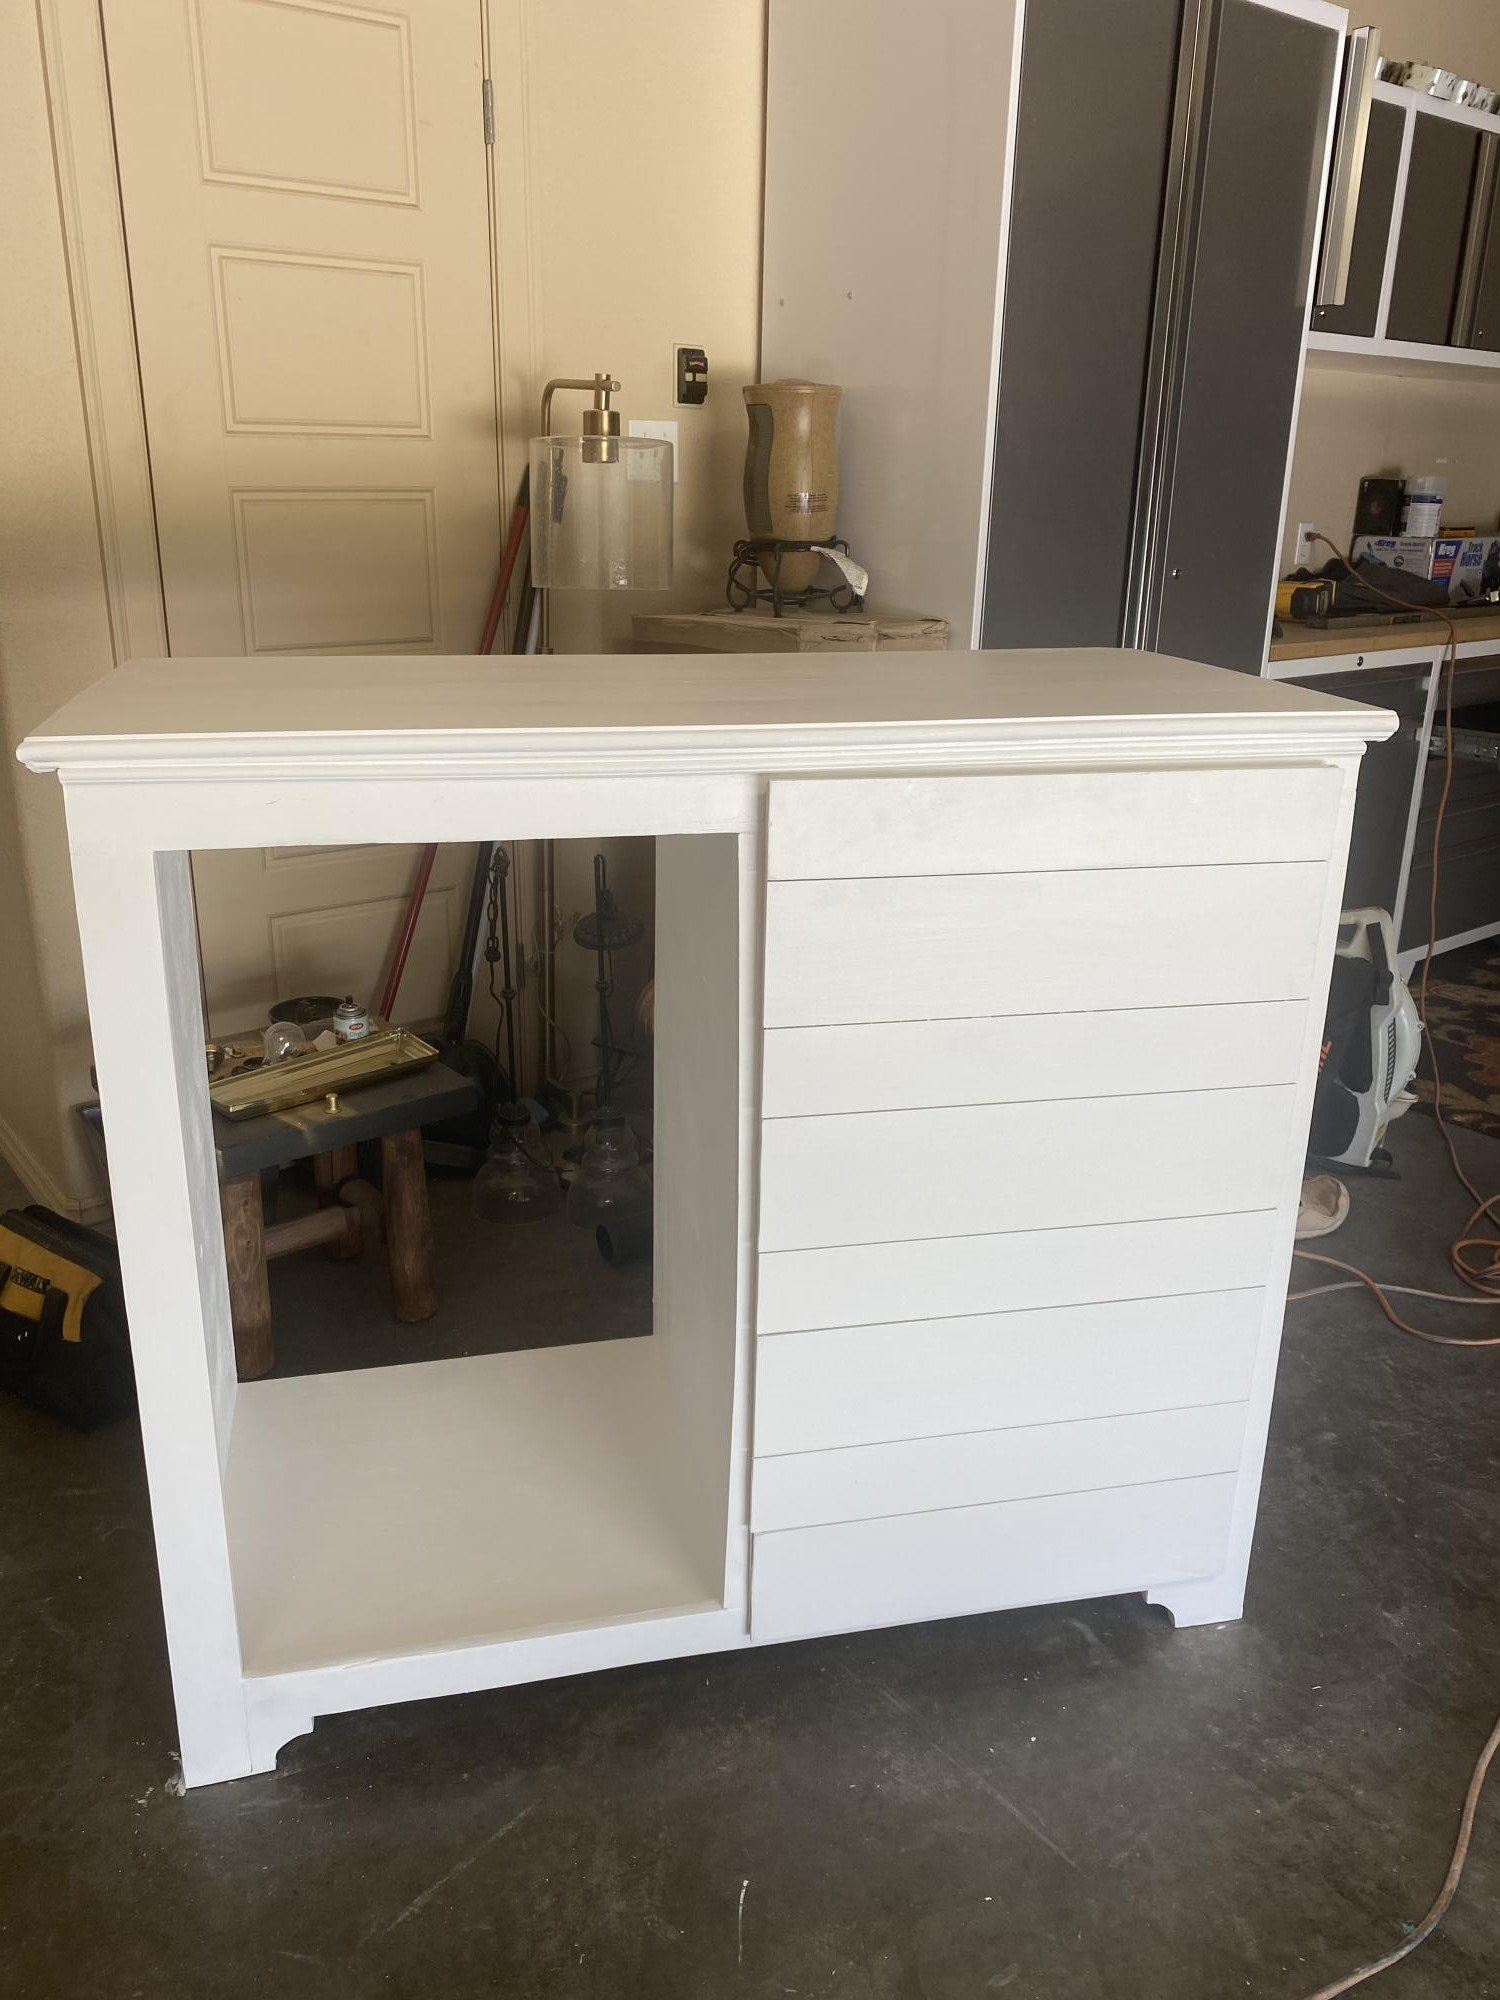
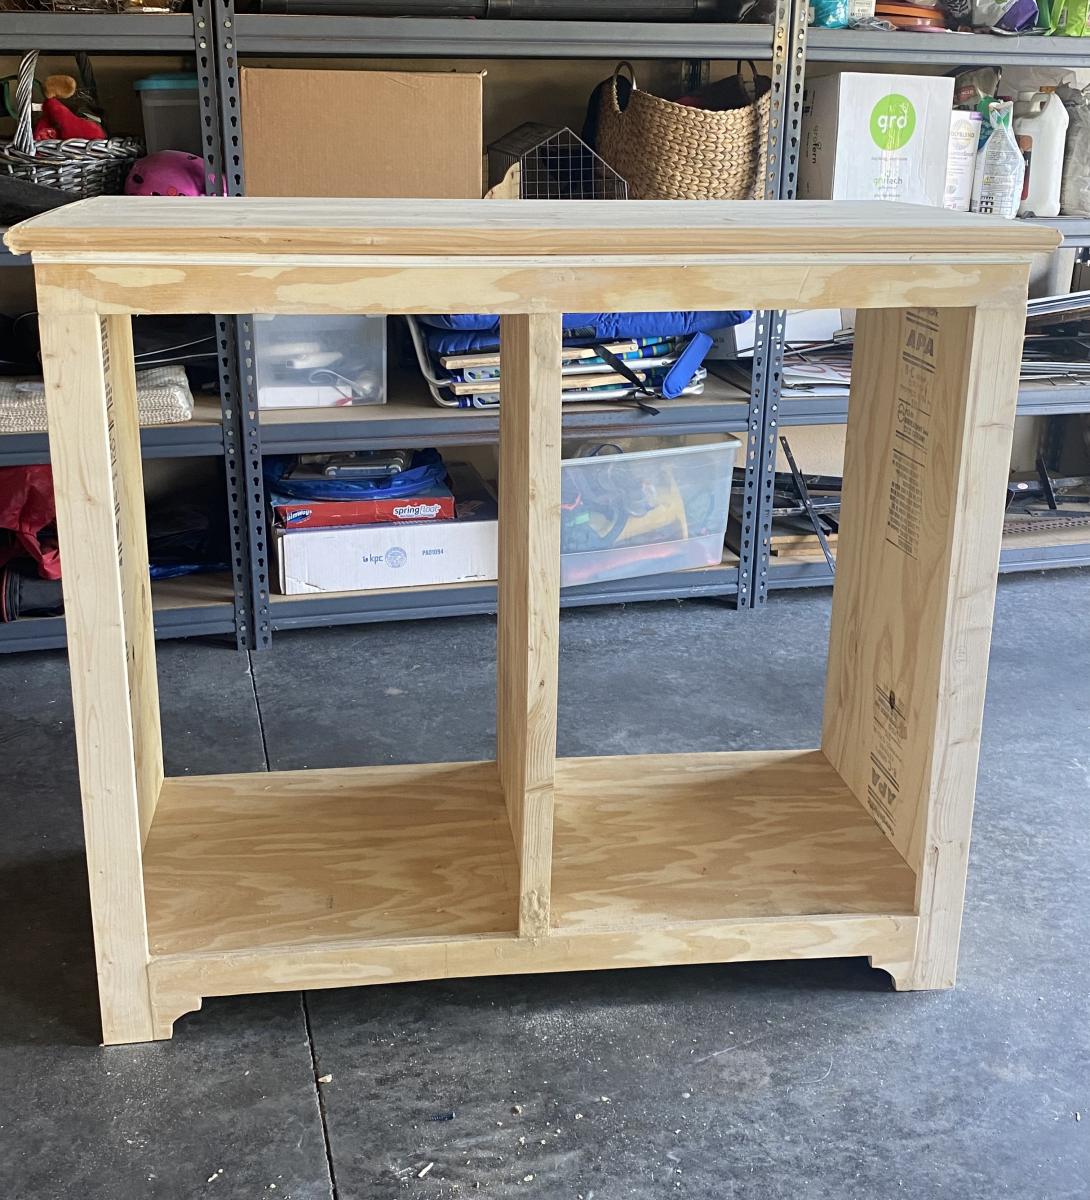
I changed plan to make deeper. I also modified the bottom trim and top. I put a ball bearing soft door drawer guide on modern door so it can slide back and forth. I feel we need more modern plans on here but with a bit of creativity and using plans you can make anything. I have never built anything before. I love General Finishes Milk Paint in Snow White and I brushed rolled it on (sanded between 3 coats). It’s basically self leveling and leaves a nice matte finish. Used door glide in picture bought from homedepot in the 24 inch and that’s how wide door was and it was 36” tall. Door glide I only used one on top of the door not on bottom as well. Door piece of fiberboard with just strips glued on and quarters spacing them correct.
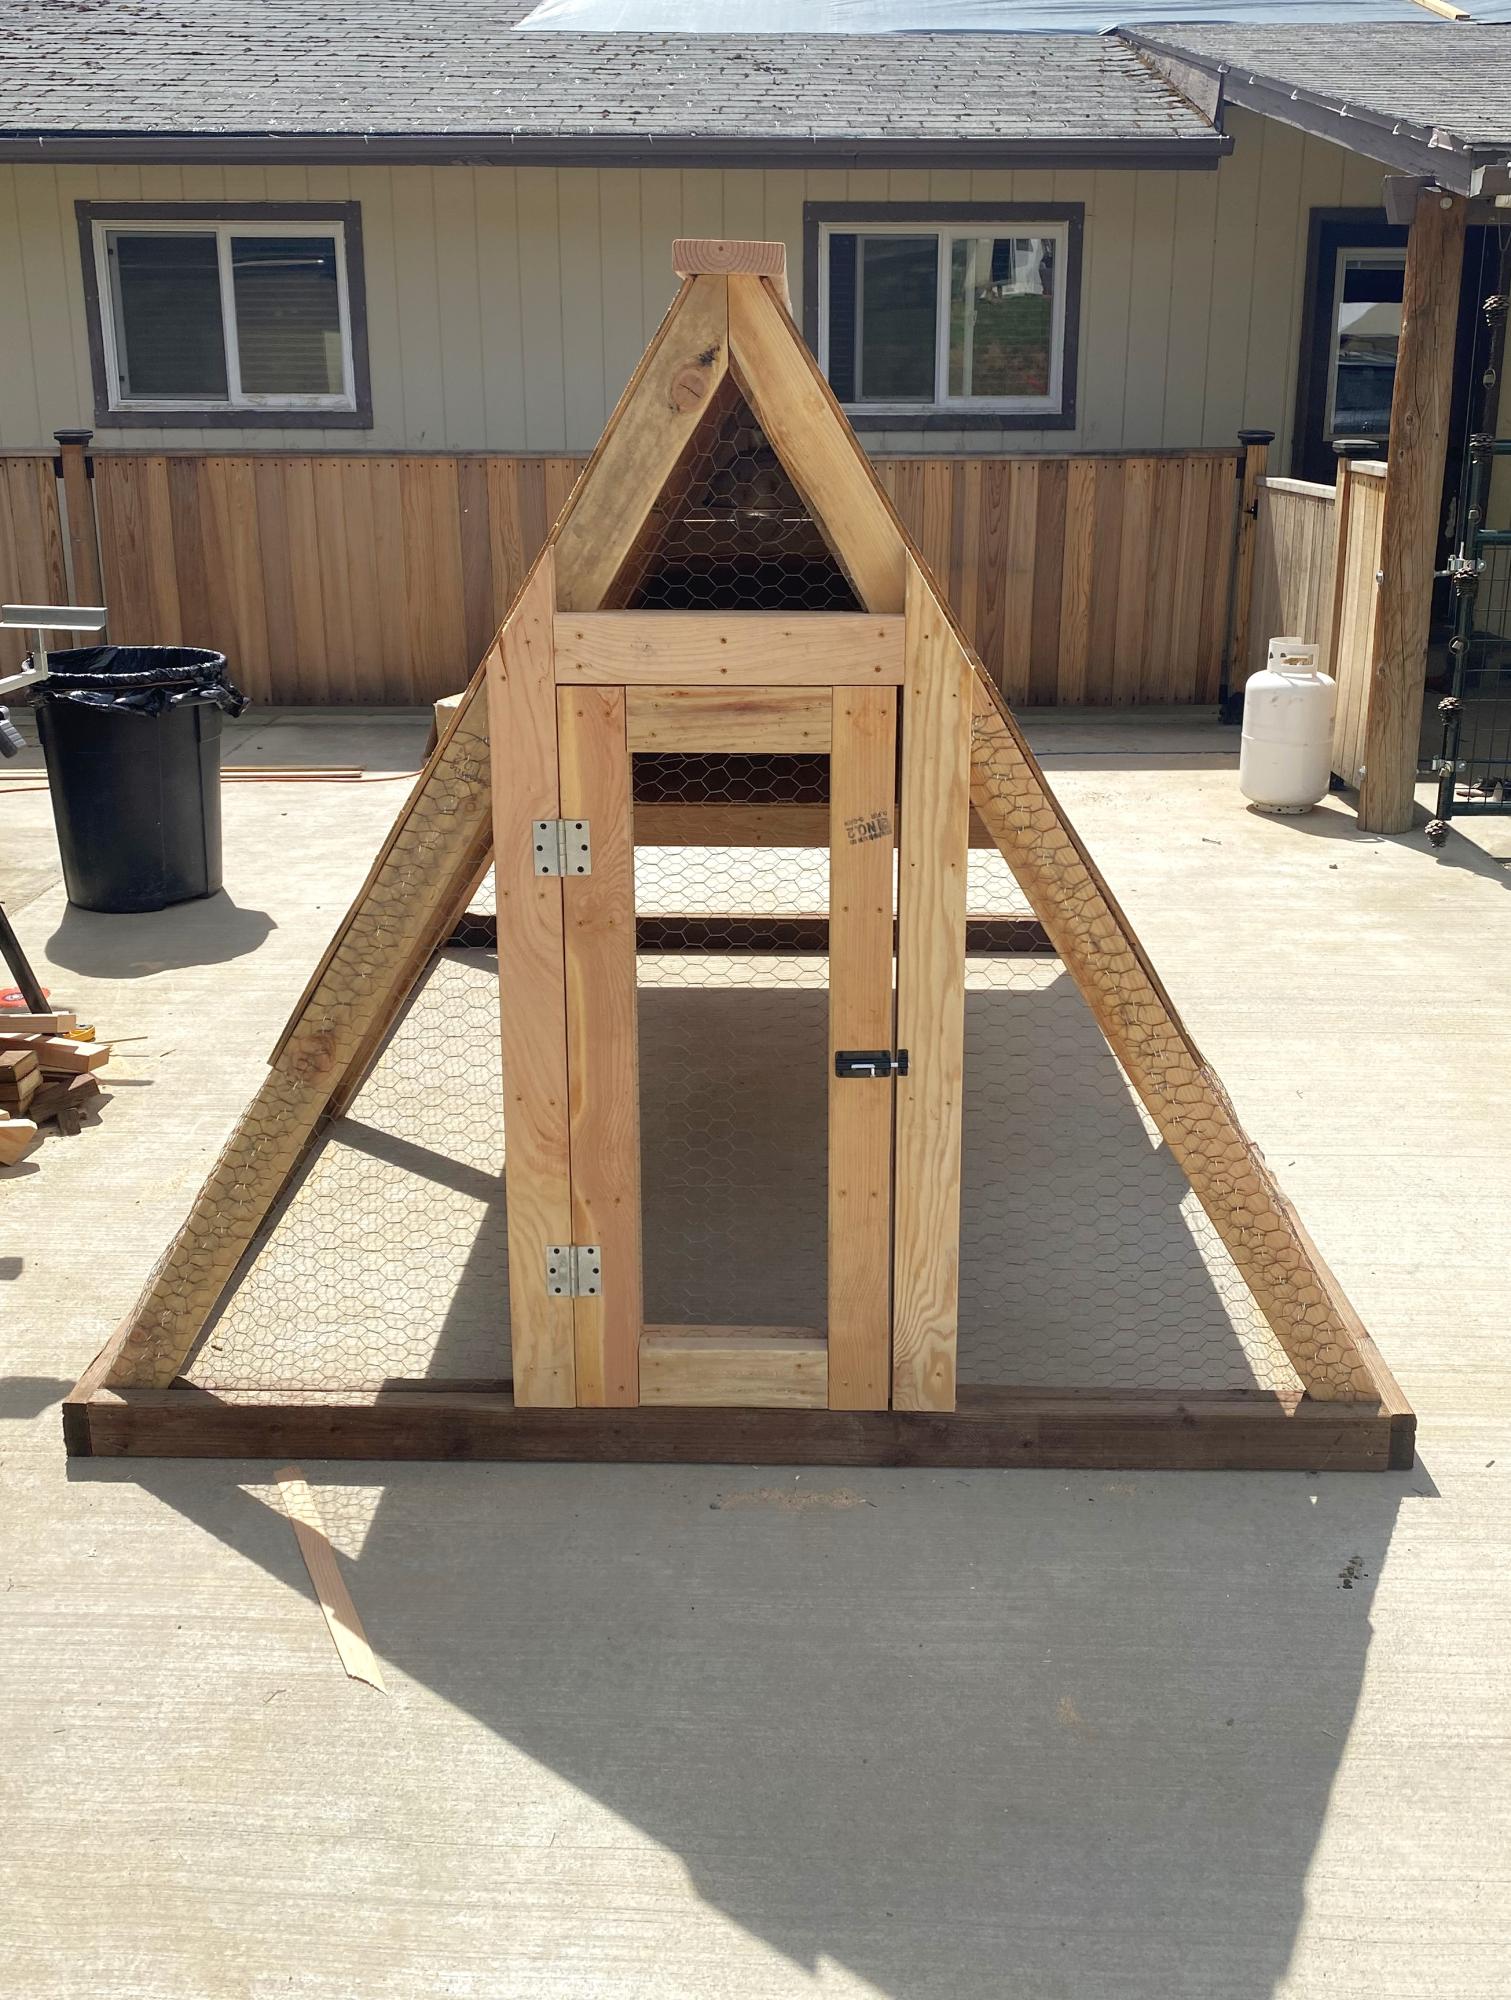
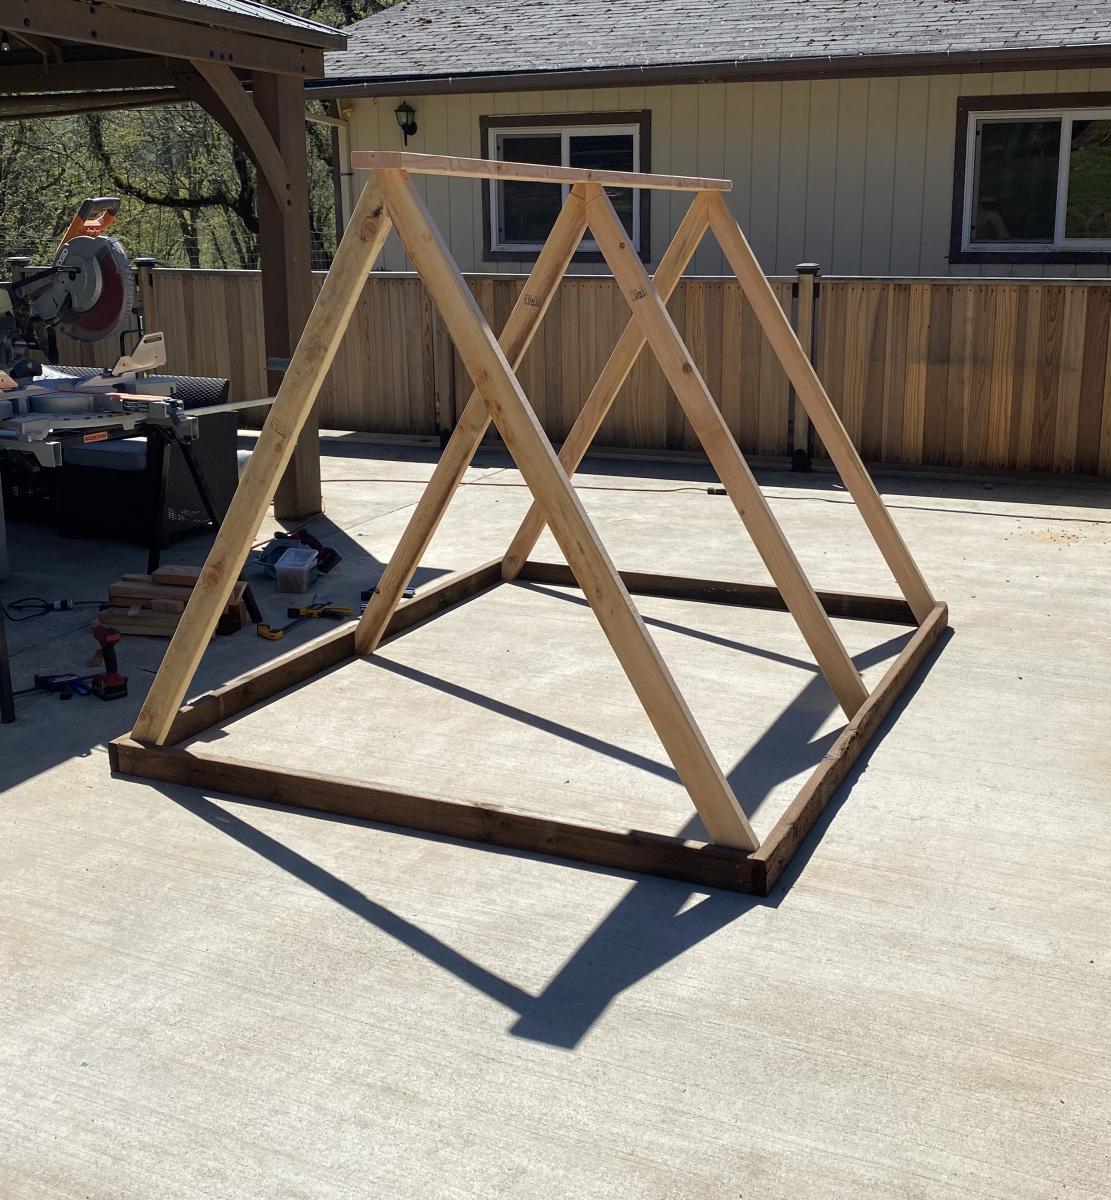
Great easy project to get the bigger chicks out of the garage to integrate with the older hens. Made some modifications because we have a lot of critters trying to kill the chickens/chicks.

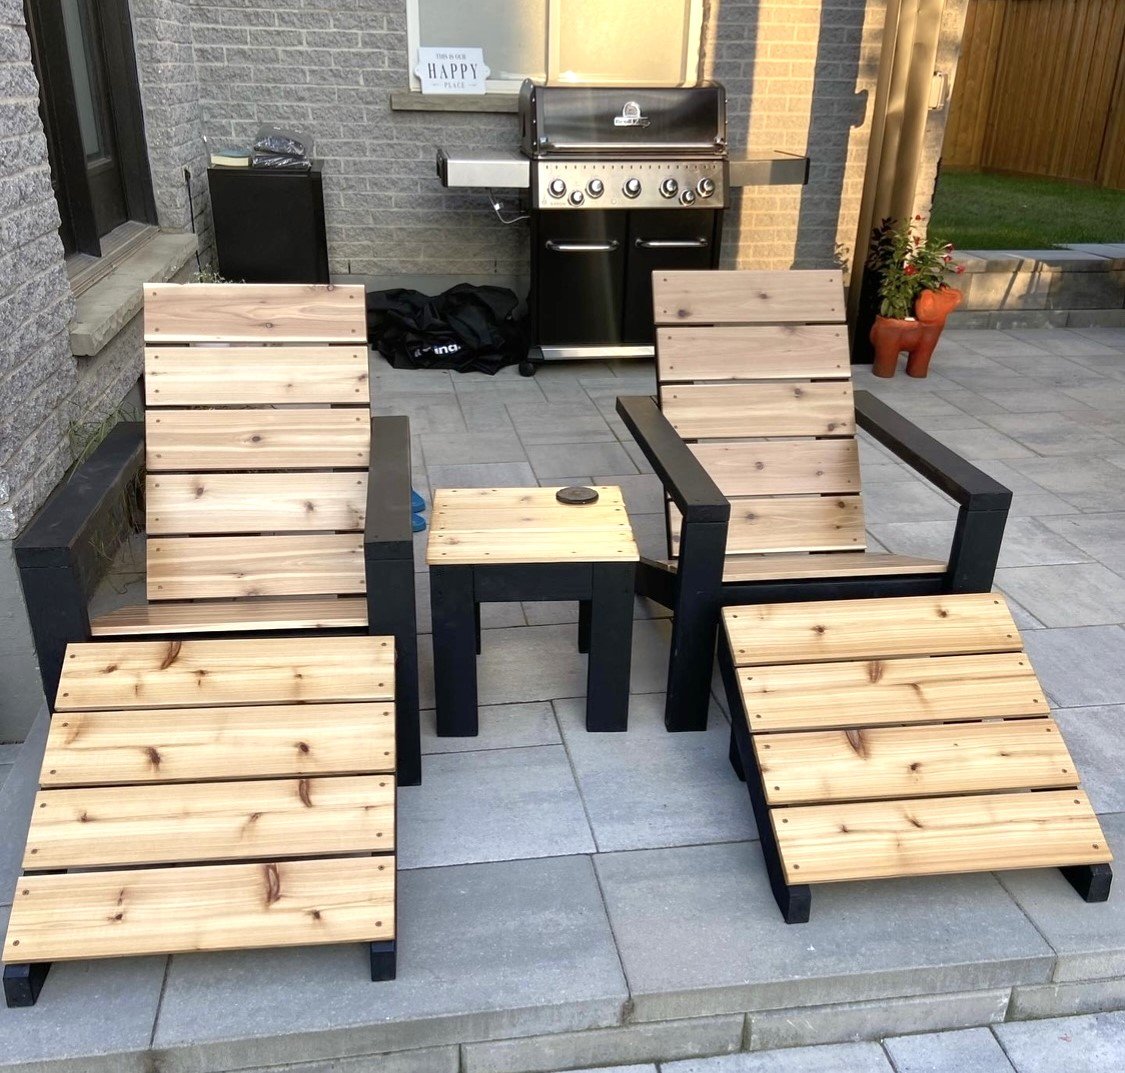
Great set of outdoor chairs with foot rest!
RG Design & Build
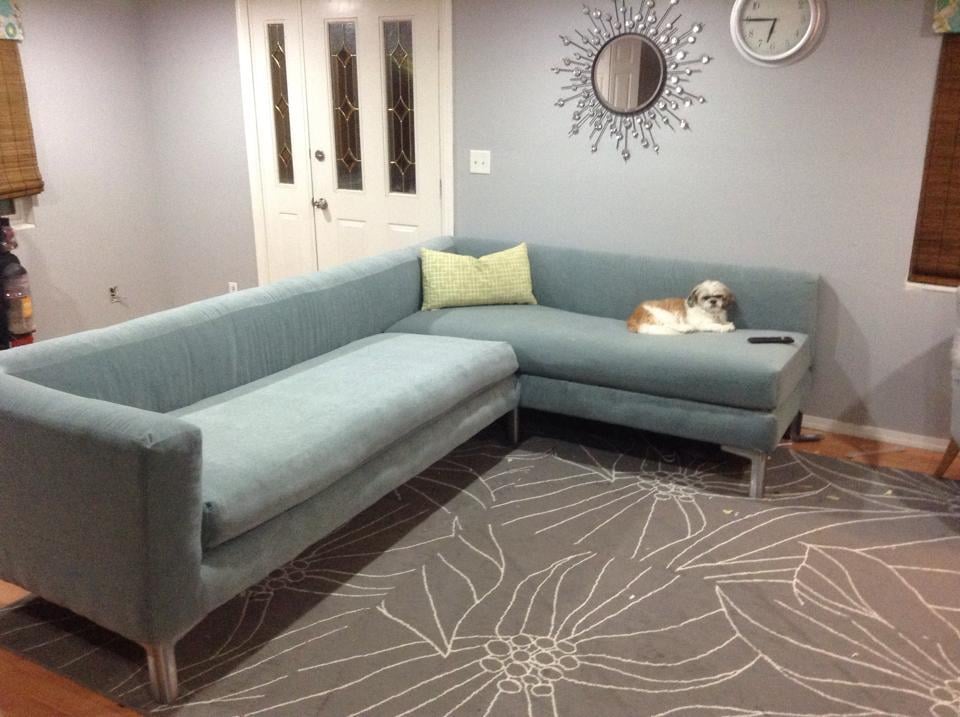
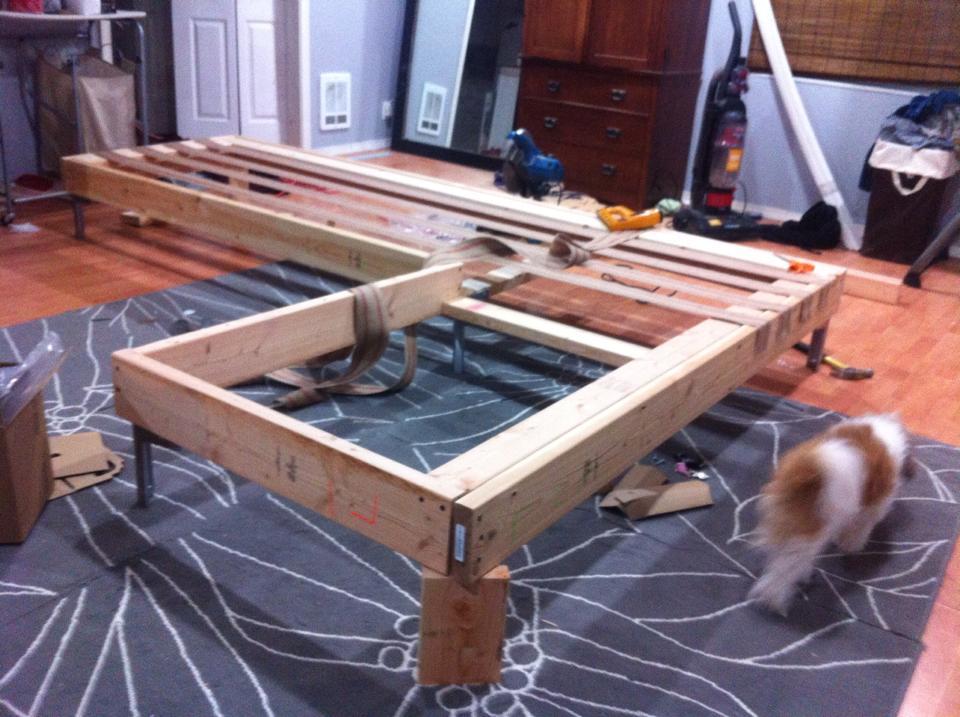
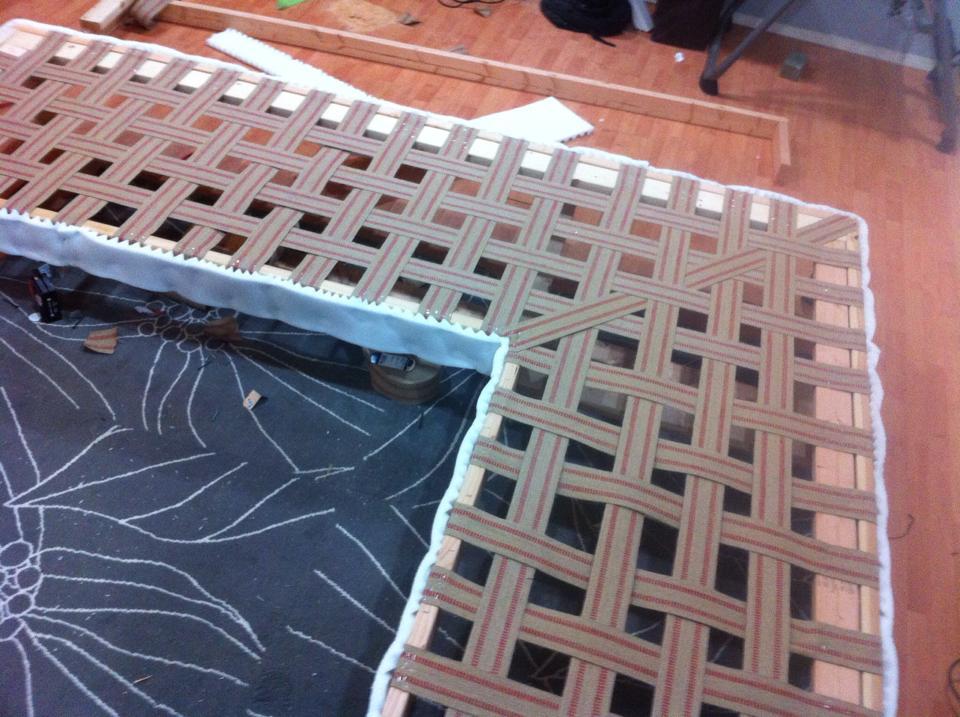
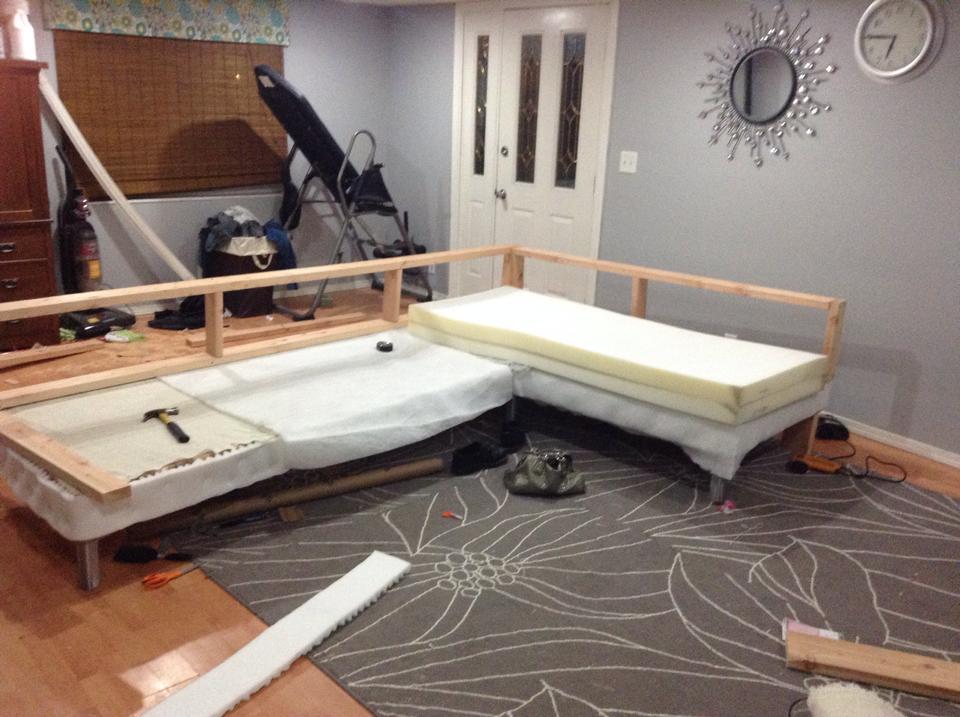
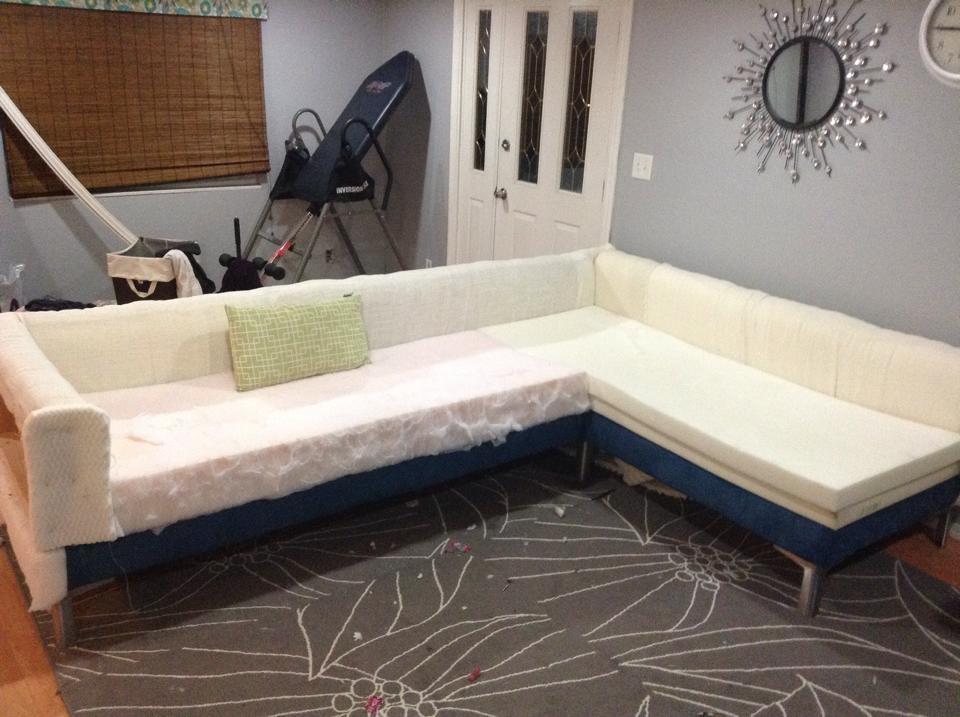
I looked all around my town for a sofa that meet my needs. I wanted something with tall legs, modern lines and fit my living room. I did not have $3,000 to buy one online so I said to myself why not???
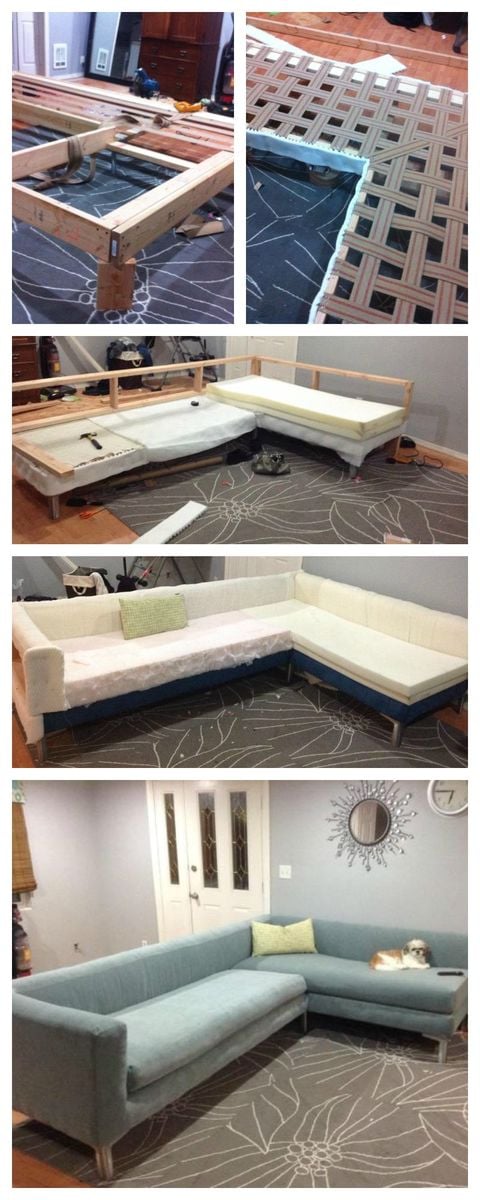

Sat, 07/25/2015 - 12:28
You are my hero ! Your modern diy sectional is amazing, love the blue fabric! Thank you so much for sharing! Ana
Mon, 08/03/2015 - 14:52
I've been looking for plans for a big sectional this would be perfect!
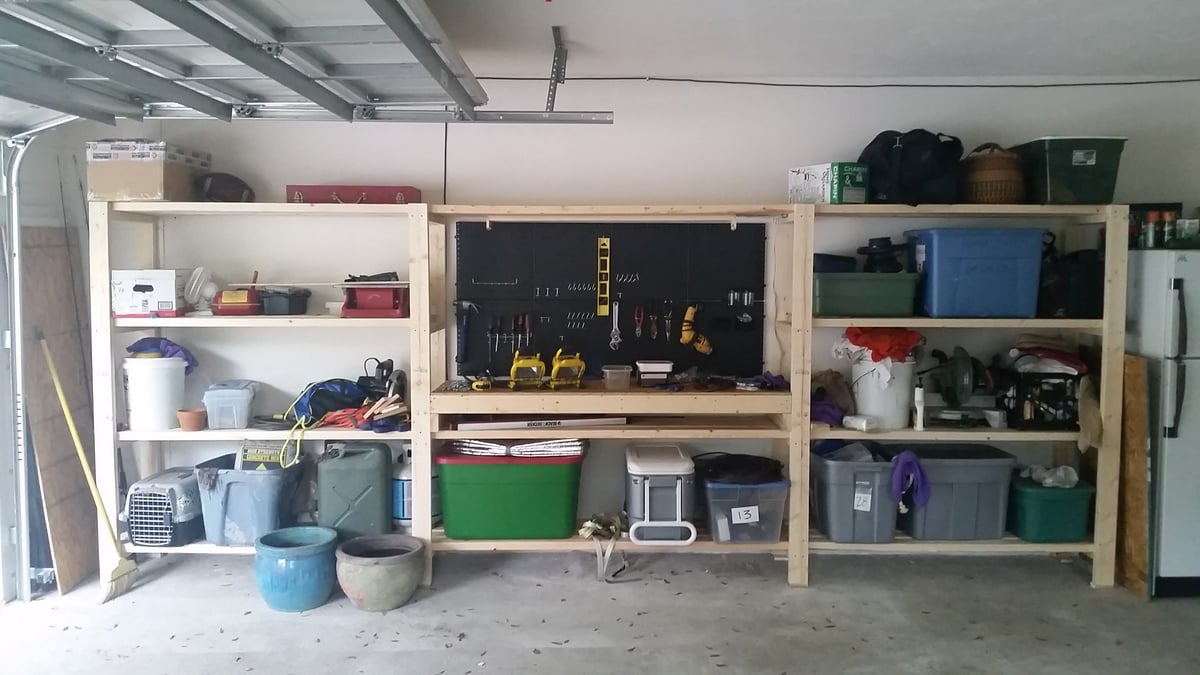
Great plans allow for versatility and easy customization. Put the whole thing together in a day w/ one other person. My set up is 16' long - 5' on the side shelves and 6' for the workbench. Added a pegboard and fluorescent light under the top middle shelves. I'm also designing a slim drawer to go under the workbencheck area. Thanks a bunch!
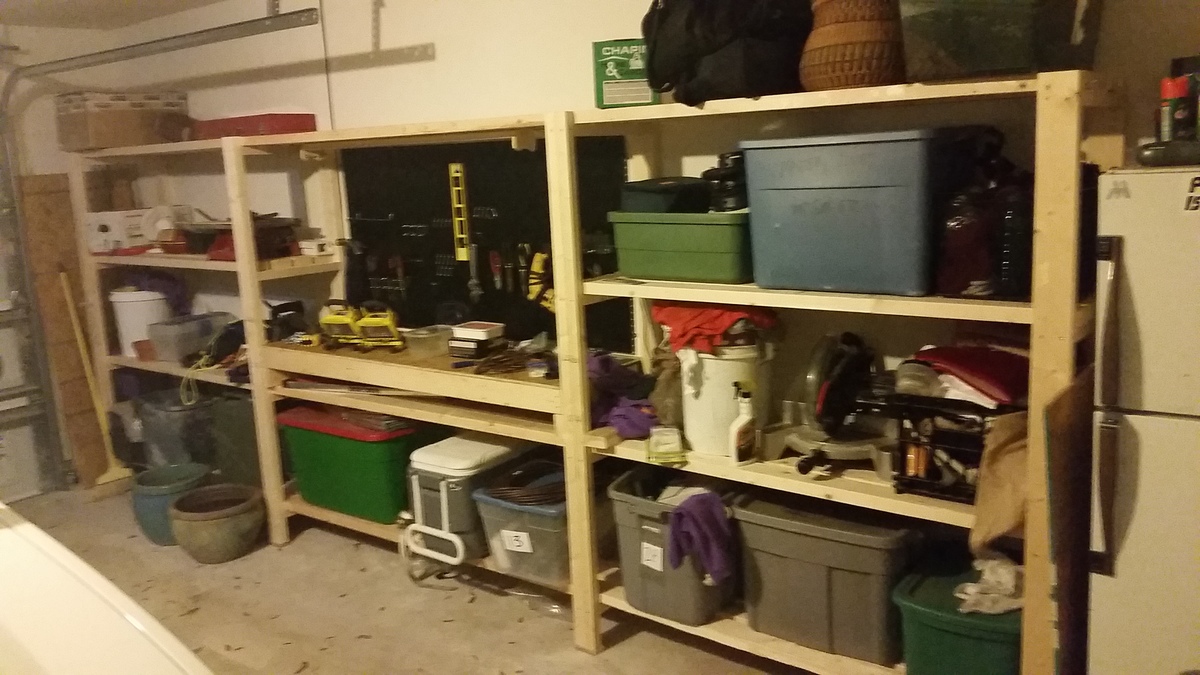
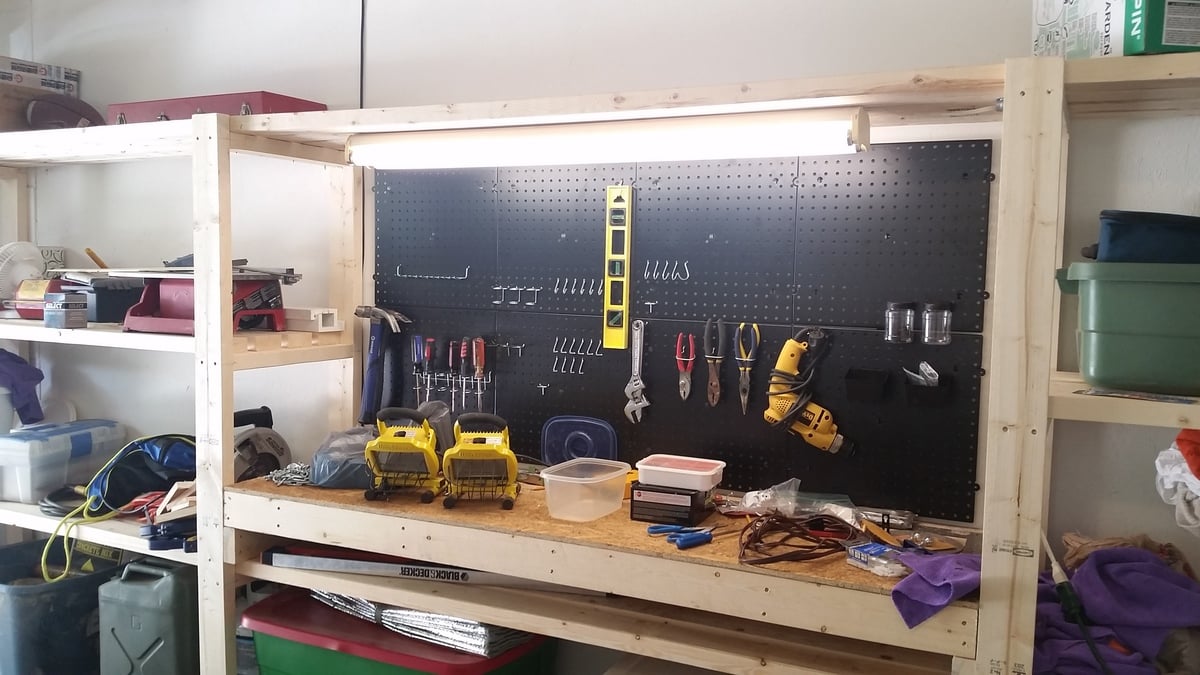

Used part of the Ultimate Roll Away Workbench with Miter Saw Stand to just build one of the roll-away workbenches to work with my miter saw and table saw. I'm very happy with how it turned out.


