A Place to Gather
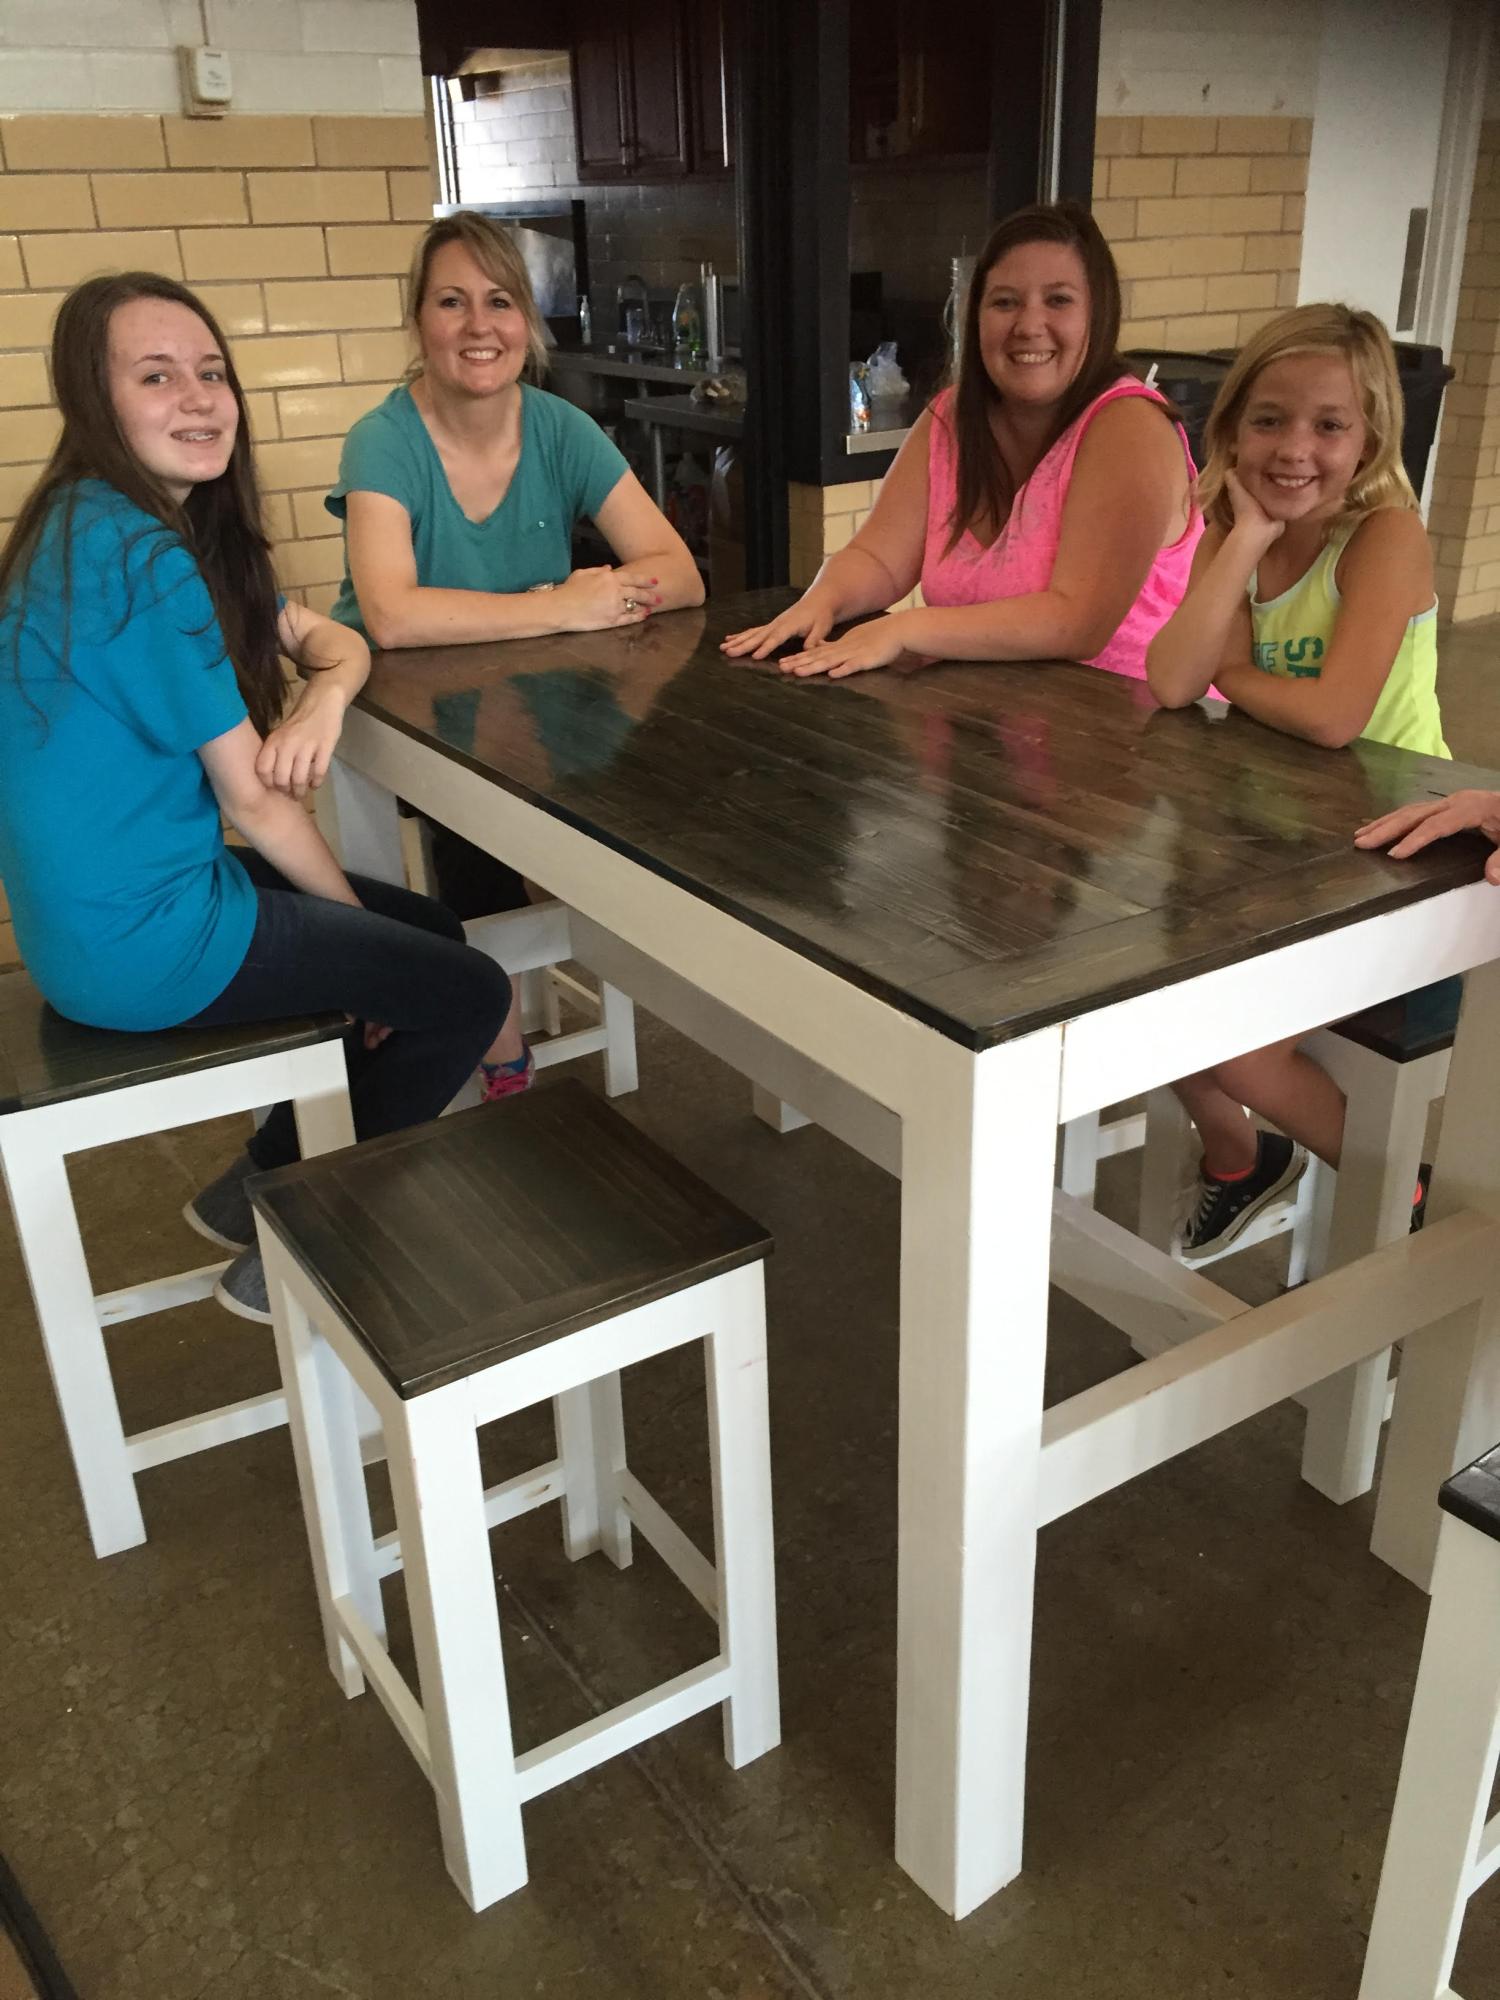
Built this for my daughter and my grandkids. Love your site. Have built many projects from your plans.
by Donny
Built from Plan(s)
Built this for my daughter and my grandkids. Love your site. Have built many projects from your plans.
by Donny
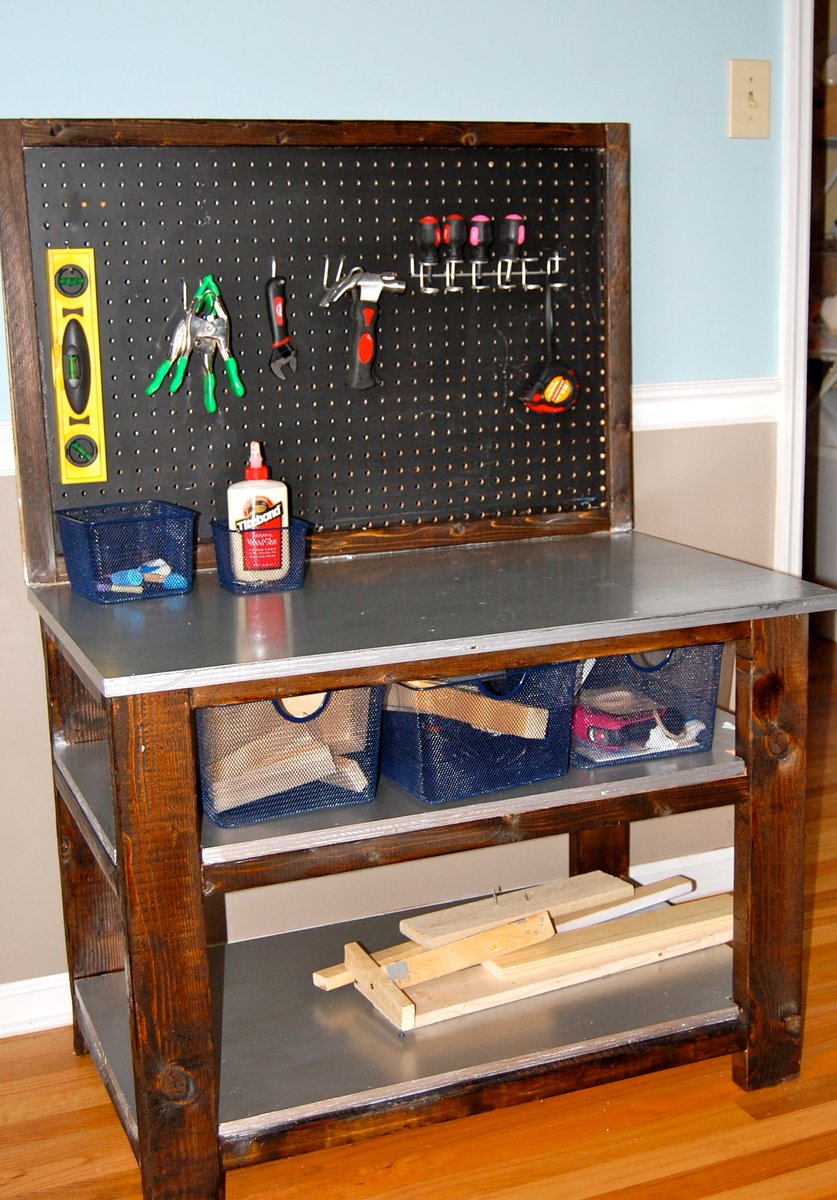
I made this workbench for my son's 5th birthday. It's a bigger style real workbench for kids. He also received real tools for his birthday. I modeled after a one that PBK used to sell.
Sat, 08/06/2011 - 19:50
This is perfect for my little boys, and I really want to build this for my son's birthday in September. I am just learning how to build though so I can't look at a picture and figure out how to build it. Would it be possible for you to send me the measurements and as much information as possible? You did such an amazing job.
Tue, 09/13/2011 - 20:39
Hi,
I would love to make this for my soon-to-be sever year old son, for his birthday. I'm a total novice where building something like this is concerned; any chance you could send me the measurements? Gabe would be so grateful!
Thanks again, and amazing work!
Denise
Tue, 12/06/2011 - 20:10
Desperately need dimensions for this in time for my son's 6th birthday in January. Can anyone help????
Tue, 12/27/2011 - 16:12
This is an awesome workbench!!!! My husband and I would love to make this for my sons seventh birthday. If possible could you please email me the dimensions and details foe this project. I love your work and creativity!! Thanks for the inspiration!!!
Sun, 03/04/2012 - 11:45
My 6 year old is begging me to make this for him,
Can anyone send me the specs or dimentions/ directions?
I think he has more building skills than I do.

Wed, 08/22/2012 - 05:52
Hi. Love your mod using the pegboard. Can you please tell me exactly how you put the frame around it? Did you sandwich between two trim pieces or router in a grove for it to sit? Thinking of making some of these in the smaller size for a craft show so any tidbits to make it go faster would be much appreciated!
Fri, 05/24/2013 - 07:48
I would love the plan details for this workbench.
Are they available some where on your site?
Thanks!
Tue, 05/28/2013 - 07:24
I would love to make this for my son for his birthday. He would be thrilled! Could you please send me the plans/dimensions?
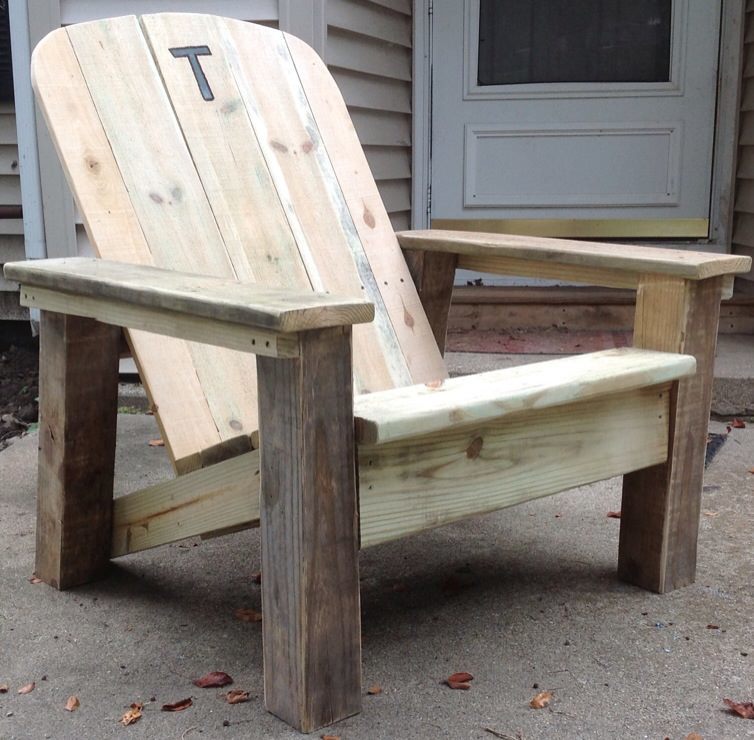
For my brother's 35th birthday, I helped him build a fence and side deck on his house. Using the leftover lumber scraps and screws, I adapted the DIH Adirondack chair plans to build this for him. He wanted a big, sturdy chair with a wide arm rest that looks "rustic". I used 4x4 and 2x4 post scraps, deck boards, and fence pickets. I also widened the seat just a bit for comfort. This is definitely the perfect chair for him!

Thu, 08/08/2013 - 14:47
This chair is wonderful!!! I love the mods - really something special! Thanks for doing this project and sharing! Ana
Fri, 08/09/2013 - 14:38
Thanks! I always enjoy building with your plans, and it was a bonus that I didn't have to buy anything to build this, since I used leftover materials.
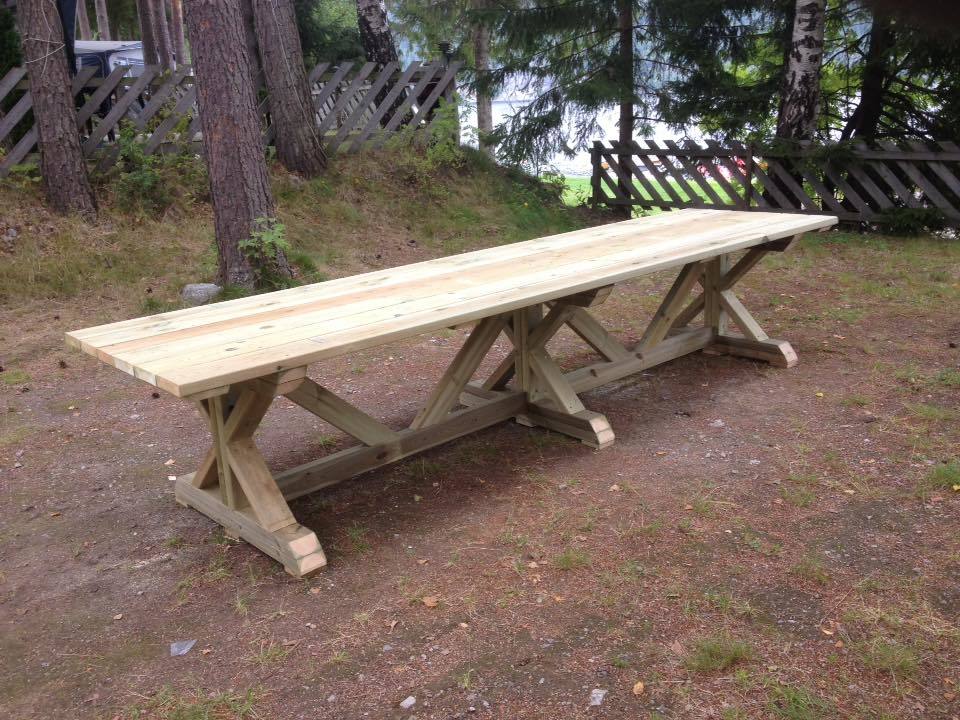
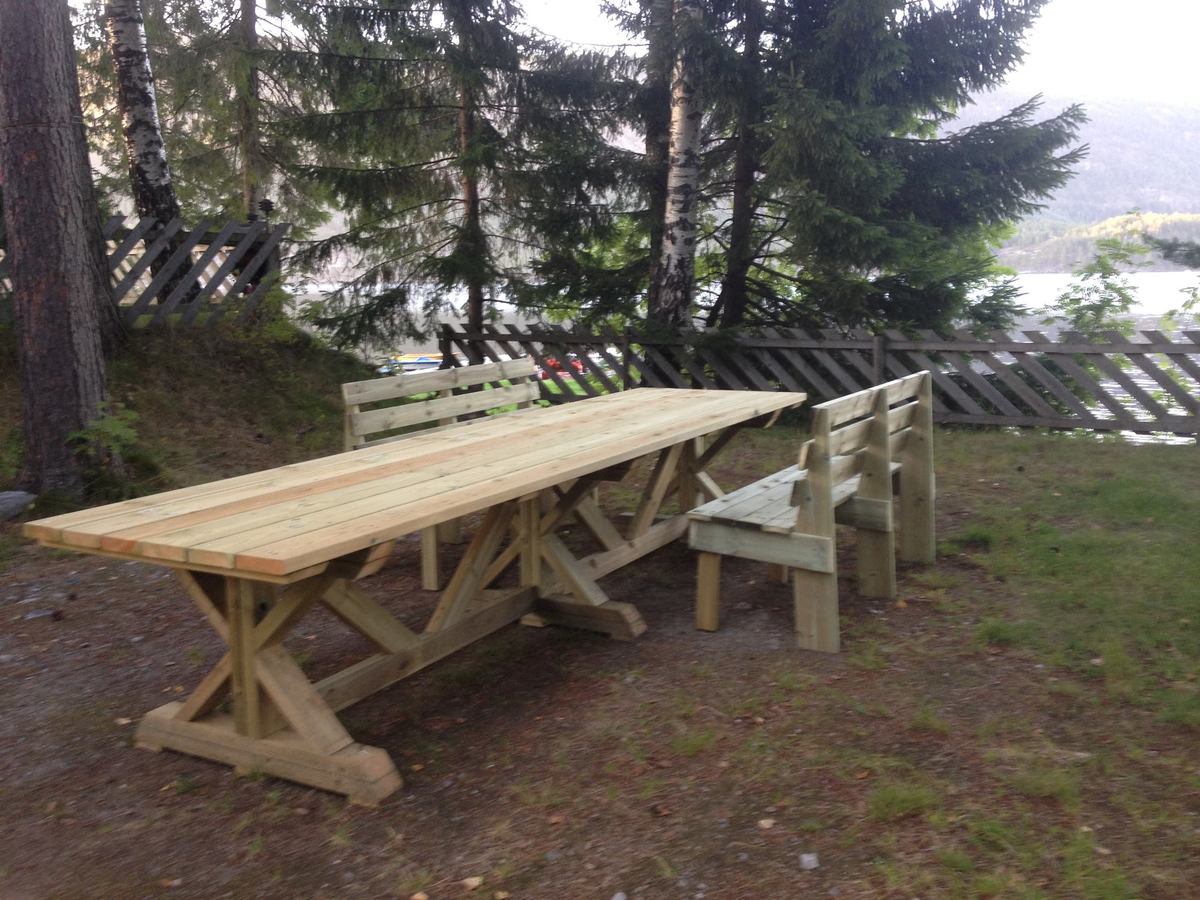
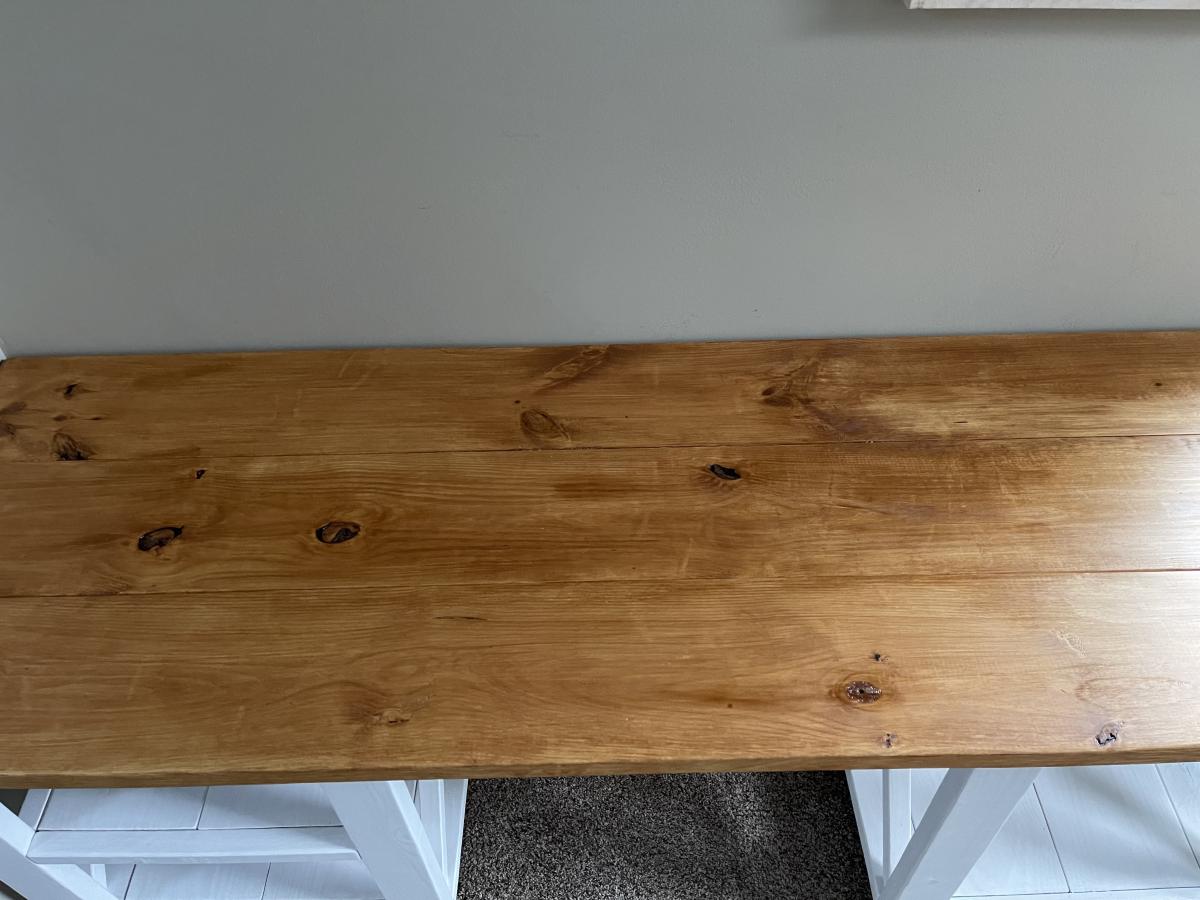
I found the plans for a farmhouse table here on Ana White`s and decided that this would be a great design an real outdoor table.The table seats 12 people and I also made four benches to go with it. The reason I made four benches is that it is easyer when someone needs to get up and leave the table. Under the feet I mounted small blocks of wood since the table will be standing directly on the ground. This way the rainwater will pass under the feet and if necessary these blocks are easy to change. The feet and the supports are made with 2X4" and the tabletop is made with 1,5X6" all in pressuretreated pine. Pressuretreated pine workes well outdoor in the nordic climate here in Norway and is cheap and widly awailable.
Greatings from Norway
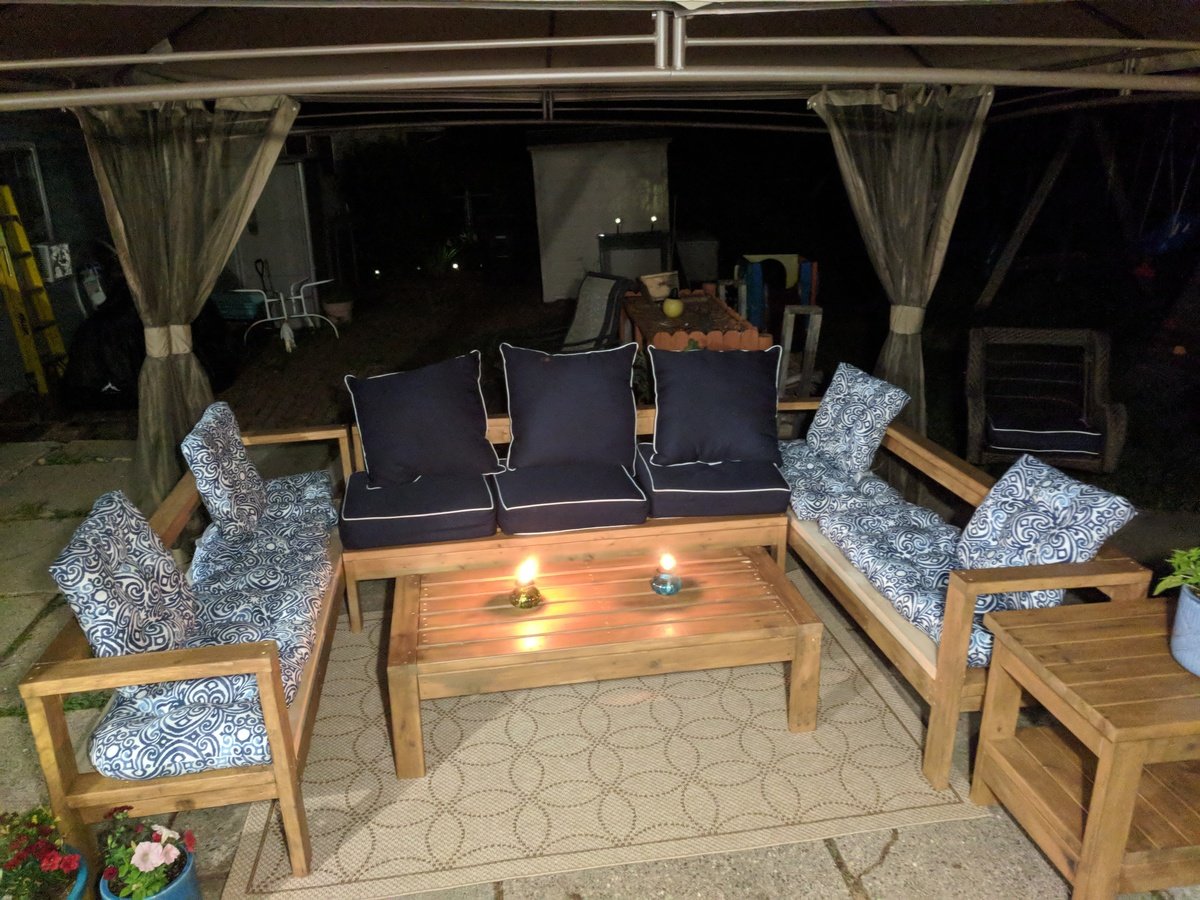
Built a new outdoor furniture set using the following plans:
Ryobi Outdoor Couch (linked to in the One Arm Outdoor Sectional plans)
I also built the Tryde End Table with Shelf & 2 of the Modern Outdoor Chair from 2x4s and 2x6s, but they will be in a seperate brag post since I can only link 3 sets of plans per post.
I built the armless middle sectional piece exactly to plan, to fit 25x25 outdoor cushions. The bench is a little deep for sitting, but great for laying out. The 2 side pieces I shallowed to fit 19" cushions, since they are cheaper and easier to find and are more naturally sized for sitting. I also added a support board under the back rail, which is missing from the Outdoor Couch plans but is present in the Armless sectional plans and I wanted everything to match. I stained everything with Thompson's water sealing stain, since it was going to be exposed to the elements at all times (though this picture was taken before the staining was completely finished, hence the untouched lumber visible under some of the cushions).
Project took a 3-day weekend. Day 1: measuring and cutting. Day 2: assembly. Day 3: sanding and staining.

Wed, 07/11/2018 - 08:13
Great job on the whole set! I like how you altered the plans to fit your needs - well done!
Love my table, I’m still working on the benches.
by Melonie

This was actually my first build. I had just about had it, went with all three kids, got the wood, and built it while my hubby was at work (24 hr. shifts at the fire station). And yes, that was after I finally Googled, "How to unlock a Dewalt Compound Miter Saw" after 30 minutes of unsuccessful prodding! :-) I'm super happy with how it came out (despite the poor flashy picture)! And it was great "practice" for doing my girl's farmhouse beds.
Sun, 05/20/2012 - 22:18
I think it is beautiful! I love the stain! This was my first build also, I used old red barnwood, but a friend wants me to build her one, so I'm thinking about going with the same finish you used, absolutely gorgeous!
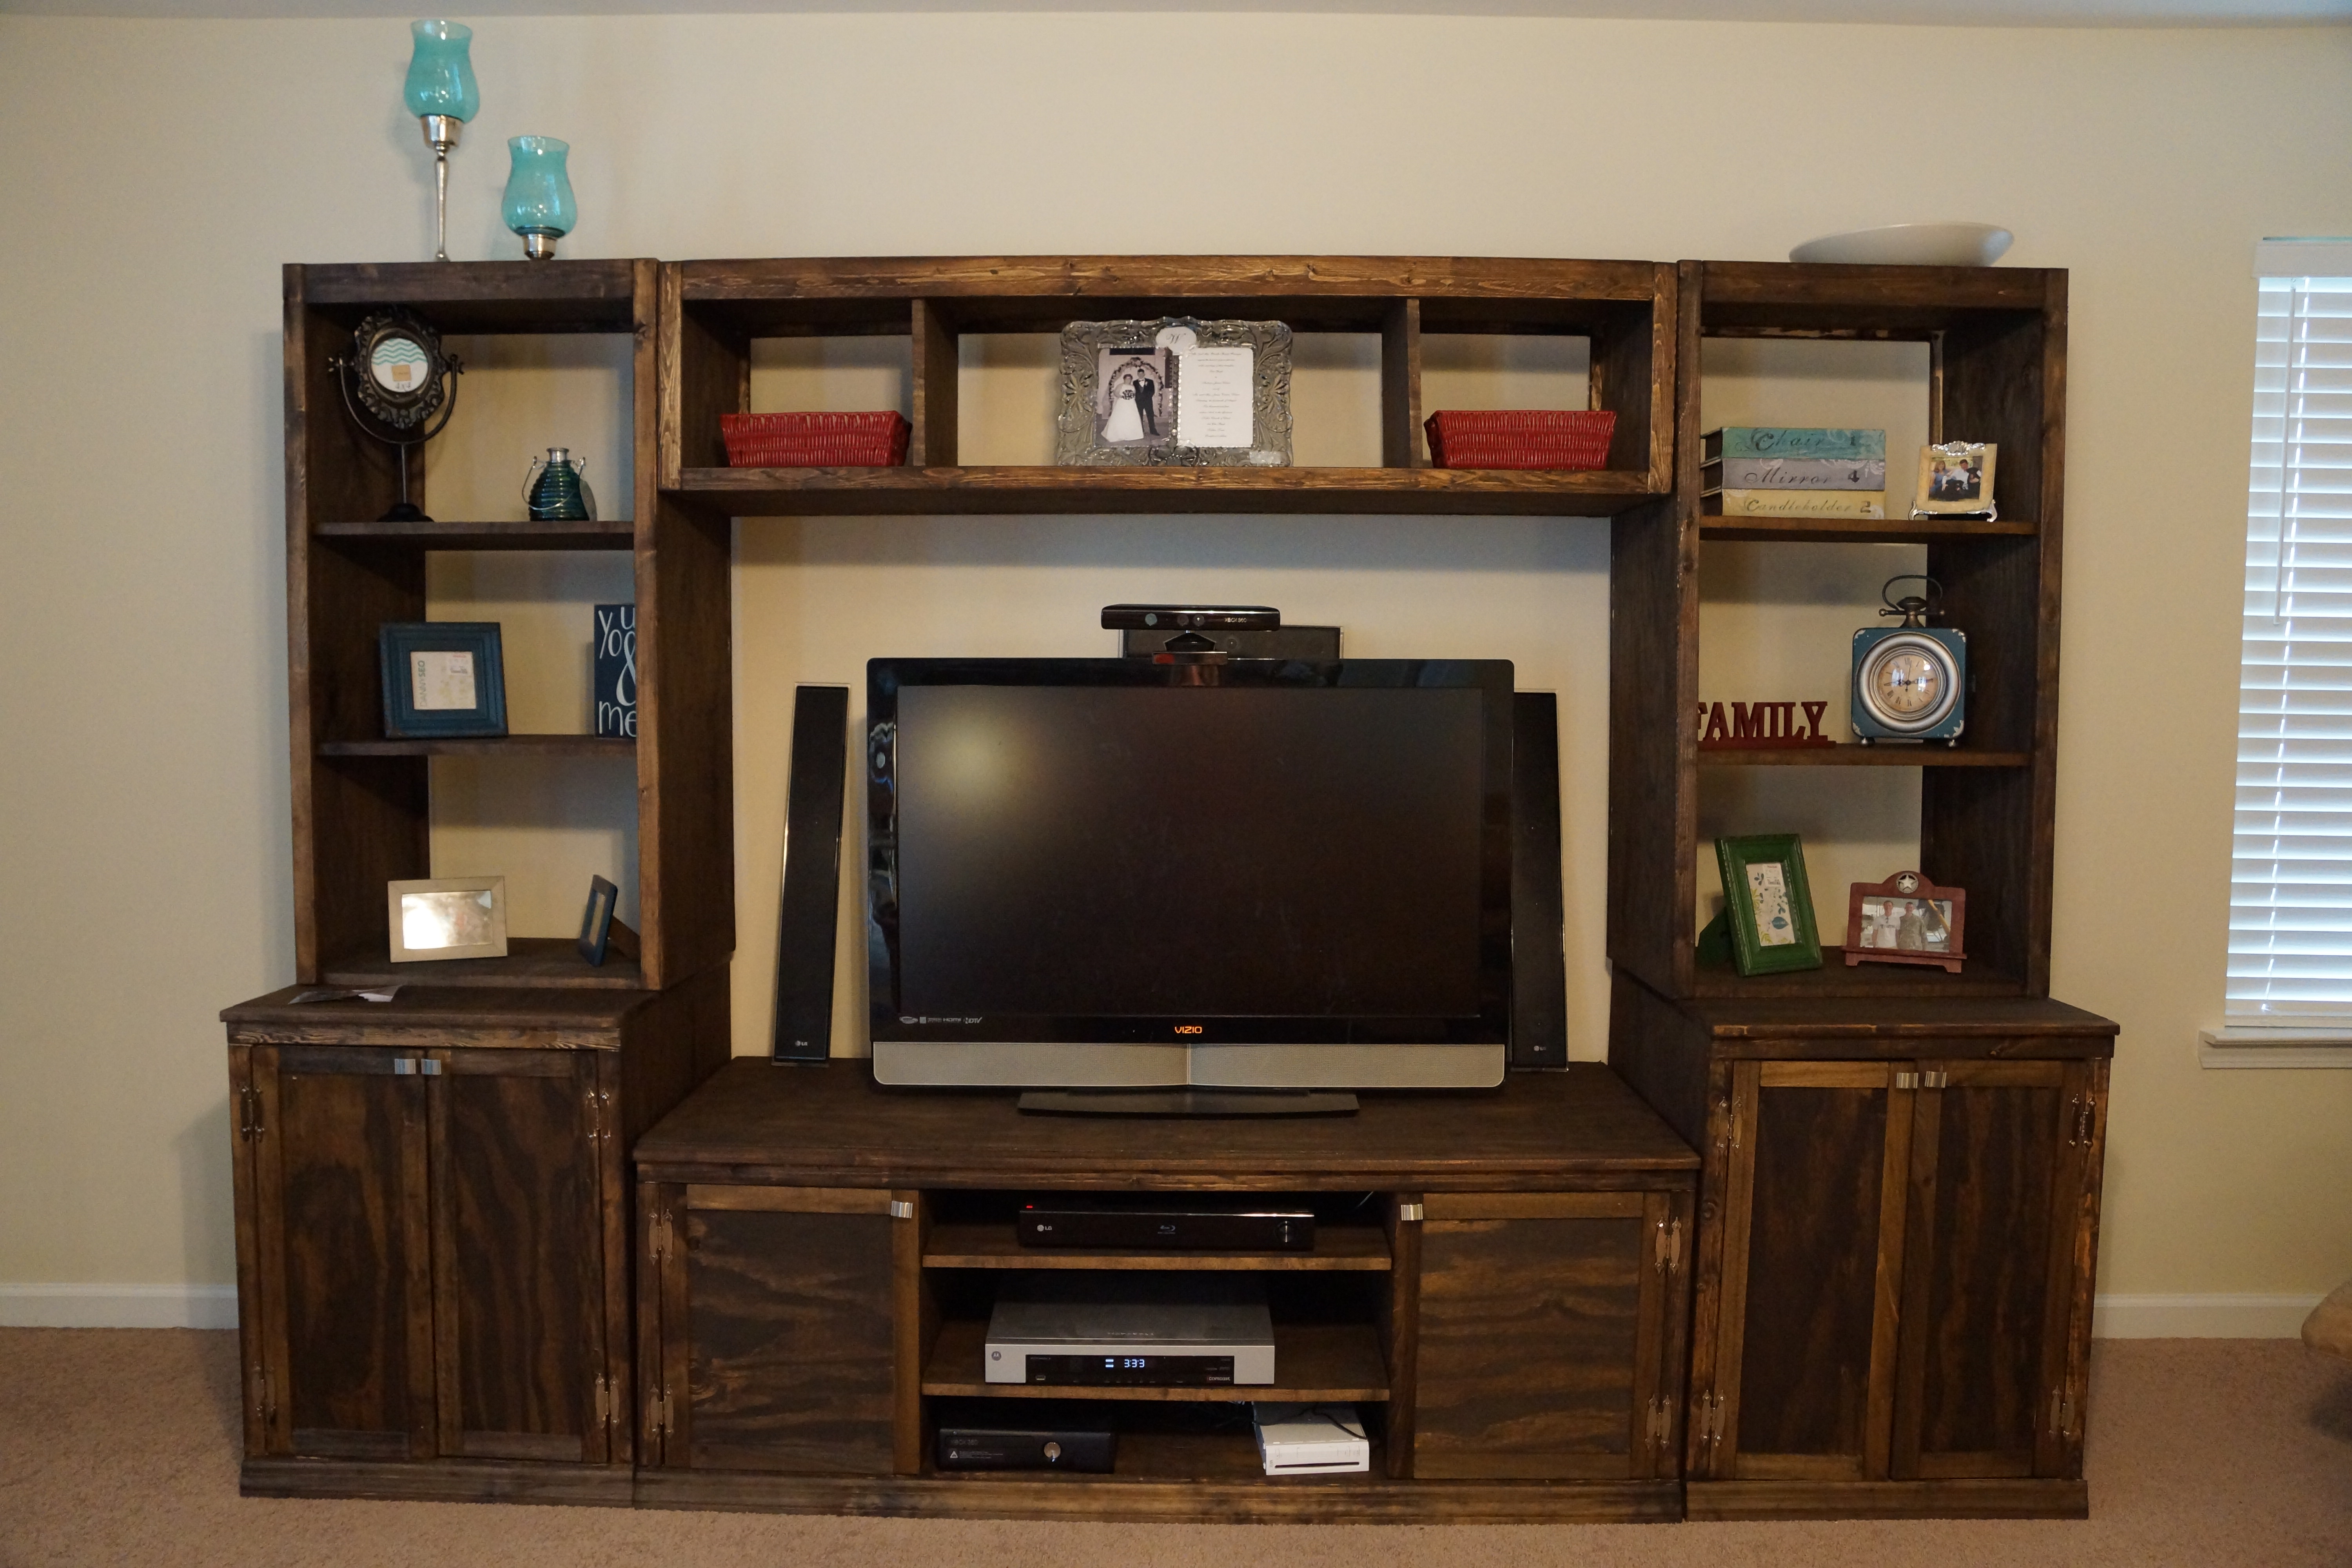
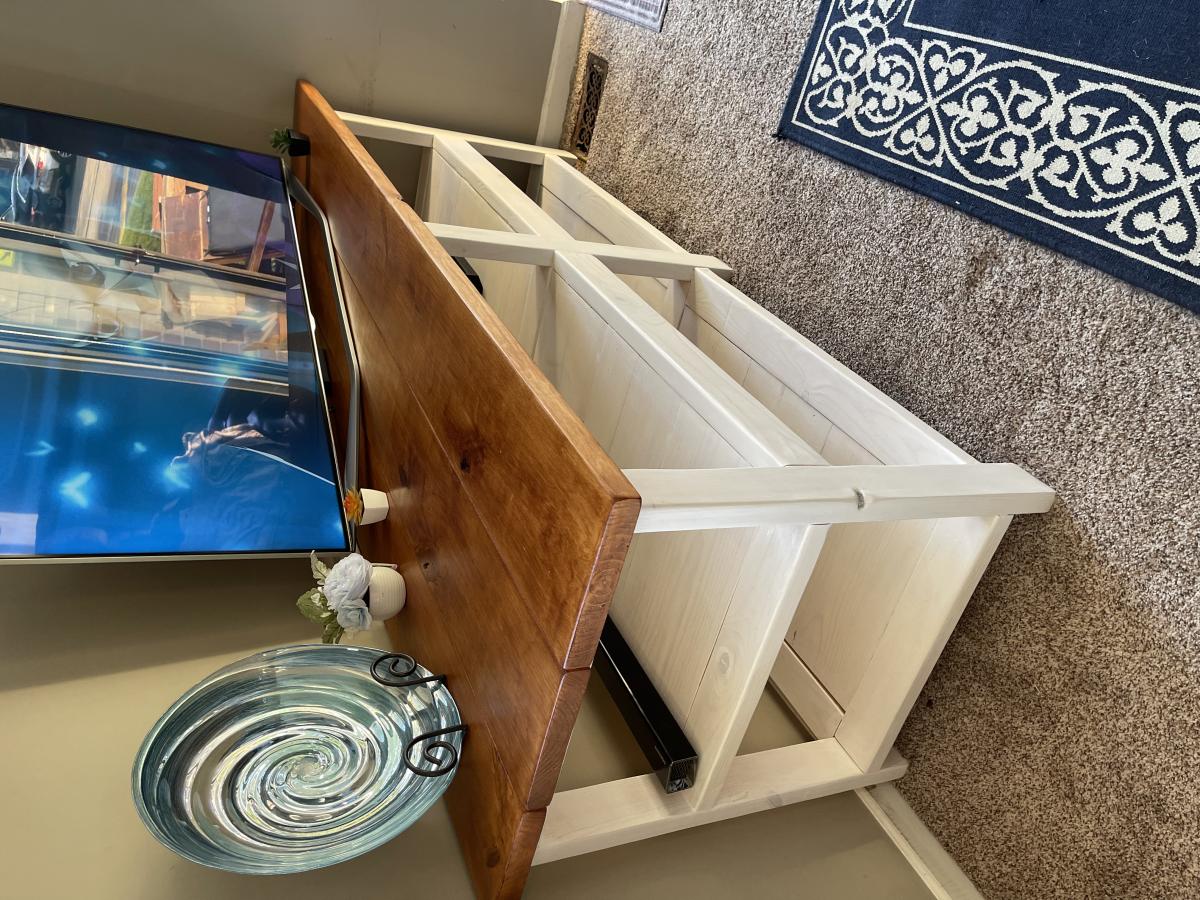
Since moving into our house almost 3 years ago, I have wanted a large piece to house the tv. The husband did not want glass, I wanted shelving on both ends and it had to hold a 60 inch tv (not pictured). To avoid paying thousands of dollars to a furniture store, I decided to build my own.
I used 1x2's, 1x3's, 4x8-3/4" plywood (sanded on one side) edge banding (super easy to use), nail gun and wood glue. I spent roughly a week building and staining, interrupted by 2 kids. The staining being the most tedious part. Cost was around $450 for all the pieces. I did attach the bridge piece by drilling holes through the bridge to the side hutches. I then installed nuts and bolts through the hole to attach it all together. Makes it easy to take apart when moved and I am not constantly drilling screws into the unit.
My husband is deployed so this was built solely by myself. My experience level is novice, this is only my 3rd piece of furniture, but I am hooked. The plans are easy to follow and use.
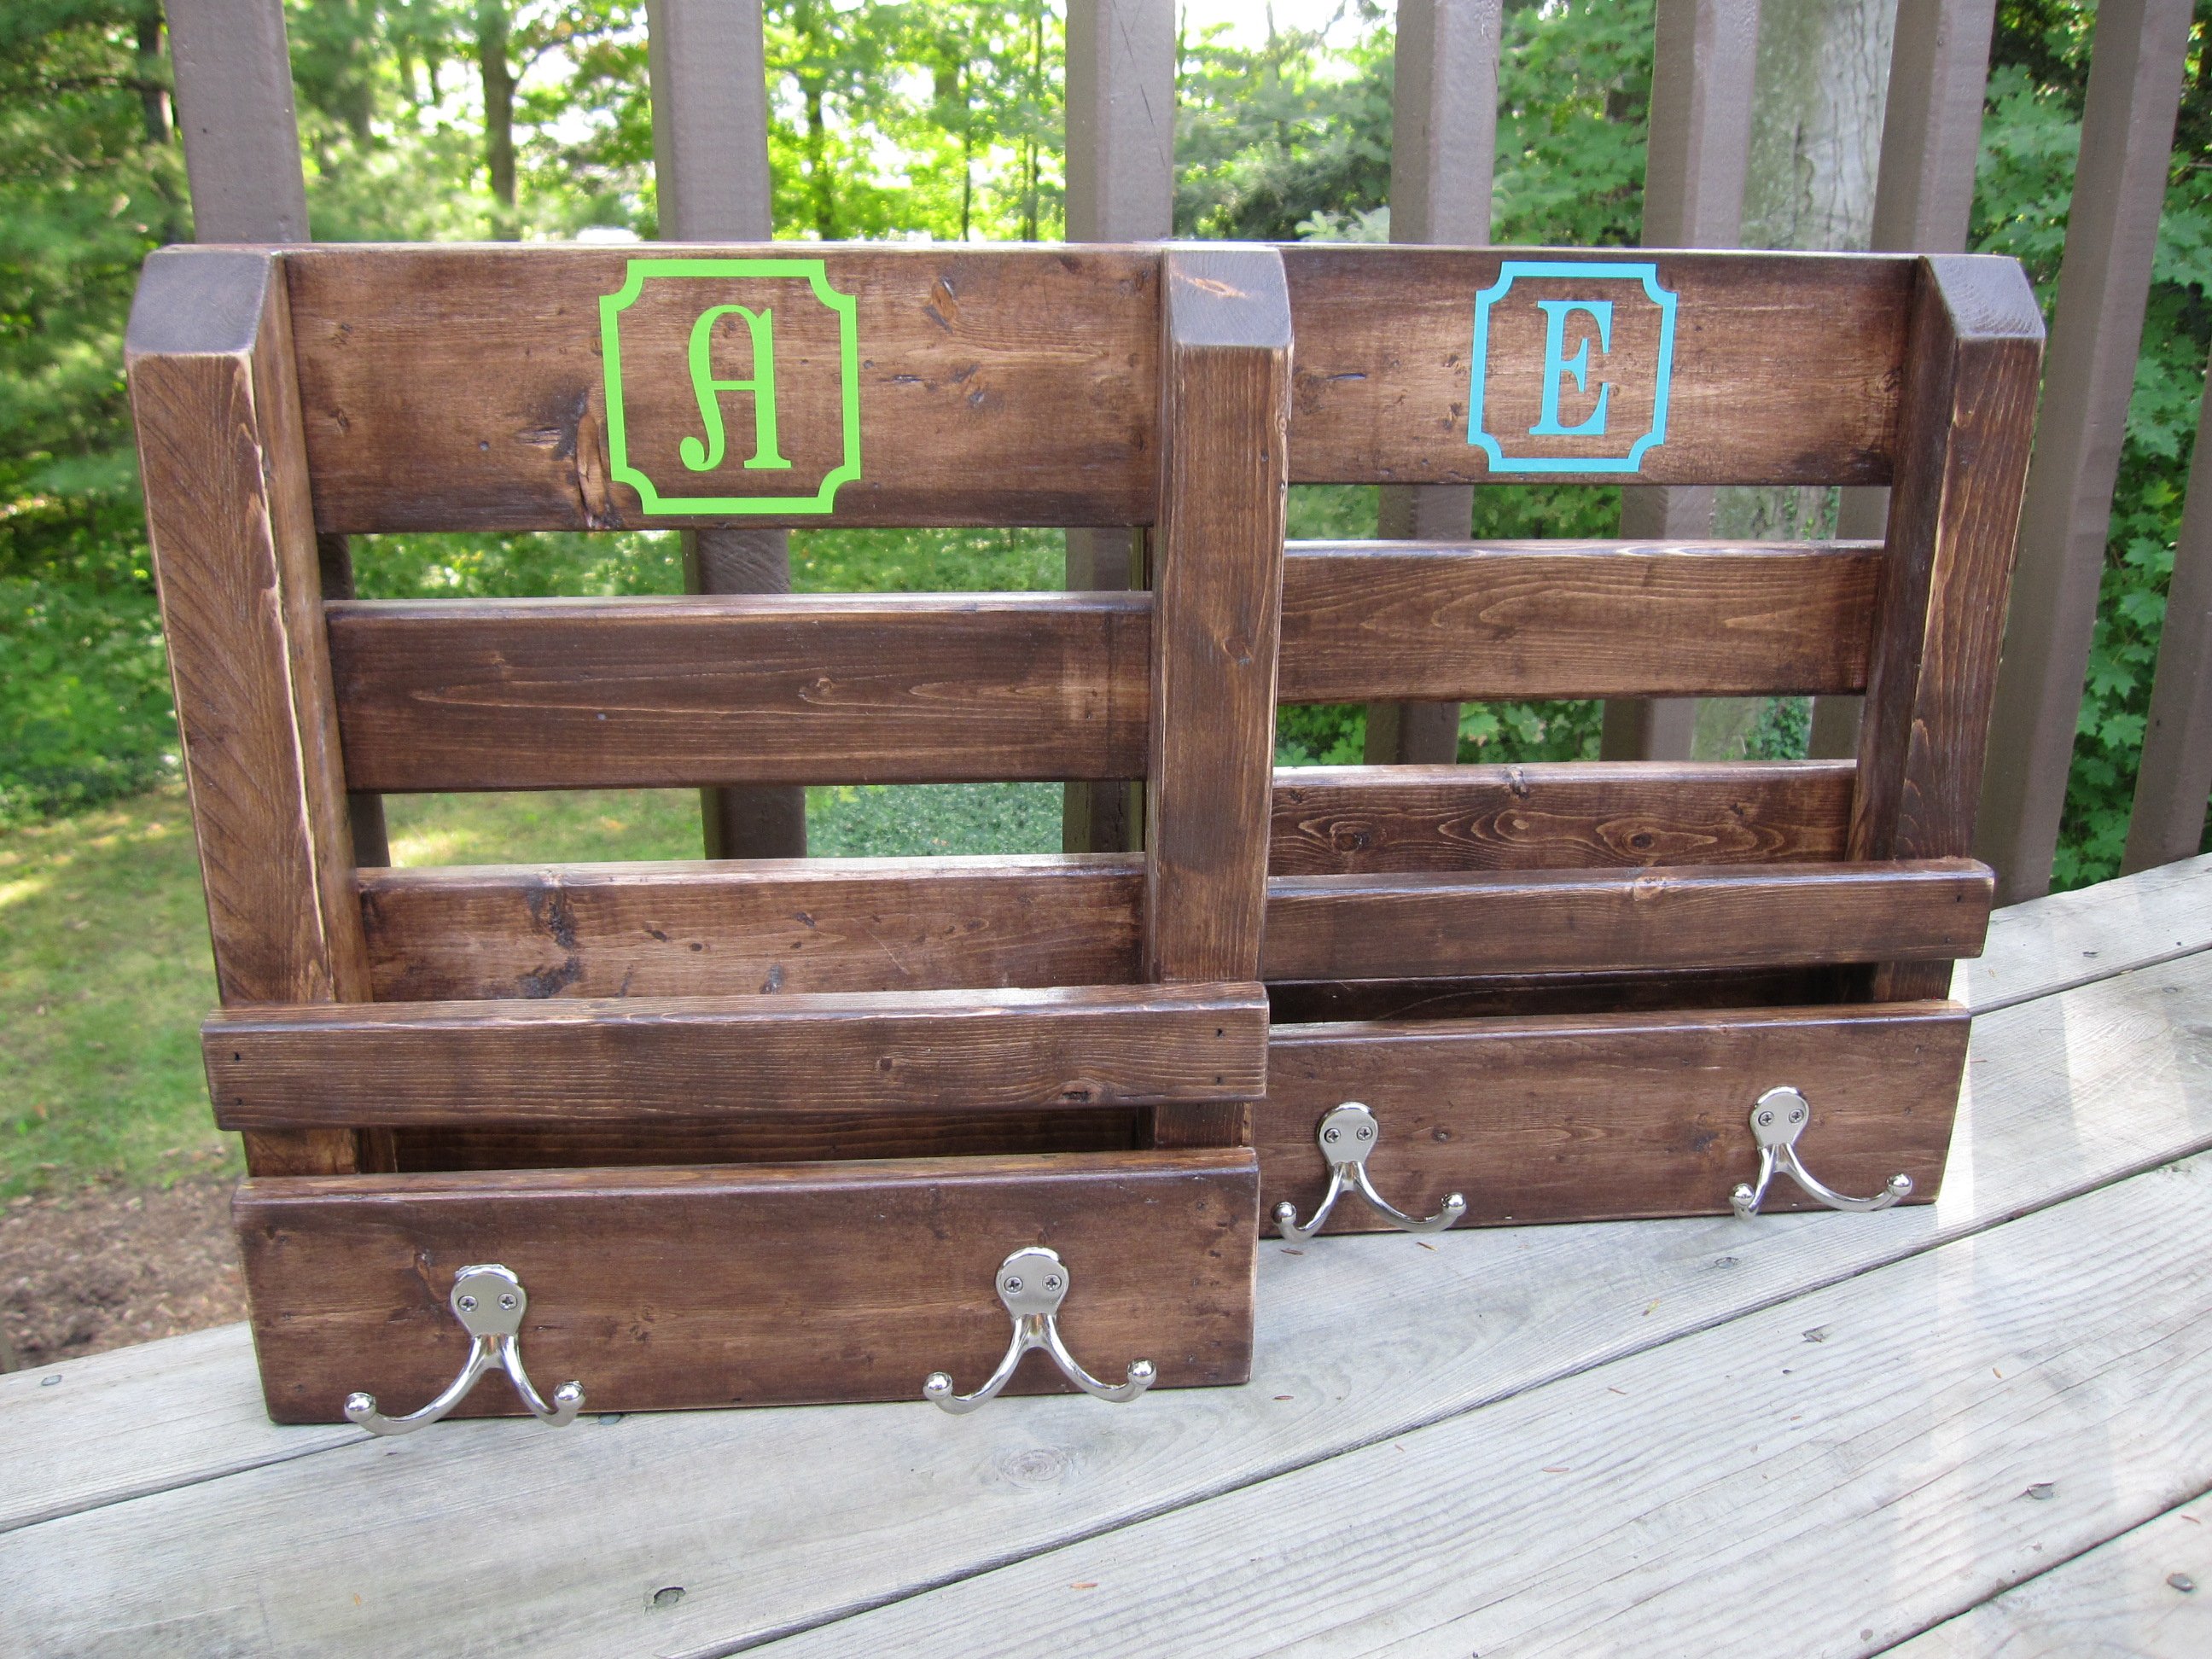
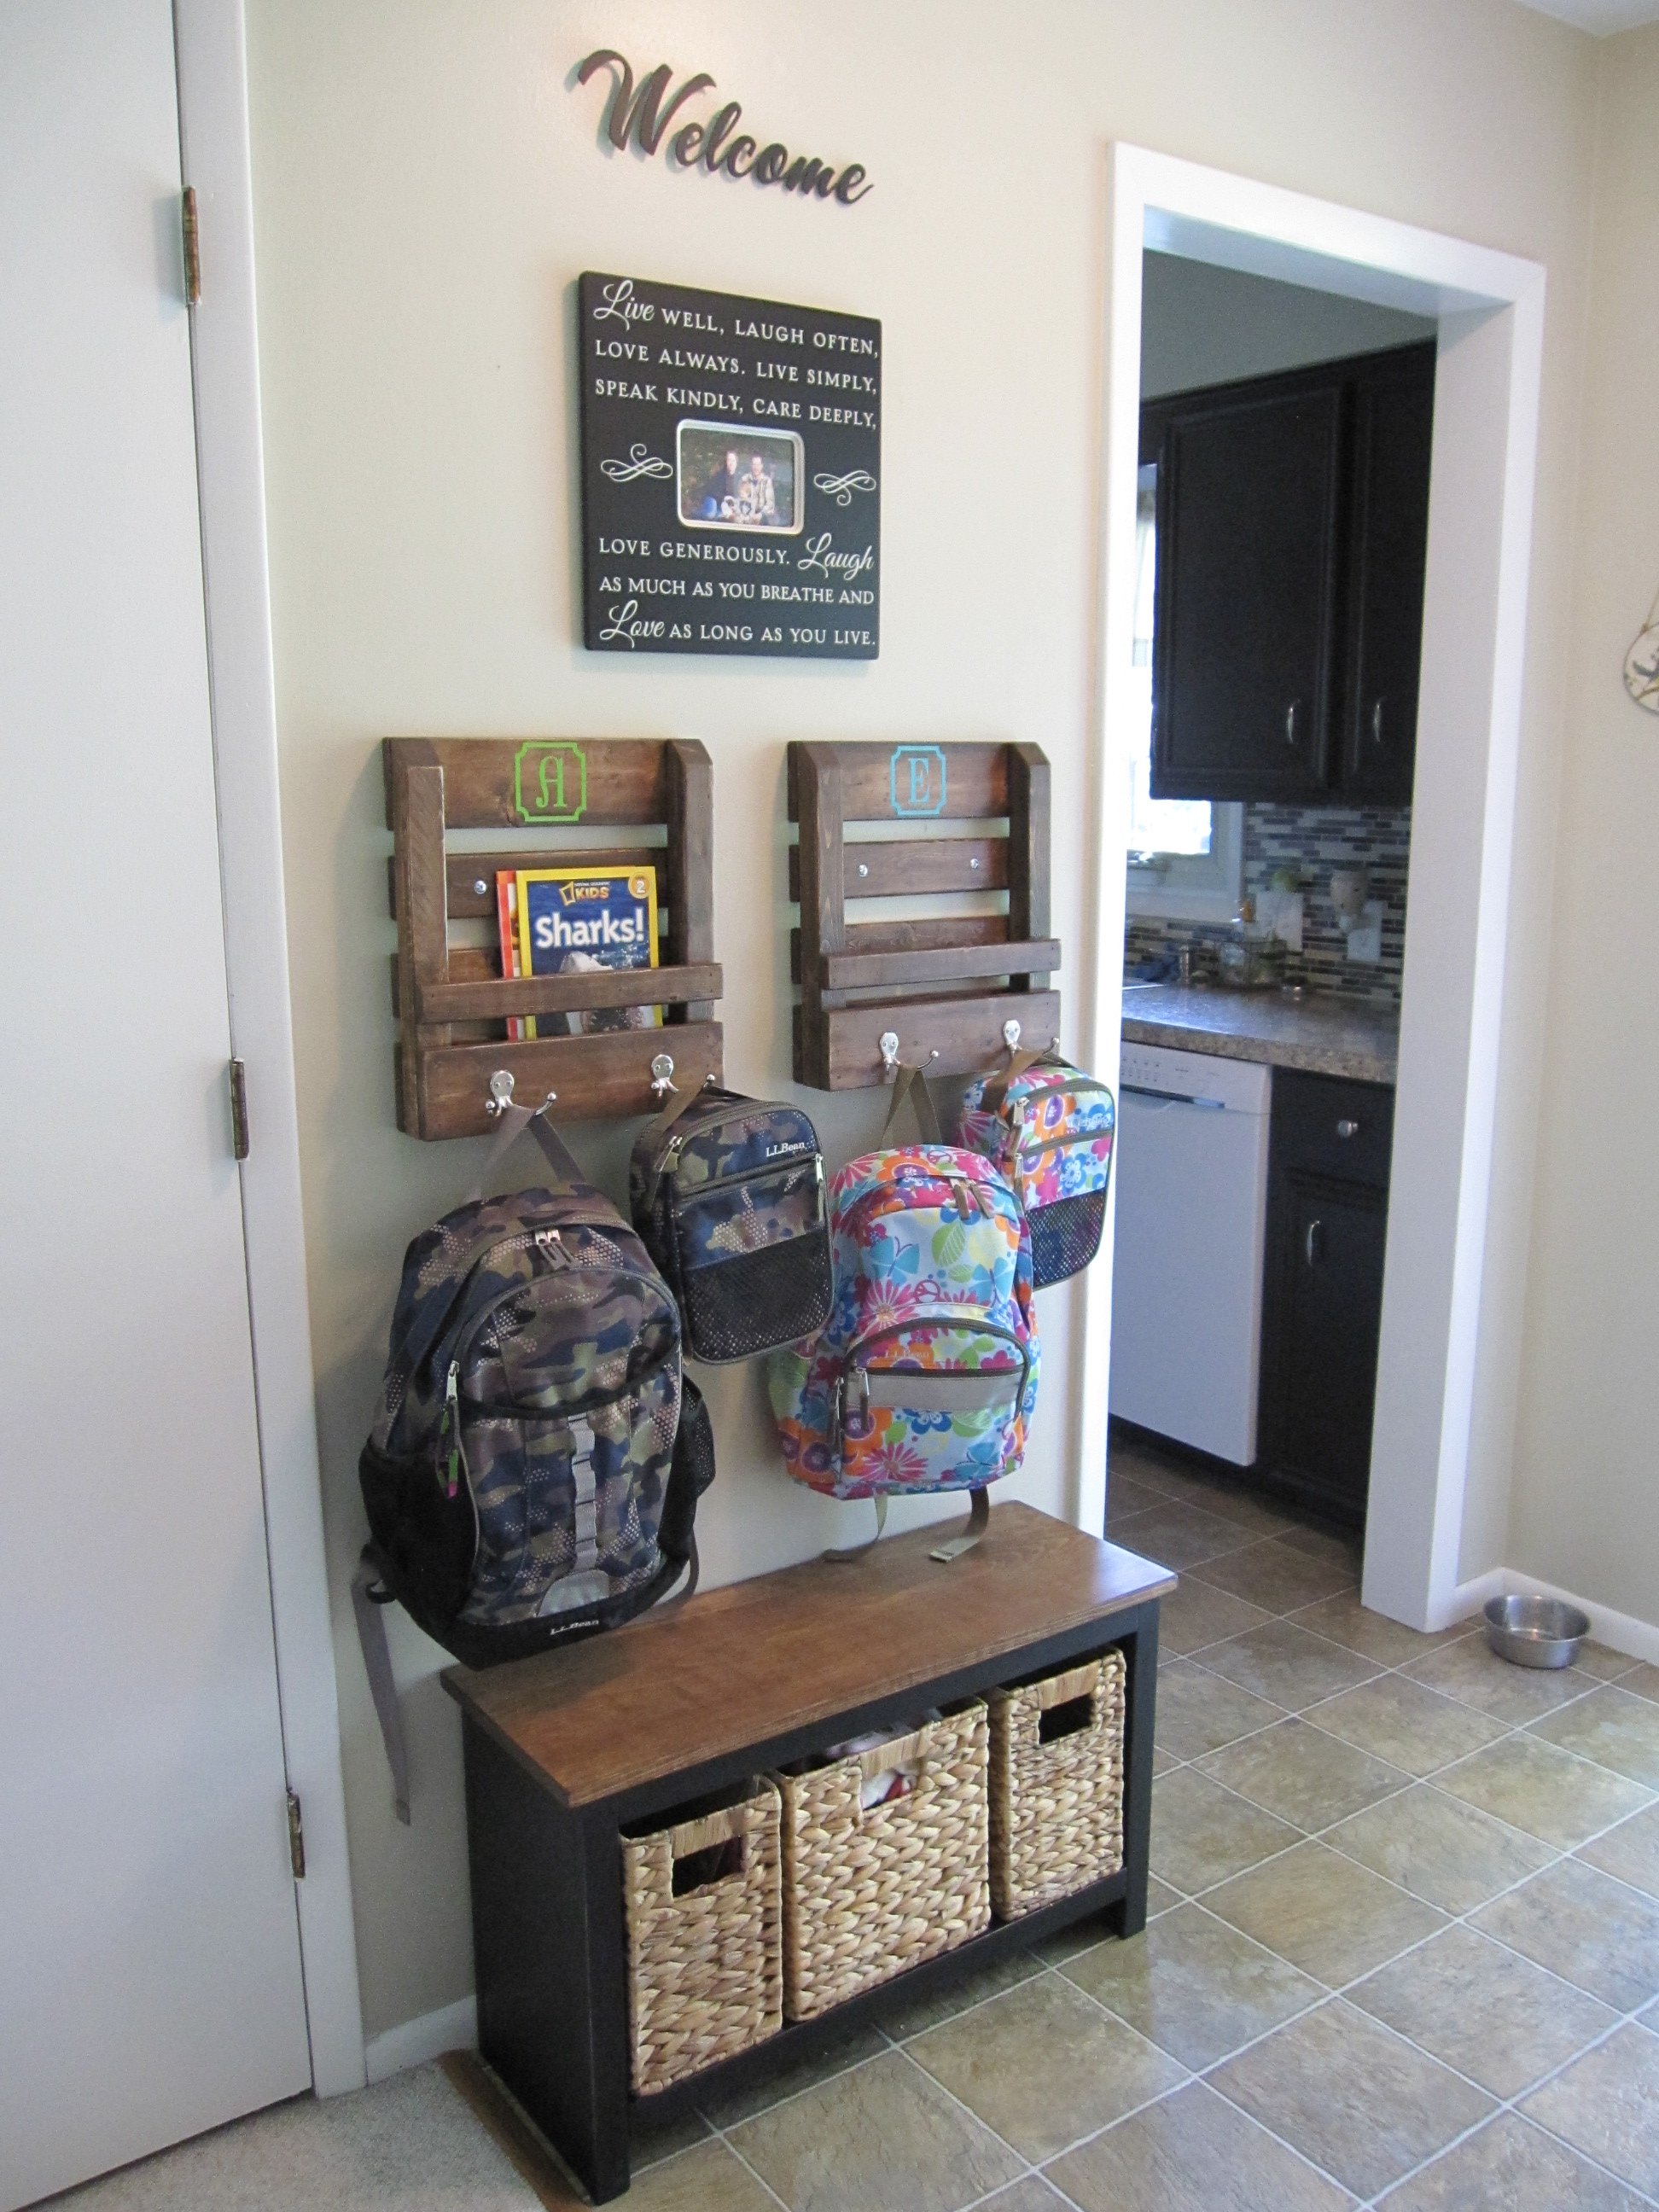
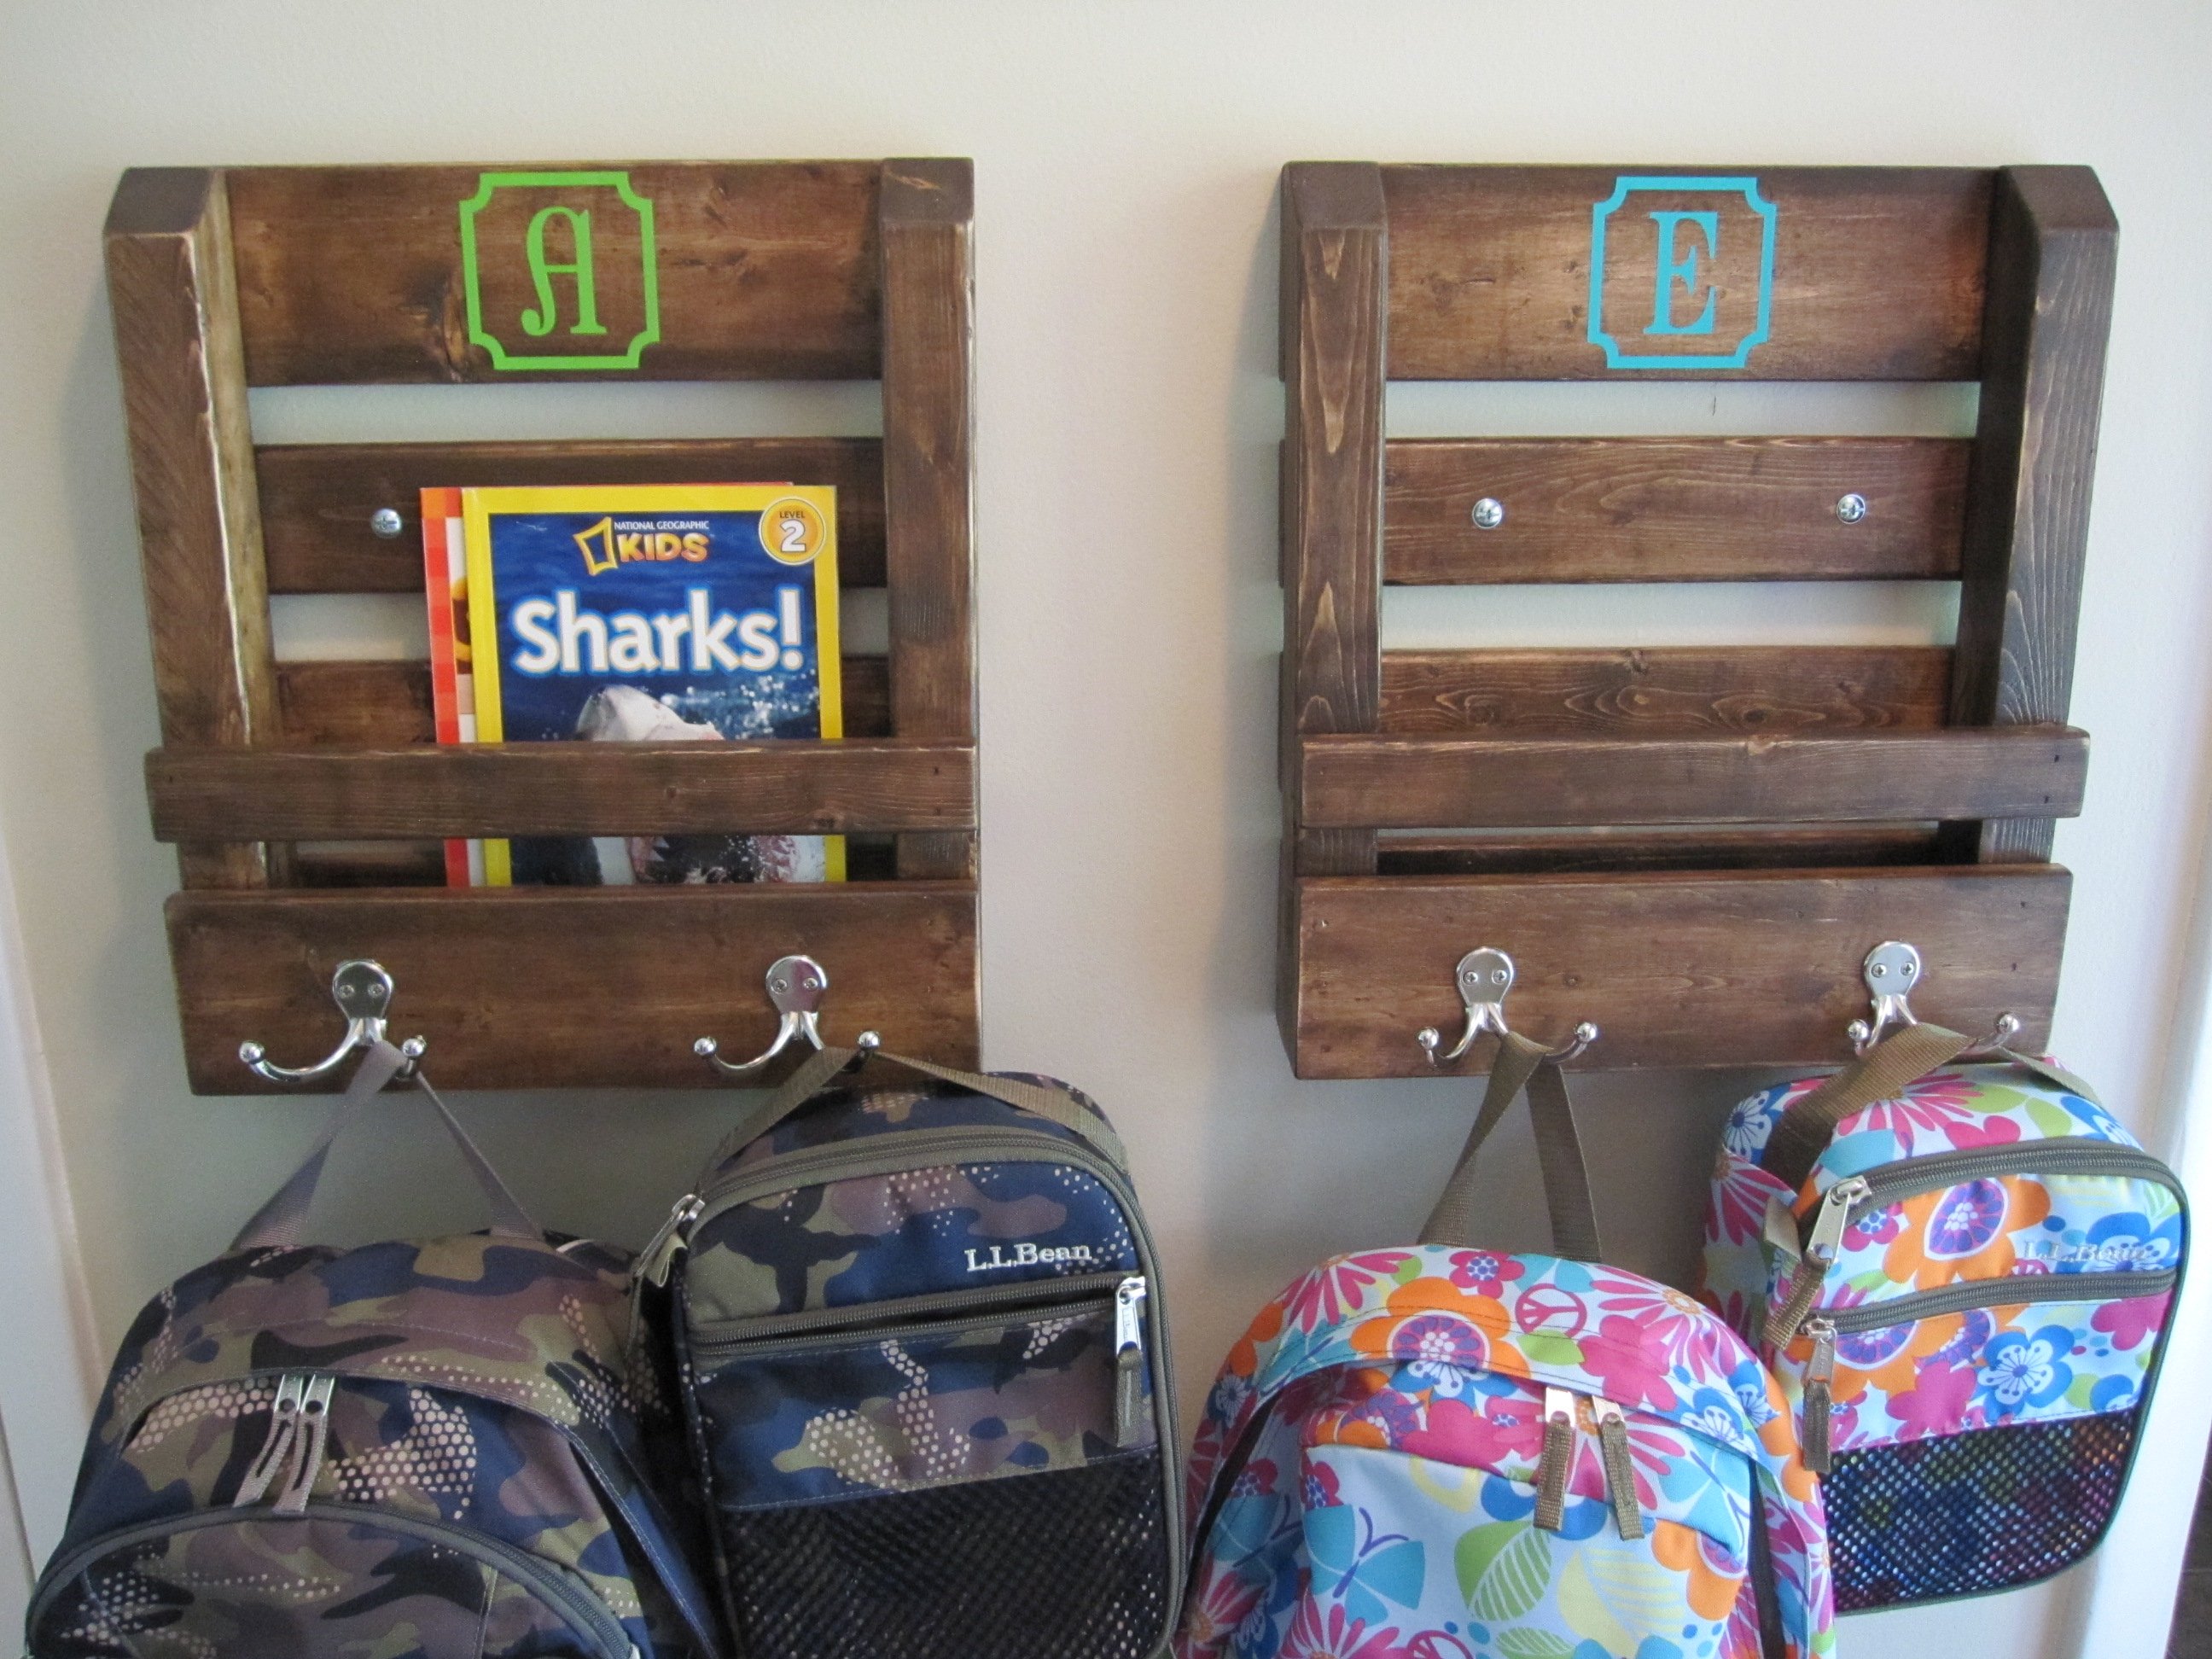
I was just thinking "Where can I put their backpacks and folders this year so we don't lose/forget so many things this year?" Thanks Ana! Modified the plans to make use of my scrap pile. I ordered the vinyls off Etsy from, The Vinyl Things in Life, she custom made them to my dimensions and I love the pop of color! Sorry I can't get better pictures, our entry is tiny.
My 14 year old son wanted a piece of furniture to put under his TV. We made it 20 inches less in length but kept the other dimensions the same as the plans. I made the cuts for him, but he did all of the work putting it together, sanding and staining. He loves the outcome and it only took us about 6-8 hours over the course of two days.
Thanks for the plans!
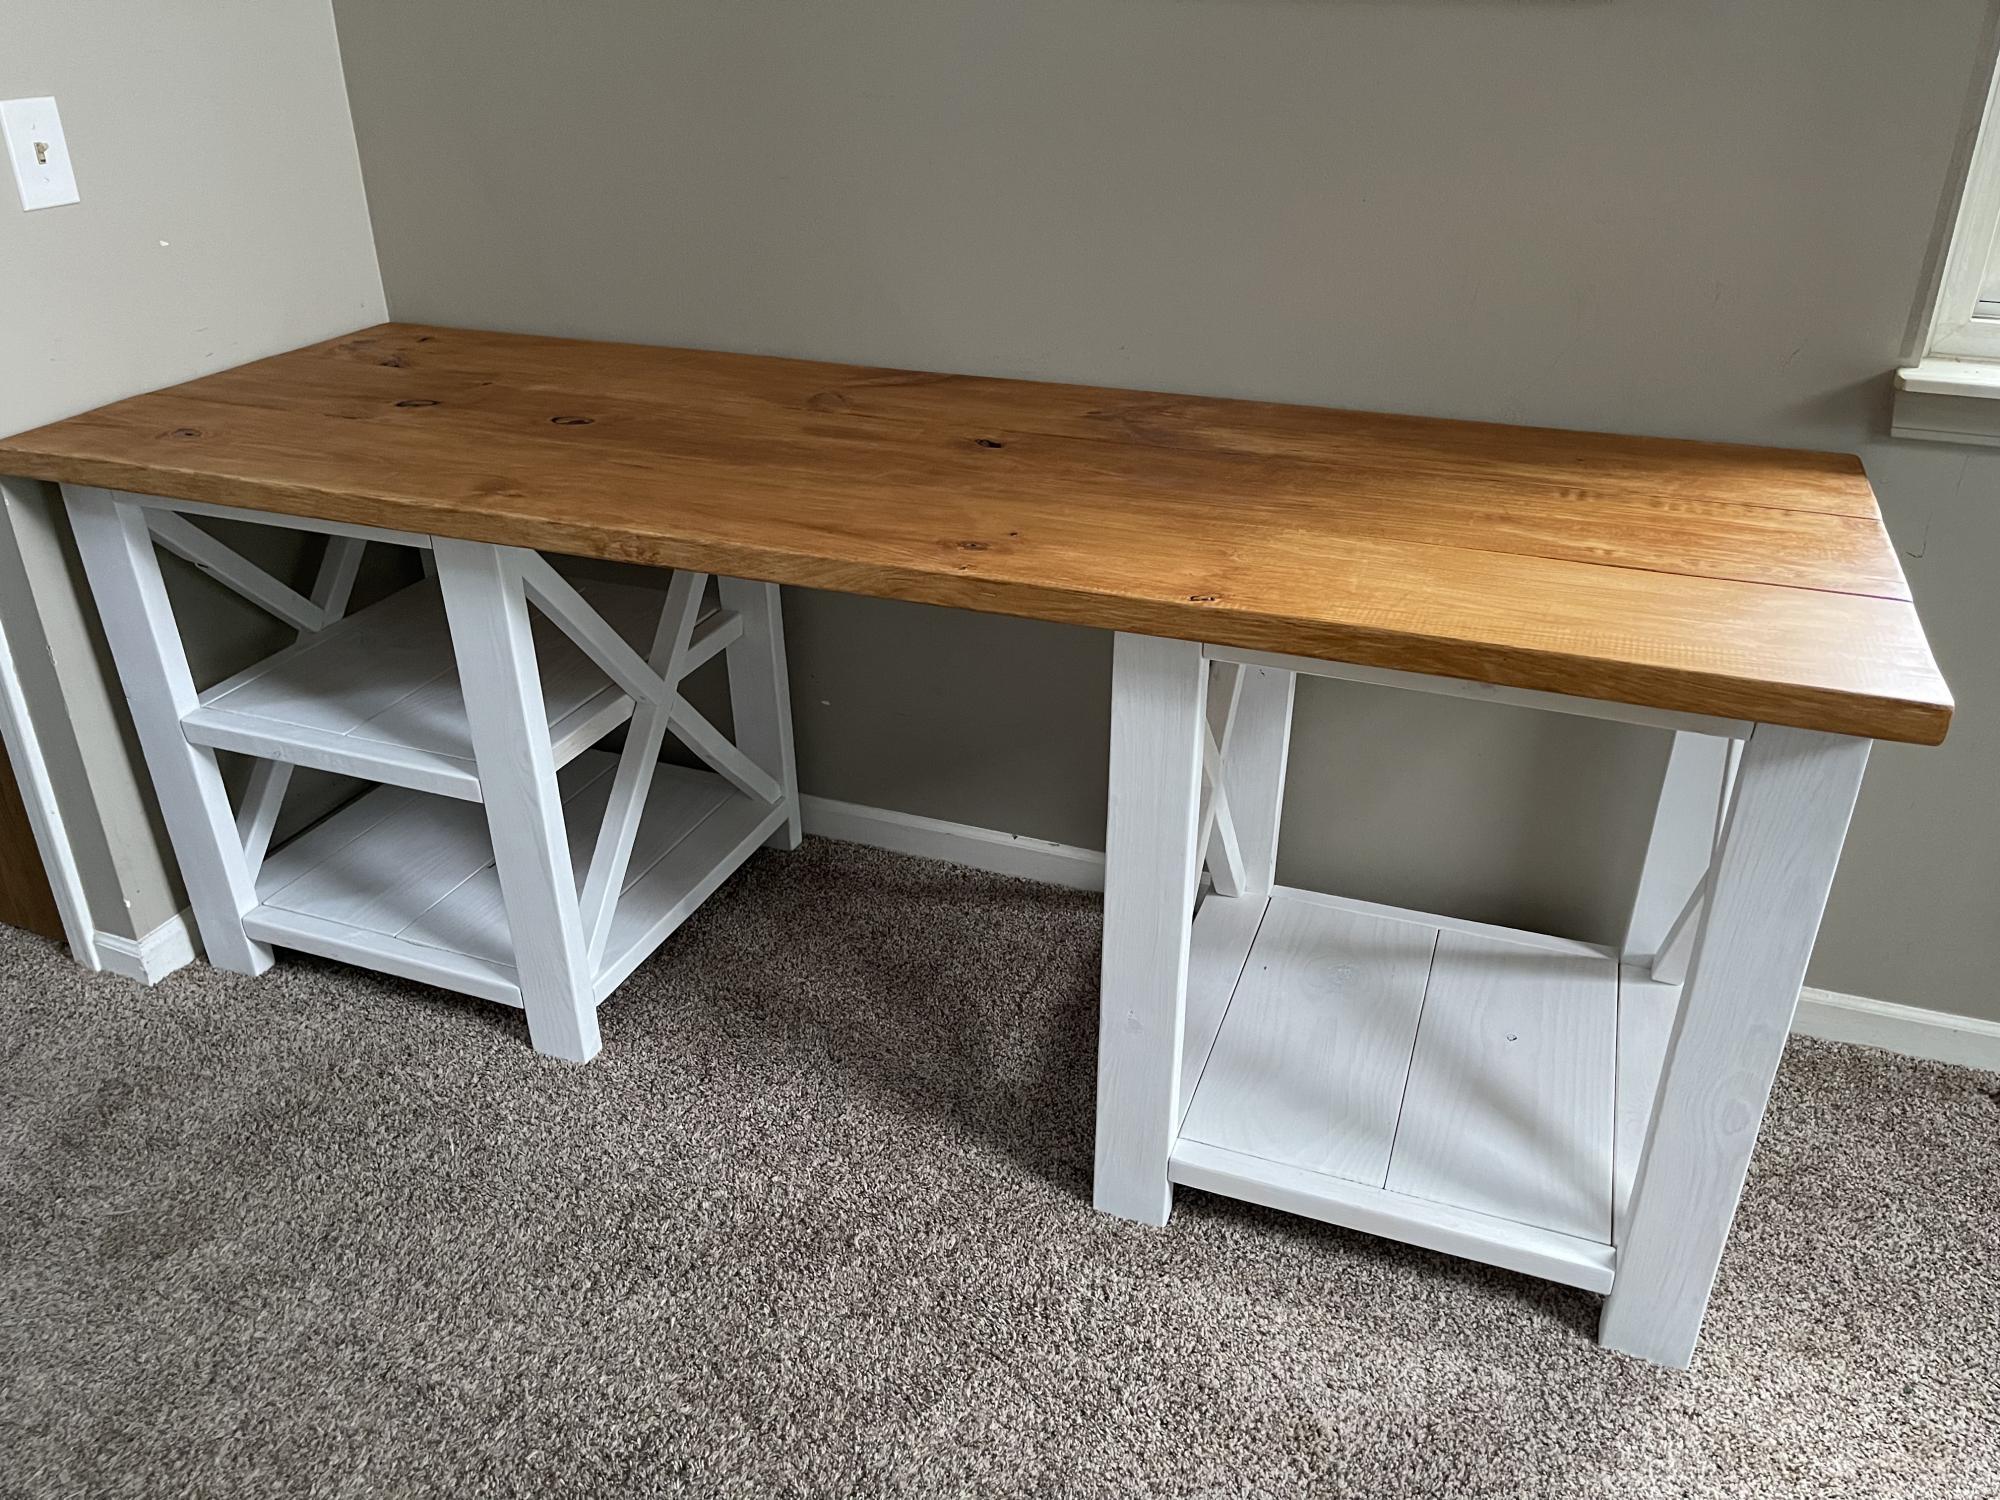
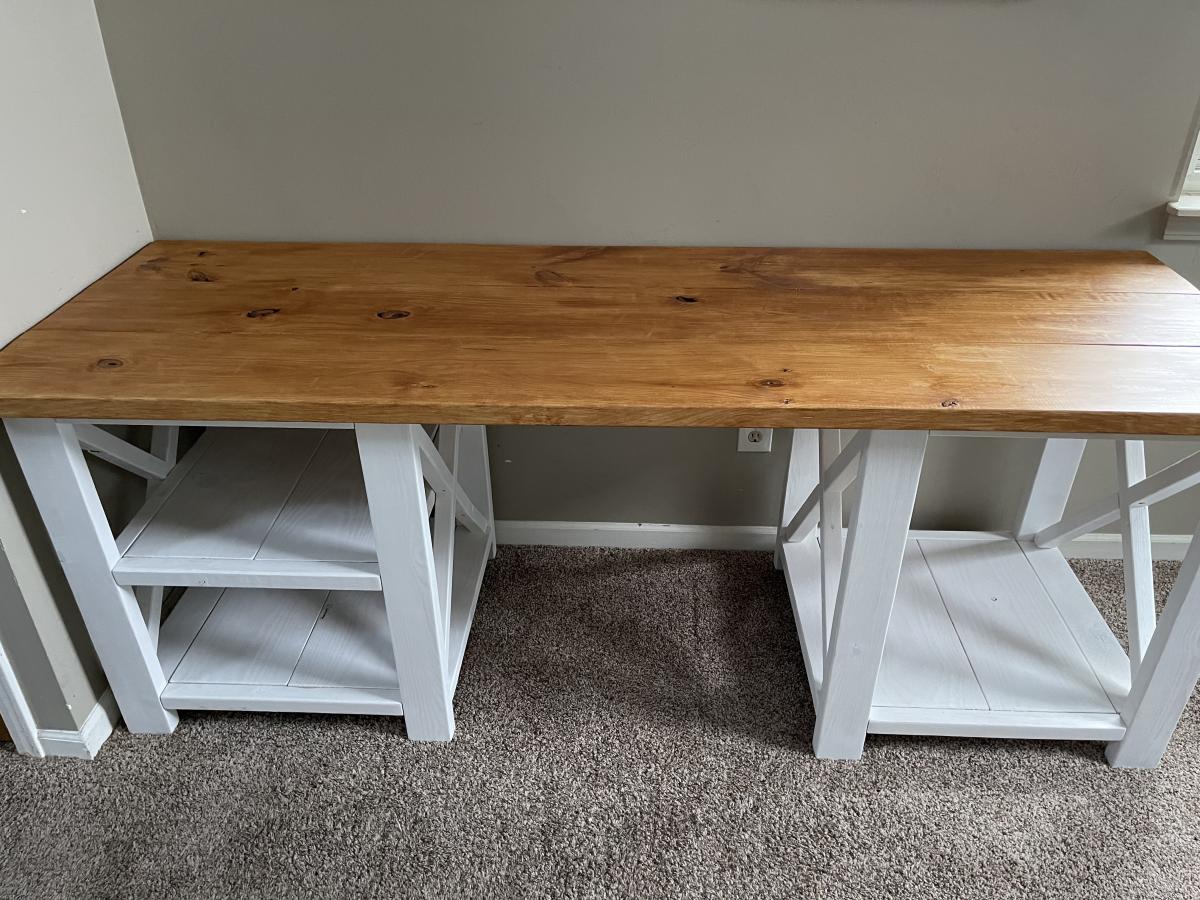
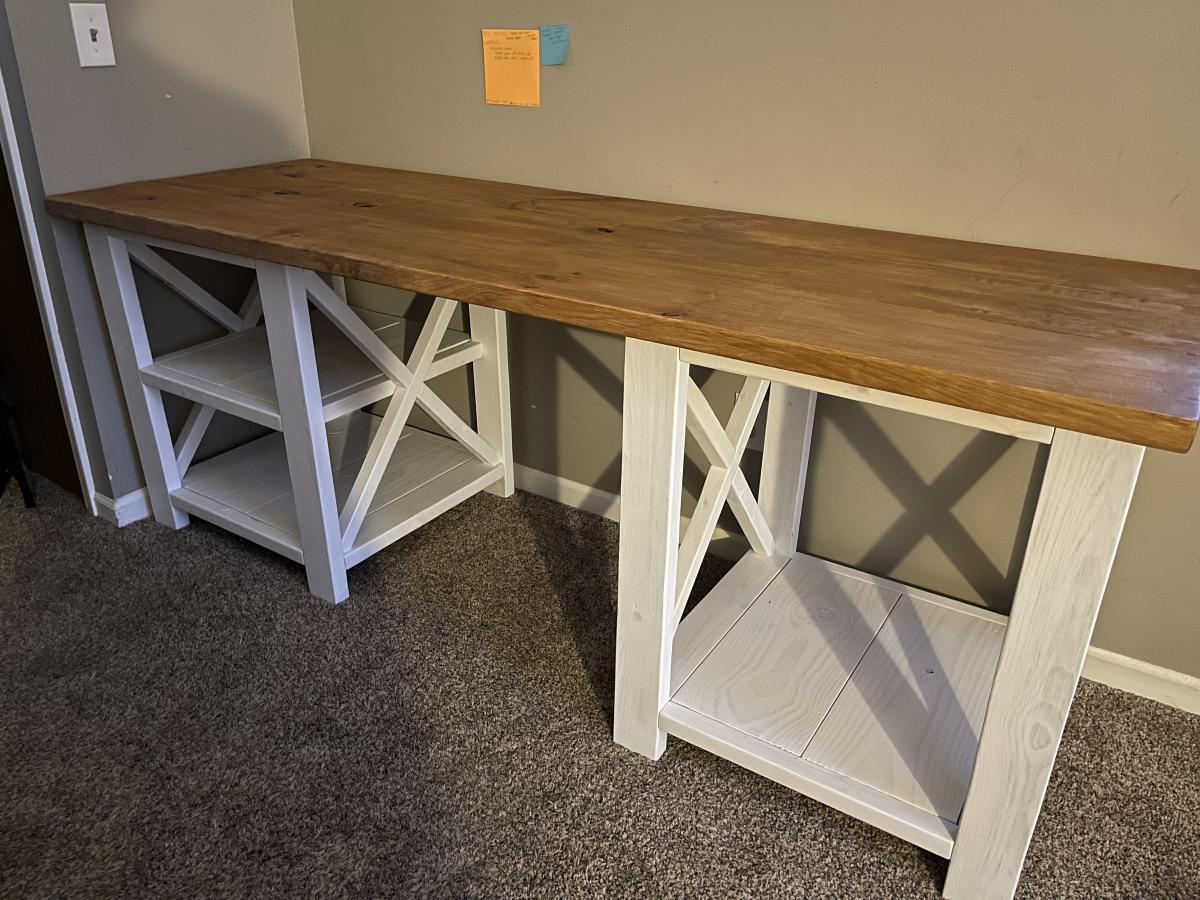
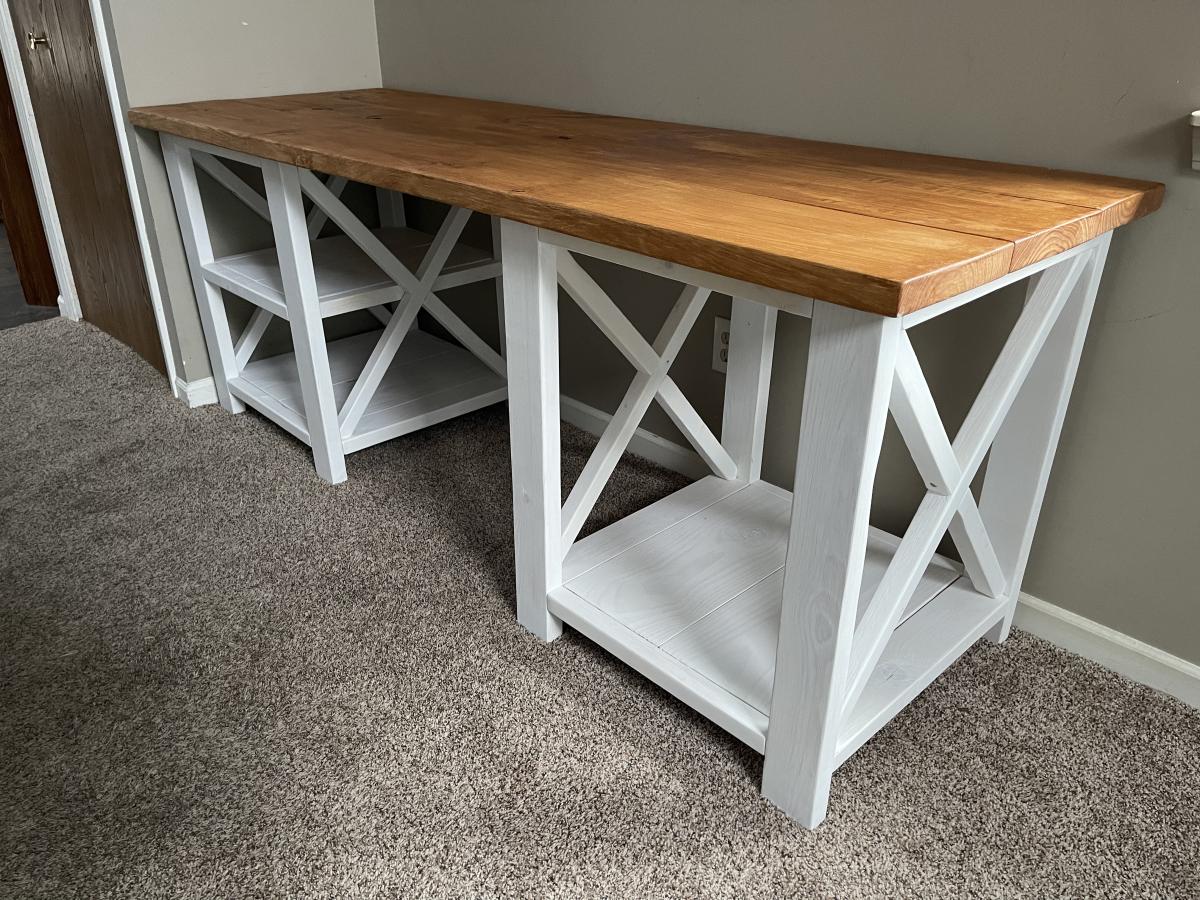
Modified the Rustic X Desk plan to include an additional shelf. Eventually the whole wall where this is now will have a matching tv stand, and dog kennel with barn doors will go in between them
Mon, 05/09/2022 - 15:53
Just got the tv stand finished. I’ll be posting pictures soon… And getting a bigger tv now that it looks so small!!!! 😂
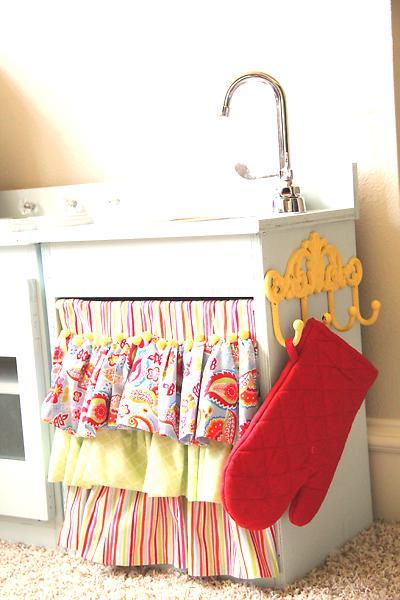
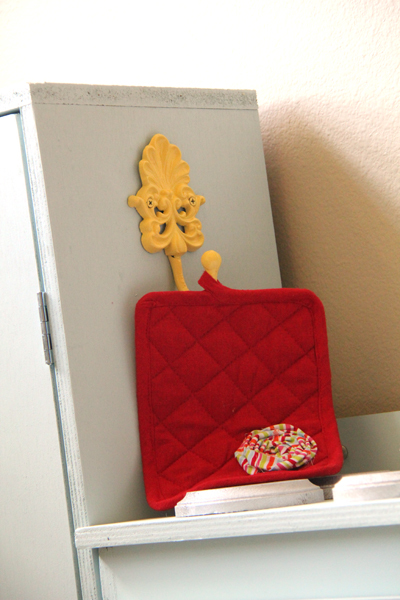
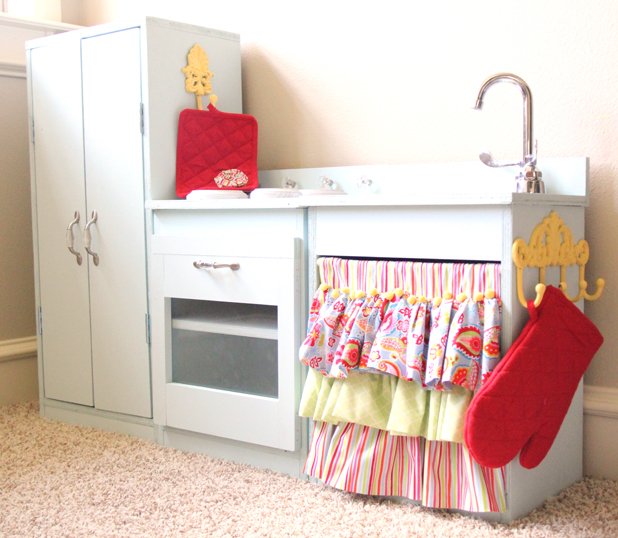
I used Ana's plans for the play stove, fridge and sink. I LOVED Crafting Chick's take on it so I copied her great accessories. I found my knobs at Walmart and my hooks at Hobby Lobby. I also found the fabric at Hobby Lobby. I used 3/4" hardwood plywood, but if I could do it again I would have used MDF. It's much smoother! I still love it though! Oh... So do the kids ;-)) You can read more details at http://www.shanty-2-chic.com/2011/07/play-kitchen-reveal.html.

Thu, 12/22/2011 - 16:05
Hi! We are building this kitchen right now and can not figure out how to mount the hinges!
Not sure what kind of hinges you used? we bought some regular door hinges but they are only able to mount to the outside of the doors. please help. thanks!
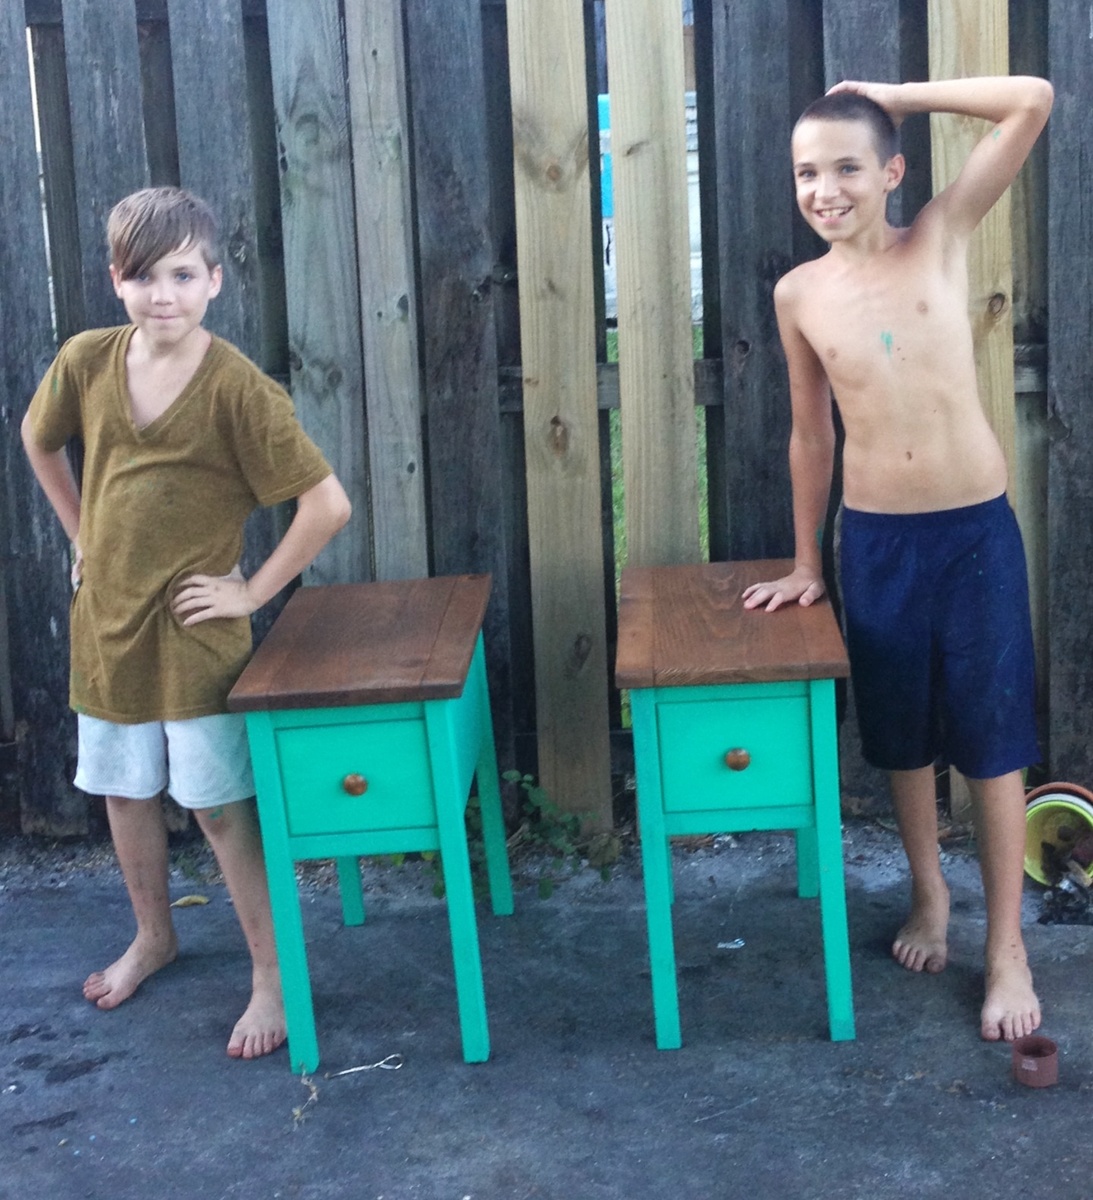
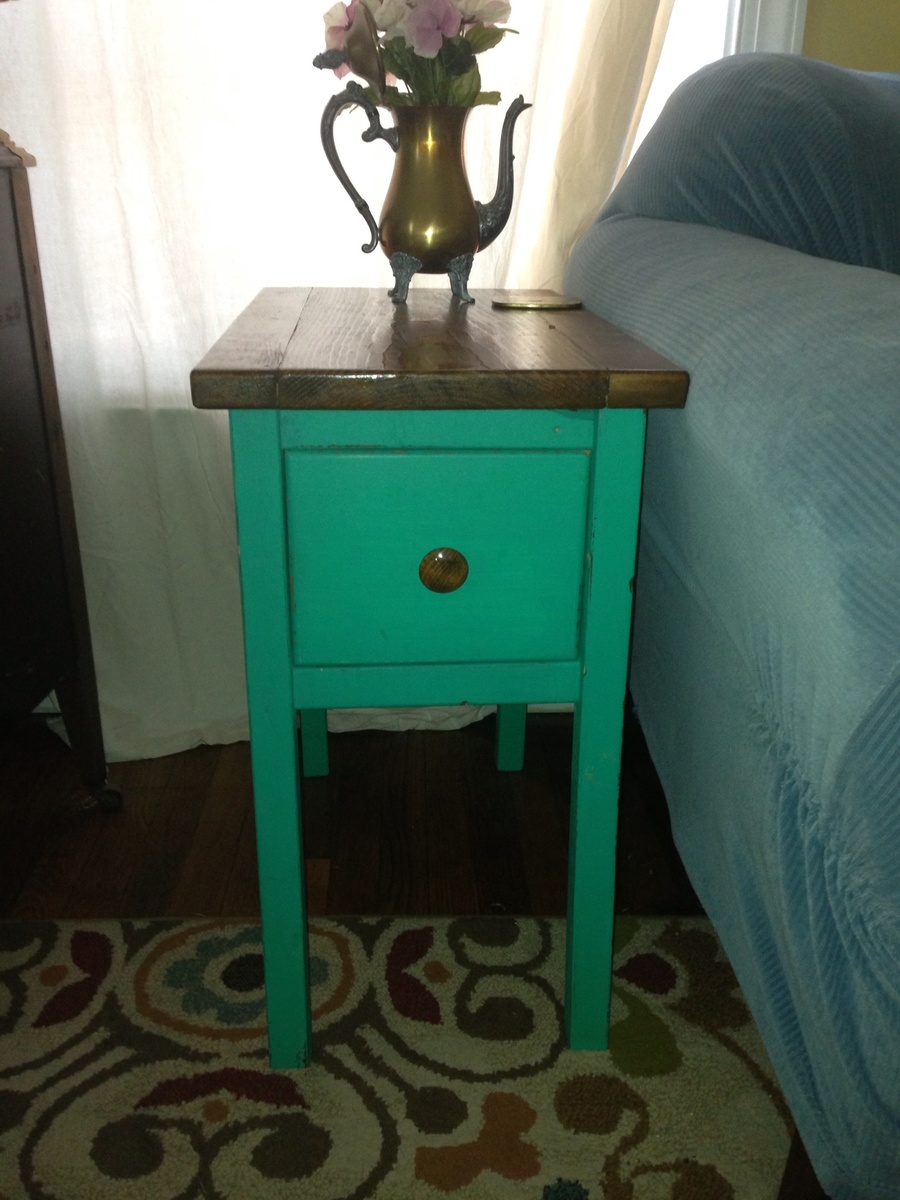
My kids (11 & 12) made these in about 3 days. We have to work during my 2 yr olds nap time so I would say 6-8 hrs total. We always have a lot of scrap wood lying around so this was a great way to use it up. Unfortunately, sometimes when using scrap wood, it is not always the exact measurements that you need but some plan reworking and measuring as you go can fix that. On this particular plan, the only thing we changed was the thickness of the top and a little fudging on the drawer box. We also used our router to round over some or the edges and we made our own drawer tracks along the bottom w/ scrap furring strips. Honestly, those studs you see in the picture, did most of the work and since their skill set usually involves a reference to the newest video game out, I would say this was defiantly a simple project! ;-)
Wed, 08/14/2013 - 16:47
Thank you! I showed them you comment. As you can tell from their studley poses, they are not lacking in the ego department ;-)
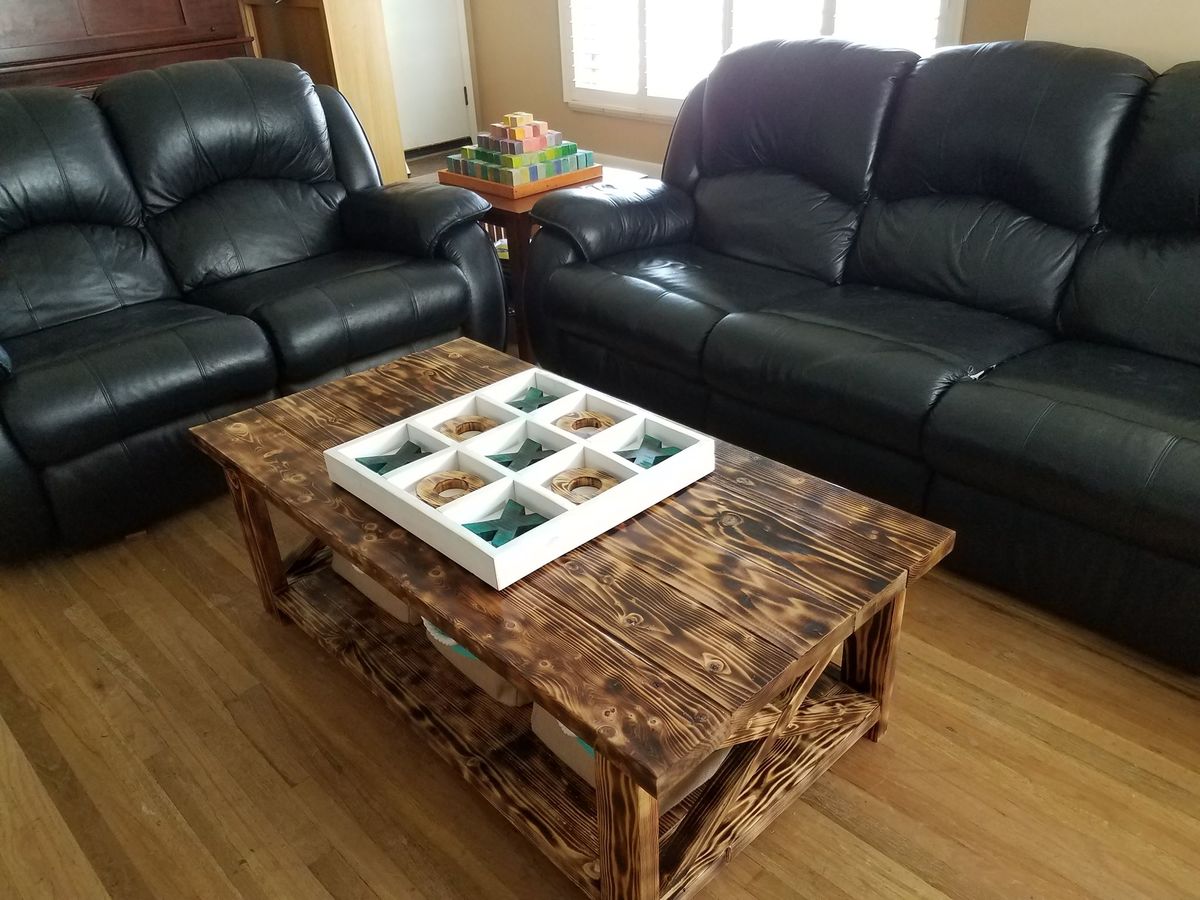
A little late uploading these. Made these for Christmas 2014.

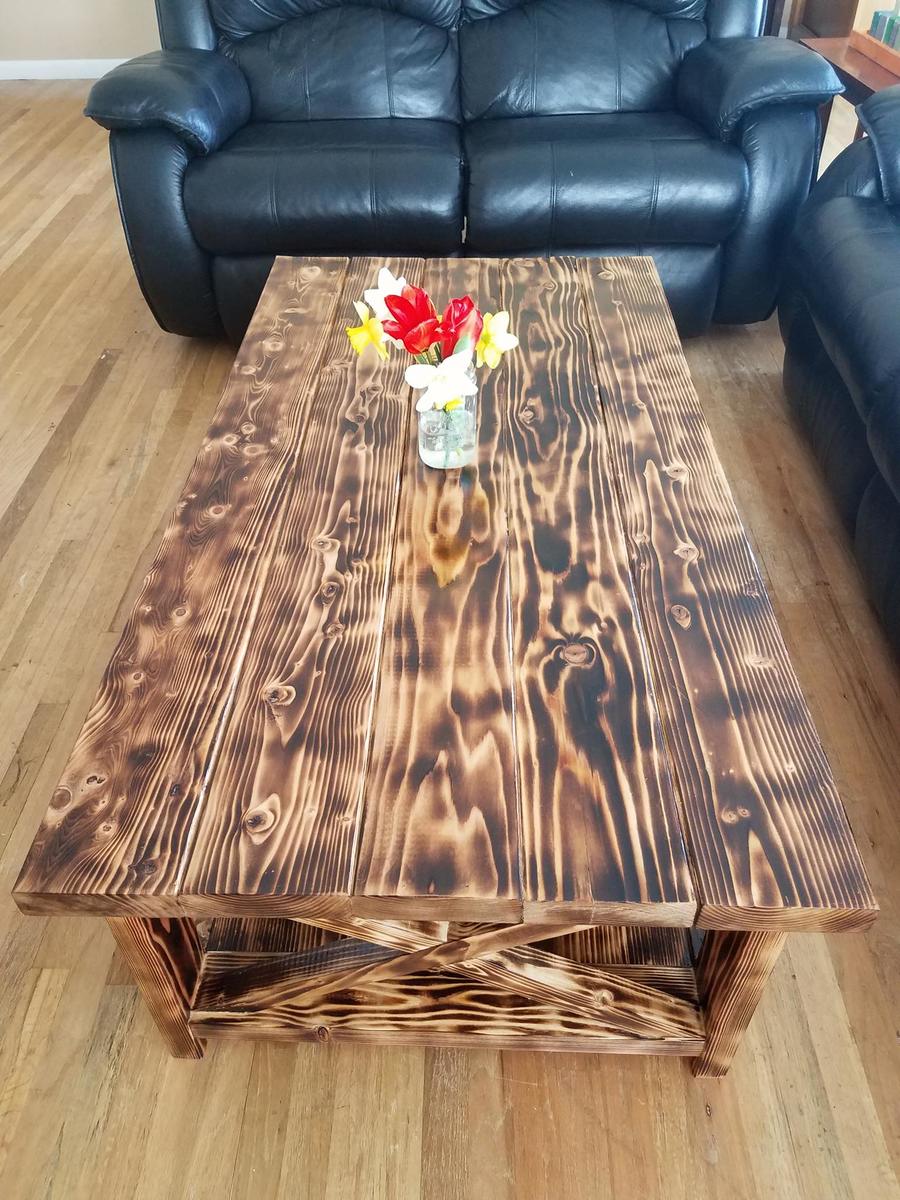
Burned wood finish with stain and lots of coats of poly for protection and shine
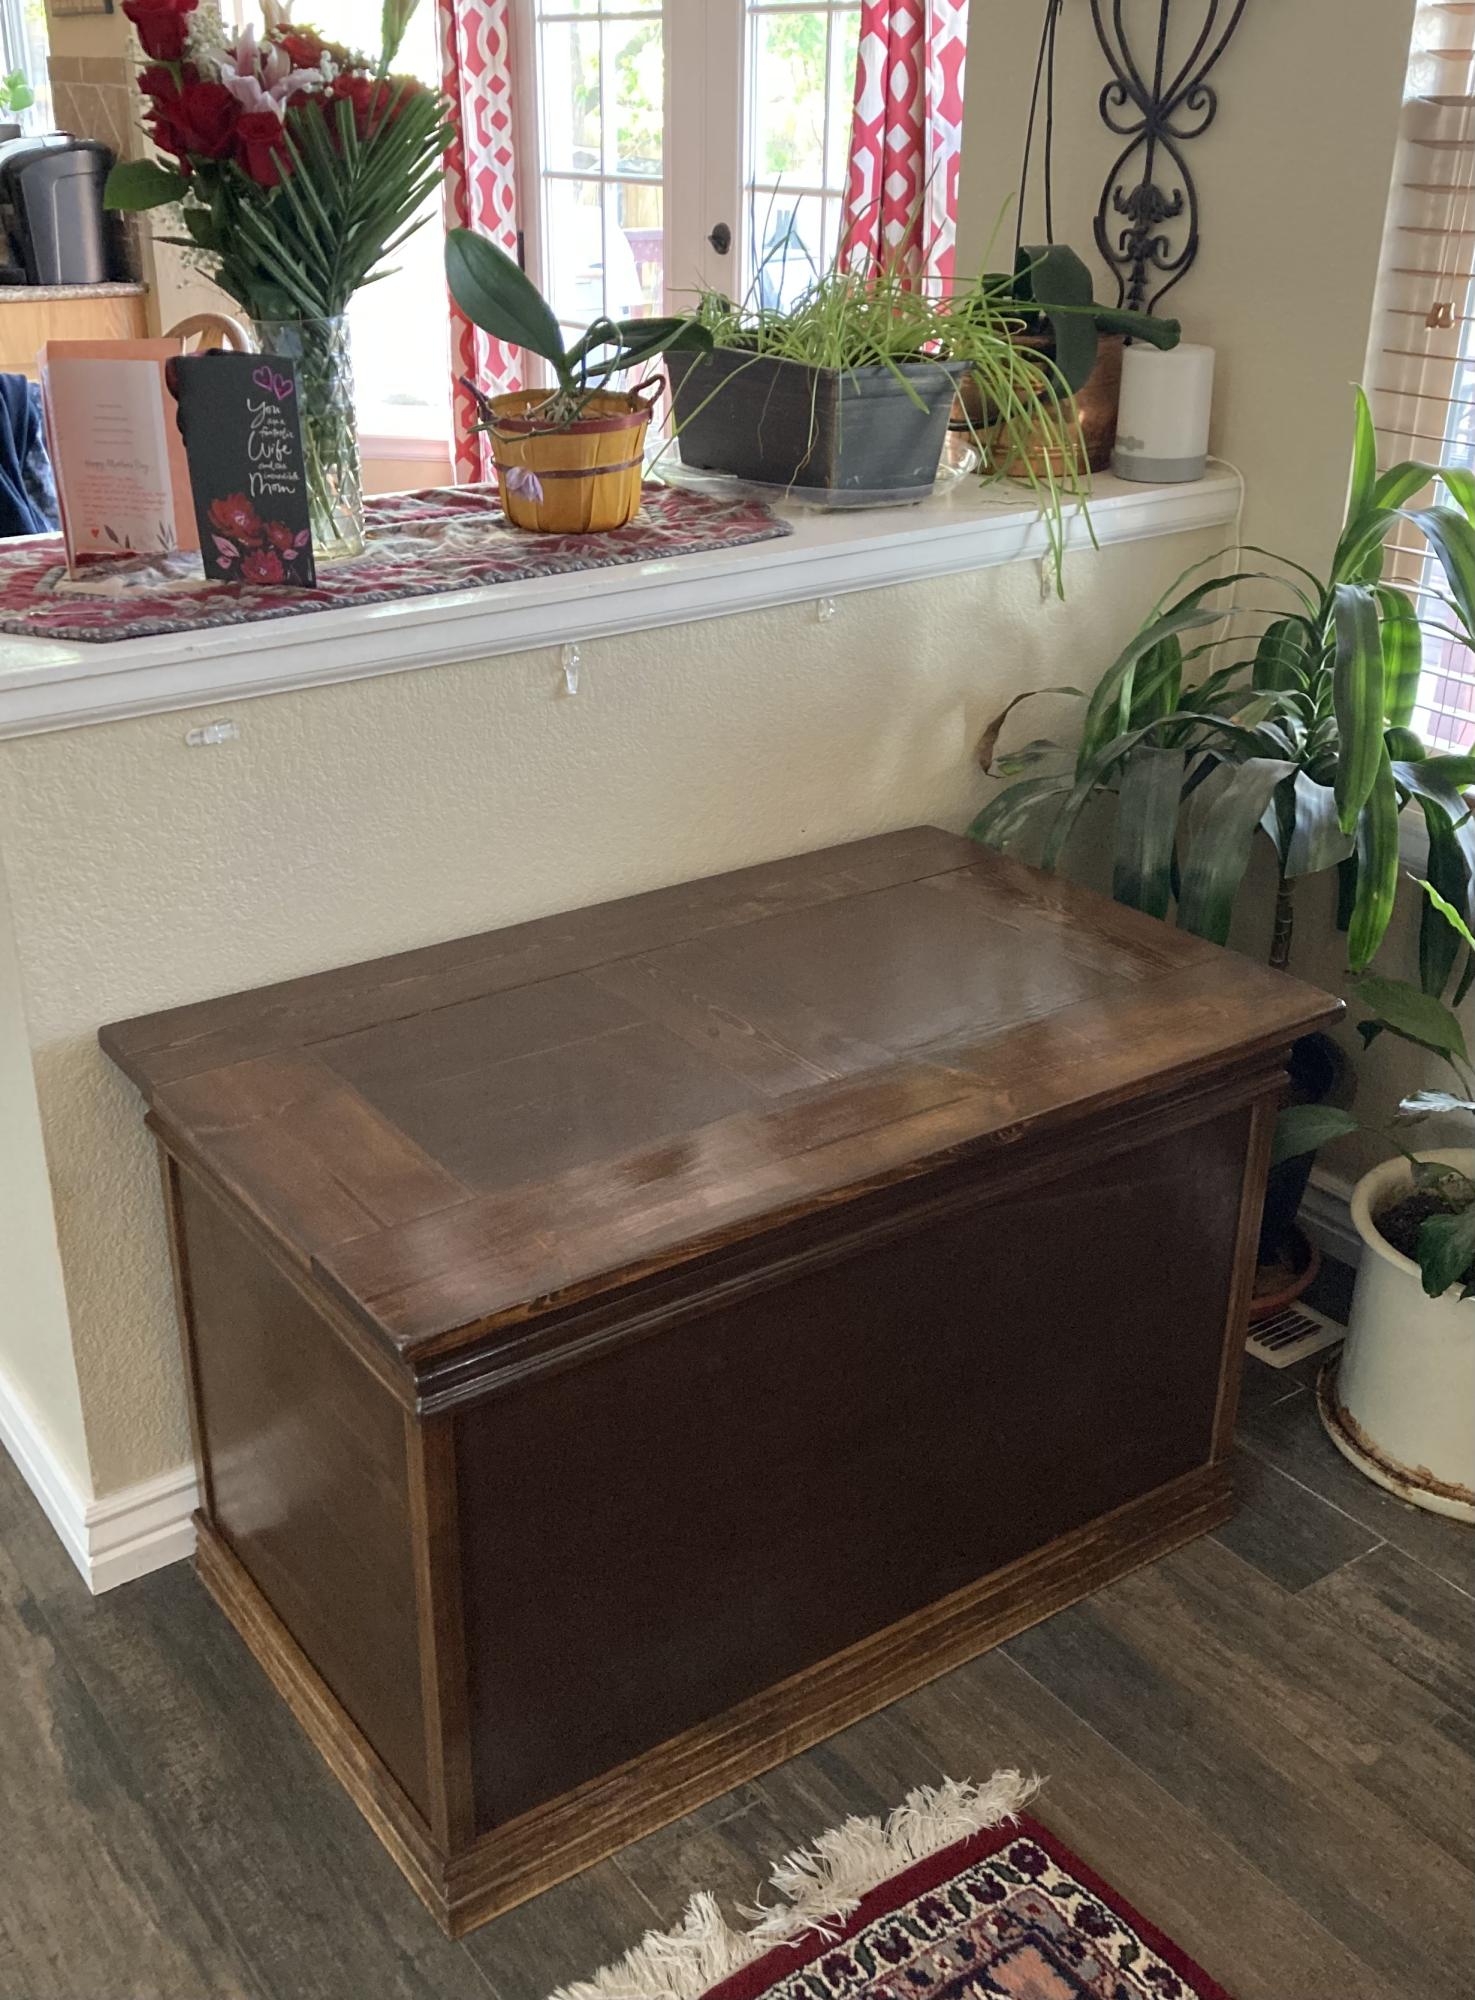
This project held two purposes: Father’s Day and my husband’s shoes/backpack. This was the perfect way to get them off of the floor and into something beautiful!
Both of my teenage kids help with different aspects of the build.
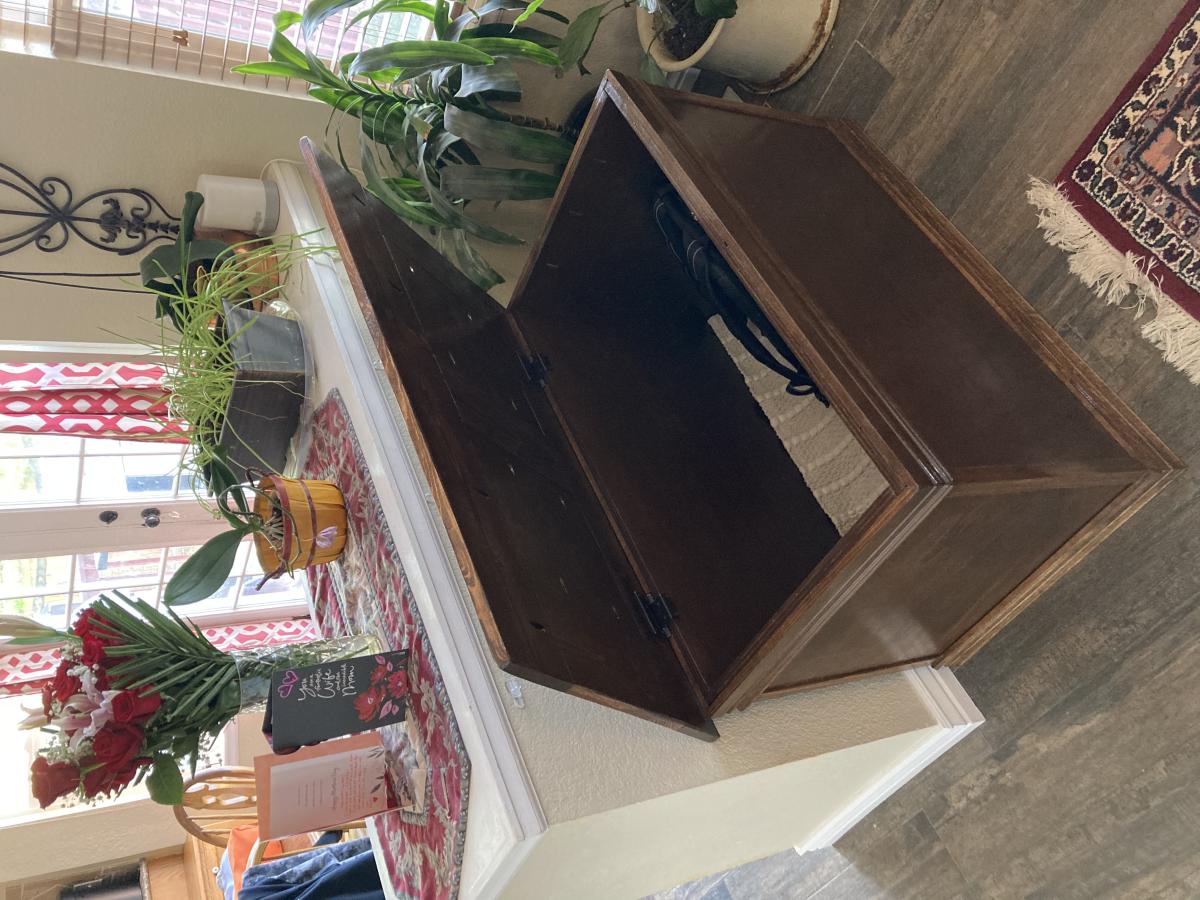
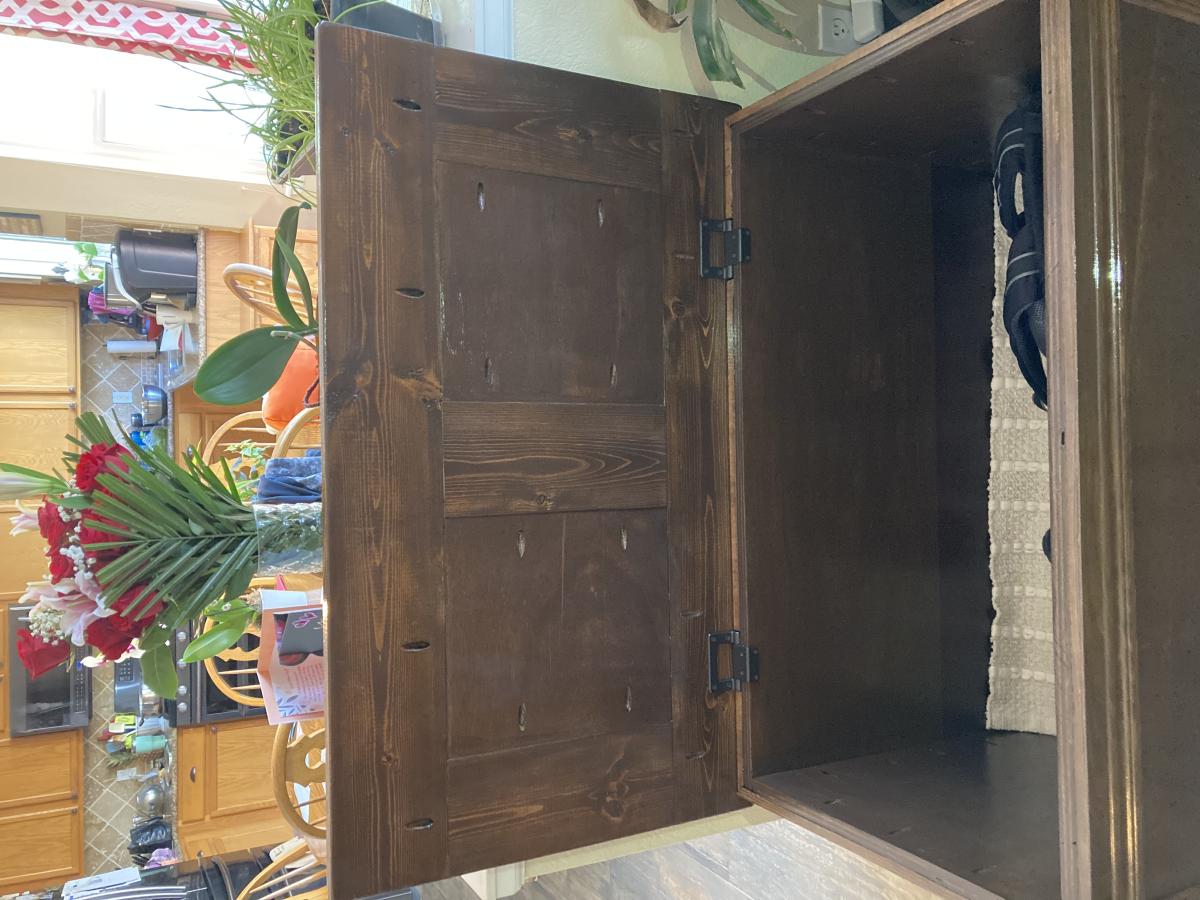
I will list what hinges and handles I used after reading all the other posts on this Becca Trunk.
I did make my carcass taller and longer than the plans to hold my husband’s items plus some couch blankets. I have 4 supports on the bottom instead of three. I only used 3/4” hard plywood. I added an inch to each side of the lid, so it was easier to open. There are 2 coats of stain and 2 coats of 3x interior gloss poly made by Varthane on this trunk. I sanded with 320 sandpaper in between each coat of poly.
After reading all the posts about hinges, soft closing and looking at each picture, I came up with Torsion Hinges by Rockler. These hold up the lid at all different angles and give a soft close once lowered to a certain point.
I installed 2 sixty pound bronze torsion hinges with the assistance of their Hinge Jig. That helped me to make my lines and pre drill marks without guessing. Rockler has several videos on them and how to install, plus several on YouTube. I bought them on Amazon for less than the site and sold by Rockler. I did chisel out a small rectangle of the molding and it was easier than I thought. I was so nervous after building it all and now cutting some out of it, but it worked! I did one and my son the other one. The Rockler Jig was very helpful lining all this up. My hinges are 6” in from each side of the trunk. I set the lid in the right spot and drew lines where the hinge jig rest in my chiseled spots. Then flipped it over and lined up the jig again on the lid and knew where my holes were going.
I have just received my 3 set of handles. The others were not chunky enough for the size and the proper look.
Adonai Hardware "Phebe" Antique Iron Drop Pull (Supplied as 2 Pieces per Pack) - Black Powder Coated. I also got these on Amazon.
This trunk took time, but it was well worth it. So beautiful and worth it. My husband was so surprised and also knew it was for his shoes/backpack. He appreciated all the detail that went into it and lived that the three of us built it together for him.
Thank you Ana and Shanty 2 Chic for the plans and pictures. They are always so helpful. I have made many of your builds and I am learning from each one. Thank you again.
Blessings,
Jennifer
Mon, 05/16/2022 - 08:26
What a special piece, it is so pretty and sure to be cherished for years! Thank you for sharing:)
Mon, 05/16/2022 - 18:30
Thank you, Ana. I appreciate your kind words. You have really inspired me and you prepare myself and others for success with your plans and especially the videos. I have learned a lot from you! Thank you!! Blessings, Jennifer
Mon, 05/16/2022 - 08:26
What a special piece, it is so pretty and sure to be cherished for years! Thank you for sharing:)
This was a father's day present. My husband was quite impressed!
Sat, 11/26/2011 - 08:43
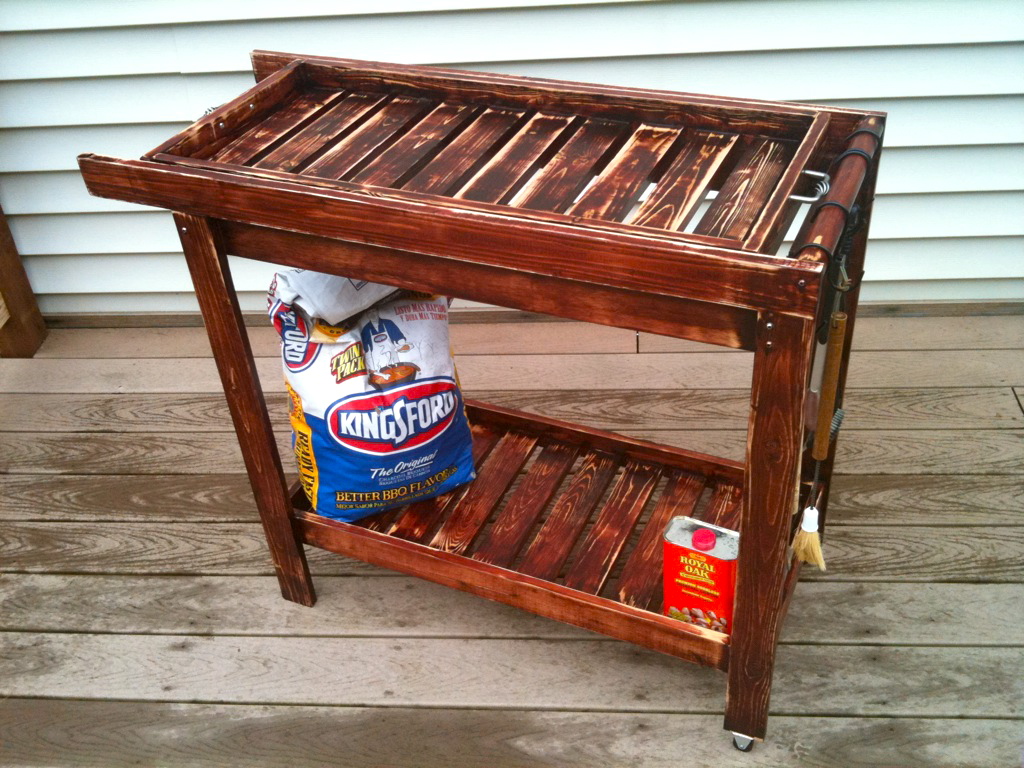
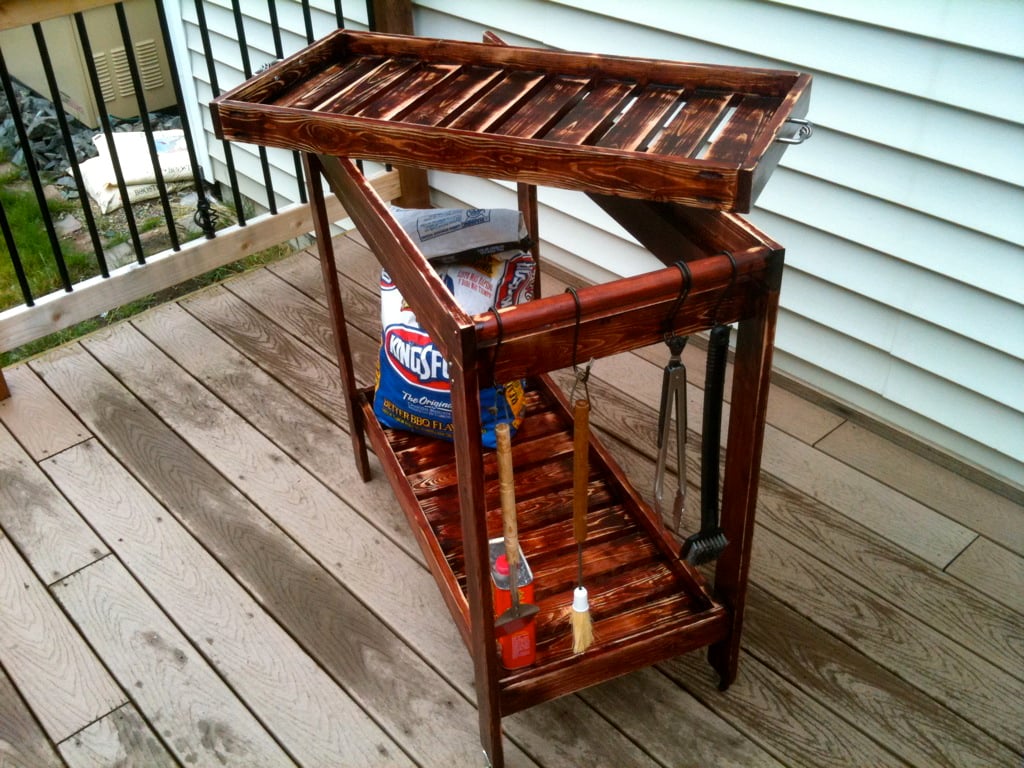
Hi, this look is the result of trying to fix a very VERY sloppy stain job. I had applied the stain much to thick and uneven and had runs all over the cart. So I decided to sand off the excess and even it out a little. I finished it off with a coat of clear poly. We like the way it looks too and it was really easy.
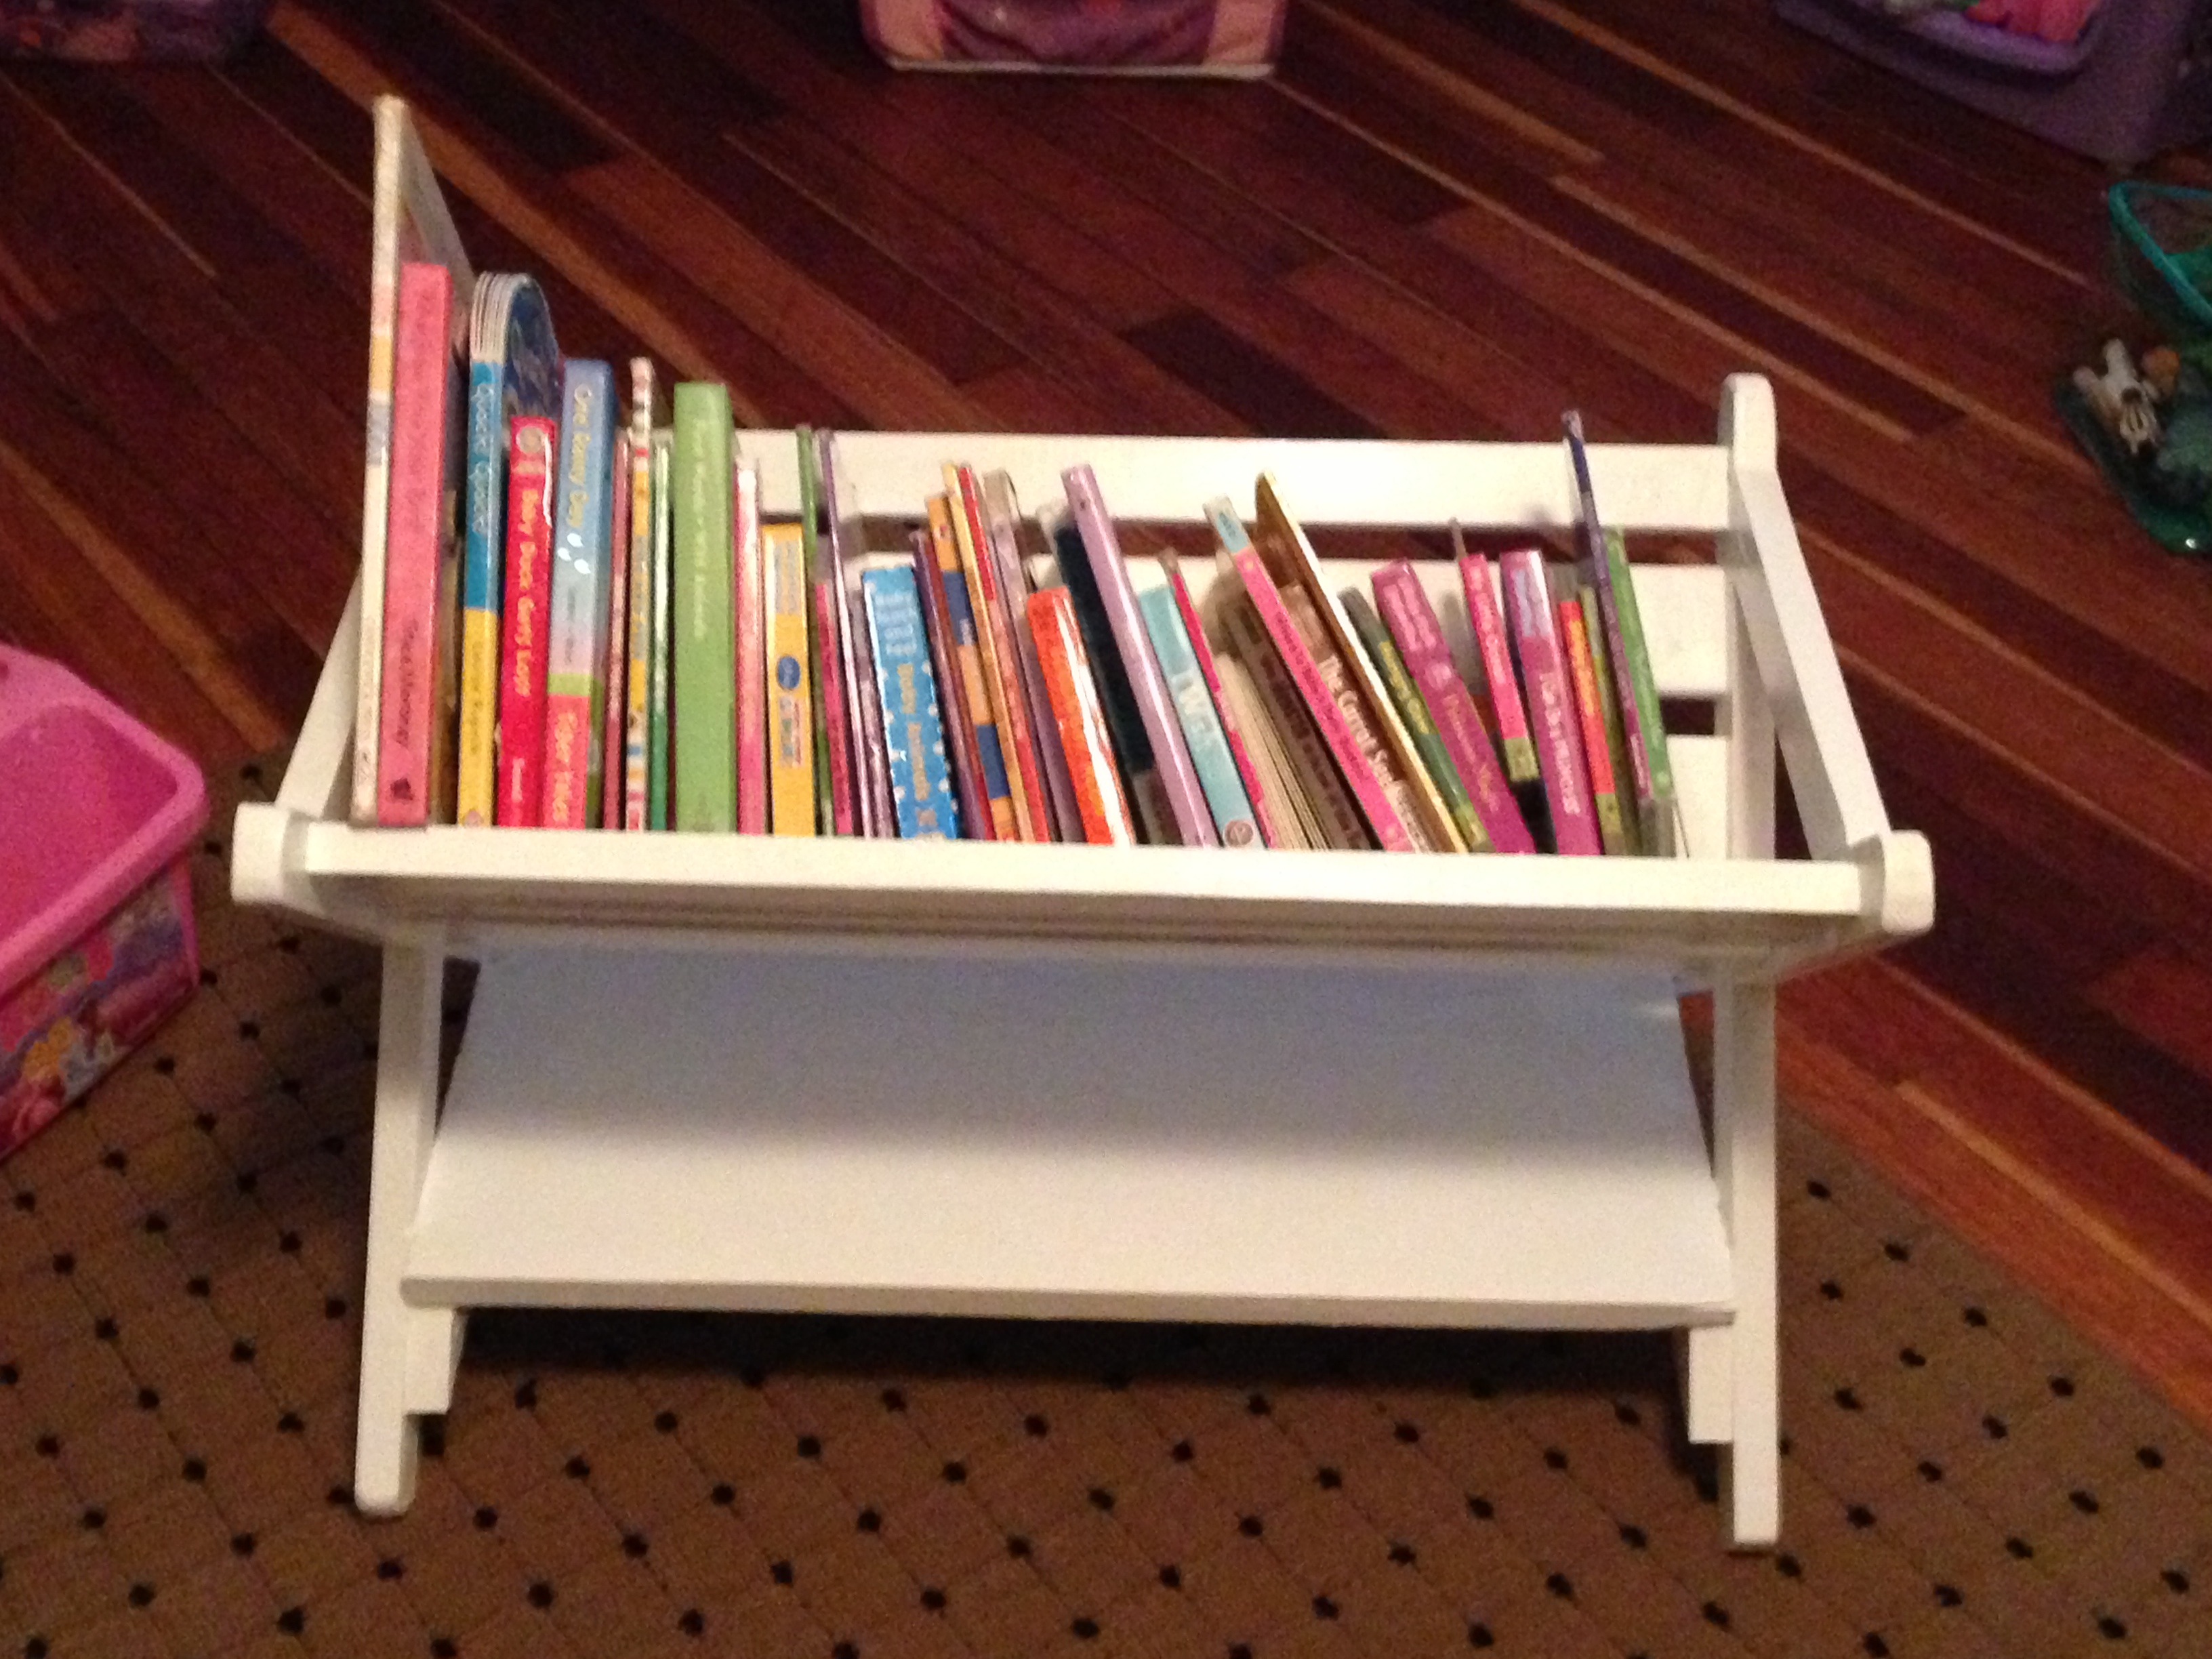
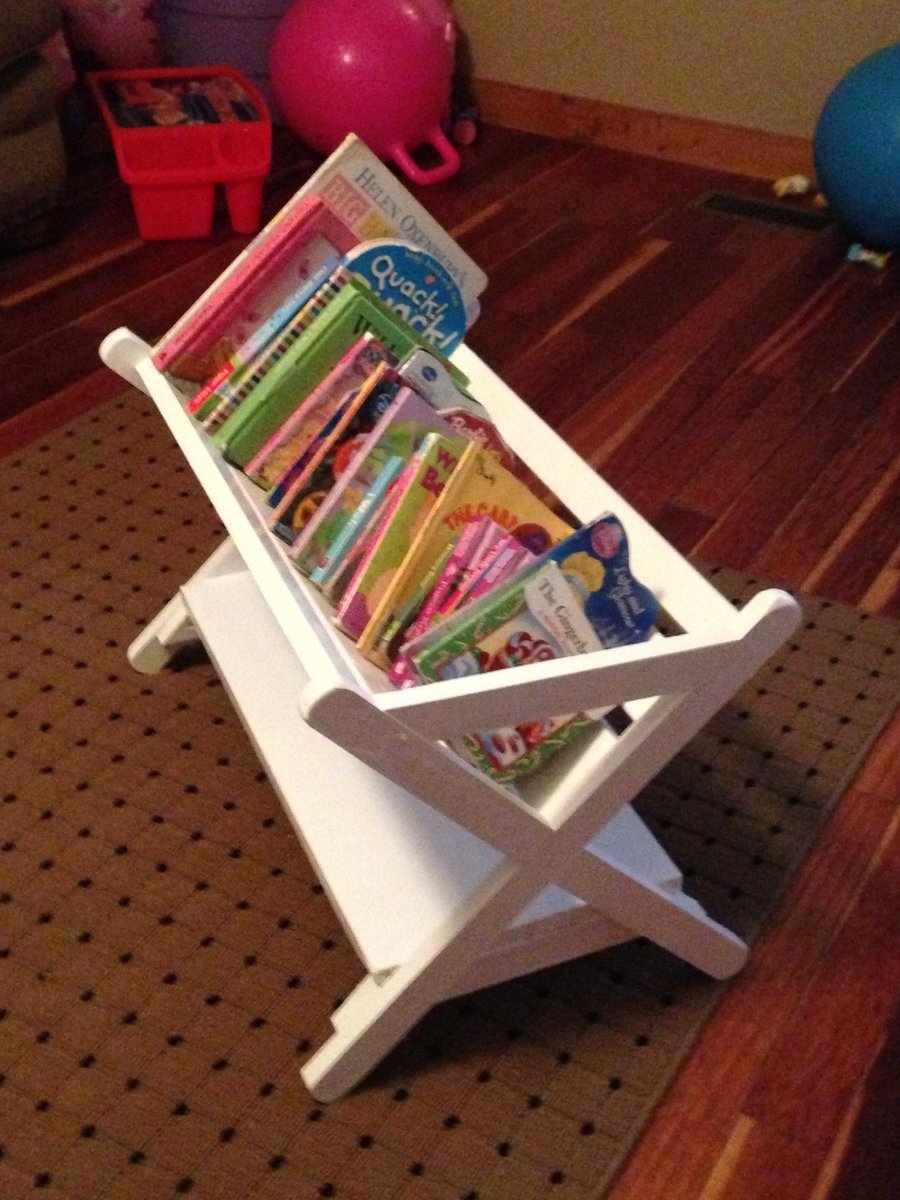
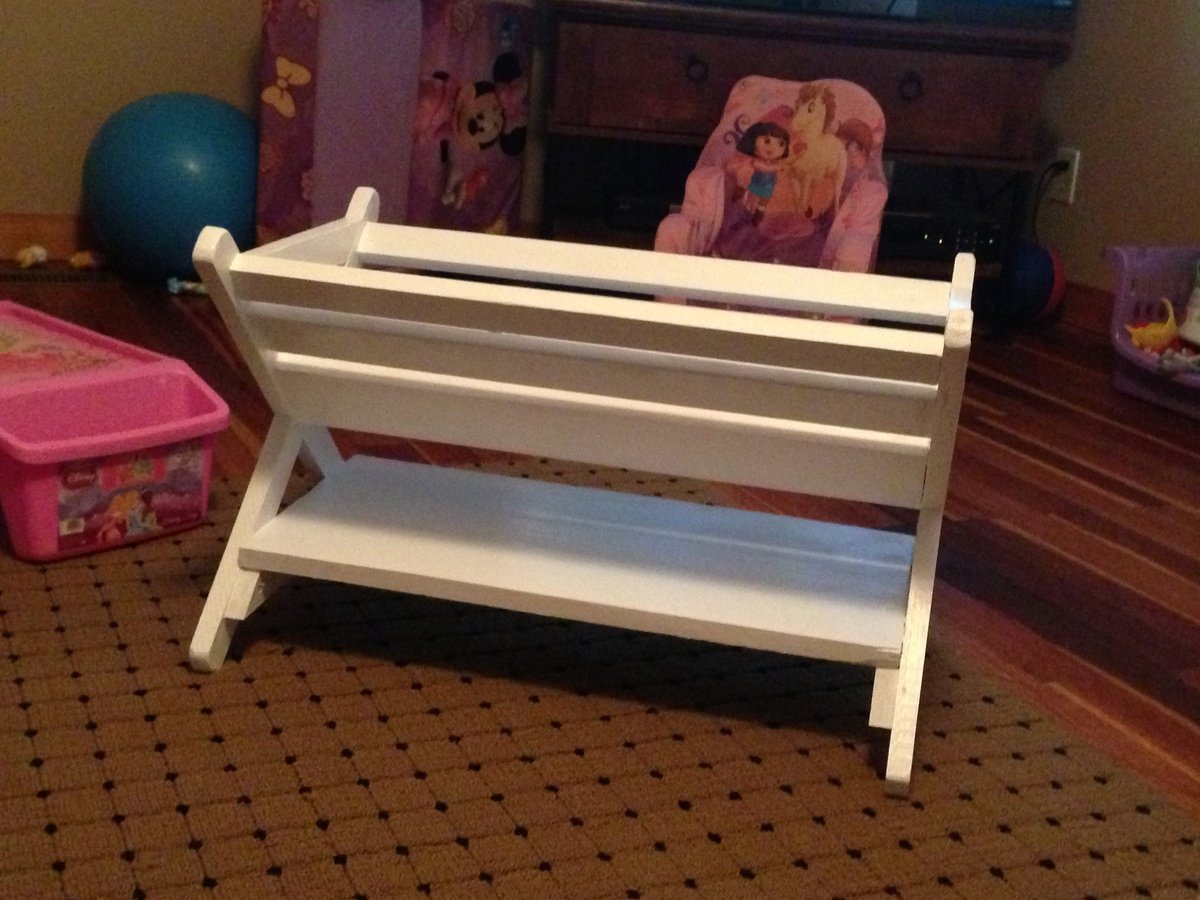
SImple and easy to make. I had leftover wood so all I had to buy was 1x2"s. I'd say the total cost was $15. It's sturdy and holds a lot of books.

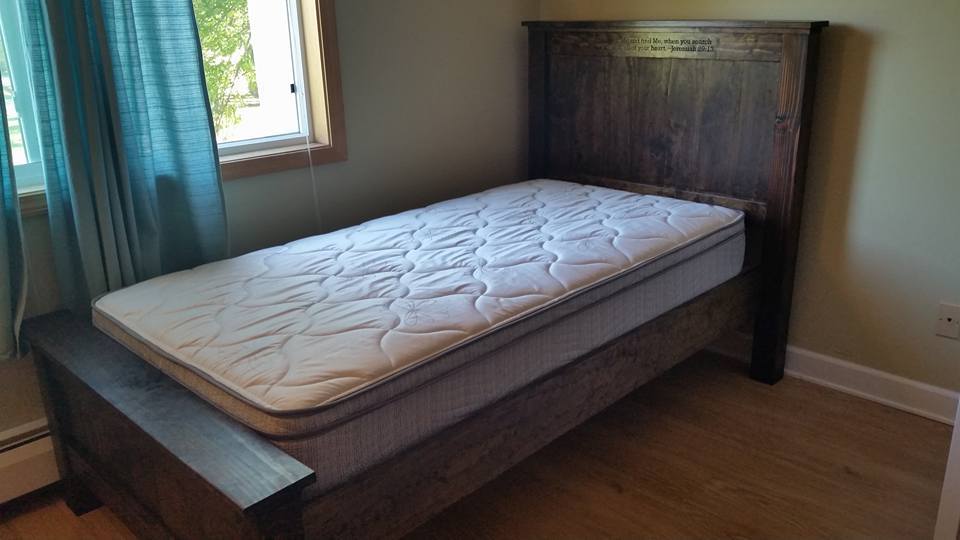
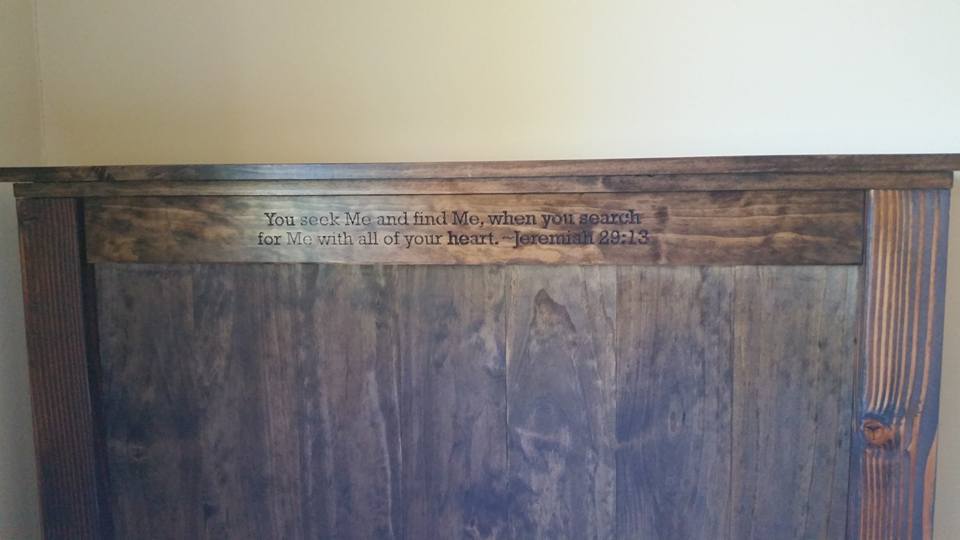
This is the second farmhouse bed that i've built from these plans. I made a slight modification to shorten the headboard for this bed. Overall, it was a fun and enjoyable project.
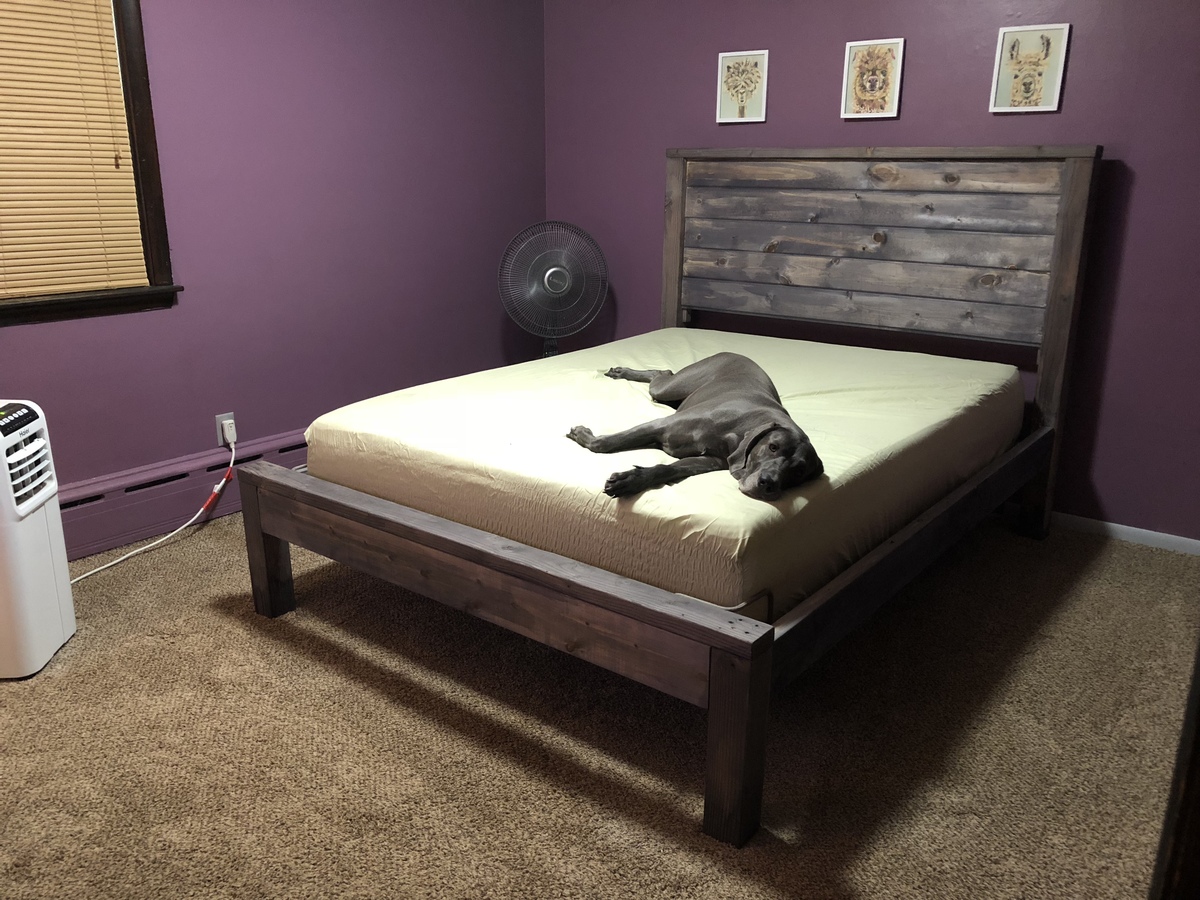
I needed a bed frame to go around my adjustable mattress and cheapest I found for pre-fabricated was greater than $200 and I thought why not go on Ana’s site and see if I could build one cheaper and I found this design. I did everything in the instructions but build the platform as I was only getting it as a frame around the base that I already had. I ended up using carsiding as it was cheaper than 1x6’s I also did not use pocket holes I just used regular screws that I countersunk and it gives it a bit of a more rustic look I did have to adjust a few things as the side rails the 2x4 toppers went over too much on the adjustable portion of the bed and I didn’t allot for additional width on the head and footboard so I had to remove them - to me it presents a little bit of a cleaner line I figure I can always go back with a 2 x 2 if I want a capped look. The weathered recommended product turned it to a grayish purple hue no matter how much I sanded it - it grew on me but definitely not the same color probably different tannins in the wood I was able to find not sure.
The build took about two days total I built it all on my own the bed hardware was tricky though after failing to find anything local I ordered bed rail hardware off of Amazon for 12 bucks it’s a lot easier and your able to connect the side rails to the head and footboard on your own.
Total cost with the bed hardware probably about $130 if I took off the stuff I wasted it may be closer to $115.
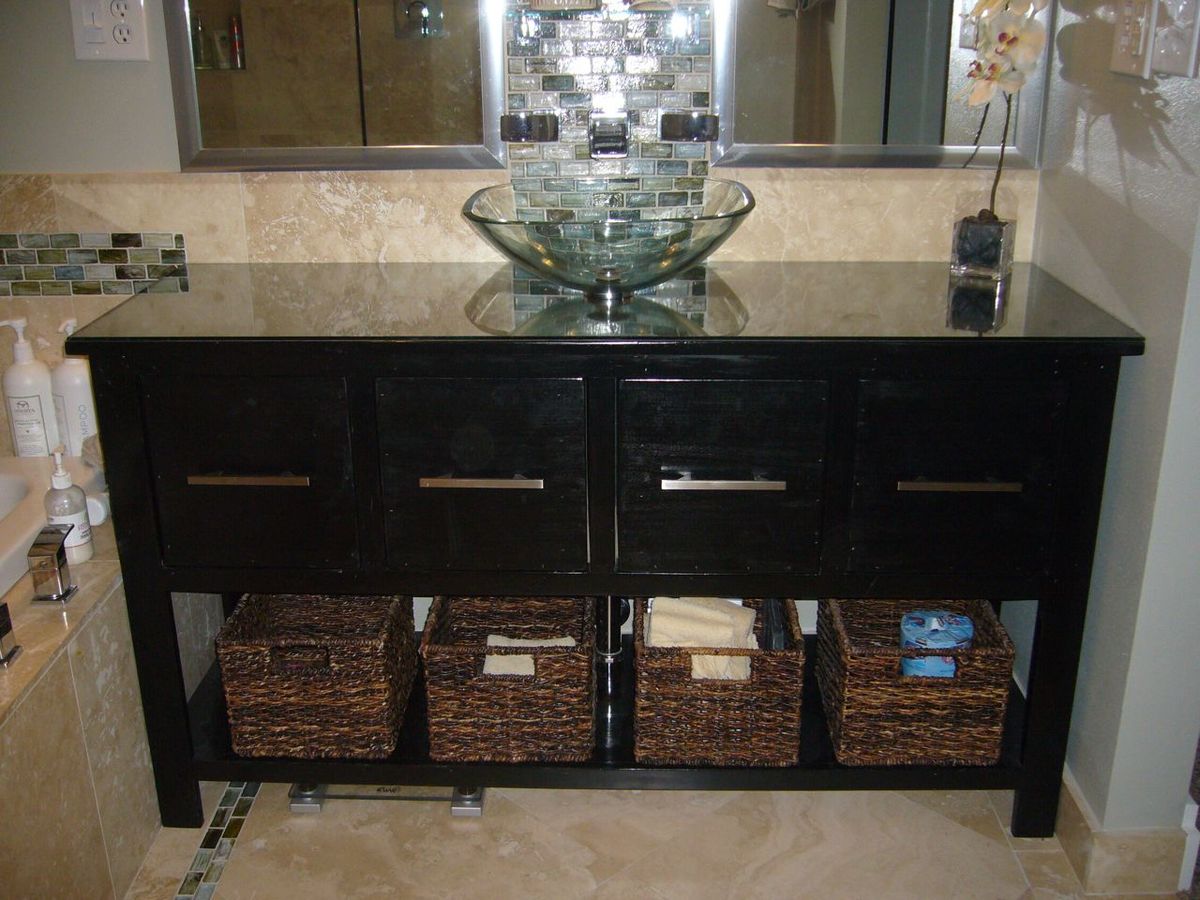
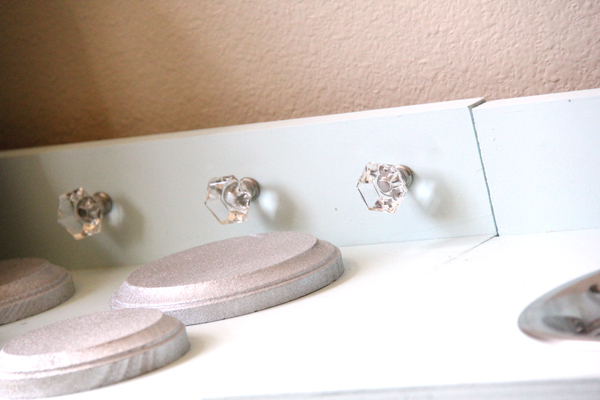
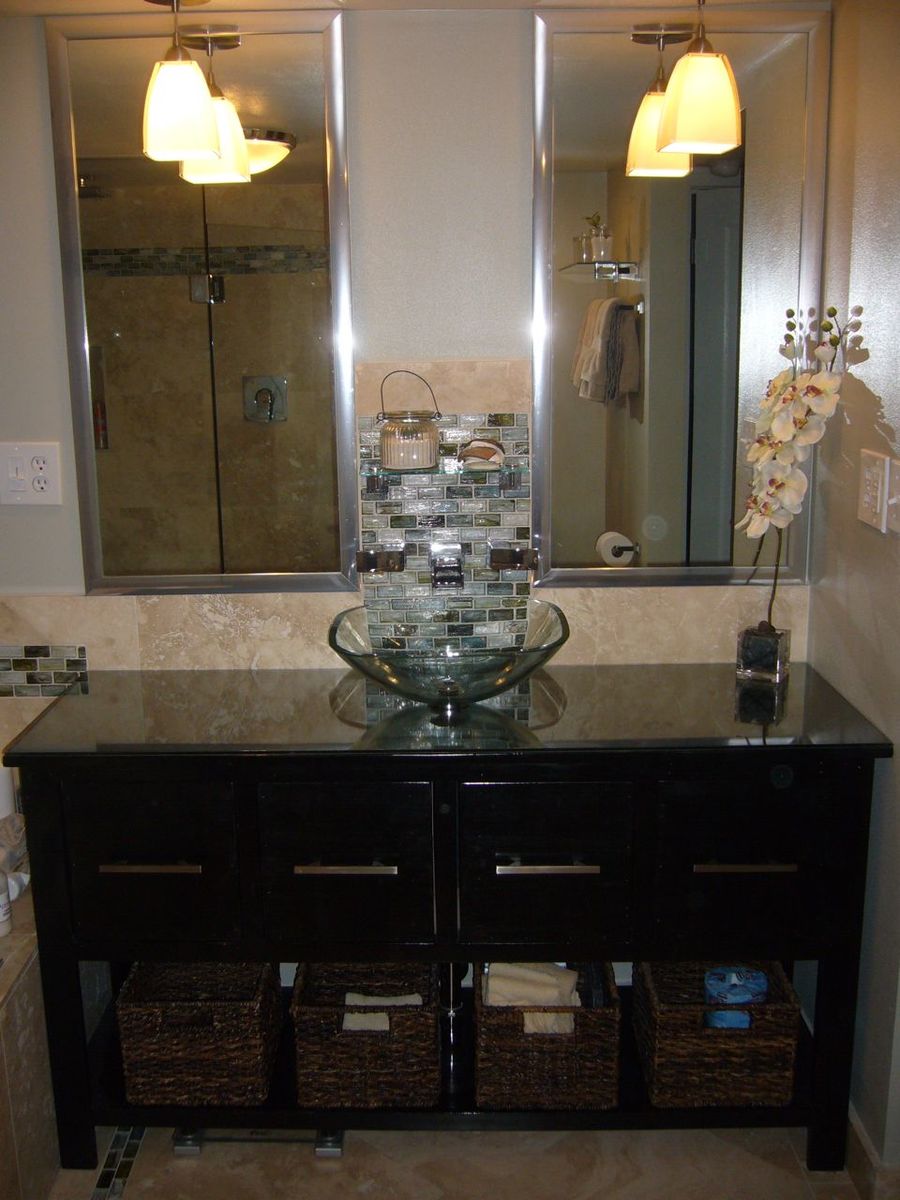
We remodeled our basement and added a master bathroom. The vanity space we had needed a custom vanity. We saw the Balin Console Table here and thought it would work nicely. It does! The four 12x12 drawers hold everything we need to use and keep discrete and the storage space underneath works nicely for extras that need to be away but quickly accessed.
In reply to Beautiful! by dananryan
Fri, 07/15/2011 - 23:16
We had to make some changes, especially in its depth as it needed to hold a sink. It came out at 31 3/4" tall, 57" wide and 20" deep. We also added a shelf at the bottom. Thanks for the compliment!
Wed, 08/10/2011 - 12:41
It looks like you have a glass top on this vanity? Or maybe its just the finish? I am very interested in doing this build for our bathroom remodel. I too would like the shelf for extra storage, and advice on how you added that?
I'm going to have to shorten it some as we only have like 53 inches for the vanity. Might just make it 48 inches which is still a plenty big vanity and just make 3 drawers instead of 4.
It looks awesome!!! Great work!
Sat, 08/13/2011 - 14:04
Yes, it has a glass top. We had the glass guy cut it to size and sand the edges and put a sealing sticky tape around the edges to make it safe and water proof. We also had to have a hole drilled in the middle for the drain and I put a bead of clear caulk to water seal that spot.
The shelf was easy. Just a couple of ledger pieces nailed with a nail gun (or screwed if you pre-drill) to the legs on each side (from back to front). Then glued the ply wood for the shelf on to the ledgers. I then measured and cut facing to cover the plywood edge and add stiffness to the plywood. I just glued and clamped those on. You may have to cut out a slot in the shelf if your drain pipes are low on the wall (I had to).
Careful is you're going to do three drawers. You'll have a drain pipe going down the middle of the vanity! I had to offset the inside drawers so that they would not hit the drain pipe. I offset them about an inch on both sides (one offset to the left, the other to the right). You can't tell from the front as I sized all four drawer faces the same. If you do three drawers, that middle drawer might need to be less deep (6" verses 12 or more) or you might just make it a false drawer...one that doesn't open at all. Either way, the four drawers (12x12x10) are plenty large enough for our needs. if I had just two drawers i would make them deeper. Good luck! Share a picture with us when you're done!
