Community Brag Posts

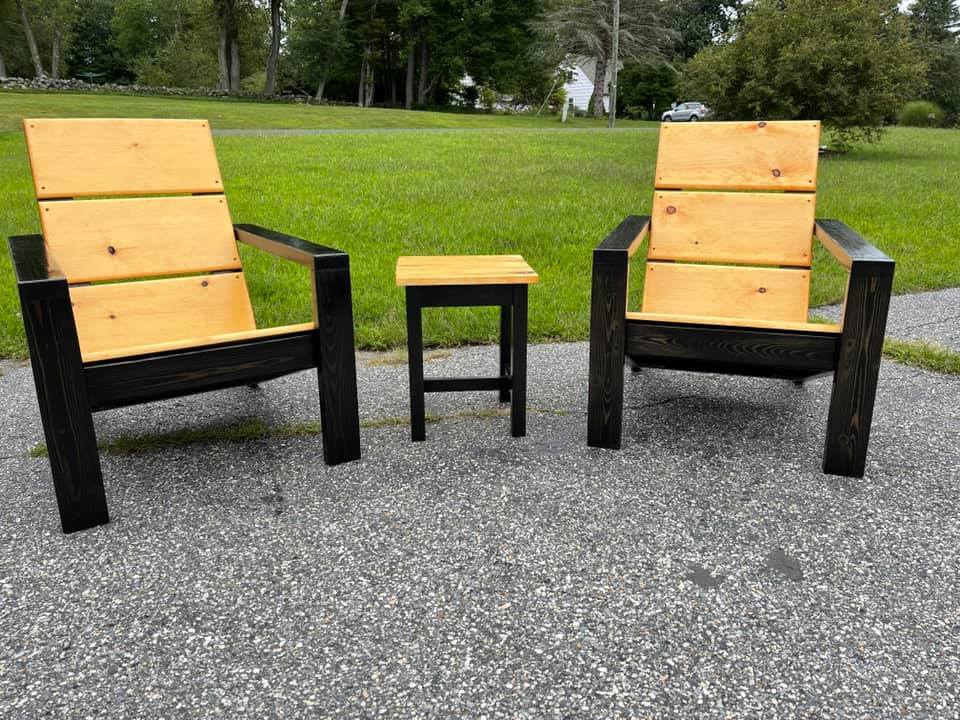
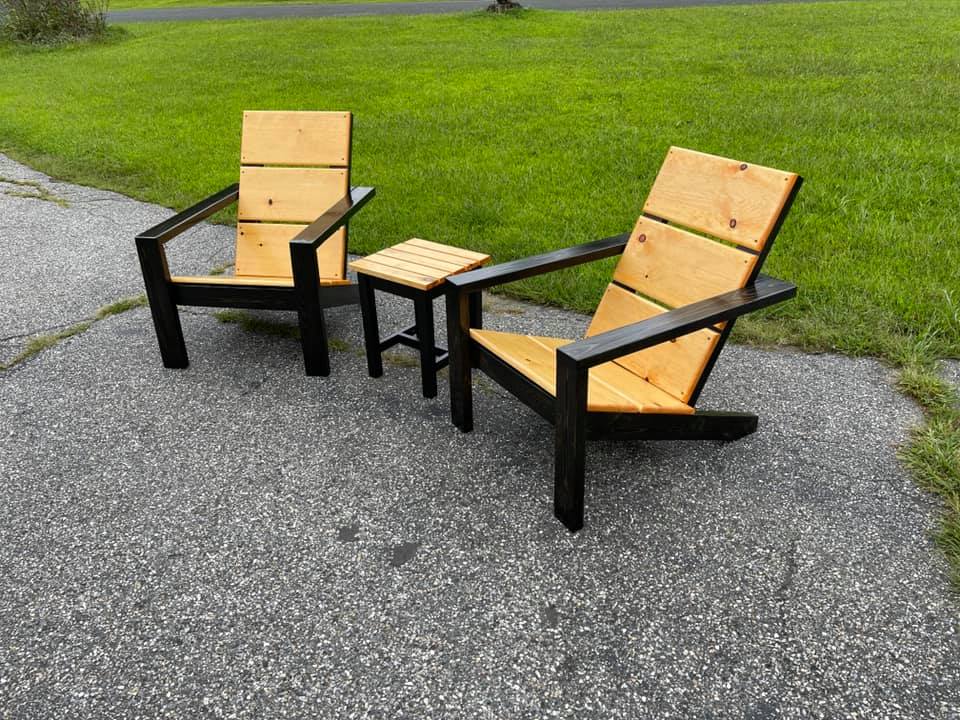
Our Thanksgiving Family Project

Submitted by loniwolfe on Wed, 03/09/2011 - 16:50

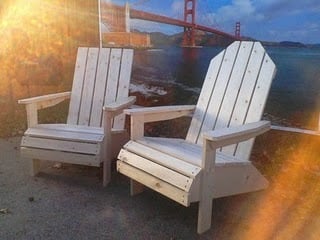
My husband, step father and I built these Thanksgiving weekend (2010) and my mom got us a half bushel of oysters to snack on and made awesome steamed mussels with bread for dinner. This was a very fun family weekend.

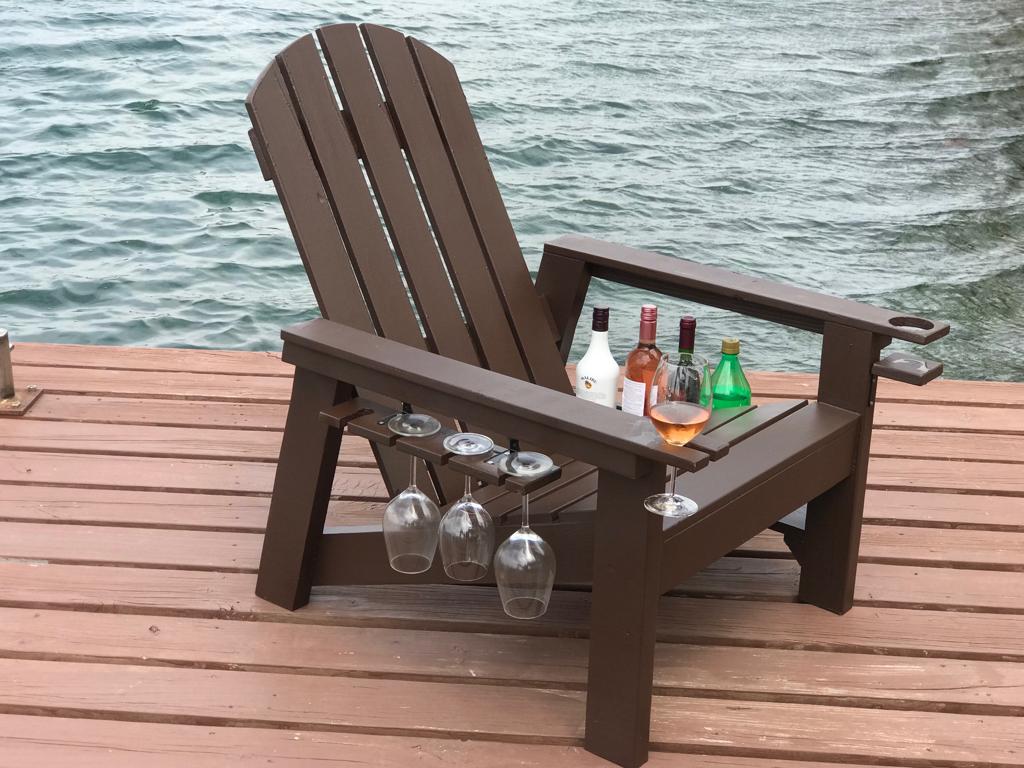
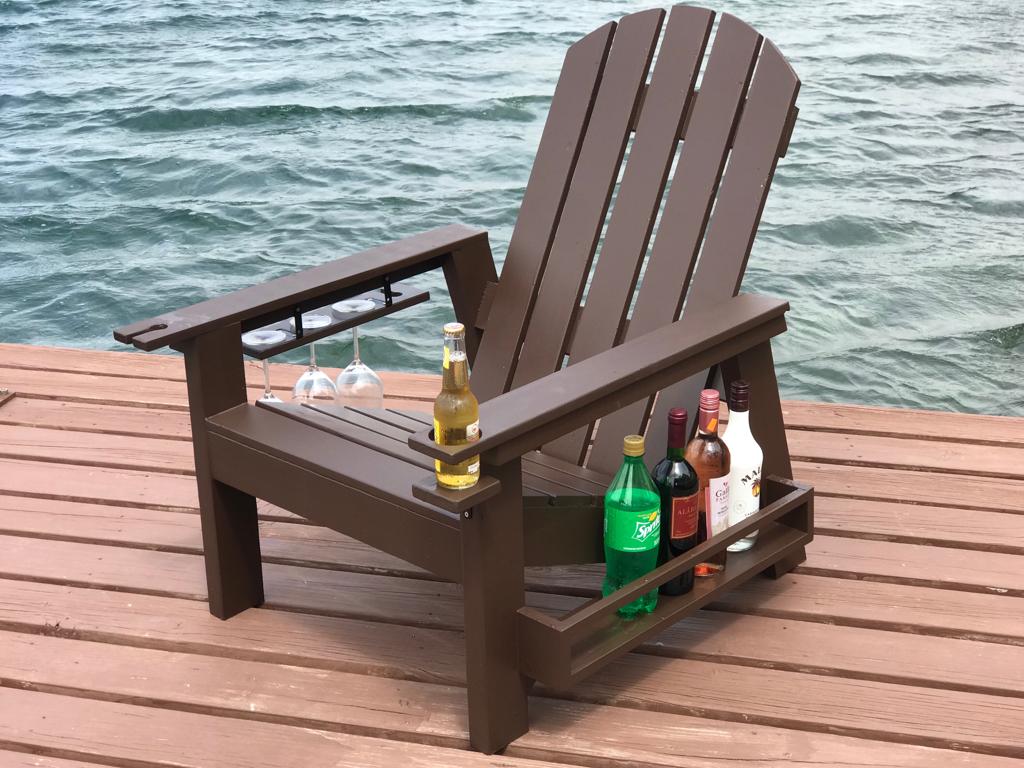
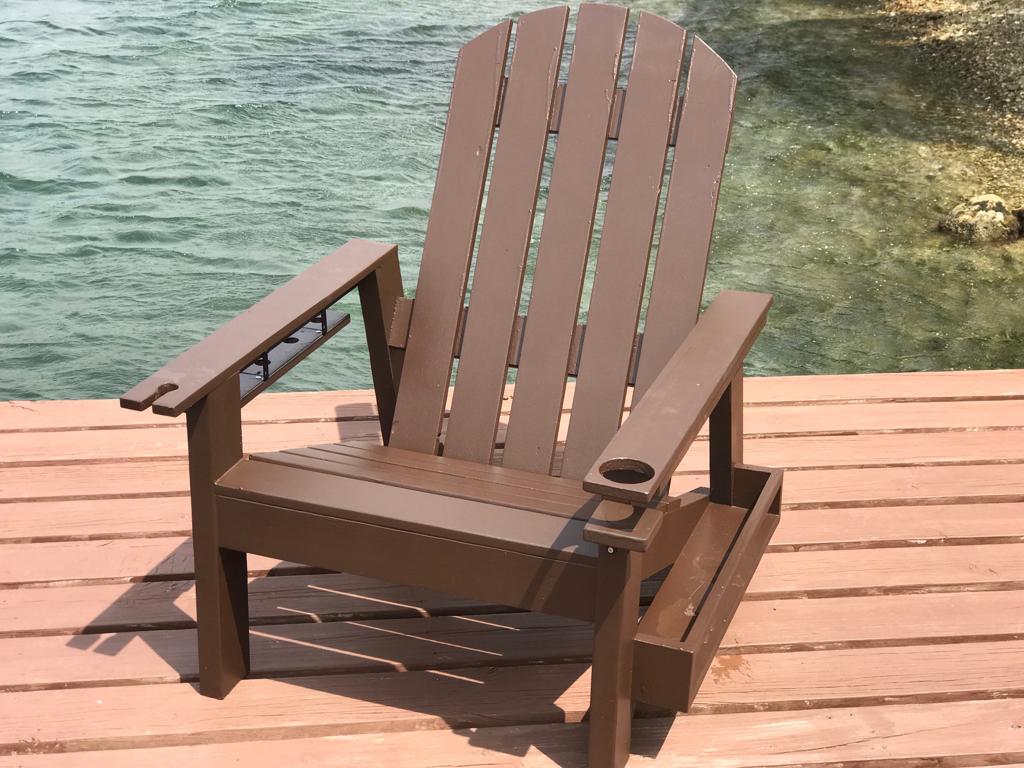
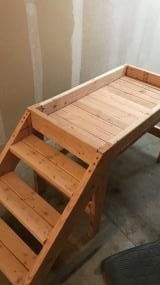
I modifyed the plans a little to make the arms angle in a bit instead of being straight boards and also created the curved front. Then after building the first chair, Pat decided to make the second chair's back rest taller and cut angles to match the arms.

I picked intermediate because of needing a miter saw for all the different angles needed for getting the front right.
Also, It took one day for each chair

Built from Plan(s)
Estimated Time Investment
Weekend Project (10-20 Hours)
Finish Used
To my knowledge, Pat has not yet stained them, but once he does I will take more pics and find out what he used!
Recommended Skill Level
Intermediate

Seesaw

Submitted by KimmoPT on Wed, 06/12/2013 - 02:38

Greetings from Finland. I made teeter-totter from excellent plans Ana has donatet for all of us. I used treated wood, so I didn't need to paint the project (and never will :-) Handles and seats are made from raw wood. Gives also nice twin color look. To add some extra support I embed the beams at foot.

Built from Plan(s)
Estimated Cost
37€
Estimated Time Investment
Afternoon Project (3-6 Hours)
Recommended Skill Level
Beginner

Comments

Seasonal And Holiday

Rustic Modern TV Console

Just finished up this unique TV console.  Built from reclaimed pallet wood. 

Estimated Cost
$150.00
Estimated Time Investment
Weekend Project (10-20 Hours)
Finish Used
Clear coat of wax
Recommended Skill Level
Advanced

Comments

Templar

Mon, 12/02/2019 - 22:10

Hi there Im new to site and also have the issue of not seeing the plans for this Rustic Modern TV Console. Are they available and Im doing something wrong or??

Modified Beginner Farm Table and Bench

Submitted by Anonymous (not verified) on Tue, 06/28/2022 - 12:09

Altered the Beginner Farm Table plans to use 2x8s for the top and 4x4s for the legs. I used pocket holes for the table. I followed the bench plans almost exactly, adjusting slightly for the 2x8 tops. I am a beginner and I did it myself! The table and bench are beautiful and sturdy! Thanks Ana!

Comments

Closet shelving for sloped ceiling.

Submitted by kellystern on Mon, 01/09/2023 - 16:22

I used Ana’s Shelf Help Configurator to build these shelves for a deeply sloped ceiling. None of those well known Closet Organizer Companies could come up with a decent plan for this closet and they charge a small fortune.

Comments

Adirondack chair

Submitted by Davis_Reed on Fri, 05/24/2019 - 07:10

These are the adirondack chairs and I took the basic model and added a wine glass holder and also a bottle/snack bag holder.

Estimated Time Investment
Weekend Project (10-20 Hours)
Finish Used
Benjamin Moore wood primer and then Benjamin Moore oil based paint.
Recommended Skill Level
Beginner

Comments

Kamado table

Submitted by lmarco191 on Sun, 05/16/2021 - 14:47

The table assembly was Inspired by farm table and workbench plans. It was built from construction grade untreated 4x4 and 2x6 and assembled using Kreg pocket screws and glue. Finish is semi-transparent wood stain. Rather heavy, the table have locking wheels to help move it. The lower shelf is used to store accessories.

The small kamado is just the right size for two people. I added a large ceramic tile under the firebox plus a small inlay next to the grill. That was the top of a small patio table. A few hooks were added as a final touch.

We built it last year; it gets a lot of use as a grill, smoker, bread and pizza oven.

We are very satisfied with the outcome. Many thanks for the plans and inspiration.

Built from Plan(s)
Estimated Time Investment
Week Long Project (20 Hours or More)
Finish Used
Semi transparent wood stain
Recommended Skill Level
Intermediate

Comments

Jacob1234

Mon, 08/02/2021 - 23:34

Your grill is very beautiful, but I prefer cooking in the kitchen, I will explain why, I recently read a lot of Kitchenotic.com here, what connects me and the kitchen most of all is the answers to my any questions, no matter how stupid they are and the answers were always correct

Palette Mud Kitchen

Submitted by Anonymous (not verified) on Fri, 05/05/2023 - 03:16

Here's the Mud Kitchen I made for my son's kindergarten. All made from palettes. Unfortunately your plans came out just too late

Built from Plan(s)

Comments

Butcher Block Kitchen Island

I built this from Ana's plans with some slight modifications. The top is built from hard maple and is an edge grain butcher block. I sealed the top with mineral oil and beeswax. The finish is distressed calypso blue. I also added 3" locking and swiveling casters.

Built from Plan(s)
Estimated Cost
$200.00
Estimated Time Investment
Week Long Project (20 Hours or More)
Finish Used
The paint is calypso blue by Benjamin Moore. I sanded and distressed the piece. I then wiped on stain and wiped off stain to add a rustic look.
Recommended Skill Level
Advanced

Comments

Outdoor Play Kitchen!

Submitted by Anonymous (not verified) on Thu, 12/28/2023 - 08:57

We modified Ana White’s excellent Mud Kitchen plans, adding a third section and scaling the whole thing slightly larger to be a better size for our 4 and 6 year old grand daughters. It was so much fun to make and accessorize!

Built from Plan(s)
Seasonal And Holiday

Cottage Bench Turned Laundry Hamper

This bench was the perfect size for a long wall in our bathroom!  My husband added a solid front panel and used peg board to create a vented back panel.  Then he made the seat hinged.  Now we have a great bench that doubles as a laundry hamper with two compartments.  I absolutely love it!

Recommended Skill Level
Intermediate

Comments

Doggy loft bed!

Submitted by Anonymous (not verified) on Sat, 06/03/2017 - 17:31

My dog loves to people watch all day while I'm at work and she needed a new bed so I took the plans for the lower platform and modified them so it would stand alone. Took the platform and put it on the bottom so that her bed would sit inside instead of on top where she could more easily fall off.

I tried building without PH screws at first and all I ended up with was a lot of cracked and wasted lumber. Got the PH jig and finished the whole build myself in 2 hours. Sanding, staining, and sealing tomorrow but I'm just so excited about it I had to post now!

Estimated Cost
With the two sets of lumber, having to buy the jig, hardware, stain, and electric sander it cost me about $130
Estimated Time Investment
Afternoon Project (3-6 Hours)
Recommended Skill Level
Beginner

Comments

Modern Adirondack Chairs and Adirondack Table

Submitted by jer727 on Mon, 08/30/2021 - 12:18

This is one of my first wood working projects I have accomplished and these two plans were some that I really enjoyed making.

Comments

Seasonal And Holiday

Coffee station

Submitted by Anonymous (not verified) on Wed, 10/20/2021 - 14:39

I was inspired by your coffee station plans to build this unit. I added an upper shelf with gas pipping, along with LED lights under the shelf. This station has been very popular in our house.

Comments

Bedside End Tables

Submitted by Grace734 on Mon, 02/05/2018 - 07:38

These are made from the three drawer plans but modified the size to meet our needs and used planks for shelves instead of drawers. Painted white and black gel stain. 


UPDATE FROM ANA - We have received MANY requests for this plan and have created a plan inspired by this post here.

Shopping List (for ONE bedside table) + Tools

  • 1 - 1x2 @ 6 feet long
  • 5 - 1x4 @ 8 feet long
  • 2 - 2x2 @ 8 feet long
  • 1-1/4" and 2-1/2" pocket hole screws
  • 1-1/4" brad nails
  • wood glue
  • Kreg Jig
  • Compound Miter saw
  • Drill
  • Brad Nailer (18 guage)

Cut List (for ONE bedside table)

  • 4 - 1x2 @ 14" - Side panel trim
  • 8 - 1x4 @ 23-1/4" - Side panels
  • 4 - 2x2 @ 27-1/4" - Legs
  • 6 - 2x2 @ 14" - Shelf support
  • 8 - 1x4 @ 17" - Shelves
  • 5 - 1x4 @ 18" - Top

Cut 1x4s and 1x2s with miter saw. Layout side panel 1x4s as shown above.  Measure and cut 1x2 to length.  Nail the 1x2 to the 1x4s, two nails per overlap with glue.  Make sure your side panels are square.  Build two.

Drill 3/4" pocket holes on inside edge of 1x4 ends as shown above.  Cut 2x2s with compound miter saw. Attach to the 2x2 legs with 1-1/4" pocket hole screws.

Set Kreg Jig to 1-1/2" setting.  Drill 1-1/2" pocket holes on end of each 2x2, one per end.  Attach to 2x2s with wood glue as shown above.

Cut 1x4 shelf boards with compound miter saw.  Nail and glue to the inside of the project as shown above.

Cut 1x4 top boards with compound miter saw.  Nail and glue to top with 1-1/4" nails and wood glue.

If you wish to add a back, measure and cut from 1/4" plywood and attach with 3/4" brad nails.

Estimated Cost
100.00 for both.
Estimated Time Investment
Weekend Project (10-20 Hours)
Finish Used
One coat of eggshell white PPG
Two coats of ebony gel stain
Recommended Skill Level
Beginner

Comments

Small Chicken Coop with Planter

Submitted by will m. on Sat, 05/25/2019 - 12:14

Great plans! Fun project

Estimated Time Investment
Weekend Project (10-20 Hours)
Recommended Skill Level
Advanced

Comments

Seasonal And Holiday

Coffee Bar with Built-In Beer Fridge and Wine Storage

Submitted by Chuck1979 on Mon, 07/08/2019 - 10:39

We made a beverage station for the corner of the kitchen!

Estimated Cost
$250
Estimated Time Investment
Day Project (6-9 Hours)
Finish Used
Semi-gloss white paint and Dark Walnut stain
Recommended Skill Level
Intermediate

Comments

gunnare57

Fri, 07/31/2020 - 09:43

Hello! Was looking to see if this is something you would be interested in building for us? We are in love with this project but don't have the tools or means to do it ourself..

Can talk about pricing / size etc.
Thanks!

Back