Community Brag Posts
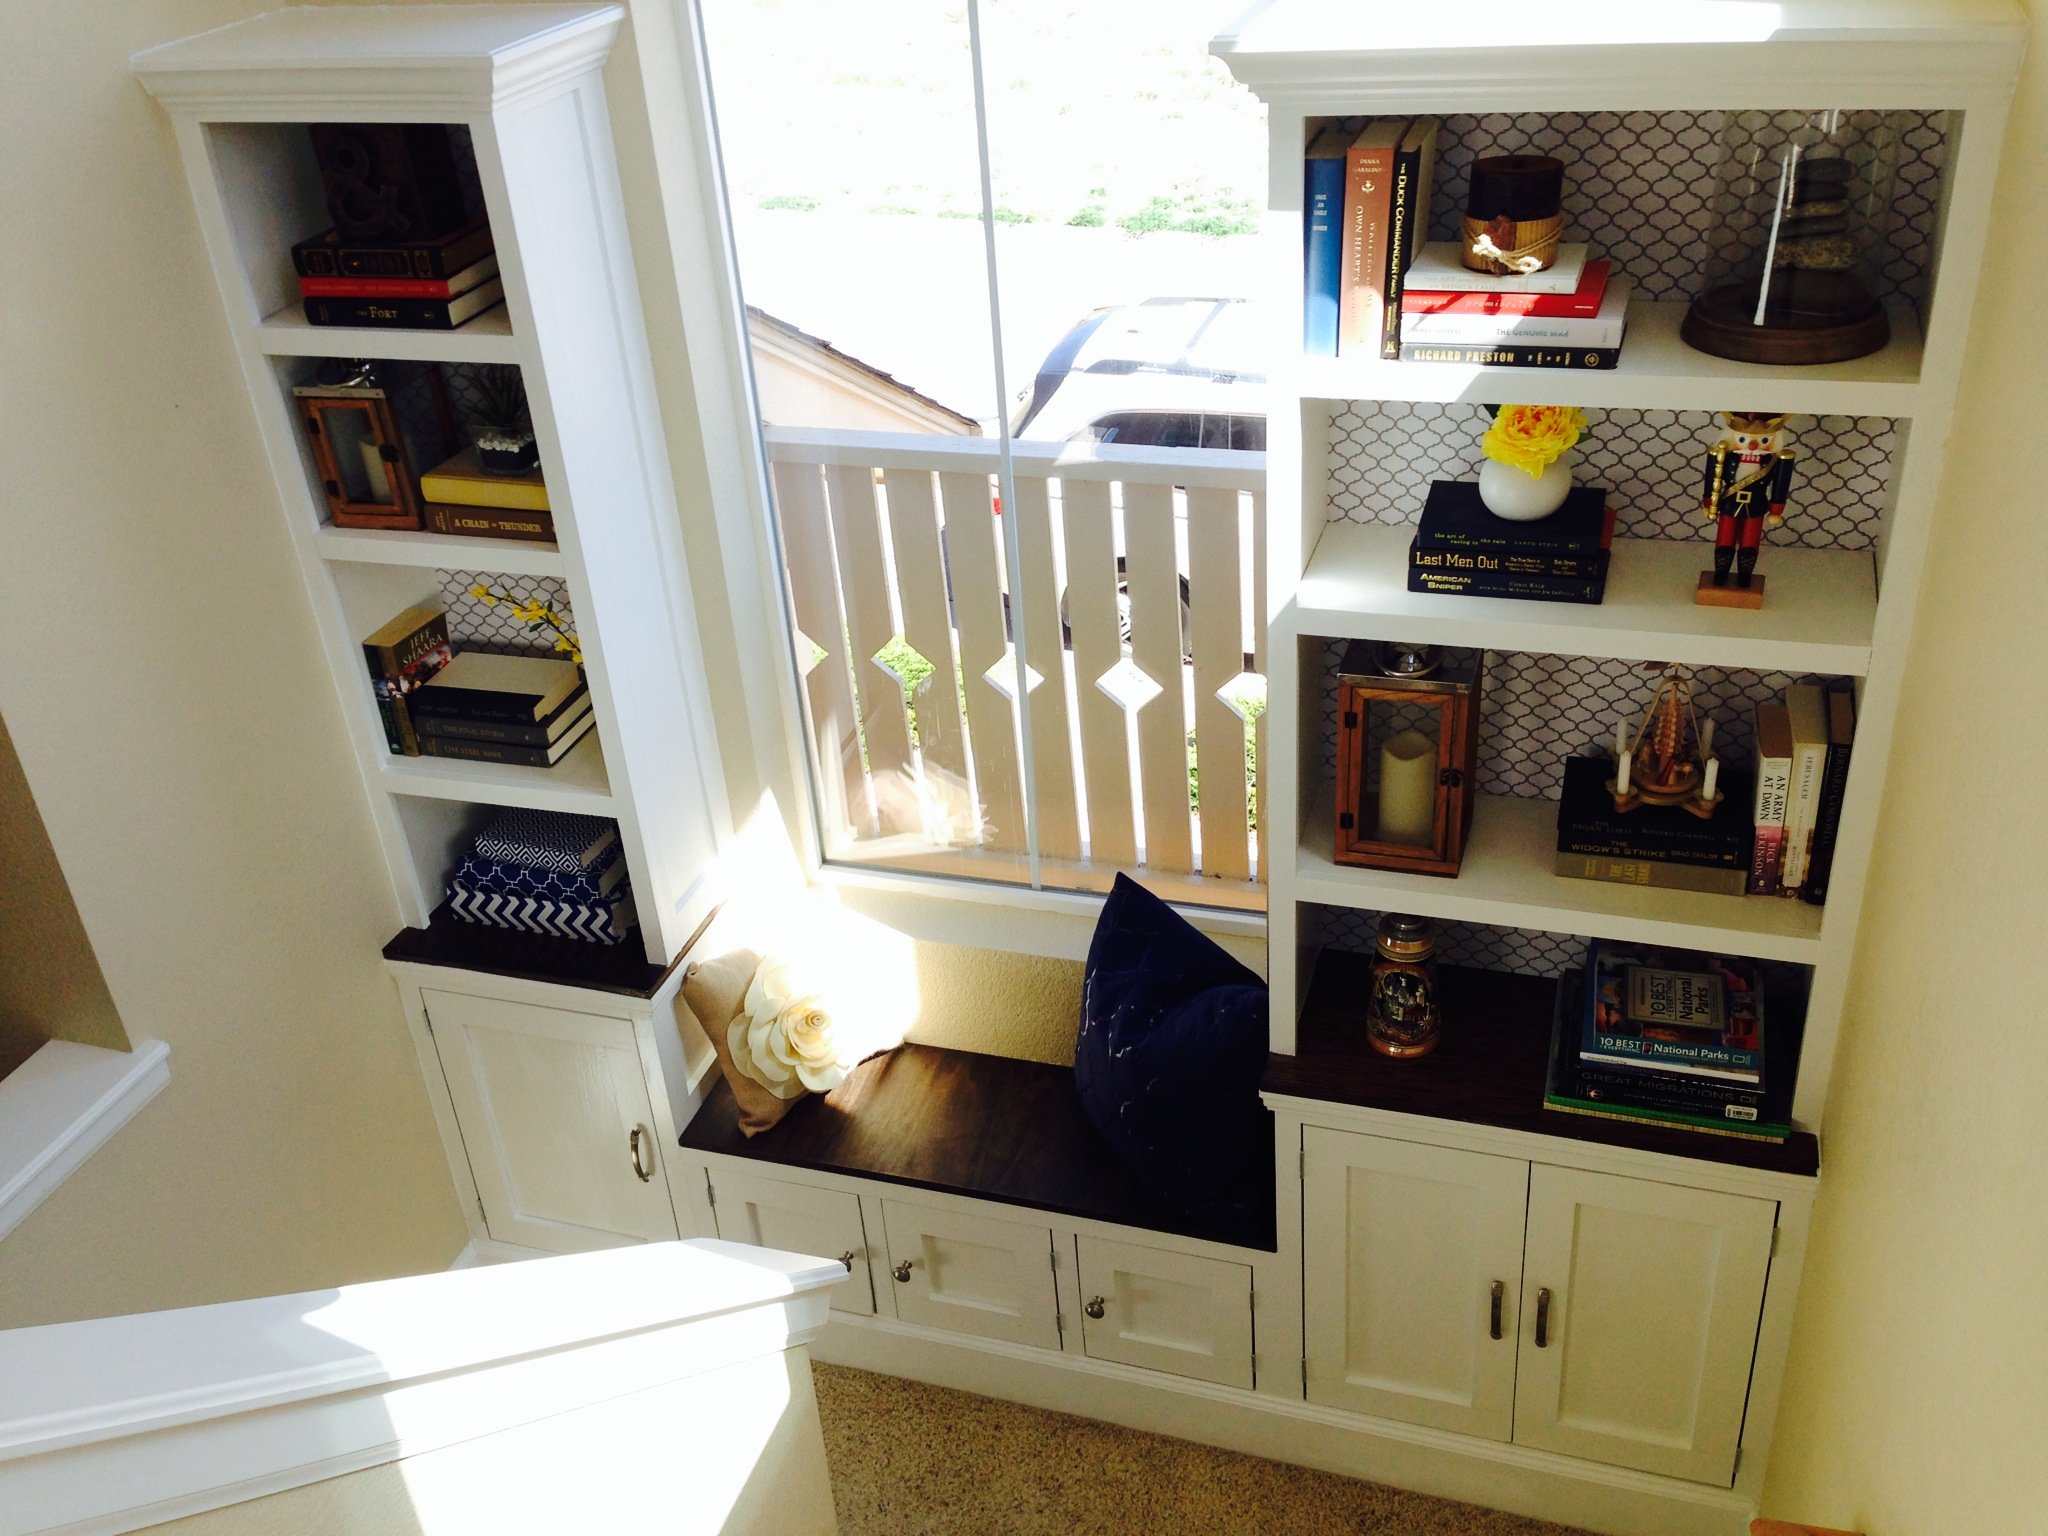
Built in bookcase with lights

Built in bookcase with lighting and power outlets in cupboards for audio and DVD equipment to feed to the wall mounted tv (to the left).
The photo with the lights is when it was unfinished and I also decided that I didn't like the inset doors and so made new overlay ones. Now I have four doors I need to use on another project...


Estimated Cost
$1000
Estimated Time Investment
Week Long Project (20 Hours or More)
Finish Used
Sherwin Williams Pro Classic Extra White Satin.
Recommended Skill Level
Intermediate
Comments
Mothers Day
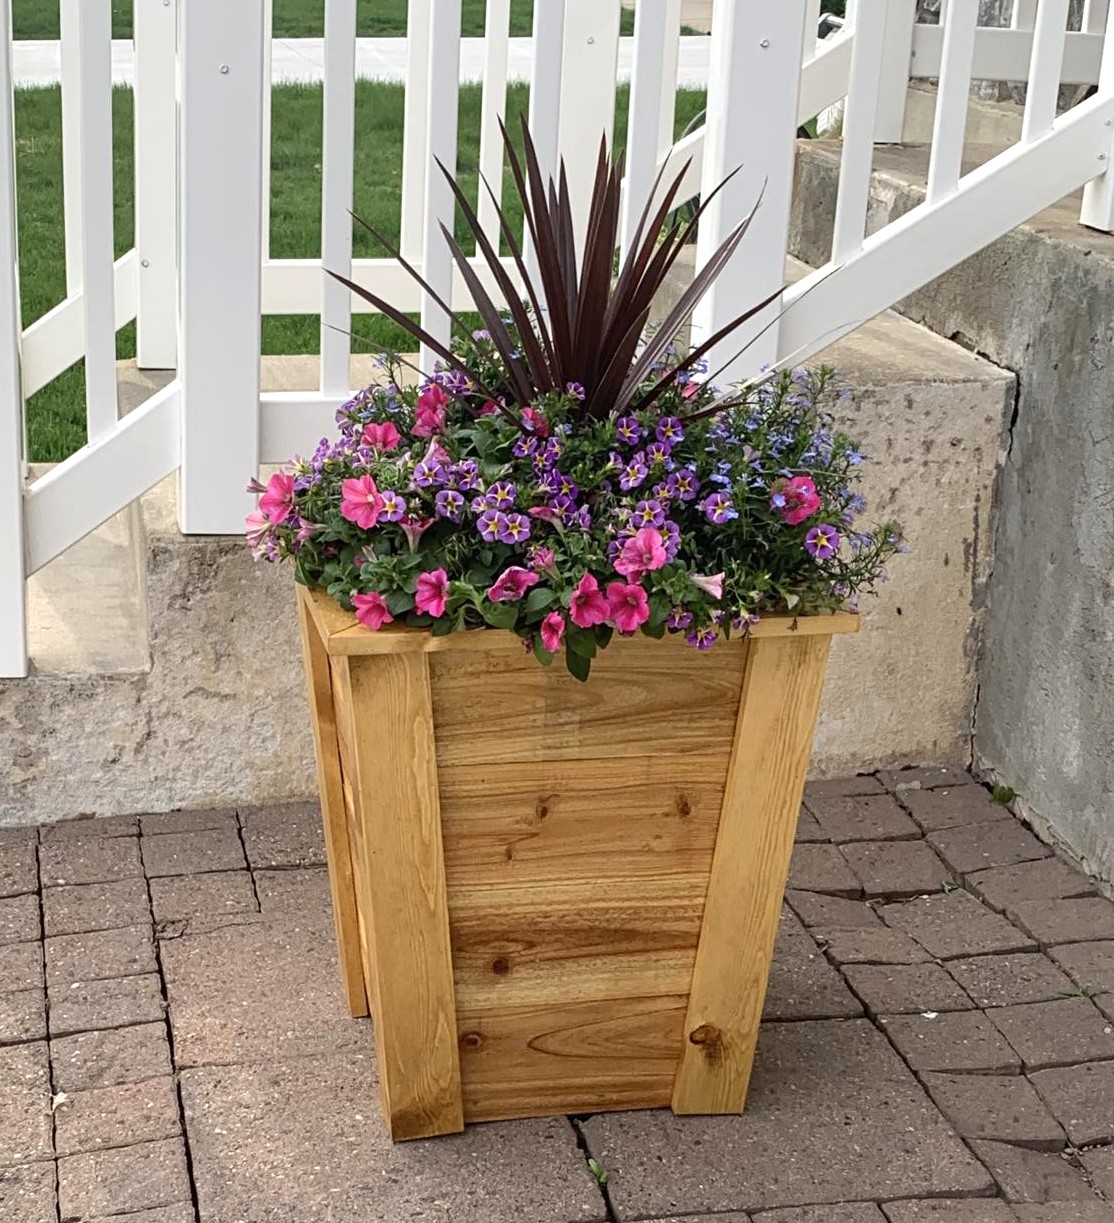
I made this tall planter for my Mom for Mothers Day. She loves it!
Built from Plan(s)
Comments
Thu, 05/18/2023 - 07:33
Beautiful planter!
I bet she loves it, fantastic job! Thank you for sharing.
Dog Bed Window Seat
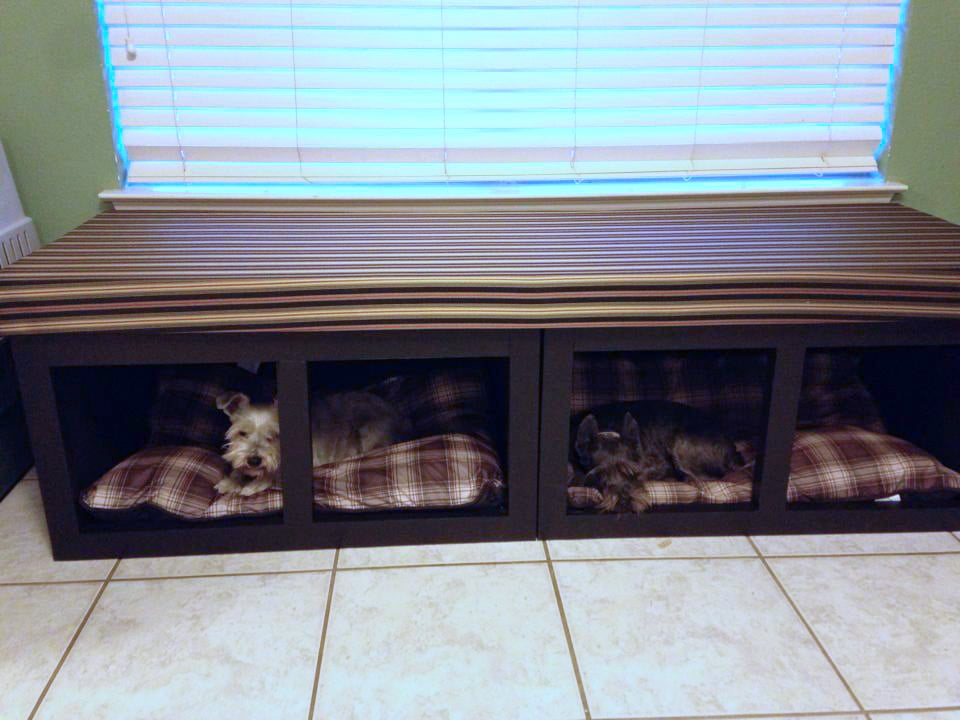
I wanted a place for our dog beds, without just having them all over the floor (we have 2 big dogs and 2 little ones. I decided to build a window seat in front of the large window in our dining room which could double as dog beds/kennels. While the base plan was off the large wood pet kennel end table, it had to be modified significantly to be wider, shorter, and sturdy enough to sit on. I am also still trying to decide if/how i want doors on here. This is actually 2 kennels next to each other (not 4) Next will be to build 2 actual kennels for the big dogs to place on either side of this.
Built from Plan(s)
Estimated Cost
$150-$200 (high because of the foam and fabric for the seat cushion)
Estimated Time Investment
Weekend Project (10-20 Hours)
Finish Used
black paint/ poly
Recommended Skill Level
Beginner
Comments
Queen Loft Bed

I made this bed for my 6 year old daughter. I loved Anna's Loft Bed plans, but she wanted a bigger play area underneath. So I modified the twin loft bed plans to fit a queen mattress. I also added extra supports for the mattress, and I used PureBond plywood on top of the supports for the mattress to sit on.
That's the Farmhouse Toddler Bed underneath. My younger daughter inherited her big sister's twin bed, so the toddler bed was put to use in the new "playhouse."

Built from Plan(s)
Estimated Time Investment
Week Long Project (20 Hours or More)
Finish Used
I sanded the wood and primed it. Then I sanded (lightly) again and painted it with Valspar latex enamel in Gloss Almond.
Recommended Skill Level
Intermediate
Comments
Wed, 02/09/2022 - 15:31
We’ve been looking for…
We’ve been looking for exactly this!! Can you share your modified plans and the list of lumber and supplies needed?
Sun, 09/02/2012 - 12:45
Modified Queen Size
I think it's great that you modified it to a queen! I live a studio and NEED something like this. Could you share the modifications? It looks beautiful = )
Sun, 09/02/2012 - 20:58
The changes I made were: End
The changes I made were:
End planks cut to 63"
Top back guard and front and back rails cut to 87"
The top guard rails on ends cut to 66"
I measured for the mattress supports and the front guard rail after the rest was completed.
You should also measure for the bookcases after the rest is completed, but each of mine wound up being about 31" wide.
Everything else was pretty much the same.
Hope that helps.
Thu, 11/01/2012 - 08:24
Thank you!
This is wonderful - I've been looking to make something like this for an urban efficiency (adult) apartment! Thanks so much for sharing your modifications!
Mon, 07/29/2013 - 14:08
queen loft for adults
Will the height of the bed allow for adults to stand under it? If not what modifications should be made to make the height fit a standing adult? (the highest being 6'1" male) Thanks! =D

Night Tables
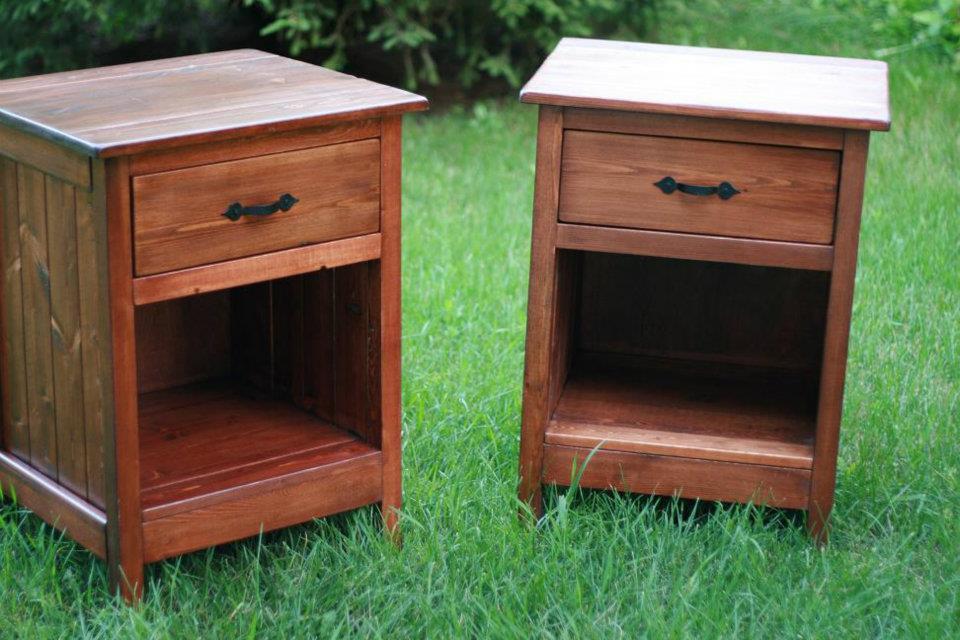
I used the plans for the Reclaimed Wood bedside tables but I didn't want to make all those drawers (being a beginner) so I settled on one. It took me fairly long to complete but really it should have been only a weekend project. I love the way they turned out.
Built from Plan(s)
Estimated Time Investment
Week Long Project (20 Hours or More)
Finish Used
One coat each of Varathane's Early American followed by Red Mahogony. Two coats of poly.
Recommended Skill Level
Beginner
Comments

Fri, 07/20/2012 - 20:16
beautiful!
I too fear drawers.
Your bedside tables have turned out beautifully!

Easy small space side table

This was my first project. It was relatively easy but I did make some mistakes that are now design features


Built from Plan(s)
Estimated Cost
Reclaimed wood
Estimated Time Investment
Afternoon Project (3-6 Hours)
Finish Used
Minwax English chestnut
Recommended Skill Level
Beginner
The Boys Create!
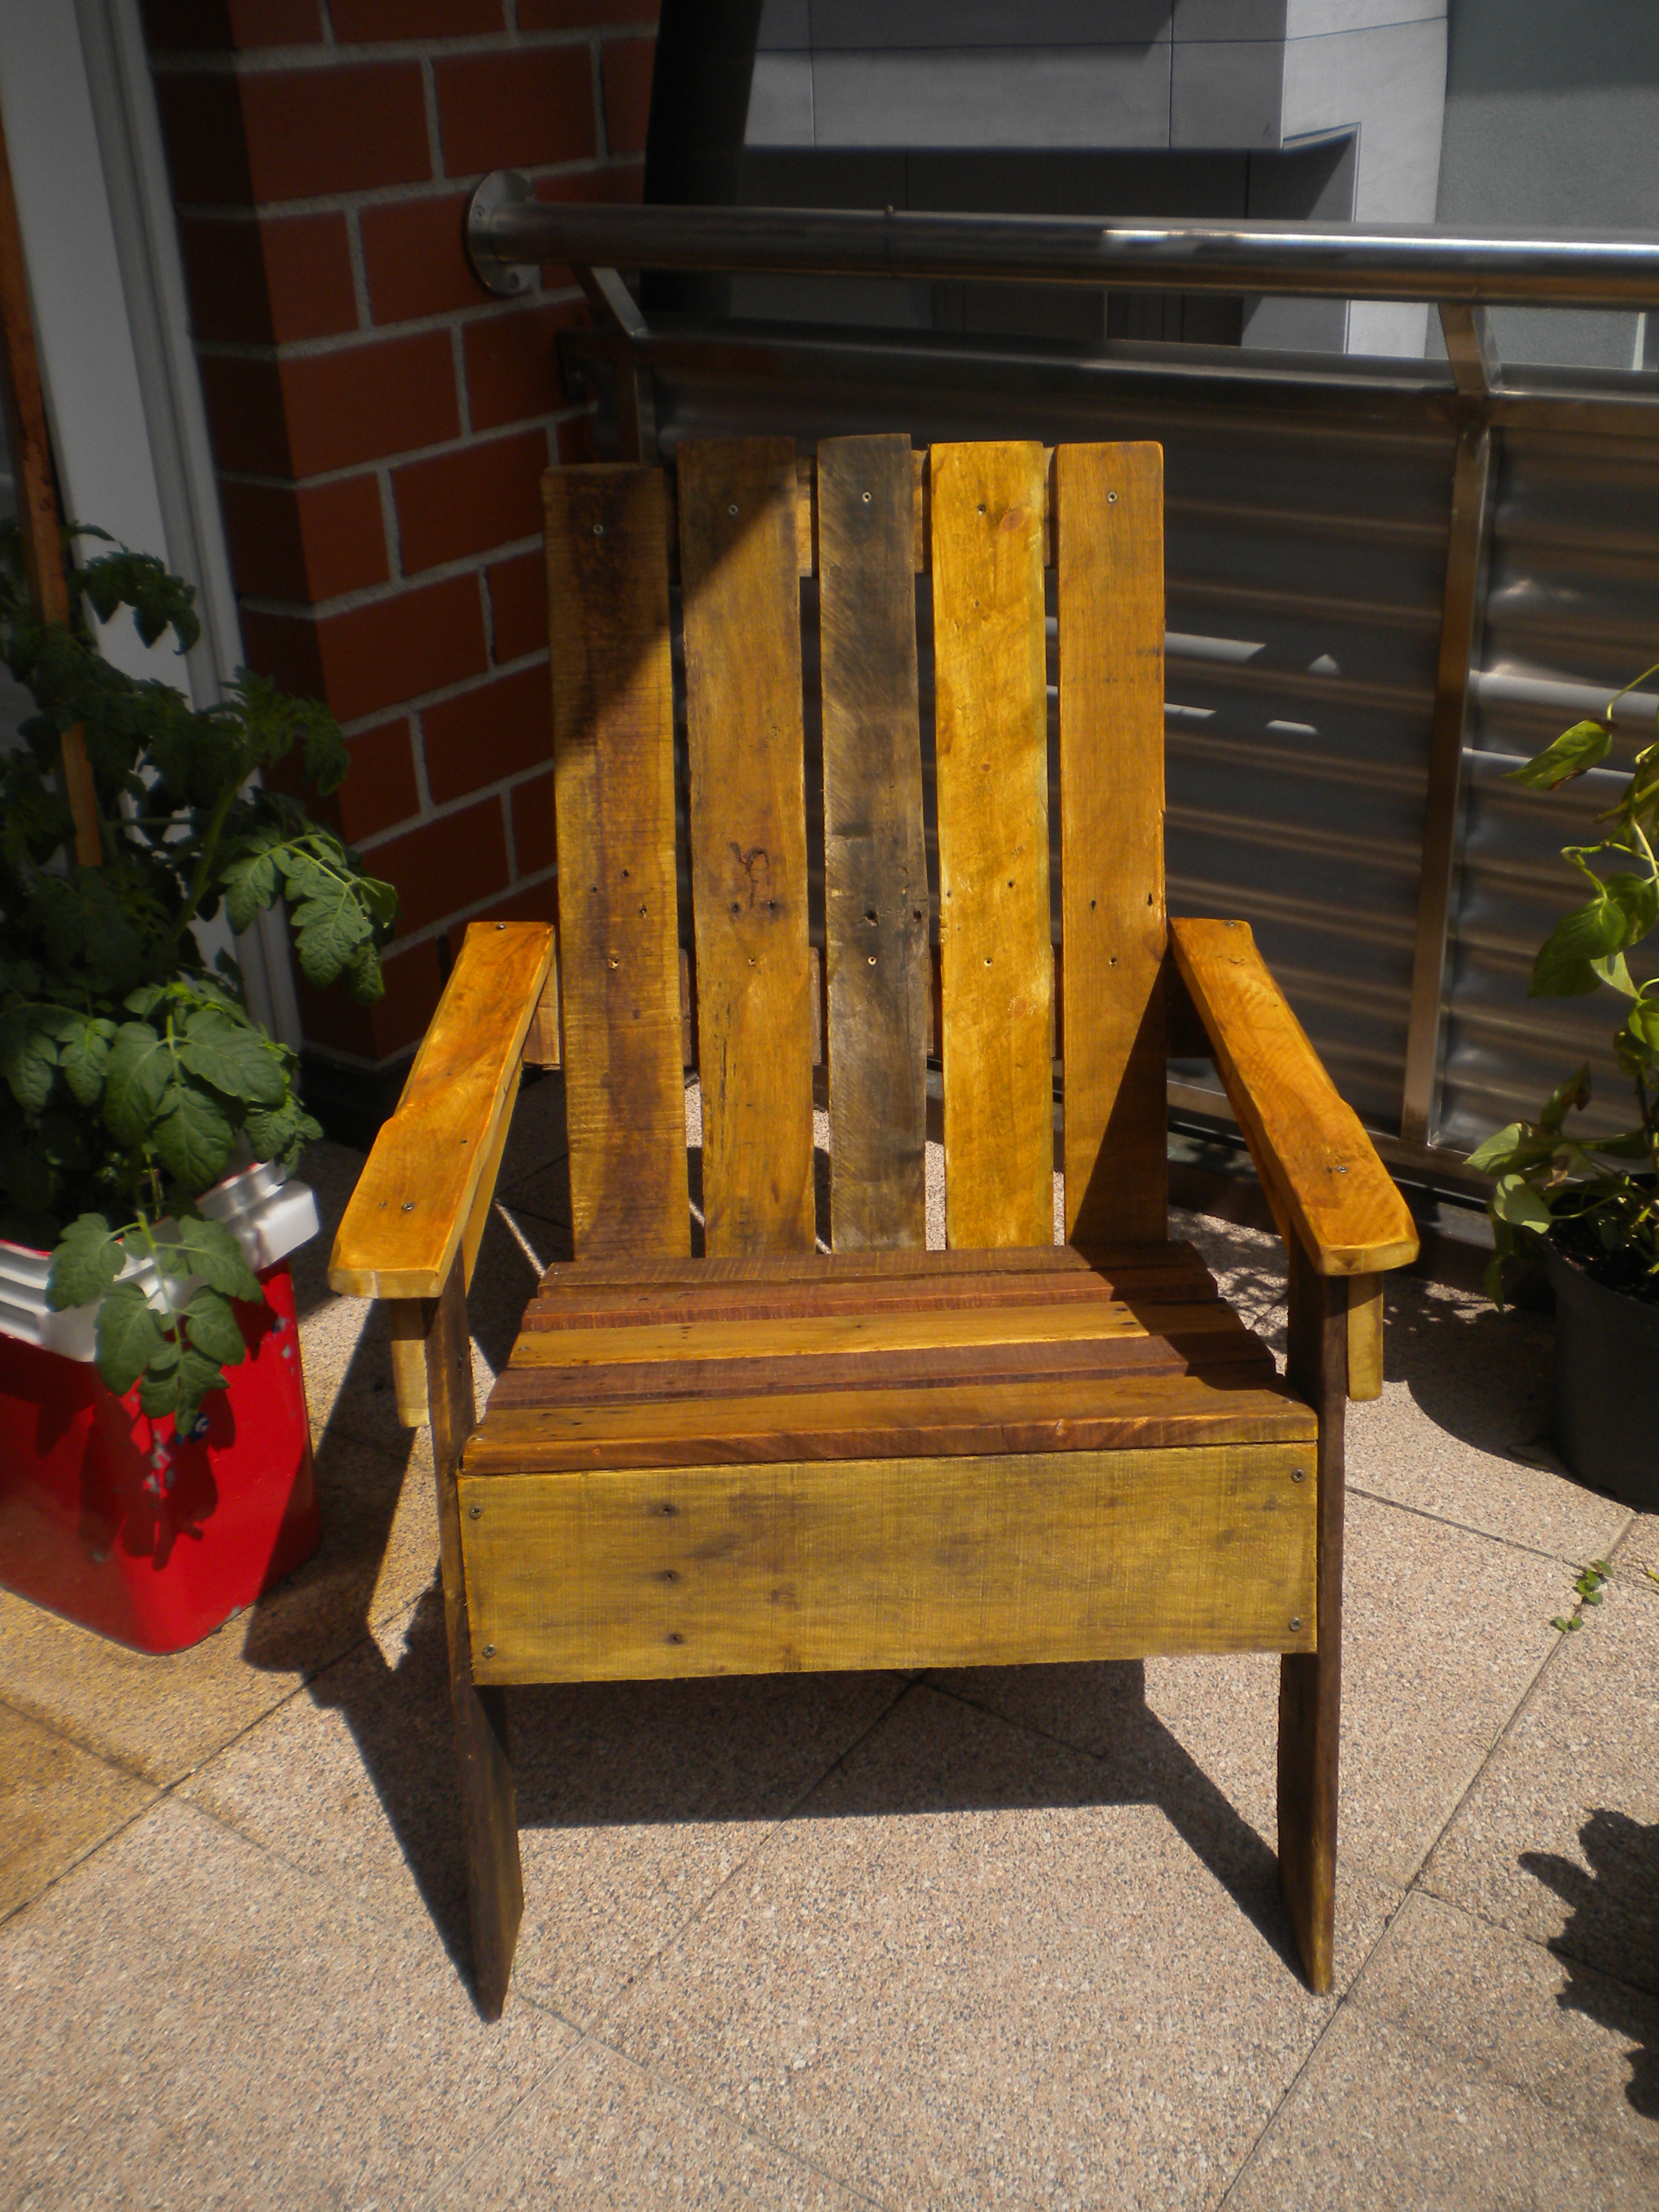
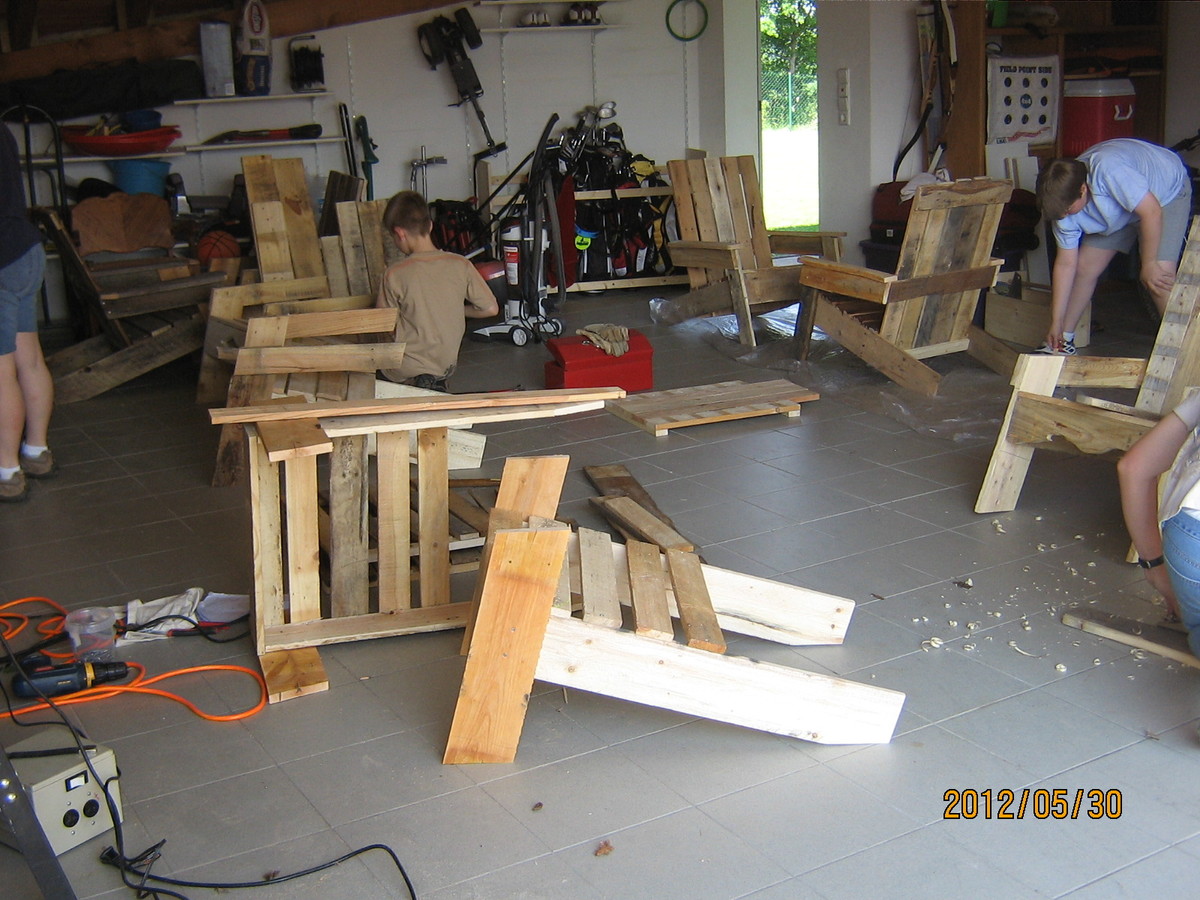
We were able to pick up pallets for free. There were 6 boys aged 10-13 years old. They each took apart 5 pallets. Their pallets with time and patience became two adirondack chairs each. We love the chairs and the boys learned quite a bit. The challenge was that the pallet peices differed in thickness and widths so the boys had to really focus on each piece and the overall look. They look fantastic. The finishes were all different. We are so thankful that Ana has put together such a wonderful website.
Thank you Ana! These boys learned that if they need something, they can make it themselves! They also learned that trash can be a treasure.
Thank you,
Amy
Built from Plan(s)
Estimated Cost
$80 for 12 Chairs
Estimated Time Investment
Week Long Project (20 Hours or More)
Finish Used
The boys chose between outdoor paint, stain, or deck stain finishes.
Recommended Skill Level
Beginner
Comments

Craft Closet

When I was given a stack of MDF sheets from a friend, I knew this was the desk I wanted to build with it first! We recently moved into my husband's grandmother's house, and have been making some improvements. We took out the dark old built in, and I replaced it with three 4' long gallery shelves, and the Parson's Desk modified to 4' long. It fits perfectly in my space, and looks so chic and modern against our teal walls. It's the perfect craft nook and workspace! I added a mason jar pendant light I DIY'd from the IKEA bulb kit, and also sewed a reversible runner to match my handmade duvet cover. The fabric is Deer Valley, from Free Spirit. I also had the glass top from the original desk cut down at Lowe's for free, and it's a perfect fit.


Built from Plan(s)
Estimated Cost
$30 for ledges, $30 for desk
Estimated Time Investment
Day Project (6-9 Hours)
Finish Used
I sanded the 2x2's with 150, then followed up with three coats of semi gloss white paint, sanding with 220 in between coats.
Recommended Skill Level
Intermediate
Farmhouse Queen Bed and Headboard
Thank You Ana-White for the amazing plans for this beautiful farmhouse queen bed! Not bad for the first try!
Built from Plan(s)
Estimated Cost
$150
Estimated Time Investment
Weekend Project (10-20 Hours)
Recommended Skill Level
Beginner
Comments
Modified rustic table and benches
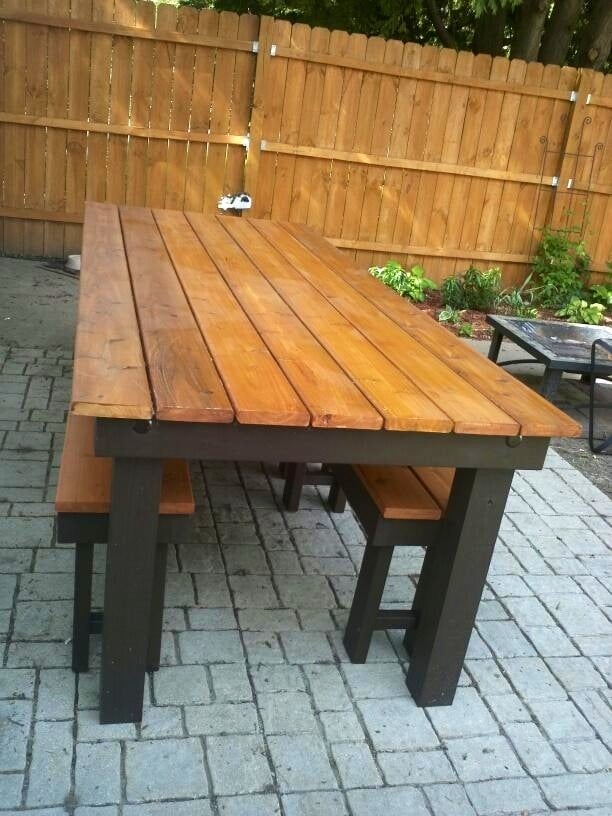
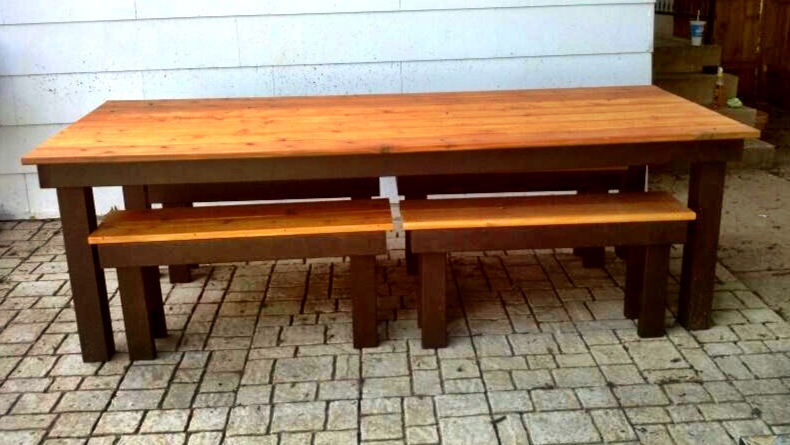
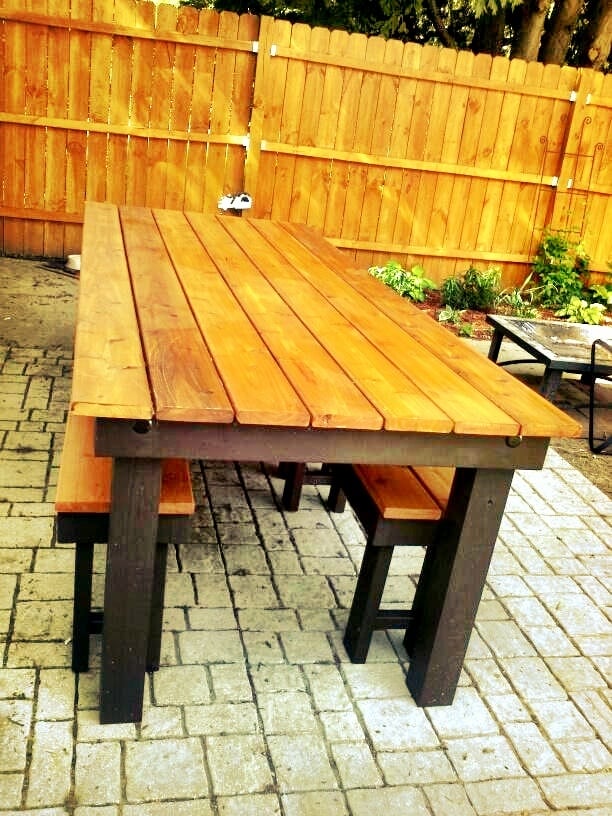
We built this table for my brother and new wife's wedding present. We modified it to use as an outdoor dining set. Instead of using the 1x10 for the tabletop we used 2x6's and for the legs we used 4x4's. We attached the top boards with a Camo fastening system we used last year on our deck (works great to conceal the screws). I stained the frame in Behr Cordovan Brown and the top boards in Behr Cedar Naturaltone. It was our first attempt at building a table and I think it turned out great, only problem was giving it away!
Built from Plan(s)
Estimated Cost
$300
Estimated Time Investment
Week Long Project (20 Hours or More)
Finish Used
Behr cordovan brown stain and Behr natural cedartone
Recommended Skill Level
Beginner
Comments
Mon, 06/17/2013 - 10:57
Very nice! I'd been
Very nice! I'd been considering this plan for my outdoor table, but my husband liked the modern farm table better. Same idea--I am leaving gaps to allow the water to drain. Love the two-tone finish! It's amazing what you can do with plain old 2 x 6s!
Convertible picnic table

I built this table with the dimensions described in the original plans, but made a slight modification by using my Kreg Jig to add pocket holes for attaching the tabletop and seat boards from below rather than drilling down through the top. I'm never really happy with the way a finish comes out after using wood filler, plus not having to fill holes saves a step in the finishing process (which is the really arduous part of the job for me). I also like the sturdiness of the Kreg joints.
This was my first project using the Kreg Jig in an application that didn't have the location for the pocket holes specified, so for the first bench I followed right along with the plans and just detached the drill guide and clamped it to my project to drill the pocket holes as I went along. For the second bench I was familiar with where all the holes should be drilled, so I was able to quickly mark off the location and pre-drill all the pieces assembly line fashion. The second one practically flew together.
If you want to use this method, you will be drilling your pocket holes in the boards labeled "seat support" and "tabletop support" (there are 2 of each of these pieces for each bench/half table). You can mark the position of the tabletop boards on the tabletop supports and drill your pair of pocket holes to correspond roughly to the center of where each board will be (so 6 holes in each of the 2 pieces labeled tabletop support for each bench). Nearly the same process for the seat supports, but remember that the holes to attach the outermost seat board won't be centered because of the location of the front leg. I chose to add a couple of pocket holes through the front leg board as well for extra sturdiness in case it gets picked up by that outermost seat board when the bench/table is getting moved. I have included a picture of the pre-drilled pocket holes to help clarify the above directions.
The build itself can definitely be classified as a beginner project and easily manageable by one lady (although it would be really nice to have a buddy to help move the finished bench...I had to take the tabletop back off mine to move it from my "workshop" (carport) around to my patio). In terms of time, the build for both benches could easily be completed in an afternoon; I ranked it as a weekend project because of the finish. The tabletop and seat boards each have 4 coats of an exterior semigloss paint and I custom blended the colors so that each board gets progressively darker as you go down the bench. I was inspired by the ocean, with the water getting darker as you go deeper and deeper. As you can see from my photos, I rushed headlong into the first bench and put it together unfinished (I was more concerned about figuring out the placement of the pocket holes than the finish.) For the second one I pre-drilled my pocket holes, then put on 2 coats of base coat and 1 coat of color (on seat and tabletop boards) before assembly, saving only the finish coat on the colored boards and touchups on the white boards for after assembly. I definitely recommend the second method.
I worked on the project over a couple of weekends and evenings because of weather and time constraints, but under the right conditions it could be completed in a weekend or even maybe a long day (especially with a second painter and in good paint drying weather). I'm really happy with the final product and I've already been enjoying the comfy bench seat for reading.


Built from Plan(s)
Estimated Cost
$100 (including finish)
Estimated Time Investment
Weekend Project (10-20 Hours)
Finish Used
Exterior semigloss paint: 2 coats of self priming base coat (Valspar Duramax) and an additional 2 coats of color that I custom mixed into 6 shades on the bench seats and tabletops. The darkest shade on the outermost seat board is called Monterrey Bay Teal from Valspar. I mixed the five additional colors with white in 15% by volume increments. (If you want to get really, really specific, I started with a quart of the teal and made 100 grams of each of the 5 blended colors and this was almost the perfect amount to put 2 thick coats of color on all sides of each of the seat/tabletop boards.)
Recommended Skill Level
Beginner
Comments

Fri, 06/28/2013 - 10:59
Like your style
I love the color scheme! Thanks for sharing your notes and tips!
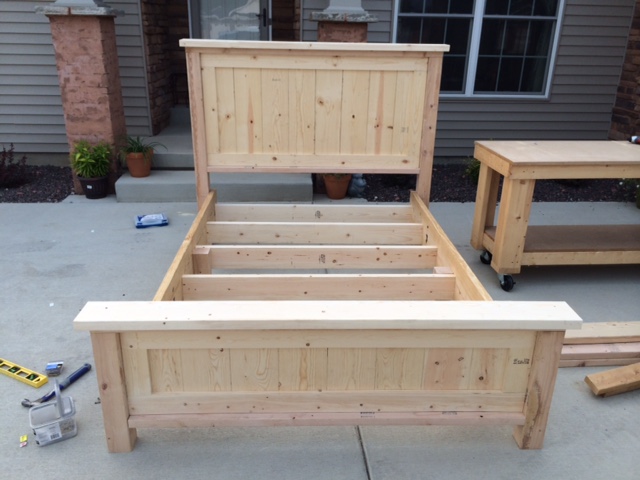
Farmhouse bed
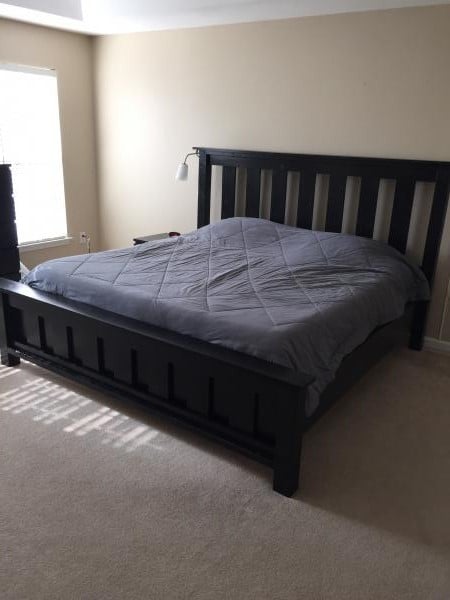
The project went relatively well. Had to readjust in order to fit our king. I used 2x4s and 2x4 joist hangers to support the mattres.

Built from Plan(s)
Estimated Cost
300.00
Estimated Time Investment
Week Long Project (20 Hours or More)
Finish Used
Rustoleum ebony stain and satin polyurethane.
Recommended Skill Level
Beginner
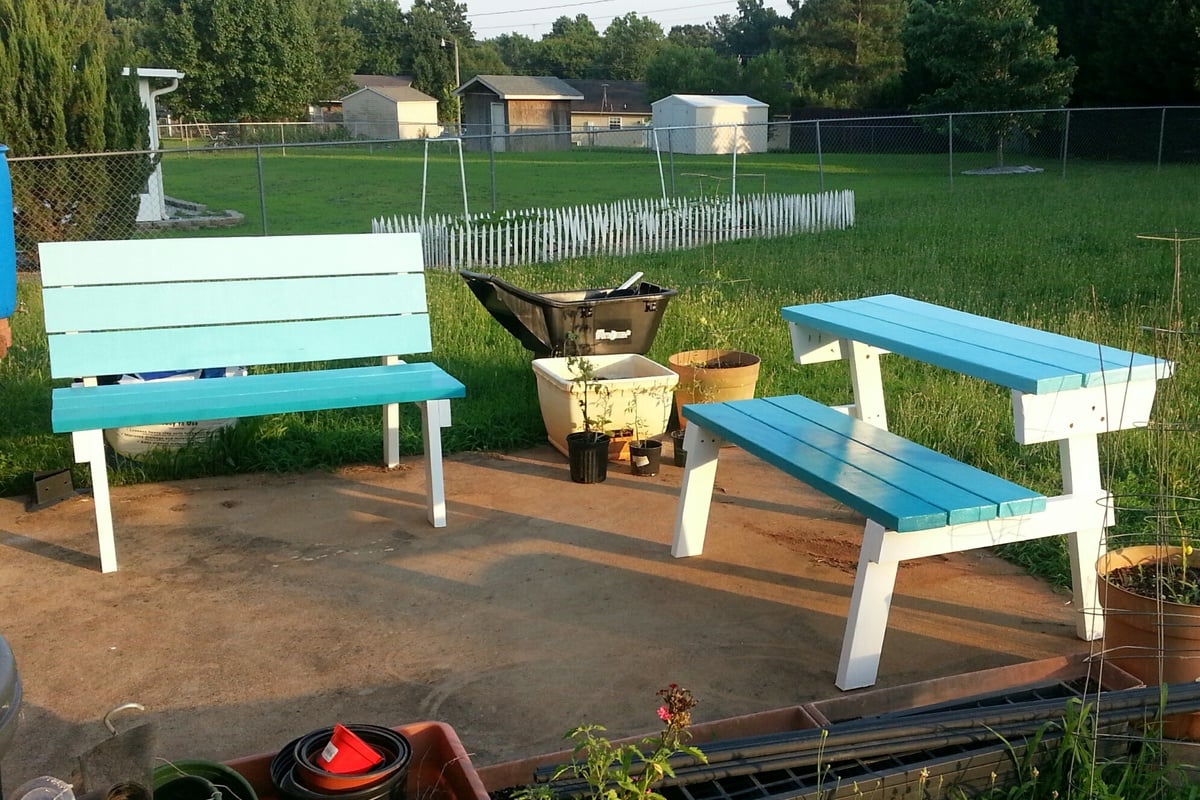
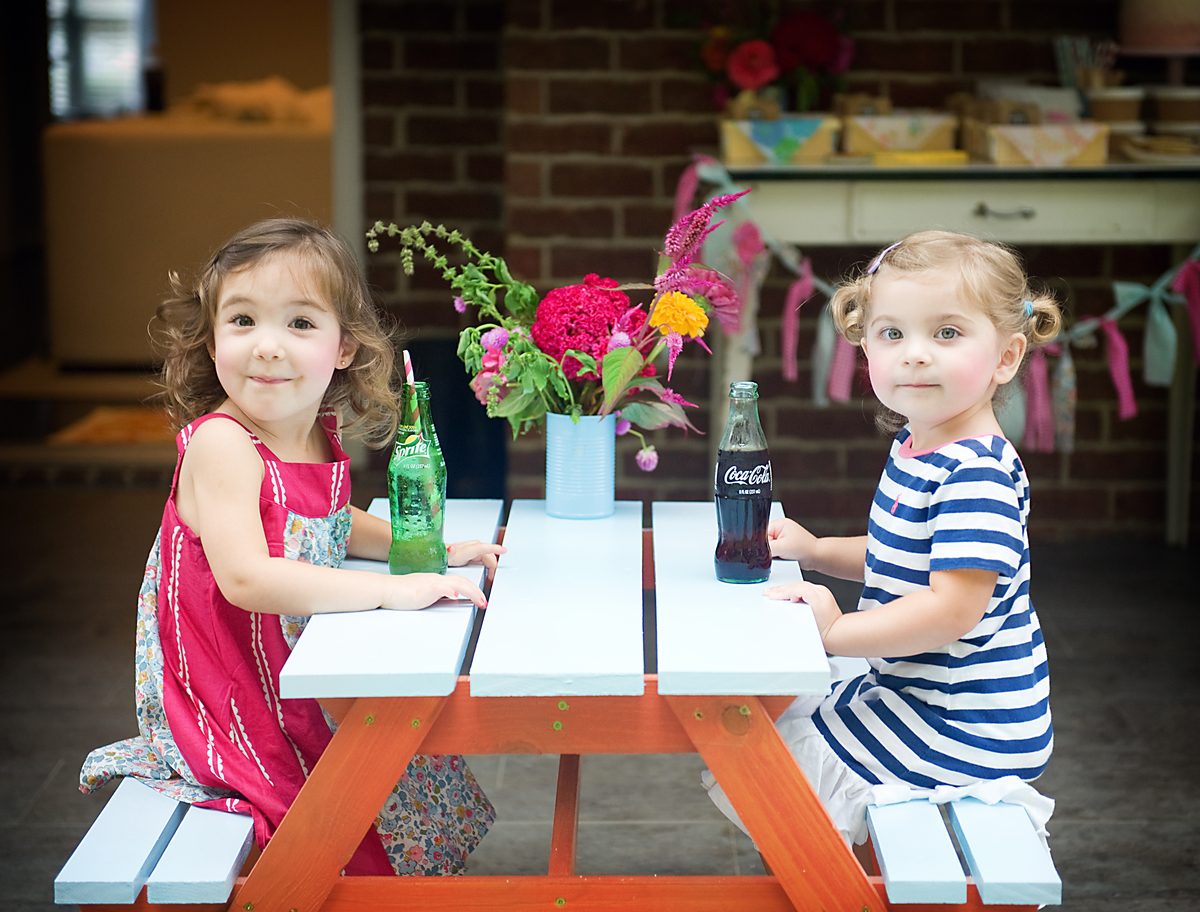
Toddler Picnic Table
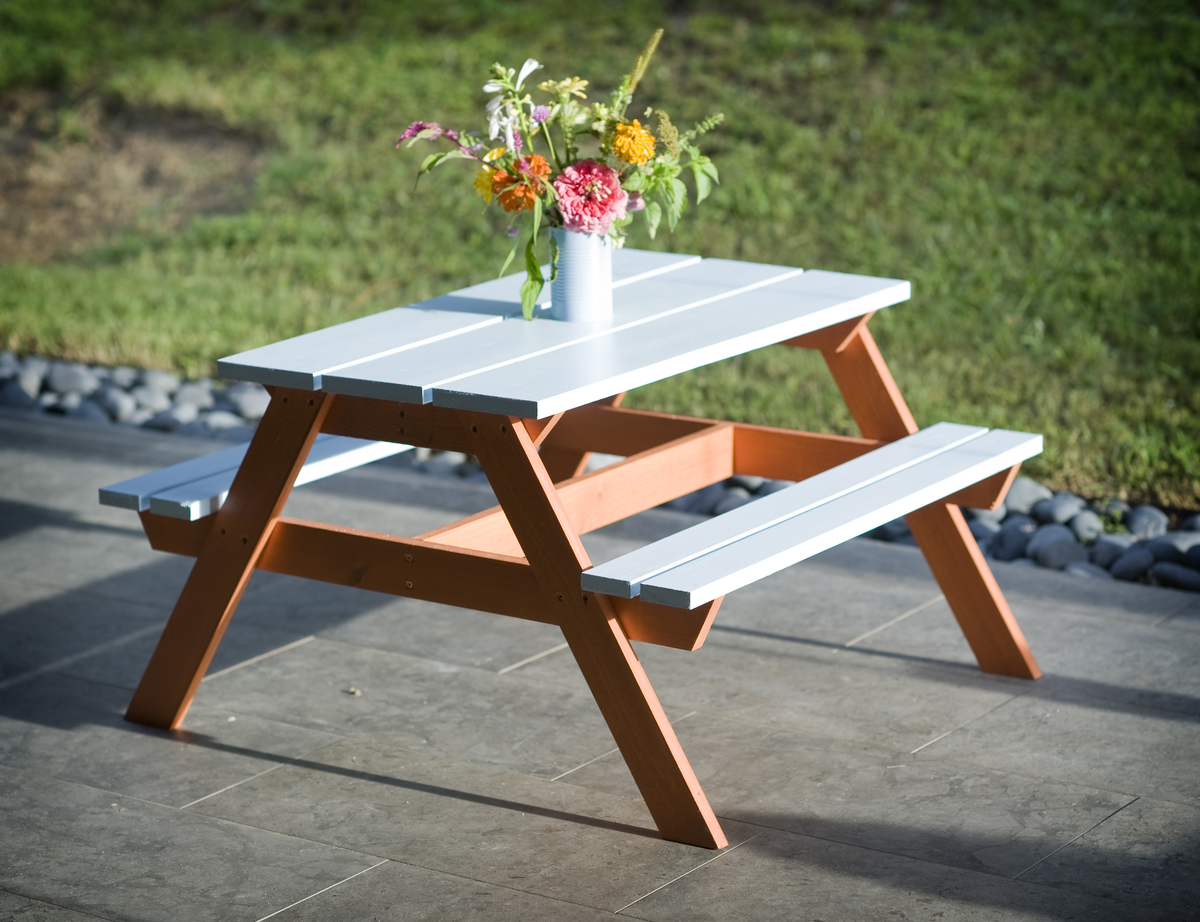
My husband and I made 2 of these for my 3 year olds "Picnic Birthday Party", and they worked out great! We will definitely be using them for a while! They took about a week off and on since I just had a little time each day to do them, but I could have gotten them done in a couple easily. Very fun, easy project! We ended up staining the bottom support pieces and painting the top pieces a light blue, I love how it turned out!
Built from Plan(s)
Estimated Cost
$50 per table
Estimated Time Investment
Day Project (6-9 Hours)
Finish Used
Stain/ Outdoor Latex Paint
I ended up cutting out the pieces, and finishing all of them with the stain/paint before we assembled the table. It worked out great! All we had to do after they were assembled is fill in the top screw holes and then paint the table top and bench seat tops.
I ended up cutting out the pieces, and finishing all of them with the stain/paint before we assembled the table. It worked out great! All we had to do after they were assembled is fill in the top screw holes and then paint the table top and bench seat tops.
Recommended Skill Level
Beginner
Comments

Mon, 08/19/2013 - 19:13
Great build!
This little table is just darling! The picture of your girls at the table is just the cutest thing! Thank you for posting this!
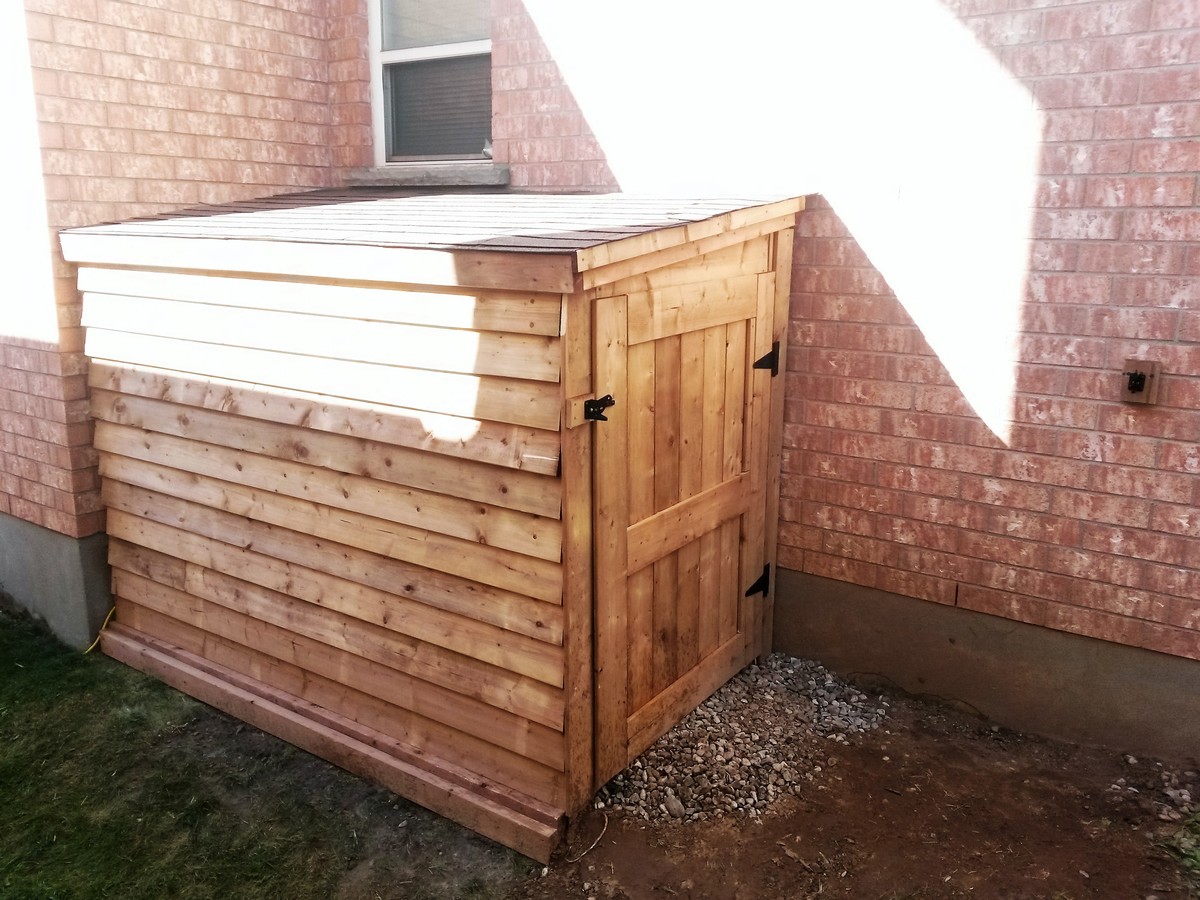
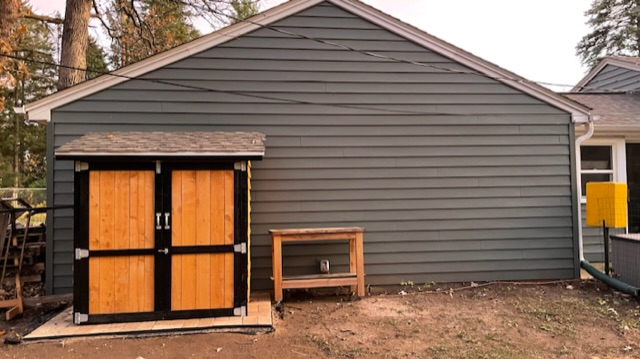
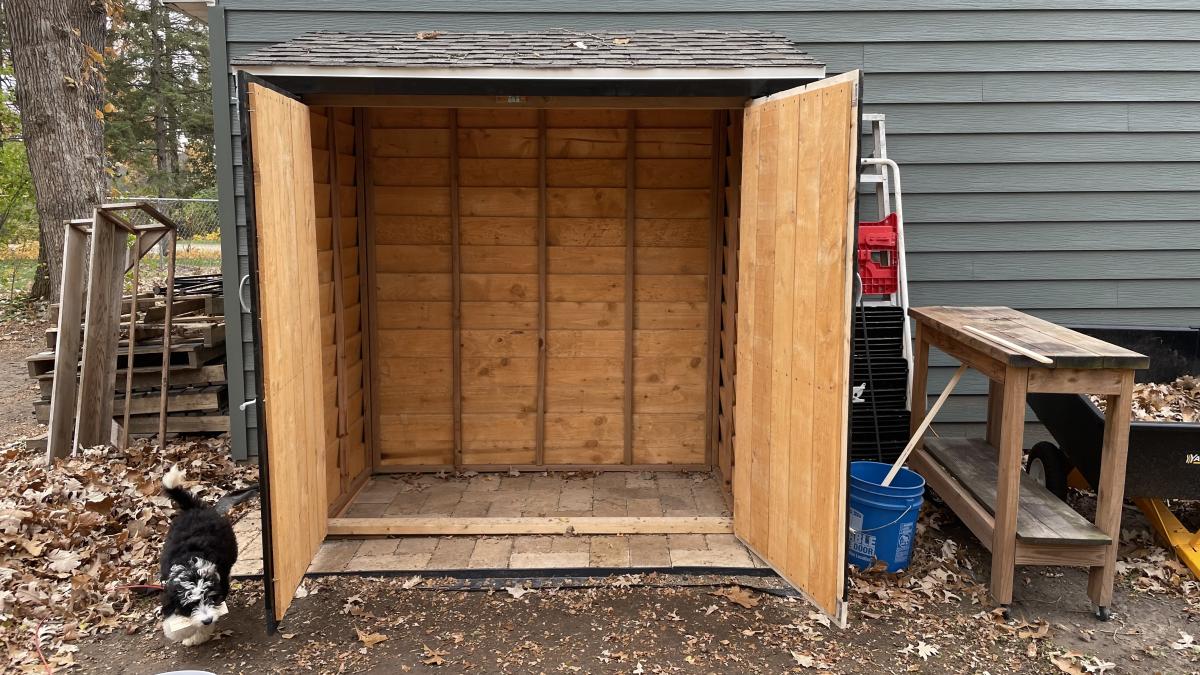
A Different Take on the Cedar Shed
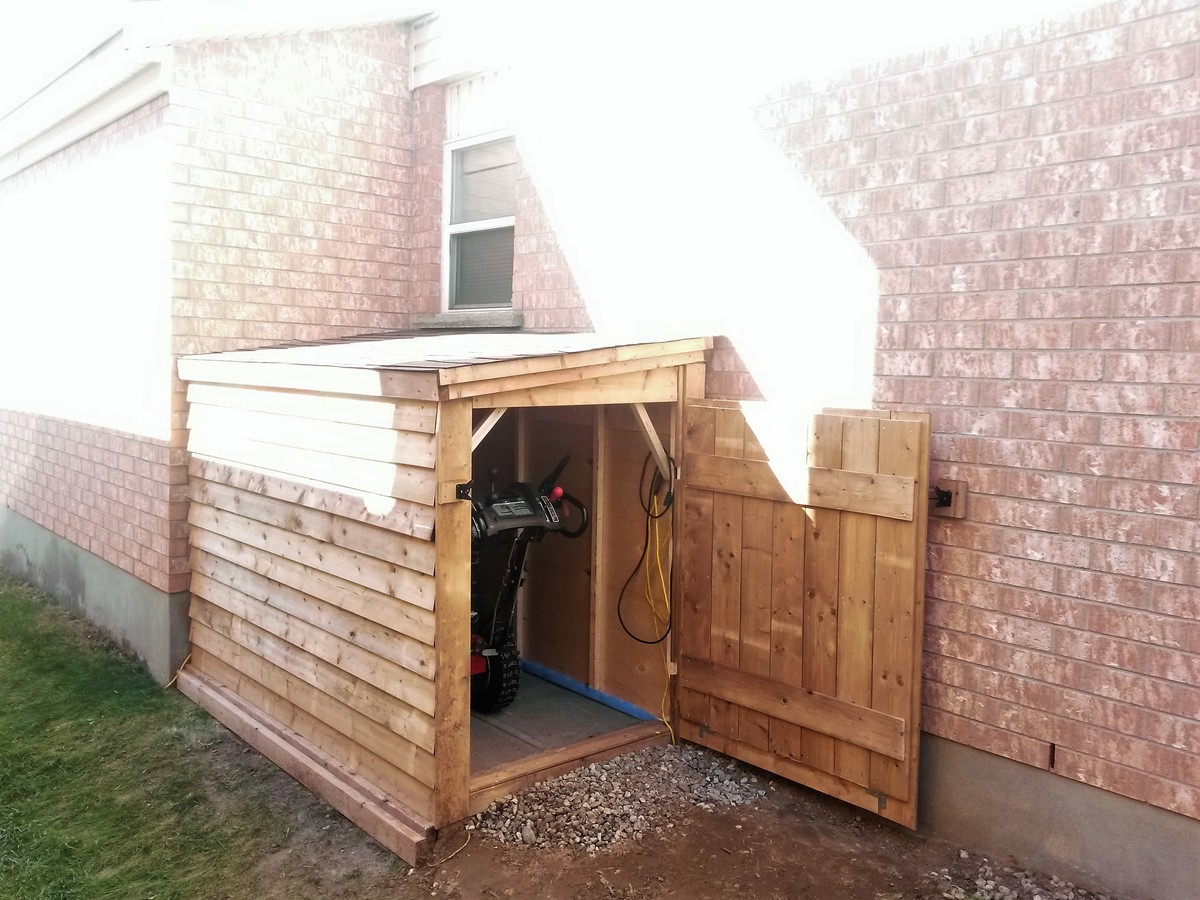
Loosely based on the small cedar fence picket storage shed plan, this was my first attempt at making a storage unit with a roof. There was only one unplanned trip to the store (to replace two 2x4's that I cut to the wrong length). Pro tip: "measure twice, cut once" doesn't work if you measure the wrong length twice. Also almost lost two fingertips because I'm an idiot and forgot the most basic of safety rules for power tools, namely the "don't put your fingers near the blade of a circular saw when it's in use" rule. Very lucky to only come out of it with a good scare and some wounds that will heal without permanent damage.
Built from Plan(s)
Estimated Cost
$500 (Canadian)
Estimated Time Investment
Weekend Project (10-20 Hours)
Recommended Skill Level
Beginner
Comments
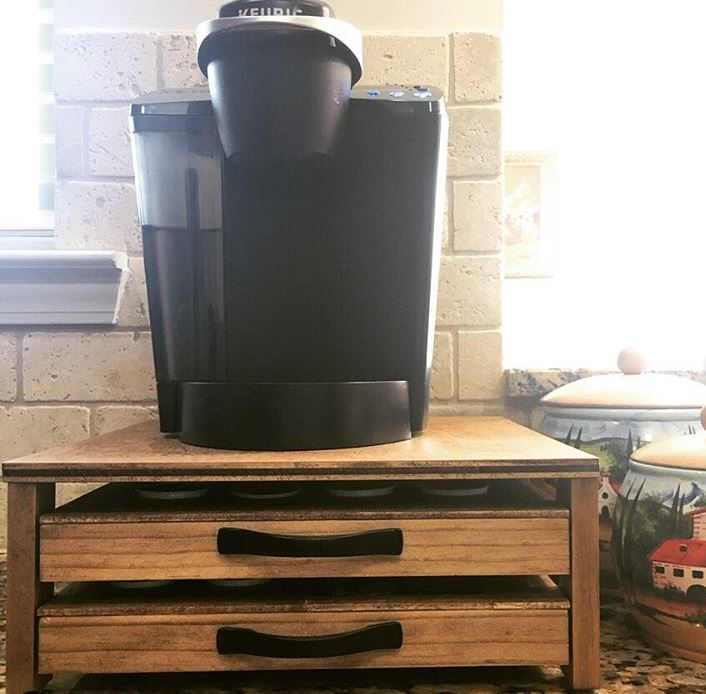
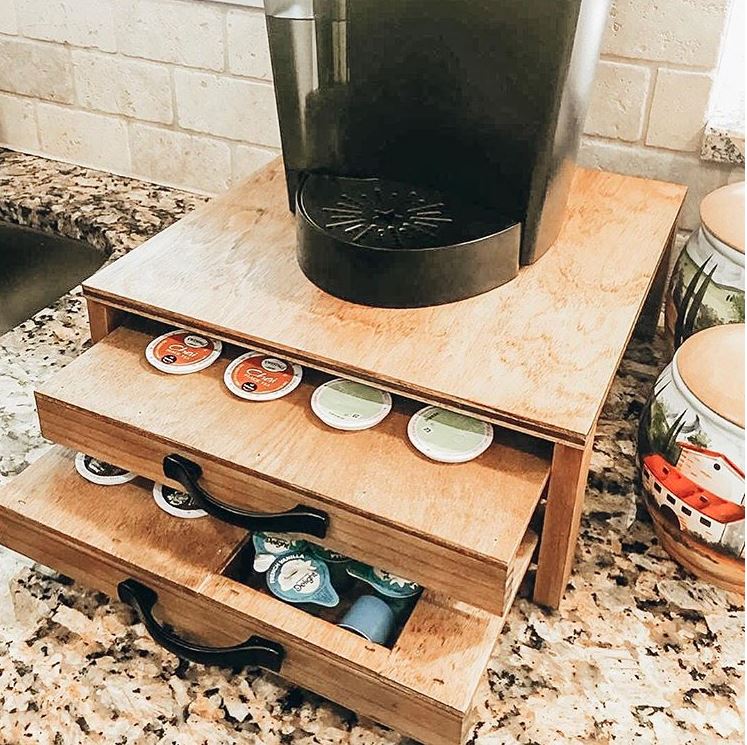
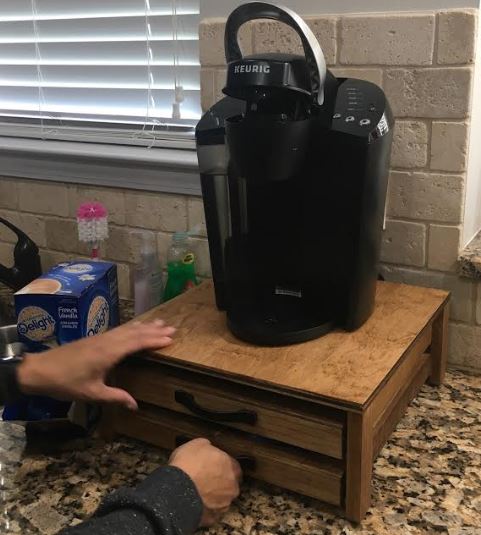
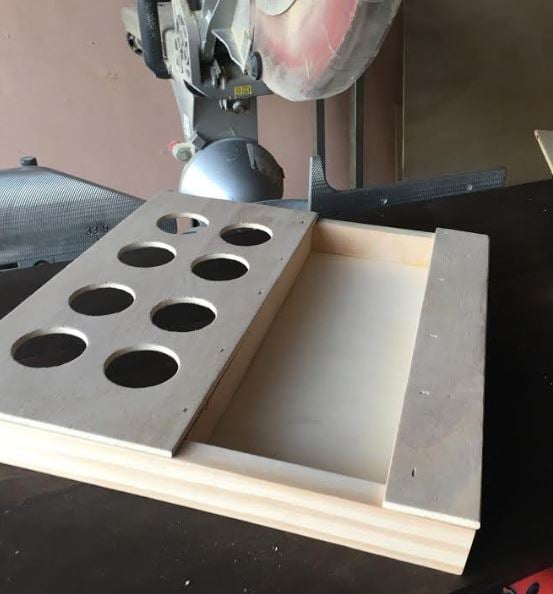
Wood Crate Keurig K Cup Holder with Mini Drawer
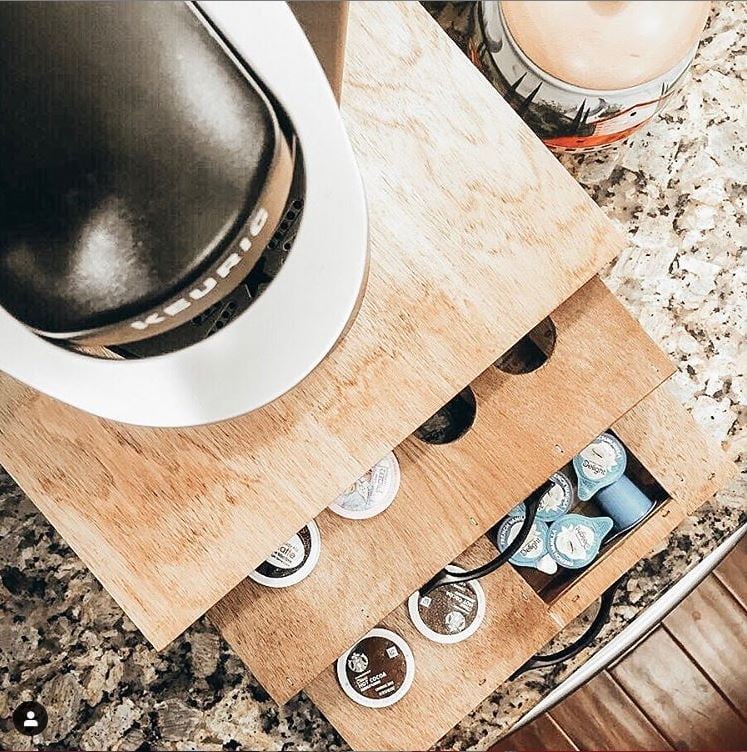
As Ana mentioned in her video, this project could be made with scraps. That’s just what I used. I used a lot of scraps and cut offs for this project.
I needed to make a K cup holder but also space to hold tea in addition to other coffee "toppings" if you well. In the pictures you can see mini creamers.
This modification was made by adding a small drawer in addition to the holes that would hold the K cups. The small drawer was made with 1/2” plywood (even more scraps) ripped just shy of 1-1/2”. I did this to make sure we did not see the plys of the drawer as I planned to add 1/4” plywood to the top all around. I wanted this to make it all uniform with the K cup area.
I added little rubber feet’s to the bottom as this will be on a granite countertop which could results in slipping and sliding.
Built from Plan(s)
Estimated Cost
$15 perhaps. But as I mentioned it was mostly scraps
Finish Used
minwax provencial and wipe on poly
Recommended Skill Level
Beginner
Comments
Thu, 06/25/2020 - 06:53
Made this for my mother in…
Made this for my mother in law. She loves it, thank you for the plans. I cant figure out how to add the pics of the one I did for her hit it was awesome and my very first wooden build EVER
Corner Banquette Bench with Storage
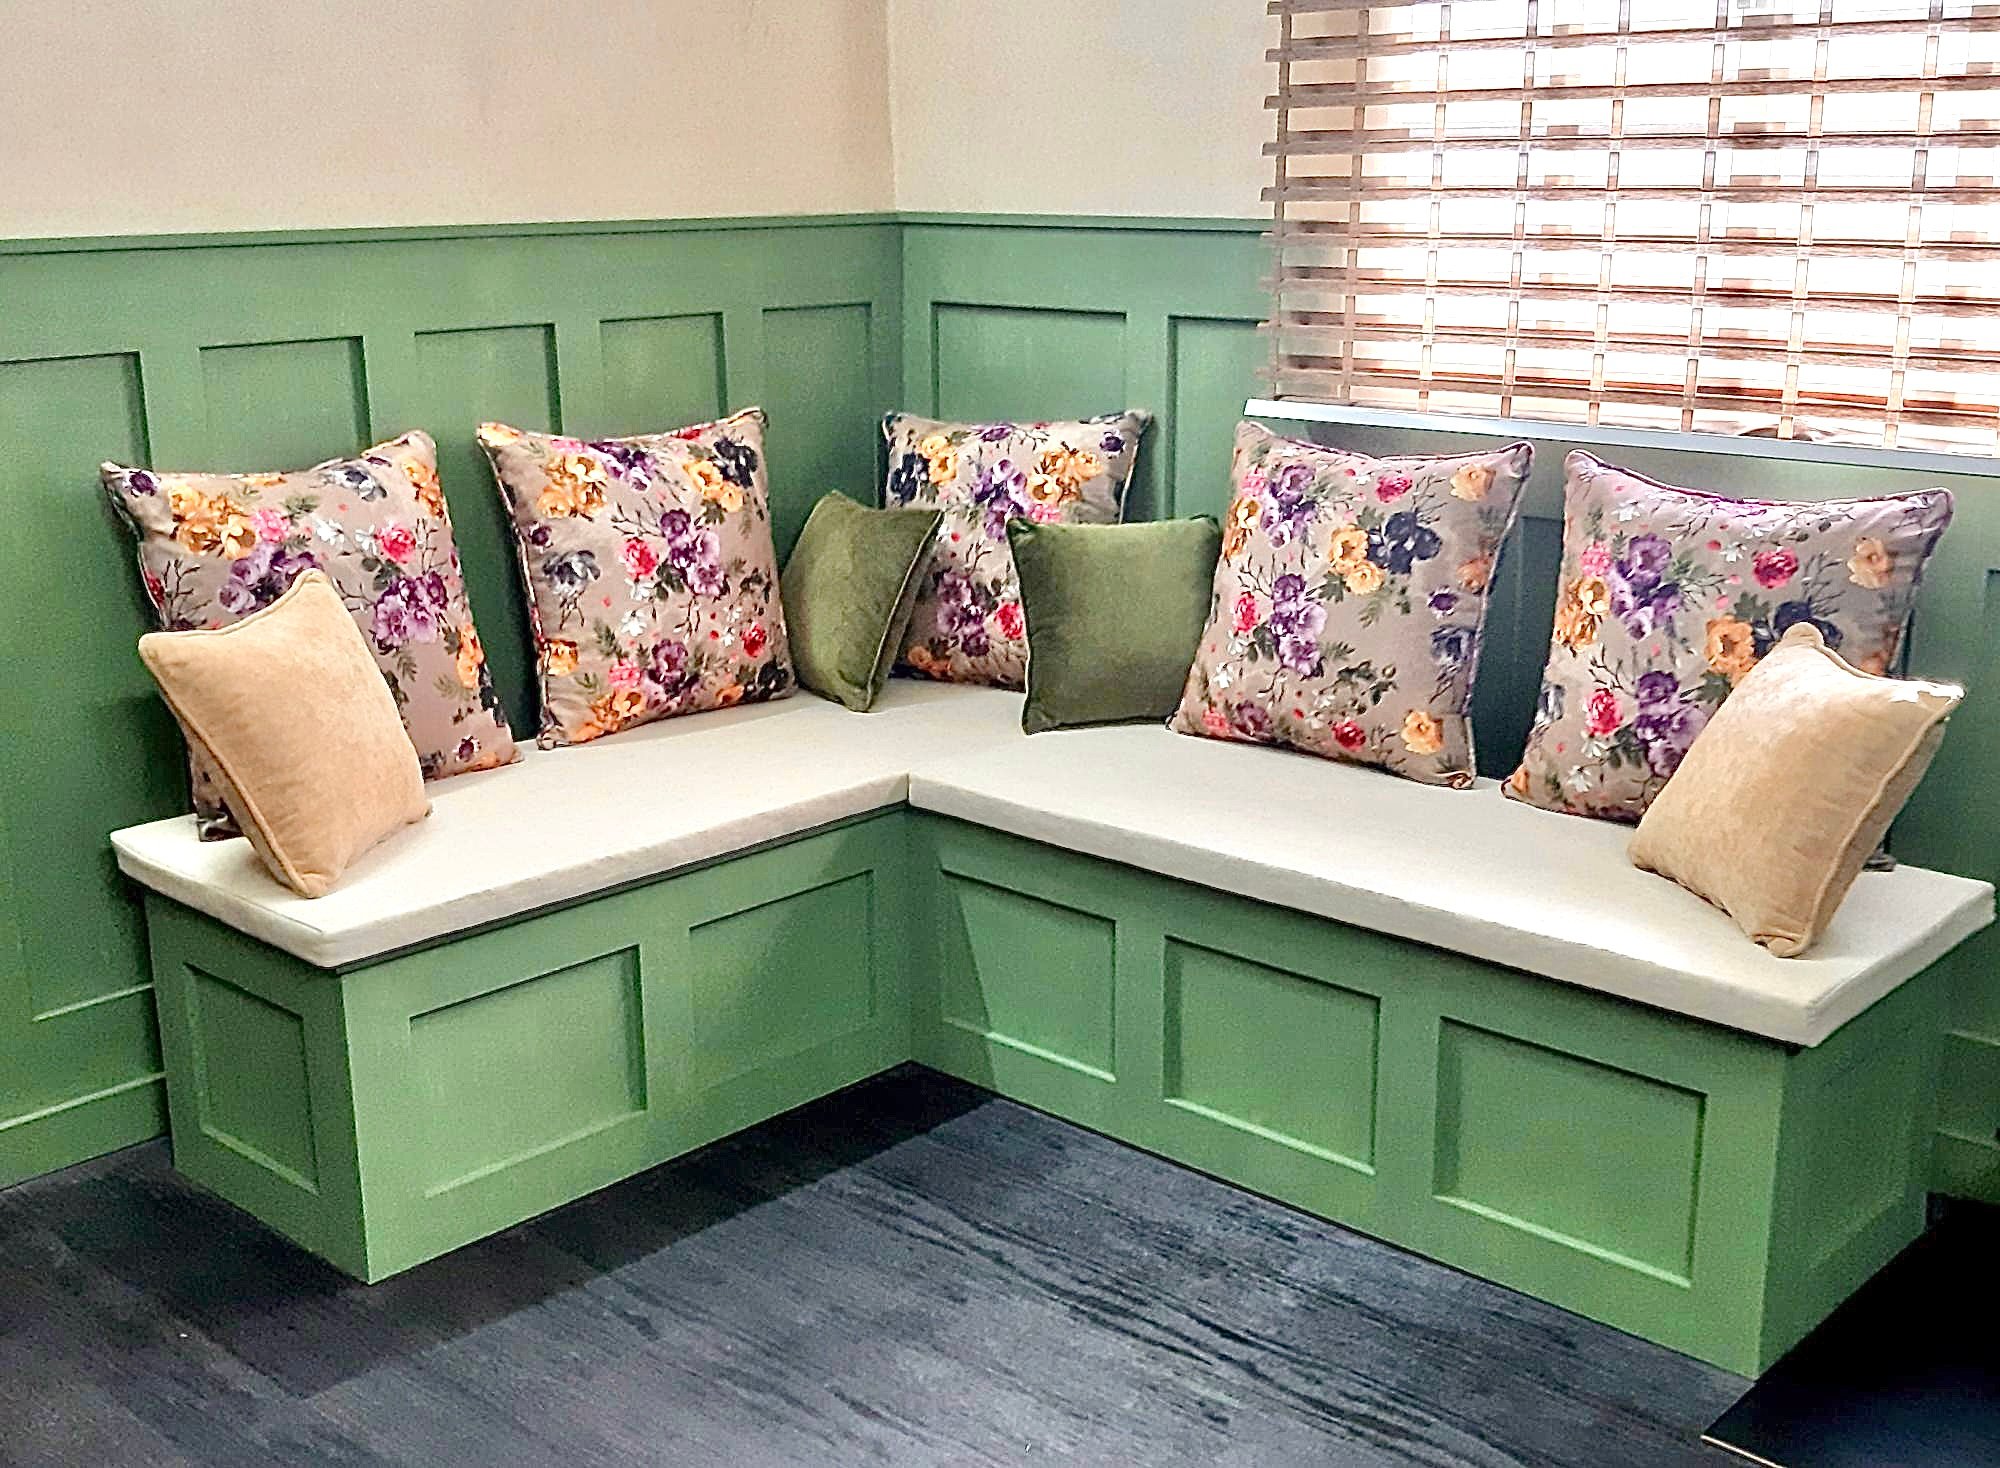
Beautiful banquette bench by Khalid Al-Bahi
Built from Plan(s)
Modern Craft Table *tweaked*

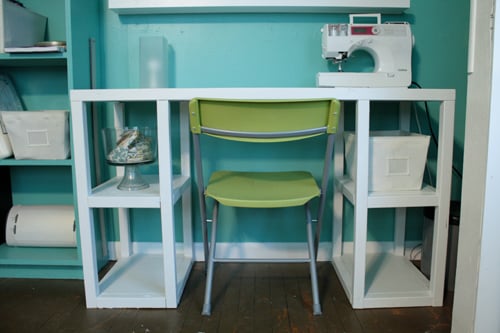
Completed Modern Craft Table! We tweaked the plans a bit because I was looking for a larger table top. The top now measures 48" x 76". We simply did this by adding an extra set of cubbies to the other side of the shelves. Absolutely LOVE how this turned out! All I need now is 4 counter height stools built and lots of shelves to complete my craft room! Will be sure to post those once they are completed!
Built from Plan(s)
Estimated Time Investment
Weekend Project (10-20 Hours)
Finish Used
Ultra White Latex Paint
Recommended Skill Level
Beginner
Comments

Thu, 11/17/2011 - 01:10
Darn I was so excited to see
Darn I was so excited to see you craft table! I apologize that your brag post did not show images. If you can send me images at knockoffwood(at)gmail.com I'd be happy to post. Thanks so much for submitting a brag post. Ana
Sun, 03/04/2012 - 07:31
Craft Desk
I LOVE LOVE LOVE your craft table. I want one! Looks like my husband wil have to get busy! Thanks for sharing!
Kristina
Houston, TX
Tue, 05/29/2012 - 00:05
Question about Middle support
This is great!! I am planning something similar, but what is your idea or the plan you used for the middle support to keep it from sagging over time? My idea is to run another cubby in the middle from side to side. What do you think?
Mon, 01/21/2013 - 09:54
I love the modern craft
I love the modern craft table, just what I have been looking for, do you share instructions, dimensions, etc.? thanks, Laura
Thu, 05/12/2016 - 15:14
Are plans for the tweaked version?
I'm loving this and would love to have FIL build it for me but the plans look like its for the regular modern craft table but not the tweaked? Also is there support for the middle? Can you send me a link for the tweaked supply list please, can't seem to find it. Love what you do!
Cedar Shed
I needed a place for all my gardening pots and planter boxes and this was a perfect solution. So with my dads help we built this shed.
Built from Plan(s)
Comments
Outdoor buffet table
My first project using Ana White plans. Used pressure treated lumber and Kreg pocket hole jig. Cost: $126.
Built from Plan(s)
Comments
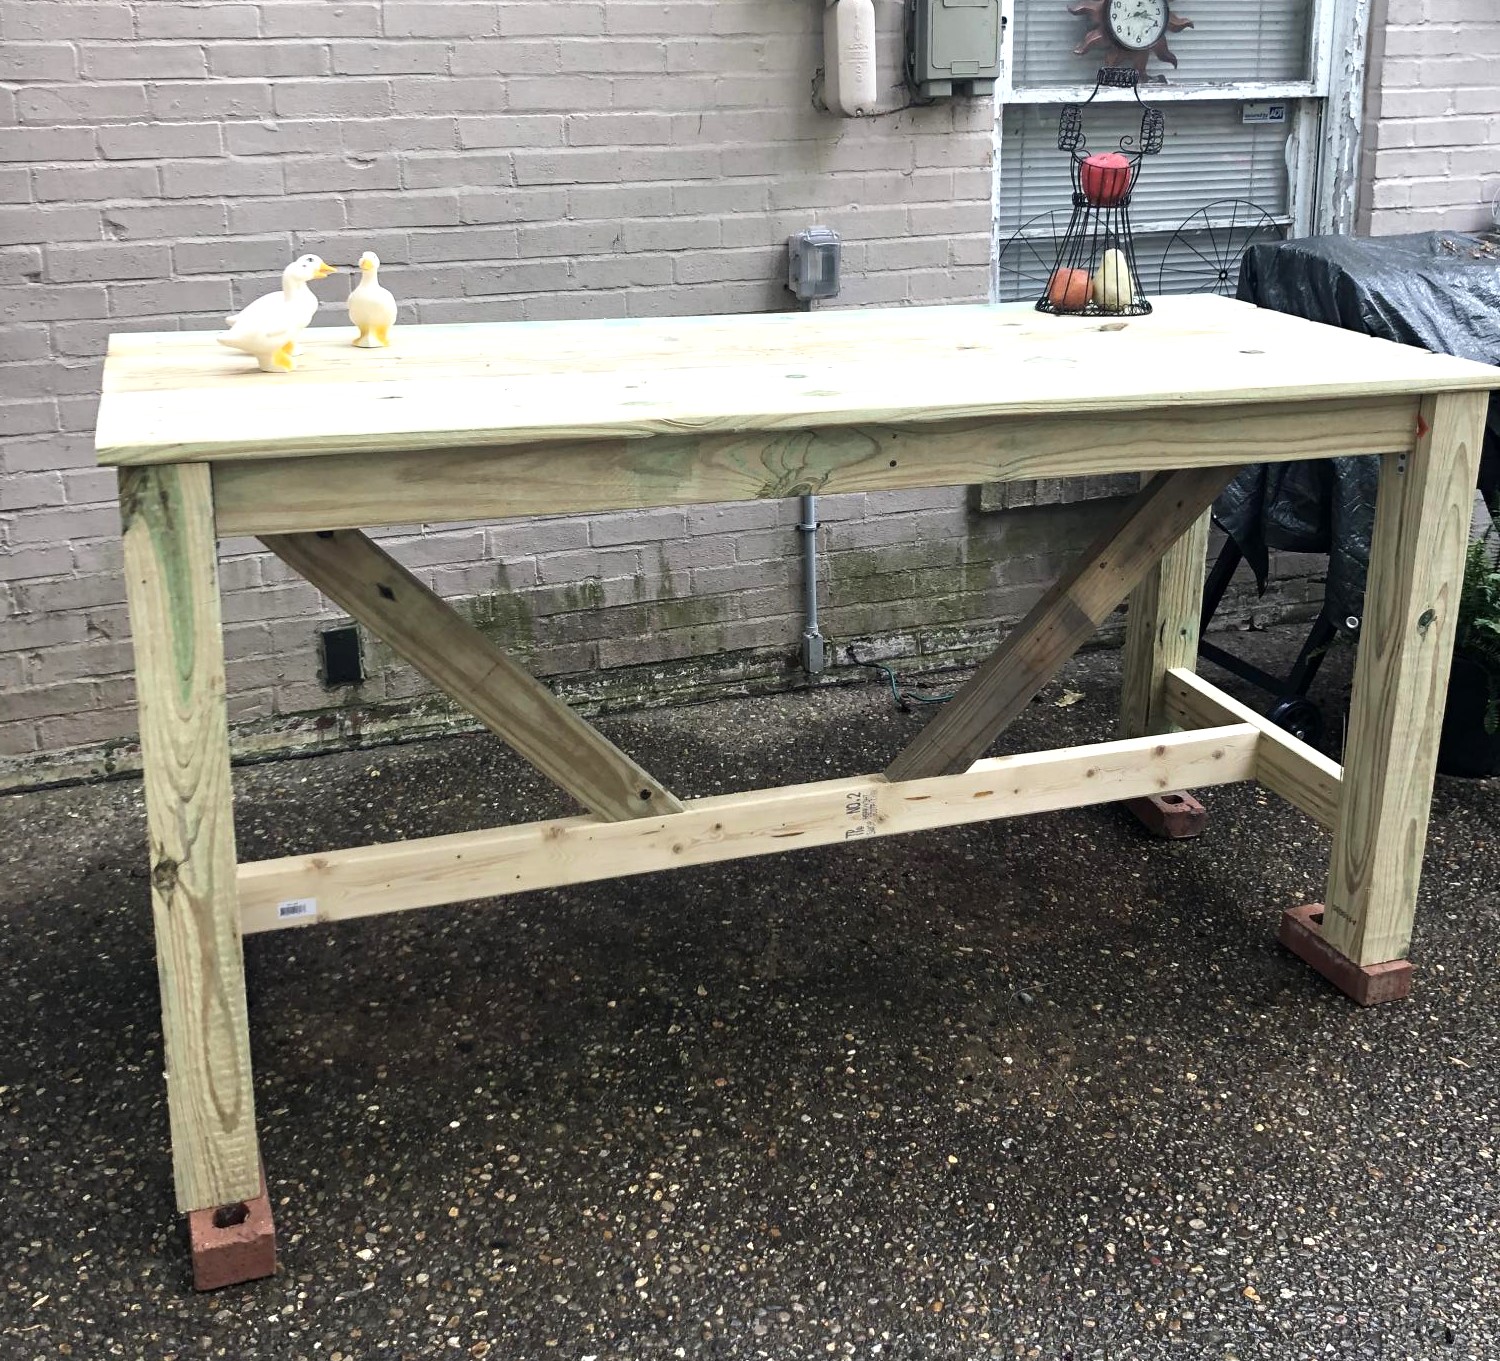
Rustic X-Entryway Table
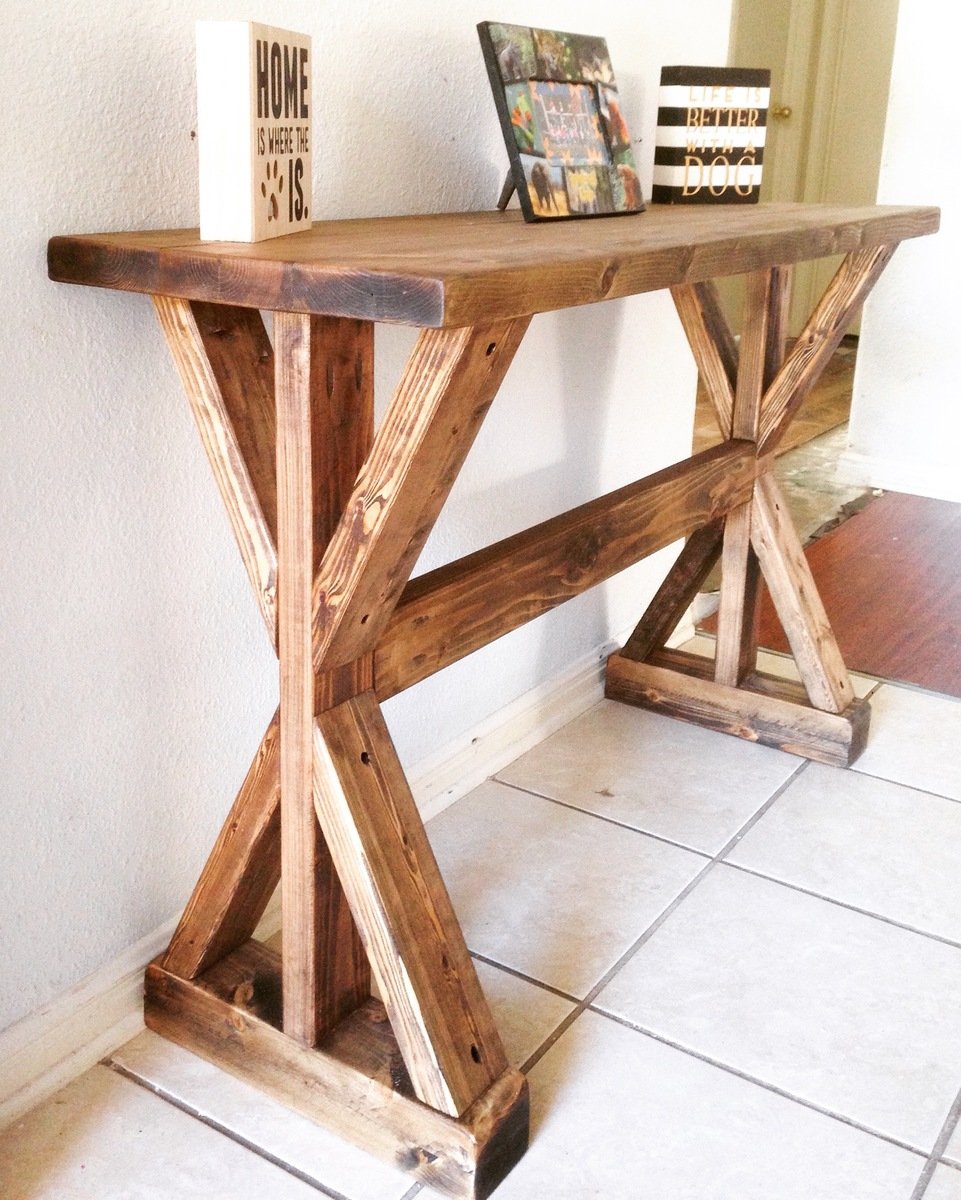
Handmade rustic entryway table. Stained with Varathane Stain and made from 2x4s & 2x6s Canadian white pine
Estimated Cost
$25
Estimated Time Investment
Day Project (6-9 Hours)
Finish Used
Varathane Ash Stain.
Varathane Polyurethane Satin
Varathane Polyurethane Satin
Recommended Skill Level
Intermediate
Comments
Mon, 04/11/2016 - 05:30
Dimensions
Hi,
I really love your entryway table. Do you have a plan that we can use with dimensions and cut list?
Thank you
Tue, 05/17/2016 - 20:33
Plans? What saw(s) did you use?
Hello can you provide us with plans for this? What saw(s) did you use?
Sun, 08/21/2016 - 08:18
Do you have plans for this
Do you have plans for this entry table?! I love it but can't seem to find the plans?
Thank you!
In reply to Are there plans for this ? by Jatin2286
Fri, 03/16/2018 - 10:49
I could draw you plans...
If you are OK with waiting a few days, I could draw you plans based off of the images.
In reply to Are there plans for this ? by Jatin2286
Sat, 03/17/2018 - 19:38
Here are plans for you.
I modified the design slightly, by adding feet and a 1x4 board accent (that makes it easier to build). I'm assuming the overall height is 29.5" and the length is 48". If you want these to be different, feel free to reach out to me and I can help you adjust.
You can find the plans here: http://famousartisan.com/diy-x-base-sofa-table-plans-or-entry-table/
In reply to Are there plans for this ? by Jatin2286
Sat, 03/17/2018 - 19:39
Here are plans for you.
I modified the design slightly, by adding feet and a 1x4 board accent (that makes it easier to build). I'm assuming the overall height is 29.5" and the length is 48". If you want these to be different, feel free to reach out to me and I can help you adjust.
You can find the plans here: http://famousartisan.com/diy-x-base-sofa-table-plans-or-entry-table/