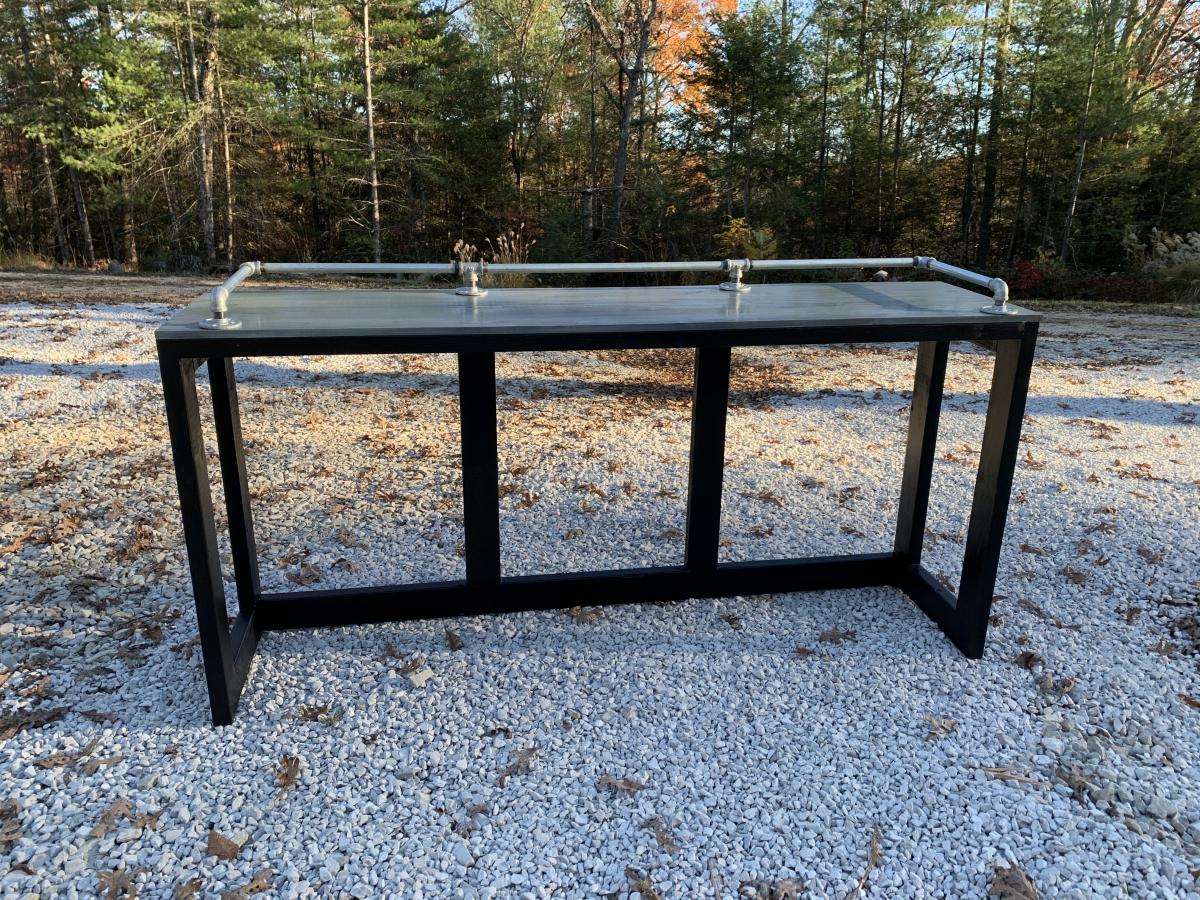
Community Brag Posts

Sofa table

Submitted by blondewolf on Wed, 11/11/2020 - 05:24

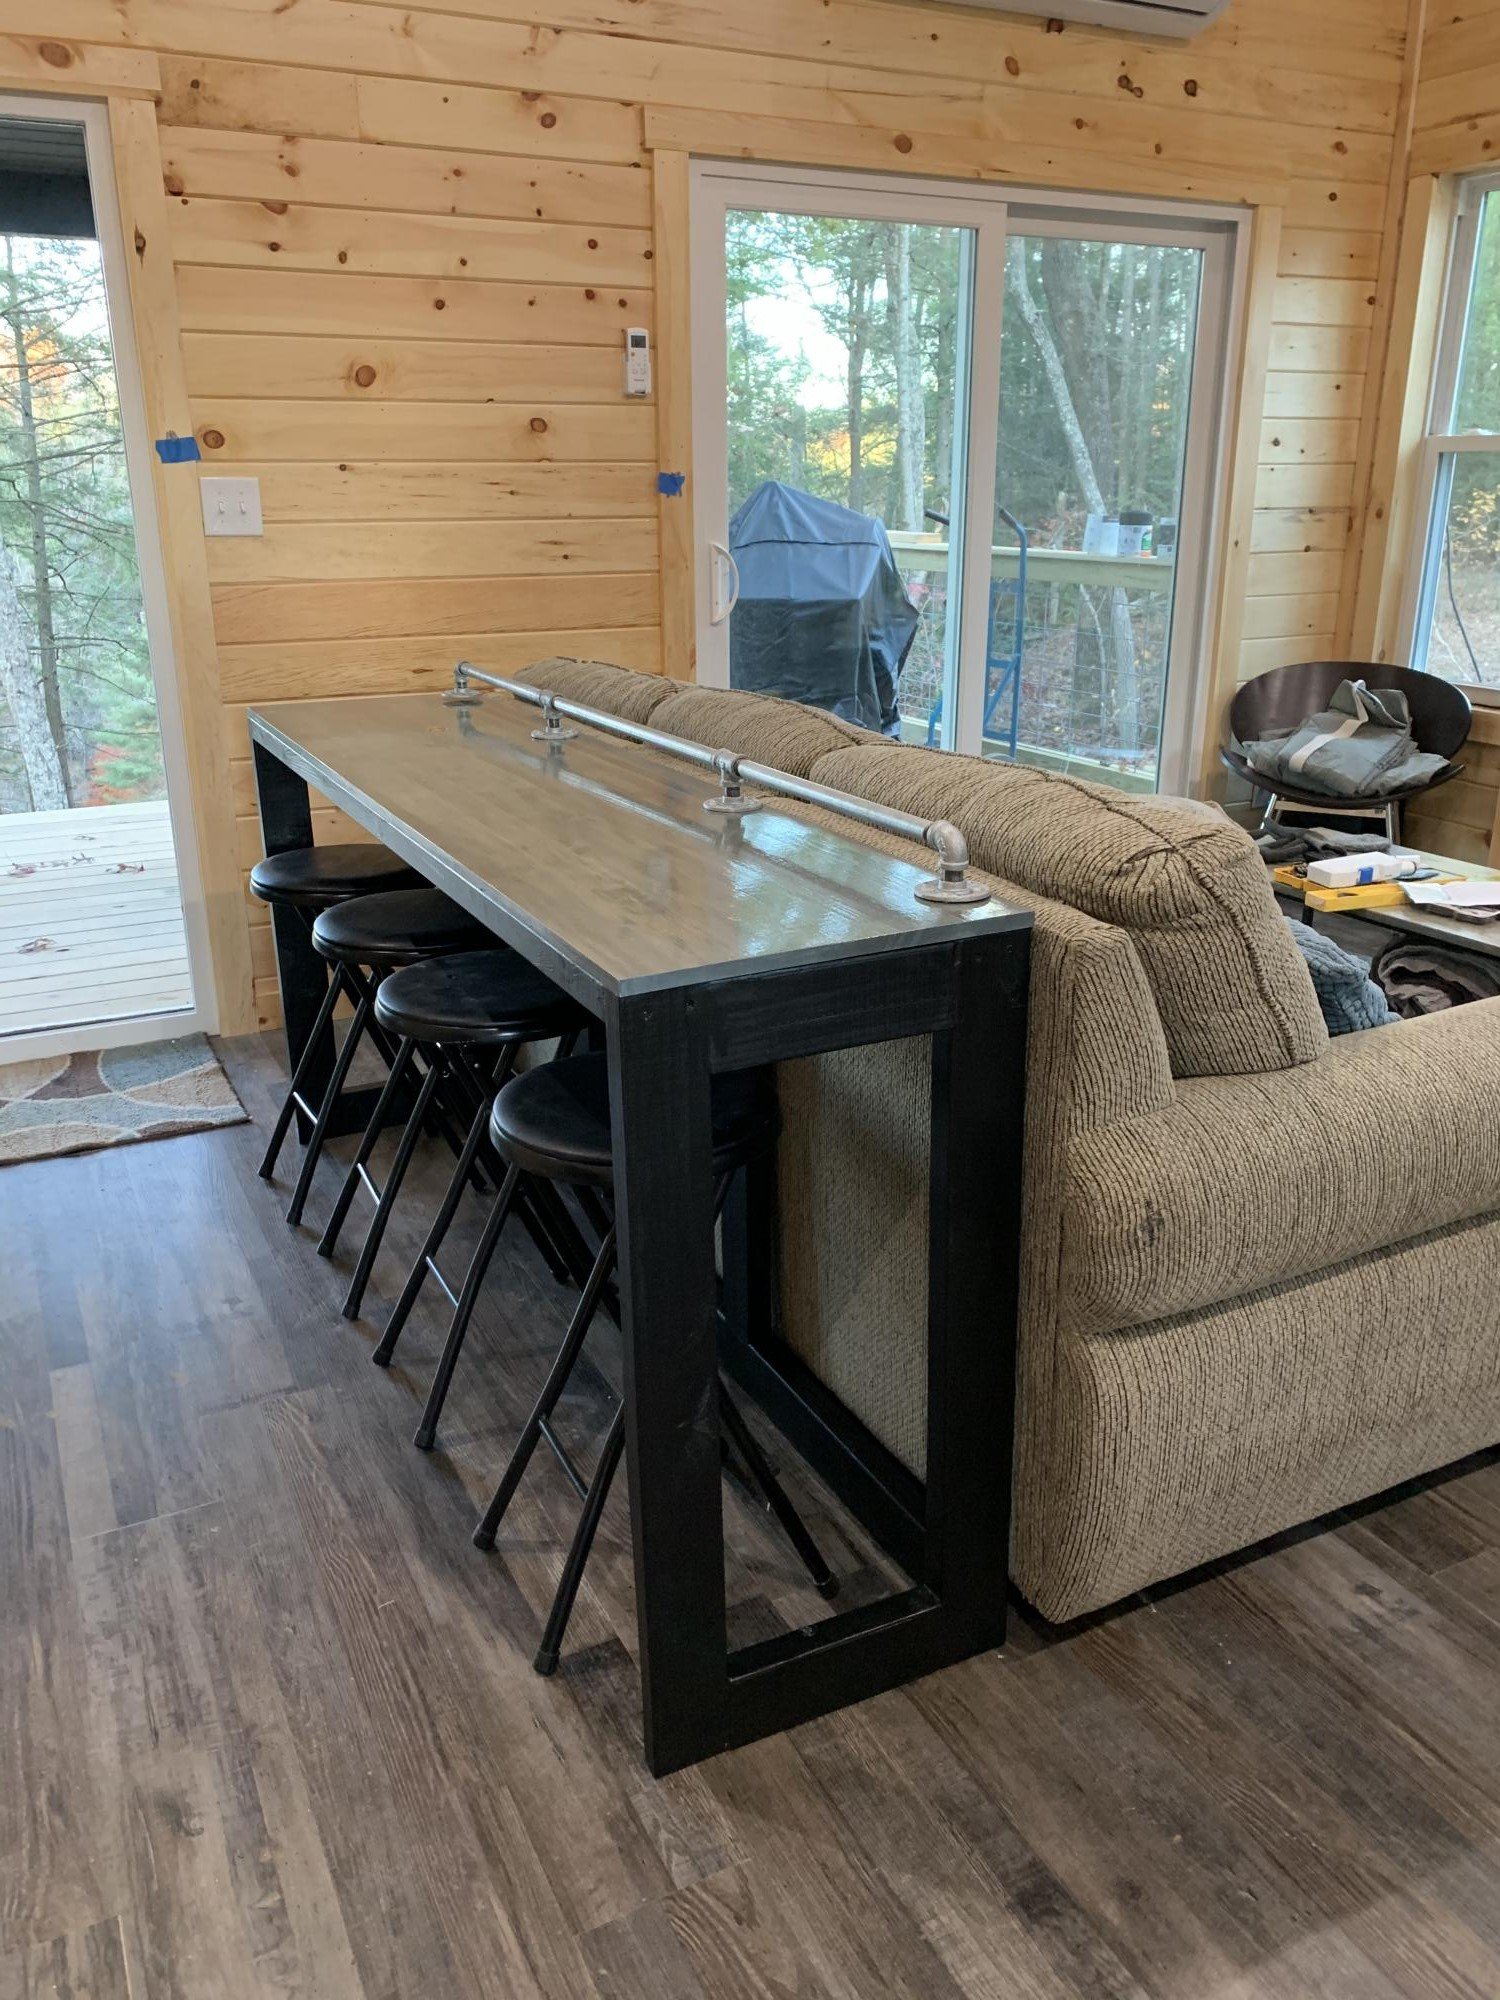
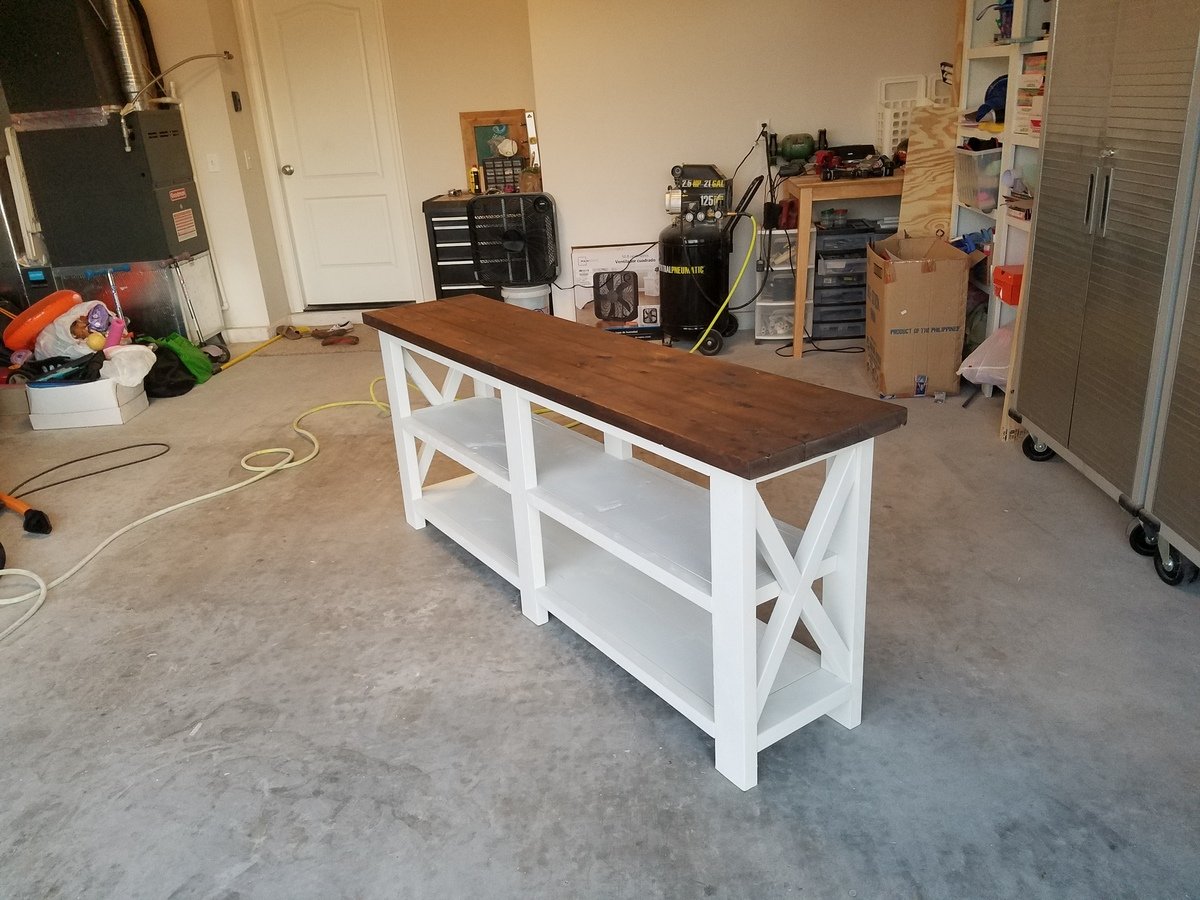
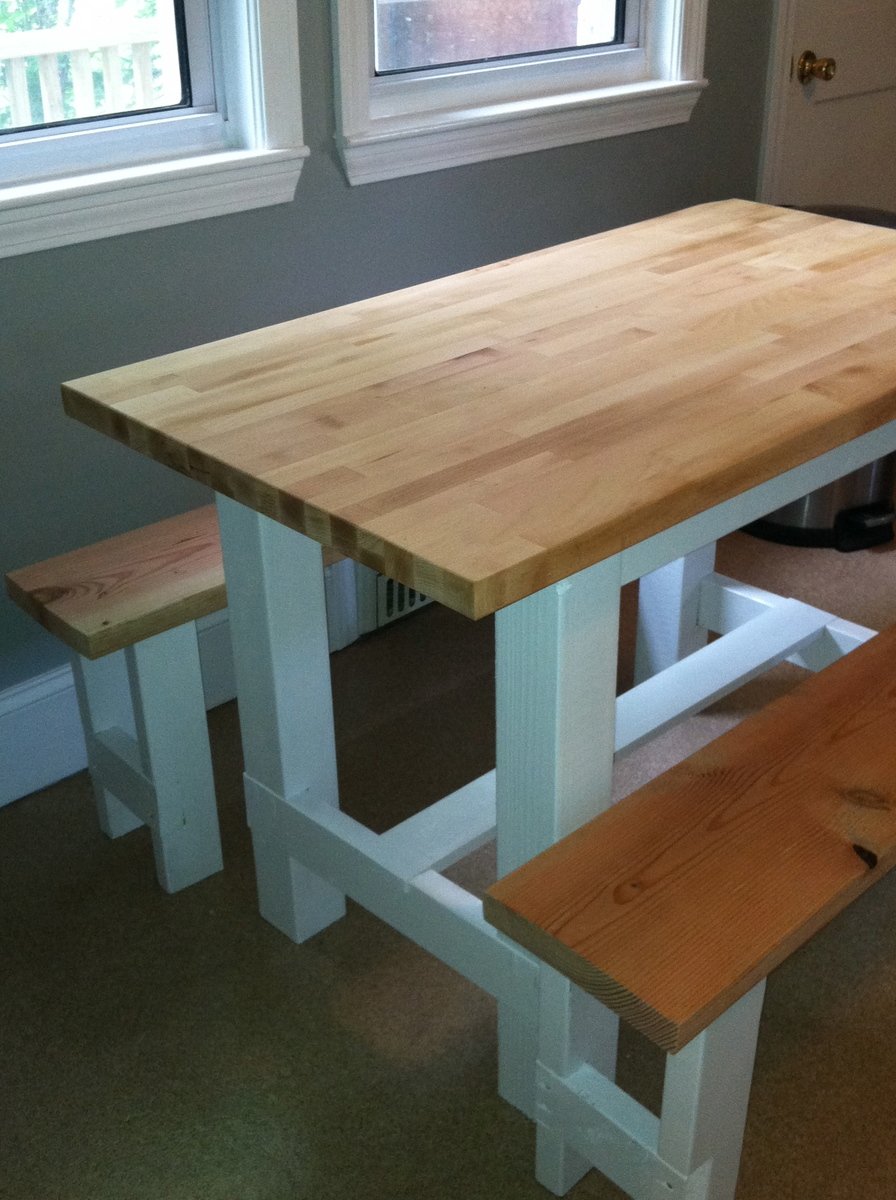
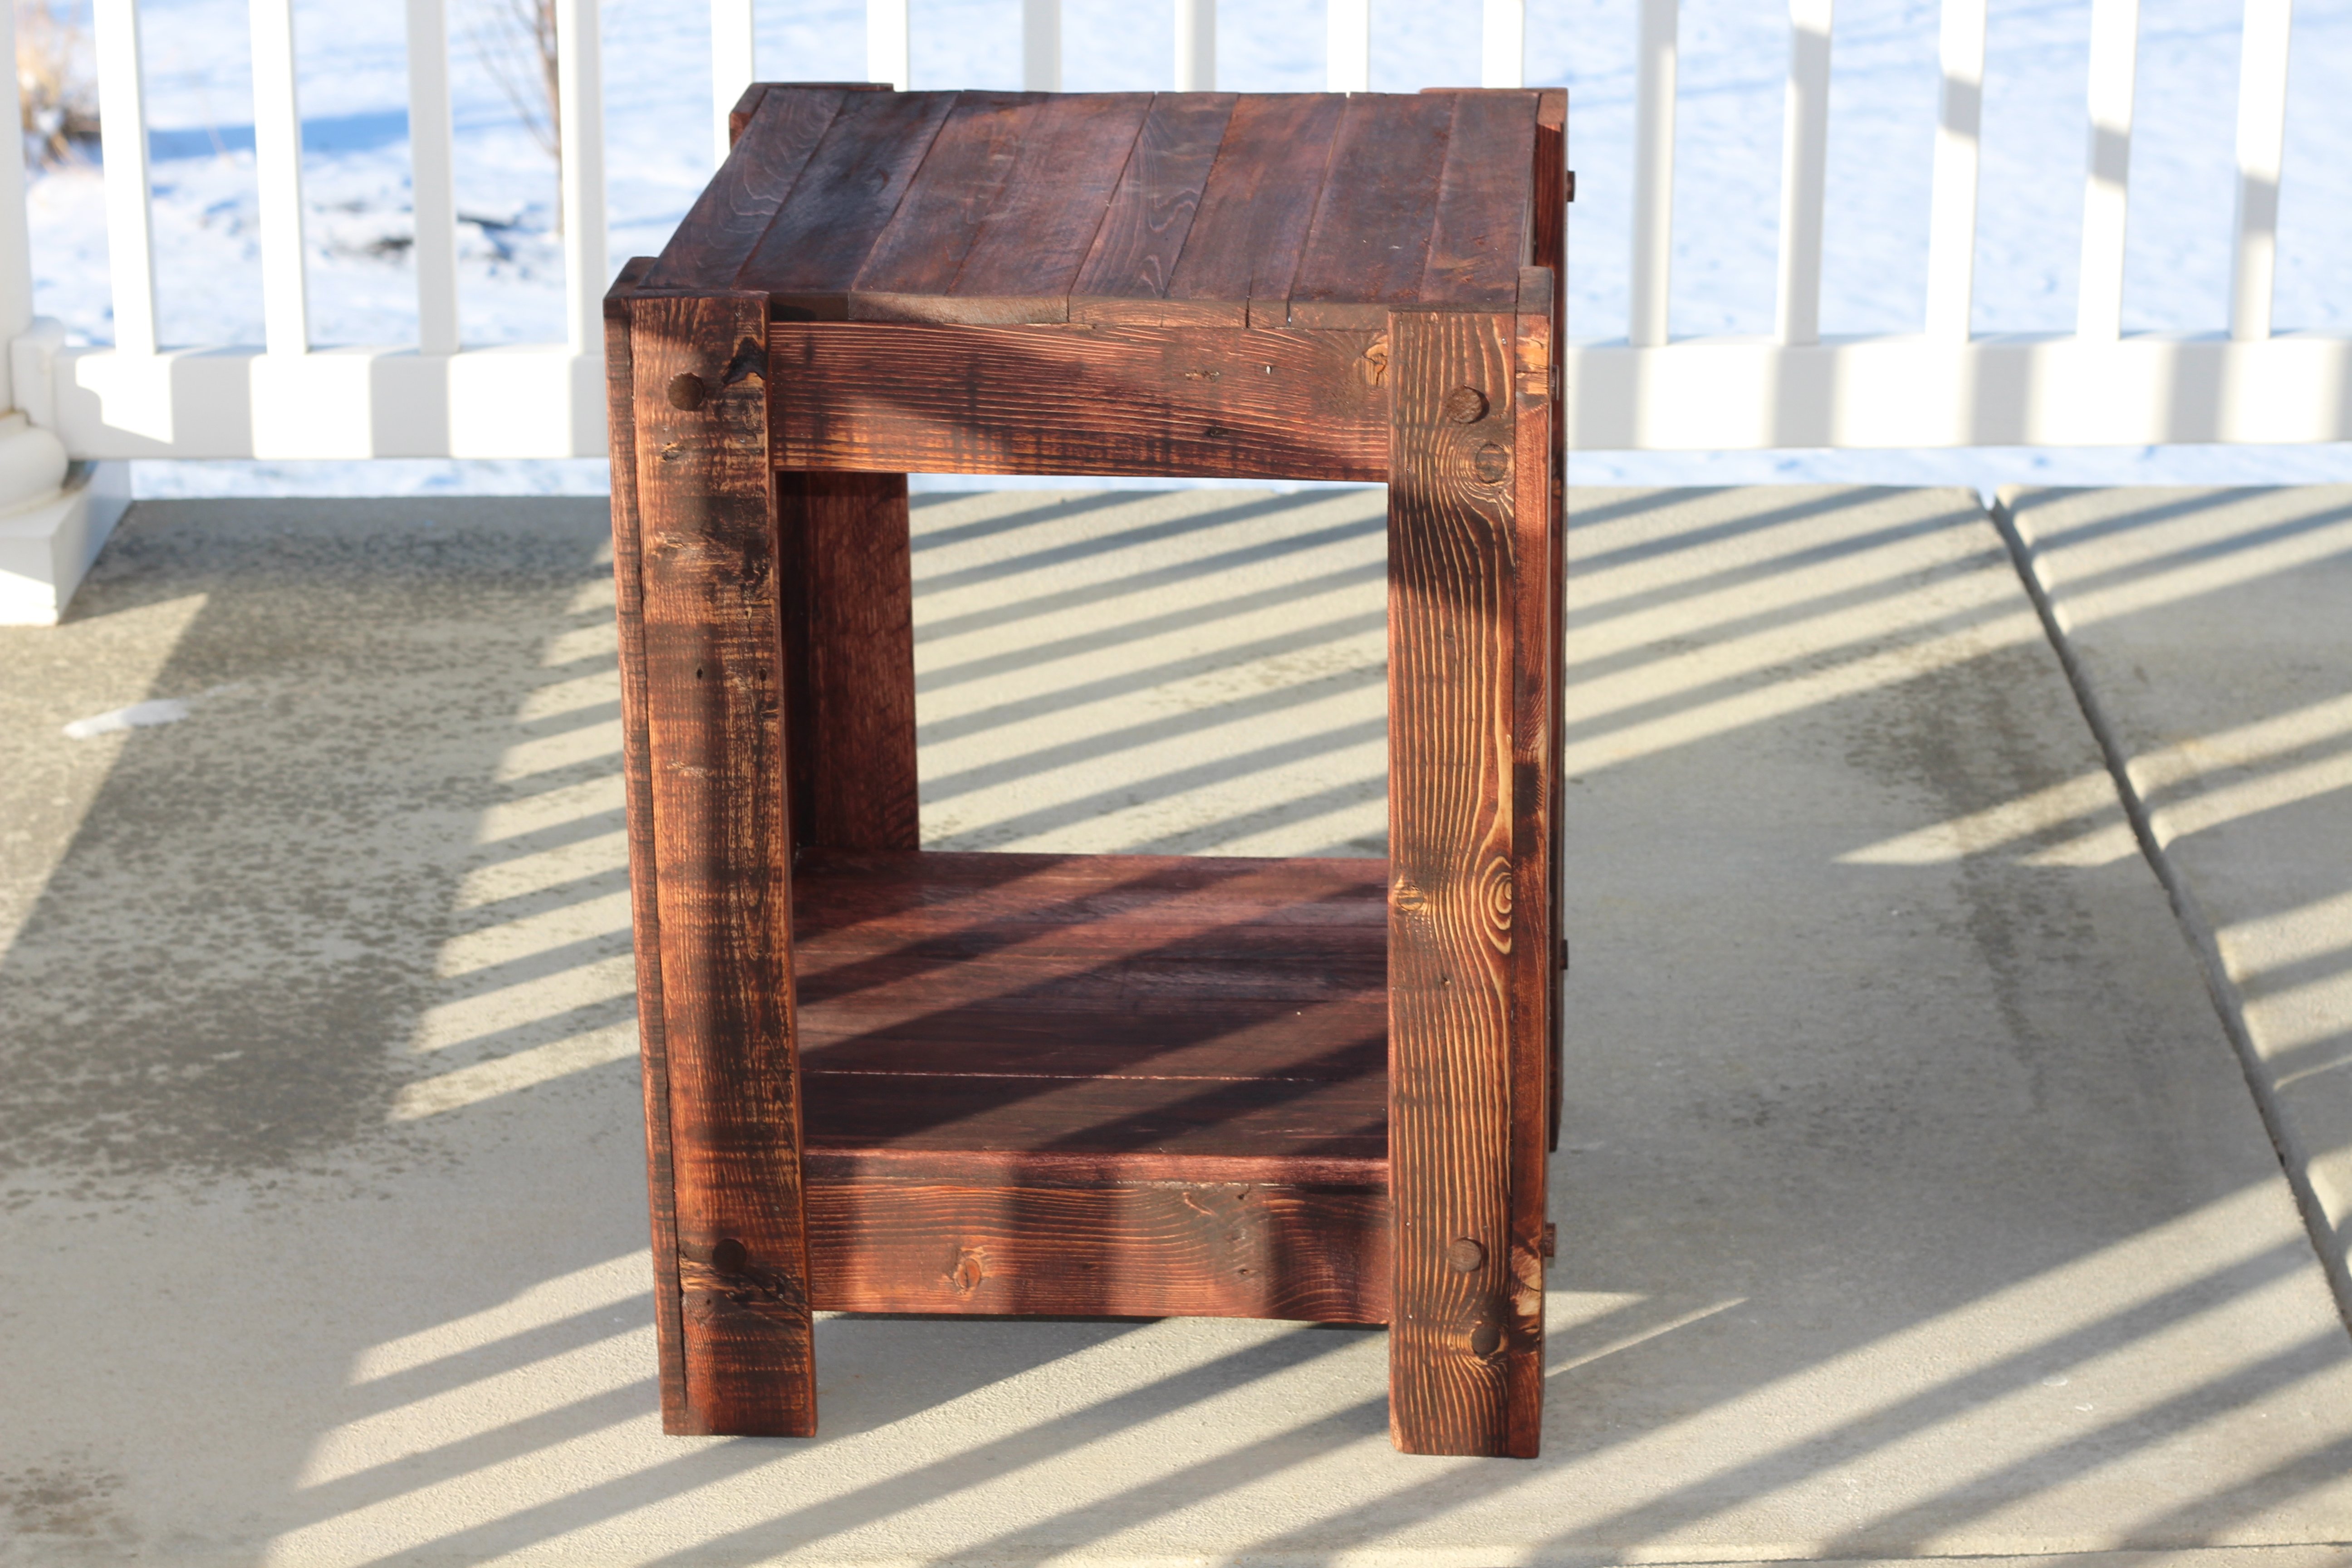
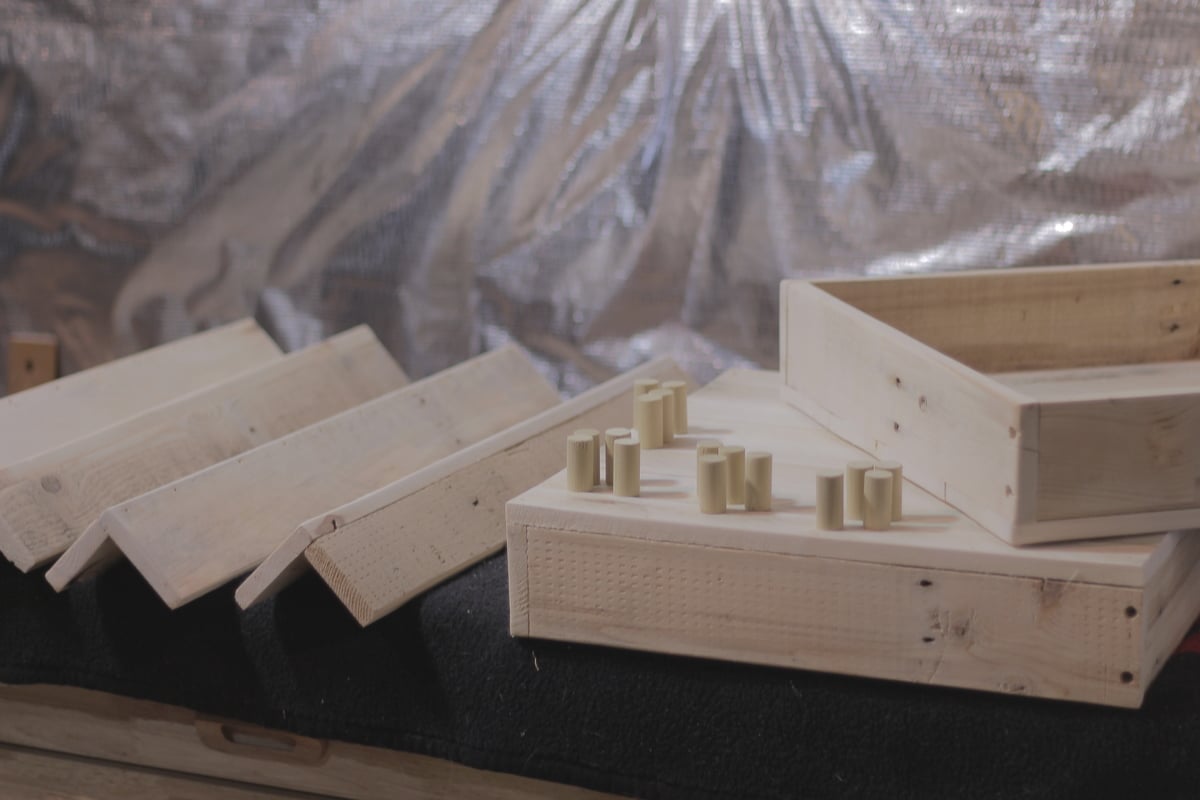
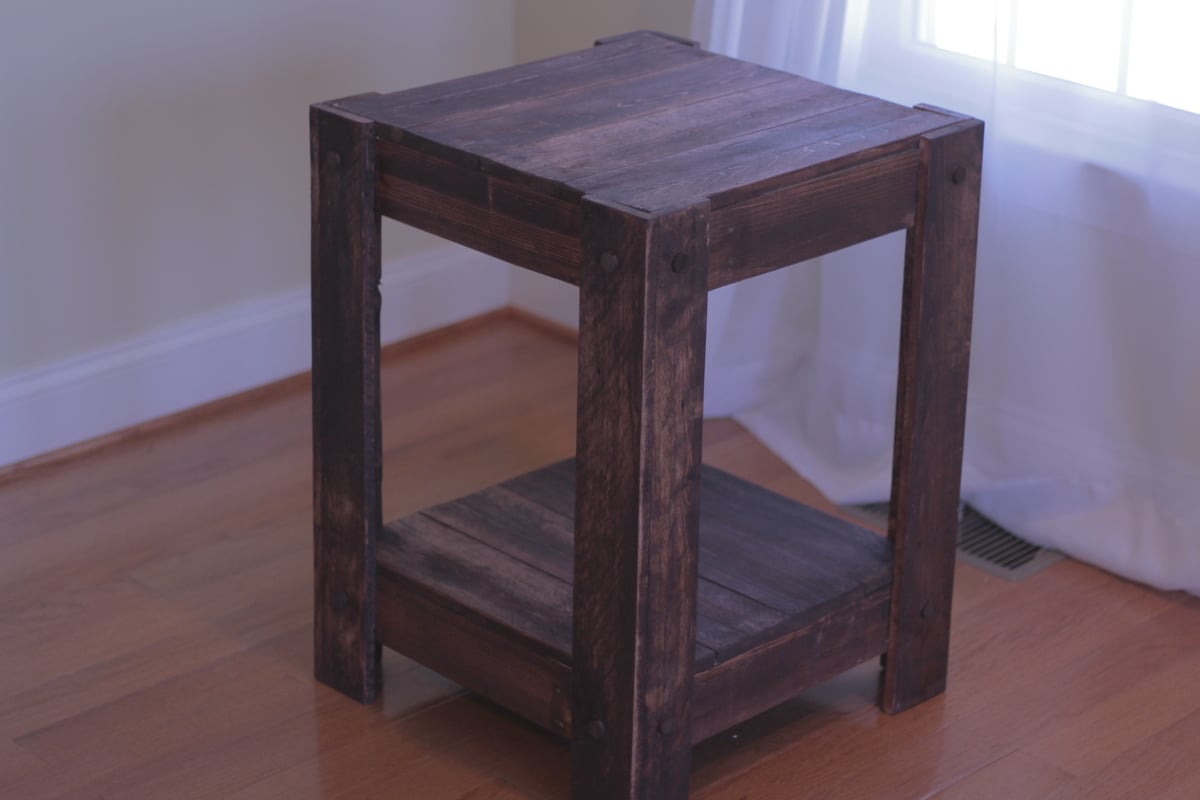
We are building a small rental cabin in the Red River Gorge and I needed a sofa table to do double duty. We needed a place for people to eat that would also be a useful sofa table when lounging. I modified this piece from the plan; very beginner friendly I’d say, lol. The bottom is painted glossy black and the top is stained a grayish blue. Galvanized hardware finished it off on top. I chose not to use the side arms once I brought it inside.

Estimated Cost
$65, I used scraps for the base. I already had the stain and varnish. Biggest cost was the galvanized pipe.
Estimated Time Investment
Afternoon Project (3-6 Hours)
Finish Used
Black gloss paint for base and gray blue stain (my own concoction) for top.
Recommended Skill Level
Beginner

Comments

Loving These Shelves

Submitted by woody311 on Thu, 01/15/2015 - 18:51

I changed the plans a little bit to add on the extra shelf on top as well as making the shelves an inch narrower than the plans. The project was actually pretty easy and really only took me about a days worth of work.

Estimated Cost
$160
Estimated Time Investment
Day Project (6-9 Hours)
Finish Used
None
Recommended Skill Level
Beginner

Comments

Beautiful bed!

Submitted by Anonymous (not verified) on Mon, 08/19/2019 - 09:05

This bed is gorgeous and the plans are perfectly laid out for even a beginner to use.  We were making a full bedframe, so we used the exact measurements given in the cut list and it fit the mattress just right.  We made the accompanying headboard with a few changes.  We were using pine and wanted the headboard casing to match, so we just used 1x4's and routed the edge with an ogee bit we had on hand.  We also wanted the platform just a tad bit higher and made the legs 10 inches instead of 7.  We also ended up making the platform slats out of 1x4's instead of 1x3's as they were cheaper.


Pin For Later! 

Beautiful bed!

Estimated Cost
$80.00
Estimated Time Investment
Weekend Project (10-20 Hours)
Finish Used
One coat of Minwax Honey stain, finished with flat spray poly
Recommended Skill Level
Beginner

Comments

Nursery Dresser

I made this dresser for my sister's nursery. The room is fairly small, so she wanted a changing table on top of the dresser to save space. We also added a third row of drawers.

Estimated Time Investment
Week Long Project (20 Hours or More)
Finish Used
Satin white paint
Recommended Skill Level
Intermediate

Comments

dbwalk

Sun, 11/23/2014 - 05:35

I like how you modified the plans to make it have two more drawers.  I'm looking forward to doing this very soon for my twin daughters.  I was just wondering how the dimensions on the right and left sides were changed?  Also, does this seems to carry the extra weight of the drawers OK?

Custom X Cross Box Craft Desk

Submitted by Anonymous (not verified) on Wed, 05/03/2017 - 13:19

DIY Craft Desk.

I built this desk for my wife to give her more space to create her crafts. I meshed a couple designs that I had researched to give her a unique design. This project took me 1 week to complete by only working on it in the evenings but it could be done faster if you have more time available than I did!  


Materials Needed:
2 - 6 foot 1x4" pine or Poplar wood
1- 8 foot 1x4 pine or Poplar wood
4- 2x2" pine wood 29" long
2- 1x2" pine wood 24" long
1- 12"x48" pine board (pre cut craft wood in Lowe's)
1- 24"x 72" pine board (pre cut craft wood in Lowe's)
Box of 1 1/2" wood screws
Wood glue

Wood stain and/or paint 
8- 1" corner braces

1). Cut the 12"x48" craft board in half (2- 12"x24"boards.)This will be your shelves. Sand all of the wood prior to staining.
2.) Stain shelves and desk top. We used two coats of gray stain. Finish with one coat of Polyacrylic. Sand. Then one more coat of polyacrylic.
3.) Cut the 1"x2" trim to 2- 24" long strips.
4.) Attach the 2x2" posts to the 1x2" trim with wood glue and wood screws. You will end up with an upside down U shape. This trim piece will give added support for desk top. Do this twice and then Paint your posts.
5.) Mark where you want your shelves on the posts and screw in your corner braces to hold the shelves up. I placed the shelf inside the posts to give me 12" of width for baskets. Screw your braces onto your shelf and then attach to the posts. I recommend doing the bottom shelf first so it stabilizes the posts.
6.) Do the same thing with the top shelf. Mark where you want them and attach with corner braces.
7.) Moving on to the cross box base.... Build the 4 sides of the box first with the 1"x4" boards. This desk is 24" deep and 29" tall. Use wood glue and wood screws to assemble. I predrilled the holes then, placed glue on then screwed together.
8.) Make sure your top 1x4" is the full depth of the desk so the weight of the desk top is spread evenly on box.
9.) I used this guide for the interior cross pieces. http://sawdustgirl.com/x-leg-office-desk/#aa
10.) Paint your cross base.
11.) Attach desk top to bases with wood glue and wood screws and you are all set!

It was a fun project! - Jen

Estimated Cost
$150
Estimated Time Investment
Week Long Project (20 Hours or More)
Finish Used
2 coats of Minwax Classic Grey Wood Stain and I used white oil based paint on the bases mostly because I already had a can of it.
Recommended Skill Level
Intermediate

Sandbox with Benches

Burnt and stained with a semi transparent mahogany water sealer

Built from Plan(s)
Estimated Cost
$120
Estimated Time Investment
Afternoon Project (3-6 Hours)
Recommended Skill Level
Beginner

Comments

Console Table

Submitted by wangbw on Sun, 06/11/2017 - 15:32

Quick and easy to follow plans.  Only issue I ran into was that my miter saw only cuts up to a 50° angle.  I set up a jig to hold the 2x2 perpendicular to the saw and set the miter to 30°.  Viola, easy 60° angles!  Pic attached for reference.


Built from Plan(s)
Estimated Cost
$80
Estimated Time Investment
Afternoon Project (3-6 Hours)
Recommended Skill Level
Beginner

Bunk Beds for a Small Room

Our bedrooms are 9' x 9' so when our girls needed to move in together, we needed a bunk bed that would be short enough to fit under the fan, have a place for drinks, books, an alarm, and tissues, and also have a place where our youngest could have a dark sleeping space while older sister stays up later.

We're not going to be in this setup for long, so I used common board to keep the cost down as much as possible. The whole bed cost about $200, but I would suggest staying away from common board. It was really warped and couldn't be sanded smooth. We ended up going with a dark, thick paint to cover the wood imperfections. To deal with the warped wood, I made an outline of each end of the bed with painter's tape on the garage floor and used weights to hold the wood where it was suppose to be. I also modified the plans to make the bottom bunk a bit shorter and made the whole thing only 3 inches off the ground. All put together the bed is very sturdy and everything lined up well.

I used some scrap wood to make the holders for drinks and tissues and a holder for the iPod and speakers. These just rest over the railing, so we can move them around if need be. The book racks are Ikea hacks....they're just spice racks painted to match the bed. The curtains are just hung on a 1" dowel set into the same cups that closet rods are put up with. I also added some flower knobs from Target so that the girls can hang a robe when it's cooler outside.

Thanks for the plans Ana! My girls LOVE this bed!

Built from Plan(s)
Estimated Cost
$200
Estimated Time Investment
Week Long Project (20 Hours or More)
Finish Used
Paint and polyurethane coat.
Recommended Skill Level
Intermediate

Comments

My first DIY project!

Submitted by Celeste808 on Sun, 05/05/2013 - 10:30

Finally Completed!!! Thank you rainy Saturday! So I wanted a new entertainment center of sorts... couldn't find one that was just what I wanted..... so why not just build what I want! Just DIY it. ;)

I used the faux fireplace plan and modified it to have attached shelves on the sides. I also added an extra strip at the top of the fireplace opening so I could mount an LED bar light.

I used 1/4 plywood to make a tile base, penny tile, and 1/2 quarter round to finish out around the entire bottom.

Total project cost was less than $200 including the tile and light!

Best part is the whole thing is movable!

Thanks Anna White for such an awesome plan to start with!

Estimated Time Investment
Week Long Project (20 Hours or More)
Finish Used
MDF & plywood
Recommended Skill Level
Beginner

Comments

spkramer

Wed, 07/03/2013 - 10:24

This whole unit is great. My wife LOVES it, which means I will be building it! Did you purchase the two shelf units or build them yourself? Did you use a pattern or plan? Thanks!

Alisonwunderland

Wed, 07/31/2013 - 13:09

This is amazing! Exactly what I'm looking for! Did you change the depth of the mantel to make sure the shelves would be deep enough to hold things?

Celeste808

Sat, 08/03/2013 - 18:25

I did make the depth of the fireplace deeper so I could have room for the halves on the side. I just sketched out the dimensions I wanted the side shelves and built them along the same lines as the fireplace. Wasn't hard to figure out and just made it to fit the size I needed. The inset of the fireplace does not go all the way back to the wall either, that way the power strip can fit on the floor behind it. Glad you like it and thanks for the compliments!

EAnne

Wed, 07/23/2014 - 14:54

Hi Celeste 808, What a wonderful faux fireplace WITH the bookcases, especially. I'm hoping I can try this in our space challenged bedroom. Did you by any change reply to the chap who asked if you had some kind of dimensions or plans you could pass along to us? I would love to see if we can make it work in the space we have available.
Thanks again for the inspiration,
e

jrybolt26

Mon, 10/28/2013 - 18:25

I absolutely love what you did with this. I am going to have my fiance help me make this for our house. If you still have the dimensions and details of how you built the whole unit I would greatly appreciate it if you could post it.

mommyof2cuties

Sun, 04/13/2014 - 13:00

This is gorgeous & I can't believe it's your 1st project. I would love to build this too. Did you use any particular plans for the side units? If you have any tips or information to share, that would be great! I've actually been trying to make up my own plans using Sketch Up, but that's not working too good, lol. Again, great job & thank you.
Lynda

emswave

Sun, 02/08/2015 - 12:31

I'm dying to know the dimensions you added to the width. Also, the dimensions of the book shelf. I have been trying to draw up plans for the last week and I'm stuck with trying to figure it out by looking at your pictures.

PLEASE HELP!

Thanks!!

mrittgers1

Mon, 07/27/2015 - 09:15

Do you have the blue print of how you built the mantel and side book shelves? I am wanting to go buy supplies to build this tonight!!!


Thank you!

Craft Closet

When I was given a stack of MDF sheets from a friend, I knew this was the desk I wanted to build with it first! We recently moved into my husband's grandmother's house, and have been making some improvements. We took out the dark old built in, and I replaced it with three 4' long gallery shelves, and the Parson's Desk modified to 4' long. It fits perfectly in my space, and looks so chic and modern against our teal walls. It's the perfect craft nook and workspace! I added a mason jar pendant light I DIY'd from the IKEA bulb kit, and also sewed a reversible runner to match my handmade duvet cover. The fabric is Deer Valley, from Free Spirit. I also had the glass top from the original desk cut down at Lowe's for free, and it's a perfect fit.

Estimated Cost
$30 for ledges, $30 for desk
Estimated Time Investment
Day Project (6-9 Hours)
Finish Used
I sanded the 2x2's with 150, then followed up with three coats of semi gloss white paint, sanding with 220 in between coats.
Recommended Skill Level
Intermediate

Farmhouse Table with Butcher Block

Submitted by kharris on Tue, 05/28/2013 - 16:51

We are selling our house and needed a small table for the corner of our kitchen. Since we had leftover butcher block after replacing the countertops, I modified the Farmhouse Table and bench plans. The piece worked perfectly in the space and the house sold immediately after our open house.

Estimated Cost
$100
Estimated Time Investment
Afternoon Project (3-6 Hours)
Finish Used
Mineral oil for the butcher block top and white paint and primer for the legs. We still need to varnish the top of the benches.
Recommended Skill Level
Beginner

Convertible picnic table

Submitted by ClemTanya on Tue, 06/18/2013 - 19:43

I built this table with the dimensions described in the original plans, but made a slight modification by using my Kreg Jig to add pocket holes for attaching the tabletop and seat boards from below rather than drilling down through the top. I'm never really happy with the way a finish comes out after using wood filler, plus not having to fill holes saves a step in the finishing process (which is the really arduous part of the job for me). I also like the sturdiness of the Kreg joints.
This was my first project using the Kreg Jig in an application that didn't have the location for the pocket holes specified, so for the first bench I followed right along with the plans and just detached the drill guide and clamped it to my project to drill the pocket holes as I went along. For the second bench I was familiar with where all the holes should be drilled, so I was able to quickly mark off the location and pre-drill all the pieces assembly line fashion. The second one practically flew together.
If you want to use this method, you will be drilling your pocket holes in the boards labeled "seat support" and "tabletop support" (there are 2 of each of these pieces for each bench/half table). You can mark the position of the tabletop boards on the tabletop supports and drill your pair of pocket holes to correspond roughly to the center of where each board will be (so 6 holes in each of the 2 pieces labeled tabletop support for each bench). Nearly the same process for the seat supports, but remember that the holes to attach the outermost seat board won't be centered because of the location of the front leg. I chose to add a couple of pocket holes through the front leg board as well for extra sturdiness in case it gets picked up by that outermost seat board when the bench/table is getting moved. I have included a picture of the pre-drilled pocket holes to help clarify the above directions.
The build itself can definitely be classified as a beginner project and easily manageable by one lady (although it would be really nice to have a buddy to help move the finished bench...I had to take the tabletop back off mine to move it from my "workshop" (carport) around to my patio). In terms of time, the build for both benches could easily be completed in an afternoon; I ranked it as a weekend project because of the finish. The tabletop and seat boards each have 4 coats of an exterior semigloss paint and I custom blended the colors so that each board gets progressively darker as you go down the bench. I was inspired by the ocean, with the water getting darker as you go deeper and deeper. As you can see from my photos, I rushed headlong into the first bench and put it together unfinished (I was more concerned about figuring out the placement of the pocket holes than the finish.) For the second one I pre-drilled my pocket holes, then put on 2 coats of base coat and 1 coat of color (on seat and tabletop boards) before assembly, saving only the finish coat on the colored boards and touchups on the white boards for after assembly. I definitely recommend the second method.
I worked on the project over a couple of weekends and evenings because of weather and time constraints, but under the right conditions it could be completed in a weekend or even maybe a long day (especially with a second painter and in good paint drying weather). I'm really happy with the final product and I've already been enjoying the comfy bench seat for reading.

Estimated Cost
$100 (including finish)
Estimated Time Investment
Weekend Project (10-20 Hours)
Finish Used
Exterior semigloss paint: 2 coats of self priming base coat (Valspar Duramax) and an additional 2 coats of color that I custom mixed into 6 shades on the bench seats and tabletops. The darkest shade on the outermost seat board is called Monterrey Bay Teal from Valspar. I mixed the five additional colors with white in 15% by volume increments. (If you want to get really, really specific, I started with a quart of the teal and made 100 grams of each of the 5 blended colors and this was almost the perfect amount to put 2 thick coats of color on all sides of each of the seat/tabletop boards.)
Recommended Skill Level
Beginner

Comments

Greenhouse

Submitted by Anonymous (not verified) on Sun, 01/02/2022 - 12:30

Built the greenhouse from Ana Whites plan
She did the plan really well..

Built from Plan(s)

Comments

Indoor Basketball hoop

Submitted by Shells1104 on Wed, 05/16/2018 - 19:37

Joined 1 x 3 boards together with pocket holes and wood glue. The hoop is reused from an old " over the door" hoop. Decided to just drill straight through the boards into studs. Really easy and my son loves it!

Estimated Cost
$50
Estimated Time Investment
Afternoon Project (3-6 Hours)
Finish Used
weathered gray, early American, ibswich pine.
Recommended Skill Level
Starter Project

Comments

Wood Crate Keurig K Cup Holder with Mini Drawer

As Ana mentioned in her video, this project could be made with scraps. That’s just what I used.  I used a lot of scraps and cut offs for this project.

I needed to make a K cup holder but also space to hold tea in addition to other coffee "toppings" if you well. In the pictures you can see mini creamers.

This modification was made by adding a small drawer in addition to the holes that would hold the K cups. The small drawer was made with 1/2” plywood (even more scraps) ripped just shy of 1-1/2”. I did this to make sure we did not see the plys of the drawer as I planned to add 1/4” plywood to the top all around. I wanted this to make it all uniform with the K cup area. 

I added little rubber feet’s to the bottom as this will be on a granite countertop which could results in slipping and sliding. 

Estimated Cost
$15 perhaps. But as I mentioned it was mostly scraps
Finish Used
minwax provencial and wipe on poly
Recommended Skill Level
Beginner

Comments

lolalove77

Thu, 06/25/2020 - 06:53

Made this for my mother in law. She loves it, thank you for the plans. I cant figure out how to add the pics of the one I did for her hit it was awesome and my very first wooden build EVER

Furring strips for a headboard

I loved that I used strapping, or furring strips, for this bead. The topper wood is a 2X4, but every other 8" piece of wood cost between $1.25 and $1.99 each. Yeah! Of course, for that price, you have to know you will be sanding the heck out of it. We had a metal frame for this bed but I wanted a headboard. Because it was going against a wall with a 45 degree angle, I had to make it a lot shorter than I wanted. I made it just tall enough so both pillows, when stacked on top of each other, did not fall off the back. I just love it.

Estimated Cost
$25
Estimated Time Investment
An Hour or Two (0-2 Hours)
Finish Used
I think I used Minwax Ebony stain. Just one coat was enough as I wanted the wood grains to come through. Then I finished it off with my favorite closer, the Finishing Paste. One swipe and it feels great.
Recommended Skill Level
Starter Project

Comments

GUEST (not verified)

Fri, 04/13/2012 - 15:33

I am intrigued by this finishing paste you speak of. Could you tell me more?

debandtom25

Wed, 04/25/2012 - 14:53

I'm not at home right now, but I think it was minwax finishing wax. I love using wax on mt pieces.

claydowling

Wed, 04/25/2012 - 17:51

If you can't find the minwax that debandtom25 used, you can also get a nice paste wax from Johnson Wax. I know that's what's on my finishing shelf, and like deb, I love it.

Modern Craft Table *tweaked*

Completed Modern Craft Table! We tweaked the plans a bit because I was looking for a larger table top. The top now measures 48" x 76". We simply did this by adding an extra set of cubbies to the other side of the shelves. Absolutely LOVE how this turned out! All I need now is 4 counter height stools built and lots of shelves to complete my craft room! Will be sure to post those once they are completed!

Built from Plan(s)
Estimated Time Investment
Weekend Project (10-20 Hours)
Finish Used
Ultra White Latex Paint
Recommended Skill Level
Beginner

Comments

Ana White

Thu, 11/17/2011 - 01:10

Darn I was so excited to see you craft table! I apologize that your brag post did not show images. If you can send me images at knockoffwood(at)gmail.com I'd be happy to post. Thanks so much for submitting a brag post. Ana

Guest (not verified)

Sun, 03/04/2012 - 07:31

I LOVE LOVE LOVE your craft table. I want one! Looks like my husband wil have to get busy! Thanks for sharing!
Kristina
Houston, TX

Kimmy (not verified)

Tue, 03/20/2012 - 17:51

Is this the pic of the one you did ?? I am wanting a bigger table top too. I have waited years for just the right table and this is it.

Kimmy (not verified)

Tue, 03/20/2012 - 17:51

Is this the pic of the one you did ?? I am wanting a bigger table top too. I have waited years for just the right table and this is it.

Kimmy (not verified)

Tue, 03/20/2012 - 17:54

Is this the one you made ? I want a bigger table top as well. But I don't see the extra cubbies.

Kimmy (not verified)

Tue, 03/20/2012 - 17:54

Is this the one you made ? I want a bigger table top as well. But I don't see the extra cubbies.

naildoctors

Tue, 05/29/2012 - 00:05

This is great!! I am planning something similar, but what is your idea or the plan you used for the middle support to keep it from sagging over time? My idea is to run another cubby in the middle from side to side. What do you think?

Laura Mulholland (not verified)

Mon, 01/21/2013 - 09:54

I love the modern craft table, just what I have been looking for, do you share instructions, dimensions, etc.? thanks, Laura

HapETexanGal

Thu, 05/12/2016 - 15:14

I'm loving this and would love to have FIL build it for me but the plans look like its for the regular modern craft table but not the tweaked?  Also is there support for the middle?  Can you send me a link for the tweaked supply list please, can't seem to find it.  Love what you do!

Kids Wooden Play Grill

Submitted by Anonymous (not verified) on Sun, 11/03/2019 - 17:10

Built this toy grill for my nephews first birthday. Went together without many hiccups. I will say these plans seemed less detailed than other Ana White plans I have worked on...but for the better I guess, as it forced me to figure somethings out on my own. I opted to add the drawer behind the grill plate, like the blogger who also made this grill did. Kept the same color scheme as well. Pretty proud of how it turned out.

Built from Plan(s)
Estimated Cost
$40
Estimated Time Investment
Day Project (6-9 Hours)
Recommended Skill Level
Intermediate

Jelly Cupboard

Submitted by emilyr on Mon, 04/02/2012 - 18:15

Ever since I saw this cupboard, I wanted it. So when I got a free day I jumped at the chance to build it. I love it! The only problem is trying to figure out where I want to put it.

Built from Plan(s)
Estimated Cost
$30-40
Estimated Time Investment
Afternoon Project (3-6 Hours)
Finish Used
Porter's Prussian Blue and black spray paint
Recommended Skill Level
Beginner

Comments

tommyc325

Thu, 02/19/2015 - 19:11

Hi Ana - I dont mean any disrespect but how do you figure this project costs $30-40. I bought just the boards no hardware or plywood and its cost me $60. Pine #2.

Please let me know your thoughts and where you buy your wood from.

Bander

Fri, 02/20/2015 - 12:00

The cost estimate is from emilyr, posted almost three years ago. Lumber prices fluctuate, but $30-40 is still quite low. I estimate about $100 to buy the lumber (pine) on the shopping list from Ana's plan at current prices in my area.

End table made from pallets (plans included)

Submitted by mtairymd on Sat, 02/08/2014 - 14:58

Building an outside side table out of scrap pallets.

Video of the build:
https://www.youtube.com/watch?v=kVAYXVGiL_8

Drawing File
https://googledrive.com/host/0B21TbB8gGNQbX2dlNGdxR0NuOE0/end_table.pdf

Estimated Cost
$5 for stain and nails - free pallets
Estimated Time Investment
Day Project (6-9 Hours)
Finish Used
Red Oak
Recommended Skill Level
Starter Project