Community Brag Posts

Modular Play Kitchen

I made this for my 3 kids for Christmas and I'm so glad I did!  They have gotten so much use out of it and love to move it around to set up different "houses" and restuarants.  Thanks so much for these plans!  I made the pieces a little taller, and use the play stove as the sink base too so that it could double as a dishwasher :)  

Estimated Time Investment
Weekend Project (10-20 Hours)
Finish Used
Color Bay by Pantone
Recommended Skill Level
Beginner

Rustic X Coffee Table

Submitted by jmuhorn99 on Tue, 02/04/2020 - 16:22

I'm really bad at making the X's, so I just added some straight pieces for decoration.

Built from Plan(s)
Estimated Cost
$64
Estimated Time Investment
Day Project (6-9 Hours)
Finish Used
Dark Walnut stain and white chalk paint
Recommended Skill Level
Intermediate

First Project - Farmhouse Storage Bed

Submitted by kmac1036 on Fri, 04/27/2012 - 11:55

Working on getting furniture done for my kids. Gives me something to do when they are away on visitation. New furniture from a store is too expensive right now & gives me something to work on to keep my mind off of things.

Modified to fit a Twin XL mattress.

Estimated Time Investment
Week Long Project (20 Hours or More)
Finish Used
Passion Pink latex enamel semi-glass from Sherwin Williams. top coat with polyurethane for chip/scratch resistance
Recommended Skill Level
Starter Project

Comments

birdsandsoap

Fri, 04/27/2012 - 13:37

Beautiful job! I love the color. I have memories of being gone for weekends on visits and coming home to a newly decorated "Rainbow Brite" bedroom and my mom assembling a waterbed for me on the kitchen floor (it was the eighties); it felt great to know that my mom was thinking about me while I was gone, your kids will not forget those things.

amercado

Wed, 05/16/2012 - 09:48

Hi!, i am new to all of this and would love to make this bed for my daughter, could you share the measurements for the twin version? thanks!

fortmac (not verified)

Sat, 06/02/2012 - 03:12

Hi, I like this bed for my son, also looking for the measurements for the twin version.Thanks

Nicole 1016

Mon, 08/27/2012 - 11:05

This is gorgeous! I would love to know how wide you made this and if you only had to adjust the headboard and footboard?

grreenbeans

Sun, 01/17/2016 - 09:17

Hi! I know this question has been posted before and replied to but, for some reason, I can't see the replies so... would anyone mind maybe sharing their converted measurements for a twin sized bed? Thank so much! This will be our first project and I'm sooo nervous!

Firemedic

Fri, 02/05/2016 - 20:20

I made this bed in a twin. The twin mattress is 39x75. That's 21 inches narrower and 5 inches shorter than a queen. So just make the head board, foot board, and slat measurements 21 inches shorter keeping the height the same. The length is five inches shorter but to get three drawer slots the same size I made mine 75 3/4 long. ( 24 1/4 for each drawer slot).

Modified Husky Farmhouse Table

Submitted by Doro.marie on Tue, 02/11/2014 - 04:28

My husband Chris and I have been planning for a few years now to build a farmhouse table for our home. Every year for christmas my mother-in-love (mother in law) gifts us a "must have" tool. We like to think of it as her investing in our home and quality time together. Last year she gave us the Kreg gig, holy cow, that sure is a must have!!! :) This year we received a hand sander. Needless to say we were motivated to start our farmhouse table journey.
We loved the table Ana built for her sister, so we followed the plans almost to a tee. We ordered the turned legs from Georgia. Let me also add that we try to buy everything we possibly can that is made in america, from paintbrushes on. I encourage everyone to take the a few seconds to look and spend an extra dollar or two to support america's economy.

The only modification we did to the plan was add a small strip of wood to the base layer for just a little extra touch of character. :)

Estimated Time Investment
Week Long Project (20 Hours or More)
Finish Used
Table top- miniwax wood conditioner, Early American stain, and helmsman spar urethane.

Base- early american stain for base layer, Old Fashion Milk Paint in Buttermilk, and spray on polycrylic.
We live in a small town and were not able to find gel stain anywhere. We could have ordered it online, however we adamant about using our snow days to work on this project. This made a difference as far as how the milk paint chipped on the legs. I had to hand sand to get the rustic look, however it still looks fabulous. :)
Recommended Skill Level
Intermediate

Comments

Herb & Flower Ladder

Submitted by Anonymous (not verified) on Mon, 05/09/2016 - 15:06

Living on a small city plot, this vertical ladder planter was just what I was looking for to grow my herbs and flowers. I am not an experienced builder but the plans were easy to follow. It didn't take me much time at all to complete this project. Now I am looking forward to fresh herbs and flowers all summer.

Recommended Skill Level
Beginner

Comments

Combination Workstation

Submitted by Anonymous (not verified) on Wed, 02/12/2020 - 07:45

Combined a few of your plans to make my wife a Workstation. Plans were easy to follow and there were no dimension errors.

Estimated Cost
200.00
Estimated Time Investment
Week Long Project (20 Hours or More)
Finish Used
Combo semi gloss paint and primer
Recommended Skill Level
Intermediate

Small Kitchen Storage Pantry

Submitted by Anonymous (not verified) on Mon, 10/02/2023 - 11:17

I adjusted your Barndoor l Pantry plans to utilize repurposed lumber from a Murphy bed. The shelves are 22" deep for my microwave, toaster oven, etc. It's so functional and much easier to work in my small kitchen.

Cheryl G

Built from Plan(s)

Library book holder

Submitted by ltl_lisa on Sat, 04/28/2012 - 18:33

Finally a place to hold library books away from spilling milk and coffee cups!

Estimated Cost
$5
Estimated Time Investment
An Hour or Two (0-2 Hours)
Recommended Skill Level
Starter Project

Pretty, massive coffee table

Submitted by sgilly on Sat, 02/15/2014 - 08:48

I'm still helping my kids furnish their new home. They "hired" me to build them a massive coffee table for their family room. They fell in love with the legs featured in a plan built by Shanty 2 Chic (http://www.shanty-2-chic.com/2013/11/diy-square-coffee-table.html). The legs definitely were the most expensive part of this table!
I made a couple of adjustments: because these kids of mine hope to have kids of their own soon, and the table measures 48x48, I reinforced the lower shelf of the table and the table top with support pieces. I picture babies crawling all over this and wanted to ensure that it would hold up!

I finished with the same steps used by Jen of House of Wood's rustic yet refined finish, but used a dark walnut stain as the base.

Another fun project for me, and they are very happy with it!

And, I just have to say that Osborne Wood products delivers a wonderful product with great follow up and customer service! http://www.osbornewood.com/

Built from Plan(s)
Estimated Cost
$250 for table - the Legs accounted for $160 of that.
Estimated Time Investment
Weekend Project (10-20 Hours)
Finish Used
Wood conditioner (2 coats), sand, Minwax Dark walnut, Minwax weathered Oak, sand, rubbed on whitewash (old, diluted white paint), sand, mixture of weathered oak and a little dark walnut, sand, 3 coats of polyurethane, satin finish, sanding between coats.
Recommended Skill Level
Intermediate

iTable with bench seats

Submitted by Anonymous (not verified) on Thu, 05/12/2016 - 13:43

Ana, I really loved this design and was pretty easy to build! I like the way the finish turned out by painting it black and just a few coats of poly on top. 

The benches are overbuilt with intention of converting 2 benches into 4 chairs in the future.  I made them larger so I can simply just cut them in half and add two 4x4s 18 inches higher than the current bench legs at 24" and just deck it as a chair back, seems simple enough. One thing I would change in the design is eliminating the 3 1x12s and 2 of the 1x4s and just going with a solid table top at 33 3/4 x 40 3/4, similar to what I did on the benches.  

Let me know what you think and if you have any questions.

Built from Plan(s)
Estimated Cost
150
Estimated Time Investment
Weekend Project (10-20 Hours)
Finish Used
Flat black paint with satin finish polyurethane
Recommended Skill Level
Beginner

Wood slab bar

Submitted by Anonymous (not verified) on Sun, 02/16/2020 - 22:03

Hand mad love edge bar

Estimated Cost
300
Estimated Time Investment
Weekend Project (10-20 Hours)
Recommended Skill Level
Intermediate

Farmhouse Writing Desk

Submitted by Anonymous (not verified) on Fri, 10/06/2023 - 08:58

Brookstone desk with a white oak top and drawer that I built for my 8- yr old son. It is a very fun build.

Jerry from NC

Built from Plan(s)

Comments

Twin Farmhouse bed for a room to grow in!

I saw this on the site, and I knew it would be perfect for my soon to be 4 year old boy's room. I wanted something that would be strong (hellloooo 4 year old boy!!) and not too "babyish" to last him through several years of preference changes and growth. This was not too difficult at all! Though I slightly modified some of the construction to make it easier to break down. I ended up using a box spring with a mattress, instead of slats to save a bit of money. (We got the box spring and mattress for free from a relative.)

I made this out of pine, and bought everything from Home Depot. Total cost for everything (including paint, sandpaper, wood glue, etc) was about $160! We are loving it!

Built from Plan(s)
Estimated Cost
$160
Estimated Time Investment
Weekend Project (10-20 Hours)
Finish Used
Behr Primer and Paint in 1, satin finish, color "Beluga"
Recommended Skill Level
Beginner

Comments

shaneandterrid

Thu, 05/03/2012 - 23:09

Hi,

I love what you have done here. We have just finished our first build and am about to start on another for our oldest girl. Check out our blog, its the latest entry on this page.

Love it.

Thanks,

Shane

Alex's Book Shelf

This design came from Ana's website. My daughter Alex asked me for a shelf to hold all her "stuff". She's a typical girl... lots of "stuff". I was able to snap a picture before she started to fill it all up!

Built from Plan(s)
Estimated Time Investment
Day Project (6-9 Hours)
Finish Used
White Paint
Recommended Skill Level
Beginner

Rectangle Nesting Tables

Submitted by BrandyK on Sat, 05/14/2016 - 14:55

I needed a small rectangular table to put between the sofa & wall. I also wanted a small table to set elsewhere in the room temporarily. Nesting tables were the answer. I adjusted several measurements to fit the wood I had on hand for the tops. The larger table used 2 1x8's. The smaller table is topped with 3 1x6's. I also used 1by lumber instead of 2by except for the 2x2 legs.

Built from Plan(s)
Estimated Cost
Mostly used lumber I already had, about $15 if new
Estimated Time Investment
Day Project (6-9 Hours)
Finish Used
Leftover white paint, stain/ poly combo from house windows
Recommended Skill Level
Beginner

Custom kitchen island

Submitted by Anonymous (not verified) on Tue, 02/18/2020 - 10:04

I built this custom kitchen island for a family friend that wanted something bigger than what can be purchased at a retail store. They also wanted to have a butcher block top for cutting meat. The base is made out of select pine and the stained parts is red oak with a couple strips of birch. The over all project took me 5 days to build. With the top being the longest because it consisted of 94 1 ¼” pieces glued together. Thanks for looking!

Estimated Cost
$1,200
Estimated Time Investment
Week Long Project (20 Hours or More)
Finish Used
White Chalk paint mixed with a little antique white, sanded, and spray with poly. Dark stain for top with butcher block oil and sealer.
Recommended Skill Level
Intermediate

Birthday Play Kitchen

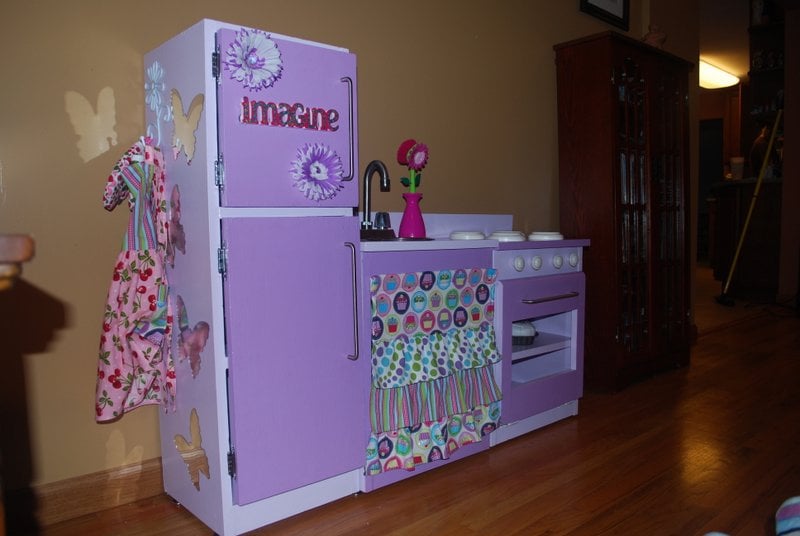
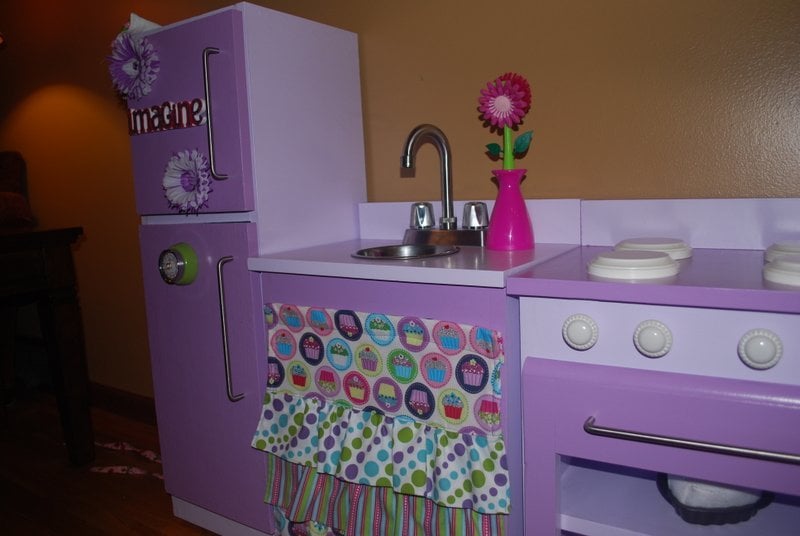
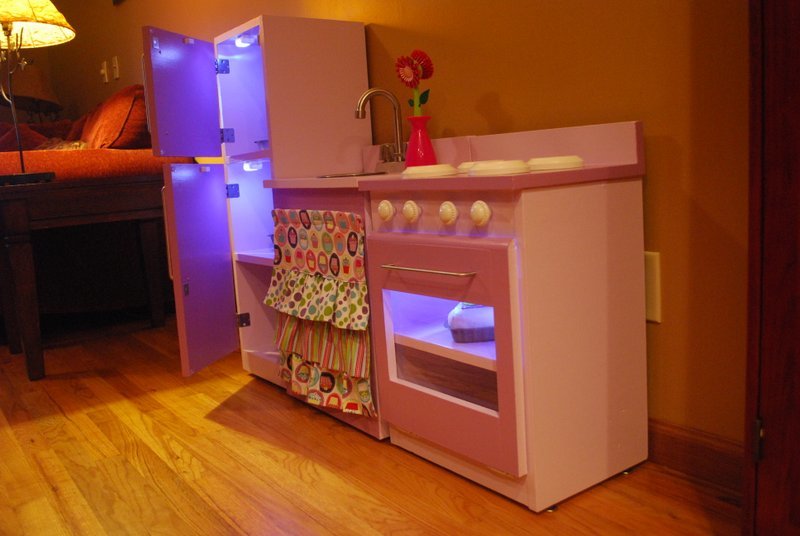
What do you want for your birthday? 'A purple kitchen'....

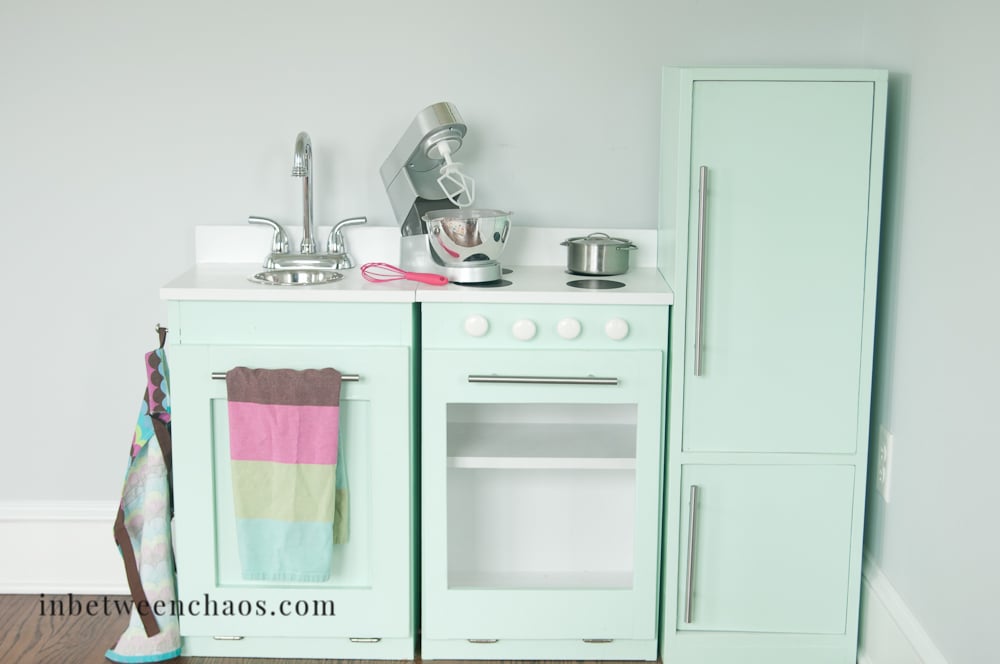
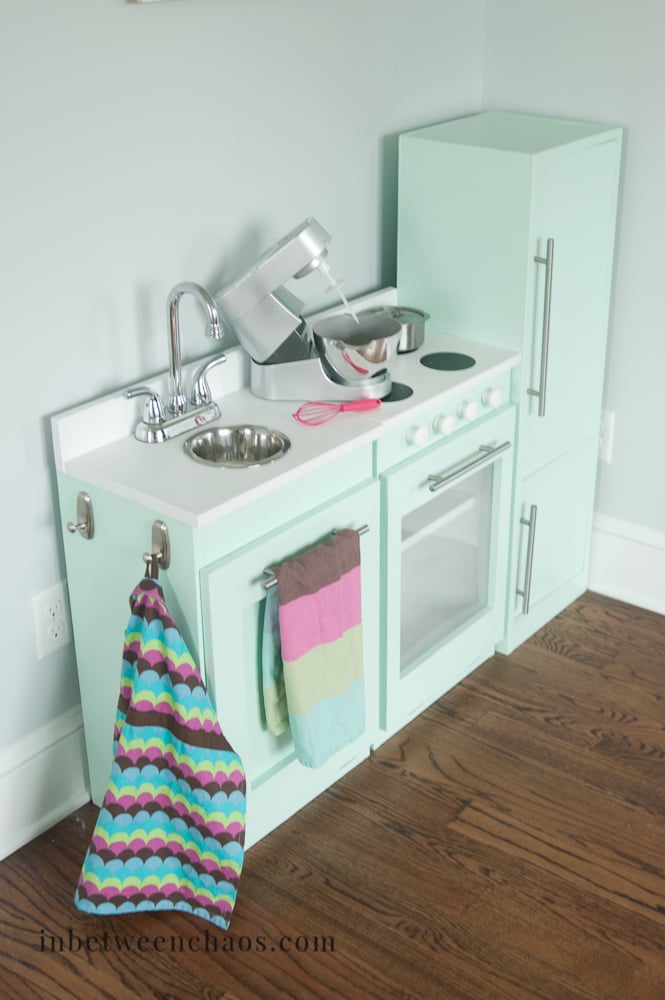
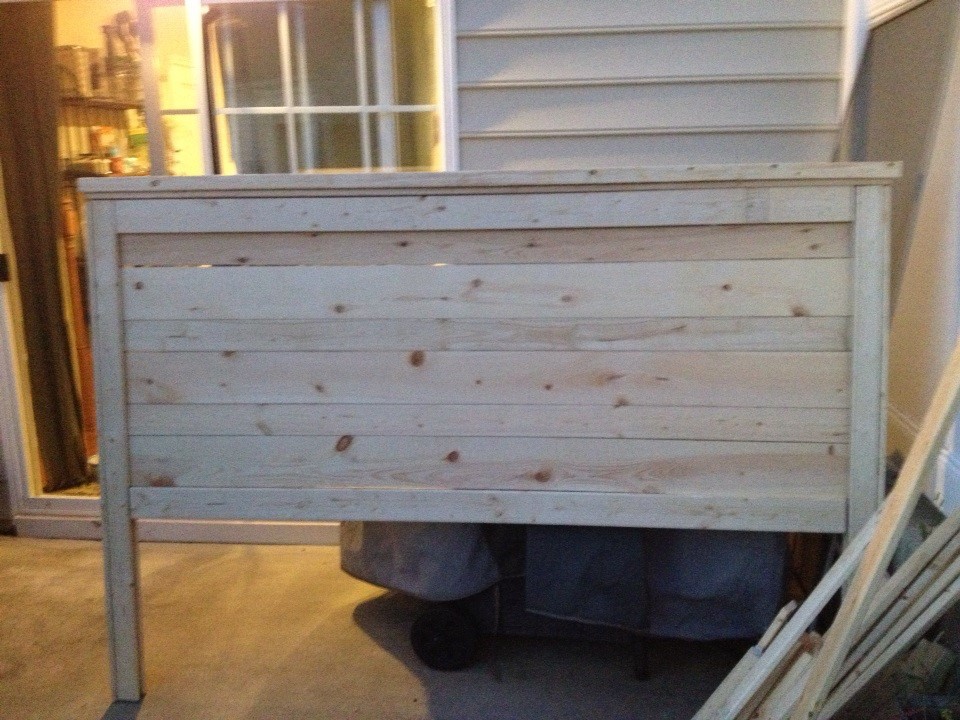
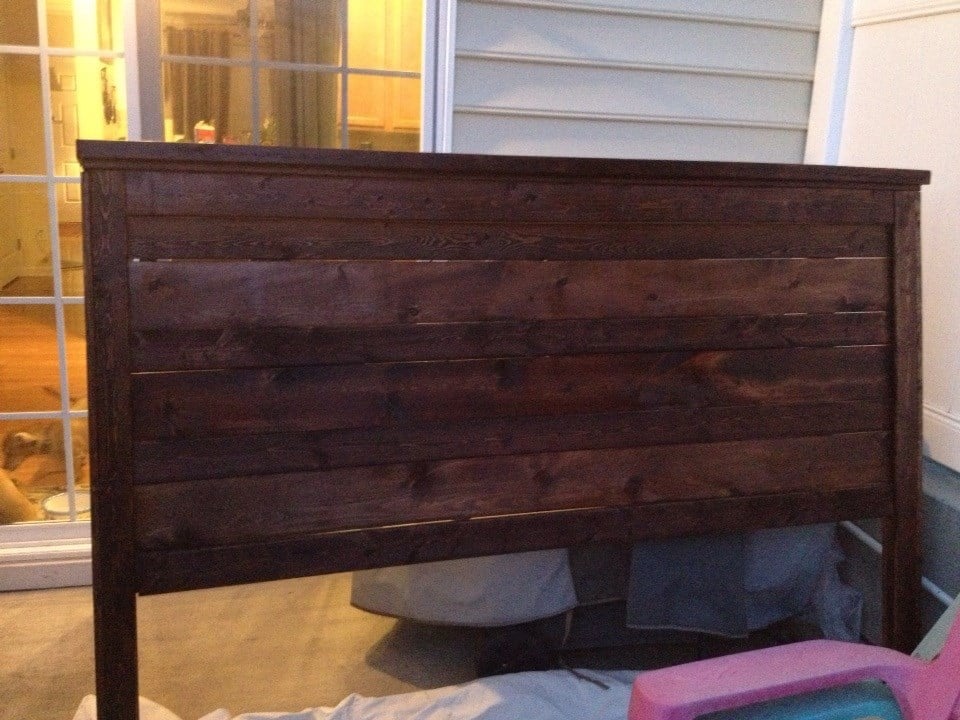
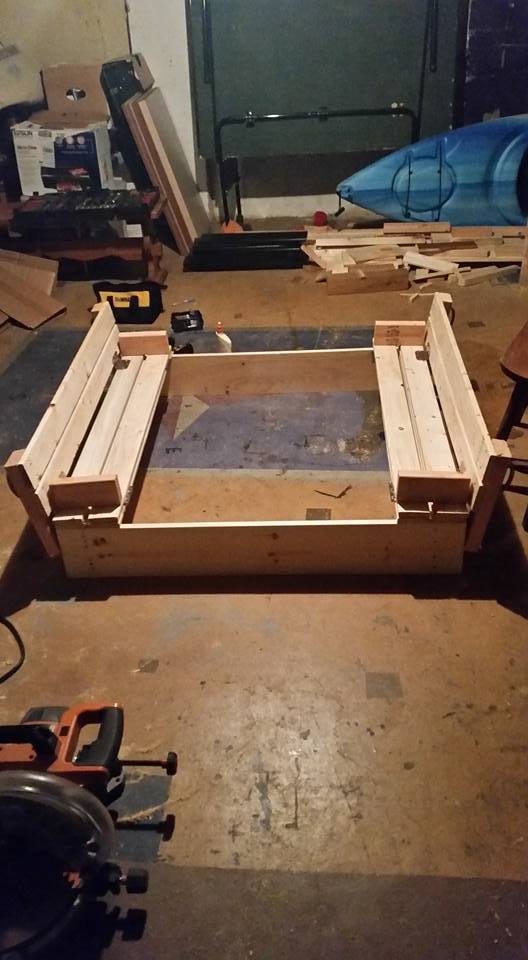
That's how it all started. My husband and I had no previous woodworking experience and we managed to build these guys.

The devil was in the details here! Building these didn't really take that long, It was the finishing and accessorizing.

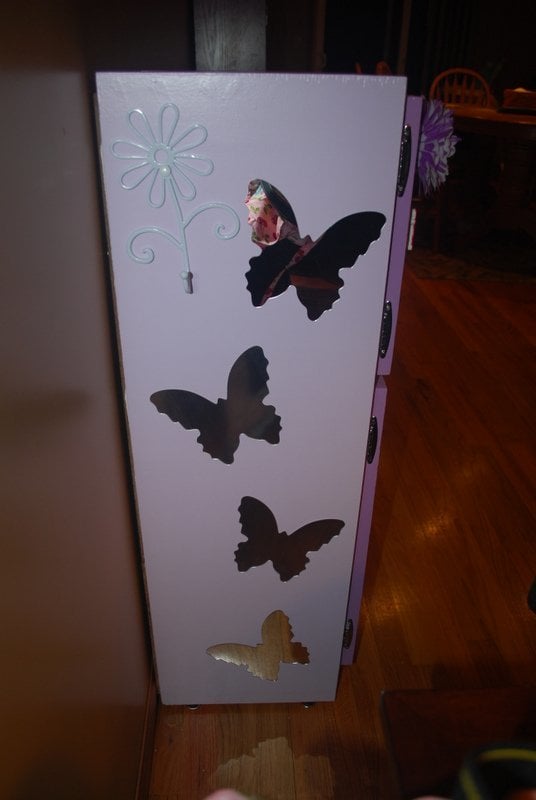
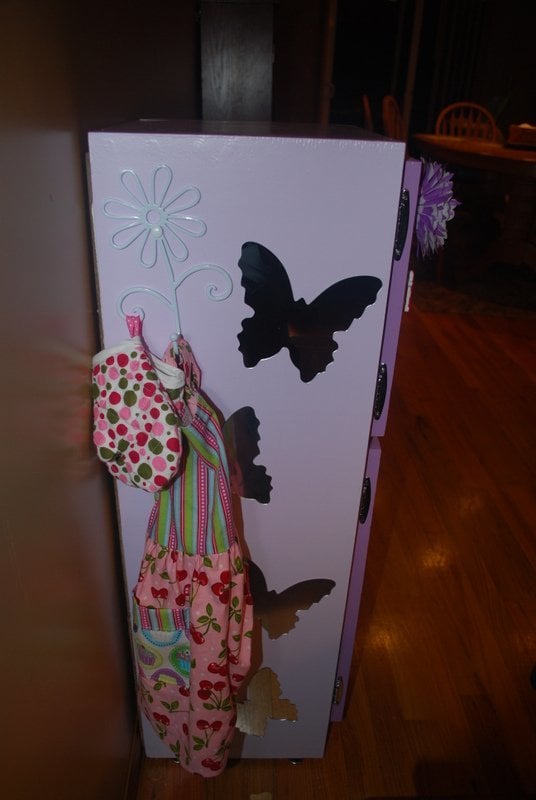
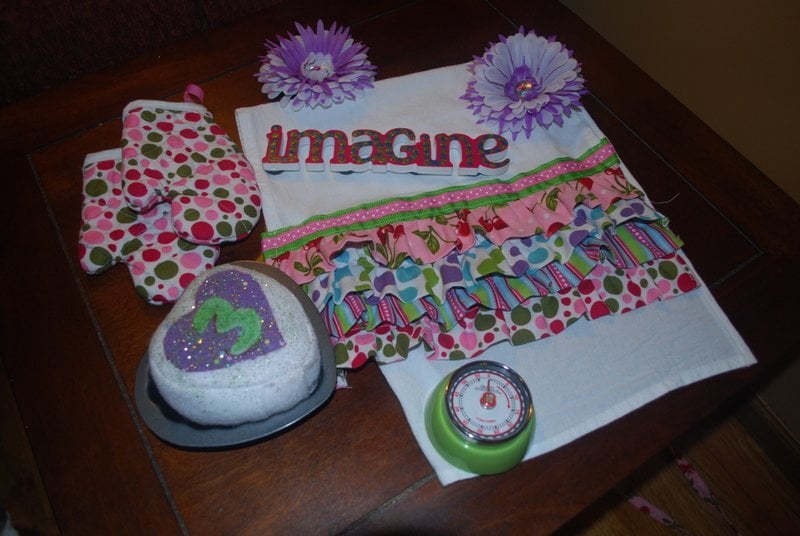
Thank God that I know how to sew/craft. I loved the ruffle curtain from crafting chicks so I made that. The apron and oven mitts were made from the same set of fabrics. I ordered the butterfly stick on mirrors on line....they didn't stick that well so we added double stick tape. The front of the fridge is magnetic primed. The flower magnets I made and the imagine was a primed wood precut from Michaels that I painted. Stove burners are plaques for wood burning. Stove knobs, brush, and flower hook all from Hobby Lobby. Bar faucet from ebay and the sink is just a bowl.

The lights were my husbands idea....the fridge lights are magnetic drawer lights that come on when the door is opened and off when closed - just like a real fridge! The oven light is a push button LED light.

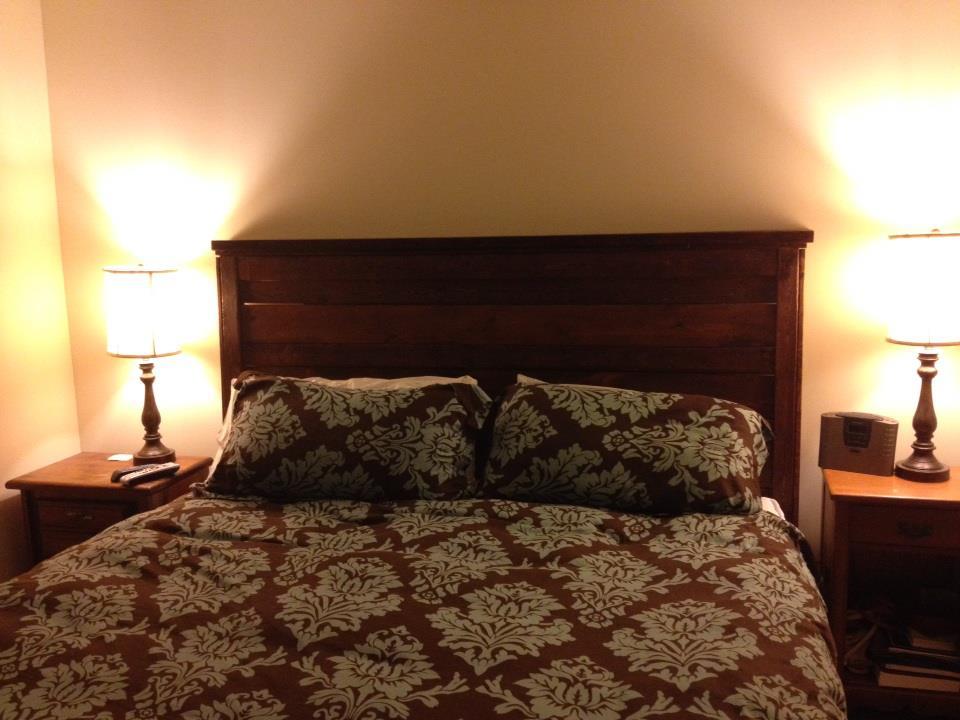
My baby was thrilled to receive this. While I loved the PB kitchens, I really think this was much better because it gave my husband and I something to work on together and it was priceless to hear my girl tell everyone that Mommy and Daddy MADE that kitchen just for her!

Built from Plan(s)
Estimated Cost
$150-$200 Probably could have done it cheaper if we didn't add a lot of the extras.
Estimated Time Investment
Week Long Project (20 Hours or More)
Finish Used
2 coats of primer, 2 coats of behr paint, and 3 coats of polyacrylic. The backs are pre primed bead board that we painted white. Magnetic primer on the front of the fridge. Burners are painted with a soft white acrylic and then polyacrylic.
Recommended Skill Level
Beginner

Comments

Aladdin79 (not verified)

Thu, 11/29/2012 - 13:10

LOVE the colors and fabrics! Using a similar scheme for the one I am repainting for Christmas now thanks to seeing your post! How did you cut the hole in the door???

Aladdin79 (not verified)

Thu, 11/29/2012 - 13:11

Love the color scheme and will be doing similar on the one I am working on now thanks to your posts!! How did you cut the stove door?

Sarah Bennage (not verified)

Wed, 12/12/2012 - 18:13

Do you have a plan for this, or know where I can find one? I would love to make this for my toddler girls.

Headboard

Submitted by meg_odom on Tue, 02/18/2014 - 14:47

2nd project - added some additional supports on the back with scraps & fixed a bowing issue. We've had it in the bedroom since October 2013 & love it (especially the price tag)!

Estimated Time Investment
Afternoon Project (3-6 Hours)
Recommended Skill Level
Beginner

Sandbox

Submitted by andygurbal on Wed, 05/18/2016 - 15:10

I followed Ana White's instructions to a tee and things turned out great! I chose a dark brown wood stain and used an exterior Helmsman Spar Urethane for protection. Because the sandbox will always be outdoors, I ended up putting 5 layers of urethane on it.

I also attached a tarp (not seen in the pictures) to the bottom to hold the sand in. This way the sandbox can be dragged if you want to move it's location.

Estimated Cost
I bought all of my wood from Home Depot, as well as the wood screws, brushes, stain and spar urethane, so it ended up being a little bit more than I expected. All in all, it was around $125, but it could definitely be made cheaper if you have wood already on hand or the screws, brushes, stain, and urethane readily available.
Estimated Time Investment
Weekend Project (10-20 Hours)
Recommended Skill Level
Intermediate
Back