Community Brag Posts

Custom X Cross Box Craft Desk
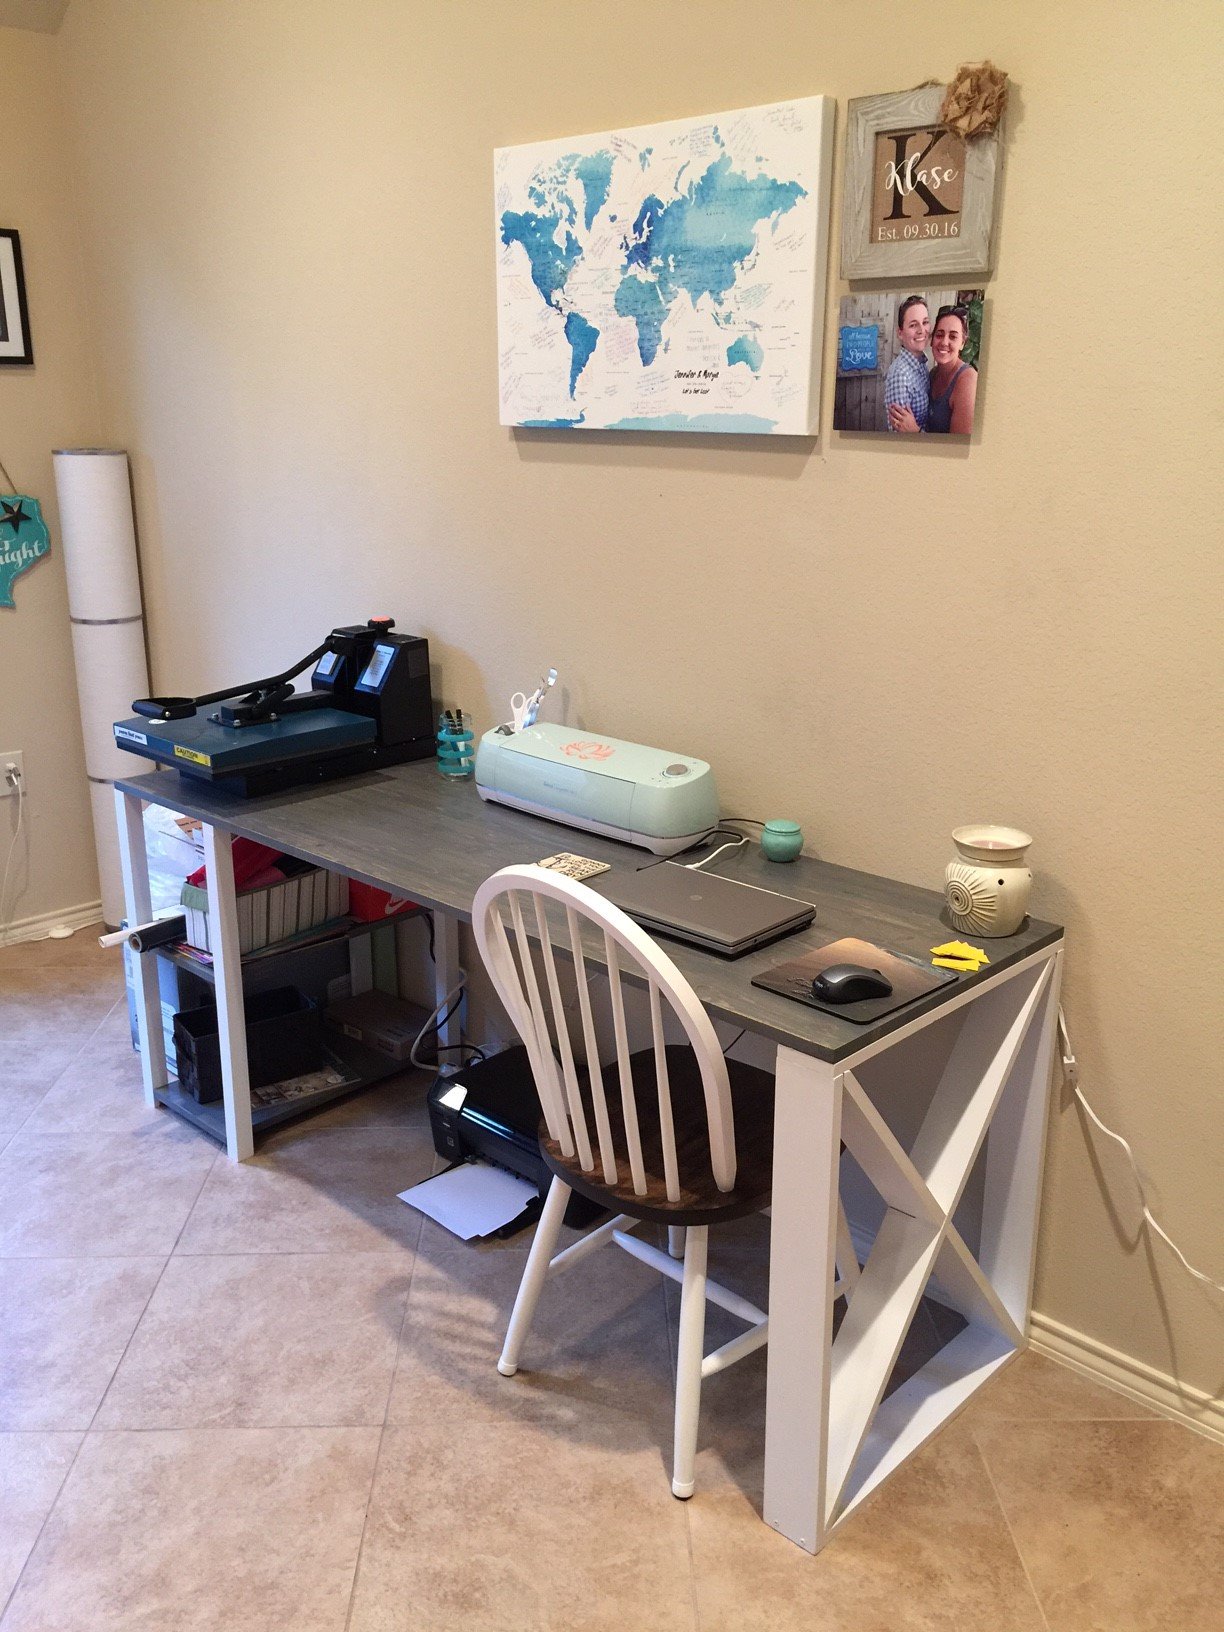
Submitted by Anonymous (not verified) on Wed, 05/03/2017 - 13:19

DIY Craft Desk.

I built this desk for my wife to give her more space to create her crafts. I meshed a couple designs that I had researched to give her a unique design. This project took me 1 week to complete by only working on it in the evenings but it could be done faster if you have more time available than I did!  


Materials Needed:
2 - 6 foot 1x4" pine or Poplar wood
1- 8 foot 1x4 pine or Poplar wood
4- 2x2" pine wood 29" long
2- 1x2" pine wood 24" long
1- 12"x48" pine board (pre cut craft wood in Lowe's)
1- 24"x 72" pine board (pre cut craft wood in Lowe's)
Box of 1 1/2" wood screws
Wood glue

Wood stain and/or paint 
8- 1" corner braces

1). Cut the 12"x48" craft board in half (2- 12"x24"boards.)This will be your shelves. Sand all of the wood prior to staining.
2.) Stain shelves and desk top. We used two coats of gray stain. Finish with one coat of Polyacrylic. Sand. Then one more coat of polyacrylic.
3.) Cut the 1"x2" trim to 2- 24" long strips.
4.) Attach the 2x2" posts to the 1x2" trim with wood glue and wood screws. You will end up with an upside down U shape. This trim piece will give added support for desk top. Do this twice and then Paint your posts.
5.) Mark where you want your shelves on the posts and screw in your corner braces to hold the shelves up. I placed the shelf inside the posts to give me 12" of width for baskets. Screw your braces onto your shelf and then attach to the posts. I recommend doing the bottom shelf first so it stabilizes the posts.
6.) Do the same thing with the top shelf. Mark where you want them and attach with corner braces.
7.) Moving on to the cross box base.... Build the 4 sides of the box first with the 1"x4" boards. This desk is 24" deep and 29" tall. Use wood glue and wood screws to assemble. I predrilled the holes then, placed glue on then screwed together.
8.) Make sure your top 1x4" is the full depth of the desk so the weight of the desk top is spread evenly on box.
9.) I used this guide for the interior cross pieces. http://sawdustgirl.com/x-leg-office-desk/#aa
10.) Paint your cross base.
11.) Attach desk top to bases with wood glue and wood screws and you are all set!

It was a fun project! - Jen

Estimated Cost
$150
Estimated Time Investment
Week Long Project (20 Hours or More)
Finish Used
2 coats of Minwax Classic Grey Wood Stain and I used white oil based paint on the bases mostly because I already had a can of it.
Recommended Skill Level
Intermediate

Pallet wood painter's ladder shelf

Submitted by Anonymous (not verified) on Sun, 06/25/2017 - 18:50

Made this one with shelf edges/trim just on the sides. Somehow my top shelf didn't span the width so had to add a little shim on each side but it all worked out! We had all the pallets and used 1x3s for the frame because some of my pallet wood was heavy hardwood. It was not without frustration because I was working with uneven/warped pallet wood but it hits the rustic look.  I am happy with how it turned out. 

Built from Plan(s)
Estimated Time Investment
Day Project (6-9 Hours)
Finish Used
English chestnut minwax stain and matte interior sealant
Recommended Skill Level
Beginner

BBQ bench

Submitted by Airbugs on Tue, 04/14/2015 - 13:21

First project I tried from here.  Not too bad.  I have a Cordless miter saw (Ryobi)

Estimated Cost
under 40 bucks
Estimated Time Investment
An Hour or Two (0-2 Hours)
Recommended Skill Level
Beginner

Comments

Airbugs

Thu, 04/16/2015 - 20:55

Thanks, I am going to customize it with whatever my fiance needs i.e. hooks, shelves, lights but the cost surprised me. 36.98 for the just the wood. I'msure when my fiance adds the stuff she wants it'll be more lol

Cute corner cabinet!

Submitted by rmurray87 on Sun, 06/02/2013 - 11:24

This project took me the majority of a three-day weekend to complete, but it was well worth it! I had the lumber store cut the beadboard panel for me so that it would fit in my car. This was also the first time I built something with doors on it, which was a bit of a learning curve, but came out alright in the end. I used pocket holes to build the face frame, and attached the shelves to the frame first before attaching them to the 1x8 back. I used 1 1/4" pocket hole screws and 2" wood screws. I left off the trim at the top and didn't bother to cut out the footer, but I think it still looks pretty cute.

Built from Plan(s)
Estimated Cost
$110
Estimated Time Investment
Weekend Project (10-20 Hours)
Finish Used
Accent color: Appletini from Valspar
Main color: Earthy Mushroom Taupe from Glidden

Everything was given a good sanding and a healthy dose of primer before painting.
Recommended Skill Level
Beginner

Comments

Work Table

Instead of having the plywood top sit on top of the frame, I sunk it into the frame instead with 2x4 supports underneath.

Built from Plan(s)
Estimated Cost
$50
Estimated Time Investment
Weekend Project (10-20 Hours)
Finish Used
oak stain
Recommended Skill Level
Starter Project

Bedzilla

Submitted by pmarchino on Sat, 02/17/2018 - 19:28

We had bought a house in New Mexico that was sadly lacking for closet space, as well as square footage for furniture. I was looking at Ana White's website, and saw the plans for the Farmhouse storage bed. It was good, but needed some steroids. I got out the calculator, and started upsizing EVERYTHING. What happened was, BEDZILLA!! King sized bed with 12 giant drawers. I also added lighting to the headboard for reading. It was a blast to build, and I was very pleased with, and proud of the finished product. 

Estimated Cost
Good question!
Estimated Time Investment
Week Long Project (20 Hours or More)
Finish Used
Minwax Polyshades Pecan
Recommended Skill Level
Intermediate

Picket Planter Boxes

Submitted by JaxCopper on Mon, 05/09/2022 - 19:09

Thanks Ana, I built your planter box, actually built 2 of them, one for each mom. The were a huge hit and I already have people asking me to build them one.

So loved building this planter box. Thanks for all you do for your fellow woodworkers!

Dale G
Callahan, FL

Comments

Cottage bedroom bookcase

Submitted by yhaas on Thu, 10/29/2015 - 20:42

I used 1 x 10s to make the bookcase a little shallower, and left the back open. Thanks for the great plan.

Built from Plan(s)
Estimated Cost
$100
Estimated Time Investment
Weekend Project (10-20 Hours)
Finish Used
Varathane diamond finish water-based polyurethane, satin.
Recommended Skill Level
Beginner

Modern Adirondack chair meets Shou Sugi Ban

Submitted by Anonymous (not verified) on Wed, 09/14/2022 - 15:17

Made one change to plans. I used 2x6s for the arms. I used the Shou Sugi Ban burning technique to finish the 2x4s and 2x6s. I stained the back and set and the applied a couple coats of poly. Love the chairs! Building a couple more sets for around the fire pit. Thanks!

Comments

Small Cedar Woodshed

Spaced out the boards to allow airflow; did a sliding barn door and metal roof. Thanks for the plans!

Comments

Seasonal And Holiday

Modern Farmhouse Bed

Submitted by Anonymous (not verified) on Tue, 02/26/2019 - 08:33

I made this as part of a room makeover for my teenager. It was my second furniture project, the first being Ana’s original farmhouse bed. This was my first project with the Kreg jig and I watched a great YouTube video by shanty2chic to learn the basics of pocket holes. This was also my first staining project and I love the results. My daughter loved it so much she had me stain her closet doors to match! The lumber for the bed was only $120, I spent an additional $80 on wood and screws for the slats to support the mattress, my new kreg jig came with enough screws to make the bed frame. I spent another $80 on wood conditioner, stain and poly since she didn’t like the first stain (Briarsmoke, which I will definitely use on another project).

Built from Plan(s)
Estimated Cost
$200
Estimated Time Investment
Day Project (6-9 Hours)
Finish Used
I started with a wood conditioner and then used Varathane Early American stain applied with a rag and dry brushed on top of that with varathane Kona, again watching a shanty2chic video for technique. Poly is water based satin finish. I used the triple thick but still had to do 2 coats, partly for coverage but also because the water based poly raised the grain so I needed to do a light sand and a second coat of poly for a smooth finish.
Recommended Skill Level
Intermediate

Comments

okstout4

Mon, 10/19/2020 - 19:49

This is very nice. Love the color too. I used Special Walnut in Behr brand and it came out too dark. Wished I had looked at some of these builds before I did the Behr brand stain.

Modern Farmhouse Bed

Submitted by DCecil43 on Mon, 07/08/2019 - 19:54

Just like my previous post on the nightstands, It was cheaper to build a bed that I envisioned instead of searching for something over priced.  I found the plans for this bed on the site but made the headboard a little over 6 feet tall.  This came out amazing and really compliments the nightstands.  I also built the sconces that are centered over the nightstands to keep the tops of the nightstands clean and not cluttered.  They also have touch pads for the lights mounted behind the bed to make them easy to turn on and off.

This is hands down the best transformation in any room in my house.  Ana, you saved me a ton of money with DIY.  I even picked up most of the Kreg jigs along the way which is an added bonus!

Estimated Cost
$275
Estimated Time Investment
Weekend Project (10-20 Hours)
Finish Used
Minwax Early American Stain and Minwax Satin Polyurethane
Recommended Skill Level
Intermediate

Comments

Growth Chart Ruler

This was a super easy project and I like the way it turned out. I just got a 1x6 board in pine (that cost about $3.50) sanded it, stained it and marked all the inches with a pencil. I then used a painter's pen in black along with my square to get all the lines straight. Then I used some stencils to do the numbers - also with the painter's pen. The whole project took probably an hour to do (besides waiting for the stain to dry).

Estimated Time Investment
An Hour or Two (0-2 Hours)
Finish Used
Minwax Golden Oak - 2 coats.
Recommended Skill Level
Beginner

Nathan's Montreal Canadians bed

Submitted by Corinne67 on Fri, 01/06/2012 - 16:04

Our nephew Nathan really wanted a captain's bed like his friend. We built him one even better for Christmas this year. I couldn't find one plan with everything we wanted to I used the plans for the Storage Daybed for the base, and used the plans for the Cozy Corner twin bed collection wide bookcase unit. We combined both the headboard and sideboard into one unit (by extending the top to the short end) giving him an L shaped headboard for all his hockey stuff :) The only thing we messed up on was the height of the bookcase. He wanted it higher so it's on blocks for now to raise it. My sister did all the final painting to match his room and it looks AWESOME!!!

Steve had everything cut at work and we put it together in one 12 hour day! Nathan LOVES his new bed. Thank you Ana!

Estimated Cost
about $125
Estimated Time Investment
Weekend Project (10-20 Hours)
Finish Used
Nathan is a HUGE Montreal Canadian's fan. He applied 2 coats of wood primer, then his mom, my sister did the finishing paint with the official Montreal Canadians colours to match his room. A couple of little touch ups to be done but it looks great.
Recommended Skill Level
Beginner

Comments

Lou-Anne (not verified)

Fri, 01/06/2012 - 21:24

The colors are the official Montreal Canadiens hockey team's colors, My son is a HUGE fan! Nathan LOVES his bed. and it is very solid.

Guest (not verified)

Fri, 01/06/2012 - 20:29

Ummm... The bookcases were too short because you didn't take the mattress height into account. Looks really good though.

Wooden patio Cooler by DIY Pete

This was my very first project I did. Very proud of how this turned out. Now my sister has one and I am building another one with Mickey Mouse on it for my other sister. I build it in a day with lots of breaks due to 4 teenagers.

Built from Plan(s)
Estimated Time Investment
Day Project (6-9 Hours)
Recommended Skill Level
Beginner

DIY Brew Station

Submitted by Anonymous (not verified) on Sun, 07/30/2023 - 14:38

I used your workbench plan to build my Brew Bench. I changed the measurements to fit my space and used a butcher block for the countertop. Very sturdy and pretty easy project. Took one day to build.

Scott R

Comments

Bed made to order - Twin XL

Submitted by kjoslyn78 on Sun, 12/22/2019 - 10:40

My daughter has a twin XL bed, which we had been unable to find a frame for since getting it. After 2 years of her mattress and box springs on the floor, this plan came out and a plan was hatched to get it made. The biggest change we needed to do different from the twin plans was to make the side rails and the side rail cleats 5" longer to accommodate the XL length. We also added a middle support to keep the side from bowing out, and the cleats are at the bottom of the siderails, as we are using a boxpsring and mattress. 

Estimated Cost
$110
Estimated Time Investment
Weekend Project (10-20 Hours)
Finish Used
I dont remember what we finished with, but the kid spilled half the can in the grass :)Photo is after sanding, and before finish
Recommended Skill Level
Beginner

Comments

amymarie02

Mon, 03/28/2022 - 09:47

Hi do you have the measurements and what to buy for this bed frame? We also have a twin xl mattess and cannot find a frame anywhere

Tryde Media Center

Submitted by kendaves on Thu, 04/05/2012 - 21:24

I had just built the Tryde Side Table and it was so easy I gave a shot at this project. Took about 4 hours to build and is a really sturdy, good looking entertainment center. The only thing that I did not like that I would change is an overlap of the tabletop in the front. There is an overlap on both ends but not in the front. Other than that, I really like the outcome.

Estimated Cost
$75 - $100
Estimated Time Investment
Afternoon Project (3-6 Hours)
Finish Used
Natural Stain
Recommended Skill Level
Intermediate

Book Rack

Submitted by Anonymous (not verified) on Fri, 04/22/2016 - 11:08

I built this book rack using scrap wood and modified plans from the Full Length Plate Rack. It was a really straightforward build, and functions very well as vertical storage that takes up little space. I predrilled, screwed and glued all of the joints, vs. stapling.

Built from Plan(s)
Estimated Time Investment
Afternoon Project (3-6 Hours)
Finish Used
2 coats of "Simplicity" country chic chalk paint.
Recommended Skill Level
Beginner

Comments

Back