Modern Adirondack Chairs!
My mom and I made these together as our first Ana White project! So much fun making both these chairs and memories! Next up is the three pedestal farm table and bench!
Built from Plan(s)
My mom and I made these together as our first Ana White project! So much fun making both these chairs and memories! Next up is the three pedestal farm table and bench!
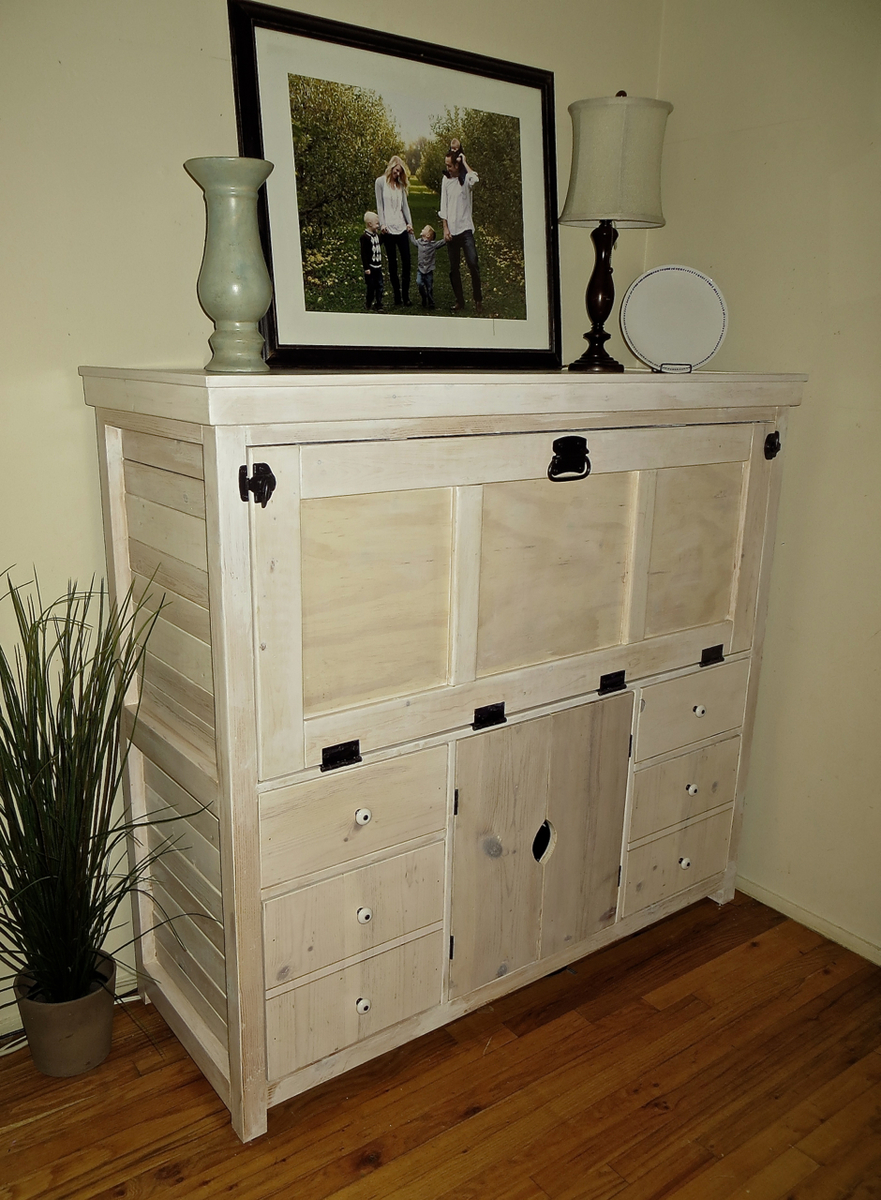
I made a few changes. I added walls and a hinge to the table to allow for a cooler to fit inside. I also decided to paint mine. The was a fun project and I love how it turned out.
Mon, 06/08/2015 - 09:20
How did you go about adding walls and a bottom to the middle? I was thinking about doing this, it seems that the seat slats would need to be shorter to accommodate this, is that what you did? Any information would be very helpful. Looks great!
Wed, 07/01/2015 - 05:08
I wanted to add an ice chest to mine as well. Was thinking to close the sides but leave the facade. slip in a couple cross boards at the bottom and that should suffice. Add some hinges on the back end and you should be set.... that's my thought process for how i may make my next one. Would love to know how they did this
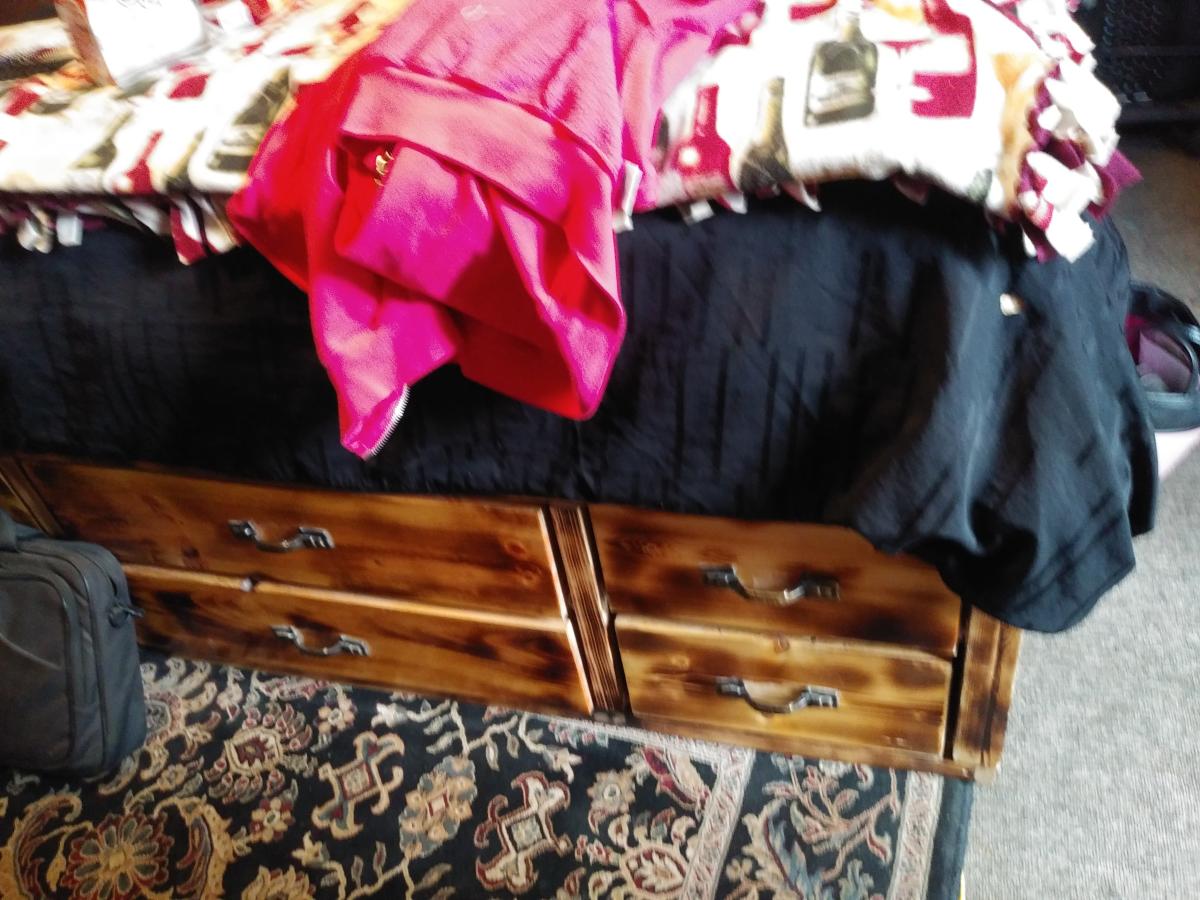
This is your storage bed and entertainment o r media center flipped upside down. I am self taught thanks to you. Thank you for making it easy to do and follow!
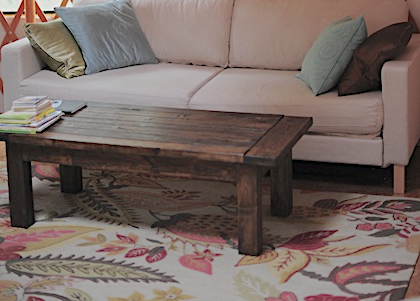
We made the Tryde Coffe table using 100% reclaimed wood
Sun, 06/26/2011 - 13:38
Also wanted to say I LOVE YURTS!!!! I want one! :) Fantastic idea for accomodation.
Mon, 06/27/2011 - 19:25
How do you like the yurt??? The table looks terrific!
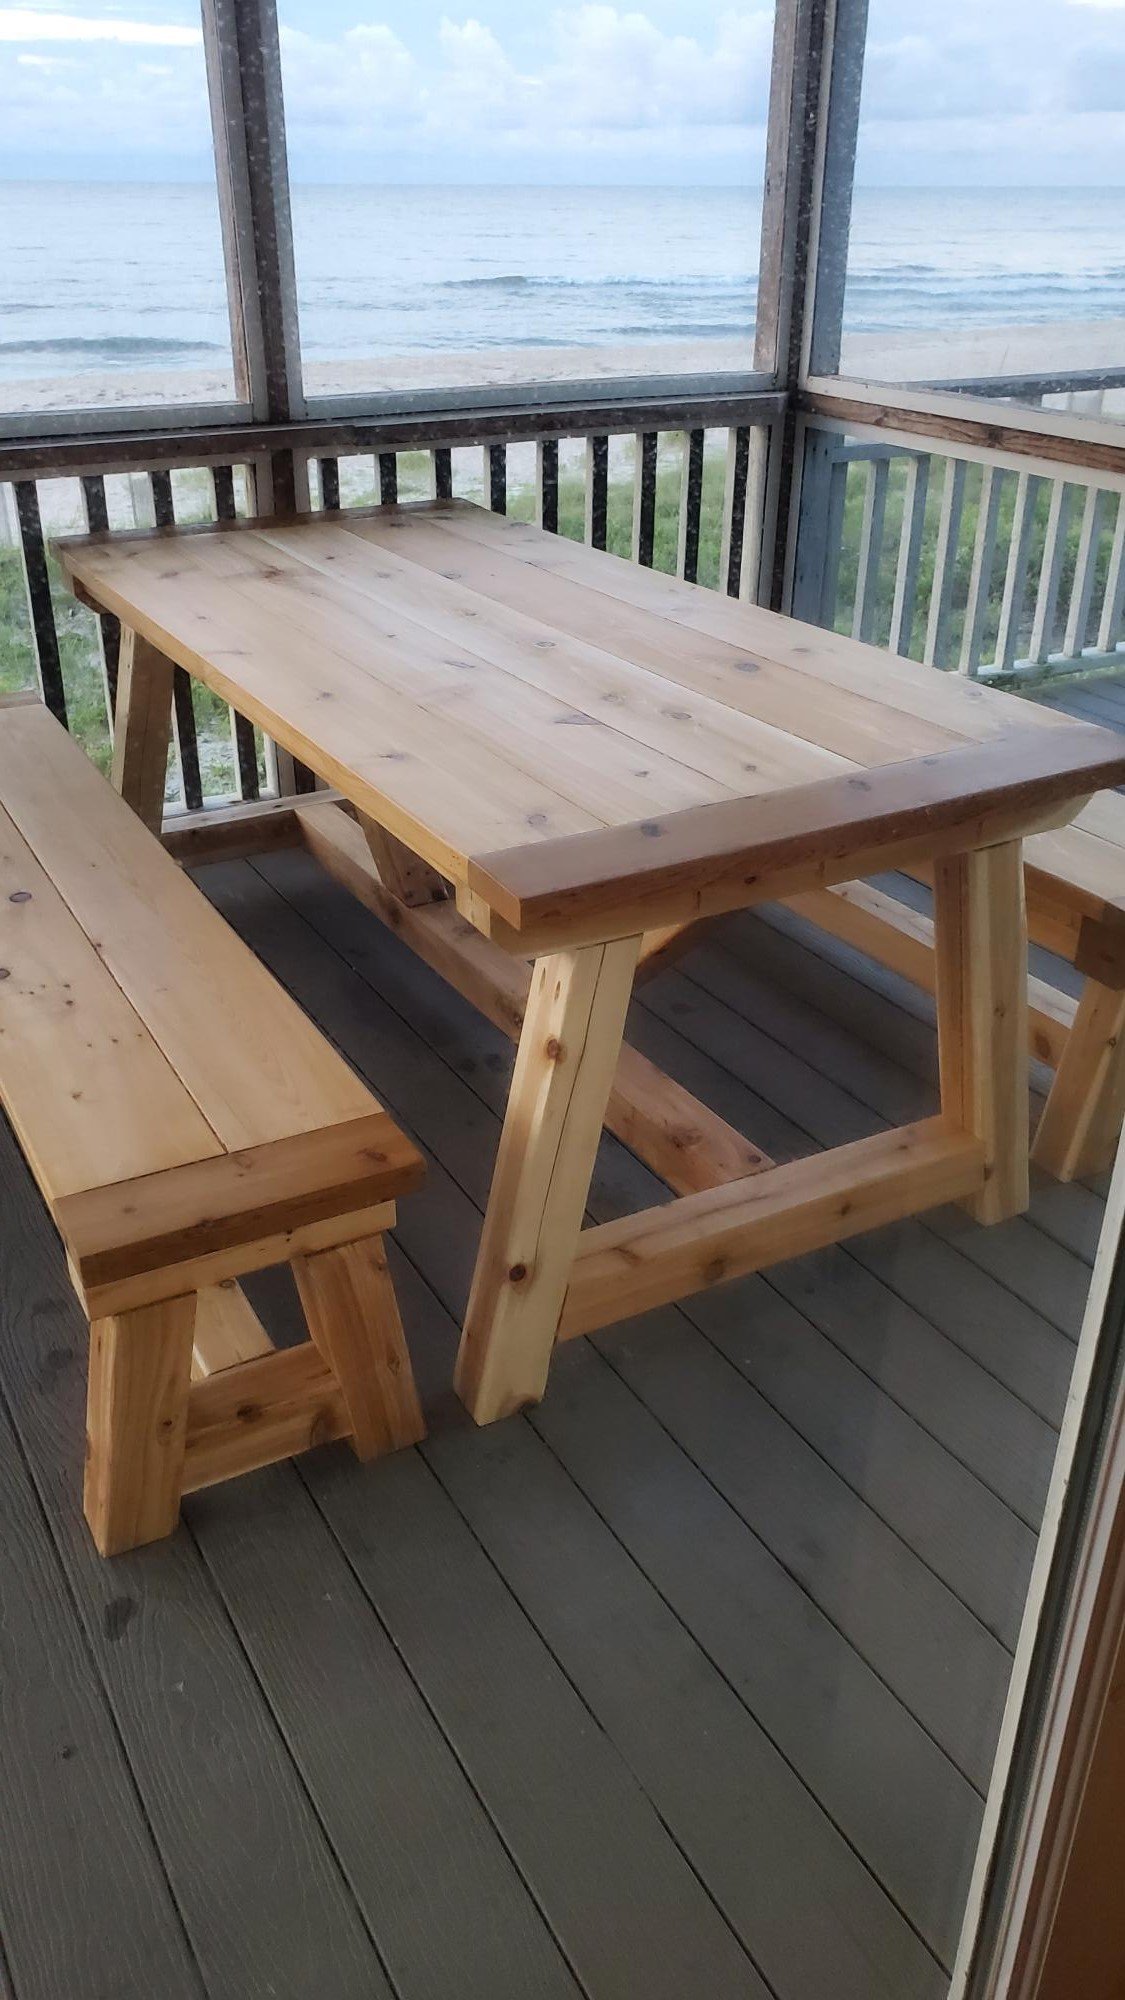
I used the trestle table and benches plans to make a cedar picnic table...
by Joe
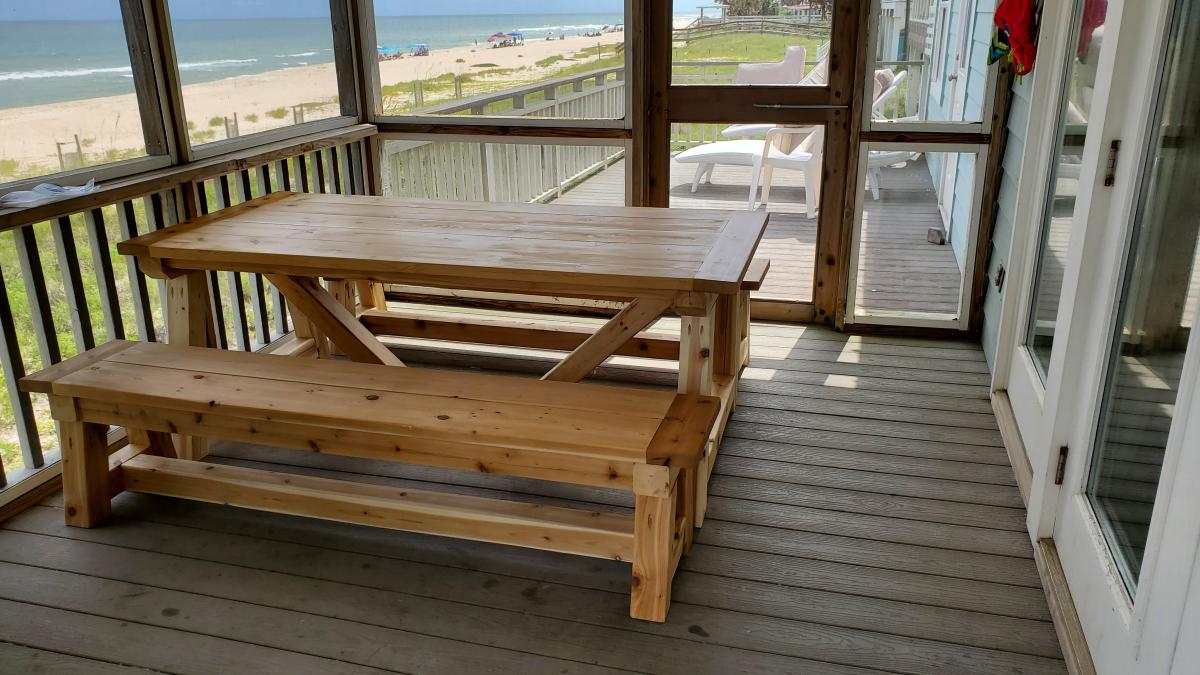
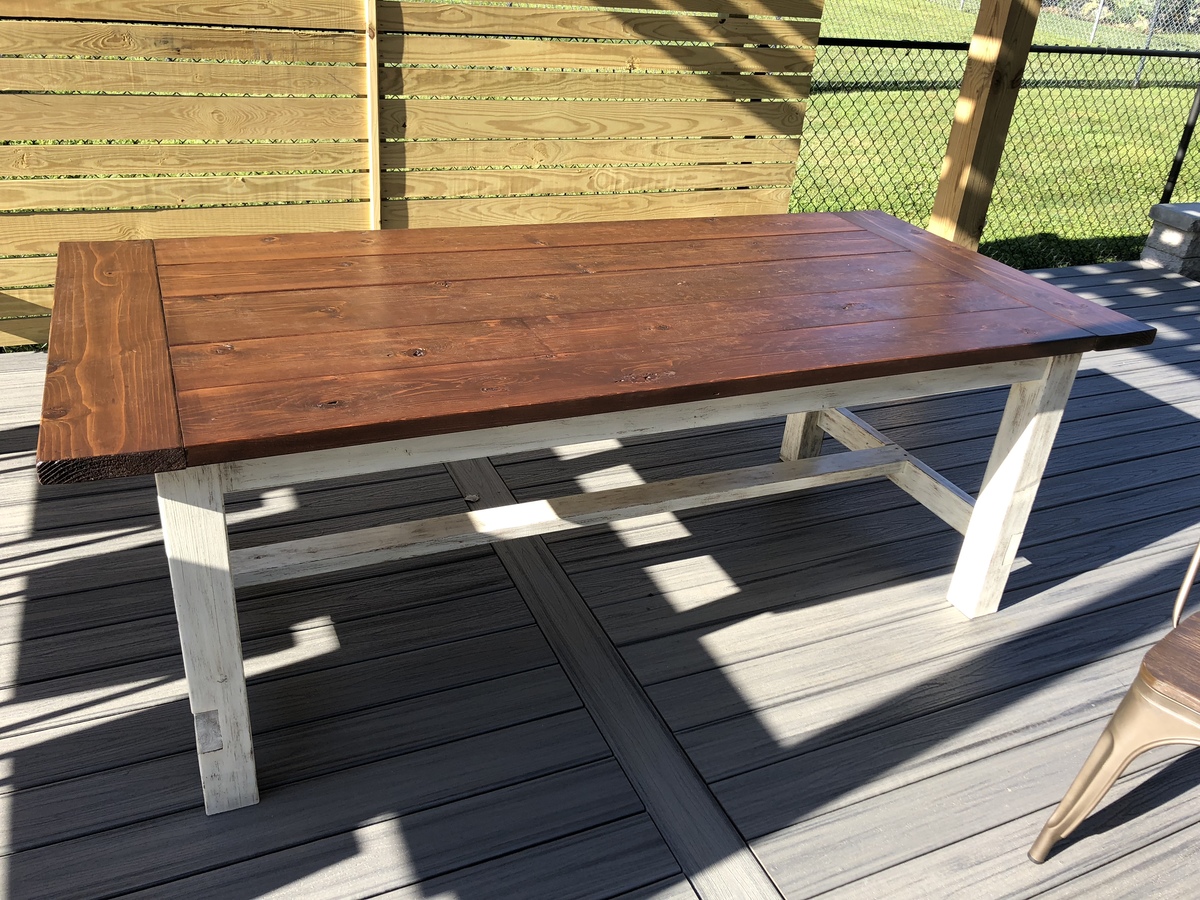
My husband and I built this table from the farmhouse table plans (Kreg-jig). I wanted a farmhouse table for our new patio and couldn’t quit find one to buy-so we made it! We used red cedar because it is an outdoor table and we wanted it weather resistant.

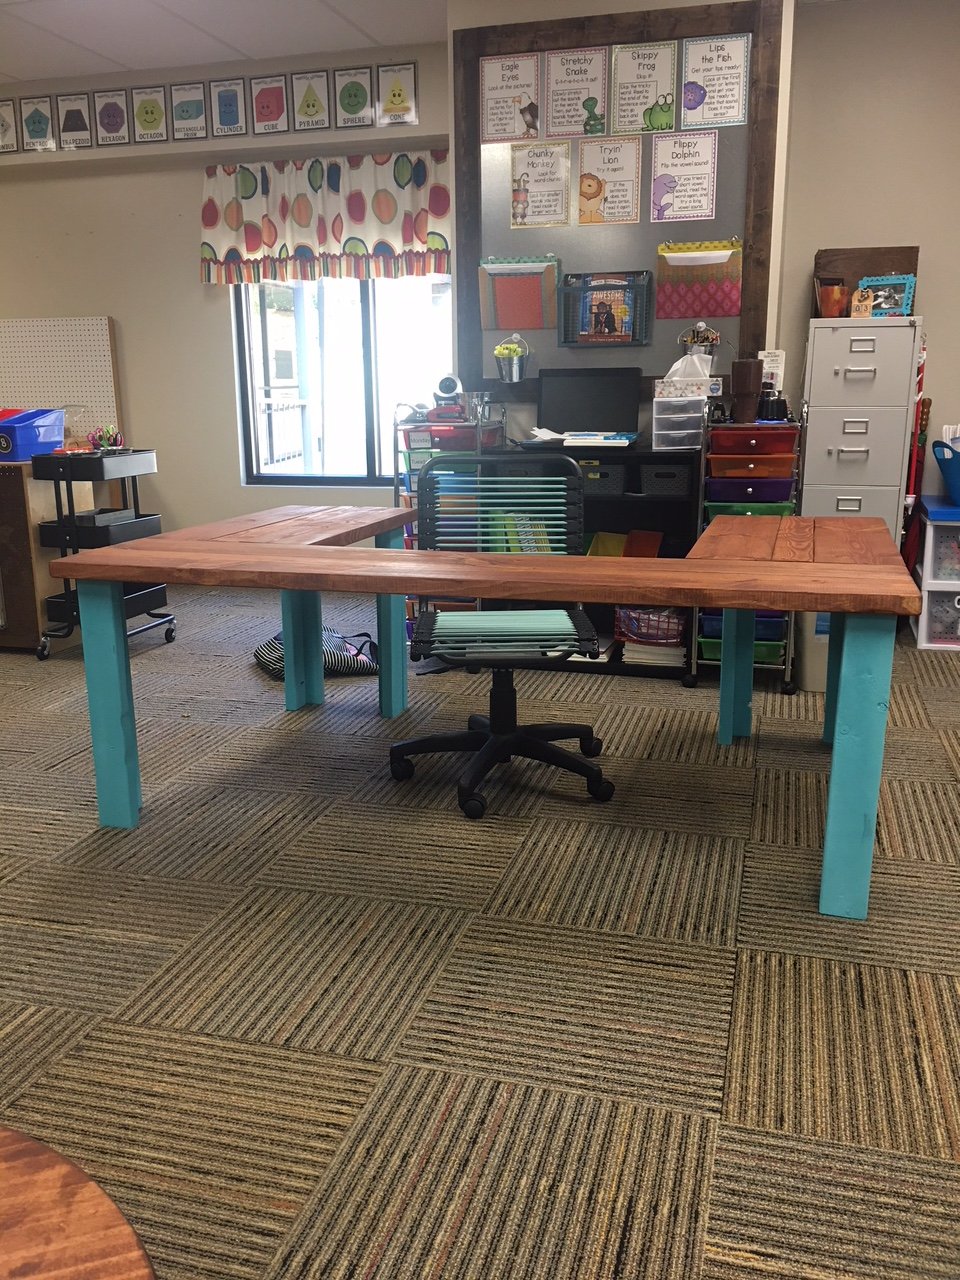
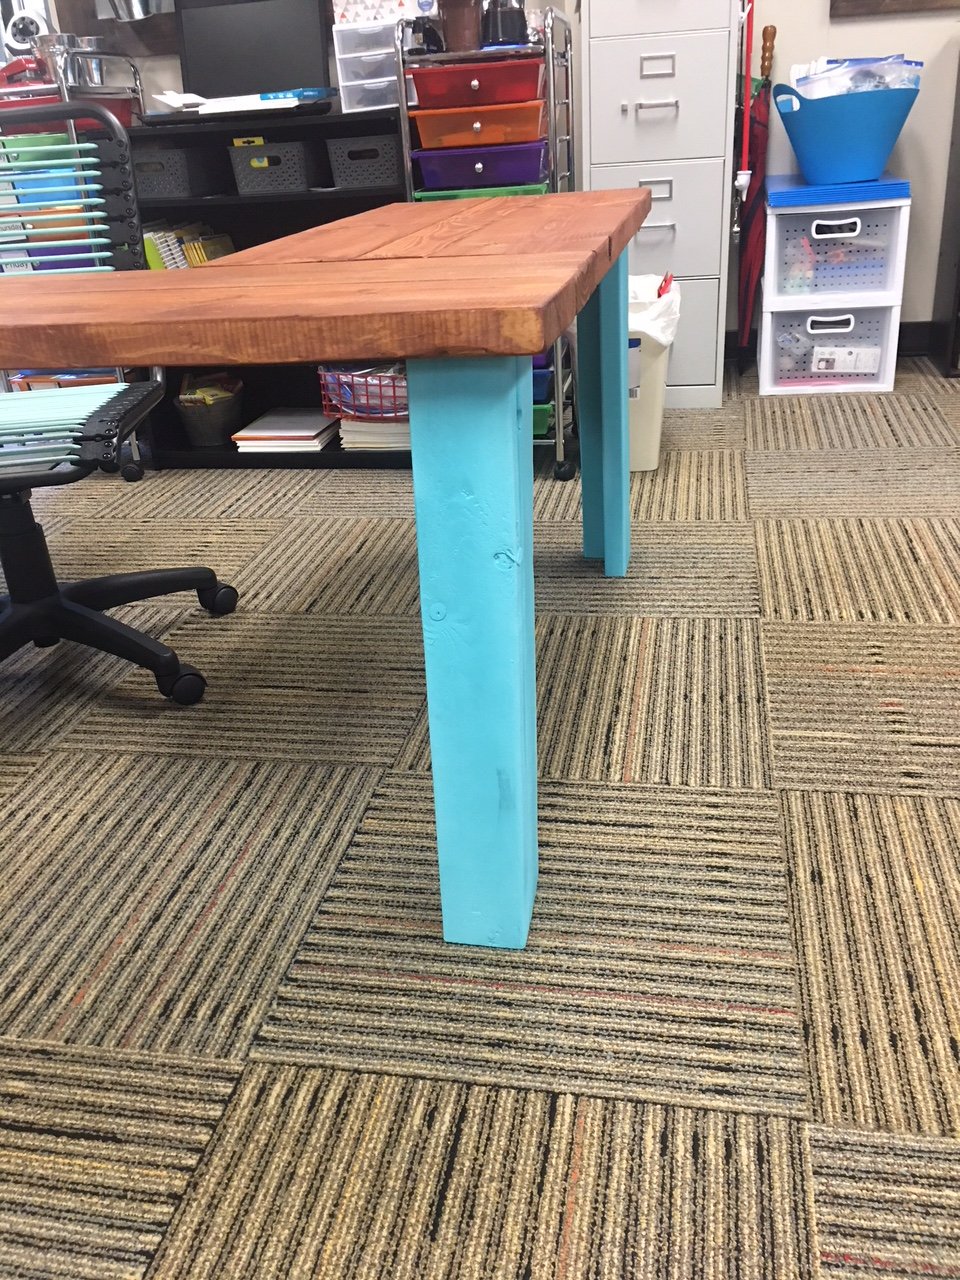
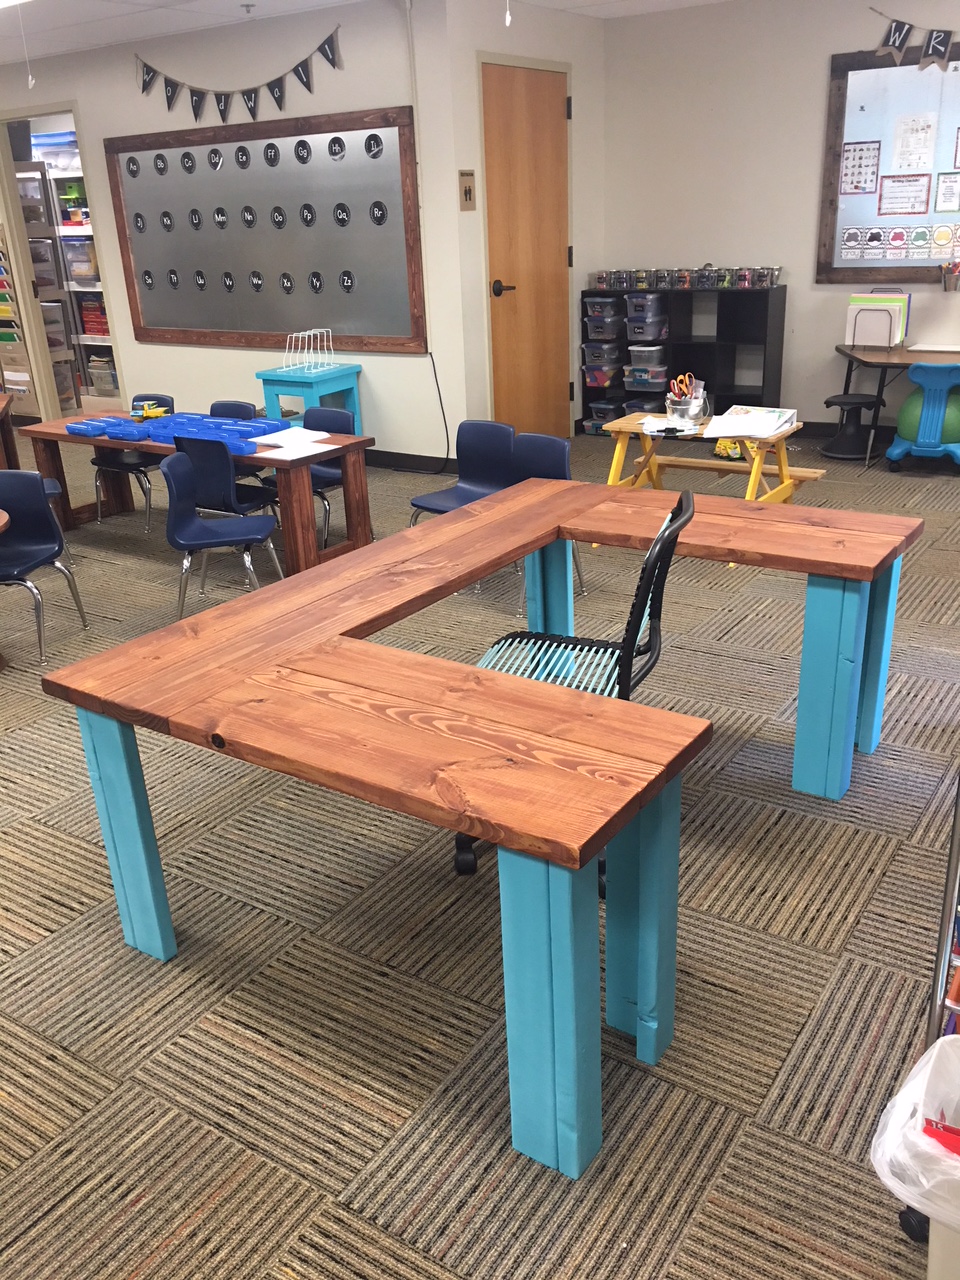
Been a while since I had time to actually build anything worth posting about! My wife wanted some items for her Kindergarten classroom this year, so built several items, most inspired by the Farmhouse family.

Sat, 06/29/2019 - 05:47
I love this! Can you give me the plans and list of materials for constructing it?
Sun, 06/30/2019 - 12:33
I am also a teacher and would love to build this desk for my reading class. Do you have plans?
Mon, 07/01/2019 - 18:05
I love this table for my classroom. Can you share the plans or the dimensions?
-Stephanie
Sun, 07/07/2019 - 09:46
I would love plans/dimensions for this! I was thinking I could also paint the top with wipe off board paint.
Sun, 07/07/2019 - 14:59
I would love to make one for my classroom. Can you share the plans and materials list for this table?? Thanks!!
Mon, 07/08/2019 - 19:11
I am looking to make this for my fourth grade classroom - can you provide the dimensions you used? Thank you so much.
Wed, 07/10/2019 - 11:59
Love this!
I would love this for my classroom! Can you share the plans and materials.
Thank You!
Mon, 07/22/2019 - 18:25
Anyone have any luck with figuring out the dimensions??
Thu, 07/25/2019 - 17:20
Has anyone gotten the plans for this table? I have contacted Ana White and tried other ways also. I would love for someone to share.
Thank you
Teri
Mon, 08/19/2019 - 12:09
I am guessing the corner posts are 2 x 4s, the top is 2 x 10s. It looks like the width is 6’ (looking at the floor carpet tiles being 24” square). So 2 - 2 x 10s side by side for the main part of the desk top and 2 - 2 x10s perpendicular on each side of the chair. I guess the height is subject to choice and the length of each side would also be subject to choice or to the length of the 2 x 10s to be economical.
an educated guess would be 4 - 8’ 2x10s for the top and 6 - 6’ 2 x 4s for the legs?
Anyone else have any input here? Open to suggestions.....
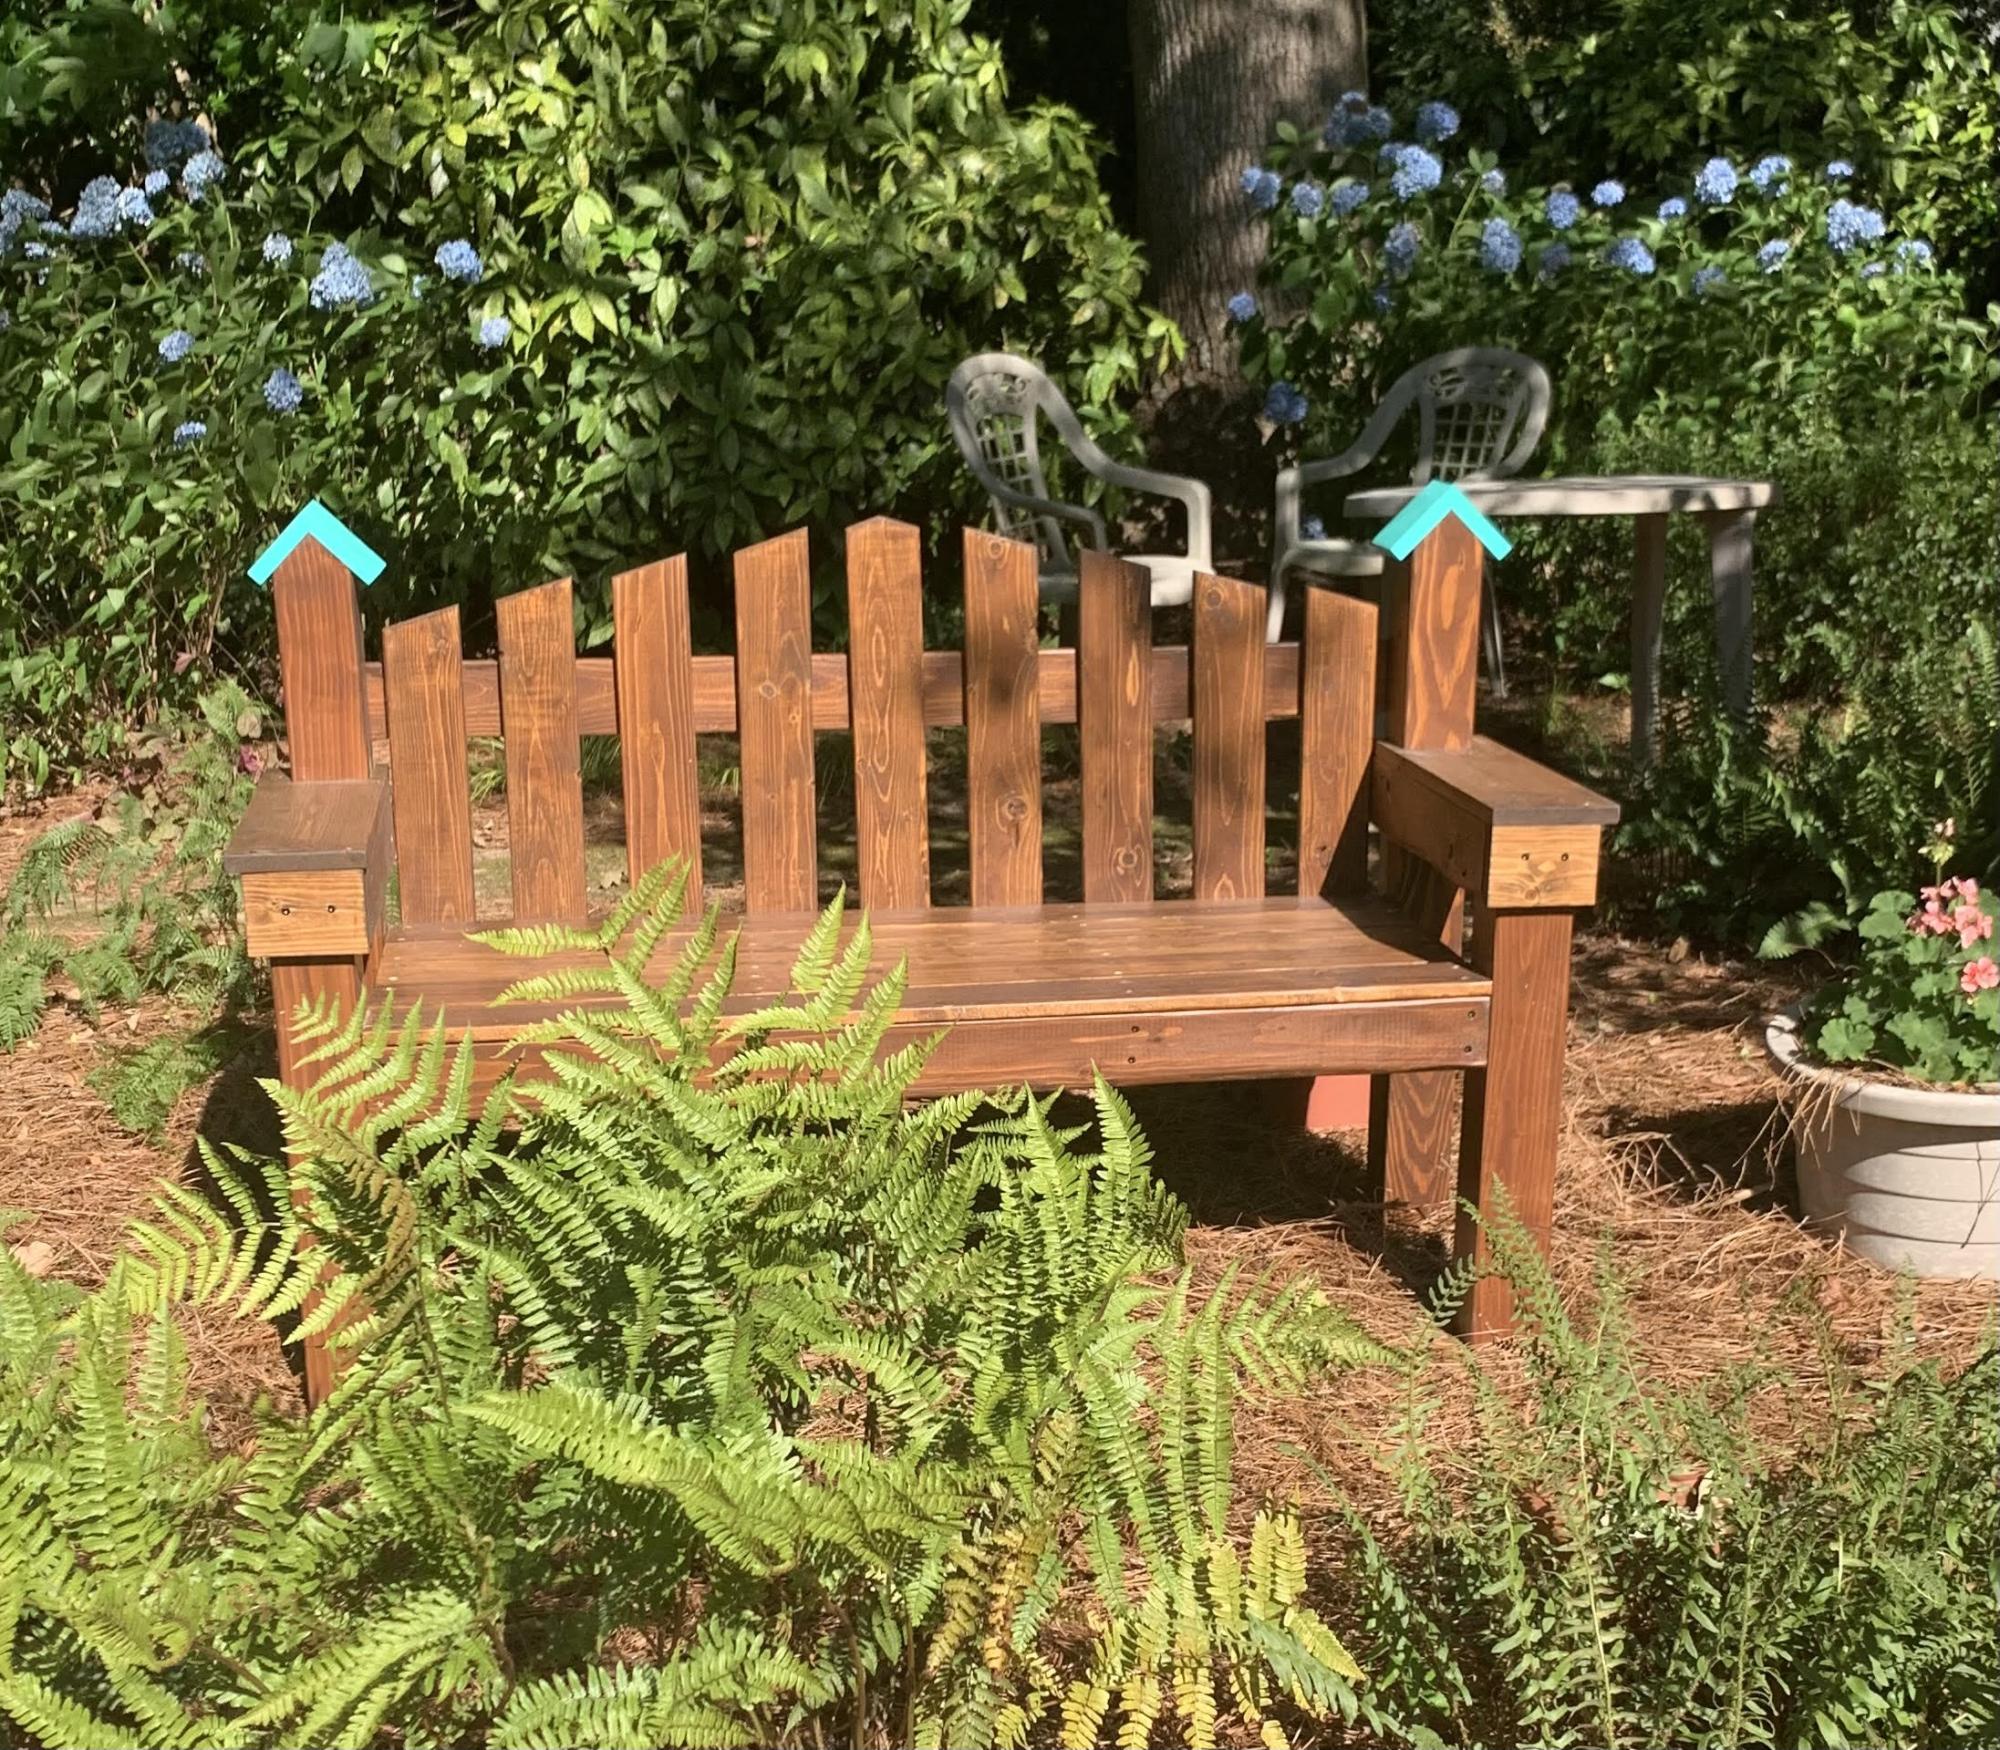
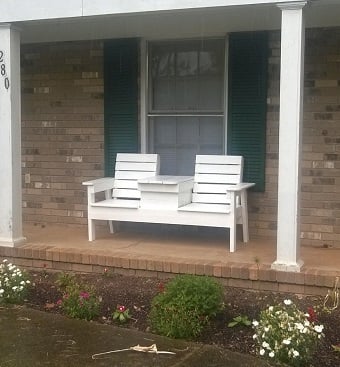
Combined several different plans from several different sites, but my mother in law is a master gardener who loves birds and wanted a new bench for her garden. I used 1x4's on the seat slats (instead of 2x4's- added an extra support in frame), made the seat a bit deeper, and I modified the arms to allow somewhere to rest a glass of her southern sweet tea. :) All made from box store non PT lumber and sealed for outdoors. The ideas for the "pickets" on the back and birdhouse came from "MyOutdoorPlans.com"- want to give credit where credit is due.
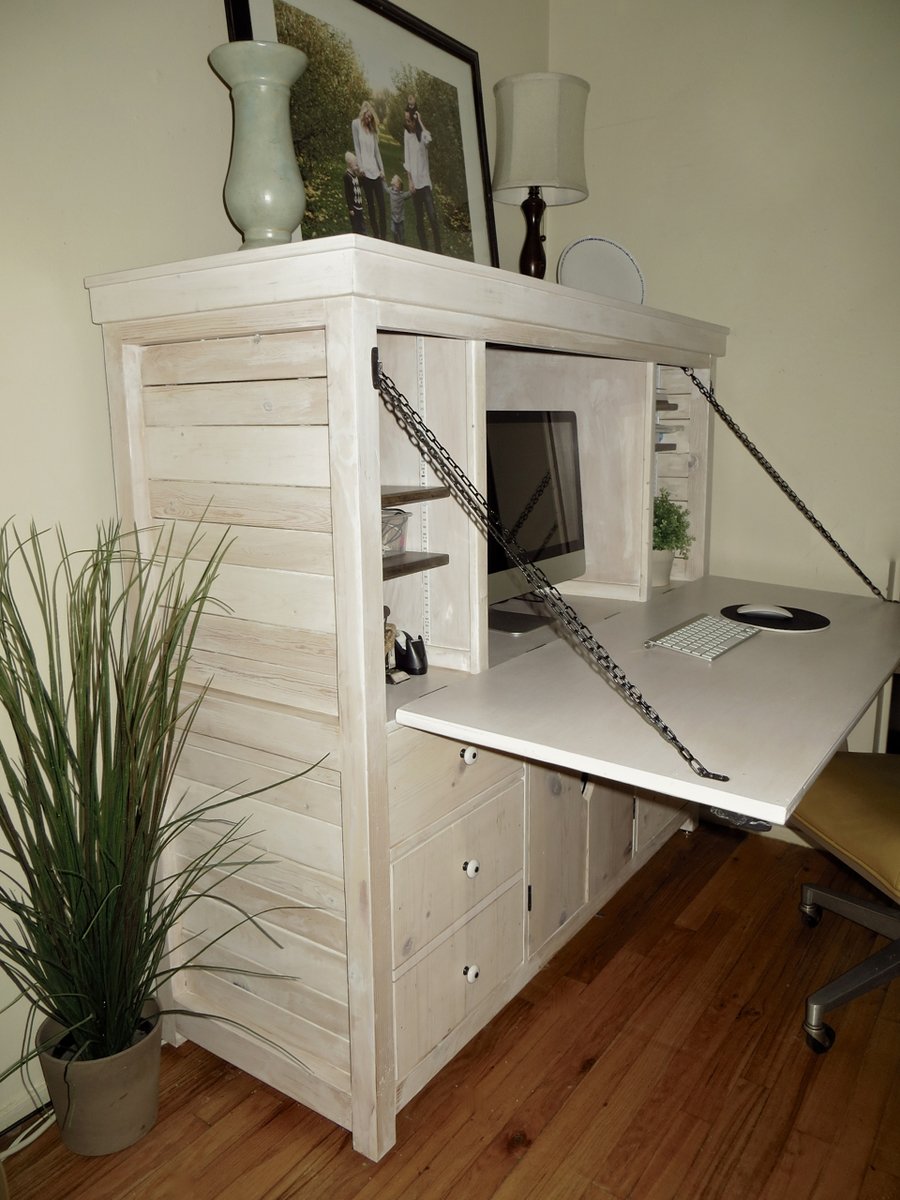
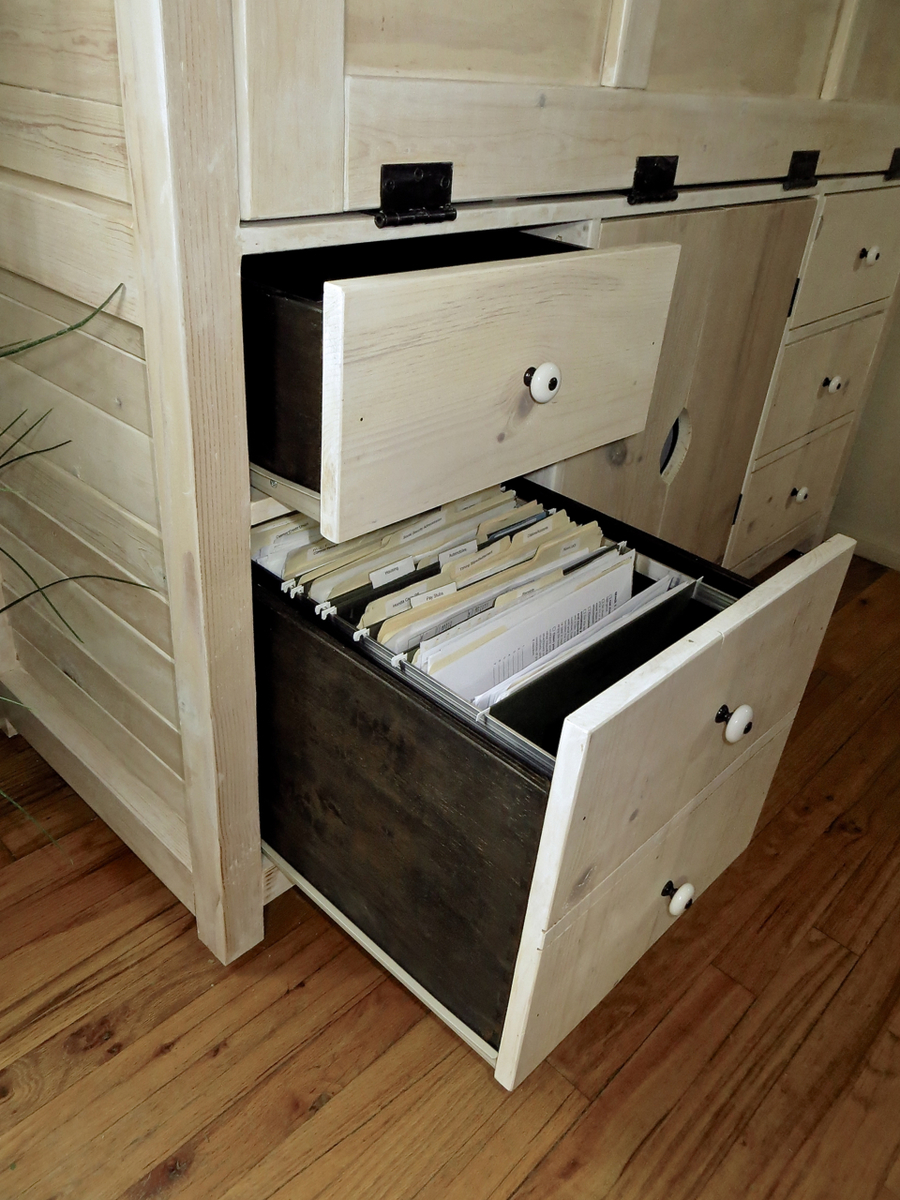
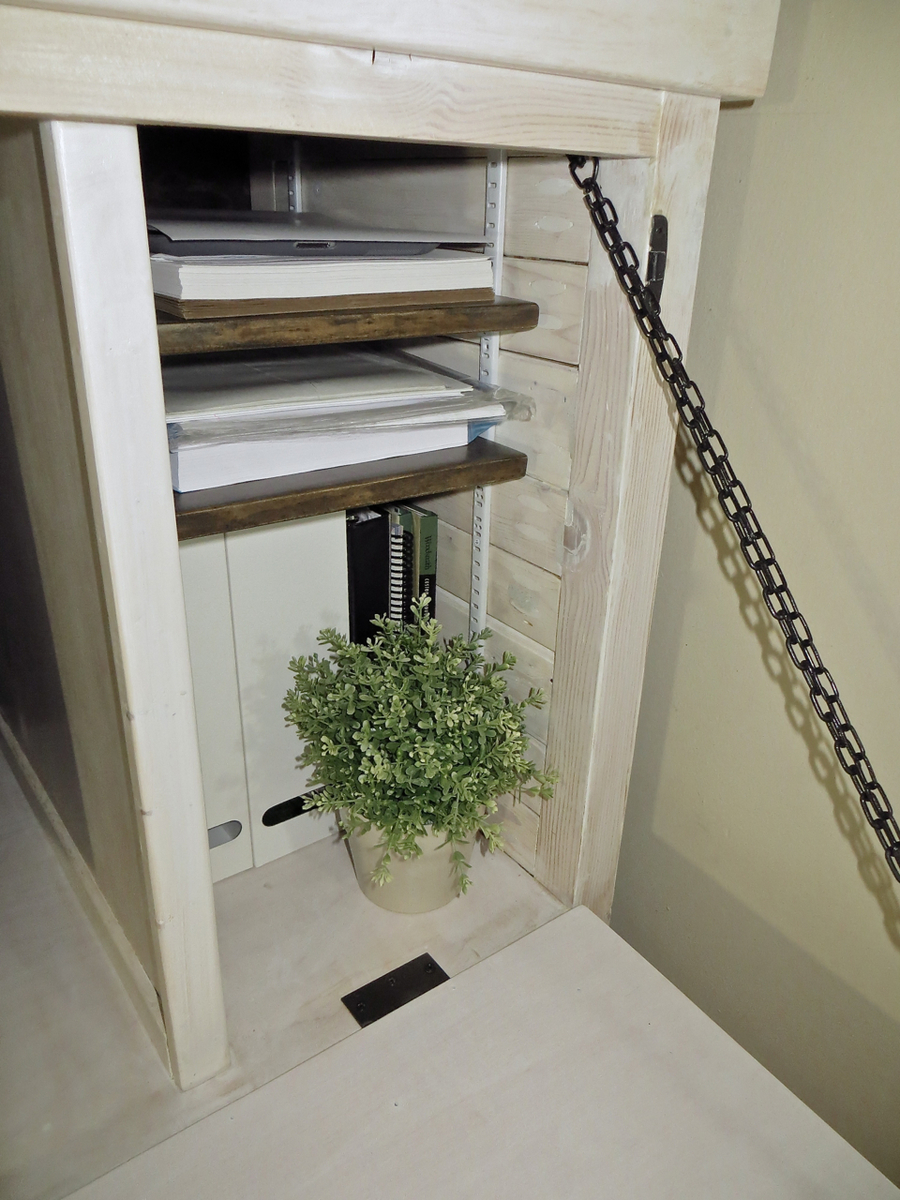
I designed this desk and created a building plan using Google Sketchup. It has 2 file drawers, 2 smaller drawers, 2 large adjustable shelves and a pullout shelf in the bottom, 4 small adjustable shelves on the top and a large space for a computer monitor. The large door drops open for a large work space. When you're done, put the door up and you have a beautiful piece of furniture!
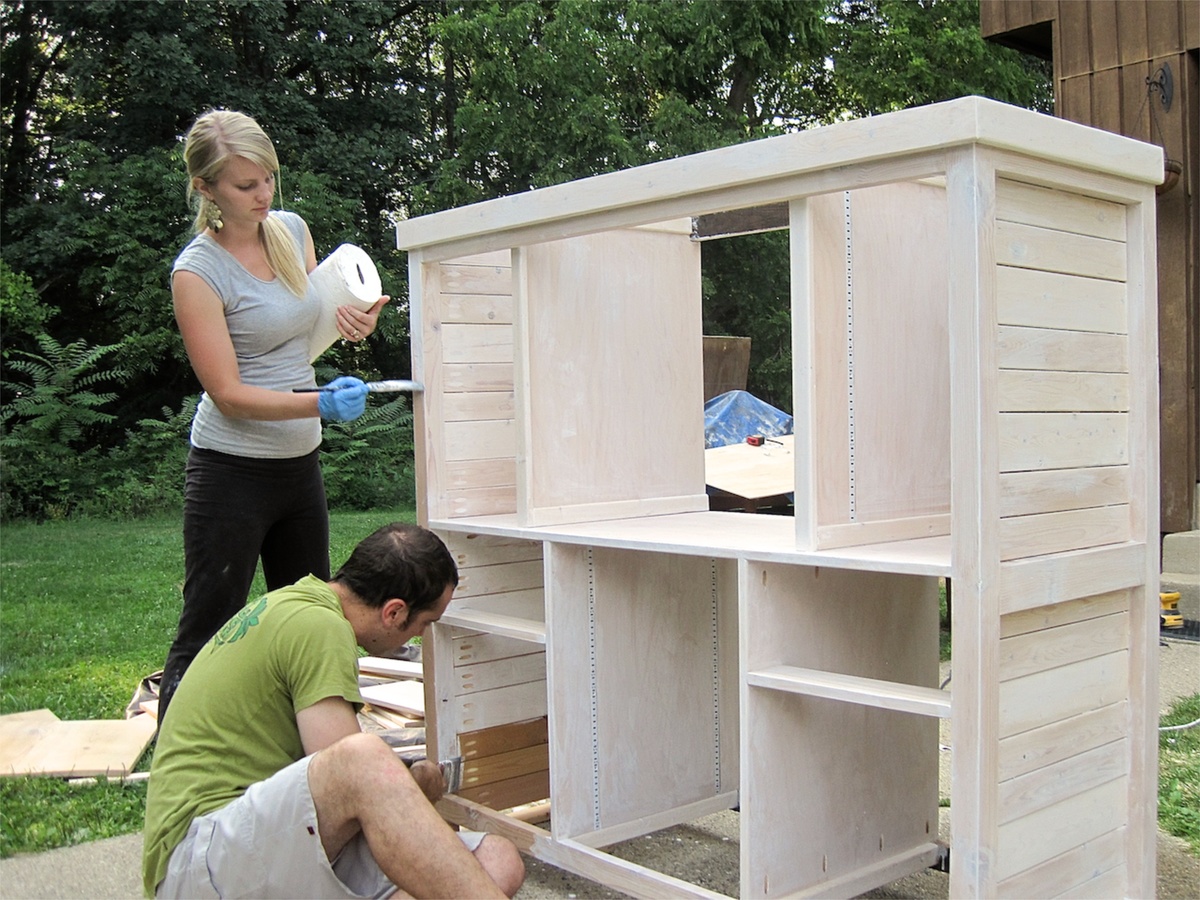
I consider myself an advanced-beginner when it comes to building. I have just enough knowledge to get me by. If you have time, patience and the right tools you can build this too! It took me 10 days to build, working as much as my kids would allow.
It took me countless hours to perfect the building plan - probably just as much work to design it as it was to build it :)
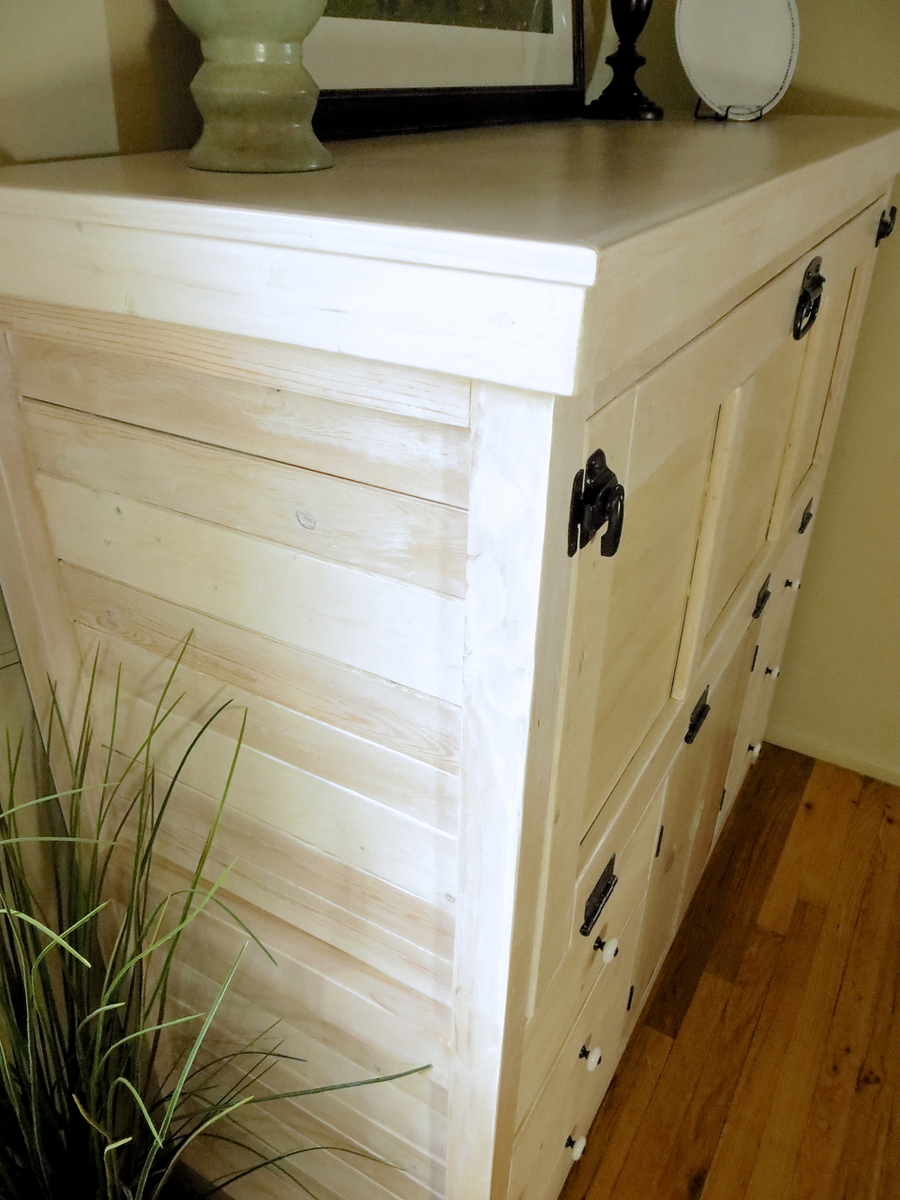
I really scrounged around to build this desk. I used a large beam my friend cut up into 2x2's for the main posts/legs, pine furring strips for the side boards and around the top for moulding (lots of scraps I already had), 3/4" plywood for the inside dividers/panels & desktop, 1/2" plywood for the drawer boxes, drop-down door & top, 1/4" plywood for drawer bottoms & backing-board. I used 3/4" pine boards for the drawer faces and small doors on the bottom. I used drawer slides from an old dresser I found by our dumpster and vintage knobs I bought online. The other black hardware (hinges, pull handle, and clasps for door) I bought from a big box store and is categorized as gate hardware.

Sun, 09/01/2013 - 15:52
Wow! Nice job, this is beautiful. I love the whitewashed finish. Cool hardware too!
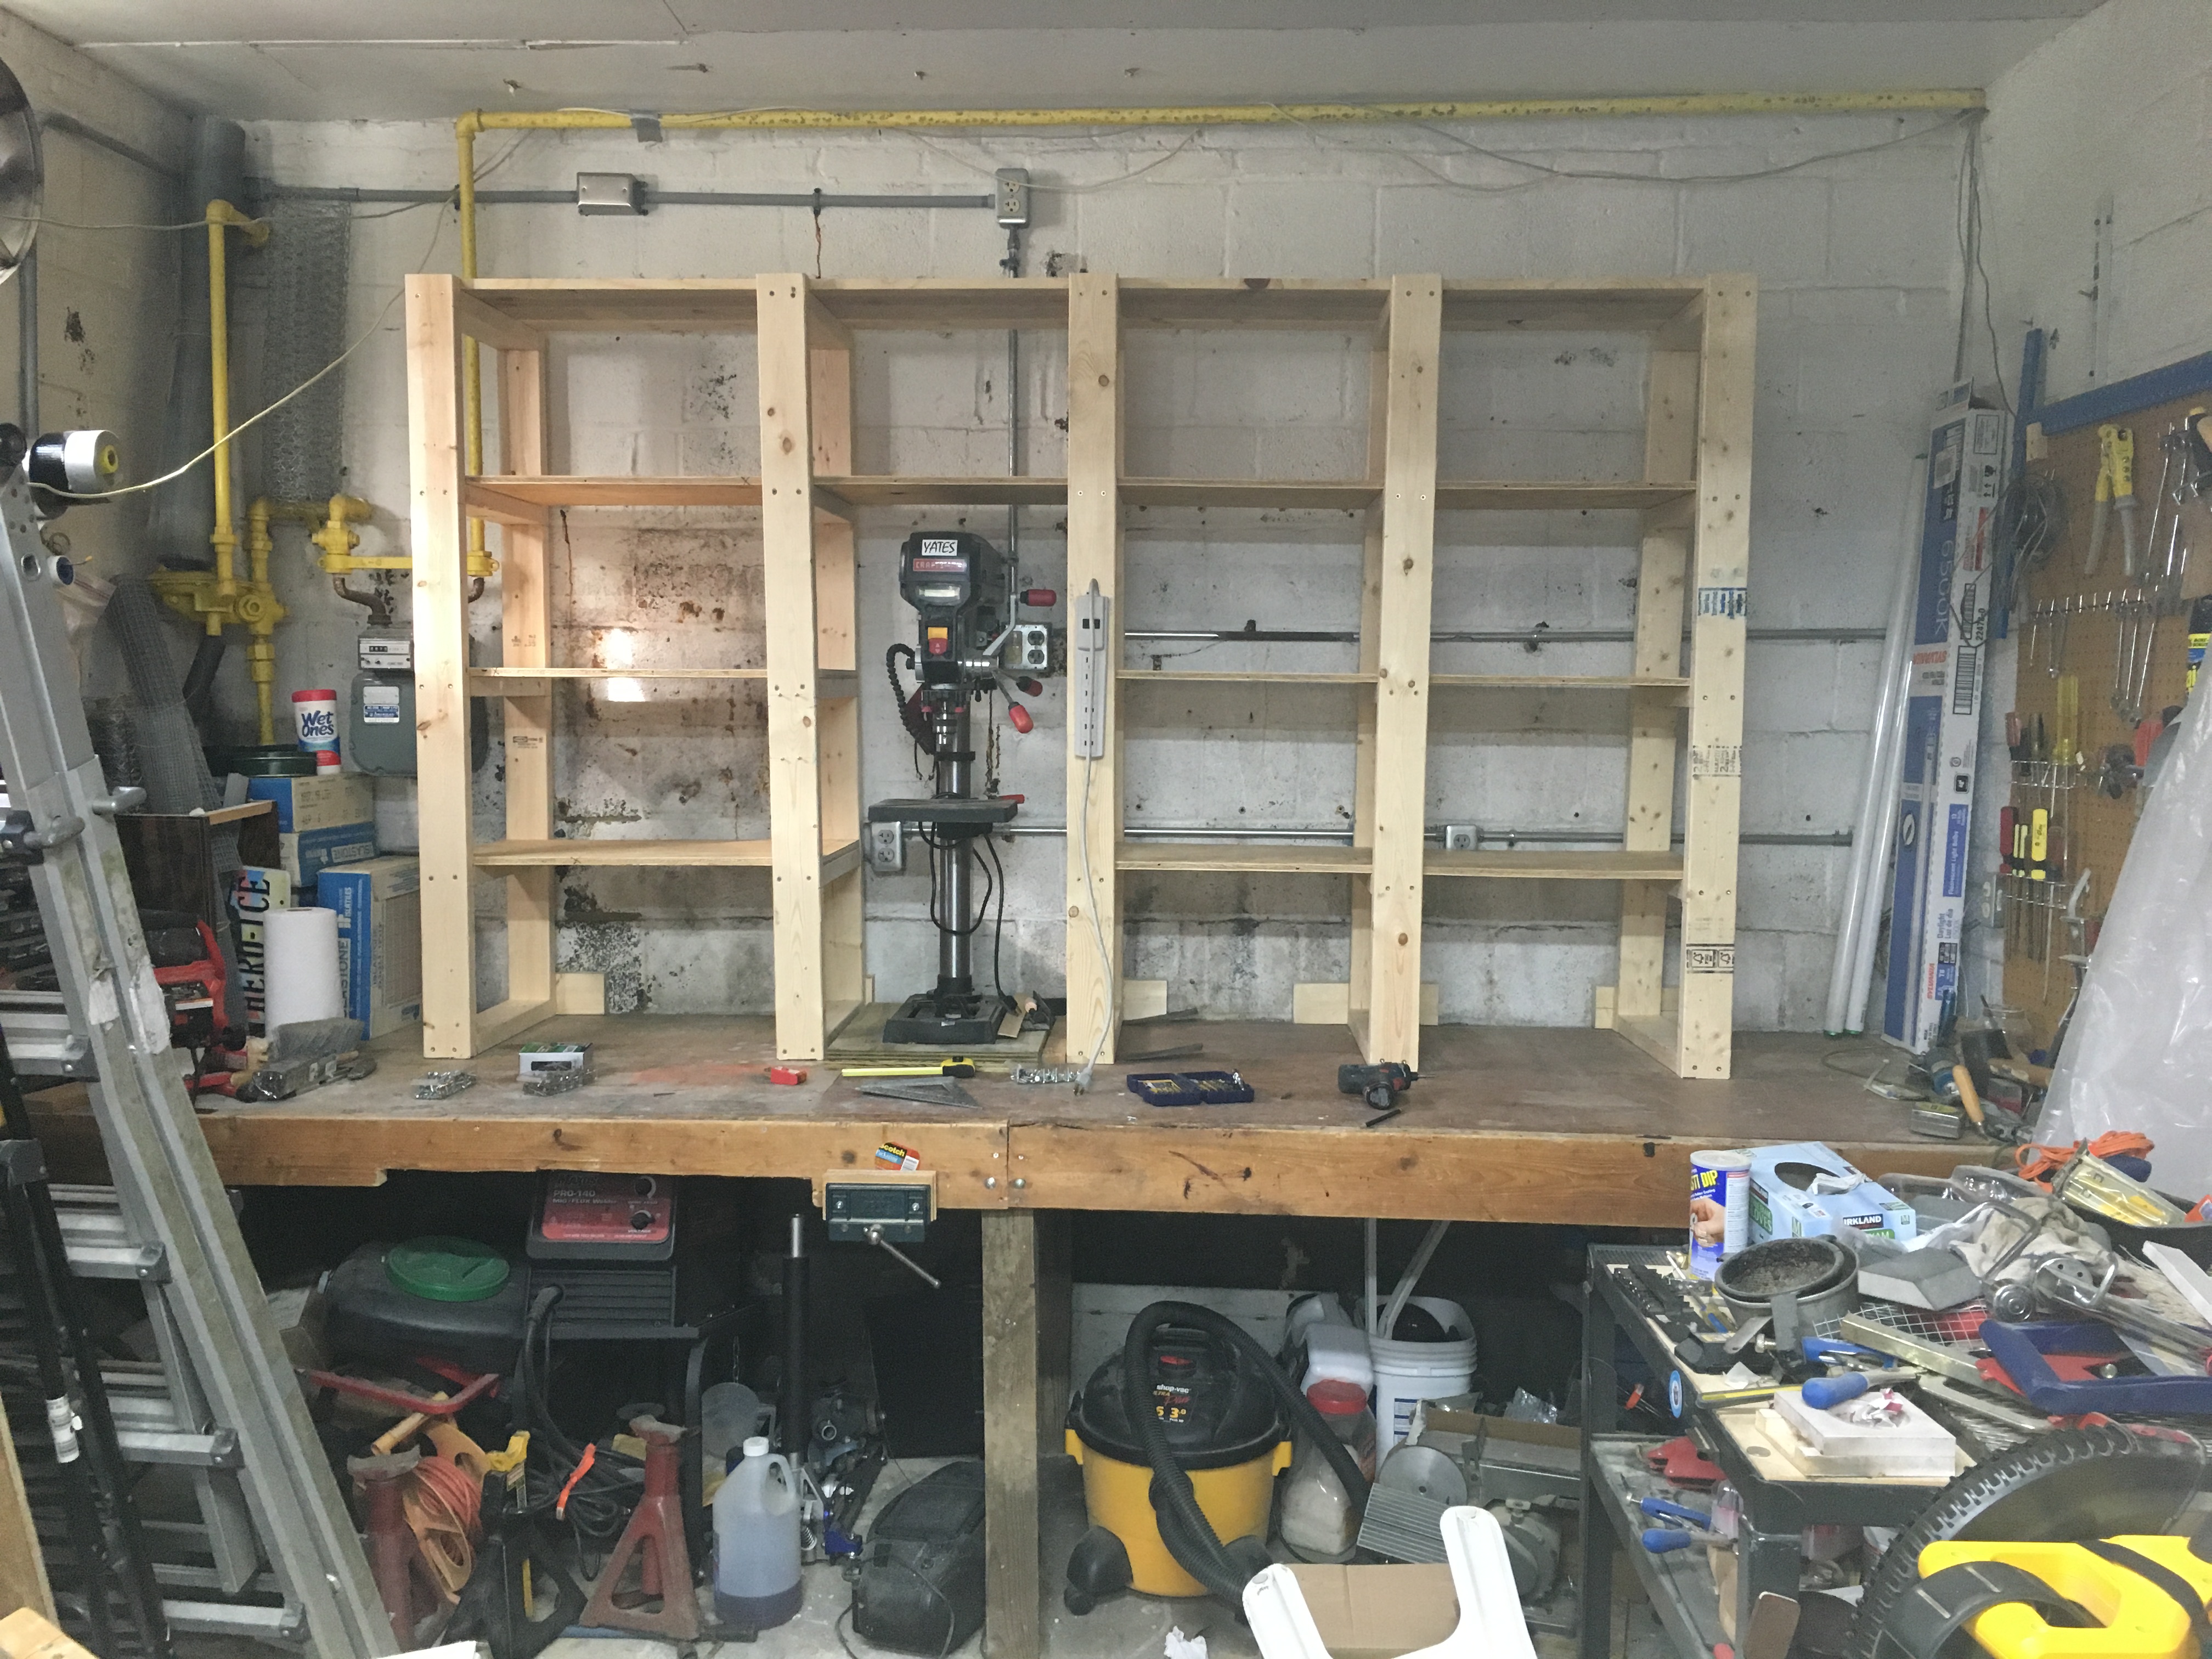
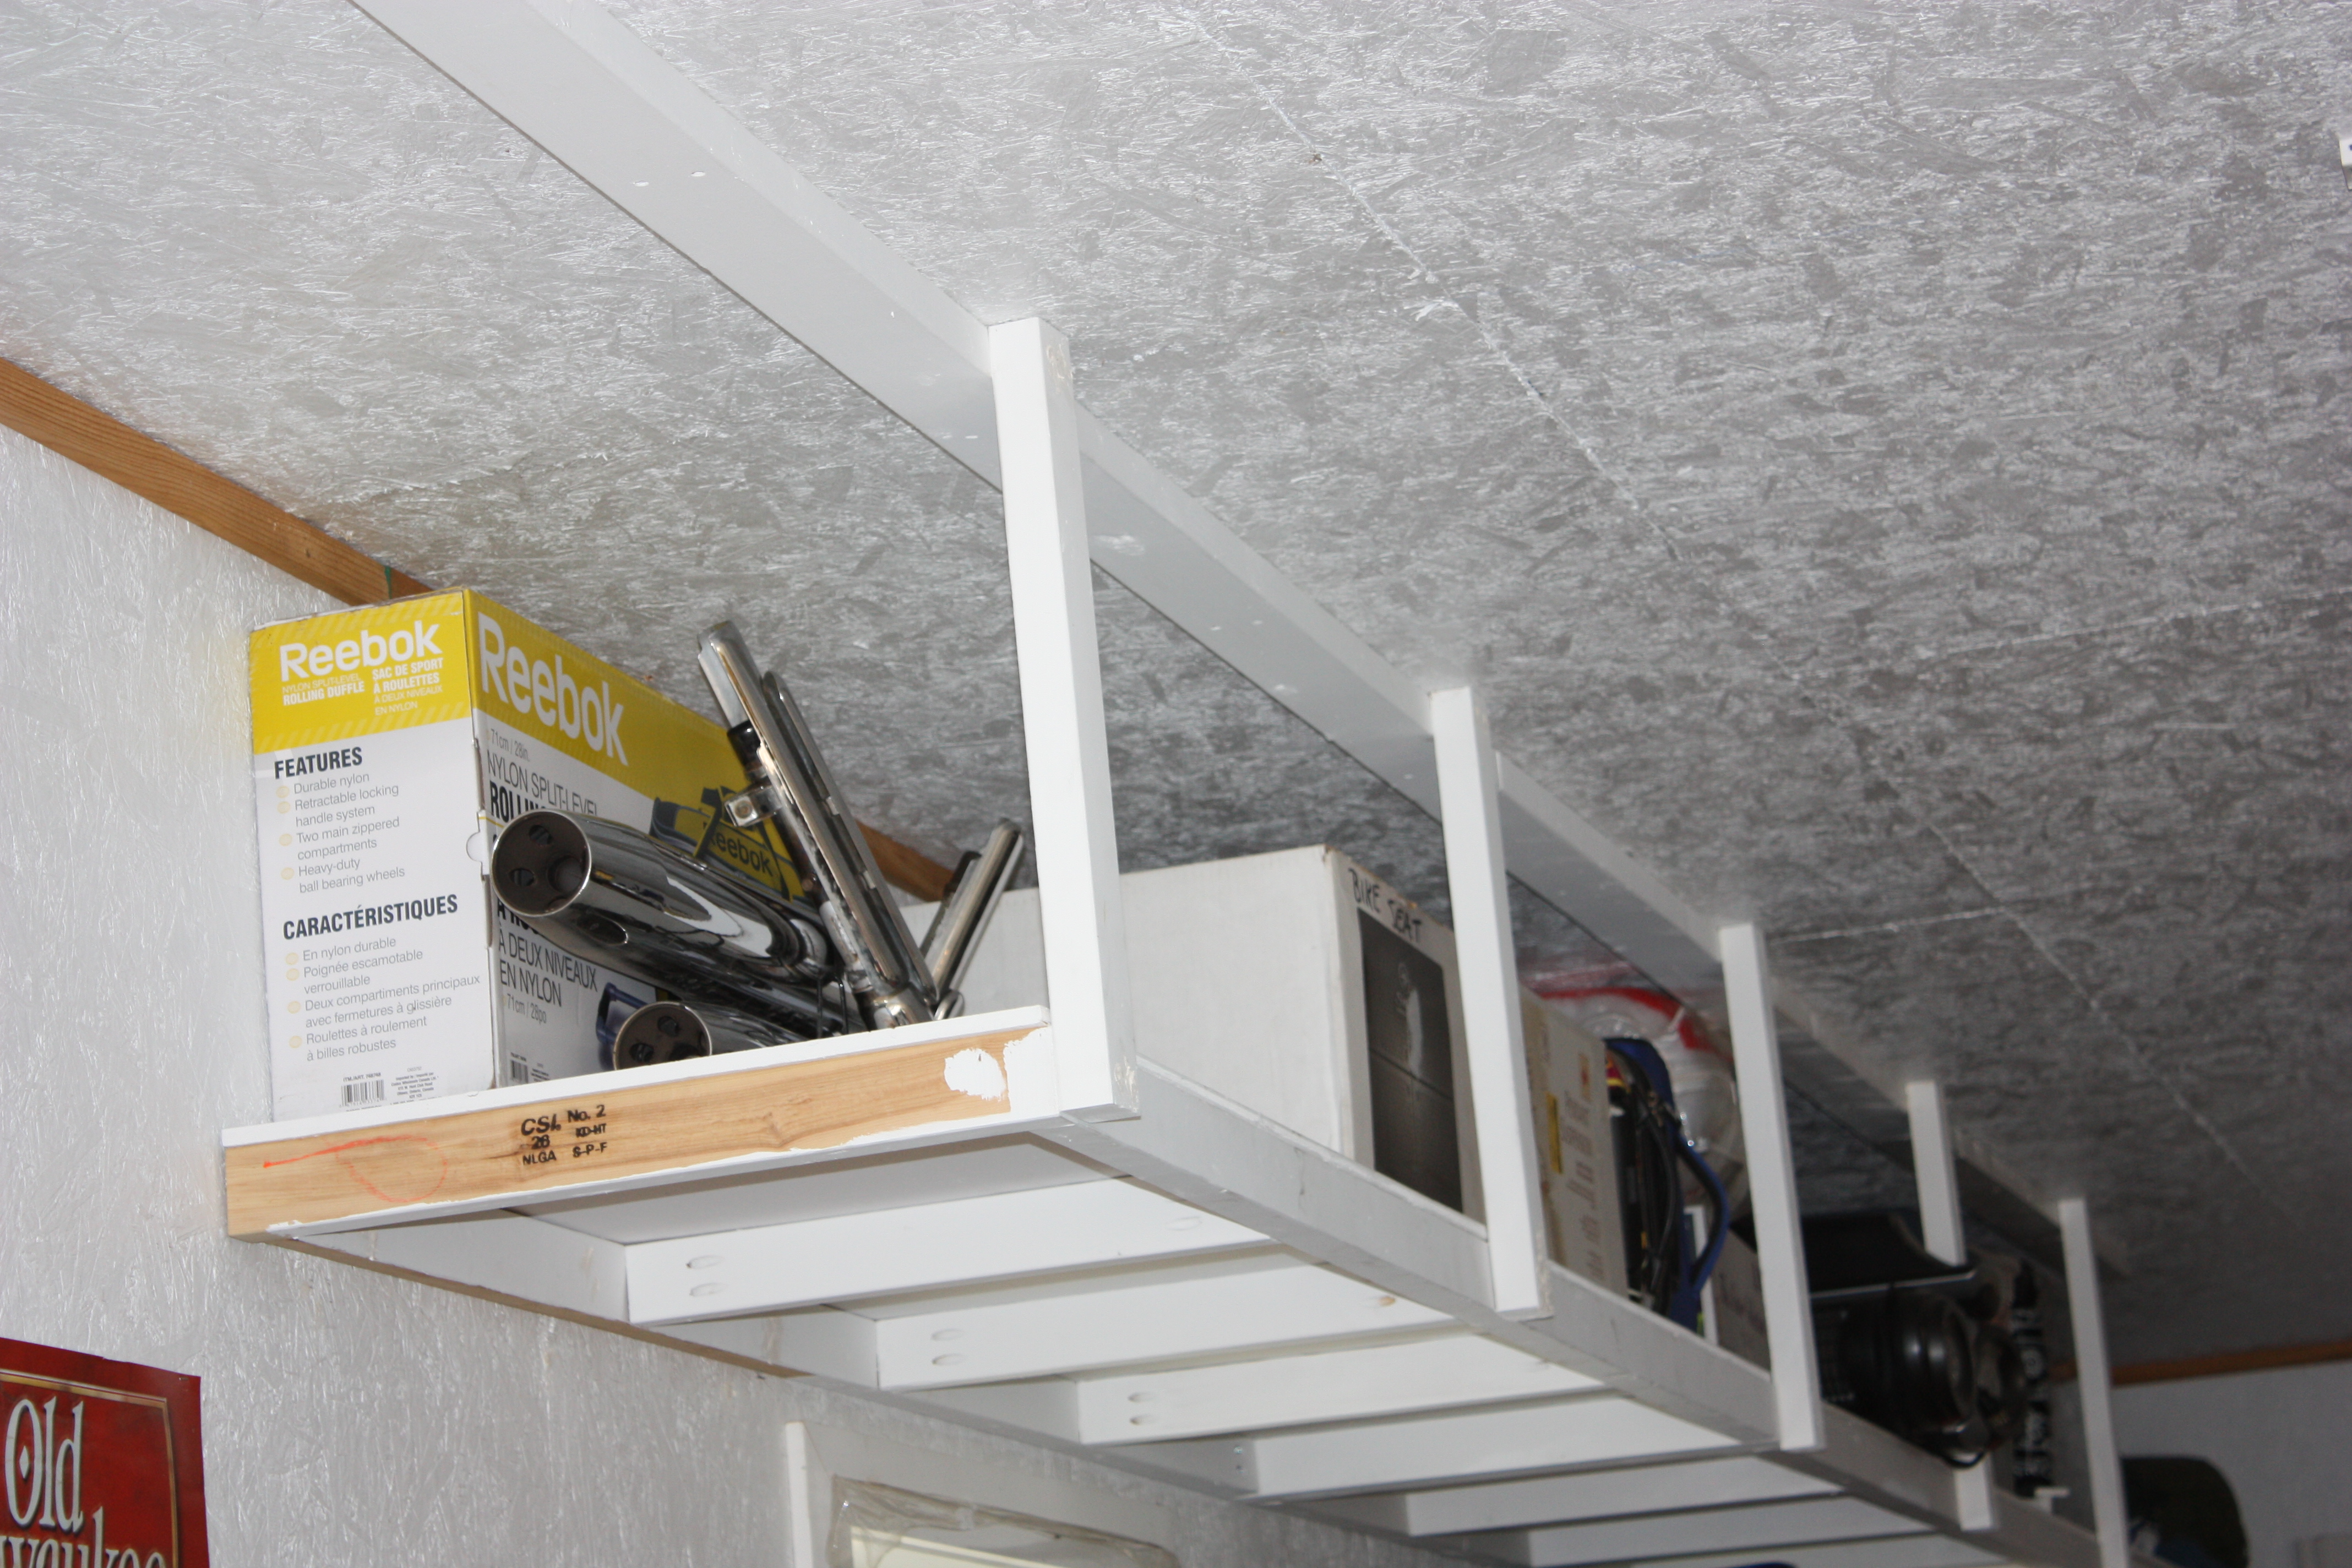
I made these shelves for the top of my work bench to keep from going insane,,,,they are 57" tall with shelves every 14", 8 feet long and 16" deep. I had to loose 2-18" deep shelves to accomodate my drill press. , I used 5/8" plywood for the shelves and 1 by 12 and a 1x4 for the top shelf. Everything is glued and screwed. STURDY like a rock! I took a long time to over engineer these shelves, should have taken about 3-4 hours or less but I took my time...warped pine makes life ugly use the best wood you can afford.- See more at: http://ana-white.com/2014/09/free_plans/easy-economical-garage-shelving…
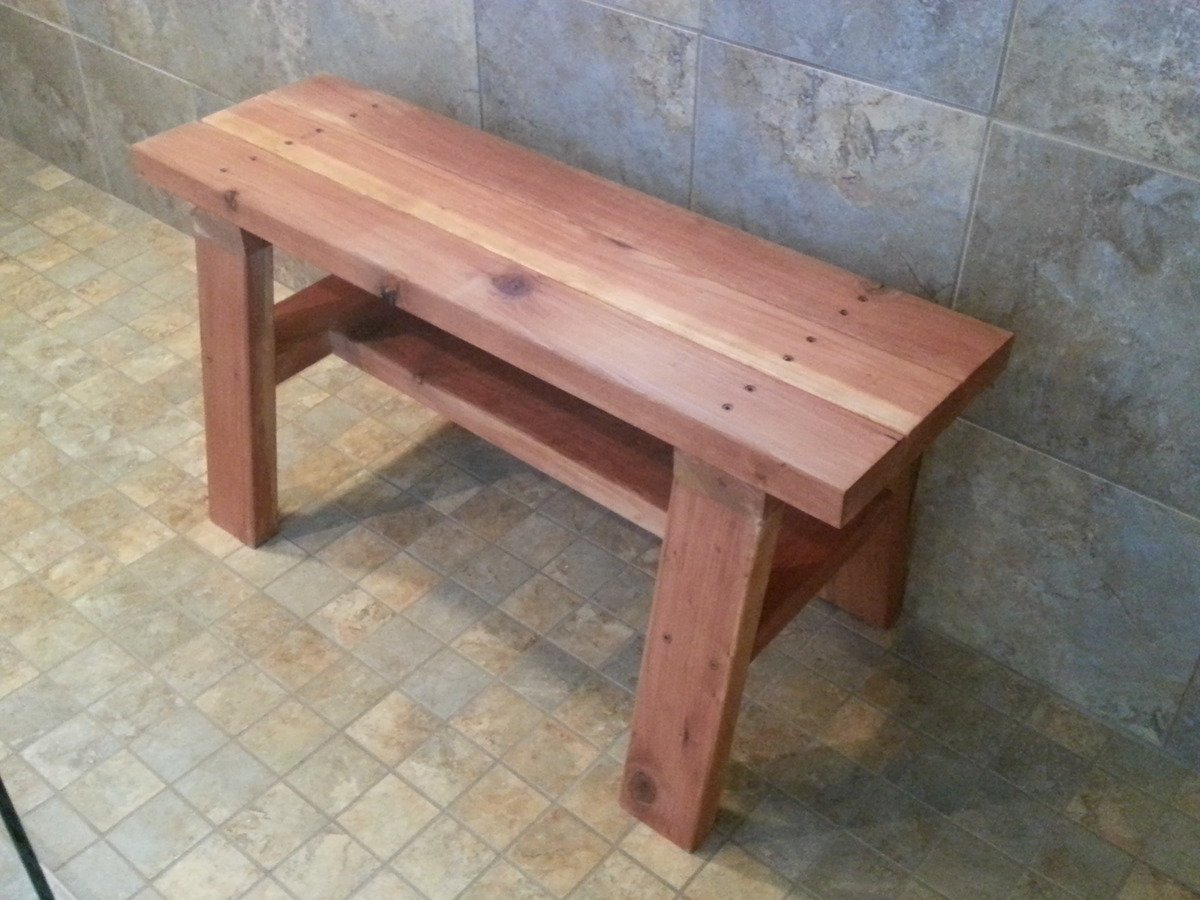
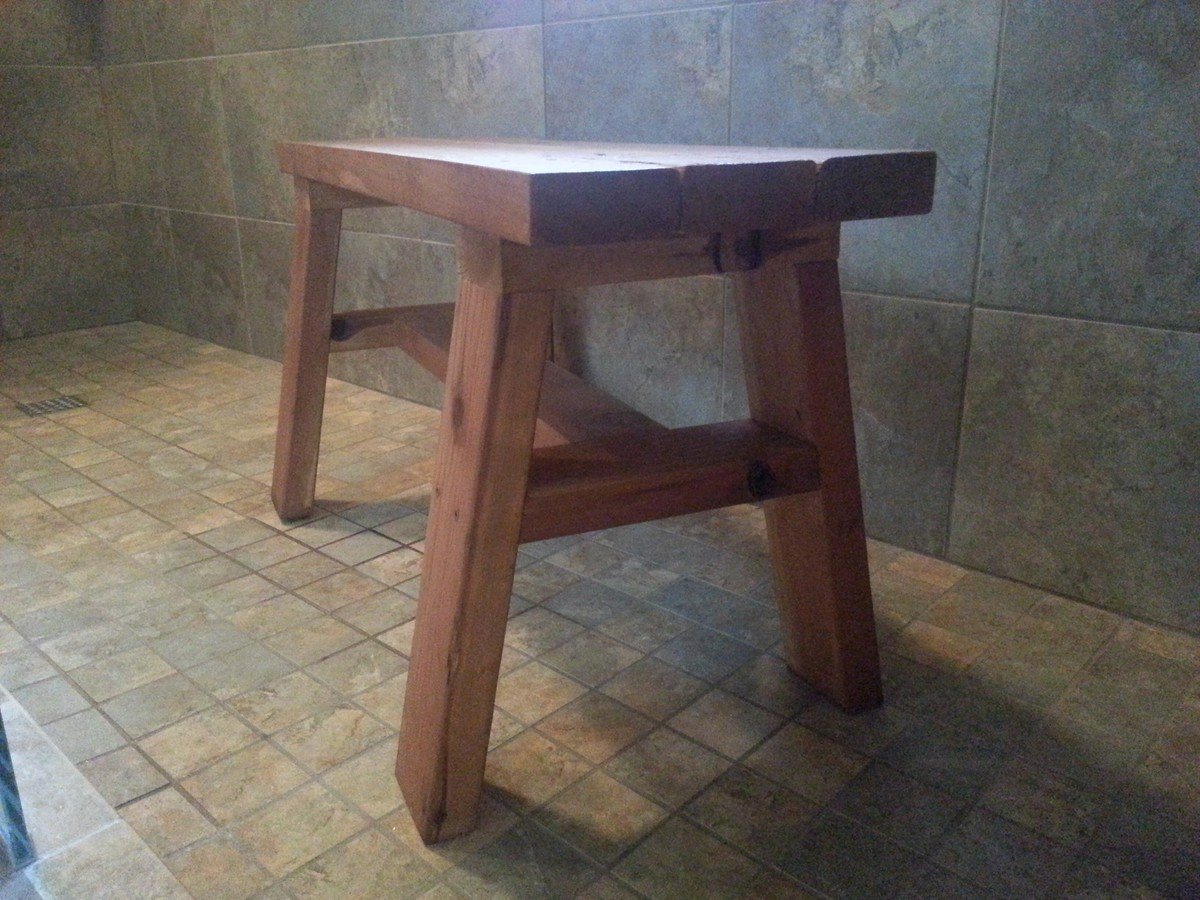
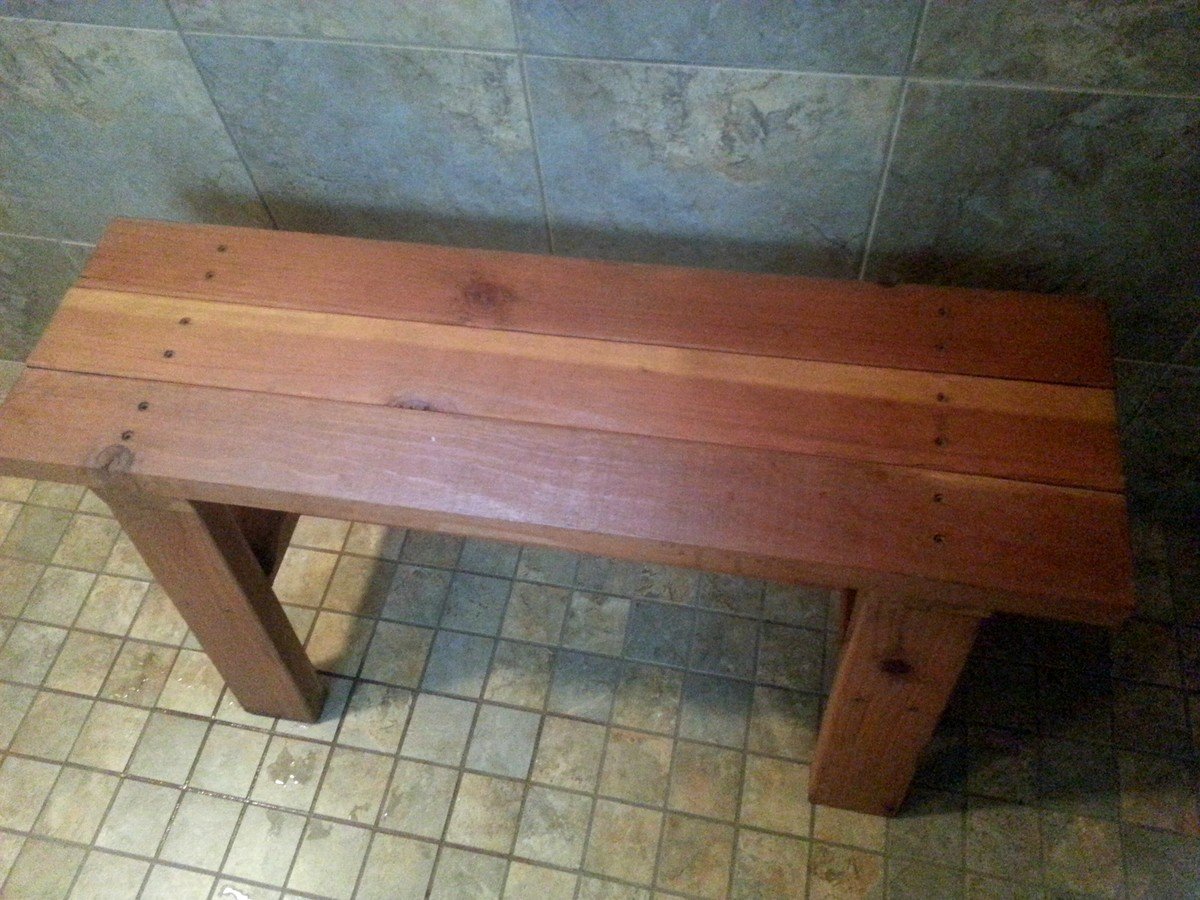
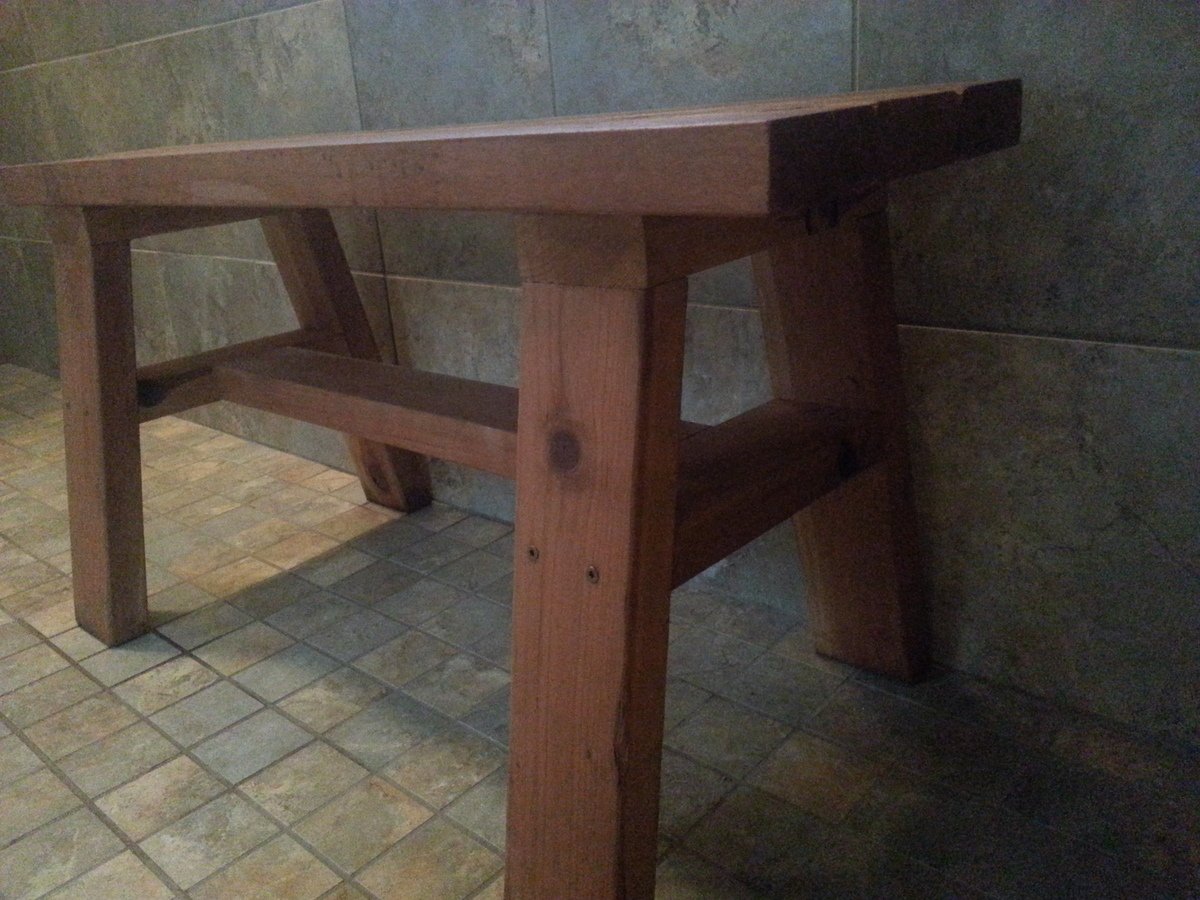
I wanted to build a small shower bench. I used the Providence Bench Plans and just made it a bit smaller with a few adjustments. This bench is 35" long and 18" tall. I did not use the cross supports on the bottom because it was so short. Also, you will see that I turned the bottom stretcher and side supports flat/horizontal. I put the screws for the seat boards through the top down just because this was the easiest way for me to do it. The plans did not show in detail how to attach the seat boards from the underside. It just said "finally, the seat boards." I guess they probably used a pocket jig. I bought a pocket jig and used it in the couple of places, but this was my first time using it. I used brown, coated decking screws in the places I did not use the pocket screws. This was my first attempt at building anything and my first time to use a pocket jig. I used a natural wood stain and Behr Weather-Proofing since it will be in a wet area.
This project was born out of desperation for some way to organize our garage. It is not difficult to build, and it went pretty quickly with two of us. It probably didn't take more than four hours tops for each section. I've seen the prices for garage storage components and some of them are staggering! We have removed a tall chrome shelf, and moved a ton of stuff onto these shelves, creating a hundred square feet of floor space! And for only $25! Come on over and check it out on my blog! Val

In reply to Awesome! This is just what I by moosmani
Thu, 10/24/2013 - 20:17
Glad you like them! They've been a real sanity-saver!
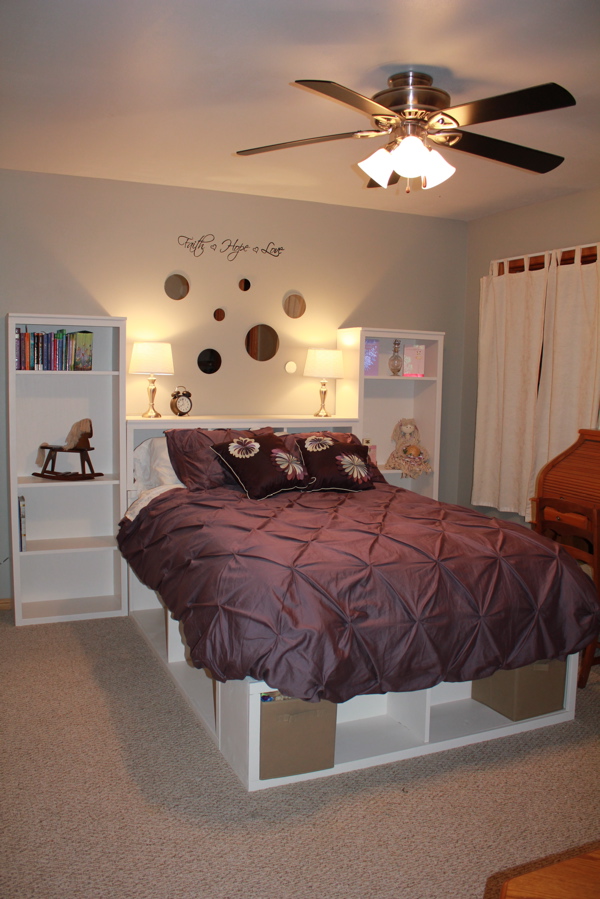
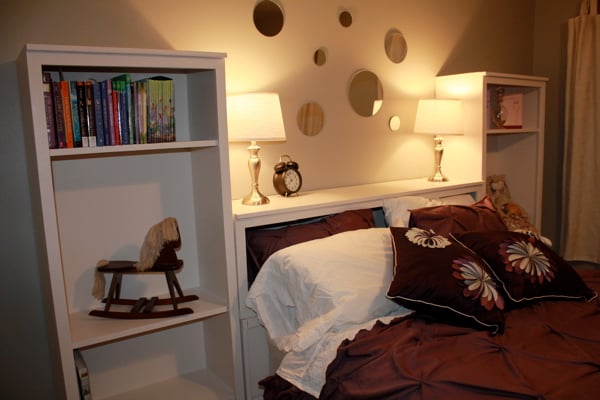
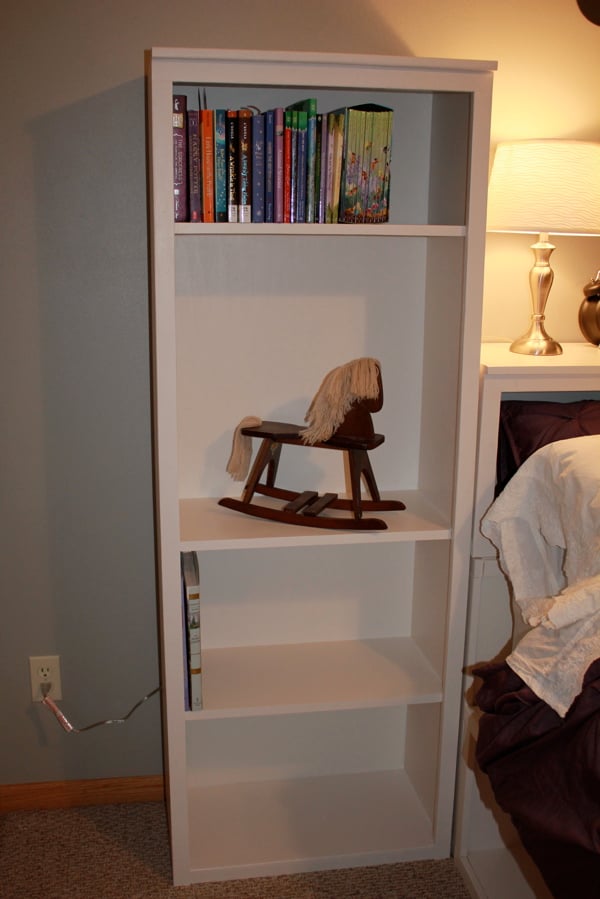
My daughter wanted her room redone for her tenth birthday. We decided to go big with Ana's storage bed plans. I had so much fun building this and really learned a lot. It took me three months to find enough spare time to finish it, but it was worth the wait.

Mon, 11/07/2011 - 19:24
You did a really great job building the storage bed. I am in the process of building this same bed for my teenage son, only I'm not building the towers. Finding enough time to actually get a project finished is nearly impossible when you only have a few hours here and there! Your daughter will love all the extra storage space as she gets older.
Tue, 11/08/2011 - 05:19
Thank you very much! For such a large project, and only the second piece of furniture I have made, I couldn't be happier with the results.
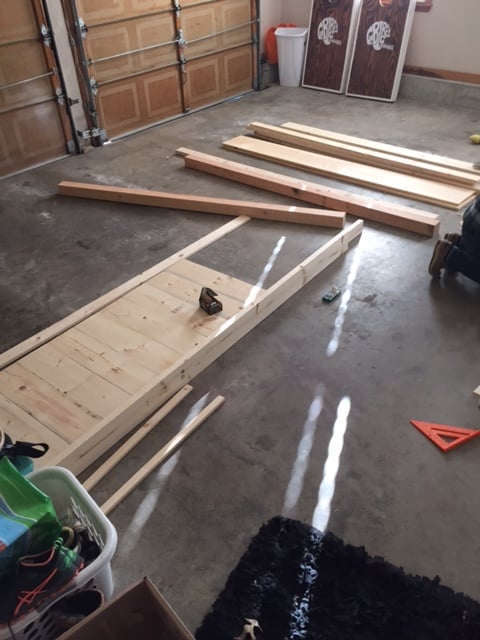
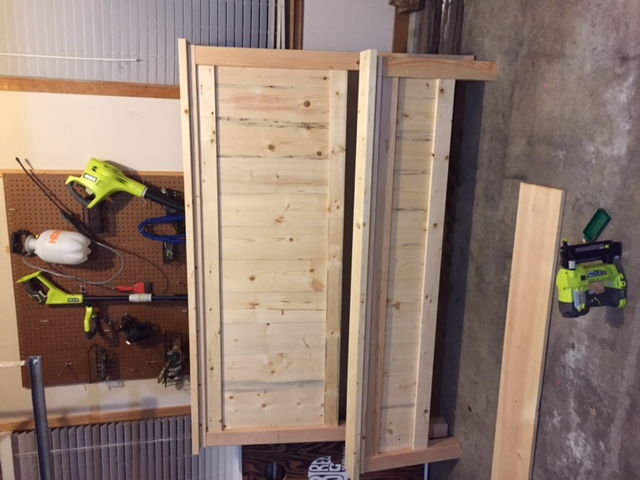
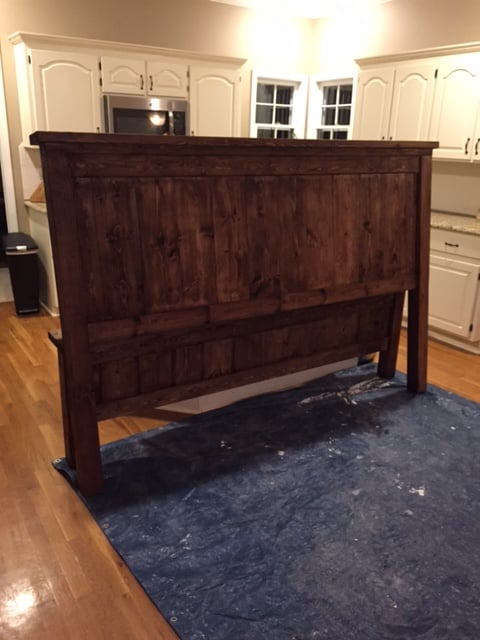
This was our first ana white build. Bed build took one Saturday - to finish up took another week or so working nights - most of our time spent on getting the color we wanted and sanding and finishing. Building the 2x4 frame took more time than anticipated as well. We are super happy with how it turned out.
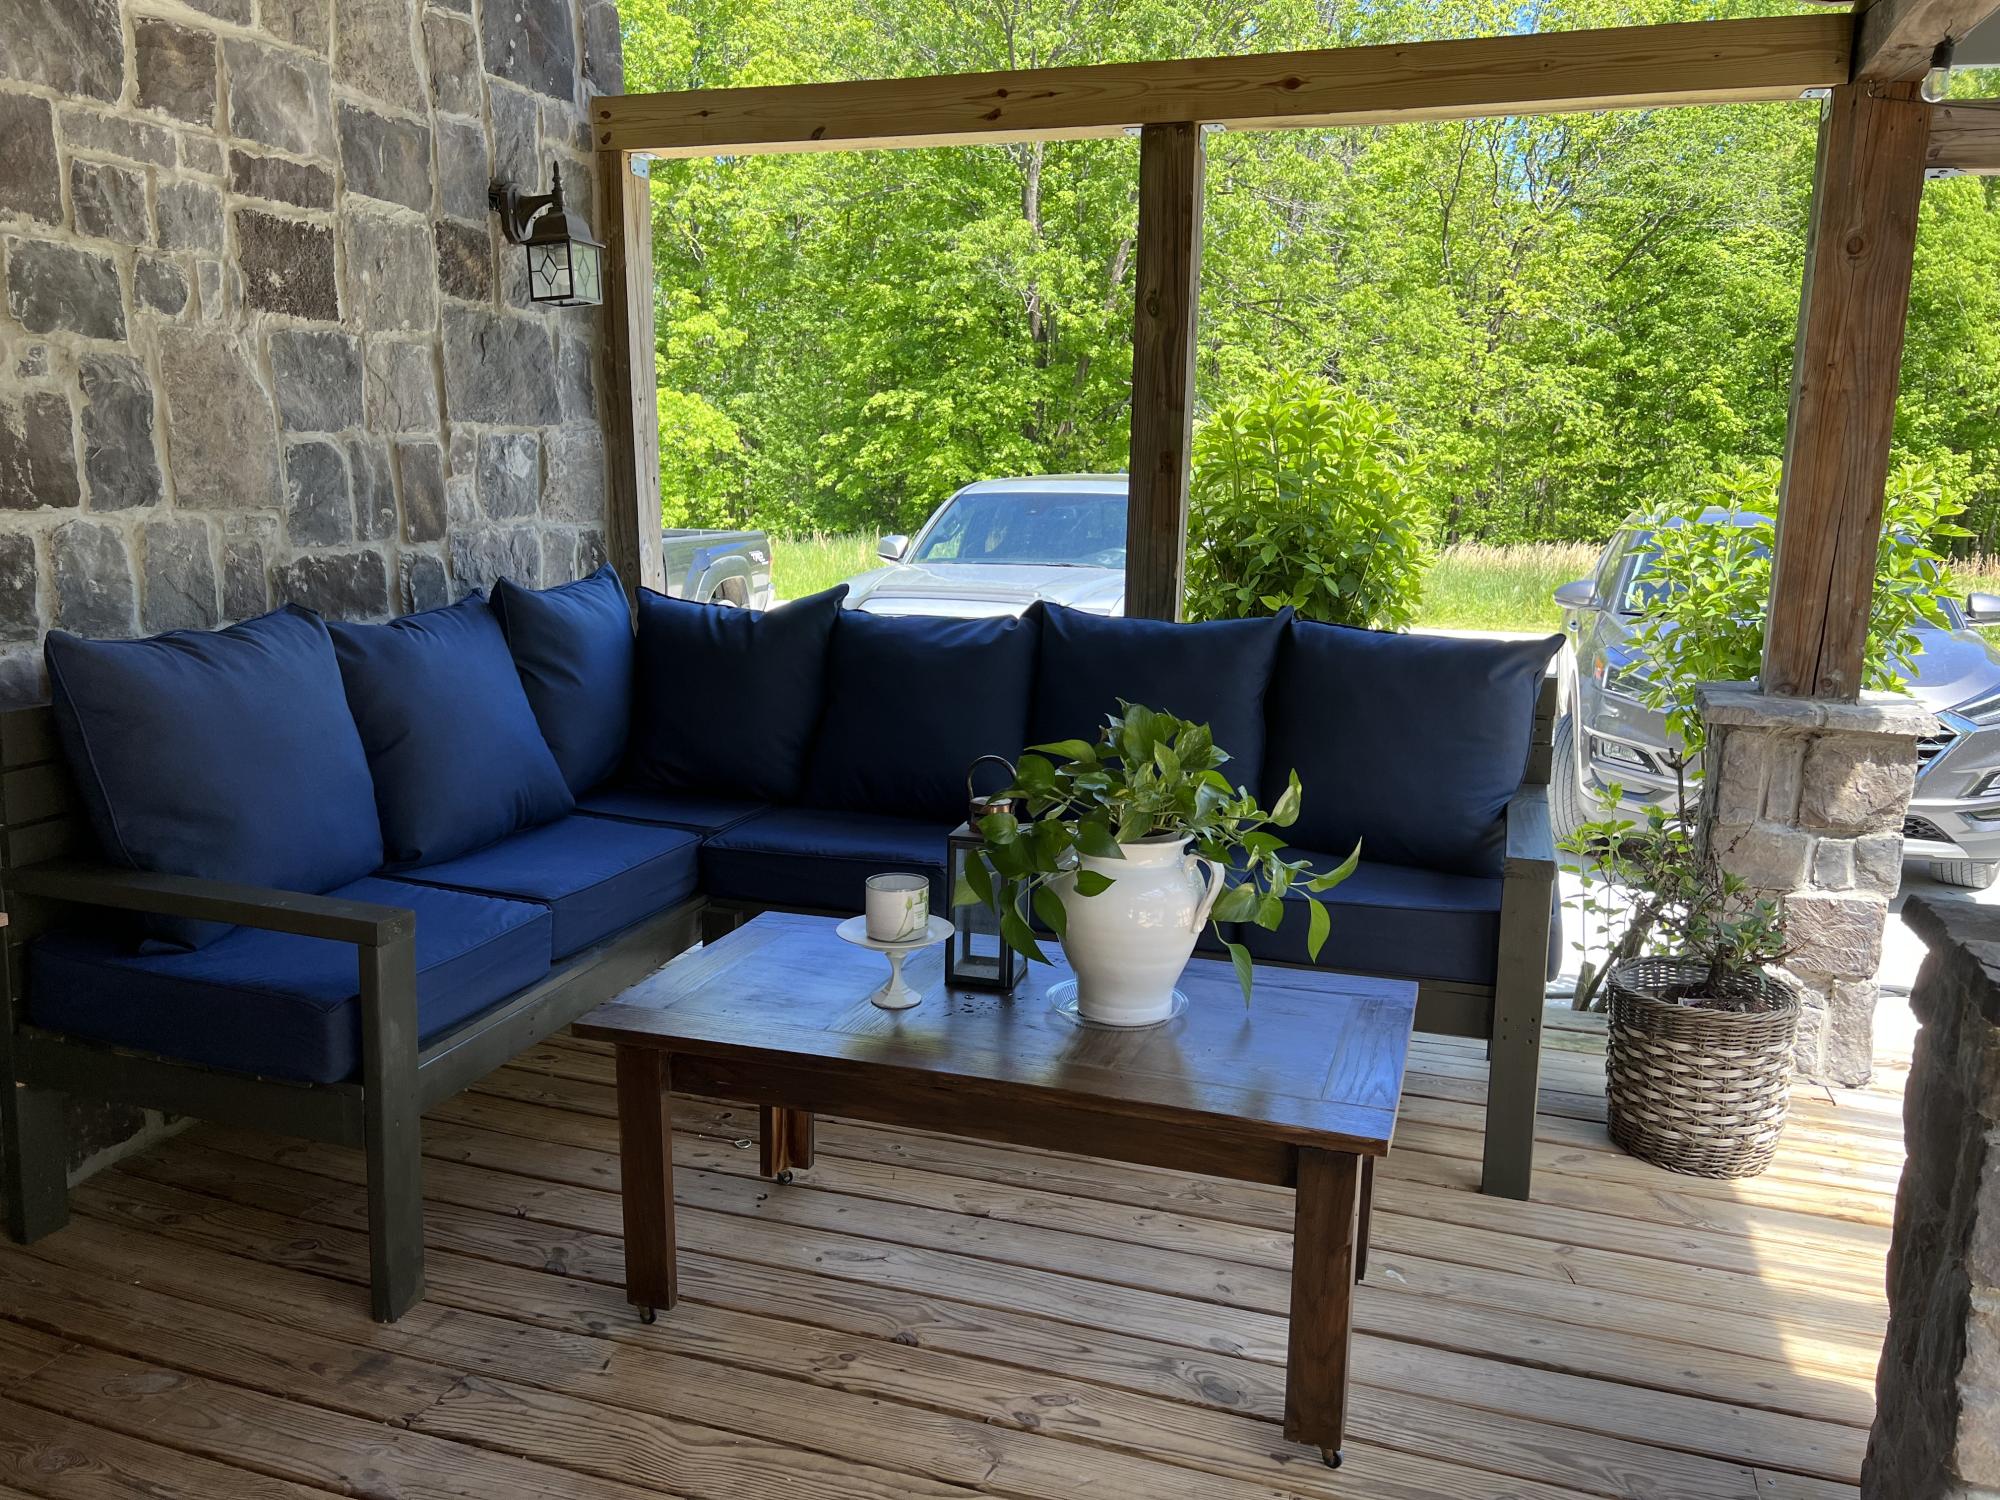
My husband whipped this up in one day using Ana’s plan. This is my new favorite spot to relax.
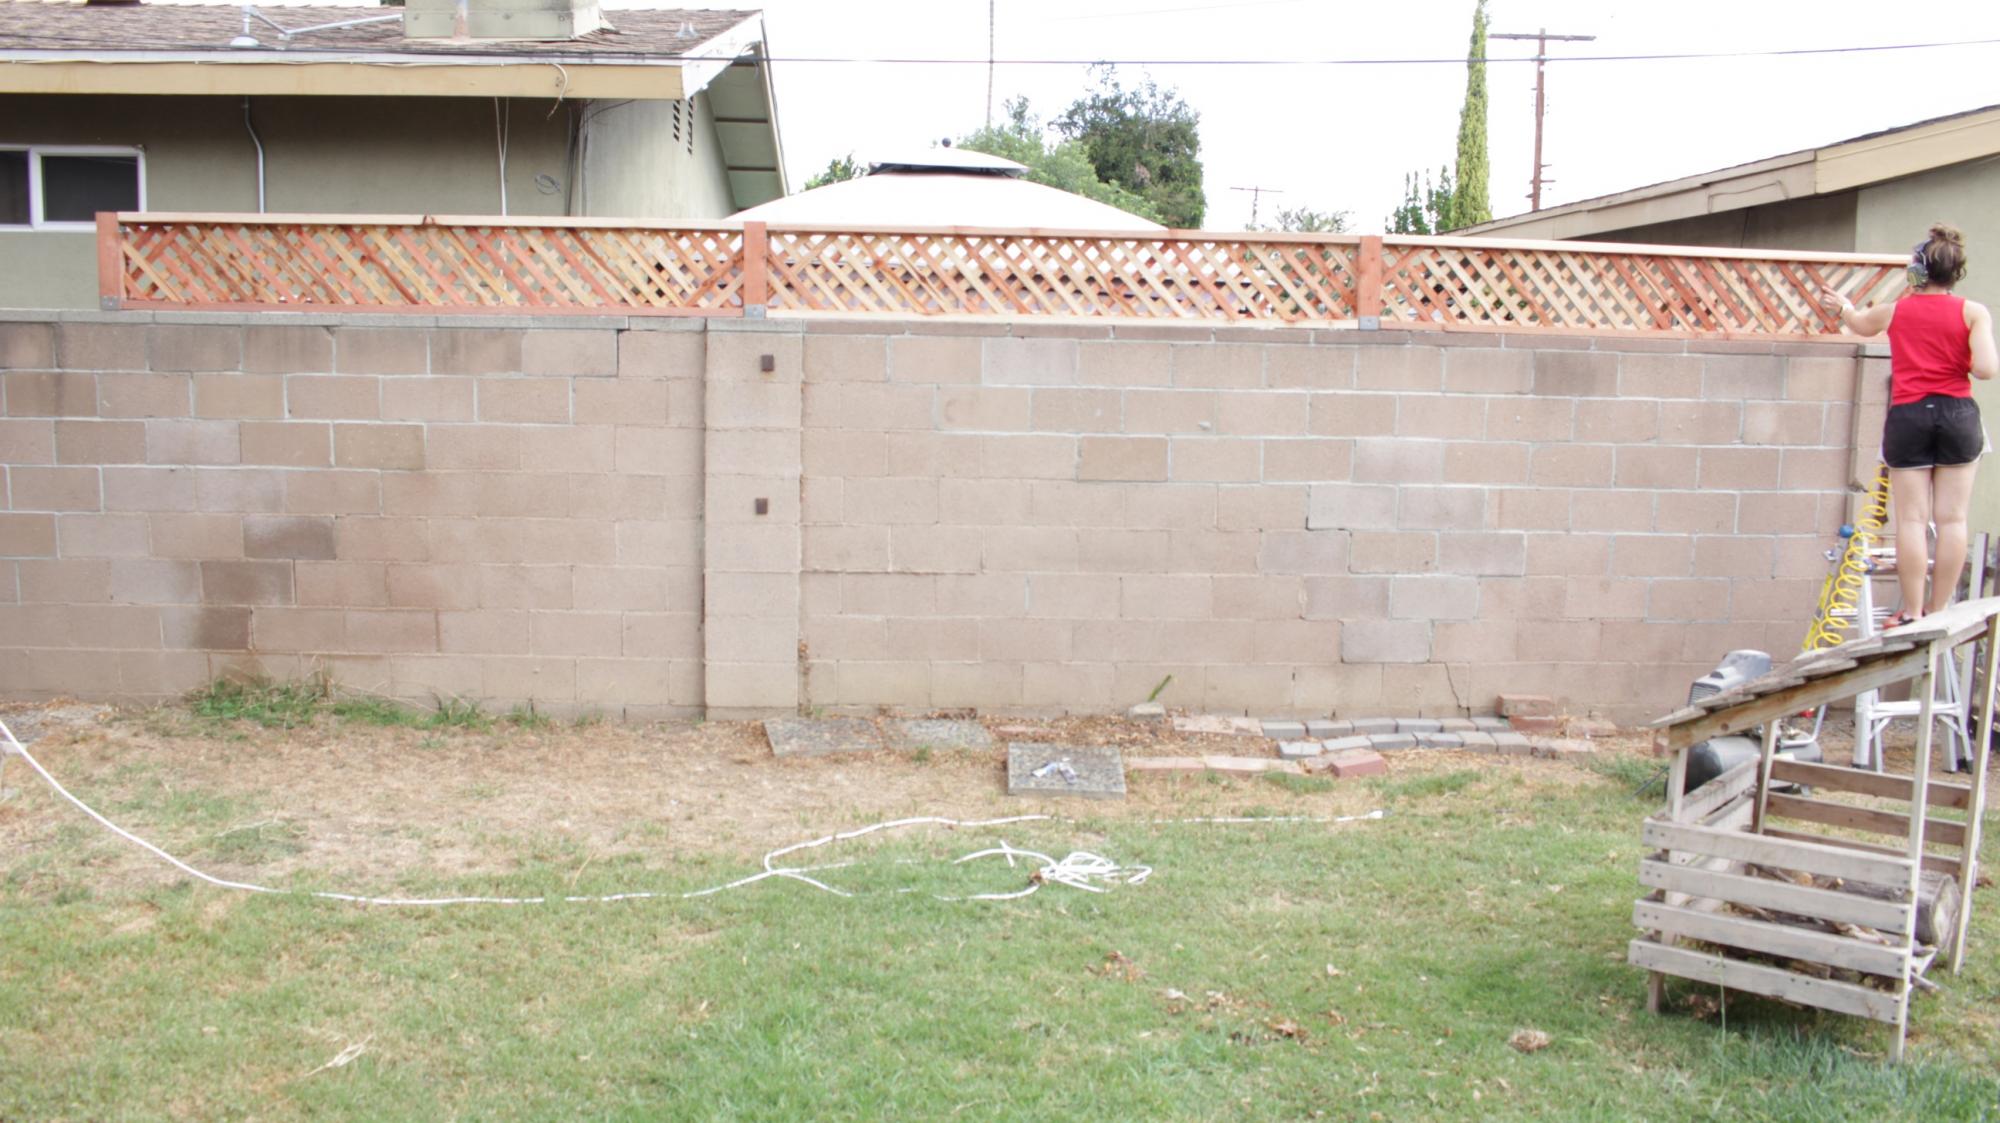
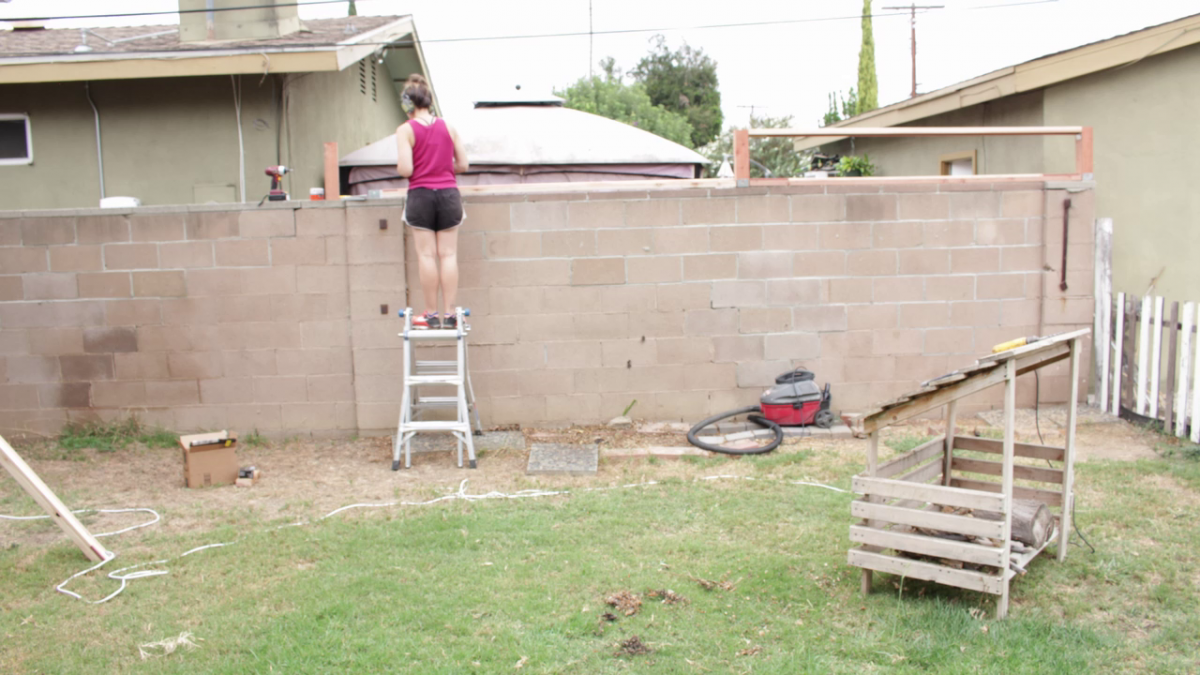
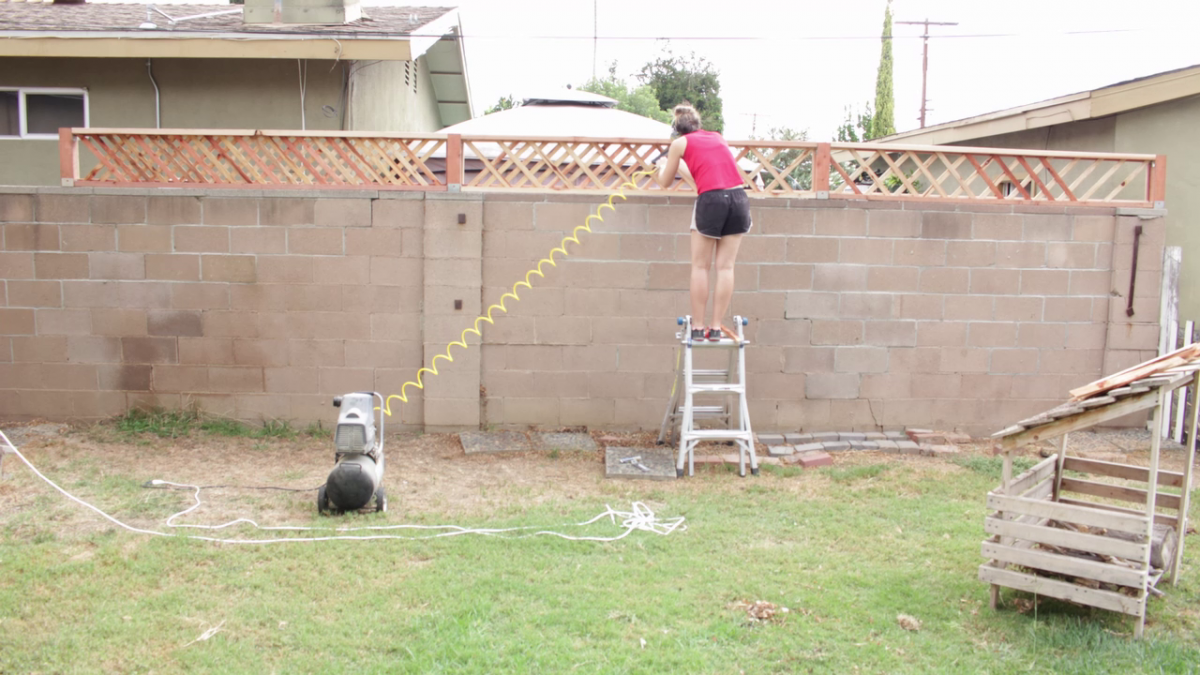
Lattice Fence Build Video
I built a lattice fence above a masonry wall dividing us from our neighbors after they cut down a bush that had formerly blocked the view. I time lapsed the whole thing, and thought you might find it of interest (or humor)
It took me 3 days instead of the 1 that I expected- am I the only one who greatly overestimates their speed at home projects? : )
Anyways, really happy with how it turned out. That’s the thing I love about woodworking. It always looks janky to begin and doesn’t show much promise, and then suddenly, it’s a work of art. Tis a thing of beauty.
There are a good amount of tips and tricks in the video of how to overcome difficulties in the build.

I’m no carpenter but this went well. I did it all with pressure treated because it is in the open. They filled in the area where there used be a hot tub. Surprisingly comfortable, too. Thanks Ana
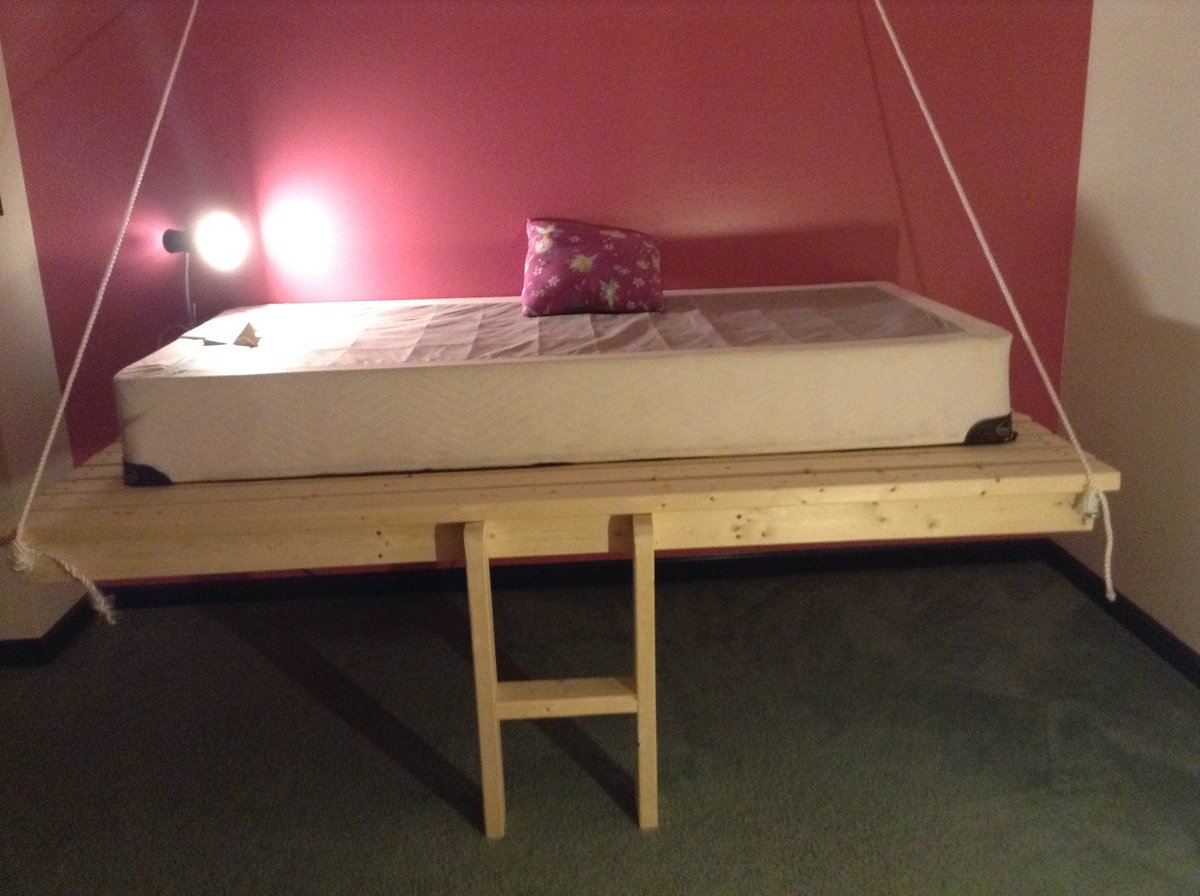
Inspired by the hanging day bed- everything was built as directed- then 5in X 3/8in lag bols used to secure to wall, as well as eye bolts and rope. Extra support added with ladder
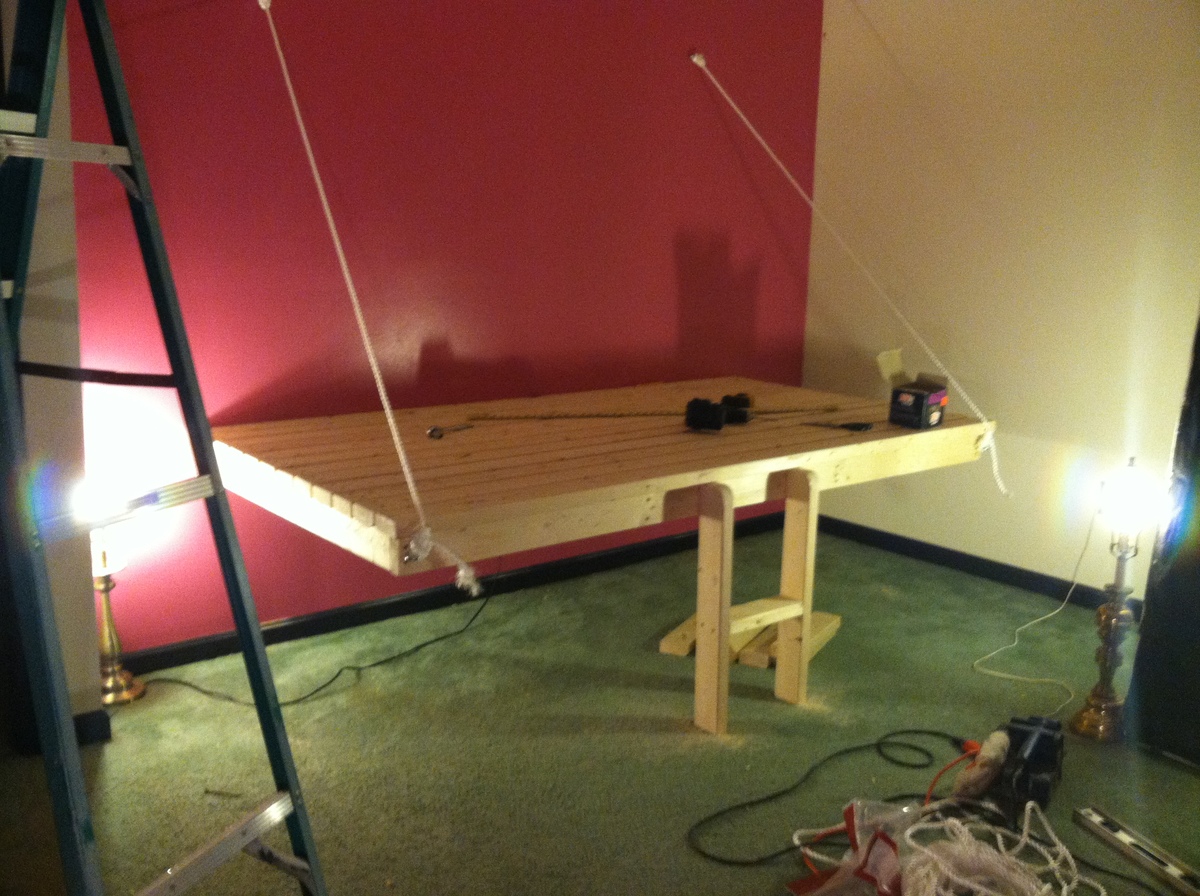
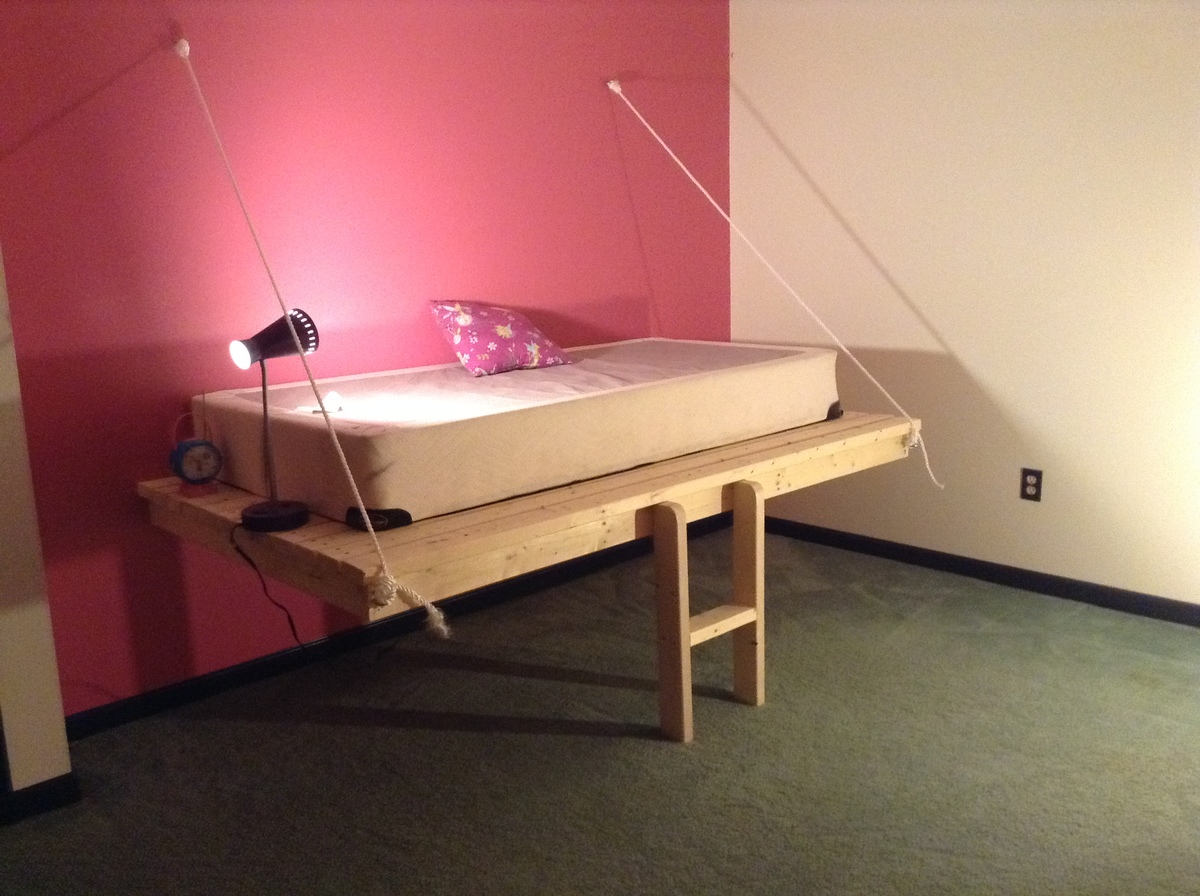
Thu, 03/20/2014 - 10:48
I am wondering if you put both a box spring and mattress on this? Is there any way to see what it looked like all finished and set up? We are thinking of doing this is our daughters room so that we can put up two, but she may not go for it if it has no box spring. :)
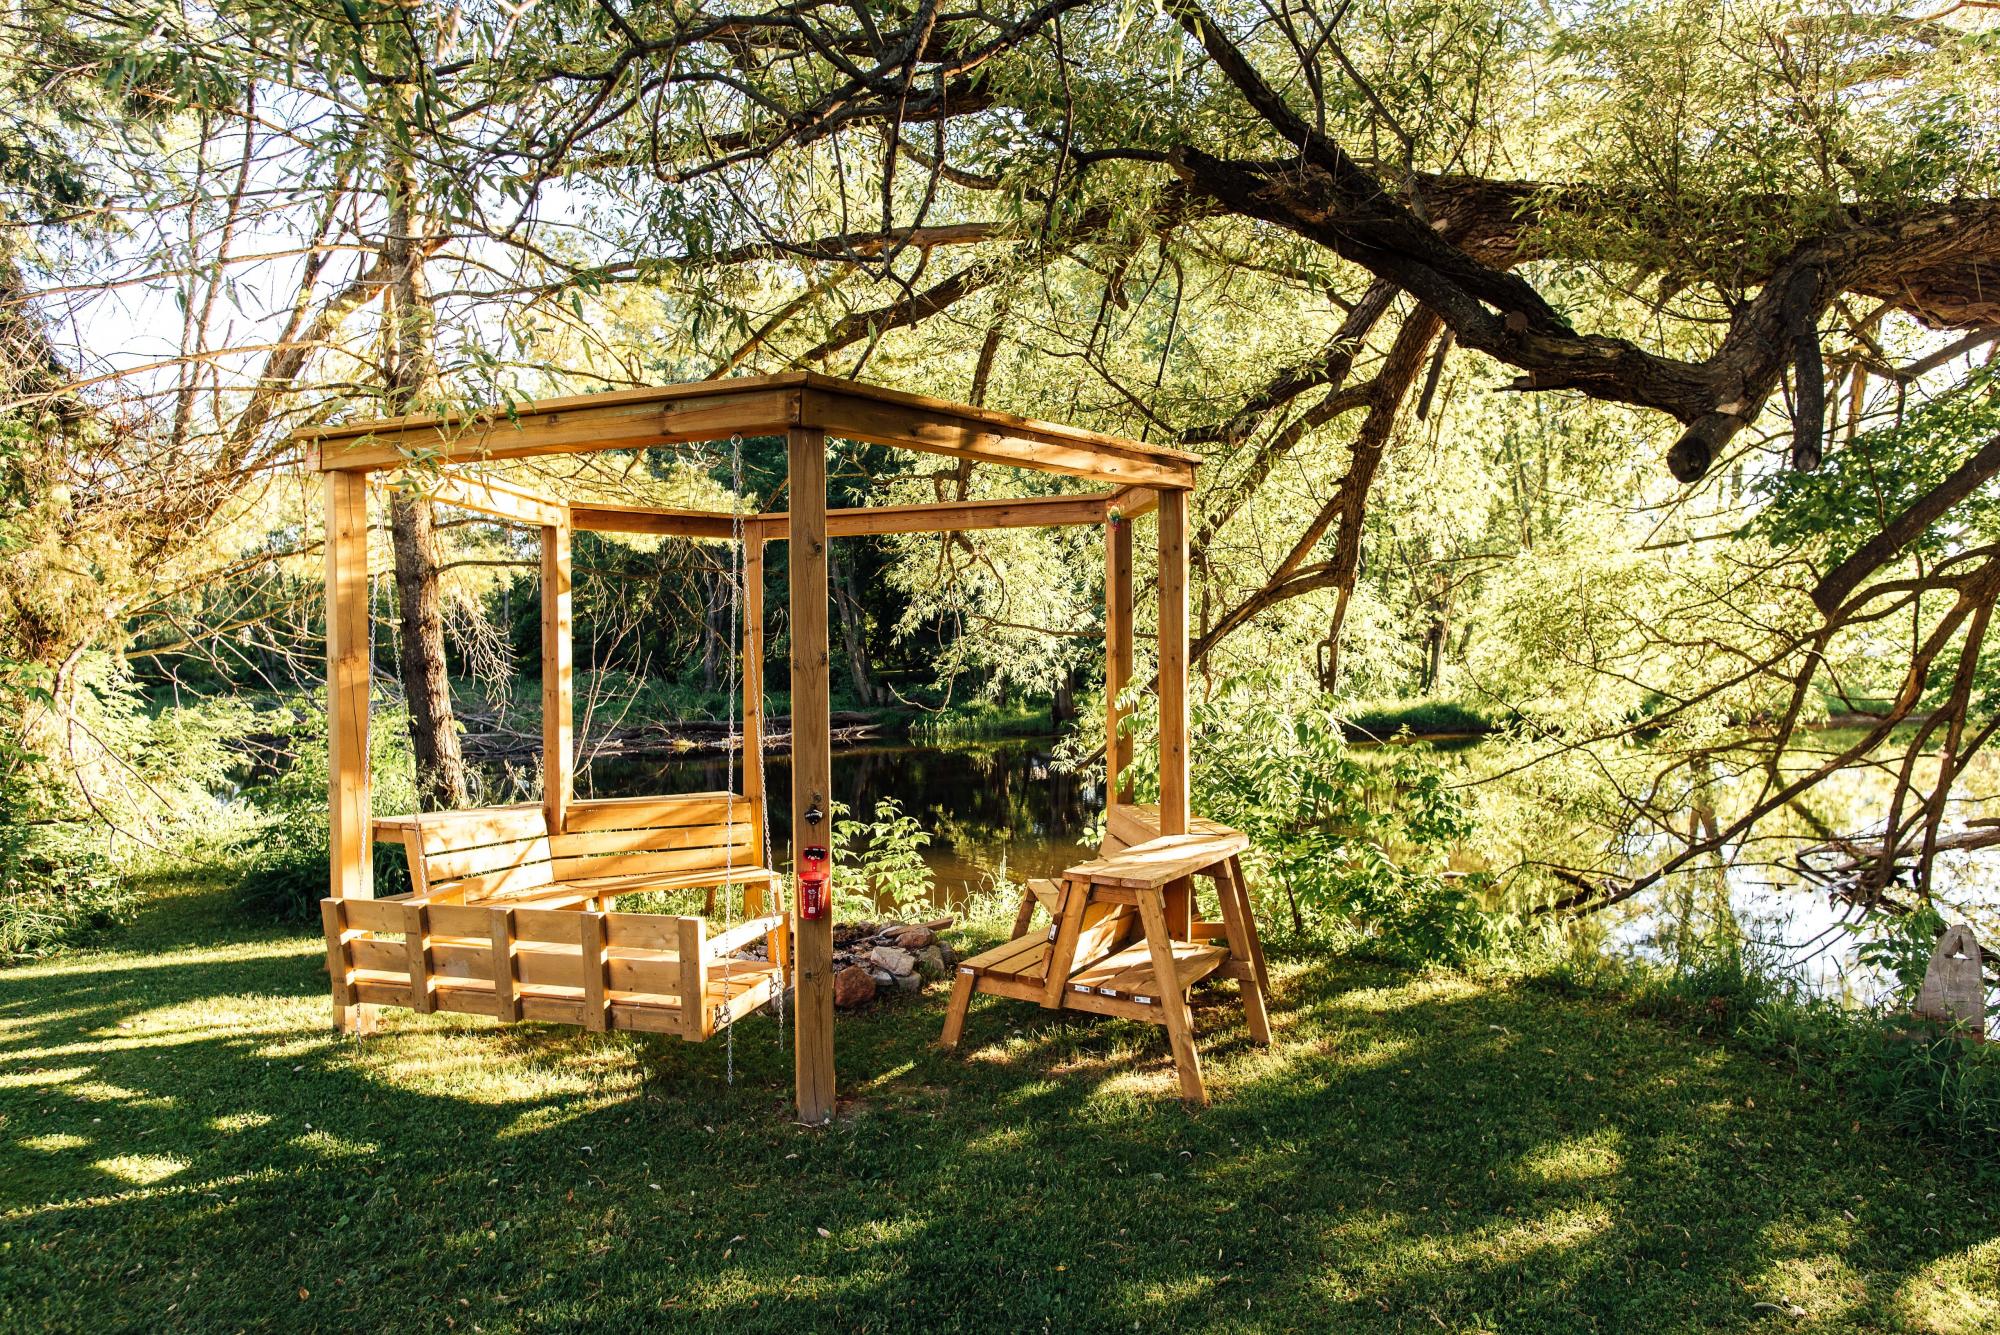
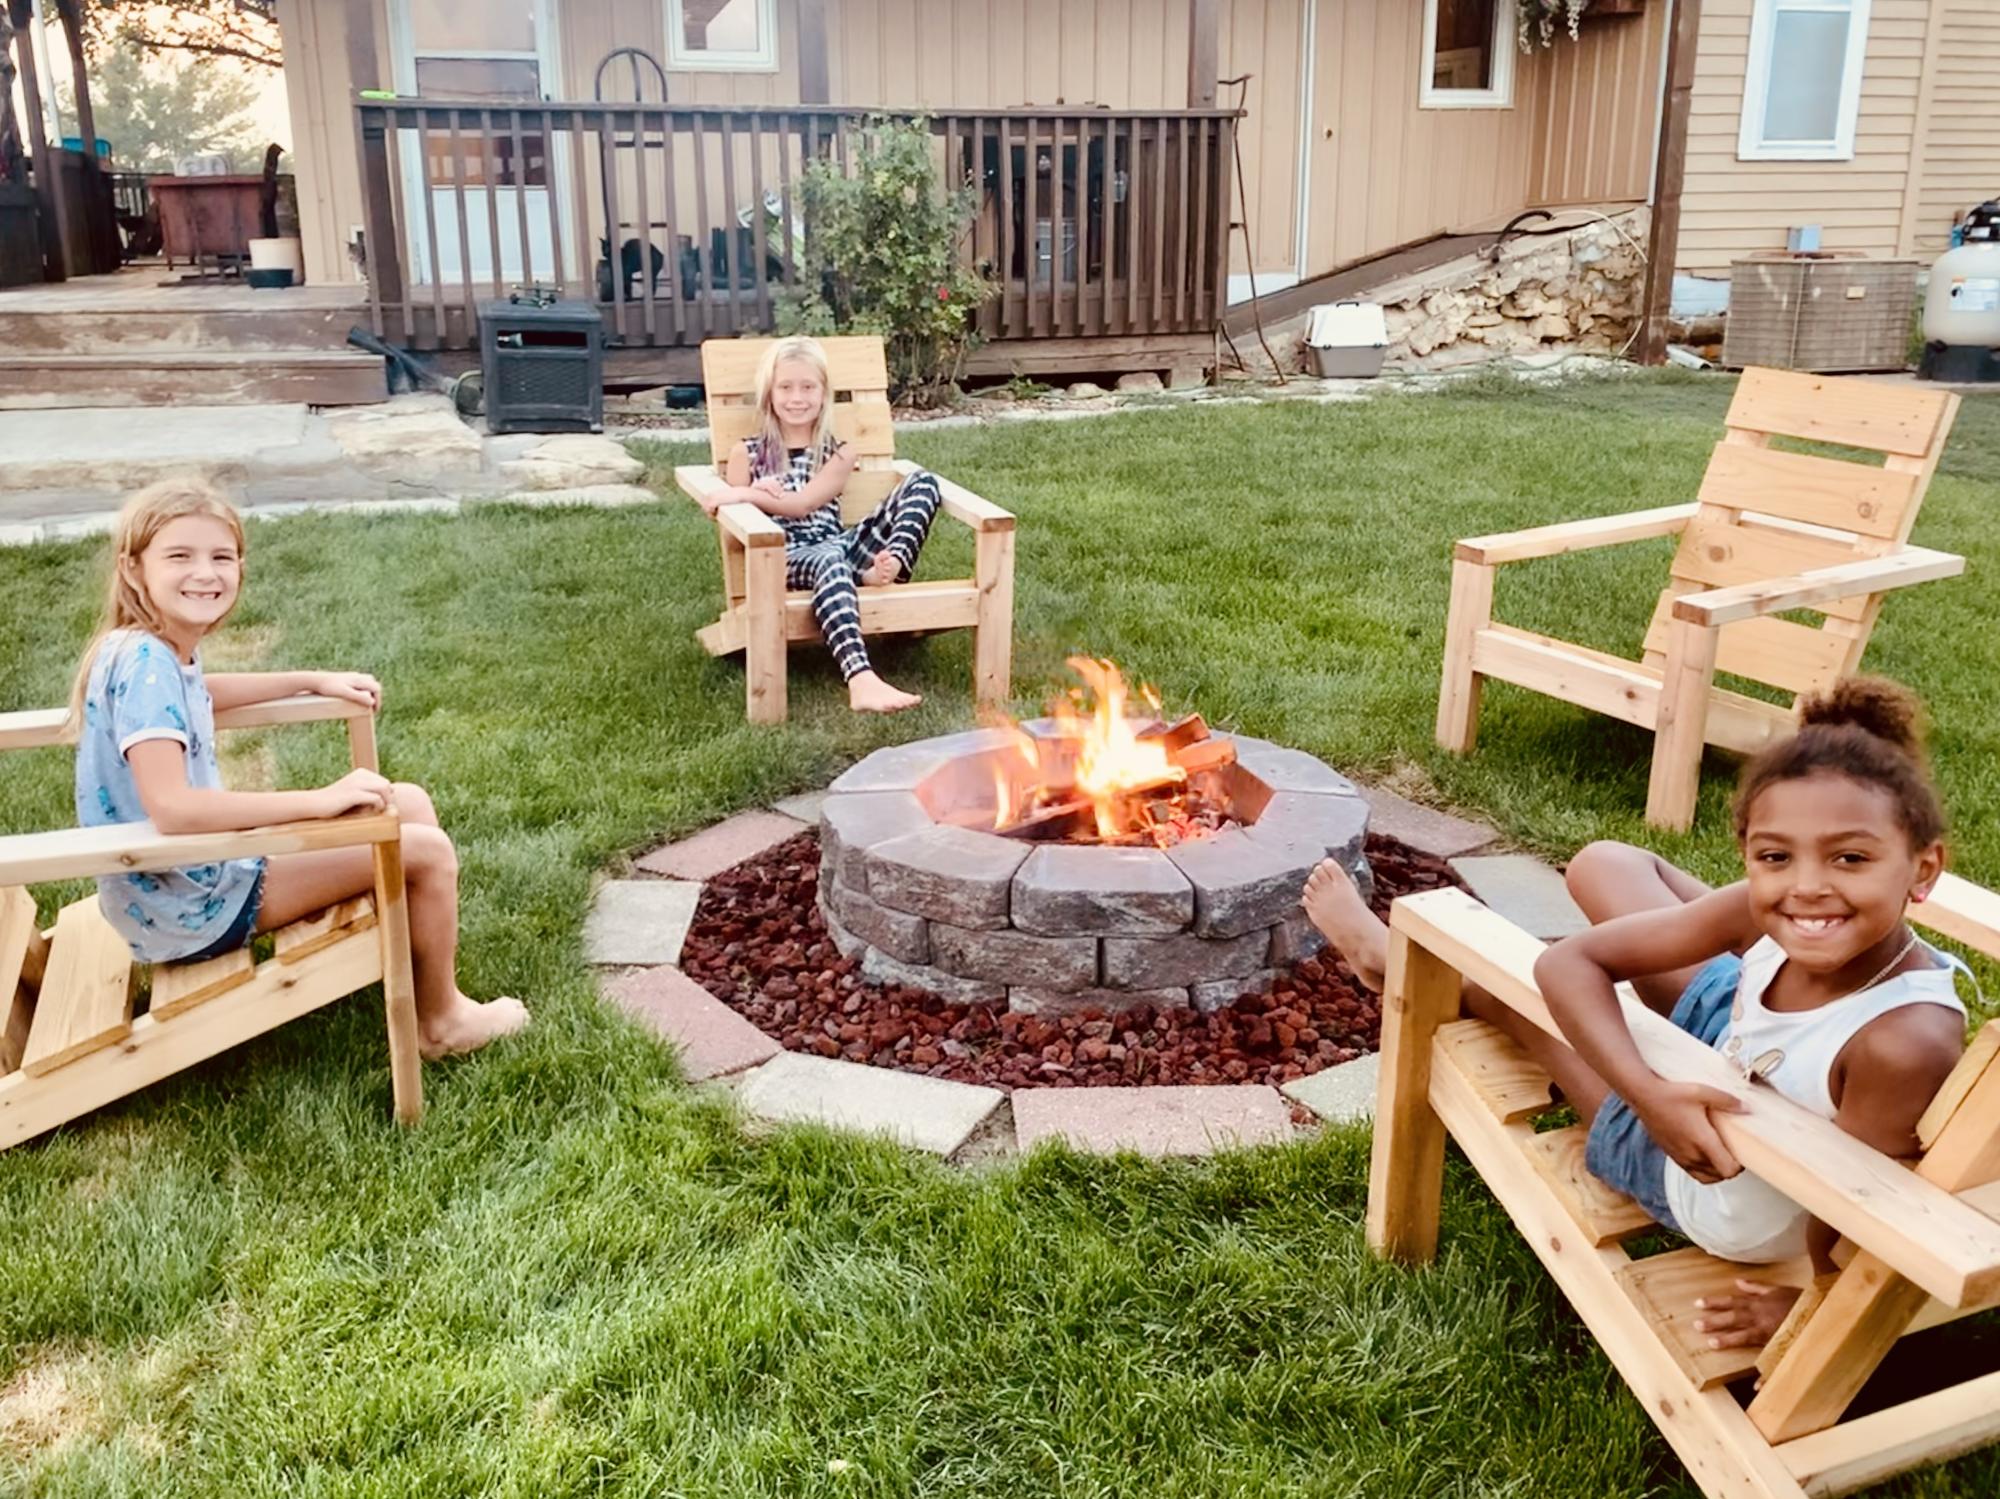
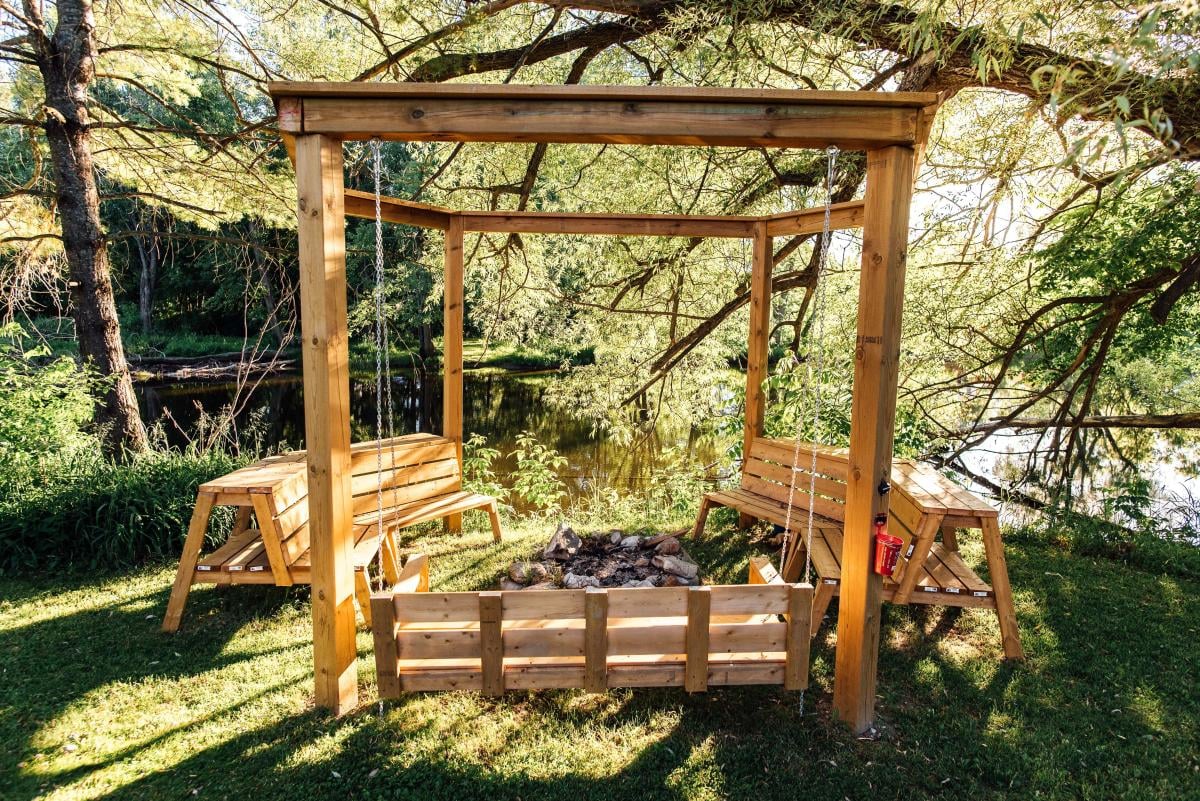
Fortunate enough to live on a beautiful river, my wife and I decided we were done bringing the folding chairs out for each weekly bon fire. Our three girls love s’mores and we wanted a great atmosphere with a place to easily grab wood and snacks in the dark while we enjoyed the outdoors. The combination of plans took us about a week to finish. The kids were away for the weekend and we rented an auger to drill the post holes. This proved to be the most difficult part of the project. It took nearly the whole weekend to dig out the unexpected granite and all the patience that we had in reserves. Once the posts were set, it was only a slightly uphill battle.
My wife made the bench in the time it took to return the auger and come home. The fire pit benches were also a pleasure to assemble and the most functional part of the project. I suspect the whole thing would have been faster if the large posts were easier to cut through. That treated lumber can eat saw blades! When setting the top posts it was also a two ladder and two person job. They were quite heavy and a little nerve wracking to set if you don’t love heights and a heavy load. We would do this project again in a heartbeat as it is a feature in our yard and makes for many enjoyable family and friend gatherings. The fire pit bench top is also great for hosting the entire bbq meal assortments to select from.
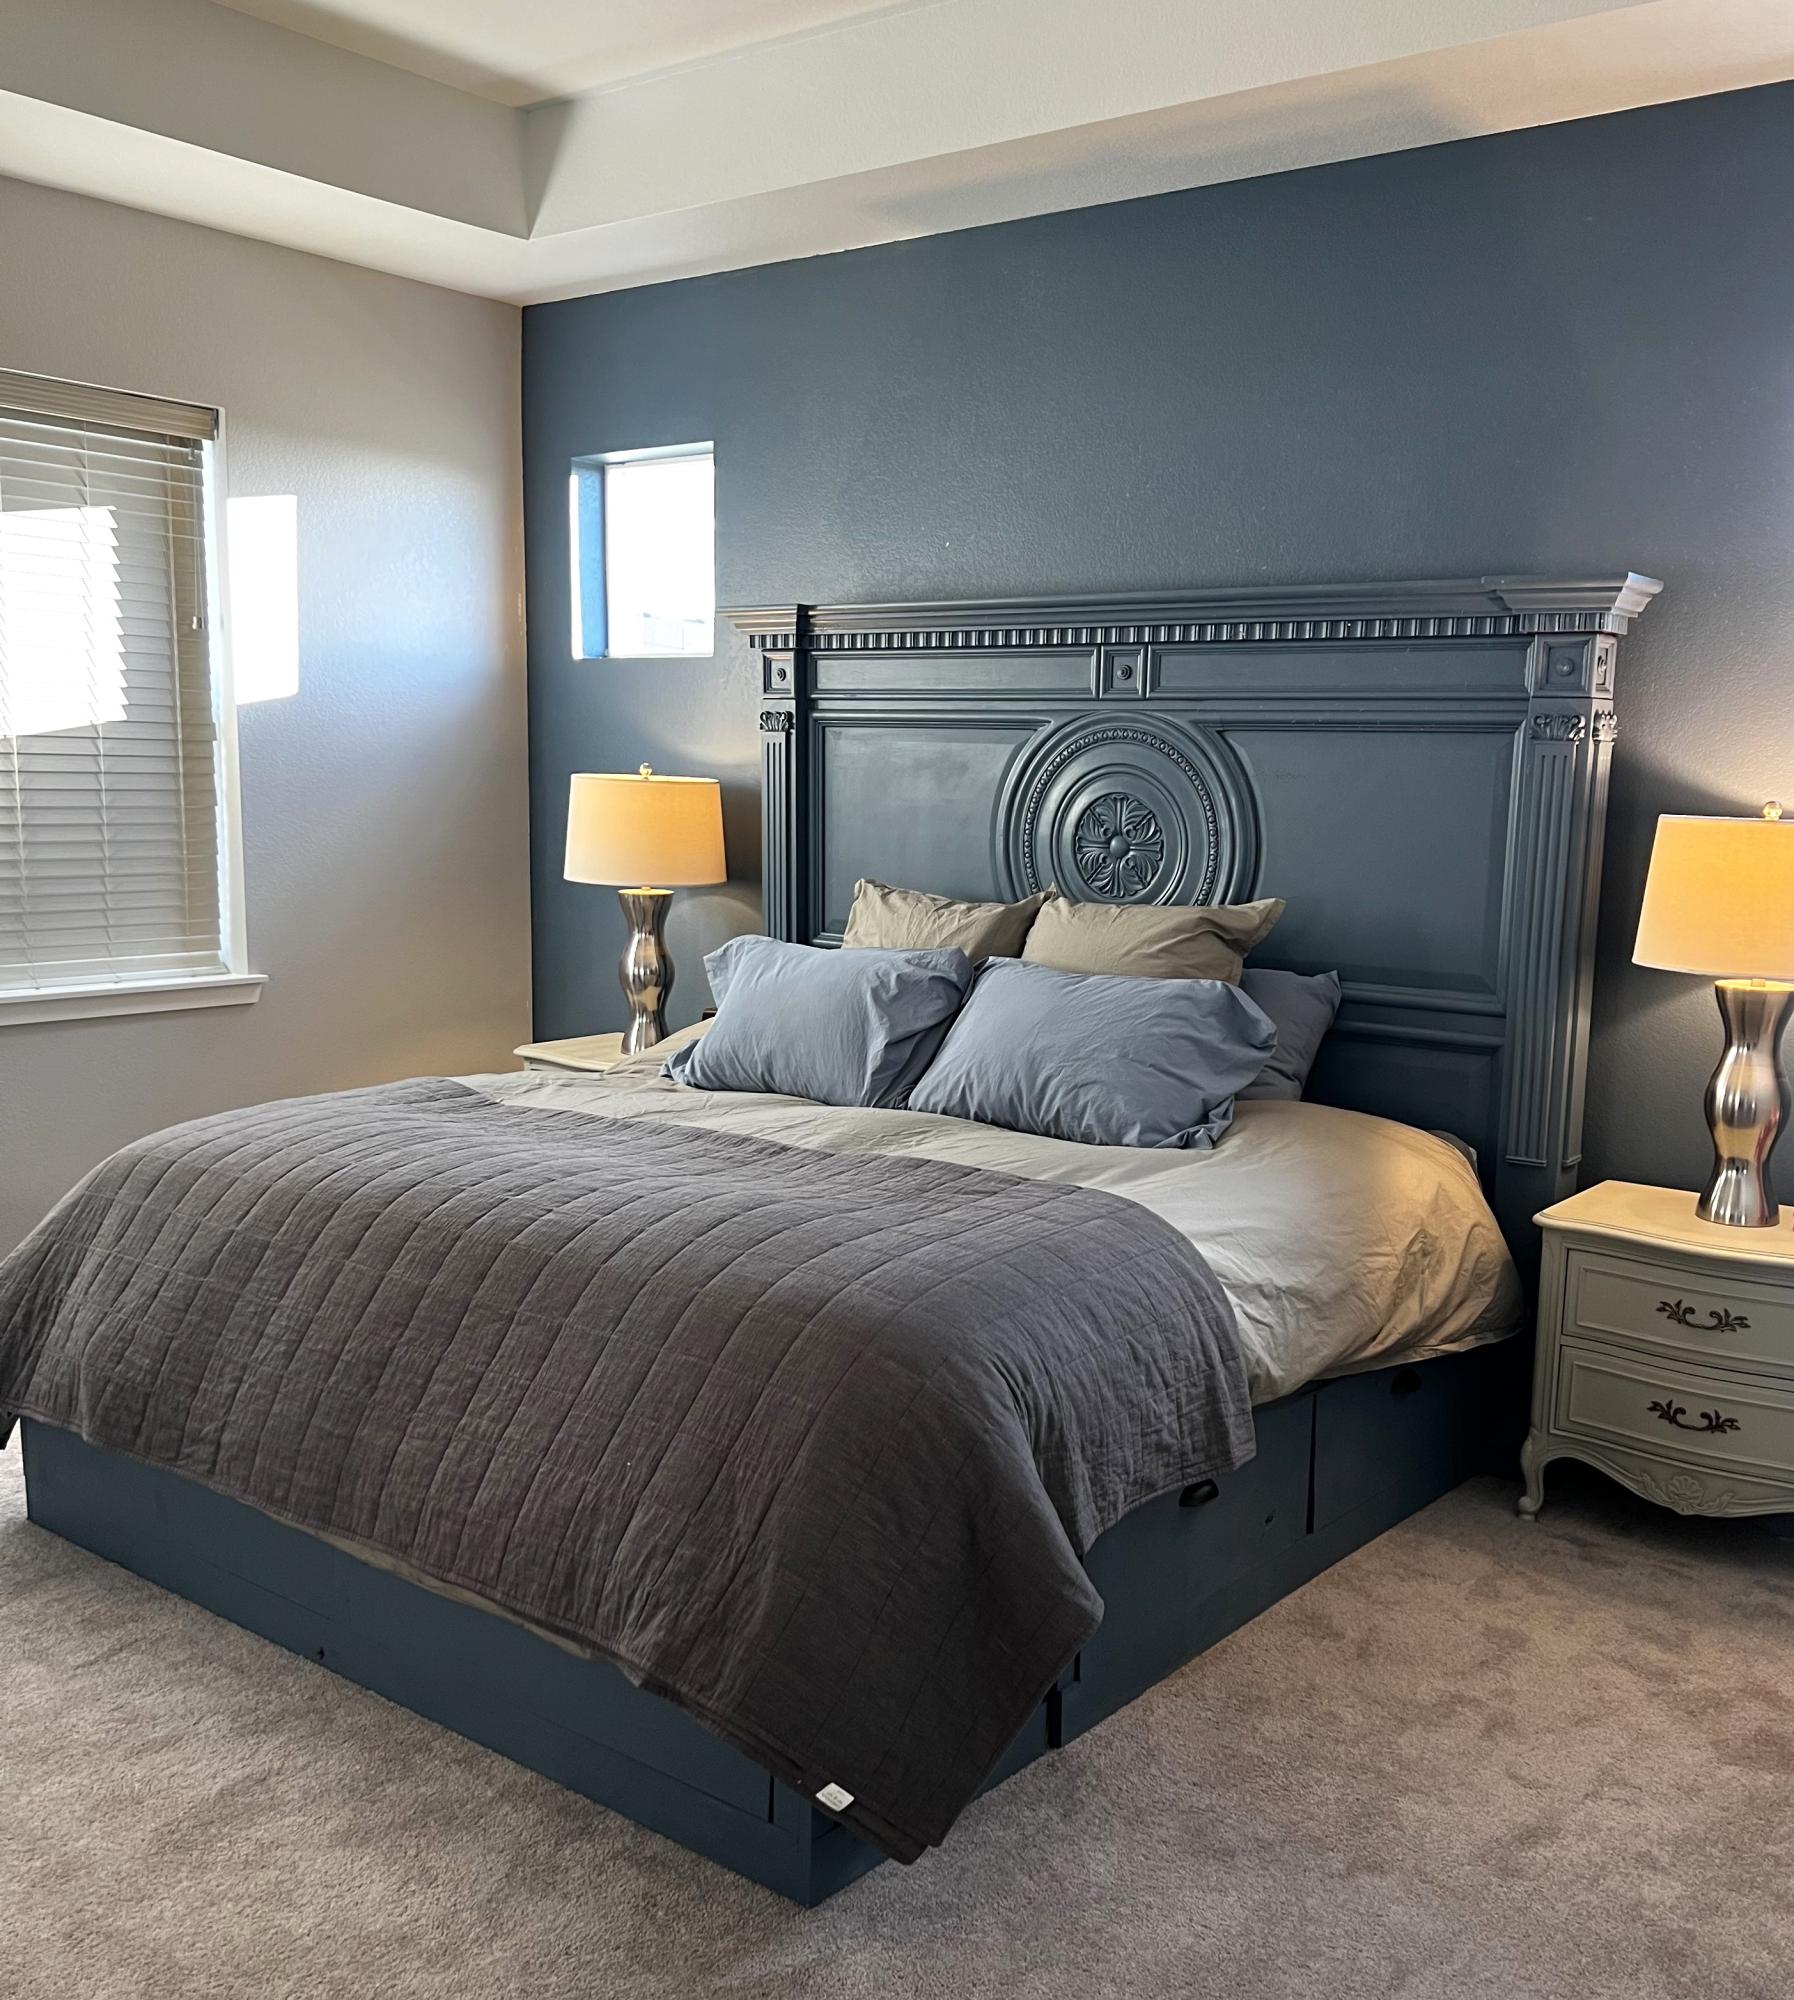
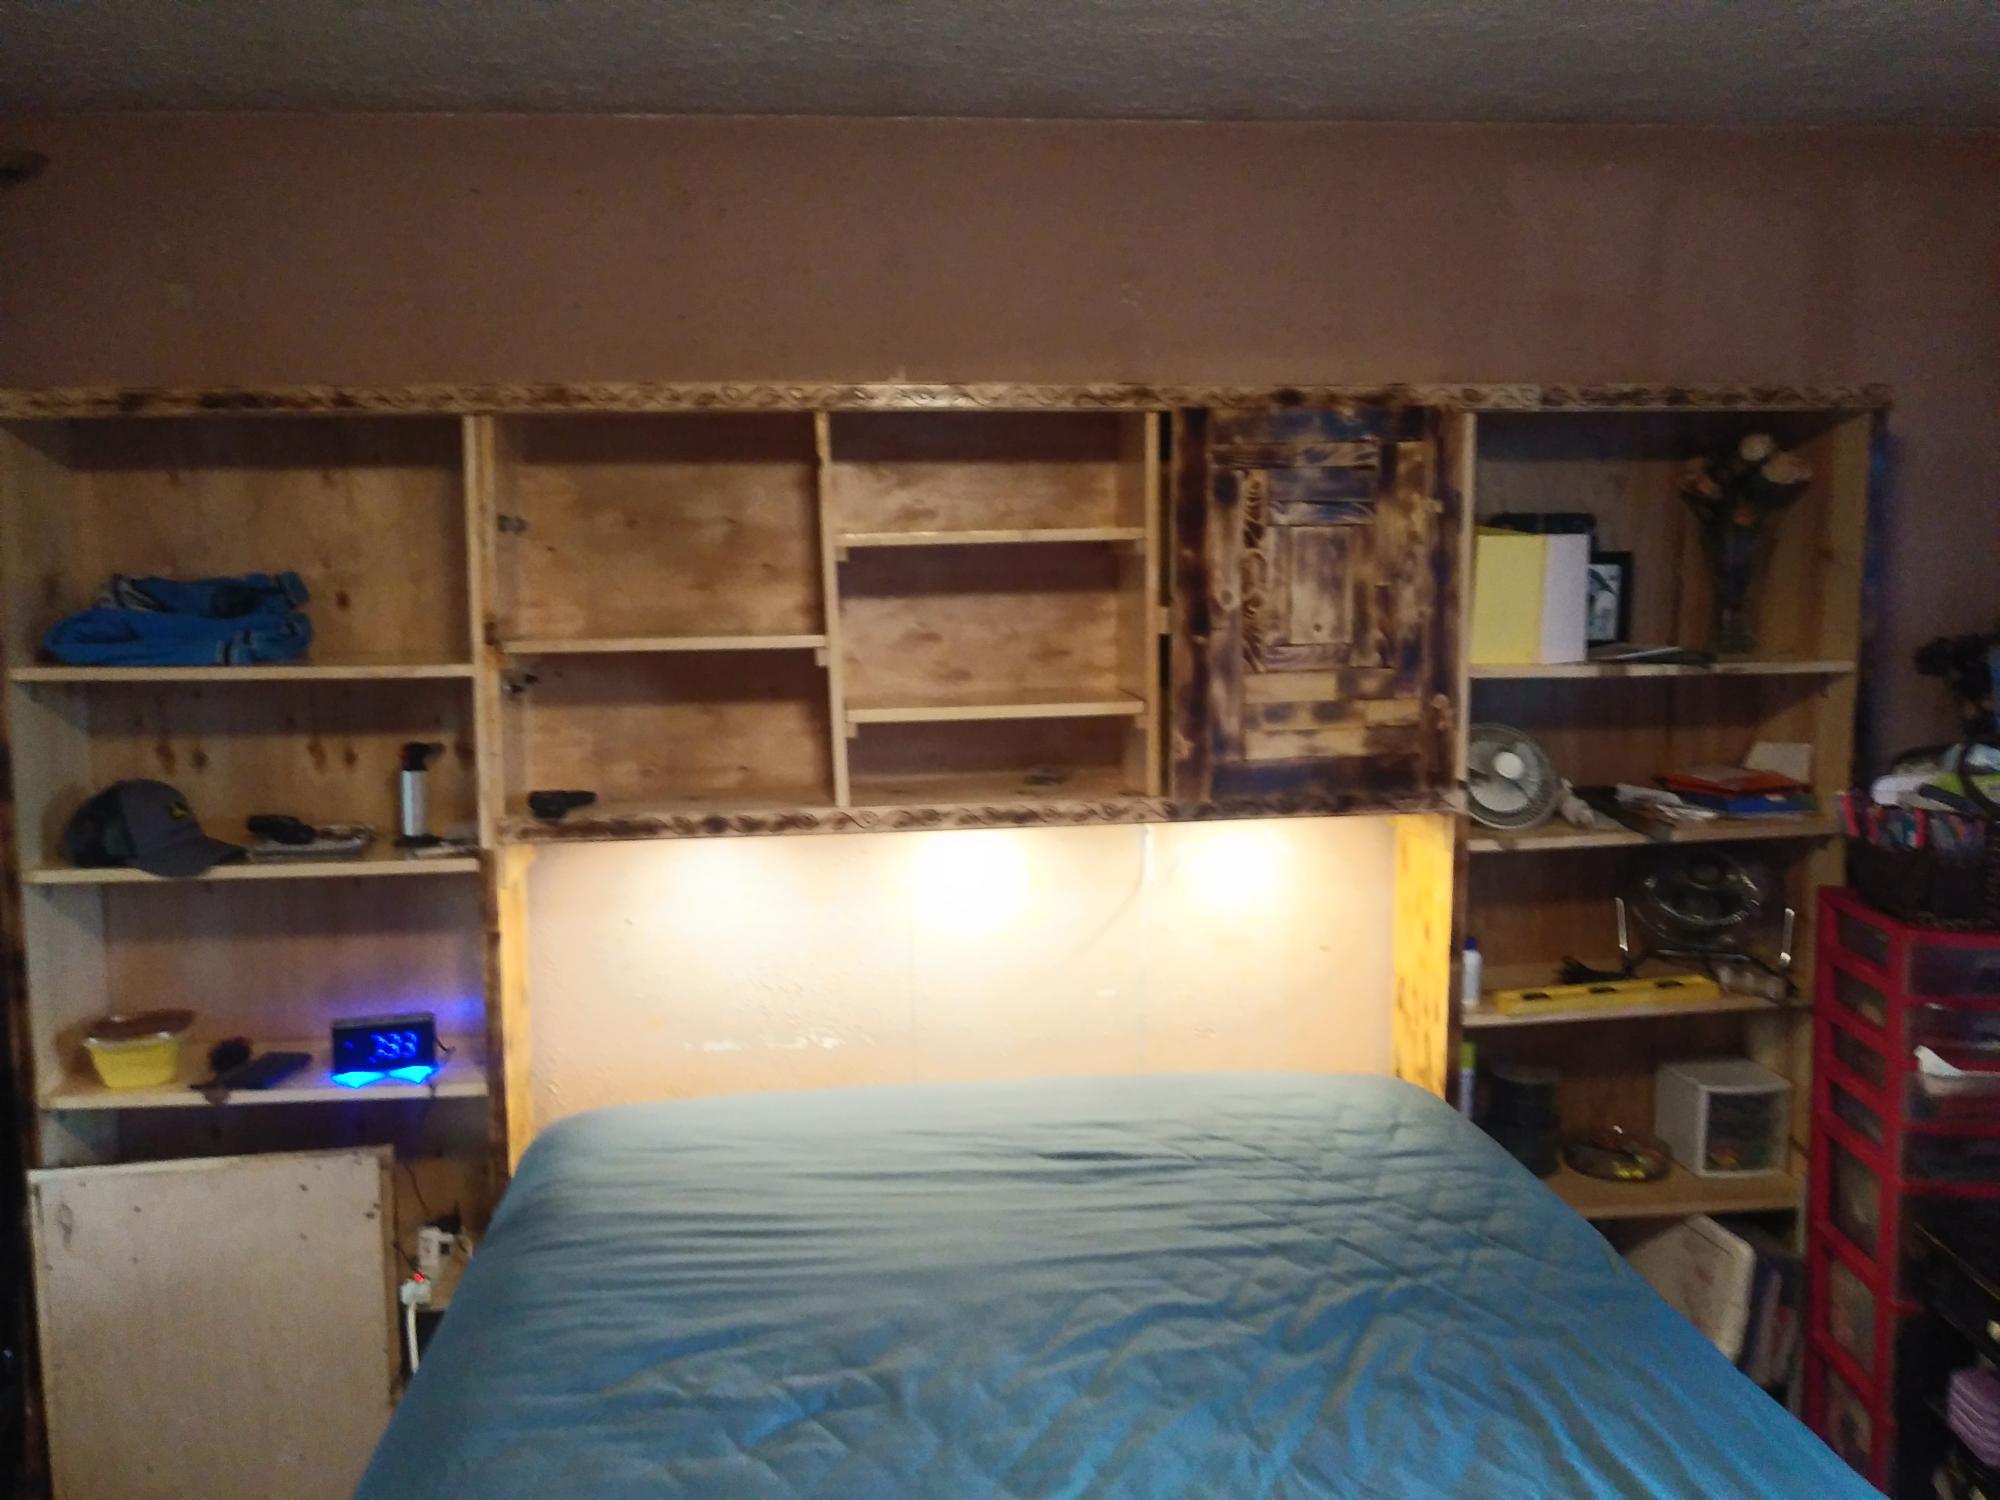
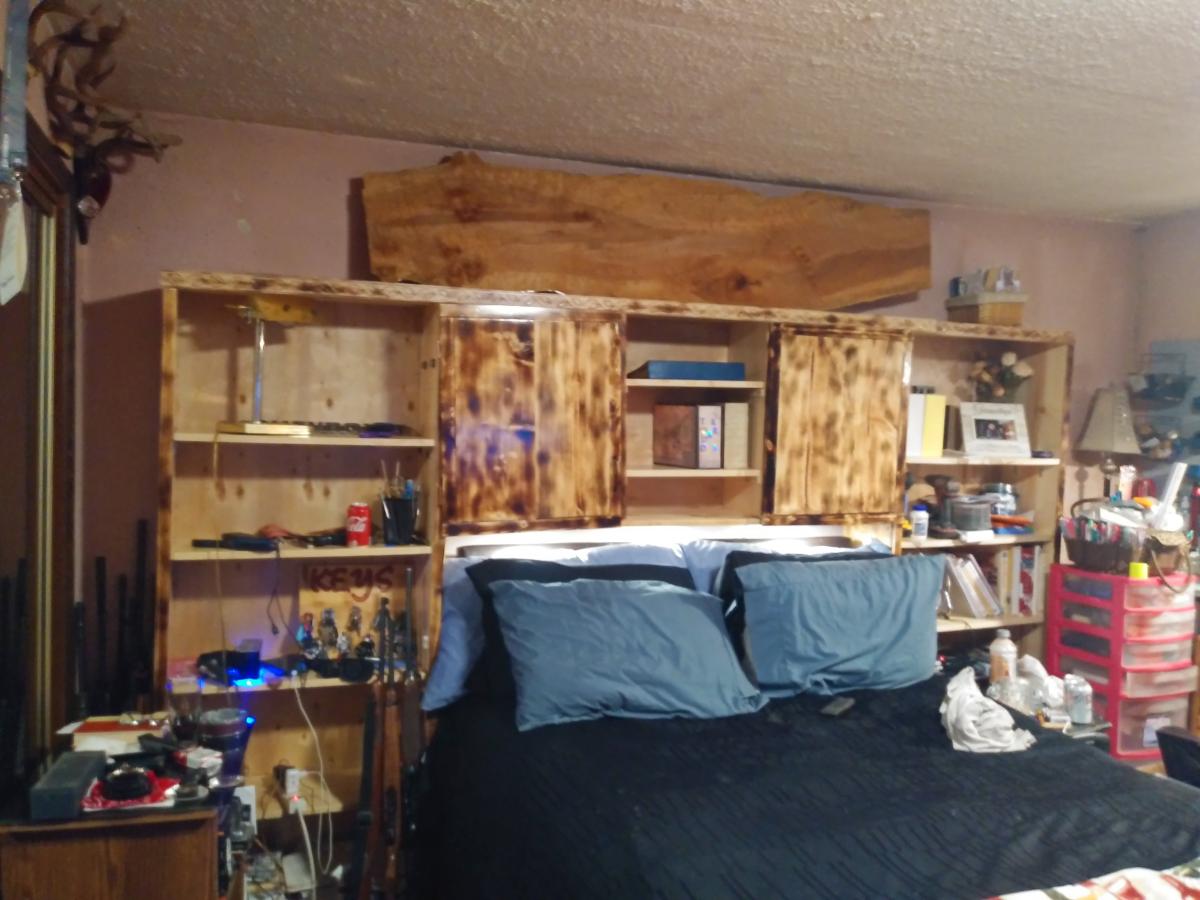
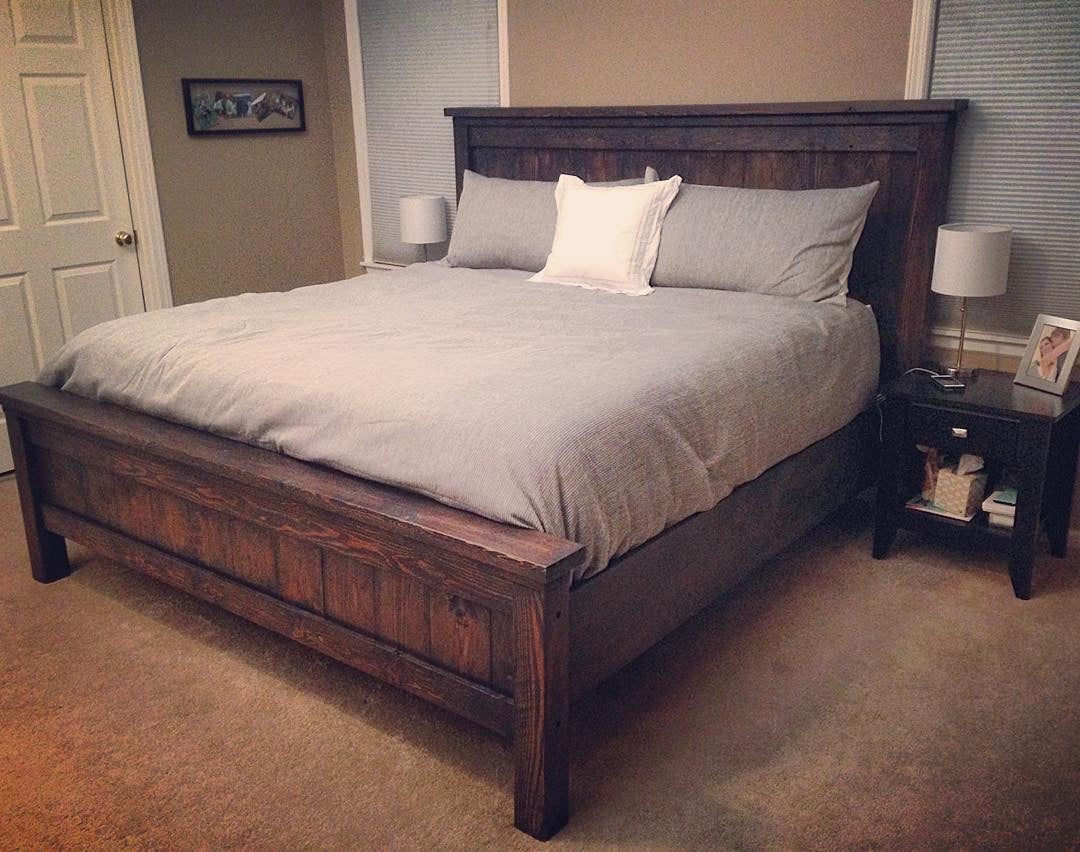
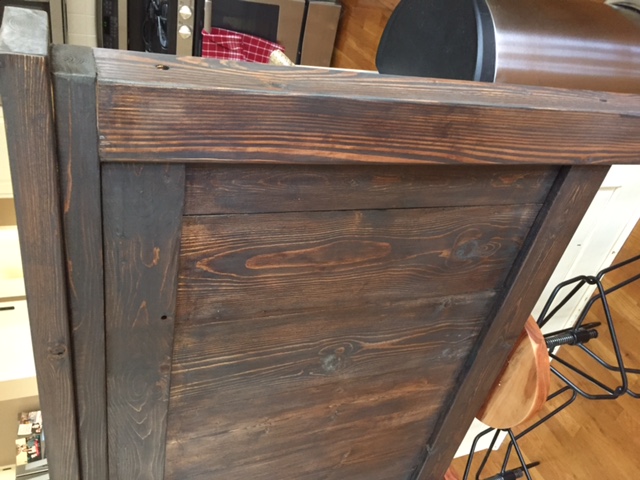
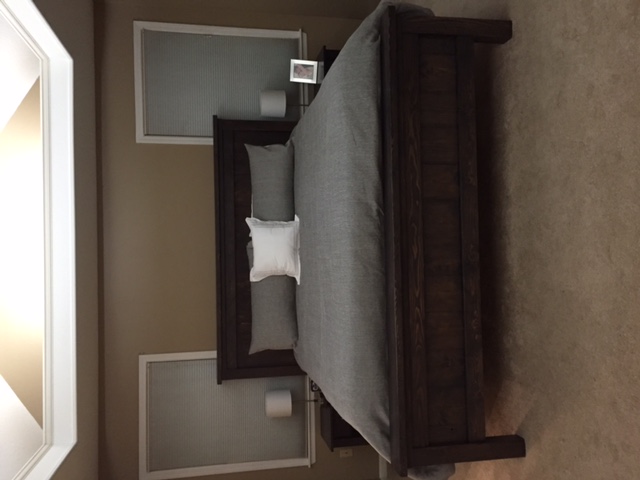
King Sized bed with Storage. Added a found headboard and found Nightstands!
A novice at best

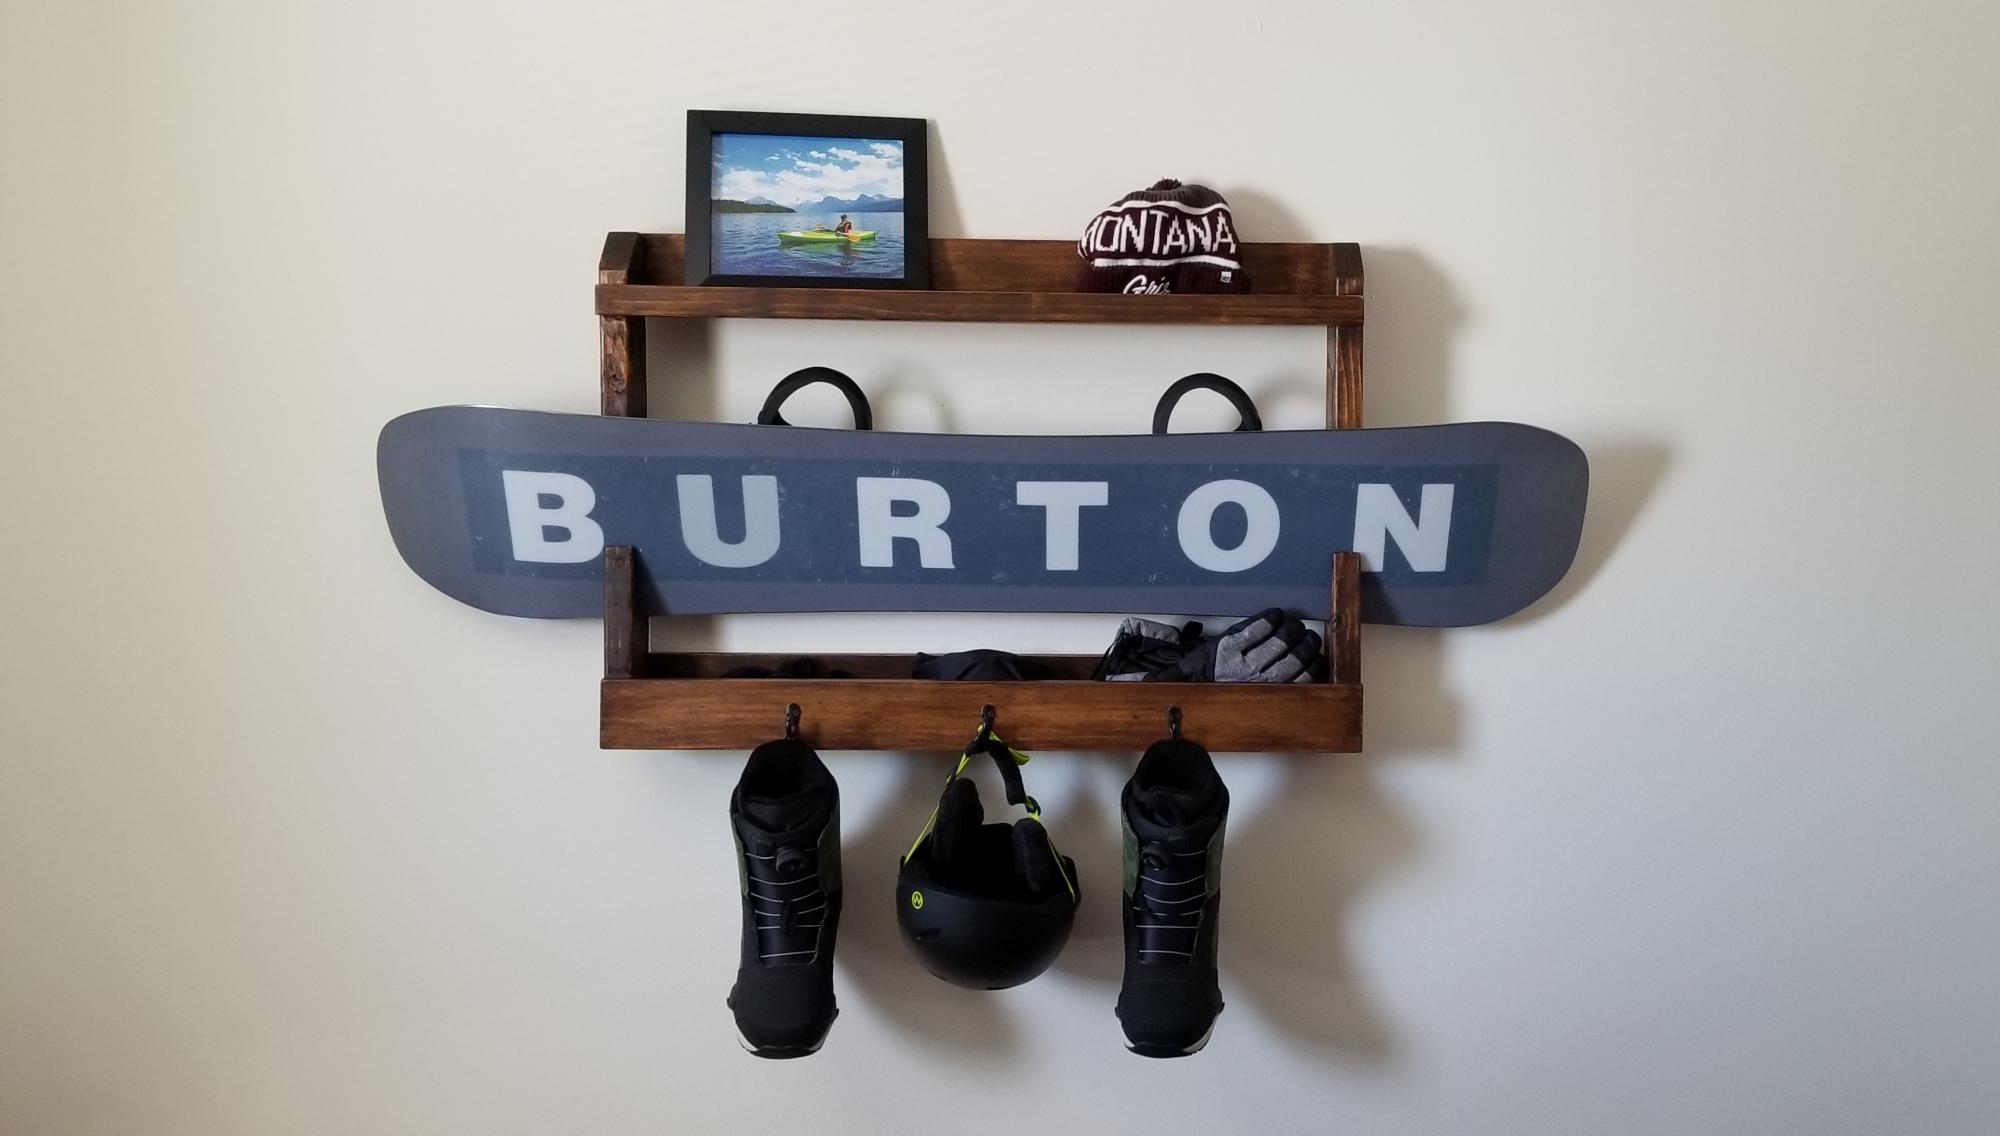
My son wanted a way to display his snowboard, so I modified the pallet display rack plans to fit his snowboard. It's constructed with 2x4s for the sides and 1x4s and a 1x2 for everything else. The 2x4s have an angled notch cut out so the snowboard can slide in and out. I built a top and bottom shelf to display pictures, as well as provide storage. The hooks are great for hanging boots, gloves, etc. He loves the way it came out.


Comments
Ana White Admin
Sun, 12/05/2021 - 14:12
Way to go!
Love these, can't wait to see the table and bench!