Community Brag Posts

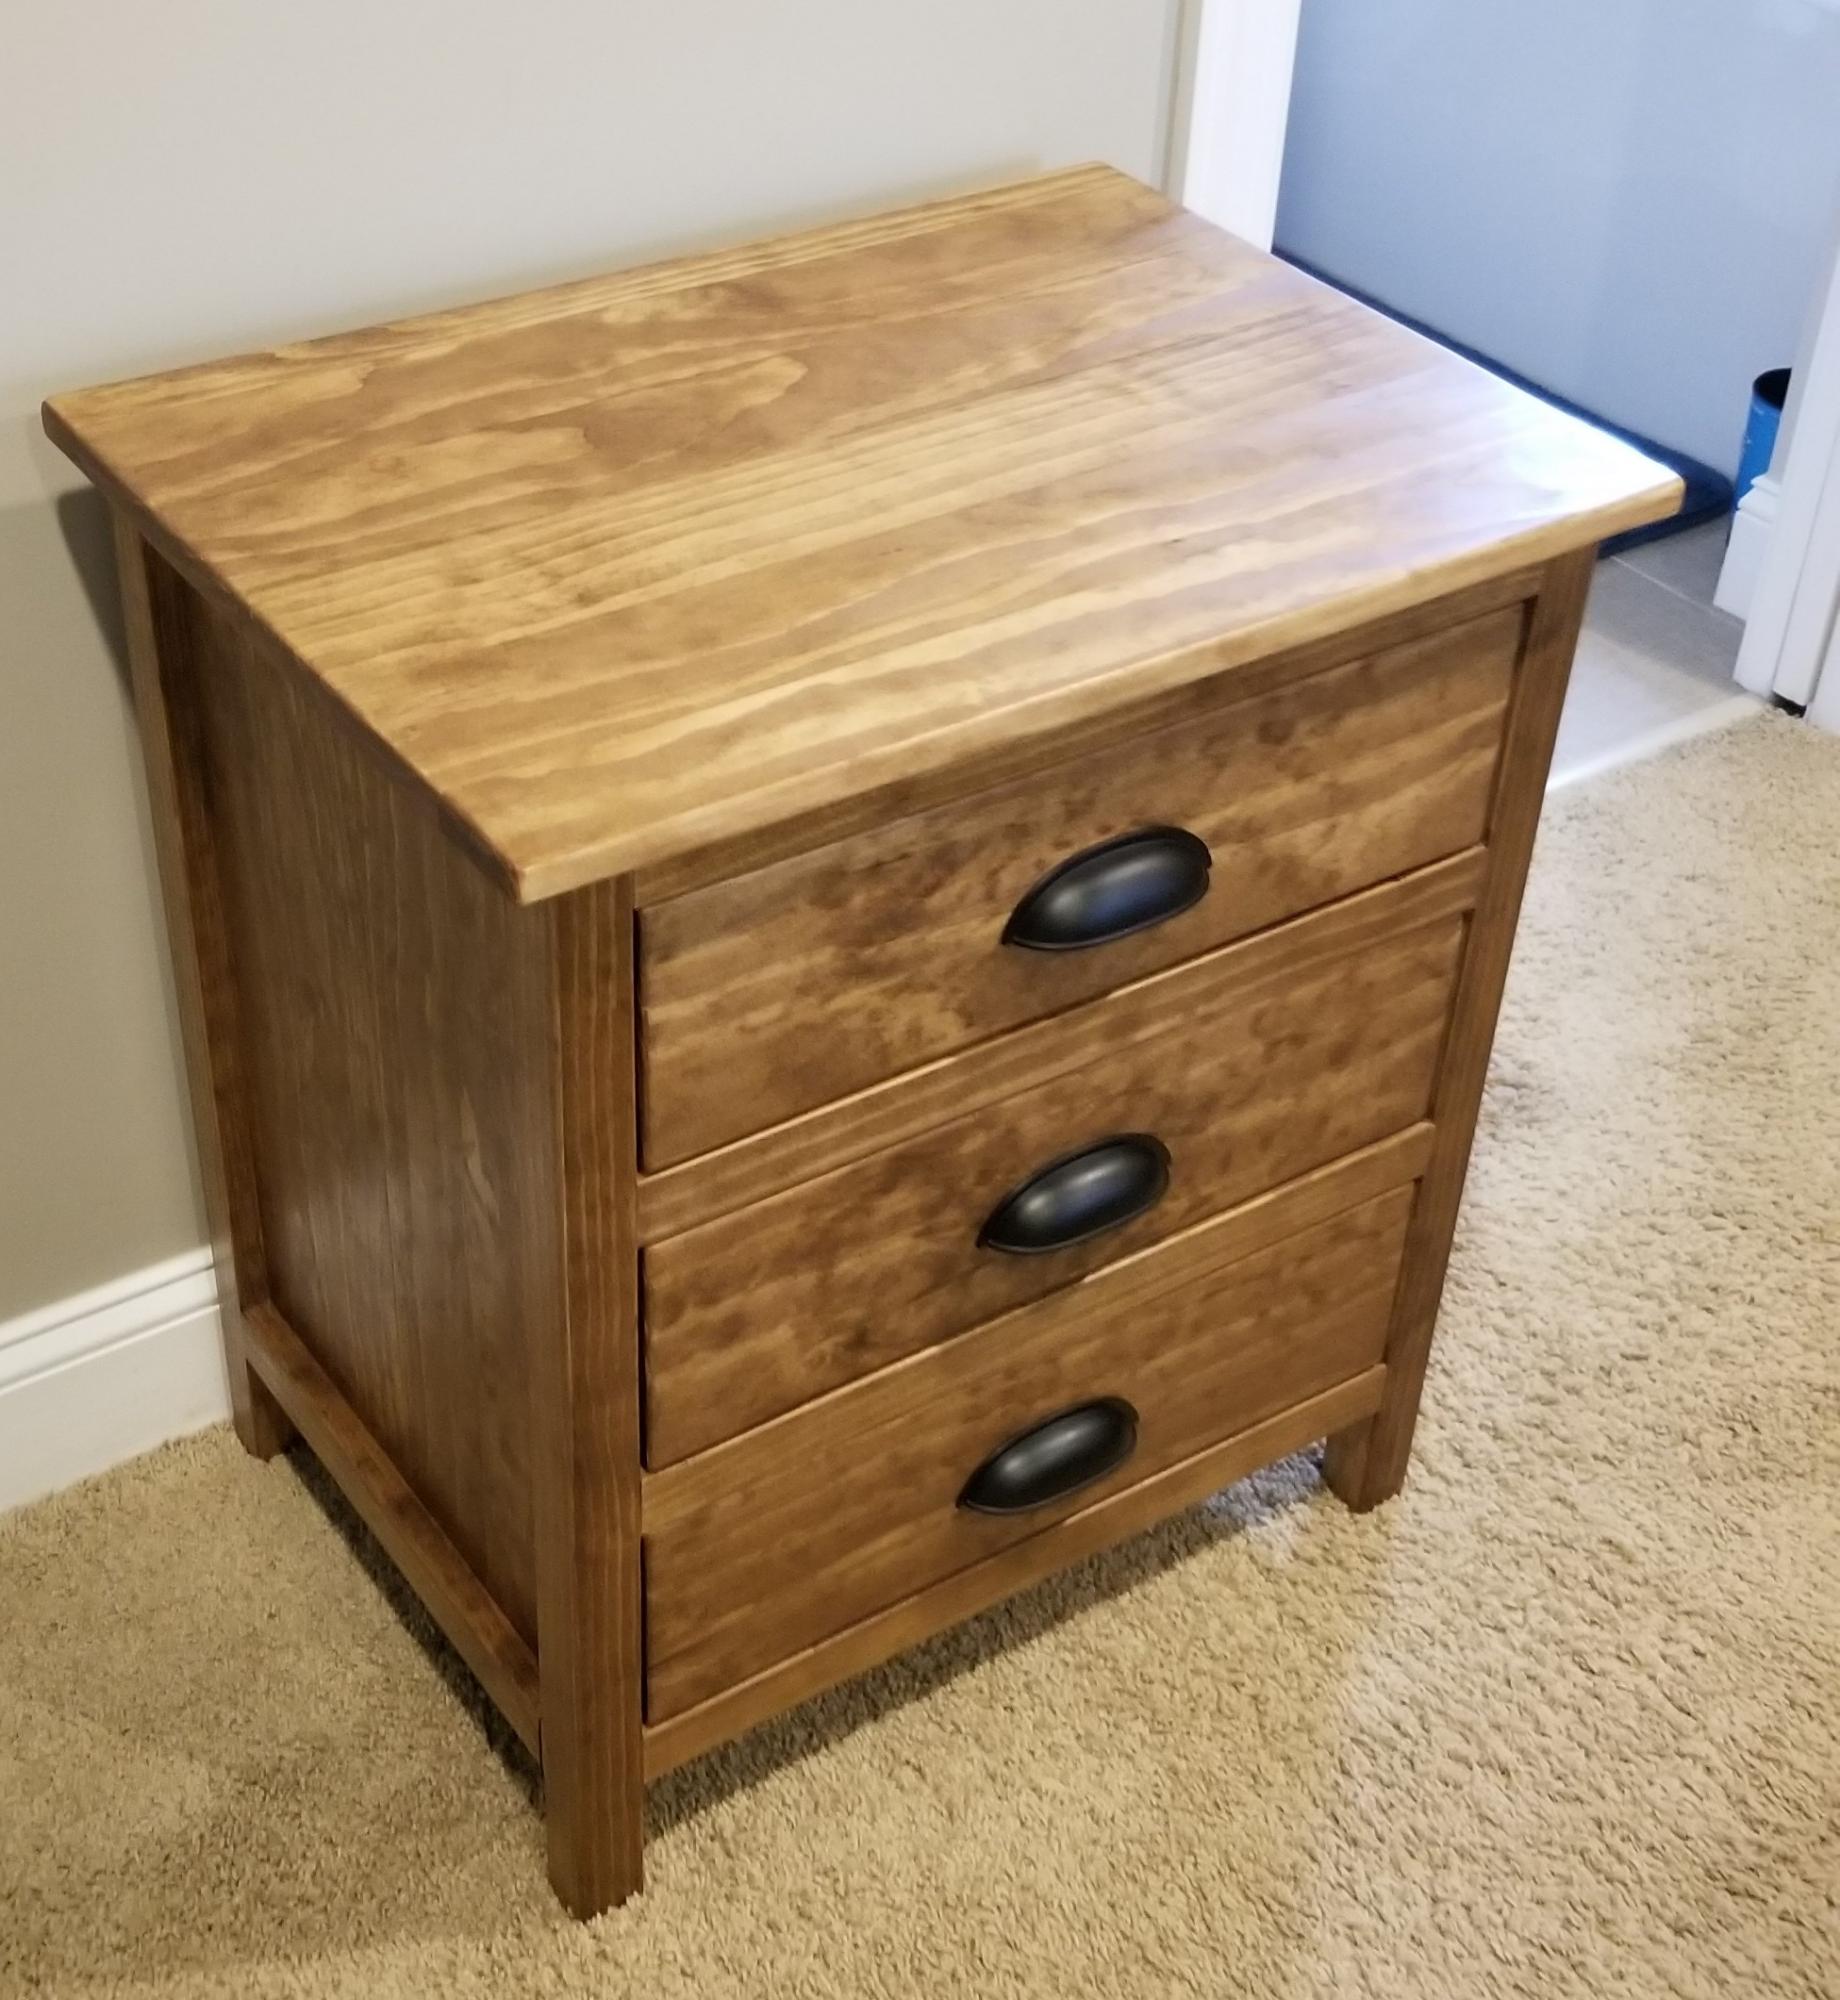
Marshall's Dresser / Changing Table

Submitted by pondrider on Thu, 12/03/2015 - 15:43

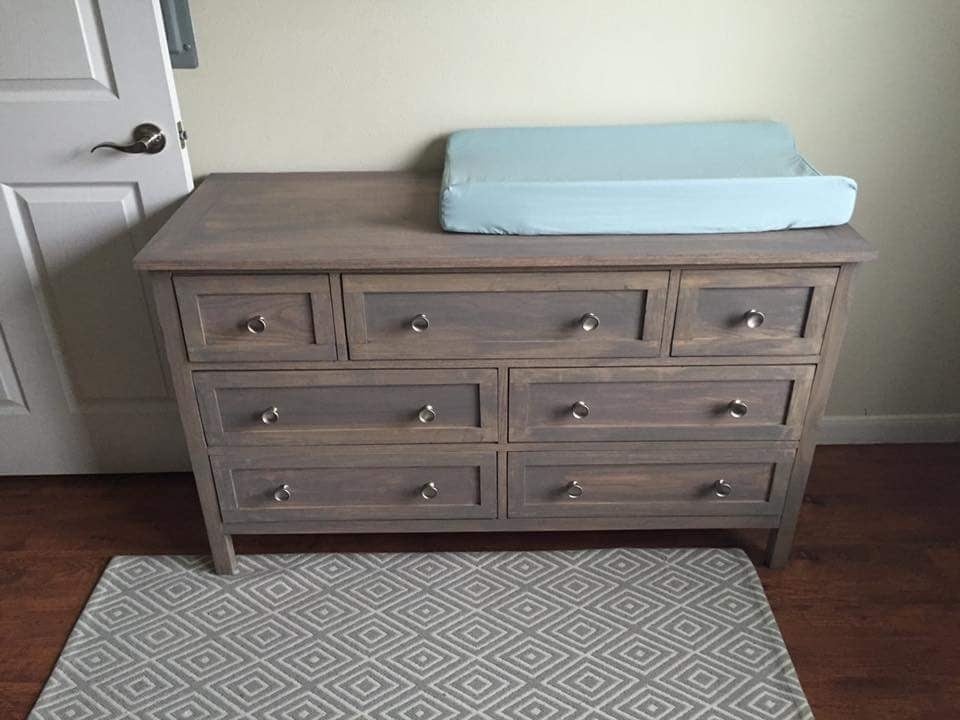
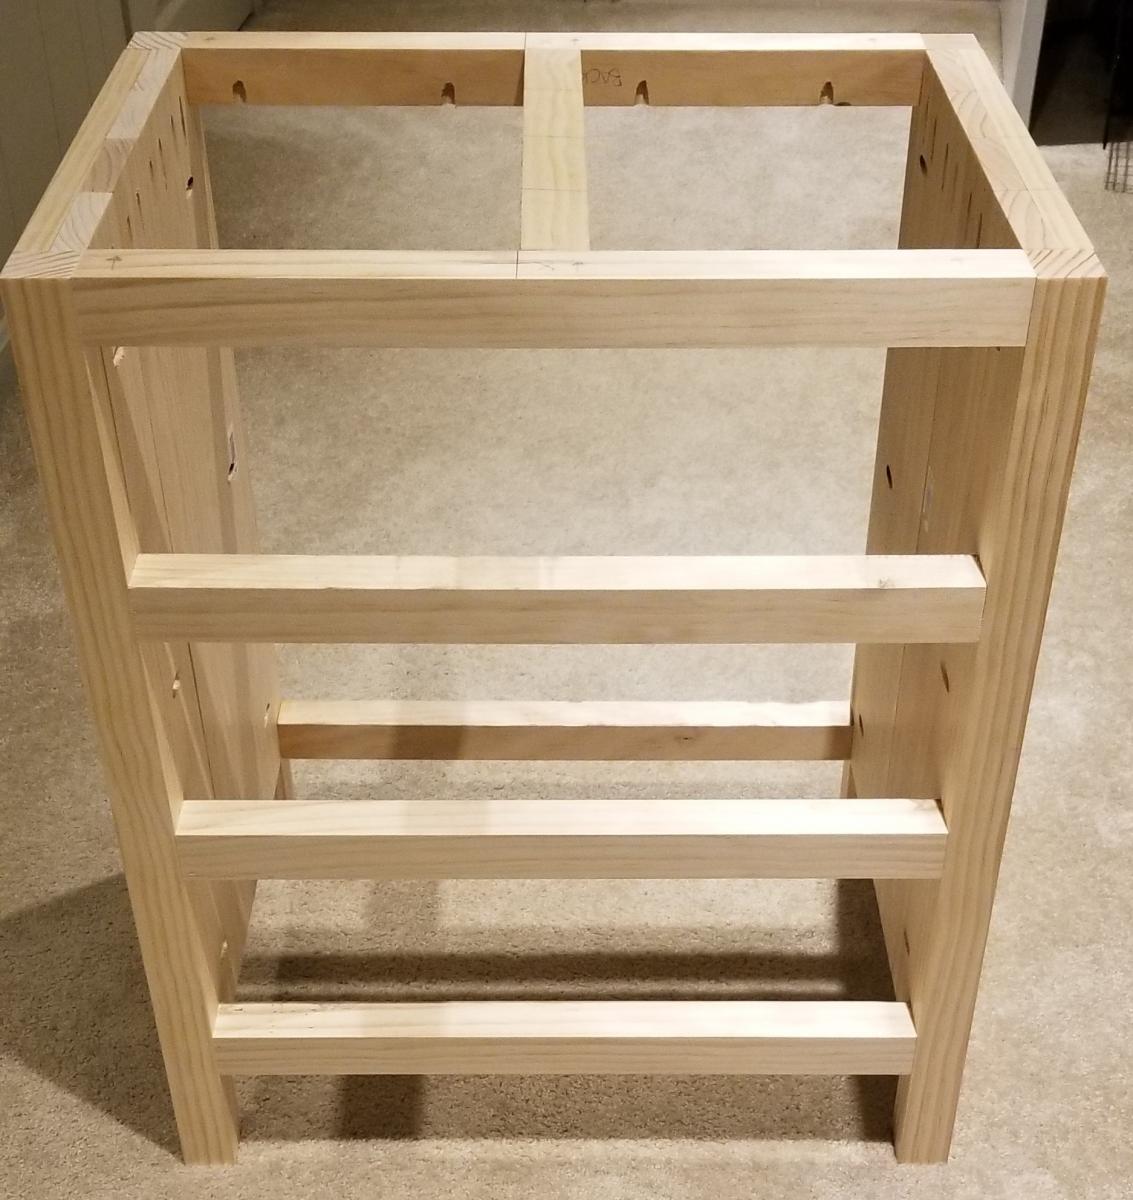
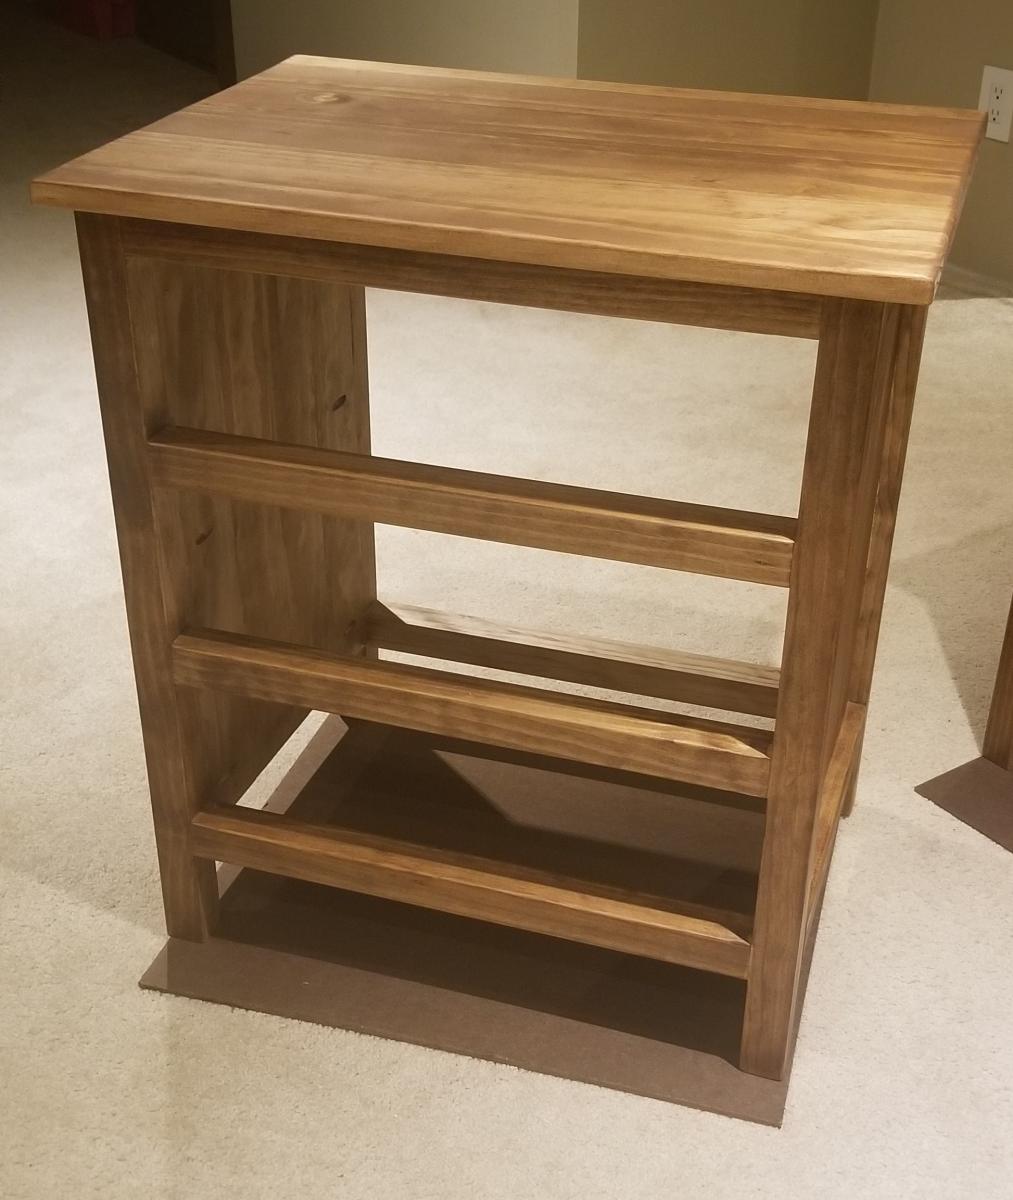
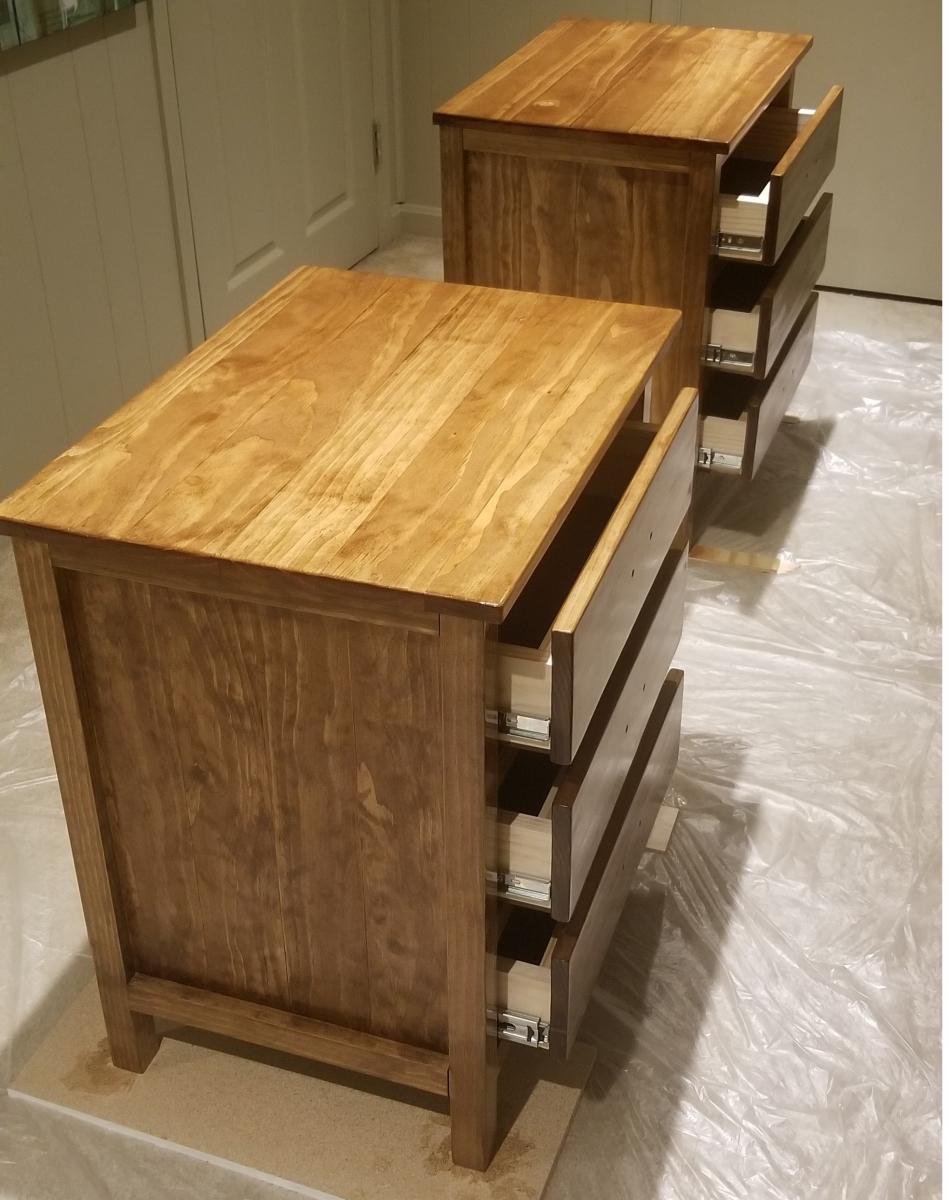
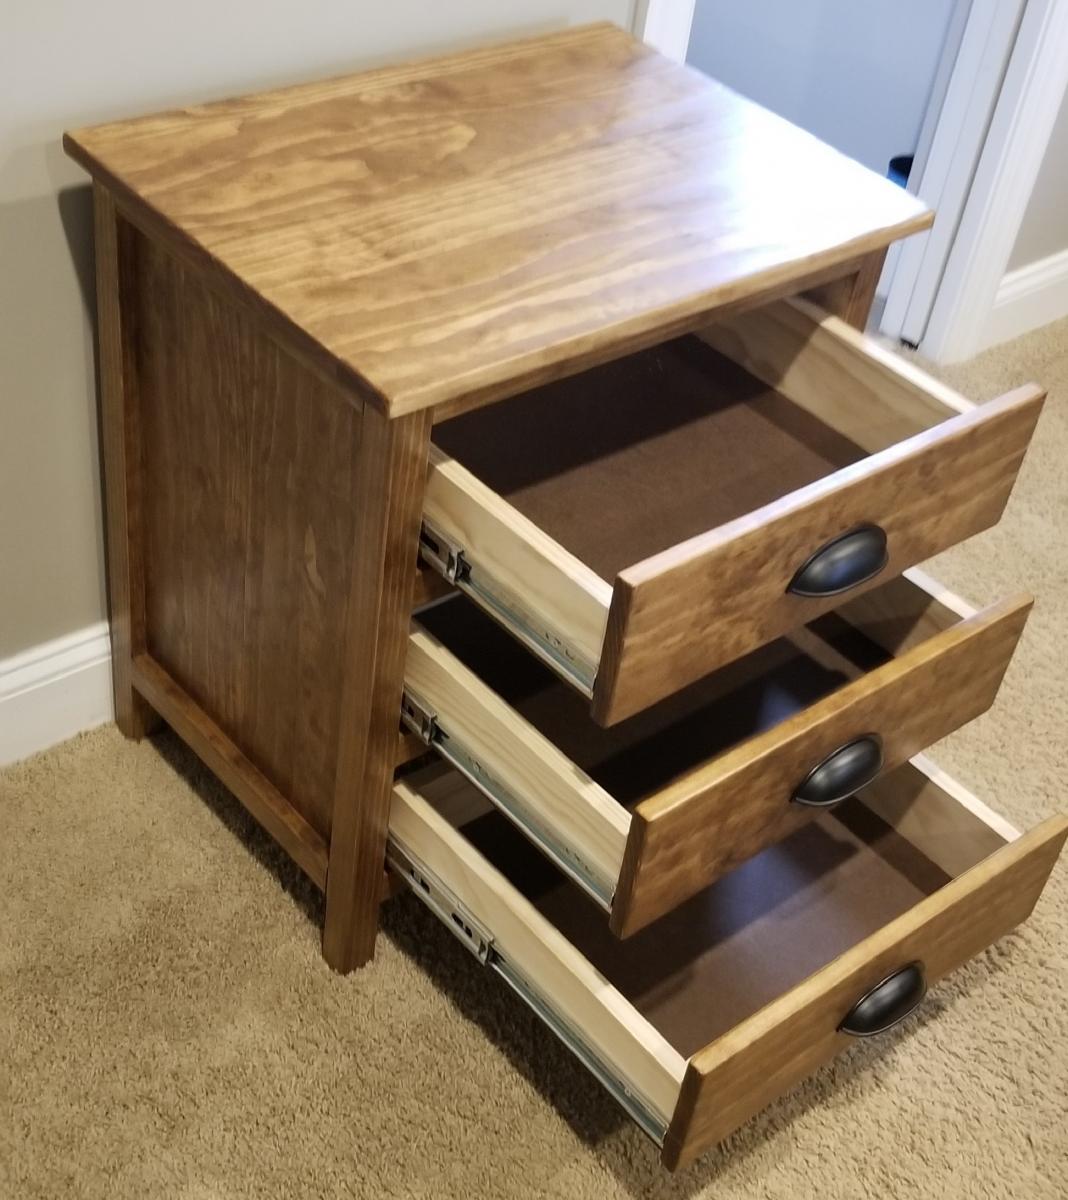
Delivered the nursury Furniture and have a ver satisfied daughter preparing to bring our Grandchild into the world. From Ariel "My sweet baby boy has the most beautiful nursery I've ever seen! I am so thankful for my father who hand built this furniture. It is definitely made with love and it's everything I dreamed of. I'm also thankful for my husband and brother in law who set up this entire nursery for me this morning. Thank you"  For this project built with a lot of love, I give a lot of credit to Ed and his very well written plans. http://www.edhart.me/2015/05/how-to-build-a-kendal-extra-wide-dresser/ I followed the plans from Ana-White with Ed's varriations almost exactly except I added Blum undermount glides. This item may 300 pounds but it is well built.  #anawhite

Built from Plan(s)
Estimated Cost
Blum glides and assorted hardwood drove this project cost up. However this project is better than the item that I was asked to build at a retailer with a price tag of $1,200. My cost was about $500. #anawhite
Estimated Time Investment
Week Long Project (20 Hours or More)
Finish Used
Sherwin Williams Custom Stain.
Recommended Skill Level
Intermediate

Comments

My Farmhouse Dining Table

Submitted by LinzFritz on Wed, 09/14/2011 - 19:28

I love my new table! My wood was a little bit warped for the tabletop, so that's where I ran into the most problems, but I used a hand planer to smooth it down and it turned out perfectly!

Estimated Cost
$150
Estimated Time Investment
Weekend Project (10-20 Hours)
Finish Used
Minwax Dark Walnut, Semi-Gloss Polyurethane, and Sherwin Williams Aesthetic White
Recommended Skill Level
Beginner

Comments

Adam (not verified)

Fri, 12/09/2011 - 06:33

Thats quite nice. I'll bet you spent more than half of the time on the finish. Great color choice.

The Weekend Sleeper

Submitted by vendo on Tue, 01/10/2023 - 10:03

My step son, who is in college, comes to stay with us some weekends and we don't have a lot of room in the rental we are in. So I built a place for him to put his things and sleep, during his visit. This was an easy and quick build using 1x10's for the frame and 1x2's for the face frame. Being 1x10's it's super low profile and doesn't make the room feel much more crowded, so that is a huge bonus! I built it around the dimensions of this floor bed/sofa that I found on amazon

Here's a Youtube Video of me building it, if you want to see how it went together.

I really like this design, because I feel it would make a great addition to a guest room, bonus room, dorm room, shared room and more. I ended up attaching it to the wall as you will see in the video because it will be tippy if not. Hope you like it!

Project "Garage Organization"

Submitted by tnjyoung on Thu, 12/31/2015 - 06:57

I saw the "Easy DIY Garage Workbench" plans and got motivated for a little garage organization.

Estimated Cost
$300
Estimated Time Investment
Weekend Project (10-20 Hours)
Finish Used
None.
Recommended Skill Level
Beginner

Comments

Rustic X Coffee Table and Side Table

Submitted by Anonymous (not verified) on Sat, 03/23/2019 - 08:53

I absolutely love how this coffee and end table set have completed my living room. Each one took me about a day to complete and $80 or less!! Excellent, detailed plans resulting in a gorgeous piece. Thank you! 

Estimated Cost
$80
Estimated Time Investment
Day Project (6-9 Hours)
Finish Used
The top is stained with Minwax Jacobean finish, then whitewashed with watered down Dover White From Sherwin Williams. Base is painted Sherwin Williams Dover White in semi-gloss finish.
Recommended Skill Level
Beginner

Comments

Modular Corner Office and Craft Desk

I started creating the furniture for my new craft room by making the Easy Three Cube Benches I found here.  I modified them so that my cats could lay on top and look out the windows.  The cube benches gave me the confidence to design a printer stand.  Using Ana White's technique of "build the box" and then add the rest, I designed a custom printer stand I am so very proud of!  After the printer stand, I moved on to the final piece that would complete my craft room, a modular desk with plenty of workspace to complete any craft I want.  I modified each module a little to keep with the theme design of the room.  I created three modules.  The last one being a bookcase that is a modification of the Modern Craft Table bases.  I used better quality Oak plywood for the desk top, and good pine and whiteboard plywood for the modules.

Estimated Cost
$500
Estimated Time Investment
Week Long Project (20 Hours or More)
Finish Used
For the modules I used Valspar Furniture Paint in ultra white. For the desk top I used Minwax Simply White stain and then Minwax Dark Walnut over that to create the "driftwood" style look. I sealed the desktop with about 5 coats of Minwax wipe-on poly.
Recommended Skill Level
Intermediate

Comments

melkaye

Wed, 02/19/2020 - 13:53

Could you tell me the measurements for the top? I absolutely love your table! 

sukheeso

Wed, 04/07/2021 - 14:07

Hi! This is very similar to what I'm hoping to make. I was wondering what the length of the left side of the desk was?
Thank you!

X-Large Dog Crate

Submitted by Sanna on Sat, 10/26/2013 - 21:19

Found these plans for the dog crate and decided to build one for my large Rottweiler. It's large and tall enough for him to stand in (29"W x 41"L x 32.5"H). It didn't take long to cut and put all the pieces together, the longest part was staining the top and putting the urethane coating on it. The cost was really reasonable, I purchased the wood, used paint and stain I already had from previous projects. I plan on building more projects soon.

Built from Plan(s)
Estimated Cost
$50
Estimated Time Investment
Weekend Project (10-20 Hours)
Finish Used
Black spray paint on body and Maroon latex paint for accent panels. Stained the top.
Recommended Skill Level
Beginner

Comments

AllegraYazz

Mon, 12/09/2013 - 03:22

I would like to build the X large kennel for my dog.
is it possible to have the measurements for the X large version.
the large version is not big enough for my sweetie.

thank you so much

AllegraYazz

Mon, 12/09/2013 - 03:22

I would like to build the X large kennel for my dog.
is it possible to have the measurements for the X large version.
the large version is not big enough for my sweetie.

thank you so much

Farmhouse Doll Beds

For these beds I modified the original farmhouse doll bed plans to accommodate a few more dolls. In the process, I discovered that, while doll furniture turns out SUPER cute, it takes me about the same amount of time to build a little piece as it does to build a big piece, especially when you consider the time it takes to sew the bedding.

I put these together mostly with nails and glue, but used my kreg jig to join the rails to the headboards and footboards.

Estimated Cost
$20 or less per bed.
Estimated Time Investment
Weekend Project (10-20 Hours)
Finish Used
Paint and Vermont Natural Coatings PolyWhey to seal. Lots of sanding before and in between coats.
Recommended Skill Level
Beginner

Comments

spiceylg

Thu, 12/15/2011 - 06:00

I love the mods you did on these. For the farmhouse w/trundle, I know you had to raise up the bottom and it looks like you did the headboard sized boards for the footboard and made the headboard w/even longer boards? Then for the bunkbeds, are those all headboard lengths for the head and footboards and then just very long 2x2s for the posts? I am never brave enough to mod anything just yet! I also absolutely love that bedding on the top pic! So bright and cheery!

In reply to by spiceylg

hillarylouise

Thu, 12/15/2011 - 06:51

Isn't that bedding beautiful? I love it. The fabric is from Hobby Lobby. They have so many cute calicos.

Yes, you got the mods right. If I were to do the trundle again, I'd make the headboard longer so that it goes almost to the ground like the footboard, otherwise you can see the trundle.

The bunk was easy -- much easier than the other bunk plans all out of 1x2s. I've made them both now and the farmhouse one just comes together a lot faster (once you figure out the measurements).

spiceylg

Thu, 12/15/2011 - 09:57

I love Hobby Lobby but never think to check out their fabric! Silly me, I'll have to do just that! Okay, thank you for the info. I just noted the additional detail of the feet, how nice! If you don't mind, I'd love the measurement of the 2x2 for the bunks, simply because I'm lazy like that, lol!

In reply to by spiceylg

hillarylouise

Thu, 12/15/2011 - 10:27

The 2x2s are 22 3/4" and the slats in the headboard are 7". I think the bottom of the bottom headboard is around 2 3/4" or 3" from the bottom of the 2x2s. All the width measurements are the same as in the original plan. Also, I used lath strips for the mattress to rest on instead of a rectangle of 1/4" ply -- it seemed easier and I think it was cheaper, too.

Tsu Dho Nimh

Fri, 12/16/2011 - 08:00

You are so right about the time it takes.

I made a stuffed doll and her clothing for a niece, and I could have made myself two complete outfits in the time it took to sew one dinky doll dress.

lmhaney (not verified)

Tue, 02/28/2012 - 07:40

Hillary how did you do the trundle for the farmhouse single bed. I read where you said you would do the headboard longer,but this is going to be my first build and I need a little more instruction to make the trundle and how long would you do the headboard. Thanks!!!

In reply to by lmhaney (not verified)

hillarylouise

Tue, 02/28/2012 - 09:05

Hey. I made the trundle using 1x3 boards just slightly shorter than the size of the overall bed (so it would fit underneath). I used two 18 1/2" 1x3s and two 14 1/2" 1x3s. I built it using pocket holes on the 14 1/2" 1x3s, screwing into the 18 1/2" 1x3s. Then I attached two 1x2 cleats to the bottom insides of the 18.5" boards so that I'd have a place to set support pieces for the mattress. I attached the cleats with glue and nails, I think, but pocket screws would work fine, too. I used pine lath for the support, attached with glue and staples.

For the headboard, I cut my panel pieces at 7", I think, but I should have cut them at 9 3/4" so that the headboard panel would extend closer to the ground like the footboard panel does. Here is an abbreviated cut list:
footboard panel -- 5 1x3s @ 6"
footboard legs -- 2 2x2s @ 7 1/4"
headboard panel -- 5 1x3s @ 9 3/4"
headboard legs -- 2 2x2s @ 11"

All of the horizontal cuts are the same as the original plan as long as you are using #1 pine. If you are using #2 pine or furring strips, your horizontal cuts will need to be slightly smaller b/c your panel board will be slightly narrower than the plans expect.

Just be sure to screw the side rails of the bed in high enough to get the trundle underneath.

Hopefully that all makes sense! Good luck! Can't wait to see photos!

In reply to by Aida (not verified)

claydowling

Sun, 08/05/2012 - 06:29

They -might- cut it for you. But based on the experience of a lot of people here, and the advice of some Home Depot employees also on here, it's a mistake to have them do that.

You can do the cuts on your own though. If you can't afford a circular saw, or you're uncomfortable with them, you can buy a hand saw for about $25. It's no good for cutting plywood or MDF, but for solid wood it's hard to beat.

Hillary (not verified)

Mon, 08/06/2012 - 19:26

Nope, I don't think they will. And if they did you won't be happy with the outcome. Too many cuts and there's no way they'll get every cut right. You'd be better off finding a friend with a miter saw you could borrow for an hour to get all the pieces cut. Good luck!

Aida (not verified)

Sun, 08/12/2012 - 08:27

Thank you........ I may have to stop been afraid of using this tools and just use it lol............love this bed and my daughter want me to make it for her........ I will post pictures

blair28

Tue, 10/29/2013 - 08:53

Just curious if you have ever thought of making these and selling them?? I have been looking for a doll bunk bed for my daughter for Christmas and love this bunk bed with trundle. So thought I would ask if you would consider making one and selling it!!

emmakayte

Sun, 12/08/2013 - 18:07

I absolutely love what you did with the trundle and the bunk bed. You are so talented! Thank you so much for sharing the measurements that you used to make the bunk bed and sharing tips. I am going to attempt to make one for my daughter. This will be my first woodworking project. I am crossing my fingers it goes well. Thank you! :)

Potting bench

I made this with leftover lumber after my mom helped me make a swingset for my kids. It's the very first project I've ever done by myself and it turned out GREAT! 

Estimated Cost
About $60 worth of wood, a other 10-15 in screws and other supplies.
Estimated Time Investment
Day Project (6-9 Hours)
Finish Used
I'm not going to finish it probably.
Recommended Skill Level
Beginner

Comments

Adirondack chair

Submitted by Anonymous (not verified) on Sat, 04/08/2023 - 13:49

Love these chairs!

Comments

Nightstands

Submitted by DCecil43 on Mon, 07/08/2019 - 19:11

I used one of the plans found on the site but modified it by making mine 8 inches wider.  They are slightly higher as well to match what I replaced in our master bedroom.  This was actually the first project that I took on after looking at bedroom furniture for over a month and realizing how expensive cheap furniture is.

Estimated Cost
$300
Estimated Time Investment
Weekend Project (10-20 Hours)
Finish Used
Minwax Early American Stain and Minwax Satin Polyurethane
Recommended Skill Level
Intermediate

Octagonal Picnic Table

Submitted by Anonymous (not verified) on Tue, 04/25/2023 - 08:16

Great plans and easy to follow!

Comments

Grandson Chair

Submitted by Anonymous (not verified) on Fri, 05/12/2023 - 10:09

Made some modifications. Love your plans Ana White. Thank you 😊.

Built from Plan(s)

Comments

Craft/Sewing Table

Submitted by mawright86 on Wed, 02/10/2016 - 09:45

This is a craft table following the Modern Craft Table Plans.  There were some adjustments to increase the size of the table to fit the entire width of the window.  The final dimensions of the top turned out at 72" x 36" and fits my wifes cutting sheet perfectly on top with no overhang.  The project did turn out a little taller than anticipated (built it as if it was a standing workbench or elevated) so that posed an issue with the foot pedal but overall, the wife approves.  Future additions may be to add a drawer and attach a couple of adjustable lights, but on to other projects to improve her craft room.

Built from Plan(s)
Estimated Cost
Used MDF and saved some on the cost, overall, about $150. 2 Sheets of MDF a few 1x2's and 2x2's, plus primer and paint.
Estimated Time Investment
Weekend Project (10-20 Hours)
Finish Used
Sherwin Williams Paint, Kilz Primer, Minwax Poly on top
Recommended Skill Level
Beginner

Comments

One arm 2x4 outdoor sofa

Submitted by Anonymous (not verified) on Thu, 05/18/2023 - 08:10

This was so super easy. We are so in love with this. Thank you Ana for making DIY so much fun!

Comments

Rustic X-Frame Coffee Table

We've built so many of these coffee tables, but this one has got to be my favorite. Isn't the stain so dreamy?

I think the biggest thing about this coffee table is to finish it properly. We like to plane our boards down so it gives it a bit more of a seamless look - but real rustic lovers don't need to do this. 

We sanded the coffee table down with 120 grit paper & then stained this table in Sunbleached Oak by Varathane. It's literally the most stunning color. Blends with almost any decor. 

Once that was dry, we applied two coats of polyurathane 

Built from Plan(s)
Estimated Cost
75.00 CA
Estimated Time Investment
Afternoon Project (3-6 Hours)
Finish Used
We sanded the coffee table down with 120 grit paper & then stained this table in Sunbleached Oak by Varathane. It's literally the most stunning color. Blends with almost any decor. 
Once that was dry, we applied two coats of polyurathane 
Recommended Skill Level
Starter Project

Cabin loft bunk bed

Submitted by Anonymous (not verified) on Wed, 10/02/2019 - 08:49

Elevated loft bed for my two boys! Easy build with the plans from Ana White! I modified this version and elevated it so I could fit my youngest underneath. It was my first time using a Kreg Jig and I’m obsessed now. I would recommend buying top quality wood and increasing all numbers by 2-3 inches to make getting the mattress in easier. I would also recommend a lower profile mattress than I used. Happy Building!

Built from Plan(s)
Estimated Cost
$300
Estimated Time Investment
Weekend Project (10-20 Hours)
Finish Used
I used SW marshmellow and stained the roof walnut. Ladder is made out of steel piping that I spray painted (with primer) black.
Recommended Skill Level
Beginner

Comments

Outdoor buffet table

Submitted by Anonymous (not verified) on Mon, 06/05/2023 - 15:03

My first project using Ana White plans. Used pressure treated lumber and Kreg pocket hole jig. Cost: $126.

Built from Plan(s)

Comments

DIY Toddler Bunk Bed

Submitted by Anonymous (not verified) on Wed, 10/02/2019 - 17:54

I needed a solution to getting my bed back from my children. Since we live in a small apartment, this toddler bunk bed was the best option for our family! We are a military family so I wanted to build something that could be taken with us every time we move. The plans were easy to follow and has such a professional result!

Built from Plan(s)
Estimated Cost
$200
Estimated Time Investment
Weekend Project (10-20 Hours)
Recommended Skill Level
Beginner

Comments