Community Brag Posts
Potting bench
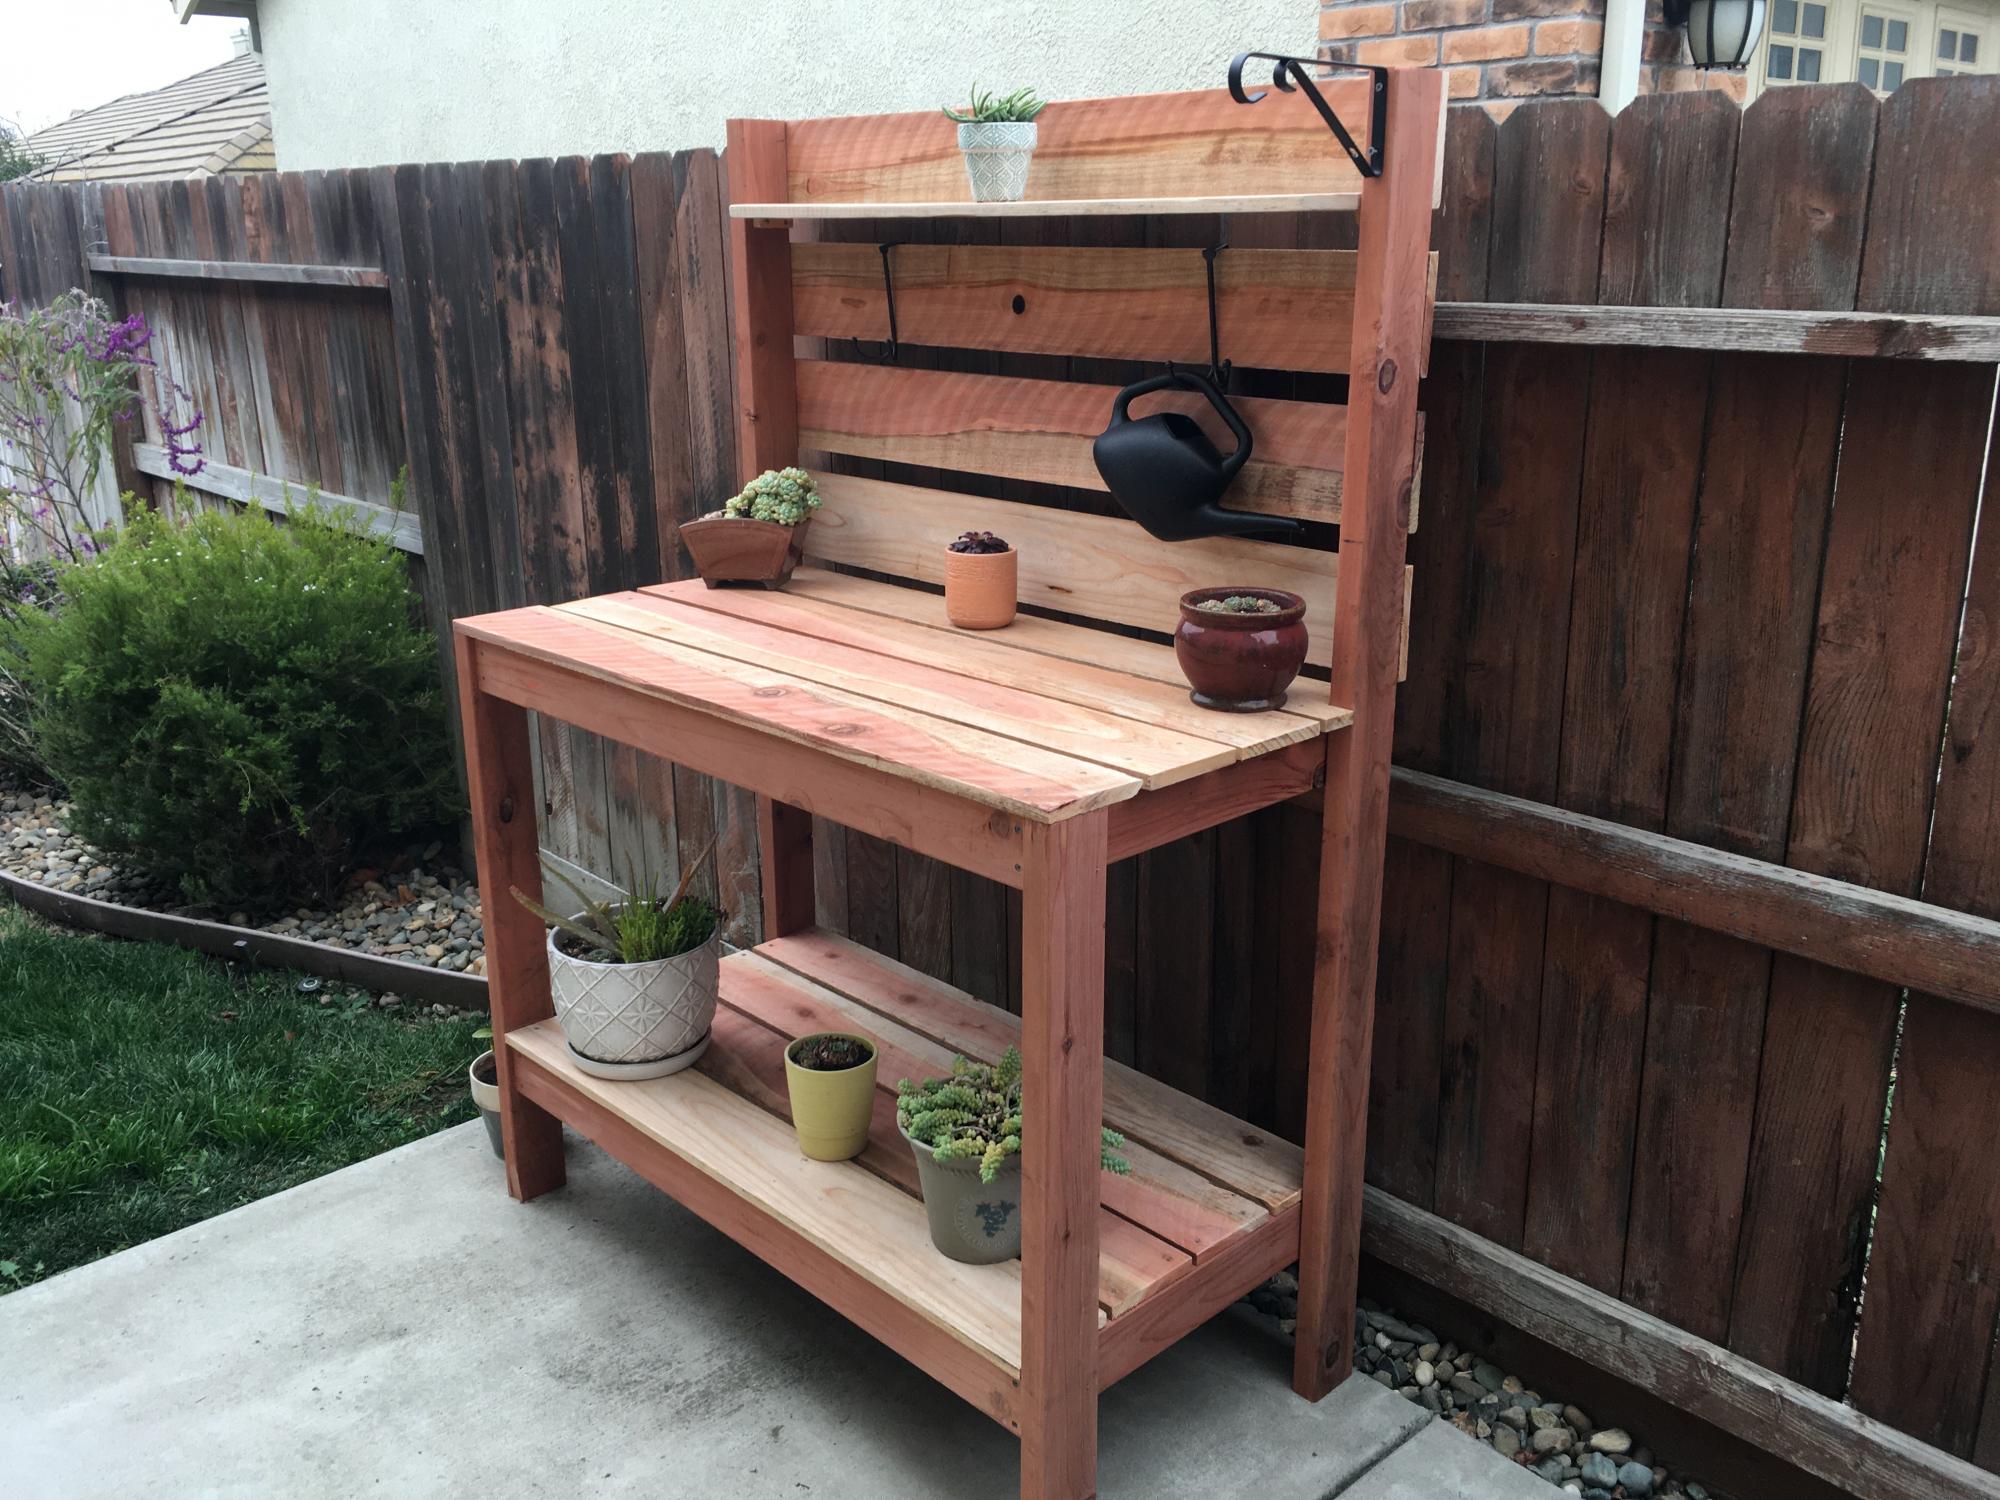
I used redwood lumber, 2x4s and 1x6s only. I wanted the bench to be a little taller so I used 2x4x10s for the legs to make work surface 38” high and total height 66”. To get the most out of the 8’ 1x6s I made the bench 48” wide. I also had to adjust the depth since I did not use 1x4s. And finally, I sanded the 1x6s because they were rough sawn.
Very fun project! Once I figured out the adjusted cut list the whole project came together in a matter of a few hours.
Built from Plan(s)
Estimated Cost
$100
Estimated Time Investment
Afternoon Project (3-6 Hours)
Finish Used
Light sanding, No finish.
Recommended Skill Level
Beginner
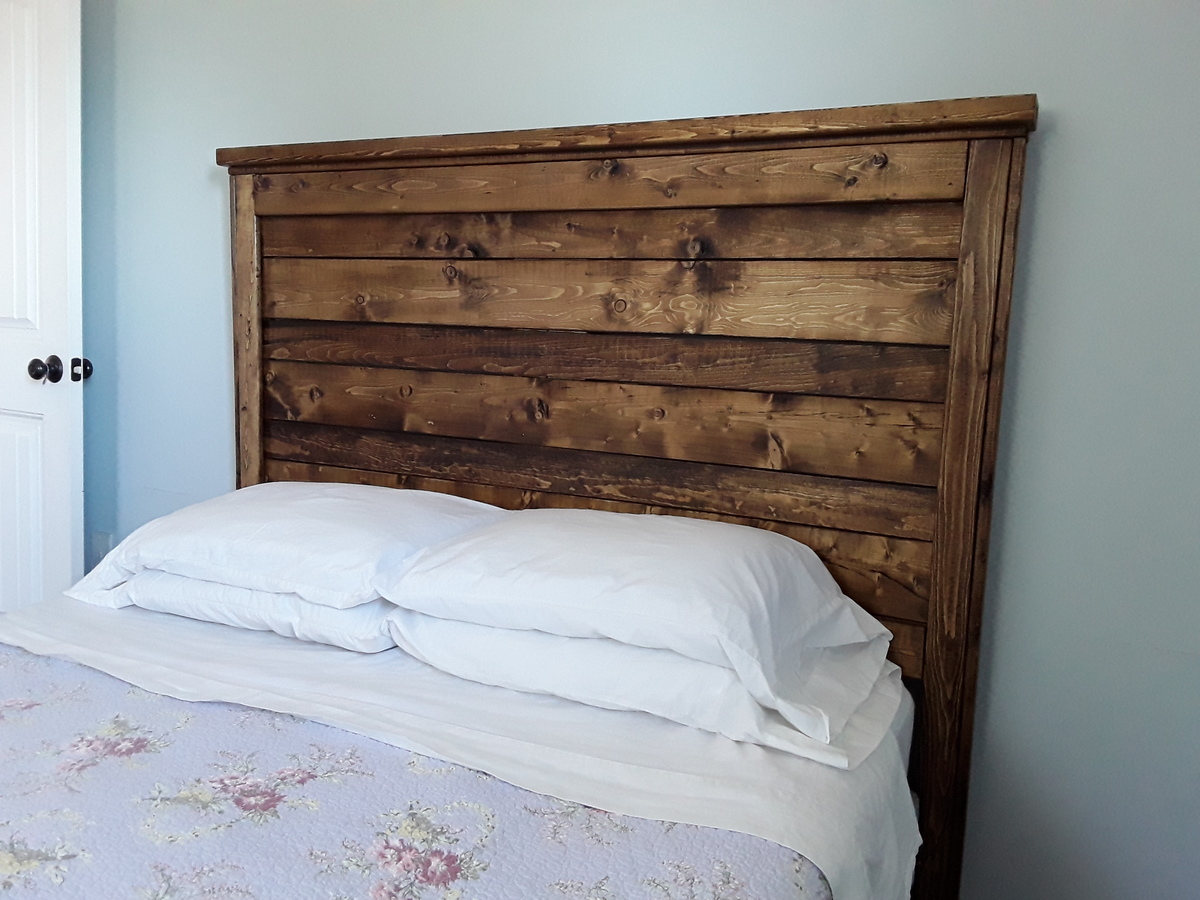
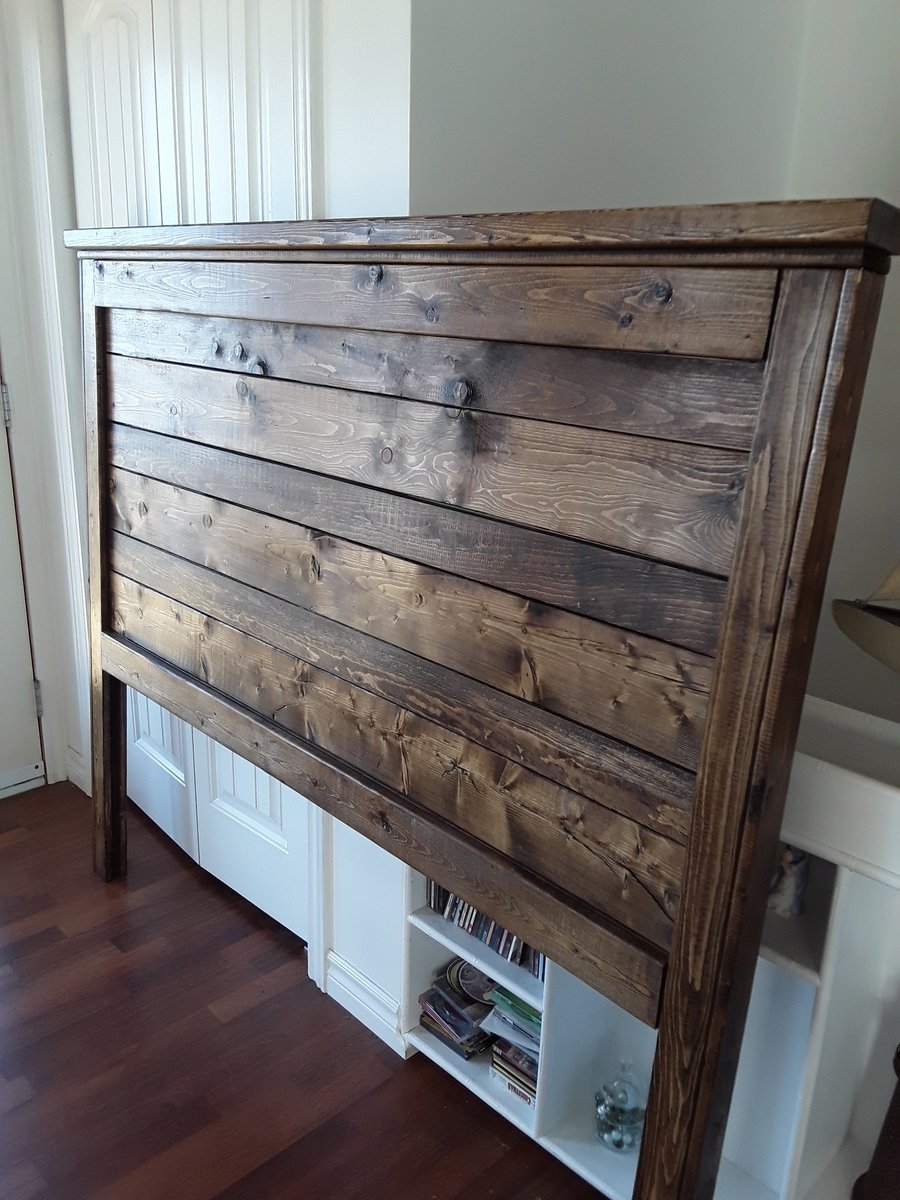
RH Inspired Shanty Sideboard & Hutch
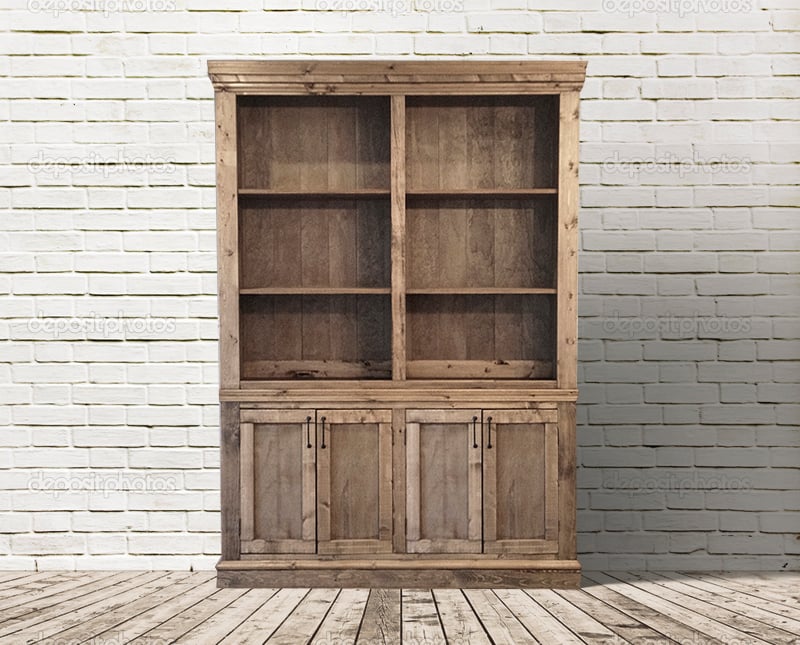
Have been wanting to build this for 6 months now and just havnt had the time. Finally completed it!
I made some small changes to the design, different trim layouts, different dimensions, and went with a plank look for the back of the hutch instead of a solid peice of 1/4" plywood.
Built from Plan(s)
Estimated Cost
$500.00. This price includes wood, stain, and hardware.
Estimated Time Investment
Weekend Project (10-20 Hours)
Finish Used
1 coat of Minwax Weathered Oak, then 1 coat of Minwax Special Walnut.
Recommended Skill Level
Beginner
Comments

In reply to This looks great. I love the by handmadewithash
Wed, 12/31/2014 - 17:00
To handmadewithash..
Thank you very much for the comment! =).
Happy New Years as well!
Cheers,
Justin

Thu, 01/01/2015 - 22:48
To ehays216
Thank you ehays216! Ive looked at your Farmhouse Storage Bed a few times.. Have always wanted to try the Steel wool/Vinegar trick.
Cheers,
Justin
In reply to Stunning! by Ana White Admin
Thu, 01/01/2015 - 22:49
Thank you very much Ana White
Thank you very much Ana White Admin!
Cheers,
Justin
In reply to Beautiful!!! by Smjackson82
Sun, 01/04/2015 - 16:07
Of coarse! I used the same
Of coarse! I used the same height and depth dimensions, just shortened the width by 9 inches.
Cheers,
Justin
In reply to backdrop by timberandsoul
Sun, 01/04/2015 - 16:09
Thanks a lot timberandsoul!
Thanks a lot timberandsoul!
Photo was taken on an empty wall in my living room, Which is currently a light gray wall. thought it looked boring so I did a quick switch of backdrops in PS. I just typed in brick wall in google.
Cheers,
Justin

Sun, 01/04/2015 - 11:30
How to achieve that finish?
Hi Justin. Did you use any special technique between the two coats of stain to achieve that effect. Thanks. Andy
In reply to How to achieve that finish? by AndyH
Sun, 01/04/2015 - 16:10
Got your email Andy,
Got your email Andy, hopefully you got mine!
Cheers,
Justin
Sun, 01/04/2015 - 18:36
Hey Singhs, I went with Home
Hey Singhs, I went with Home Depot Regular Knotty Pine. Cheap and easy to work with.
Cheers,
Justin
Mon, 01/19/2015 - 13:03
Stain color and plank backing
I love this! Can you give me information on how you modified the plan to achieve the plank backing and the stain color?
In reply to Stain color and plank backing by juddgirl2
Sat, 01/24/2015 - 13:08
Sure! the plans call for 2
Sure! the plans call for 2 solid sheets of 1/4 plywood for the backing.. I simply just ran the plywood through a table saw at 5.5" wide and brad nailed it the back. =)
The stain is weathered oak and let sit for 15min. Then right away special walnut and let sit for 15 min.
repeat until desired colour. let me know if you have any more questions!
Cheers,
Justin
Sun, 01/08/2017 - 07:33
Stain question
How many coats did you have to do to achieve this look? The weathered oak looks so light...and gray.
Thanks!

Sun, 05/17/2015 - 19:40
Attaching Sideboard to Hutch
What was your strategy on attaching the sideboard to the Hutch. I haven't seen where there is any instructions or conversation around this. What and how did you accomplish this and/or is there anywhere to go that discussed this that helped you.
Thanks,
Tue, 07/05/2016 - 00:19
Truly gorgeous!
This inspired hutch/sideboard is absolutely divine! What an awesome job!
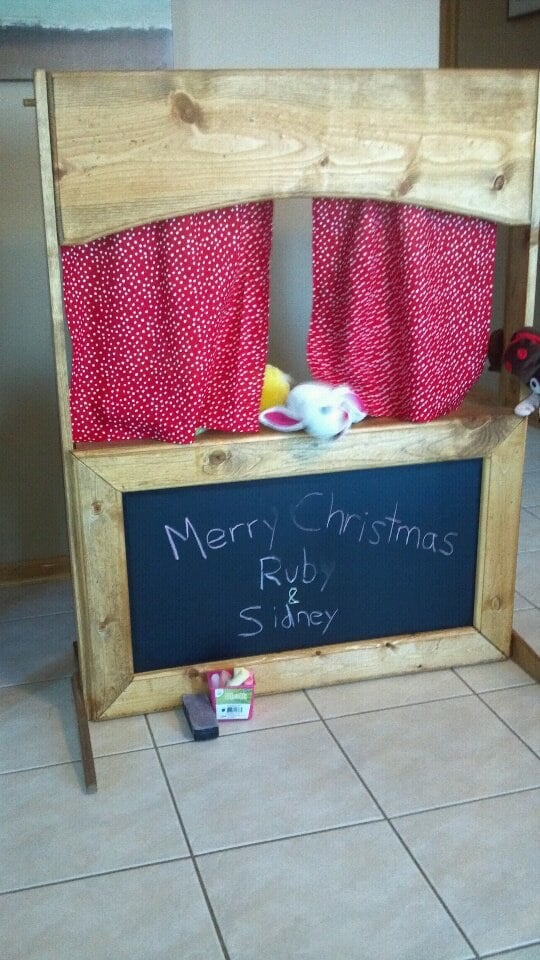
Traditional Bird House Brag Post
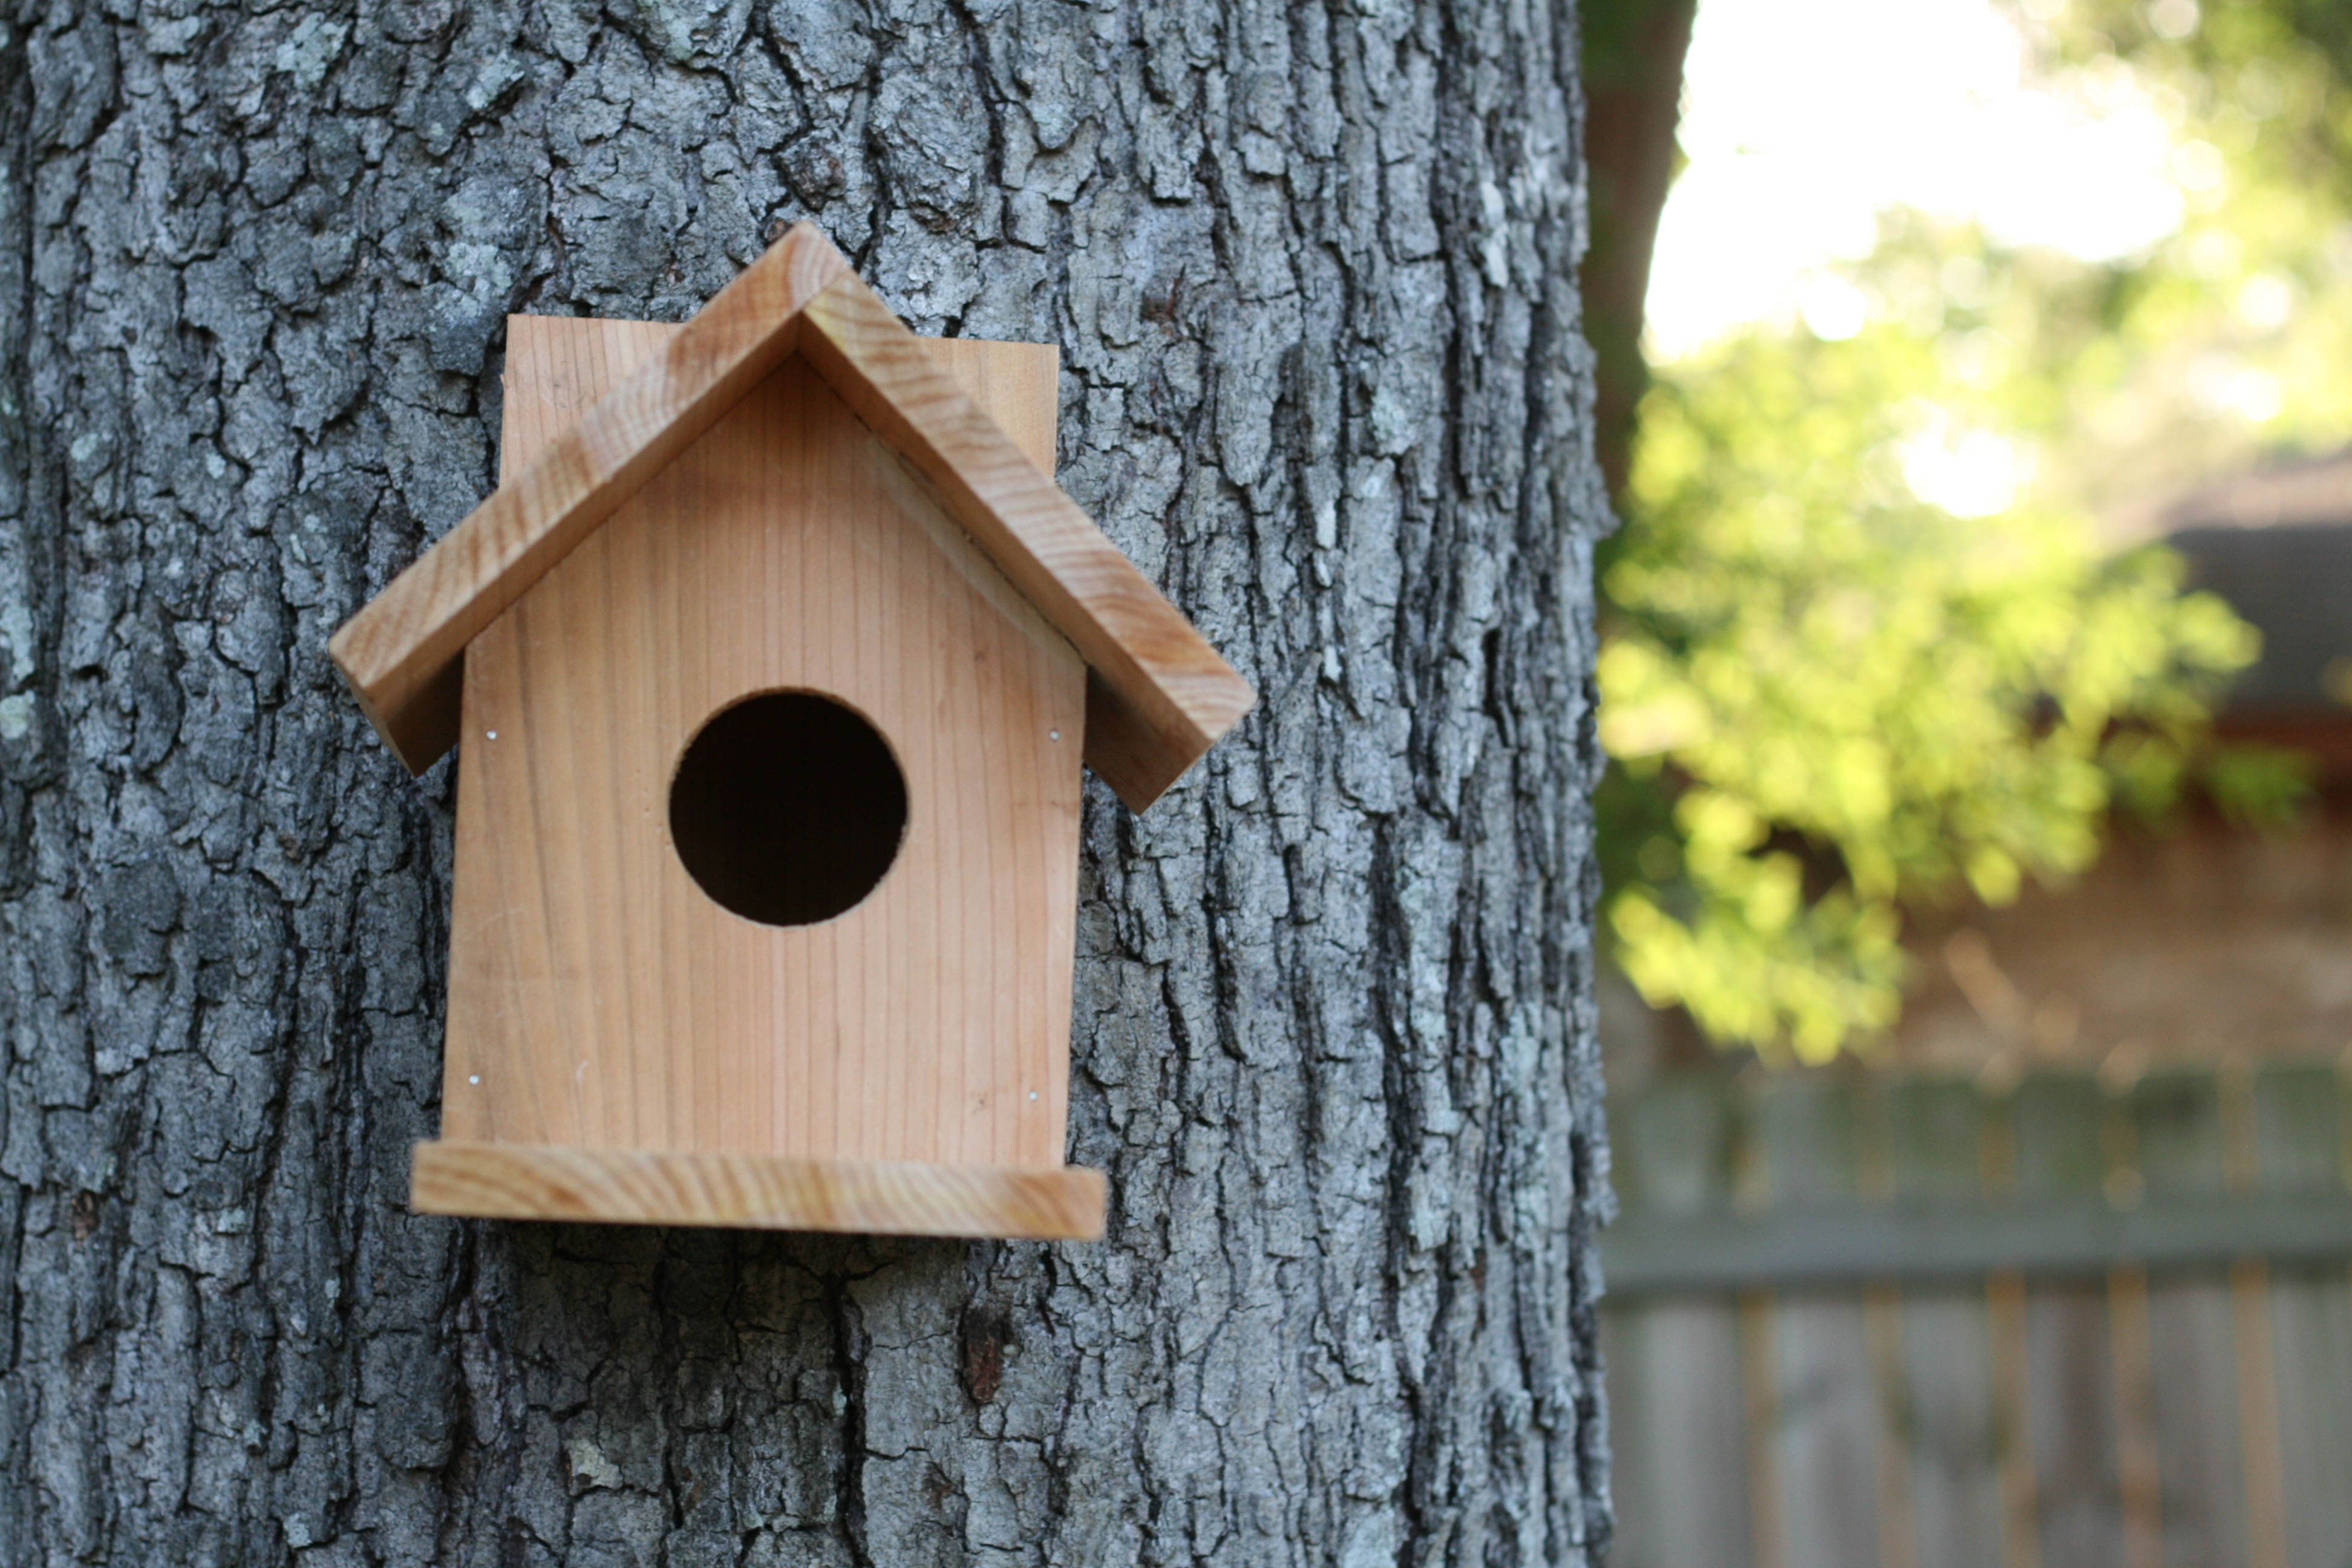
My very first project using the Compound Miter Saw. Easy Cuts. Easy assembly. Cost was about $1.50. I think I am going to make kits (as suggested in the sister plan) for a couple of birthdays coming up!
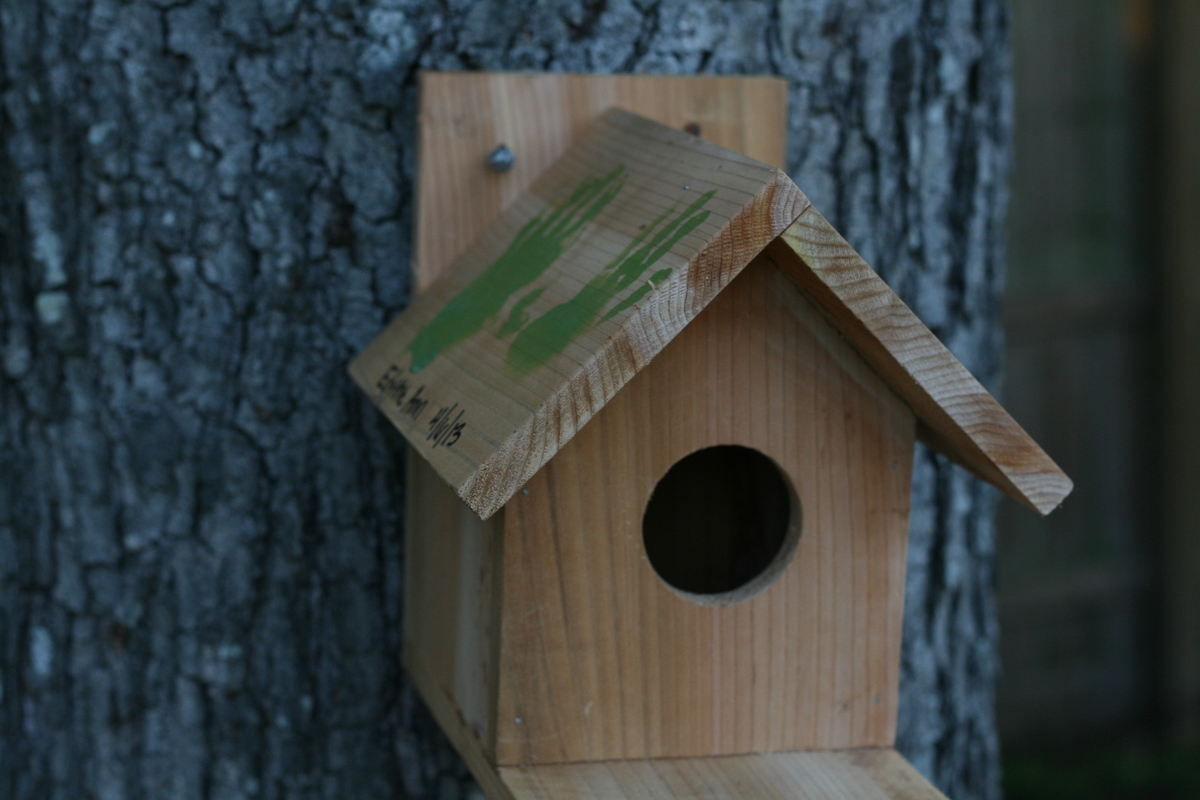

Built from Plan(s)
Estimated Cost
$1.50
Estimated Time Investment
An Hour or Two (0-2 Hours)
Finish Used
No finish. Used spray paint to put Little One's hands on the roof.
Recommended Skill Level
Starter Project
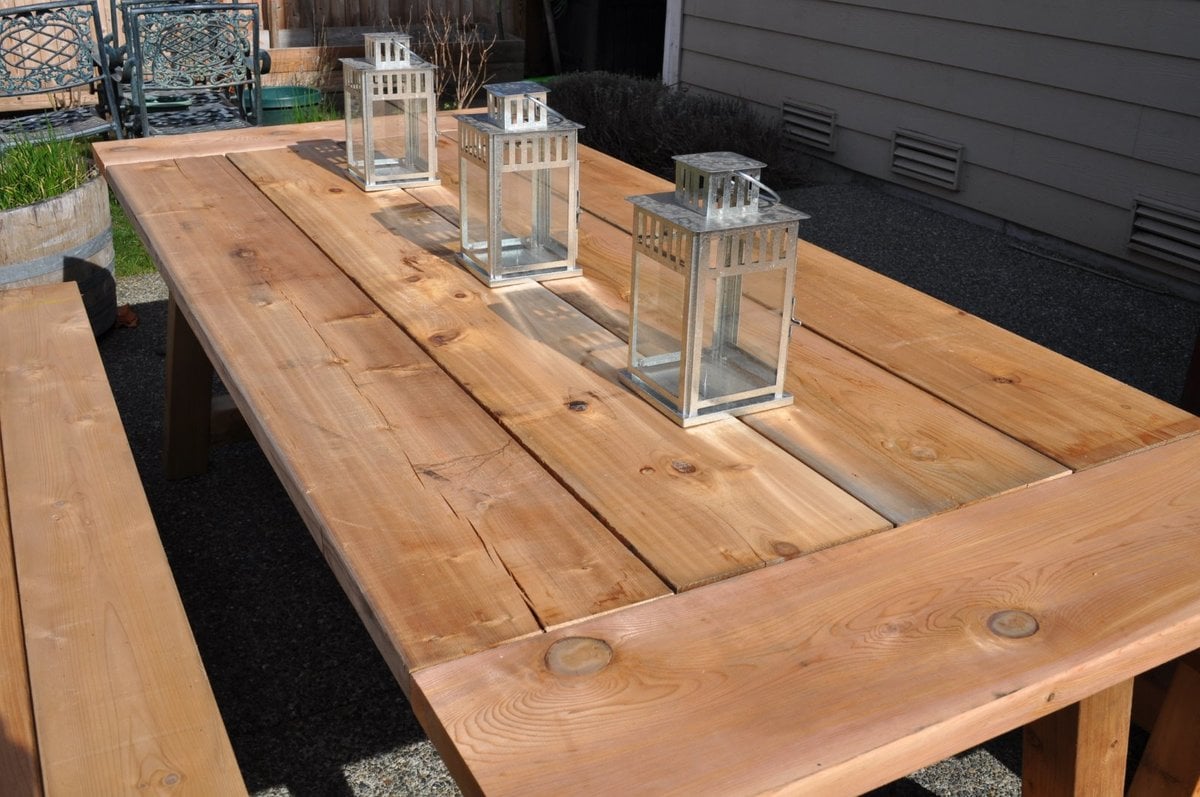
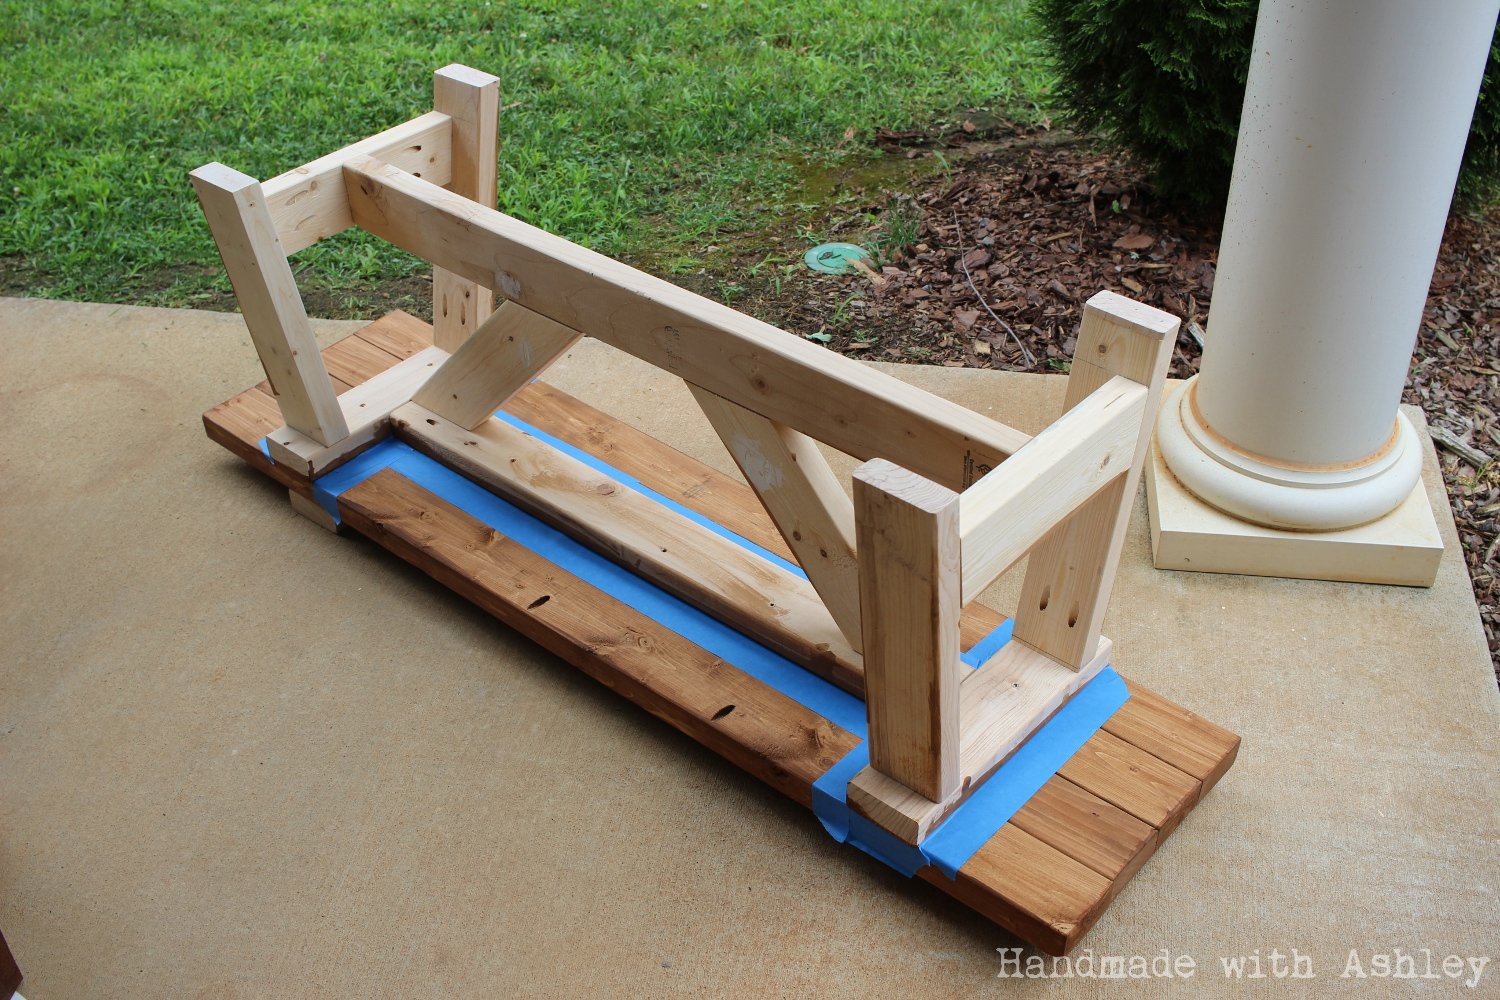
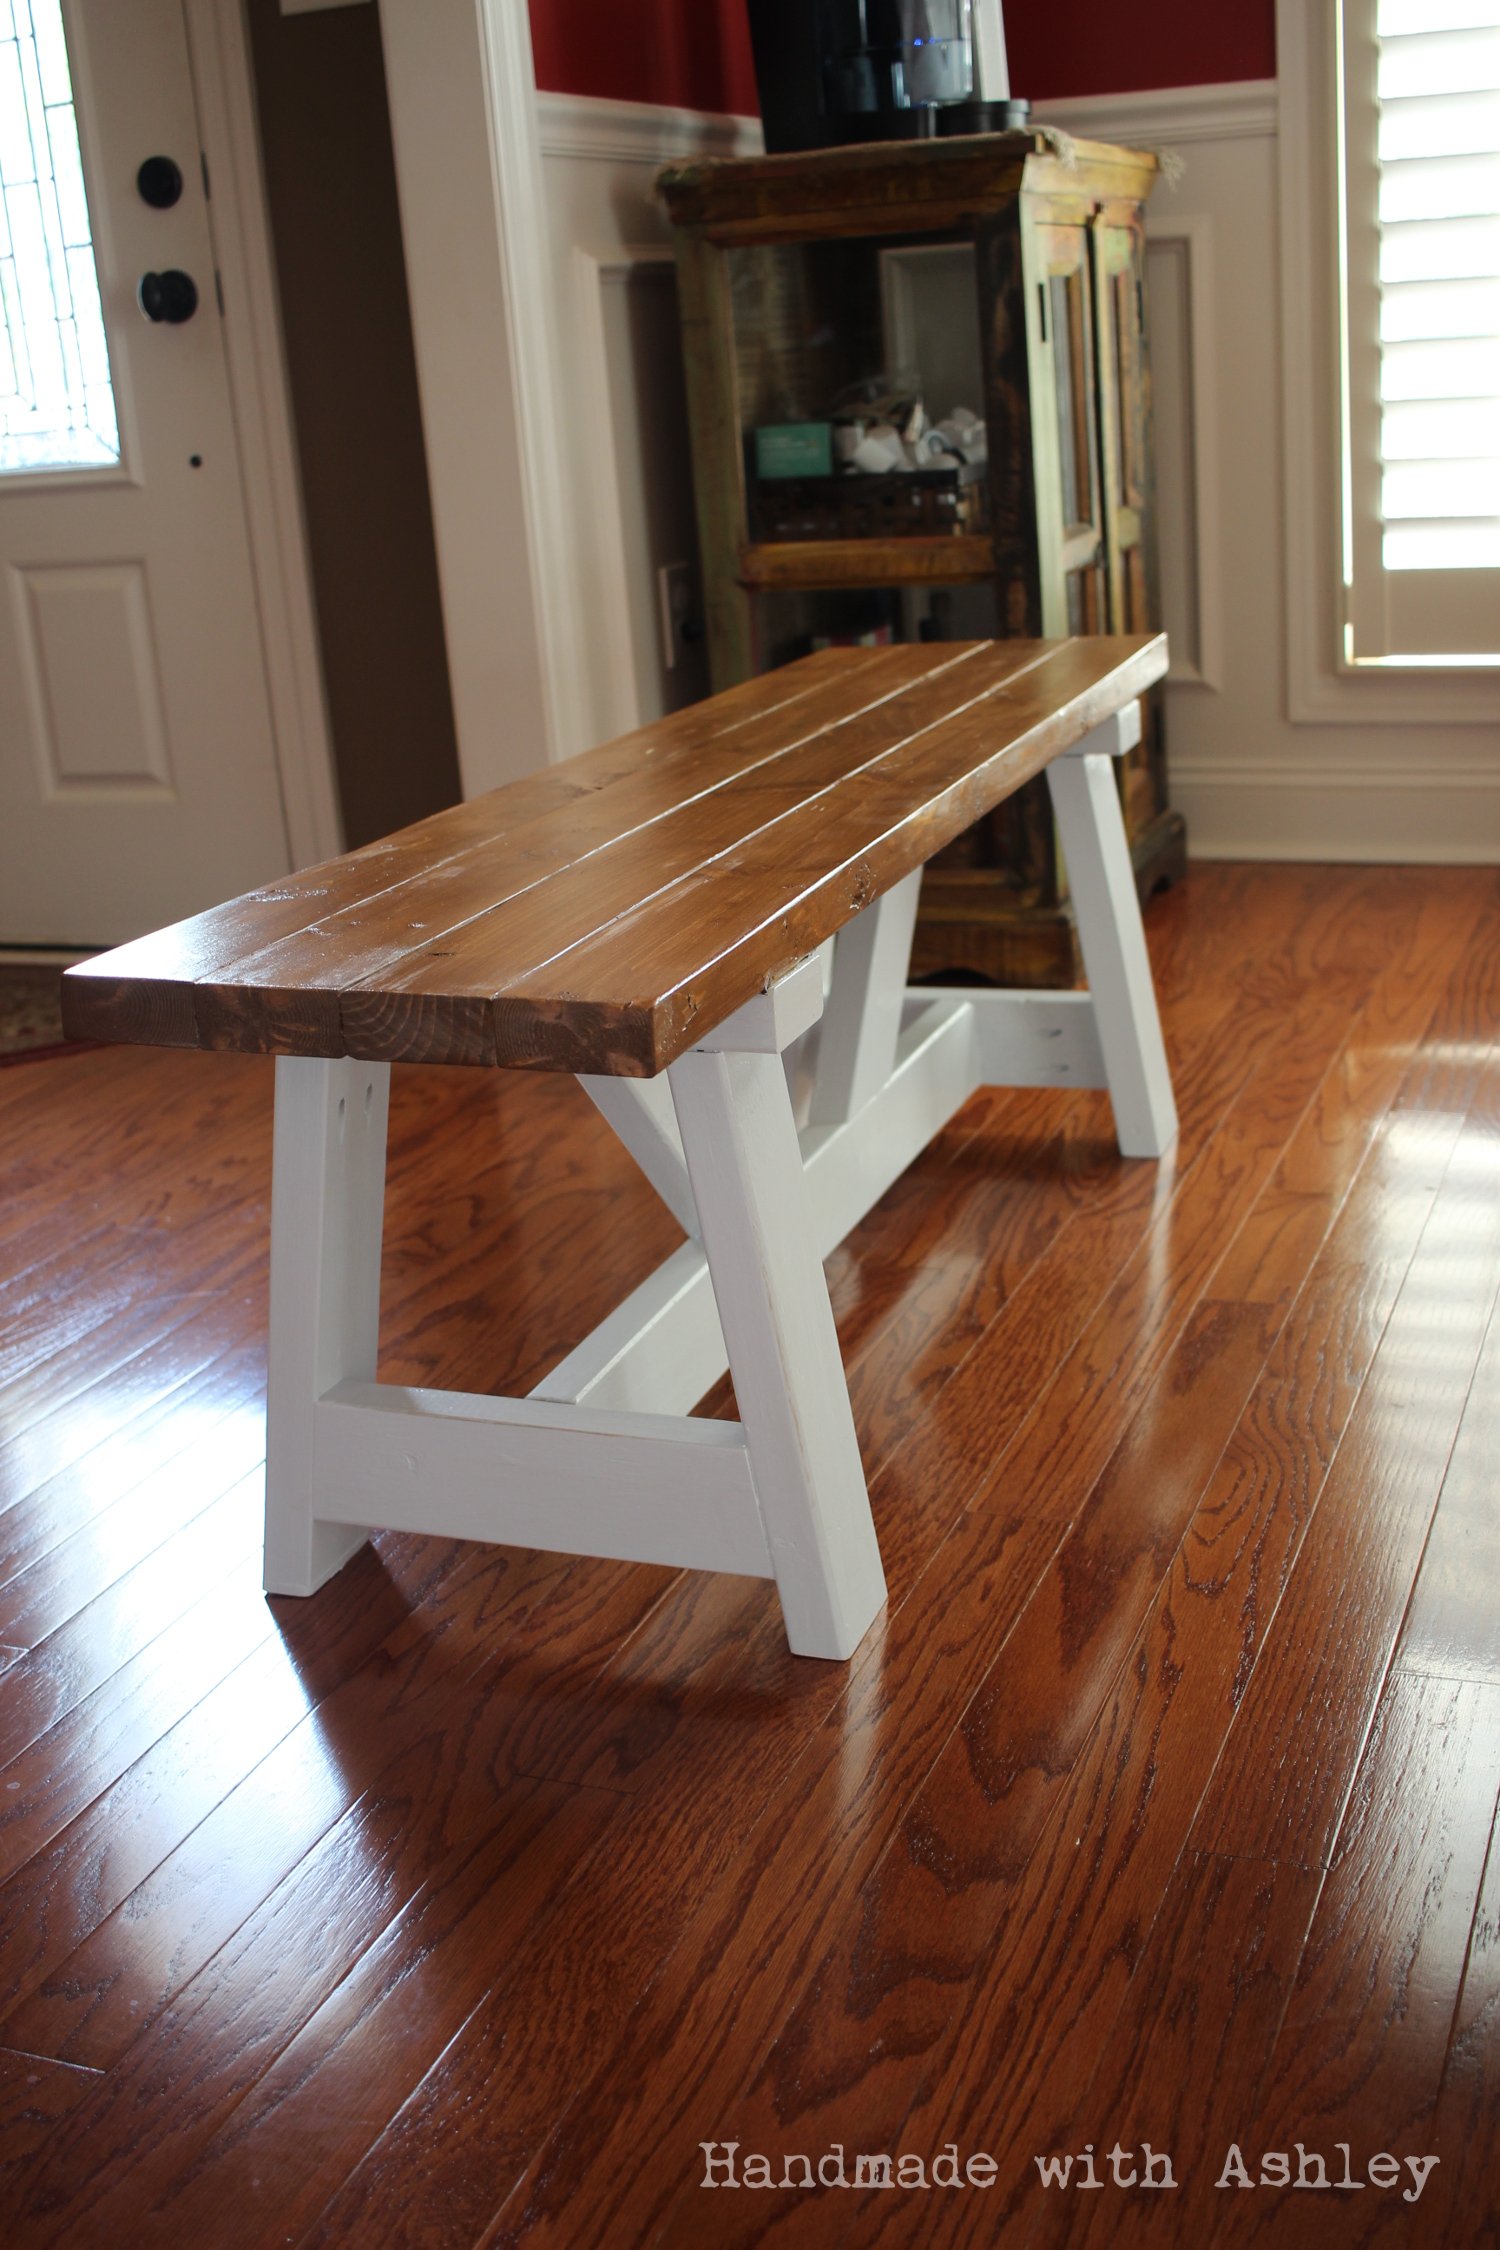
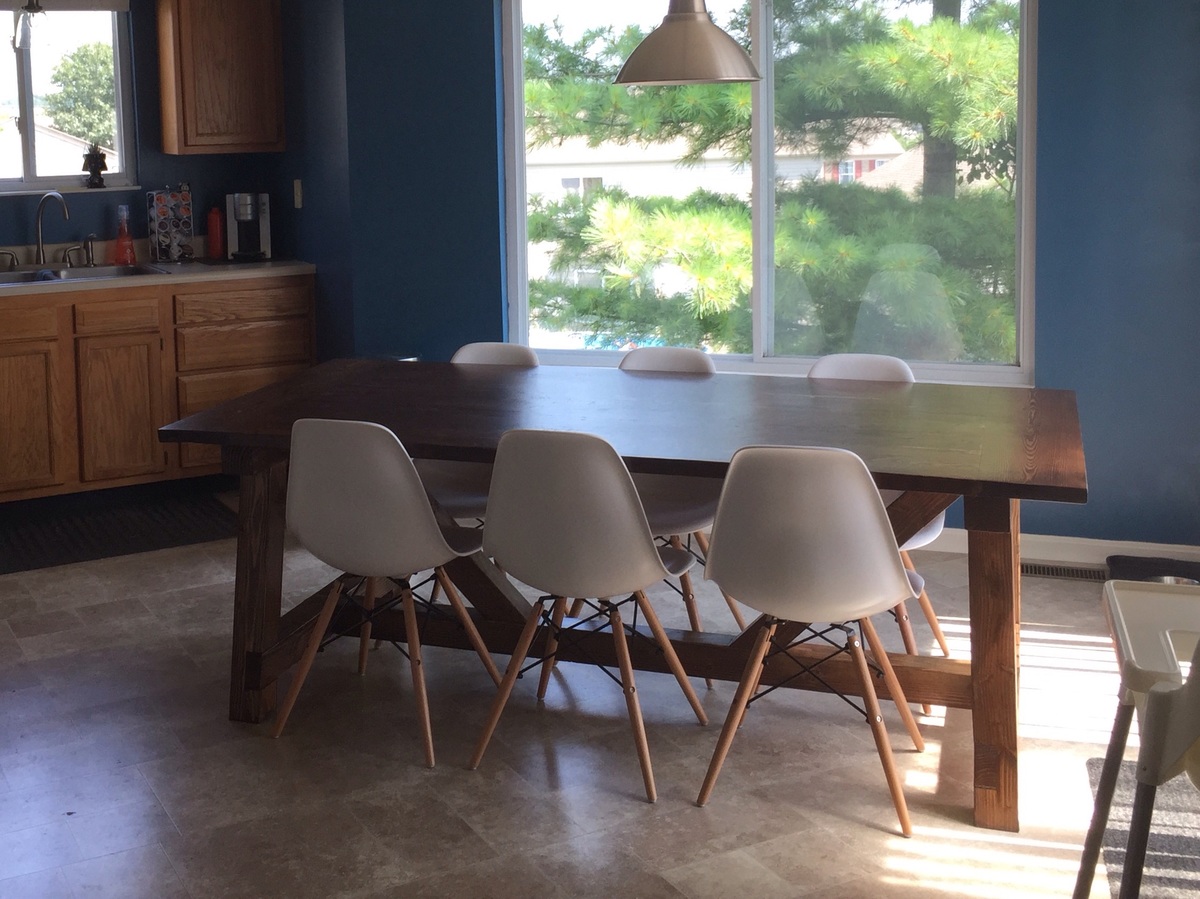
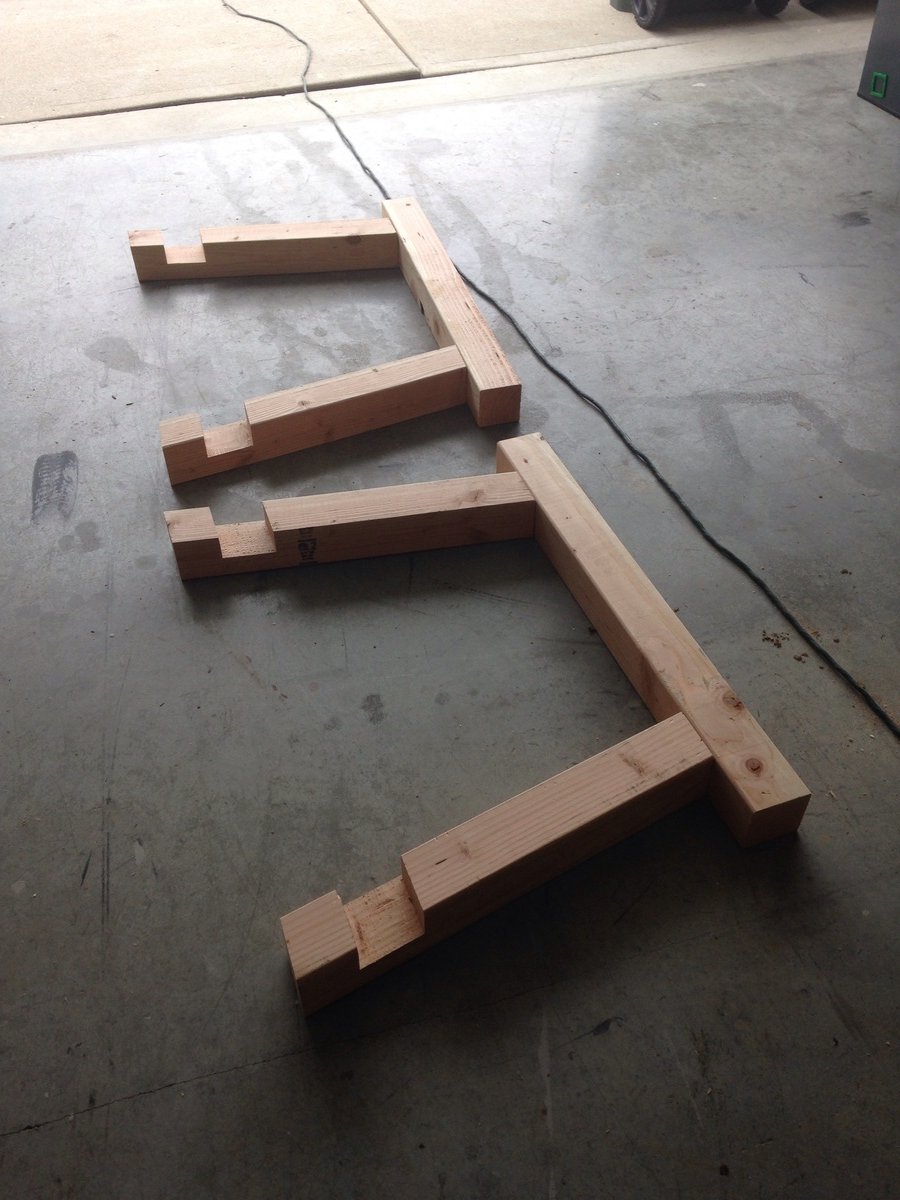
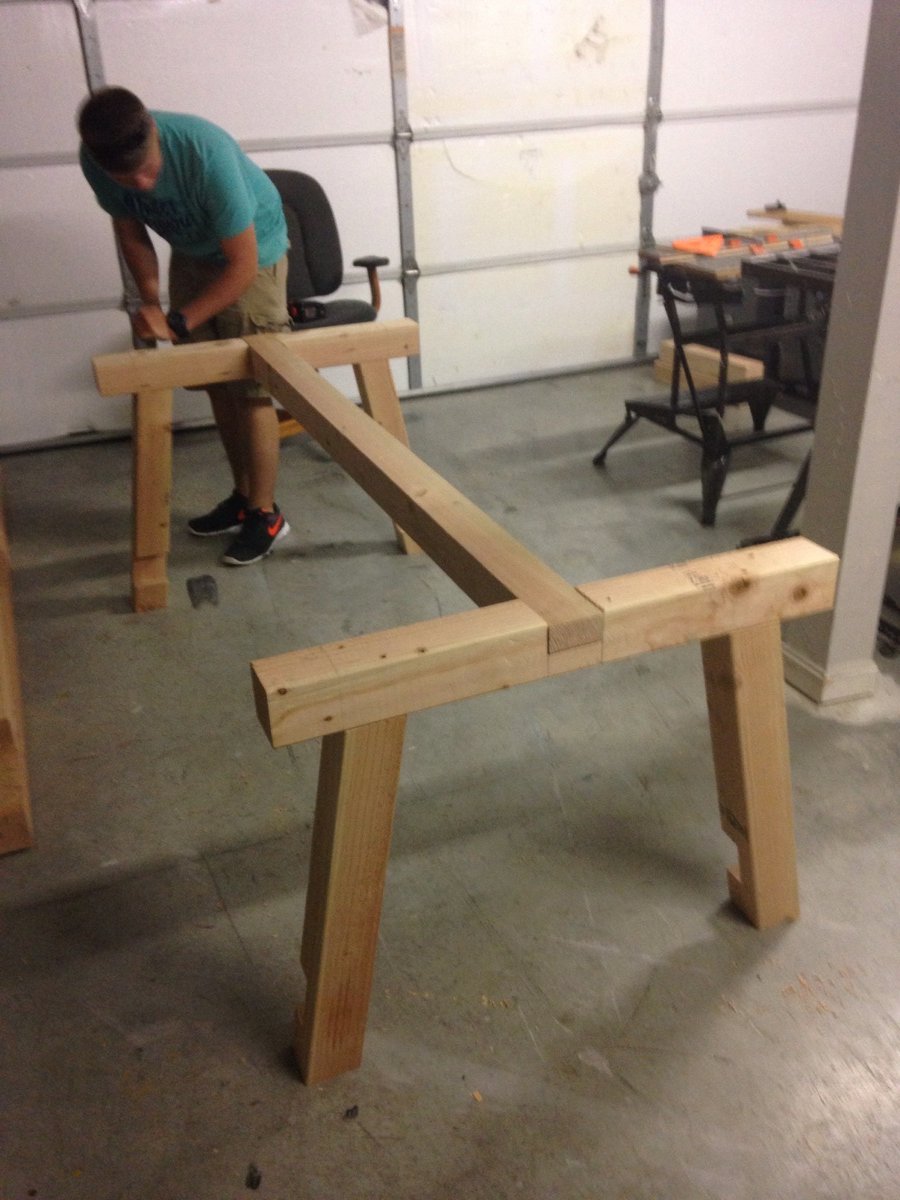
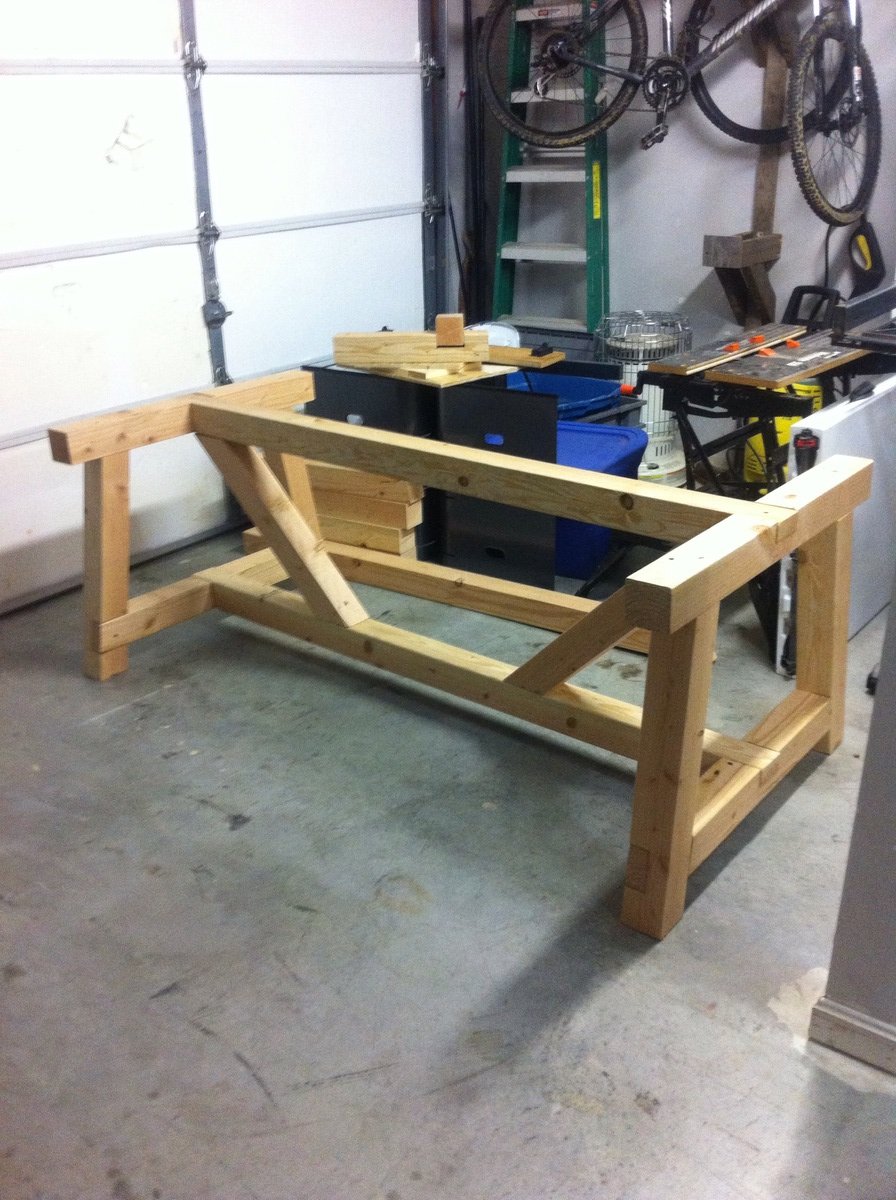
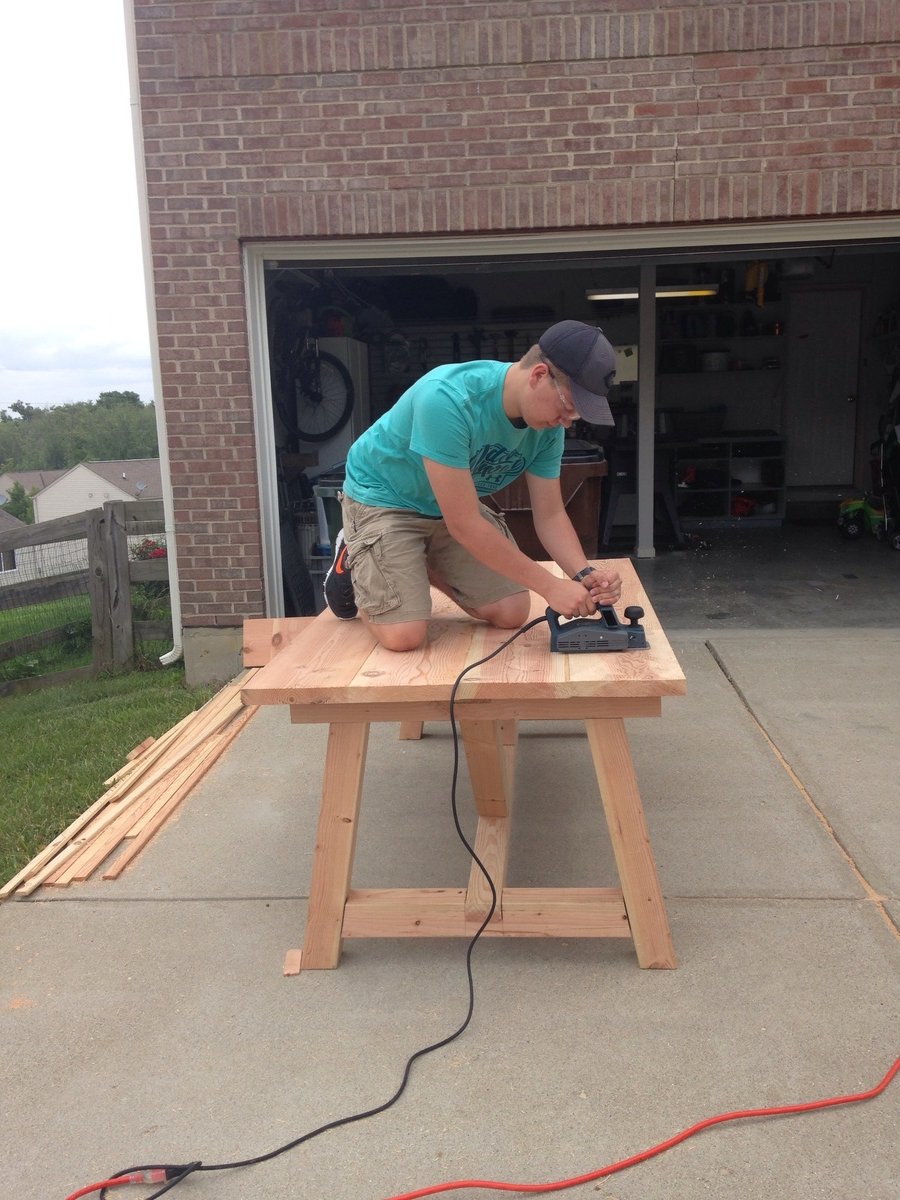
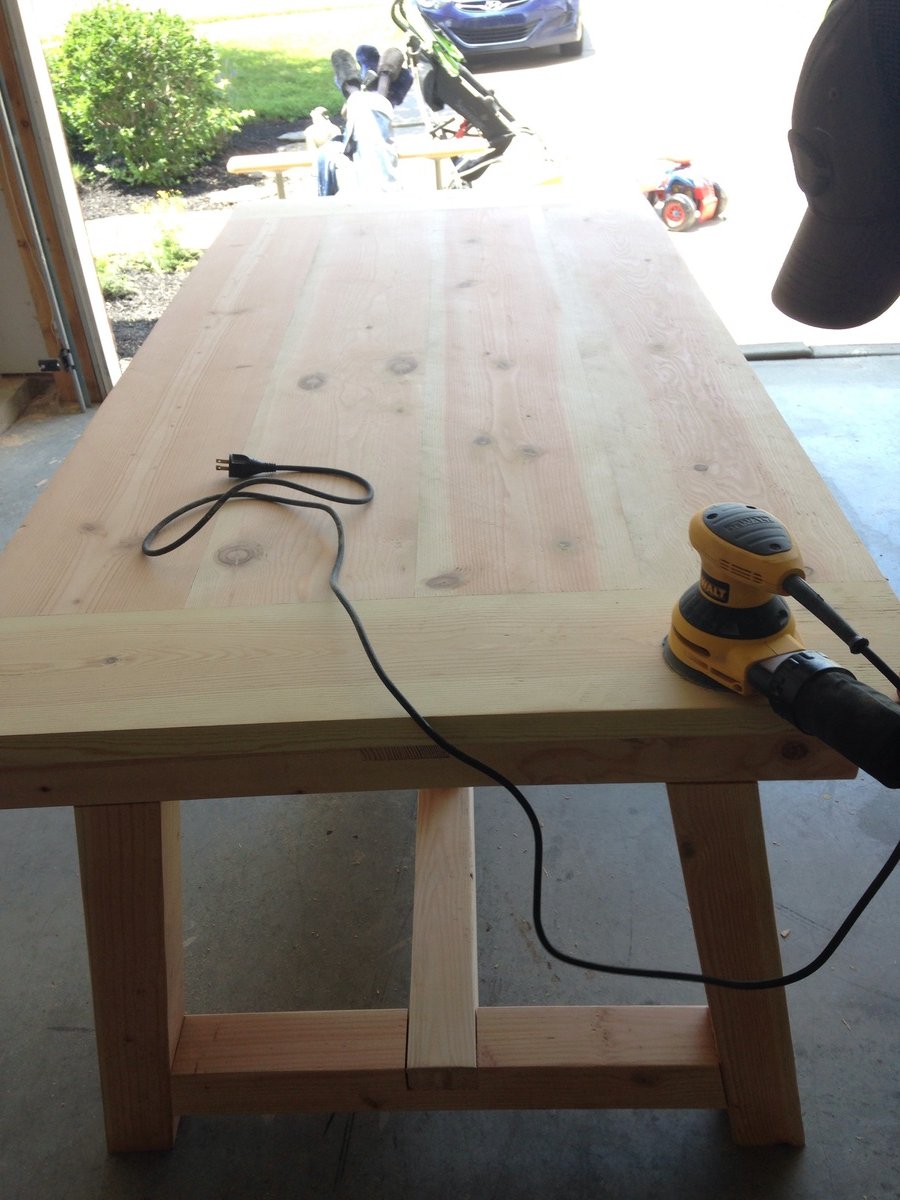
Restoration Hardware Inspired 4x4 Truss Beam Outdoor Table
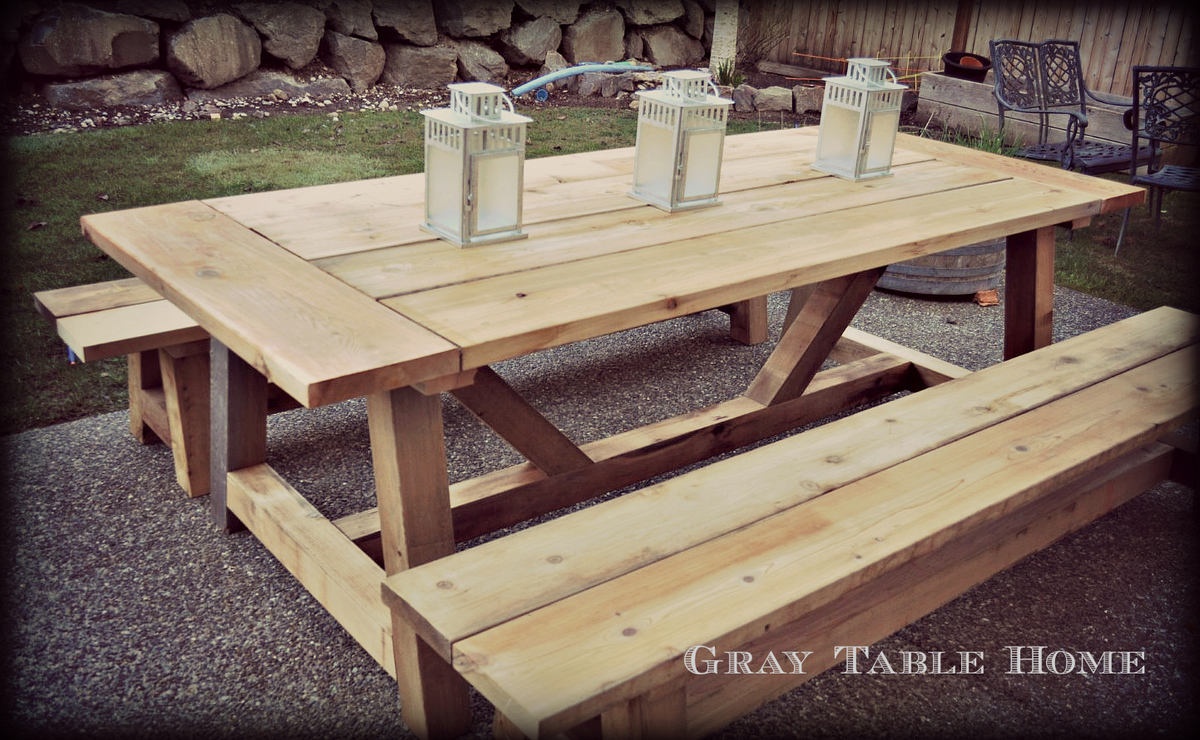
Hi! I was truly inspired by the plans I found at this site and the many brags that I saw! I have now built this table set a few times (first for myself, then for friends & family) and learned a lot each time. The things I have modifiied include...
1) Length = make it longer or shorter as space allows (I've done tables from 84" to 108" long)
2) Outdoor table top = because these are being used outdoors, I use screws as spacers between boards so that they have a 1/8 to 1/4 gap to allow for water to run through
3) Breadboard end support = I found that with just the pocket hole screws, my breadboards were a little 'wobbly' so I added Simpson Stong Tie metal plates underneath to reinforce the ends.
4) End length = in order to provide a little more legroom to those sitting at the end of the table, I recently changed the plan so that I would have at least 15" from the table base to the end of the table top (although this pic shows the regular plan with the ~8" overhang)
I really appreciate all of the plans and brags which have been shared by users of this site. Thank you!!!
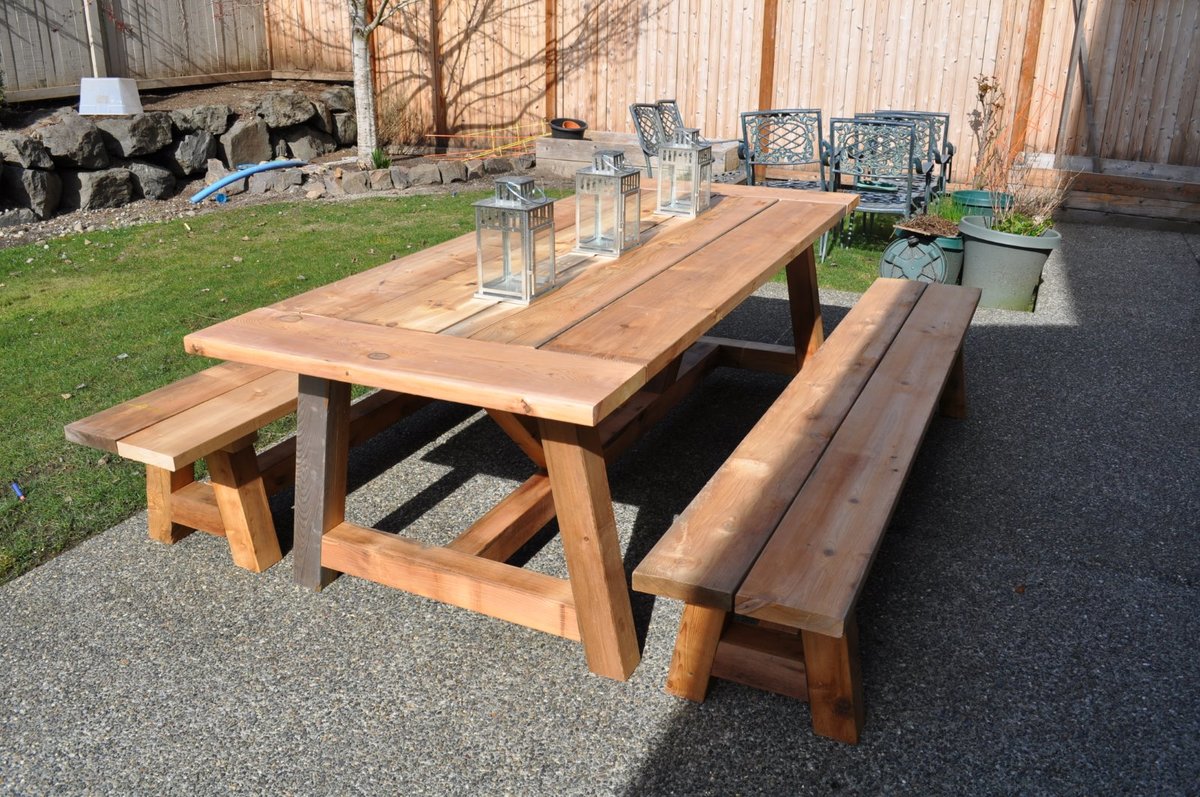
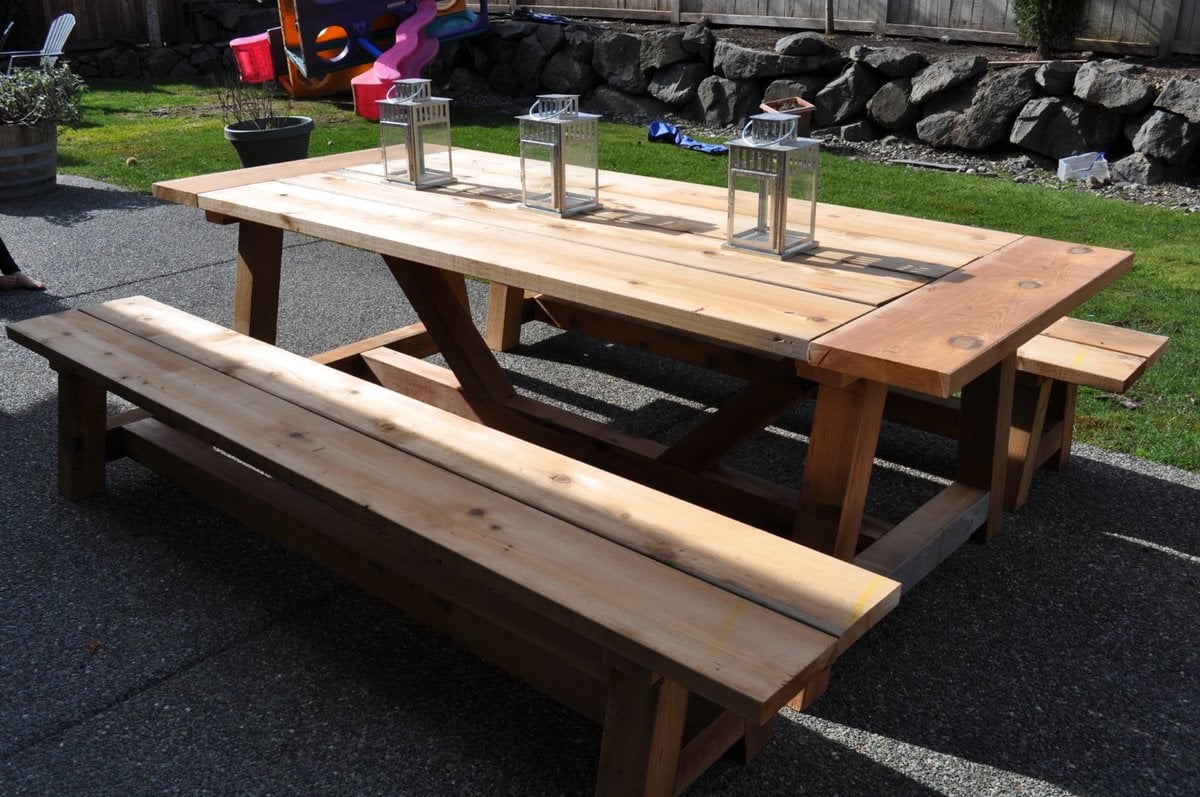
Built from Plan(s)
Estimated Time Investment
Afternoon Project (3-6 Hours)
Finish Used
I picked cedar boards that had some color variation in order to add interest. To get an even more rustic & weathered look, you could consider using a steel wool & vinegar mixture.
Recommended Skill Level
Beginner
Comments


Thu, 04/30/2015 - 21:38
Thank you!!! That sounds
Thank you!!! That sounds about right for the cost - I spent about $425 on my lumber and hardware. Cedar is more expensive, but I was happy with the results. And it still seems like a good 'deal' when you consider what you would get for that price from a store.
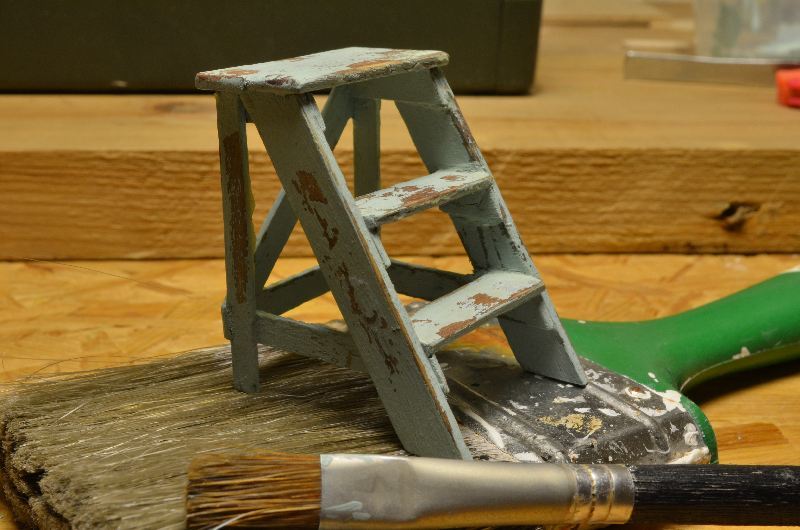
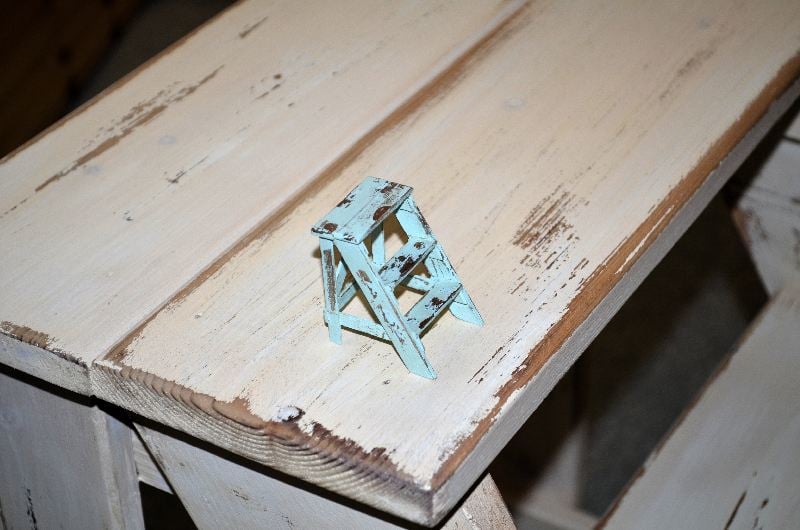
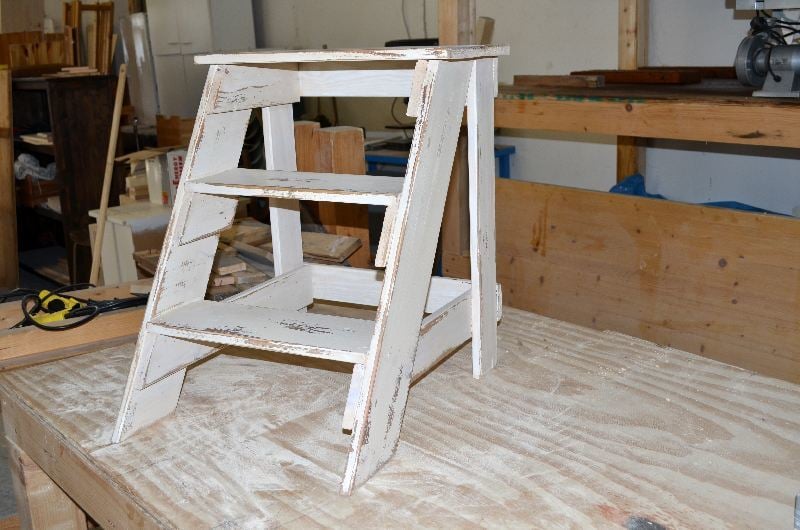
Vintage step stool end table, in 1:1 and 1:12
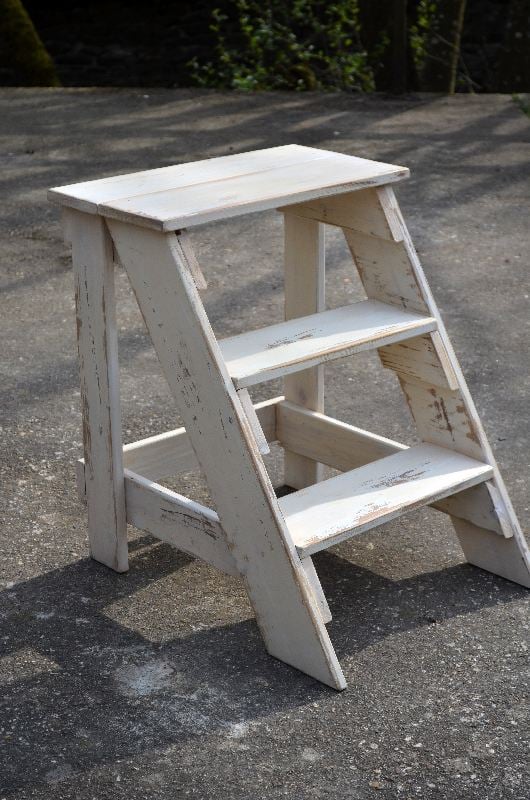
I built this step stool for friend, and a tiny version for my own dolls house. I had expected difficulties with the angled parts, but it went together very easily. I stained both of them with a vinegar/steel wool mix, painted with homemade chalkpaint. At last I sanded them for a distressed look and coated them with brown finishing wax.
Built from Plan(s)
Estimated Time Investment
Afternoon Project (3-6 Hours)
Finish Used
vinegar/steel wool mix, homemade chalkpaint, dark finishing wax
Recommended Skill Level
Beginner
Foldable Farmhouse Rustic Dining Table

My wife wanted a portable farmhouse style rustic dining table that she could take to photoshoots and other events. I started with a top made with 2x6s and make the legs with 4x4s and the rest with 2x4s. Stain is dark walnut with a clear coat on top.
The legs are attached with door hinges and can fold into the top for more portable use. There is also a board that can be inserted in the bottom slots so that when in use the legs can not fold in.
So far the rustic dining table is working out great, although this table is VERY HEAVY and needs 2-3 strong people to carry it around. I have also made a lighter version using 1x6 tops and all 2x4 frame and legs.
Photos courtesy of Jennifer Blair Photography Designed by Amber Veatch Designs


Built from Plan(s)
Estimated Cost
150.00
Estimated Time Investment
Weekend Project (10-20 Hours)
Finish Used
Miniwax Dark Walnut
Recommended Skill Level
Intermediate
Comments
Wed, 06/12/2013 - 04:15
oh plans pleeease
Oh I really hope that you are able to put these modified plans up!!! A foldable farmhouse table.... what will they think of next!

Sat, 10/22/2016 - 12:25
Stunningly beautiful! Thank
Stunningly beautiful! Thank you for sharing and inspiring!
Sat, 10/22/2016 - 17:21
Toe kick drawers
I cannot find the plans for the tiny house drawers any where. Can someone please point me in the right direction. Thank you!
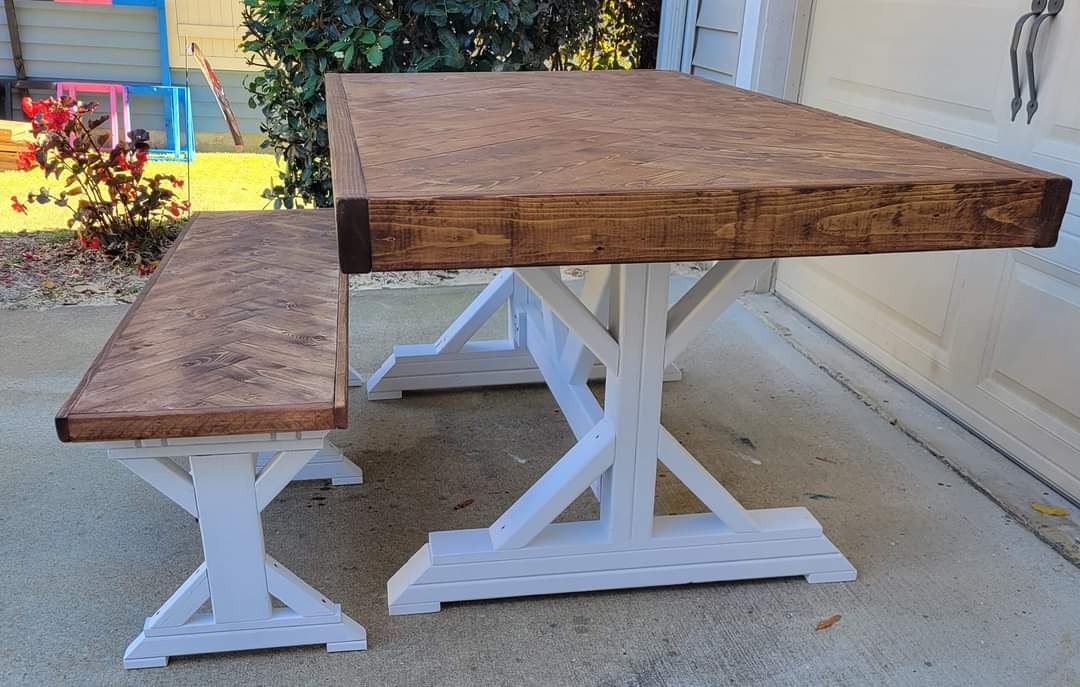
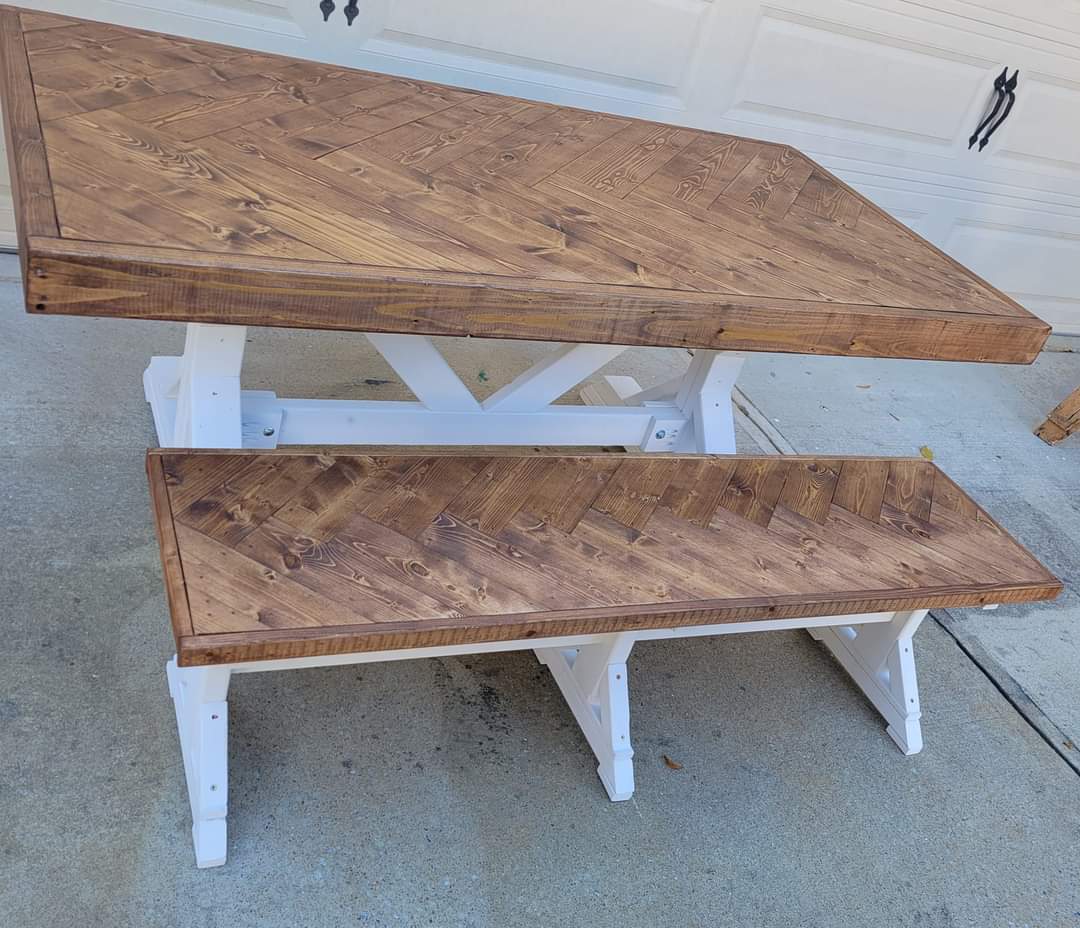
Fancy X table and bench
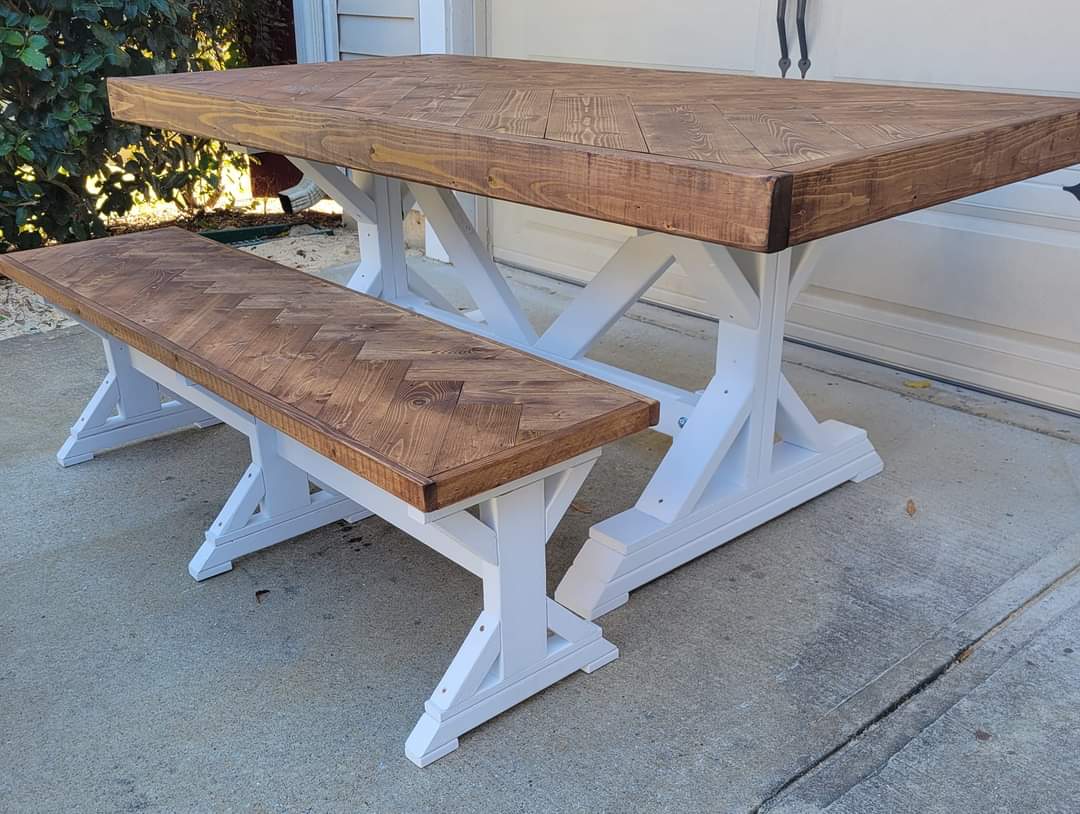
Put a fancy twist in this tabletop and bench top. We like the 45 degree angles that the top and legs both have to compliment each other. The top is stained with minwax special walnut.
Built from Plan(s)
Comments
Tue, 11/16/2021 - 19:18
Another amazing build!
You've been busy, this is gorgeous all the way around!
Farmhouse table and bench
The table is based on the farmhouse table with pocket holes. I used a mulwark pocket hole set. The bench was made with all scrap lumber and I ended up being short on 2x4 wood, so I used 2x2 on each side to accommodate the same dimensions. It was a time crunch, but I got it all done before Xmas Eve and it looks dope.
Built from Plan(s)
Comments
Sun, 12/26/2021 - 13:49
So pretty!
Oh yes, that is dope! Thank you for sharing, love the finish choices!
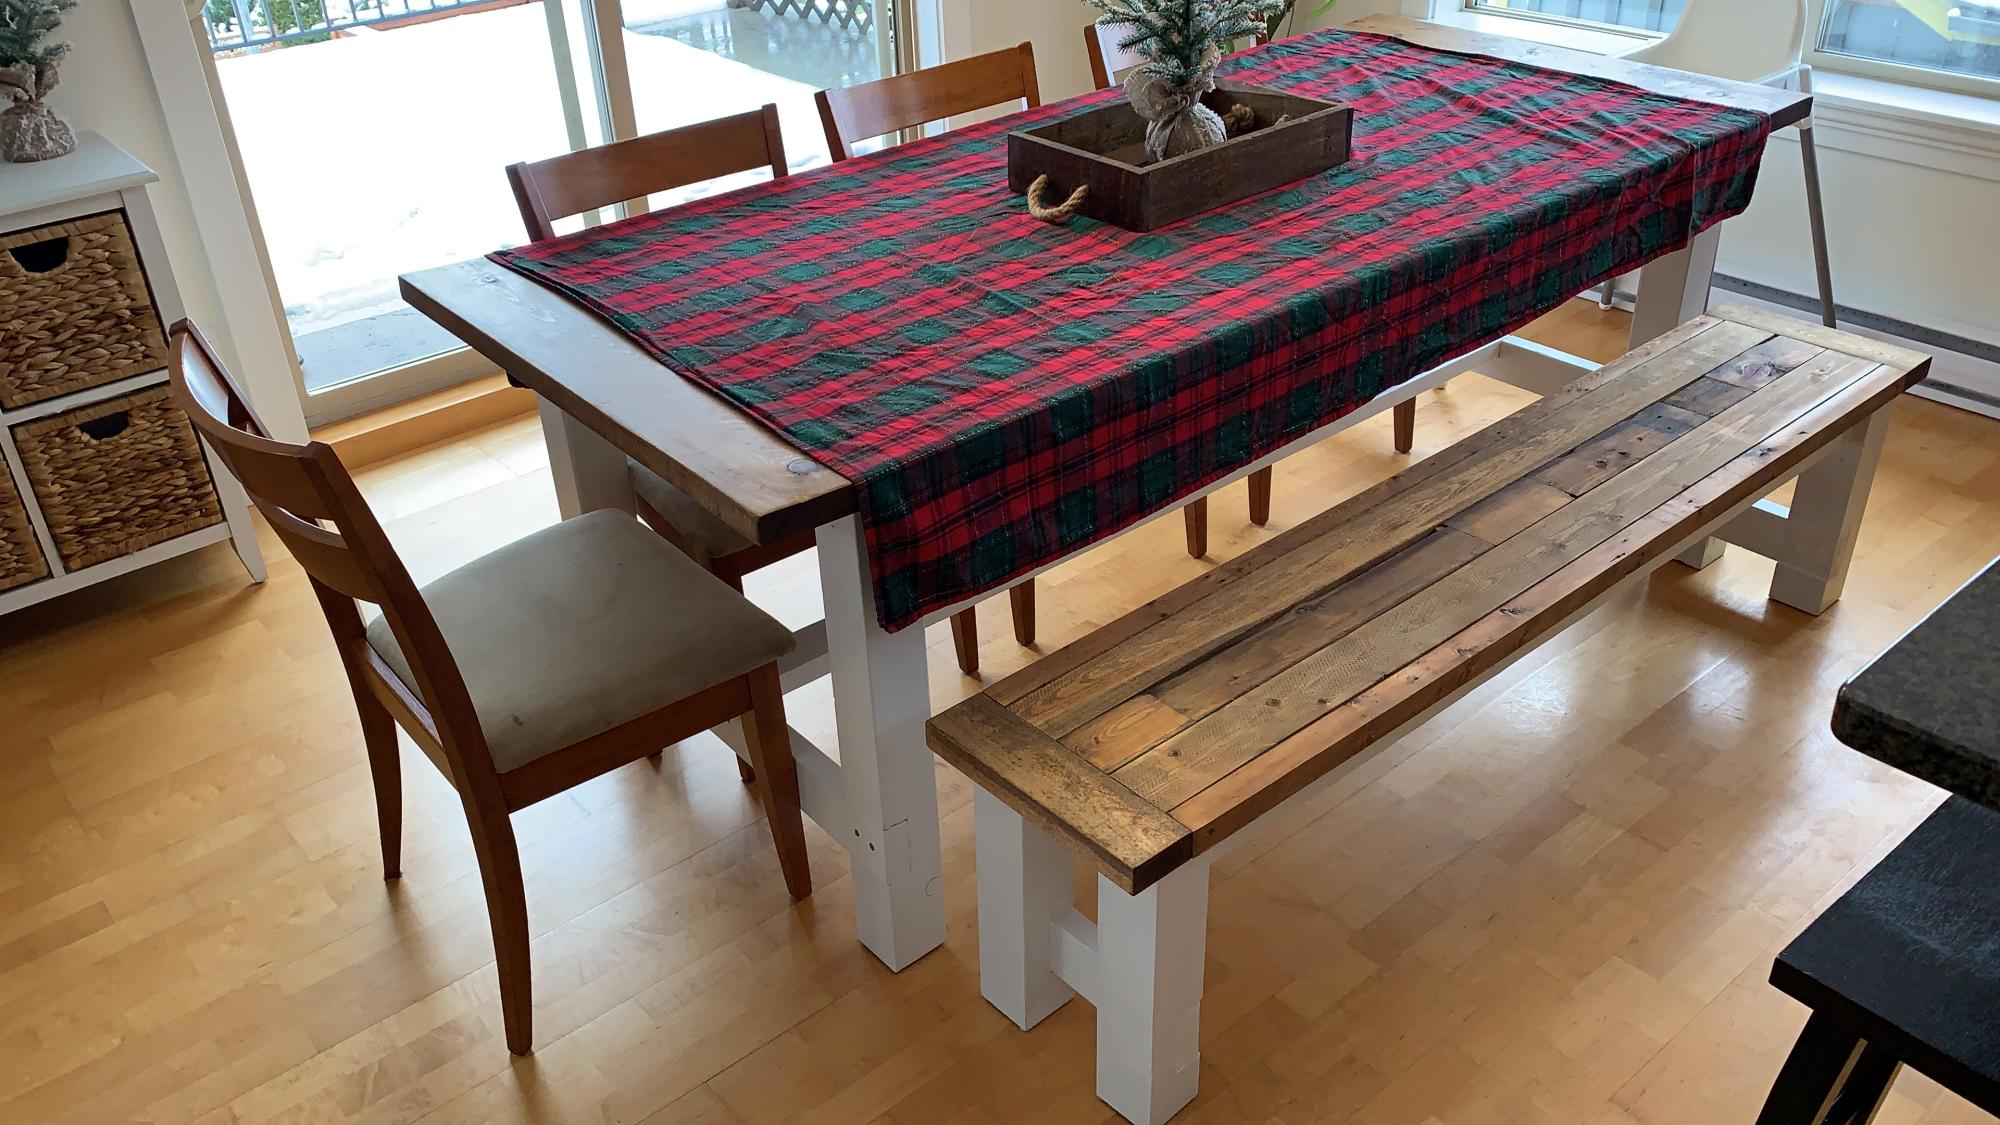
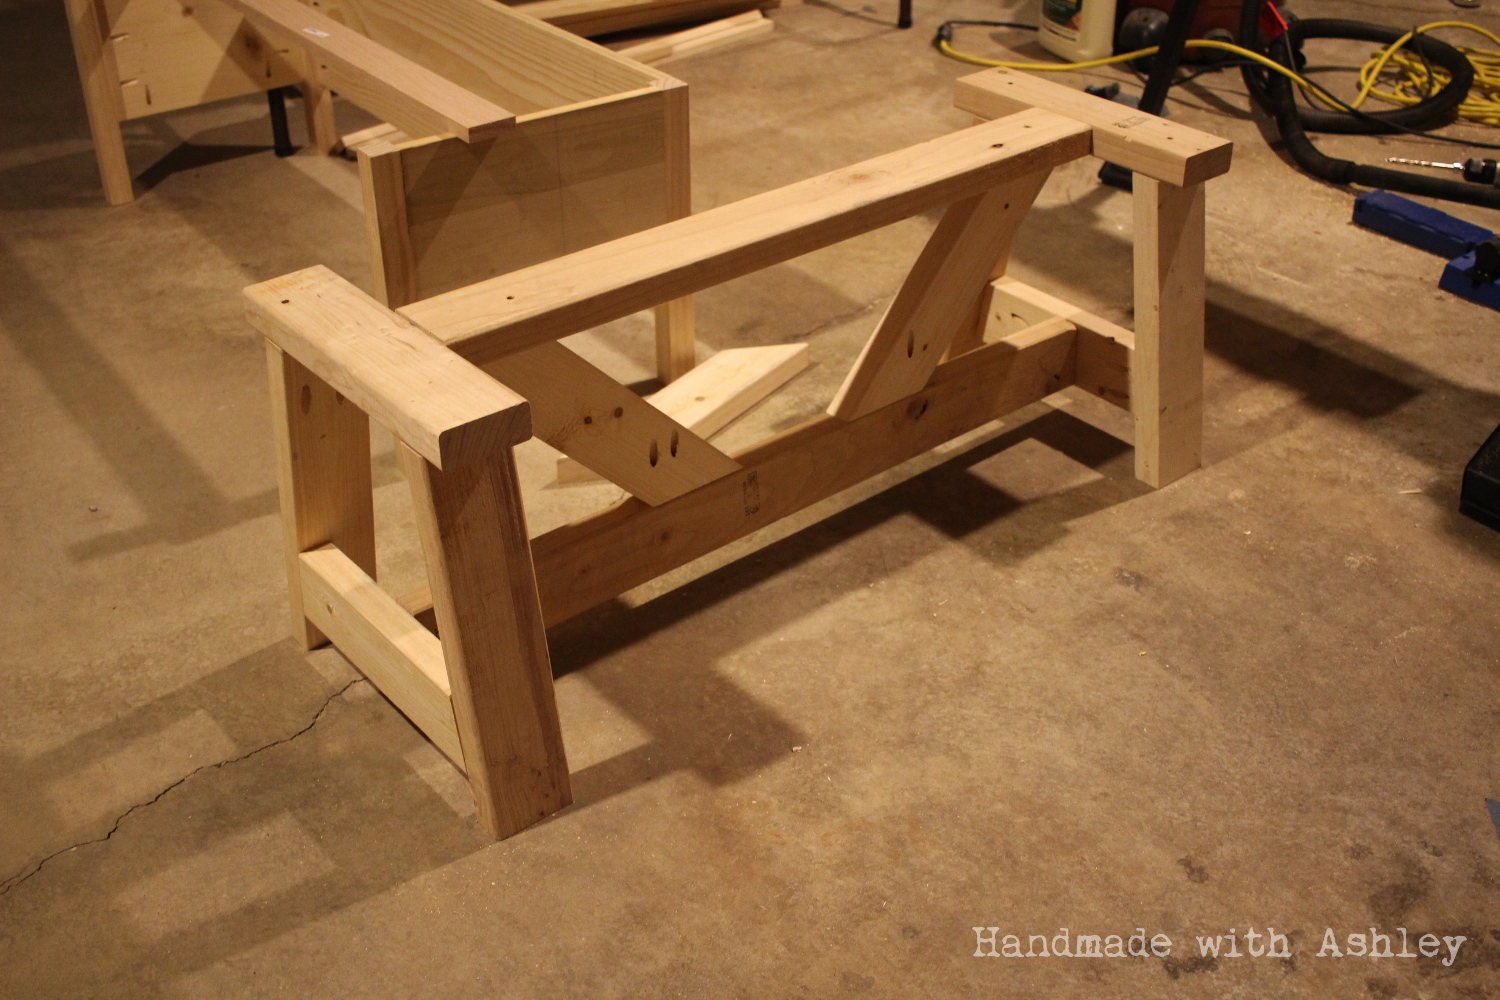
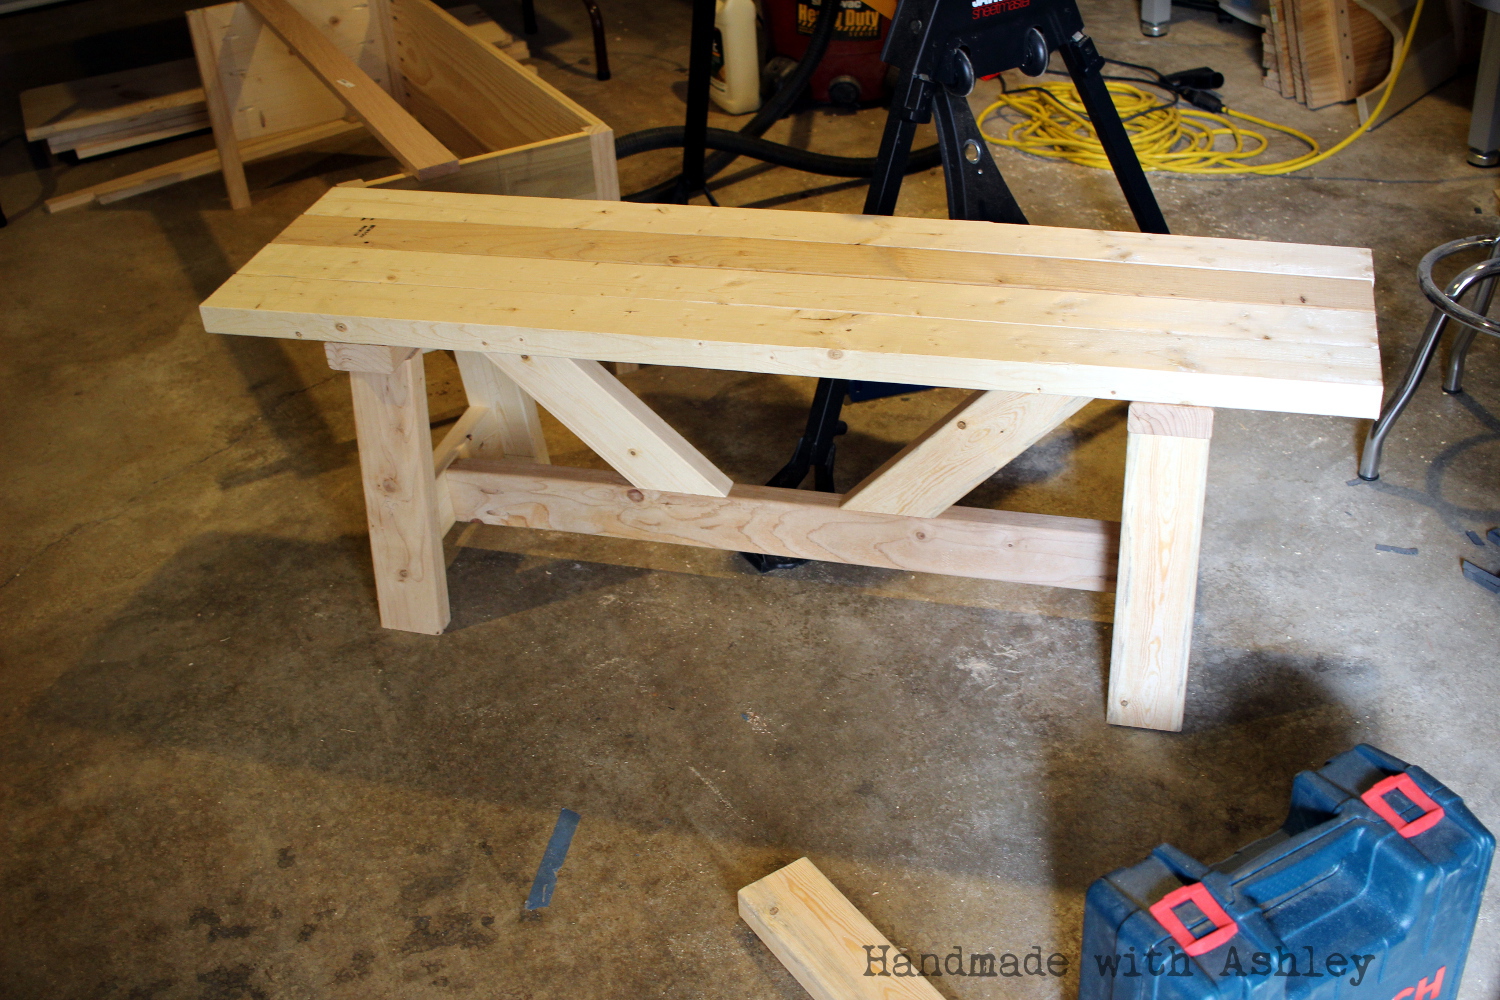
DIY Providence Bench
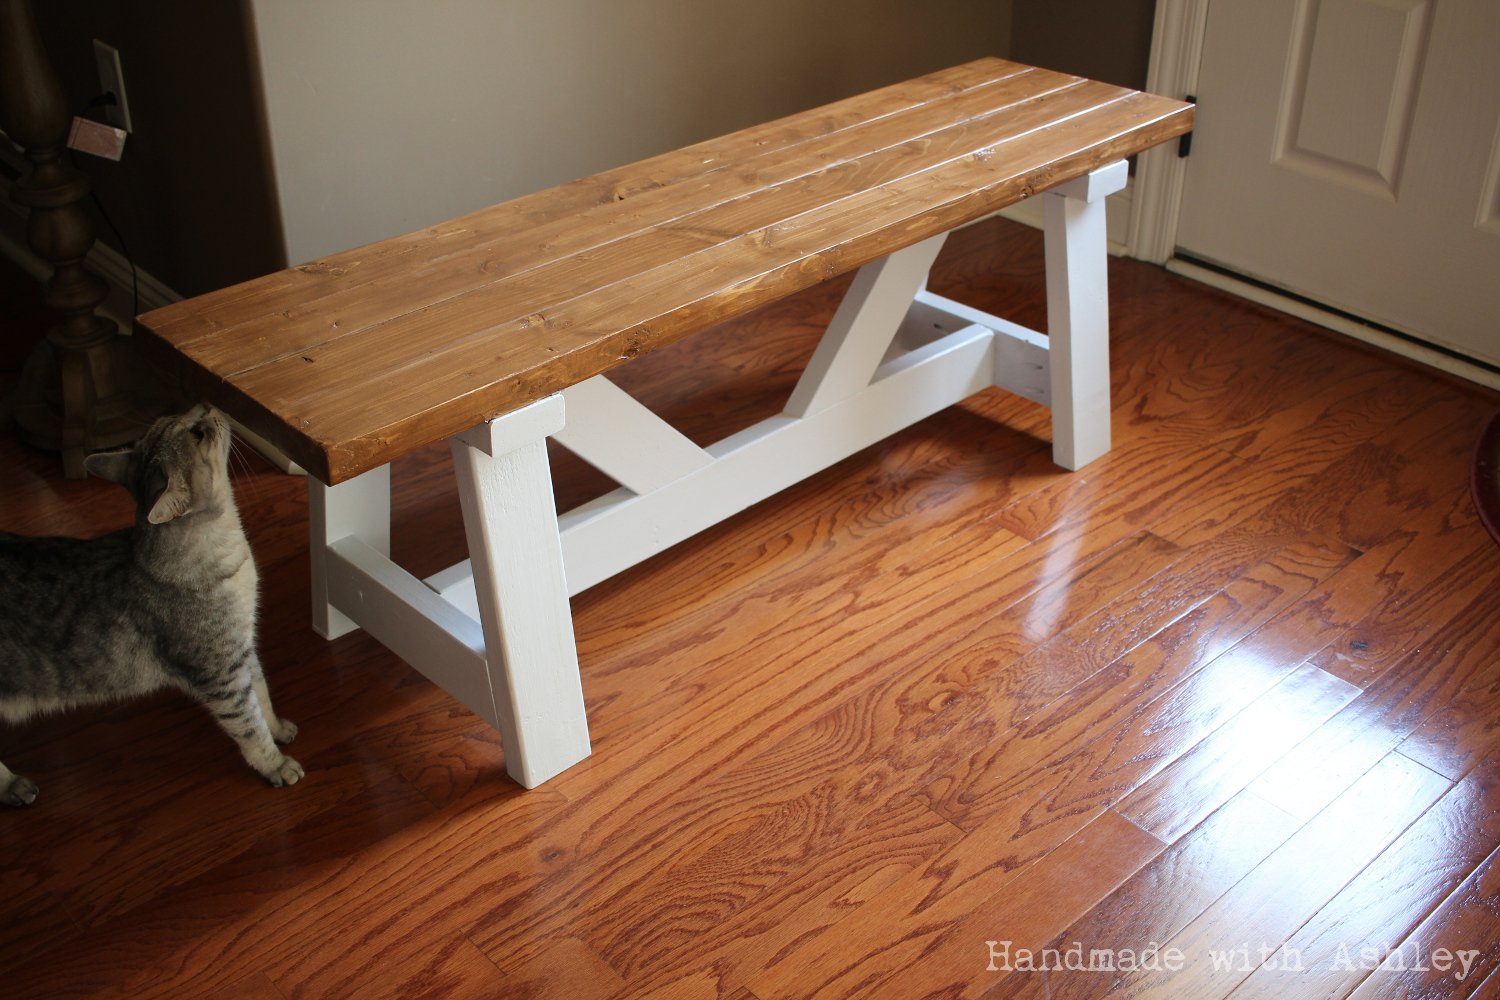
Hooray! I recently finished building a dining room bench. For this project, I used the Providence Bench plans by Ana White. I started this project in May, and two months later it is finally complete! I am really happy with how the bench turned out! It is pretty sturdy and makes for a nice addition to the dining room!
Built from Plan(s)
Estimated Time Investment
Weekend Project (10-20 Hours)
Finish Used
ECOS Paint Woodshield Stain in Pine Needles and their Satin varnish
Rust-Oleum White Semi-Gloss
Rust-Oleum White Semi-Gloss
Recommended Skill Level
Beginner
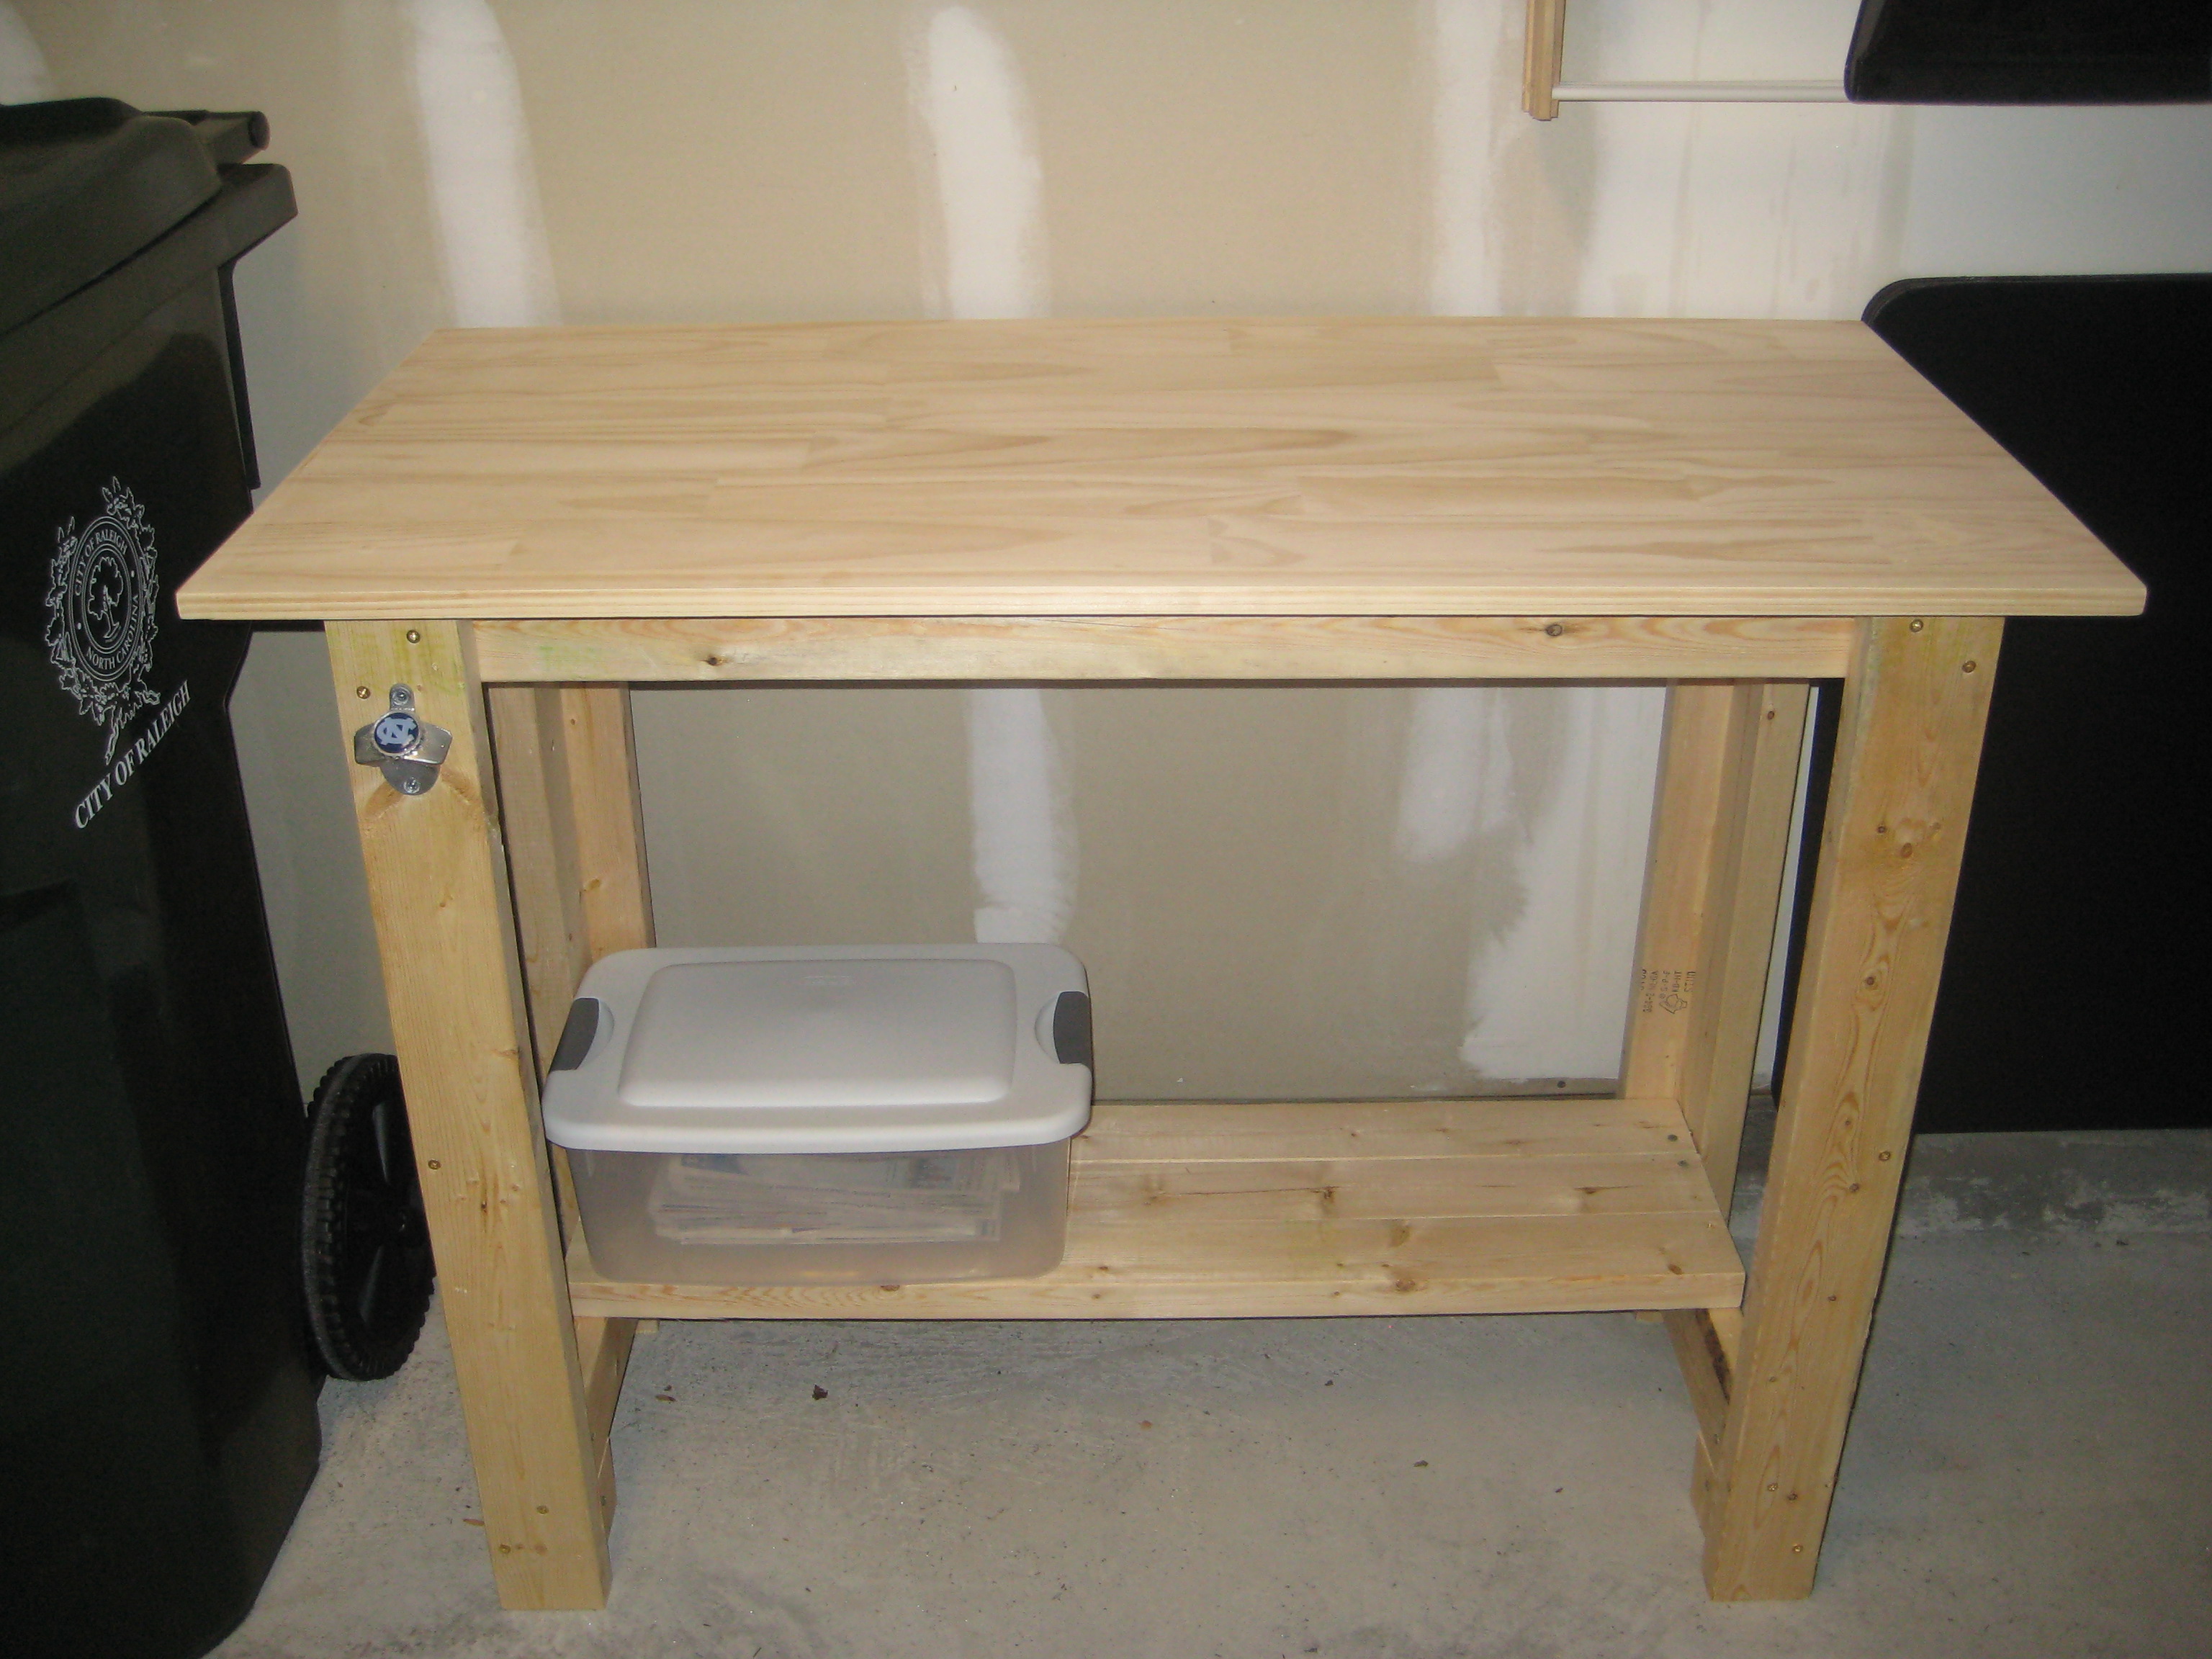
Sturdy Work Bench - First project completed!
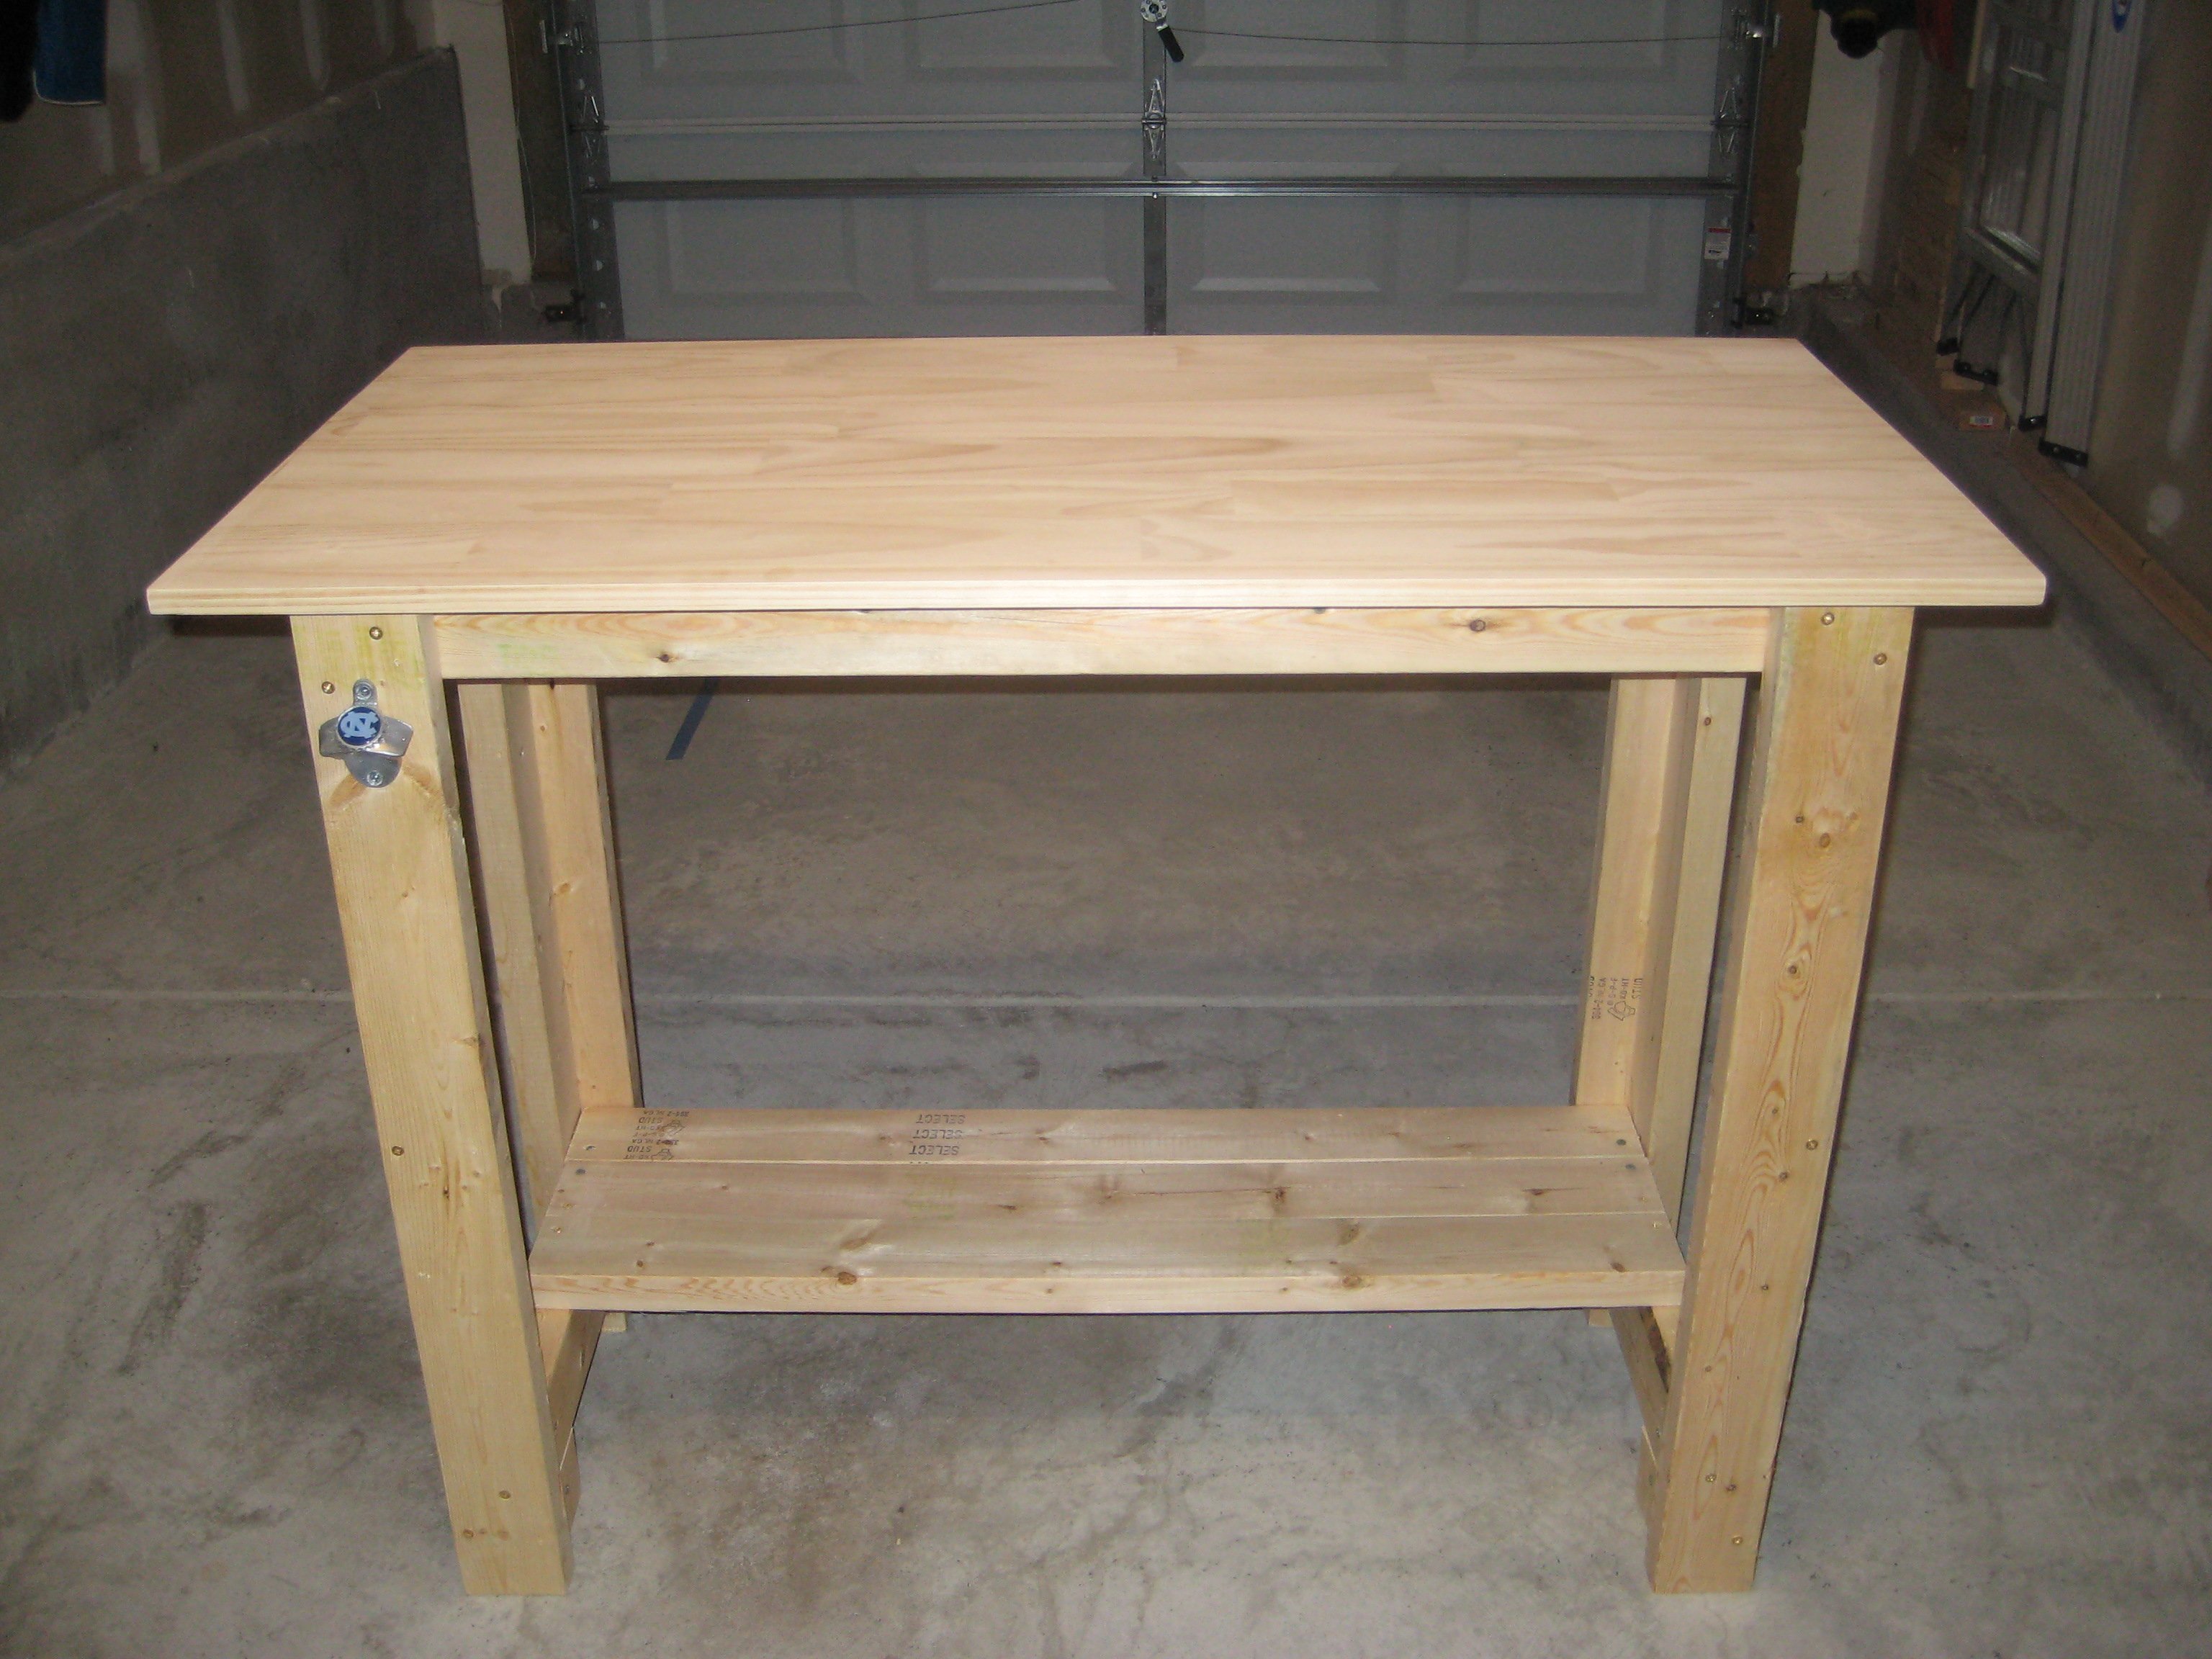
My first project from Ana's website! I figured in order to make more furniture I'm going to need a sturdy work bench to help me along the way. I cut my legs at 36" instead of 33". The 3 added inches brings it to a standard kitchen countertop height (I think, at least mine is). Thanks for the inspiration and plan pericles49!
Built from Plan(s)
Estimated Cost
$65
Estimated Time Investment
Day Project (6-9 Hours)
Finish Used
Water based clear semi-gloss polyurethane.
Recommended Skill Level
Beginner
4x4 Truss Beam Table with Half Lap Joints
My take on Ana's table that I made with my son over Summer Break.
Built from Plan(s)
Estimated Time Investment
Week Long Project (20 Hours or More)
Recommended Skill Level
Intermediate
Comments
Wed, 03/30/2016 - 01:07
I really like how you made
I really like how you made half cuts so that the beams were more supported!
On the legs did you attached with pocket holes or where did you attach so that the screws were hidden?
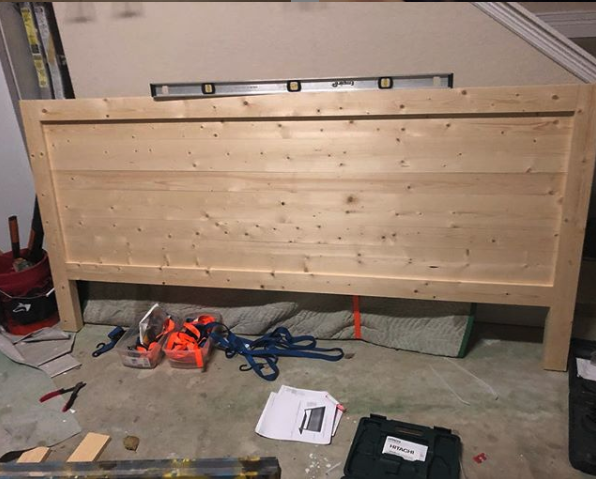
Reclaimed wood headboard, queen size
Made out of spruce to keep the cost under fifty dollars.
Built from Plan(s)
Estimated Time Investment
Day Project (6-9 Hours)
Finish Used
Minwax Provincial Stain
Recommended Skill Level
Beginner
Outdoor Dining Table
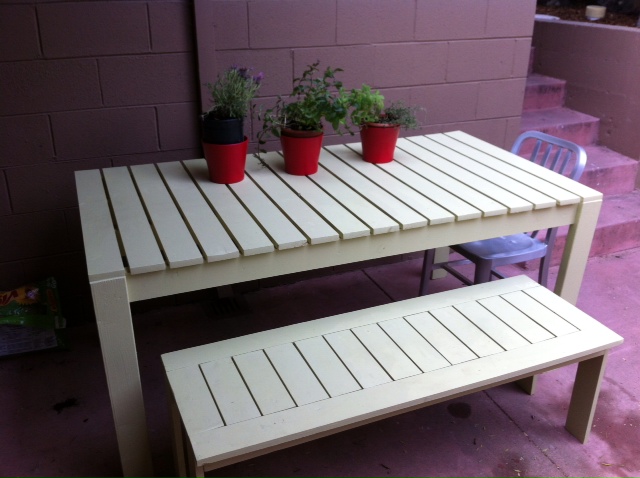
We started with the bench as a weekend project. After counter-sinking and filling all those screw holes we borrowed a Kreg jr and took onothe table project. However we ended up countersinking the top boards for the table as well; it was easier for us to visualize the spacing between boards and make sure everything was as square and level as we could make it... We used behr paint and primer in one in a satin finish and opted for a punchy green to brighten up our courtyard.
We plan to build another bench since it will tuck in nicely under the table when not in use, and we can pull the table out and use the bench when we need more seating.
We love our new outdoor furniture!! Thanks Ana!
Estimated Cost
$150
Estimated Time Investment
Week Long Project (20 Hours or More)
Finish Used
behr outdoor paint and primer in one
Recommended Skill Level
Beginner
Wine Cabinet

I took what was a single cabinet and doubled it.

Built from Plan(s)
Estimated Cost
500+
Estimated Time Investment
Week Long Project (20 Hours or More)
Finish Used
Destressed
Recommended Skill Level
Intermediate
Simple Outside Serving Table
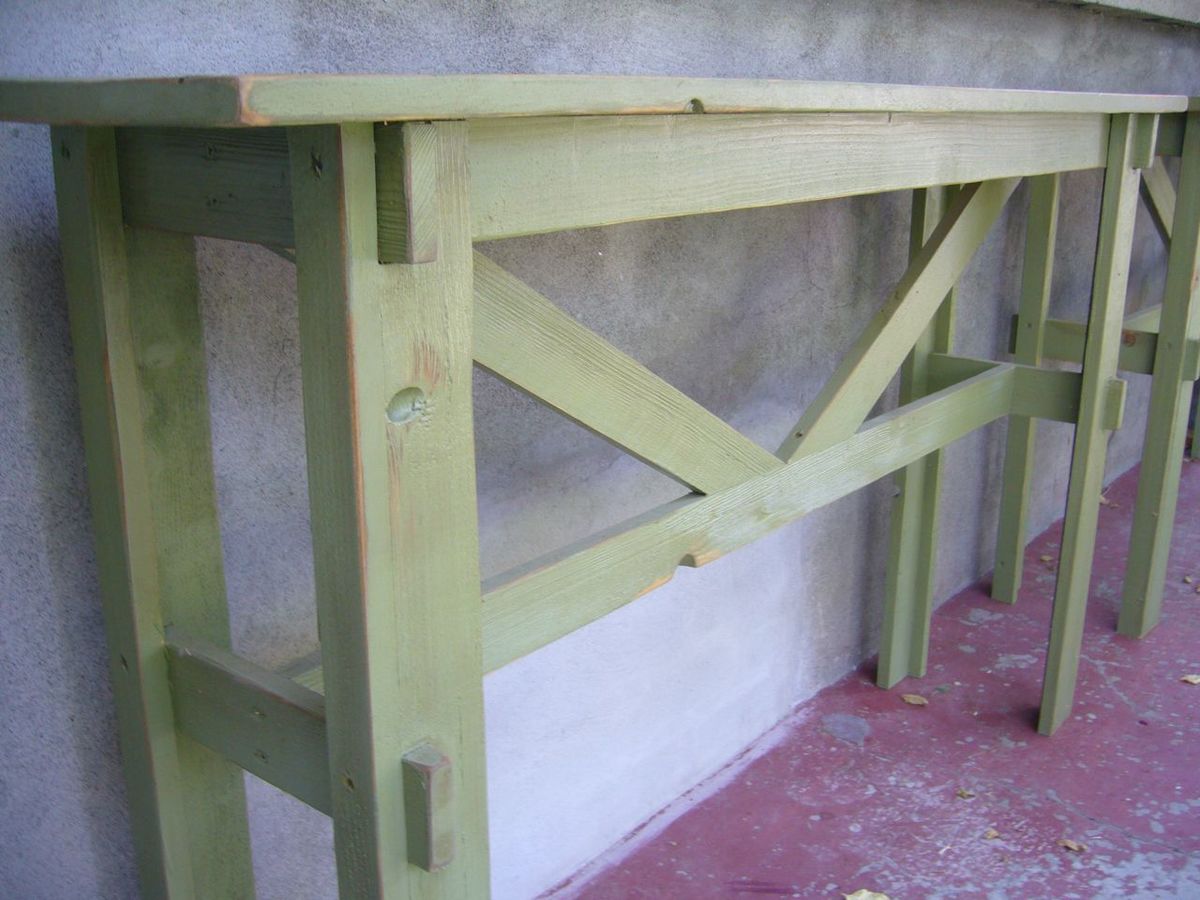
Problem: I want a serving table. I love the Rustic X Bench. Solution: Longer legs! This was made from the Rustic X Bench plans. We built two. And they serve us well. We love them. They are small enough to move around and use for all kinds of purposes from serving outdoor meals to holding the screw gun while I clamp the next ana-white inspired project (it was my tool holder/work bench when I built our chicken coop). Easy project made super cheap that works perfect for every outdoor serving table need.
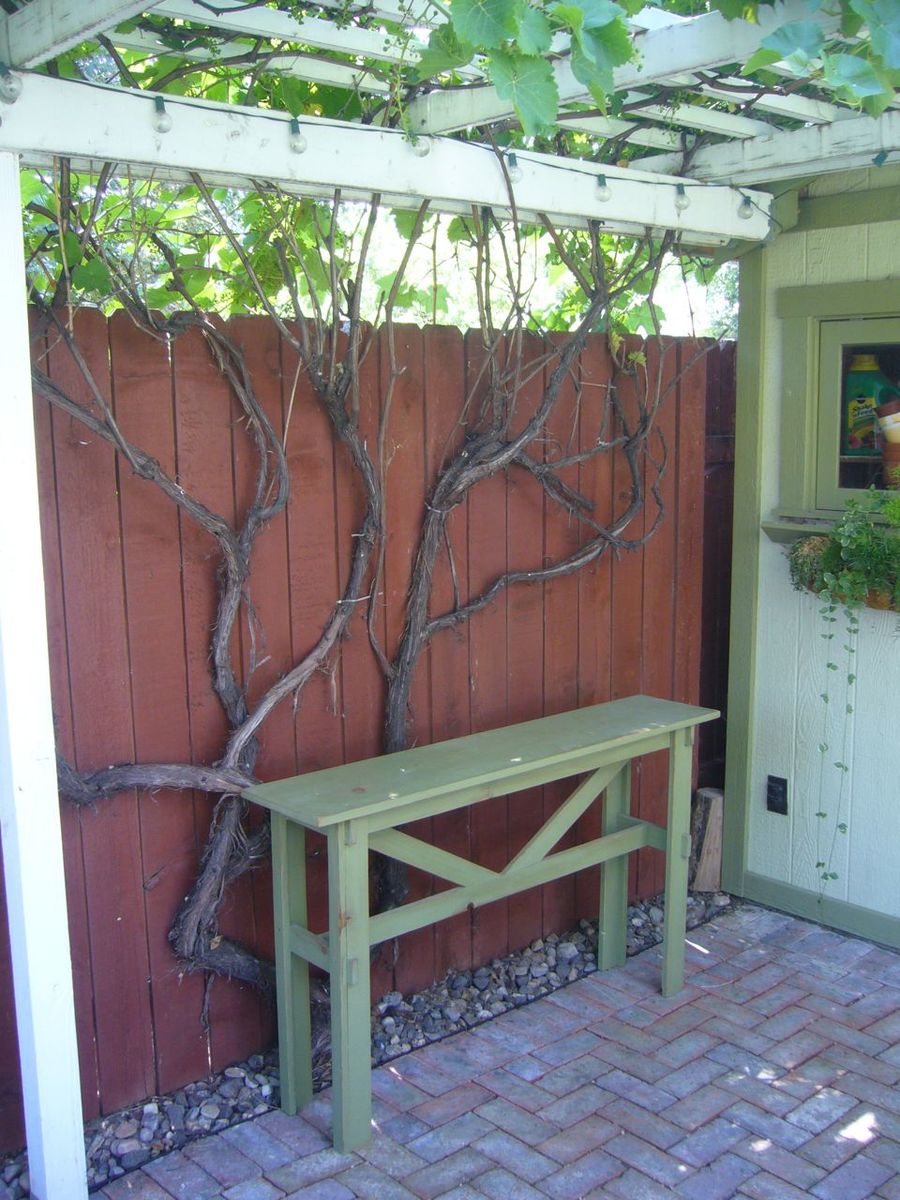
Built from Plan(s)
Estimated Cost
$75 for two
Estimated Time Investment
Afternoon Project (3-6 Hours)
Finish Used
Dark Moss Green paint, distressed with a red mahogany stain rub.
Recommended Skill Level
Beginner
Comments

Awesome table.
Made for my wife for a Christmas present. Awesome project.
Built from Plan(s)
Estimated Time Investment
Day Project (6-9 Hours)
Recommended Skill Level
Intermediate
Modern Farmhouse Bed
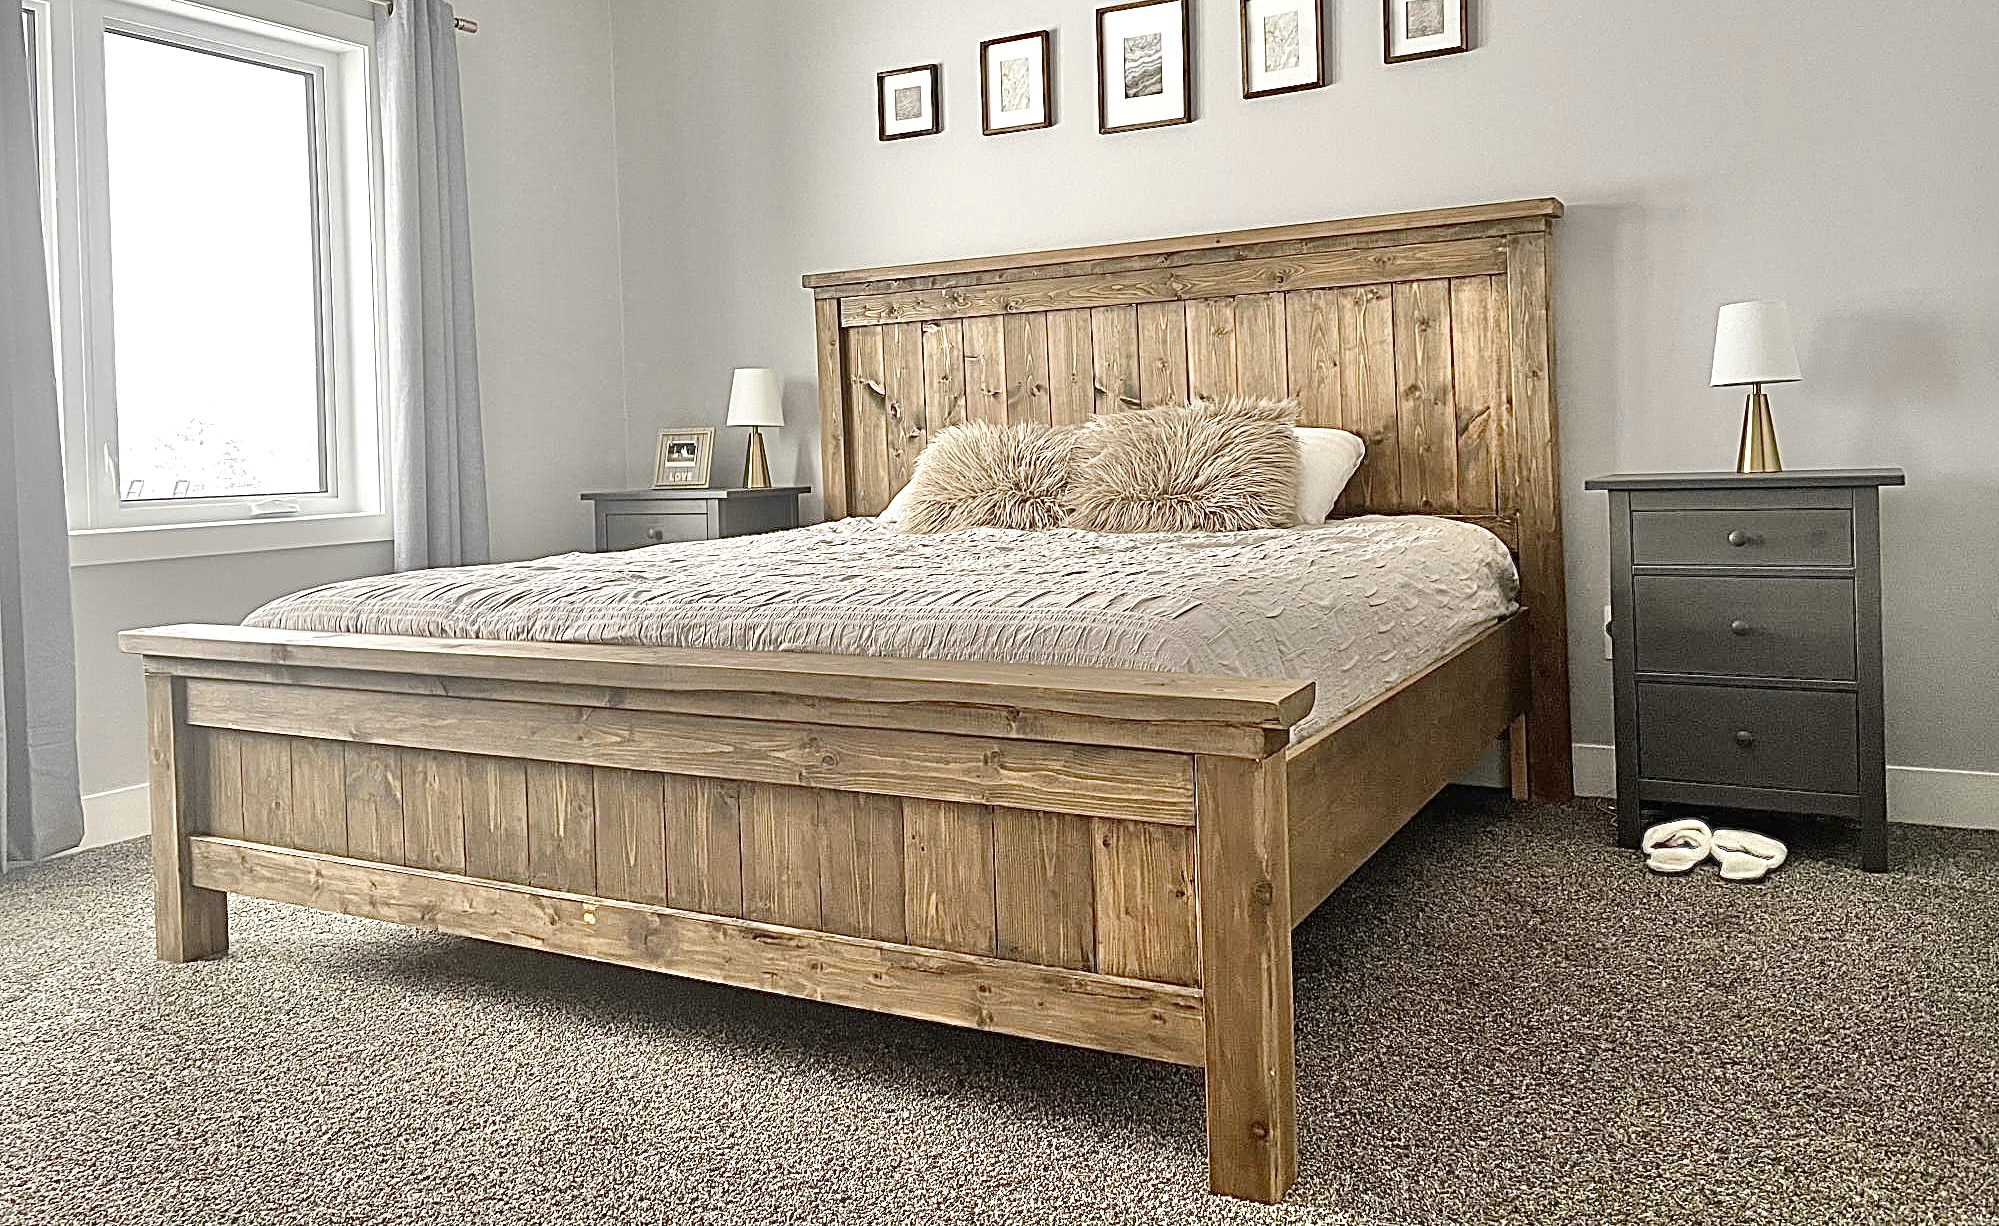
My husband and I had worked on this bed together, and we are so happy with it! We went with taller side tables that we purchased, and just stained the wood instead of painting it.
Built from Plan(s)
Comments
Corner Banquette Bench with Storage
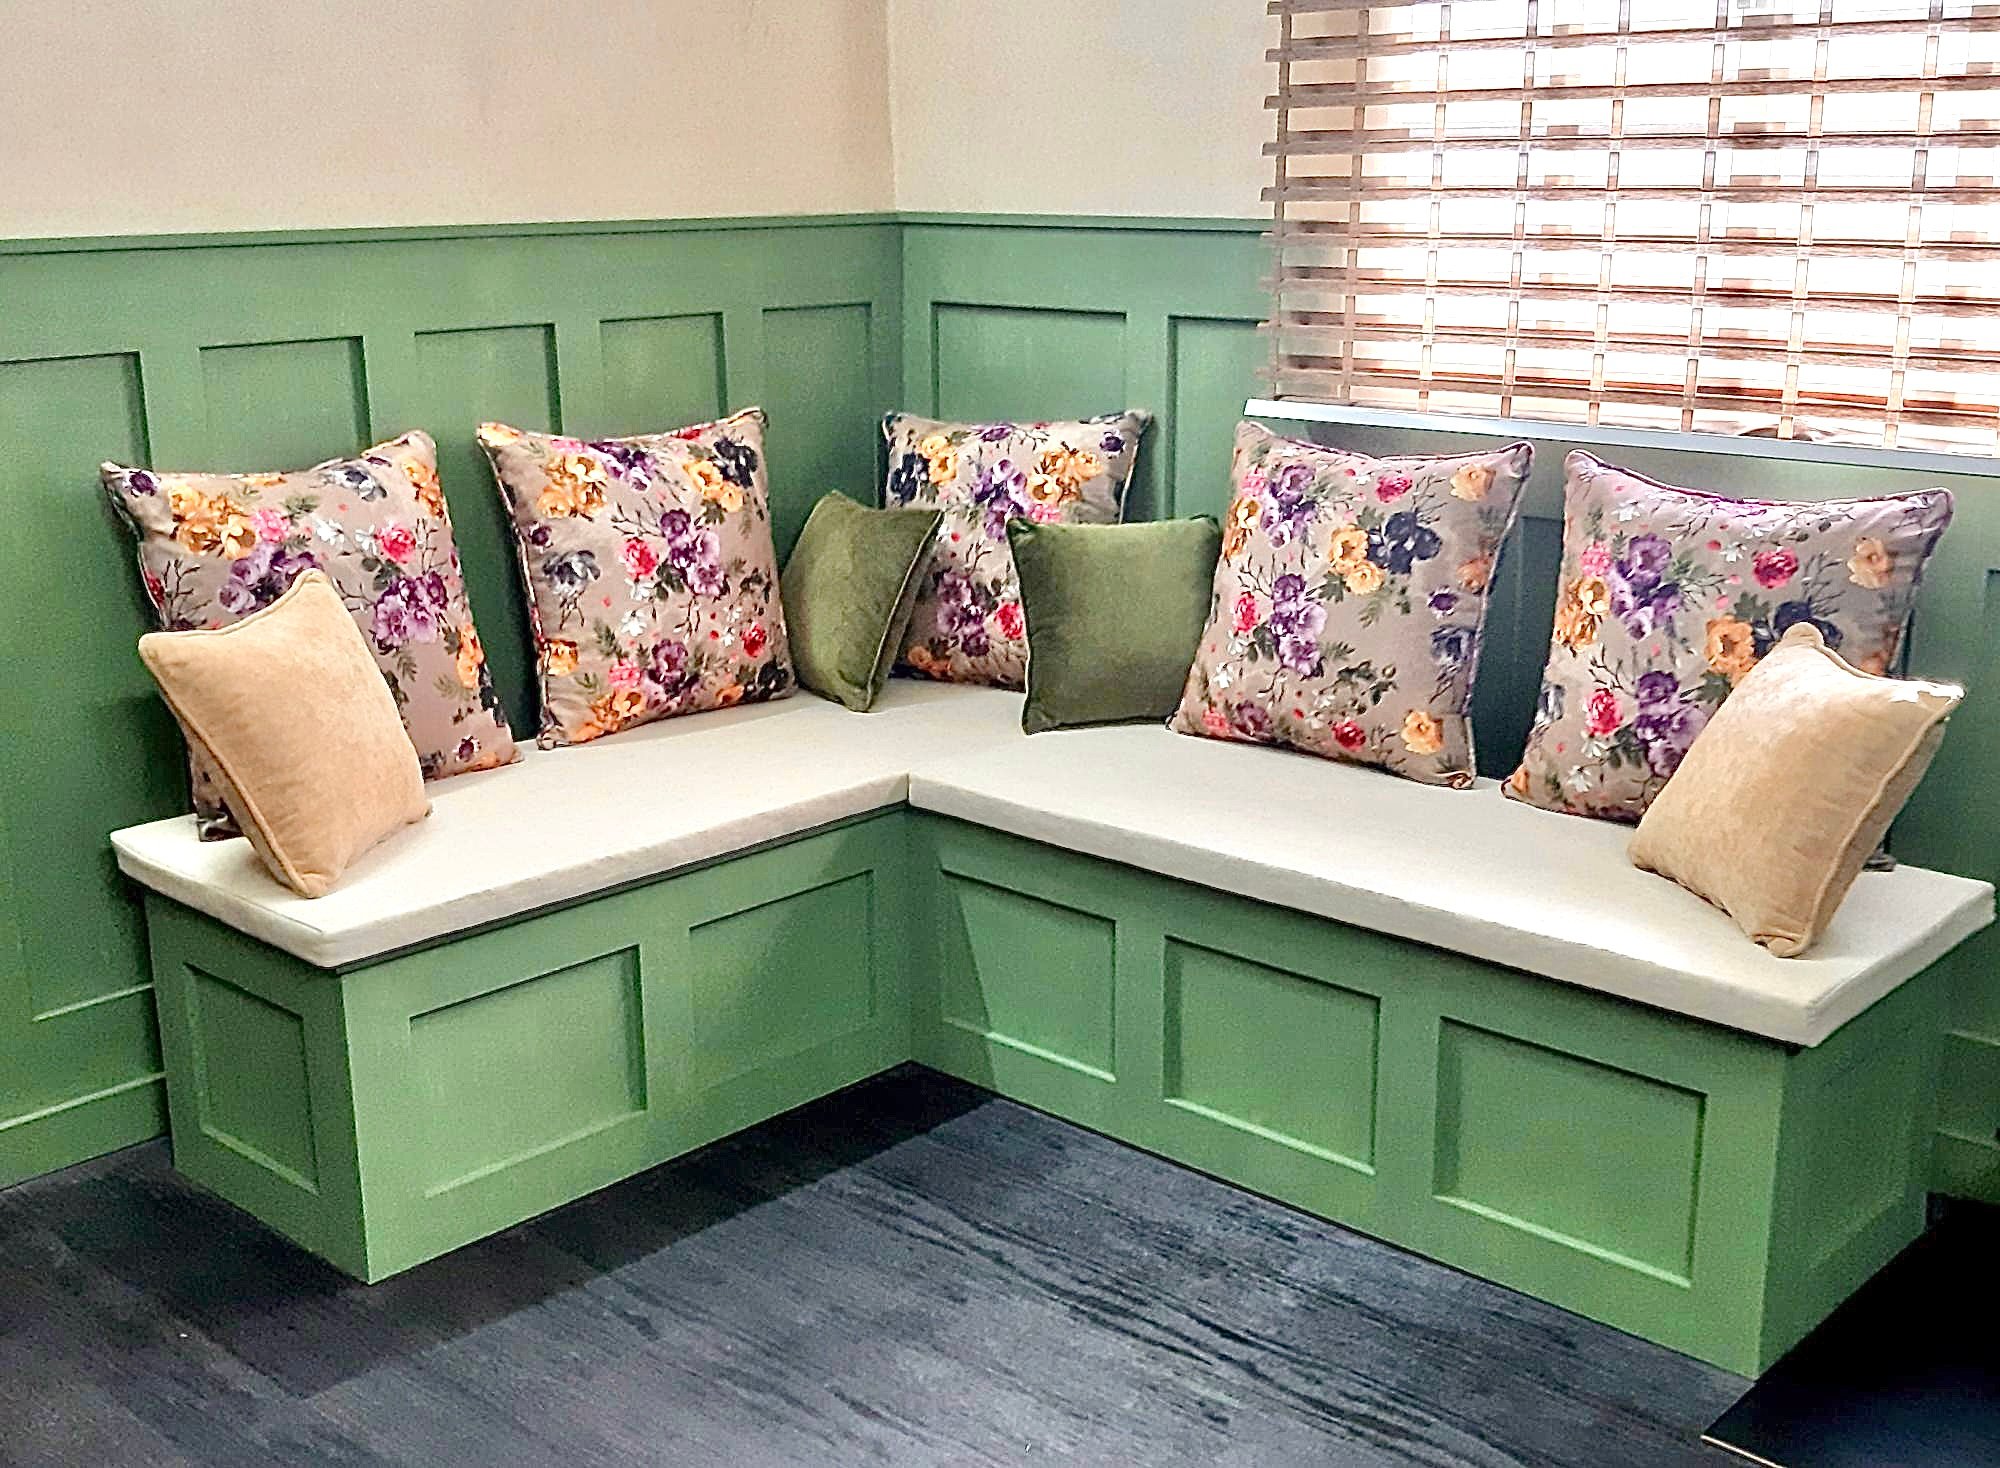
Beautiful banquette bench by Khalid Al-Bahi
Built from Plan(s)
Reclaimed wood - look Headboard and . modified platform bed.
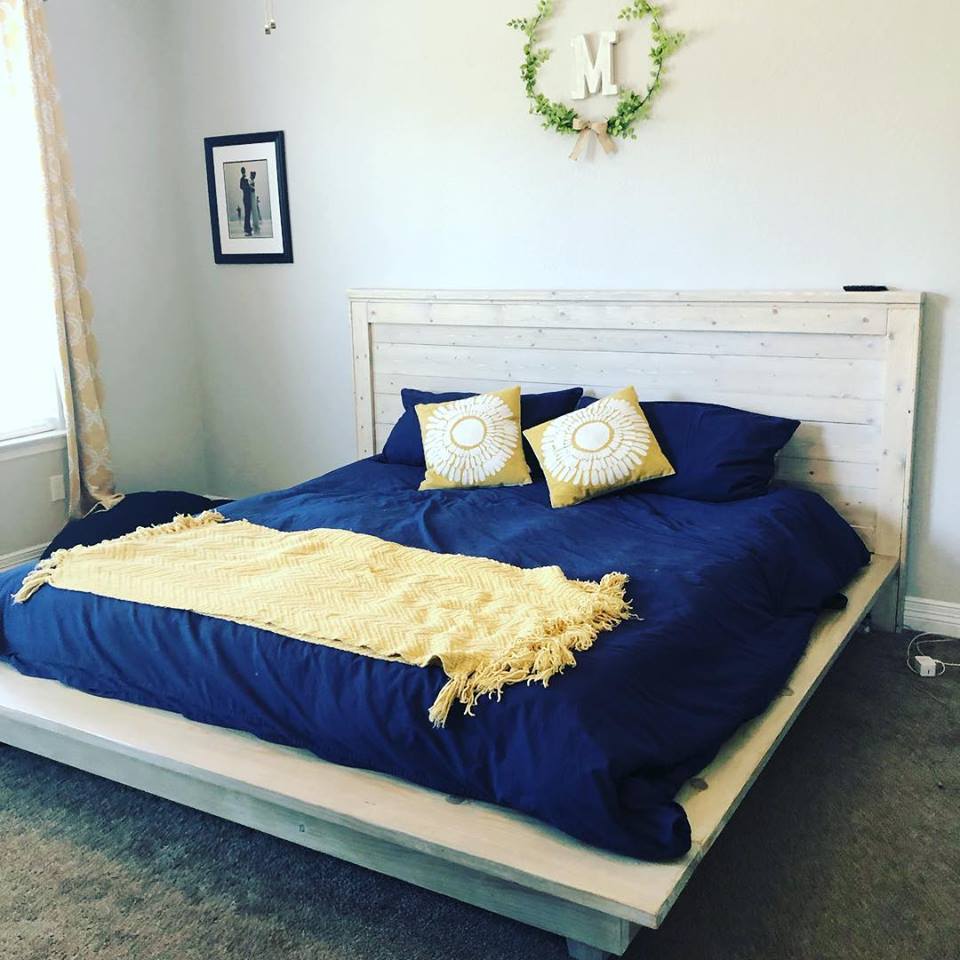
Made wider for a king and modified platform bed. Used a weathered oak stain followed by a 50/50 whitewash.

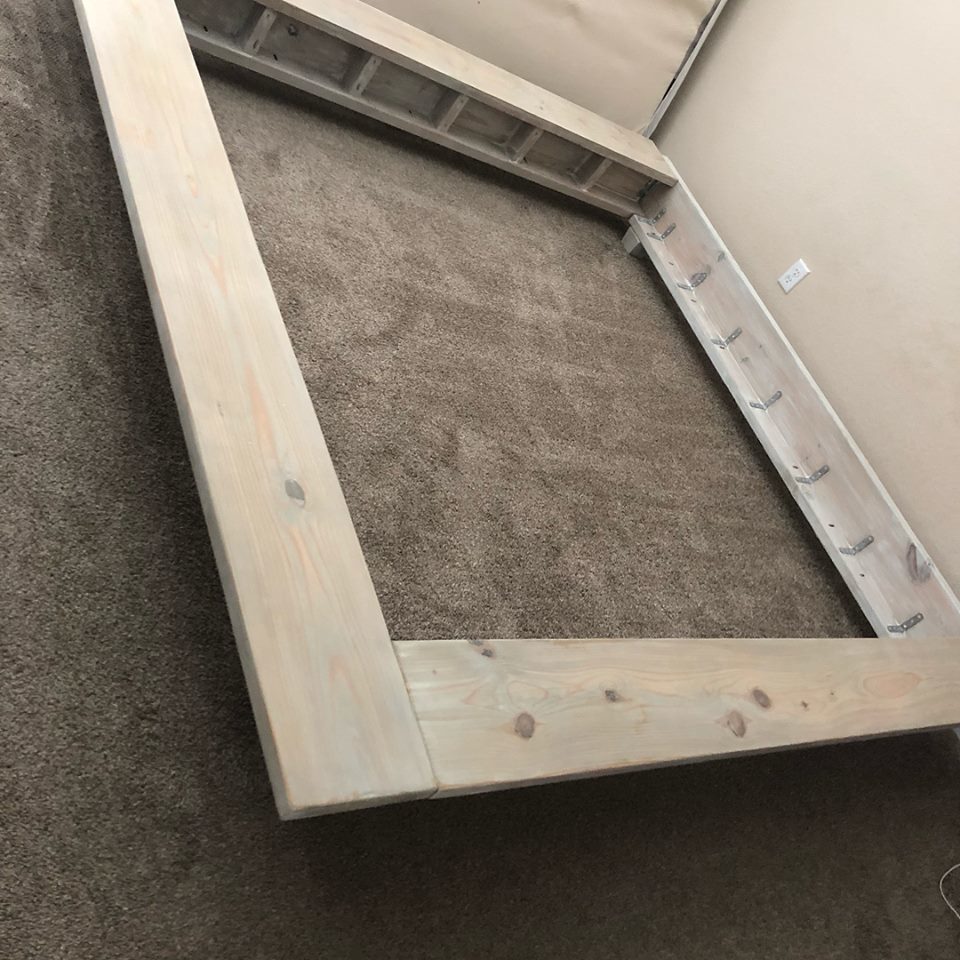
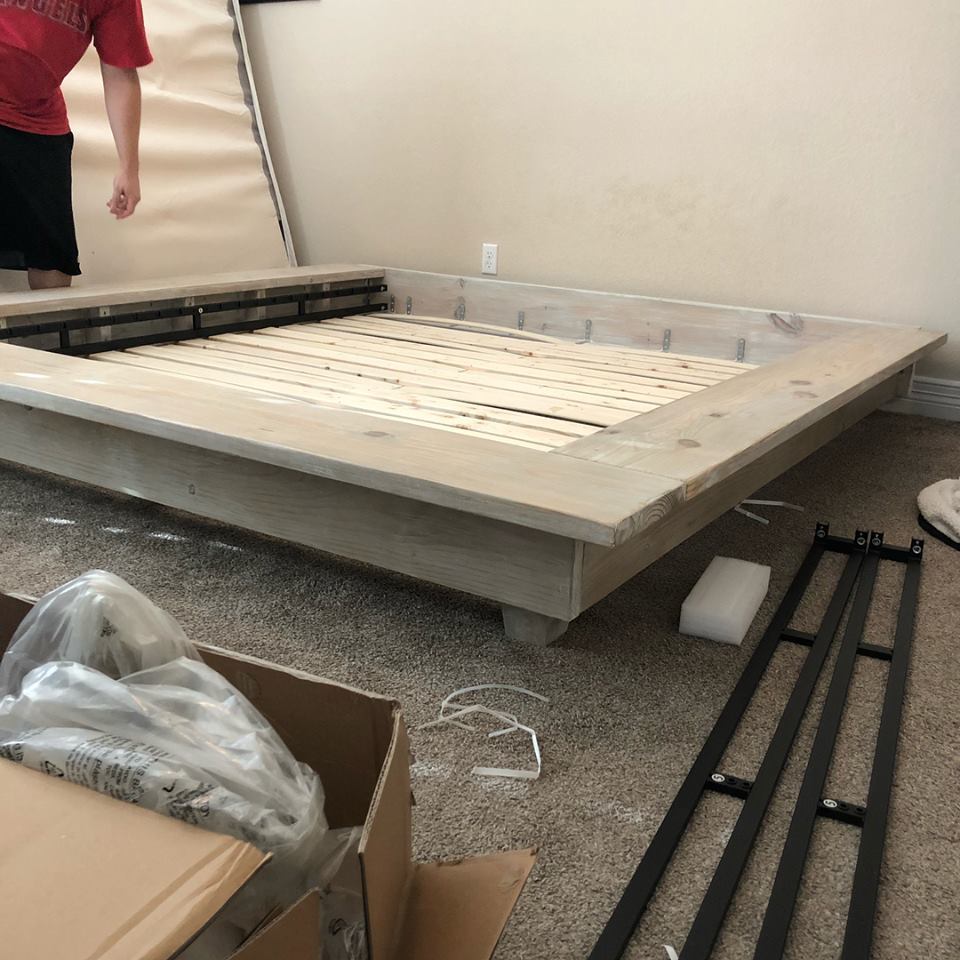
Built from Plan(s)
Estimated Cost
$300 ish
Estimated Time Investment
Week Long Project (20 Hours or More)
Finish Used
Used a weathered oak stain followed by a 50/50 whitewash. Varythaned.
Recommended Skill Level
Intermediate
Modular Corner Office and Craft Desk
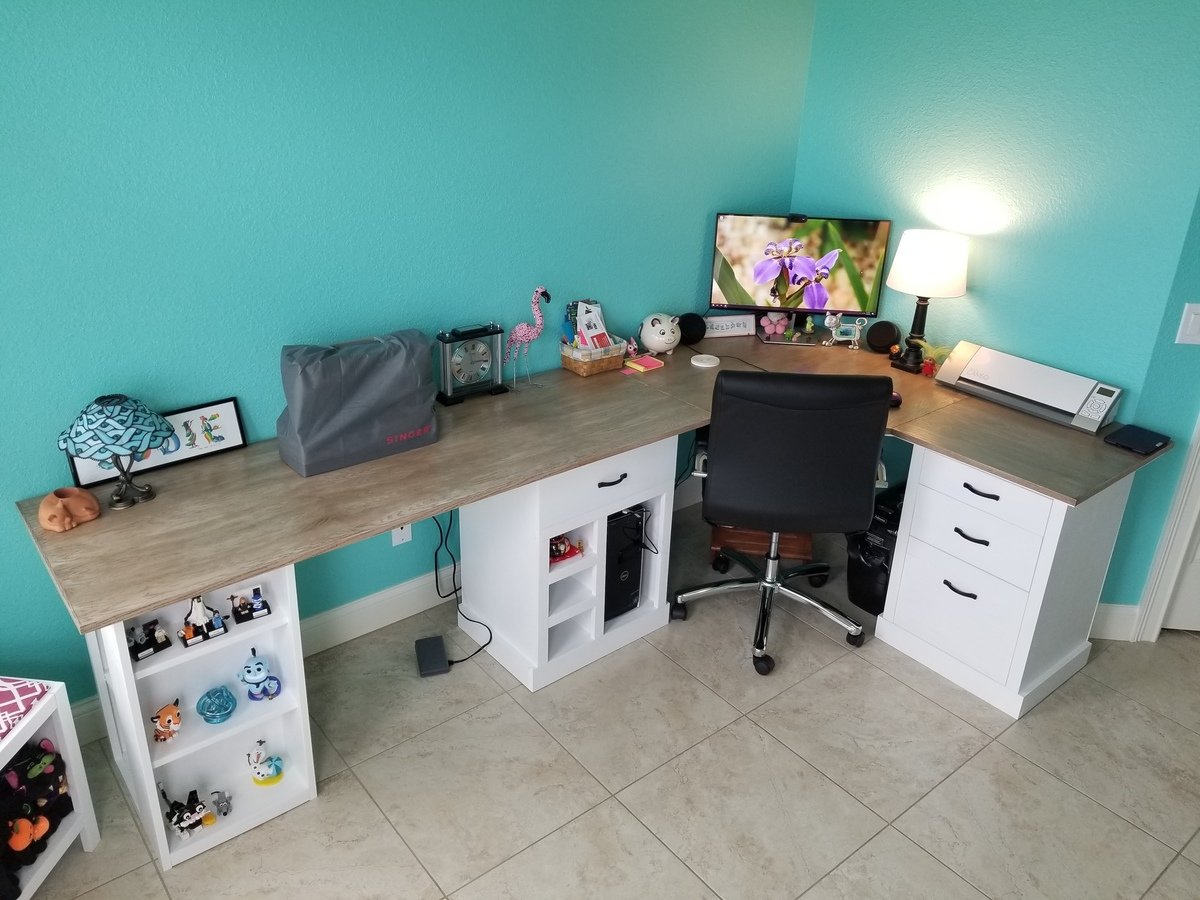
I started creating the furniture for my new craft room by making the Easy Three Cube Benches I found here. I modified them so that my cats could lay on top and look out the windows. The cube benches gave me the confidence to design a printer stand. Using Ana White's technique of "build the box" and then add the rest, I designed a custom printer stand I am so very proud of! After the printer stand, I moved on to the final piece that would complete my craft room, a modular desk with plenty of workspace to complete any craft I want. I modified each module a little to keep with the theme design of the room. I created three modules. The last one being a bookcase that is a modification of the Modern Craft Table bases. I used better quality Oak plywood for the desk top, and good pine and whiteboard plywood for the modules.
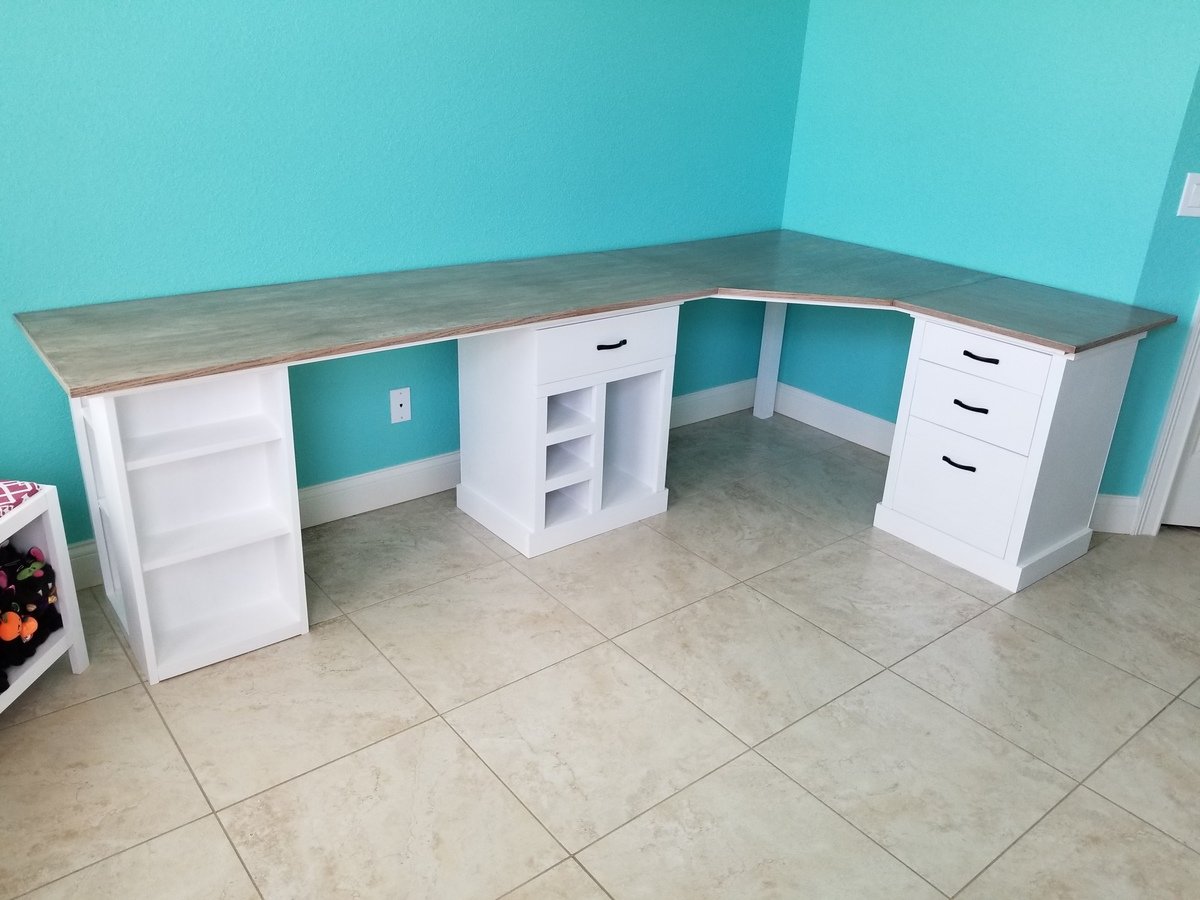
Built from Plan(s)
Estimated Cost
$500
Estimated Time Investment
Week Long Project (20 Hours or More)
Finish Used
For the modules I used Valspar Furniture Paint in ultra white. For the desk top I used Minwax Simply White stain and then Minwax Dark Walnut over that to create the "driftwood" style look. I sealed the desktop with about 5 coats of Minwax wipe-on poly.
Recommended Skill Level
Intermediate