Community Brag Posts

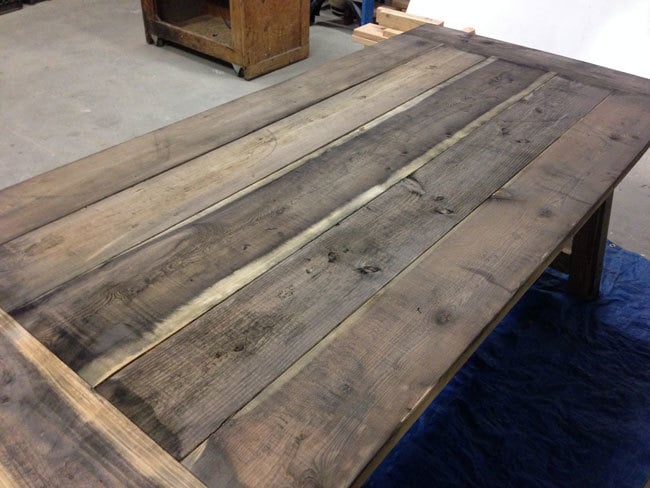
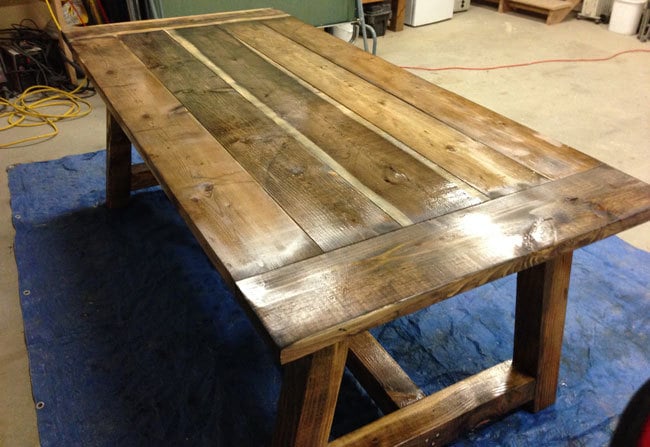
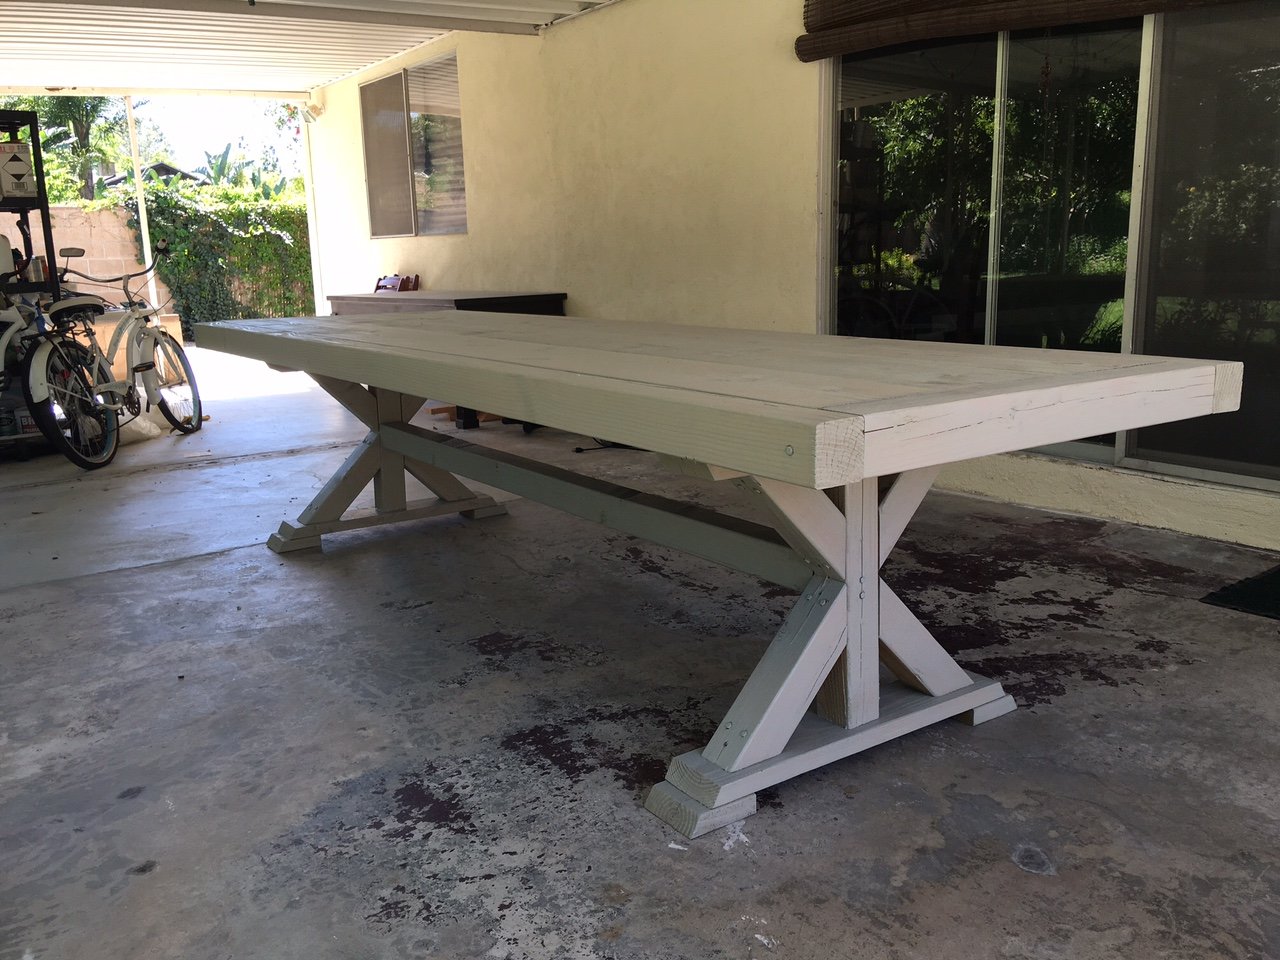
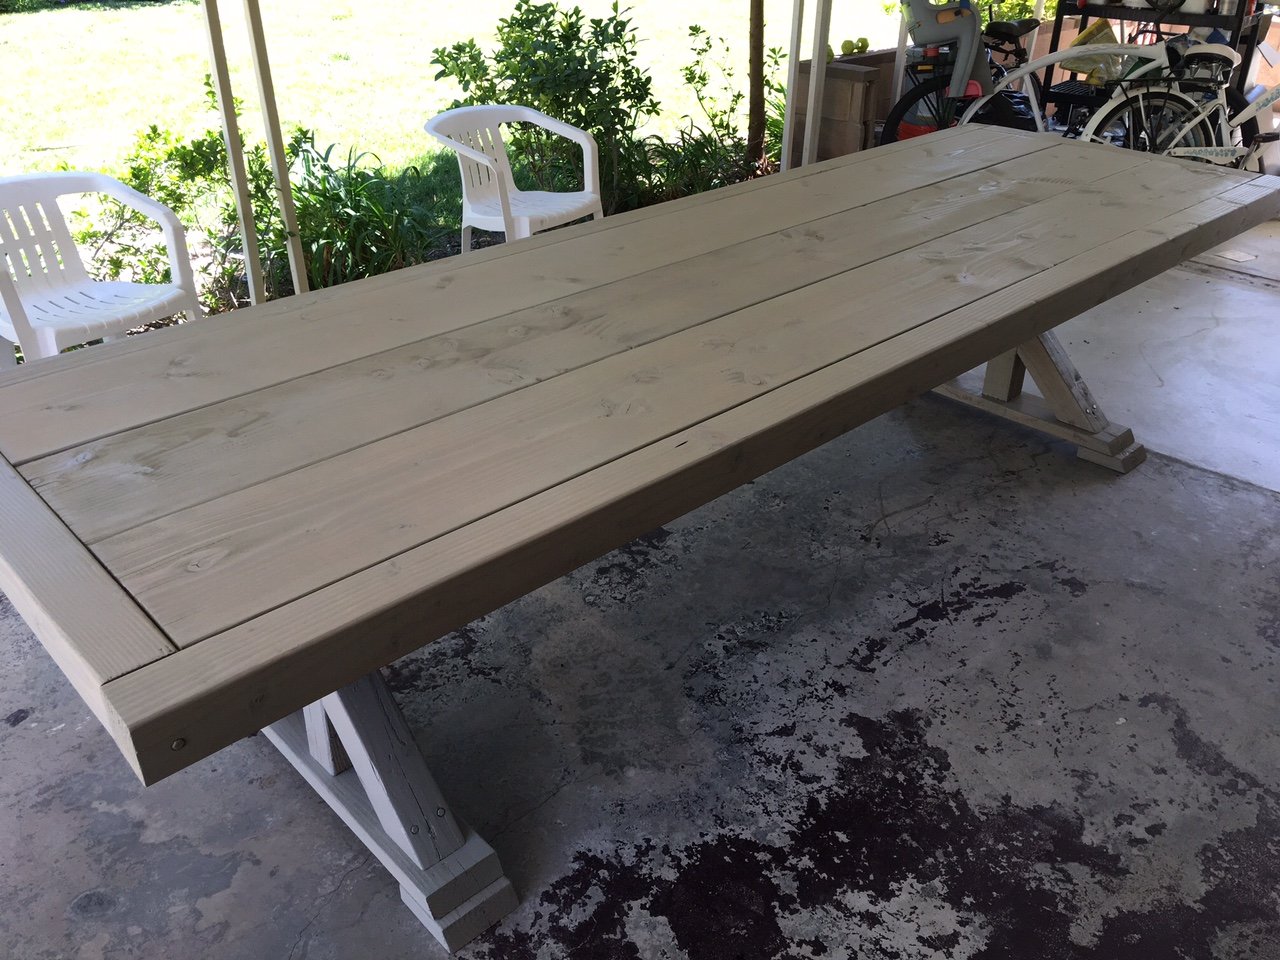
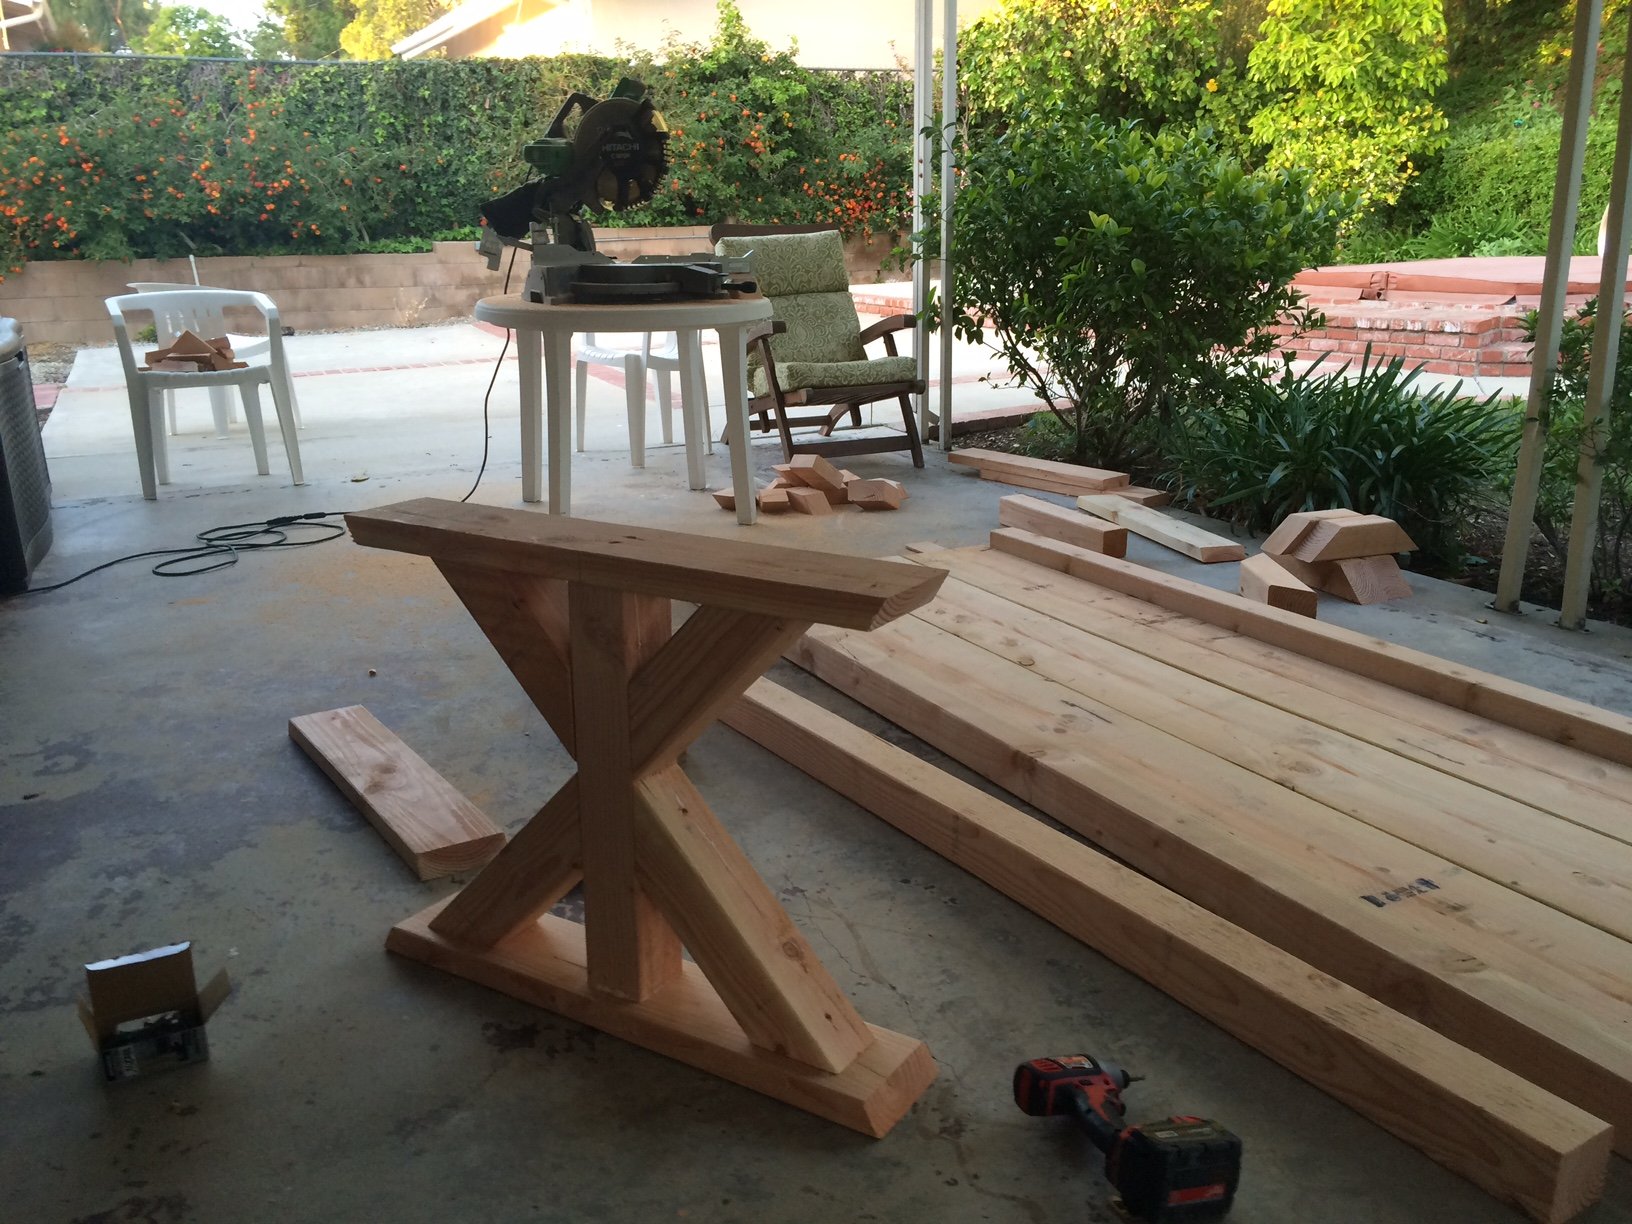
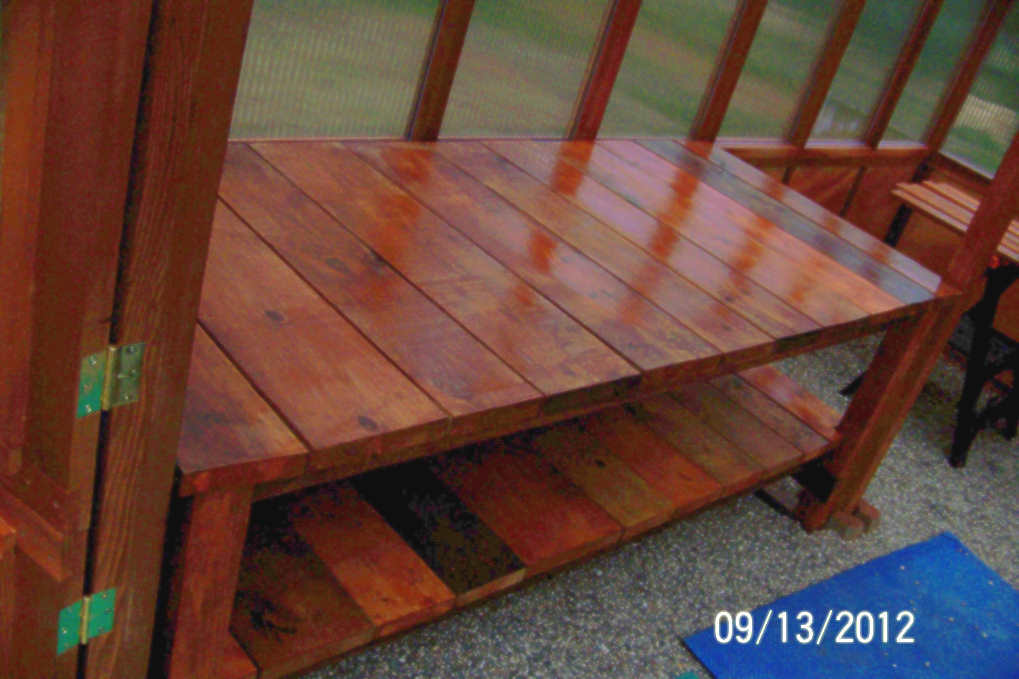
Rustic Farmhouse Table with Distressed Finish

Submitted by petesveen on Tue, 10/15/2013 - 13:06

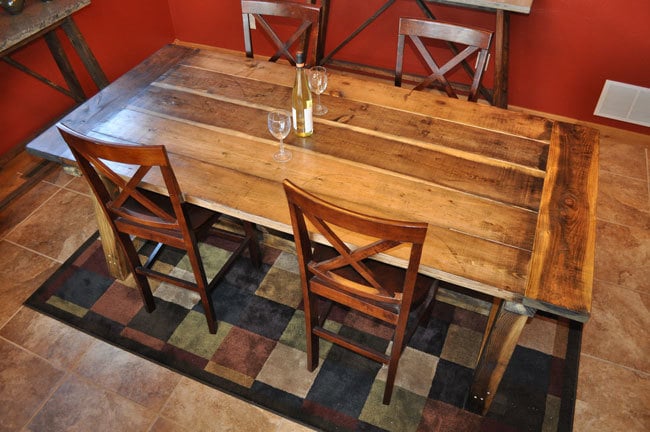
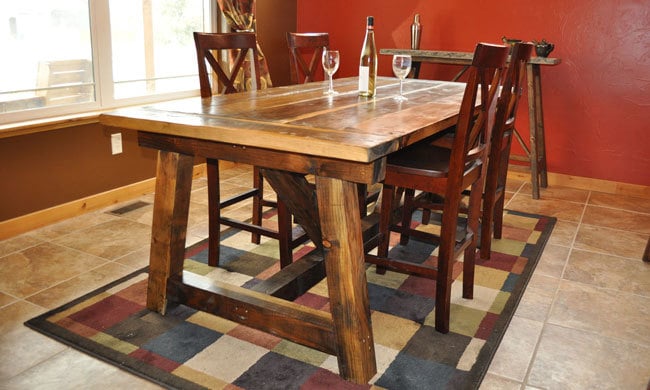
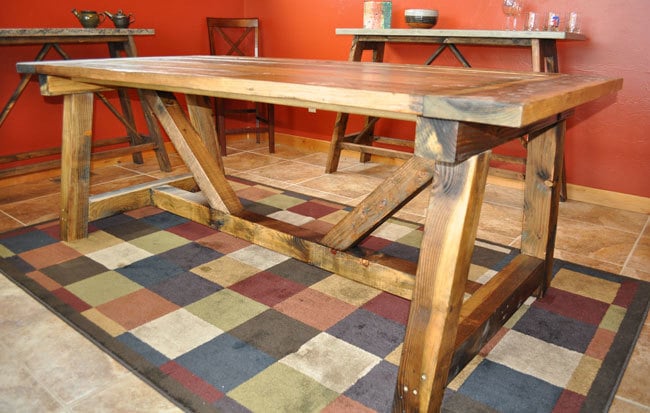
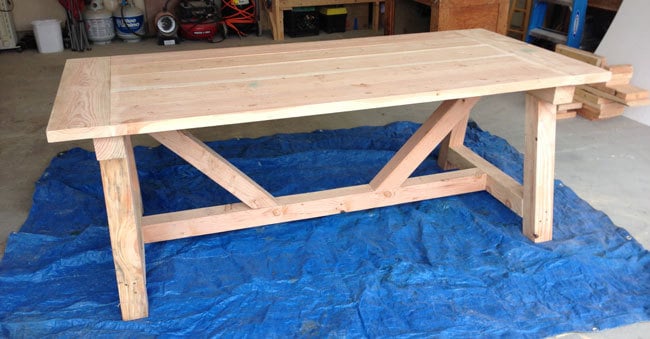
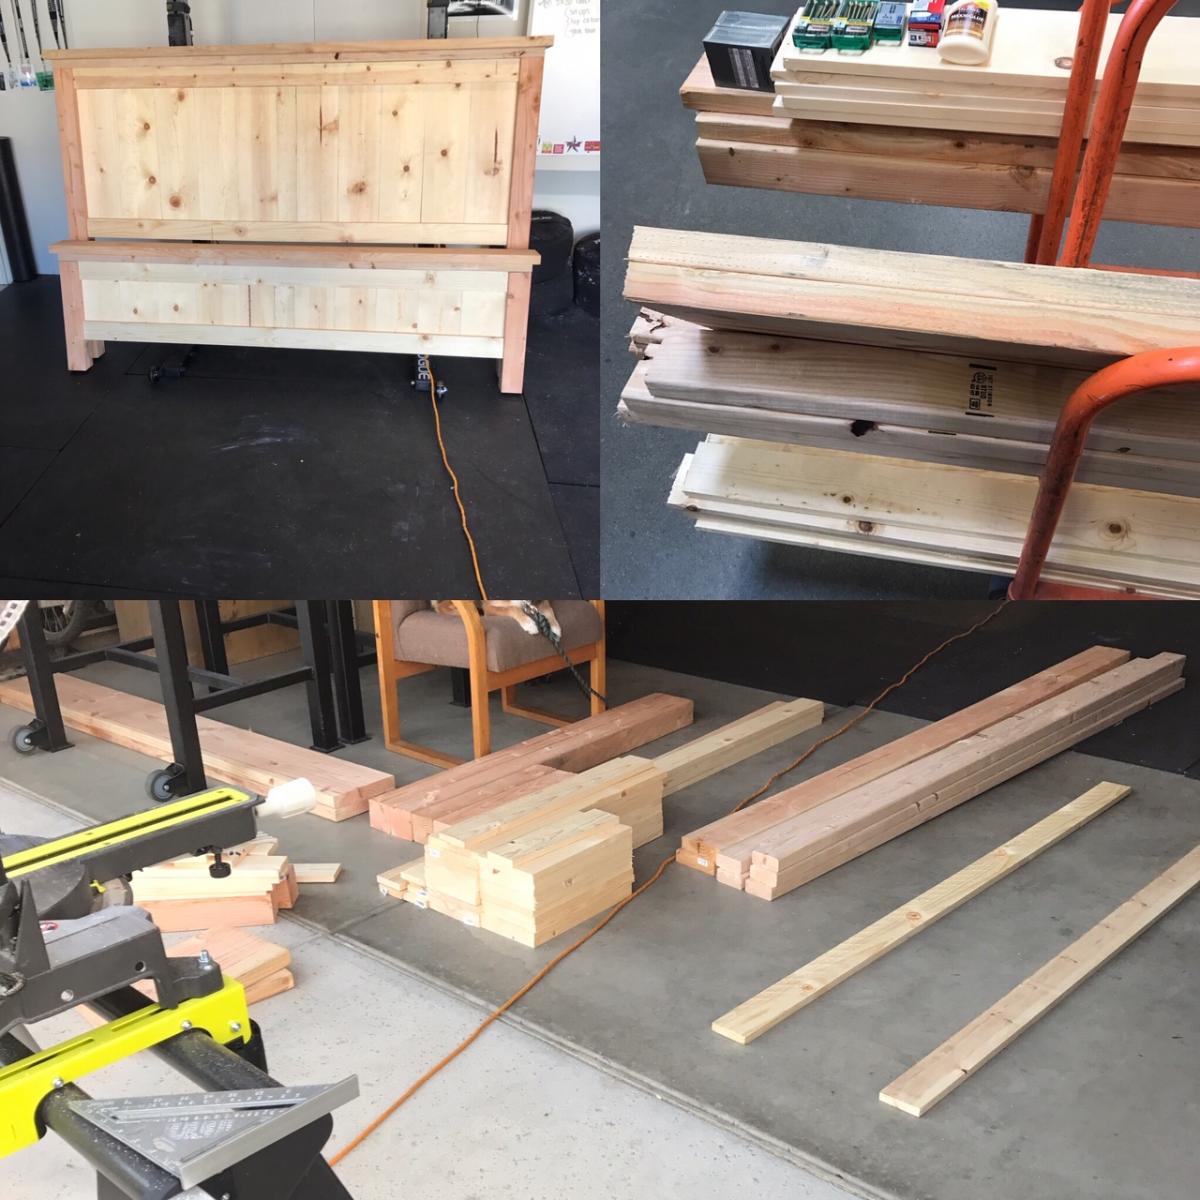
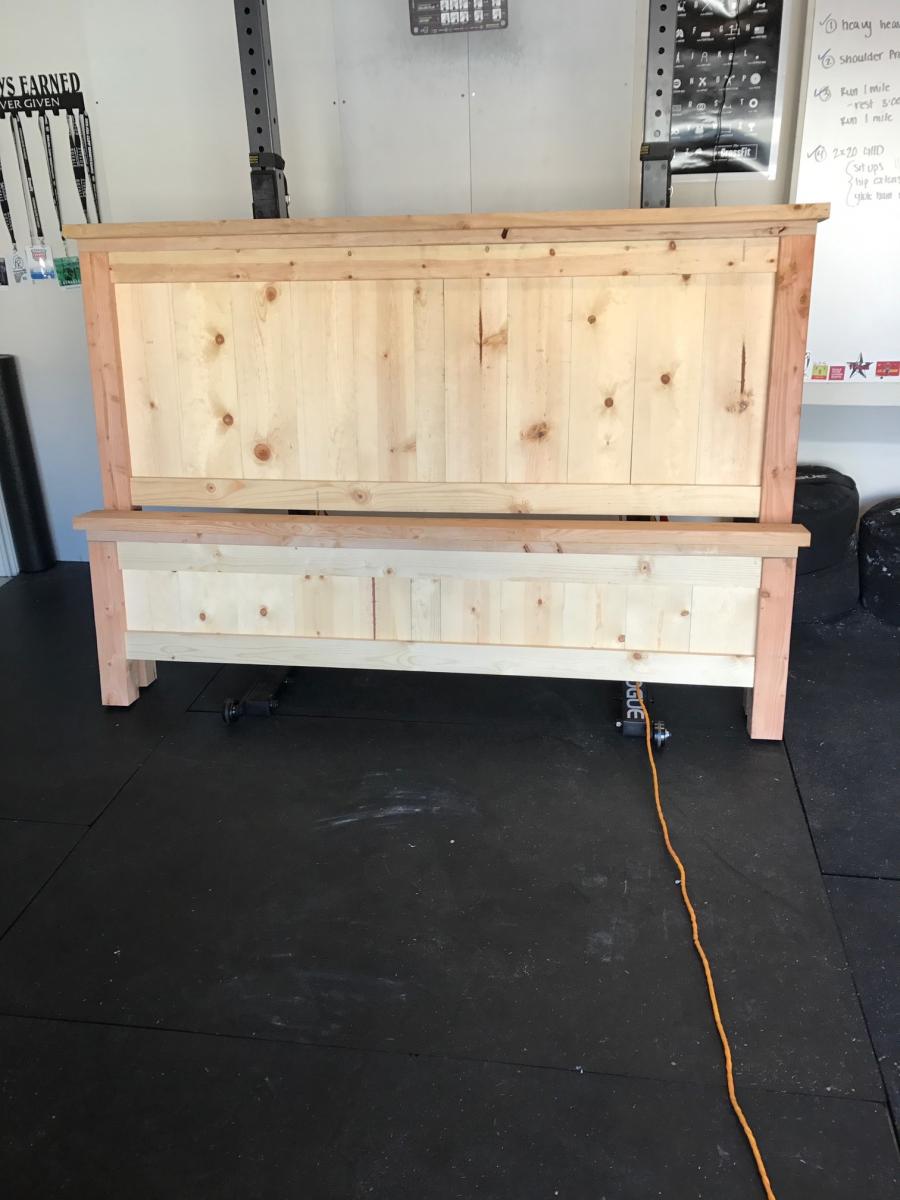
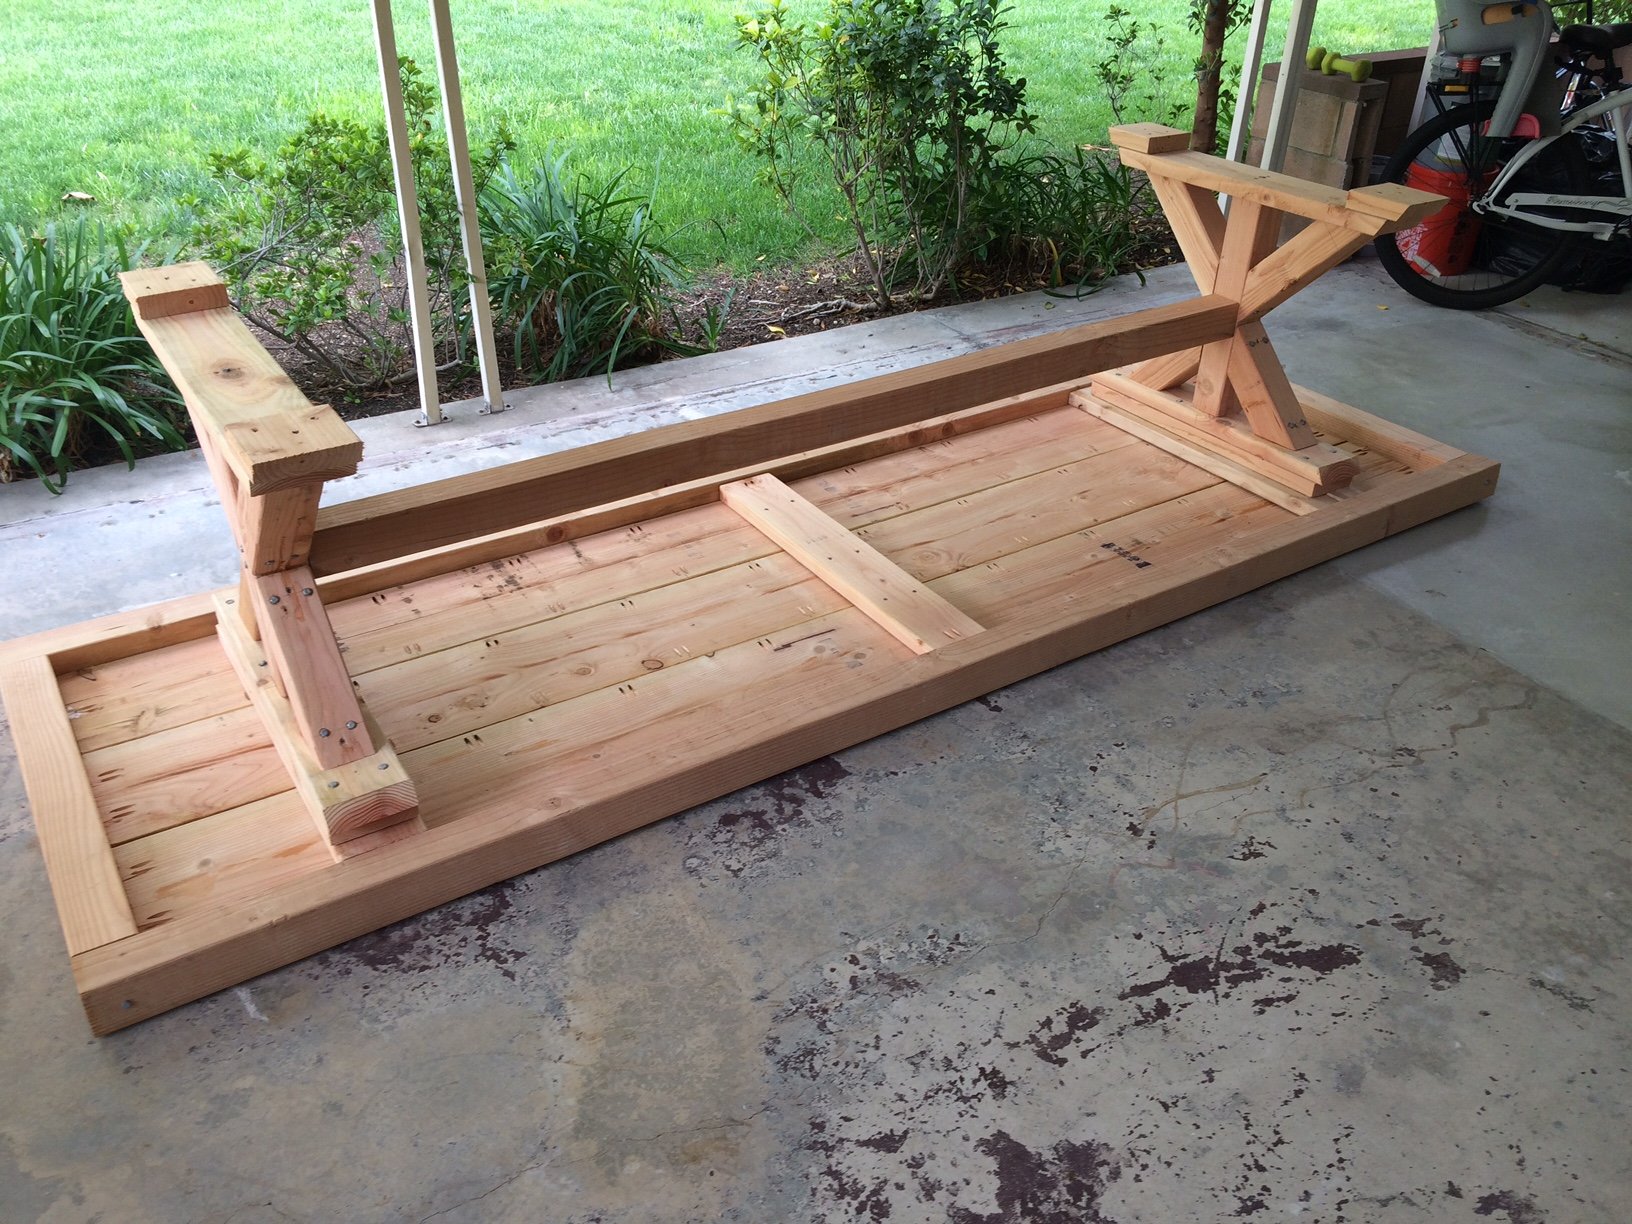
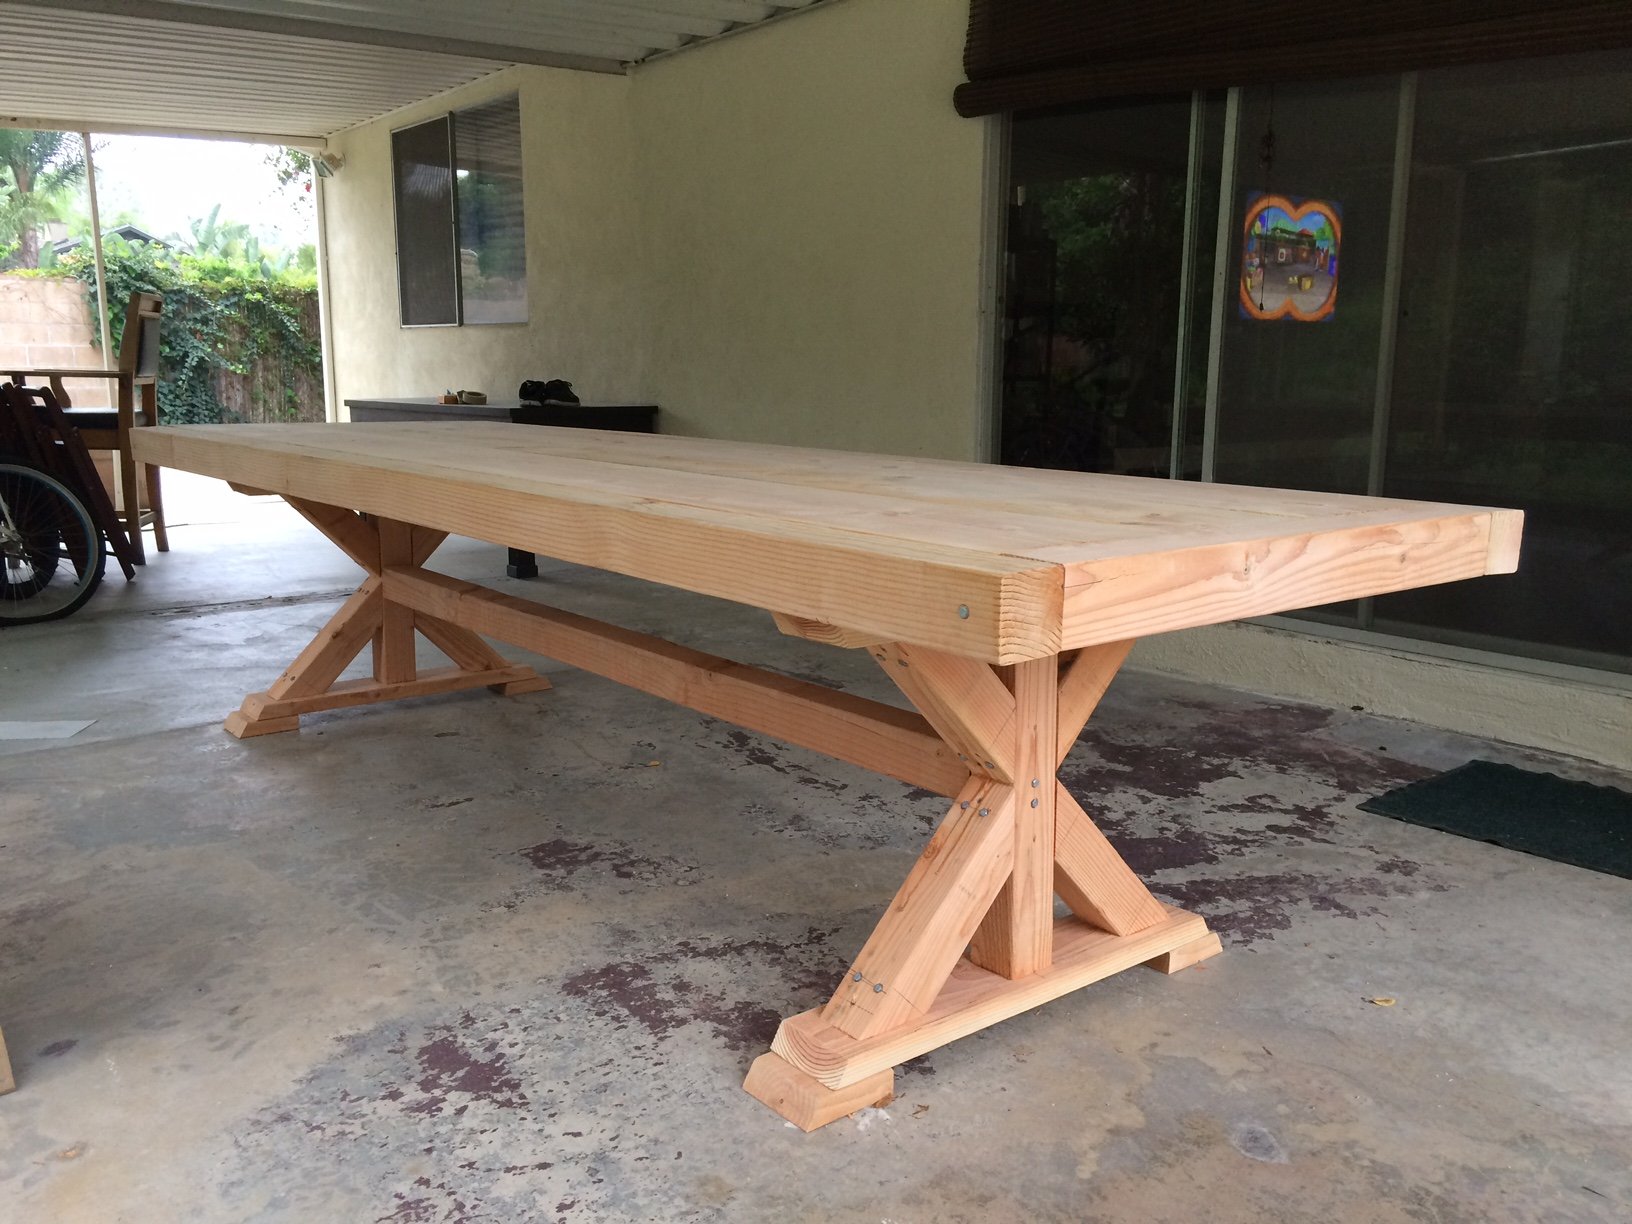
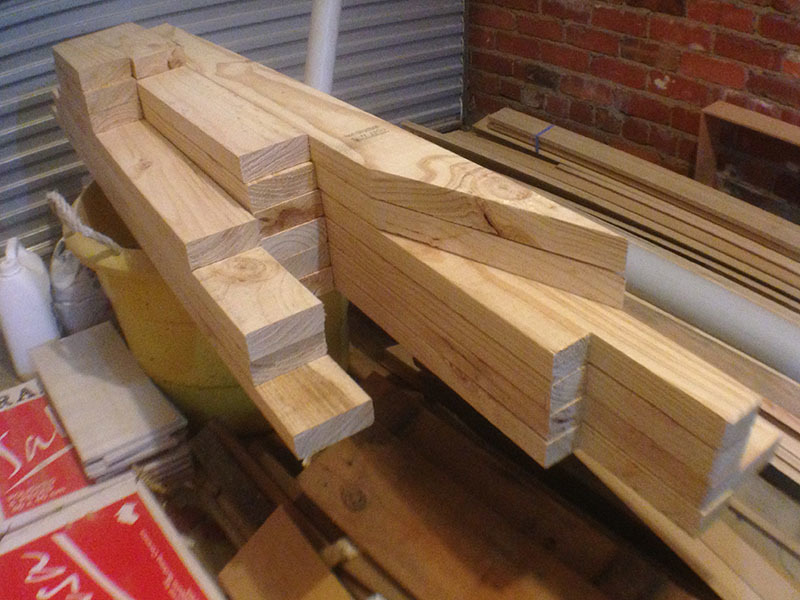
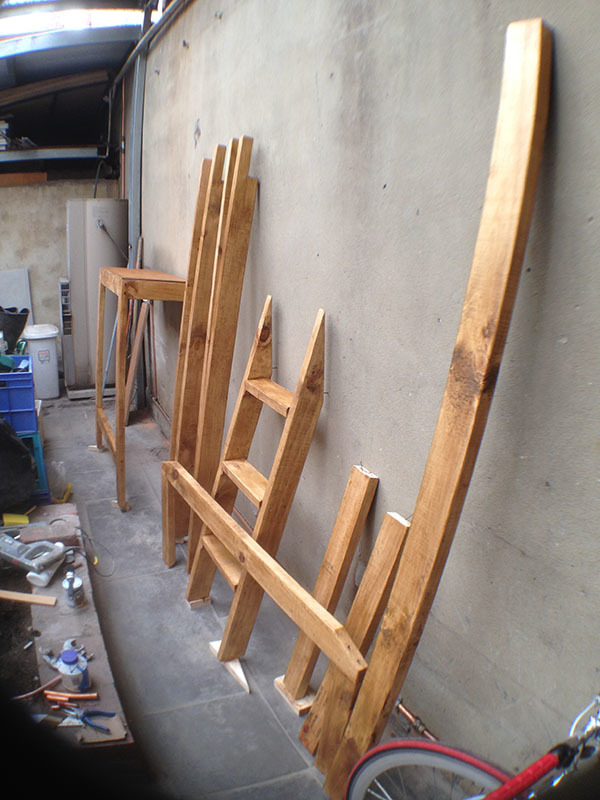
When I saw Ana's plans I had to make this table for my home. I like the rustic look, and so I distressed the wood using a steel wool and vinegar solution. I modified the top by using four 2x8's and one 2x10. Otherwise everything is the same. It turned out great and everyone who has seen it at my home loves it.

Built from Plan(s)
Estimated Cost
$130
Estimated Time Investment
Weekend Project (10-20 Hours)
Finish Used
Brushed one coat of steel wool and vinegar. Then brushed on 2 coats of Minwax semi-gloss. Next, I sanded using 400 grit. After sanding, I wiped on a very thin 3rd coat of poly using a clean rag.
Recommended Skill Level
Beginner

Comments

Kabarie

Mon, 11/04/2013 - 14:00

The finish you chose just sold this table to me. Love it love it! Great job!

beccalc1981

Fri, 09/05/2014 - 05:55

So very very new to all this wood working but very excited to get started! I LOVE the finished look of this table. I had never heard of steel wool and vinegar, but just googled and can't to try it! Thanks!

charchav

Wed, 11/25/2015 - 07:14

I Love this Table . You should just come to our house and make it for us.LOL

I was just wondering what type of wood did you use? We live in the south east and cant find any Douglas Fir wood. what other wood would you suggest?

thanks Char

Misha1dibbs

Tue, 08/09/2016 - 07:12

The table looks fantastic. I know you built this two years ago. How has the top of the table held up? I am currently working on this table, and I am debating weather or not to use the kreg pocket screws or to use 7/16ths dowels for the body and mortise and tenon joints for the breadboards. However, that is more work than the kreg screws. If the kregs hold up well, than I would rather do that. Anyway, the table looks fantastic.

Kitchen island

Submitted by Anonymous (not verified) on Fri, 04/21/2023 - 11:56

my first project!

Built from Plan(s)

Comments

B&T - King Farmhouse Bed

Submitted by Anonymous (not verified) on Fri, 10/04/2019 - 11:33

My wife wanted a new King bed frame, and we were searching around stores to find one that she loved. All of them were close. but not perfect, and also way too expensive. I told her I'd just build one! It was my first woodworking project, and it came out exactly what we wanted. We even had some fun Saturday nights sanding and painting together.

Estimated Cost
400
Estimated Time Investment
Weekend Project (10-20 Hours)
Finish Used
White paint & Kona Varathane stain
Recommended Skill Level
Starter Project

Greenhouse

Submitted by Anonymous (not verified) on Mon, 06/26/2023 - 13:04

I saw this greenhouse built on the Justin Rhodes YouTube channel and immediately wanted my own. My husband was a champ at making my dream come true!

Built from Plan(s)

Comments

nifof17547

Tue, 04/09/2024 - 01:43

What a great idea! Building your own greenhouse can be a rewarding and cost-effective project. With the right planning and choice of materials, you can create a sturdy structure that will last you for years to come. In fact, a greenhouse is a great way to take care of your health because the crops grown there are undoubtedly of higher quality and healthier for you. Speaking of health, if you want to improve your health, consider using natural supplements such as mullein. Mullein supplements are known for their potential respiratory benefits and can promote overall well-being. You can find organic mullein supplements https://www.amazon.com/USDA-Organic-Mullein-Drops-Lungs/dp/B0CKBPTPRL on Amazon. Adding them to your daily diet can complement the peaceful environment of your greenhouse. So, whether you are a gardening enthusiast or just starting out, remember to take care of both your plants and your health!

Seasonal And Holiday

Main closet bench and shelving

Submitted by Anonymous (not verified) on Sun, 10/27/2019 - 13:11

We have a 10 ft closet in our entry which offered plenty of space but had three closet sliding doors. Only one could be open at a time. Had two upper shelves and a rod. Wanted to get things more organized and have a place to get shoes on. Always give my 1 and 3 year old easier access to dress/undress themselves. First attempt at building anything. As I went along changed things based on materials and to get around issues with our closet or my skill level/available tools.

Estimated Cost
200
Estimated Time Investment
Week Long Project (20 Hours or More)
Finish Used
Painted areas are Olympus white sherwin Williams. Stain is classic oak.
Recommended Skill Level
Starter Project

Vintage Butcher Block Vanity

Submitted by Anonymous (not verified) on Fri, 07/21/2023 - 10:40

Use the general idea of the kitchen island plans. I had an old butcher block work table top from June 1952. I wanted to cut it down and make a bathroom vanity. We used cedar legs for the posts and shelves.

Kristi


Built from Plan(s)

Chunky X Base Table

Submitted by Anonymous (not verified) on Thu, 03/24/2016 - 20:56

So my sister in-law kept sending me tables on craigslist that were for sale. I didn't like anything I was seeing and to buy what I wanted I was looking at roughly $1000 so I found these plans and was like... YES! When I told the family I was doing this they were all pretty much like... "yeah sure, good luck"
I knew that I could do I just needed the plans which were here.

I pretty much stuck to the plans with a few exceptions. I made the table longer to accommodate the entire family on Friday Family Night...! It's a little over 10' long. Instead of 3 – 1x12x8 I went with 3 - 2x12x10. One because as I said earlier I wanted the table longer and two because I just felt that the 1x12 was too flimsy and I wanted something real solid. Because of that I ended up putting pocket holes on each side of all the 2x12 boards and I also put a 2x6 in the middle for additional support.

Everything was pretty much right on except for the base posts, for some reason they were about 2" too short which forced me to cut the upper parts of the X on the base a bit shorter as well. I ended up putting an additional 2 2x6 on top of the base to raise the table to the height I felt was necessary. If I did it over I would have just made my base post 2" higher and only used one additional 2x6 for the additional height.

I ended up staining it with a semi-transparent beige stain to give it a grayish look.

I gotta say everyone was like "holy crap...!" and thought it was beautiful. I gotta say it feels really good to build it yourself and especially when it comes out the way you want it.

thanks so much for the plans!!!

Estimated Cost
$200
Estimated Time Investment
Weekend Project (10-20 Hours)
Finish Used
2 coats of a semi-transparent beige stain from Olympic. Stain and Sealer in one
Recommended Skill Level
Beginner

Comments

SESchild

Thu, 06/04/2020 - 12:15

Hi Ana. I'm a new member here. My wife and I really enjoy your projects! Quick question about the Chunky X Base Table... we're about to build it and we're going to do it 10 ft long like you did. I'm curious how rigid the center span is? I'm guessing the span is roughly 6'. Is it bouncy? I was thinking about running 2 or 3 2x4 "joists" under thre table attached to the bases to provide more support. Thoughts? Suggestions? Thank you!

Easy Shelving

Submitted by Anonymous (not verified) on Tue, 04/12/2016 - 12:52

So easy. Being able to just use 2x4s was so convenient for transporting and cutting. This is a small room so the only hard part was figuring out the math to get 4 rows in this tight space. I made 2 changes: instead of 4-2x4s wide I did 5 so the bins fit better, and I didn't use a any 2x4s on the bottom shelf because they can just sit on the floor, so it saved me buying more wood. Super happy with this, now I just have to make another one for our garage so we can store more things!

Estimated Time Investment
Afternoon Project (3-6 Hours)
Recommended Skill Level
Beginner

Rustic X Hall Tree

Submitted by Anonymous (not verified) on Mon, 01/27/2020 - 14:22

I built this scaled down version of Ana's Hall Tree to fit into a 3 foot wide space in my daughter's living room.

Built from Plan(s)
Estimated Cost
$55
Estimated Time Investment
Afternoon Project (3-6 Hours)
Finish Used
Whitewash
Recommended Skill Level
Starter Project

Sewing & Craft Table

Using Ana's plan for a simple sewing table, I modified it to meet the needs of my daughter.

I only used 1 wing instead of two and made a brace that folds away under the leaf. On second thought I added a safety leg and foot to keep the table from tipping when the sewing machine is on top of the leaf.

I trimmed out everything but the leaf with 1 x 2 pine.

The top (with leaf raised) is 31 x 46 inches of work space. 

Built from Plan(s)
Estimated Cost
$130
Estimated Time Investment
Weekend Project (10-20 Hours)
Finish Used
White satin paint ( 1 1/2 quarts) applied with a roller and a sprayer
Water based polyurethane on the top only, applied with a brush.
Recommended Skill Level
Intermediate

Comments

Western Red Cedar Stool

I made this for my wife. It is a simply design but she loves it and I think it turned out very nicely. I had an 18" inch long western red cedar log laying around that I sat on sometimes and wondered how I could make it more comfortable to sit on, and this is what I came up with. I peeled the bark with a draw knife. and then marked out a 3" thick slab out of the middle lengthwise and carefully ripped it out using a chainsaw. I used the two end pieces as the base by turning the outer sides in while using the slab for the top. Out of a smaller log I cut the cross member about an 1 1/2" thick sized to fit between the legs. After lots of sanding I was able to get the marks from the chainsaw out and assembled the pieces using 5 1/2" x 1/4" hex head screws countersunk and holes plugged with 3/4" poplar dowels. After a final sanding I applied 3 coats of Spar-Urethane. The red parts of the cedar turn a rusty color quickly after sanding so a finish needs to be applied rather quickly. I hope you like it.

Estimated Time Investment
Day Project (6-9 Hours)
Finish Used
Spar-Urethane
Recommended Skill Level
Intermediate

Custom Rustic Hall Tree w/Bench

Submitted by Anonymous (not verified) on Sat, 05/30/2020 - 10:39

Thanks for the inspiration Ana! My daughter wanted a custom size hall tree and bench with a light switch cut out - basically your plans with an ebony stained poplar seat and bead board backing (to match her wainscoting). I had a little crown left from another project so I added a little detail to the top shelf.....And a Couple of lower level Hooks for the grandkids coats! She loved it and it was fun to make!! Mike in Columbus, OH

Built from Plan(s)
Estimated Cost
$98.00
Estimated Time Investment
Weekend Project (10-20 Hours)
Finish Used
Ebony varathane stain(seat) with varathane ultimate polyurethane oil based semi gloss Interior finish on seat(4coats)

Kilz2 primer/stain blocker interior white

Finish paint Behr marquee Semi gloss custom white to match room color.

Seat sanded to 400 all other areas to 220 before paint. Between seat coats of ur at hand used 0000 steal wool lightly with soapy water mixture.
Recommended Skill Level
Intermediate

2x4 Sofa w/ Chaise and coffee table

Submitted by andrew_w on Wed, 06/03/2020 - 10:25

Just completed this to make the most of the little hot weather we get in the UK. Great plans to follow thank you. Built around a cushion set for a rattan corner sofa which was then filled with 3" firm upholstery foam

Estimated Cost
£200 including upholstery
Estimated Time Investment
Day Project (6-9 Hours)
Finish Used
Ronseal Natural stain
Recommended Skill Level
Beginner

Full Size Loft

So I had an IKEA DELSEV single bed frame which i bought off someone who didn't need it anymore. Great sturdy bed for $25, but I wanted more space in my rental room, so I decided to go loft given the generous ceiling height. I did some research for ideas to convert my current bed, and found the perfect one at your site! I made modifications to your plans so that I would be able to walk underneath without having to slouch, and adjusted some measurements to integrate the IKEA bed frame. The project only cost me $38 worth of timber, screws were pinched (with permission!) from my landlord's stash, and this was the result after 3 days of cutting, sanding, partial assembly, staining and varnishing, and final assembly! The small tin of stain and varnish was originally for a wooden rack project for my vintage bicycle, and i managed to cover both rack and bed frame with the entire tin, down to the very last drop!

Estimated Cost
$38
Estimated Time Investment
Week Long Project (20 Hours or More)
Finish Used
British Paints Stain and Varnish, Maple Satin
Recommended Skill Level
Intermediate

Kids Storage Bench

Submitted by ValBryant on Thu, 08/16/2012 - 09:10

After building a few things from plans I decided to come up with something on my own, and from scraps I made this bench for my son.

Built from Plan(s)
Estimated Cost
Scraps
Estimated Time Investment
An Hour or Two (0-2 Hours)
Finish Used
Dark Walnut
Recommended Skill Level
Starter Project

My version of the small chicken coop

Submitted by Anonymous (not verified) on Wed, 09/07/2016 - 12:58

Plans for this coop were fantastic. It was a lot of work, but really fun to build.  As hard as I tried to keep the cost down, it cost probably close to $300 in materials, but it is well worth it compared to the quality of similar priced premade coops.  I did not want the garden bed, so I enclosed the run fully with hardware cloth. I also added a 2" lip around the cutout in the floor so they wouldn't push all of the bedding down the hole. 

Estimated Cost
~$300
Estimated Time Investment
Weekend Project (10-20 Hours)
Recommended Skill Level
Intermediate

Comments

Lady Goats

Wed, 09/07/2016 - 13:17

I just got your email and had to run over to check it out. Looks great!! That was a great idea to add the lip to the opening (am I weird for not using bedding in the coop? We just have the painted floor that we scoop out every day). 

The red roof and the flower box are making me swoon <3

Teen loft bed

Submitted by Anonymous (not verified) on Mon, 06/22/2020 - 20:34

Combined two plans found on this wonderful site with our own revisions to provide a larger desk work area (20" deep). I also added a small shelf to allow for setting a book, water, whatever on it without getting out of the bed. As my first "indoor" project there were several lessons learned - one is to buy the higher grade lumber for the primary components including legs and beams. I did not do this and I had to spend more time than I should've finding good square, straight wood. Another lesson was that staining and polyurethane coating are a skill that requires a lot of practice and time. I and my daughter are thrilled with the final result but choosing to stain/poly it likely doubled the overall build time. Still no regrets, though. My 12 yo daughter just loves her new bed and thanks to this site for the spectacular ideas.

Estimated Cost
$600?
Estimated Time Investment
Week Long Project (20 Hours or More)
Finish Used
I used Minwax Cherrywood gel stain (2 coats) and Minwax Fast Drying Polyurethane (3 coats). For the gel stain, apply with cotton rag and do NOT let it sit on the wood for more than 10 minutes before wiping it off. Before applying first coat, vacuum the wood especially the knots, wipe all with white cloth, wipe with cloth dampened with mineral spirits and let dry, then wipe with tack cloth, then apply stain. AFTER the first coat and between all subsequent stain coats, let fully dry and wipe with tack cloth before applying poly. For the first poly coat, wipe with white cloth, then wipe with tack cloth, and apply poly using a china brush (specific for finishing). Submerge your brush in mineral spirits and press down to eliminate bubbles, then wipe it along newspaper until mineral spirits are nearly gone from the brush. Cut the first coat of poly 25% with mineral spirits and brush on in even strokes. AFTER the first coat, sand lightly with 220 or 320 sand paper, vacuum all dust, wipe with white cloth, then with cloth dampened with mineral spirits and let wood dry, then wipe with tack cloth, then apply second coat with full strength poly using the same process of first eliminating the bubbles from the brush. Repeat that process for all subsequent coats. Then let dry for several days before assembling the bed.
Recommended Skill Level
Intermediate

Heavy Bench for New Greenhouse - Modified Farmhouse Table

Submitted by Tonya P on Wed, 09/12/2012 - 11:38

Before my new greenhouse was even delivered and built, I was searching for ideas on potting / greenhouse benches. The company wanted nearly as much $$ for the benches as they did for the greenhouse. By accident I came upon Ana's site. I saw the Farmhouse Table plans, then I saw Handy Andy's modification of the plan, and I was inspired to build them myself!
I found a big pallet of 2x pieces of wood at Menards for $25. They usually set out a pallet of odds and ends that are of "like" items. These were about 3.5' long pcs of 2x10's and 2x8's and such (I have enough of these to do the other benches I want to build... and then some!). I also used some 2x4's that came off a really nice sturdy pallet that we picked up for free, and the rest were just boards we had around the shed.
Hubby was willing to help me with this project, but I wanted to do it myself. He did help with the heavy lifting, and I do appreciate that :) Once I had the frame built, we had to move it into place in the greenhouse otherwise we would not have been able to get it in there. And now that it's complete... it's HEFTY!!! And believe me, it's not going to shift about! lol I also put 2x4's across the bottom of the legs so that it wouldn't sink down into the pea stone floor.
The benches basic construction is the Farmhouse Table, but I added a bottom shelf, a little like Handy Andy's. I must say, because this was not a fine piece of furniture, I was not as intimidated or nervous. It was great for my first ever big project :) It took me some time to complete it, over the course of 2 days, but then I also have to cook and clean and work and garden and a hundred other things in a day :) So, I was in no hurry, but it was a very fun project and I'm SO glad I took it on.
I will be building more of these benches to fill up my beautiful new 10x14 Cedar Built Greenhouse.
Thank you Ana, and Handy Andy!!! I couldn't have done it without your examples!
~ Tonya

Estimated Cost
$10 more or less
Estimated Time Investment
Day Project (6-9 Hours)
Finish Used
Cedar colored stain sealer.
Recommended Skill Level
Beginner
Back