Craft and Homework Table
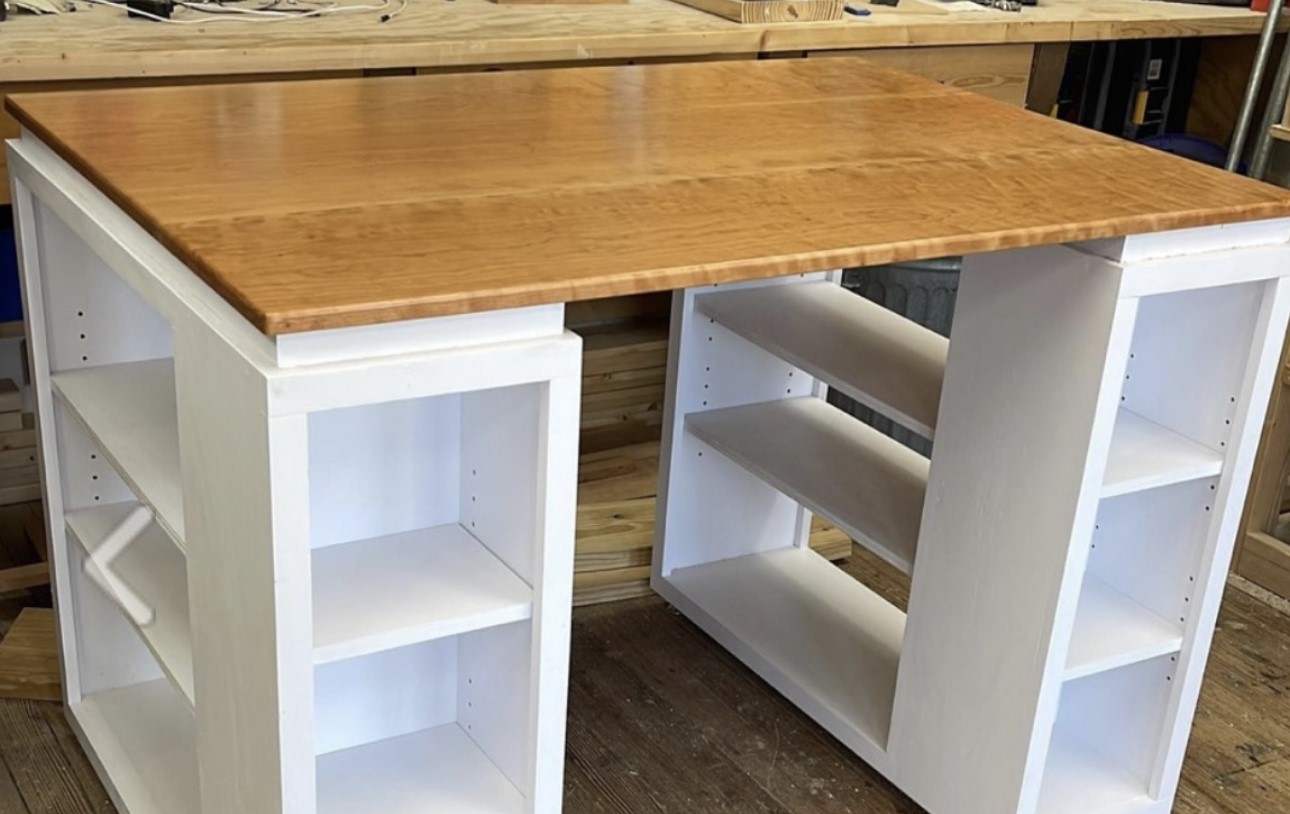
I used the plans for the modern craft table for this build and I had some curly cherry laying around begging to be use so I used that for the top.
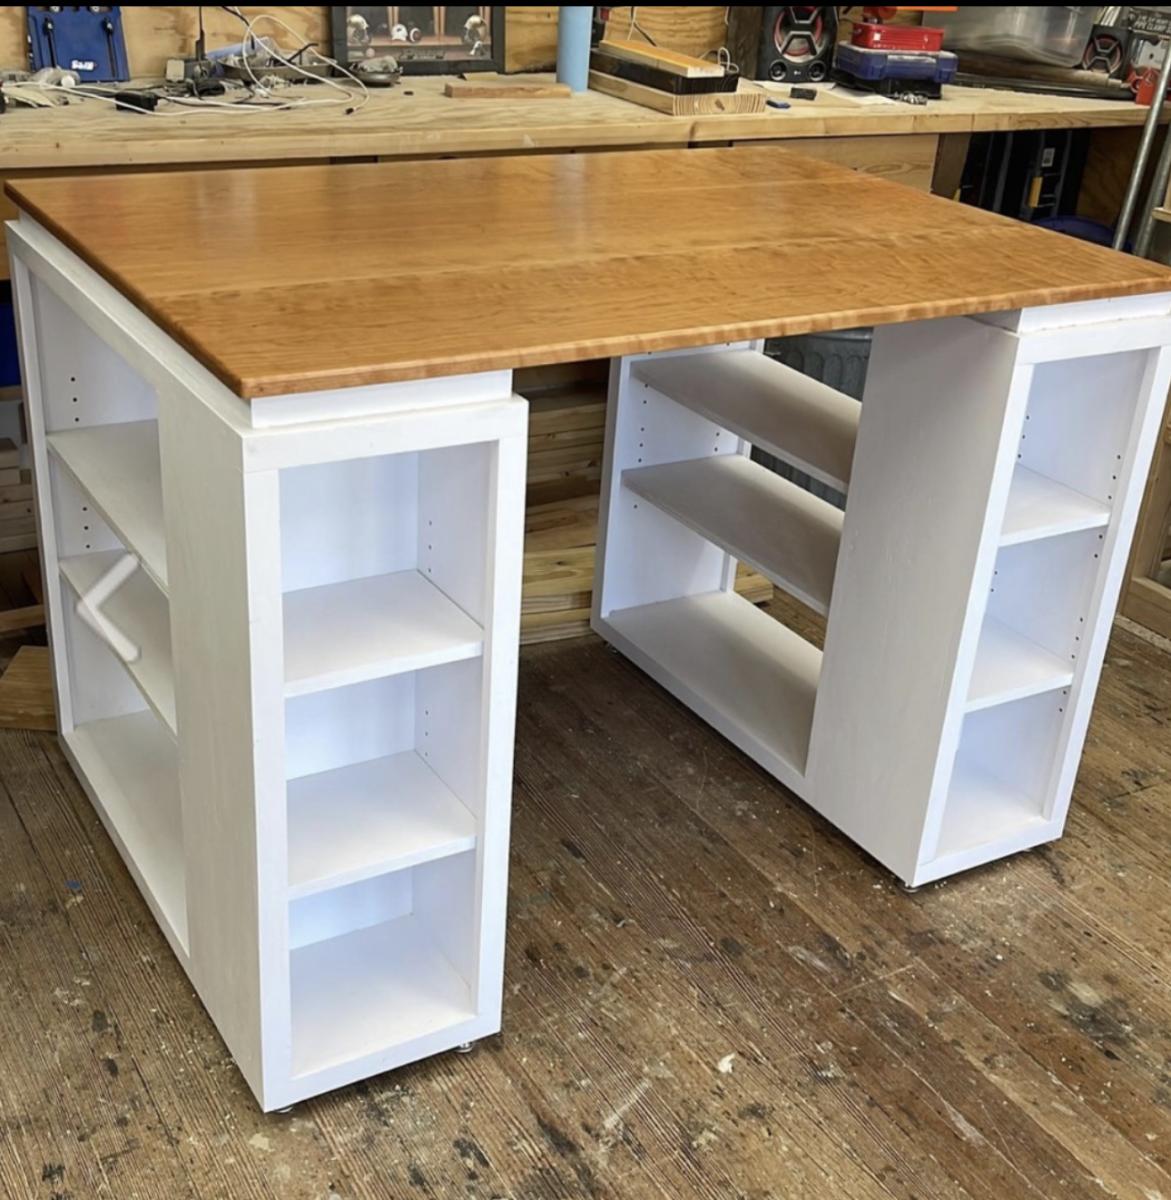
Built from Plan(s)
I used the plans for the modern craft table for this build and I had some curly cherry laying around begging to be use so I used that for the top.
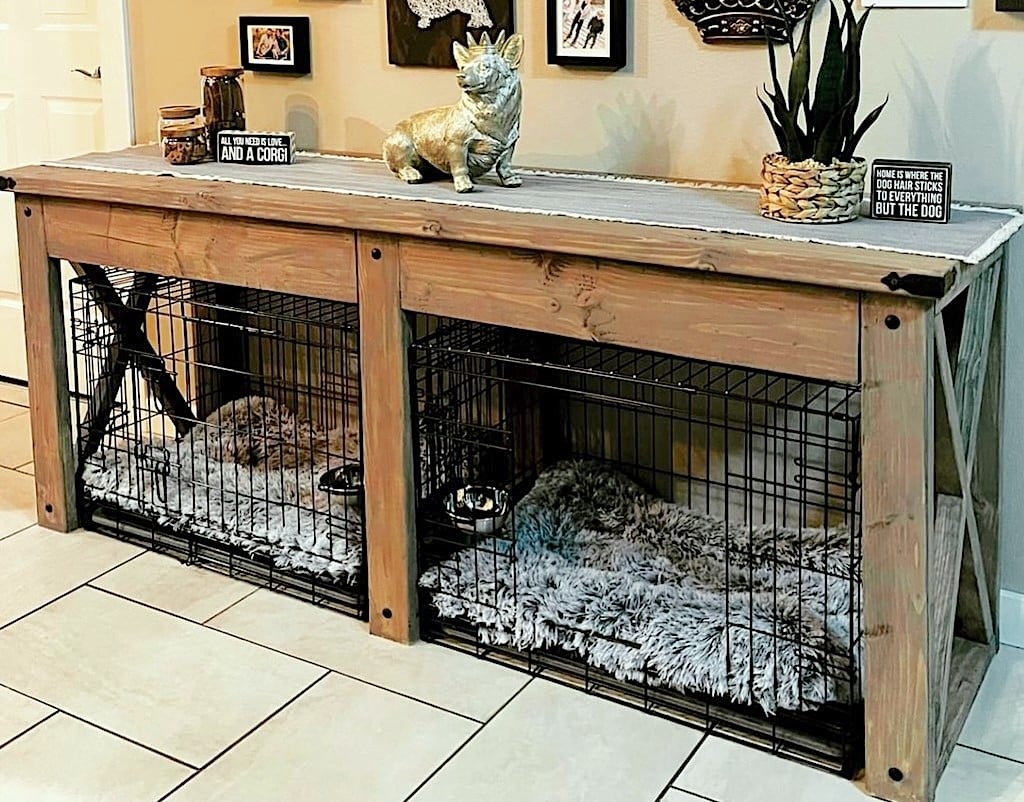
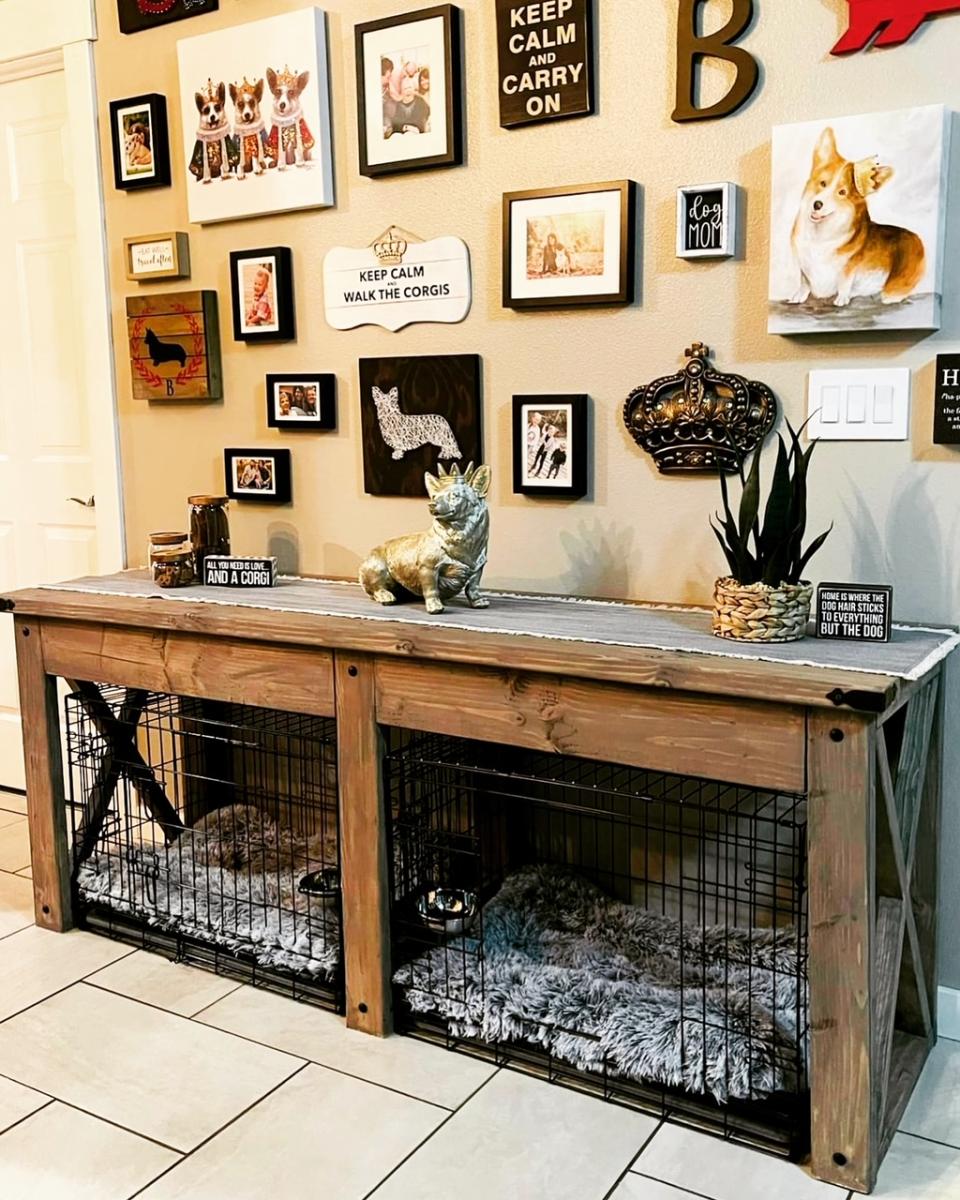
"I modified the Farmhouse X Console to become a surround for my dog crates. Thanks for the project plan!"
Sheena
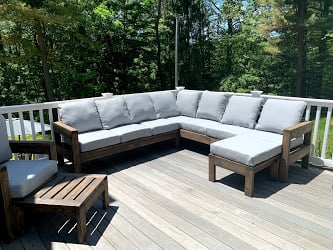
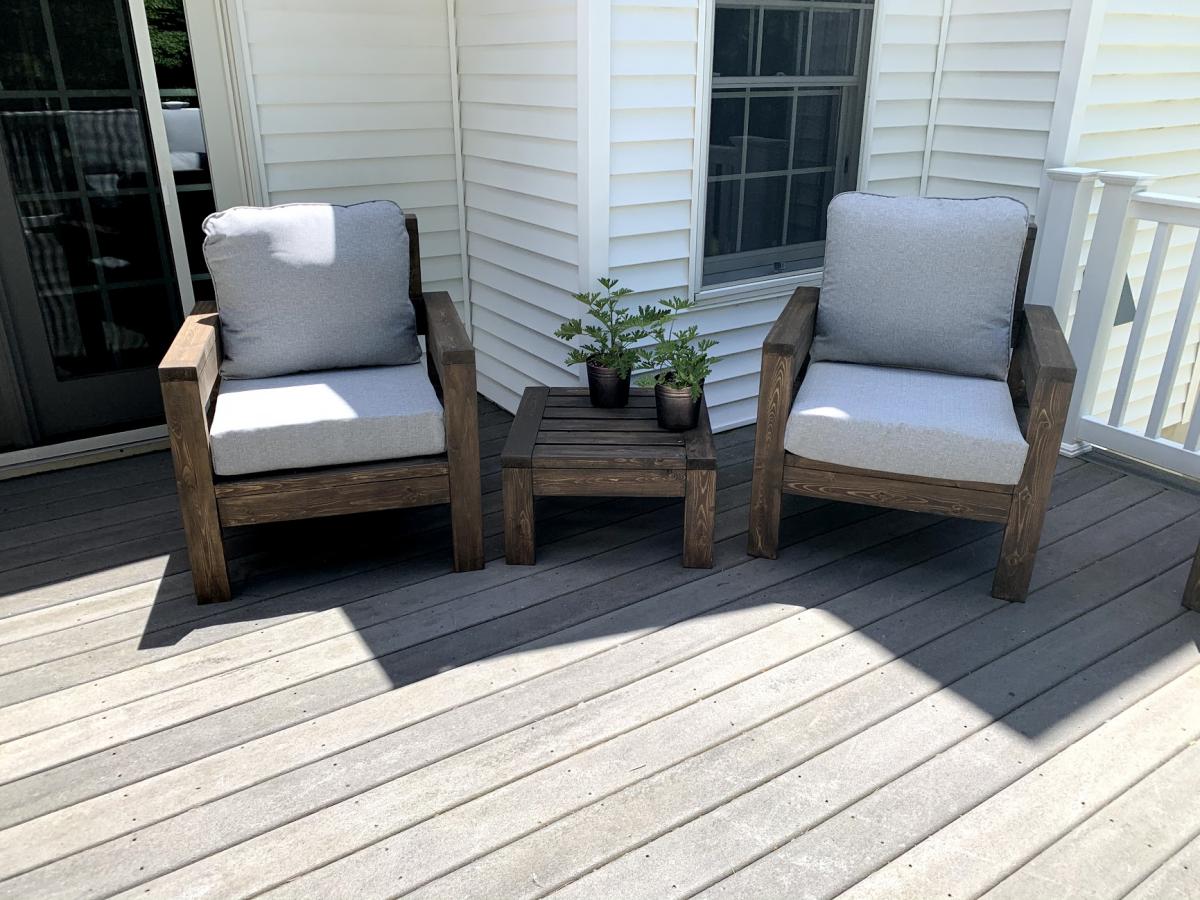
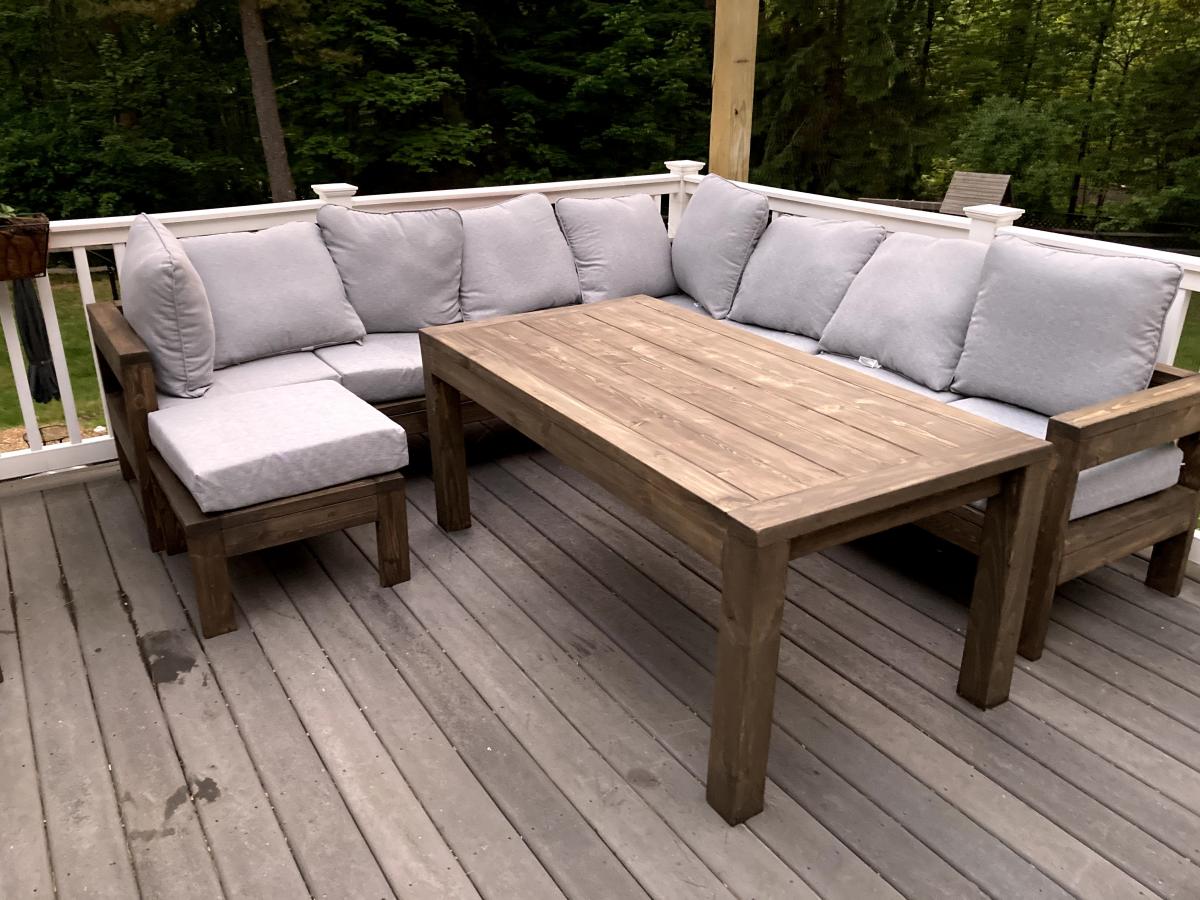
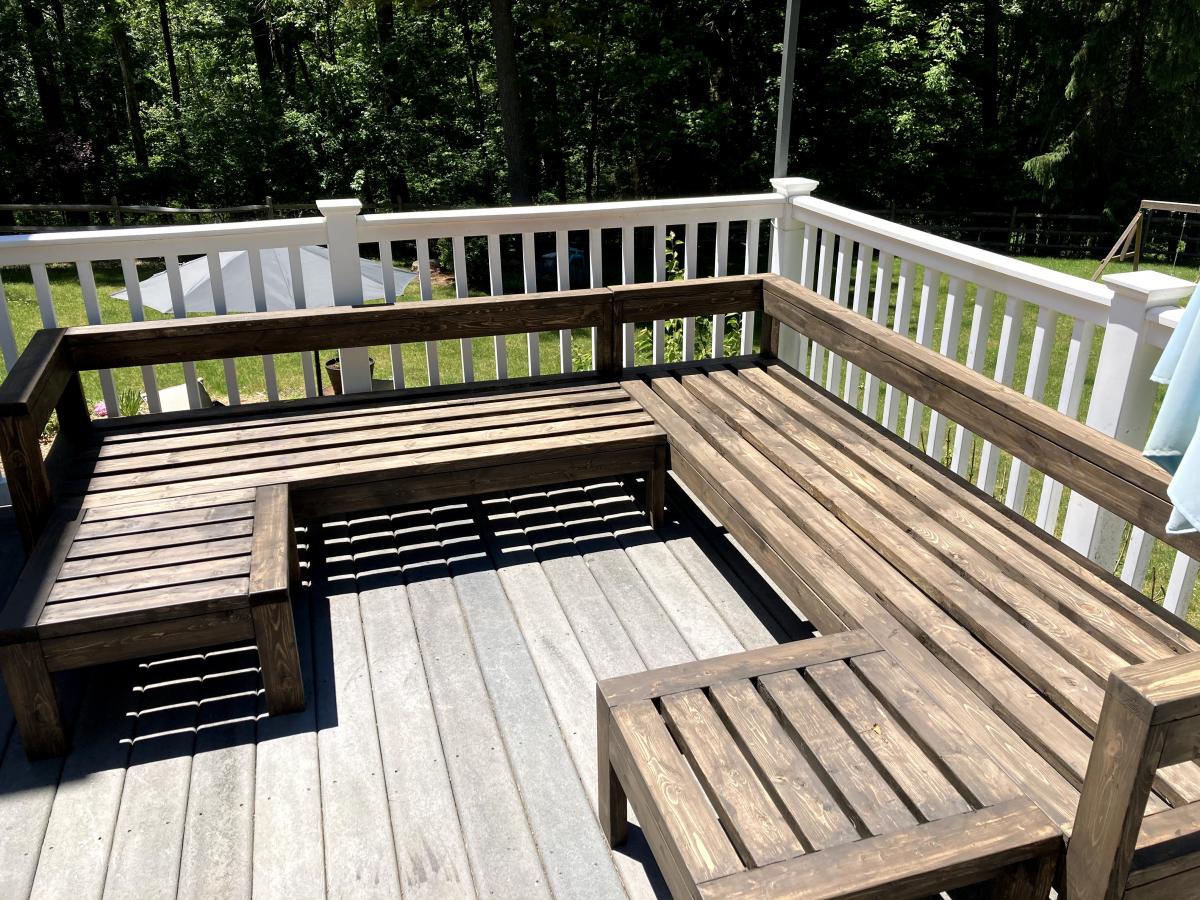
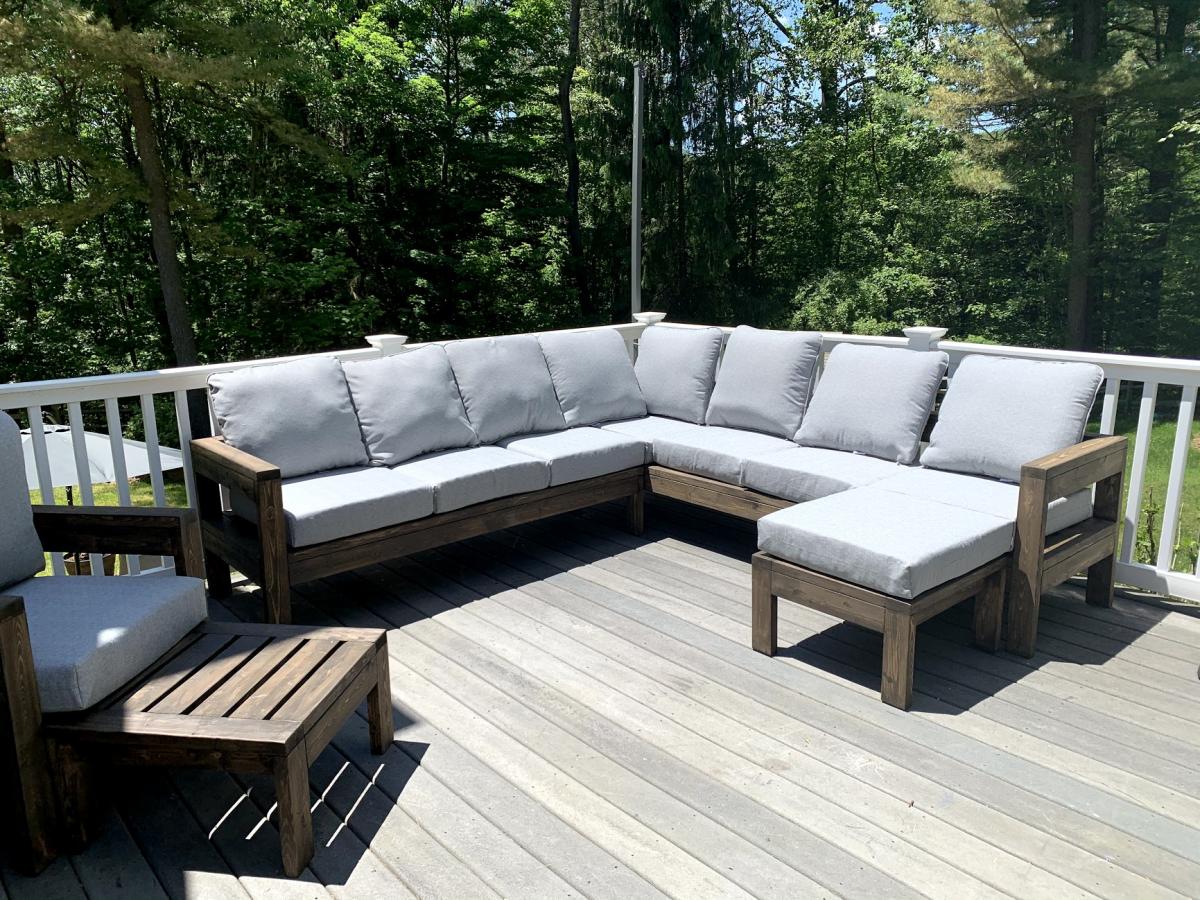
We were looking for outdoor furniture for our deck, and for the size and amount we needed it would have cost us at least $2000. We really like the idea of having an outdoor sectional that we can also use for dining, and we had trouble finding a set we liked. We found Ana's plans for the 2x4 Outdoor Sectional, and i loved the look. After seeing what others have done with the plans, I thought I would be able to modify it to get everything we needed for much less cost than buying a set.
We ended up extending the size of the 2x4 outdoor sofa by one 24" section, for a total length of 96". I then used the same design to make two outdoor chairs, just reduced the length to 24". I modified the 2x4 outdoor coffee table plans to create two ottoman's that can be moved around to make the seating more lounge style Finally, I modified the coffee table plans to make a 5 foot outdoor dining table. All in all, it took about a week and I couldn't be happier with how it turned out!

Mon, 08/02/2021 - 09:44
Looks amazing! What method did you use (pocket holes, dowels, deck screws, etc) to join the visible portions like the arms?

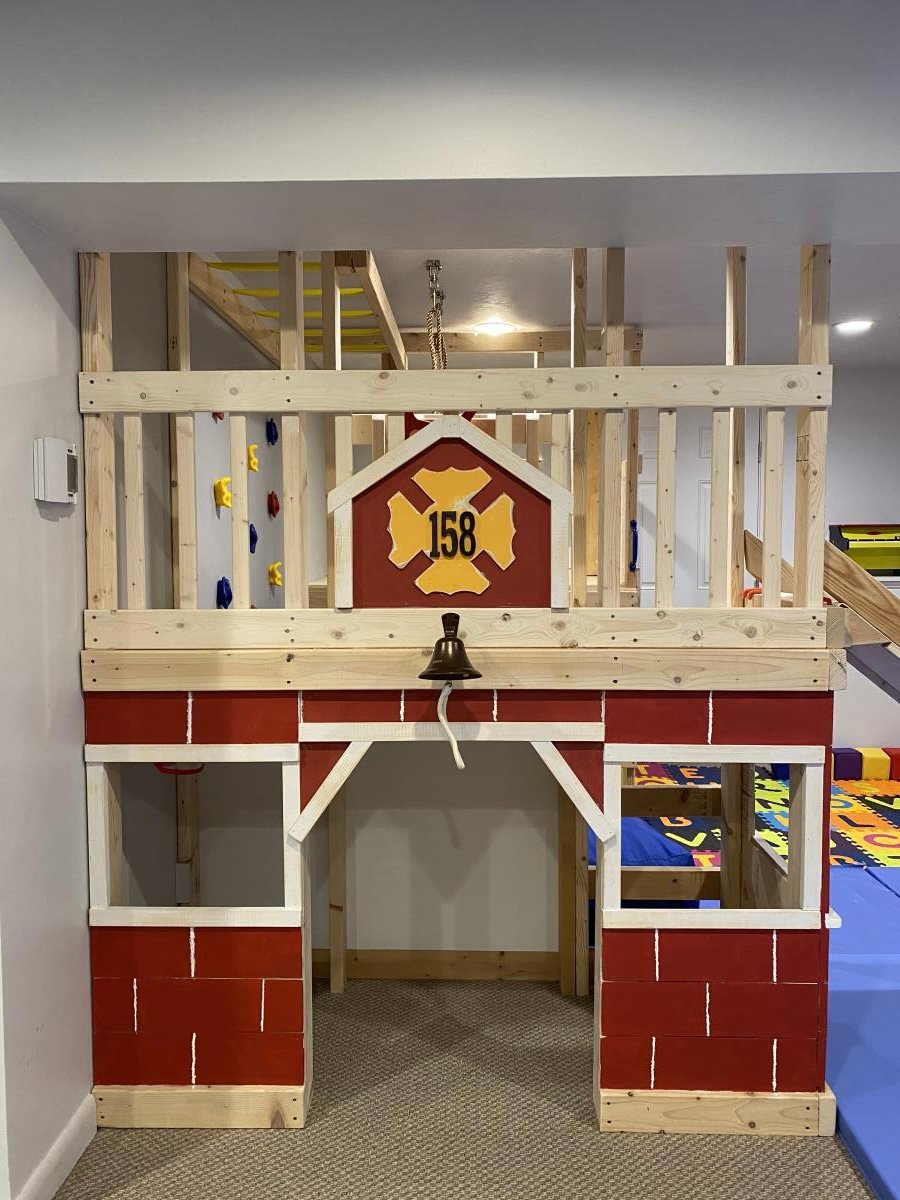
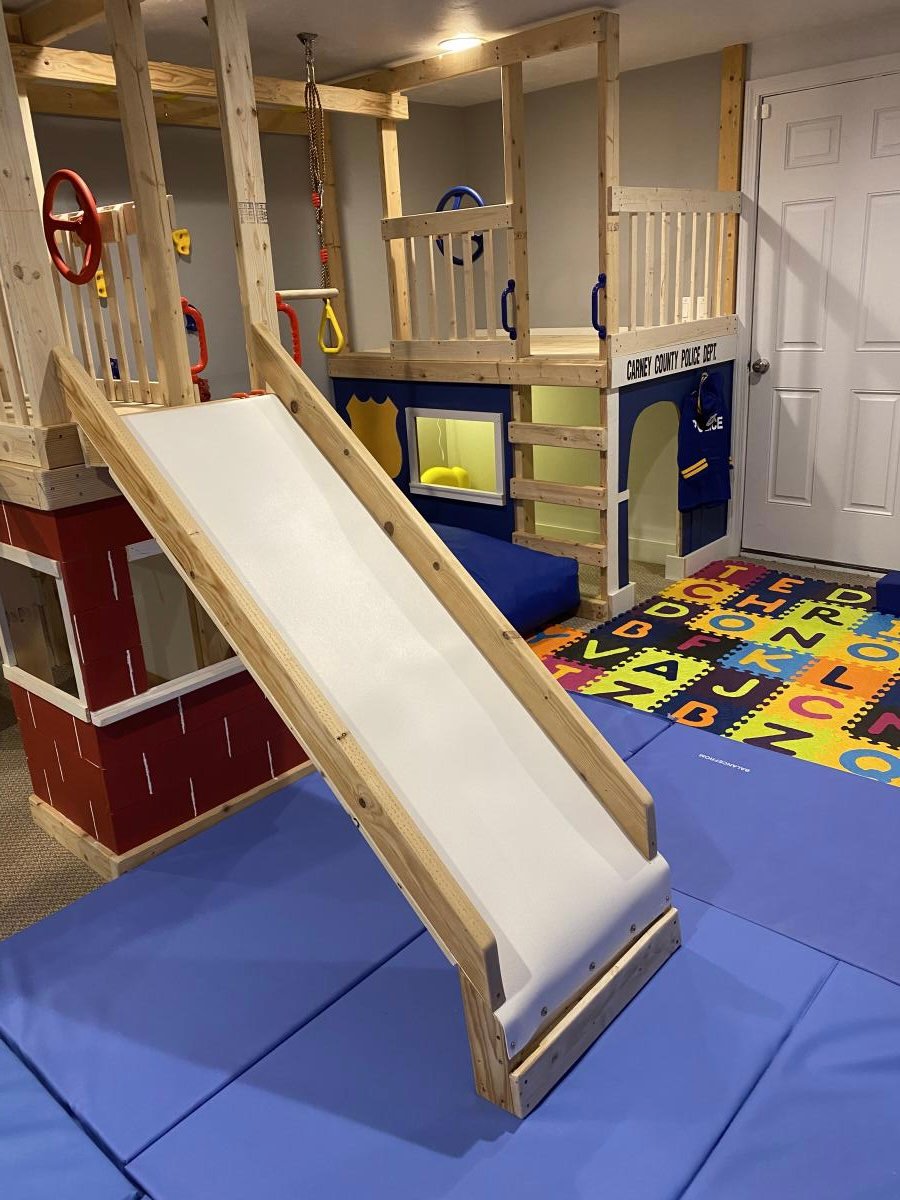
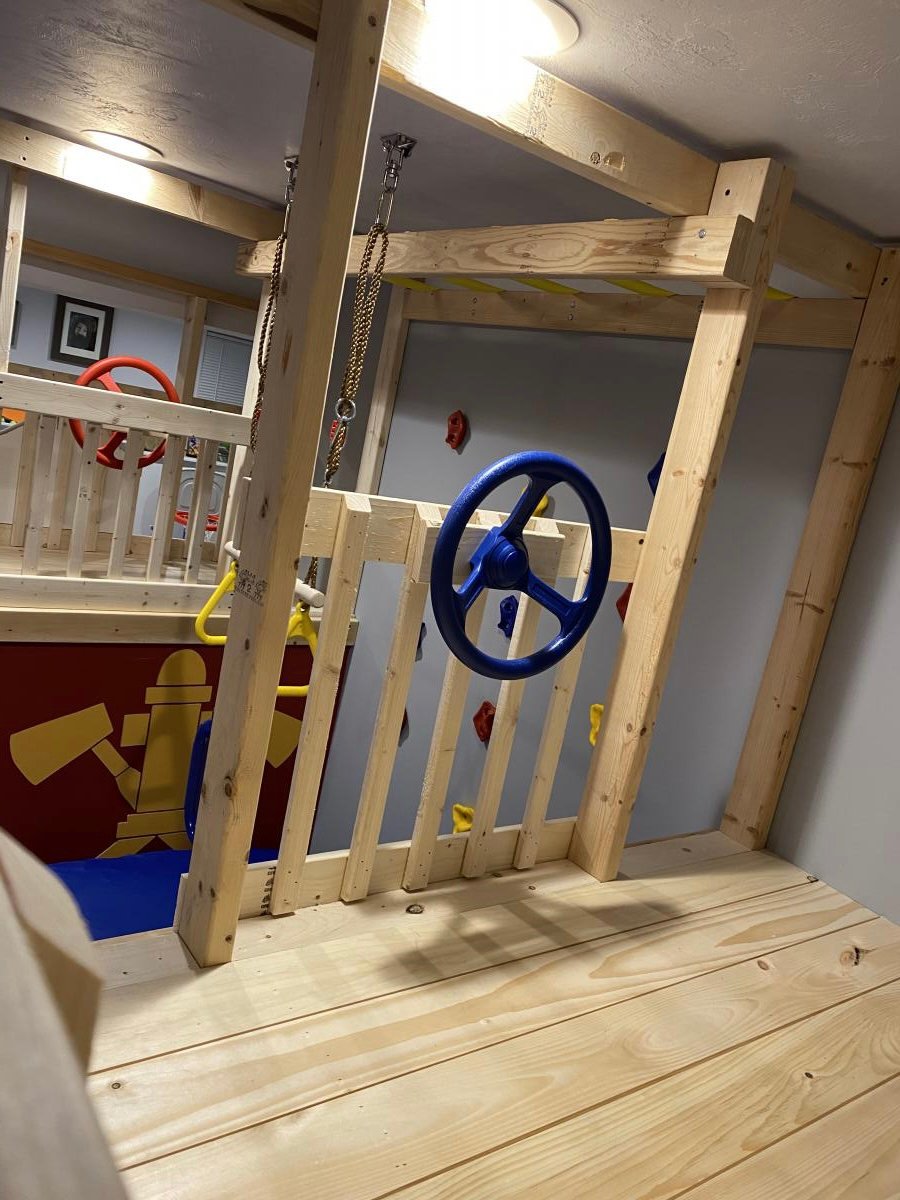
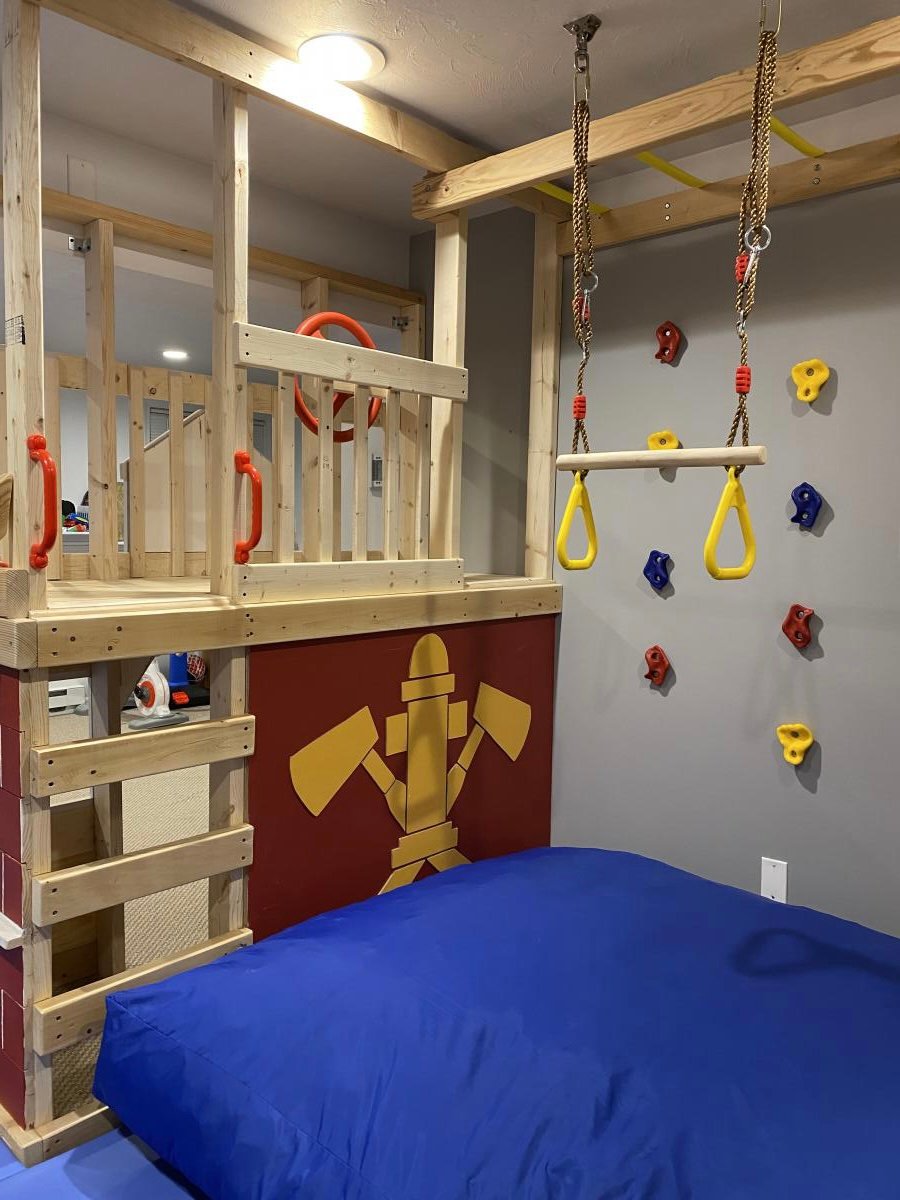
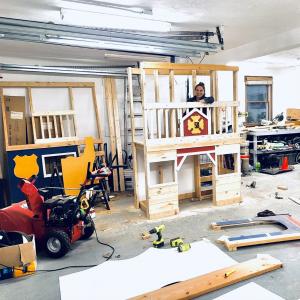
With Christmas approaching and the realization that my three young boys had way too much “stuff”, I enrolled the help of my dad to build this amazing basement play area. When I found Ana’s plans for the play gym with monkey bars, I knew we were in business. I modified the design to fit our space and we were off. Such a fun build and my boys absolutely love spending time down there. Thanks so much for your continued inspiration and the confidence you give us mamas to build with the big boys, Ana!!
In reply to Fabulous! by Ana White Admin
Fri, 01/08/2021 - 16:23
Thank you so much!! 🙏

I used Ana's plan as a base.
I changed it from 8x8 to 8x12, made the 4x4x8's to 4x4x10' for a higher main platform and swing platform, and added a 12' long monkey bar set to the other side. Also, an 8' climbing wall and a plank walkway to accompany the two slides.
For the clubhouse, I used Hardiplank 4x8 sheets for the siding and an EZ-Framer kit for the structure itself.
The slides I purchased from Lowes, monkey bars from Amazon, and the swing frame braces from Amazon as well. The swing kits I got from ebay.


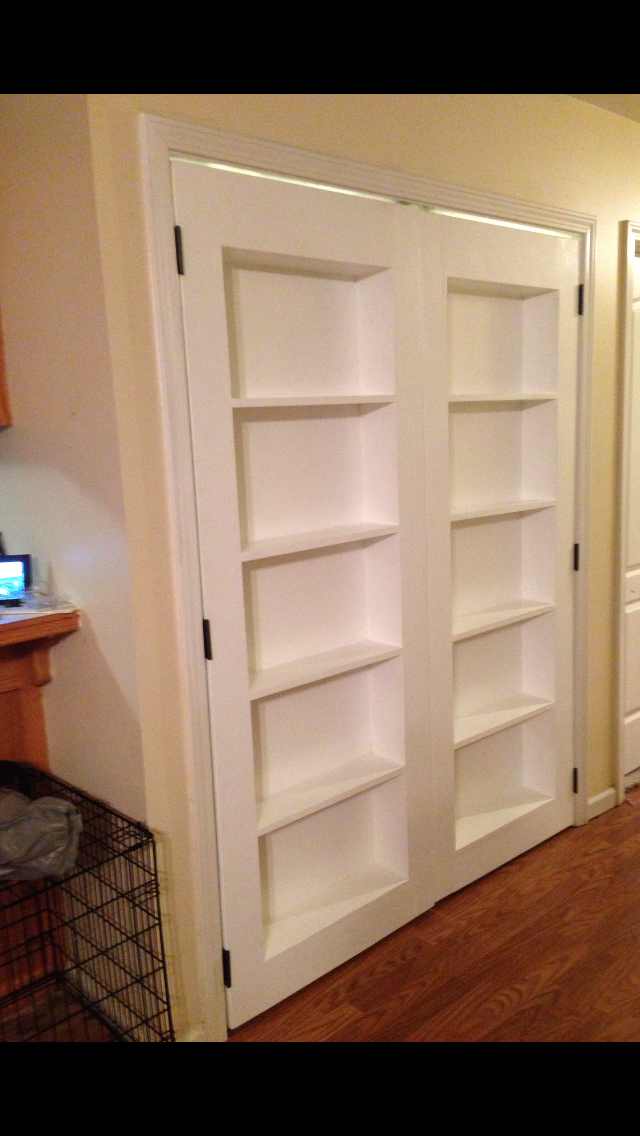
You made this project look so simple that I just had to try it. However, to suit my needs I had to make a few alterations to the plans. I had a set of bi-fold doors that were in need of replacement and I thought inset bookshelf doors would be the perfect way to replace them. This project was easy enough for me to do it myself and I am really new to the DIY game but I did have some help. I really love the way they turned out. You can read all about my my adventure at http://heresalittletmi.blogspot.com/2013/08/bookshelf-doors.html

We've been desperate for more storage in our little house and this build really helped. The whole bench is 103“ wide and each drawer gives us 24"x17" of usable space. We had to do some custom shaping for the benchtop (two joined fir 2x12's) fit as the walls are not square but in the end we were really pleased.
The hardest part of the project was getting all of this built and in place while working around a busy family as this is our only meal space and the majority of cutting/forming was done either on the weekends or after bedtimes. If I were to do this again I'd prioritize sending the kids to grandparents for the weekend and know king everything except for paint out in one go.
We could have spent less time with the benchtop by using plywood like in the plans but we wanted the look of a separate benchtop. We may replace the fir with stained oak down the line but this should be plenty sturdy for the next several years.

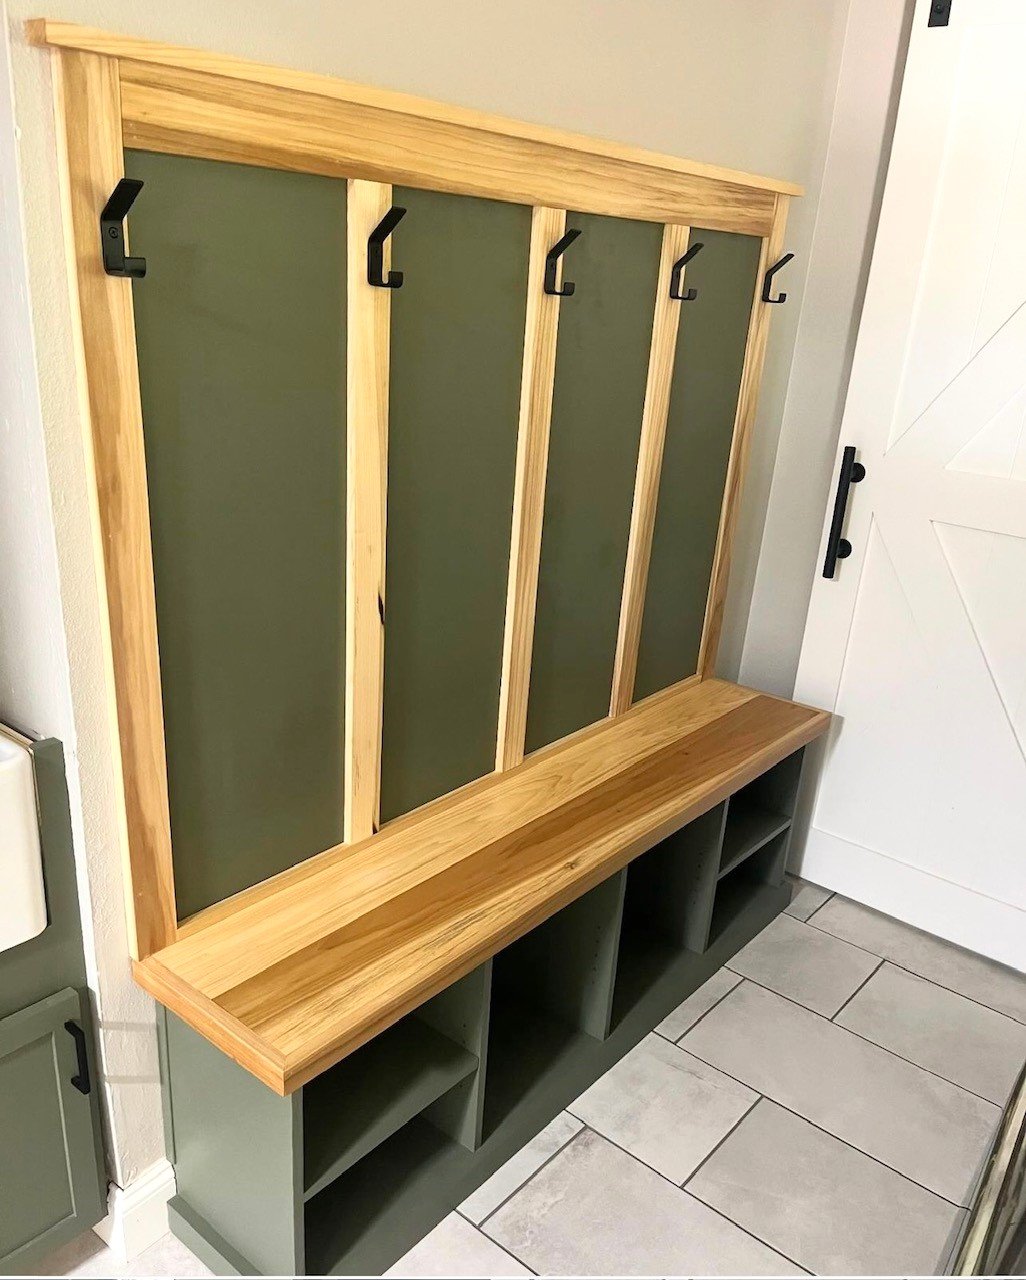
We built this bench using Ana's Entryway Bench Plans. We modified it by adding adjustable shelves for additional shoe storage. We added the back with hooks for coats and backpacks. We’ve made this small space feel so much bigger by adding storage and utilizing the space that is in the room. We can’t wait to finish this project.

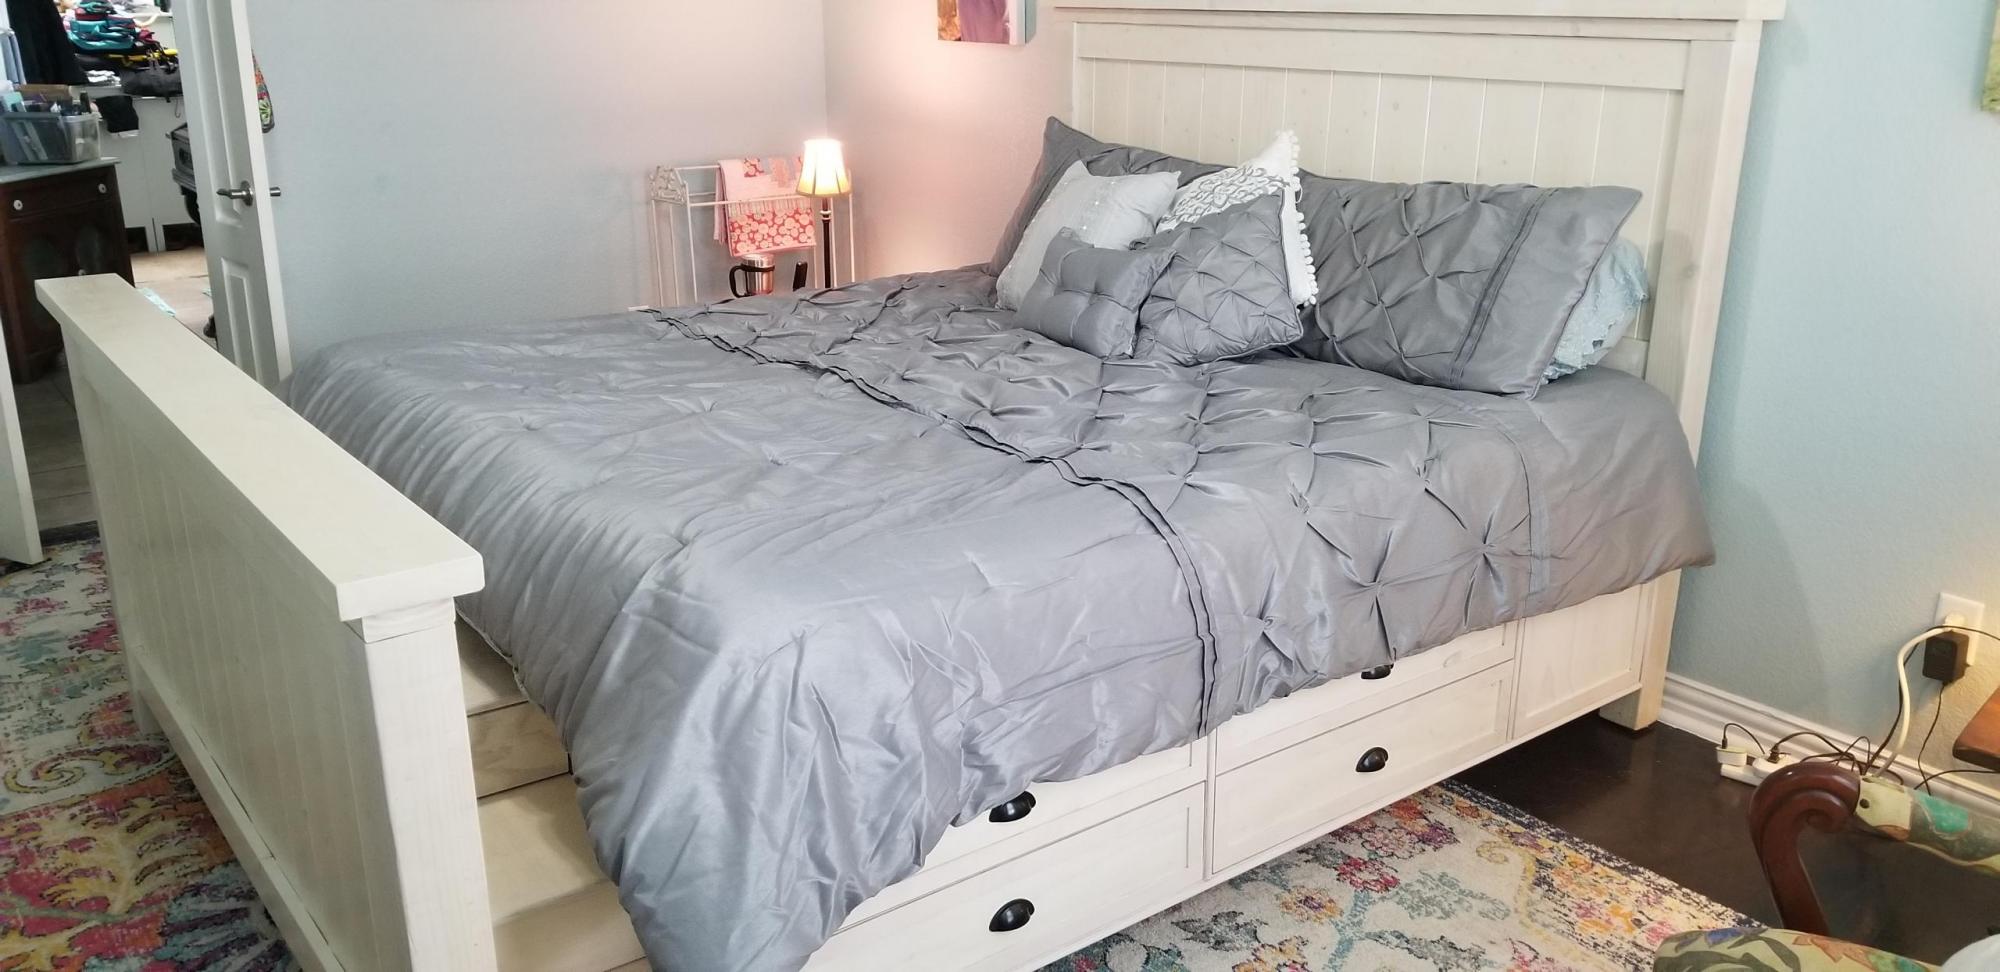
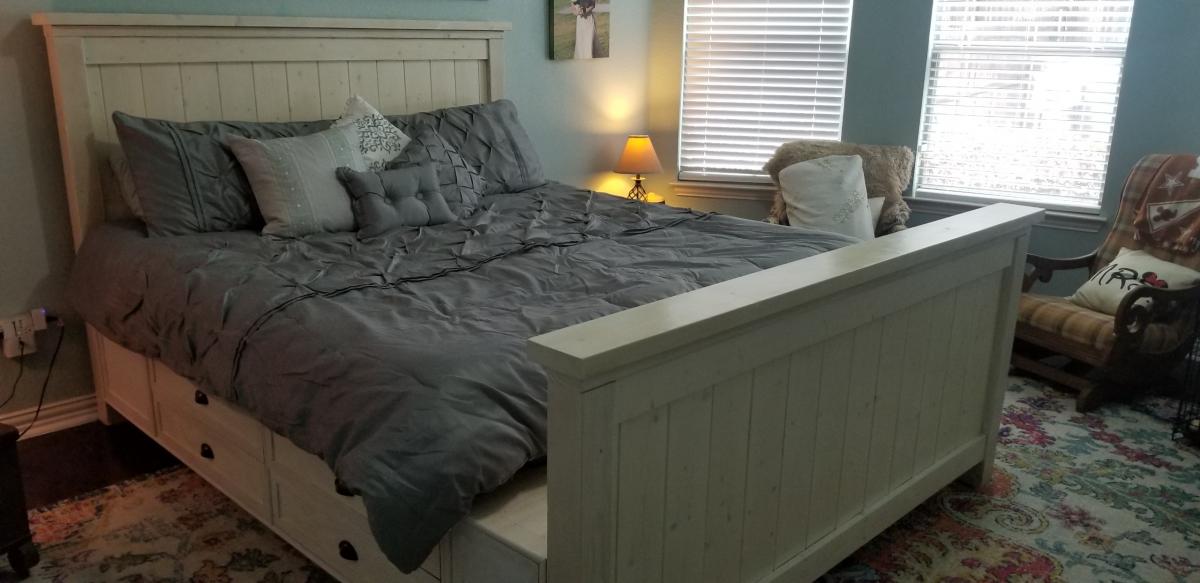
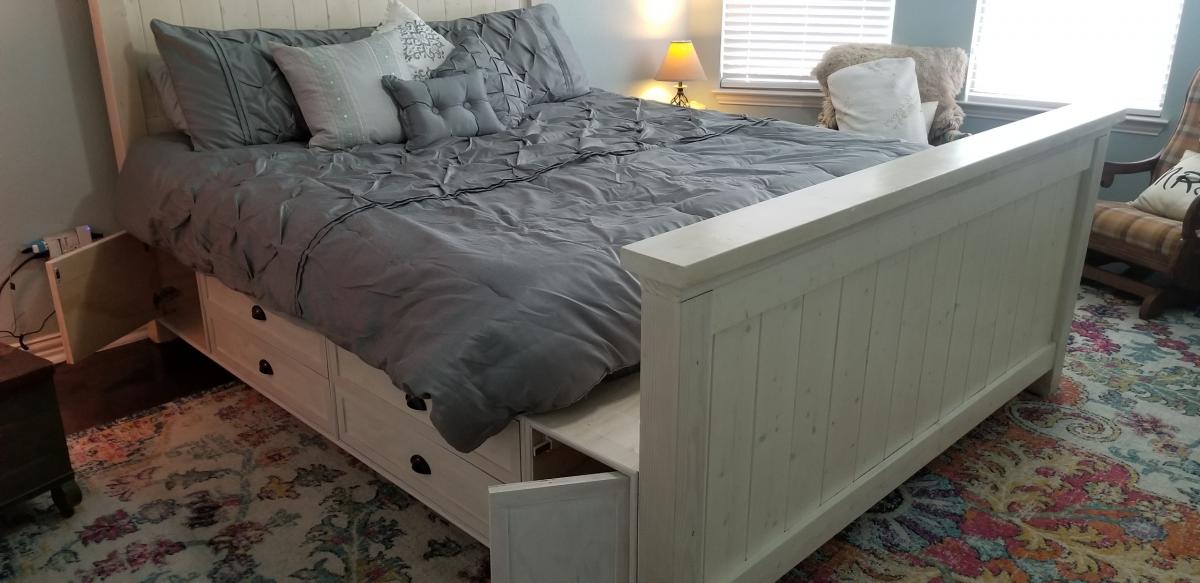
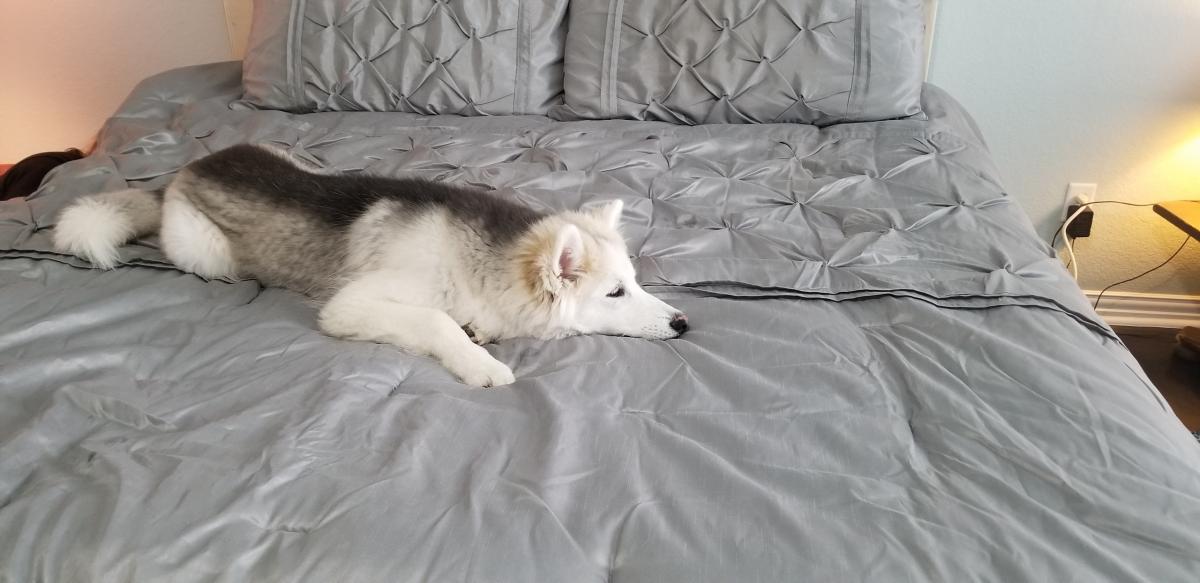
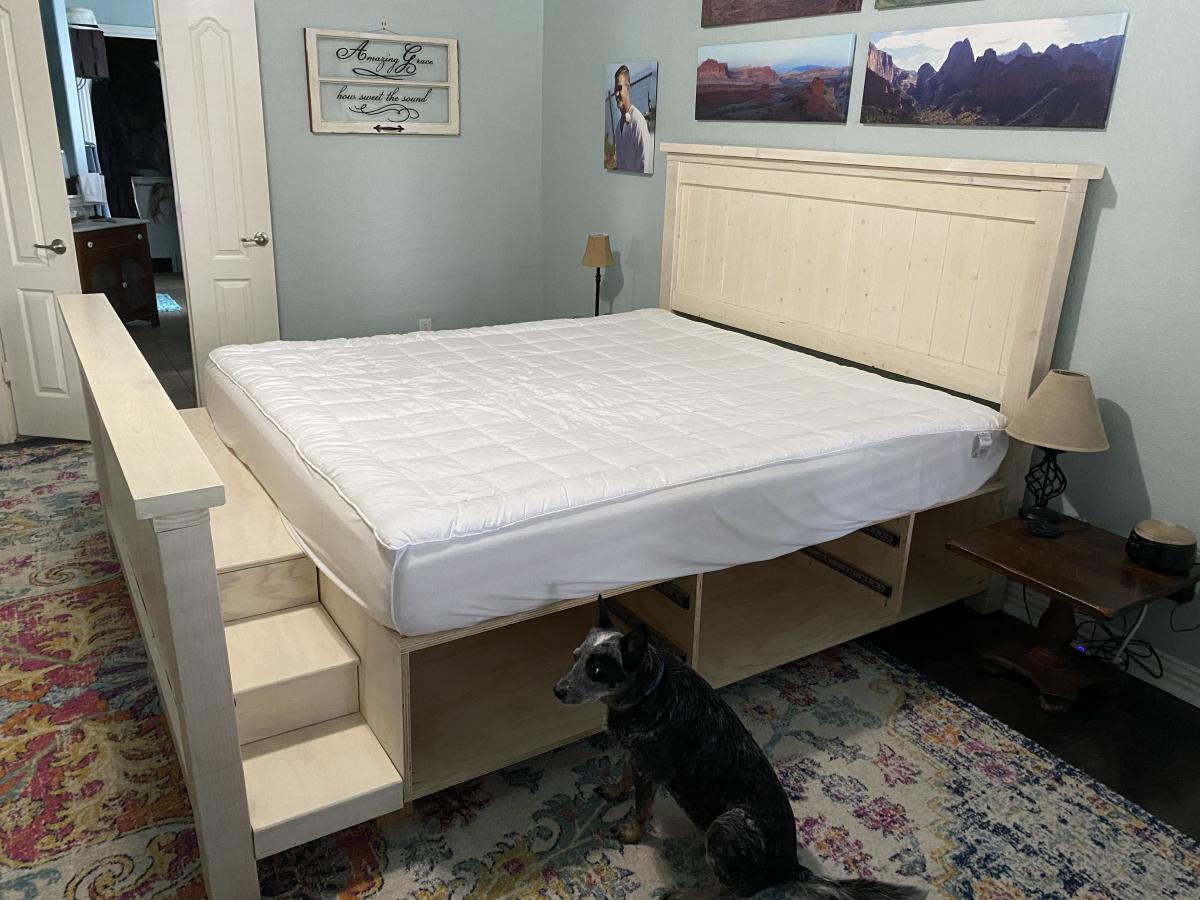
We have a frosty faced blind girl and an aging tri-pawed that we wanted to be able to continue snuggling with us so we adapted the Farmhouse Bed with Storage to make it a king size. We made the drawer boxes deeper which allowed us to get rid of our dresser to create more space in our room. And we added a flight of stairs for the pups.

Fri, 12/30/2022 - 07:53
This is exactly what I’m looking for! Perfect for our dogs. Although, I wonder if a ramp would work or if it would be too steep? Hmmm
Weekend swing project

Tue, 05/07/2019 - 10:42
We don't currently have this plan available, although I'd be happy to draw it with the author's permission.
I have linked a few plans above that could be used to create this plan. Just make sure you bury the arbor uprights underground on concrete pier posts or similar (like building a fence)

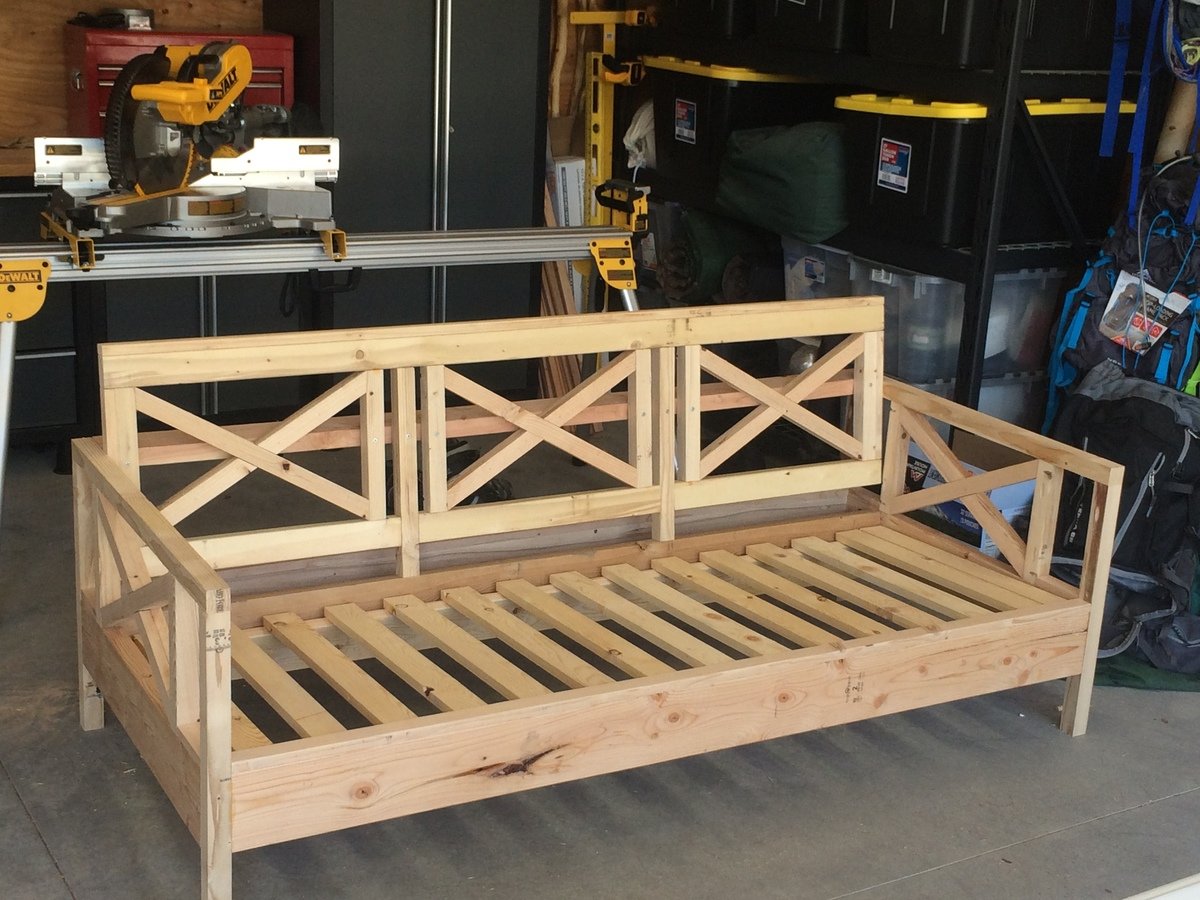
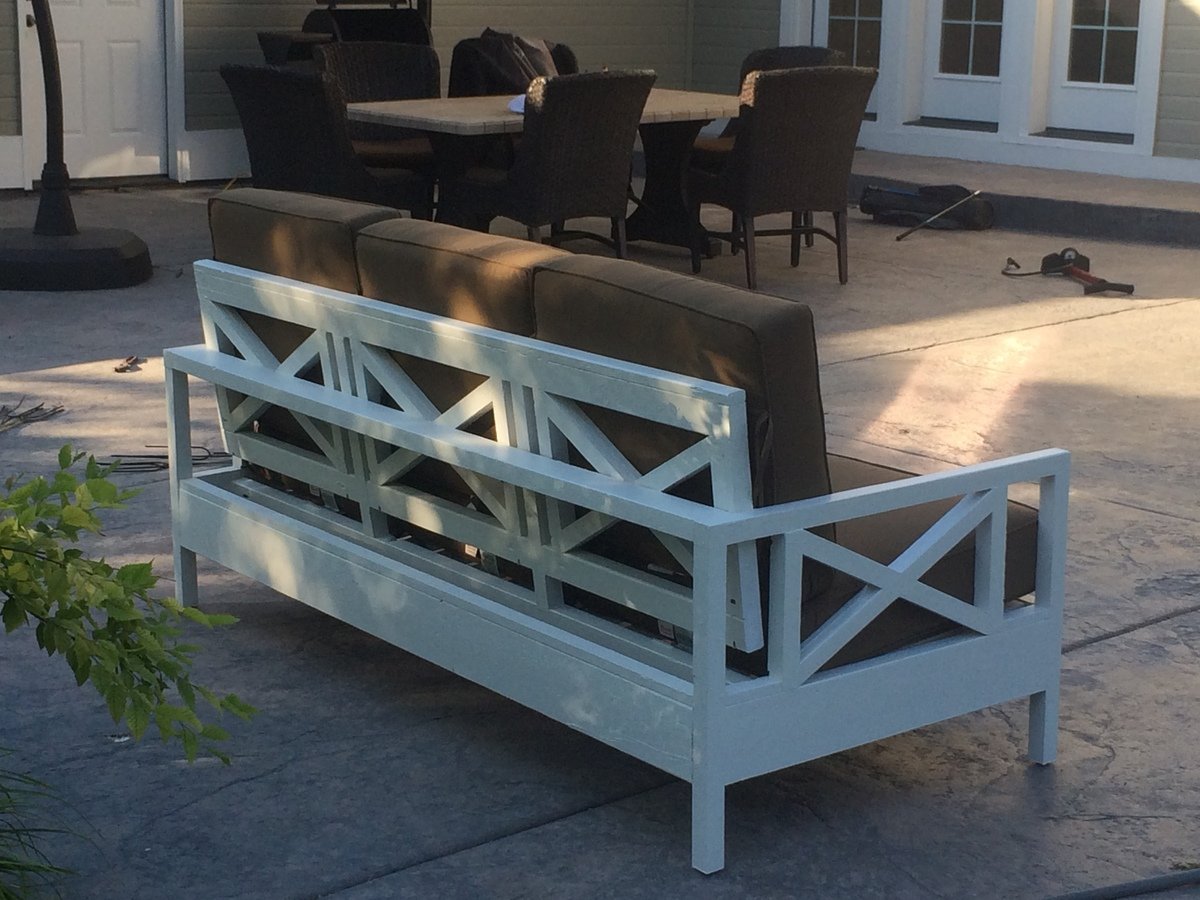
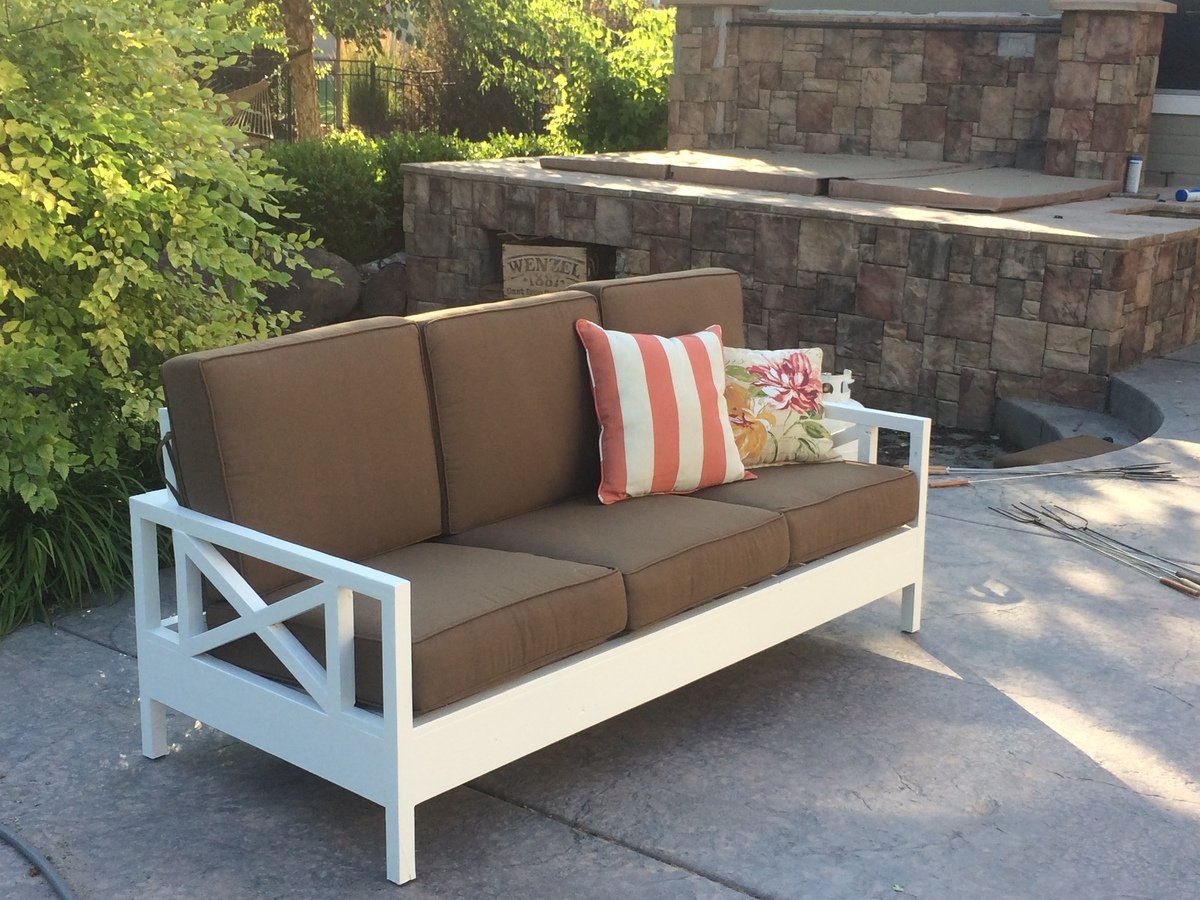
My wife loves the X pattern of the Weatherly Sofa, but wanted the tilted back from the Simple White Outdoor Sofa. This was our best of both worlds effort!
Tue, 06/11/2019 - 05:25
Can you share where you got your cushions please?
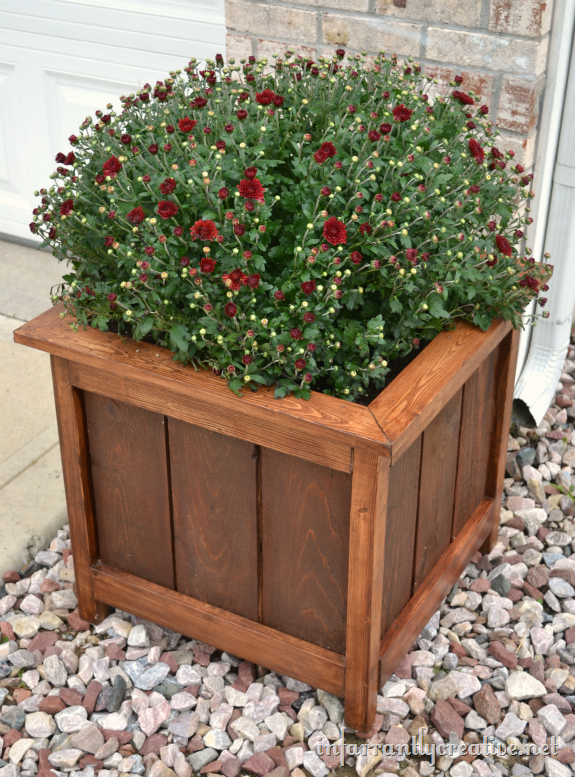
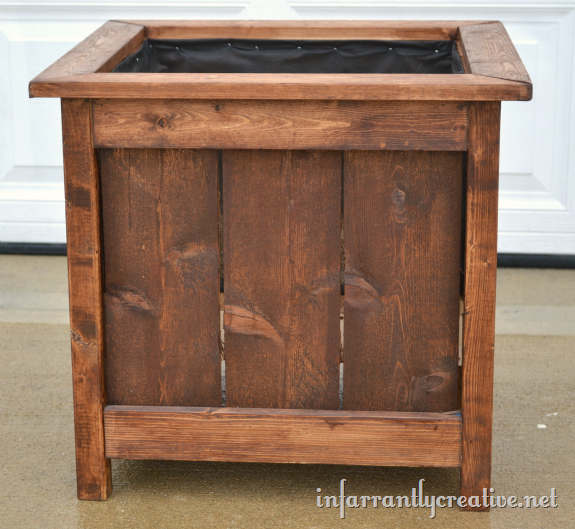
This was by far the easiest project. This planter is HUGE as well and makes a great focal point for your curb appeal. I didn't extend the sides but rather created a mitered edge for the top creating a nice clean finish.
Mon, 10/29/2012 - 23:02
This looks beautiful! I just made one too, I will have to do the top like yours it's pretty that way. I love how the stain too!
:) Valerie
Sun, 09/22/2013 - 20:25
how exactly did you attach the mitered top?? Finish nails or is there a way to use the kreg jig to hide joinery? These are beautiful, BTW. Thanks :)
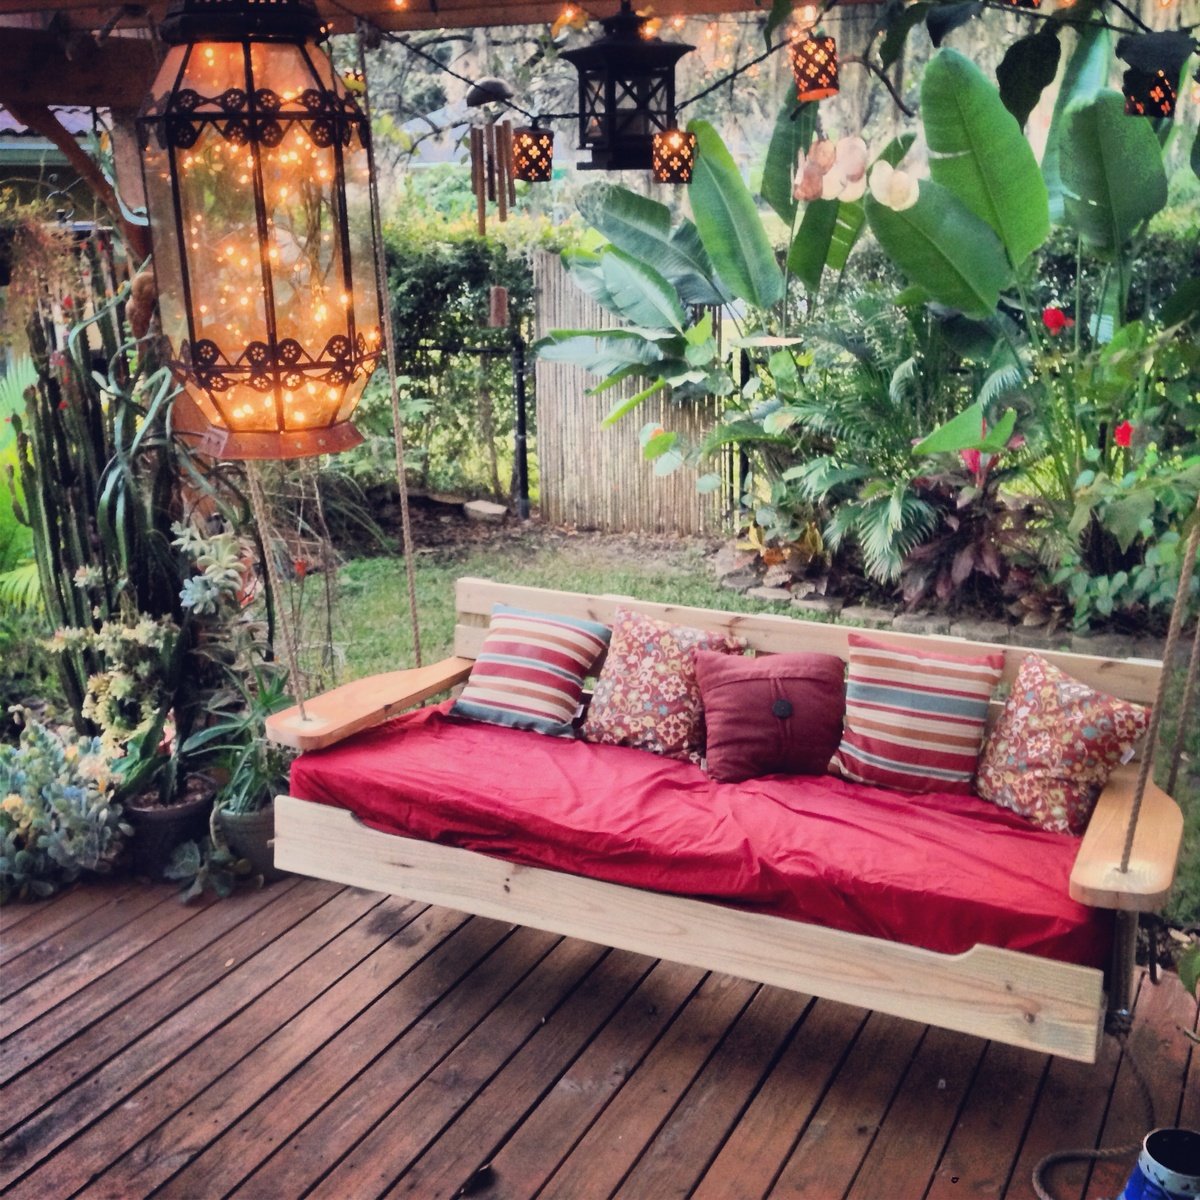
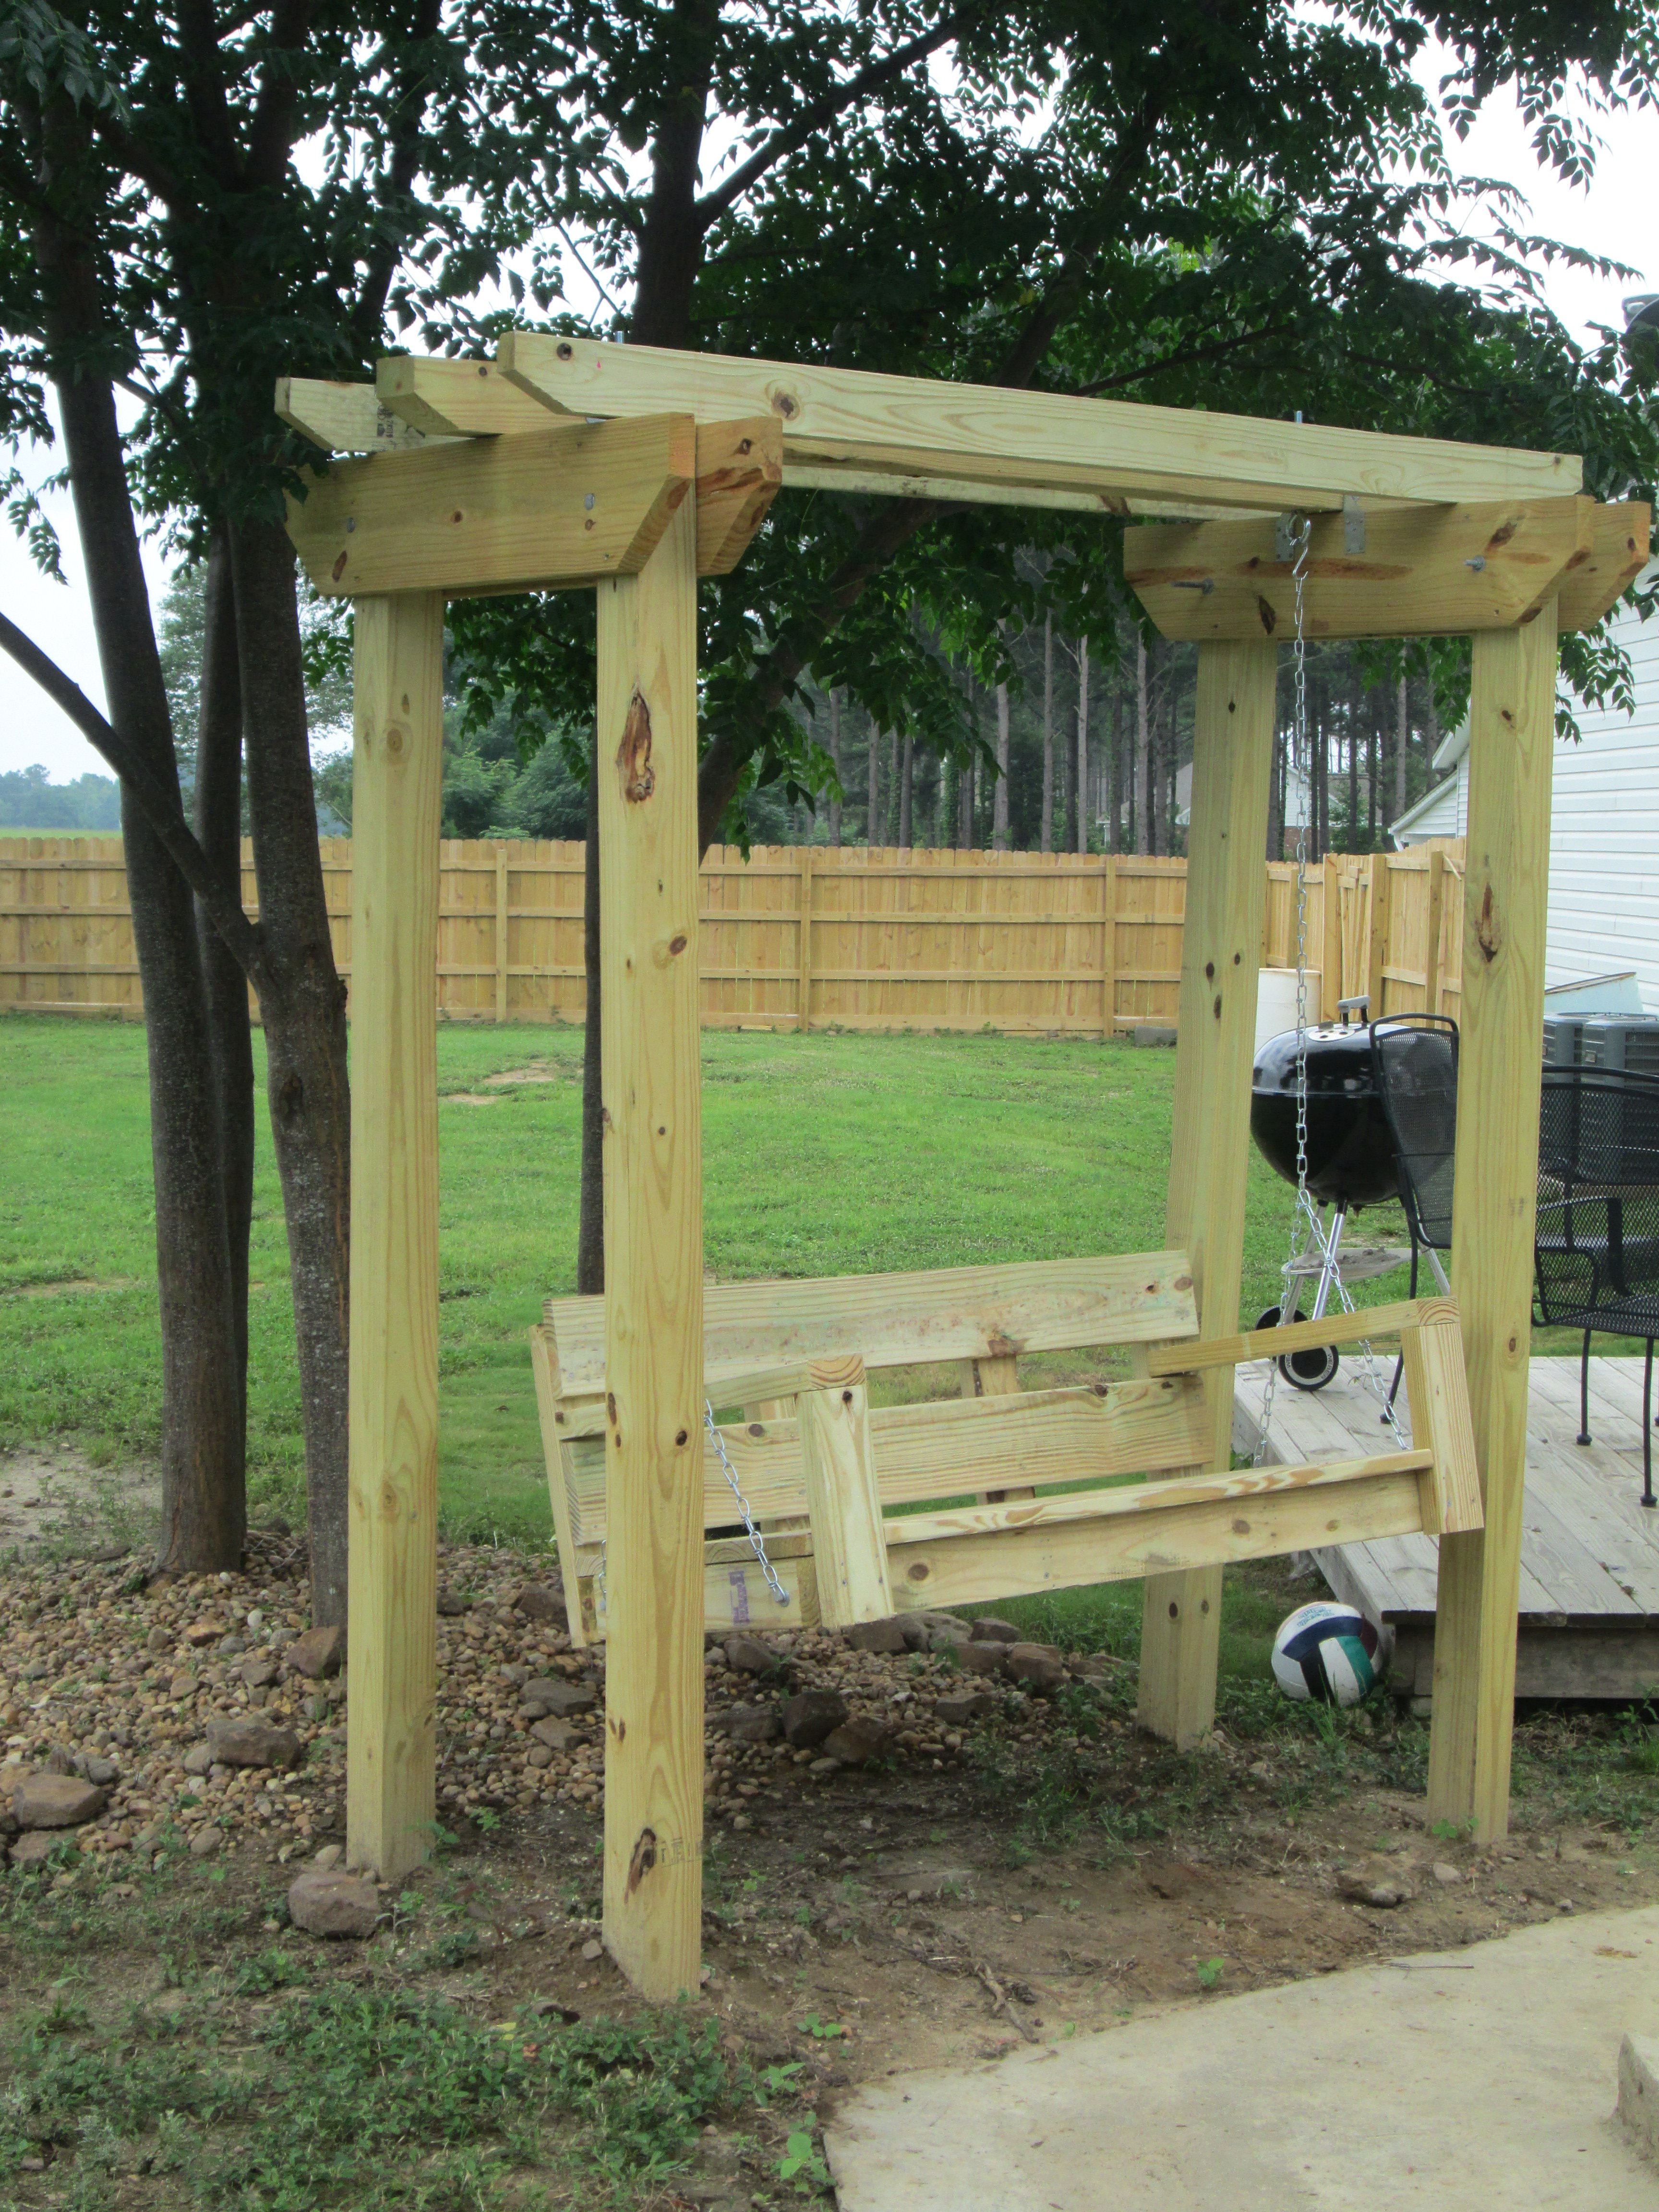
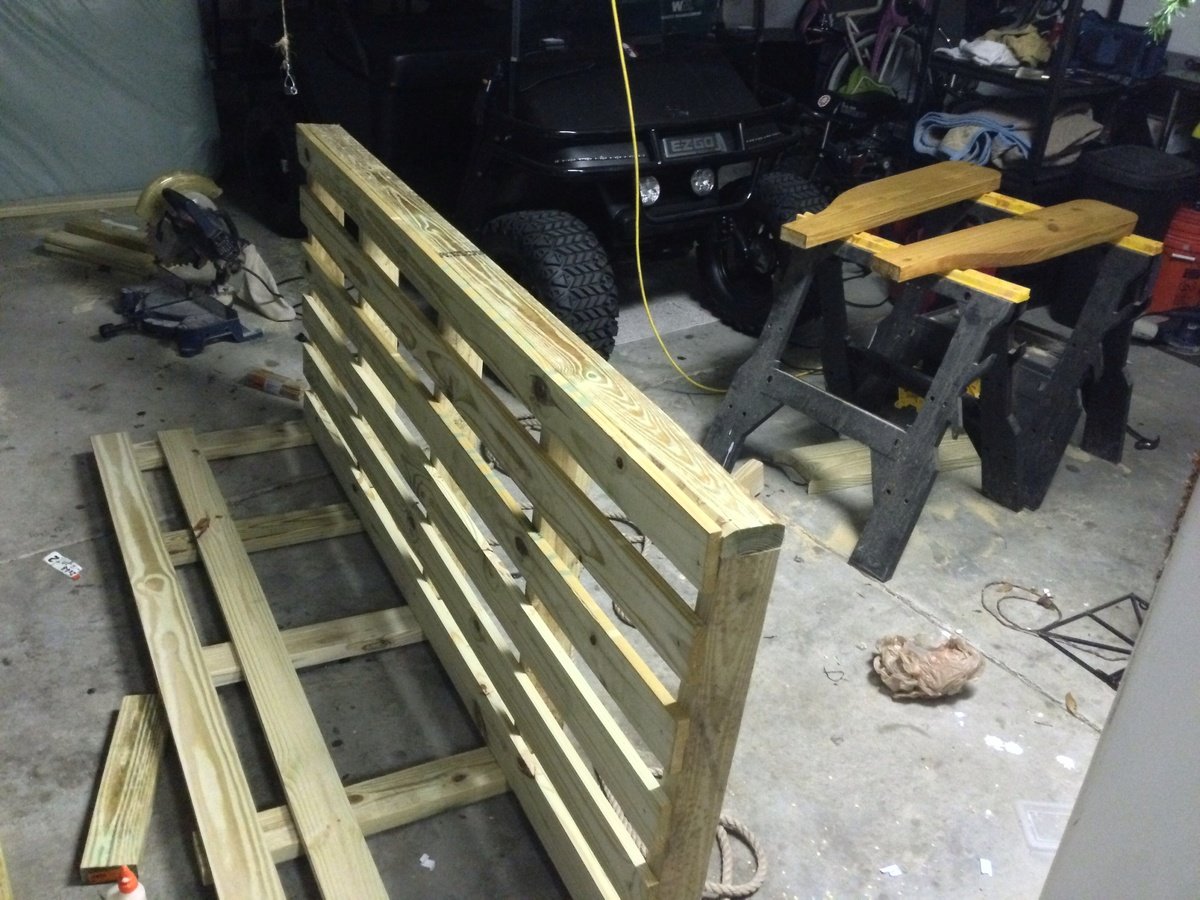
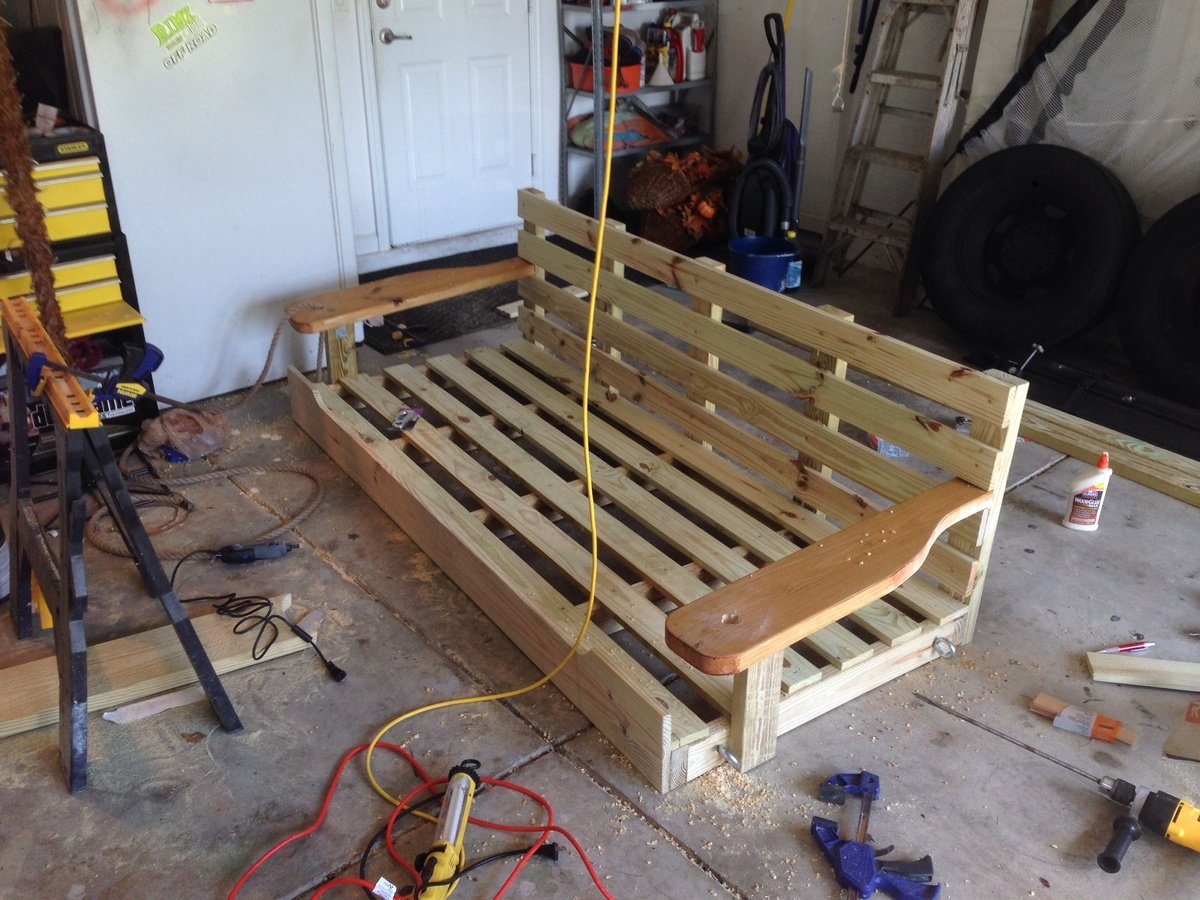
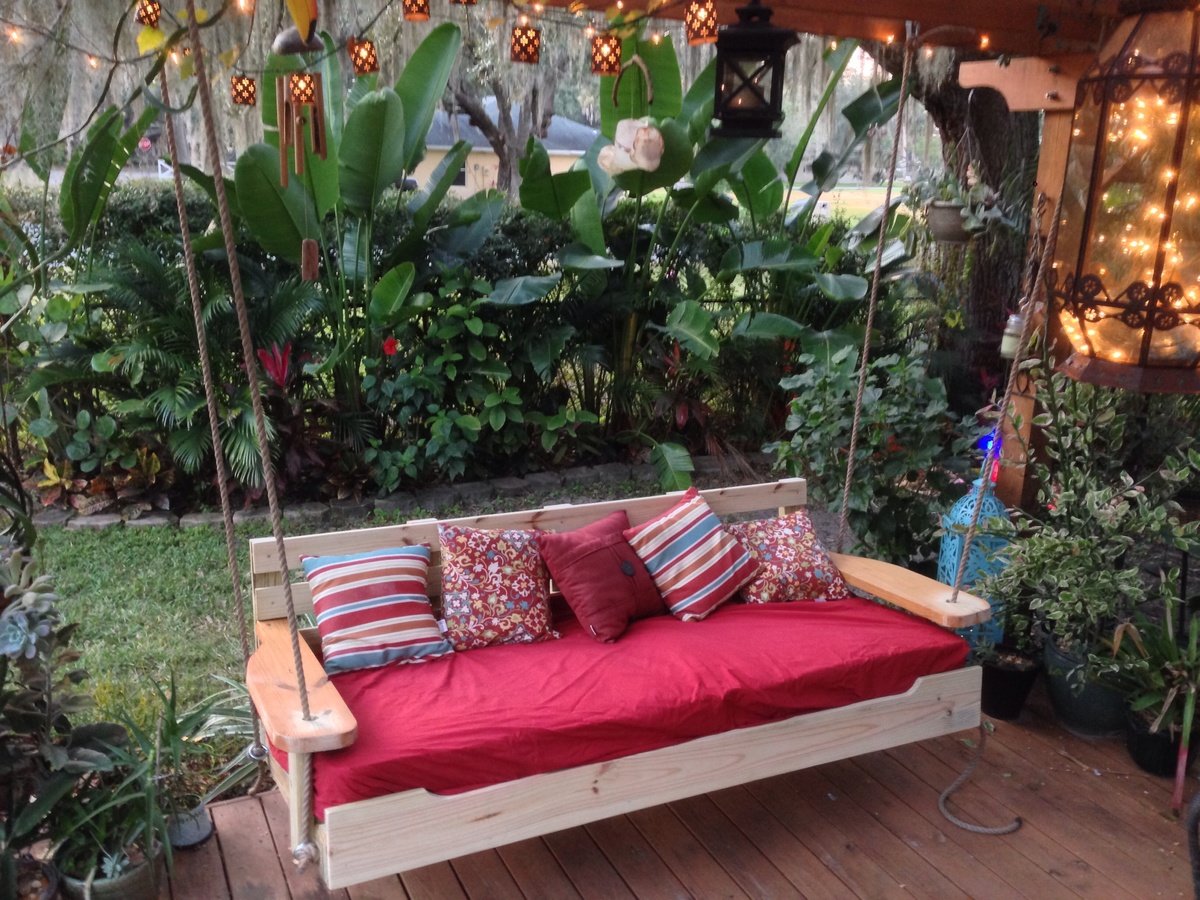
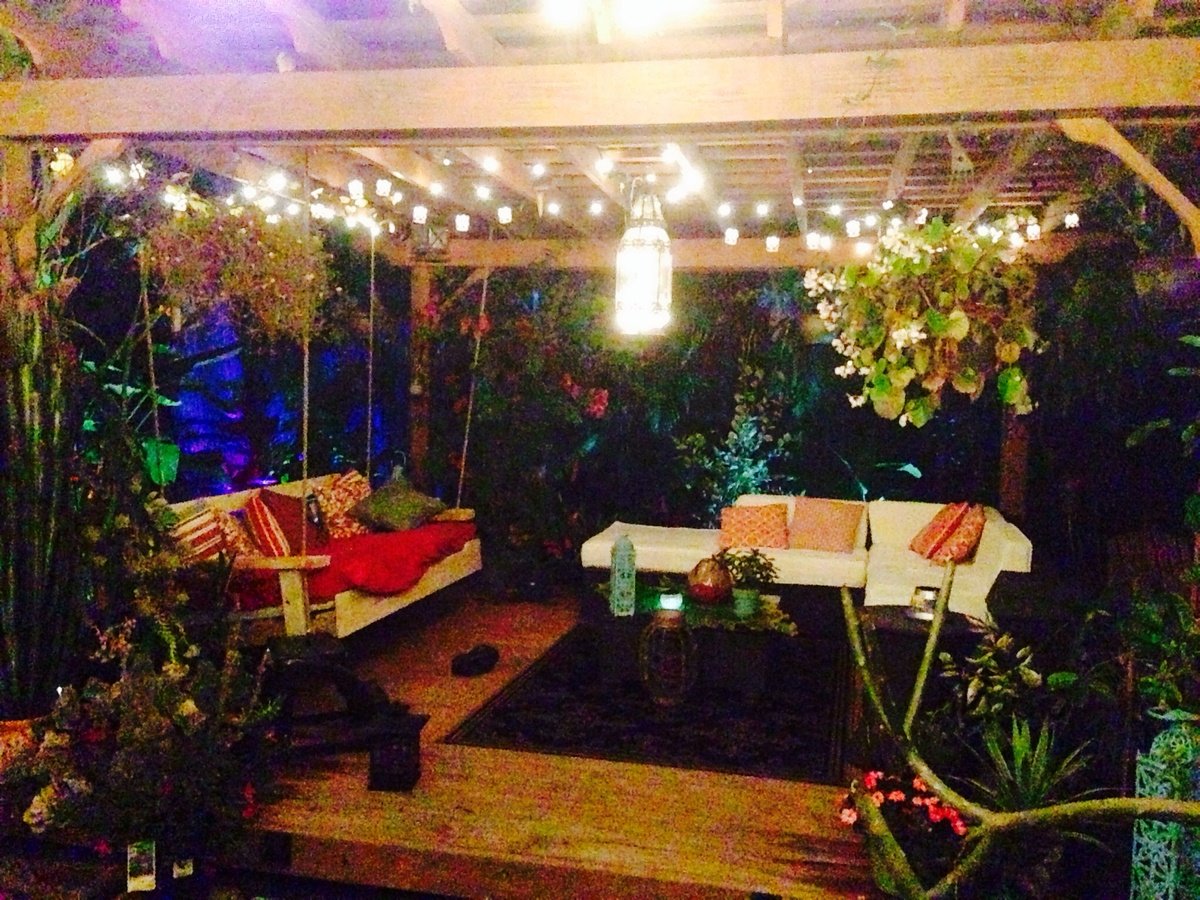
Started off with the original design but enlarged it to fit an oversize single mattress. The mattress cost me $35 from a local faith farm, while the materials came in around $200. I decided to hang under my backyard pergola. Fun and easy project.
Tue, 01/28/2014 - 21:10
Wow this looks so inviting I might just have to make one too! Nice work-- it looks great!
Mon, 04/07/2014 - 22:49
Really lovely! Great job! This will be one of your favorites spots all summer long.
Mon, 07/27/2015 - 22:45
I want this! I just made a couple of plant stands for my front porch. My husband asked me what my next project was, why, a swing bed. (This was only my second project!) I want to put cup holders in those big ole arms! We have a house at the beach in South Alabama, so, you gotta "hydrate." This is an awesome swing. I can't wait to do mine...pillows to rest on, one foot on the concrete pushing me in a slow swing. Cold beverage in my hand or in my cup holder. Yep, southern girl has a new project. Love it!
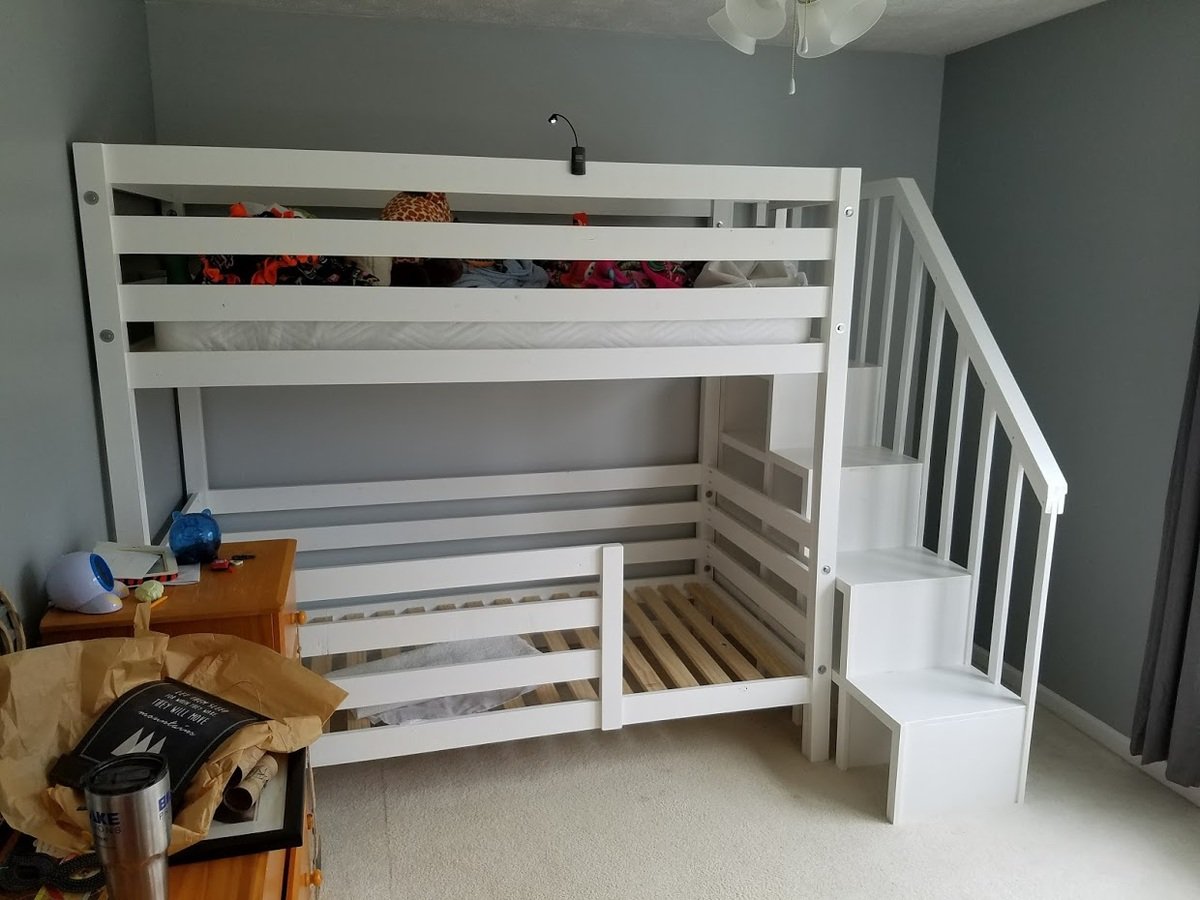
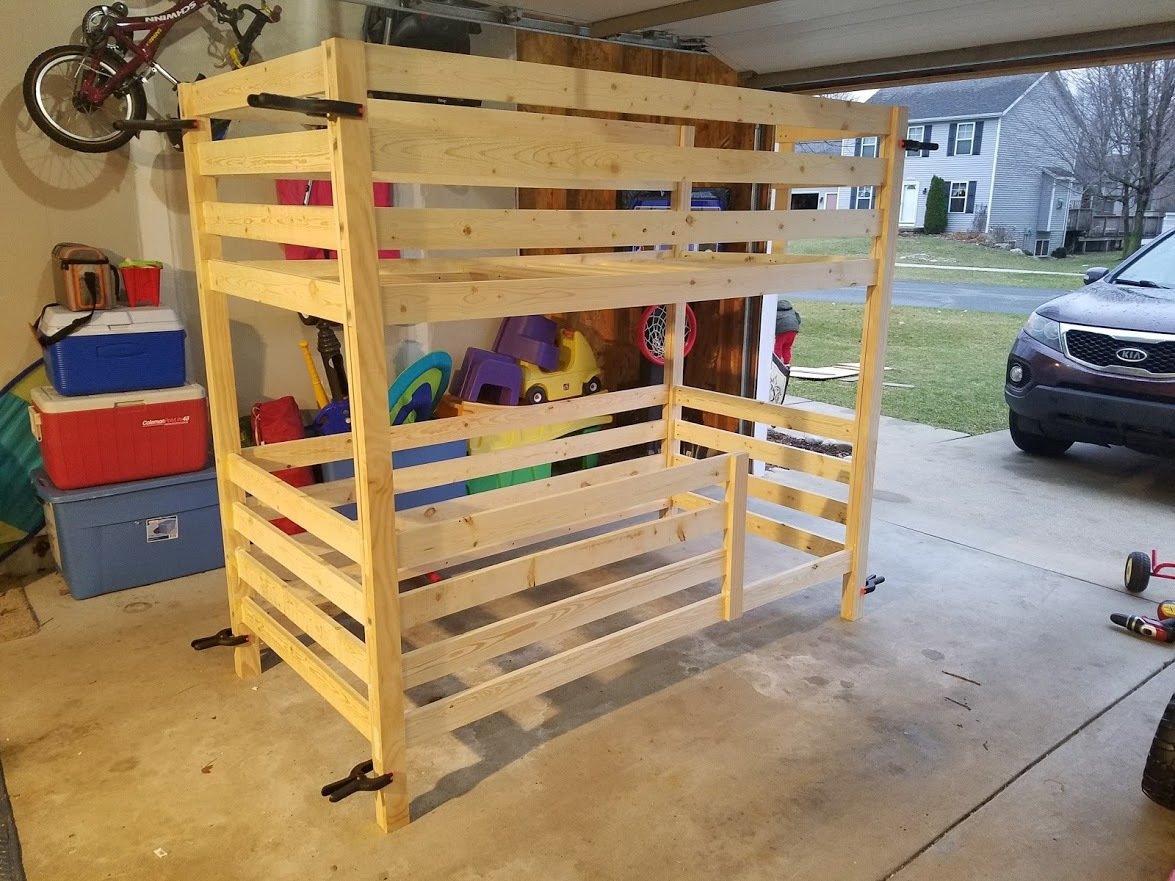
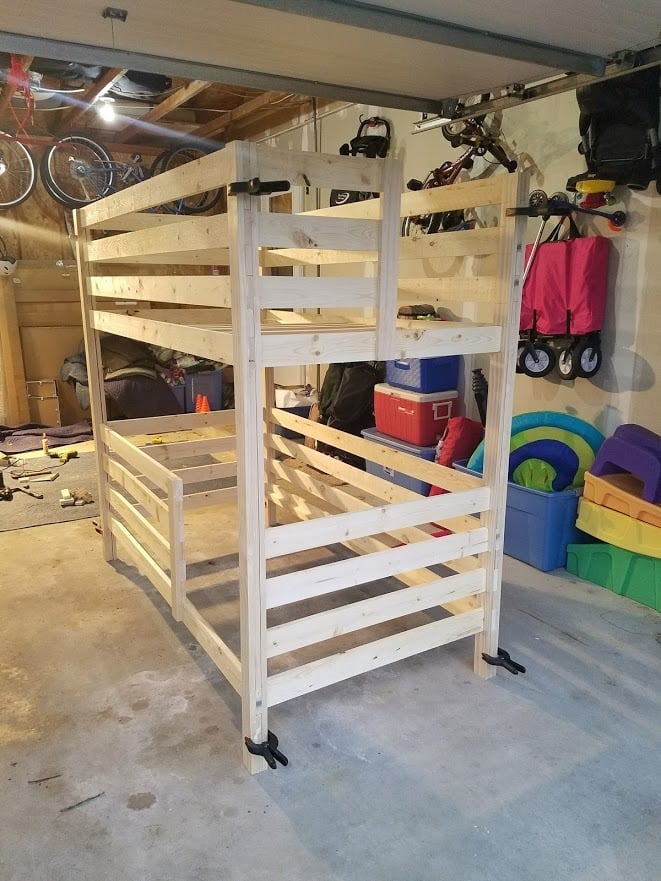
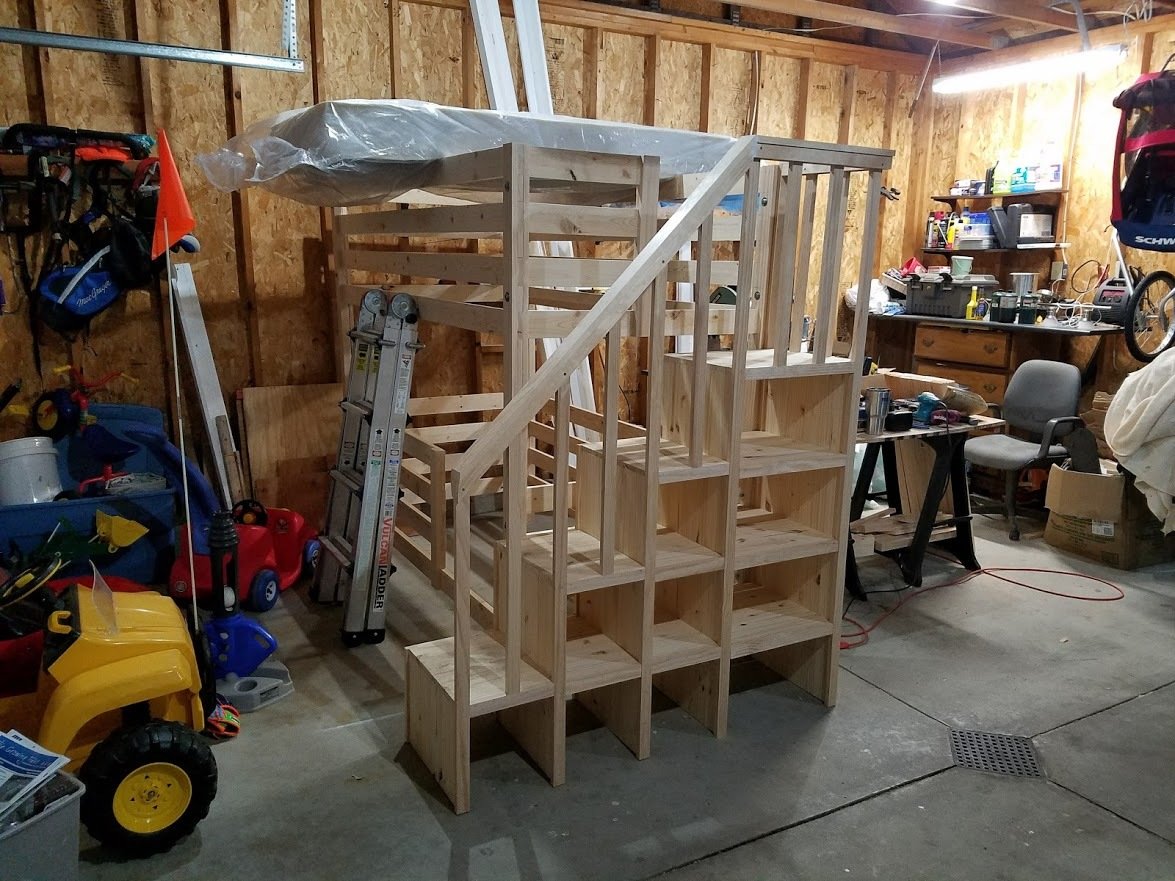
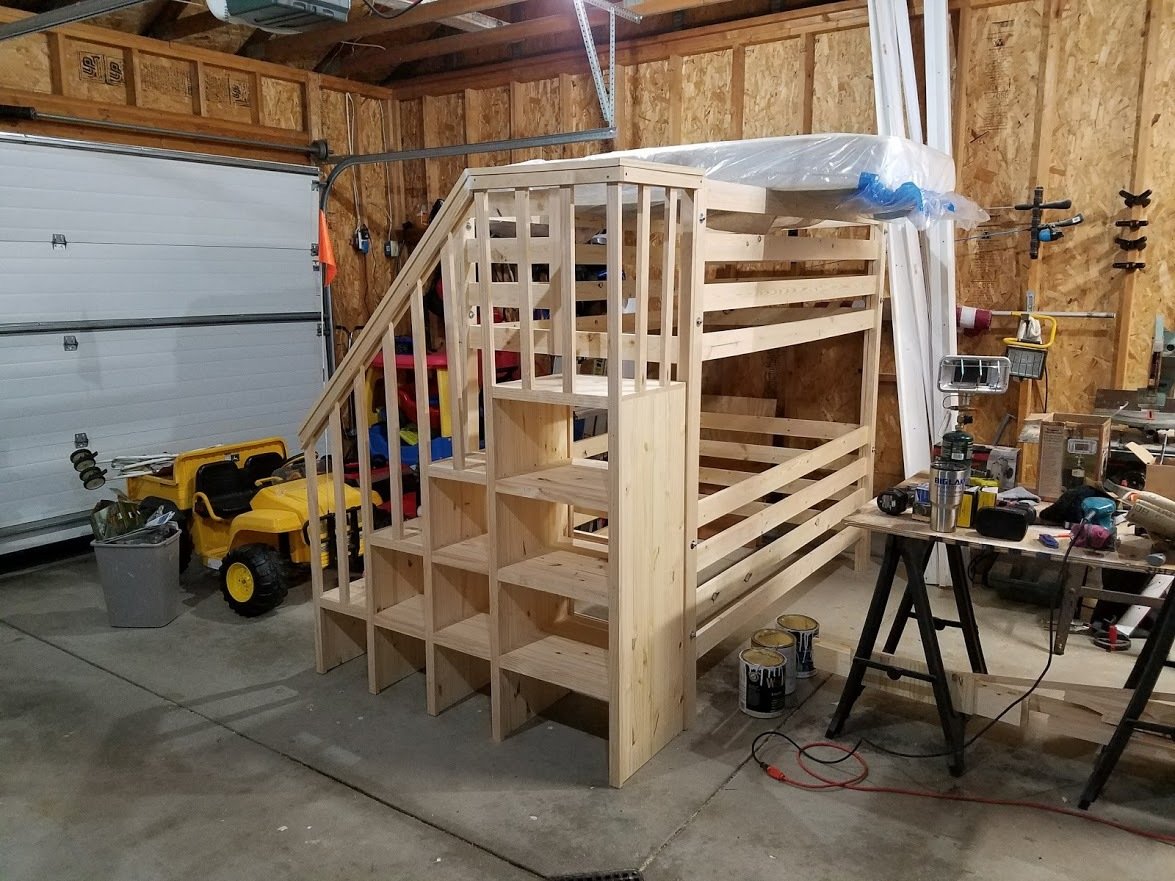
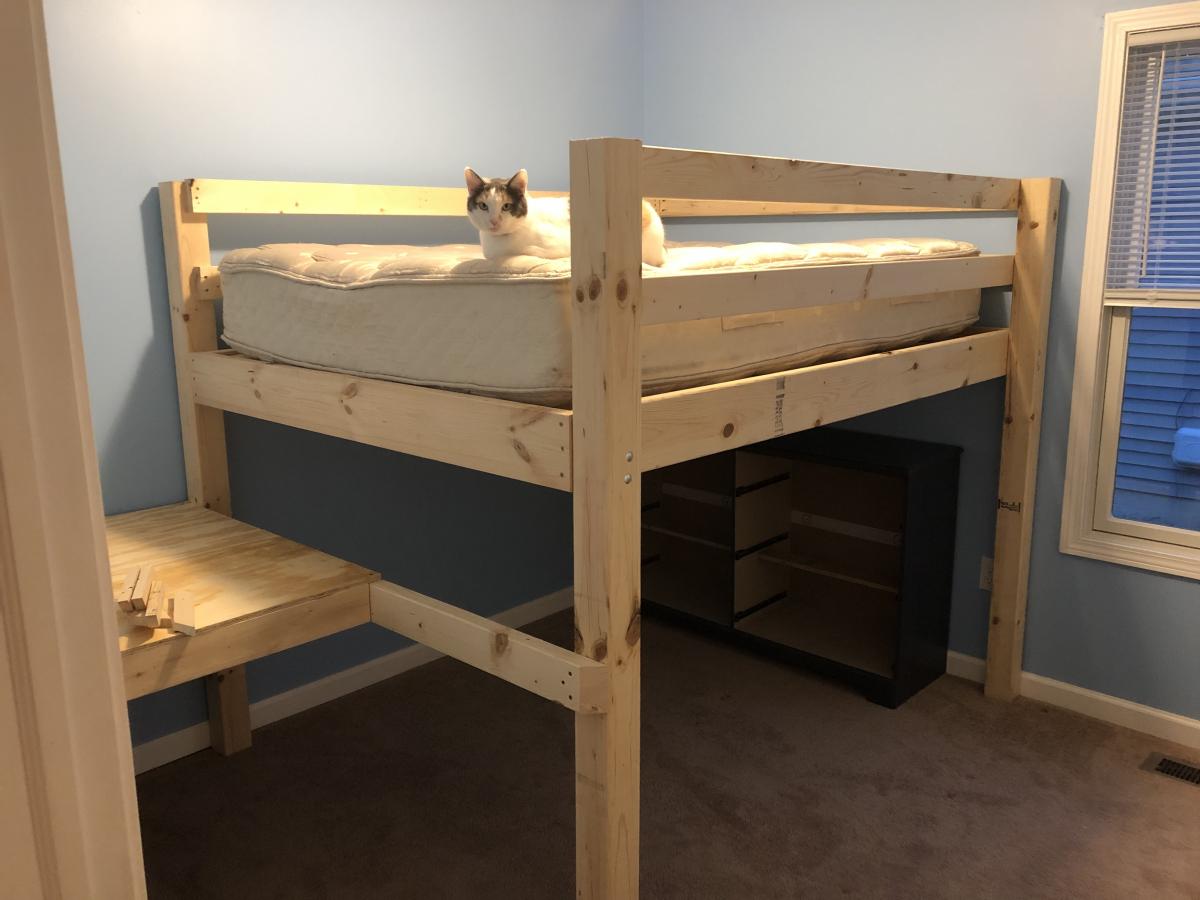
I modified the plans for the Classic Bunk beds by making them 74" tall instead of 63" and added a fourth slat all the way around to add more protection from potential falls. I created one opening in the front for my youngest to get into the bottom bunk, and built slats about 2/3's across the front to act as a gaurd rail. I created another opening on the side for my oldest to get into the top bunk with stairs instead of ladders to again prevent falls. I had to modify the Sweet Pea stairs to accomodate for the extra height in the bunk beds, simplified the railings, and I created each cubby to be big enough to use cloth storage totes that were 11x11x11. Sanded the whole bed and stairs so the corners and edges were all rounded and smooth, and put two coats of white Deck and Porch paint to stand up to the the boys running up and down. I used brackets to secure the stairs to the bed, and sixteen 3" bolts to bind the bed together. Precut and drilled 17 slats for each bed seperated them 2" apart. Spent a few hours every night during the week measuring, cutting, glueing, drilling and assembling the bed and stairs. Spent an entire weekend sanding and painting. Very happy with the way these beds turned out. Overall cost of the project including the paint was around $400.
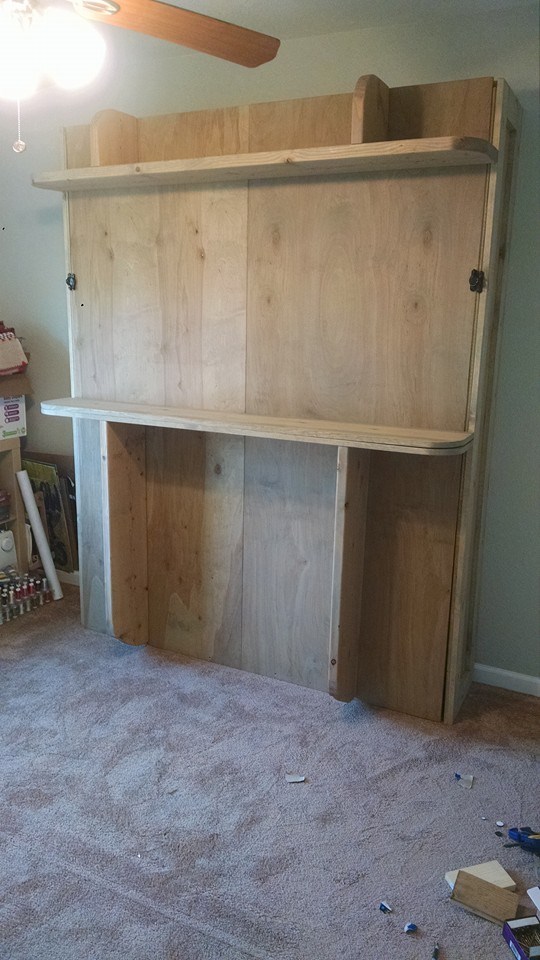
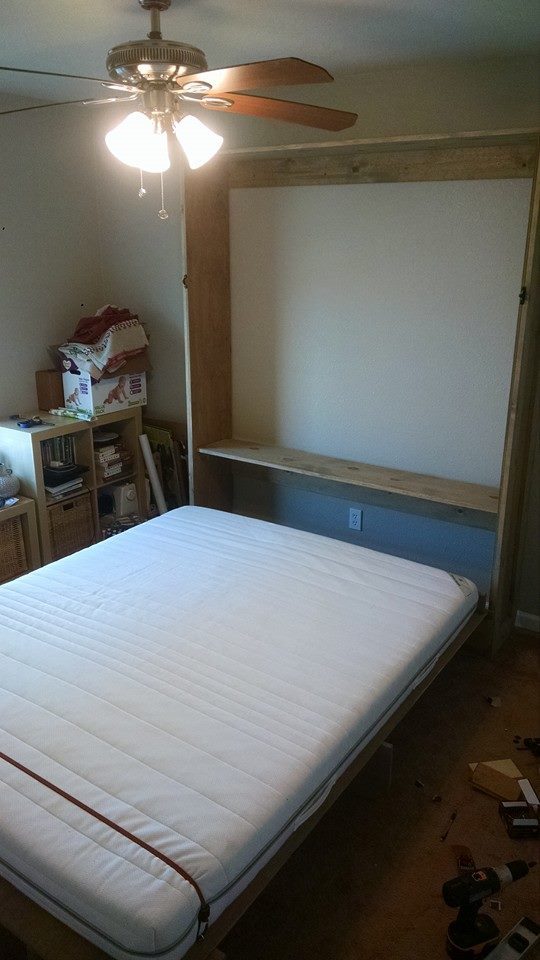
Just finished up my Murphy Bed project. Hope you like.
Mon, 03/09/2020 - 20:30
Amazing. I’ve seen these and have been looking for plans. May just have to dive in and interpret from pictures. You did a really great job, nice work.
Wed, 12/22/2021 - 14:06
The plans are for a different bed than the one in the picture.
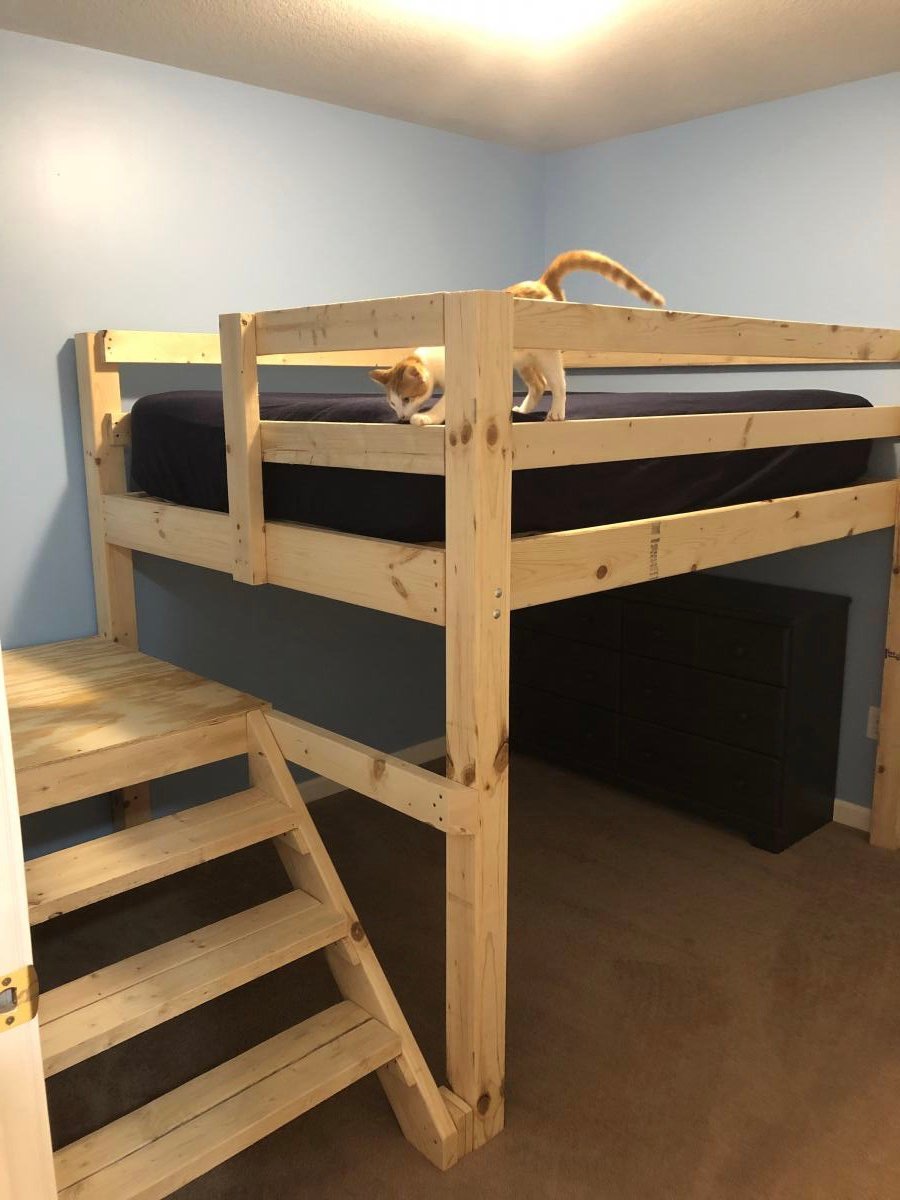
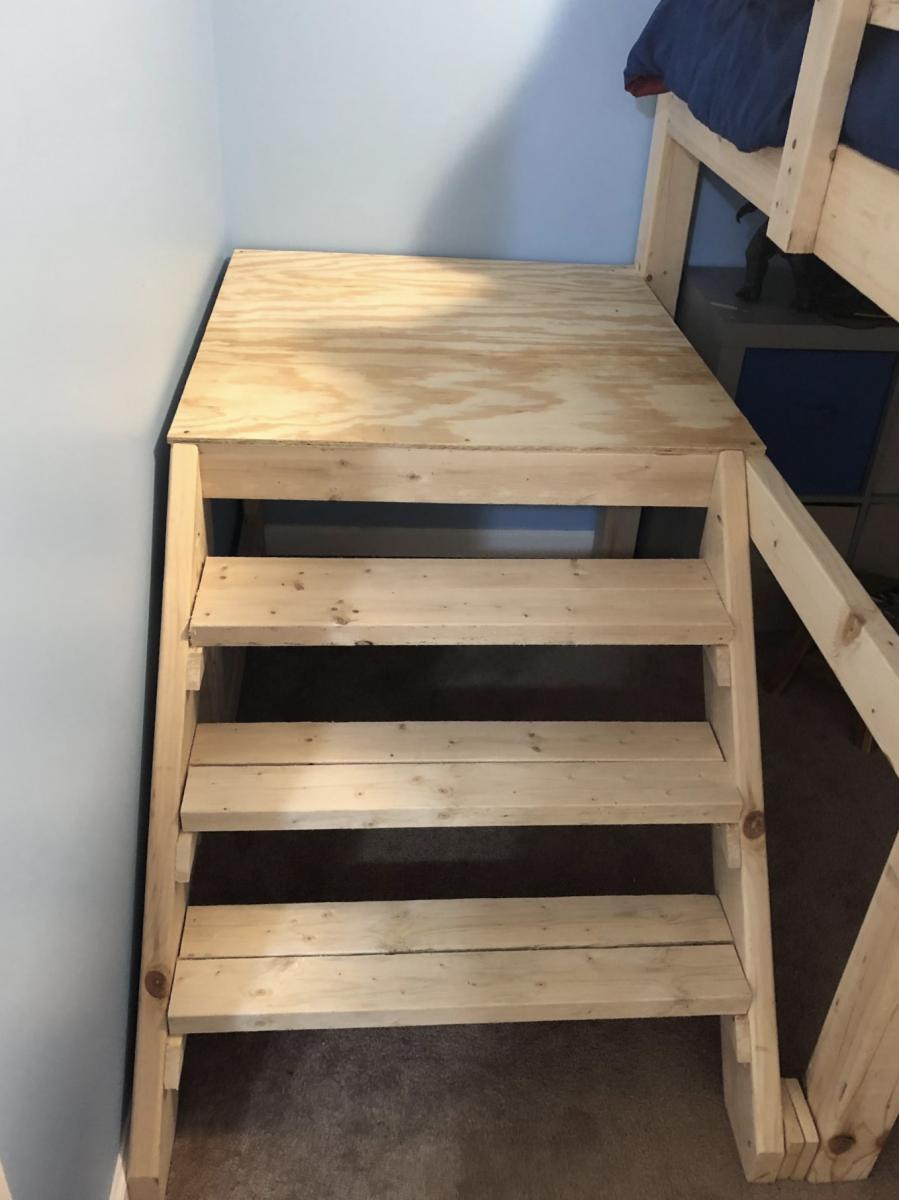
Built a full size loft bed for my kids but wanted something safer than having them climb up and down a ladder so used the Camp Loft Bed plans to add the platform and stairs. It is much easier for the kids. Going to finish by covering the platform and stairs with carpet.
Wed, 10/02/2019 - 09:51
I really like how the platform is only half way so the stairs are inset, this is very smart and good use of space.
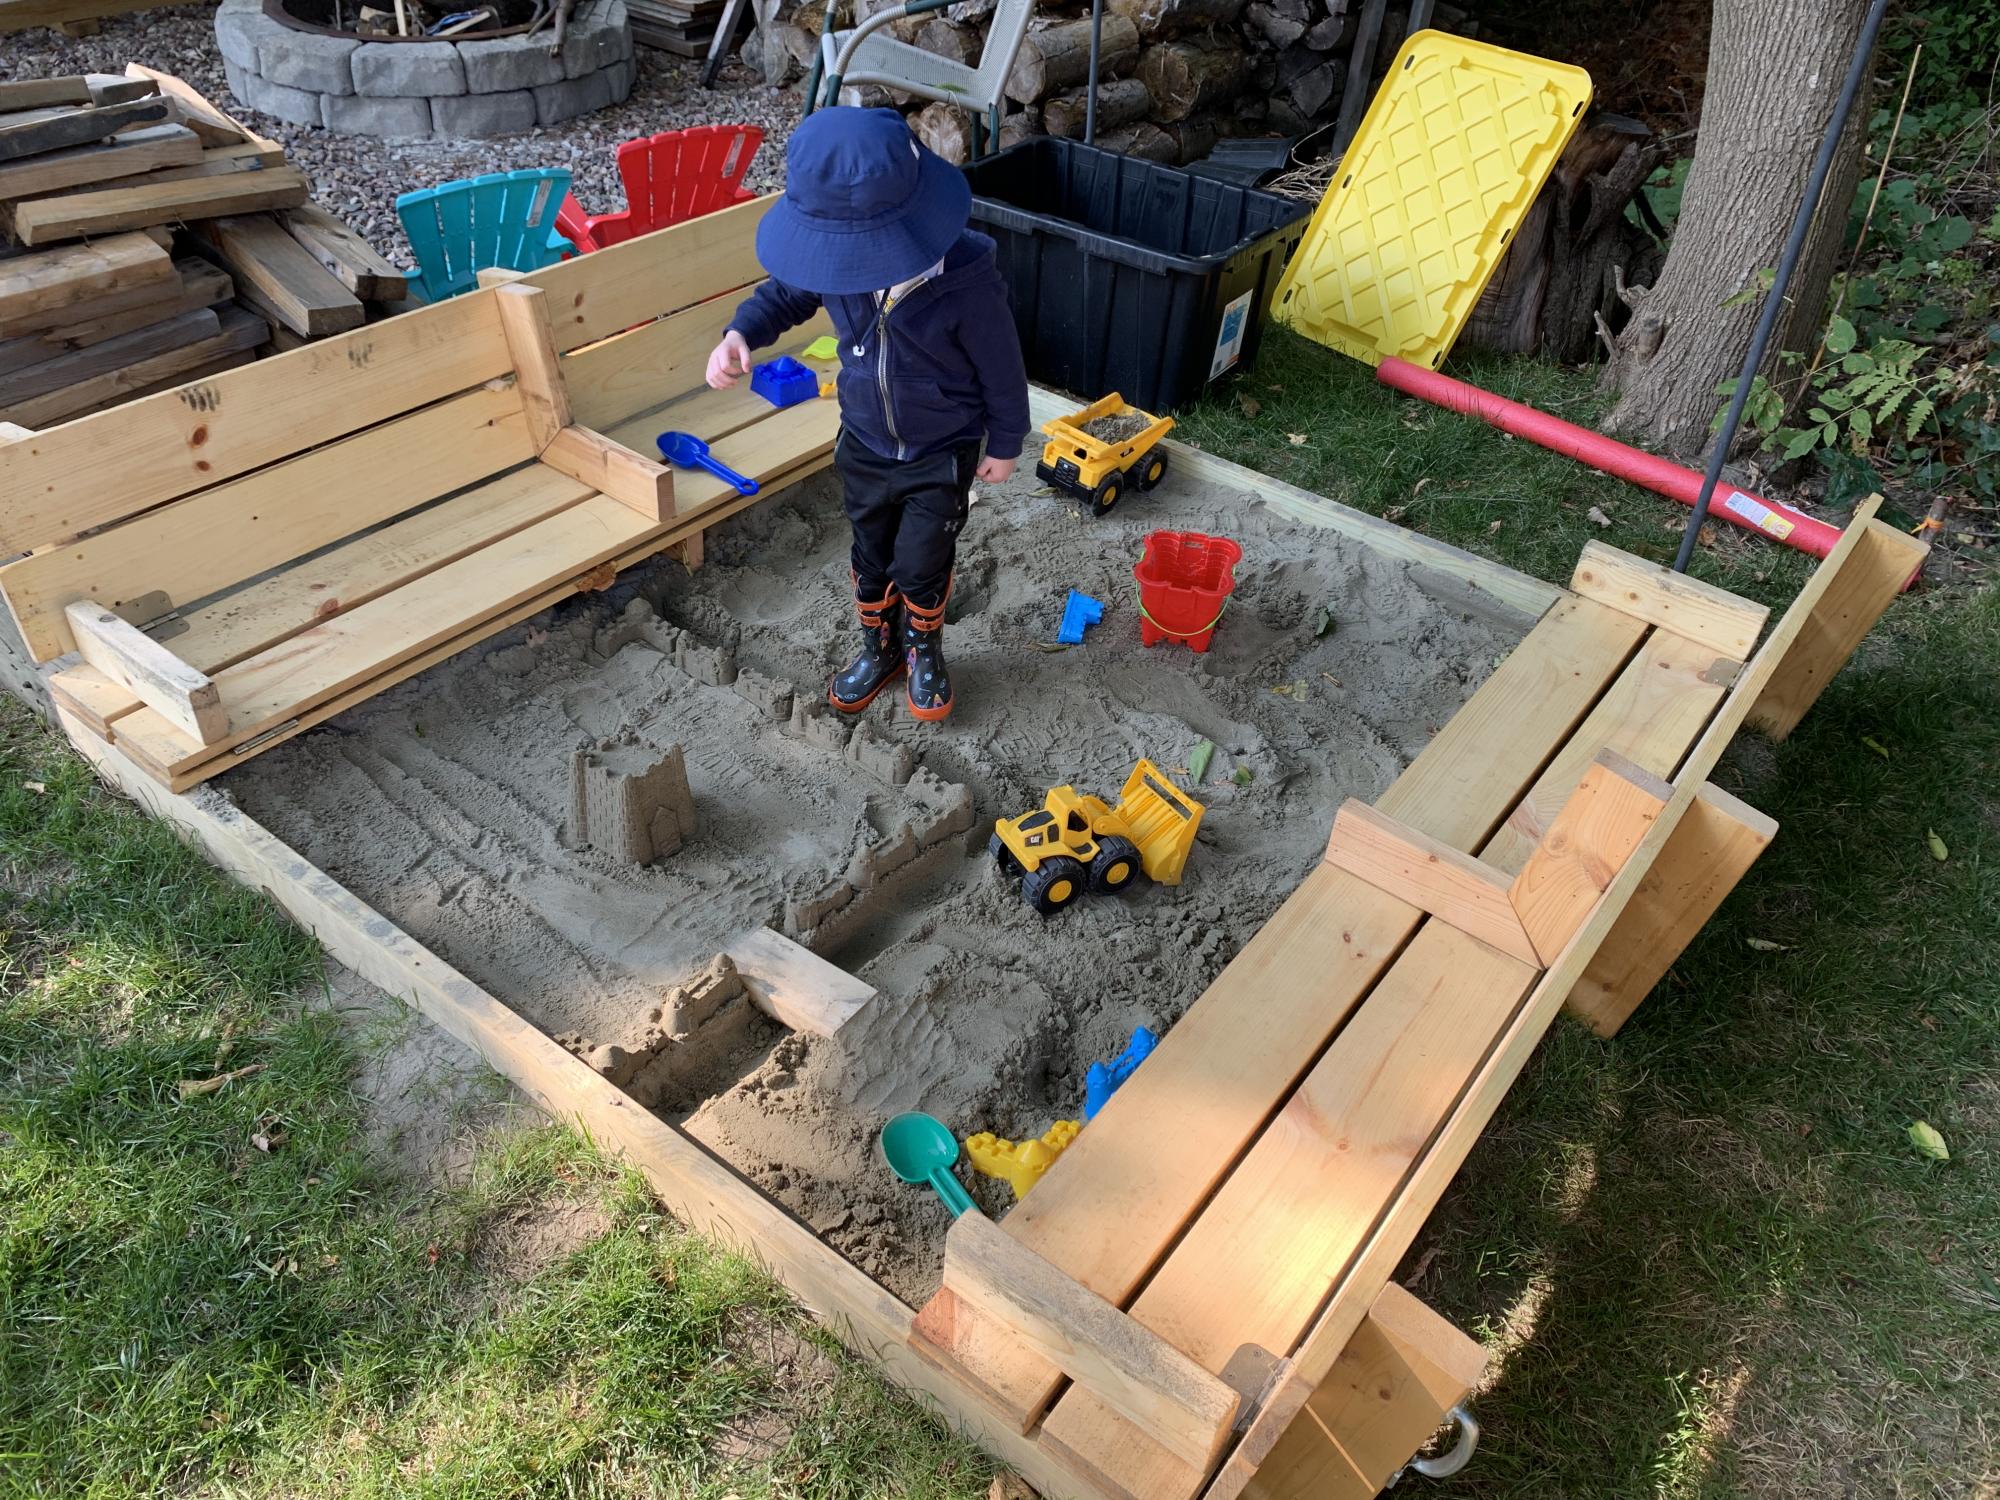
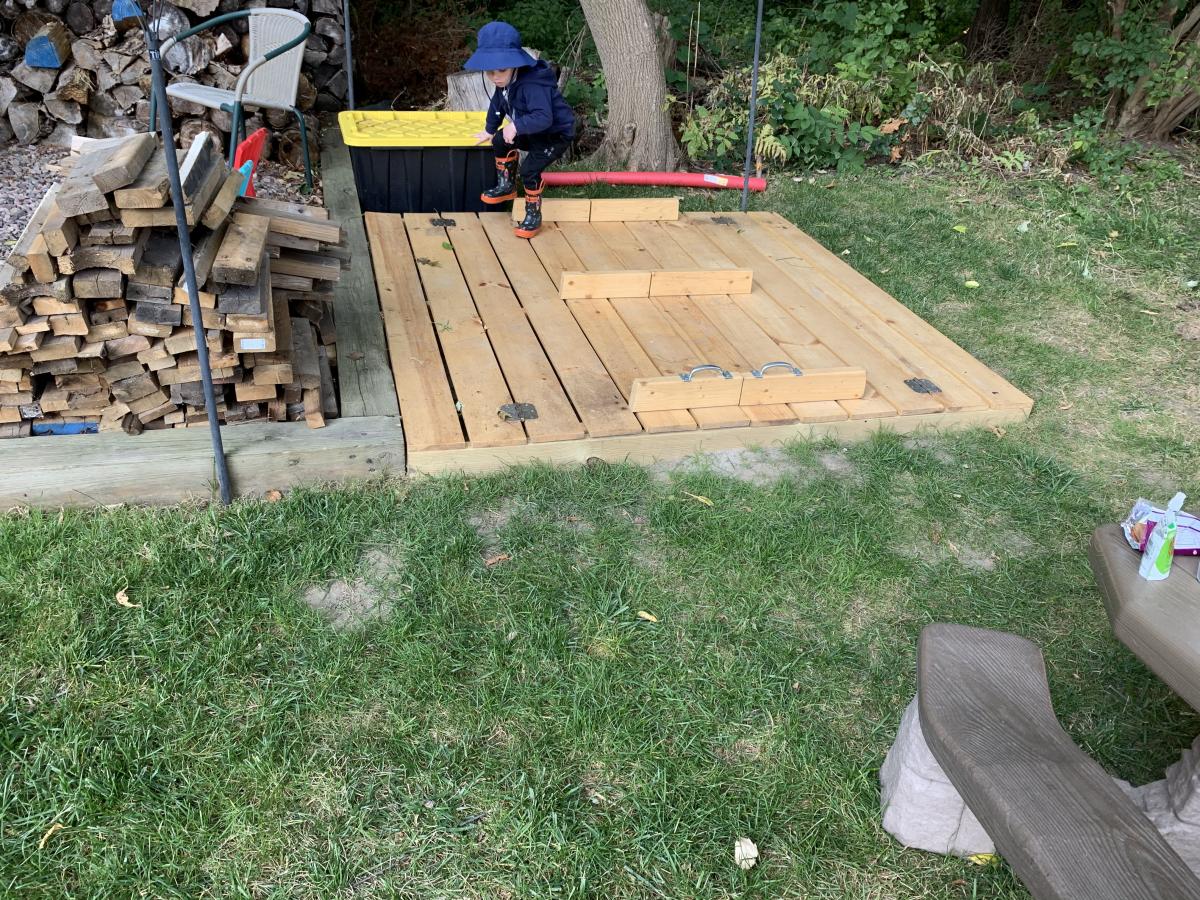
Made the sandbox 6x6. Recessed it so it sits flush with the timber’s around our fire pit area. I added extra armrests in the middle that double as supports when the lid is closed in case anyone wants to walk on it. Filled the sandbox full enough that the armrests sit on the sand when closed. It’s very sturdy now for walking on and the kids have tons of room to play. Thanks for a great plan to work from.
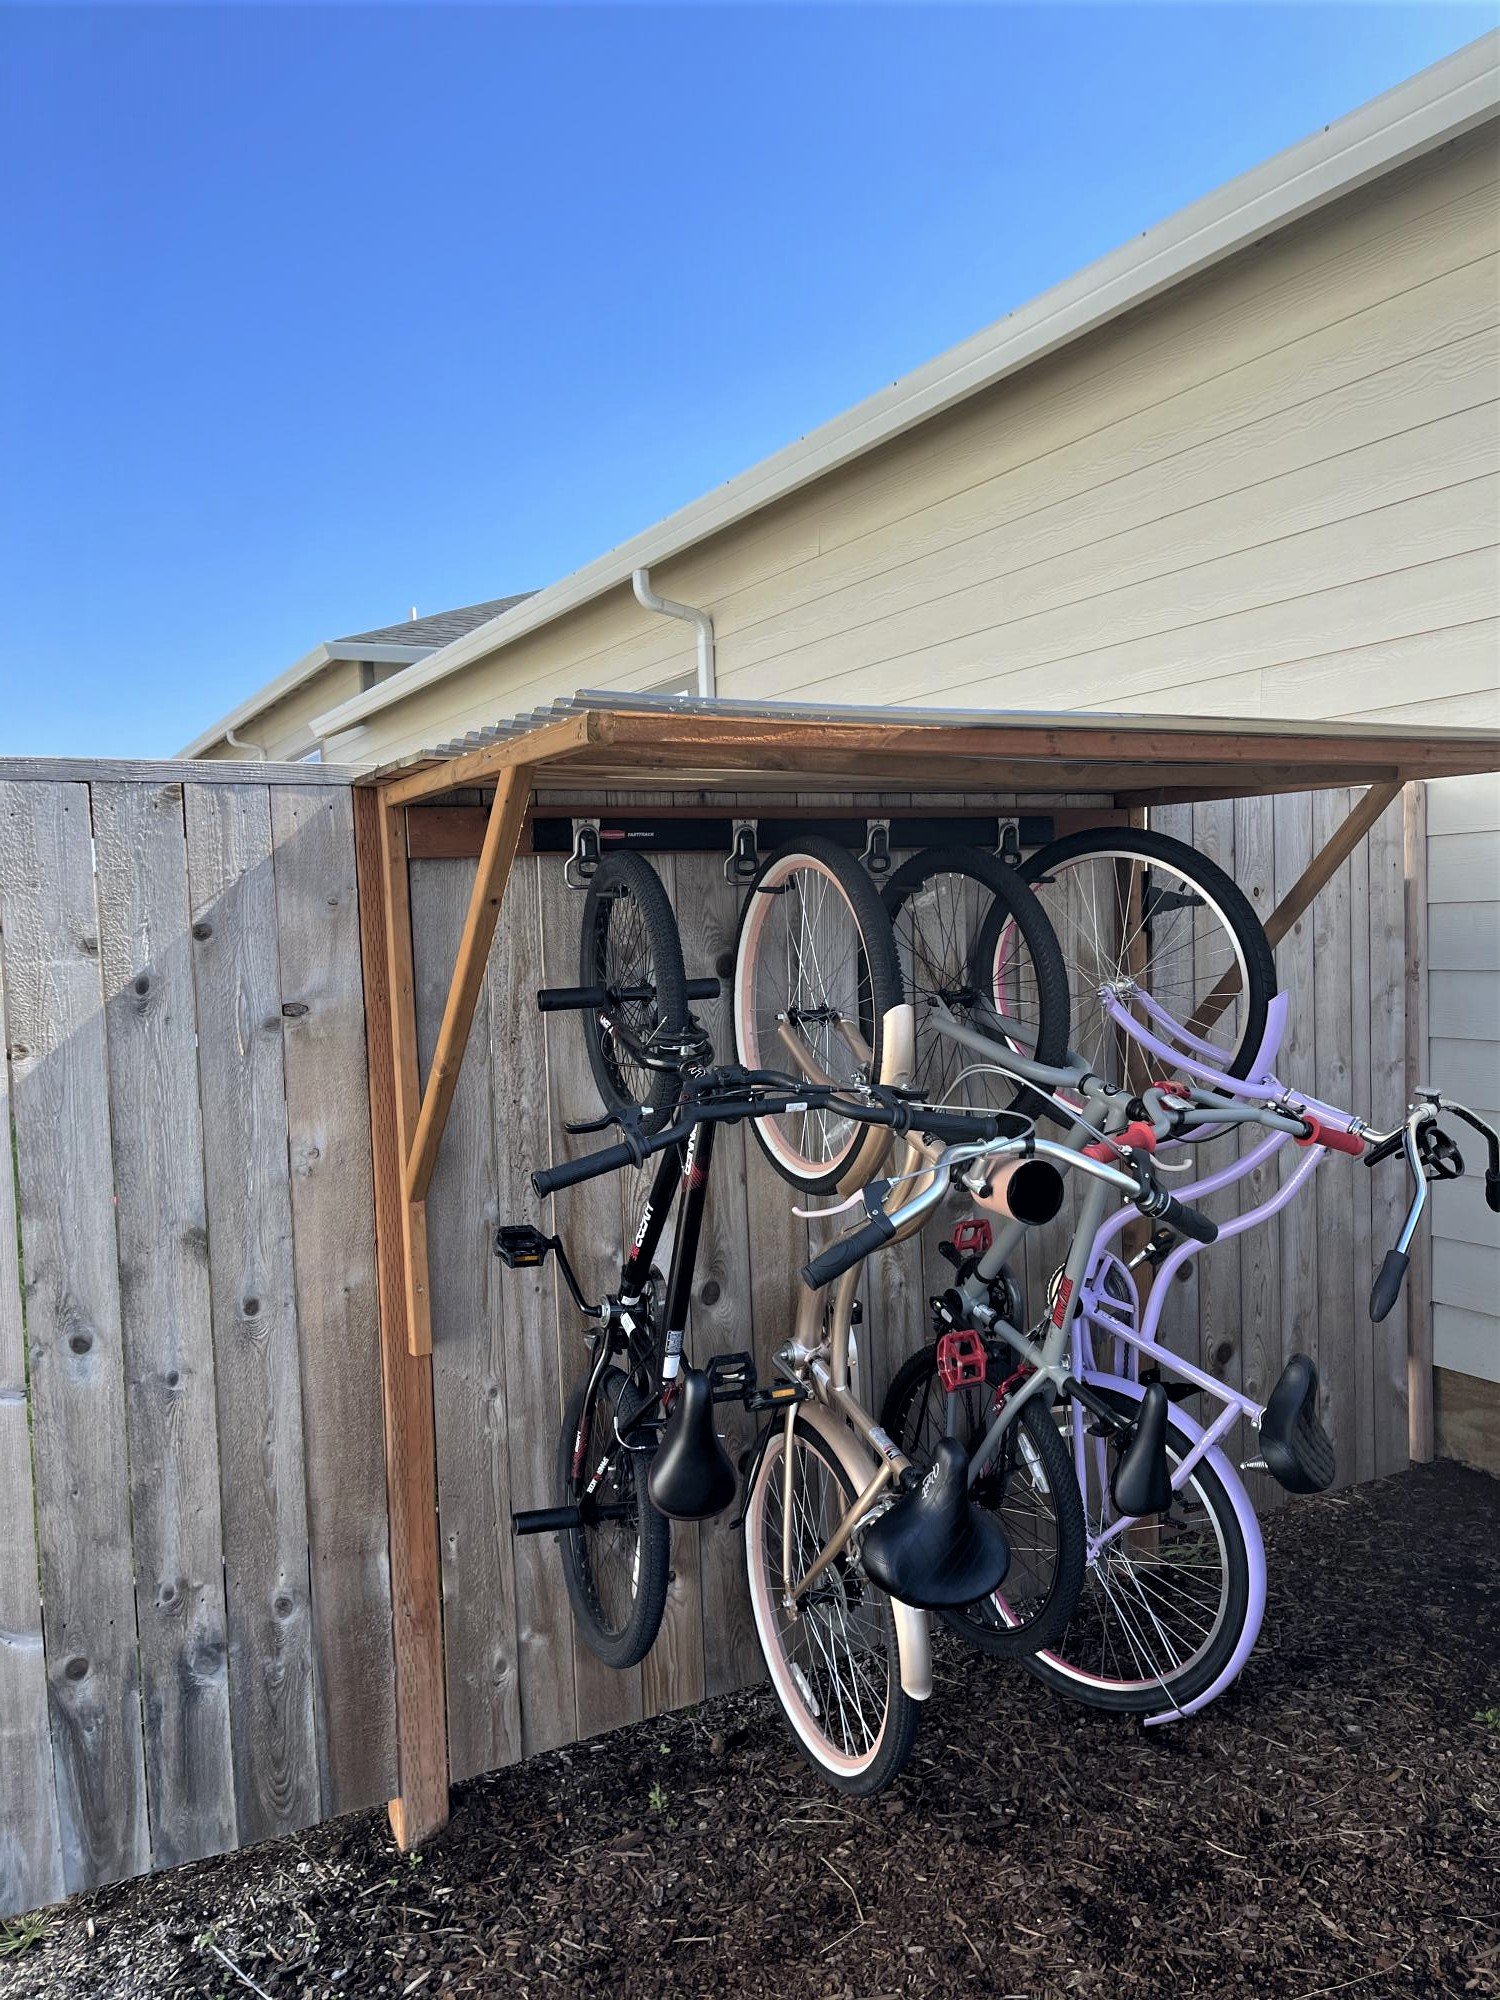
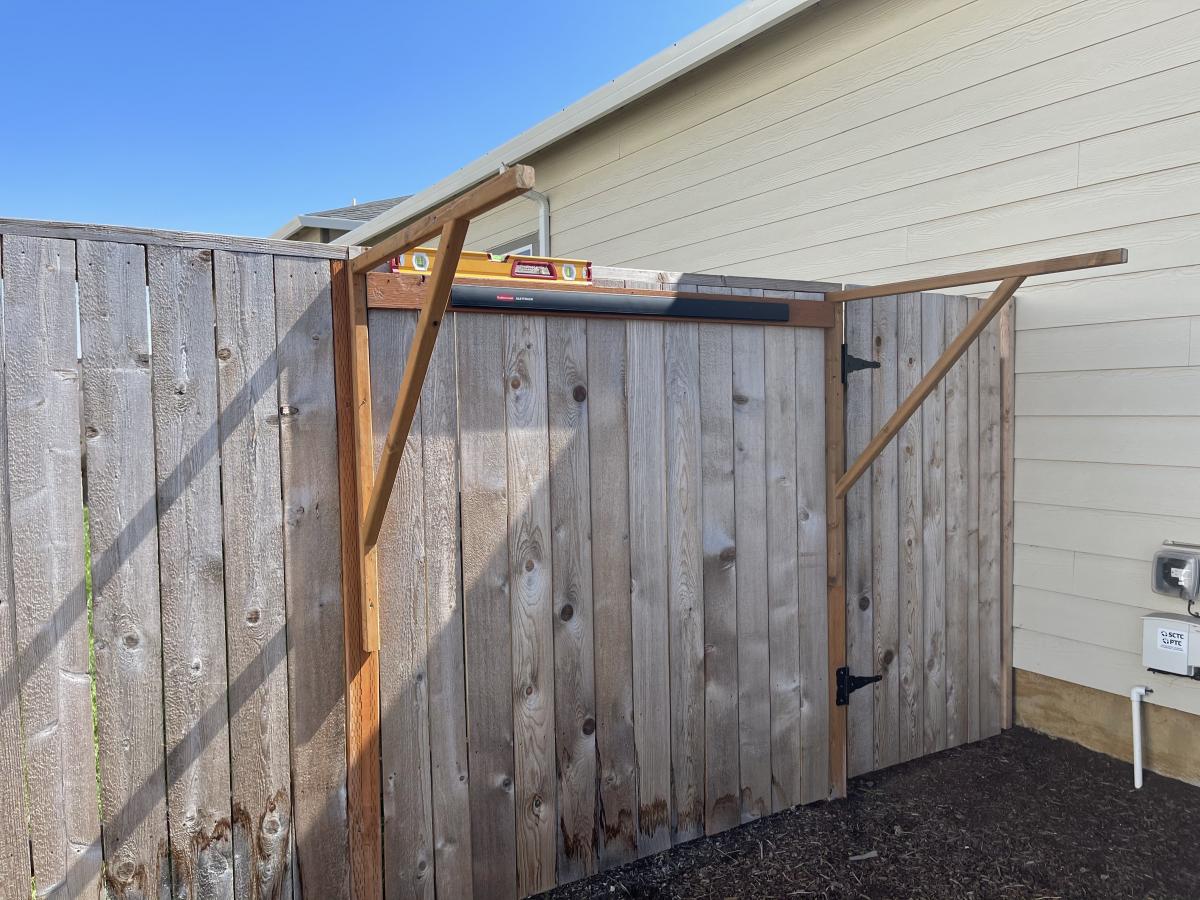
I live in a smaller rental with limited garage space, so I needed a place for my kids bikes. This is what I came up with. It required minimal screw holes in the treated fence posts and I attached a rail system(rubbermaid fasttrak) for the bikes to hang from. I used Ana's easy shelves plan for the upright supports and then just added some corrugated roofing and cedar fence pickets (which I had on hand) to finish off the top.
This was my first project from Ana's website and I'm hooked! I'm a beginner, but thank goodness for my Dad's help because I have a lot of learning to do!
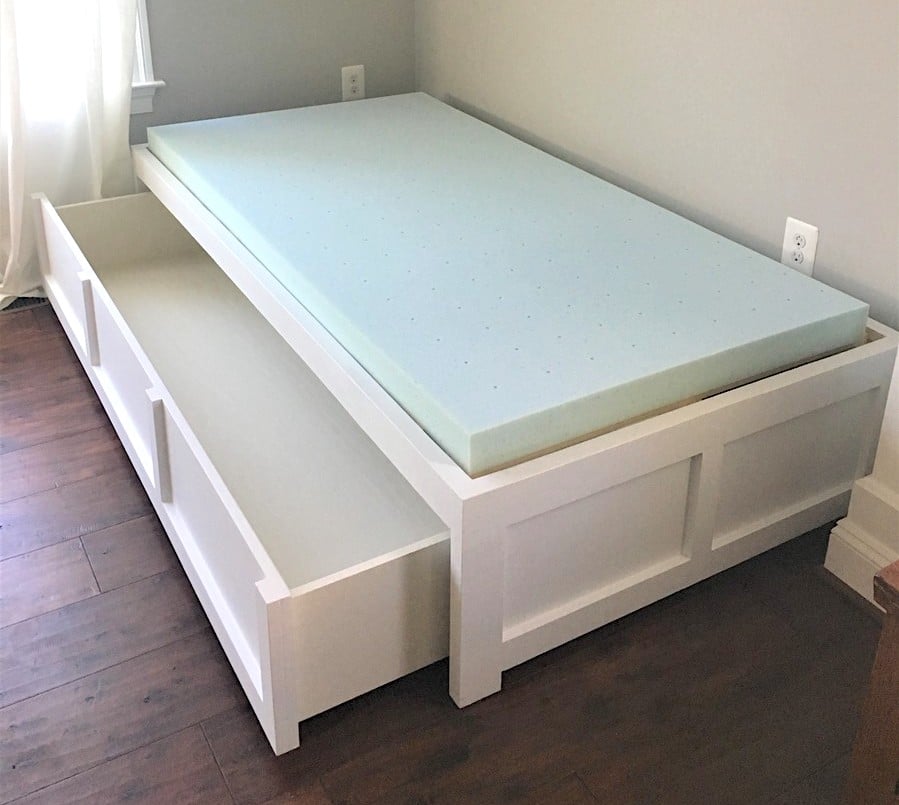
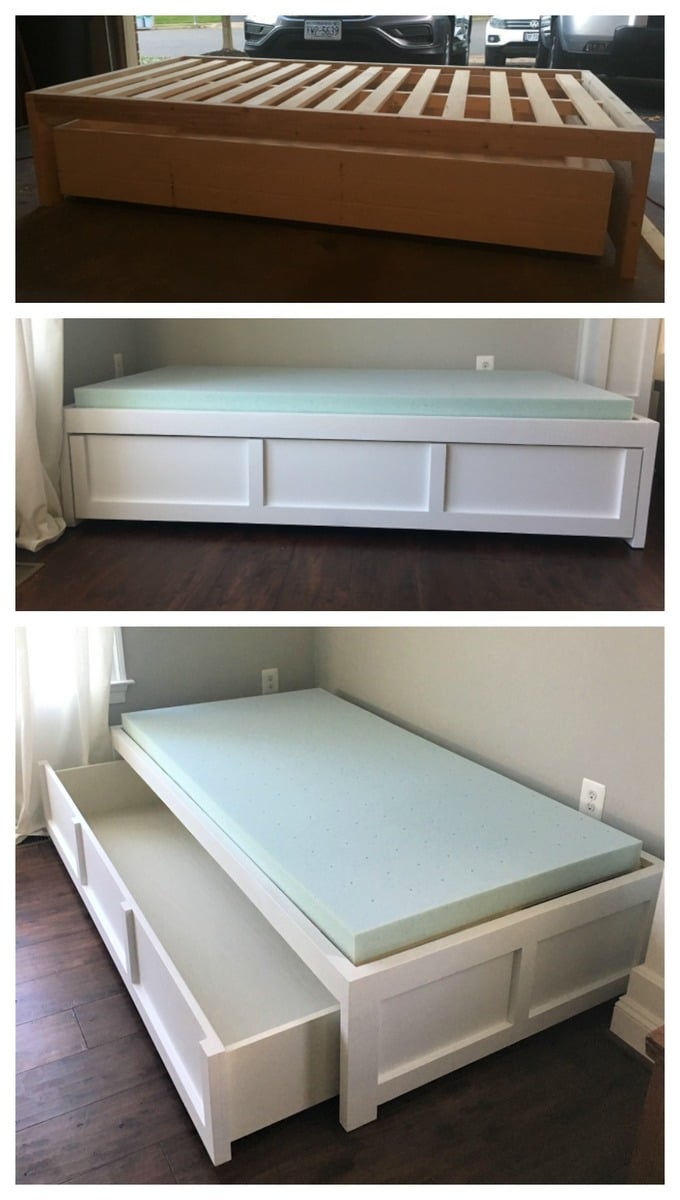
I wanted the drawer to be 1 drawer instead of 3. I feel like it looks cleaner (without having to adjust 3 drawers constantly to make it look good when you push them in). I was thinking the bed could actually be used as a trundle bed in the future too! I use this to store toys right now and it is Awesome!
I increased the bed size to fit a twin mattress and increased the height of the bed slightly so that the drawer would be a little bit deeper. We also added a back to the bed and carried around the trim to make all sides look the same. We added a bumper to the back and sides of the inside of the bed so the drawer is easy to push in and fits in snug. Finally we reinforced the bottom of the drawer with more 1x4 boards so that if a child does sleep in it, it would be more sturdy. I now have kids come over and jump into the drawer (literally) and I'm glad we reinforced it.
The changes we made did add to the cost and our time (as well as being newbies), but I think it's worth it and the bed turned out beautiful!


Sat, 01/15/2022 - 08:02
Any chance you have your cut list for this? Will the trundle storage drawer fit a twin mattress in it? Also, you say you increased the bed size to a twin, was the original not a twin too?
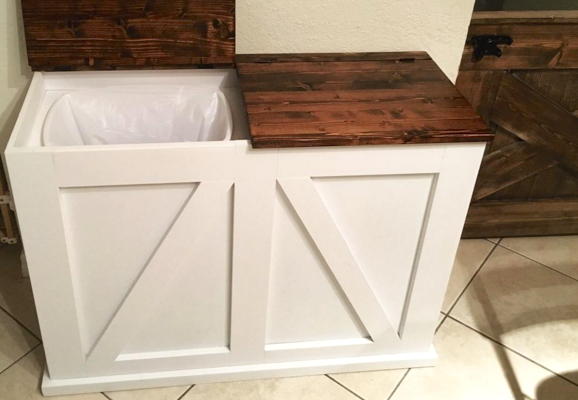
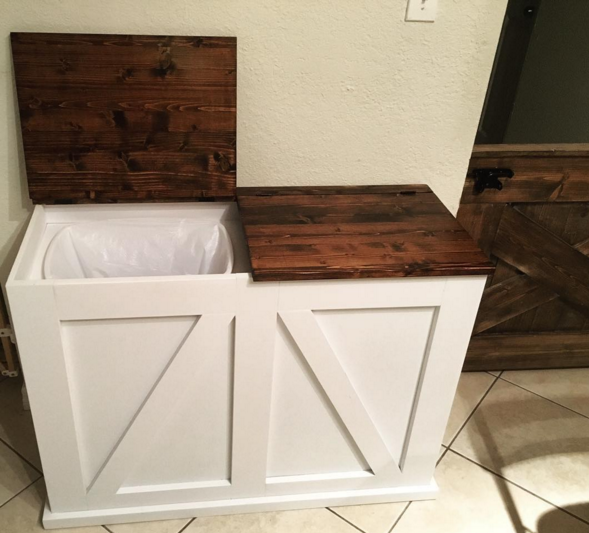
Modified the design a bit to be lift up lids instead of tilt out.
Fri, 02/16/2018 - 17:18
Can you post the specific plans for the lift up trash and recycle bin??
Sun, 05/26/2019 - 18:28
If you could post the plans for this, It would be nice. Great job!
Fri, 01/10/2020 - 05:16
I just love this and would love to have the specific plans for this project!!!

Fri, 01/17/2020 - 20:23
Thank you for the great idea. I’m going to add a third bin and use it for laundry in my bedroom.
Sat, 03/07/2020 - 02:29
I’d be grateful for details, plans, measurements for this project. This is an amazing build, nicely done.With green top looks fantastic and complements the white very well.
Thu, 01/11/2024 - 20:31
To everyone asking for the plans, it's a modified tilt out. It states right there under the pics that it was modified and the original plans are there in red, under "Built from plans"
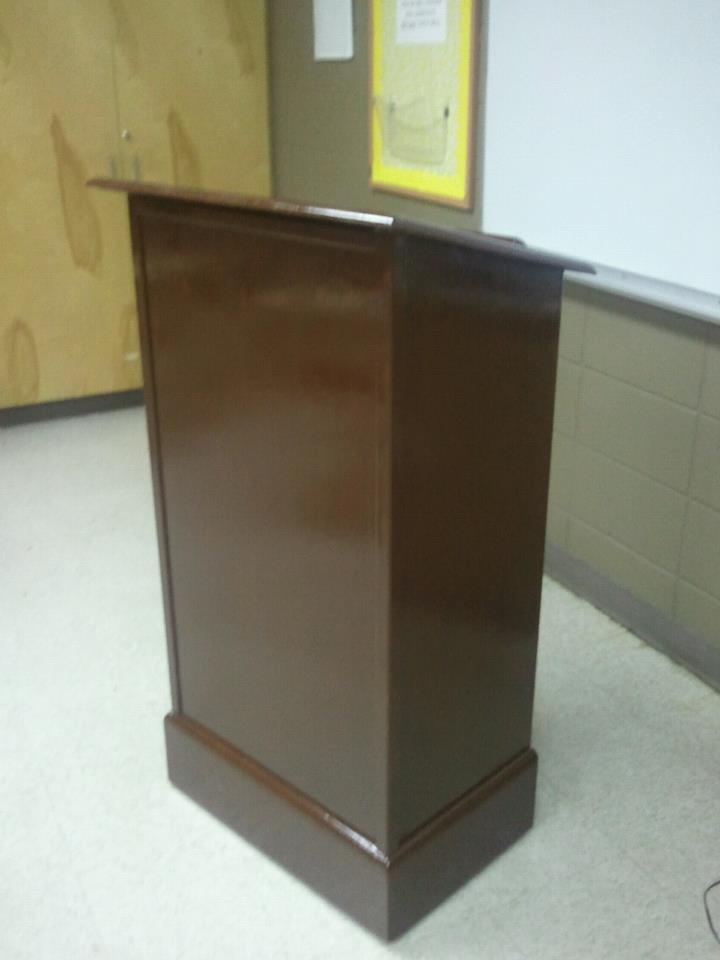
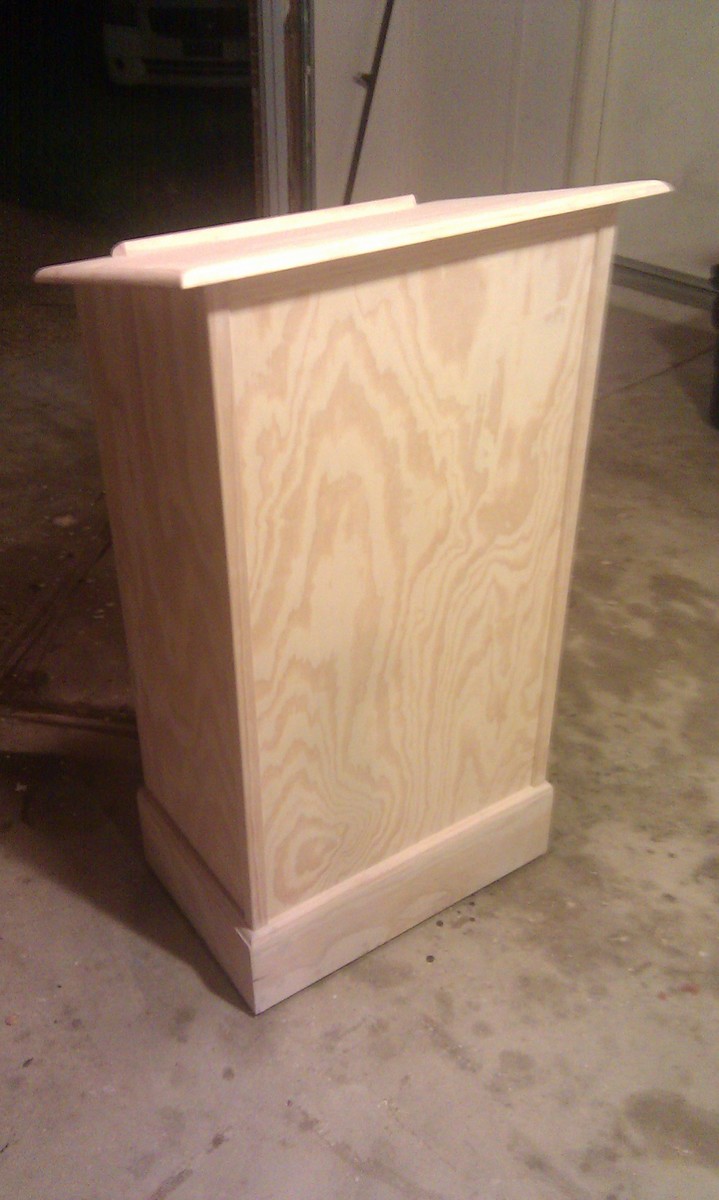
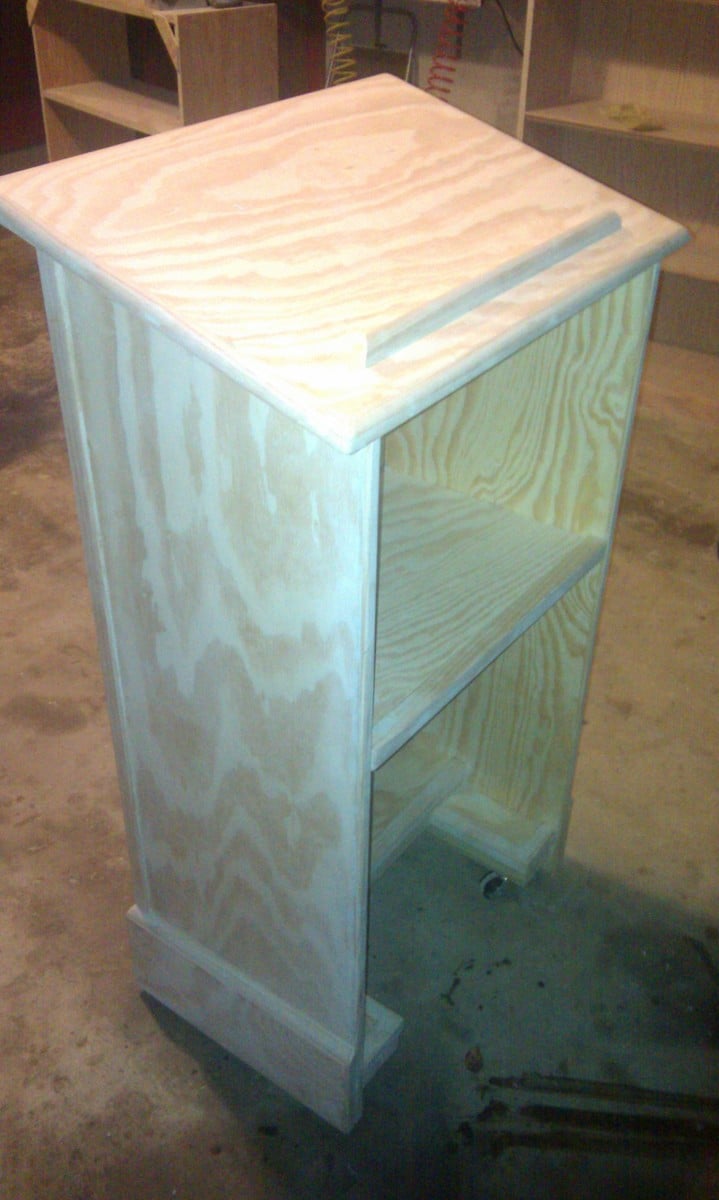
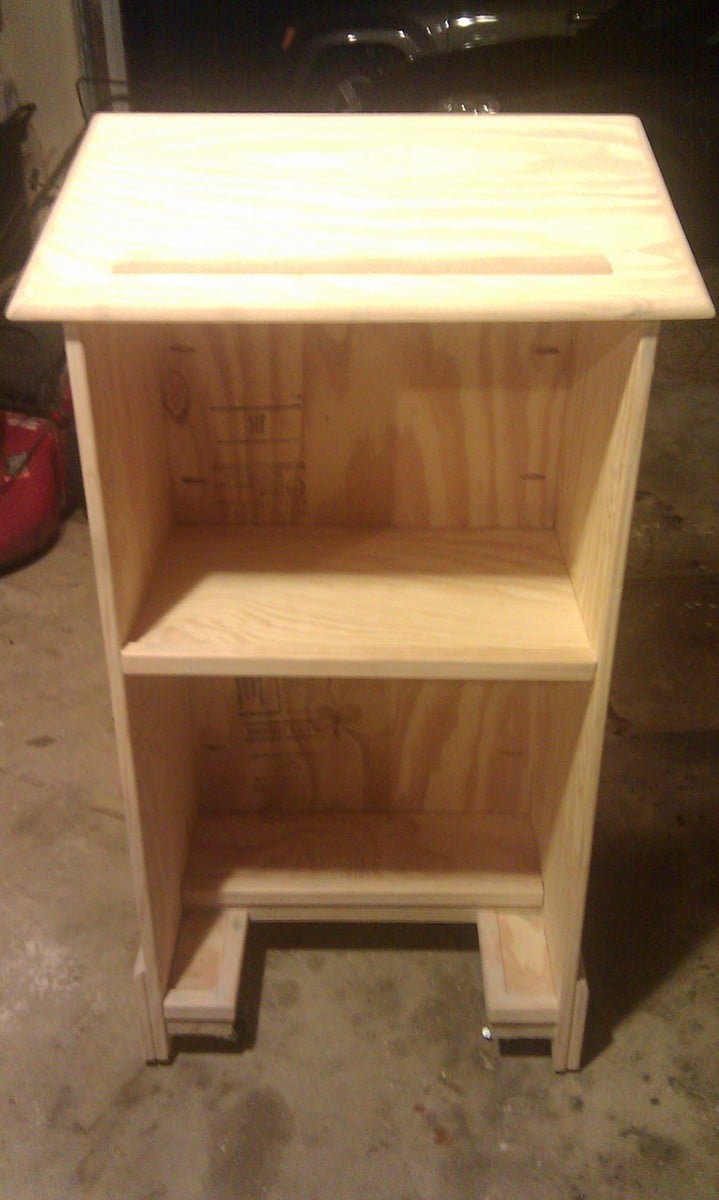
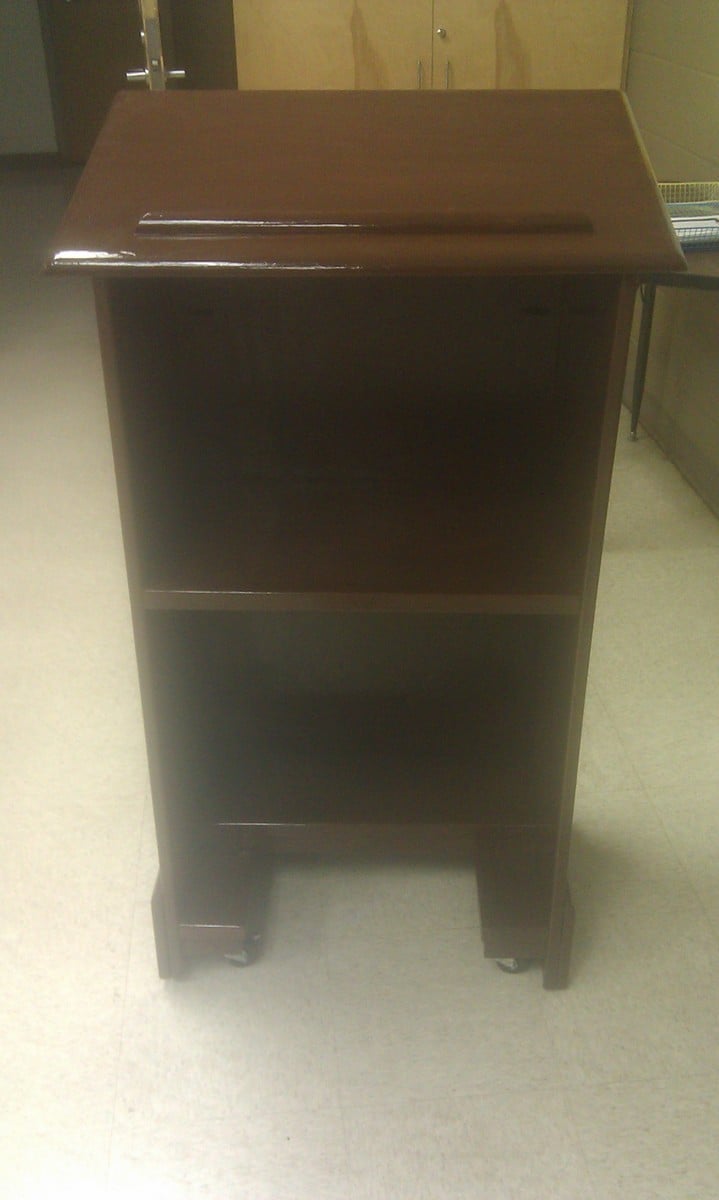
This is my first try at building furniture. I've built larger things in the past like decks and a fort for my nephews, but never furniture. Even though I used the plans to build the main box, I did change up the bottom and added some new stuff. I added wheels to the bottom my wife could easily move it around her classroom. I didn't want to put a square base on it because I thought it might hit her ankles when she was standing close to it. So I sort-of notched it out to give an opening for her feet and I used some scraps to create a short shelf at the bottom. I also added more trim that the plans call for. I cut strips of the pine plywood for the base molding and topped it with quarter round. I used corner trim for the front corners, the self inside and the bottom notched shelf. I also used screen trim for the back of it. I think it came out nice and I've very pleased with it. I used 2 coats of Minwax PolyShades American Chestnut on it.

Comments
Ana White Admin
Sun, 11/20/2022 - 12:32
Gorgeous Craft Table!
This is delightful, love the white base and stunning wood top! Thanks for sharing.