Community Brag Posts

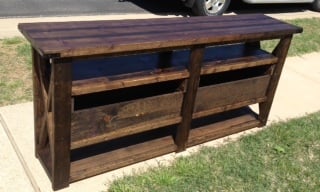
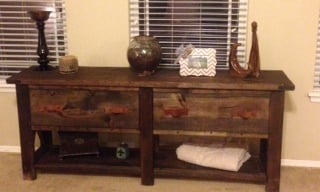
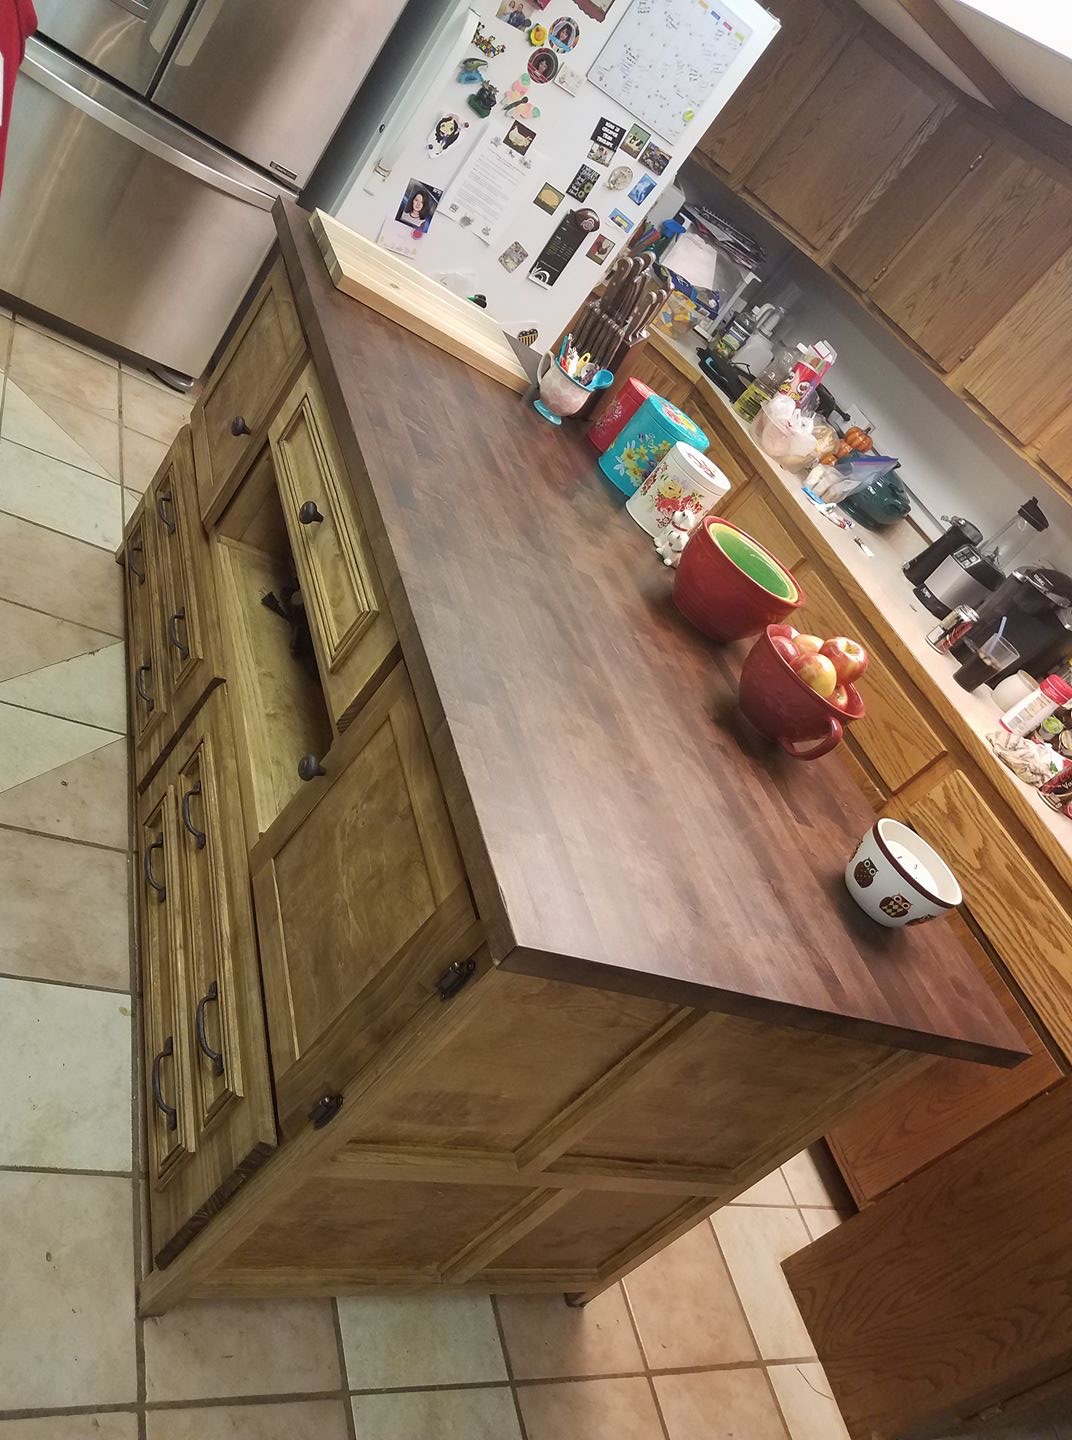
2 Rustic X consoles with drawers and one with an extra shelf

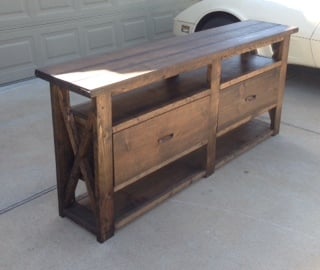
The one with the extra shelf is 3" taller than the one in the plan and I also took 3 inches from the bottom shelf as well as lowered it. The X's for the taller one were very challenging but turned out pretty good and I chose to use wood guides underneath instead of purchasing metal ones. the drawer fronts are 1x12's and sides are 1x8's. I used my router to cut a grove to hold the plywood bottom and added a support in the center. I have a dovetail joiner but haven't learned how to use it (hopefully will learn soon).
Overall I am very pleased with the way these turned out. I plan on making some with single drawers with the left over wood!
Thanks Ana I couldn't have done any of this had it not been for your site!!!

Built from Plan(s)
Estimated Cost
$120.00 each
Estimated Time Investment
Weekend Project (10-20 Hours)
Recommended Skill Level
Beginner

Comments

Fire Station with Fire Truck Bunk Bed

Submitted by Anonymous (not verified) on Sun, 08/28/2016 - 08:37

From the Fire Station Loft bed, this was modified to accomodate a full bed underneath; essentially making it a bunk bed.  The bed underneath is an Ikea Fjellse. The footboard was made to look like a fire engine backing into the fire station.

Built from Plan(s)
Estimated Cost
$450
Estimated Time Investment
Week Long Project (20 Hours or More)
Finish Used
Paint
Recommended Skill Level
Intermediate

Leaning Bathroom Shelf

This was a perfect Labor Day weekend project and solved a storage problem in my cramped bathroom. I plan on getting some wicker baskets or bins to store toiletries on the shelves. It's also a great spot to store fresh towels so guests have easy access. The shelf feels very stable when leaning against the wall. I curved/rounded the front,  top corners of the shells using 40 grit sandpaper. 

Estimated Cost
I had a lot of the lumber on hand from other projects but I would guess about $20-25
Estimated Time Investment
Day Project (6-9 Hours)
Finish Used
Paint & wipe on poly
Recommended Skill Level
Beginner

5 foot picnic table with pocket holes

Submitted by milleall on Thu, 07/02/2020 - 08:56

We built from the plan with green treated lumber. We also joined the top and the seat with pocket holes and outdoor blue Kreg screws so there are no screw holes exposed on the tops. Easy build. Great compact picnic table.

Estimated Cost
$90
Estimated Time Investment
Afternoon Project (3-6 Hours)
Finish Used
None
Recommended Skill Level
Beginner

Cedar sectional

Submitted by rhn0489 on Mon, 07/06/2020 - 11:39

My sister needed new outdoor furniture for her deck and liked the look of the sectional. I used cedar with a clear varnish to creat this piece for her that was perfectly sized for her deck. The challenge to this one was getting it to her house about 3 hours from mine. Fully assembled it would have been tight getting it in my truck. I ended up cutting all of the boards and drilling all of the pocket holes in my shop and then assembling at her house. I have added backs to some of the pieces I have made fro others that want the extr support. I add a 1x4 laying flat across the back of the seat. The slats going up and down then have a slight angle to them which adds comfort and support. I attached the pieces to the 1x4 and the upper back rest piece in the plans.

Estimated Cost
$340 including lumber and hardware
Estimated Time Investment
Weekend Project (10-20 Hours)
Recommended Skill Level
Intermediate
Seasonal And Holiday

Farmhouse Table and Bench

Submitted by SNukem on Thu, 07/03/2014 - 21:10

This was our first furniture building project. It took us about 20 hours to complete and we couldn't be more happy with the results. We used 4x4's instead of 2x4's for the legs. We also changed the dimensions of the table so that it was the perfect size for our kitchen. After completing the table we decided to build a bench as well. It is the same plan as the table, just miniaturized. We used Minwax Jacobean stain on the table and then topped with a clear coat. It is a very heavy, sturdy table.

Estimated Cost
150
Estimated Time Investment
Weekend Project (10-20 Hours)
Finish Used
Minwax Jacobean stain - 1 coat applied with rag, We didn't wipe any of the excess off.
Minwax Fast-Drying Polyurethane in Satin - 3 coats applied with a soft brush, light sanding in-between each coat.
Recommended Skill Level
Starter Project

Cedar Outdoor Dining Table and Benches

My wife and I loved the version that Finns-Dad made but we wanted it to be rectangular. The top is 1x6s around the edges with 1x4s in between. The frame is 1x4s. The bench tops are all 1x4s with 4x4 legs. There are 3/8 inch lag bolts in the legs. We did 4 coats of the urethane.

This was my first major project, and while there are many things that I would do differently if given the opportunity, we're still very pleased with it.

Built from Plan(s)
Estimated Cost
$350
Estimated Time Investment
Weekend Project (10-20 Hours)
Finish Used
Rust-Oleum Varathane Classic Clear Water Based Outdoor Spar Urethane Semi Gloss
Recommended Skill Level
Beginner

Comments

Brookstone Desk

Submitted by Abby721 on Mon, 09/21/2020 - 20:09

This was an easy and quick build, perfect for a beginner. Due to the quality 2x4 wood available to me, I ended up ripping the boards down to 3” in width (.25” from each board side). If you do this, remember to adjust the length of the under desk supports to account for the drawer slides and drawer box width. I also ripped the drawer front board to 3”. The plus of doing this is that you will get nice joints since the chamfer on the 2x4 will be removed. Overall the desk turned out great and am very happy with the results.

Built from Plan(s)
Estimated Cost
$75
Estimated Time Investment
Day Project (6-9 Hours)
Finish Used
Varathane Aged Barrel with Varathane Triple Thick Polyurethane over the top
Recommended Skill Level
Beginner

Comments

Corner Table for stair landing

Project for corner of stair landing at my house. Made in an afternoon using poplar wood -- no finish, only water based matte finish polycrylic. No plan used, please let me know if you would like plan supplied.

Estimated Cost
$30
Estimated Time Investment
Afternoon Project (3-6 Hours)
Finish Used
Topcoat only - water based polycrylic
Recommended Skill Level
Intermediate

Comments

Outdoor Furniture Set

Submitted by Anonymous (not verified) on Sun, 11/08/2020 - 16:56

This set was the first thing I've built. I did it completely by myself and am so proud! I started with the coffee table to get a hang of the tools the. Moved on and made the sofa, love seat, and two chairs. I had a little trouble finding cushions but eventually found some at Lowe's. The cushions are just so expensive. I didn't love the color of the stain on the coffee table and the plan was to sand it and retain after staining the rest but I actually like how it stands out. It took a long time to finish because I had to work on it whenever I had spare time but a motivated individual with some building experience could do this all in a weekend or two. Coat of wood and screws for the whole project was $350. All the cushions were $518.

Estimated Cost
$875
Estimated Time Investment
Week Long Project (20 Hours or More)
Recommended Skill Level
Beginner

Comments

Seasonal And Holiday

18" Doll Wardrobe

Submitted by Anonymous (not verified) on Sat, 02/18/2017 - 07:33

I used the 18" Doll Wardobe plans! I decided not to do the Murphy bed. I loved how it turned out and the plan was easy to follow! Looking forward to more DIY projects

Recommended Skill Level
Beginner

Garden shed

Submitted by Anonymous (not verified) on Sat, 11/28/2020 - 13:19

Our take on the small garden shed. Ours is 4 1/2 by 7 feet. We used cedar fence pickets and 2x4 construction. Left over shingles from when our house was built. We are definitely not roofers or framers, also chasing around a 3 year old didn't make things easier. Turned out beautiful for what we want it for. Just rustic enough. Great intermediate project.

Built from Plan(s)
Estimated Cost
$400
Estimated Time Investment
Weekend Project (10-20 Hours)
Finish Used
Thompson's clear water seal will be applied this summer.
Recommended Skill Level
Intermediate

Comments

Seasonal And Holiday

Vegetable Rack with Slide Out Trays

Submitted by Anonymous (not verified) on Sat, 12/12/2020 - 05:12

This is the application of the "Vegetable Rack with Slide Out Trays" from Ana White.
I just added a door and some mosquito net, to avoid midges in summer.

Estimated Cost
100€
Estimated Time Investment
Week Long Project (20 Hours or More)
Finish Used
A mix of coconut oil and wax.
Recommended Skill Level
Beginner

Comments

Custom Kitchen Island with Butcher Block

One of a kind custom kitchen island with a butcher block top. 

Estimated Cost
$800
Estimated Time Investment
Week Long Project (20 Hours or More)
Finish Used
Dark Walnut Danish Oil
Recommended Skill Level
Intermediate

Bi-Fold Closet Doors

We wanted to replace the vented / painted bi-fold closet doors in our Master Suite with something that was warmer and more consistent with the decorating motif of the house.  We priced out various wood bi-fold doors and were shocked at the $350 - $600 price range of what was available.   We decided that building them ourselves was a much better choice.

The frames are made from 1” Knotty Pine and the panels are from ¼” Knotty Pine.   Frames were made to fit and assembled w/ Kreg screws & Glue.  Rabbet channels were cut w/ the router and the panels were brad nailed & glued.

It was finished w/ the same stain used on our Knotty Pine ceilings / walls and finished w/ a satin varnish for a perfect match to our house.

This was a very straightforward, quick & inexpensive alternative to purchasing expensive bi-fold doors.   

The doors took about 15 hours to build / sand and 10 hours to finish.   Total cost was around $100. 


Estimated Time Investment
Week Long Project (20 Hours or More)
Finish Used
Custom stain and satin varnish.
Recommended Skill Level
Beginner

Comments

Queen bed with rails and headboard

Submitted by K79miller on Sun, 02/07/2021 - 09:21

I have an adjustable bed frame so the rails are not supporting any weight. Each piece of wood in the headboard is 5.5 inches long and 1.5 inches tall. I used boards that were 1/2 inch thick and 3/4 inch thick and put them on in the checkerboard pattern. I have some navy blue and coral in my bedroom so I decided to paint a few block with those colors. I used poplar wood because I thought it would hold up better and it wasn't too expensive. It took a while to build because of cutting all of the individual blocks.

Estimated Cost
$150
Estimated Time Investment
Week Long Project (20 Hours or More)
Finish Used
Sherwin Williams Emerald paint
Recommended Skill Level
Intermediate

Comments

Art Studio Loft Bed

Submitted by Auntie LAD on Tue, 02/26/2013 - 08:26

After I built my nephew's AT & T Park bedroom, I had to figure out what to create for my 5 year old niece, Maggie. She loves drawing, so I settled on an "art studio," where she can work and display her art.

The bed was created using Ana's Camp Loft Bed Plans. I narrowed the stairs by 4 inches as one of the other posts had done. I also put shelves under the stairs like another post I read on this site.

I built a small drafting-type desk for underneath using my new Kreg Jig (Man, I love that thing!). I also made some curtains to pull shut in case Maggie wanted to escape from the world. Chairs, storage containers, flower light, and leaf above bed are from Ikea.

I bought some cheap picture frames, and put a bulletin board in one and a chalkboark in the other for above the bed, and the string hanging across the front of the bed is from Target. It actually has clips to hang artwork.

I painted the bed using Ana's antique finish with the Minwax pen. It came out fantastic.

Estimated Time Investment
Weekend Project (10-20 Hours)
Finish Used
Antique White paint from Home Depot with Minwax pen finish.
Recommended Skill Level
Beginner

Comments

spiceylg

Tue, 02/26/2013 - 10:00

Your niece and nephew must be over the moon! Another awesome build!