Community Brag Posts

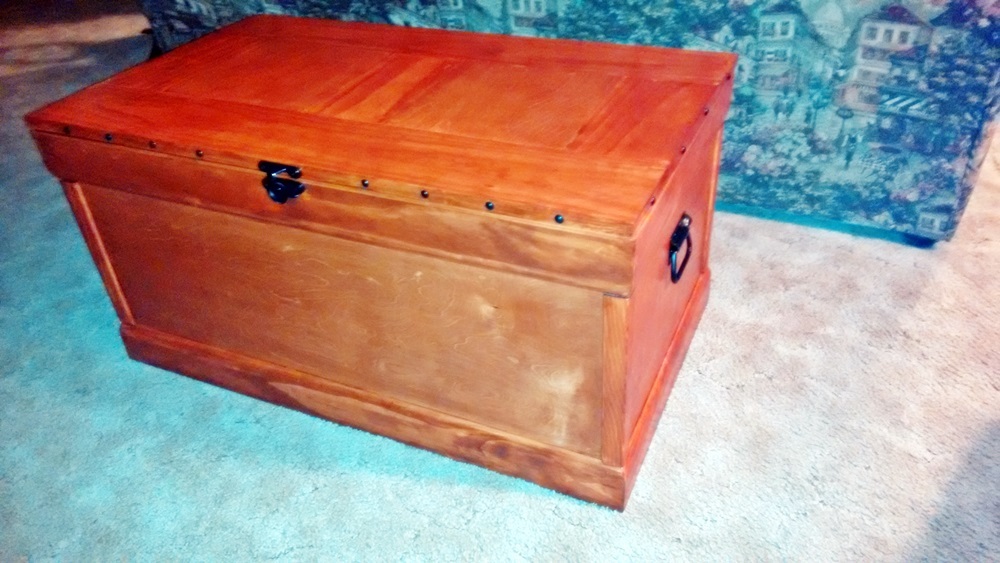
Three Bin Laundry Sorter

Submitted by Meyer1120 on Mon, 01/21/2013 - 21:10

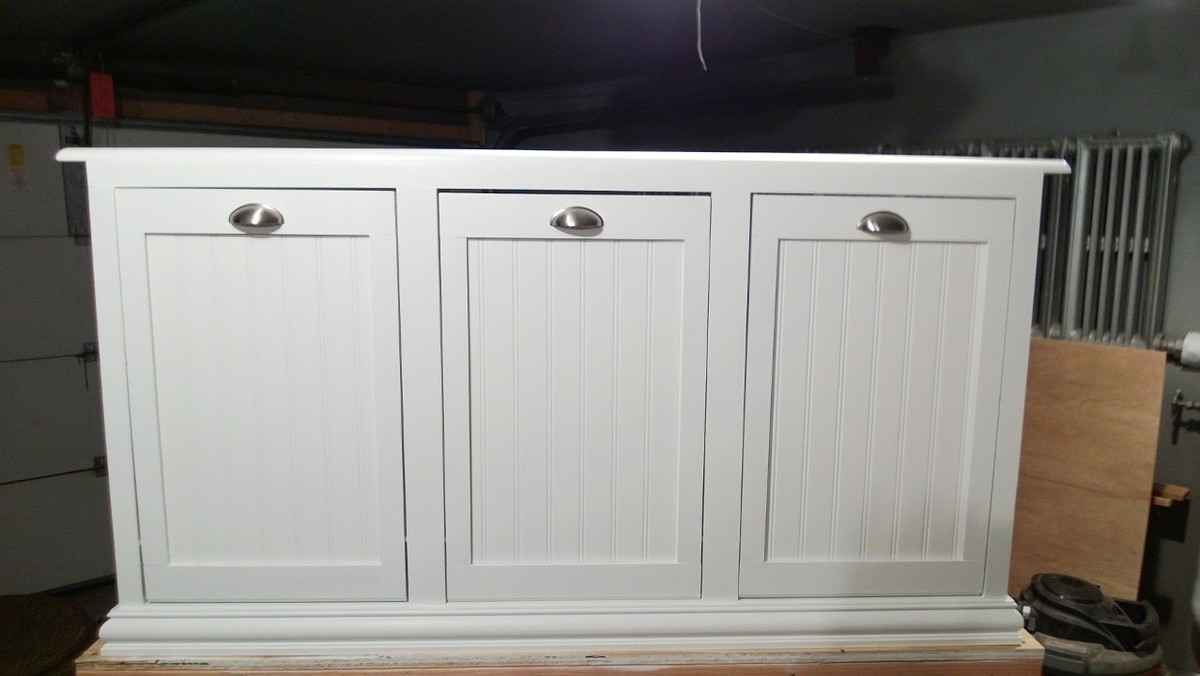
Modified the original plan to meet our needs of a laundry sorter. Had problems with the hinges so ditched them. I used dowels with a combination of a chamfer cut on the bottom of the door. Dado-ed the trim on the doors and slide the bead board panels in. The face frame is all held together with pocket hole screws, which I highly recommend because it eliminates nail holes and keeps the face frame square. This was my first wood working project, took me a little long to get it done. Thanks for looking.

Modified January 28

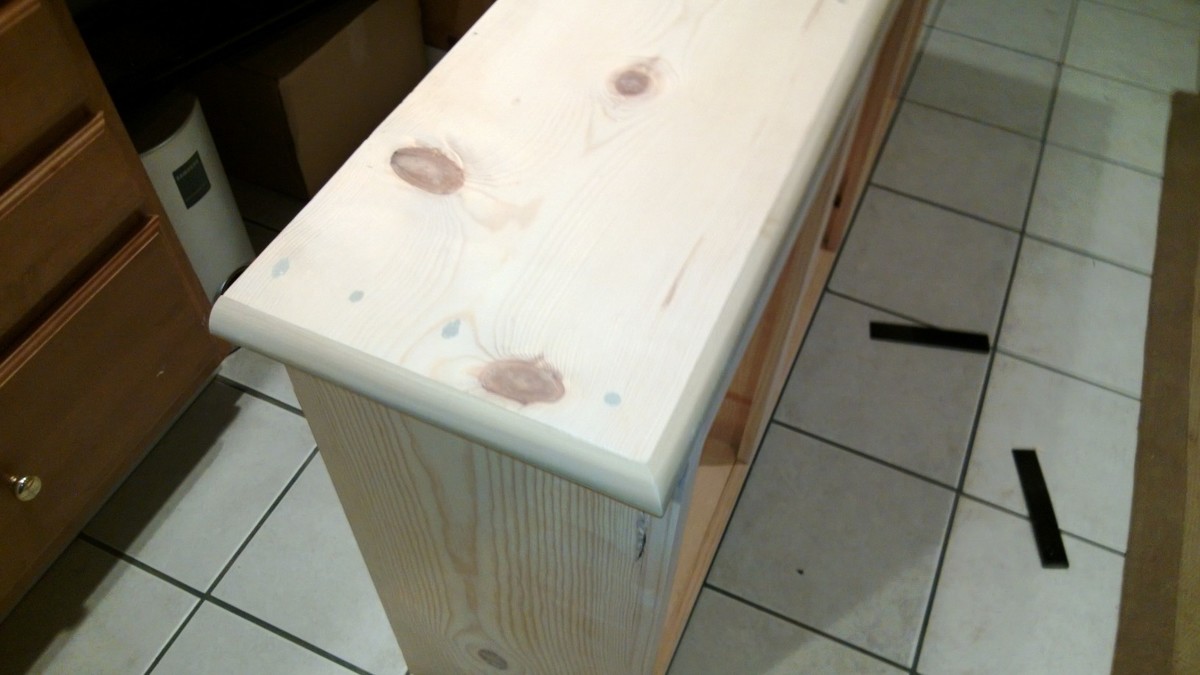
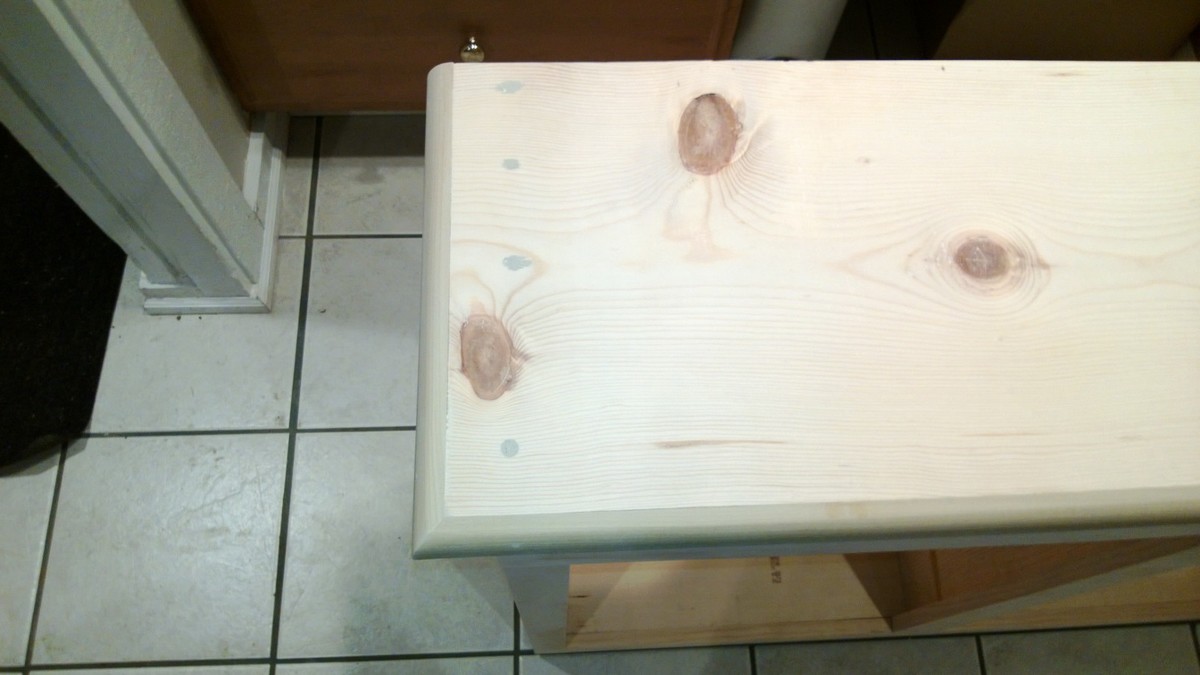
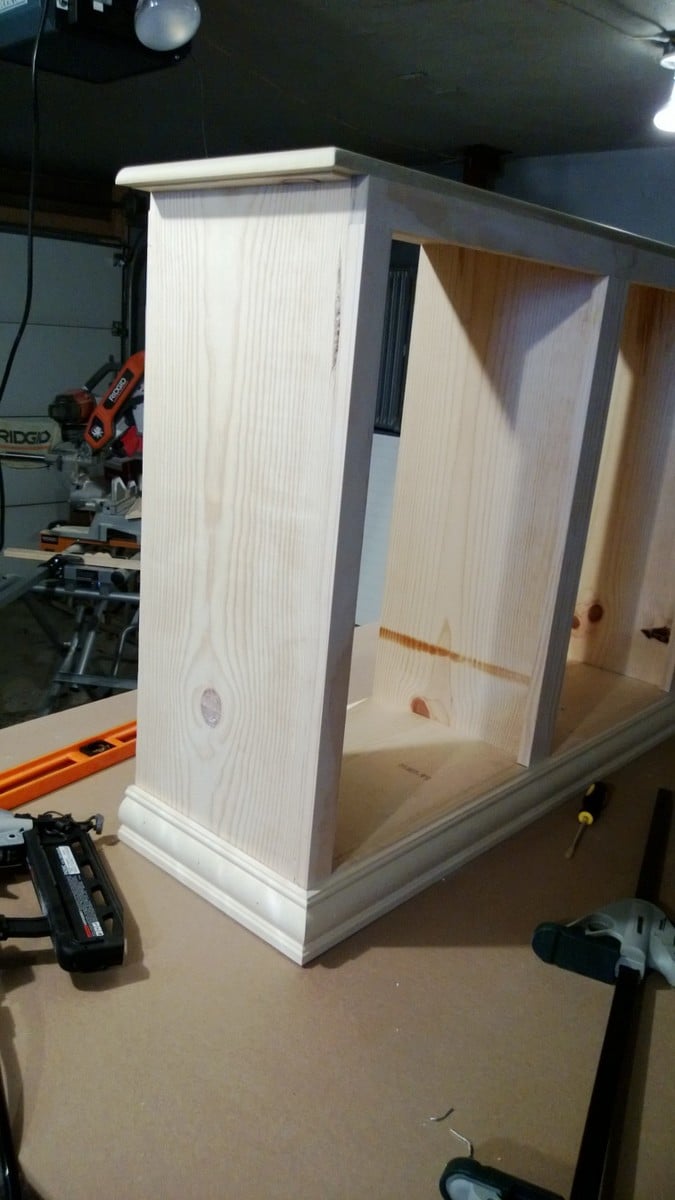
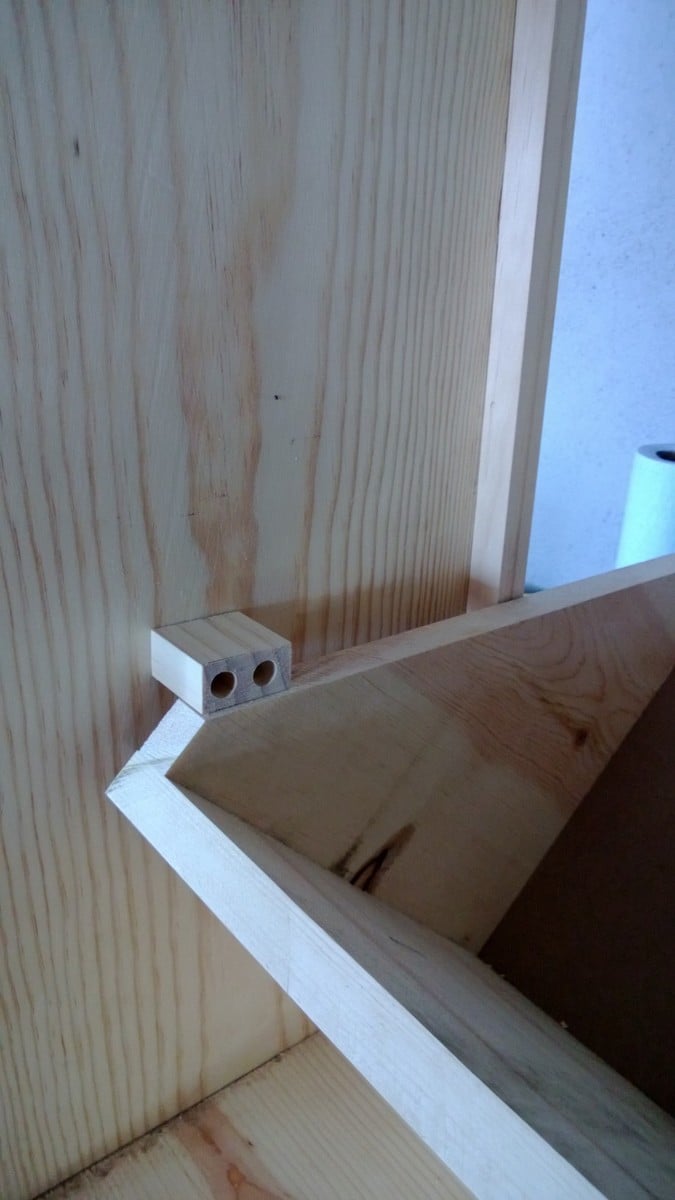
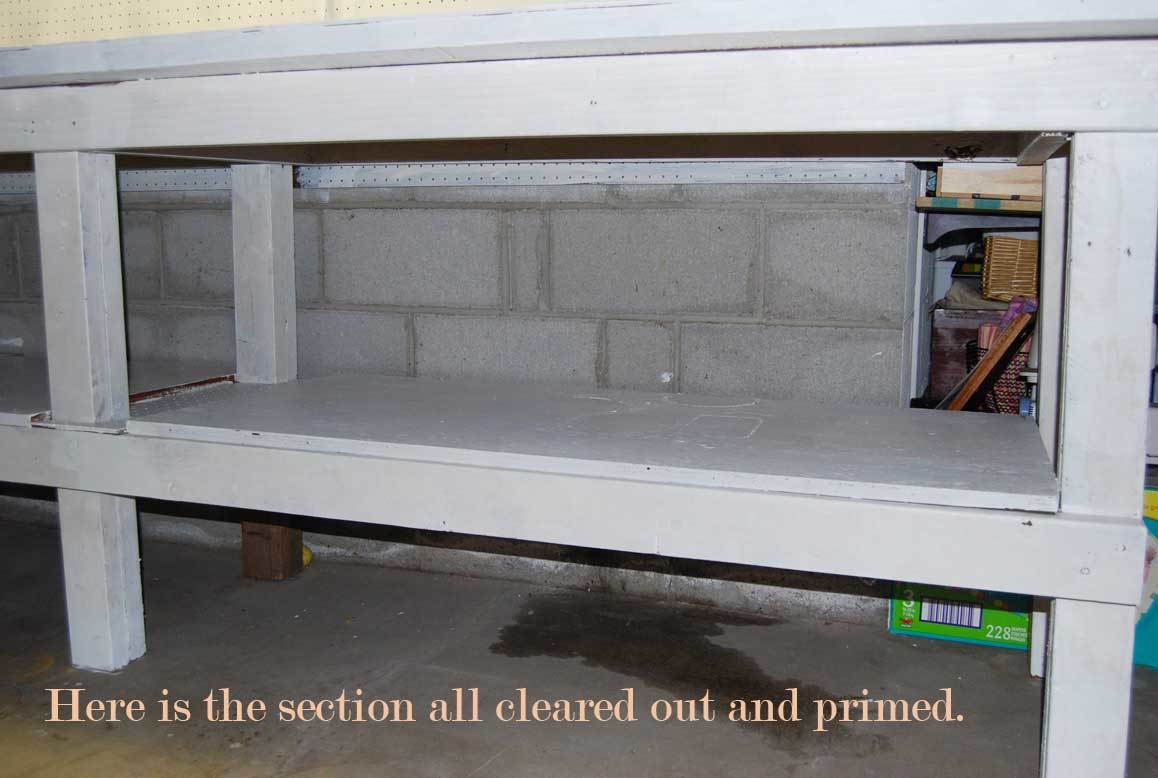
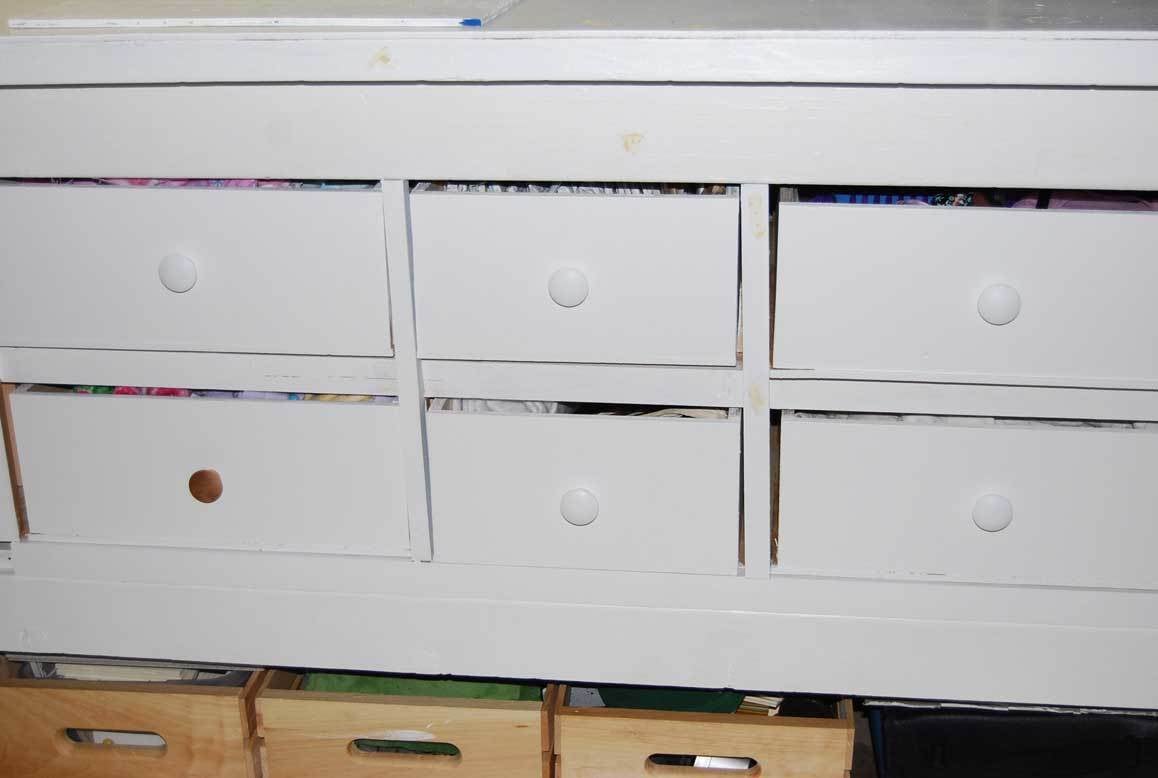
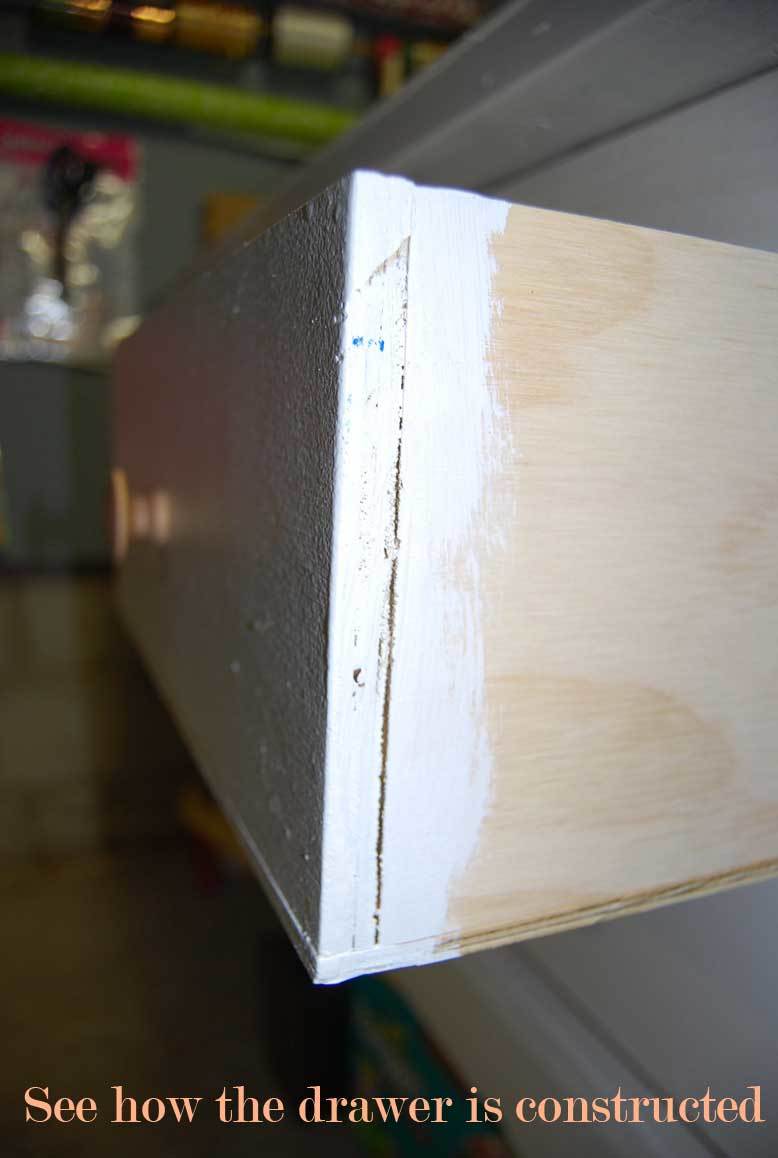
So here are some more pictures of my project. I don't really have any good pictures of the dowels. But what I can tell you is, I drilled holes through the sides of the face frame and the trim pieces and then measured where the holes would be in relation to the "drawer". I then drilled holes in the drawers at those measurements, I was careful to not go to deep. I think I went in half an inch. After that I started at one end and placed the dowels in, then put each drawer in. It wasn't easy but with a little patience it worked. The key is to wax the dowels so they will last longer as well. I also am including pictures of the top and bottom trim. On the top the original plans called for an overhang piece and I didn't like the way that looked. I ran the top board an inch long on each side and then wrapped it in quarter round trim. I did this because I plan on adding the Mimi Hutch Top. The bottom was built per the plan, but I ran into a problem with my bottom trim not being level and you could tell. So I raised the whole unit on 1 1/2 legs then placed it on a level surface and again wrapped it in a decorative trim. The key on both trims was a nice miter joint. Last picture I added was of my stoppers. I took scrap from the 1x2 trim and cut them to an inch and a half or two (can't really remember), then using the Kreg Jig drill bit drilled recessed holes. I then opened the doors until the side 45s were level then mounted the blocks on each side. I feel that it is better than a chain or string catch. Again thanks for looking and I hope I answered all of your questions.

Estimated Time Investment
Week Long Project (20 Hours or More)
Finish Used
Primmer and paint
Recommended Skill Level
Intermediate

Comments

moosmani

Tue, 01/22/2013 - 11:29

Dowels! What a great idea! Would you mind sharing how you did it? Could you possibly add some pictures showing the dowels? You did a great job. It looks beautiful.

mullid1

Thu, 01/24/2013 - 09:27

I love what you have made! Could you post pictures of the top and the bottom trim? I'm very impressed that this is your first project!

mullid1

Tue, 01/29/2013 - 09:12

Thank you for the photos and new instructions! You're awesome!!!

VLT

Fri, 03/15/2013 - 12:05

This is lovely; I like the trim job you did. Is there a way to post the plans so we can all get to them. I cannot believe this was your first project!

Liz82

Sat, 11/16/2013 - 18:23

I am a little confused. I love the three bin laundry sorter, but everyone is mentioning plans. I am not finding plans for it on the site. Also, what goes in to hold the clothes? There may be obvious answers, but I am not seeing them. I'd appreciate any help you could give.

towering inferno

Tue, 12/02/2014 - 02:58

I've been thinking of working up one very similar to this, also with 3 bins, but I didn't want to use chain either.  Those stoppers will be ideal - do you put them on both sides or is one enough?  Thanks for the share!

Karahd

Sat, 01/24/2015 - 11:29

Hi-

Im not sure if you still have the plans to this awesome project, but if you do, would you be able to share them with me? Ive been looking to make something like this forever, but just couldnt find any help!

thanks,
karah
[email protected]

petemoore

Mon, 02/08/2016 - 07:46

hi im the same as everyone can you send me the build plans with dimensions etc

many thanks

virginie D.

Wed, 03/02/2016 - 14:49

Hi

It's exactely what i need. so amazing. Someone can send me the plan please? I'm so newbie to do tat all by myself without plans. Thanks you.

virginie D.

Wed, 03/02/2016 - 14:49

Hi

It's exactely what i need. so amazing. Someone can send me the plan please? I'm so newbie to do tat all by myself without plans. Thanks you.

ajbreaux

Mon, 05/02/2016 - 14:22

My wife loves this . if its possible could i get the plans and hopefully have time to build it to give to her for mothers day ? thanks 

Kimhubbell

Fri, 12/02/2016 - 11:01

I would also love to have the plans for the 3 bin sorter. I am barely an intermediate so more specifics would be a huge help! Thanks to anyone who could help.

lworthy

Mon, 07/10/2017 - 04:19

 I absolutely LOVE your laundry sorter!!!! You did a fabulous job and the TRIM, WOW amazing!!!! I've searched Ana's website and cant find the plans' could you please email me the plans to [email protected].  I started building my own furinture back in October 2016 and the reward is amazing... Keep up the good work.

Happy Building,

Lisa

woodmama

Tue, 01/16/2018 - 22:18

I'm too new at woodworking to be able to tackle this right now, but would love to download the plans for future. My most successful project so far is a pretty standard bookshelf. I got a free plan, with lots of guidelines and explanations, at https://tinyurl.com/ydeup8lo -- it came with a 440 page guide, "The Art of Woodworking" that has tips and techniques, and am plowing through that right now.

momto3

Wed, 02/28/2018 - 12:53

This is amazing.  I am very new to woodworking.  Could you send me the plans please?  I would be most appreciatative 

Ljohns

Wed, 03/11/2020 - 23:27

I would love to have the plans for the three bin laundry sorter to build for my laundry room. Are the plans available? Awesome work!

Craftsman playhouse!

Love how this turned out!! Thank you thank you Ana!! Plans were great, I think we got it done for just about $250! 

Thanks again!

Built from Plan(s)
Estimated Cost
$250
Estimated Time Investment
Weekend Project (10-20 Hours)
Recommended Skill Level
Intermediate

Comments

Plant Corner

Submitted by Anonymous (not verified) on Tue, 02/23/2021 - 08:35

This was my first piece of furniture to make all on my own and the Corner Cupboard plans were soooo helpful! I needed more space for plants and had already built shelves in every window of my house, so I decided it was time to make a larger space to house my plants and add supplemental lighting so I could put it anywhere I wanted. This corner was dark and I don't love lamp light, so I thought a pop of color + plants + daylight grow lights would be perfect for the space! I've been taking on more carpentry projects and also wanted something that was a bit more challenging. This plan was perfect! I'm more of a napkin planner myself, so it was nice having the structure provided in Ana's plans and the cut list was super helpful. I had to make some modifications to fit things into my car, but it all came together nicely! This being a plant hutch with grow lights was the plan all along, but I gotta tell ya, when it came to having to drill 3/4" holes in the back of my newly built beautiful hutch, it took me a minute to work up the courage! I really love how it all came together - thanks for sharing your plans, Ana!

Built from Plan(s)
Estimated Cost
$100
Estimated Time Investment
Weekend Project (10-20 Hours)
Finish Used
Kilz primer + Behr orange flambe paint
Recommended Skill Level
Intermediate

Comments

Farmhouse headboard

I built this headboard a while back but just never got around to posting it.  I distressed the wood, painted it mint green and applied a chocolate glaze. 


Estimated Cost
$100.00
Estimated Time Investment
Day Project (6-9 Hours)
Finish Used
Mint green and chocolate glaze
Recommended Skill Level
Starter Project

Comments

Twin Over Full Bunk Bed

Submitted by sapperstan on Mon, 04/01/2013 - 14:47

My 4 year old kept asking for a bunk bed, so my wife and I went to the furniture store and saw we would be paying close to $1000 for a junkie bunk bed. We told him it cost too much and left it at that. Then he started bringing us pennies, dimes and all the change he could find to pay for the bed. So I found this website and decided to attempt to build him one. I started building it after work on Monday, continued for a few hours every evening and finished Saturday morning. It turned out amazing, and both the boys love it. It is extremely sturdy, and will last beyond my lifetime. It's just a good quality design. Total Cost was about $300. Not bad for what we would have been paying for a lesser quality bed. Changes I made: I added the railing on the front of the upper bed to match the headboards and railing on the back side because my wife is a worrier. I also designed and built the stairway and bolted it to the lower bed. I am no professional carpenter, a novice at best. Most people with a little carpentry knowledge can build this. Thanks Ana, we all love it!

Estimated Time Investment
Weekend Project (10-20 Hours)
Finish Used
Sanded with 220 grit
Applied wood conditioner
Applied Minwax Aged Oak gel stain
Applied Polyeurathane for protection
Recommended Skill Level
Intermediate

Comments

spiceylg

Tue, 04/02/2013 - 05:17

Wow, you did a wonderful job! What a sweet story with your son bringing you any change he found. Adorable. I'm sure your sons are so proud of you and it means so much more than just store bought. In looking at that first smaller picture of just the top part, it looks like a view from the back side of a day bed. You can take apart the bunk beds when they get older and you have one full bed and one day bed. Awesome!

Rustic Modern Platform Bed

Submitted by Anonymous (not verified) on Tue, 05/23/2017 - 12:48

We loved this bed much! And others loved it so much that the people who purchased our home requested to keep the bed frame as well. I guess we'll be building it again. We used a vinegar/steel wool solution to oxidize the wood and then sealed it with a natural finish (rubio-monocoat 'cotton white'). Thank you for these plans!

Finish Used
vinegar / steel wool + rubio monocoat cotton white,
Recommended Skill Level
Beginner

Outdoor Sectional

Submitted by jwhipp on Thu, 04/11/2013 - 11:38

We followed the outdoor sectional plan from Ana Whites blog to create this outdoor sectional. First we bought the cushions and custom built this sectional to fit the cushions. We used 2x4's and the kreg jig for pocket screws, then covered the base in beadboard and some pine trim, gave it a good sanding and a nice paint job.

Estimated Cost
900
Estimated Time Investment
Week Long Project (20 Hours or More)
Finish Used
bead board and pine trim
Recommended Skill Level
Intermediate

Comments

Juanita_r

Thu, 04/11/2013 - 15:12

I just want to curl up there with a book and spend the day on that lounge, so pretty & inviting. where did you get the base and back cushions, they are a great colour?

jwhipp

Fri, 04/12/2013 - 05:46

Thanks! We built the frame according to Ana's design (customized dimensions for our cushions) and then covered the base in bead board and used pine trim around the edges. The cushions are from the Frontgate Outlet in Cincinnati.

Seesaw for my daughter Milica

Submitted by Anonymous (not verified) on Wed, 05/31/2017 - 01:25

Seesaw for my daughter Milica!
Thank you Ana for the idea.
Greetings from Serbia.

Built from Plan(s)
Estimated Cost
15€
Estimated Time Investment
Afternoon Project (3-6 Hours)
Finish Used
Belinka: Belles (for impregnation, 1 layer) + Toplasur UV Plus (3 layers) No.
Recommended Skill Level
Beginner

Comments

Seasonal And Holiday

Modern Adirondack Chairs and Adirondack Table

Submitted by jer727 on Mon, 08/30/2021 - 12:18

This is one of my first wood working projects I have accomplished and these two plans were some that I really enjoyed making.

Comments

Seasonal And Holiday

Desk

Submitted by gfranq on Sat, 03/21/2015 - 14:51

This was my biggest project to date. The hardest part was finishing it.

Built from Plan(s)
Estimated Time Investment
Day Project (6-9 Hours)
Finish Used
Sherwyn Williams Acrylic Latex Satin in "Mosaic Tile". I then sprayed it with a coat of polyurethane
Recommended Skill Level
Beginner

Comments

Simple Outdoor Collection

Submitted by handymommy on Wed, 03/09/2011 - 05:32

The outdoor bench was my first Ana project. It was so easy and rewarding that I immediately set out to build the rest of the set!

Built from Plan(s)
Estimated Time Investment
Weekend Project (10-20 Hours)
Finish Used
dark deck stain
Recommended Skill Level
Starter Project

Comments

Floating "Book" Shelves

I wanted to make floating shelves. As I was making them, I got the idea to decorate them like books.

Estimated Time Investment
Weekend Project (10-20 Hours)
Finish Used
To decorate I used card paper to round one side and covered it with scrap book paper. I used three coats of shellac for protection.
Recommended Skill Level
Beginner

Bathroom Vanity 2 Ways, Hammered Copper or Wave Sink

Custom Bathroom Vanity in traditional furniture styling. Designed two ways, one with a hand hammered copper sink and matching hardware, the other with a Kohler Wave sink with black aged hardware. 

Estimated Time Investment
Weekend Project (10-20 Hours)
Finish Used
Ultra White Paint, Special Walnut Stain
Recommended Skill Level
Intermediate

Table turned cabinet

I had an old table that was in my basement.  I wanted to re-do my craft room.  I have been thinking and thinking about it.  So when I saw Ana’s link to her drawer organizer – and how to install drawer slides – I thought – ok – now it’s time to do it.


I spent about a week drafting plans, making measurements.  At first I was going to recycle the metal sliders I had left over from the kids dressers…but there wasn’t enough – and to do 12 drawers would be more money than I wanted to spend.


So – a trip to home depot – I was able to take this table that was just collecting junk – literally – to an organized and functional crafting cabinet – with huge deep drawers.  There are 12 drawers in total.  They are all 6 inch in height, 26 inches deep, and then there are 8 that are 16 inches wide, and 4 that are 12 inches wide.


Here are some before and after pictures – I have all the details on the build on my blog.  I wouldn’t have been able to do it without Ana.  Her plans and continual inspiration!

Estimated Cost
Around $80
Estimated Time Investment
Afternoon Project (3-6 Hours)
Finish Used
On the fronts of the drawers only. Sanded, primed and painted with high gloss white.
Recommended Skill Level
Intermediate

Dog Bunk Bed

We’ve been looking around for some plans for a doggy bunk bed for a while now, but couldn’t find anything that we liked so I decided to build it from scratch. This is a huge bunk bed that was built based on the size of our larger dog’s bed which is 44 x 35. This was pretty simple to build although the stairs we’re quite challenging as I have never done them before so if I can make it, anybody can.

I must stress that before I found Ana’s website about 6 months ago I could barely cut a piece of wood straight. Over this time I have made several things based on the easy to follow plans on this website which ultimately gave me the confidence to go it alone and build this bunk bed. Friends and family are shocked at some of the furniture I’ve made and some don’t even believe I made them and think I’ve bought them from IKEA. My wife has got a list of furniture she wants to make now including a TV console, an armoire and a twin bed for one our daughters. Every spare second I have now is spent is making furniture and I LOVE it.

For anybody who has never built anything and is apprehensive to do so I would just say, do it. Grab what you need and dive right in. You may get frustrated and scream a bit at first, but the reward at the end is well worth it and each project you do will get easier and easier. Be warned though. The better you get, the more people will pester you to make things for them.

Thank you, Ana.

This was made using cheap 1 x 3 and 1 x 4 furring strips for the railings and bed slats, 2 x 4s for the posts and 1 x 10 board for the stairs.

Estimated Cost
$75 - $100
Estimated Time Investment
Weekend Project (10-20 Hours)
Finish Used
I haven't sanded or finished this yet as we are still deciding on what to do with it.
Recommended Skill Level
Beginner

Comments

Becca Trunk

Submitted by Linda7 on Fri, 05/29/2015 - 13:39

I built this trunk for my grandson’s high school graduation, and filled it with a lot of things he might need as he begins his life in the U.S. Air Force. Here are a few hints:
• Build the top after you place the moulding around the top of the box so you can measure exactly how long and wide the top needs to be.
• Don’t forget to measure the width of the 1” x 6” boards; if they are not exactly 5 ½”, adjust the length of the vertical boards on the trunk top or it could be slightly too small.
• Because of the extra width the moulding creates around the perimeter of the box, use narrow utility hinges, piano hinges, or Beverly of bzhays used black decorative strap hinges from Amazon.com.
• I used black handles from Amazon.com: Reliable Hardware Company RH-0540BK-2-A Set of 2 Chest Handle, Black
• For a more finished top on the inside, I filled the holes with wood putty and sanded it smooth, then stained and polyed like the outside of the trunk. The kreg holes are still visible, but not too much.
• Before screwing the box together, I recommend finishing the inside surfaces first; cover the edges that will meet with painter’s tape so the glue will have bonding surfaces.

I love the rustic look most have used in their finishes, but since I used a traditional stained finish, I used the ideas from Justin of jeverette1 who covered the exposed plywood edges with scrap. Since I didn’t have that, I used corner moulding for the corners, and lattice strips to cover the top edges of the box. This gives the trunk a more finished look if you are not going for the rustic/distressed look. I notated below a week-long project - I spend a lot of time in the finishing and do so over several days. Others could certainly finish in a weekend.

I’d like to thank Ana for the wonderful plans, and Whitney of Shanty 2 Chic for the great step-by-steps. Also, a big thank you to Beverly of bzhays and Justin of jeverette1 for responding to me with my questions; you were both so helpful.

Built from Plan(s)
Estimated Cost
$150.00 - I used better pine and stain-grade burch plywood to avoid hours of sanding.
Estimated Time Investment
Week Long Project (20 Hours or More)
Finish Used
Stain: Rusteoleum “classic cherry”; one coat and it took every drop of the small can. Finish: Minwax wipe-on poly, one can is enough for several coats. The pictures were taken at night with a flash, so it appears much shinier than it really is, plus the color is off too - not as "orange-ish" as it appears. I also had to paint the sash lock black (couldn't find any in black) and the piano hinge. The decorative tacks were found at Lowe's in the hardware section among the nails and they come in several finishes.
Recommended Skill Level
Beginner

2x4 Garden Beds

Submitted by binah06 on Wed, 05/18/2011 - 09:37

My husband and I were inspired by Ana's plans, but needed to use up some wood we had laying around the garage because it was starting to bend and warp. We made the large box 2x6 ft and the smaller one is made from scrap and is about 15in x 2.5 ft.

Estimated Cost
free
Estimated Time Investment
An Hour or Two (0-2 Hours)
Finish Used
none
Recommended Skill Level
Starter Project

Console table/shelf/thingy

I gave away our piano and needed something to fill it's spot. I also needed some storage. I knew right where to look and eureka!! there it was, the Simple Rustic Modern Console plans.

It was inexpensive, easy, quick and perfect!! I modified it to the height I wanted and added some dividers for baskets and a bottom shelf as well.

Loving it!!!

Estimated Cost
30.00-40.00 depending on the size you need
Estimated Time Investment
Day Project (6-9 Hours)
Finish Used
I used Minwax Polyshades but I hated the way it gooped up in spots. I had to sand and redo but in the end was satisfied with the way it turned out.
Recommended Skill Level
Starter Project

We Love our Sectional and Tables

Submitted by Mrs.F on Sun, 05/15/2022 - 09:33

We love our sectional built from the modern sectional plan. We also made the tables from an Ana White plan but we adjusted the size. My husband and I love projects.

Comments

My version of "Outhouse Plan for Cabin"

Submitted by johnseigle on Mon, 06/06/2022 - 15:00

Hi Ana and Family,

I mostly followed your plans for my remote Alaska property outhouse build, with slight modifications. Our property is 7 miles from any road (and 2.5 hr drive from Anchorage) and I typically go there in the winter via snowmobile (December-April). I built this on my back deck in Anchorage and then took it apart and transported it in sections (back wall, 2x sidewalls, floor parts, door, roof parts, seat parts). It took me 5 trips to get it all up to my property from the truck at the trailhead via snowmobile!

The hardest part was digging the hole under 5 ft of snow! I cut several dead spruce trees in the area I planned to situate the outhouse and started a big fire (really big). We kept that going until we had melted out about a 15ft wide area down to bare soil. The next morning, while the ground was still warm from the previous evening's fire, we dug the hole (only about 3.5x3.5ft). Then I cribbed in the hole with old cedar fence slats to help prevent the inevitable ground cave-in that we often see with soil melt and rains in Alaska. Then, I pieced the outhouse together, with the frame sitting on small pavers.

I used a combo of T&G pine and cedar for the walls. I used metal for the roof. As I built this in January and February over several weekends (in Alaska), it was very cold and I would take the pieces inside and paint/stain them. As such, this basically took me all winter from start to finish. It doesn't take that long if you build it on site in warm weather. Once transported to the cabin site, it took parts of 3 weekends to get it in place and useable, including site prep. I've still got a little touch-up work to do (e.g., window for light in winter and bird block to keep the spring and summer nesters out). I put some anti-slip tape on the frame so that I don't slip on the frame base.

There is some waste wood if you follow the plans directly (especially 2x6), but I am using that to build a small firewood cover at home. This was not an inexpensive outhouse even without pandemic prices (I could have chosen a less expensive siding), but I wanted a nice outhouse and I'm very pleased with the outcome, so it was money well spent. Great plans! Thanks.

Built from Plan(s)

Comments