Community Brag Posts

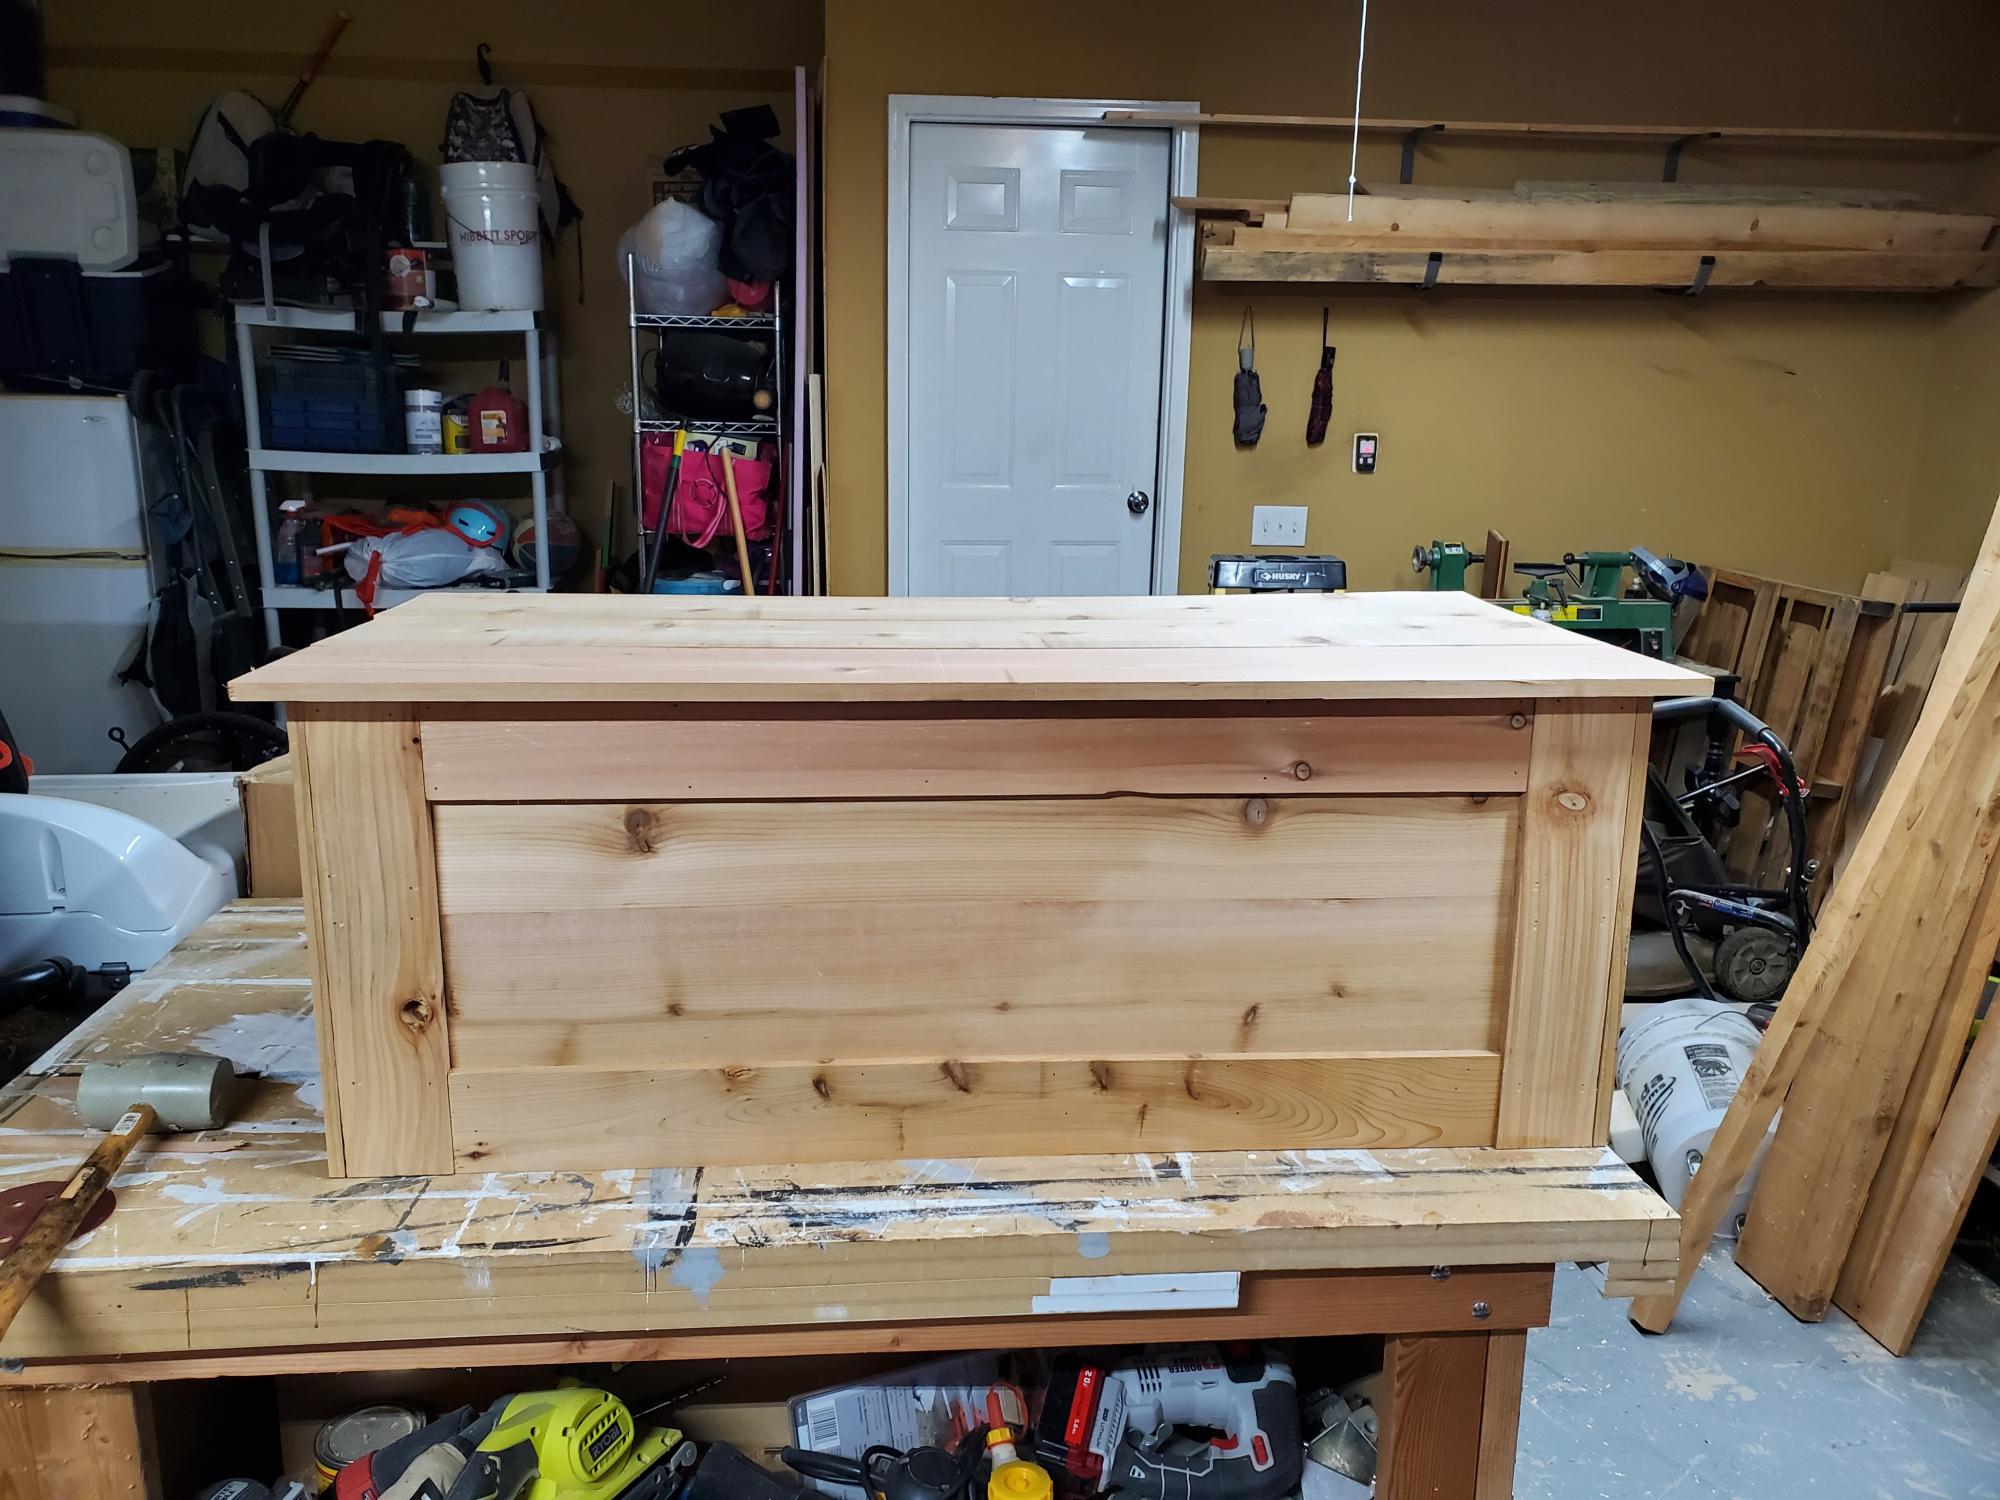
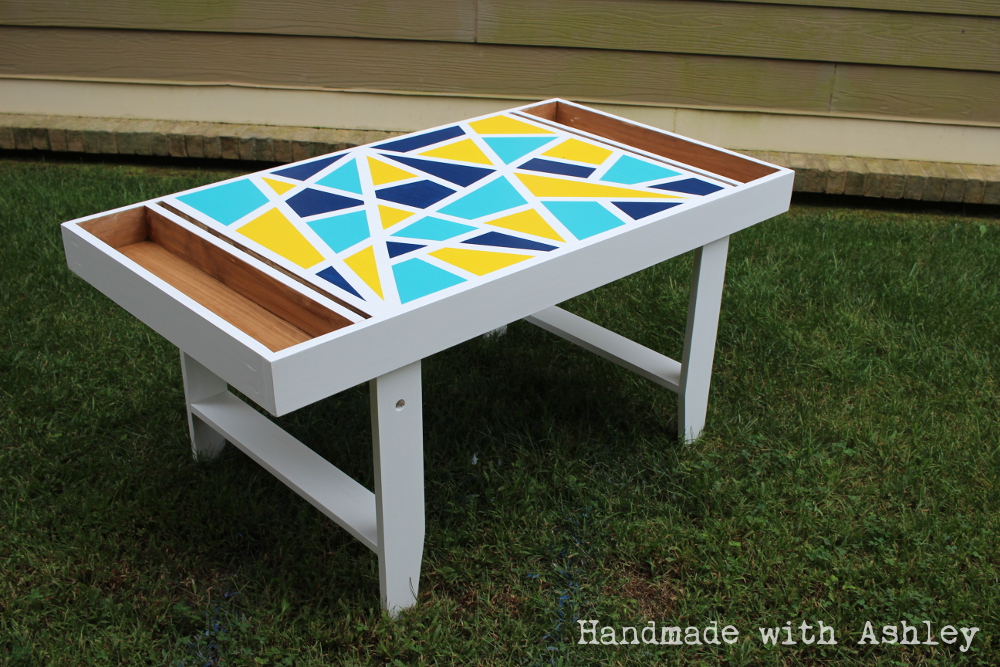
Patio Table w/Built in Beer/Wine Cooler

Submitted by RoyBoy on Sat, 05/18/2013 - 06:58

After seeing the patio table with beer/wine cooler, I wanted to build this for my brother and wife who recently bought a house. I asked them if they were interested and of course they said yes. I modified the original plans by adding a 2x4 on each side of the cooler to make the table wider. I also made the legs out of 4x4 vs the 2x4s that were originally called for. I used redwood and then stained it and used a varnish for the final coating. I probably wouldn't use the varnish again for an outdoor table, because it looks like it should be an indoor table vs outdoor. Overall, I'm pleased with the results and the best part about it, I get to enjoy it every time I go over for a BBQ.

Estimated Cost
$225-250
Estimated Time Investment
Week Long Project (20 Hours or More)
Finish Used
Olympic Redwood Naturaltone Toner Exterior Stain
Cabot Spar Varnish Semi-Gloss
Recommended Skill Level
Beginner

Comments

Msharp1211

Wed, 07/03/2013 - 13:04

Awesome table, do you happen to have the measurements you used. I'd like to make the same table but I need the lumber yard to make the cuts.

Double Chair Bench

Very nice bench.  I have now made three.  This one is grey washed red cedar.  

Estimated Cost
170.00
Estimated Time Investment
Weekend Project (10-20 Hours)
Finish Used
Grey Washed Flat Exterior paint, mixed 50/50 with water. Varathane Satin finish. Practice on scrap wood wiping on/off the grey paint to get the desired look. Polyurethane has a yellow hue, the varathane is crystal clear.
Recommended Skill Level
Intermediate

Rustic 4x4 Bench

Submitted by AlexO on Thu, 05/21/2015 - 08:27

Modified the Cherished Bliss plan a bit to include Carriage bolts instead of pocket holes and I notched the top of the legs to make a shelf for the top.

Legs were cut at 18" and the top is 40". The two center 4x4's are connected with two internal (and smaller diameter) carriage bolts and glued together. The end 4x4's are glued and then a 1/2 x 6" carriage bolt with a pre-drilled "Head" hole (using 1" paddle bit).

Very easy to make but this baby is heavy!!!

Estimated Cost
$50-$75
Estimated Time Investment
Afternoon Project (3-6 Hours)
Finish Used
Clear Watco Dutch Oil and Varathane 3x Poly.
Recommended Skill Level
Beginner

Comments

Not quite the same

Submitted by cyfry77 on Sun, 04/10/2011 - 14:45

This was something I build a couple years ago, it's not the same as this plan, but very similar. When we moved in to the house, the slab was already poured, with 4x4s already in place, I just used what was there and my imagination for the rest.

Built from Plan(s)
Estimated Cost
$200
Estimated Time Investment
Weekend Project (10-20 Hours)
Finish Used
Purple outdoor deck stain. (Behr?)
Recommended Skill Level
Intermediate

Corner Cupboard - Bookshelf

Submitted by CustomPulp on Thu, 05/28/2015 - 10:38

Modified corner cupboard to use as corner bookshelf in boys room. Omitted the lower doors otherwise shelf cut to specs. Painted with bold blue to match boys colors.

Built from Plan(s)
Estimated Time Investment
Day Project (6-9 Hours)
Finish Used
Valspar - Royal Blue
Recommended Skill Level
Beginner

Comments

Laundry Basket Organizer

Submitted by Lovelace on Mon, 04/25/2011 - 07:48

I use this dresser in my walk-in closet to separate dirty laundry...each basket holds either "whites", "lights" or "darks". The size of each basket is perfect for one wash load. I just love how much more room I have in my closet because of it!

Built from Plan(s)
Estimated Cost
$35
Estimated Time Investment
An Hour or Two (0-2 Hours)
Finish Used
I lighting sanded all sides and edges then put done two coats of Sherwin-Williams ProClassic acrylic latex paint
Recommended Skill Level
Beginner

Comments

Cedar Chest

Submitted by Keldani5 on Mon, 12/27/2021 - 06:42

I created this from rough cut cedar I glued everything together and finished it off with brad nails and brass hinges. Then I added a poly gloss on the outside.

Comments

Storage Bed

We used the plans for a six drawer storage bed to build this with a custom headboard and footboard. We used plywood to build these boxes but have since switched to using MDF. We use a pine laminate for the drawer faces.

Estimated Time Investment
Weekend Project (10-20 Hours)
Finish Used
Custom mix
Recommended Skill Level
Intermediate

Comments

leftysgirl

Sat, 09/26/2020 - 05:51

I absolutely love this style. I am trying to figure out your modifications.
What size pine planks are those for the foot and head board? 6”?

Thanks!

Floating Shelves... Simply Fantastic and Easy...

Submitted by Anonymous (not verified) on Mon, 12/27/2021 - 19:48

Utilized your idea... First ever woodworking project. My wife is super excited these shelves came out superb. She is excited to see what I have planned next. Thank you.

Built from Plan(s)

Comments

Closet Door and DVD Storage

Since we moved into our house over a year ago, we had no closet doors for our TV room. Just a giant gaping hole in the wall. Filled with 2 boxes of DVDs. Needless to say, it was really unattractive. I saw someone on the Knock-Off Wood facebook page building her own closet doors, and I was inspired. I drew out a quick sketch and got to work. They were really simple to make, but because they were so bulky they were a bit hard to manage. (The husband never helps out with my "buildy" projects, but I definitely needed an extra hand getting these into place!) I also built the behind the door storage to go on the larger door for all of our DVDs. What turned this project into a "Weekend" project rather than a "day" project was really the bulk and the finishing. While I am normally the self-proclaimed queen of spray paint, I took the time to do a really nice hand painted and glazed finish on the doors. (The DVD storage, though, went back to my area of expertise with the spray paint.) We LOVE all of this extra storage! We definitely have room to grow our DVD collection now!

Built from Plan(s)
Estimated Cost
$100
Estimated Time Investment
Weekend Project (10-20 Hours)
Finish Used
For the doors, I used General Finishes Milk Paint in "Snow White" with a coat of "Van Dyke Brown" glaze. For the DVD storage, I used 4 cans of Rustoleum spray paint in "Dark Grey" gloss.
Recommended Skill Level
Intermediate

Comments

teembee

Tue, 06/21/2011 - 17:00

hi I was wondering you had plans created for these doors...I "need" these doors!!

Debi_G (not verified)

Sat, 07/07/2012 - 19:37

Bypass doors drive me nuts, so I'd love love love to see a how-to about the doors you built. They look great!

Picket Storage Shed

Submitted by dp38393 on Tue, 08/04/2015 - 05:16

Pretty fun and easy weekend project.  Decided to go with Pine shingles instead of cedar based on availability.  First time roofing, and it is apparent.  We have had many strong storms since, and it is waterproof - so at least I have that going for me! 

Overall, I am very happy with this shed, and I should have taken pictures of the inside.  I have two 5 level shelves on the side walls, and a garden tool rack on the back wall.  I have been able to clear a lot of space in my garage thanks to this shed.  

Also, the beer bottle opener and cap catcher were a must for me when I work in the yard!

The plans are excellent!  Don't hesitate to build this shed if you need it!


Built from Plan(s)
Estimated Cost
$250 (originally $300+, but I returned the Kreg Jig when I realized I could get by without it).
Estimated Time Investment
Weekend Project (10-20 Hours)
Finish Used
Cabot Cedar Stain, and gloss white trim.
Recommended Skill Level
Intermediate

Kendal Extra Wide Dresser

Submitted by Fulton610 on Mon, 03/12/2018 - 09:34

Overall I am very pleased with this project and I deviated from the plan with the drawer fronts and the slides as well.

Built from Plan(s)
Estimated Time Investment
Weekend Project (10-20 Hours)
Finish Used
used walnut stain with general finishes flat poly.
Recommended Skill Level
Intermediate

DIY Kids Art Table

I'm so excited Ana created plans for this table!  When I first came across it on Pottery Barn Kids it was love at first sight. :D  I built it over the weekend for my little toddler.  Unfortunately, he's too short for it, but he'll grow into soon enough. :)  (I secretly wished it was an art table appropriate for my height!)

It cost me about $75 to build.  I splurged and bought select pine boards for the project.  The art table was also my submission for September's Fab Furniture Flippin' Contest.  September's sponsor is General Finishes and the theme was geometry!

Now, I just need to build matching seats! I love the little stools Ana built; maybe I'll do something sorta like that. :)  


Thank you Ana for inspiring me to build!


Built from Plan(s)
Estimated Cost
$75
Estimated Time Investment
Weekend Project (10-20 Hours)
Finish Used
General Finishes Milk Paint (Snow White), Acrylic craft paints for the geometric pattern, ECOS Paints Woodshield in Pine Needles for the cubby stain, and ECOS Paints Gloss Varnish
Recommended Skill Level
Beginner

Comments

Outdoor Sectional

Submitted by mdj1281 on Mon, 11/16/2015 - 06:27

Our new home has a 21'x17' screened in porch that needed somthing, anything to occupy it! We looked for sectionals from online retailors and could not believe how much money they were demanding for them. Being new homeowners we could not afford/justify spending that amount. I found Ana-white.com while looking for shoe bench plans and found these 2 plans for the sectional. It was time to justify all of my tool purchases! lol


I took the 2 plans for the sofa and armless sectional and increased the size on the armless sectional by 1 seat to fill the area better. Future plans also include a bar, serving area and coffee table in the space. I bought (30) acq 2x4x8's and, not including scrap pieces, had 3 reamaining full pieces after completing the project. Total for the wood materials was $130 and I also had to buy a Kreig Jig ($37) and 2-1/2" ext deck screws so all in all about $180 for the materials


For the cushons I searched local retailors and found since we were going into the winter season a lot of local stores were selling off their patio supplies at big discounts. I found a local Home Depot selling Hampton Bay deep cushions for 75% off (normally $49.98 on sale for $13.xx). I needed 8 seats and since one was a corner I ordered 9 sets (9 backs, 8 seats).


Project took me less than 5 hours pick up the wood, set up on-site shop, make all the cuts and assemble. That 5 hour timeline also included a break for dinner. The sofa sections are heavy when put together, if you plan on moving them more than once or twice a year I'd suggest putting some caster wheels on the base with locks to keep it from rolling away when being used.

Estimated Cost
$130 in wood materials, $117 in cushions (on sale) + incidentals (glue, screws)
Estimated Time Investment
Afternoon Project (3-6 Hours)
Finish Used
None
Recommended Skill Level
Starter Project

Comments

kbdesigns

Tue, 11/17/2015 - 17:58

Looks like some nice pieces of furniture you have here! I actually built the same sofa from that same plan as our outdoor furniture, along with some chairs built with the same style to match. Mine is a few months old and I'd like you give just a tiny bit of advice (if you'll accept it lol) so yours doesn't end up like mine... On the back, top horizontal support (the ones that traverse the entire length of the sofa) I would put 1-2 vertical support posts spaced evenly. After just a month of having mine I started to notice a slight sag in the board :( No doubt after 6 months to a few years it would become pretty bad. Its just a matter of cutting a couple scraps and screwing them in, so its a pretty simple fix! I hope it helps, and keep up the tool collection and builds!


-Jeremy

mdj1281

Wed, 11/18/2015 - 04:09

Funny you should mention that, I was thinking it while showing it off to the in-laws a few nights ago. I'm a big guy and leaned back on it and naturally it had movement. I was torn between a 2x4 on end running under the rear piece or horizontal supports... I didn't want there to be any undesirable spots to sit in if my guests leaned back. So, since you did this addition does it effect the seating area?


Good call though and something I'm going to do!


Thanks!

Trash Can Cabinet w/ Bead Board Insert

Submitted by dhunt on Sat, 09/17/2011 - 22:00

My mom bought a similar one several years ago and I've been wanting something like this ever since...so glad I came across this site so I can proudly say I built it myself whenever someone asks!

Estimated Cost
$50-$75
Estimated Time Investment
Day Project (6-9 Hours)
Finish Used
Olympic One
Paint and primer in one!
Recommended Skill Level
Intermediate

Comments

shammrocky

Sun, 05/19/2013 - 13:44

I would like to purchase something like this, but I cannot find it any where. I actually want to make it into a laundry hamper where it is deep enough to fit two tall thin laundry baskets. Can anyone help me on this?

dia

Thu, 10/10/2013 - 20:59

Absolutely adore how yours turned out. Such an elegant look. Please share the color you used. Can't really tell if it's black or a very dark brown. Thanks and congrats on the gorgeous result!

Debbie440

Mon, 11/25/2013 - 16:23

Yes, I agree, this turned great. I'd also like to know what color it is?

DIY Bailey Dog Chair for Dogs with Megaesophagus

Hello everyone, today I’m sharing details on something I built recently: a Bailey Chair for dogs suffering from Megaesophagus.

Dogs with megaesophagus have an enlarged esophagus. This makes swallowing food difficult. Eating while in an upright position helps and the task of keeping the dog vertical is easier when the dog is sitting in a Bailey chair.

This blog post is less of a detailed how to and more of showing in progress photos. Adam, over at Lazy Guy DIY, has put together a great tutorial on how to build the Bailey Dog Chair. I followed his instructions with very few modifications.

CLICK HERE to read my build details and see more photos!

Estimated Time Investment
Afternoon Project (3-6 Hours)
Finish Used
clear spray
Recommended Skill Level
Beginner

Church Pew

Submitted by ndetermann on Fri, 10/18/2013 - 01:58

I redid a very old church pew fro one of my friends. It's origins is from one of the original churches in our home town. (There was SO much lacquer on it) This church pew was in bad shape, I had to take it totally apart and re-glue and pocket hole jig every wooden piece together because it was falling apart.

Estimated Time Investment
Day Project (6-9 Hours)
Recommended Skill Level
Beginner

Redwood Shower Bench

Submitted by lwarteman on Sun, 10/20/2013 - 08:33

I wanted to build a small shower bench. I used the Providence Bench Plans and just made it a bit smaller with a few adjustments. This bench is 35" long and 18" tall. I did not use the cross supports on the bottom because it was so short. Also, you will see that I turned the bottom stretcher and side supports flat/horizontal. I put the screws for the seat boards through the top down just because this was the easiest way for me to do it. The plans did not show in detail how to attach the seat boards from the underside. It just said "finally, the seat boards." I guess they probably used a pocket jig. I bought a pocket jig and used it in the couple of places, but this was my first time using it. I used brown, coated decking screws in the places I did not use the pocket screws. This was my first attempt at building anything and my first time to use a pocket jig. I used a natural wood stain and Behr Weather-Proofing since it will be in a wet area.

Built from Plan(s)
Estimated Cost
$20
Estimated Time Investment
An Hour or Two (0-2 Hours)
Finish Used
Behr All-in-One Stain and Weatherproofing in Cedar Naturaltone (No. 5533). Because this is going to be in a wet area, I put 2 coats on and let each one dry 12-24 hours in between and before getting wet.
Recommended Skill Level
Beginner