Community Brag Posts
Cedar Fence Picket Bird House
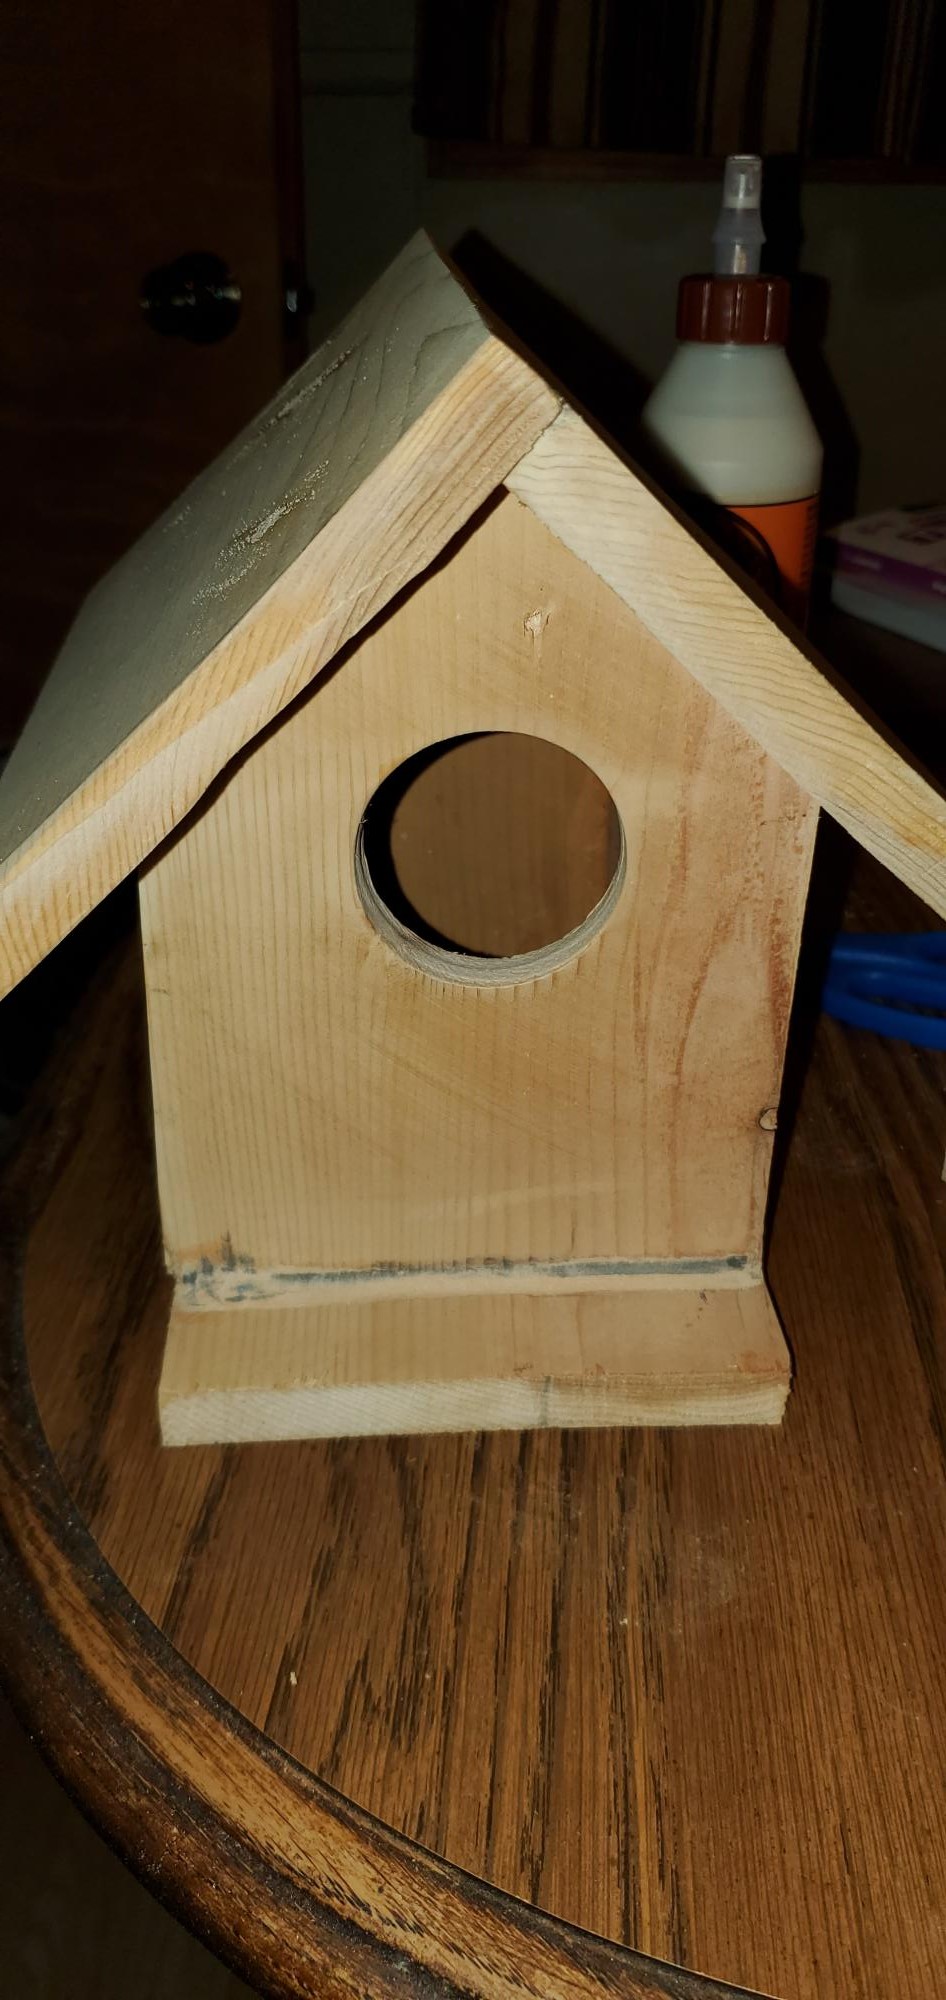
Not pretty, but not bad for a start while working with an 11,7 and 5 yr old.
Built from Plan(s)
Estimated Cost
$2
Estimated Time Investment
An Hour or Two (0-2 Hours)
Recommended Skill Level
Starter Project
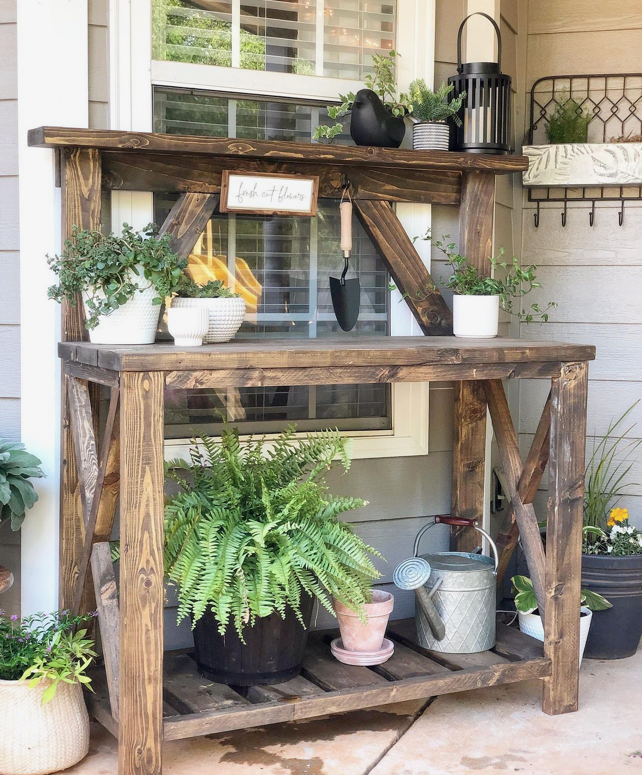
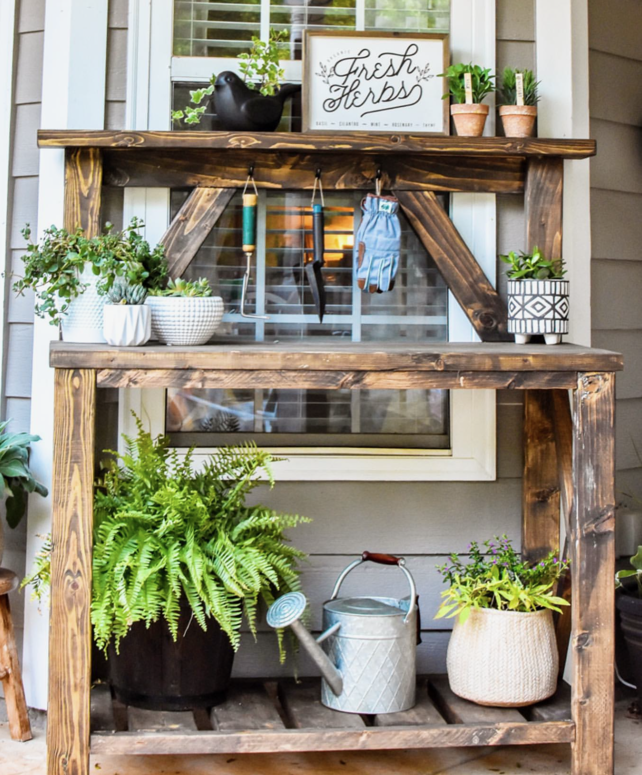
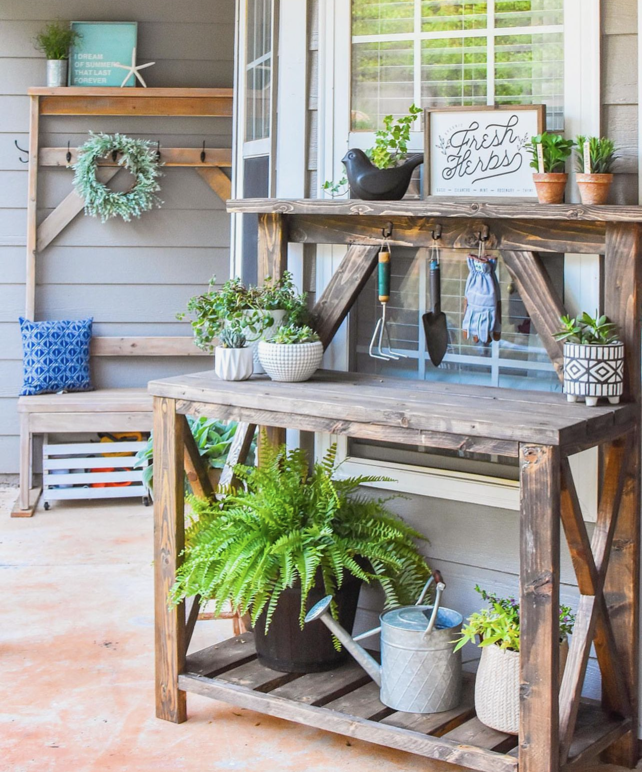
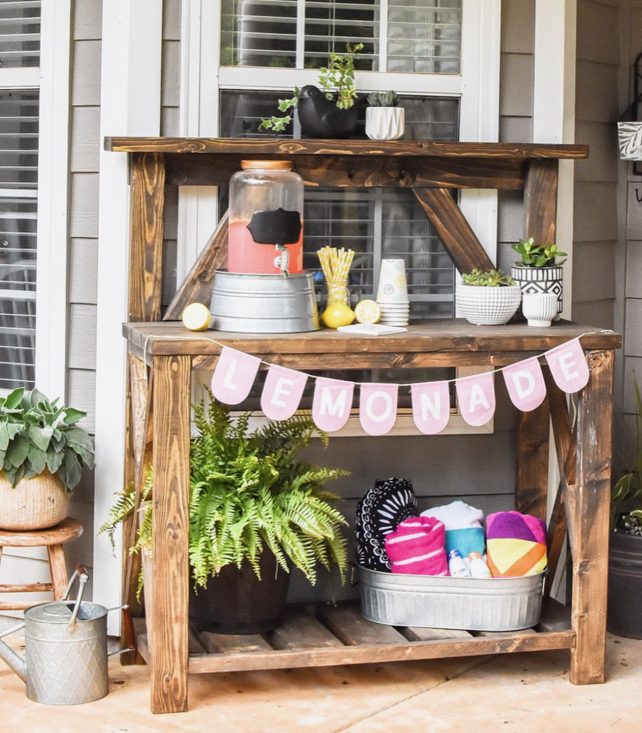
Potting Bench with Roof!
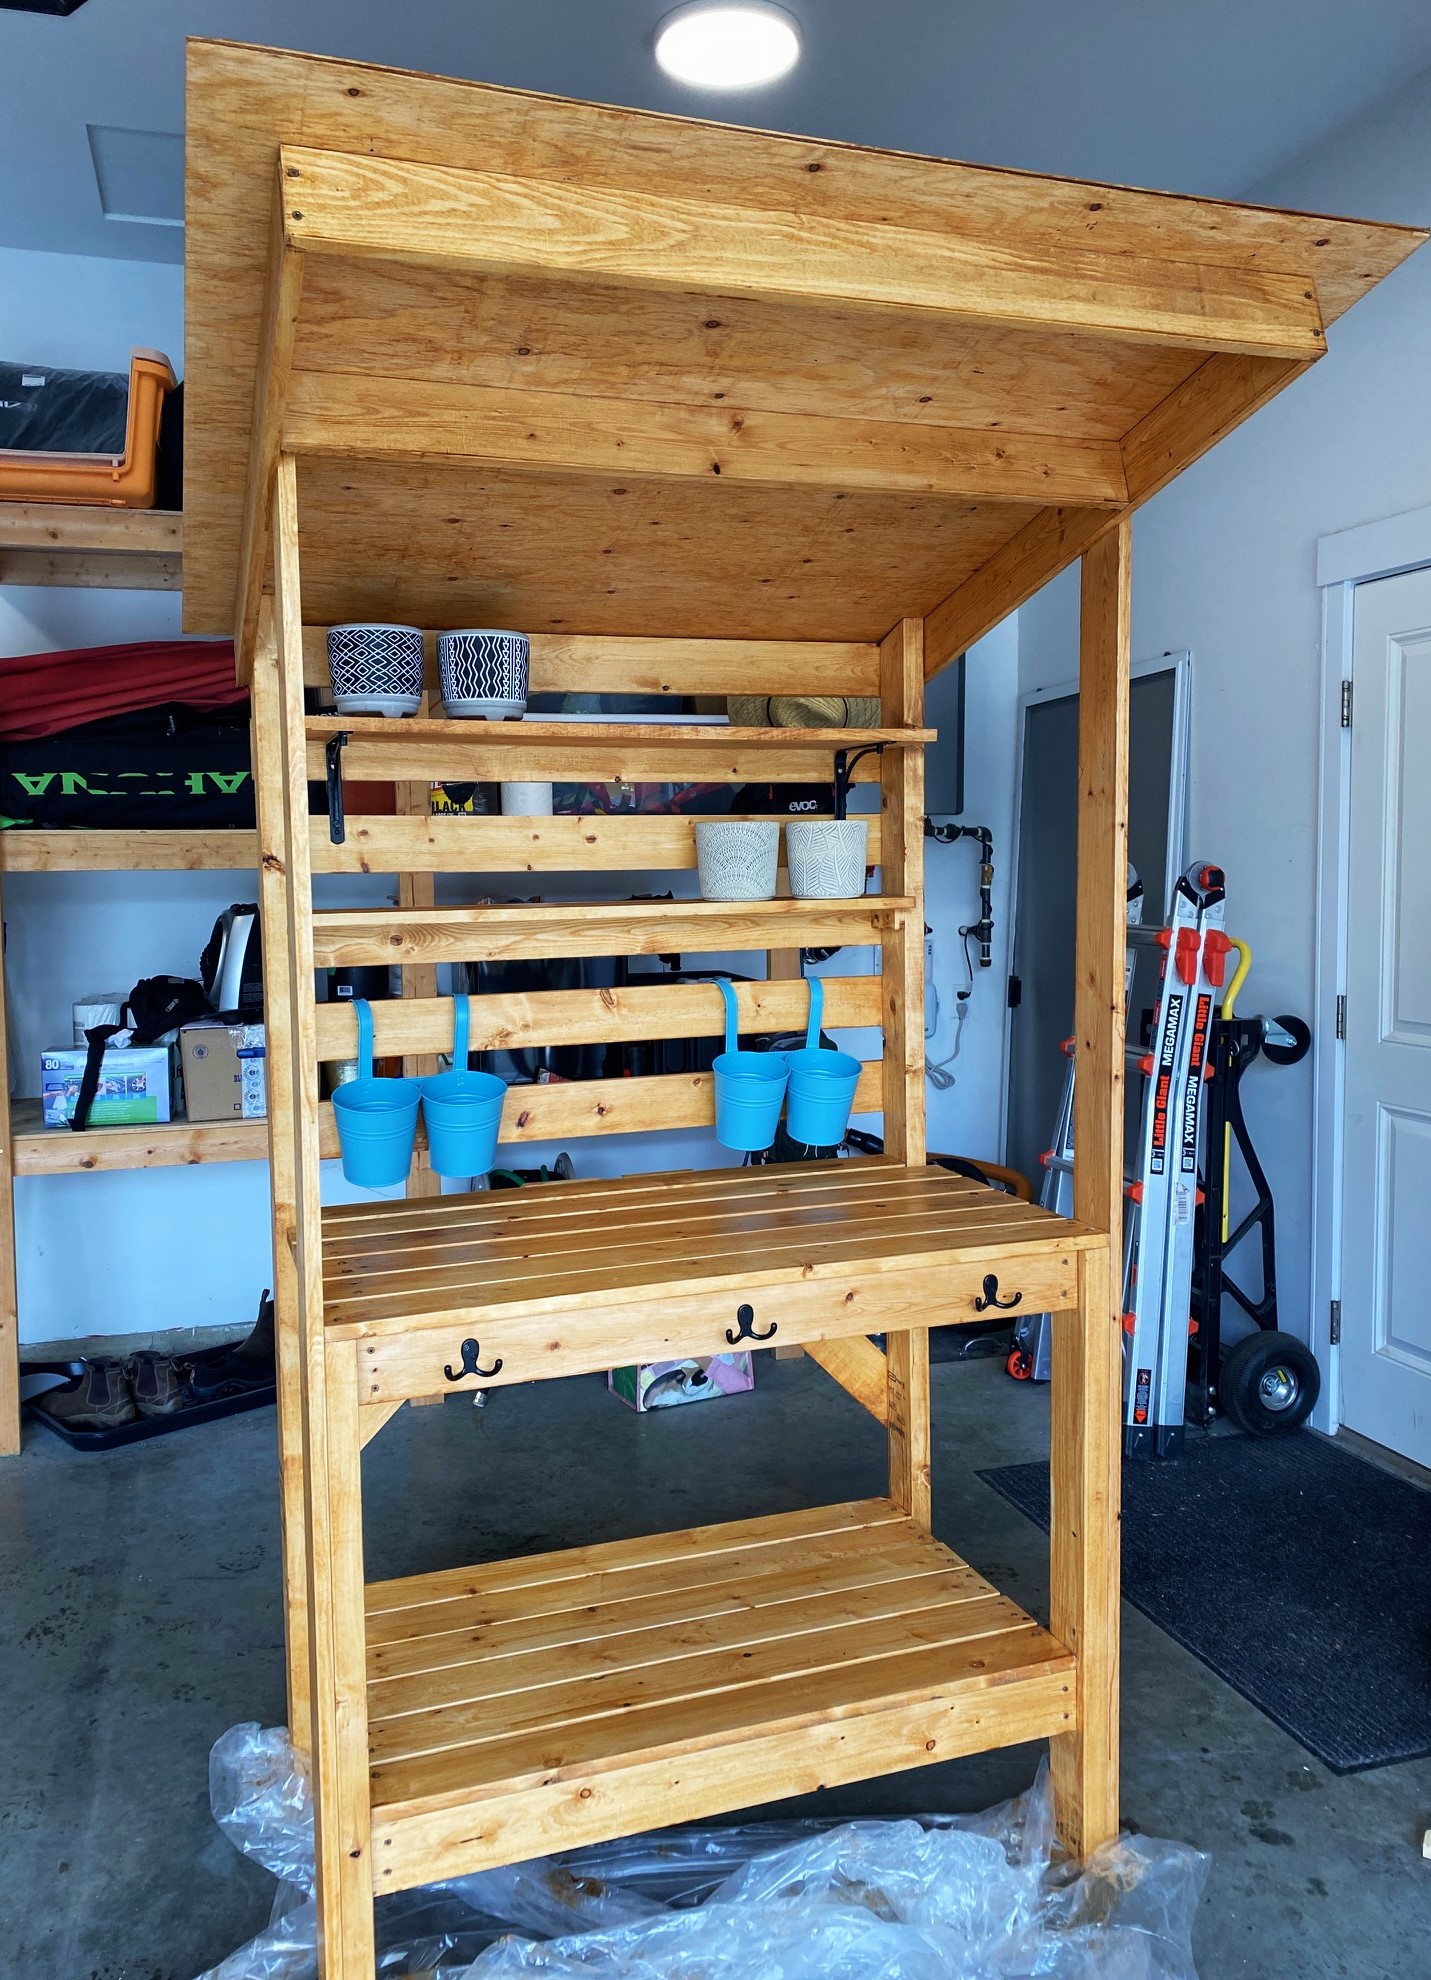
Based on the 2x4 Simple potting bench but added shelves and a roof!
Built from Plan(s)
Outdoor Octagon Table
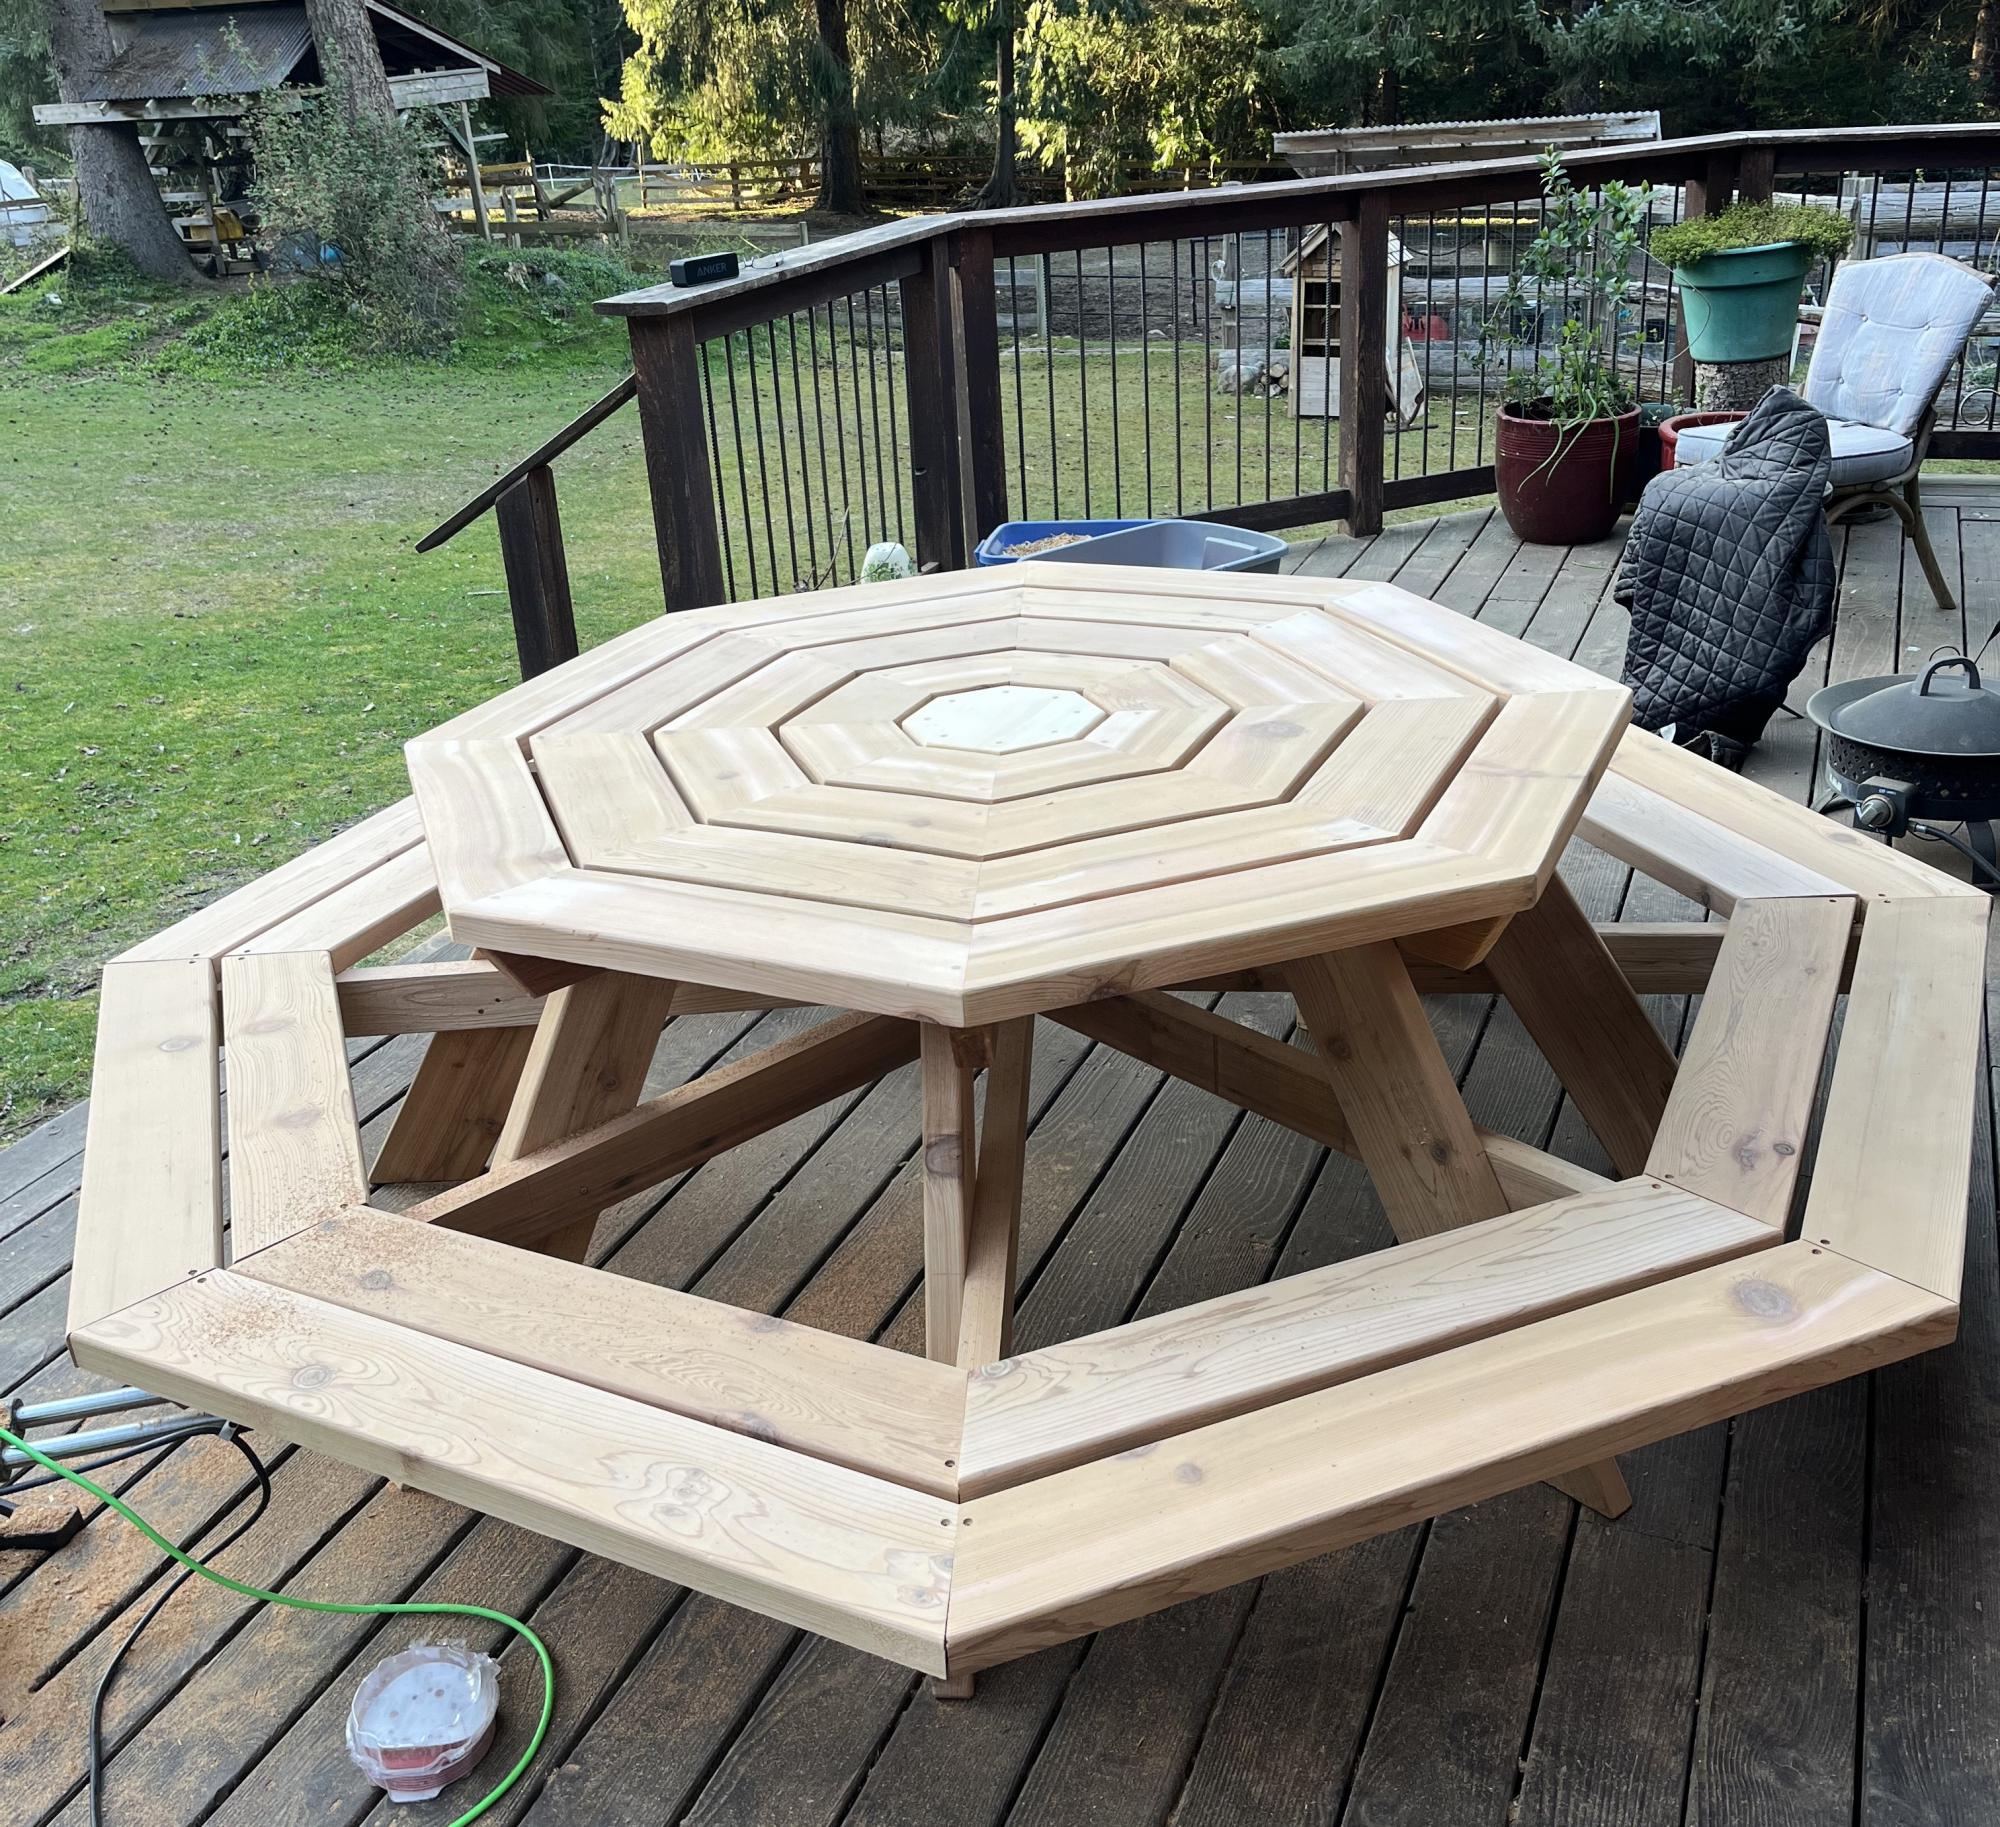
DIY Octagon Picnic Table
Built from Plan(s)
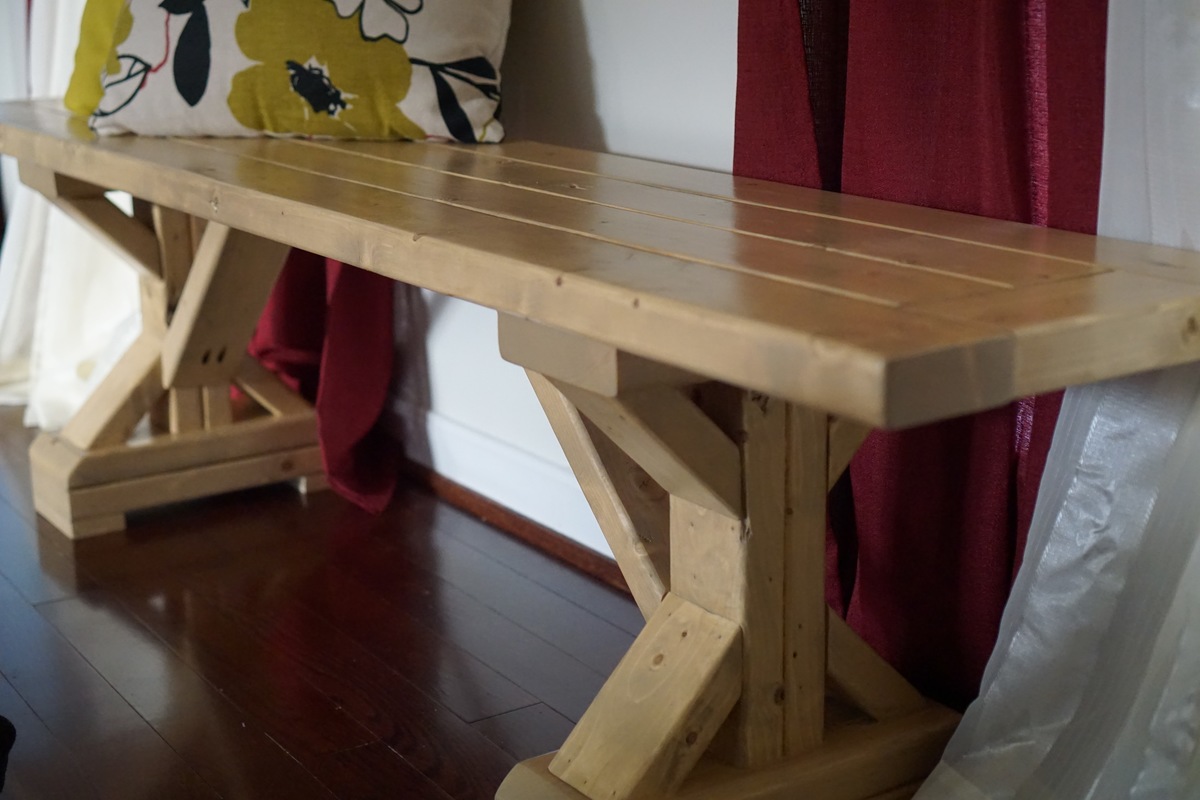
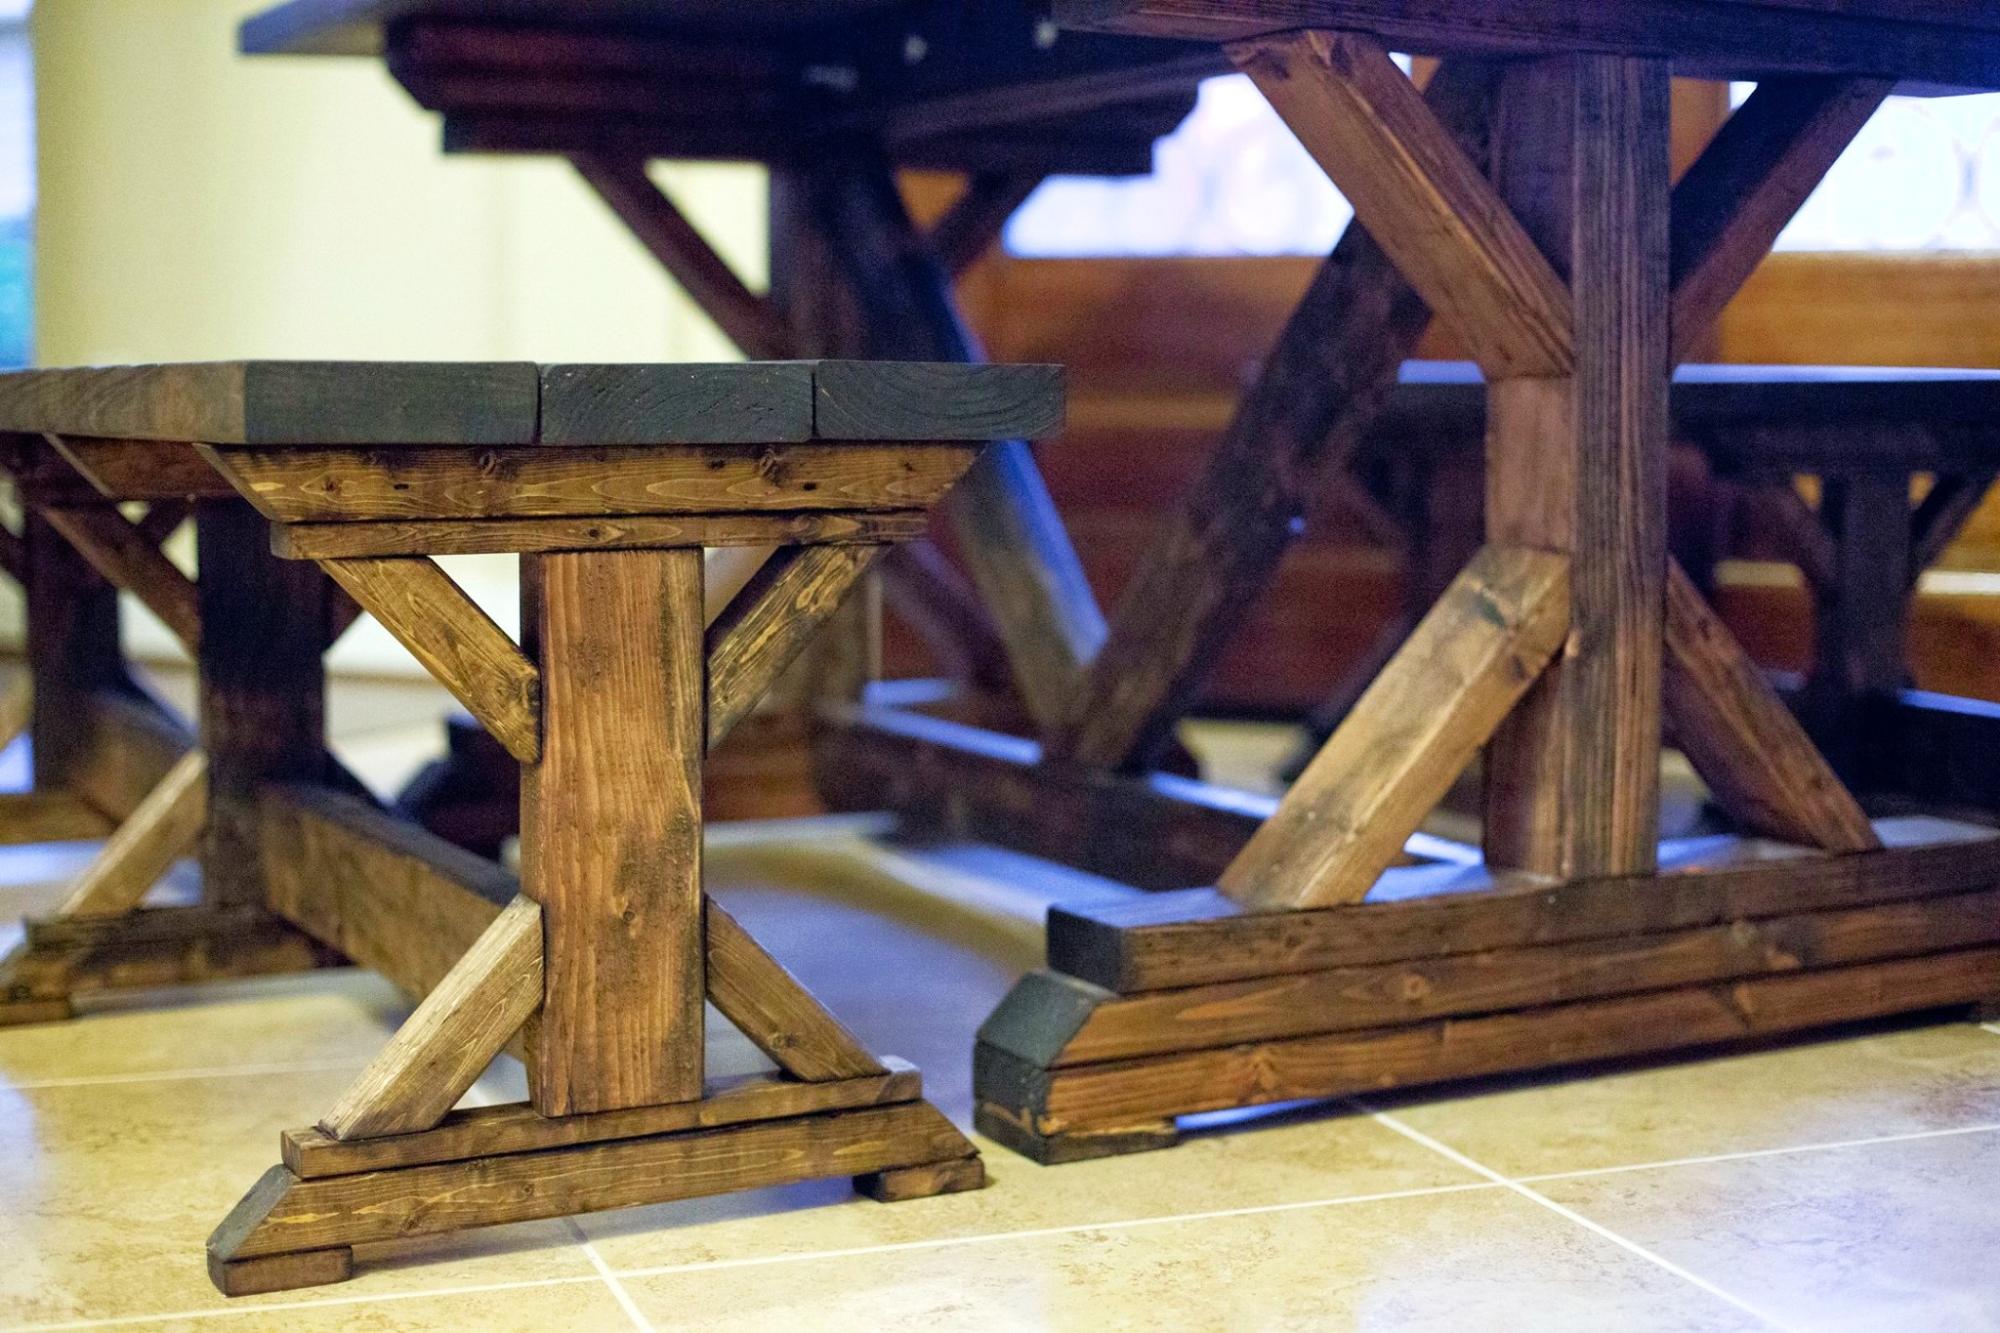
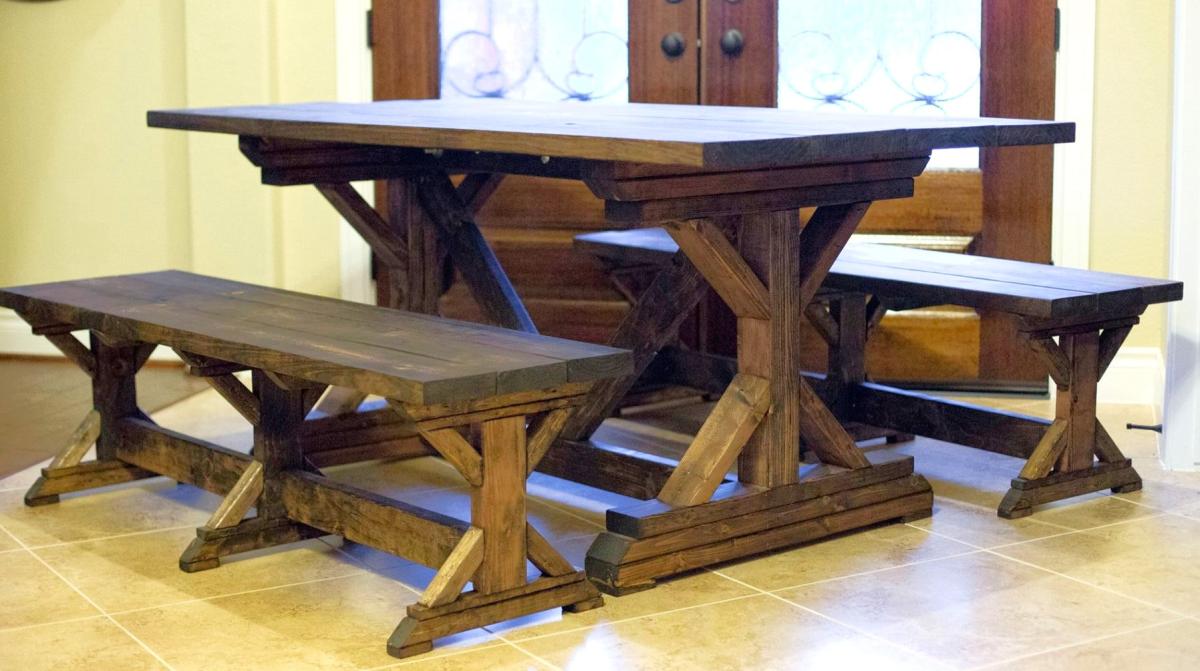
Benchright Farmhouse Bench
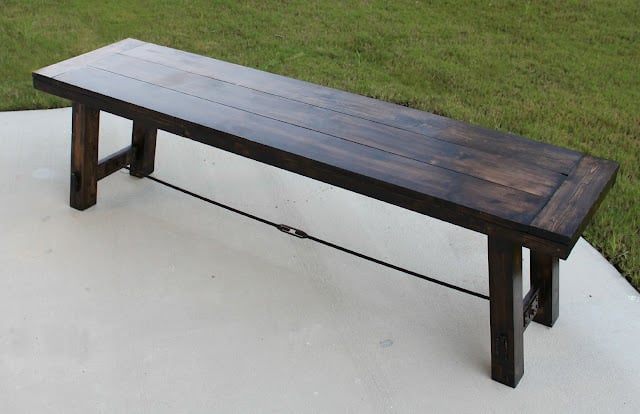
Our first Ana white project! My husband and I are both really excited with the results. We plan on making the table too. I followed the plan and added comments/details/changes we made on my blog http://thehuth.blogspot.com/2012/09/diy-pottery-barn-bench.html I added pictures to follow along the steps from the tutorial.
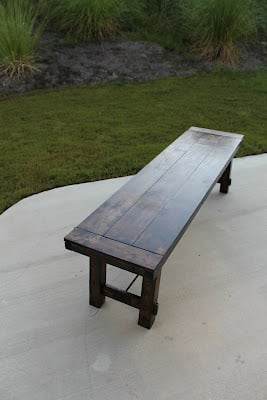
Built from Plan(s)
Estimated Time Investment
Weekend Project (10-20 Hours)
Finish Used
2 coats- Minwax Oil-Based Dark Walnut Wood Stain
2 coats- Minwax Polyurethane
2 coats- Minwax Polyurethane
Recommended Skill Level
Beginner
Easy small space side table

This was my first project. It was relatively easy but I did make some mistakes that are now design features


Built from Plan(s)
Estimated Cost
Reclaimed wood
Estimated Time Investment
Afternoon Project (3-6 Hours)
Finish Used
Minwax English chestnut
Recommended Skill Level
Beginner
Hallway Shoe Dresser
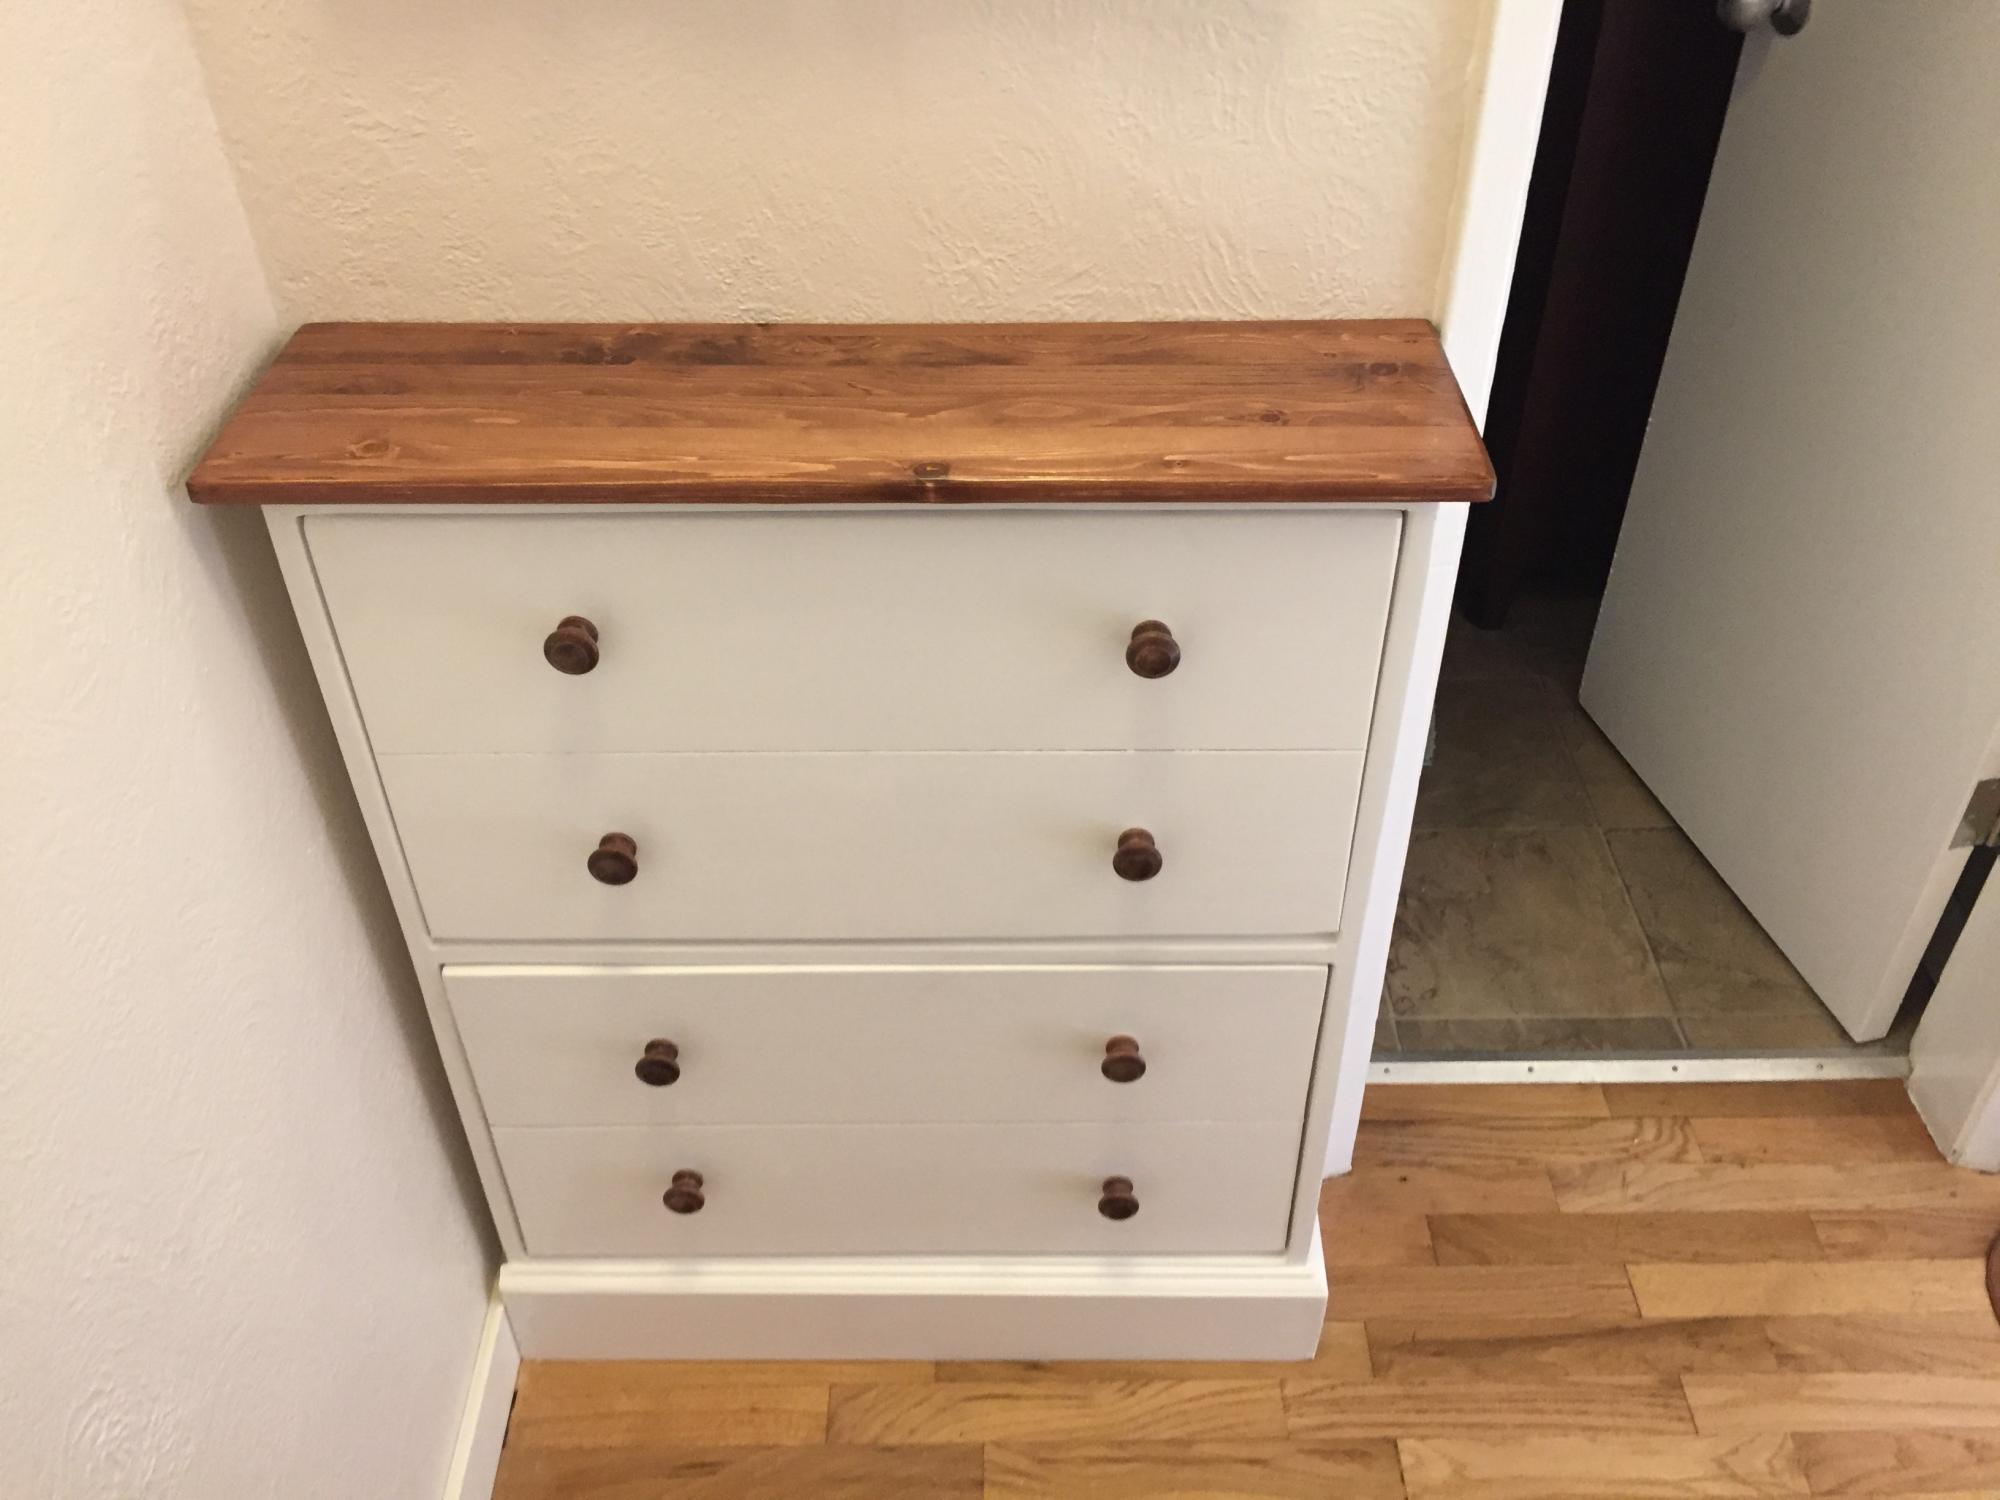
This was the first project we built from Ana White's website and one of our most successful projects to date. Between Ana's great plans and description, along with tips from other people on the site, it was so easy to modify and build this into exactly what we were looking for. Jennifer and I are both novice wood workers, but this site made building a wonderful project really easy. Thank you. Now Jennifer wants a bigger one for the bedroom.
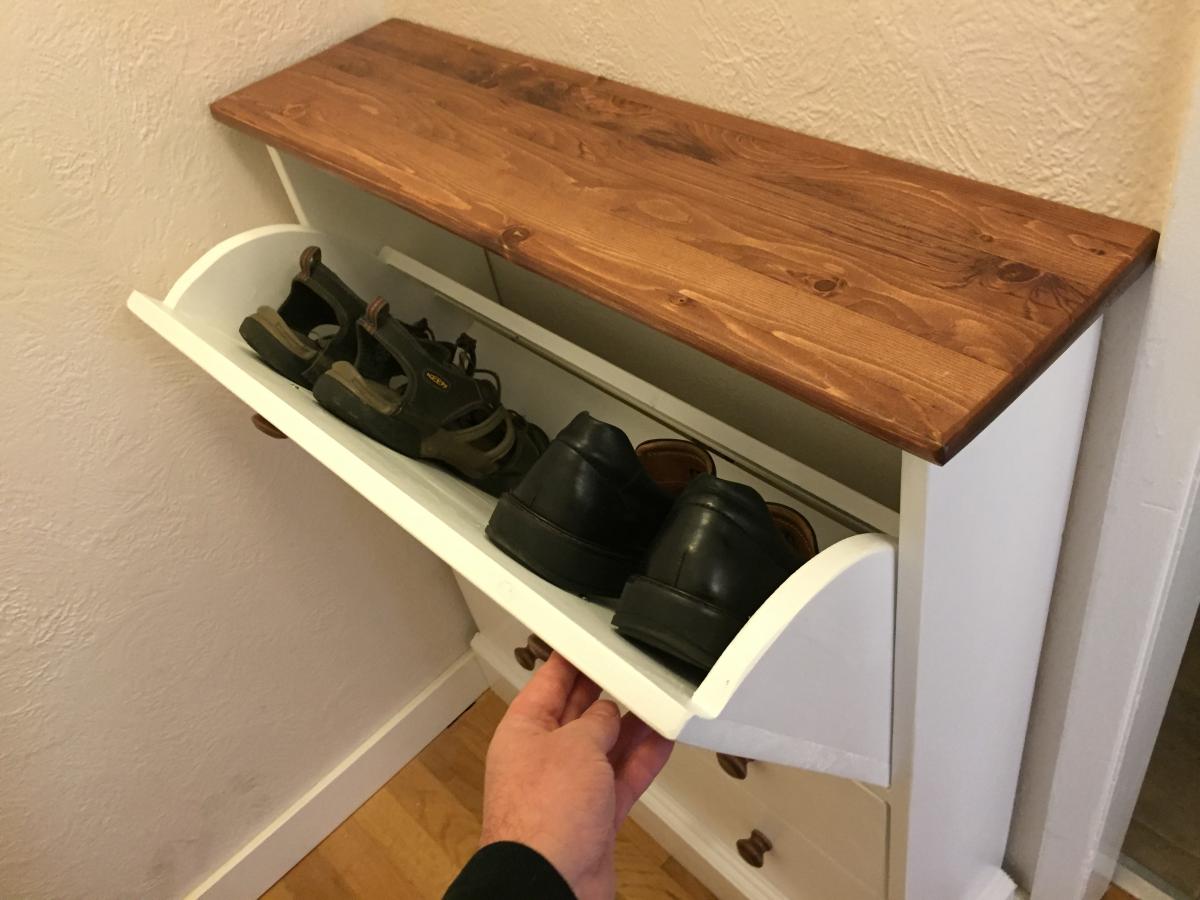
Built from Plan(s)
Estimated Cost
$100 (CDN)
Estimated Time Investment
Weekend Project (10-20 Hours)
Finish Used
Primer and paint on the base, stain and varathane on the top.
Recommended Skill Level
Beginner
Miter saw stand with rolling tool storage carts
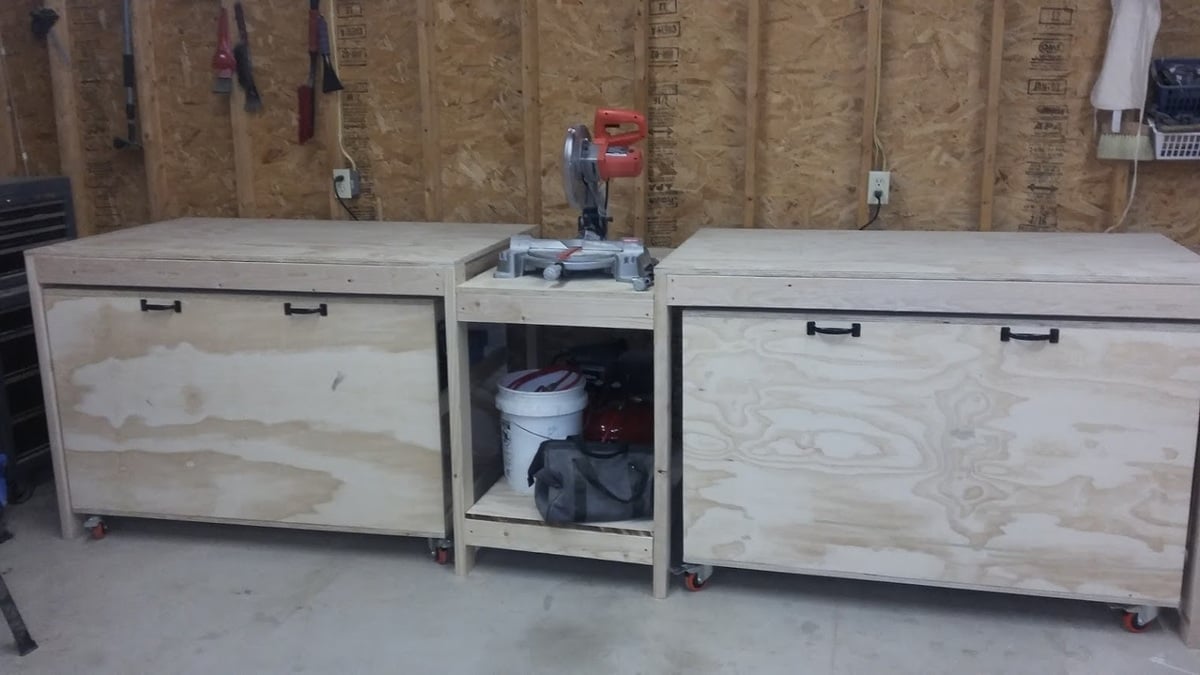
When I saw the plans for the miter saw stand that had two rolling tool storage carts, I knew I had to make it. Having a cart used for an outfeed table is a brilliant idea. It was a fun project to make. I tweaked a few dimensions because I like taller workbenches because I'm taller. Now my shop is looking more organized.
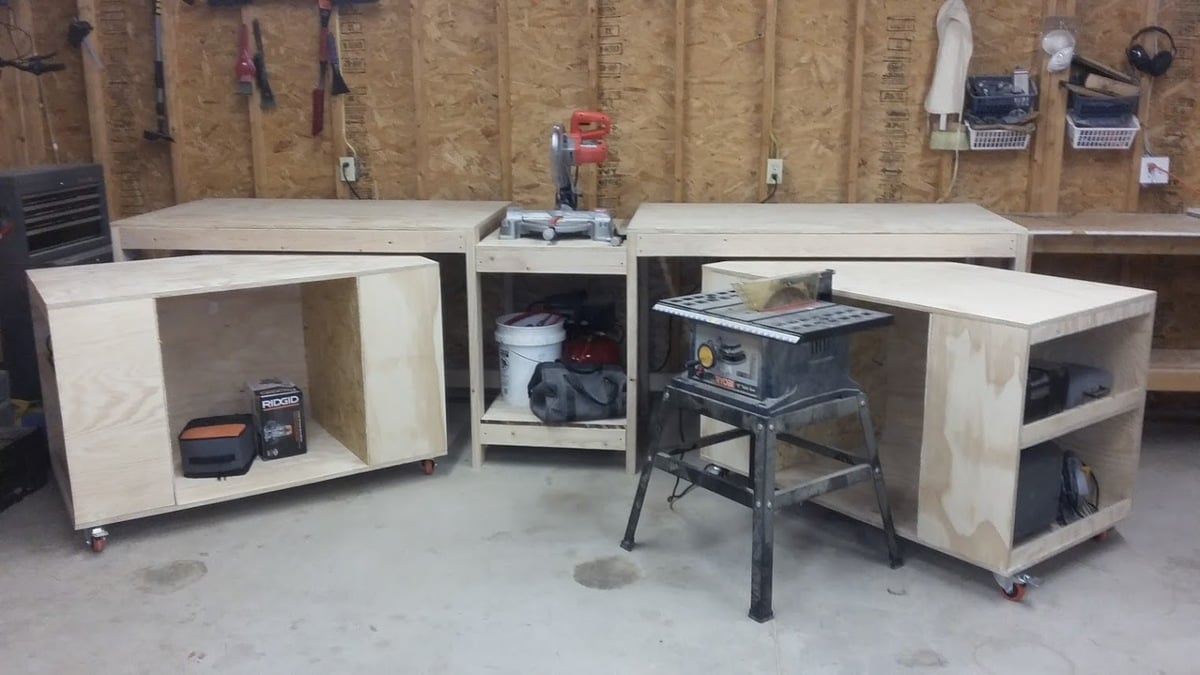
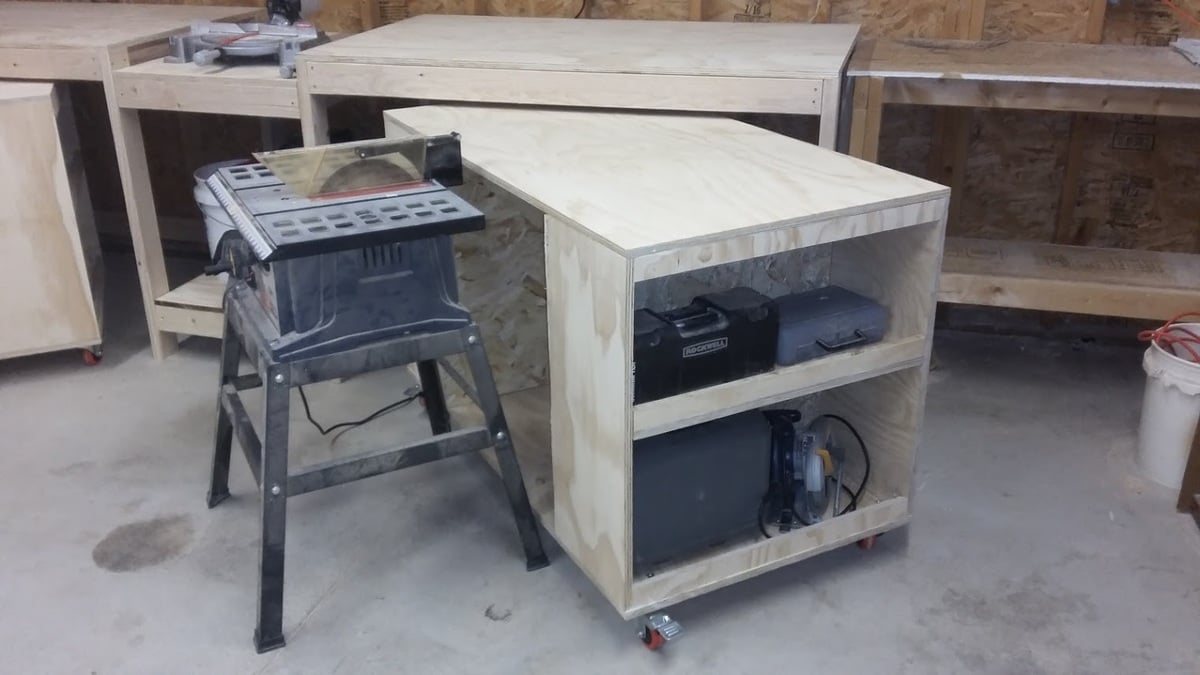
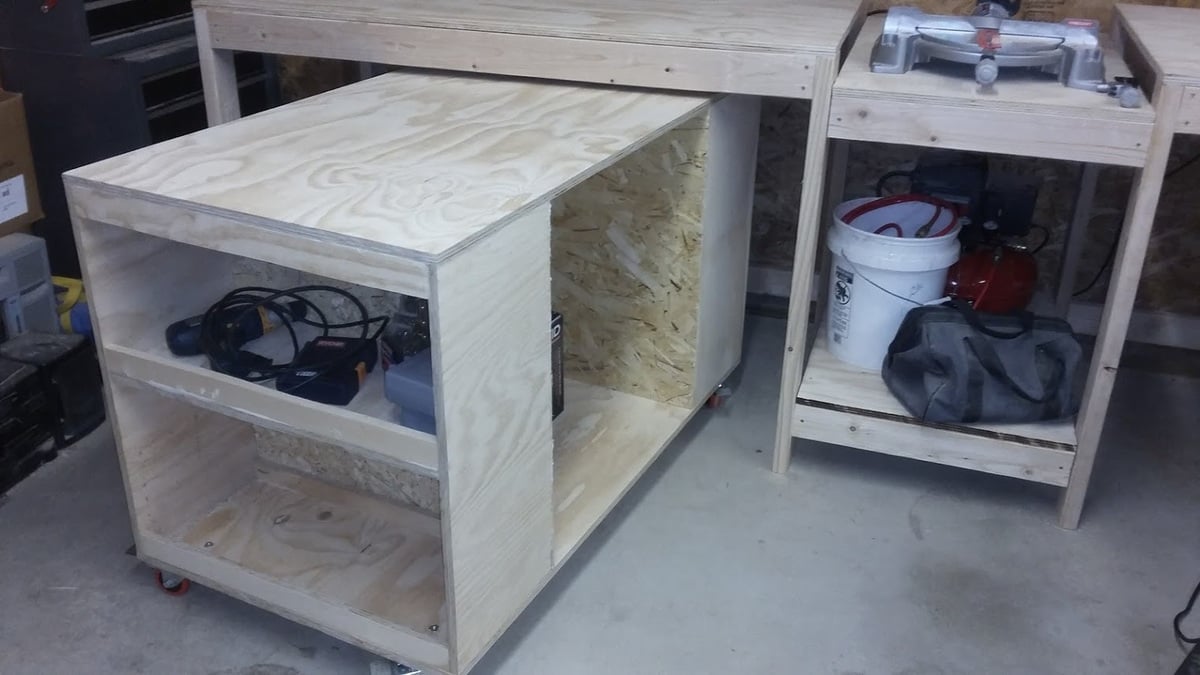
Built from Plan(s)
Estimated Time Investment
Weekend Project (10-20 Hours)
Recommended Skill Level
Intermediate
Comments

Sat, 03/18/2017 - 09:02
Great job!
Very nicely done. I am thinking about building the same system. How is the dust control on the mitre saw working? That is my one concern, that sawdust will be all over my other tools when I use the mitre saw.
Wed, 05/10/2017 - 20:47
sawdust
I don't really have a dust control system. I let the dust fall where it does and then just sweep it up. I have a wet/dry vac but my wife uses it in the house because it's more powerful than many other vacuums. If the dust gets out of control, I can just bring the wet/dry vac out to the garage and clean up. There is lots of room to maneuver the vacuum.
Tue, 06/23/2020 - 07:02
what kind or brand of…
what kind or brand of plywood did you use for your project?
Sat, 03/18/2017 - 09:07
Great Job!
Very nicely done! I am thinking about building this same system but am worried about the dust from the mitre saw getting all over my other tools stored in the rolling sections. Do you have any issues with that?
Truss Shelves- my first project!
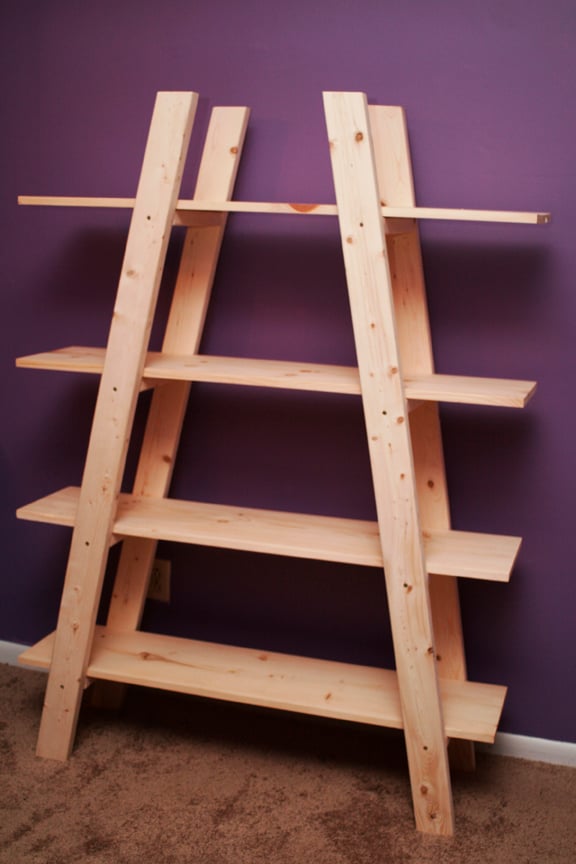
Not going to lie, as this was mine and my husband's first time building we did run across a few challenges BUT, nothing that we weren't able to figure out and correct. It came together beautifully and I can't wait til we purchase our first home in January so that I can figure out what color to stain it!
FYI- the angles were difficult to get perfect especially since we were using a makeshift work bench (ie: a pallet and the sidewalk) and a circular saw - we were also rather unfamiliar with some of the terminology used in the directions
Built from Plan(s)
Estimated Cost
80.00
Estimated Time Investment
Weekend Project (10-20 Hours)
Recommended Skill Level
Beginner
Fancy X farmhouse with extension
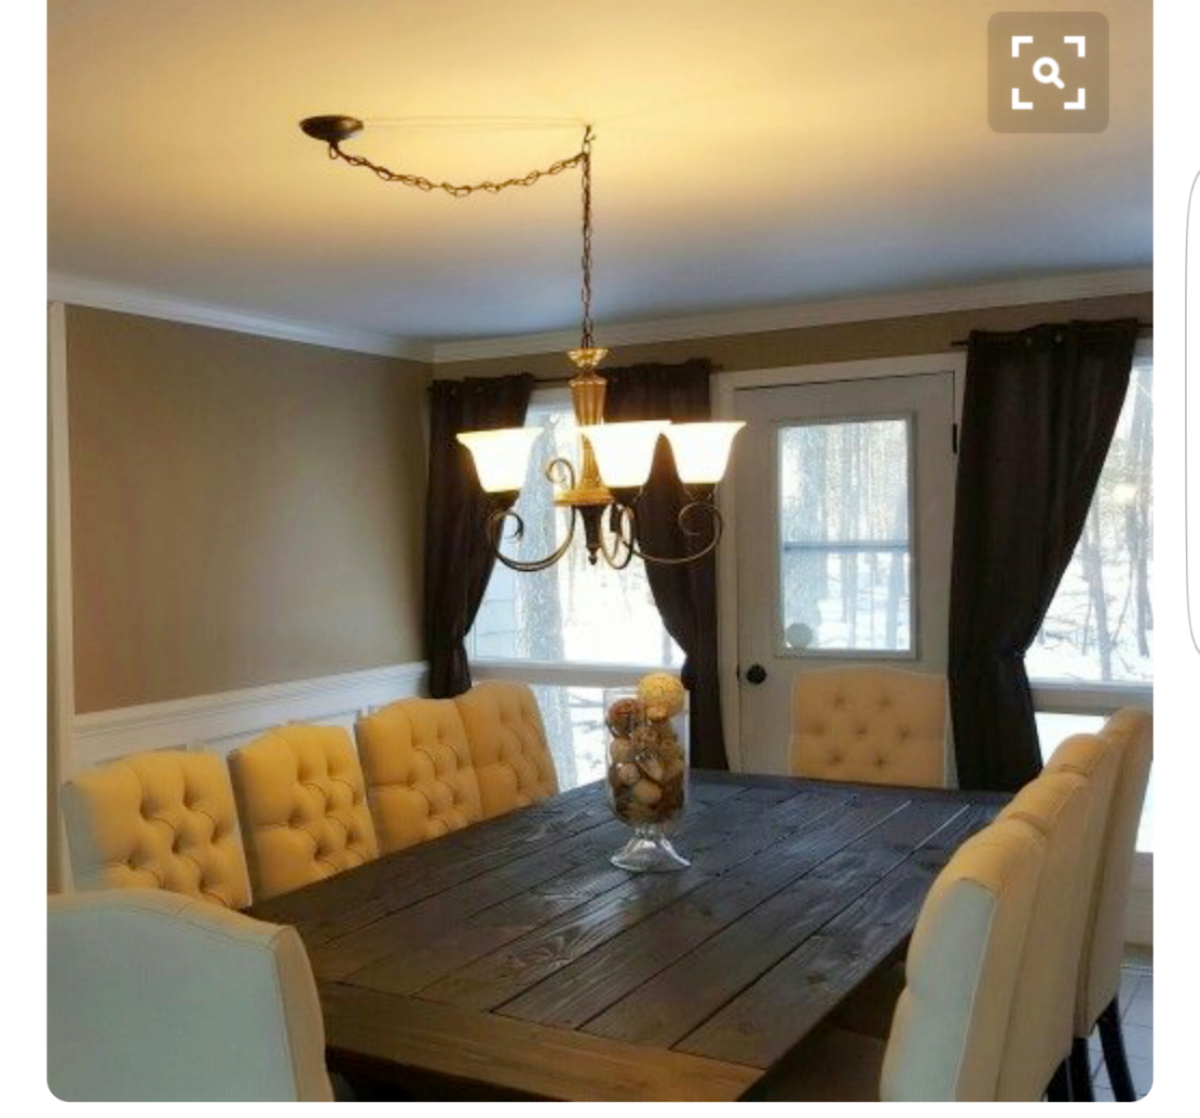
This was the first furniture my husband built. He also did amatching sideboard table using Ana white plans.

Built from Plan(s)
Estimated Time Investment
Weekend Project (10-20 Hours)
Finish Used
I used wood conditioner and then dark walnut stain. My husband built me a sideboard table to match this table.
Recommended Skill Level
Intermediate
X Leg Farmhouse Bench
The challenge this go around is build benches to match a wheat colored dining table, sight unseen. Quite a challenge!. The table has X legs with cross braces running from leg to table bench top for support. Coming up with a design to match the X legs was simple however matching the color was not easy and left me anxious until I delivered the benches. Thanks to my previous experience building a farmhouse bench and using this plan, I had the foundation and cut list to execute. With a few tweaks it came together very nice!
Visit charitybuilds.com to find our how the color turned out!
Built from Plan(s)
Estimated Time Investment
Day Project (6-9 Hours)
Finish Used
Varathane Sunbleach, Summer Oak and Honey Maple. Head over to charitybuilds.com to find out ratio to acheive final color.
General Finishes High Performance Top Coat
General Finishes High Performance Top Coat
Recommended Skill Level
Starter Project
Potting bench
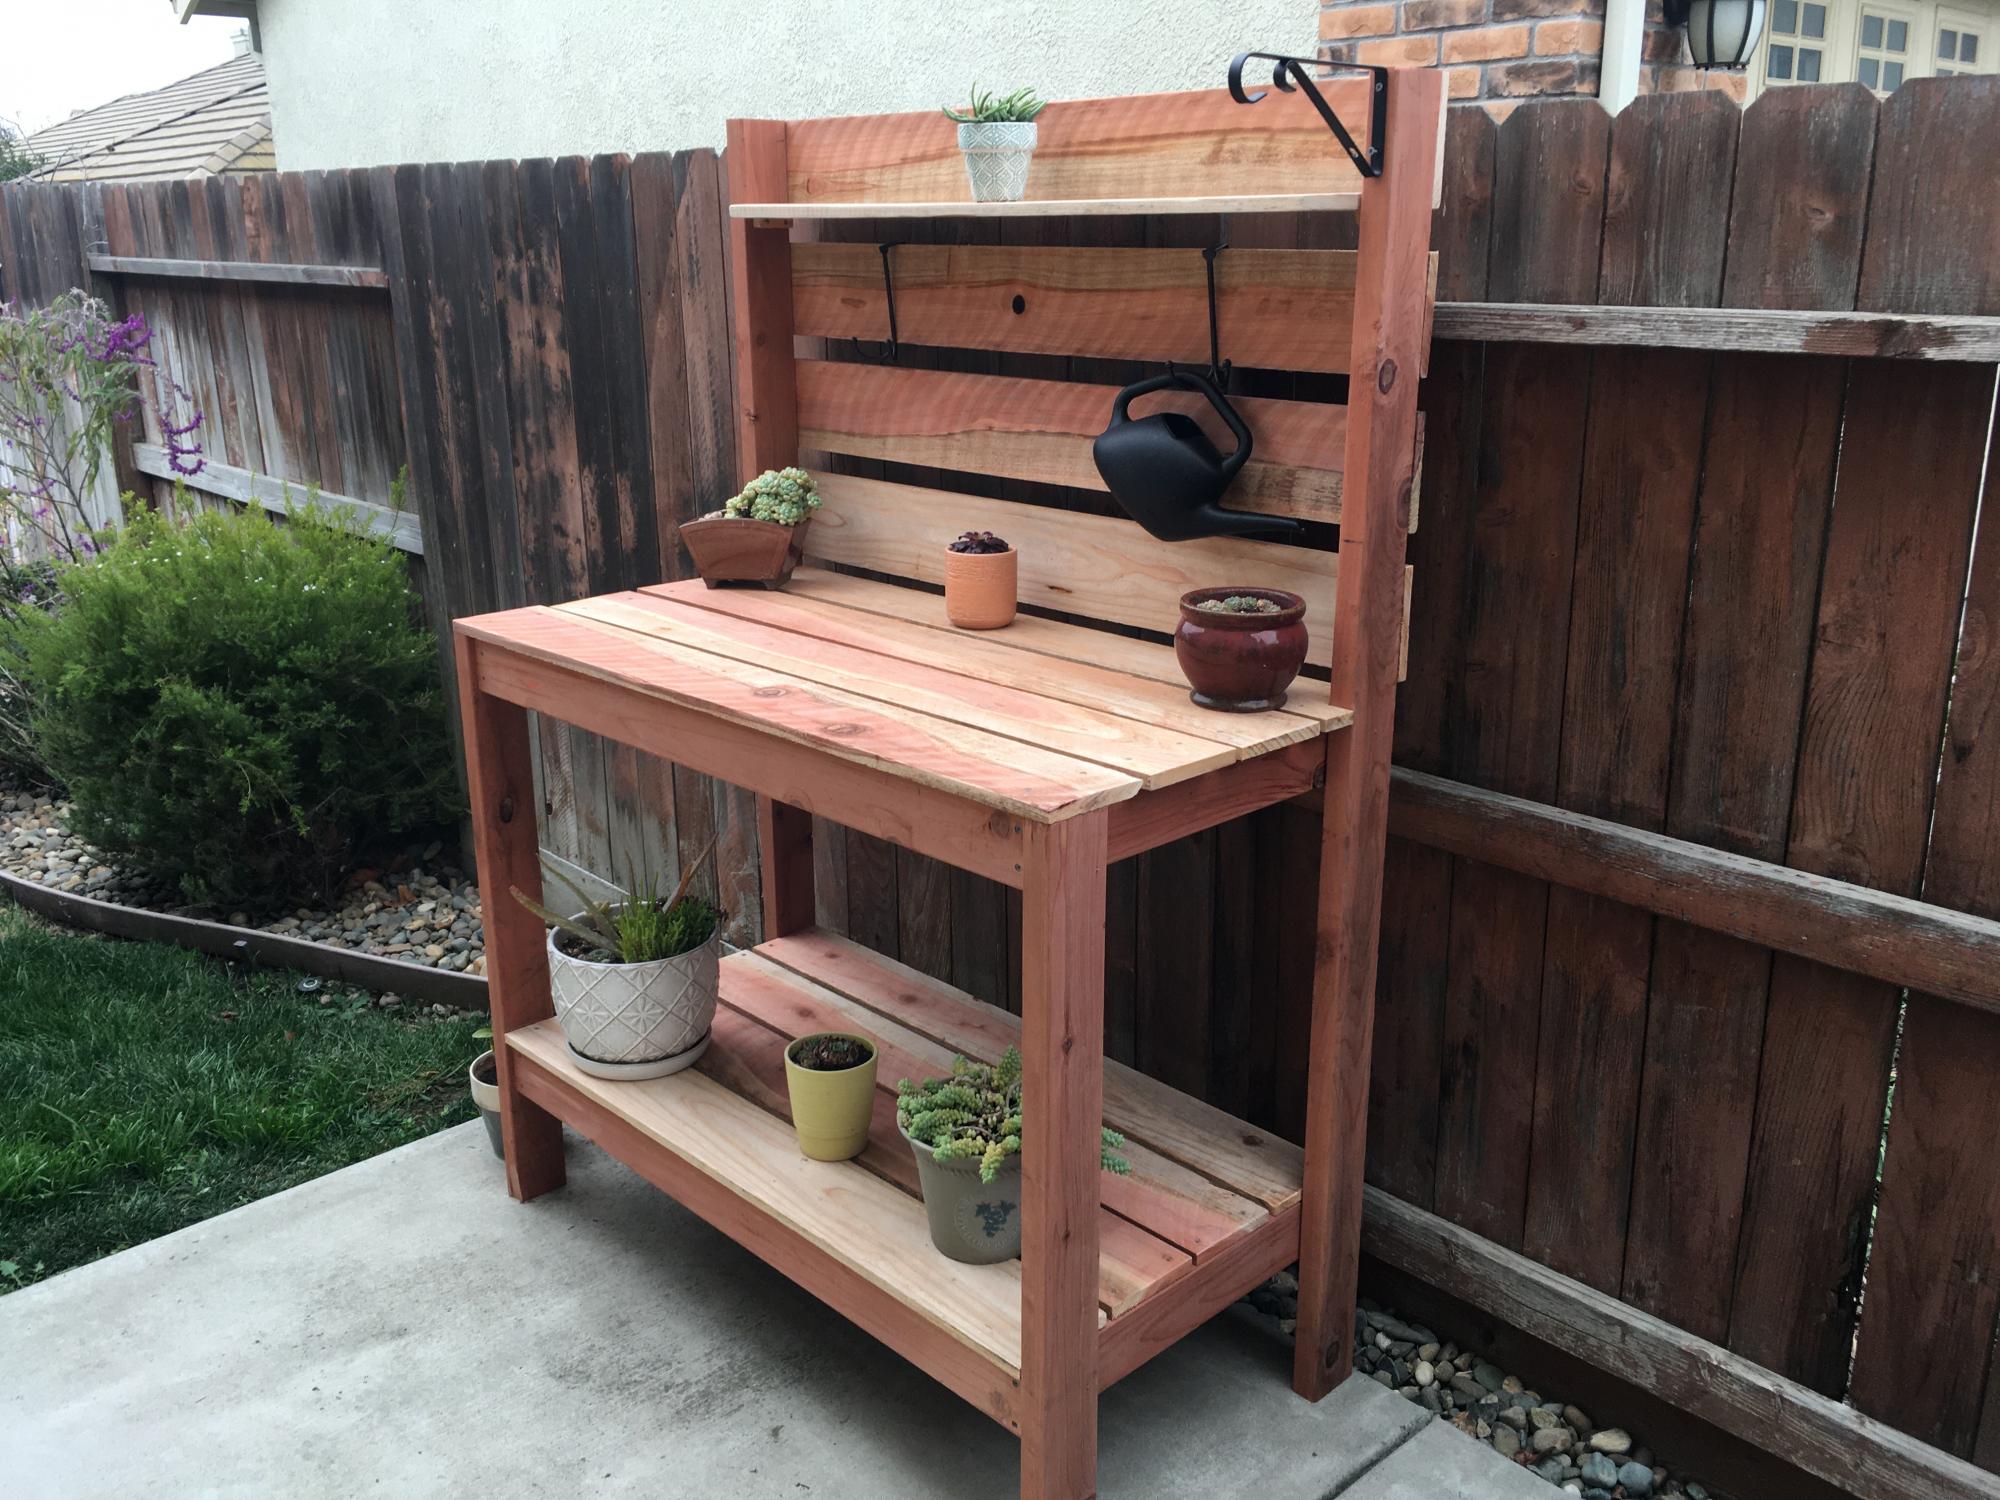
I used redwood lumber, 2x4s and 1x6s only. I wanted the bench to be a little taller so I used 2x4x10s for the legs to make work surface 38” high and total height 66”. To get the most out of the 8’ 1x6s I made the bench 48” wide. I also had to adjust the depth since I did not use 1x4s. And finally, I sanded the 1x6s because they were rough sawn.
Very fun project! Once I figured out the adjusted cut list the whole project came together in a matter of a few hours.
Built from Plan(s)
Estimated Cost
$100
Estimated Time Investment
Afternoon Project (3-6 Hours)
Finish Used
Light sanding, No finish.
Recommended Skill Level
Beginner
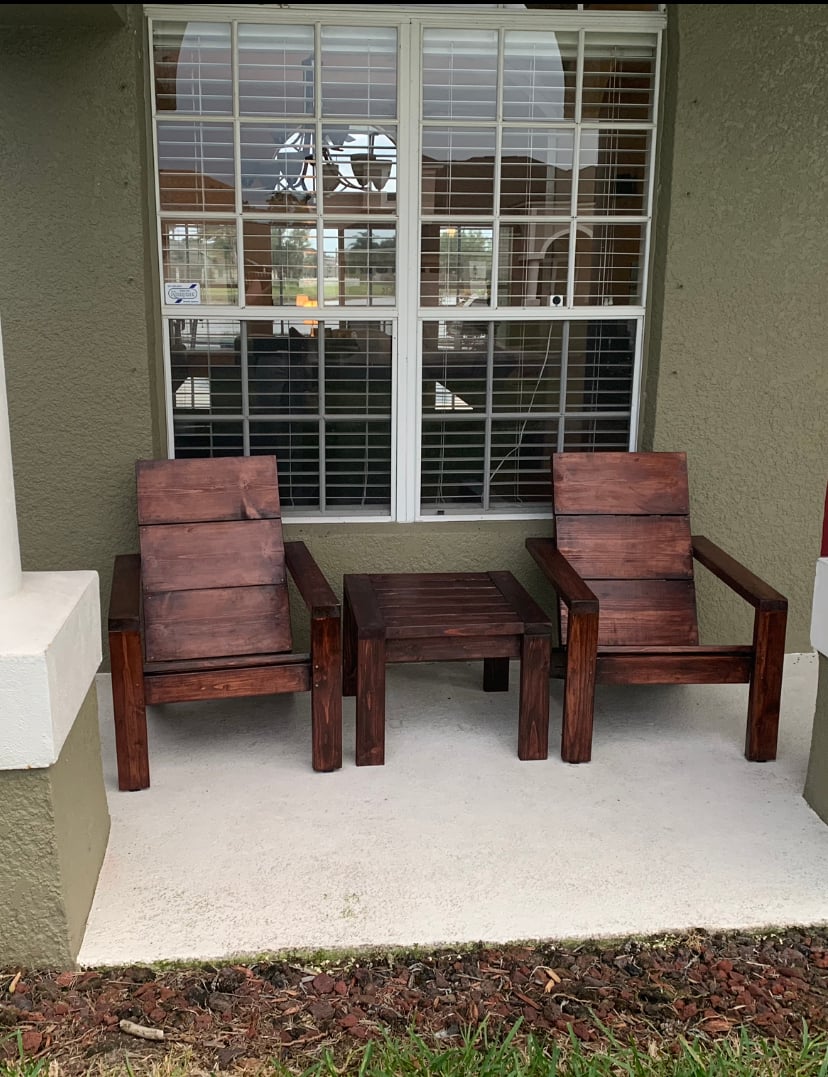
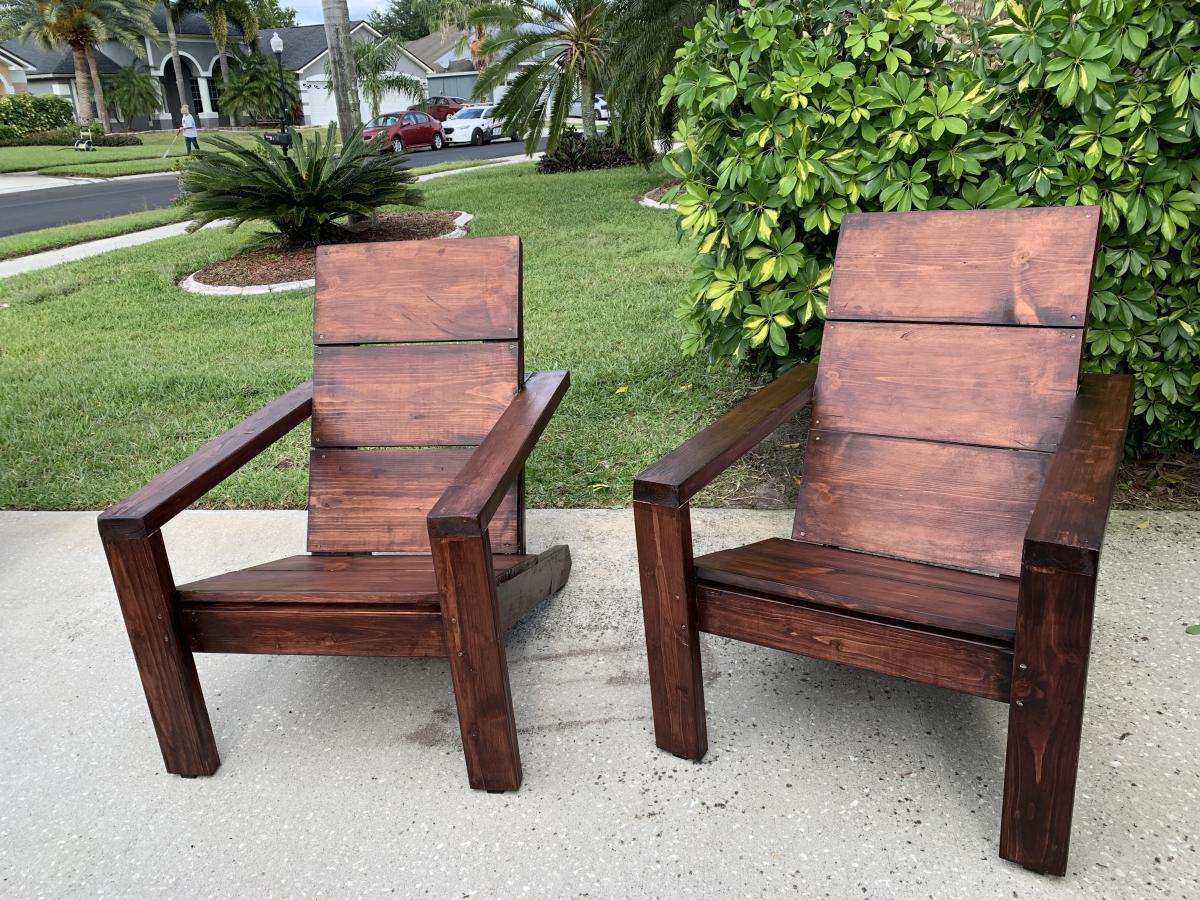
Adirondack chairs
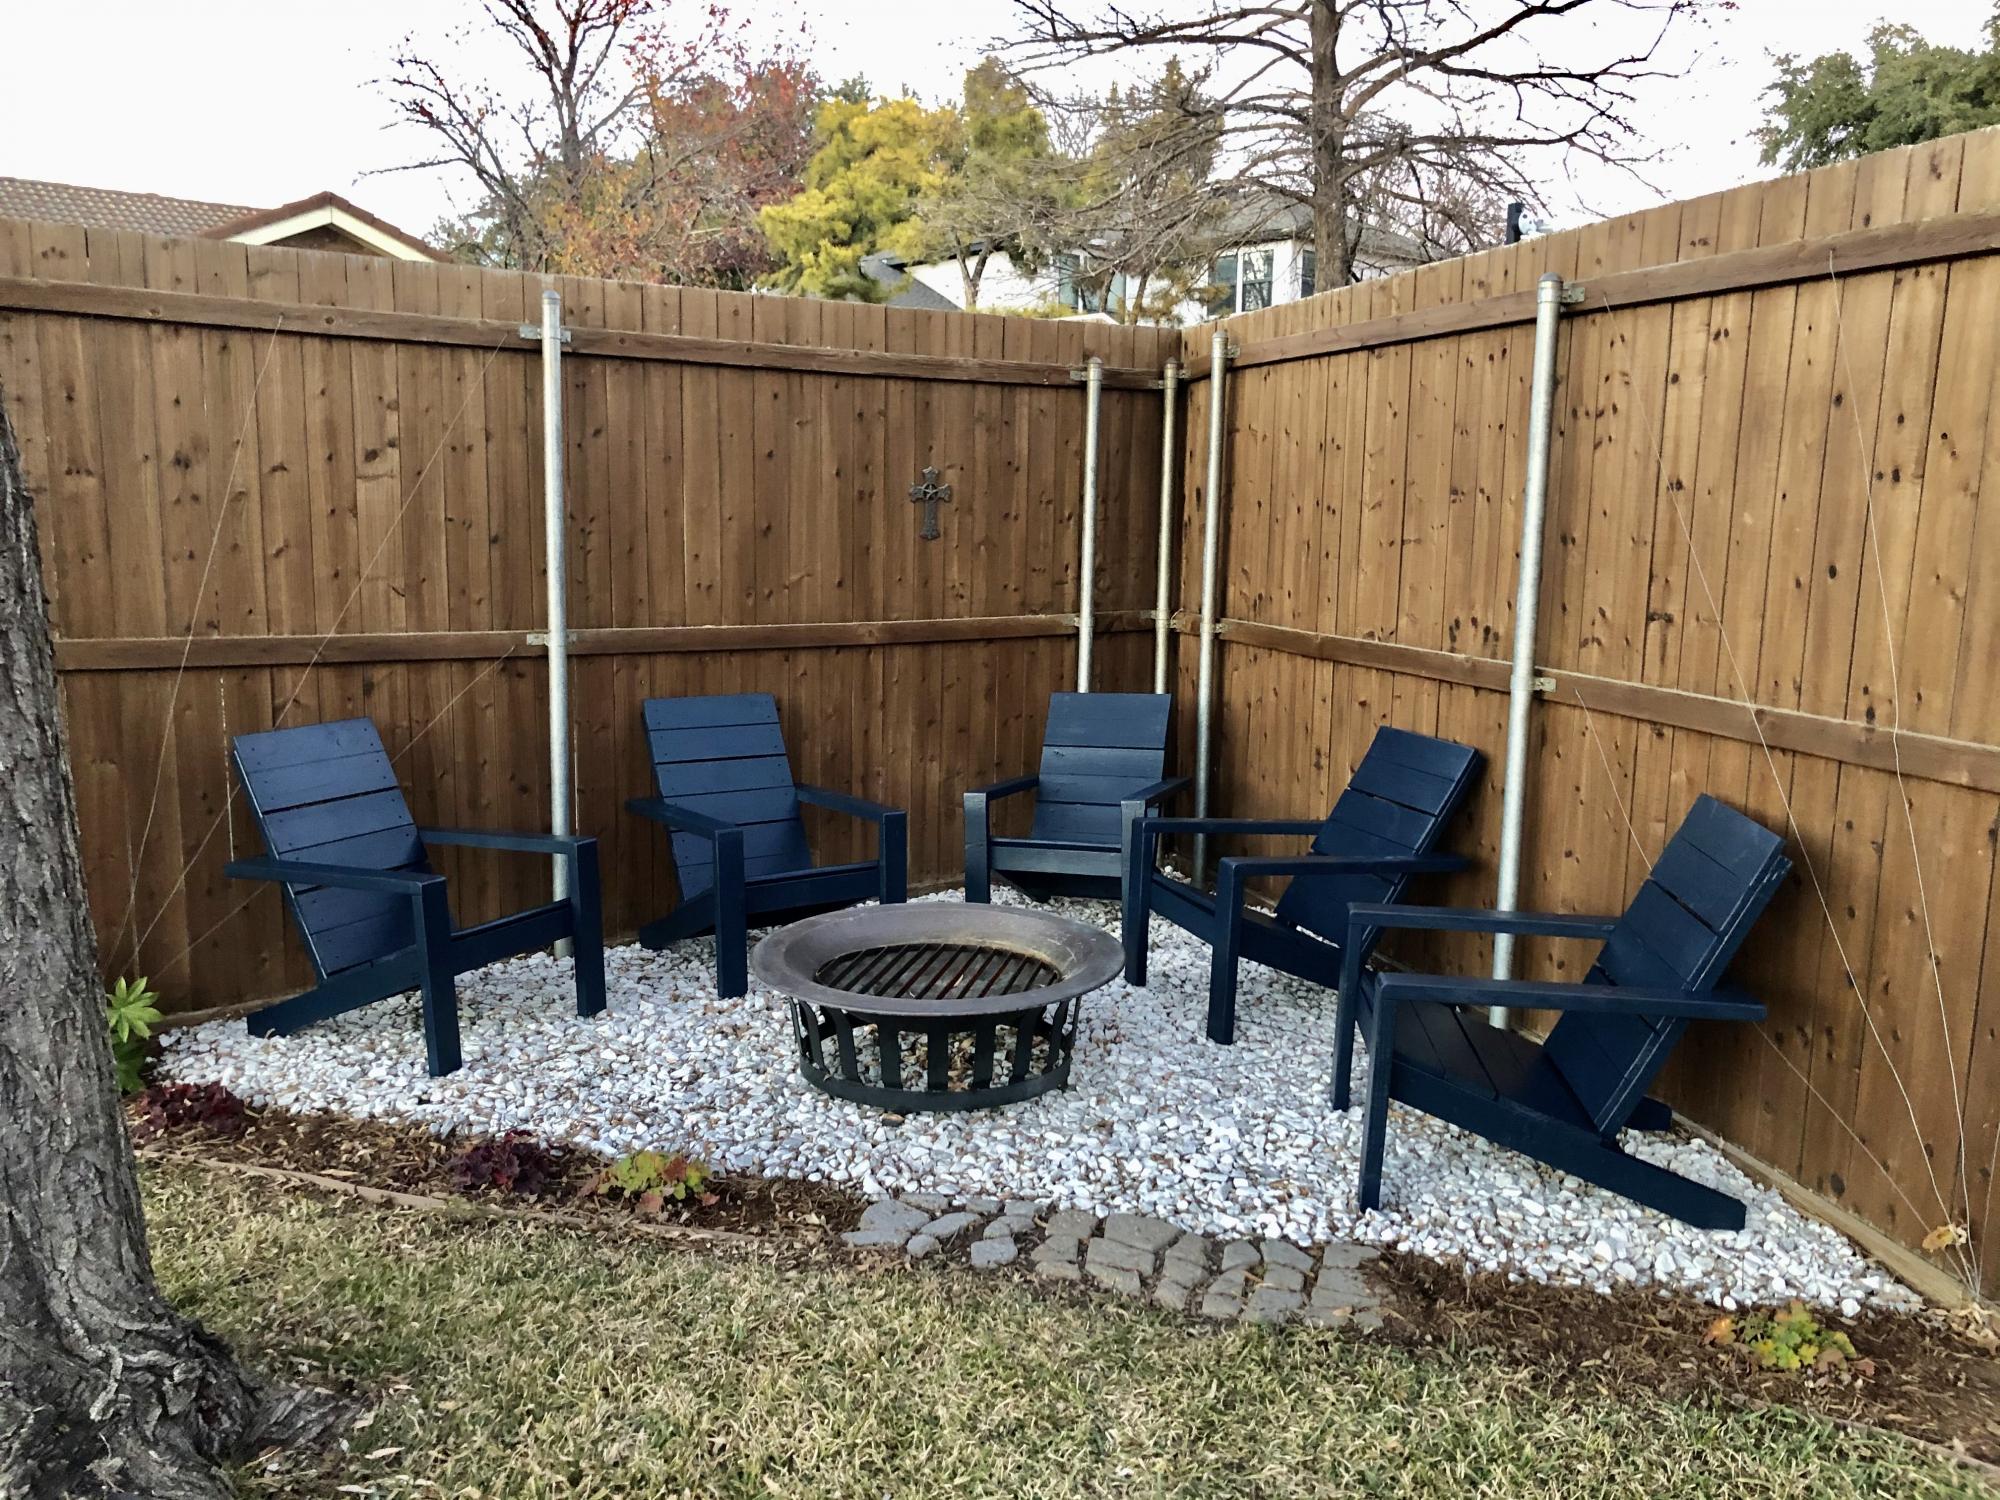
Thanks for the awesome plans Anna! God bless.
Eddie Jimenez
Built from Plan(s)
Comments
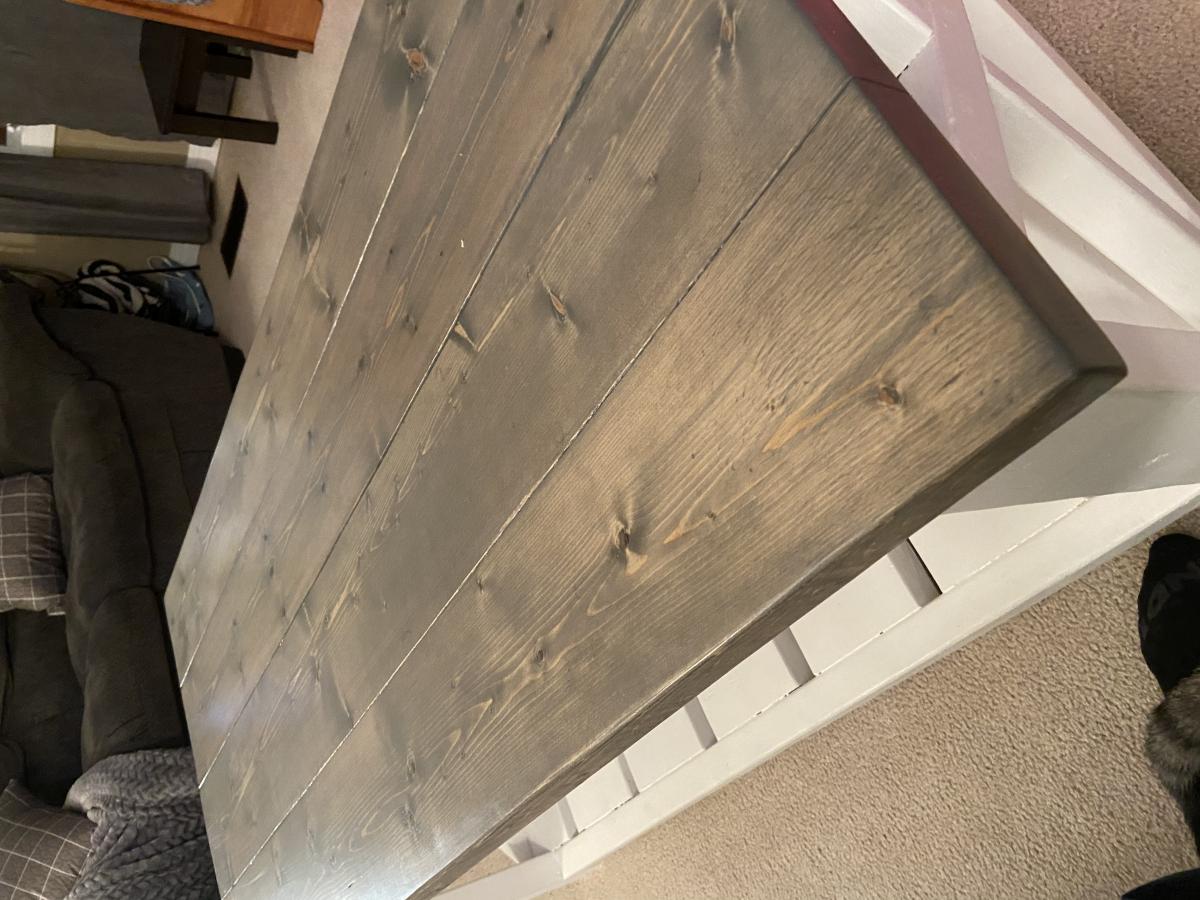
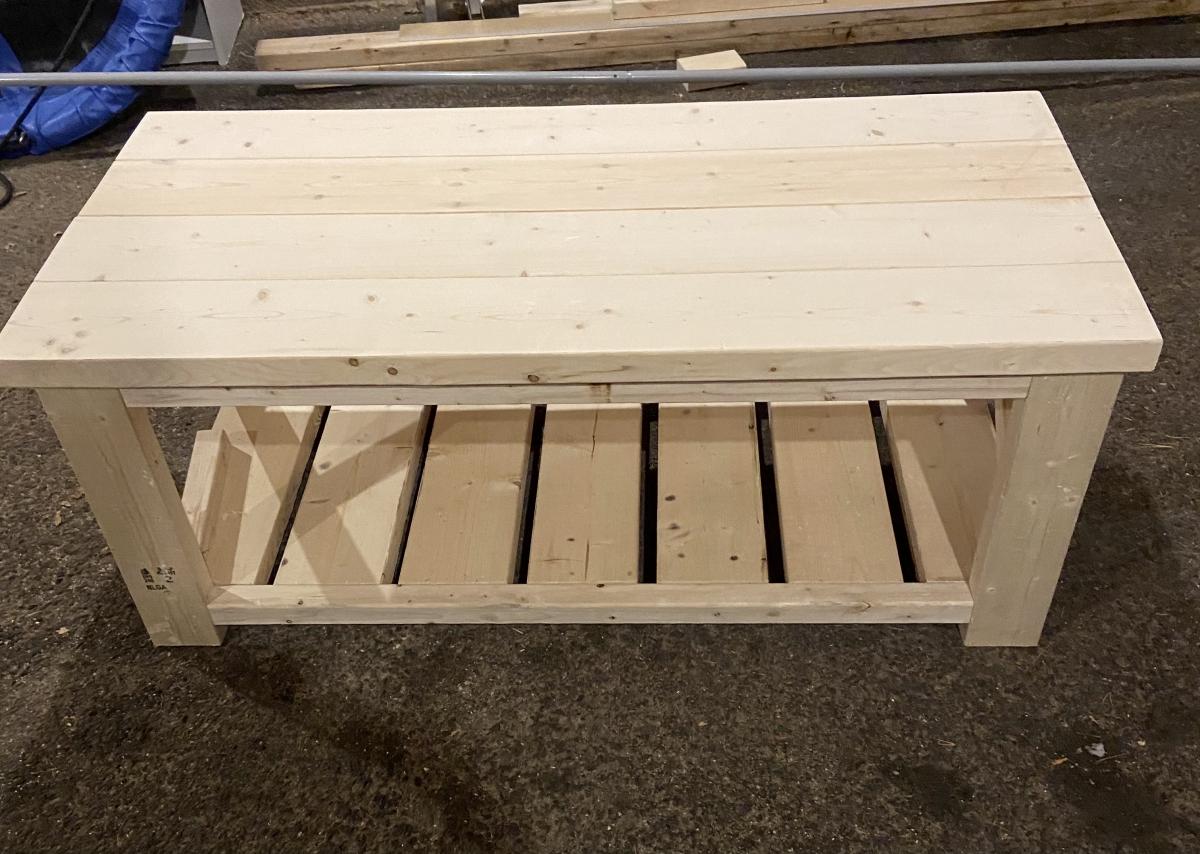
Farmhouse coffee table under 40 - ( 65 dollars Canadian)
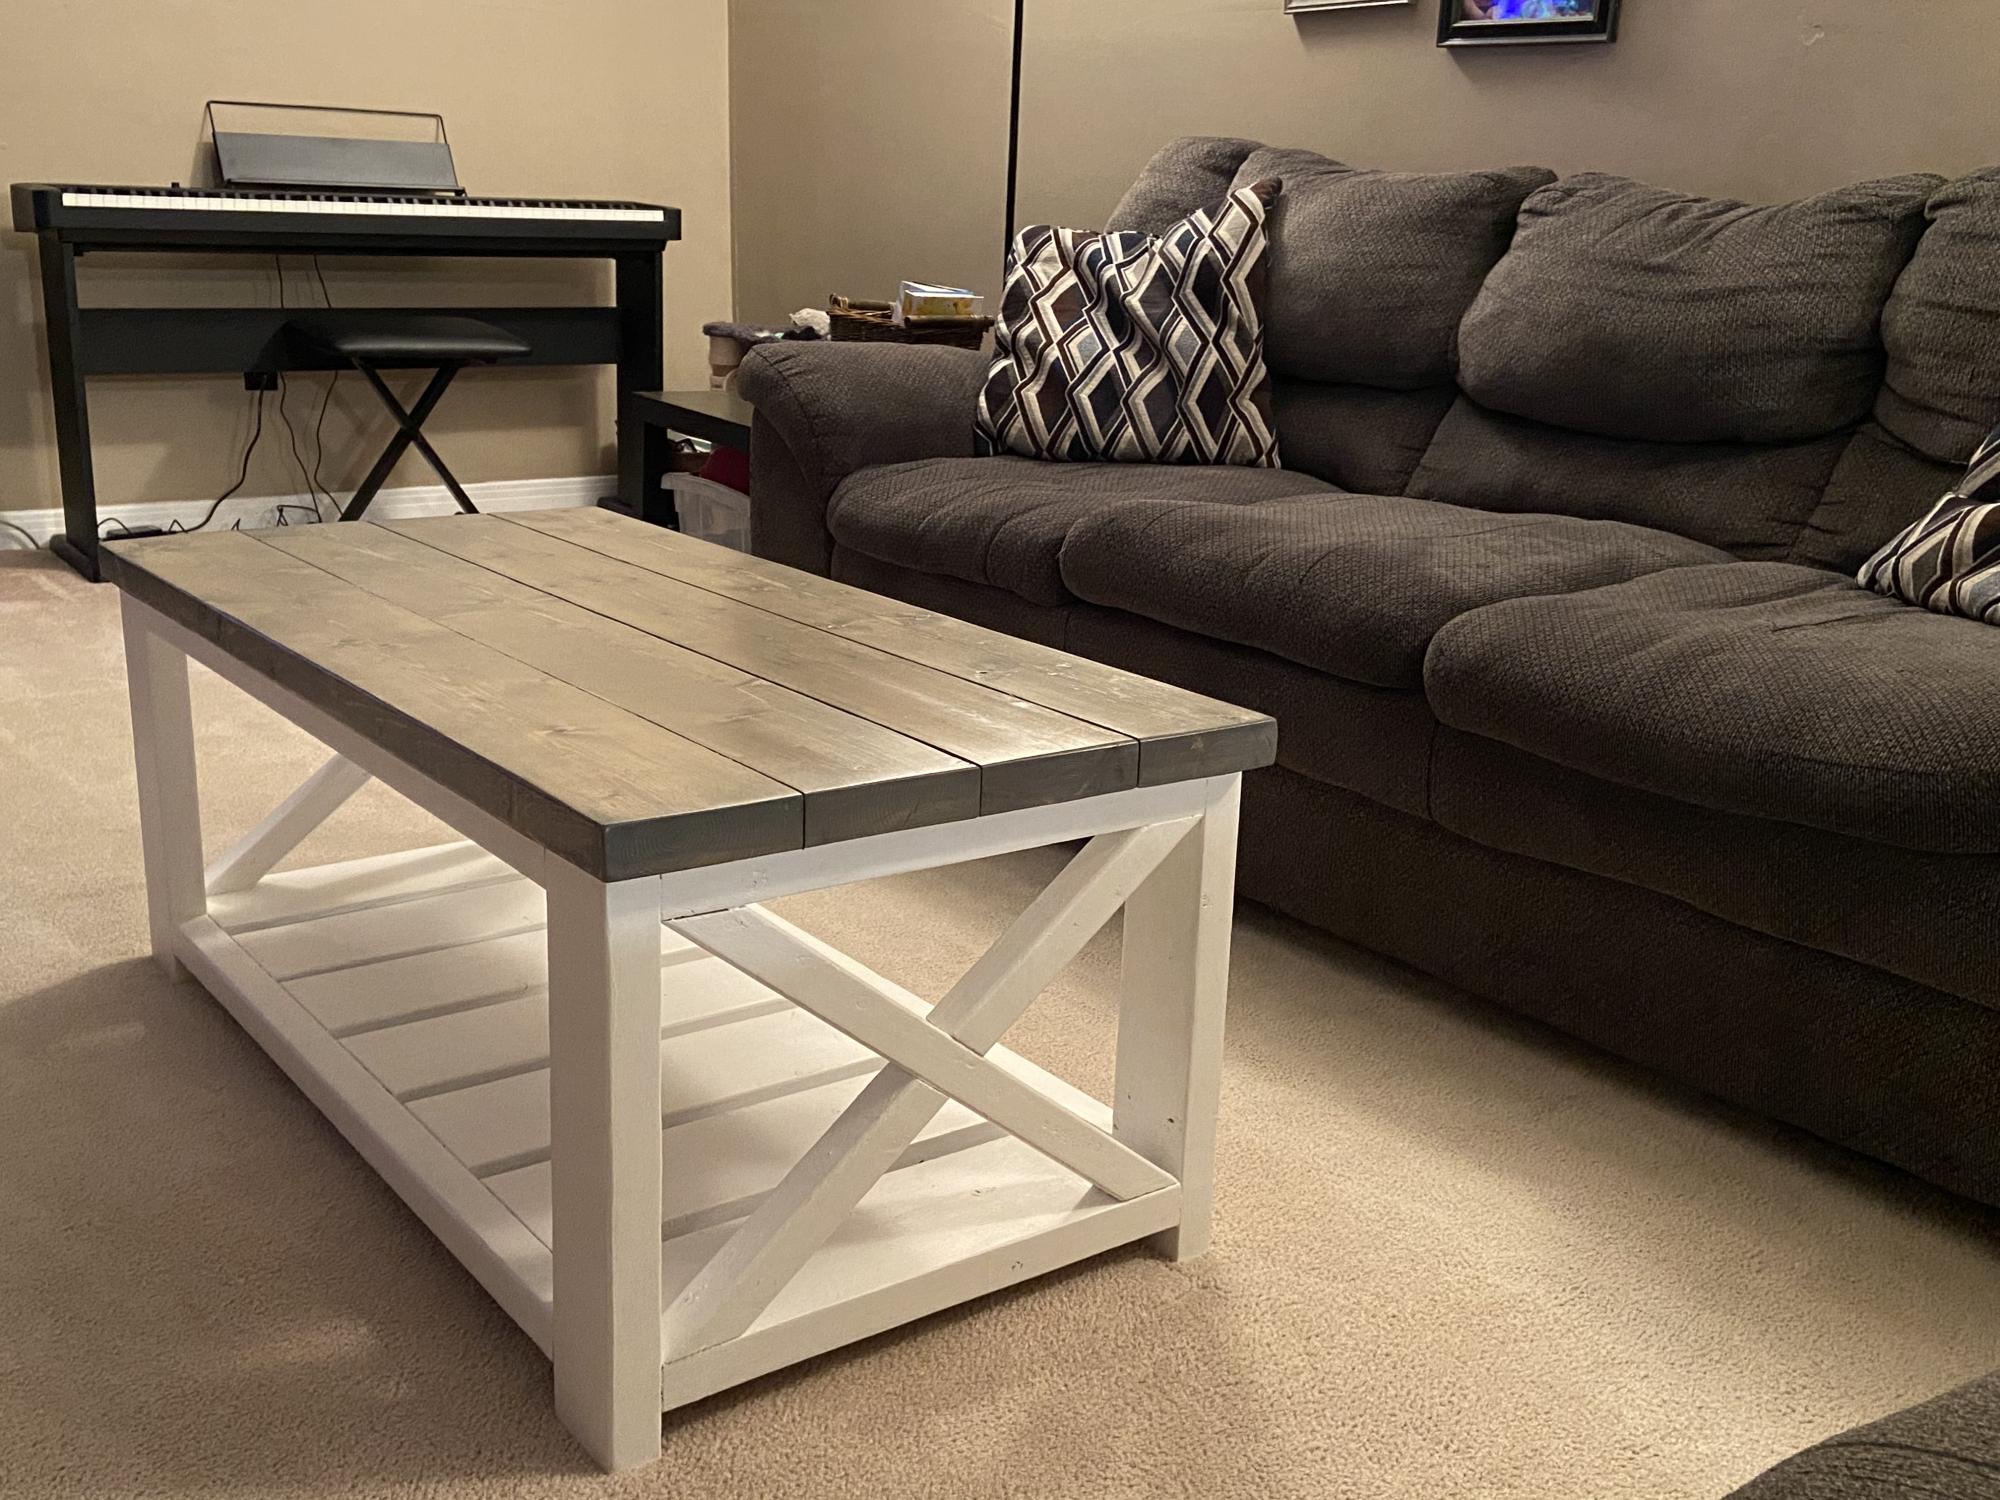
This was my first project and had tons of fun building it. Can’t wait to build to end tables to match.
The plans are so easy to understand. The only change I made was instead of exposed screws I used the pocket hole method

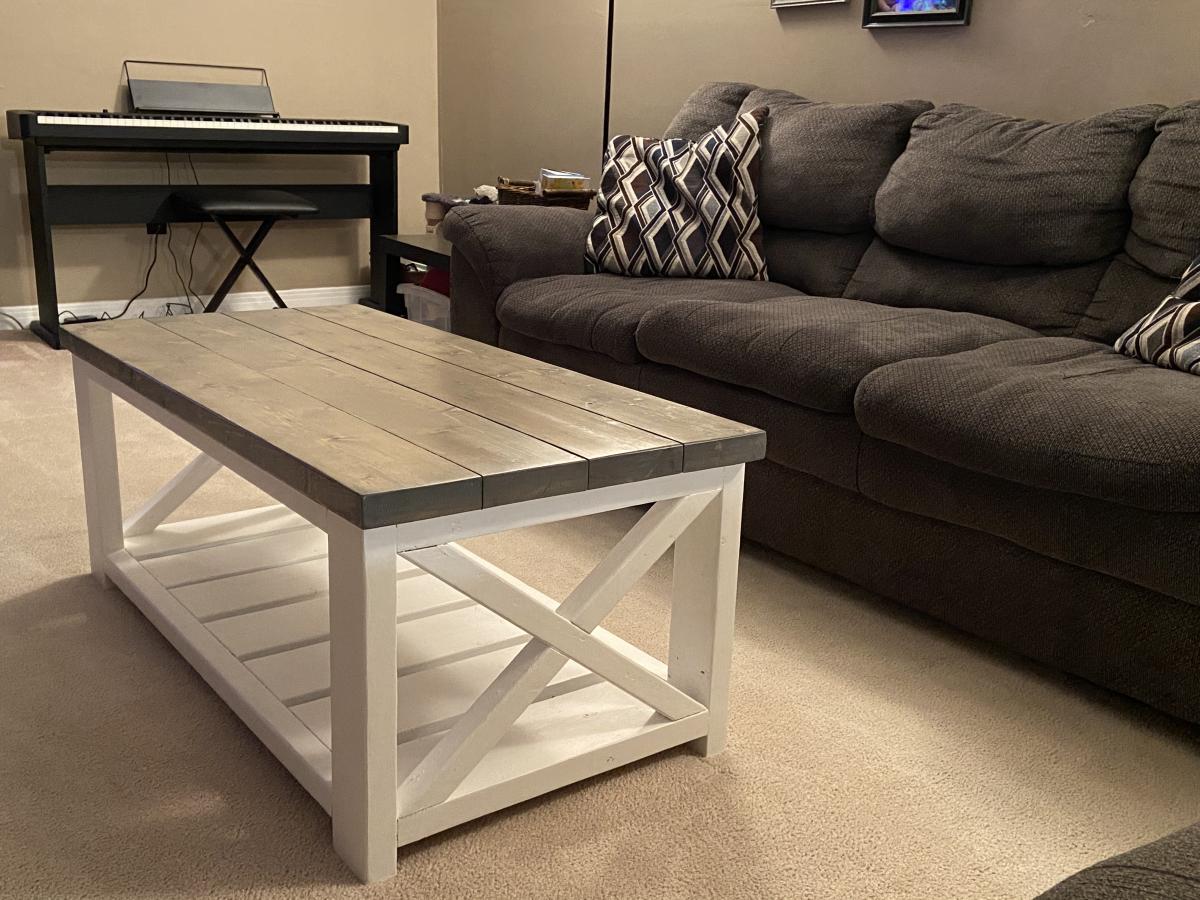

Built from Plan(s)
Estimated Cost
65 dollars ( Canadian)
Estimated Time Investment
Weekend Project (10-20 Hours)
Finish Used
Minwax pre- stain wood conditioner, minwax classic grey ( 2 coats) minwax clear satin poly urethane.
Recommended Skill Level
Beginner
Comments
Fri, 01/12/2024 - 08:33
Farmhouse table: Beginner
This is beautiful and just the look I'm going for with the color scheme. I am wondering if it would be easier to paint the wood before constructing it? Also, what is the pocket hole technique? I think I would like the screws hidden too.
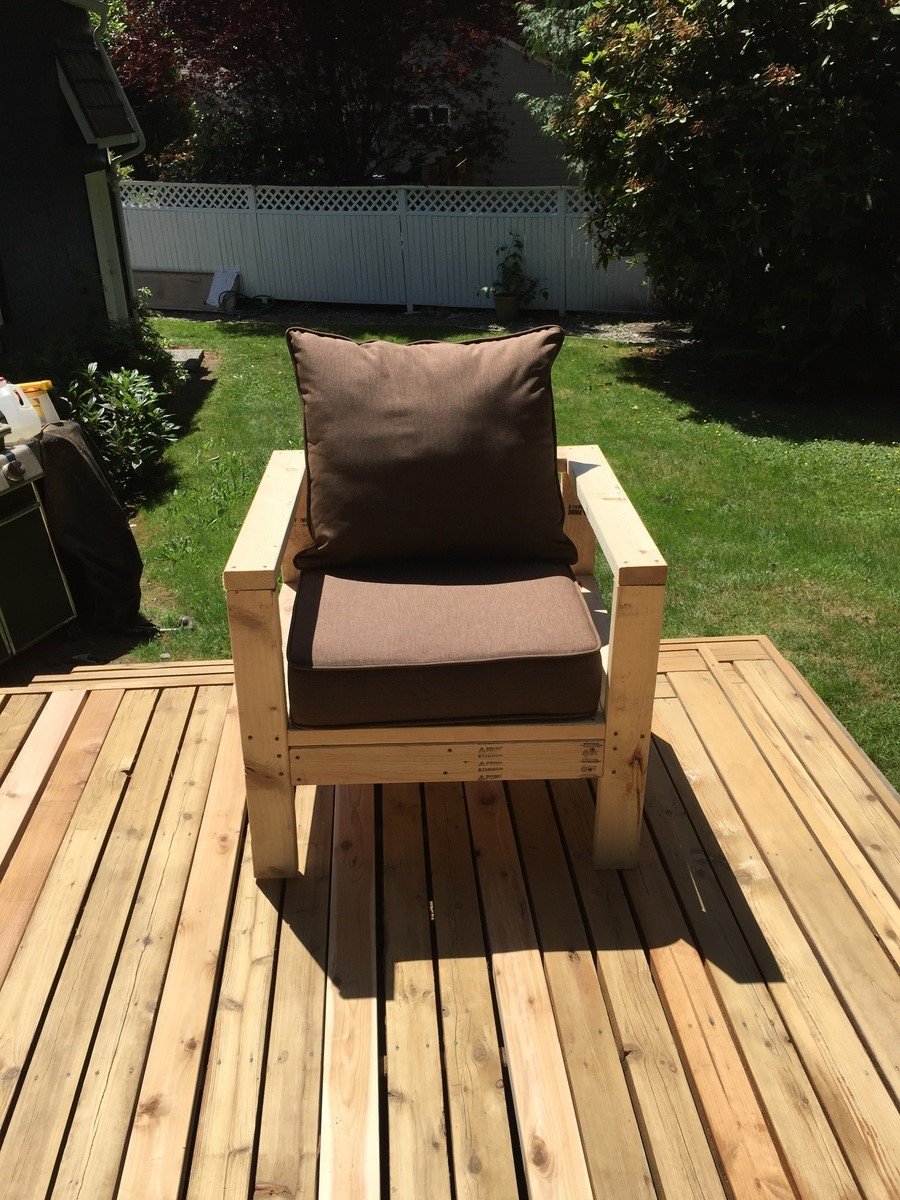
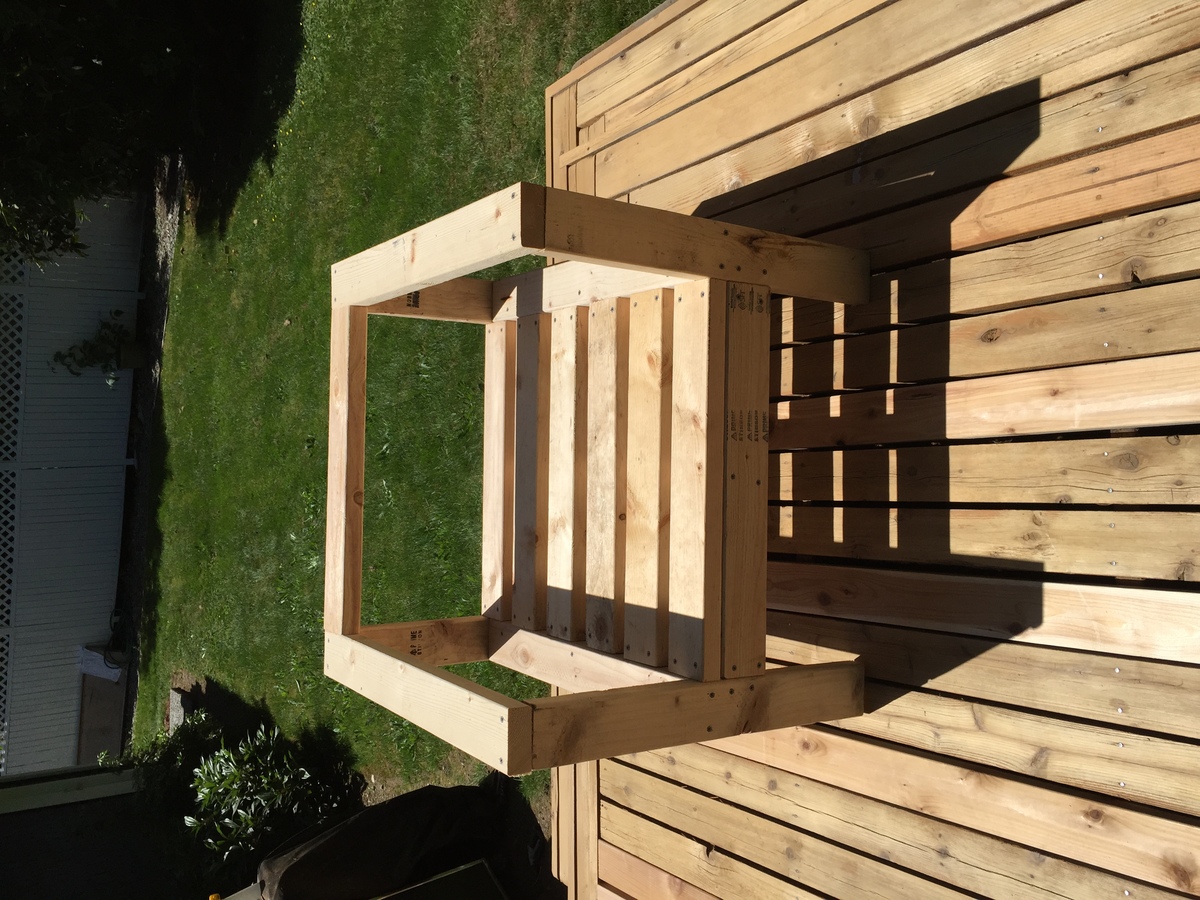
Modern Adirondack Chairs & Outdoor Side Table
These modern Adirondack chairs were my first wood working project ever and they turned out awesome! I wanted to build a small table to complete the set and Ana’s new side table plans were exactly what I was looking for. I am truly amazed at how easy these projects were to make and how great they look on our front patio. Ana’s step-by-step plans make it so simple. My wife and I can’t wait to build some more of these projects for our backyard lanai and pool area.
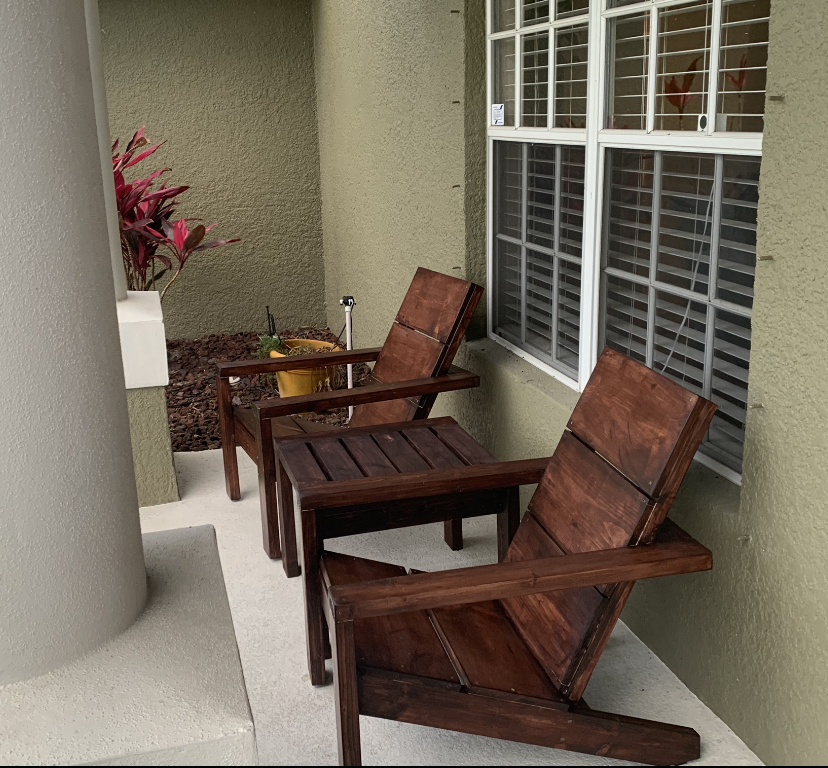


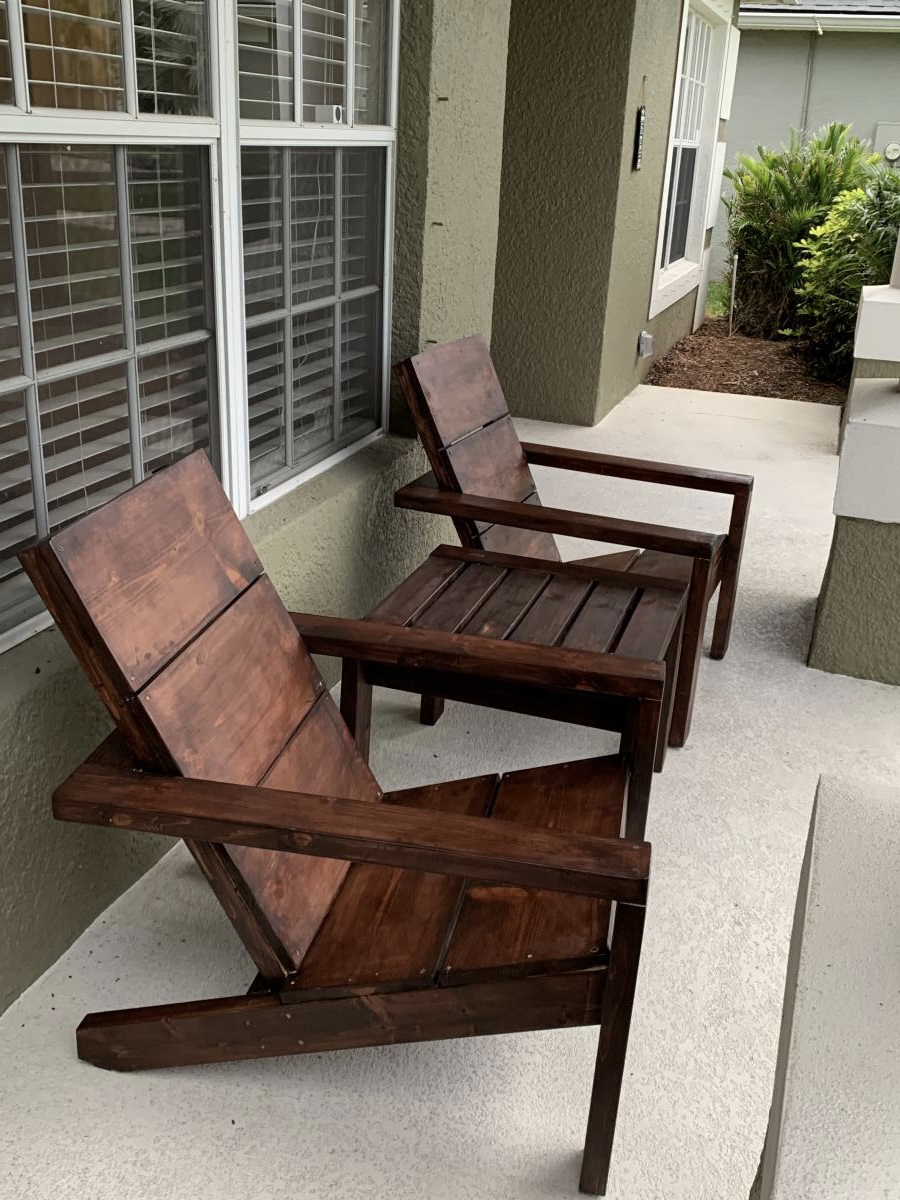
Built from Plan(s)
Finish Used
General Finishes Red Mahogany stain
Spar Urethane
Spar Urethane
Comments
Mon, 04/12/2021 - 10:21
First project!
Amazing job on your first build, I see more handmade pieces in your future!
Small Chicken coop
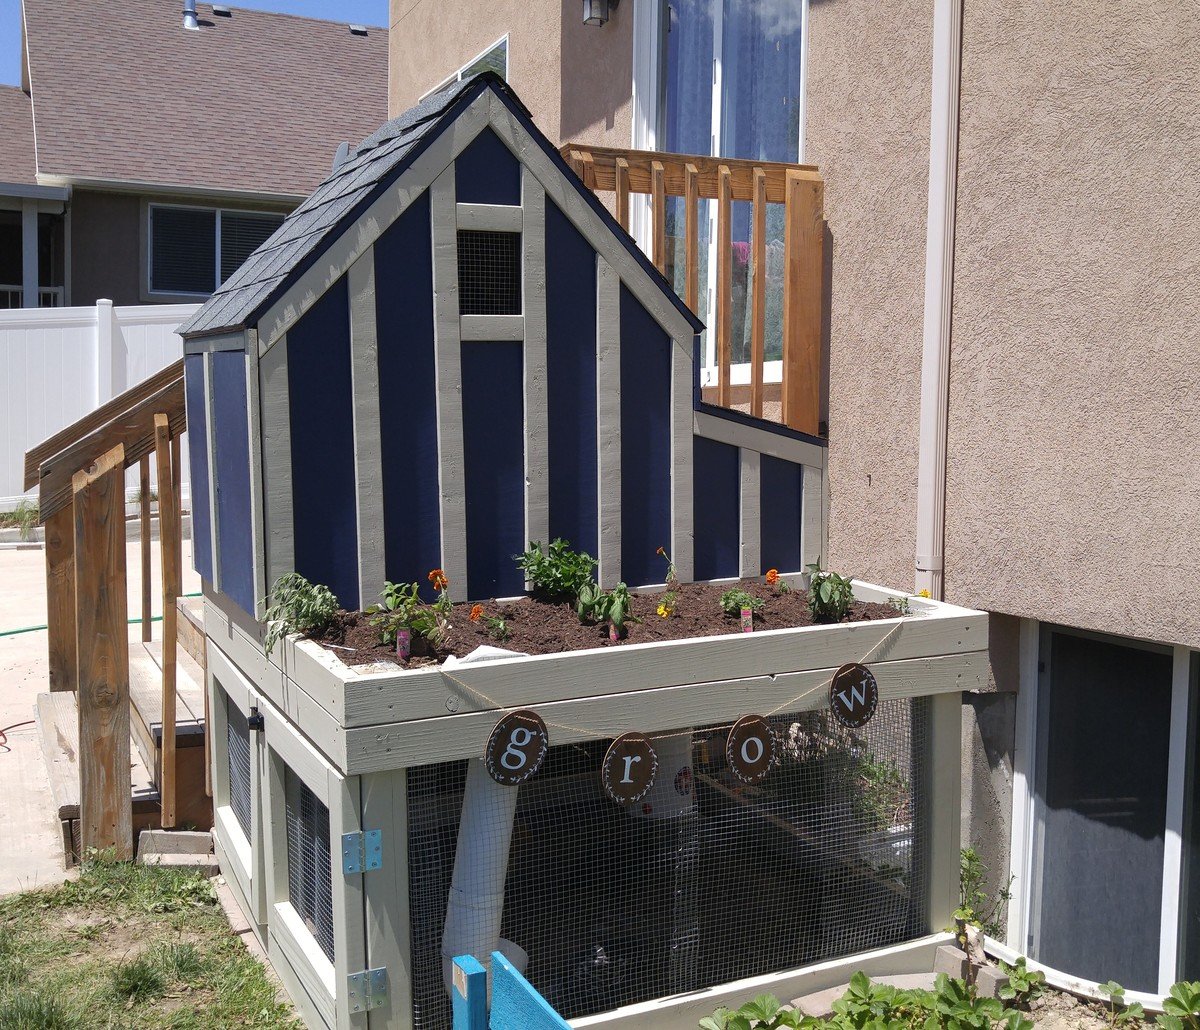
We built this to go right next to our stairs. The run has hardware cloth on 3 sides and then the side touching the stairs opens up to under the stairs so they have a bigger run.
We extended the floor so that it went all the way to the nesting box. We will be adding a nesting box to the wall by the cleanout doors rather than where the plans put the nesting box. We like that this gave us more square foot per chicken on floor space. Due to this change though we had to use interier hinges so the floor could slide in and out easily. We also added a door to the bottom so the coop could be locked seperately from the run.
I wanted to turn the space where the planter box is into a storage space and may still do that later to store food, clean out supplies, and first aid supplies. We'll see!
Built from Plan(s)
Estimated Cost
$500 This includes Cedar wood for all exterior wood, hardware cloth to cover everything and have a 12 inch apron under the coop, two colors of stain, shingles, big boxes of screws (we had a million leftover), hinges and locks with keys. We definitely went the expensive route but I think it will last us a long time and hopefully we've created a Fort Knox!
Estimated Time Investment
Weekend Project (10-20 Hours)
Finish Used
Cabot Stain Newberry Blue and Navajo White
Recommended Skill Level
Intermediate
Farmhouse Dining Set
This was a bit more work than I anticipated but I think it turned out great. The quoted buy list was a little off so I had to make an additional trip to the hardware store.
I used the Fancy X Table plan and the Fancy X Bench plan to make this set. Since I wanted it only 6' long I had to do some modification to the plan but not much.
I also designed the table top into two pieces that fastened together through the center piece so I could take it apart easily and fit it though a standard door.
Built from Plan(s)
Estimated Cost
$120 (since there were two benches and the table). I found the wood in my area to be a little more expensive than quoted on the plan. Particularly the 2x10's.
Estimated Time Investment
Week Long Project (20 Hours or More)
Finish Used
MinWax - Dark Walnut. To get the finish even I had to invest ALOT of time into sanding. I had to use 60 grit in some spots to even out the factory cuts but most of it I was able to go over with just 220 grit. DON'T FORGET TO SAND THE ENDS!
Recommended Skill Level
Intermediate
Comments

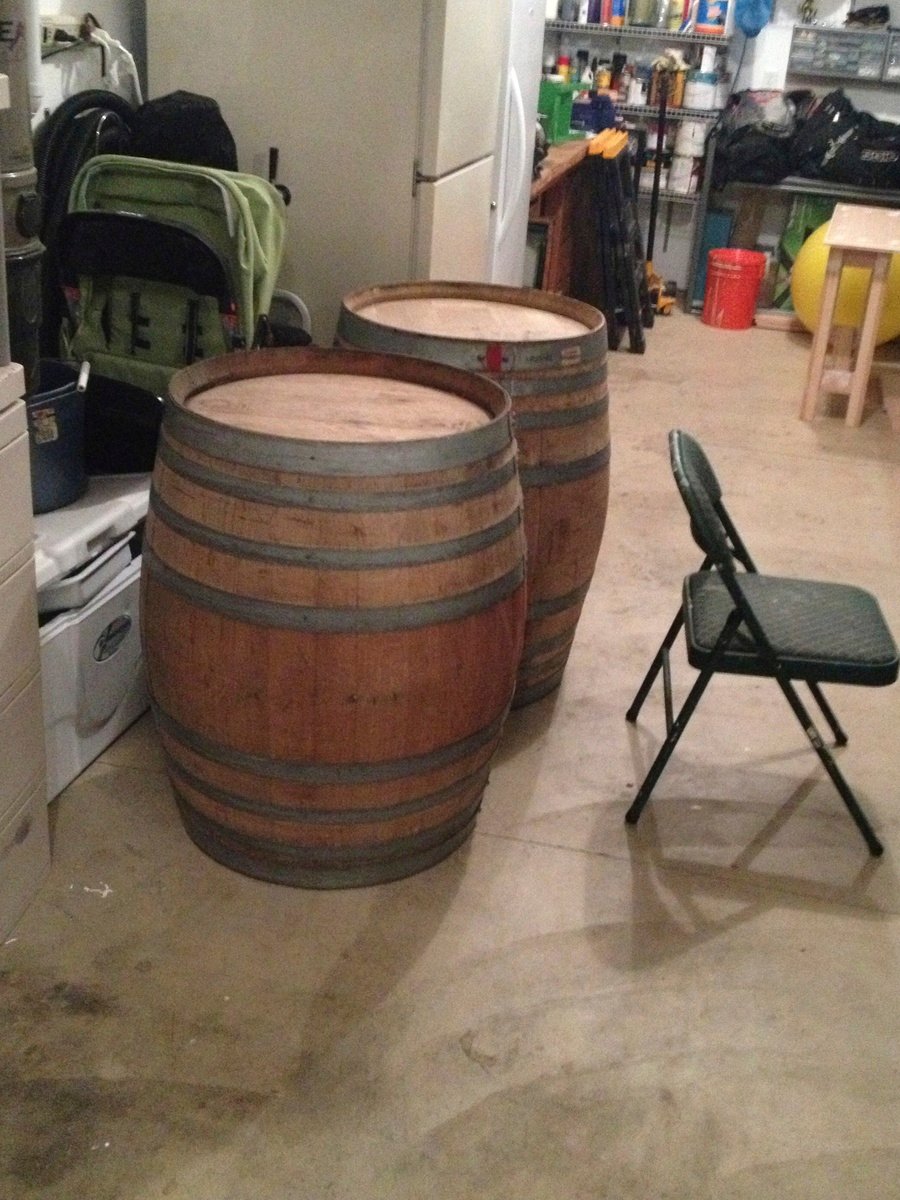
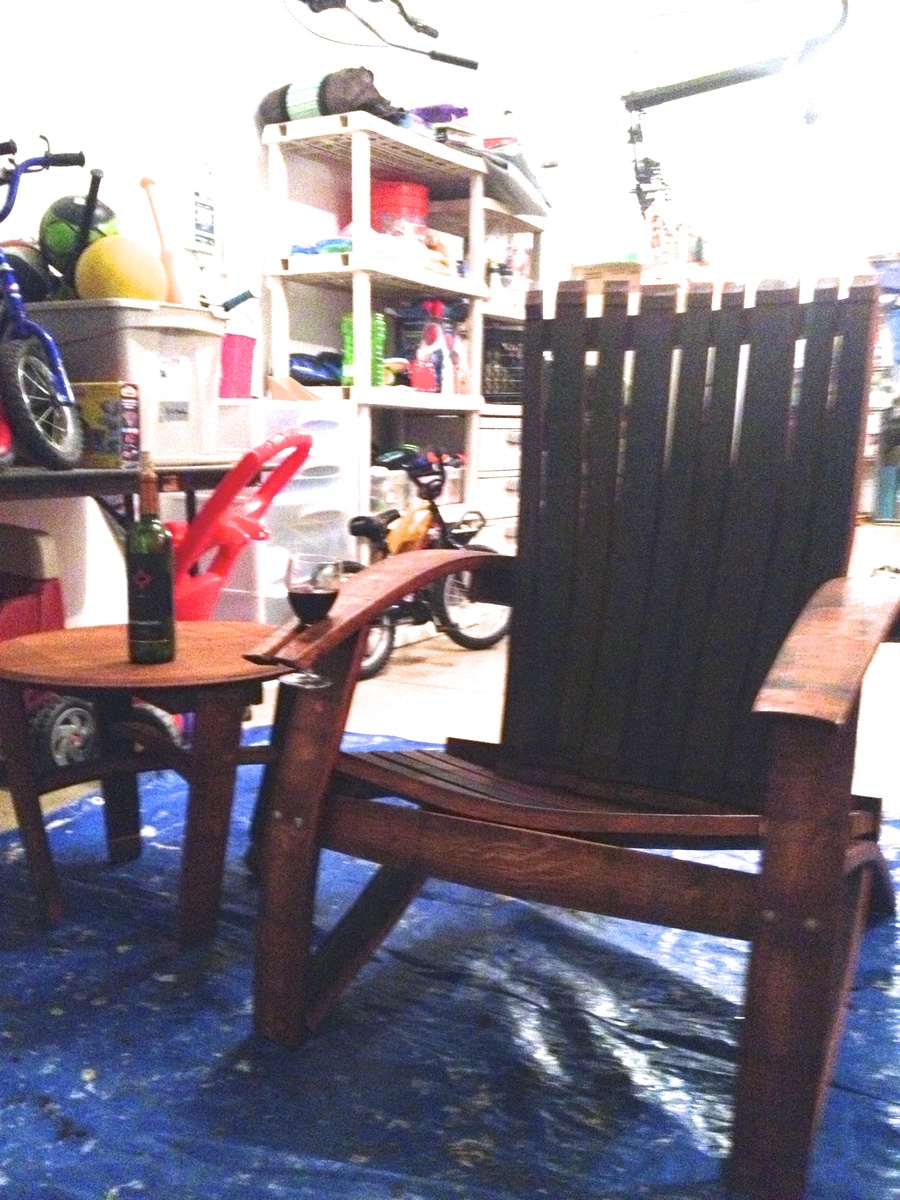
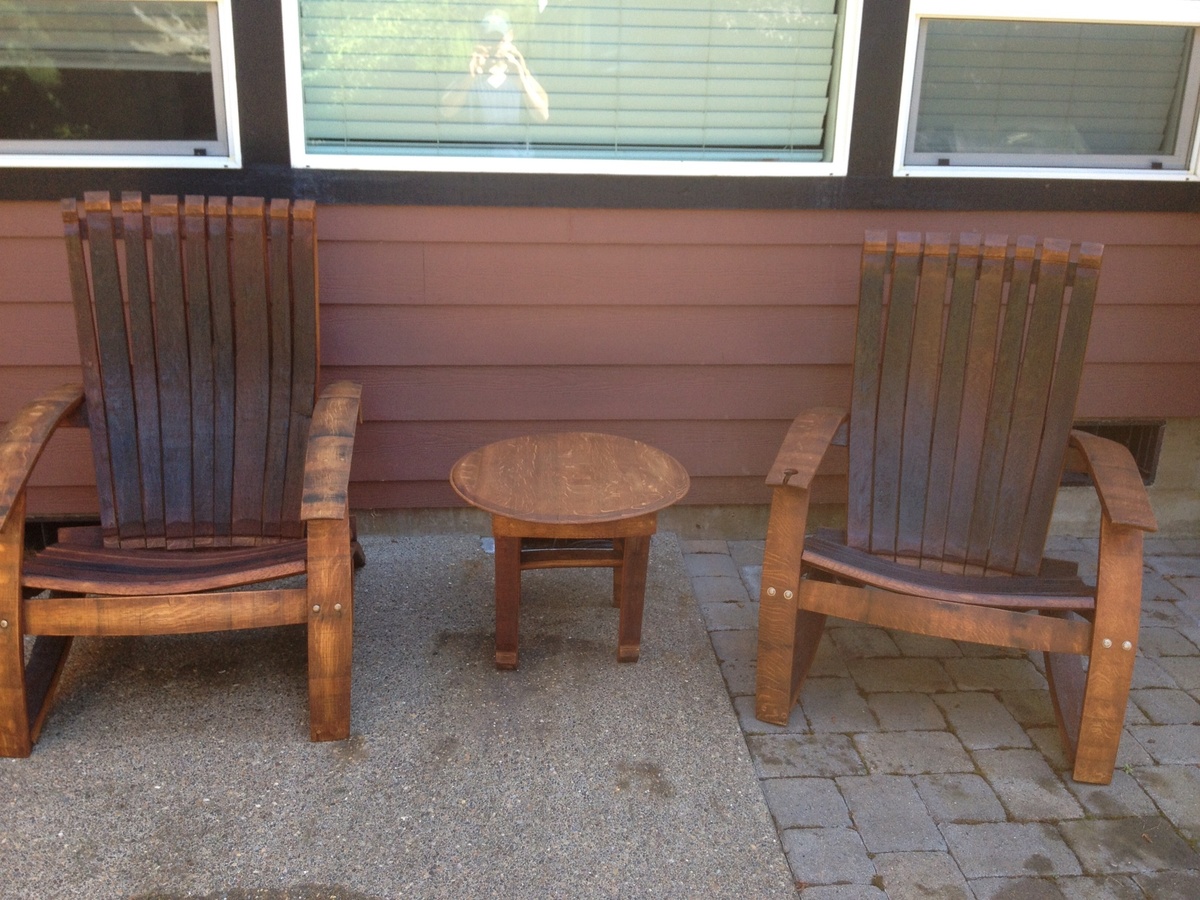
Wine oak barrel Adirondack chair
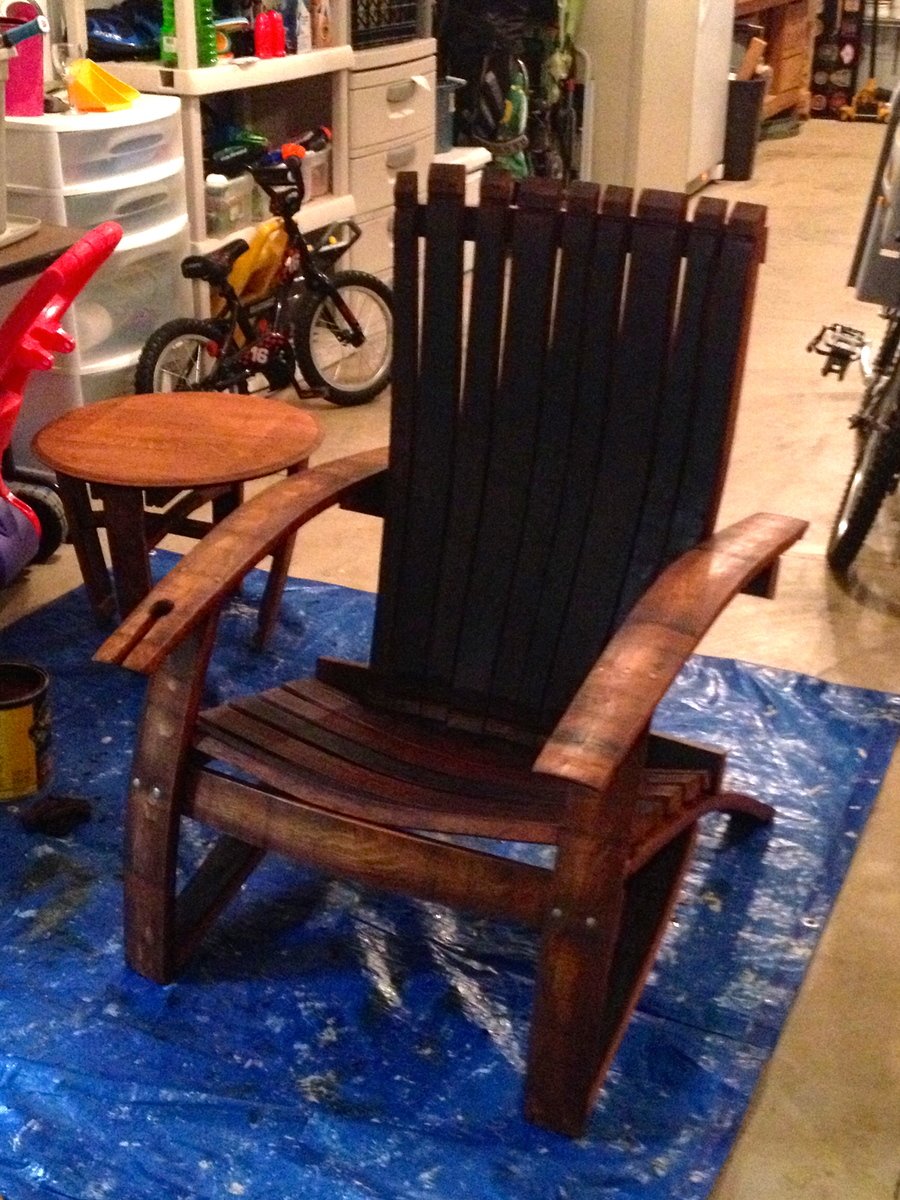
I got some oak barrels from a local vineyard and decided to try making some adirondack chairs. It was harder than I thought it would be, but well worth it!! The stain was a little darker than I thought it be, but it's rubbing off on me!
predrill, predrill, predrill, and learned a valuable lesson in predrilling, as solid wood under strain cracks easy when using 2 1/2" deck screws!
I need to whip out the nice camera and stop using my cell phone for finished products!
Estimated Cost
Around 100.00 dollars per chair (depends on cost of barrel!)
Estimated Time Investment
Weekend Project (10-20 Hours)
Finish Used
I used Cabot's Australian timber oil. Not the cheapest product out there, but they actually recommend one coat only and no sanding necessary for future coats. Once it stops beading water, just clean the chair and than reapply! It penetrates deep and forms a wax protective layer that repels water! This is why I chose not to varnish the item!!
Recommended Skill Level
Intermediate
Comments


Sun, 07/21/2013 - 19:45
Yes I did
I did have some plans, which made it easier. I didn't use them as designed i.e. tracing, and I also altered the plans some to my liking. I got the plans for 15$ from here: http://www.gcwoodworks.com/Wine-Barrel-Adirondack-Chair-Large.htm
Outdoor sectional and table
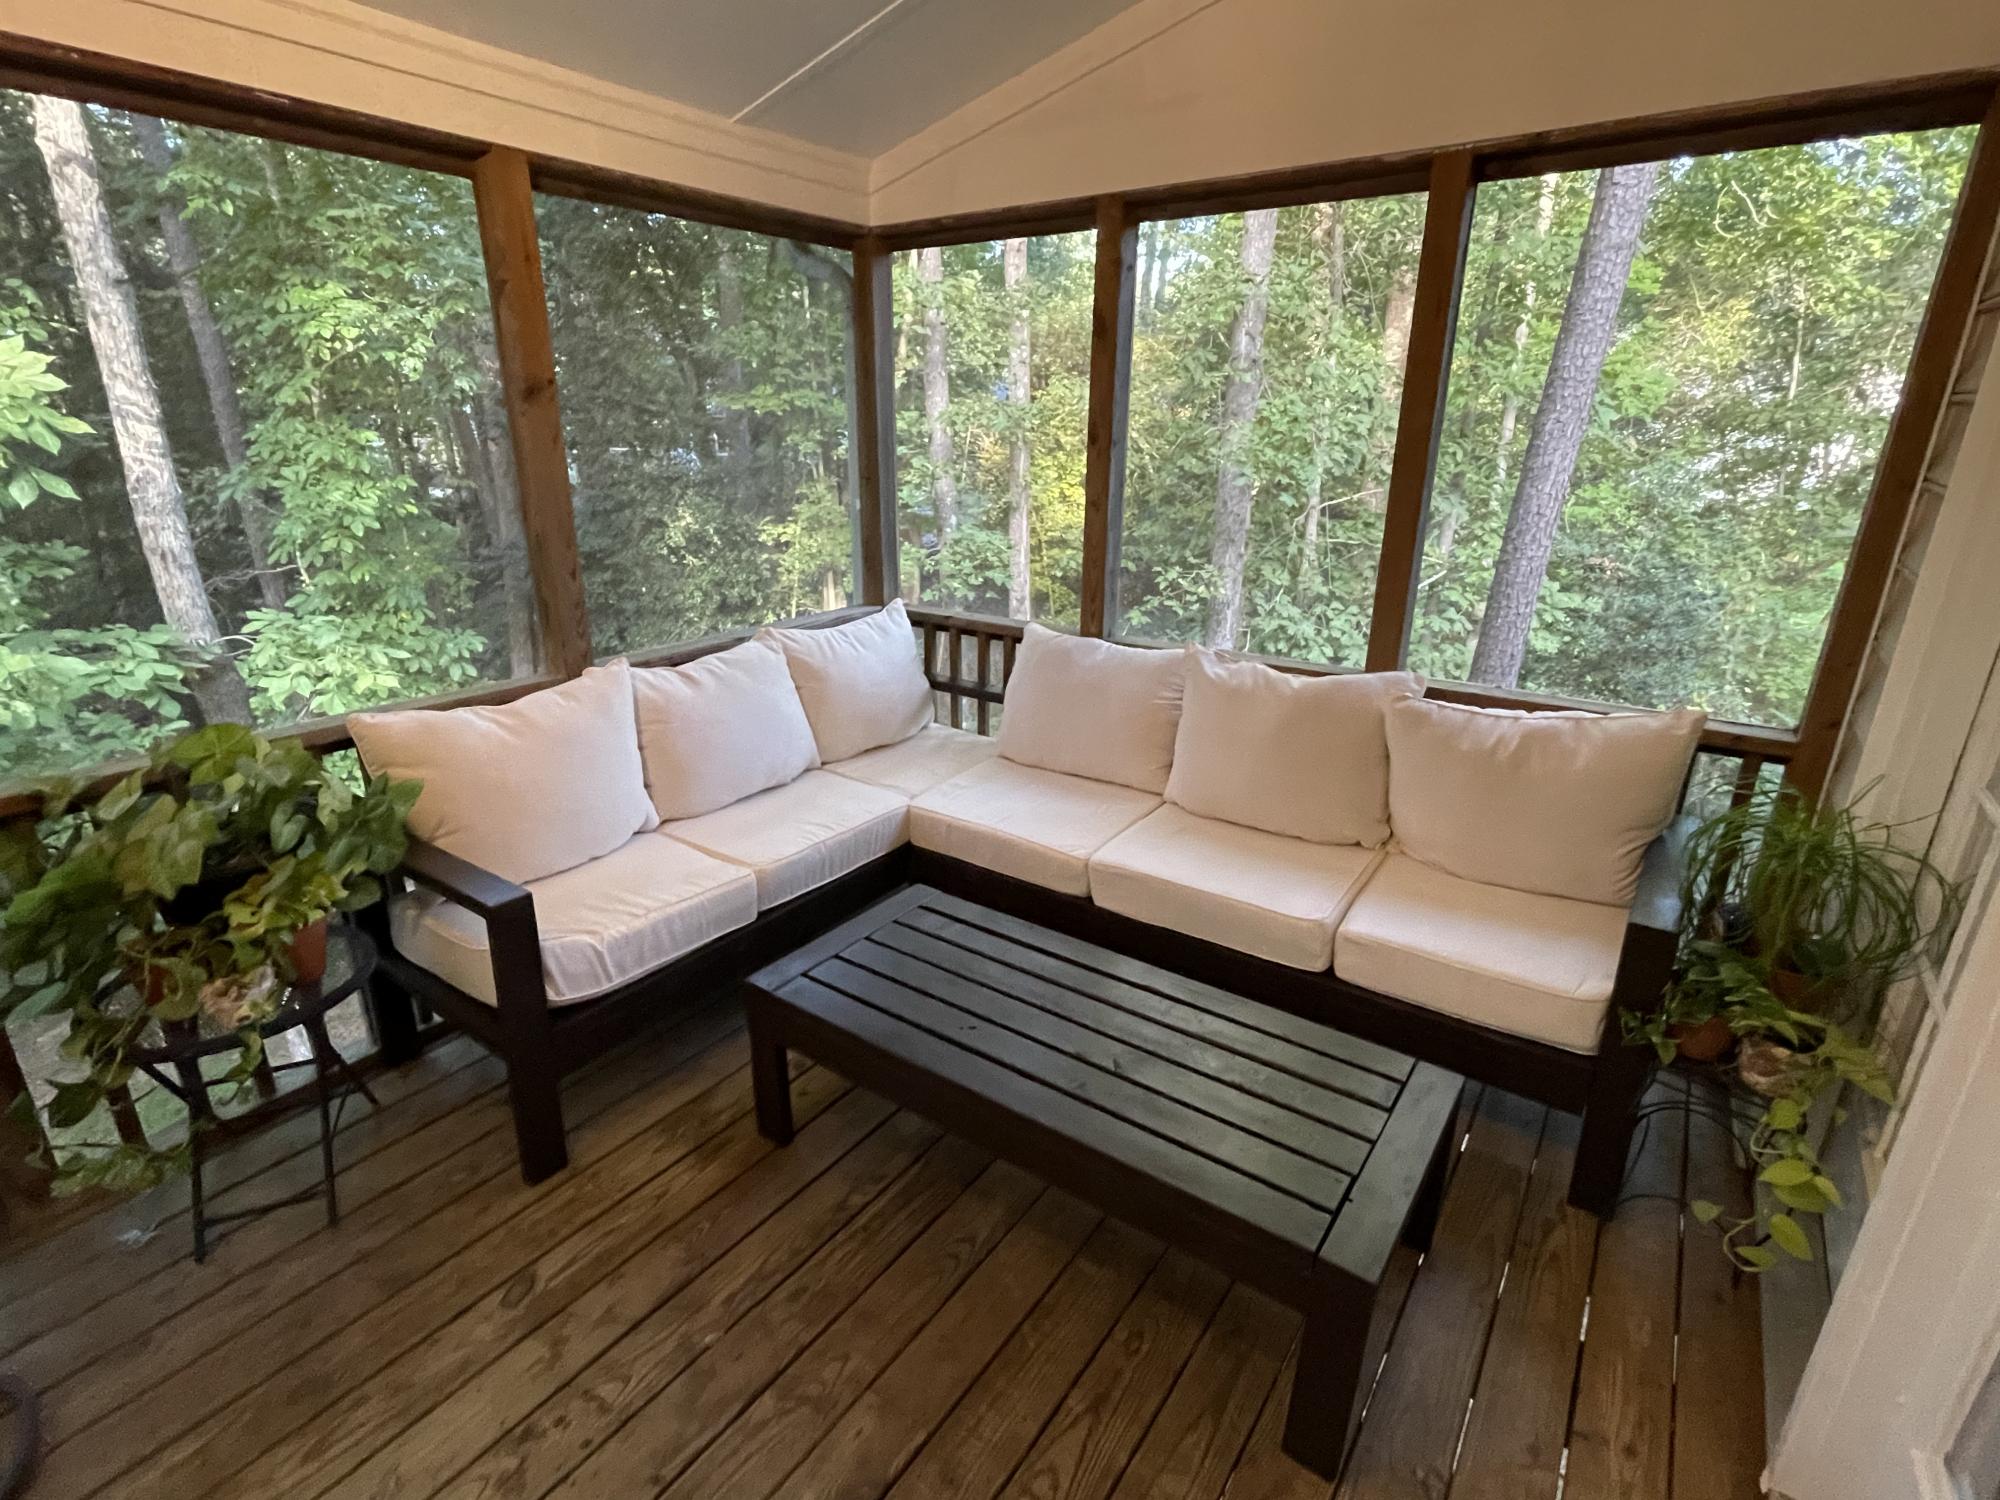
First time building anything. I think it came out pretty good! Thanks Ana white for the plans!!
Built from Plan(s)
Comments
Fri, 10/15/2021 - 15:31
Amazing job!
Thank you for sharing, can't wait to see your next project! It looks so beautiful in your space!
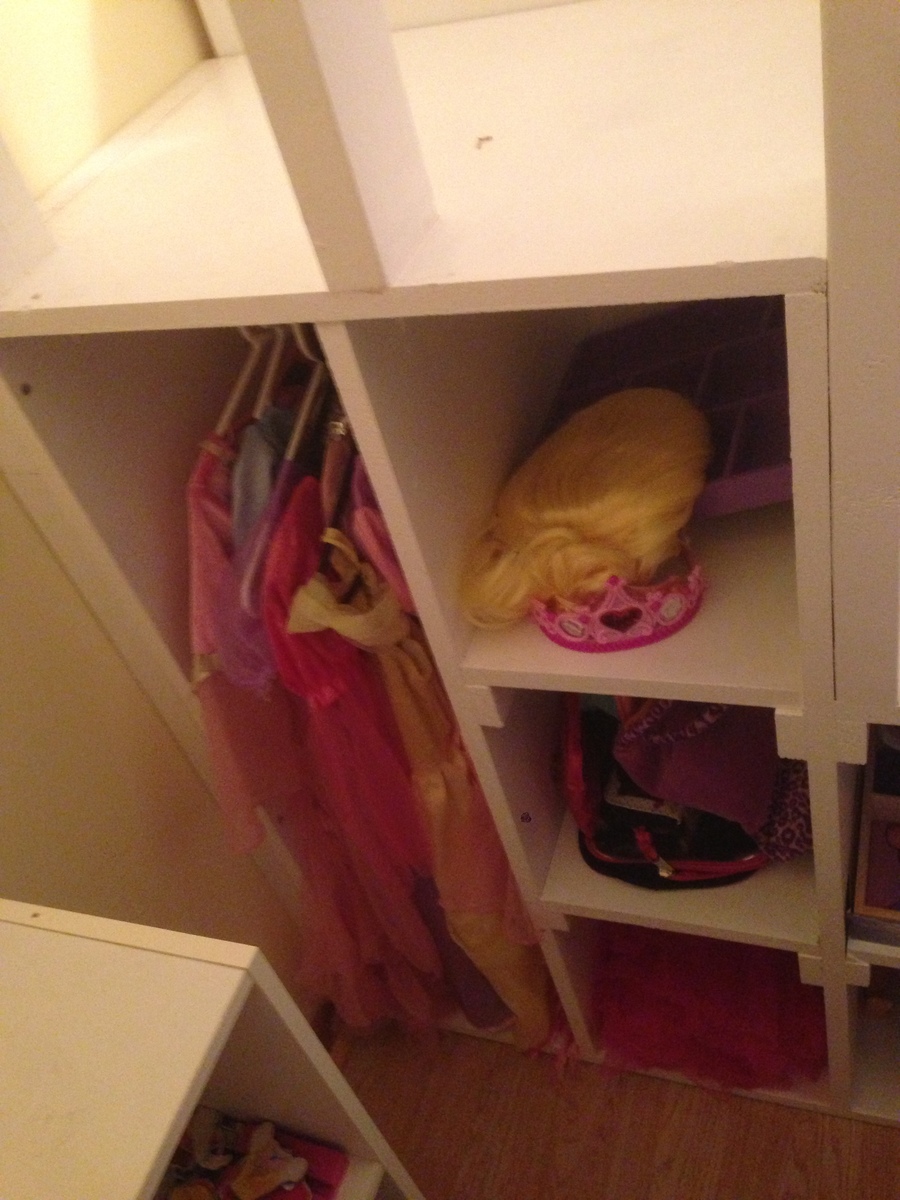
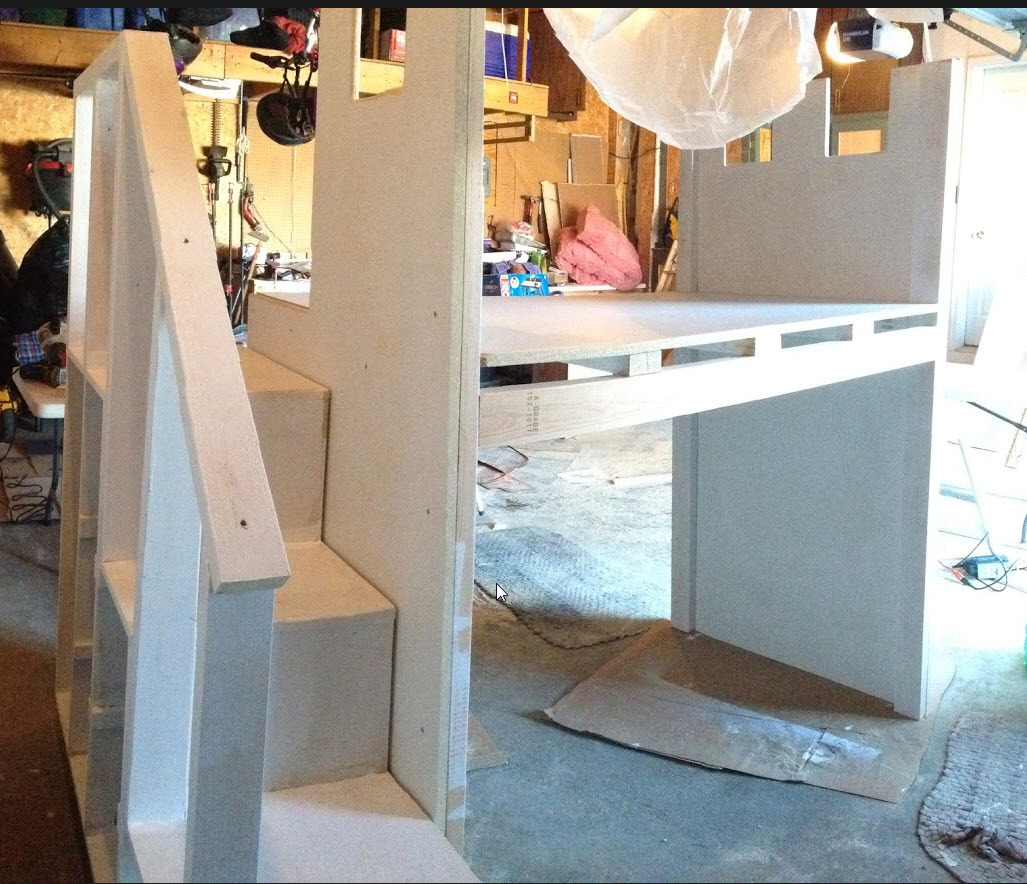
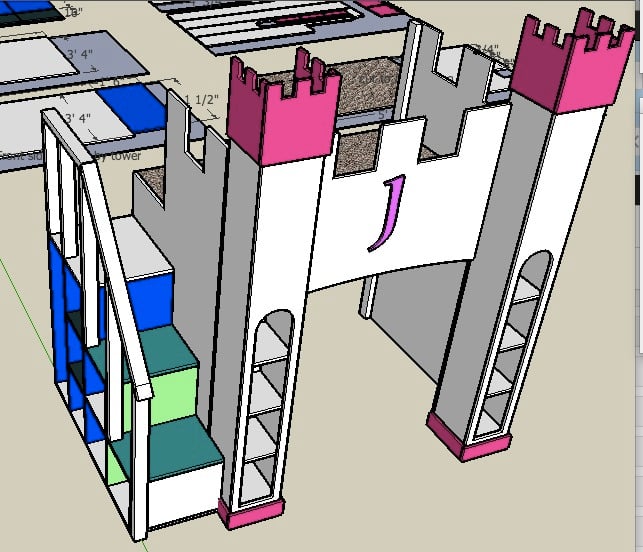
Princess Castle bed with storage
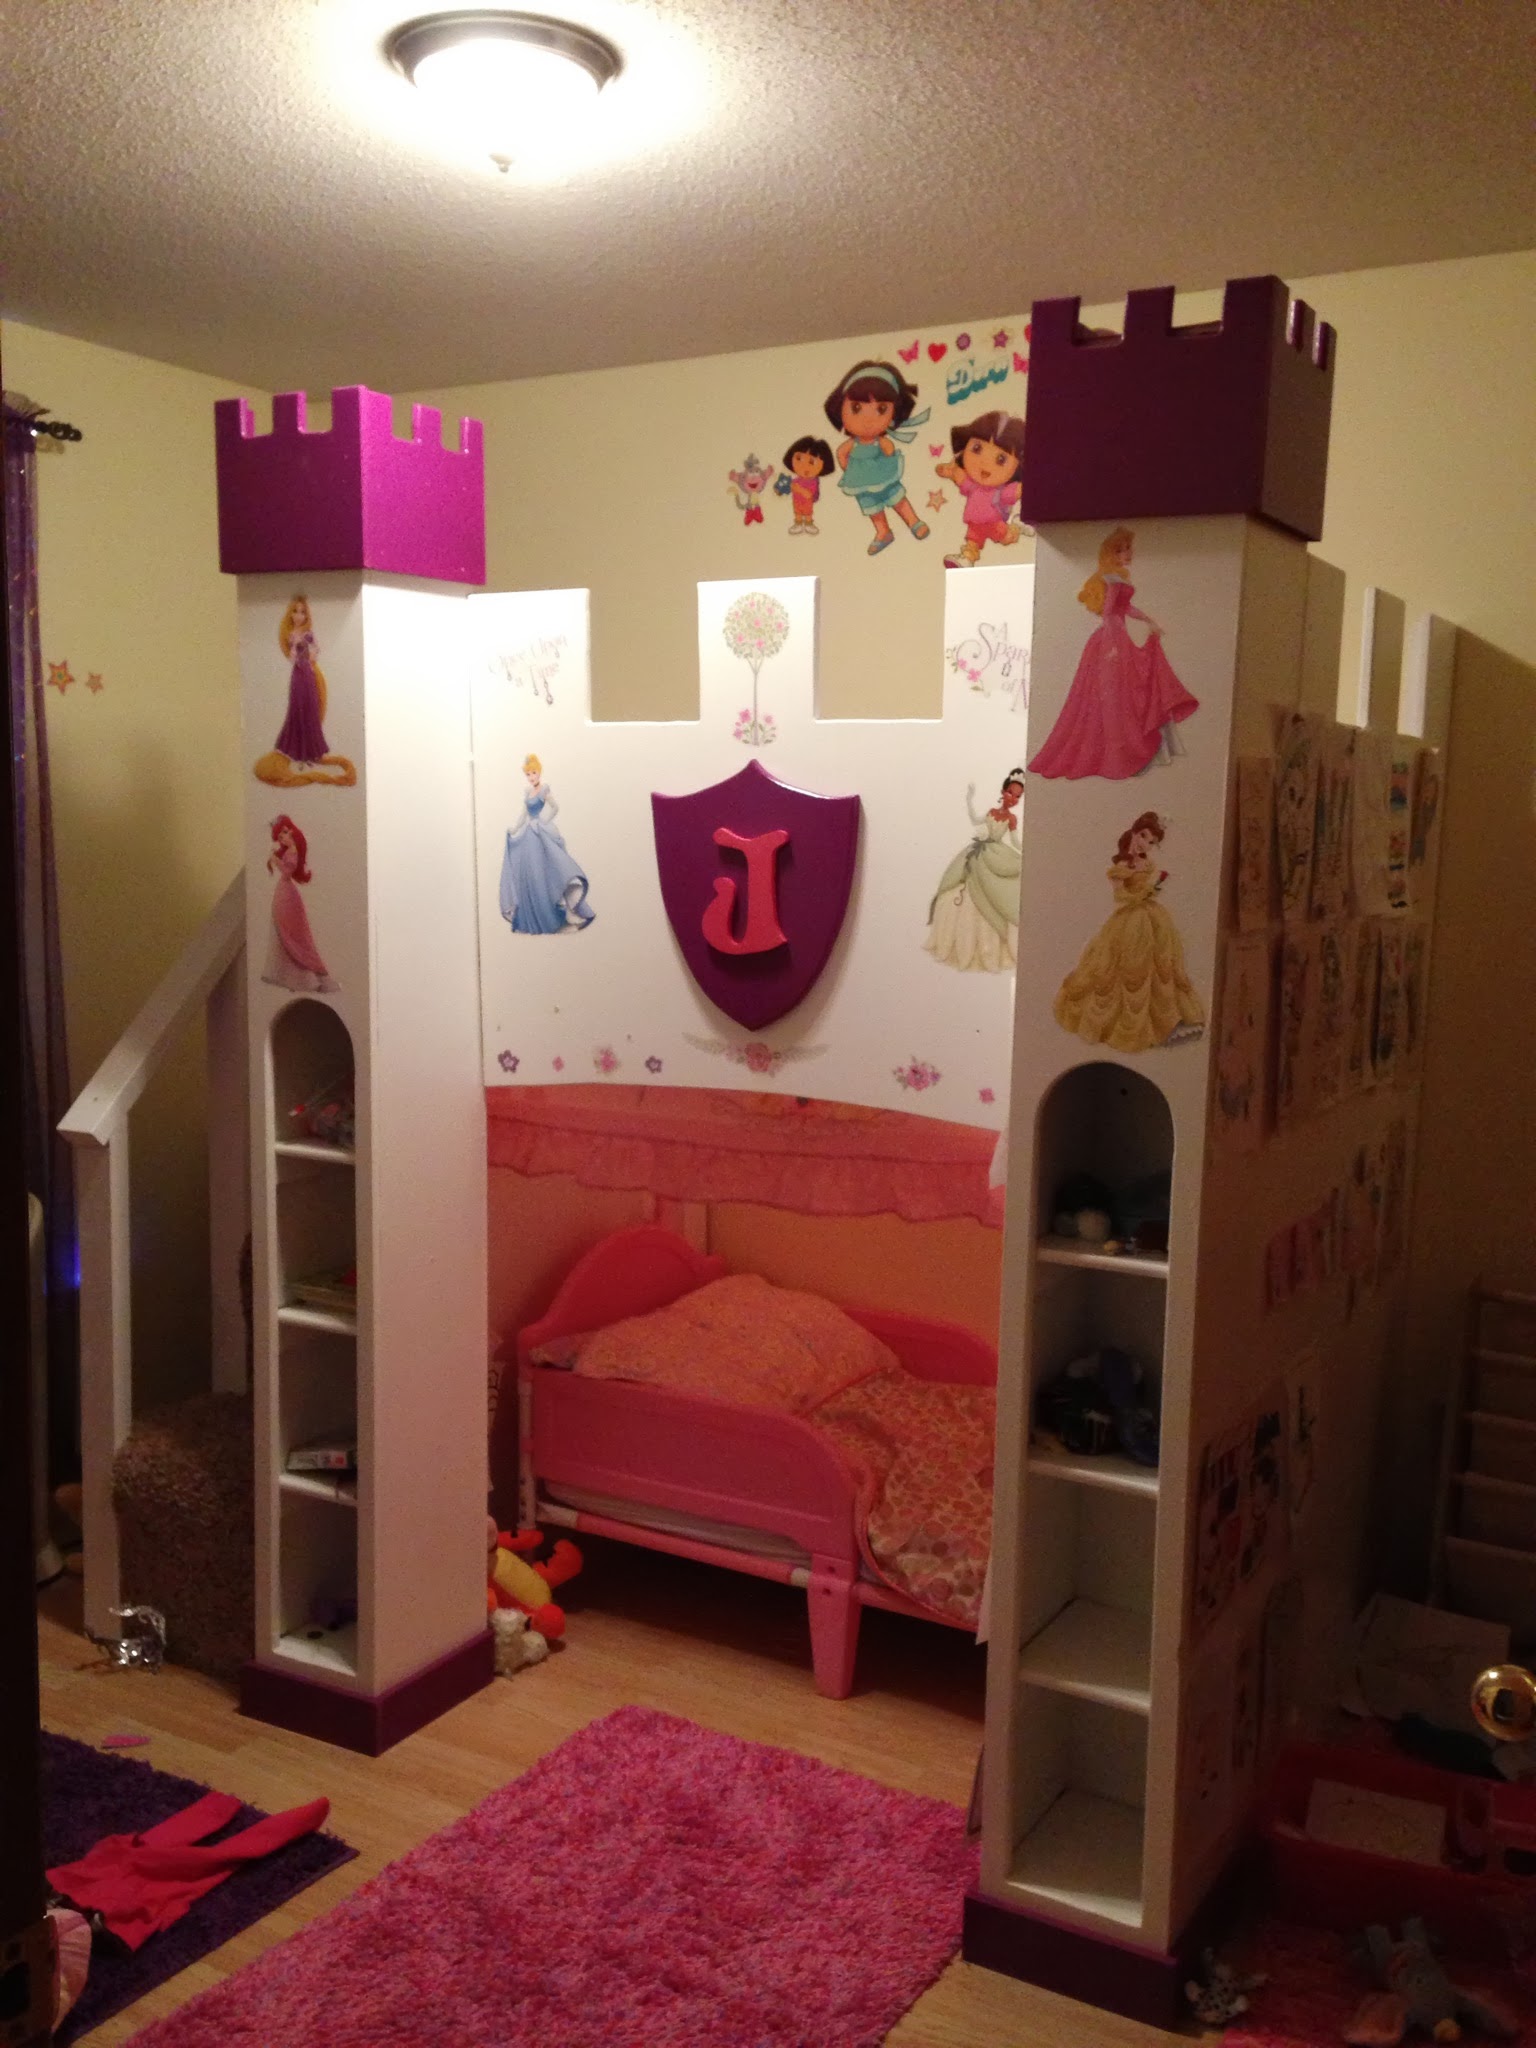
Our daughter has a very small room. She also LOVES disney princesses. So I wanted to build her a princess castle bed.... but how do you fit a castle bed in a 9x11 bedroom?
There were some plans on Ana's site (good plans), and others on-line. But many of these plans had the bed on the TOP of the castle, and we were concerned with her trying to make her way down if she needed to in the middle of the night.
She also loves her Disney princess canopy bed that she has now... so if I could somehow build the castle around that bed, we'd be set. Which is exactly what we did.
I reviewed several pictures online, and then designed this bed with Sketchup (I LOVE that tool).
There is storage in the stairs, in the towers on the front down below, and in the back up on top. I also put rope lights inside around the ceiling over her bed for that 'Night light Princess glow."
There is also enough room on top for her bed if she wants to put it up there at some point in the future.
The idea for the decoration came from another poster who simply used the Vinyl Disney princess wall decals.
She loves it. Plus its big enough for daddy to read stories to her up in the loft at bedtime!
I've posted the plans on the sketchup warehouse... here is the link...
http://sketchup.google.com/3dwarehouse/details?mid=65f7fb029052c660cb6c…
If you can't find it with that search the sketchup warehouse for 'castle bed.'


Built from Plan(s)
Estimated Cost
$150
Estimated Time Investment
Week Long Project (20 Hours or More)
Finish Used
Latex interior paint. Castle top and trim were painted with spray paint.
Recommended Skill Level
Intermediate
Comments
Sat, 07/27/2013 - 16:17
Well done!
Nice work. We worried about the height for our three year old, and if I were to build another (hah!) I would definitely make it lower. Carpeting the stairs is a good idea, I think I'm going to do the same. You've done well to cram everything into a small footprint. We're house-shopping now, and the tape measure comes with us. Gotta have 2.8m in the kid's room! Decals are great. My daughter went off hers for a while - nothing breaks your heart like a kid saying they want to give away something you worked really hard to build, even if you know they don't mean it. My wife put on some big wall stickers of a tree with squirrels and birds and suddenly she's in love with it again. Princess indeed (eyeroll).
Sat, 07/27/2013 - 20:53
Thanks- it was fun and the next project is..
Interesting your commented today :-) I am doing a similar project for my son for his 3rd birthday (this weekend) making a Lightning McQueen garage for his Ligthning McQueen bed...
Thanks for your comments... the castle project was fun. Its been fun to be able to even do these things now that I've visited Ana's site. And yes- I know its going to be a bummer when they no longer want the castle, or the garage (I had my son's bed in his garage tonight and not knowing better he hopped on the bed and jumped and bumped his head bad... now he's scared to have the bed in the garage- AND ITS NOT EVEN DONE YET!)
Thanks again..
Modified version of the 2x4 outdoor sofa
Clearly, not done with my project yet (sanding, priming/painting) but I was so excited I wanted to share right away. I've been checking Ana's site for about a year now and never had the courage to build anything... until today - I am thrilled I did. I had some cheap 2x4's studs at home so if I failed, no big waste of money. To my surprise... this was incredibly easy to build and that seat is sturdy. I modified the plan and intend to build 1 more chair and 1 sofa that accommodates 2 people. Thank you Ana! Amazing site and now I am so much more confident on my ability to build beautiful projects myself :)!
Estimated Time Investment
Afternoon Project (3-6 Hours)
Finish Used
Not finished yet - but will use deck solid stain (Behr) all in one from the Home Depot.
Recommended Skill Level
Beginner