Community Brag Posts

Treehouse Adventure Bed (Alternate Beach Hut Bed)

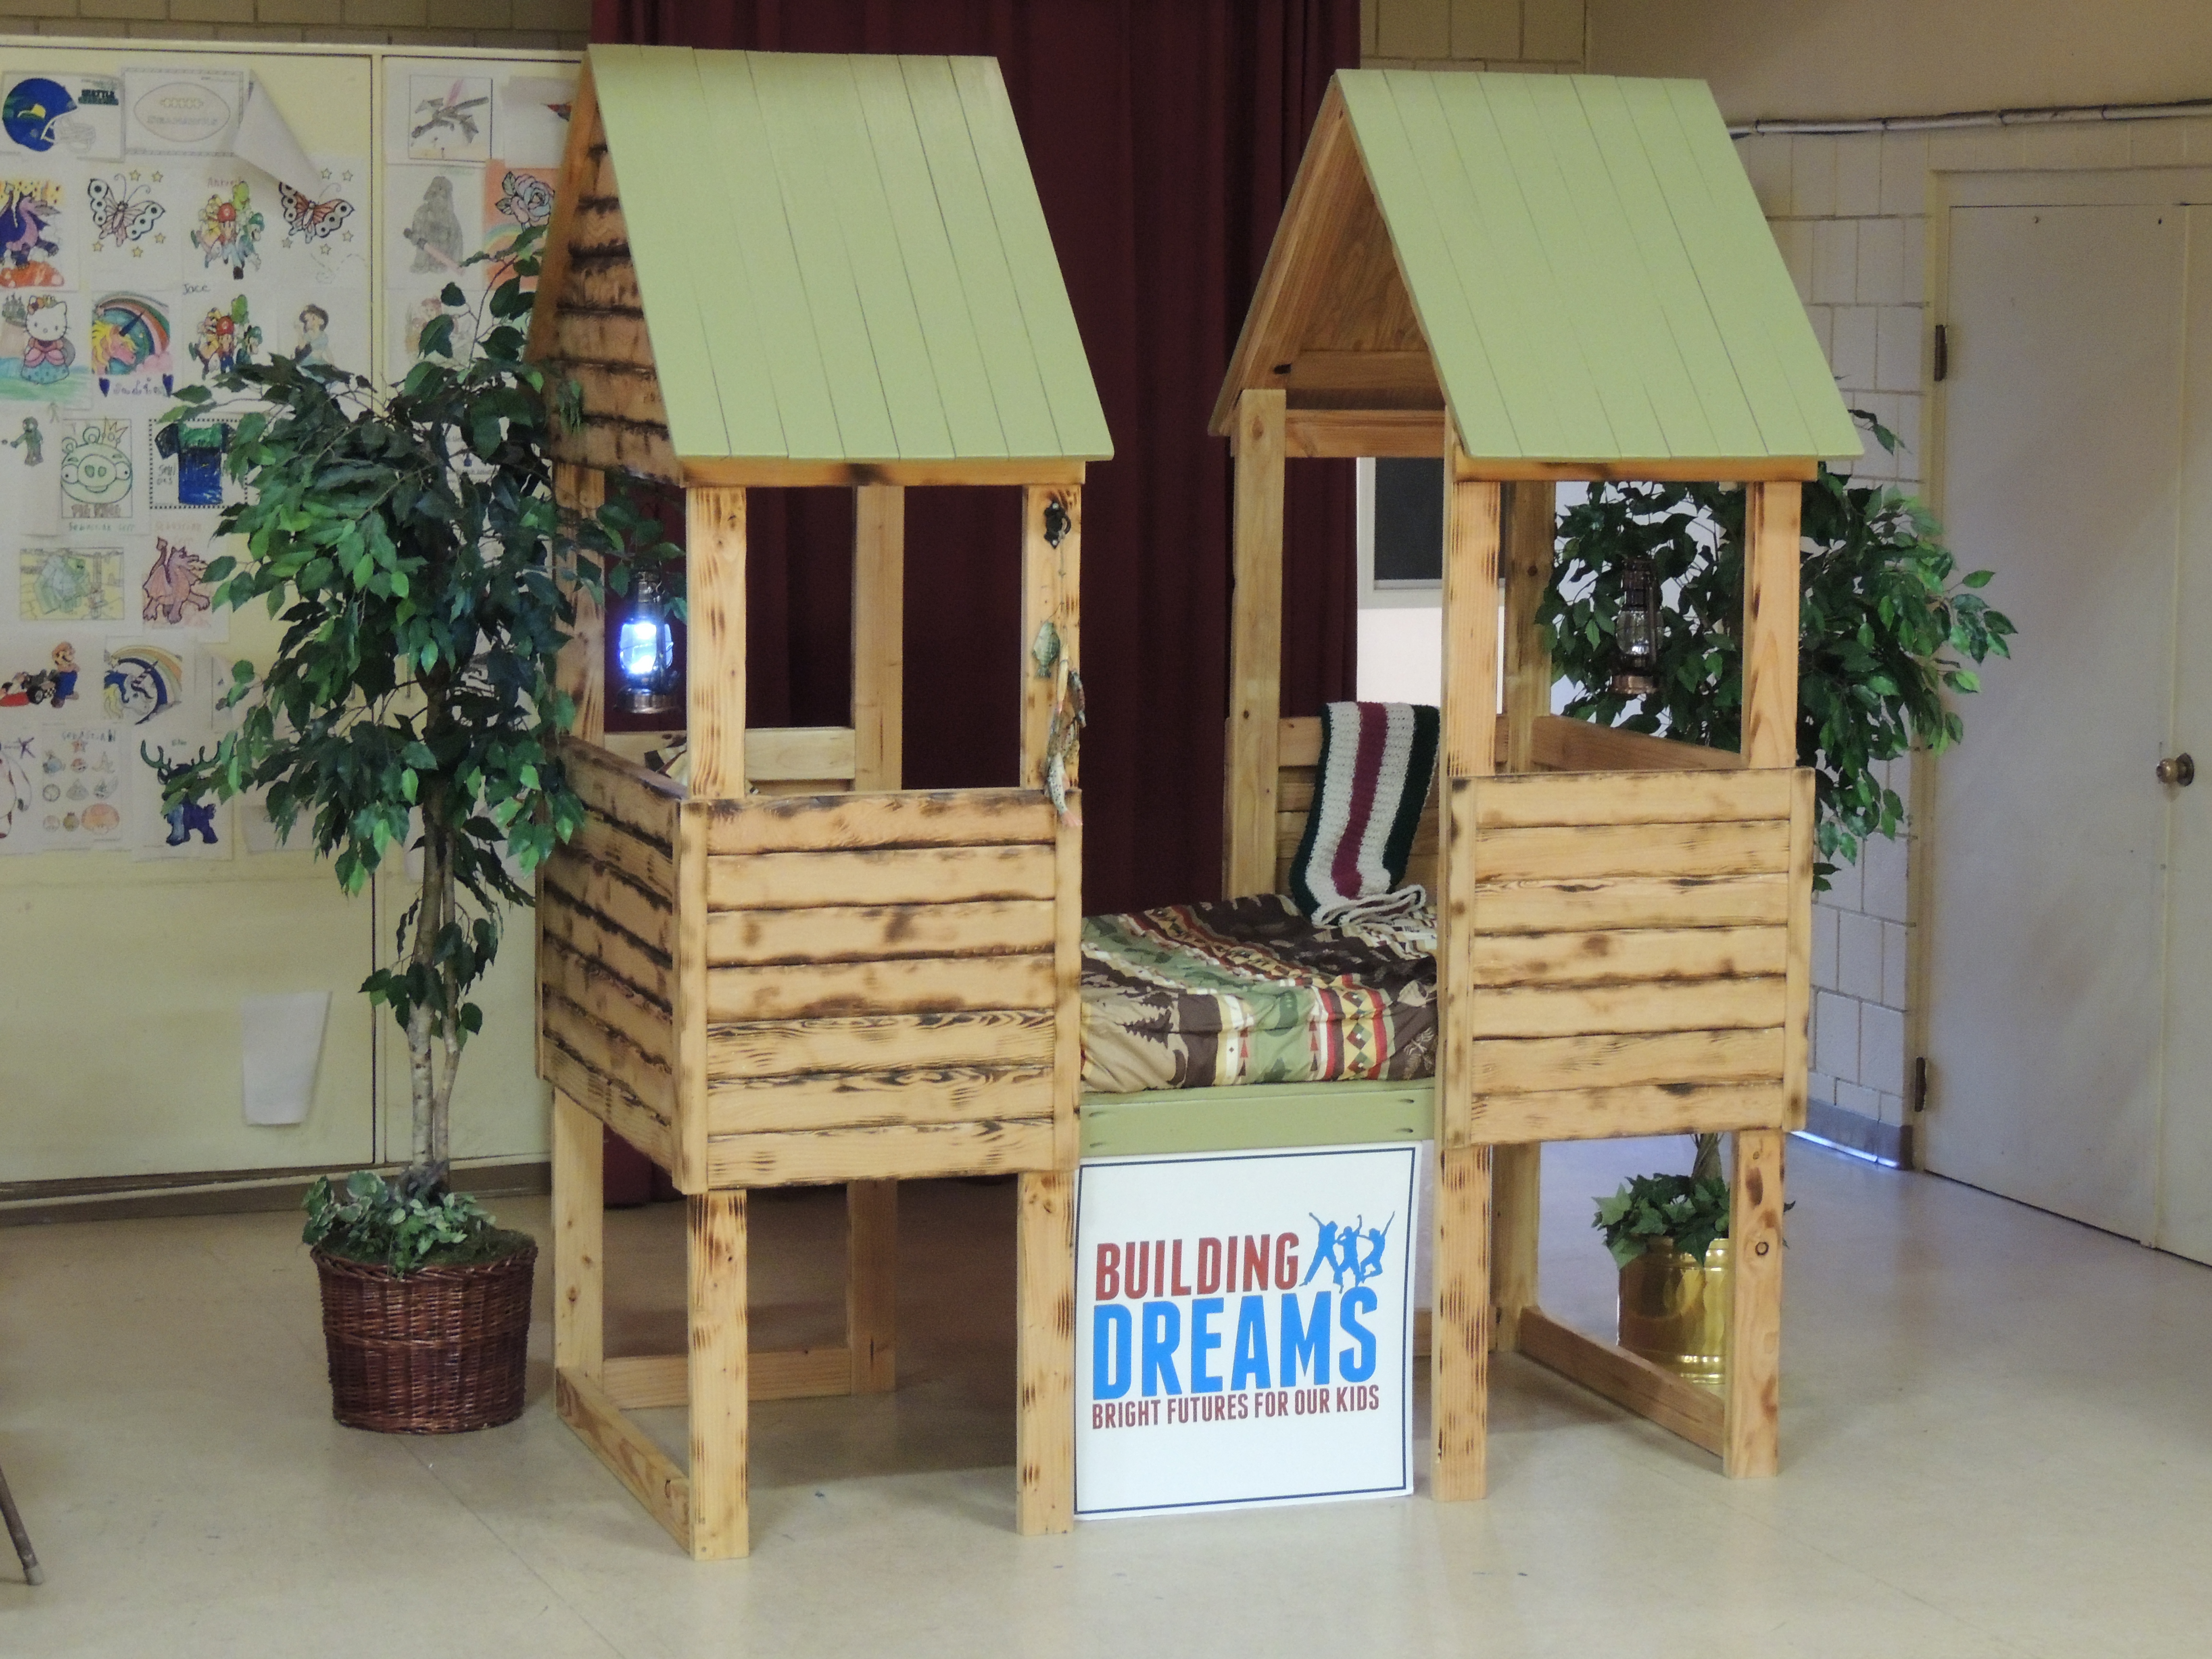
I was looking for something to build for a fundraiser this year and found the Beach Hut Bed plans. I liked the idea of a little house inside a kids room but I wanted to do something a little more rustic. here's what I came up with!!!

The shopping list and cut list is pretty much the same. However, I only used one 1x3 and needed to buy 4 extra 1x4s. I lowered the bed deck about a foot and left half of the walls open for easy parent access. I sorta just winged it as I went. Turened out pretty neat!!!

Built from Plan(s)
Estimated Time Investment
Week Long Project (20 Hours or More)
Finish Used
Roof: Valspar Exterior latex paint+primer. Main structure: burned with torch, wipe on poly, high gloss
Recommended Skill Level
Intermediate

Comments

Woven Back Bench - A little longer

We made our bench 17-1/2 inches longer, just enough for a third panel on the back.  We also added 2 braces under the seat slats to give it additional strength.  A lot of fun to make!  Thanks, Ana!

Estimated Cost
$100
Estimated Time Investment
Weekend Project (10-20 Hours)
Recommended Skill Level
Intermediate

Kitchen Island with Storage

Submitted by Anonymous (not verified) on Sun, 10/17/2021 - 13:09

We built a basic island that will have bar height stools on two sides with storage on the other. The top is a food safe wood that we will use as both a cutting board and breakfast table.

Country Rustic Shelf

We just bought our first home a few months ago.  It is taking me a long time to decorate, because I am more picky about what goes on my walls.  I saw this shelf and I knew I had to build it.  It was really simple to do.  I even did it without my husband, and that is huge for me. I have step by step pictures on how to make this shelf on my blog.
supersaturdayldscrafts.blogspot.com

Ana's Barn Beam Ledges are very simular, but I turned them and added molding to the front.

Built from Plan(s)
Estimated Cost
20.00
Estimated Time Investment
Afternoon Project (3-6 Hours)
Finish Used
For the finish I used dark walnut gel stain, and then after the stain dried, I painted it with Home Depot Vermont Cream. When all the paint is dry, you sand the outside so the stain shines through to give it a more rustic country look.
Recommended Skill Level
Beginner

Just Couldn't Reach

My son is a little short for his age and we have been searching for a stool that he could use to wash his hands by himself. I came across these simple and quick plans for an amazingly, functional stool. I spent about 4 total hours on it, made it from scraps that I already had, it looks great and it hold me too... all 230 lbs.

Built from Plan(s)
Estimated Time Investment
Afternoon Project (3-6 Hours)
Finish Used
Semi-Gloss Paint (left over from painting my ceiling)
Minwax stain and poly.
Recommended Skill Level
Beginner

Benchright Coffee Table

This was one of my first projects. I made it for my daughter who was moving to a new apartment and wanted to replace her college coffee table. It was fairly easy other than keeping everything square so the drawers worked correctly. I finished it with Rust-Oleum Ebony stain and Minwax Satin Poly (3 coats). All the hardware and lumber came from the Orange big box store

Estimated Cost
$100
Estimated Time Investment
Weekend Project (10-20 Hours)
Finish Used
Rust Oleum Ebony Stain
Minwax Satin Poly
Recommended Skill Level
Intermediate

Narrow farmhouse table with benches

These plans were perfect for the small space we had for the kitchen table.  Really like how the benches fit under the table too.

Built from Plan(s)
Estimated Cost
$100
Estimated Time Investment
Afternoon Project (3-6 Hours)
Finish Used
The legs are Eider White and the stain is a mix of dark walnut/weathered oak/special walnut.
Recommended Skill Level
Beginner

DIY Potting Bench

I’ve been wanting a potting bench for a while now - something by the back door to display some decor, use as an outdoor work station, and double as a place for UPS to leave packages. After looking around online and at local stores, I couldn’t find anything that I liked that fit the narrow space - so I did what any #woodworkingmom would do, I decided to build it myself. Please see my blog post for additional photos and lessons learned during this project.

Built from Plan(s)

Comments

Seasonal And Holiday

A bathroom cabinet for all that stuff!

Overall measurements: 24x40. I followed the same basic steps as the nursery armoire, but on a much smaller scale and with a 1x3 added to the back for hanging the cabinet on the wall. I sketched this out on my own and built it to fit above the toilet in my girls' bathroom.

For the first time, I used my table saw to route a space for the 1/8" MDF cabinet backing and drawer bottoms. I will probably use the same method again, but the MDF has to be absolutely square for it to work.

Also a first for me, I used a shelving jig to drill perfectly spaced shelf pin holes on the inside of the cabinet. I love the jig and the accompanying drill bit (from Woodcraft -- orange and blue do not carry it) and I'm looking forward to using it a lot more in the future.

The white latex paint finish is covered in Krylon "crystal clear" spray, which is (sadly) not actually crystal clear. I really like its durability and ease of application (re-coat after only one minute!), but will only use it on darker colored projects in the future. I'll have to sand, paint again, and recoat with my old standby, Minwax Polycrylic, to get rid of the yellow tones in the "crystal clear" Krylon spray.

Built from Plan(s)
Estimated Cost
$125
Estimated Time Investment
Weekend Project (10-20 Hours)
Finish Used
Spray primer followed by Sherwin-Williams ProClassic semi-gloss white (which I applied in several thinned coats). Krylon not-so "crystal clear" topcoat.
Recommended Skill Level
Beginner

Queen Size Farmhouse Bed

Submitted by Yodannos on Sun, 06/09/2013 - 13:28

Modified Queen Farmhouse for a rental unit that we have. I changed the heights of the head/footboard to give it a taller look.

Built from Plan(s)
Estimated Cost
$200
Estimated Time Investment
Weekend Project (10-20 Hours)
Finish Used
Minwax ebony (3 coats). Antiqued by sanding various edges. 2 coats of satin polyeurethene.
Recommended Skill Level
Intermediate

Comments

Farmhouse Nightstand

Submitted by RenoRustic on Tue, 05/12/2015 - 10:17

I built this nightstand when my wife and I purchased a new bed. We had to rearrange the bedroom and as such, I no longer had a desk or table on my side of the bed. I wanted something "country" style and after searching through several different plans I found a brag post that fit exactly what I was looking for. Well, technically, I found the original Farmhouse Bedside Table plans and modified them to fit what I needed. It wasn't until after I completed the project that I realized there was a "Mini" version as well. What can I say, I'm not that great as using search. I actually built this over a year ago at this point, and it was the second project I ever built. I learned quite a bit on this project, including the fact your project will only come out as good as your lumber selection! This build actually created my addiction for DIY and woodworking. Thank you Ana!

Estimated Cost
$40
Estimated Time Investment
Day Project (6-9 Hours)
Finish Used
I used Minwax Special Walnut for the entire project, then painted the base and drawer Behr white (their basic white off the shelf, I didn't have the paint mixed) in semi-gloss. I antiqued everything for a more rustic look.
Recommended Skill Level
Beginner

Comments

Kids Adirondack Benches (Pressure Treated)

Submitted by Anonymous (not verified) on Fri, 11/05/2021 - 12:45

I built these benches for my son’s school. Their current ones were very rotted and falling apart. These will be outside and uncovered so pressure treated stock was used and I filled the screw holes with epoxy.

Comments

Planters

Submitted by Liz H. on Thu, 03/31/2011 - 11:33

This was a fun easy build...I took the toy box plans and used 1X4s instead of solid sides and bottom.  I cut the legs short and put finals on.  

Estimated Cost
$25
Estimated Time Investment
Afternoon Project (3-6 Hours)
Finish Used
Black outdoor paint.
Recommended Skill Level
Starter Project

Truck Shelf or Desk Organizer

very easy

Built from Plan(s)
Estimated Time Investment
Afternoon Project (3-6 Hours)
Recommended Skill Level
Beginner

Comments

Farmhouse Console Table

Submitted by Sylka on Mon, 11/08/2021 - 15:41

My husband and I just recently moved to Savannah from Annapolis.
I got my hands on some beautiful wood from an old house in Savannah. The console table for the bedroom came to mind immediately. Great project, thank you for the plans, Ana!

Built from Plan(s)

Comments

Farmhouse table & bench!

Submitted by jamie_C on Sun, 04/03/2011 - 19:42

This was quite the project- took us several weekends to finish (we don't have a garage or really any good working area- we rent.  Oh and we also have a toddler).  We assembled the table in the living room, stained it on our front sidewalk, did a couple coats of poly in the backyard, and finished the last coat of poly in the dining room!  (we know how heavy this table is, that's for sure!  We modified the original farmhouse table dimensions so that this table would fit in our oh-so-tiny dining room.  As you can tell, we also decided to build a bench to go with it.  We are extremely pleased with the results!

Estimated Cost
$125
Estimated Time Investment
Week Long Project (20 Hours or More)
Finish Used
Used wood filler on screw holes, and did LOTS of sanding. Used two coats of Cabot Early American stain. Followed by 3 coats of polyurethane, and 2 coats of Minwax Polycrylic on the table top.
Recommended Skill Level
Beginner

Home Depot Adirondack Chair

Submitted by Seth on Wed, 06/12/2013 - 12:07

A few weeks ago my wife said she needs a footstool for our rocking chair while she rocks the baby to sleep. Being a sneaky husband, I quickly began planning to build her one because I knew I wasn't going to be able to find anything commercially sold that matched our baby room colors. A week later I have 2 Adirondack chairs, a table, a bunch of tools I didn't have before, and no footstool.... So about the chairs...The plans were super easy and well thought out. I learned a few things about cutting angles, which if you look closely you can see the seat portion does not extend to the front legs. Instead of wasting more wood, I simply adapted the plans. This makes the backs of the chairs sit upright more, but I actually like it because I have a bad back. We sanded it with 150 grit sand paper, and should have done a second sanding with a finer paper, but we didn't. I primed the wood with a basic multi purpose primer and then painted with BEHR outdoor white semi-gloss. I wanted to seal it with a poly, but Home Depot did not recommend sealing with with Poly, and I could not find a Poly in Home Depot that did not warn AGAINST using it on painted surfaces. Oh, and make sure you wear eye protection! Dust in the eyes is brutal. Fortunately I have a kind wife who washed them out for me. :) Now I have a nice pair of clear glasses.

Estimated Time Investment
Day Project (6-9 Hours)
Finish Used
BEHR white semi-gloss exterior paint

They only needed 1 coat of primer and 1 coat of paint. This paint was really thick.
Recommended Skill Level
Starter Project

Comments

Great Book Caddy / Wine Rack / Side Table..fun project!

Submitted by Don Ellery on Sat, 05/16/2015 - 17:12

Great project plans from Ana and of course, LadyGoats. Thank You!

Wood: Pine (similar cut list to what was in the plans)

Time to complete: Approx 4 hours.

Joints: 3/4 inch pocket holes with 1 1/4 inch pocket hole screws and glue. Love my Kreg Jig.

Stain: Varathane Espresso color, two applications.

Fun morning project! This table/shelf can be used for so many things. Once the two pieces are secured together it is very solid. The bottom was made from Ana's x book caddy plan and the shelf was modified from LadyGoats booksellers plan.

Hope you all like it!

Don

Estimated Cost
$80, approx. Depends on what type of wood you use.
Estimated Time Investment
Afternoon Project (3-6 Hours)
Finish Used
Espresso color varathane, single application, foam brush and rubbed with rag to finish.
Recommended Skill Level
Beginner

Comments