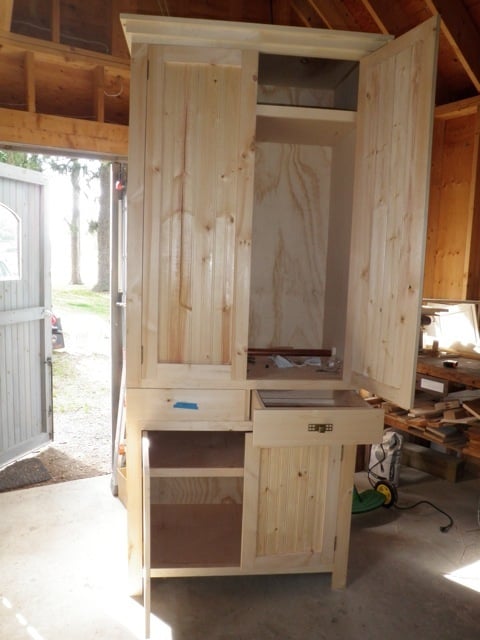
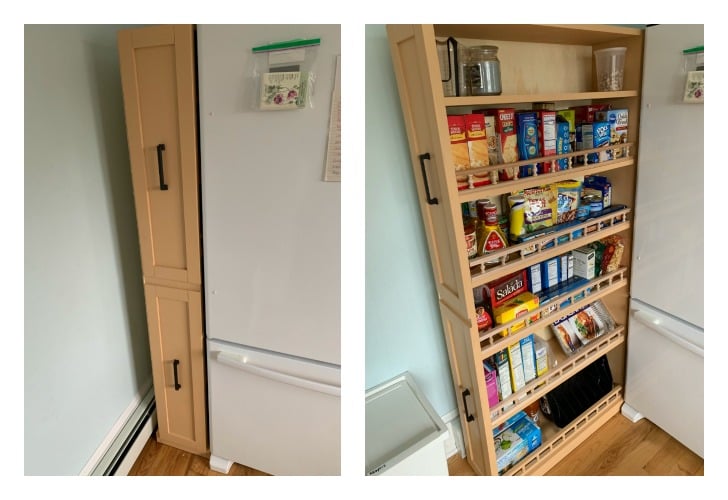
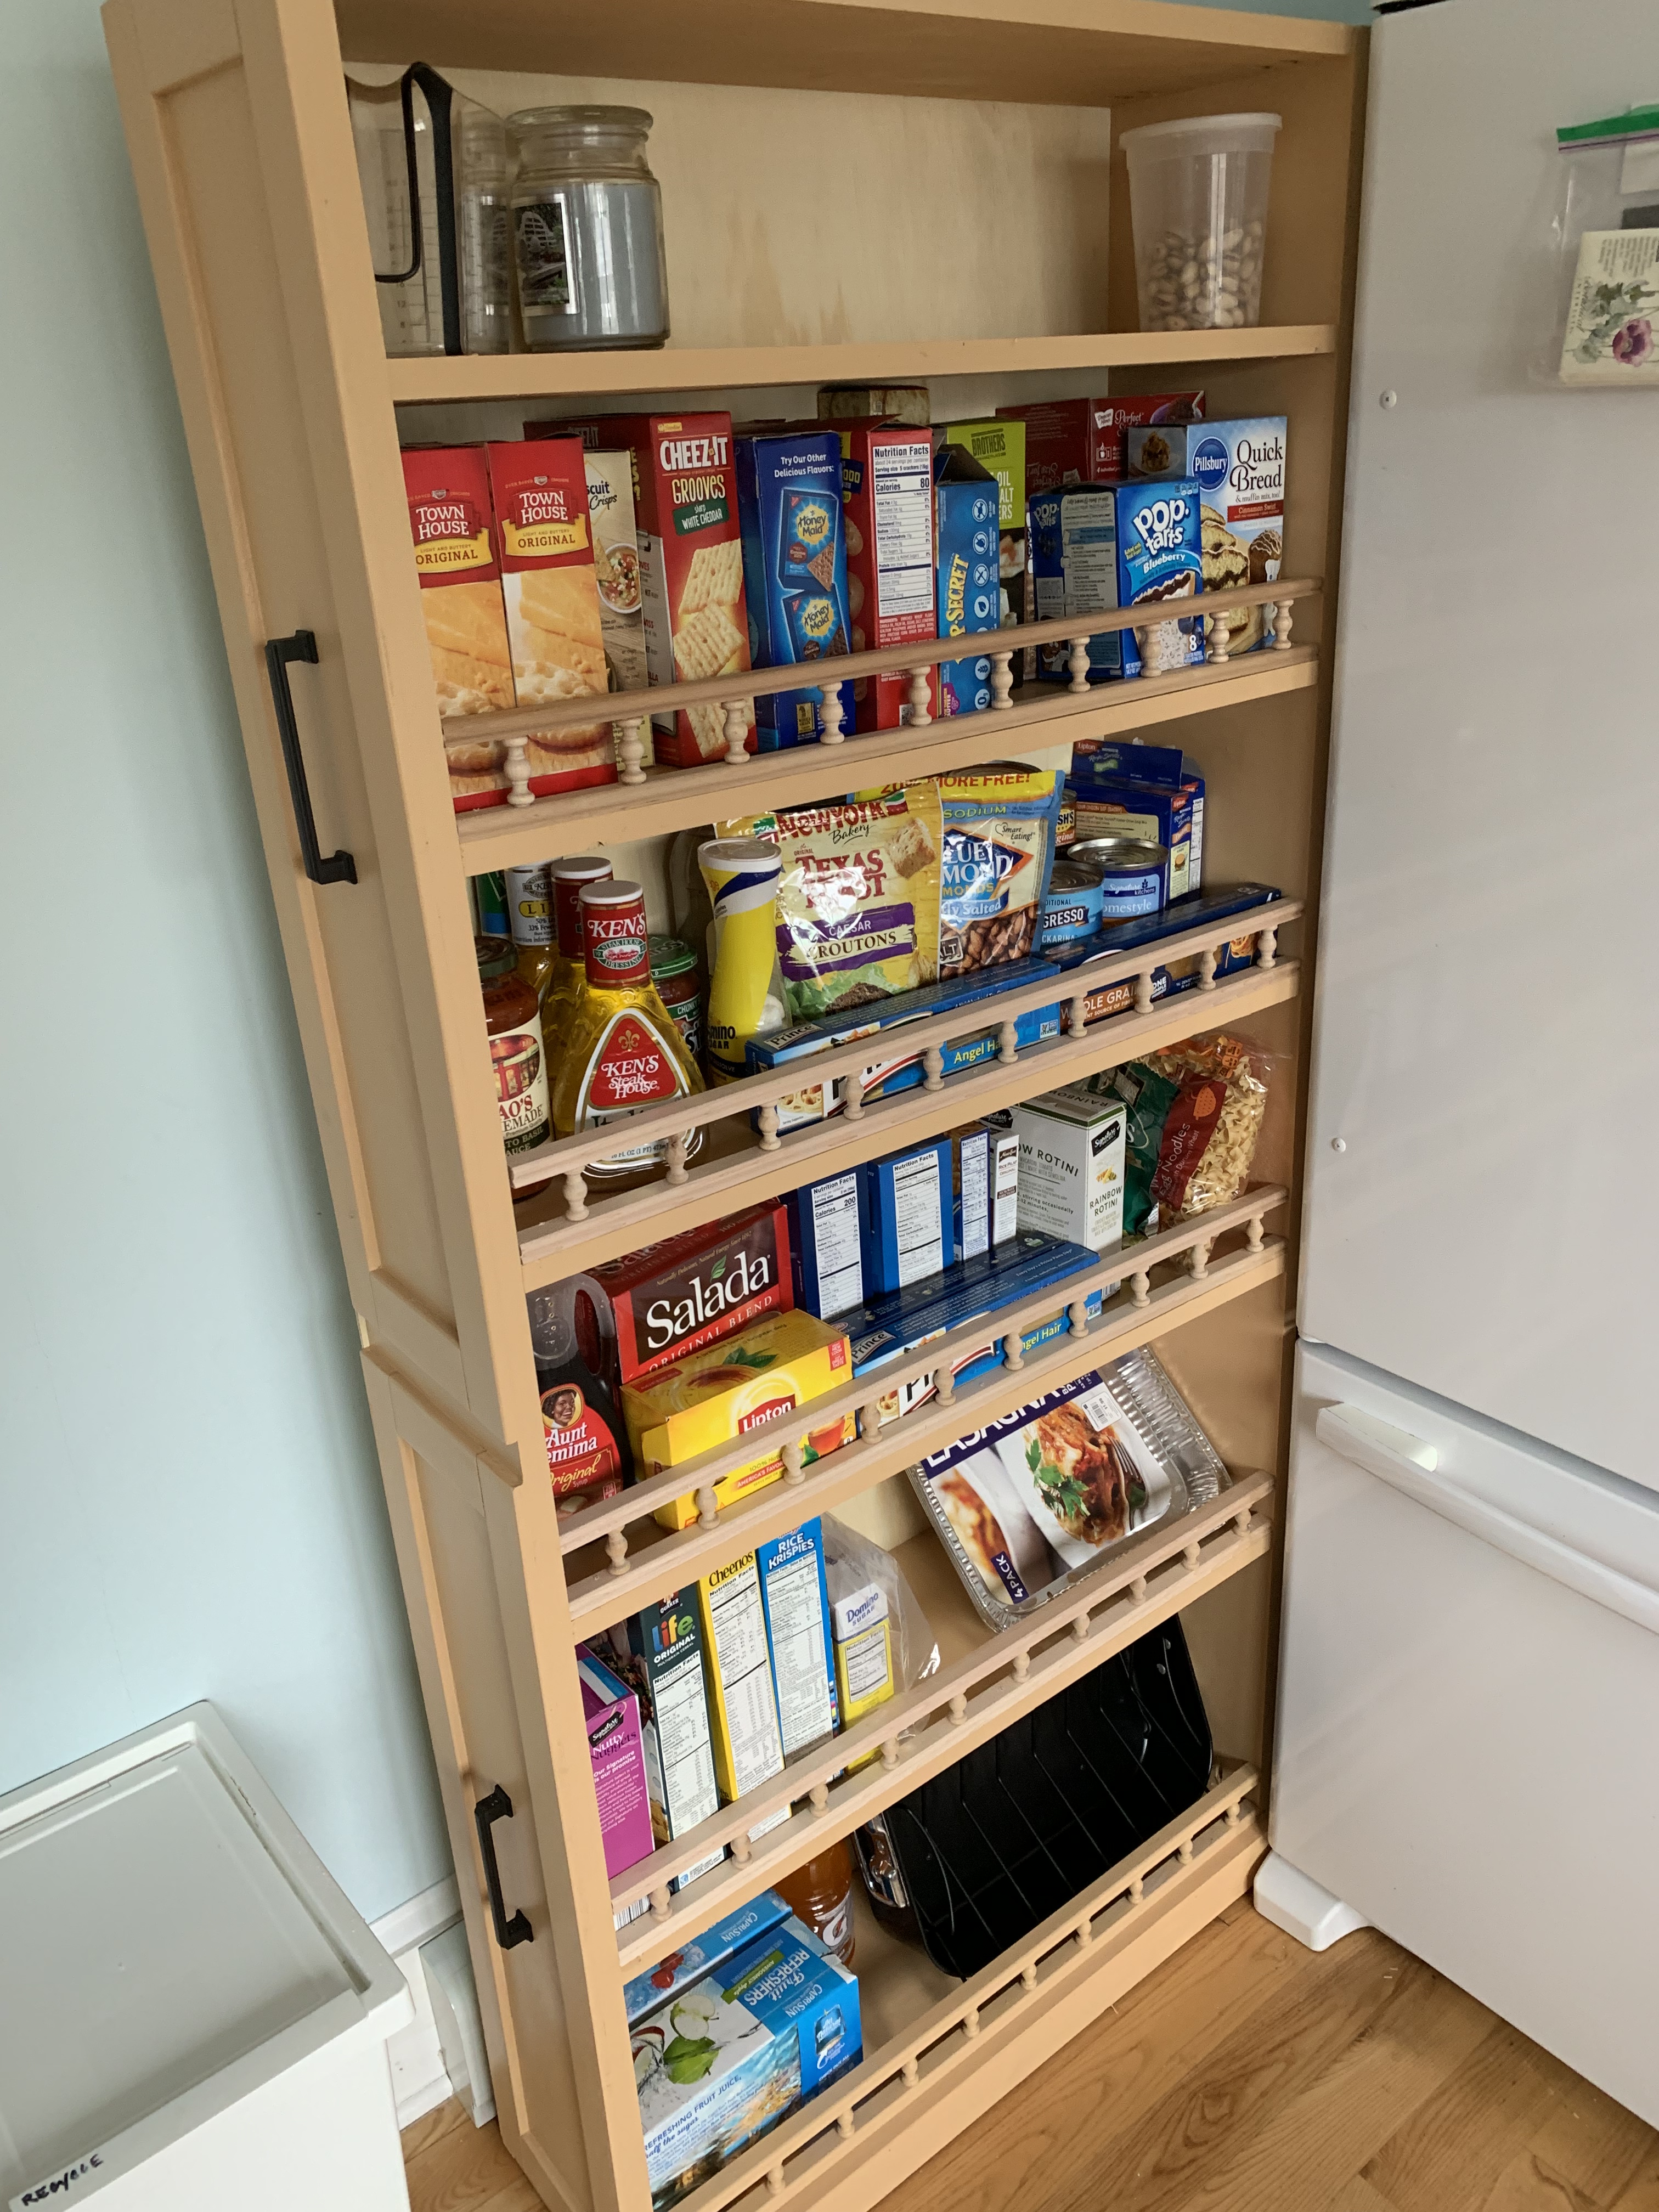
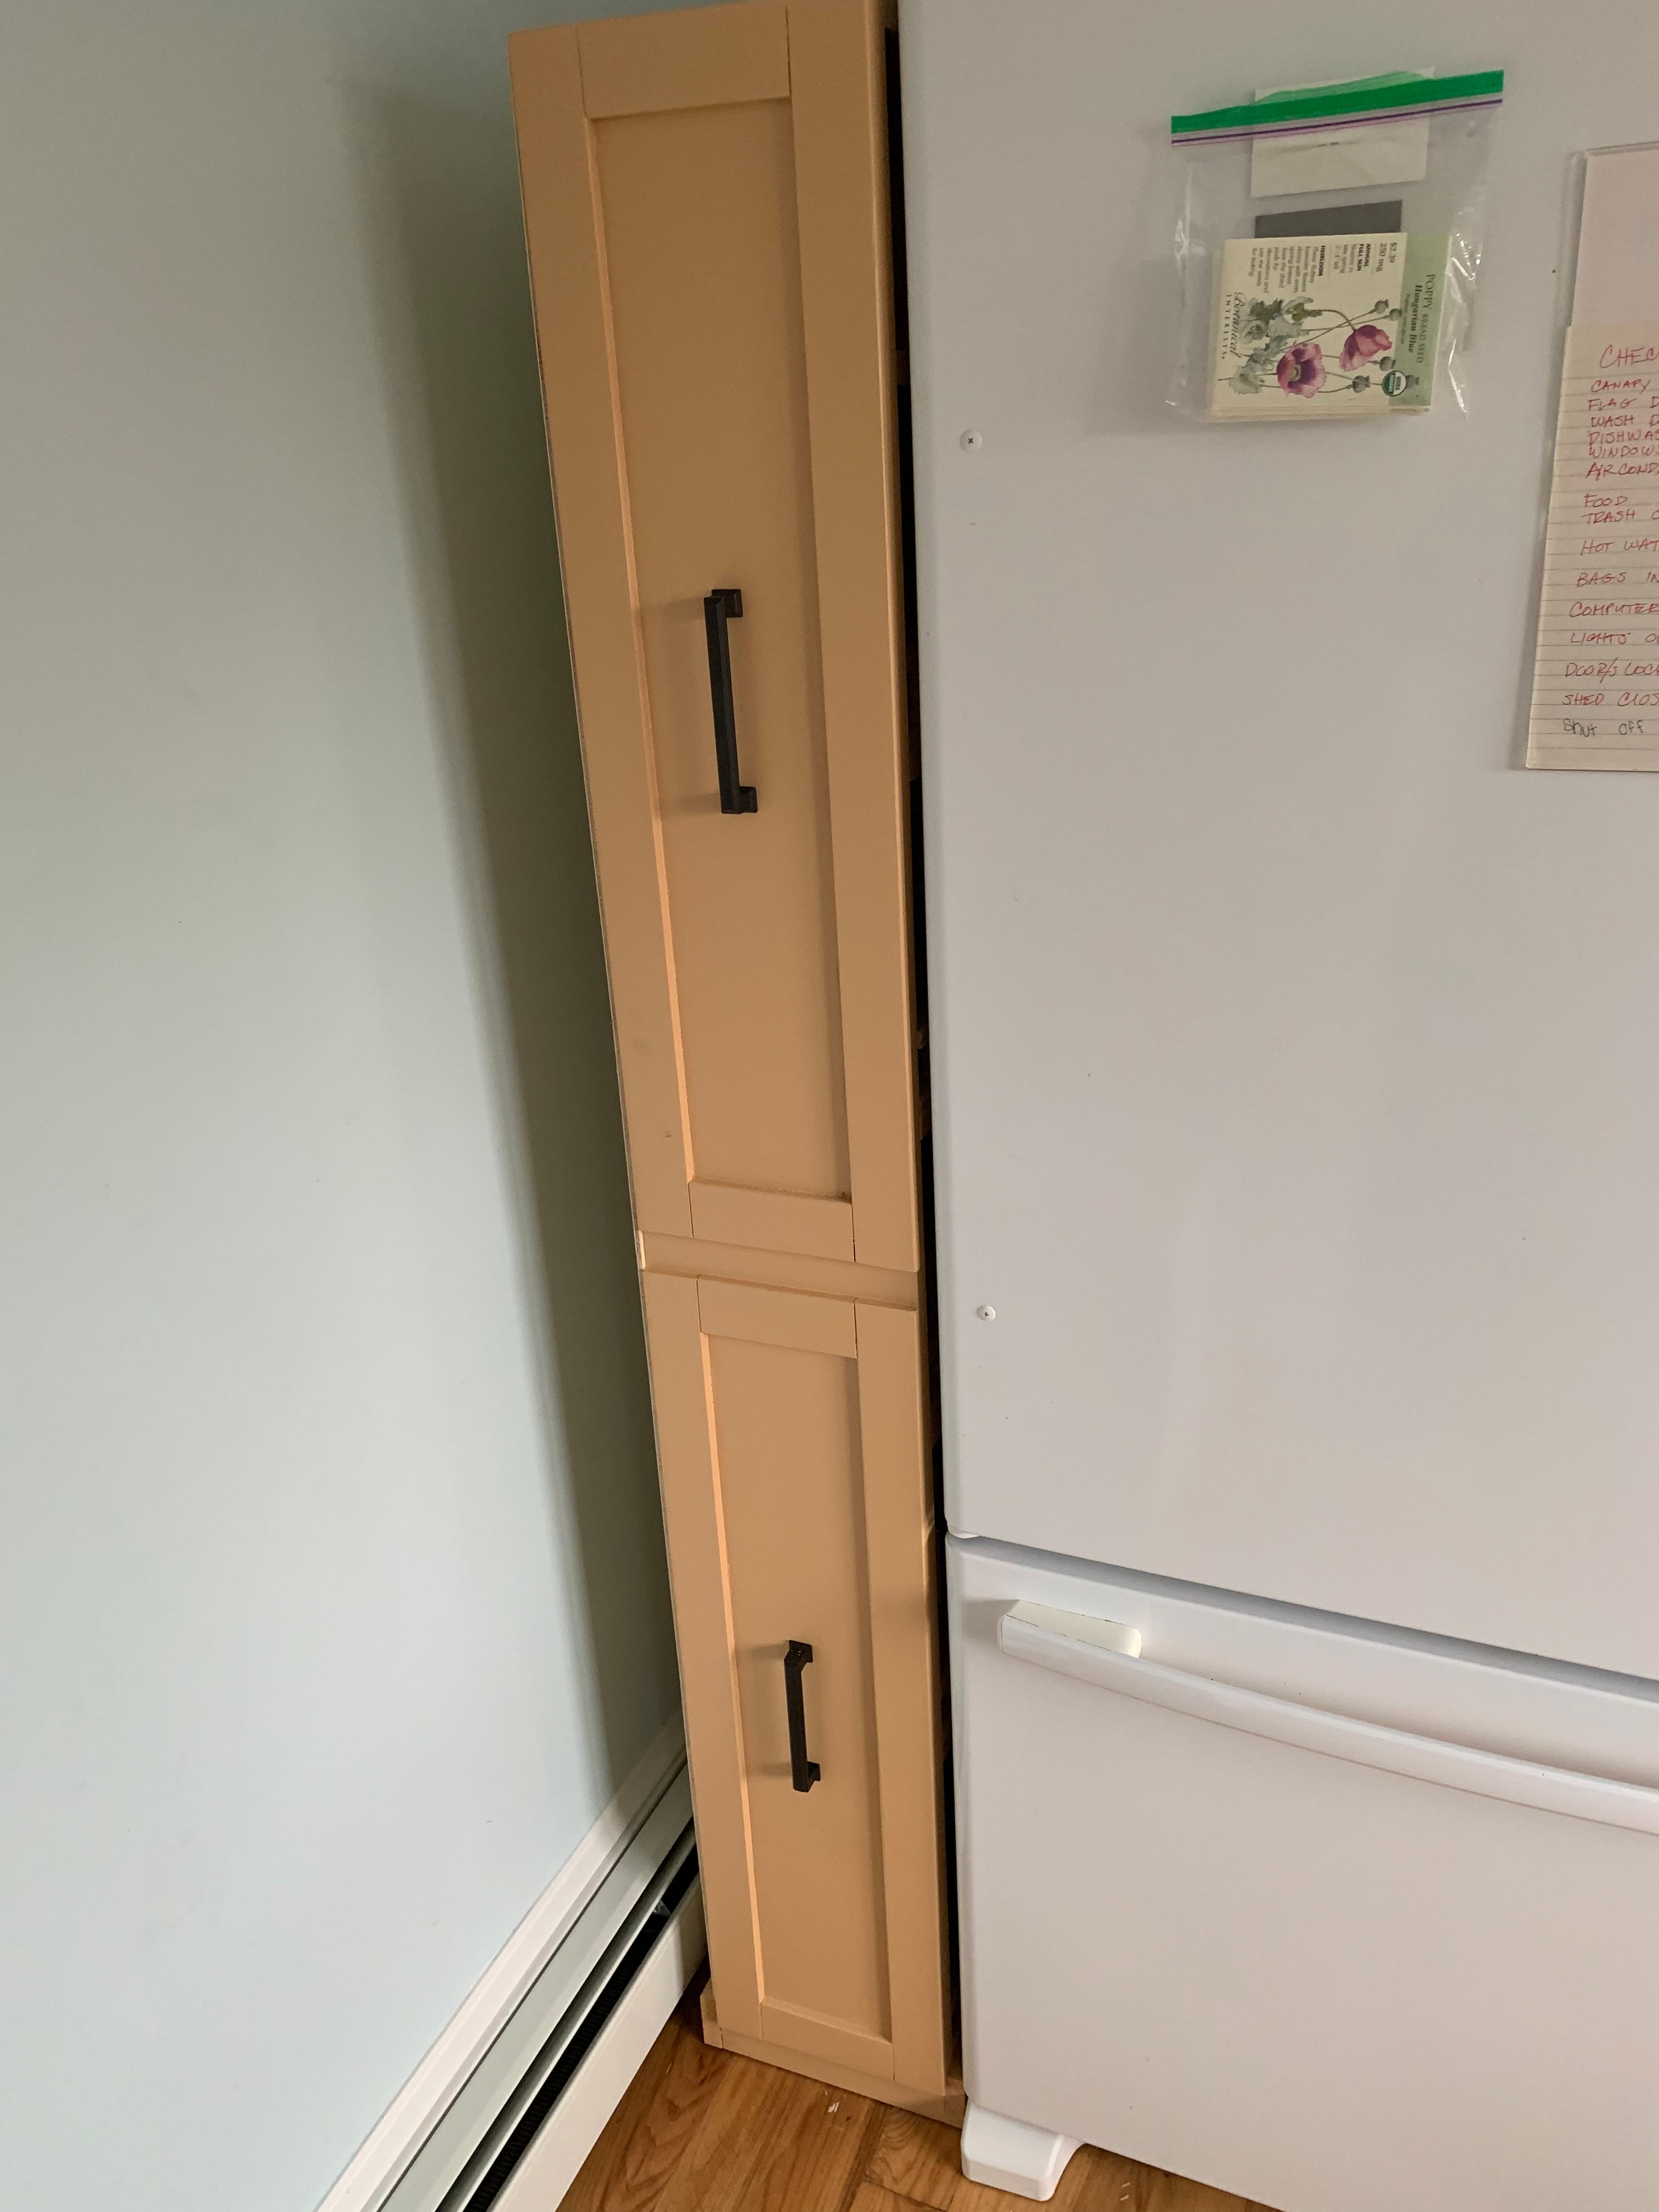
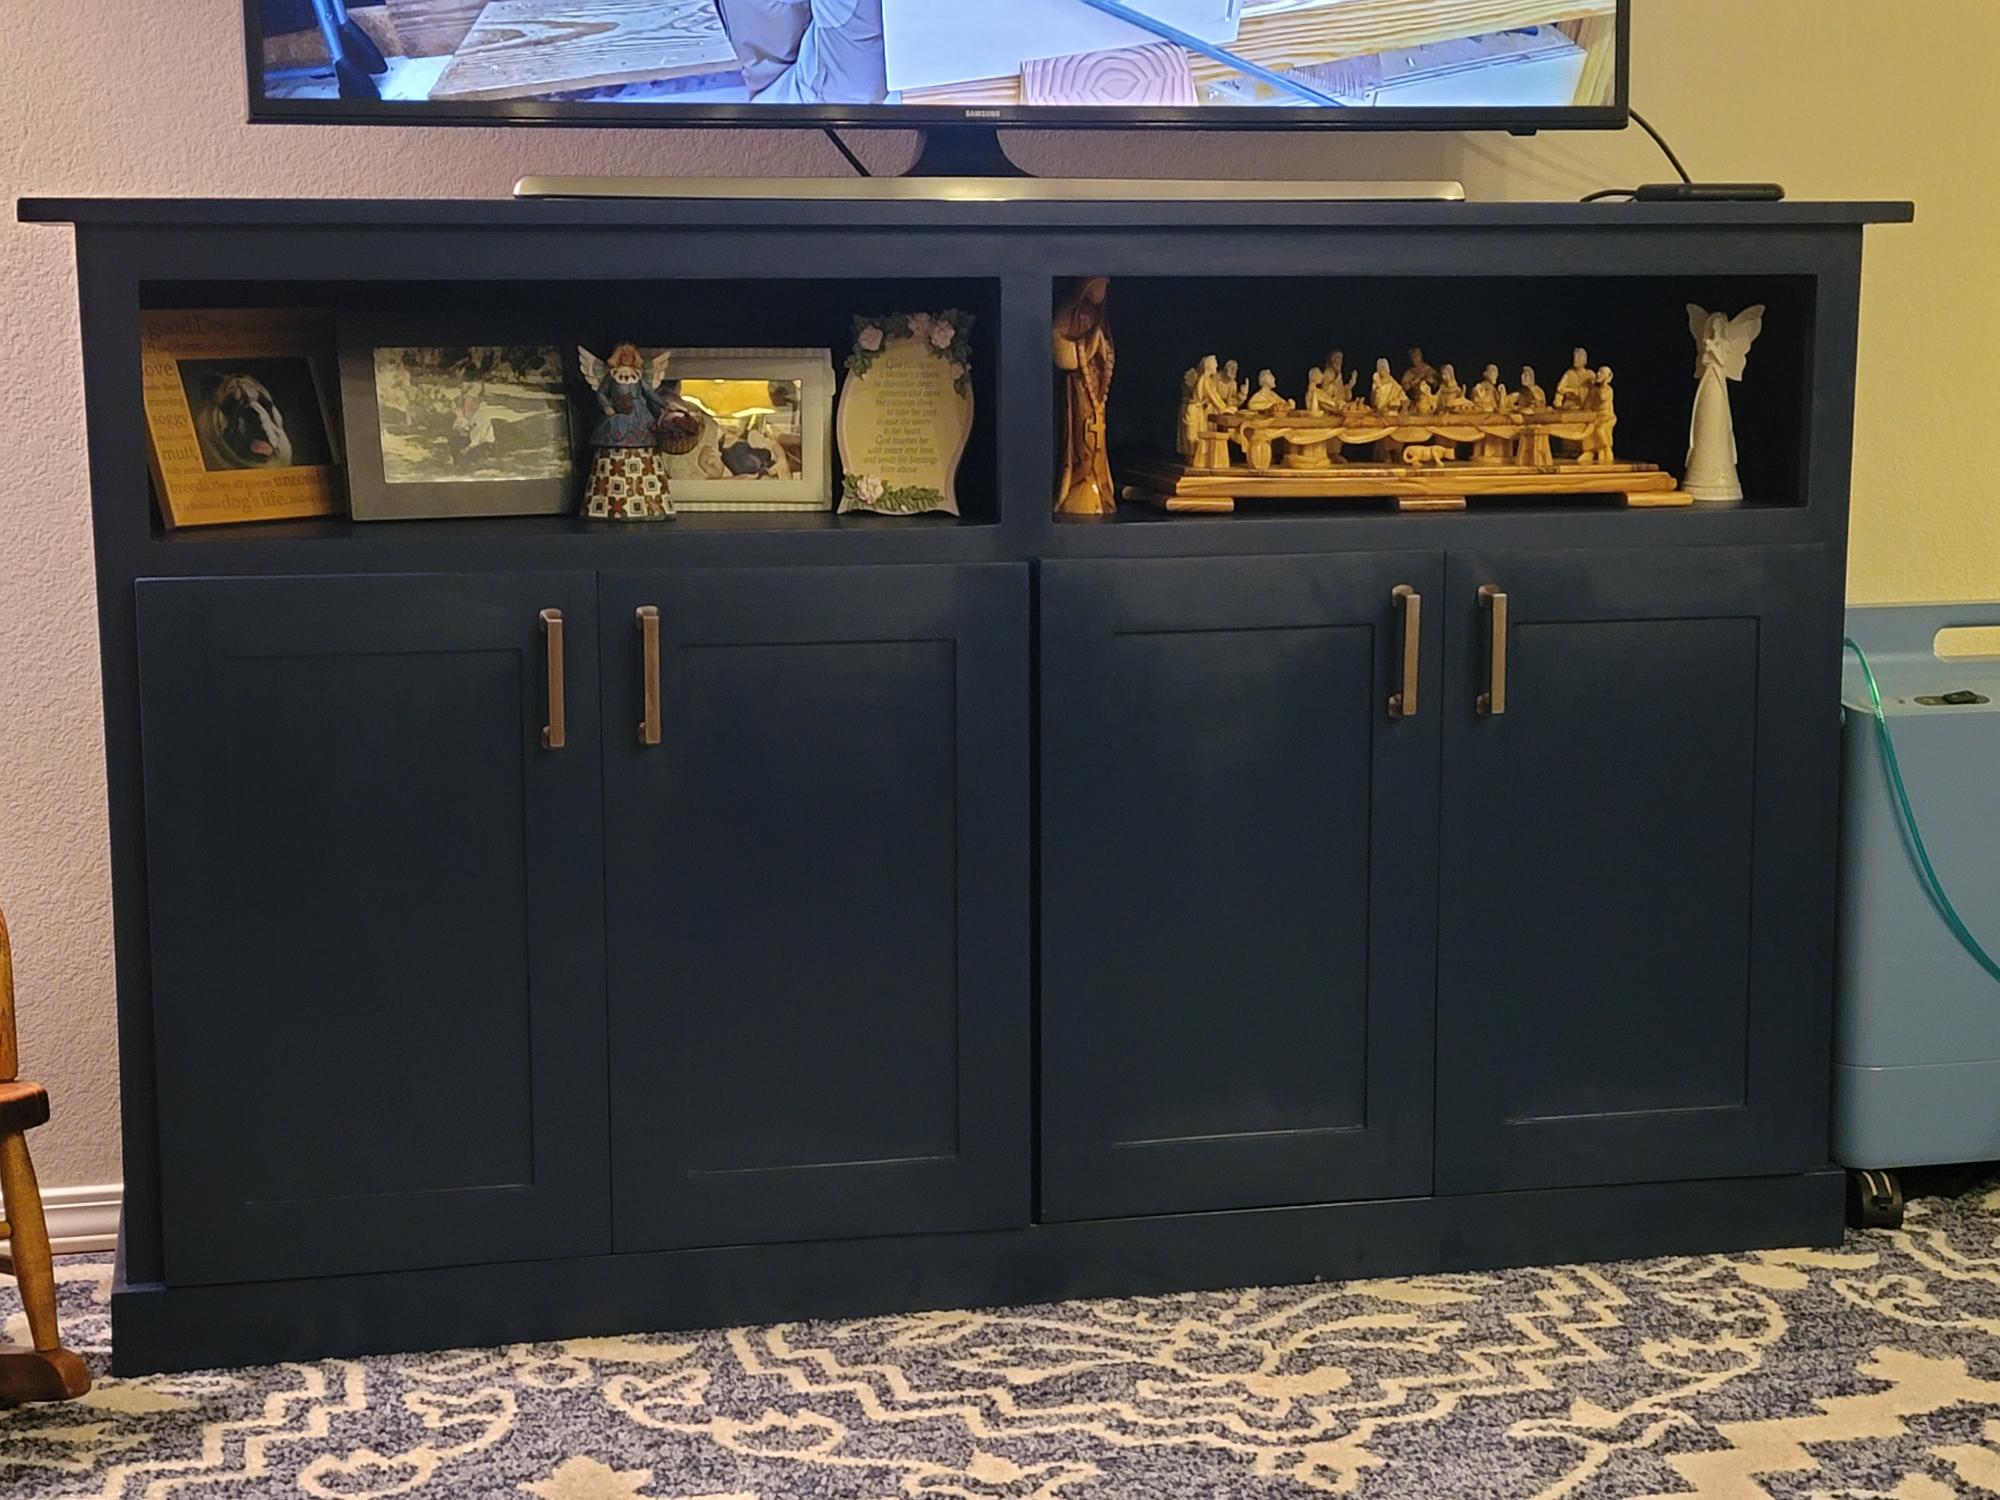
Community Brag Posts

Front Hall Armoire

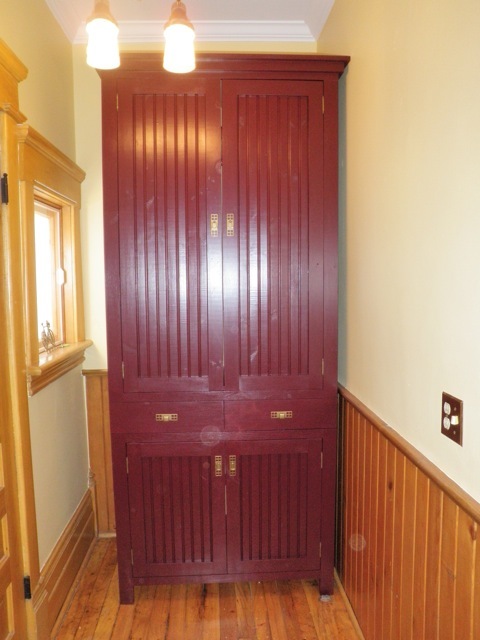
Our big old house doesn't have a front hall closet, so I decided to make the Nursery Armoire for our extra coats and shoes. Since our ceilings are so tall I decided to make it the full 96" that I could get out've the sheet of plywood.
I also modified the plan to adjust the door heights so that the top would make good coat hanging and the bottom can be used for shoes and boots. I also changed the drawers to be on the outside instead of behind the upper doors.
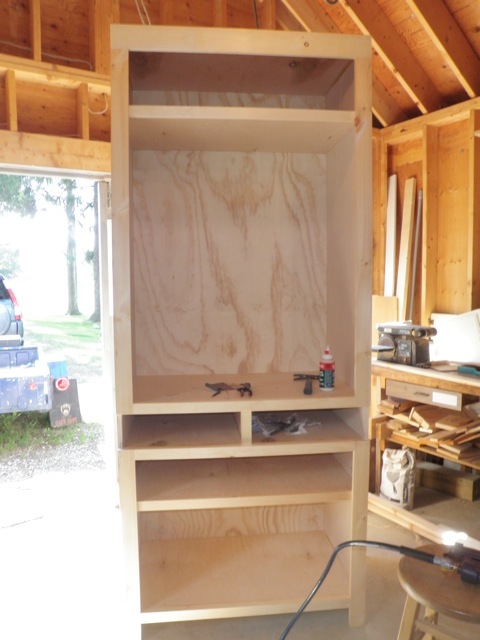
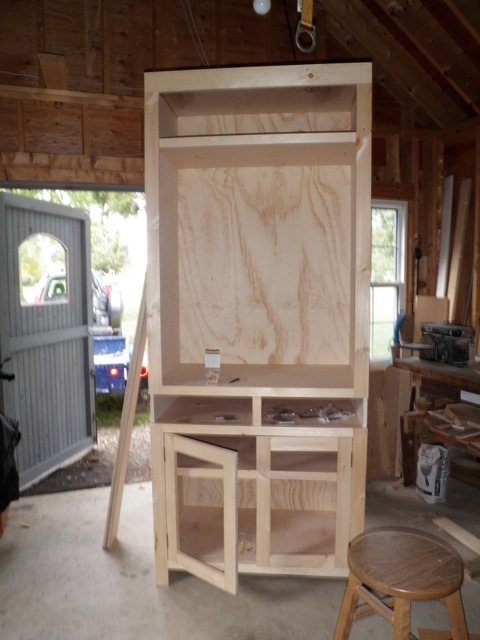
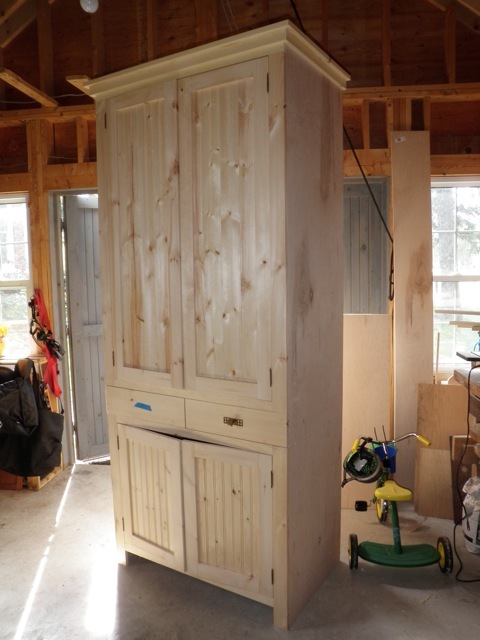
I used 3/4" plywood for the box and pine for the doors and trim.
For the doors I pocket holed the frames and then routed an edge on the backside and stapled pine paneling to fill out the middle. This matches doors I made previously to make cupboards in our full-wall brick fireplace (and the hardware matches too).
I did the top trim as in the plan, and I decided to leave the bottom plain.
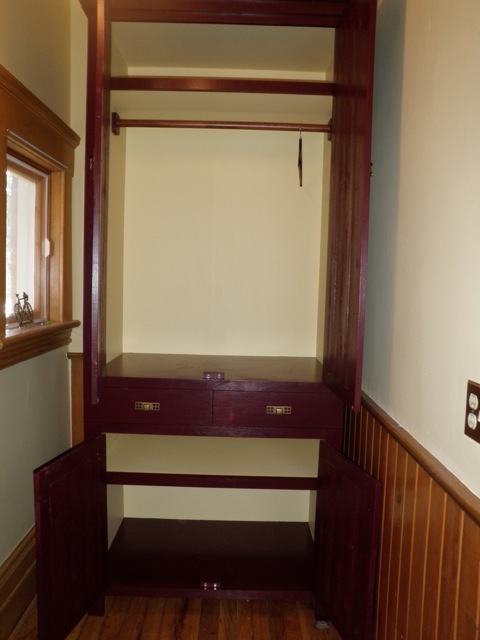
It's quite large! But in the space a smaller one would've looked silly, so I'm glad I went with the height.

I decided to paint it so that I didn't have to fuss with staining, but went with the same paint as the walls for the backs and undersides of shelves to lighten it up.

Can't wait to fill it up! ....just have to give the dark paint one more go-over....

Built from Plan(s)
Estimated Cost
$300
Estimated Time Investment
Week Long Project (20 Hours or More)
Finish Used
Paint! "Wine and Dine" Exterior semi-gloss from Canadian Tire! And an interior yellow paint leftover from the walls in the foyer.
Recommended Skill Level
Intermediate

Comments

Coat Rack with a Cubby

Our mud room/laundry room is very busy with 2 boys and 2 adults. Scarves, gloves and hats are generally tossed here or there, usually far and wide when it comes to my boys.

My solution was a coat rack with cubby. Like most of my creations, it is a Kelley Special, all up in my head. I don't have plans, although I will make some when I make the next ones for me and my husband.

I used poplar 1x4's for the sides, bottom and back attachment and 1x6's for the front where coat hooks will be mounted, 2 small coat hooks on the sides, wood glue, and pocket holes to construct it.

If you add the time I spent on it, it didn't take too long, but it took a while since it was a few minutes here and a few minutes there. I am very happy with the final product, and we are starting to test it out now that the weather is cold again.

If you want to see more pictures take a swing by my blog: www.trekkiemom.com

Estimated Cost
$20-$30 per coak rack - not sure anymore
Estimated Time Investment
Day Project (6-9 Hours)
Finish Used
2 Polycrylic clear coat, light sanding between coats
Recommended Skill Level
Beginner

4x4 truss beam table

Submitted by Anonymous (not verified) on Thu, 01/07/2016 - 22:01

Great instructions, easy weekend build. 

Built from Plan(s)
Estimated Cost
$150
Estimated Time Investment
Weekend Project (10-20 Hours)
Finish Used
Stain finish with hand rubbed wax sealer
Recommended Skill Level
Beginner

Roller Vertical Pantry

Submitted by MikeW on Mon, 05/06/2019 - 08:49

Made my wife happy!

Estimated Time Investment
Day Project (6-9 Hours)
Finish Used
Paint
Recommended Skill Level
Intermediate

Comments

Dog kennel

Submitted by Anonymous (not verified) on Fri, 03/03/2023 - 06:54

In January, I came across your plans for the farmhouse, coffee table. I made it, and loved it! I had been wanting a new spin on kennels for our dogs. And thought your coffee table transformed into a dog kennel would be perfect, and they are!!

Comments

Modern Craft Table *tweaked*

Completed Modern Craft Table! We tweaked the plans a bit because I was looking for a larger table top. The top now measures 48" x 76". We simply did this by adding an extra set of cubbies to the other side of the shelves. Absolutely LOVE how this turned out! All I need now is 4 counter height stools built and lots of shelves to complete my craft room! Will be sure to post those once they are completed!

Built from Plan(s)
Estimated Time Investment
Weekend Project (10-20 Hours)
Finish Used
Ultra White Latex Paint
Recommended Skill Level
Beginner

Comments

Ana White

Thu, 11/17/2011 - 01:10

Darn I was so excited to see you craft table! I apologize that your brag post did not show images. If you can send me images at knockoffwood(at)gmail.com I'd be happy to post. Thanks so much for submitting a brag post. Ana

Guest (not verified)

Sun, 03/04/2012 - 07:31

I LOVE LOVE LOVE your craft table. I want one! Looks like my husband wil have to get busy! Thanks for sharing!
Kristina
Houston, TX

Kimmy (not verified)

Tue, 03/20/2012 - 17:51

Is this the pic of the one you did ?? I am wanting a bigger table top too. I have waited years for just the right table and this is it.

Kimmy (not verified)

Tue, 03/20/2012 - 17:51

Is this the pic of the one you did ?? I am wanting a bigger table top too. I have waited years for just the right table and this is it.

Kimmy (not verified)

Tue, 03/20/2012 - 17:54

Is this the one you made ? I want a bigger table top as well. But I don't see the extra cubbies.

Kimmy (not verified)

Tue, 03/20/2012 - 17:54

Is this the one you made ? I want a bigger table top as well. But I don't see the extra cubbies.

naildoctors

Tue, 05/29/2012 - 00:05

This is great!! I am planning something similar, but what is your idea or the plan you used for the middle support to keep it from sagging over time? My idea is to run another cubby in the middle from side to side. What do you think?

Laura Mulholland (not verified)

Mon, 01/21/2013 - 09:54

I love the modern craft table, just what I have been looking for, do you share instructions, dimensions, etc.? thanks, Laura

HapETexanGal

Thu, 05/12/2016 - 15:14

I'm loving this and would love to have FIL build it for me but the plans look like its for the regular modern craft table but not the tweaked?  Also is there support for the middle?  Can you send me a link for the tweaked supply list please, can't seem to find it.  Love what you do!

Children's Zoo

I made this as a gift for a friends Baby Shower. It's meant to mount on the wall and hold Baby's stuffed animals. After the Shower yesterday, it's half full of animals already!

I used pine, and a "walnut" stain by minwax. We only stained the structure part so the bars would look like they were a different material. I also used glue, a staple gun and my Ryobi Airstrike automatic nailer - it's a new toy for me, but one I'm in love with already :)

Please feel free to click over to my blog for details on how to help build yours! ---> http://projectjumanji.blogspot.ca/2013/10/what-ive-been-up-to.html

Estimated Cost
$50
Estimated Time Investment
Afternoon Project (3-6 Hours)
Finish Used
minwax stain - "walnut"
Recommended Skill Level
Starter Project

Small Flower Planter

Submitted by JamieLynn on Sun, 05/19/2019 - 04:45

This is my first project in years. It turned out exactly as I wanted. I decided to paint it after with some white paint That I had laying around. This whole project cost about $15 and 2 hours.

Estimated Cost
$15
Estimated Time Investment
An Hour or Two (0-2 Hours)
Recommended Skill Level
Starter Project

Bar stool

Submitted by Anonymous (not verified) on Fri, 03/10/2023 - 13:10

Hi Ana,

Using the bar stool plan and I built two bar stools for my man cave in Australia. Thank you so much. Cheers
Ricky

Built from Plan(s)

Comments

Ariel's Coffee Table

I built that table for a friend using primarily hand tools. The only power tools were a table saw to rip the legs from a scrap 2x12 from another project, and a drill for draw-bore holes.

The table is made from pine, so that it is light enough for a woman of small stature to carry it up to a third-floor apartment. The frame is made with mortise and tenon joinery for strength, and the joints are draw-bored to make sure it doesn't fall apart in our lifetime.

The top is a glued-up panel from five other boards. This was my first panel glue up, so it was a little bit exciting in the same way that a kitchen fire is exciting. The surface has a rustic texture, made by planing it smooth with a cambered jack plane. The texture isn't visible under normal lighting, but with a raking light you can see it. It's very interesting to run your fingers over this table because of the texture from the plane, and the strong grain of the white pine.

Estimated Time Investment
Week Long Project (20 Hours or More)
Finish Used
The finish is amber shellac, with four coats of gloss polyurethane, thinned 1:1 with mineral spirits to improve the flow and help the finish self-level.
Recommended Skill Level
Intermediate

Wood Trug - Kit Form

Submitted by rosiejane on Tue, 10/29/2013 - 01:25

I made these back in February. I came across this project on Jamie's site (http://thatsmyletter.blogspot.com.au/2012/10/t-is-for-trug-naked-versio…) earlier in the year and thought that it would make a fantastic birthday gift for my 6 year old nephew. I gave it to him in kit form complete with nails and glue so that he could assemble it himself. I predrilled the nail holes. Of course I then had to make one for my own 6 year old so that they could build them together. I adjusted the size to accommodate some tools my dad had given them for Christmas. Time indicated includes personalisation time.
I've had a bit of practice painting names since this project. Each time I get better at it.

Built from Plan(s)
Estimated Cost
under $5
Estimated Time Investment
Afternoon Project (3-6 Hours)
Finish Used
Used cheap craft acrylics for the stripe and the name. Due to time constraints I skipped the protective poly coat. I did go back later and add poly to my son's one.
Recommended Skill Level
Starter Project

2x4 patio couches

Submitted by Sner77 on Mon, 05/27/2019 - 10:49

I built 2 of the 2x4 couches with slight modifications.  I didn’t like the straight bar across the back so changed it to a leaning high back.

I also added a square box that can be used for a dividing table on the couch or side table when additional seating is needed.  

Plan on scaling down for a love-seat and chair.

Kreg jig for pocket holes was time consuming but well worth it! 

Built from Plan(s)
Estimated Time Investment
Weekend Project (10-20 Hours)
Finish Used
Urathane.
Not pleased with the urathane finish after 2 years. I have begun sanding them down to try a linseed oil finish instead.
Recommended Skill Level
Beginner

High Patio Chairs

Submitted by Anonymous (not verified) on Sat, 03/18/2023 - 12:12

Made from reclaimed materials. Made it easier to standup with my bad knees

Comments

Seth's first work bench

I am so excited to have my son see this on Christmas morning. I decided to build in the bottom shelf for more tool storage and I am considering drilling some holes in the sides of the top shelf or the back for hammering in "nails" (or clothespins painted grey). This was my first project without any man-help and I can't wait to get started on the next one! Thank you so much Ana for your designs and more importantly, your inspiration.

Built from Plan(s)
Estimated Cost
$21.00
Estimated Time Investment
An Hour or Two (0-2 Hours)
Finish Used
Clear coat and laytex paint (benjamin moore admiral blue)
Recommended Skill Level
Beginner

Comments

rhonit

Sun, 12/04/2011 - 13:44

you're little guy should love this. my grandson is 4 months old but next year this is on my list to build for him. love the idea about the wooden clothes pins. good job!

Rustic X Console Table

Submitted by hmctagg on Sat, 11/02/2013 - 13:05

We followed the plans closely, and it turned out well for the first project. It was the perfect size for what we needed! My husband had never built anything like this before and after a little research on how to use the kreg jig, he was able to finish it in a weekend.

Estimated Cost
$120 including finishing supplies
Estimated Time Investment
Weekend Project (10-20 Hours)
Finish Used
I used one coat of Minwax Provincial. I originally bought a sample can to practice on some scraps and then planned to go buy the bigger can, but I was able to stain the entire table with the sample size using an old T-shirt instead of a brush (I didn't want to risk brush marks). I liked the look after one coat, so I stopped there. I also decided against adding the hardware since I liked the look without it.
Recommended Skill Level
Beginner

Outdoor Sectional

Submitted by KristenP on Thu, 06/06/2019 - 18:00

We built Ana’s outdoor sectional in a few hours and it’s made a huge impact on our deck! It saved us so much money but looks like a high end piece! Thank you for the simple and structured plans!

Estimated Cost
$200
Estimated Time Investment
Afternoon Project (3-6 Hours)
Finish Used
Cedar Stain
Recommended Skill Level
Beginner

Comments

Entry Cosole/Media Stand

Submitted by Anonymous (not verified) on Fri, 03/24/2023 - 14:09

Thank you for this plan! We did a few alterations like the soft close shaker doors. We painted with Navy Blue paint mixed with BBFrosch chalk mix. Love this so much! John + Jina
Colorado

Comments

Rustic X Bench

Submitted by jont on Fri, 12/09/2011 - 18:51

Simple x bench followed the plans posted below except I shortened it to fit our old table.

Estimated Cost
$35
Estimated Time Investment
Weekend Project (10-20 Hours)
Finish Used
English Chestnut Minwax stain with 2 coats minwax polyurethane
Recommended Skill Level
Intermediate

Comments