Community Brag Posts

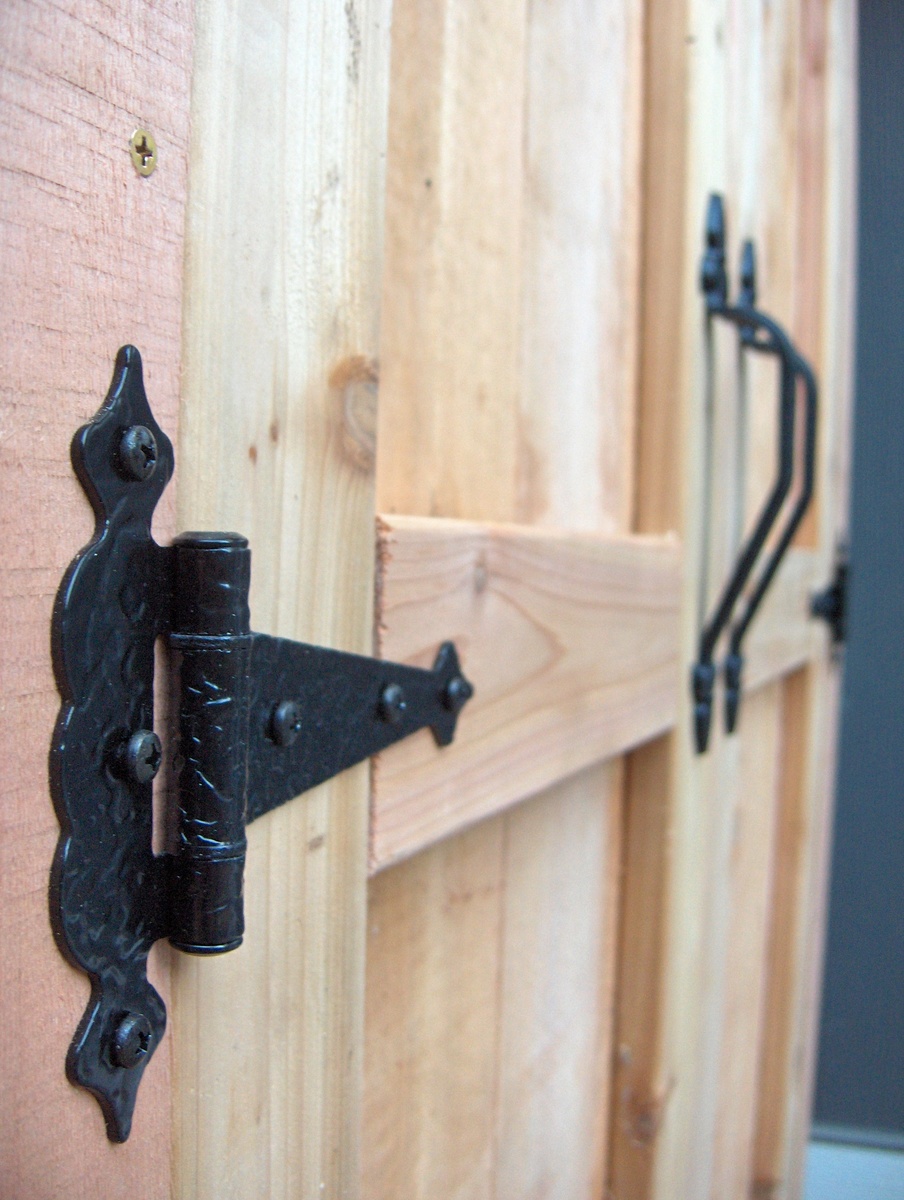
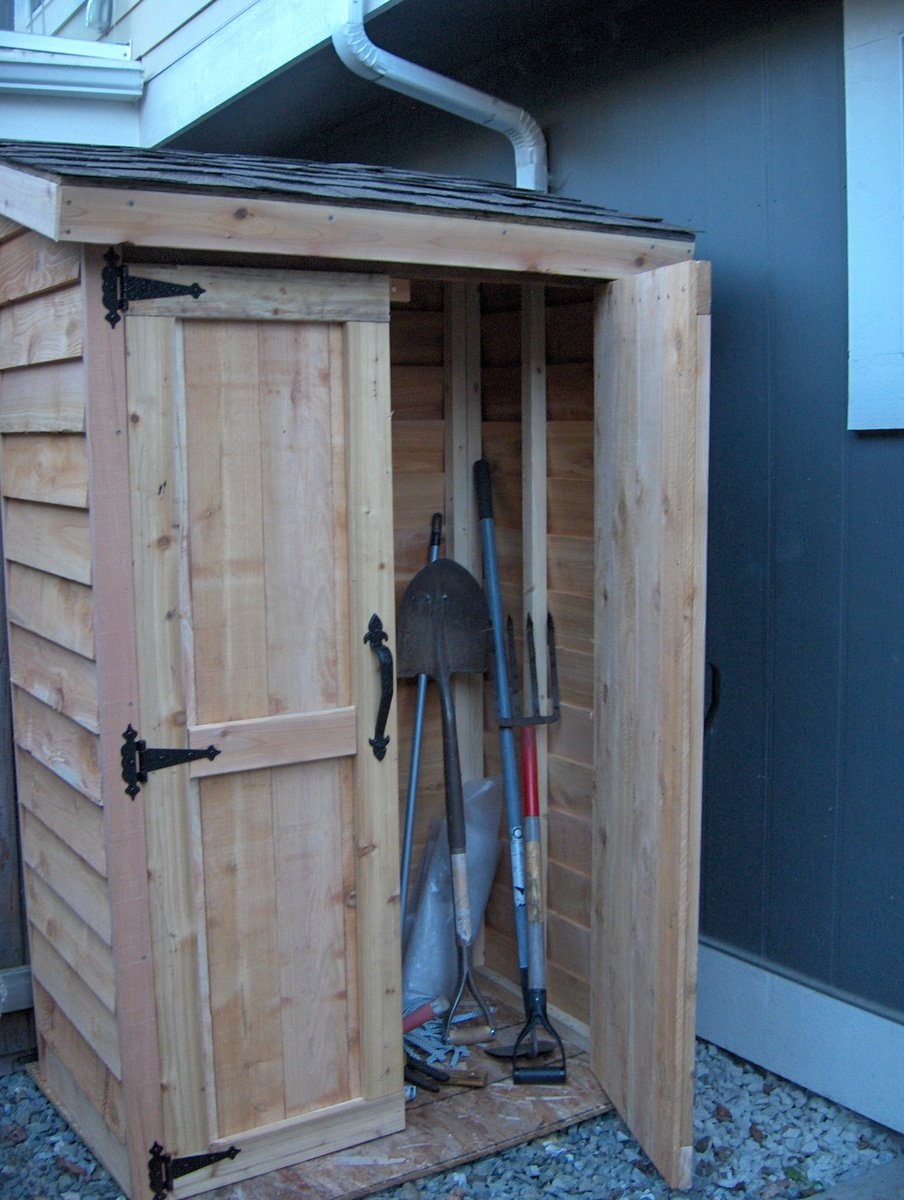
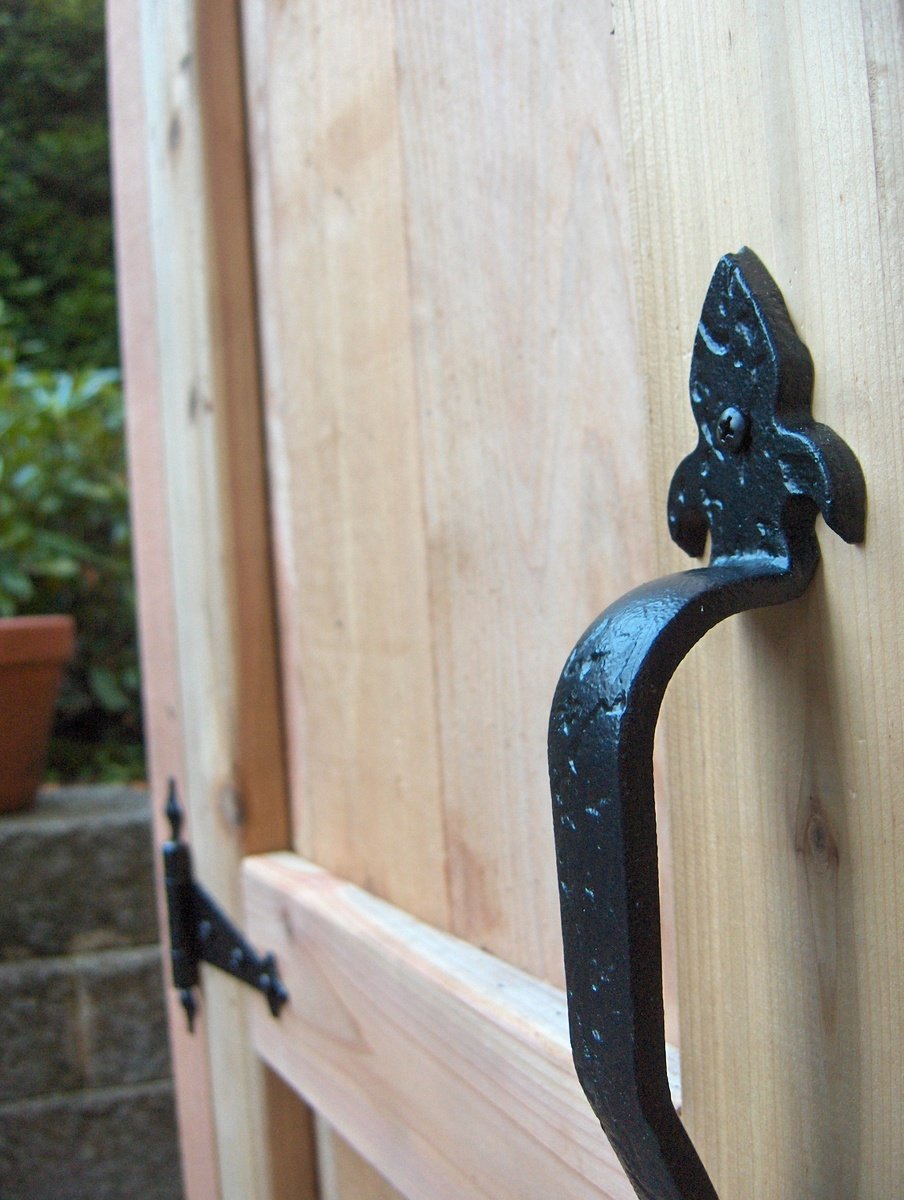
Mini Cedar Storage Shed

Submitted by jakevdp on Sun, 06/09/2013 - 23:10

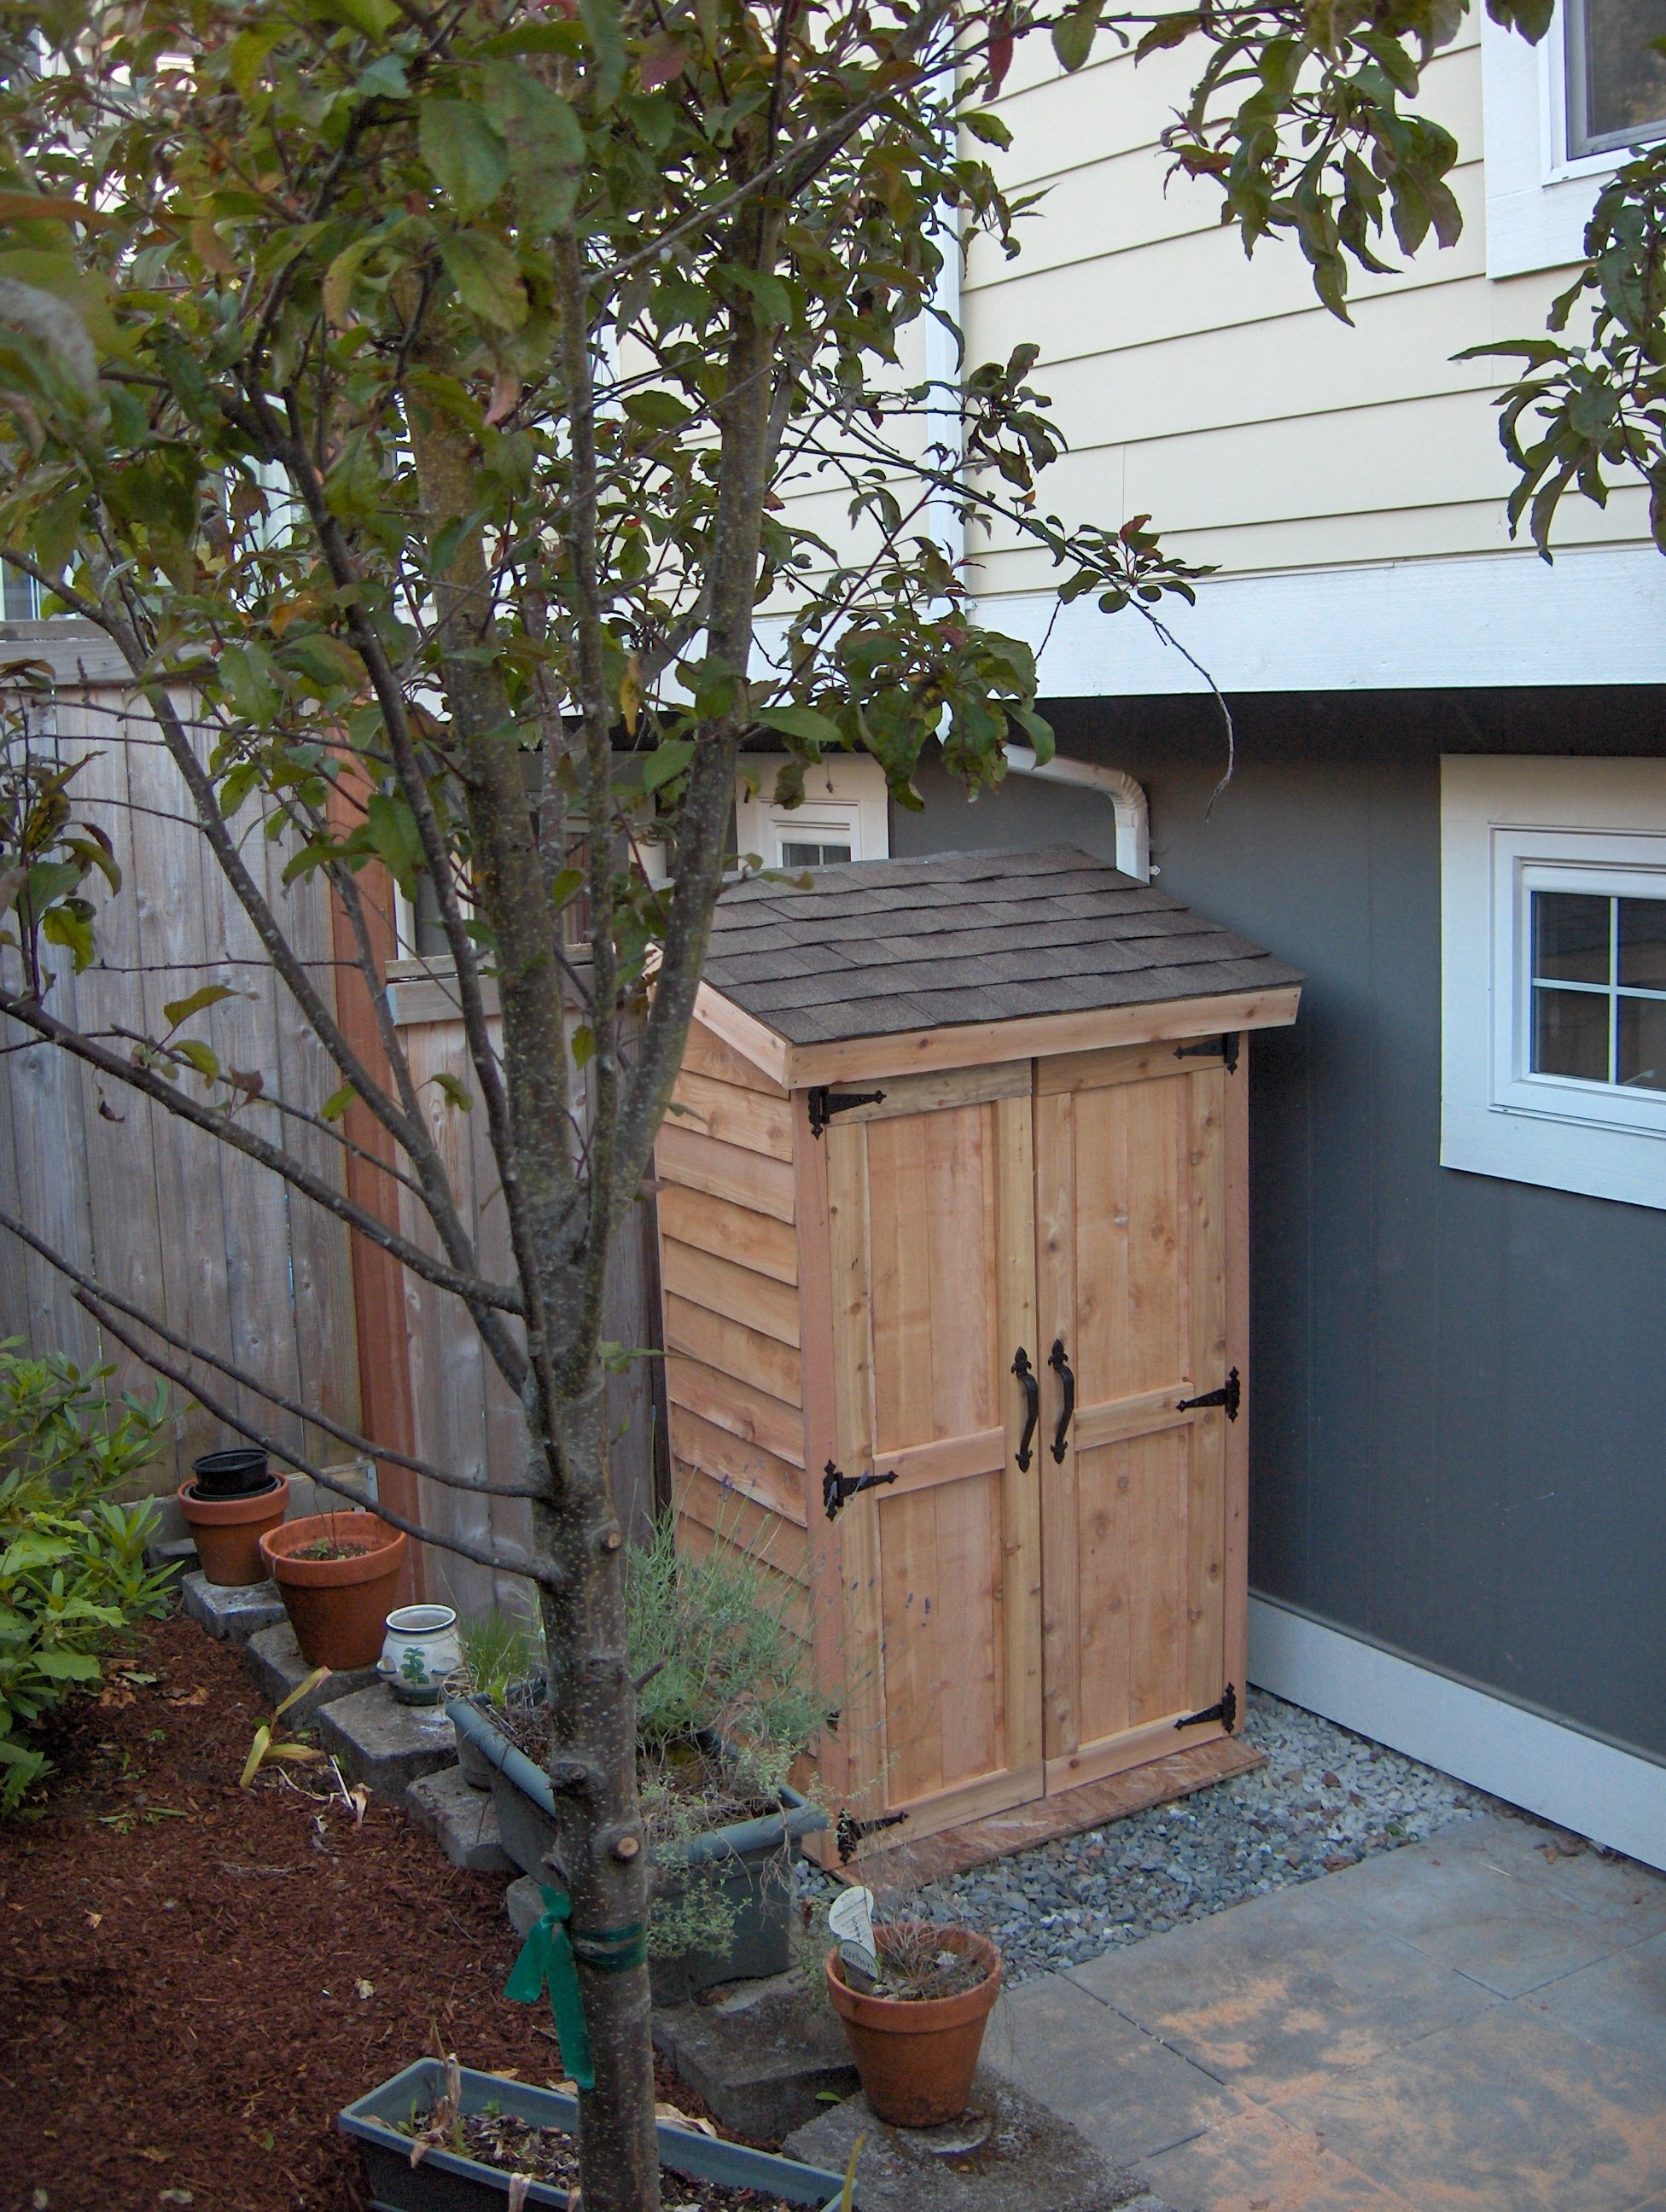
I loved the idea of re-purposing fence pickets as siding for a cedar shed, but the plans on the website were much too big for the space I have. I ended up modifying the design to make a smaller shed, with approximately a 4 foot by 2 foot footprint. It turned out beautifully! Cedar is expensive, but I was able to save money on the project by buying much of the material at local salvage and second-hand stores.

Built from Plan(s)
Estimated Cost
$140
Estimated Time Investment
Weekend Project (10-20 Hours)
Recommended Skill Level
Intermediate

Comments

HOWsMom

Thu, 04/30/2015 - 05:44

This is exactly the size I want - did it take much to modify the plans to be smaller like this ?

RenoRustic

Tue, 05/19/2015 - 11:19

My mom just asked me about building her a garden shed in a small area. This looks perfect for what she is looking for. I'll have to show her this. Great job!

BeckfordRVA

Sun, 03/29/2020 - 09:59

I'd also love to know what modifications you made to create the mini version. Did you just take out one of the sections of the back frame and adjust the side widths? Thanks!

Simple Bunk Beds - My First "Ana" Project!!

Submitted by margjack on Fri, 04/29/2011 - 07:17

I made the bunk beds from the simple bed plan, following tips from others who turned them into bunks. Instead of headboards on bottom and footboards on top, I used all headboards to add height, and made the posts a little longer so that an adult can sit up on the bottom bunk to read during bedtime. (the room has 9' ceilings) I used 2x4s glued and screwed together, as I could not find 4x4 non-pt posts. I made the ladder out of scrap 2x4s and the railings from scrap 1x3s. I did as suggested and attached the bottom header to the bottom of the top bed, which made it easy to attach. This bed is super sturdy! It will be painted one of these days!!

Estimated Cost
$200
Estimated Time Investment
Weekend Project (10-20 Hours)
Finish Used
None yet - will be painted!
Recommended Skill Level
Intermediate

Wood Cooler Box

Submitted by AK1013 on Wed, 06/24/2015 - 12:02

I'm new to woodworking but I'm already obsessed. I was looking for something I could make for Father's Day and came across this. I thought it'd be perfect for my dad especially if I did it in his favorite team's (Miami Dolphins) colors. It's definitely not perfect and there was a lot of frustration when it came to putting the cooler inside... but I'm proud of the finished product.

Built from Plan(s)
Estimated Time Investment
Weekend Project (10-20 Hours)
Recommended Skill Level
Beginner

8 foot long shelf with a little twist

Submitted by Daniel_ram on Mon, 01/03/2022 - 17:25

I just made this shelf using 2x4s 8 ft long wood. It is very strong and looks great. My garage size required the shelf to be max 16 in deep, so I used a 1 plywood sheet divided by 3 equal parts for the upper 3 shelfs. Since I made a 4th shelf, I used 3 1x2s for the 4th bottom shelf instead of a new plywood sheet and avoided having extra 2/3 of the sheet around and also saved like 30$ since the 2x1s were only 2$ea. That touch makes it look a bit stylish too so a win win. If you do that, here's a tip: use the outer 2x4s as rails - make sure that the cleats on the lower shelf are placed a bit lower ~ 1in. In such way, you can place the three 1x2 rails at the same level as the outer 2x4s and this you end up having 5 rails total in the shelf. Do use the wooden screws with star head if you can, they were muuuuuch easier to use compared with the regular ones. Note, this shelf is very strong, probably too strong for my needs. For a 8ft long, and my storage needs (camping, Christmas stuff, other lighter things), I'd probably use 2x2s instead of 2x4s. That would save costs, specially since wood isn't cheap these days( I spent ~$150 in materials Jan 2022).

Comments

Simple Bookshelf

Submitted by binah06 on Thu, 05/26/2011 - 18:47

Came together pretty easily. Took about half a day.

Built from Plan(s)
Estimated Cost
$20 for wood, $20 for screws, nails, sandpaper and stain
Estimated Time Investment
Afternoon Project (3-6 Hours)
Finish Used
Minwax stain in Provincial. Tung oil as a finish. Might put a better finish on later.
Recommended Skill Level
Starter Project

Perfect Shelves For Any Room!

Had a Blast making these shelves for my daughters room last Summer! (sorry for just posting now) She had such a long plain wall I thought what a perfect way to take up space but still have places for her toys! She loves them as much as I do!

Built from Plan(s)
Estimated Cost
$25 ea. (Not Counting bins target $7ea. on sale)
Estimated Time Investment
Weekend Project (10-20 Hours)
Finish Used
Plain ole White Valspar Paint and Valspar spray clear coat. If I would have to do it all over again I would have sanded down more.. but at the end of the day we all love them the way they are :)
Recommended Skill Level
Beginner

Comments

Cupboard

Submitted by Olof on Thu, 08/13/2015 - 22:01

Spend some time on pintrest and made this nice Cupboard hard to find the right plan but its my first furniture so freebasing and a few misstake later.

Built from Plan(s)
Estimated Cost
150$
Estimated Time Investment
Week Long Project (20 Hours or More)
Recommended Skill Level
Intermediate

Comments

Play fort and Swing Set

Submitted by gsnpbc on Fri, 03/16/2018 - 20:33

I wanted to build a structure for the kids to play in and on. I used the playhouse deck design and made it 8 feet by 8 feet. The "roof" is removable to provide shade when it's sunny. It's just 2x2 and a tarp - pretty simple, but it does the job. I used treated posts, dog eared fence boards andlots of screws. I stained and built the walls in my garage before assembling it. Once all of the wood at been stained, it came together pretty quickly with the grandkids help...Lol


Estimated Cost
$350
Estimated Time Investment
Weekend Project (10-20 Hours)
Recommended Skill Level
Intermediate

Comments

My laundry basket dresser with doors

Submitted by jensimmons on Sun, 07/03/2011 - 20:19

I wanted to use our laundry basket dresser as a collector for dirty laundry in our bathroom, and wanted it to have doors so it would blend in better. I also made the shelf above for our towels. It is painted white with a faux-zinc finish on the top. I made the top slightly larger so it would overhang and added cute little bun feet. My talented friend Carli helped me build the doors (and by helped I mean I handed her things while she impressed me with all her tools and skills!) and frame.

Built from Plan(s)
Estimated Cost
$75-100 (can't remember exactly)
Estimated Time Investment
Weekend Project (10-20 Hours)
Finish Used
white semi-gloss paint, zinc faux finish: layer 1 dark charcoal paint, layer 2 dark pewter metallic glaze, layer 3 white paint thinned with water & rubbed on/off.
Recommended Skill Level
Intermediate

Comments

Guest (not verified)

Fri, 07/29/2011 - 23:37

this is perfect! i totally need a bunch just like this! I love the added doors!

Pam in Colorado (not verified)

Sat, 09/17/2011 - 12:48

This is the look I'd like, fit the baskets and hide them behind doors until you are ready to do the laundry. These could be made for bedrooms, bathrooms, toy rooms (okay, toys instead of dirty laundry)...

Guest (not verified)

Fri, 11/11/2011 - 08:05

I absolutely love this! Could you please add instructions on how to make/paint and install the doors? I am a newbie to making my own furniture. Thanks!

Guest (not verified)

Wed, 01/11/2012 - 08:29

I love this idea! I will have a new bathroom soon and I think this will get used! What are the dimensions, or what style cabinet would you suggest to look for? TIA!

Jennifer Simmons (not verified)

Fri, 02/17/2012 - 05:57

The dimensions are the same as Ana's plan: http://ana-white.com/2010/11/laundry-basket-dresser except that the top is slightly bigger (3/4" overhang on front/sides) to look more like a countertop. On the doors we just made a frame w/ angled pieces, routed a notched line on the back & glued/nailed some beadboard in from the back. Sorry I can't be much more detailed on that, a friend did most of the doors for me!

Guest (not verified)

Sun, 02/19/2012 - 07:42

I actually got the plywood to do this project and I was going to add doors. I looked at the baskets suggested but it seems they would stick out the front. I was just curious, did you use different baskets that would fit inside the cabinet or did you make the cabinet slightly deeper?

Jennifer Simmons (not verified)

Sat, 02/25/2012 - 05:36

Actually I discovered the same problem after it was built. I just didn't put a back on and they stick out a tiny bit in the back. I actually kind of like it that way because it lets some air in (being in the bathroom and putting towels in I could see it getting mildewy without much circulation). But if I had gotten the baskets first I probably would have made it about 2" deeper, then leave some open space, but not all, on the back.

Wife's Kindergarten Classroom

Been a while since I had time to actually build anything worth posting about! My wife wanted some items for her Kindergarten classroom this year, so built several items, most inspired by the Farmhouse family.

Estimated Time Investment
Day Project (6-9 Hours)
Recommended Skill Level
Beginner

Comments

Octagon Picnic Table

Submitted by Anonymous (not verified) on Thu, 05/26/2022 - 18:07

Just completed the Octagon picnic table. I added a couple of features to mine, namely a center hole for an umbrella and support blocks around the center point under the table to lock in the umbrella post on the lower base. Finished it in time to have lunch AND dinner on it today. This took from Monday through Thursday morning for me, but some of that time was me waiting for supplies along the way. In reality, I think this can be built in one day, with paint/stain curing overnight and final set up on the morning of day two.

Comments

Cedar 2-Drawer Desktop Storage Cube

Submitted by JoanneS on Sat, 08/24/2013 - 15:02

This is the prototype build for the Cedar 2-drawer desktop storage cube. It is made from 1 piece of ½” x 5 ½” x 6’ fence picket, about $3 for wood. I had based this plan on a board that is ½” thick and 5 ½” wide, and had identified areas in the plan where you’ll want to measure and cut as you build. I found this especially important on the prototype build, since it turned out the picket I bought was 5 3/8” wide, which affected the depth of the shelf, length of the drawer sides, and the size of the drawer bottom. Measuring and trimming as you go gives the best fit for all the pieces. Probably the most helpful thing besides keeping the measuring tape handy, was some 60-grit sandpaper. After everything was assembled, I used 60-grit sandpaper with my palm sander to sand down any high spots caused by cupping, to get the outsides nice and smooth. Followed up with some 220-grit for a nice smooth final sand. The pulls are some ¾” x 1 ½” pieces of the cedar, sanded well on all sides. I just cut these from the scraps, and they are glued on. You can use regular knobs or pulls if you like. You may need a shorter screw or a ¼” spacer, since the drawer face is only ½” thick. The screws for regular knobs are normally sized for a ¾” thick door or drawer face. This build took about 3 hours. Finishing time will depend on the type of finish used. My words of advice for building this would be: Take your time measuring. Measure twice before cutting. Sand thoroughly. Have fun!

Estimated Cost
$3 for wood, + finishing materials
Estimated Time Investment
Afternoon Project (3-6 Hours)
Finish Used
I plan to stain this with Minwax Express Color in walnut, to match the 1-board cedar desk accessory set that I posted last week. But I had to brag this one with it au naturale, because I thought the grain on the cedar was so pretty and I wanted to show it off. It has a neat kind of striped look which is pretty all on its own. I’ll add the stained picture of it below, later this weekend.
Recommended Skill Level
Beginner

Comments

Coffee Table for Daughter’s Dorm

Submitted by Anonymous (not verified) on Mon, 07/18/2022 - 10:02

My daughter and her room mate were looking for coffee table that is small enough for their dorm and able to store items underneath.

This plan was easy to follow and I completed it within a weekend. I even took the pocket hole suggestion for the table top.

The Golden Oak stain looks great on the 2x6xs. I added two coats of polyurethane to make that top as smooth as glass.

Comments

Dining Room Buffet Cabinet

Submitted by kdins31 on Sat, 08/13/2011 - 11:26

I scoured the web unsuccessfully for months trying to find a cabinet big enough to store everything we needed to store. I wanted something huge and bright and simple, and so I decided to just build away. It's 8'4" long, 18" deep and 36" tall. Topped with a slab of Giallo Napoleon granite and painted a nice plain white. Took me only a few nights to build and paint, thanks to my power nailer and power paint sprayer. Thanks to a great deal on a remnant granite slab, this was just about $400 total start to finish. I winged the entire plan and didn't really use any plans in particular, though I have gathered many great ideas and tips from this site.

Built from Plan(s)
Estimated Cost
$450-500
Estimated Time Investment
Weekend Project (10-20 Hours)
Finish Used
Satin white, nothing special!
Recommended Skill Level
Intermediate

Comments

shanestric

Sat, 08/13/2011 - 14:51

Wow - looks great! You would think it was done by a pro! You should be very proud of your finished product.

Outdoor Sofa

Submitted by Anonymous (not verified) on Fri, 09/23/2022 - 15:56

After we built our deck we needed furniture...so I headed to see what projects Ana White had. These benches were so easy and quick to build and look great on our deck!

Built from Plan(s)

Comments

Kitchen Cabinet

Submitted by rjustice21 on Thu, 09/26/2013 - 09:18

My wife and I needed space in our kitchen to store various items. This cabinet works perfectly for that purpose.

Built from Plan(s)
Estimated Cost
$100
Estimated Time Investment
Weekend Project (10-20 Hours)
Finish Used
Dark Red paint. I am not sure of the name.
Recommended Skill Level
Beginner

Comments

mybartmart

Fri, 09/27/2013 - 21:17

That paint colour is beautiful. As is the pantry, very well done. I wish you could find out the name and brand of the colour. It is stunning.

mybartmart

Fri, 09/27/2013 - 21:17

That paint colour is beautiful. As is the pantry, very well done. I wish you could find out the name and brand of the colour. It is stunning.

Sweet pea bunk bed

Submitted by Anonymous (not verified) on Fri, 12/18/2015 - 22:01

Project took on by my dad and painted by myself and my mom...LOVE how it turned out!

Built from Plan(s)
Estimated Cost
Because we used quite a bit of solid oak it's cost was more...around $800
Estimated Time Investment
Week Long Project (20 Hours or More)
Finish Used
Paint
Recommended Skill Level
Intermediate

King Farmhouse bed with drawers

Submitted by Anonymous (not verified) on Mon, 02/13/2023 - 19:01

I started with your king size fancy Farm style head board and made it taller (67” tall”) and created a footboard using same pattern. Then added three drawer on each side adding supports for king size bed - followed up by installing 4 usb charging ports behind each side of headboard.

Comments

DIY Red Storage Sofa

Submitted by TracAttack on Mon, 11/07/2011 - 23:11

Thanks Ana White for the blue print to an awesome storage sofa. I used the similar dimensions except mine is a bit shorter in width (60 inches wide). Now I just need to find awesome pillows to go with it.

Built from Plan(s)
Estimated Time Investment
Weekend Project (10-20 Hours)
Recommended Skill Level
Intermediate

Comments

Erika (not verified)

Sat, 12/24/2011 - 18:57

How much did it cost you to build this?

Cynthia l. (not verified)

Sat, 12/08/2012 - 05:41

How has the sofa held up? I want to make one, and also would like to know how much it cost to make.

Smaller Version of Grandy

Submitted by Anonymous (not verified) on Sat, 01/09/2016 - 19:11

The original size of the unit was too big for our needs so we cut down the size of the unit to 72" long and 30" high. Used patio rollers for the doors.

Built from Plan(s)
Estimated Cost
$200
Estimated Time Investment
Weekend Project (10-20 Hours)
Finish Used
We used English Chestnut for the stain and the paint is called La Fonda Midnight using Valspar paint.
Recommended Skill Level
Intermediate

Comments

ctufano

Mon, 07/18/2016 - 15:28

Hey love your unit! What did you do for the doors? We are doing similar in cutting the height to 30"

Not sure what to do the doors out of. What was your base material? Kind of trim?