Community Brag Posts

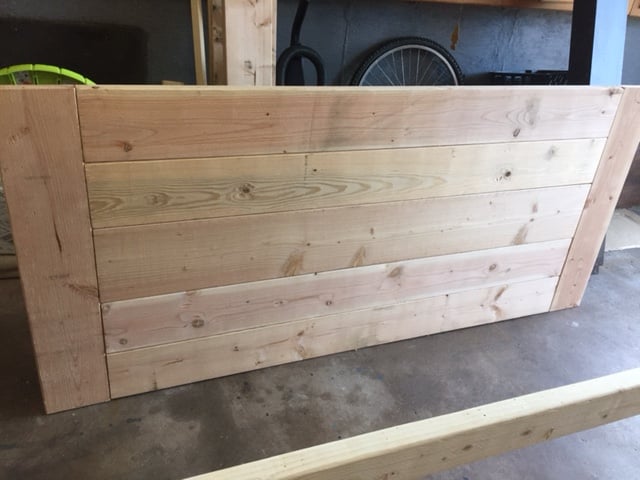
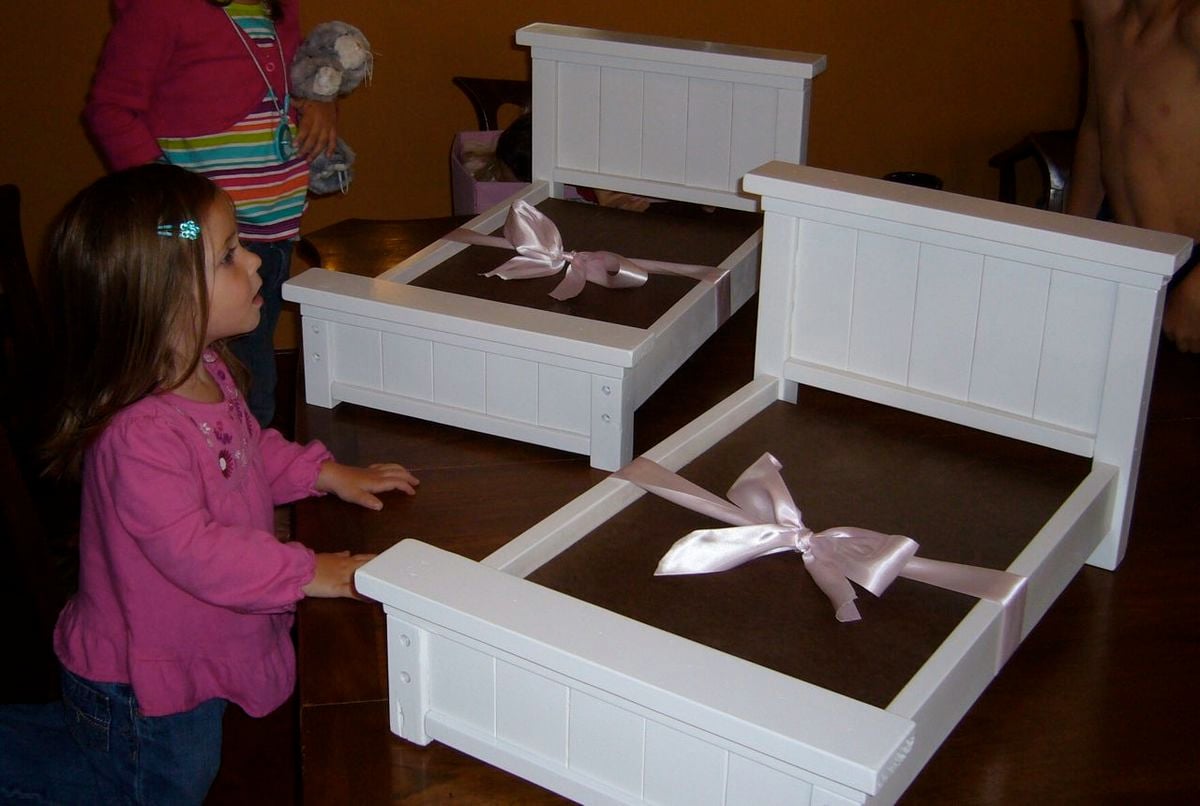
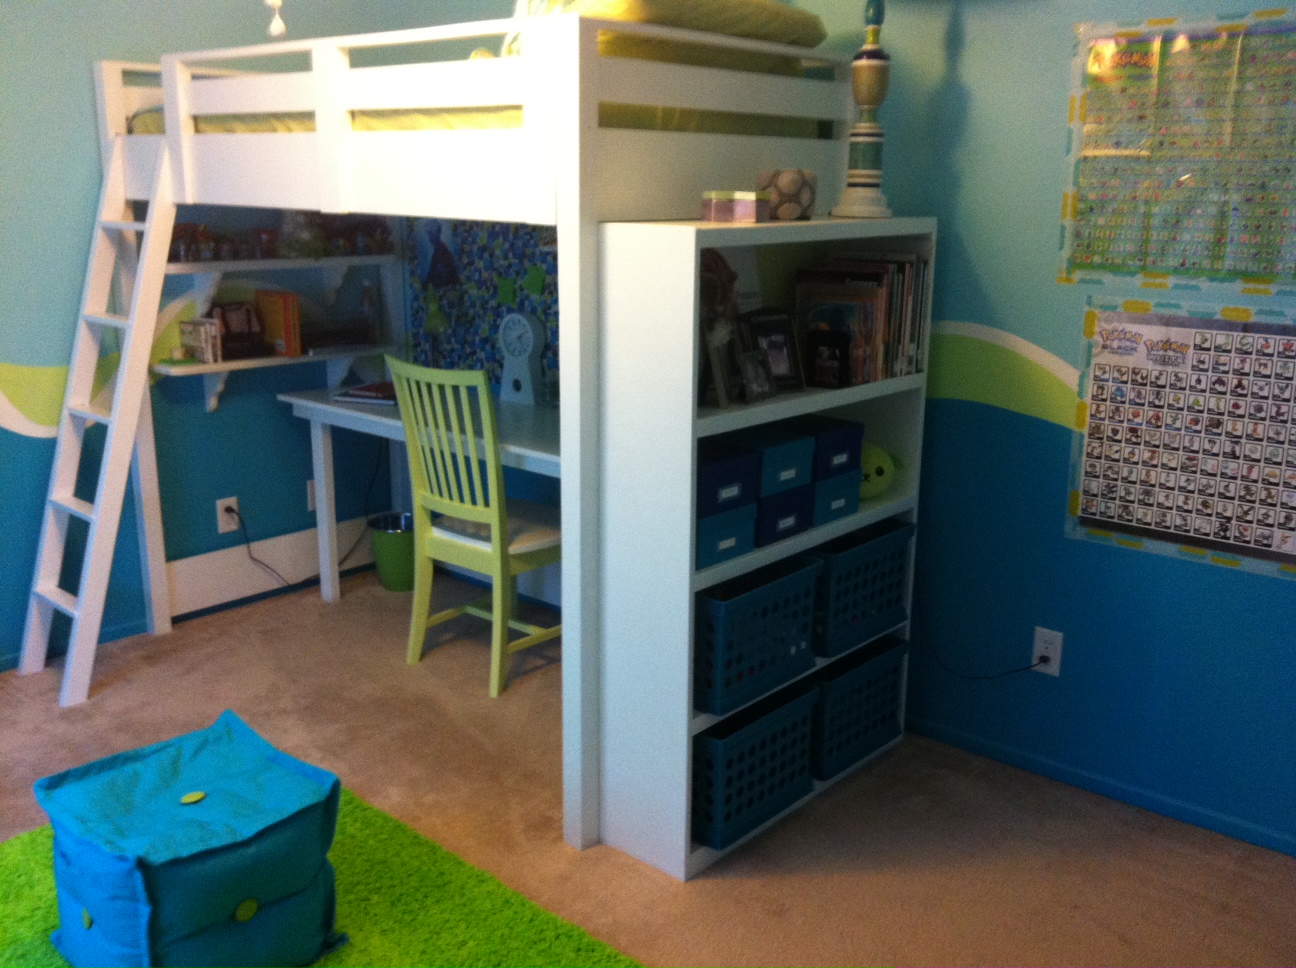
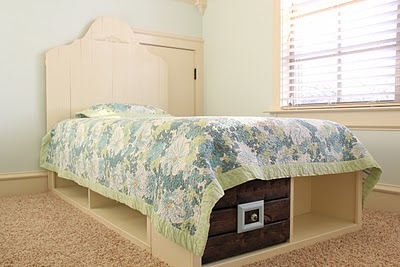
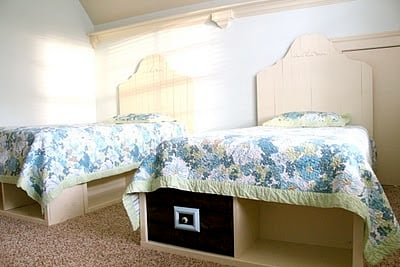
Twin Fancy Storage Bed

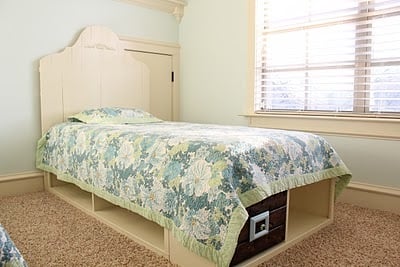
I built my girls' beds using two of Ana's plans. I used all whitewood boards for the construction. It took a few hours to build both beds and I love the result! I used my brad nailer and gorilla glue for both the headboard and bed base. I also used drywall screws (my fav) to attach the bottom bed pieces. You can see more details at http://www.shanty-2-chic.com/2011/01/beds-finished-well-almost.html !

Estimated Cost
Under $100 for each bed
Estimated Time Investment
Weekend Project (10-20 Hours)
Finish Used
Two coats of custom cream color you can find in my blog post above. I use Whizz 4" rollers on almost all furniture painting... LOVE.
Recommended Skill Level
Beginner

Outdoor loveseat - love it!

Submitted by herzo1852 on Tue, 08/13/2013 - 13:40

The wood for this project cost me about $50 from Lowes (and this was combined with making a 3ft square table and another love seat, so in total for all 3 was about $145).

I didn't add the trim pieces (I felt they were unnecessary and more likely to come apart or fall off), I used only 1x3 for the slats on the seat and back, and 1x4 for the seat back top rails. I used 2x3 for the legs because the 2x2 was horrible quality and I used a 2x3 for the front cleat, which I think makes it stronger.

I also didn't attach the back the way the instructions say as I thought all those screws would look ugly, so I fashioned a wooden corner brace to hold the back in place, and used metal corner braces and screws (in 3 places, UNDER the back rest 2x4) to hold the seat back still and then only 2 screws to hold the bottom of the back in place. I added photos of these changes to help you see what I did.

One HUGE TIP - assemble the frame (minus the slats) and stain / paint that part, THEN stain and polyurethane the slats before attaching - it's horrible to try to stain or paint with the slats in place as there are too many tiny gaps to fill!

All in all, I think this plan of Ana's is brilliant - it's simple, rustic looking and yet looks great on my deck - I will take a photo of the 2 sofa and table as soon as the second sofa dries enough to finish assembly.

First sofa took me a little longer as I was getting used to the Kreg, second sofa has taken me about 6 hours in total so far.

One issue I do have is that I think I would use a 2x4 for the top rail of the seat back, simply because the 1x4 has a tendency to split easily.

If you make this project, you won't be sorry, it looks awesome!

Estimated Time Investment
Day Project (6-9 Hours)
Finish Used
Rustoleum Kona stain (the 75% faster variety NOT the normal Kona - it doesn't go on as dark!).

Any polyurethane in clear finish to finish it off!

The cushions are from Lowes and cost more than the 2 loveseats and coffee table combined - they cost $160 as I bought 4 (Garden Treasures 46.5 x 25, item no: 332404, normal price $49.98, but I got them on 20% off), they fit perfectly!
Recommended Skill Level
Intermediate

Coffee Table Plan Modified for Flat File Cabinet Table

I found this fabulous vintage metal flat file cabinet at an antique store (Hunt & Gather Vintage Market, in Princeton, MA), but it didn't have a base or a top, so I went searching online for something that I could build.  The Corona Coffee Table plans were going to be perfect!  I just had to make a few adjustments:

  1. Build it to fit my flat file cabinet.  
  2. I didn't inset my apron 1x3 boards because I wanted the top ones to be flush with the edge of the flat file cabinet, and then I wanted the bottom ones to match.
  3. There was a "lip" on the top of the flat file cabinet, so I had to build a thin trim around the bottom edge of the table-top.  This lip keeps the top from sliding off the flat file cabinet, but just to be sure there wasn't any wiggle, I put a bead of silicone around the top of the metal cabinet and then placed the wood top on.  

LOVE how this table turned out!  It's counter-height and the perfect centerpiece for my craft room.


Built from Plan(s)
Finish Used
I stained the piece with dark walnut and then painted with 2 coats of "creamy" Sweet Pickin's milk paint.  Sanded it down to distress it a bit, and then used a clear wax to seal it.
Recommended Skill Level
Beginner

Kitchen Island

Took roughly 15hrs and $500... We bought the top at Lowes for $150 on sale (Acacia), because it turns out butcher block counter tops of this size (considered an "Island" top) are like $500 and I don't know who can afford those shenanigans but certainly not us. Interesting point: in as much as I totally appreciate the design (Thank You Ana!) the instructions are mostly beautiful but have a few key areas with room for improvement. If you are thinking of building this take some time to go over all the materials and really map out the project. I purchased everything in 8' lengths as per the shopping list, I realized afterwards that because my unit is only 5' long I now have many 3' cut-offs.... had I purhased 10' lengths, you see where I'm going with this yes? I would have paid more per board but had less leftovers. I think I also have a package of unopened screws and an extra board from the shopping list, no big deal, it's like the 10 hot dogs for an 8 pack of buns conundrum, I've now entered an infinite loop. I also realized too late that to use the pocket hole screws to secure the counter top I would need to drill the holes (using my handy dandy Kreg Jig) before putting the slats on the top shelf or else I couldn't get my drill in, rookie move I know...You may find, as I learned, Lowes/Home Depot do not carry such things as 4x4s that are not pressure treated and therefore not ideal to have in one's kitchen...I ended up purchasing all the lumber at an actual lumberyard (Peacock Lumber, Oshawa, Canada), which was cool, because now I know where that place is, and it smells nice. Have fun with your build. I tried to post some other pictures but they kept coming up sideways, story of my life. Take a look on Facebook if you want Adam Connor in Pickering, Canada, I'm not shy ;-)

Built from Plan(s)
Estimated Cost
$500
Estimated Time Investment
Weekend Project (10-20 Hours)
Finish Used
Lowes: Valspar paint (Kettle Black)
Recommended Skill Level
Intermediate

Modern Outdoor Table & Benches

Submitted by Anonymous (not verified) on Thu, 05/19/2022 - 13:59

I made the table 6’ long and 30” wide to fit my narrow deck. I used some heavy duty shelf brackets under the legs to reinforce the table, mostly because I don't trust my beginner abilities. Took me about a week to cut, sand, stain and put it together (and then i stained and sealed again). Actually assembling it took only a few hours. I see a combo of pocket holes and regular exterior wood screws. Loved building this, love Ana’s plans. Thanks Ana!

Comments

Laundry Basket Dresser & Board and Batten Wall

Submitted by canesa on Thu, 07/14/2011 - 21:44

If you'd like to find out how I modified the laundry dresser to hold four baskets and how I hung the board and batten wall, check out the details on my blog. http://isteppedoutofmycomfortzone.blogspot.com/2011/02/and-did-spontane…
After I hung the boards with Liquid Nails I found out that if I ever want to take them down, the sheet rock is coming down with them! So I would probably skip that step...just incase!

Built from Plan(s)
Estimated Cost
Under $50
Estimated Time Investment
Weekend Project (10-20 Hours)
Finish Used
I painted everything in Dark Kettle Black by Valspar.
Recommended Skill Level
Beginner

Comments

aw02bzhmz (not verified)

Sun, 01/08/2012 - 15:34

Des [url=http://www.longchampbagsfr.com]Sacs Longchamp[/url] sont des sacs qui sont faites dans l’usine de masse, juste comme le genre plus mature que vous pourriez probablement découvrir dans les grands magasins, sauf qu’ils sont créés rendant l’utilisation du bien, dessins à couper le souffle. En fait, ils ont des styles, couleurs et matériaux qui sont comme des sacs de créateurs, mais sont ensuite utilisées dans l’itinéraire des sacs fabriqués en usine. De cette fa?on, vous obtenez le très plus efficace de chaque monde. Vous serez en mesure d’obtenir une belle revanche, un sac dynamique, mais payer alternativement bien moindre que vous n’aurez probablement besoin pour vous d’obtenir une marque de fabricant qui est en développement à être utilisé. Vous serez en mesure d’obtenir ces généralement en ligne, aussi que dans plusieurs magasins. Des sacs Longchamp, par exemple, sont généralement créés beauté. Ils fournissent des designs tout en utilisant favorisées régulière et les schémas, les figures de dragon animé individus, aux conceptions fourre-tout, après quoi il a offert à tous qu’ils obtiennent à travers le monde, à cause de cette réalité, ils pourraient générer suffisamment pour tout le monde. Vous ne devez posséder plus longue dans les sections et de payer pour à peu près n’importe quel élément limité, tout simplement parce que des dirigeants avides de style dans l’industrie.

Sacs à main sont vraiment un énorme business, et des ressources énergétiques et du marché de milliers de dollars. Sacs à main Longchamp pliage, en particulier, sont offerts comme objets de grande classe ce marché étoile et montrent loin de d’, portant le co?t et alléchantes chaque femme à vouloir un équivalent particulière à cela. Elle a utilisé étant de savoir comment la série vous vécu était d’acquérir une normale, sac inintéressante brun, [url=http://www.longchampbagsfr.com]Sacs Longchamp[/url] ou avoir à payer pour le meilleur co?t de posséder un concepteur de sac extrêmement. Mais heureusement, qui pourrait effectivement très probablement pas être plus longs vrai, parce que la mode des sacs sont en train de révolutionner l’industrie.

Avant, [url=http://www.longchampbagsfr.com]Sacs Longchamp[/url] sont réellement développés au sein d’une manière assez normale. Vous avez vécu des usines qui a élaboré des normes, brun ou des sacs, offerts à des milliers pour pas cher, alors vous incontestablement connu les sacs de créateurs. Les individus sont réellement développés par des designers bien rémunérés qui ont travaillé dans l’industrie de style, et montrerait loin de leur nouveaux sacs à chaque douze mois sur le tapis de couleur rouge. Là, ils obtiendraient des célébrités, acteurs et artistes en général, à mettre sur leurs nouveaux modèles, et leur montrer lointaines à partir de la route du monde. Mais quand il est arrivé le temps de les générer, ils ne font de petites quantités, tout comme le choix de maintenir le co?t varie de haut. Voilà comment ils seraient artificiellement fournir les gens de la demande et la pression ces temps qui désiraient acheter ces articles à dépenser des prix exorbitants. Mais dans les décennies précédentes, cela a commencé à changer avec Longchamp bon marché, ainsi que la révolution qui est-il passé au sein de l’industrie de style.http://www.longchampbagsfr.com

1-Board Trinket Box from Cedar Fence Picket

Submitted by JoanneS on Fri, 08/16/2013 - 15:30

I built this as the prototype for the 1-Board Cedar Trinket Box plan. My goal had been to create something that would make a nice gift, only use 1 cedar fence picket (about $3 in wood), didn't require any special cutting or ripping, and could be made with just your miter saw and brad nailer (you could use regular nails and hammer too, but I love my nailgun!) Also highly recommend using a palm sander for this. (Love my power tools!)

As I was building I discovered the beauty of cedar, the imperfections of cedar fence boards, and the value of prototyping. I added some tweaks to the plan to identify the places where you should build the first part, then measure, then cut the next part.

This took about 2 1/2 hrs to build, which included a whole lot of sanding. I started with 80-grit, then 220 grit to get the board surfaces smooth. After the prototype was assembled and I noticed how much cupping there was in my fence board, I broke out the 60-grit and went over all the high spots to smooth them down. Next time I'll be much more careful to choose a board without much of a cup. It did give some real interesting grain patterns though, so it all worked out in the end.

For pulls I cut a couple of interesting looking knots from my cedar board and glued them on. The next one I'd like to try some strips of leather or maybe a rope knot for pulls.

Estimated Cost
$3 in wood + finishing materials
Estimated Time Investment
Afternoon Project (3-6 Hours)
Finish Used
I started to leave this one natural, but after trying the tutorial for the Walnut Minwax Express Color on cedar, I had to use that finish on this piece. I'm loving the walnut color! Topcoat is 1 coat of Minwax Oil Modified water based poly in satin.
Recommended Skill Level
Beginner

Comments

yurra-bazain

Fri, 08/16/2013 - 17:44

Joanne, I am so blessed to see how creative you are every day, how you approach your builds with others in mind, and how you work with the situations you encounter and turn things into functional and beautiful pieces! =D Thank you for sharing your creativity with passion and drive!

JoanneS

Sat, 08/17/2013 - 05:10

Thank you so much for your kind comments! I have gained so much from the experience of participating on this site, I am hoping sharing this might be helpful to fellow readers/builders. Building, and sharing it here brings me joy, and I want to share that!

Famhouse Table

This is my 2nd built and it was a fun one.  I built this table for a friend of mine and she wanted a different look to the table.  She picked Patina Green and Snow White paint for the base and legs.  First I applied the white paint, let it dry and then applied a very small amount of the patina green and dry brushed it in.  After it dried I used my sander to blend it in and have some of the wood grain to show.  On the table top, I applied the stain and let it dry over night and then sanded down (lightly) so the grain would pop.  She loved the different colors and look of the table.  She had the perfect chairs to match the rustic look.  Excellent project!

Estimated Cost
$100 wood materials, $75 for wood conditioner, milk paint, stain and top coat.
Estimated Time Investment
Week Long Project (20 Hours or More)
Finish Used
General Finishes Wood Stain, Water Based, Antique Cherry Stain, HP Polyurethane Top Coat, Semi-Gloss
Recommended Skill Level
Starter Project

Side table

Submitted by jarsofclay on Tue, 08/28/2018 - 10:29

I made this side table after the truss end table plans. I added my own flair to it and made the center in a herringbone design.  slight modification to the plan to my desire.

Built from Plan(s)
Estimated Time Investment
Weekend Project (10-20 Hours)
Finish Used
Mahagany
Recommended Skill Level
Beginner

Greenhouse

Submitted by Anonymous (not verified) on Wed, 06/01/2022 - 06:08

I am so in love with my greenhouse, it is amazing the plans were perfect and it went up without any problems, your designs are amazing and beautiful. We are going to do the chairs next!!!

Built from Plan(s)

Comments

Doll Bed

Submitted by jazberg on Fri, 07/15/2011 - 13:47

I asked my husband to build these as birthday presents for my daughter and my niece this past spring. Very cute, collapsable when they get tired of playing with it, sturdy enough to be sat on and used by both small children, the dog and the dolls! Materials and labor were cheap (thanks hunny!) and the product will last for as long as the girls play with dolls.

Estimated Cost
$50 for two
Estimated Time Investment
Afternoon Project (3-6 Hours)
Finish Used
White spray paint.
Recommended Skill Level
Beginner

Rustic Wood Cooler

Submitted by Robinwood on Mon, 08/19/2013 - 21:47

I went with my own measurements to accommodate my old cooler and leave a little room for storing extra water or whatever. As you can tell, I'm a Coca Cola nut...so I had to go with the Coke theme.

The cooler I used was actually a battery powered car cooler, so it didn't already have a drain. I just drilled through the bottom; added a drain and then ran some pipe over to a faucet at the end.

I glued some coke lids that I had been saving in the bottom of the "cap catcher" (not sure exactly what it's called), for special effects.

Because I'm always looking for a paper towel (I hate having wet hands); I added a paper towel holder on the end, instead of a shelf.

This was made entirely from scrap wood from other projects, so except for the faucet and of course my coke accessories, it didn't cost me anything and that's always a plus.

My husband loves it - every time he sees me looking at this site on the computer, he wants to know what I'm planning to build now.

Recommended Skill Level
Beginner

Oliver's Toy Box

Submitted by jswsks on Tue, 09/22/2015 - 14:20

I found these plans and told my husband he had to make it for our grandson's 2nd Christmas.  So.....he did!  I was so happy with the outcome.  We didnt put in the groove on the front & we used the Rockler torsion hinges.  I chose the letters and painted them for his name.                    We are now beginning a new one for our new Granddaughter for this Christmas!  

It gets lots of use and will be a treasured gift from Grammy & Grampy for years to come!  

Built from Plan(s)
Estimated Cost
$250.
Estimated Time Investment
Week Long Project (20 Hours or More)
Finish Used
Glossy white paint
Recommended Skill Level
Intermediate

Comments

mtrainerjr

Sun, 07/31/2016 - 14:51

Which Rockler hinges did you go with, as far as the inch-pound?  I'm not sure if I need the 40 inch-pound or the 60 inch pound.  Thanks in advance.

Farmhouse bed

Submitted by Randinef on Sat, 09/22/2018 - 07:28

Thanks for the great plans. Love this bed.  Next project, a nightstand.

Built from Plan(s)
Estimated Cost
150$
Estimated Time Investment
Weekend Project (10-20 Hours)
Finish Used
Dulux melamine paint
Recommended Skill Level
Beginner

Outdoor Bar Table and Stool

Submitted by Titus2000 on Thu, 06/09/2022 - 14:38

I love this bar table! I needed something long and narrow for our small patio - just deep enough to fit a plate and a drink, or a laptop, and long enough to fit three stools, so I modified Ana's dimensions. Also, living in Florida, we occasionally need to bring our furniture inside for hurricanes, so I made it a lighter by using 1x3s and 1x4s instead of 2x or 4x4s. I still need to paint the bottoms a cream color and build two more stools, but I already use it a lot. Thanks Ana! (The photo was upright on my computer, but I didn't see how to rotate it once it was uploaded)

Comments

Cameron Wall Storage Unit

I used Ana's plans to build a Cameron Wall unit for my new nursery. I used 3/4" MDF and 1 1/4" brad nails with lots of Gorilla Wood Glue to assemble. I also used bead board on the doors. Great storage! You can read more at http://www.shanty-2-chic.com/2011/07/furniture-for-the-new-nursery.html

Estimated Cost
$140
Estimated Time Investment
Weekend Project (10-20 Hours)
Finish Used
2 coats of Valspar Premium satin black paint, 1 coat of Polycrylic
Recommended Skill Level
Beginner

Comments

Loft Bed for Renee's Room

This is the 2nd of two loft beds I have built using Ana's plans - they came out great and my girls love them! I did make some modifications to each, as the girls have different needs. It was a great project and I would like to thank Ana for the concise plans, cut lists, ideas, etc. You made it so easy!

If you are interested in seeing more about this project feel free to visit my blog at www.mothersmusings.net. See you there!

Estimated Cost
$150.00
Estimated Time Investment
Week Long Project (20 Hours or More)
Finish Used
I must say, if I had it to do again I might have upgraded on the wood, but I got the cheapest pine I could find. This led to using A LOT of wood filler and sand paper - and probably took me about twice the time it would have taken had I used prime wood. I used an oil based primer to make sure the knots stayed covered, and 2 coats of Behr high gloss white paint for the finish. Extra work...yes - but ultimately I think I cut my cost in half.
Recommended Skill Level
Beginner

Taylors console

Submitted by DWeen on Mon, 09/28/2015 - 16:30

Our recent Taylors Console project. A nice, easy project. We're very pleased with how it turned out!

Built from Plan(s)
Estimated Time Investment
Weekend Project (10-20 Hours)
Finish Used
Behr 'Lap Pool Blue'
Recommended Skill Level
Beginner

Rustic Lift Top Coffee Table, with storage

Submitted by Anonymous (not verified) on Sun, 10/14/2018 - 12:57

I used the Rustic Coffee Table Plans from ana-white.com, but purchased lift top hinges and added 2" x 6" around the perimeter, which provided storage inside when the top is lifted.

Estimated Time Investment
Weekend Project (10-20 Hours)
Recommended Skill Level
Intermediate

Comments

Sawhorse desk

Submitted by Anonymous (not verified) on Fri, 06/24/2022 - 15:14

Sawhorse desk with drawers. Table top and shelves with dragon spit, table top with epoxy.

Comments

Rustic Barnwood Picture Frames

Submitted by kmatt55 on Mon, 07/25/2011 - 18:49

Thanks to Ana's plans I was able to build this in a couple of hours. It's not necessary, but a miter saw makes this project a cinch. I used one coat of Minwax Mahogany for the stain and distressed the wood with various sharp edged tools from my garage. I used a large Lowes moving box ($1.50) to cut the backing to 18"x24" and spray glued it to the print. I didn't use glass partly because its expensive and I was a little lazy. As you can see in the pictures below I just stapled the back to the frame. Even without the glass, I think it came out pretty well. Another project completed to go in the mountain house....

Estimated Cost
$10
Estimated Time Investment
An Hour or Two (0-2 Hours)
Finish Used
Minwax Mahogany
Recommended Skill Level
Beginner