Community Brag Posts

An heirloom for the youngest grandson

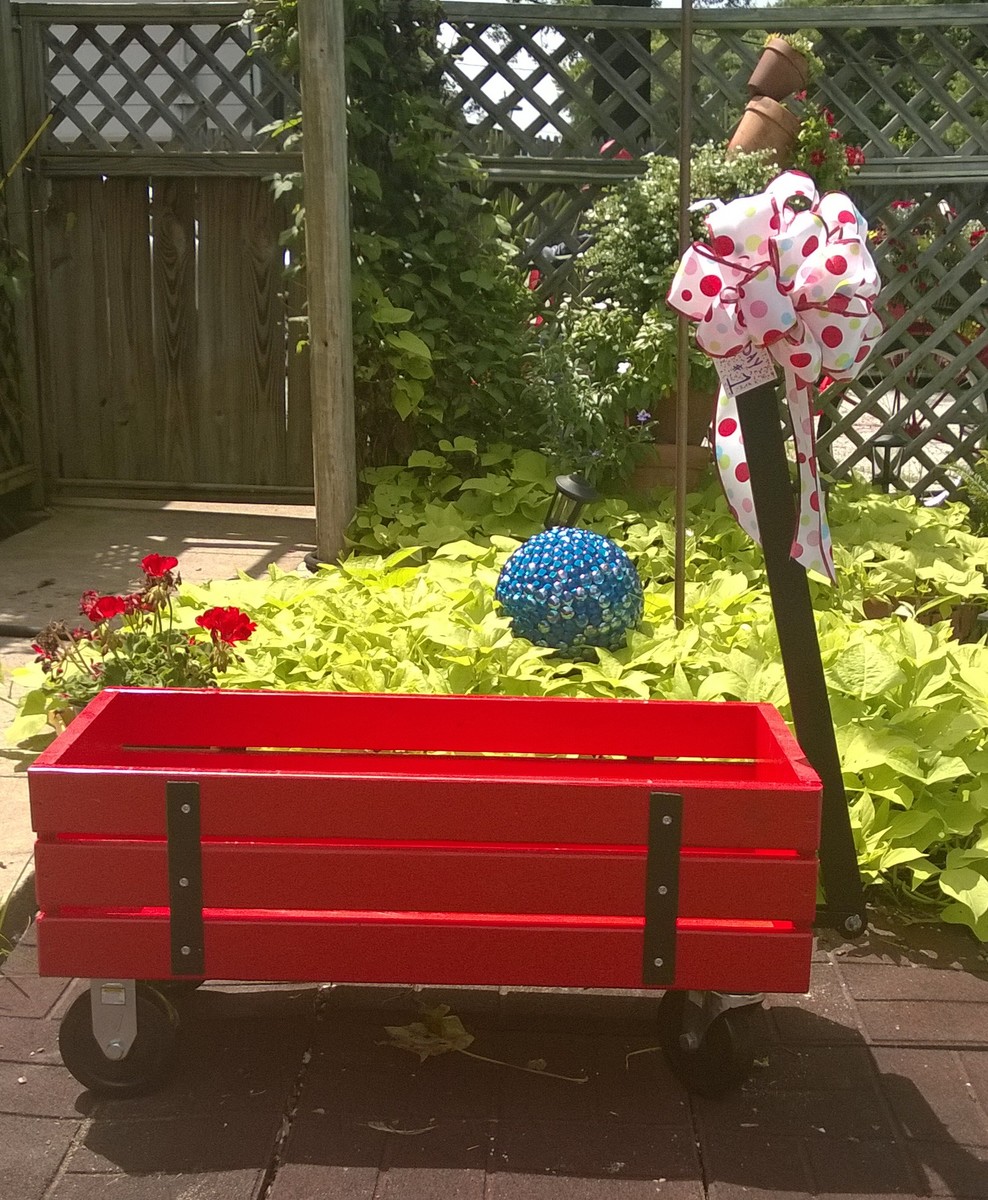
I used 5 inch wheels  as I wanted the wagon to sit a little higher. http://www.harborfreight.com/5-in-polyurethane-heavy-duty-swivel-caster-69852.html and http://www.harborfreight.com/5-in-polyurethane-heavy-duty-rigid-caster-61757.html    We bought these metal pieces for the straps http://www.lowes.com/pd_44138-37672-11662    Our Lowes didn't have snow blower parts in July. But we were able to find a shear pin  in the draawers where much of their specialty hardware connectors are located.  . I opted to screw everything together and not use nails.  Thanks so much for plans that include a seperate shopping list and cutting list and easy to follow directions.  The wagon was a huge hit with the birthday boy.

Built from Plan(s)
Estimated Cost
$69
Estimated Time Investment
Day Project (6-9 Hours)
Finish Used
The body of the wagon was finished with homemade chalk paint. The metal pieces were spray painted in black satin.
Recommended Skill Level
Beginner

Comments

Step Stool for a Friend

Submitted by Jake on Sun, 08/04/2013 - 12:35

At dinner a couple of nights ago with a good friend and his wife she commented that she really needed a stool of some sort for her older kid to stand on at the bathroom sink. Well that need became the next quest for me. I really savor trying to fill a need quickly and successfully. It took a few hours from the scrap pile to put the stool together and it appears from the picture that it was a success.

I deviated from the plan just a little by adding stiffeners on the four legs just because I did not like the direction of the wood grain and felt they might break off with enough lateral force.

If I build another stool of this type I think I would hinge the top step to give access to a small storage compartment. Should be easy to do and could add some versatility to the stool's function.

Built from Plan(s)
Estimated Cost
Probably about $5
Estimated Time Investment
Afternoon Project (3-6 Hours)
Finish Used
None, just a lot of sanding.
Recommended Skill Level
Beginner

Antique Quartersawn White Oak Dining Table

This is a solid, quartersawn white oak 5-legged dining table. It was originally built in the late 19th or early 20th century. The table was in need of a refinish. The massive turned and fluted legs were full of cracks, chips, and splits.

I took the table completely apart and began stripping and sanding. The legs were re-glued where needed and clamped. I filled the cracks, splits, and and chips with wood filler, sanded, and repeated until I was happy with the results. I replaced some bracing and replaced the screws where needed. Heavy duty casters were added. They have brakes/stops that can be locked to keep the table from rolling on a hardwood or tile floor.

Once the final sanding was completed, I applied 2 coats of Minwax Dark Walnut stain with a foam brush. I wiped down after each coat after waiting 10-15 minutes or so. After drying I began applying Minwax Fast Drying (oil based) polyurethane. The table received 3 coats and the top received 6 coats. I hand sanded with 220 grit sandpaper between coats.

After applying the final coat of poly to the top, I allowed it to cure 48 hours. I then hand sanded the top very lightly using 400 grit paper. I did the same using 0000 steel wool. I then added a few drops of dish soap to a cup of water and wet sanded with the 0000 steel wool. I used a circular motion to remove any scratches. I then wiped down the table and buffed out two coats of Johnson Past Wax with an orbital buffer. It resulted in a super smooth finish.

I am very happy with the results. By the way the table if for sale ($600) and is located in Evansville, Indiana.

Estimated Cost
$80
Estimated Time Investment
Week Long Project (20 Hours or More)
Finish Used
Minwax Dark Walnut Stain (2 coats) and Minwax Fast Drying (oil based) polyurethane.
Recommended Skill Level
Beginner

Planked Wood Bedside tables

Submitted by JMG on Wed, 07/06/2022 - 19:26

My son moved out and needed bedside tables. I have been hounding him to learn how to build and this was the first project he did! He was super proud of himself and how they turned out. Not bad for a first build! #mompride

Comments

Garage shelf and work bench

Submitted by Anonymous (not verified) on Wed, 08/10/2022 - 12:29

Used the plans from attached garage shelving to make a 10 ft, 24 inch wide shelf then used similar idea for workbench which I still need to put doors on. I love it! Such an easy plan!

Comments

Hanging queen swing

Submitted by Anonymous (not verified) on Fri, 09/02/2022 - 06:03

I built 3/4 OD ply base on 4x4’s. Rope had 3/16 steel cable inside it attached to ceiling hardware for strength. Rest was 2x4 painted. Little overbuilt but it was my first.

Comments

Modified shoe bench

Submitted by mdj1281 on Mon, 11/16/2015 - 05:06

In our new home there was a 46" wide coat closet at the entrance. My wife wanted a place to sit down, take off shoes and put our coats and backpacks when we were home. I found Ana White's plans for this shoe bench and modified it to fit our space. The project took 3 days to complete due to the painting, staining and polyurethane, construction of the bench itself was quick. Previously I added a light switch and two 3" LED recessed lights in the ceiling. The project came out wonderful and I am very pleased. Thank you for the inspiration!


-Mike

Estimated Time Investment
Weekend Project (10-20 Hours)
Finish Used
White semigloss paint (2 coats), Minwax Red Mahogany 225, Varathane Polyurethane semi-gloss (3 coats)
Recommended Skill Level
Beginner

Comments

Floating Bunk Beds and Desk

This little girls room needed a little happy birthday!  I planked the wall with birch veneer, made simple box frames for the beds and desk, and attached them to walls with heavy duty cable.  Then my friend added her designer touch, and made it cozy and  girl CHIC!

Built from Plan(s)
Estimated Cost
$500
Estimated Time Investment
Week Long Project (20 Hours or More)
Finish Used
white paint
Recommended Skill Level
Intermediate

King Farmhouse Bed

Me and my husband had only a hollywood frame forever and just never wanted to spend the money to buy one, then I found this website!! This is the first thing that I ever built I'm pretty proud of my self. Espically since I had the help of my one and two year old it took a little longer but i got it done.

Estimated Cost
$150 including stain, nails and screws
Estimated Time Investment
Weekend Project (10-20 Hours)
Finish Used
Ebony Stain
Recommended Skill Level
Beginner

blowtorch stained kitchen table

Submitted by KL728MX on Tue, 01/05/2016 - 12:55

I combined two plans to make this and added my own touch to it as well. I am 6' 4" and wanted a taller table but I really like the farmhouse table. I found 35" turned table legs at Lowes that worked perfectly. I also found these really cool 2'X4' butcher block style spruce panels that worked great for the table top. I pocket holed 3 of them side by side to get the size I wanted. I built the frame out of 2X3's and trimmed them out with some molding. I had seen people blowtorch tables before and I thought it would look really good. I added the stain afterward to darken the color and it came out awesome. I painted the legs and frame white to match the trim and cabinets in my kitchen.

Estimated Cost
$200
Estimated Time Investment
Weekend Project (10-20 Hours)
Finish Used
blowtorch and minwax gunstock stain, 3 coats of polyacrylic satin clear
Recommended Skill Level
Intermediate

Comments

CSaintD

Wed, 01/06/2016 - 10:12

That is a great idea for the table top - using the panels, I mean.  I  never thought of that as an alternative to the long 2x boards.  Great job!

KL728MX

Sun, 01/24/2016 - 12:46

I really aprriciate your comment. It was really easy to use the panels and it also eliminated the amount of pocket holes needed. It also made it alot easier to get a smooth and flush table top. The only downside is you typicaly want the wood grain to run the length of the table. Given the size of the panels I had to run the wood grain the other direction. I still like it but some wouldn't because of that reason.

Ultimate Workbench/Miter Station

Submitted by Anonymous (not verified) on Mon, 03/06/2023 - 15:32

This plan is exactly what I needed for my workspace. I ended up adding some slat wall pieces and cabinets above from cubicles in an old office nearby that closed down for a tool wall and storage. I left the right opening empty due to how unlevel my floors are. I may close it in later with drawers or cabinets, but it will be my sitting workspace for now. I trimmed out the edge with 1x2s and painted and stained everything for aesthetics.

Comments

Modern Angle Chair

Hello Ana, I decided to modernize your project a little ...
This is 3DS MAX ... ;)
Thank you for your work ...
Regards, Serge...

Built from Plan(s)
Estimated Time Investment
An Hour or Two (0-2 Hours)
Recommended Skill Level
Advanced

Farmhouse Coffee Table [Beginner/Under $40]

Submitted by Anonymous (not verified) on Sat, 03/25/2023 - 03:46

Than you Ana, My first time ever that I have made anything - my coffee table taking pride of place. Looking forward to making my next project from your plans.

Comments

Dining Room Table

Submitted by Anonymous (not verified) on Tue, 04/04/2023 - 06:31

This table was made out of Pecan. The legs are pine. I think the basic plan was from Ana-White.com but I am not sure.

Built from Plan(s)

Comments

New bed for my youngest

Submitted by Anonymous (not verified) on Mon, 04/10/2023 - 15:45

Moved into a new house after a fire destroyed almost everything, rather than buying new beds for my kids, we decided to build! They turned out beautifully, and the kids love them! Decided to modify the camp loft bed, removing the stairs and using the foot of the bed a ladder style.

Comments

Entertainment Center

Submitted by azca33 on Mon, 01/09/2012 - 18:48

My wife and I decided it was time to give our new TV a home. We began looking on ana-white.com and saw a beautiful black entertainment center. That is where I received my inspiration. It is a very similar design however, I decided to change the color and add inset doorsand drawers.

Everywhere we looked for an entertainment center, it was either too pricey, or the measurements were not right. I decided to come up with a plan for an entertainment center that would fit perfectly into our little niche.

Estimated Cost
650-700
Estimated Time Investment
Week Long Project (20 Hours or More)
Finish Used
Dark Walnut Stain/White Latex Paint
Recommended Skill Level
Intermediate

Comments

Jana Thomas (not verified)

Mon, 01/23/2012 - 12:28

I LOVE your entertainment center....exactly what we are working on as we speak. Ours will be a little larger (12 foot wide) after adding on two end shelves to hold lots of DVD's!! I know I want the white color, but could you give a little more information on the distressing and finishing? We've never done that before. Thanks!

azca33

Mon, 01/23/2012 - 17:59

Hey Jana,

What I did was kind of a pain. To give the entertainment center the distressed looked, I stained all the areas that we were going to distress a dark walnut. After we allowed that to dry, we painted it with white latex paint. Since we were painting over a dark walnut stain, it took about 3 coats to completely cover the color. After 24 hours of drying we sanded it with 100 grit sand paper on all the areas we wanted distressed. You will want to lightly sand it until the dark walnut color comes through. Avoiding sanding too hard as you will sand through the stain.

We still have some distressing that we would like to do on it, but we need to get a wire sponge for that, and just haven't gotten around to it. The sand paper works really well on corners, but not so much on the face of the wood. We haven't sealed it completely since we still have some areas to distress, but will use a water-based sealer.

Let me know if you have any other questions.

davidmac (not verified)

Tue, 01/24/2012 - 14:15

It looks great. How did you attach the side units to the middle unit? Are the drawer fronts just solid 12" x 12" with the decorate trim attached to front? I can't tell if the portion where the handle is attached is recessed or not. And lastly, are those 1" x 3" trim pieces around the drawers?

azca33

Tue, 01/24/2012 - 16:46

Hey Davidmac,

The trim is all 1x3 solid pine, including the trim around the drawers. The drawers measure out to 10x10. I built the drawer faces the same way I built the cabinet doors. I used 1x3 trim and dado'd a 1/4" groove to inset a 1/4" piece of plywood. I then added molding to give the drawers and cabinet doors a more detailed look, so it is recessed where the handle is attached.

The side units are attached by 1 1/4" screws that are hidden behind the trim. Easy access to remove for any future moves.

Jeff (not verified)

Sat, 01/28/2012 - 22:15

Are there actual plans for this? I just see it in another brag post. but no actual laid out plans.

Guest (not verified)

Sun, 02/19/2012 - 19:22

Where can I find plans for this. Beautiful.

azca33

Fri, 03/23/2012 - 09:24

Unfortunately, there isn't a set of plans for this entertainment center on the site. I looked at the Entertainment Center for Kristen Lotz and built my own plans according to her pictures, with a few adjustments. If you have any questions, I will be more than happy to help you out.

Kristen Lotz (not verified)

Tue, 05/29/2012 - 17:32

I just checked in onto this site for the first time in awhile and I saw your entertainment center. I knew you must have gotten inspiration from ours... I love how yours turned out! I love the white, I love the distressing, and I love the inset doors and drawers with all the details. It turned out absolutely beautiful. Good job!

azca33

Mon, 06/11/2012 - 12:21

Thanks Kristen and thank you for the inspiration. When I saw yours on ana-white, I knew that is what I wanted in my living room. I also thought it was genius to put the DVD Player etc... up higher so the kids can't play with it. We are really happy with it.

kristenlotz

Mon, 12/31/2012 - 14:20

I finally got around to making the plans for our entertainment center (well, actually my husband did it). It is very similar to yours except the inset doors and drawers, the door and drawer trim and the finish colors. Hopefully that helps those looking for plans for this beautiful entertainment center. I love finding brag posts of similar entertainment centers because they are absolutely beautiful at a fraction of the cost of buying one. And we love telling people that we built it!
http://www.jrlwoodworking.com/2012/12/furniture-plans-custom-entertainm…

Andrea Miller (not verified)

Mon, 01/07/2013 - 12:26

Did you do an under coat or did you just add stain to the sanded areas? Love the look.

Bunk Bed

Submitted by hoffer5353 on Wed, 02/08/2012 - 14:04

I am very happy to have completed the up portion of the bunk bed. The full size down was done quite sometime ago and I became sidetracked on other projects.
This is a sturdy bed and a favorite in my home. One day I even found my husband napping (hiding) on the top bunk.
The part that I like the best is when we graduate from bunk beds we still have two beds to use.
I also completed the ladder and it works, but I cut it just alittle shorter than the plan called for. Lets just put another on my to do list.

Estimated Cost
100-200
Estimated Time Investment
Week Long Project (20 Hours or More)
Finish Used
minwax, red oak stain. Minwax Poly
Recommended Skill Level
Beginner

Comments

hoffer5353

Sat, 02/11/2012 - 14:37

It was surprisingly more easy that I expected. It helped me stay motivated to finish both beds.

Yard Swing Pergola

Submitted by Anonymous (not verified) on Sat, 07/08/2023 - 09:31

Just saw on instagram that no one bragged about this plan yet. We did order the swing online, but built the outdoor room from your plan. We did put our support posts in concrete, very windy here. Just waiting for the roses to grow up the sides. Thank you for making it easy with your plan.

Bill and Maryann Tate

Built from Plan(s)

Comments

My Leather Accent King Size Bed

We modified the plans because I had a specific idea of what I wanted and we needed a king size bed. We are so proud. We used left over foam from a previous project and covered it with the faux leather for the back rests. Because I love the look of dust ruffles but couldnt use it because of the slats to support the bed I cut out the material from which the dust ruffle is sewn and attached velcro to it and then to the bed and I got the look I wanted. Ana is awesome!

Estimated Cost
196.00
Estimated Time Investment
Weekend Project (10-20 Hours)
Finish Used
Expresso Paint and waterbased poly urethane to protect it
Recommended Skill Level
Beginner