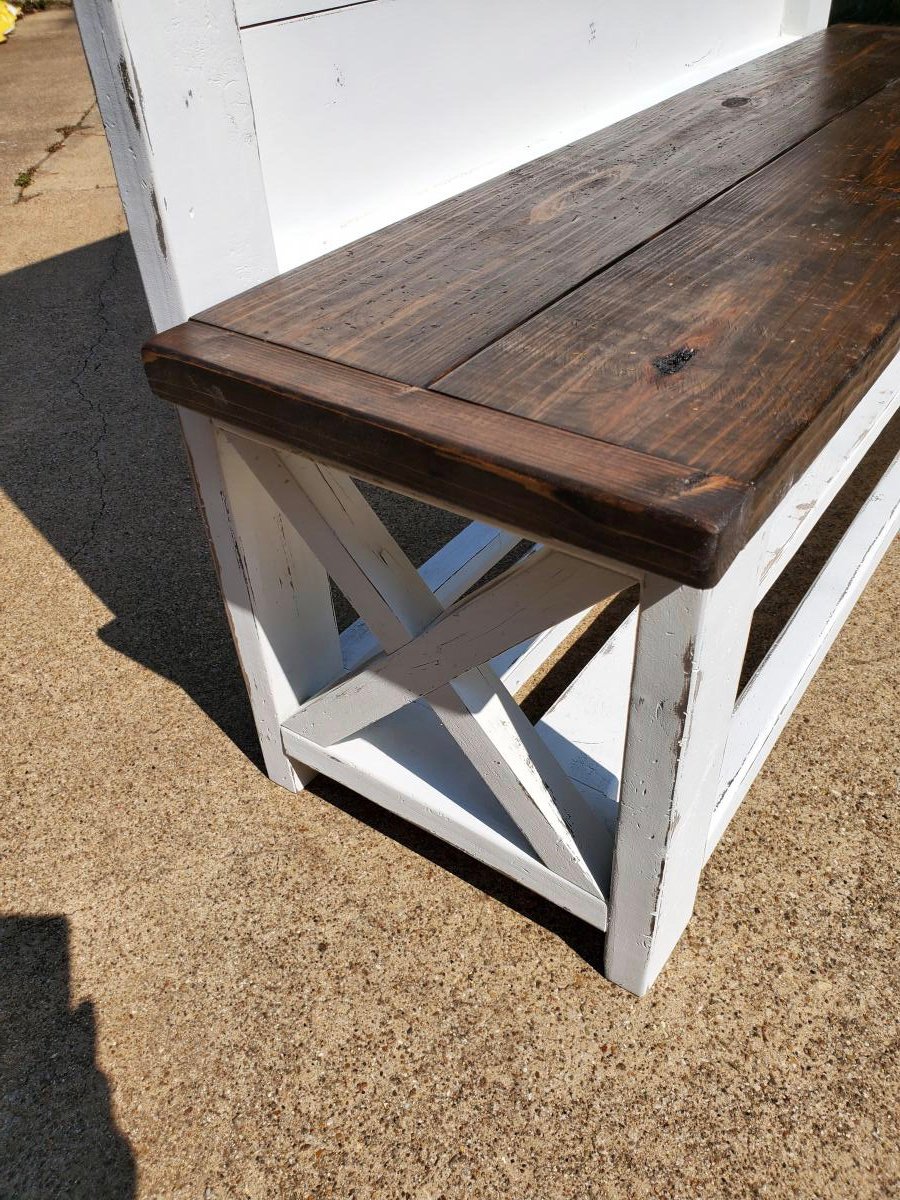
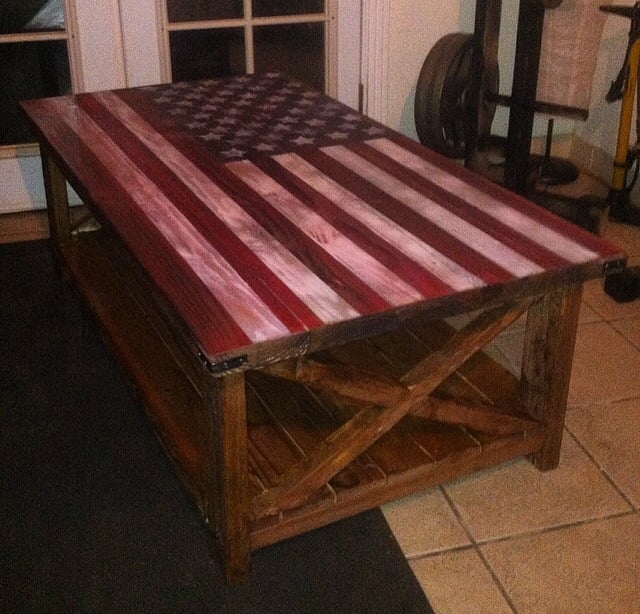
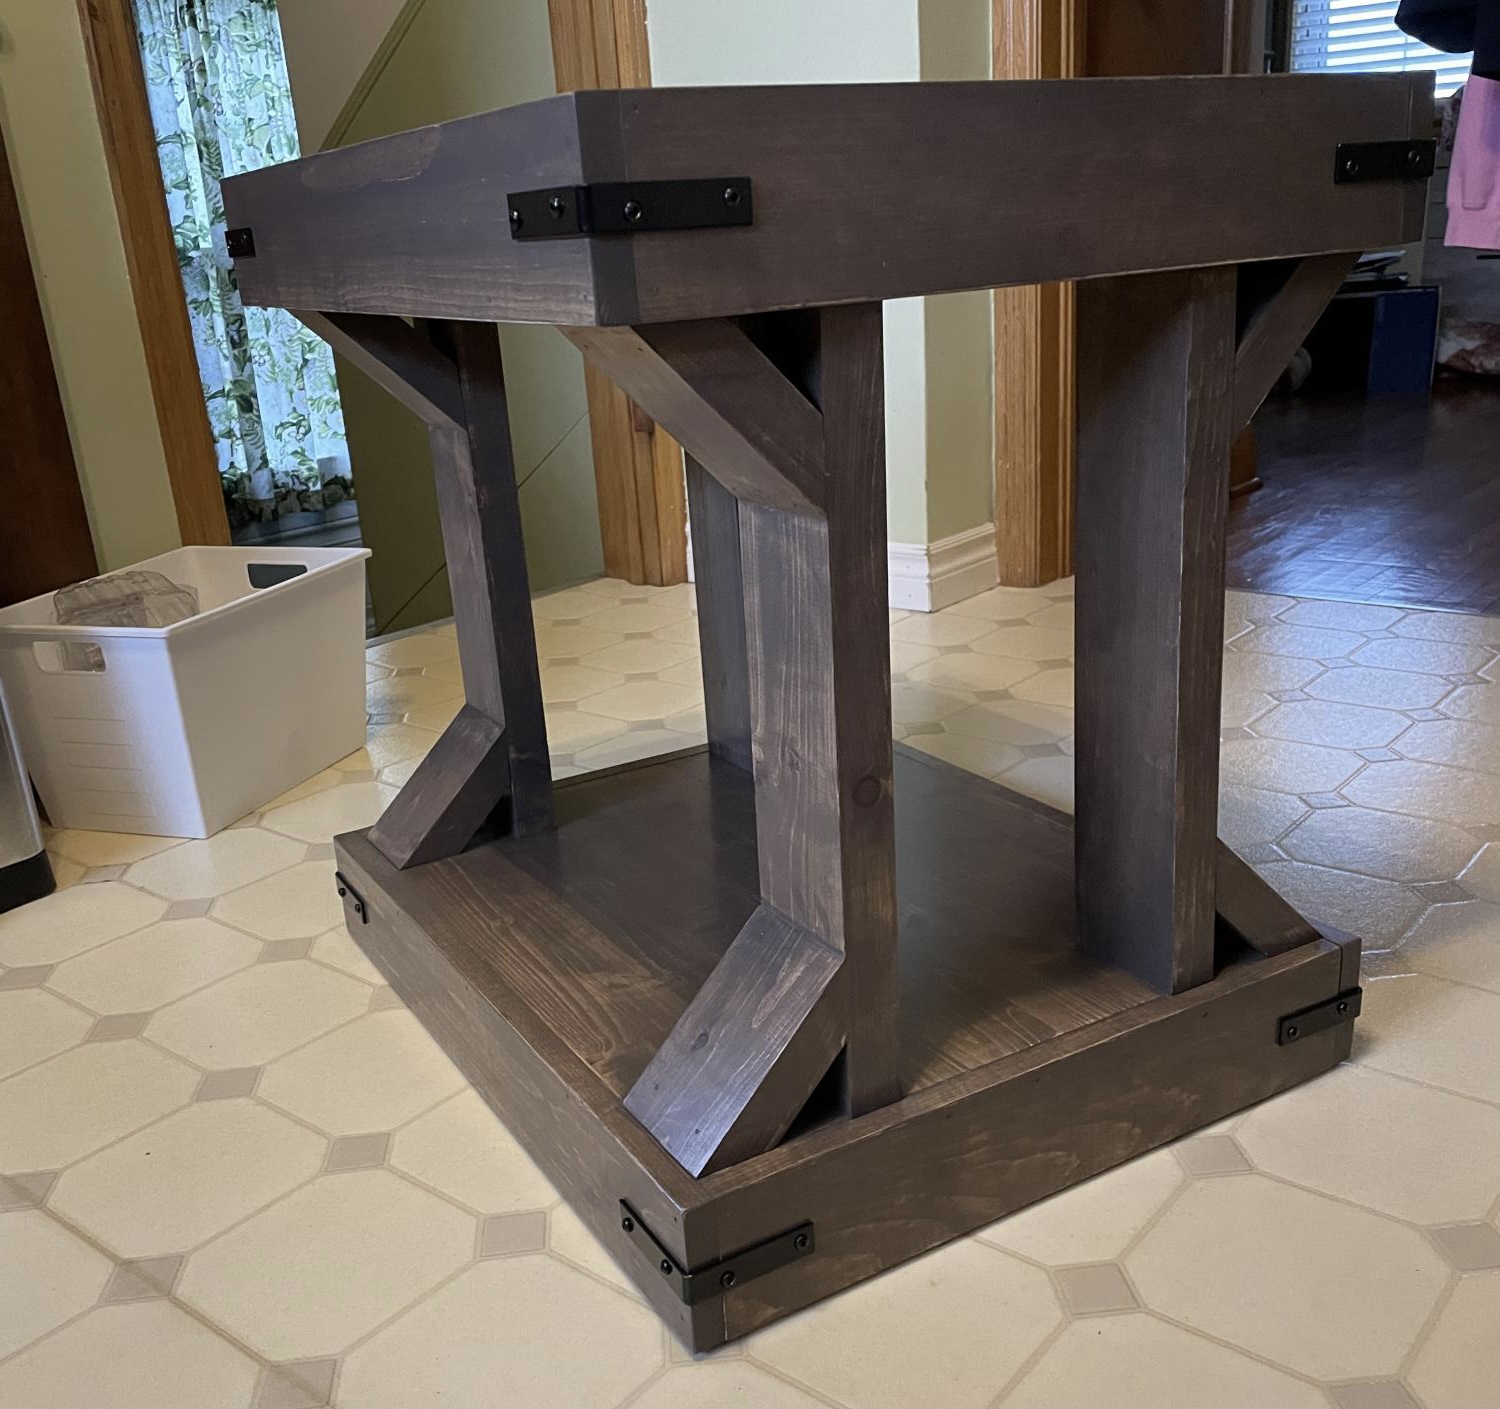
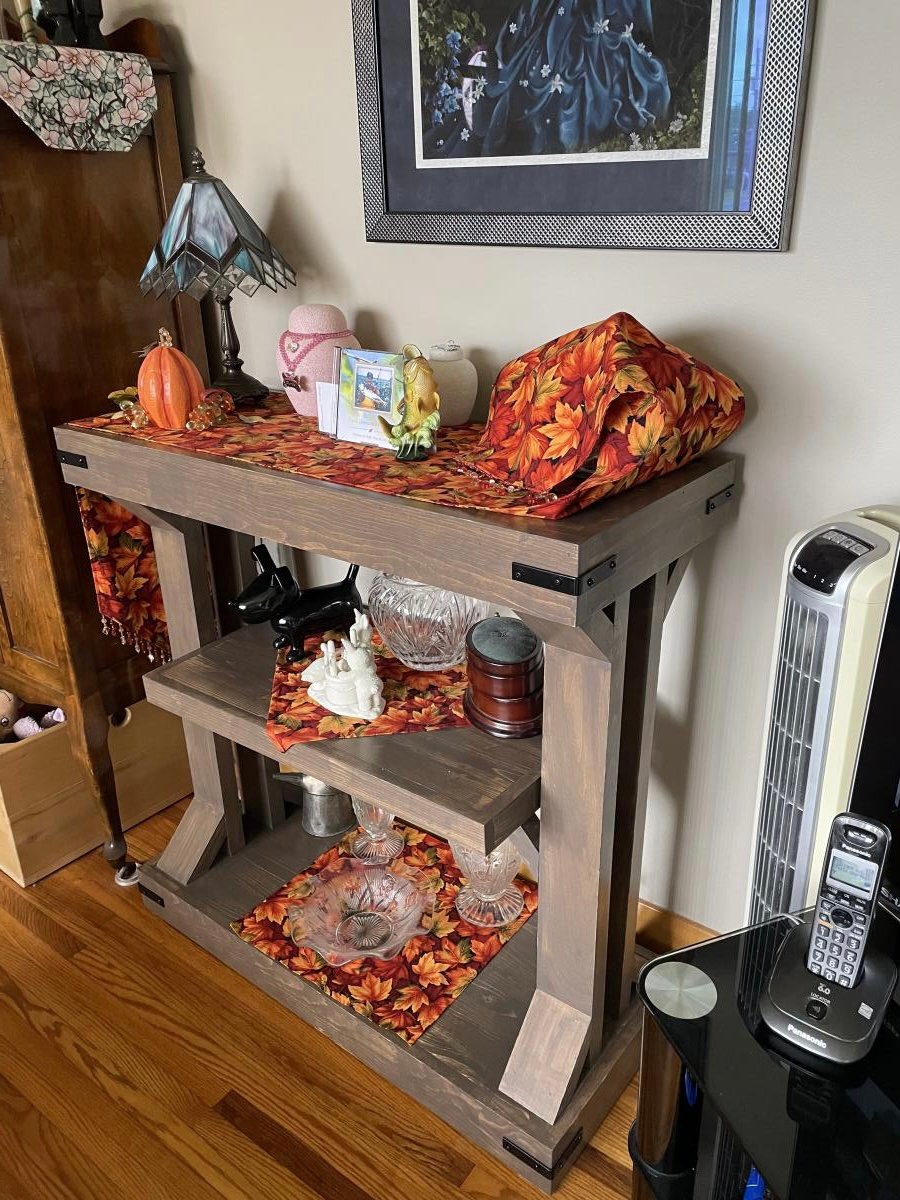
Community Brag Posts

X Coffee Table

Submitted by mcputs on Sun, 10/07/2012 - 17:41

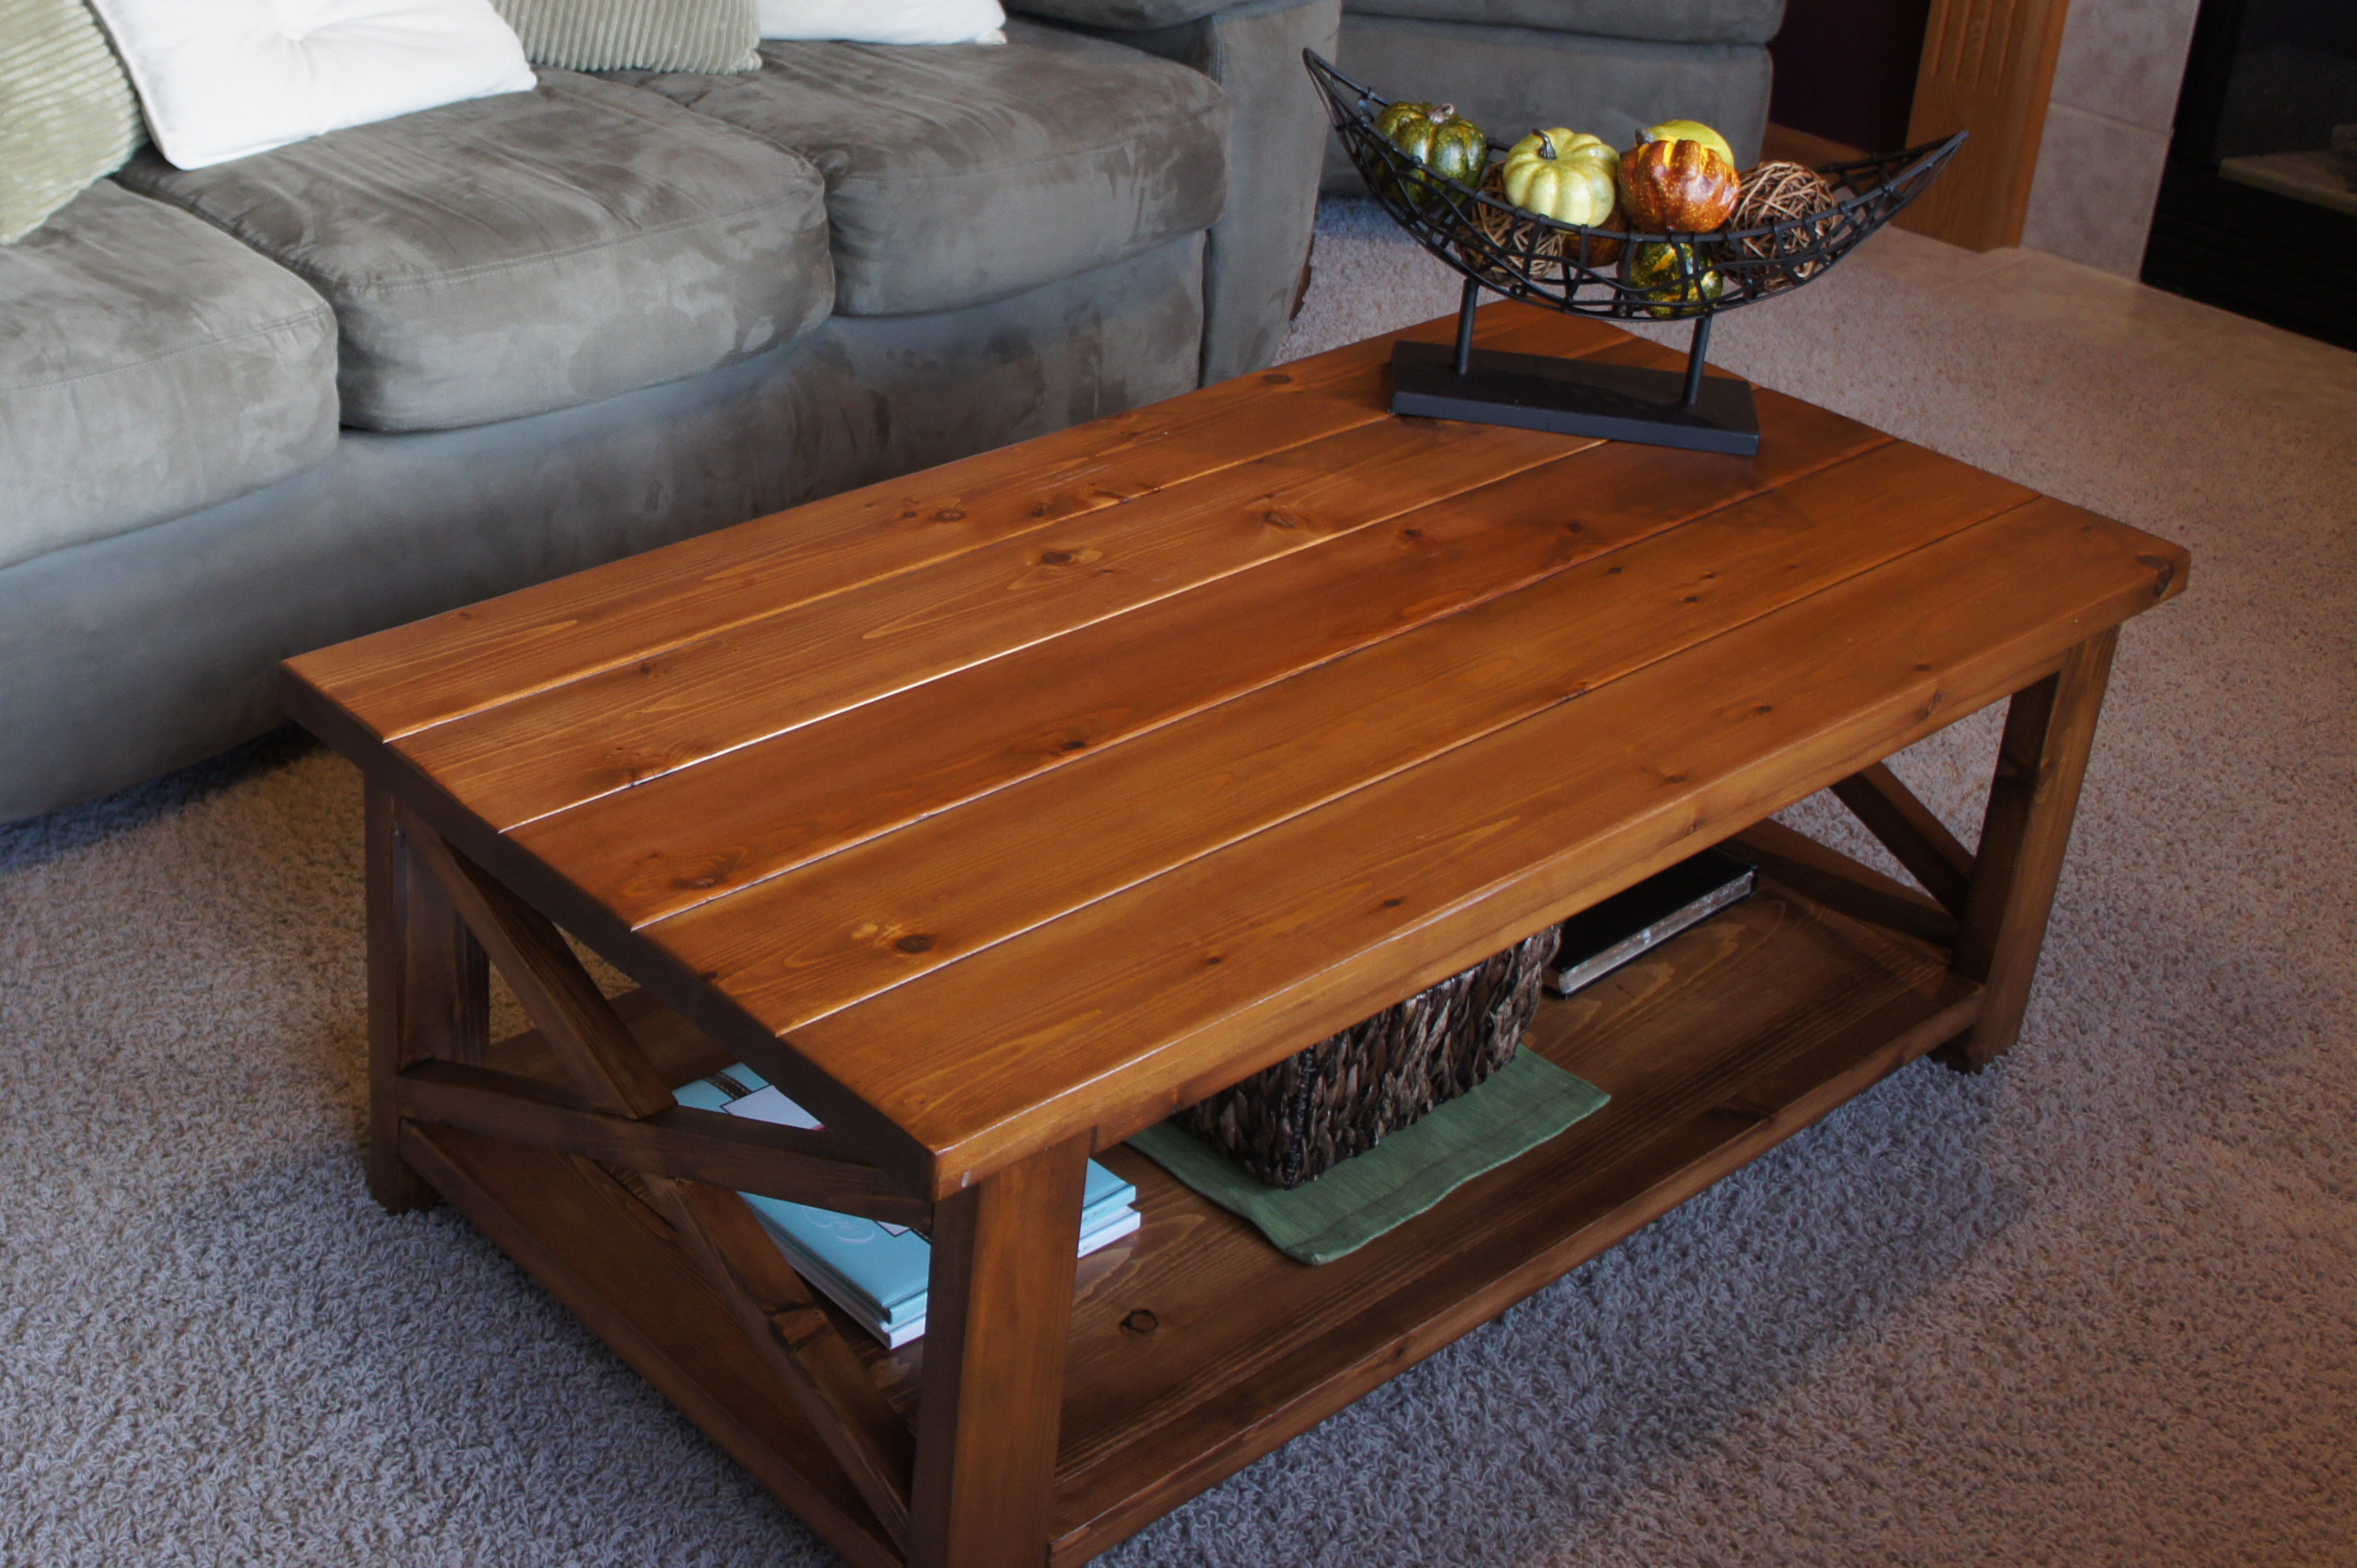
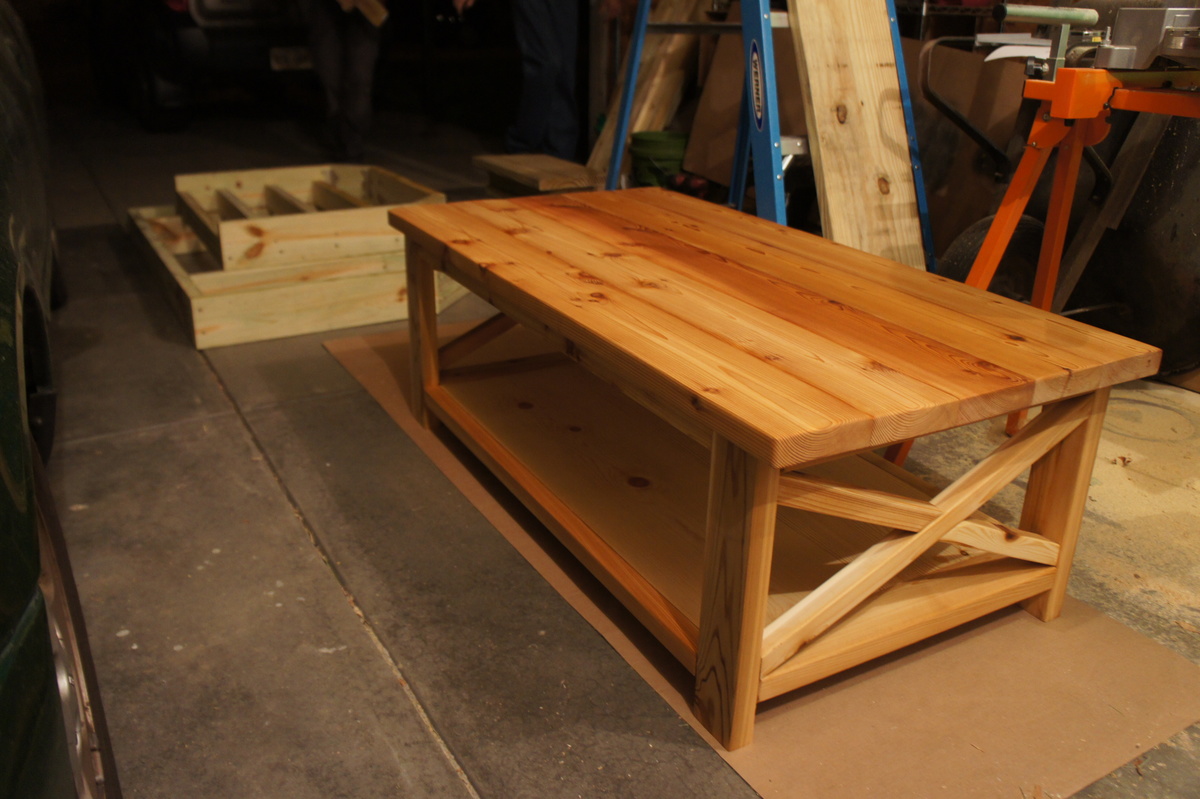
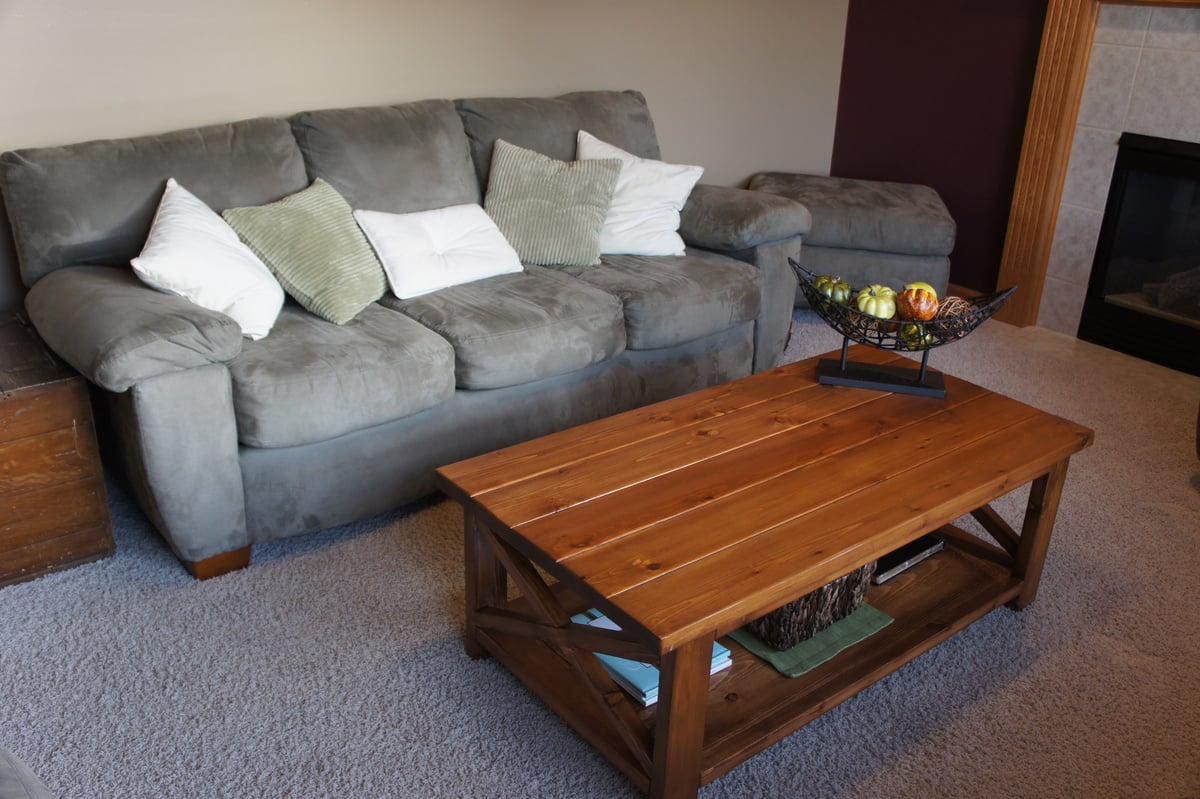
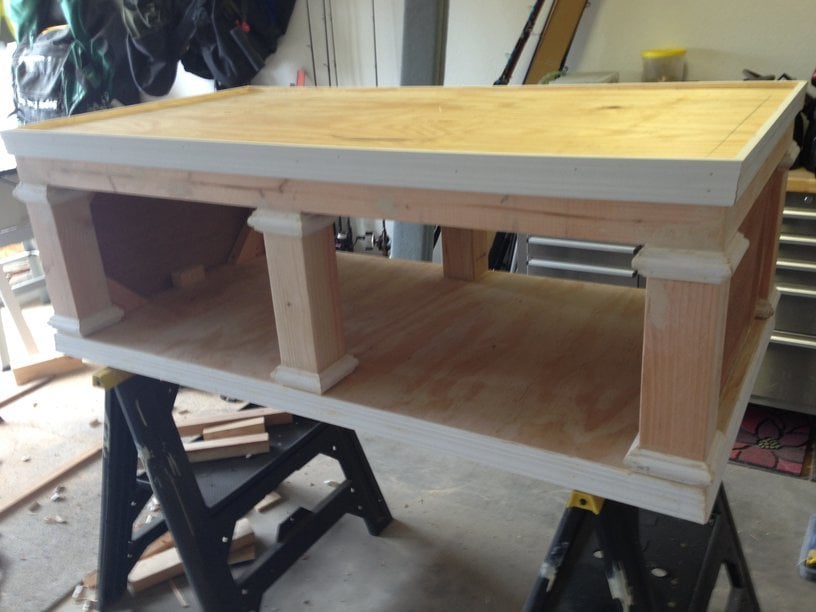
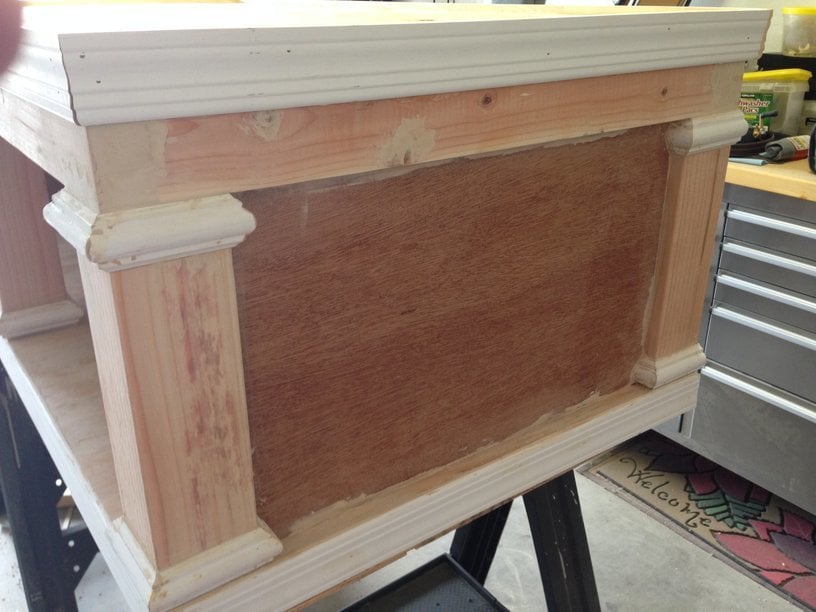
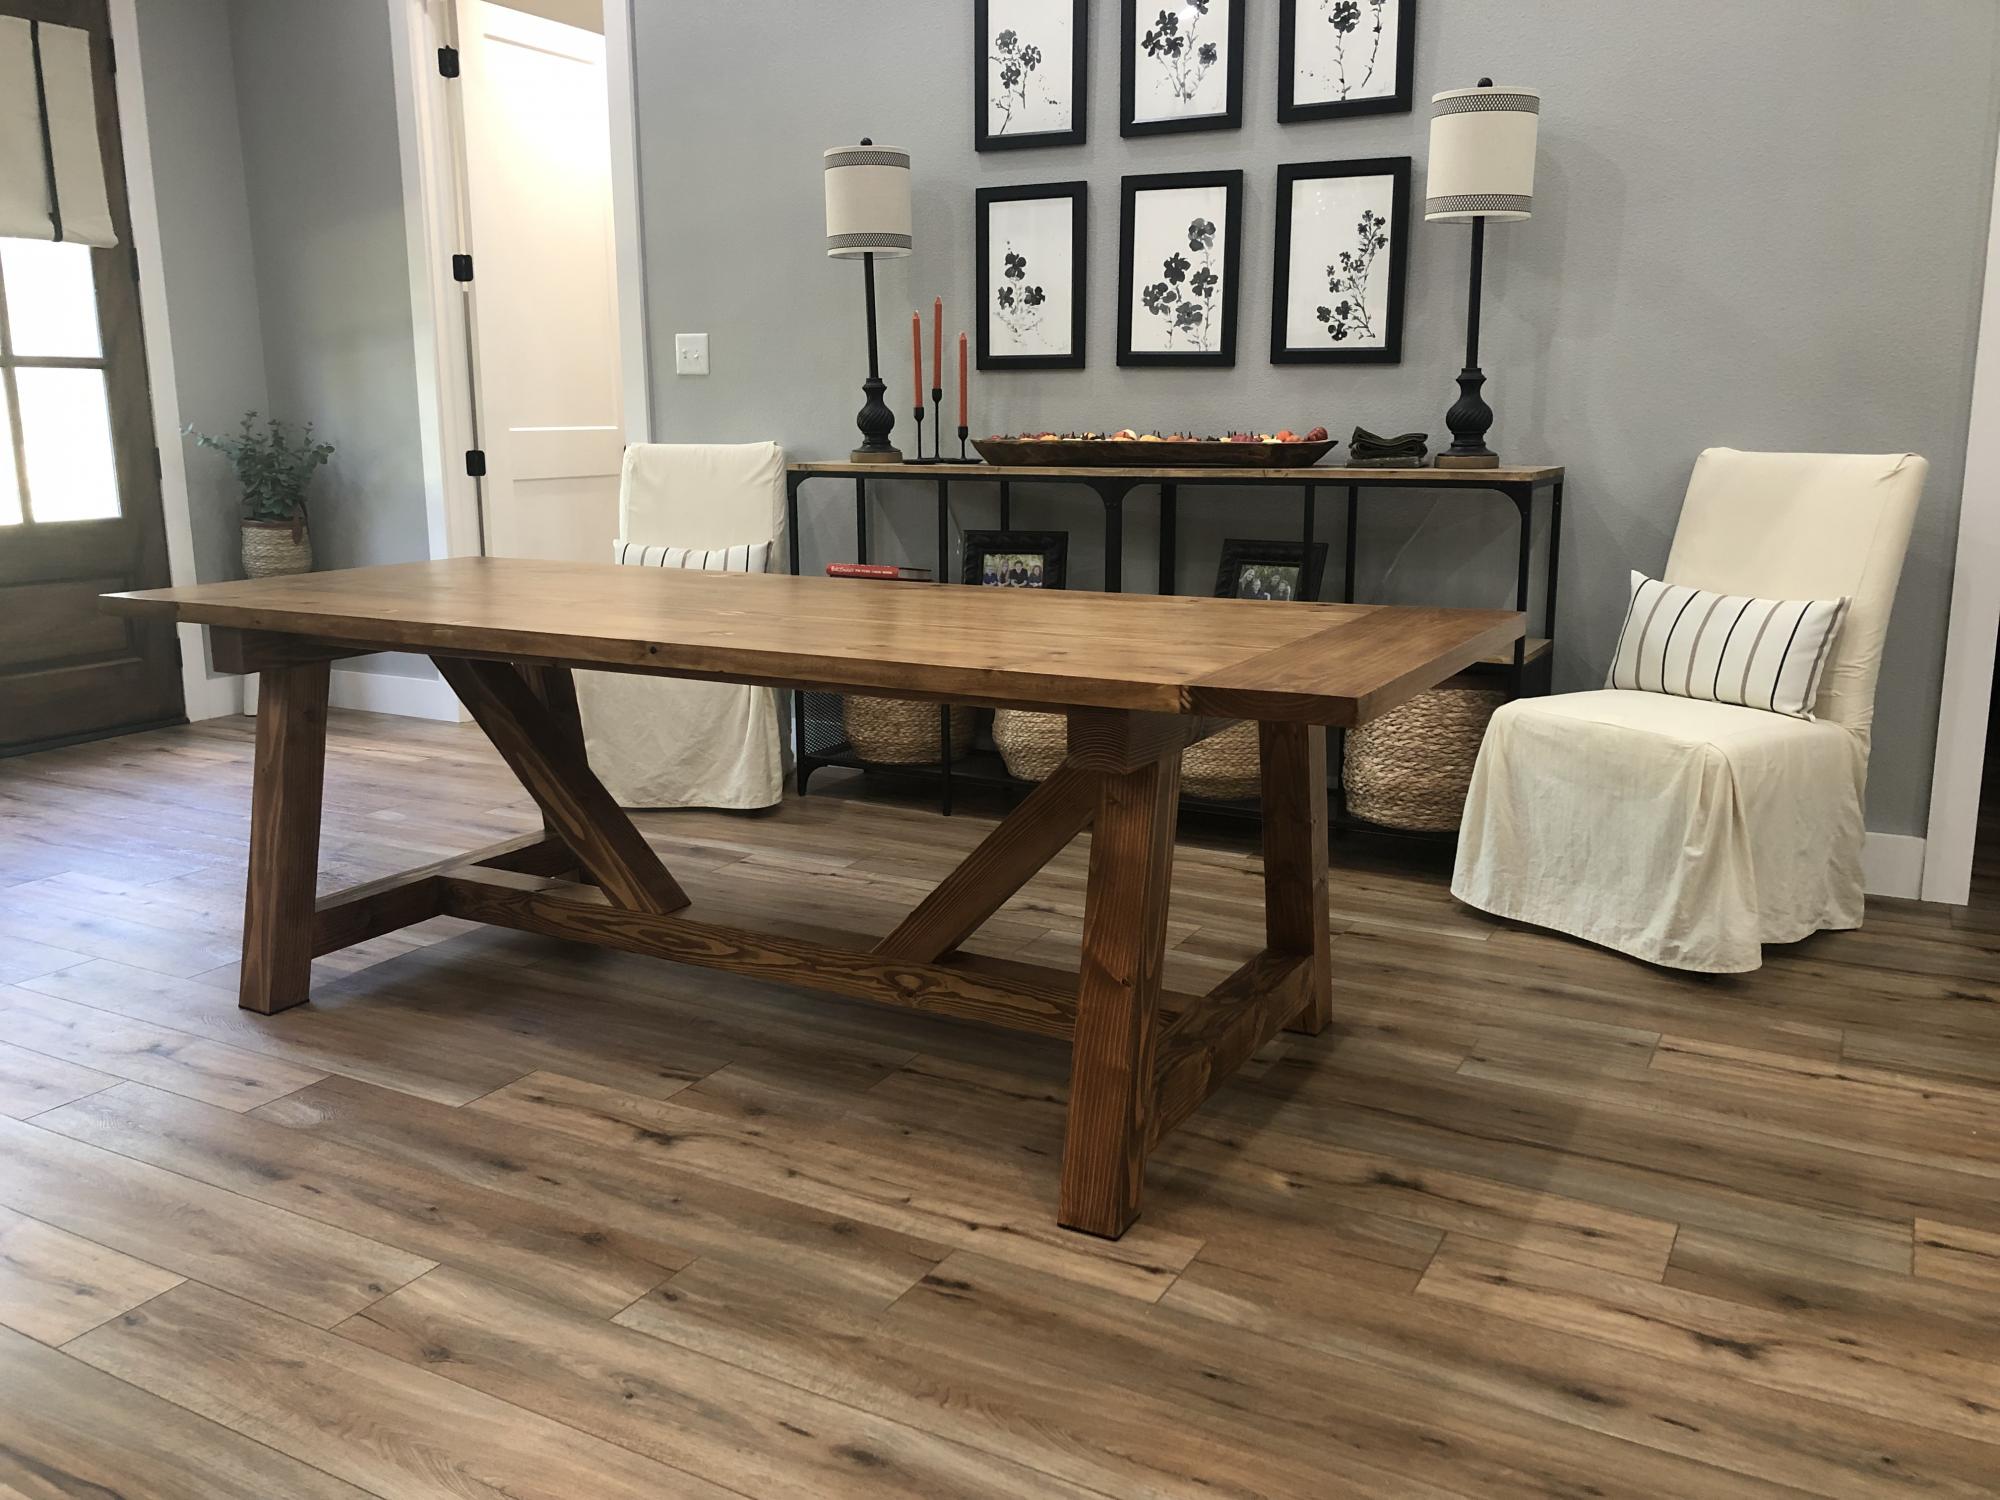
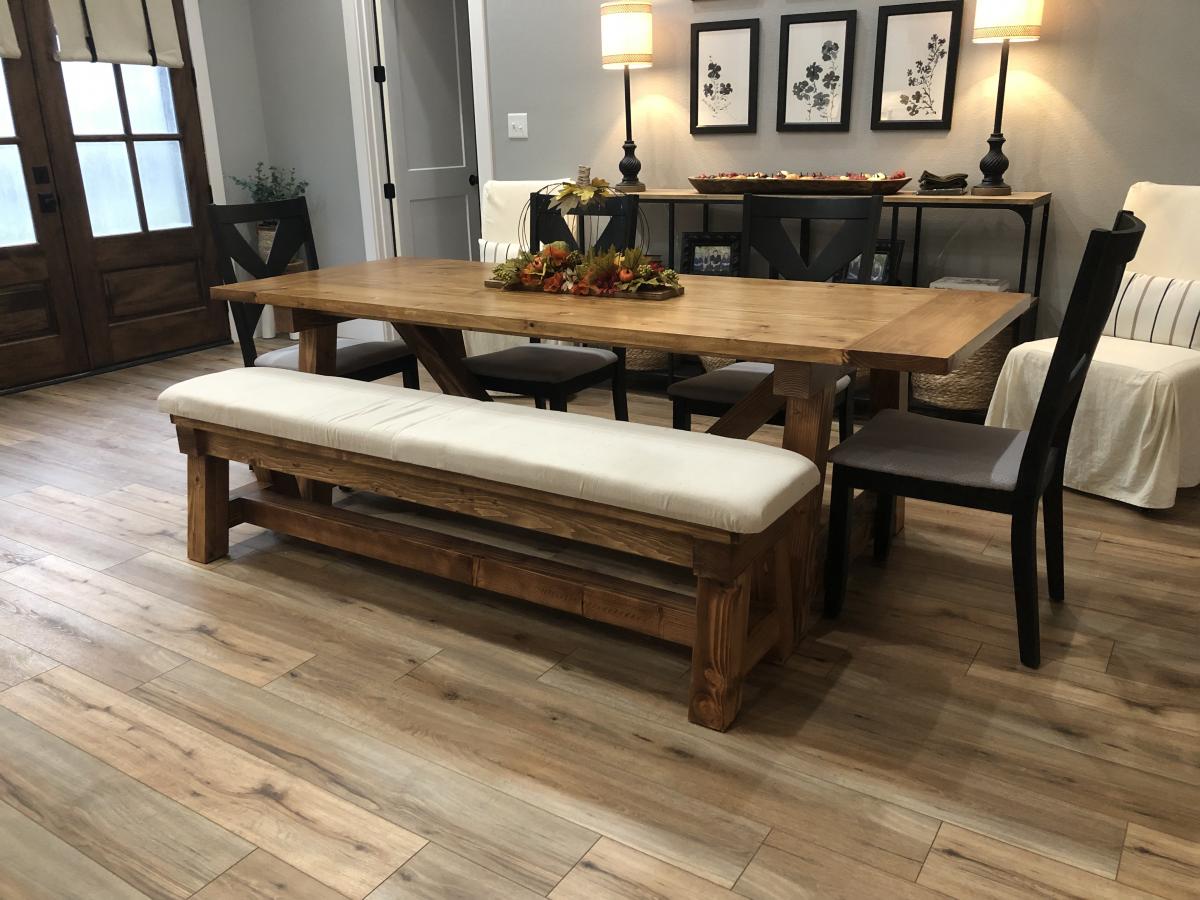
This is the Rustic X Coffee Table without the rustic finish. I used cedar wood with Early American stain. This was my first furniture project and I am so happy I did it. We needed a coffee table badly and I couldn't fathom spending several hundred on a good one. This one saved money and I appreciate it so much more. Because I used cedar the cost of the project was about $100. I used pine on the 1X12s on the bottom shelf and once stained it looks just fine. I did not stain the under side of the table top so as to maintain the smell of cedar.

Built from Plan(s)
Estimated Cost
$100
Estimated Time Investment
Weekend Project (10-20 Hours)
Finish Used
Stain: Varathane - Early American
I started with Varathane Wood Conditioner, then applied one coat of stain, wiping with a cloth after application. To finish I applied two coats of Minwax polyurethane.
Recommended Skill Level
Intermediate

Comments

jlynchtx

Fri, 01/05/2018 - 23:10

The table look great! Thinking about building one myself soon? Have you noticed any warping or cracking of the wood since you built this? 

Mom's Jelly Cabinet

Our first DIY furniture project. We told friends it was an assignment from couples therapy. lol Don't look too close or you will see the many flaws, but I can say it has character and will serve its purpose.

We had problems with the doors. I think they are true and plum, but the cabinet, not so much. They hang a little cockeyed, but they do swing. The plans for the doors didn't quite match the cabinet, but we are newbies so we could have misread the plans.

The hinges and latch are from the blue store - painted matte black from a can from the original nasty brass. The red is Balero and the shelves are a coordinating tan from Sherwin Williams. A coat of Minwax Polycrylic for protection. We used square wire from the blue store for the doors. We didn't router the doors to inset the wire, a stapler worked fine.

It was an absolute great first project that Husband & I enjoyed tremendously. Mom has been looking for a jelly cabinet for 6 months without success. Old functional furniture pieces just aren't manufactured anymore. This cupboard fit the bill perfectly.

Estimated Cost
$80 for wood and another $80 for paint and supplies
Estimated Time Investment
Weekend Project (10-20 Hours)
Finish Used
Sherwin Williams Balero Red and coordinating Tan with Minwax Polycrylic Spray
Recommended Skill Level
Beginner

Comments

Maira (not verified)

Tue, 10/23/2012 - 08:01

This is awesome. Seriously. You two did such a great job and your mom will enjoy it for many years. That red with the black hardware looks so great.

aruchti

Tue, 12/13/2016 - 07:41

Hi, I can't seem to find the plans for this, the PDF is just a PDF of the thread. I'd love to make this as a coffee stand. thanks!

aruchti

Tue, 12/13/2016 - 07:44

Hi, I can't seem to find the plans for this. would love to make this for a coffee stand. can you provide the link to the plans?


thanks!

Rocking Chair

Submitted by PPTG on Mon, 08/31/2020 - 12:11

Getting ready for retirement, so I thought I needed a rocking chair.
No plans, just built what looked and felt right.

Estimated Time Investment
Week Long Project (20 Hours or More)
Finish Used
Early American
Recommended Skill Level
Intermediate

Comments

David King

Thu, 03/18/2021 - 01:27

Lovely chair. Nice proportions. Would like to copy it. Have you got any plans, sketches, or dimensions to share?

jlxvnwk

Fri, 02/10/2023 - 13:10

Love this rocking chair! Do you have any dimensions or plans. I would live to take this project on. Thank you.

Rustic x hall tree

Submitted by Takoravi on Mon, 10/05/2020 - 08:50

first furniture build from scratch. A few minor differences. I decided to distress by staining entire piece with minwax espresso stain, then painting over with white chalk paint and sanding through. Decided to leave bench and to molding stained for effect. Love the piece and so does my wife.

Built from Plan(s)

Comments

Shoe cabinet!

Submitted by JMasters on Thu, 01/26/2017 - 13:43

Created my own version out this plan. 

Built from Plan(s)
Estimated Cost
$80
Estimated Time Investment
Weekend Project (10-20 Hours)
Recommended Skill Level
Intermediate

Ryan's Washer/Dryer Pedestal

Submitted by zoolander on Fri, 12/05/2014 - 17:25

I loved this design.  I couldn't believe that they wanted to charge me almost $600 for the pedestals for the washer/dryer set that I bought on black friday, so I decided to give this project a go.  I basically used the same construction plans from Sausha's project, but I dressed mine up a bit.  First, I chose a bit larger trim for the tops and bottoms of the posts.  Then, I bought some 2" baseboards and did the top and bottom with baseboards.  On the bottom, I had to use my tablesaw to trim off about 1/2" because I used 1x1" boards on the bottom so that I could have more space for baskets.  Then, on the top, I inverted the baseboard and allowed it to overlap a bit so that if it were to vibrate, the washer/dryer could not fall off the edge.  I also added some fabric on the top (stuff that I use to cover the bunk boards on my boat trailer...kind of like a very thick and durable felt material) to cut down on vibration and also keep the units in place.  Finally, I added sides by using wedge trusses on the inside of my side posts and then I put a 1/8" piece of plywood over top and nailed/glued it to the trusses.

It turned out great.  Thanks for the plans Sausha!

Estimated Cost
$125
Estimated Time Investment
Weekend Project (10-20 Hours)
Finish Used
paint
Recommended Skill Level
Intermediate

Comments

Zlk200

Mon, 12/21/2015 - 17:38

Did you use sanded plywood? Did you use any veneers for the exposed 2x4's to get a smooth finish or did you paint right on it?

lastly, what is the name of the trim you put on the 4x4s? I've hard a hard time finding it. Thank you!

In reply to by Zlk200

zoolander

Wed, 06/29/2016 - 13:59

Sorry for the super delayed response.  I didn't realize this question was here.  I did not plane anything.  I did sand the surfaces a bit, but I didn't get too crazy.  I put 3 thick coats of paint on it which made it pretty smooth.  If you look very closely in person, you can still see a bit of wood grain, but it is only noticable if you really get down and look.  I did use a lot of wood putty to fill all of the gaps and crevaces and then I sanded those parts pretty well.  


With regard to the trim, the top literally just standard baseboard material turned upside down, and then the little trim on the tops and bottoms of the 4x4s is just another standard strip of moulding that I got from Lowes.  I think they call it "Chair Rail" moulding.  Its the stuff that you put down if you are doing some sort of paint separation or wainscoting.

http://www.lowes.com/pd/1-625-in-x-12-ft-Mdf-Chair-Rail/3403018

I used woodglue on all of the moulding and tacked it on with a nail gun.  Then I filled all of the nail holes with wood putty and also use the putty to fill gaps where the corners came together to make that look smooth.

I hope that helps...you are probably already done with your project by now, but I figured that I would answer anyway.  :)

Bathroom Vanity

Submitted by brittanyj on Thu, 03/09/2017 - 11:45

Built this vanity to fit our space in our tiny bathroom.  I love the storage increase from having a pedestal sink.  All hardware and sink was from Habitat Restore, and the faucet was off amazon for $25, making total cost for this project around $75. 

Built from Plan(s)
Estimated Cost
$75
Estimated Time Investment
Weekend Project (10-20 Hours)
Finish Used
grey paint, poly finish
Recommended Skill Level
Intermediate

Chicken coop

Submitted by Anonymous (not verified) on Tue, 03/09/2021 - 07:44

This is a coop I built from plans on the site. I modified by covering the ply with old cedar boards and used tin for a more rustic look. I opted not to add the planter just covered it with wire.
Love your plans! So easy to follow!

Estimated Cost
Since I used recycled materials the overall cost was about $50
Estimated Time Investment
Weekend Project (10-20 Hours)
Finish Used
I just did the outside like a jigsaw puzzle. Cutting to fit as I went. Be sure to use nails or staples that do not protrude the inside when attaching siding.
Recommended Skill Level
Intermediate

Kerplunk Game for Outdoors

Submitted by thediyplan on Thu, 03/18/2021 - 13:54

Here’s another fun game to play for all ages, especially for kids. It’s called a Kerplunk Game. The original Kerplunk game is small, made from plastic, and is mainly for indoor use. But to make it more interesting and to encourage kids to spend more time outdoors, I’ve built a Giant DIY Kerplunk Game with a wire mesh screen. This is a great backyard game for any occasion or a party.

See my website for additional pictures and how I've built it, TheDIYPlan.com

Estimated Cost
$70
Estimated Time Investment
Afternoon Project (3-6 Hours)
Recommended Skill Level
Intermediate

Comments

Beautiful bed!

Submitted by Anonymous (not verified) on Mon, 08/19/2019 - 09:05

This bed is gorgeous and the plans are perfectly laid out for even a beginner to use.  We were making a full bedframe, so we used the exact measurements given in the cut list and it fit the mattress just right.  We made the accompanying headboard with a few changes.  We were using pine and wanted the headboard casing to match, so we just used 1x4's and routed the edge with an ogee bit we had on hand.  We also wanted the platform just a tad bit higher and made the legs 10 inches instead of 7.  We also ended up making the platform slats out of 1x4's instead of 1x3's as they were cheaper.


Pin For Later! 

Beautiful bed!

Estimated Cost
$80.00
Estimated Time Investment
Weekend Project (10-20 Hours)
Finish Used
One coat of Minwax Honey stain, finished with flat spray poly
Recommended Skill Level
Beginner

Comments

American flag rustic coffee table

Thanks so much for the plan!

Built from Plan(s)
Estimated Time Investment
Weekend Project (10-20 Hours)
Recommended Skill Level
Beginner

Comments

Stonewall711

Fri, 02/20/2015 - 09:35

This looks INCREDIBLE!!!!! I was hoping you could possibly share how you painted on the American Flag, and gave it the rustic look to match the coffee table? I'm new to this site, so I'm not sure if you can reply directly to this comment or not. If you can't, would you mind emailing me at [email protected]?

Thank you so much!

cristy118

Wed, 10/07/2015 - 13:59

Hi.  I love this coffee table.  I have read through all the directions.  I have one quick question.  After I have built the coffee table and then oxidize the wood, do I then paint the flag with regular red white and blue paint and then seal it with the wax?  Thank you 

Outdoor patio sectional and patio coffee table

Submitted by Anonymous (not verified) on Tue, 05/16/2017 - 13:08

Welcome to our labor of love. This is our first build and while my bf did most of the work, it was a great project for us as a couple. It was definitely work, but well worth it. We love the way it fits perfectly in our courtyard and people keep commenting on how high-end it looks. Thanks for the plan, Ana! The project took a little longer than it probably should, since it was the first project for us. You should account fort he time it will take to cut, sand and stain your pieces before assembly. There are times you will need to allow for the lumber to dry etc.

Finish Used
1-gal. #ST-129 Chocolate Semi-Transparent Waterproofing Stain and Sealer
Recommended Skill Level
Beginner

Comments

Sandbox with Benches

Burnt and stained with a semi transparent mahogany water sealer

Built from Plan(s)
Estimated Cost
$120
Estimated Time Investment
Afternoon Project (3-6 Hours)
Recommended Skill Level
Beginner

Comments

My first DIY project!

Submitted by Celeste808 on Sun, 05/05/2013 - 10:30

Finally Completed!!! Thank you rainy Saturday! So I wanted a new entertainment center of sorts... couldn't find one that was just what I wanted..... so why not just build what I want! Just DIY it. ;)

I used the faux fireplace plan and modified it to have attached shelves on the sides. I also added an extra strip at the top of the fireplace opening so I could mount an LED bar light.

I used 1/4 plywood to make a tile base, penny tile, and 1/2 quarter round to finish out around the entire bottom.

Total project cost was less than $200 including the tile and light!

Best part is the whole thing is movable!

Thanks Anna White for such an awesome plan to start with!

Estimated Time Investment
Week Long Project (20 Hours or More)
Finish Used
MDF & plywood
Recommended Skill Level
Beginner

Comments

spkramer

Wed, 07/03/2013 - 10:24

This whole unit is great. My wife LOVES it, which means I will be building it! Did you purchase the two shelf units or build them yourself? Did you use a pattern or plan? Thanks!

Alisonwunderland

Wed, 07/31/2013 - 13:09

This is amazing! Exactly what I'm looking for! Did you change the depth of the mantel to make sure the shelves would be deep enough to hold things?

Celeste808

Sat, 08/03/2013 - 18:25

I did make the depth of the fireplace deeper so I could have room for the halves on the side. I just sketched out the dimensions I wanted the side shelves and built them along the same lines as the fireplace. Wasn't hard to figure out and just made it to fit the size I needed. The inset of the fireplace does not go all the way back to the wall either, that way the power strip can fit on the floor behind it. Glad you like it and thanks for the compliments!

EAnne

Wed, 07/23/2014 - 14:54

Hi Celeste 808, What a wonderful faux fireplace WITH the bookcases, especially. I'm hoping I can try this in our space challenged bedroom. Did you by any change reply to the chap who asked if you had some kind of dimensions or plans you could pass along to us? I would love to see if we can make it work in the space we have available.
Thanks again for the inspiration,
e

jrybolt26

Mon, 10/28/2013 - 18:25

I absolutely love what you did with this. I am going to have my fiance help me make this for our house. If you still have the dimensions and details of how you built the whole unit I would greatly appreciate it if you could post it.

mommyof2cuties

Sun, 04/13/2014 - 13:00

This is gorgeous & I can't believe it's your 1st project. I would love to build this too. Did you use any particular plans for the side units? If you have any tips or information to share, that would be great! I've actually been trying to make up my own plans using Sketch Up, but that's not working too good, lol. Again, great job & thank you.
Lynda

emswave

Sun, 02/08/2015 - 12:31

I'm dying to know the dimensions you added to the width. Also, the dimensions of the book shelf. I have been trying to draw up plans for the last week and I'm stuck with trying to figure it out by looking at your pictures.

PLEASE HELP!

Thanks!!

mrittgers1

Mon, 07/27/2015 - 09:15

Do you have the blue print of how you built the mantel and side book shelves? I am wanting to go buy supplies to build this tonight!!!


Thank you!

Montessori bed

Submitted by Anonymous (not verified) on Mon, 10/04/2021 - 12:24

Was a little challenging at first but I was able to pull it off and it came out to be perfect

Comments

4x4 Truss beam table and bench

Submitted by Anonymous (not verified) on Mon, 10/04/2021 - 13:42

The plans were very easy to follow for non avid woodworkers. We decided to upholster the seat on the bench.

Built from Plan(s)

Comments

Raised Garden Beds!

Submitted by ferbit on Thu, 03/10/2011 - 08:02

Yay! Here are my raised beds, motivated by Ana White's post. :) I decided to use 2x lumber rather than 1x lumber because I plan to add benches on the ends of each bed. I just love how these turned out! I used Hemlock rather than cedar because it was a THIRD less expensive. Orange told me hemlock would last roughly 5-6 years whereas cedar would last 7-9 year. I staggered the sizes too - first bed (with the strawberries) is 4' x 10', second is 4' x 8' and the third (with the stakes) is 4' x 6'. Hubby hauled in a bunch of pea gravel to surround the beds while the girls and I added rocks from around our yard to the perimeter. :)

Estimated Time Investment
An Hour or Two (0-2 Hours)
Finish Used
None!
Recommended Skill Level
Beginner

Modern Farmhouse Tables

Submitted by Anonymous (not verified) on Sat, 10/16/2021 - 09:43

I made the coffee table, an end table and I modified the console table to add another shelf because I have too much stuff lol! These are my first wood projects and I am happy how they turned out 🥰

Comments

Farmhouse Bunkbeds with Stairs

Submitted by Yodannos on Sun, 06/09/2013 - 13:19

We have a rental unit and decided to fill one room with 2 sets of bunk beds. One is a twin over a full. The other is a full over full. Due to a duct running through one corner, and limited amount of space, I decided to build a set of stairs on the 17" gap. I used the simple bunk bed plans, but modified it to the style of the farmhouse. Also, I changed several of the heights of the foot/head boards. The full over full will have a ladder coming off the end and is in progress.

Estimated Cost
$450
Estimated Time Investment
Week Long Project (20 Hours or More)
Finish Used
Minwax Ebony Stain. Satin Polyeurethene.
Recommended Skill Level
Intermediate

Paper Roll Dispenser

Submitted by vendo on Wed, 11/17/2021 - 10:44

This took me about 20 minutes! I love the look of it and that it can just be left out when the kids aren't doing art. A great little item to add to keep the kids busy and inspired. I made a couple of mods from the plan. I used glue and nails instead of pocket holes and I did that bottom board flat instead of on it's side. I also used a little bigger dowel, and bought two rolls of paper on Amazon for $14.I'm giving this to my daughter for her birthday with some fun art supplies, so I think it's a great gift idea for any occasion for those crafty people out there!

Built from Plan(s)

Comments

Monika

Tue, 04/02/2024 - 06:09

Sometimes, when working with papers, you might need to convert file formats, right? So, I recently came across this website https://pdfflex.com/webp-to-png It's super handy for converting. It's been a real time-saver for me, especially when I need to tweak documents for printing or sharing. I'd desided to share in case it helps someone else out there too!