Community Brag Posts

Coffee table

Submitted by aderosa on Tue, 02/13/2018 - 05:42

It was time to replace our 12 year old rectangular coffee table. I used the corona coffee table plans with a few modifications.

Built from Plan(s)
Estimated Cost
Only cost me $30 because I had some scrap wood from another project.
Estimated Time Investment
Day Project (6-9 Hours)
Finish Used
Valspar cabinet paint (white) mixed with coastal gray minwax stain. Bottom shelf is stained with natural stain by minwax. Finished off with two coats of satin polyurethane.
Recommended Skill Level
Beginner

Modified Simple Outdoor Dining Table

Submitted by ewood on Tue, 05/31/2011 - 08:04

Wanted a Patio table and when I saw the plans on this site I really liked it; I just changed the plan a bit. Everything was screwed from the underside of the table, also I attached the legs with 2" lag screws.

Built from Plan(s)
Estimated Time Investment
Weekend Project (10-20 Hours)
Recommended Skill Level
Beginner

Comments

DIY Barn Door From 2x6 Boards

I made his Barn door out of the wood that was left in our garage when we moved in. Using (7) 2x6 boards and adding stain sanding and hardware, it became a super functional industrial rustic (is that a design style LOL) door! (I added a cat door to for our cat ;))

Estimated Time Investment
Afternoon Project (3-6 Hours)
Finish Used
Rustoleum summer oak, varathane cabernet, flat black spray paint, and polyurethane semi gloss. I have the full tutorial on my blog and am more than happy to answer any questions ;)
Recommended Skill Level
Beginner

Comments

Lift Top Coffee Table

Submitted by JJones0925 on Fri, 03/16/2018 - 20:48

Instead of attaching the top to the coffee table base as done in the plans, the top is attached using a set of coffee table lift top hinges. 

Built from Plan(s)
Estimated Time Investment
Weekend Project (10-20 Hours)
Recommended Skill Level
Beginner

Comments

Shoe Dresser with Extras!

Submitted by Anonymous (not verified) on Sun, 04/24/2022 - 11:30

We added a bit to your shoe dresser plan. We ended up building into the wall since it had the perfect little indent and put a baby cabinet in the middle so we had access to the outlet. 

by Angela

Built from Plan(s)

Outdoor Bench

I started giving much needed attention to my deck and found Ana's plan for this bench. I modified it slightly to make it longer (for four seats instead of three).

Built from Plan(s)
Estimated Time Investment
Day Project (6-9 Hours)
Recommended Skill Level
Beginner

Outdoor Grill Trolley

Submitted by angiemicn on Sun, 07/24/2011 - 05:39

This started out as the Outdoor Multipurpose Cart....and after my hubbies evergrowing wishlist, it quickly become THE GRILL TROLLEY EXTRAVAGANZA!!!! I added the bulk and the height which he wanted, a John Boos butcher block 24x18, which is removable. Funny thing is, I also sampled Ana's Farmhouse frame to cradle the butcher block! I didn't want to put any holes in the 100 clam butcher block so it has it's own little bedframe. It's totally waterproofed and stained since it's new home will be beside the pool. I used all Kreg joints, so you could sit on this it's so sturdy. I also added 2.5 inch locking casters for the bottom. There's a stainless steel bathroom towel rack which doubles as a handle, lots of hooks for his BBQ paraphenelia, and the most important addition...The Guinness bottle opener. Totally hubby customized. And the best thing> I did it myself, setting it aside whenever a problem arose, but always coming back to it. This was originally a Papa's day present

Estimated Cost
150. (100 of it was just for the upgraded John Boos outdoor reversible butcher block! well worth it!)
Estimated Time Investment
Week Long Project (20 Hours or More)
Finish Used
Thompson's Waterseal, Minwax Puritan Pine, 2 coats, but wiped it off very quickly, didn't want it too dark. I didn't want a uniform appearance, so I wet it down, heavier in some areas than others, with water, wiped the stain on, and was taking it off with the other hand.
Recommended Skill Level
Intermediate

Comments

Framed and Tufted Upholstered Headboard

Submitted by marrsgirl on Wed, 08/21/2013 - 17:16

I love the look of diamond tufting, so that's how I did the upholstered insert, which added hours to the project. The frame itself was built in about 3 hours, so this could easily be an afternoon project if you skipped the tufting.

Estimated Cost
$200
Estimated Time Investment
Weekend Project (10-20 Hours)
Finish Used
Behr "White Mocha" with wipe-on poly finish
Recommended Skill Level
Beginner

Bench

Submitted by marchand on Thu, 11/12/2015 - 14:52

I used a mix of 2x4's and 1x4's for this project. It is only 4 feet long so I thought 2x4's would make it too bulky. It goes together very quickly and it looks great!

Built from Plan(s)
Estimated Cost
$60.00
Estimated Time Investment
Day Project (6-9 Hours)
Finish Used
exterior white paint
Recommended Skill Level
Beginner

Comments

Rolling Cabinet

Submitted by Ovidiu on Fri, 11/20/2015 - 01:14

This is one of the projects I am most proud of, as it has a farmhouse look and it is also really useful around the house. I use it for my guitar amp, as well as to store other small items. The caster wheels make moving it very easily, so it can also be used as a kitchen island. 

Estimated Cost
100 $
Estimated Time Investment
Day Project (6-9 Hours)
Finish Used
Water based paint and Stain
Recommended Skill Level
Intermediate

How to Build a Raised Balance Beam for $60

Submitted by Anonymous (not verified) on Thu, 01/31/2019 - 14:49

From watching Olympic gymnast Simone Biles on the television to running, flipping and twirling all around our living room — my girls LOVE everything gymnastics. Both girls began competing with a local gymnastics club. Now that my oldest has moved up and is pretty serious about practicing her beam handstands and dismounts, she begged me to build a raised balance beam with suede covering so it would have a similar feel to her beam at the gym.

If you can relate to this, or even if you have a new gymnast (like my youngest in the pic above) wanting to improve their skills at home, then this comprehensive tutorial on how to build a raised balance beam is for you.

Full plans available on my blog The Creative 'Carr'penter. You can also find and pin this tutorial on Pinterest here.

Estimated Cost
Cost of materials were about $60. Could vary depending on materials used.
Estimated Time Investment
Afternoon Project (3-6 Hours)
Finish Used
I used an outdoor flat paint to finish the exposed pieces of wood. The remainder was covered in padding and suede fabric.
Recommended Skill Level
Beginner

Dog Crate

Submitted by Anonymous (not verified) on Fri, 02/24/2023 - 06:28

I modified the Grandy Console to be dog crates for my Grand Pups so we didn’t have to have crates set up in the house. Middle divider can be raised to make one big crate.

Built from Plan(s)

Comments

Wood Tilt-Out Trash Bins

Submitted by kendaves on Mon, 11/21/2011 - 15:38

These two trash bins were very easy and fun to make. Plans were very easy to use and made the project very easy to build.

Estimated Time Investment
Afternoon Project (3-6 Hours)
Finish Used
No finish yet.
Recommended Skill Level
Beginner

Comments

spiceylg

Tue, 11/22/2011 - 07:26

This came out really beautiful! I'm thinking of building two like this for our hampers which we keep in our bedroom. We really don't have another place to put them and this is so much nicer looking! Of course, I'd have to modify it so the clothes can breathe. Certainly worth looking into...

Melissa G (not verified)

Fri, 02/24/2012 - 08:31

Seeing these 2 sitting side by side gave me an idea for our trash & recyclables. My husband & I want to make one of these for our trash, but now I am thinking it would reduce the clutter from the recyclables. Thanks for posting. They look great!

Jeff Giuliani (not verified)

Sat, 12/15/2012 - 10:54

This was a great project. Very easy to follow...until I got to the door. There are no instructions for the door and no link to a video. Now I have to try and "wing it" which I think is going to make my trash bin, which is a christmas present for my wife, look like trash. I only have this weekend to do this but maybe someone else will be saved by adding the directions for the door. otherwise, thanks for the great step by step.

murph447

Tue, 11/11/2014 - 13:31

The bins look great!  When you installed the beadboard did you just simply fasten it to the back of your door frame or did you cut grooves in your frame (on a table saw) and insert the beadboard?

Farmhouse - King Headboard - made it longer

Submitted by Anonymous (not verified) on Sun, 03/13/2016 - 19:40

We used flooring from Homedepot for the middle boards.  My decorator suggested that I make it longer and that worked well with this flooring.  We did discover that our Lowe's has the post for only $10 - we paid too much at 84 lumber - only to discover that they were warped - we had to use corner brackets to fix it.


Homedepot - Maui Whitewashed Oak 8 mm Thick x 11-1/2 in. Wide x 46-1/2in. Length Click Lock Laminate Flooring (22.28 sq. ft. / case)

Estimated Time Investment
Day Project (6-9 Hours)
Finish Used
Lowe's grey stain - only had one
Recommended Skill Level
Intermediate

L-Shape Outdoor Bench

Submitted by ShannonG on Mon, 07/24/2023 - 13:21

Modified to make an L shaped bench . Absolutely love it! Thank you!

Built from Plan(s)

Comments

Dress Up Closet with Lights

Submitted by jimf on Tue, 01/07/2014 - 09:44

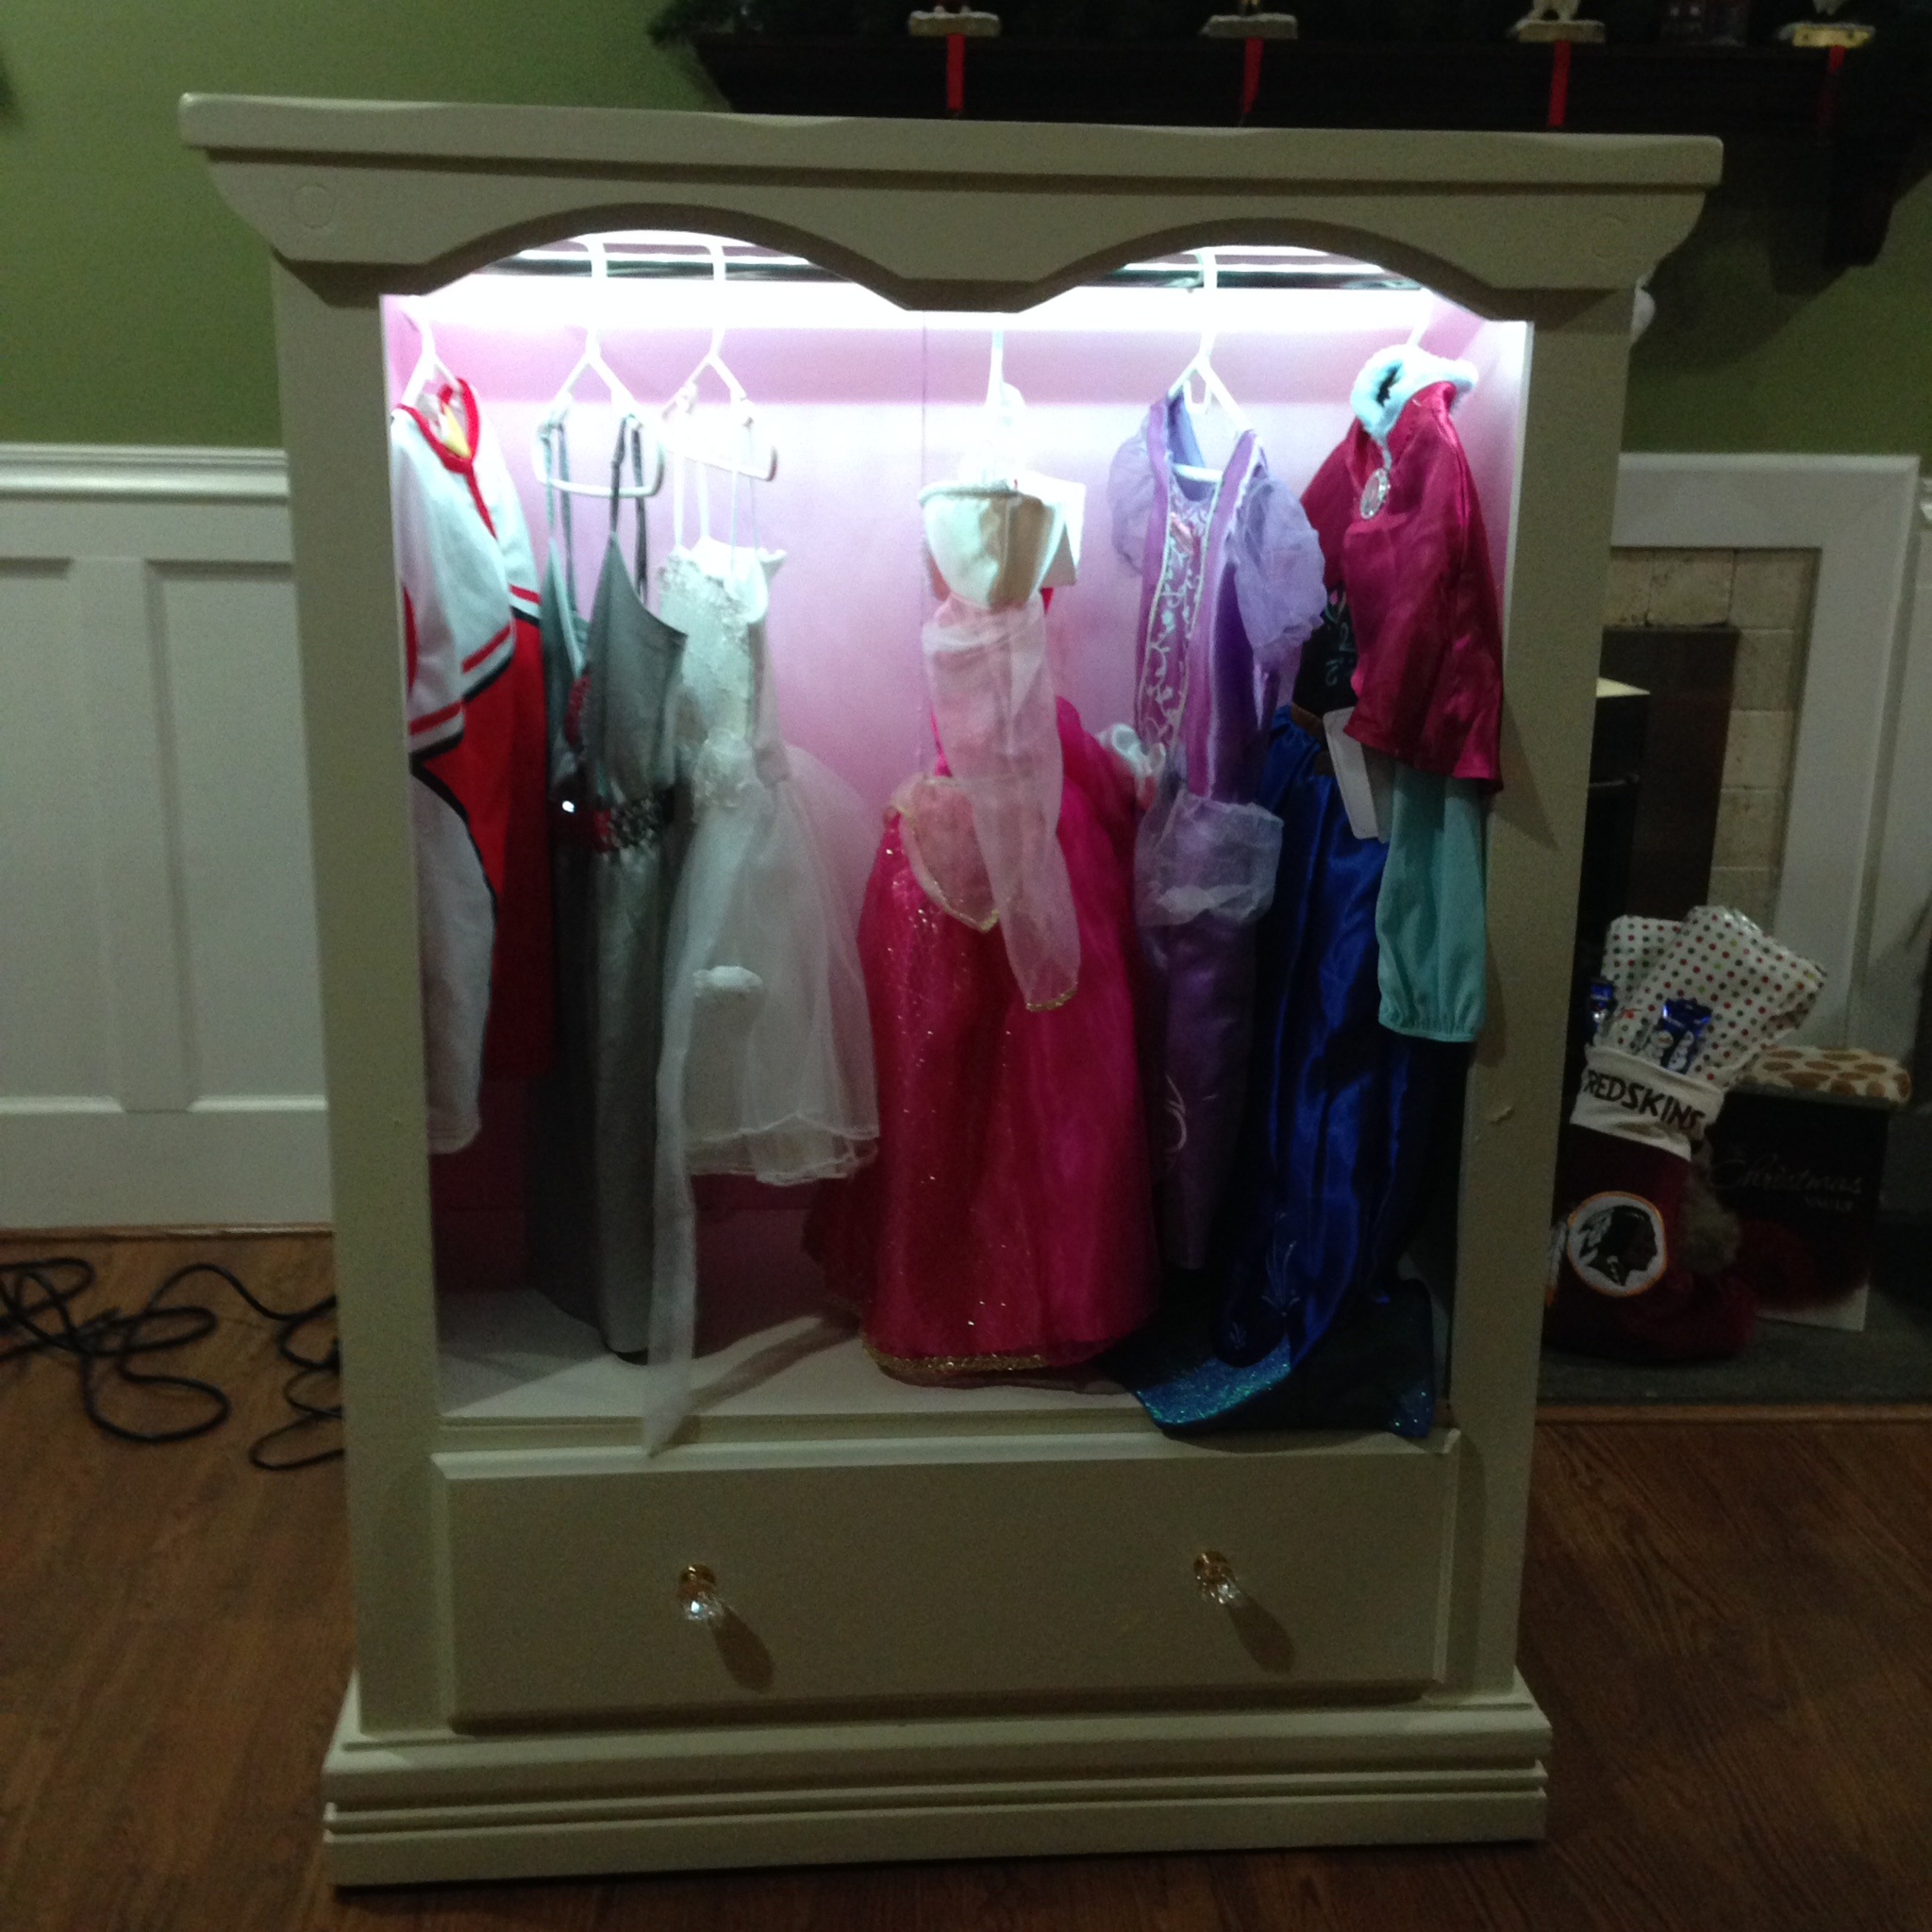
My daughter, like most other 2 & 3 year olds, love playing dress up. Over time we have collected a large selection of princess dresses and various other dress up clothes. Where do you put this stuff? My wife went to Pinterest for ideas. She came to me asking if I could make her a closet. A closet, what? She then showed me a picture. I said "that looks like a box. I can do better." the idea of repurposing a dresser sounded like a much better and time saving idea. So I set off to the second hand stores in search of a sterdy, decorative, not too expensive dresser.

Once the dresser had been procurred ($30 at Goodwill) and transported home, the project began. I first removed all but the bottom drawer and drawer supports. Next I removed the hardware from the remaining drawer and deglossed the entire dresser and drawer. Once deglossed, I put down a single coat of white primer. The next day I came back and put down two coats of paint. The outside I used a cream color to match the playroom where it would be housed. On the inside of the dresser I painted it bright Pink; Bear Paint calls this color "sexy Pink". We'll call it bright pink since its for my 3 year old.

After two coats of paint the project was pretty much complete. Then I had the bright idea to add lights. I went to the hardware store looking for under cabinet lighting. I was unimpressed with the lighting options and price points. To Amazon.com I go. I found 16 feet of LED Strip lighting for $4 and a power supply for a couple extra bucks. The lights came with a remote control. When UPS delivered the package of lights I couldnt wait to install them. This was going to put the closet over the top. I cut the strip to the size I needed and installed using the provided 3M tape. It could not have been easier to install. I was able to cut the strip into the size strips I needed (64 inches total).

The final product with the lights on can be found on my youtube page:
http://www.youtube.com/watch?v=gE1soeC2OaE

My daughter was THRILLED! She loves using the remote to turn the lights on and off as well as changing the colors of the lights.

This project was super easy!

Estimated Cost
$50
Estimated Time Investment
Day Project (6-9 Hours)
Finish Used
Sexy Pink Bear Paint
Color Matched Beige Bear Paint
Recommended Skill Level
Beginner

Comments

The Entertainment Center

Submitted by a.mcdaniel on Mon, 03/19/2012 - 00:34

It took 2 1/2 months and a LOT of wood, but my husband created this masterpeice. Thank you to the inspiration provided by Ana White and Kristen Lotz, we have finally done our biggest project yet!

Estimated Cost
1000.00
Estimated Time Investment
Week Long Project (20 Hours or More)
Recommended Skill Level
Advanced

Comments

a.mcdaniel

Wed, 03/21/2012 - 10:22

Thank you so much, Ana! That comment means a lot to my husband and I! He is so amazing at building things now and your website has been a major inspiration for him - THANK YOU! THANK YOU! THANK YOU! Now our new home is becoming more "ours."

Christie (not verified)

Thu, 07/26/2012 - 20:44

Both yours and Ana's centers are beautiful! I am a little more drawn to yours with the lighting and architectural touches you've added. Did you have a formal plan drawn for it? I would like to make an exact replica of it if possible. It is just stunning and exactly what I am looking for. GREAT JOB!!!

kristenlotz

Wed, 12/19/2012 - 15:58

I love it. I am so glad our project inspired you to build this! You incorporated a lot of the things we considered during the build such as fluted stiles on the bookcases, downlights, and faux raised panel doors. Now, we just need to see pictures with it all decorated.

kristenlotz

Mon, 12/31/2012 - 14:42

I finally got around to making the plans for our entertainment center (well, actually my husband did it). It is very similar to yours with a few exceptions. Hopefully that helps those looking for plans for this beautiful entertainment center. I love finding brag posts of similar entertainment centers because they are absolutely beautiful at a fraction of the cost of buying one. And we love telling people that we built it!

http://www.jrlwoodworking.com/2012/12/furniture-plans-custom-entertainm…

Thanks,

Panel bed king

Needing a new bed frame because we upgraded our mattress to a king size. Looking for something simple and inexpensive. We came across this plan and loved the outcome!!!!!

Estimated Cost
$150
Estimated Time Investment
Weekend Project (10-20 Hours)
Finish Used
Minwax Early american
Matte black for the border
Recommended Skill Level
Beginner

Comments

Small End Table from 2X4's

Submitted by jbknakal on Sun, 04/10/2016 - 11:55

I made a smaller version of the Tryde End Table with Shelf. I made 2 of them from 6 2X4's

Estimated Cost
$30
Estimated Time Investment
Afternoon Project (3-6 Hours)
Finish Used
Black Paint
Recommended Skill Level
Beginner

Comments