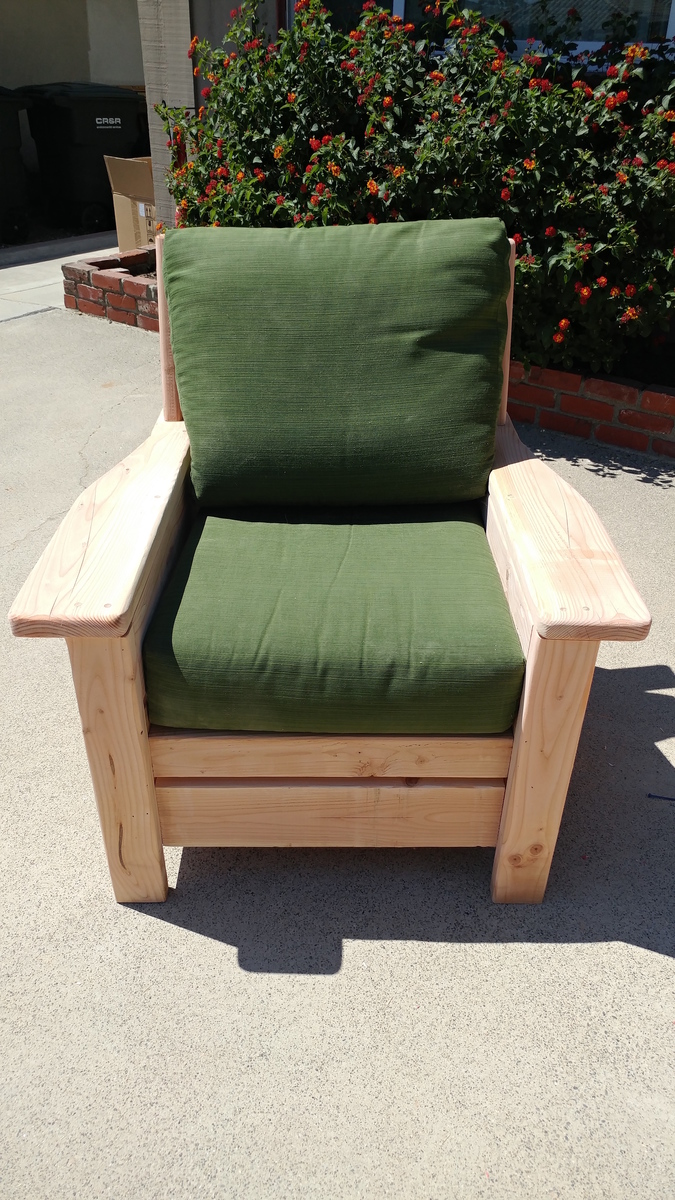
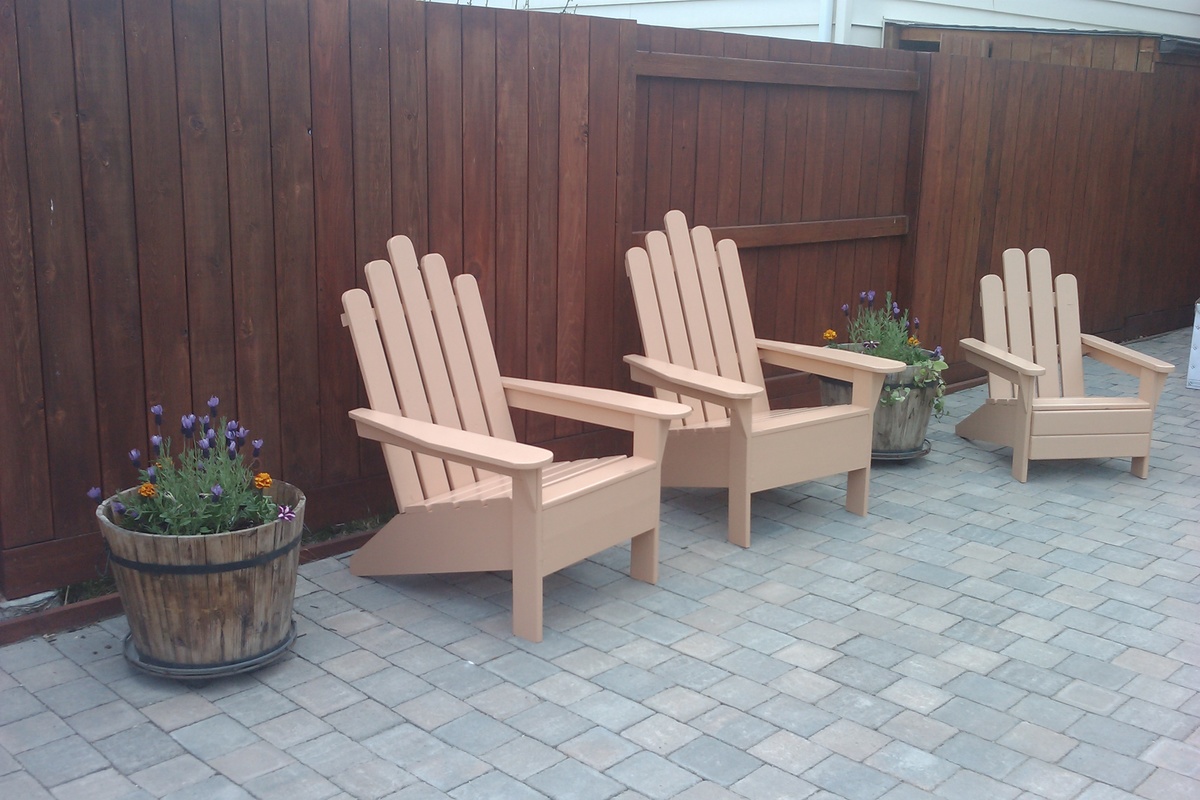
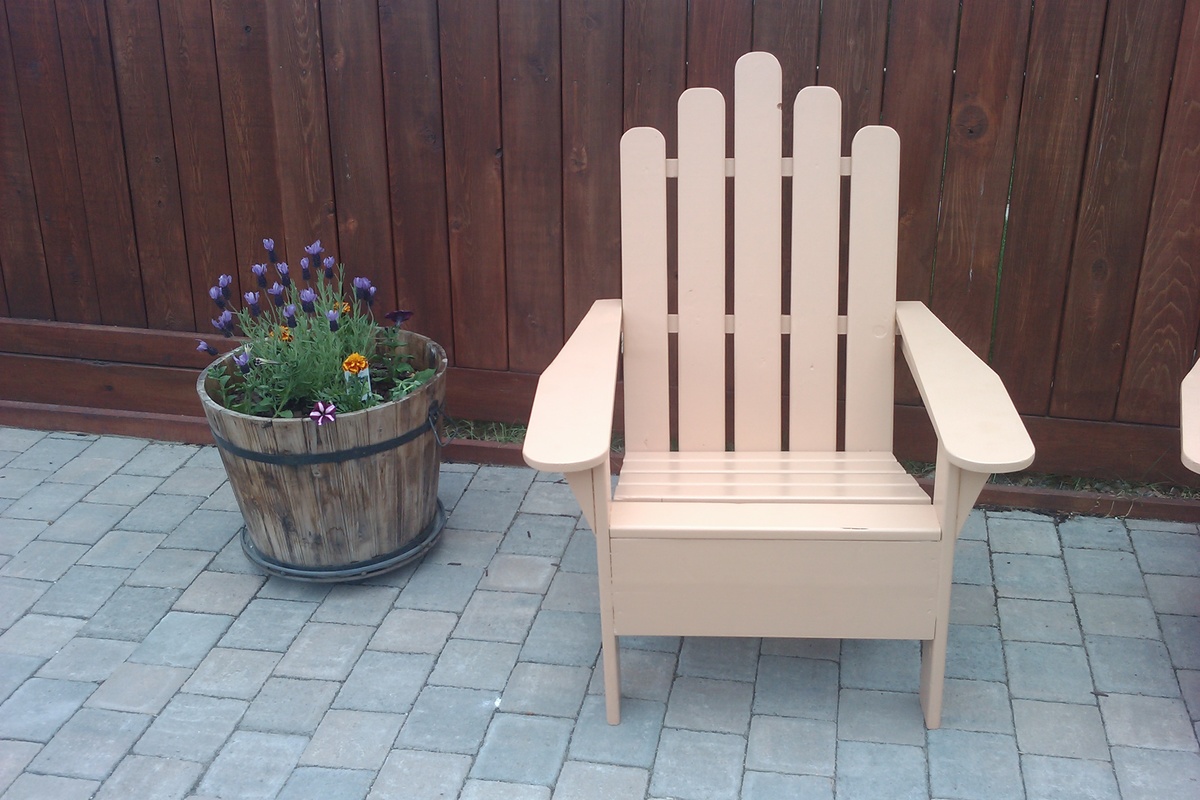
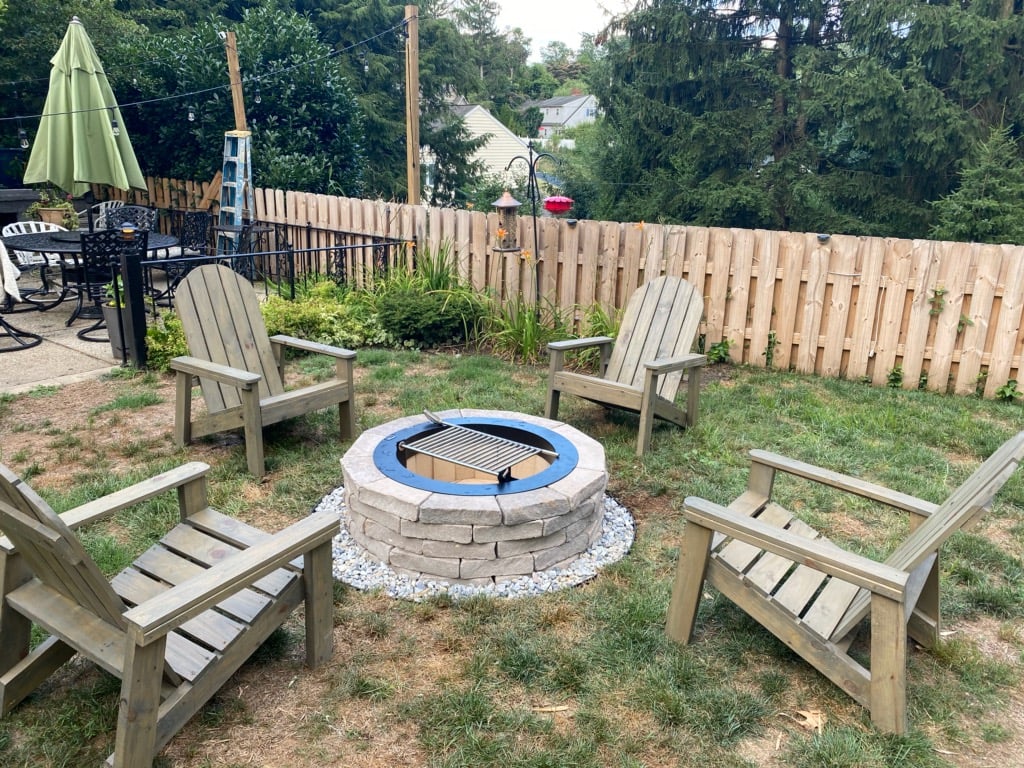
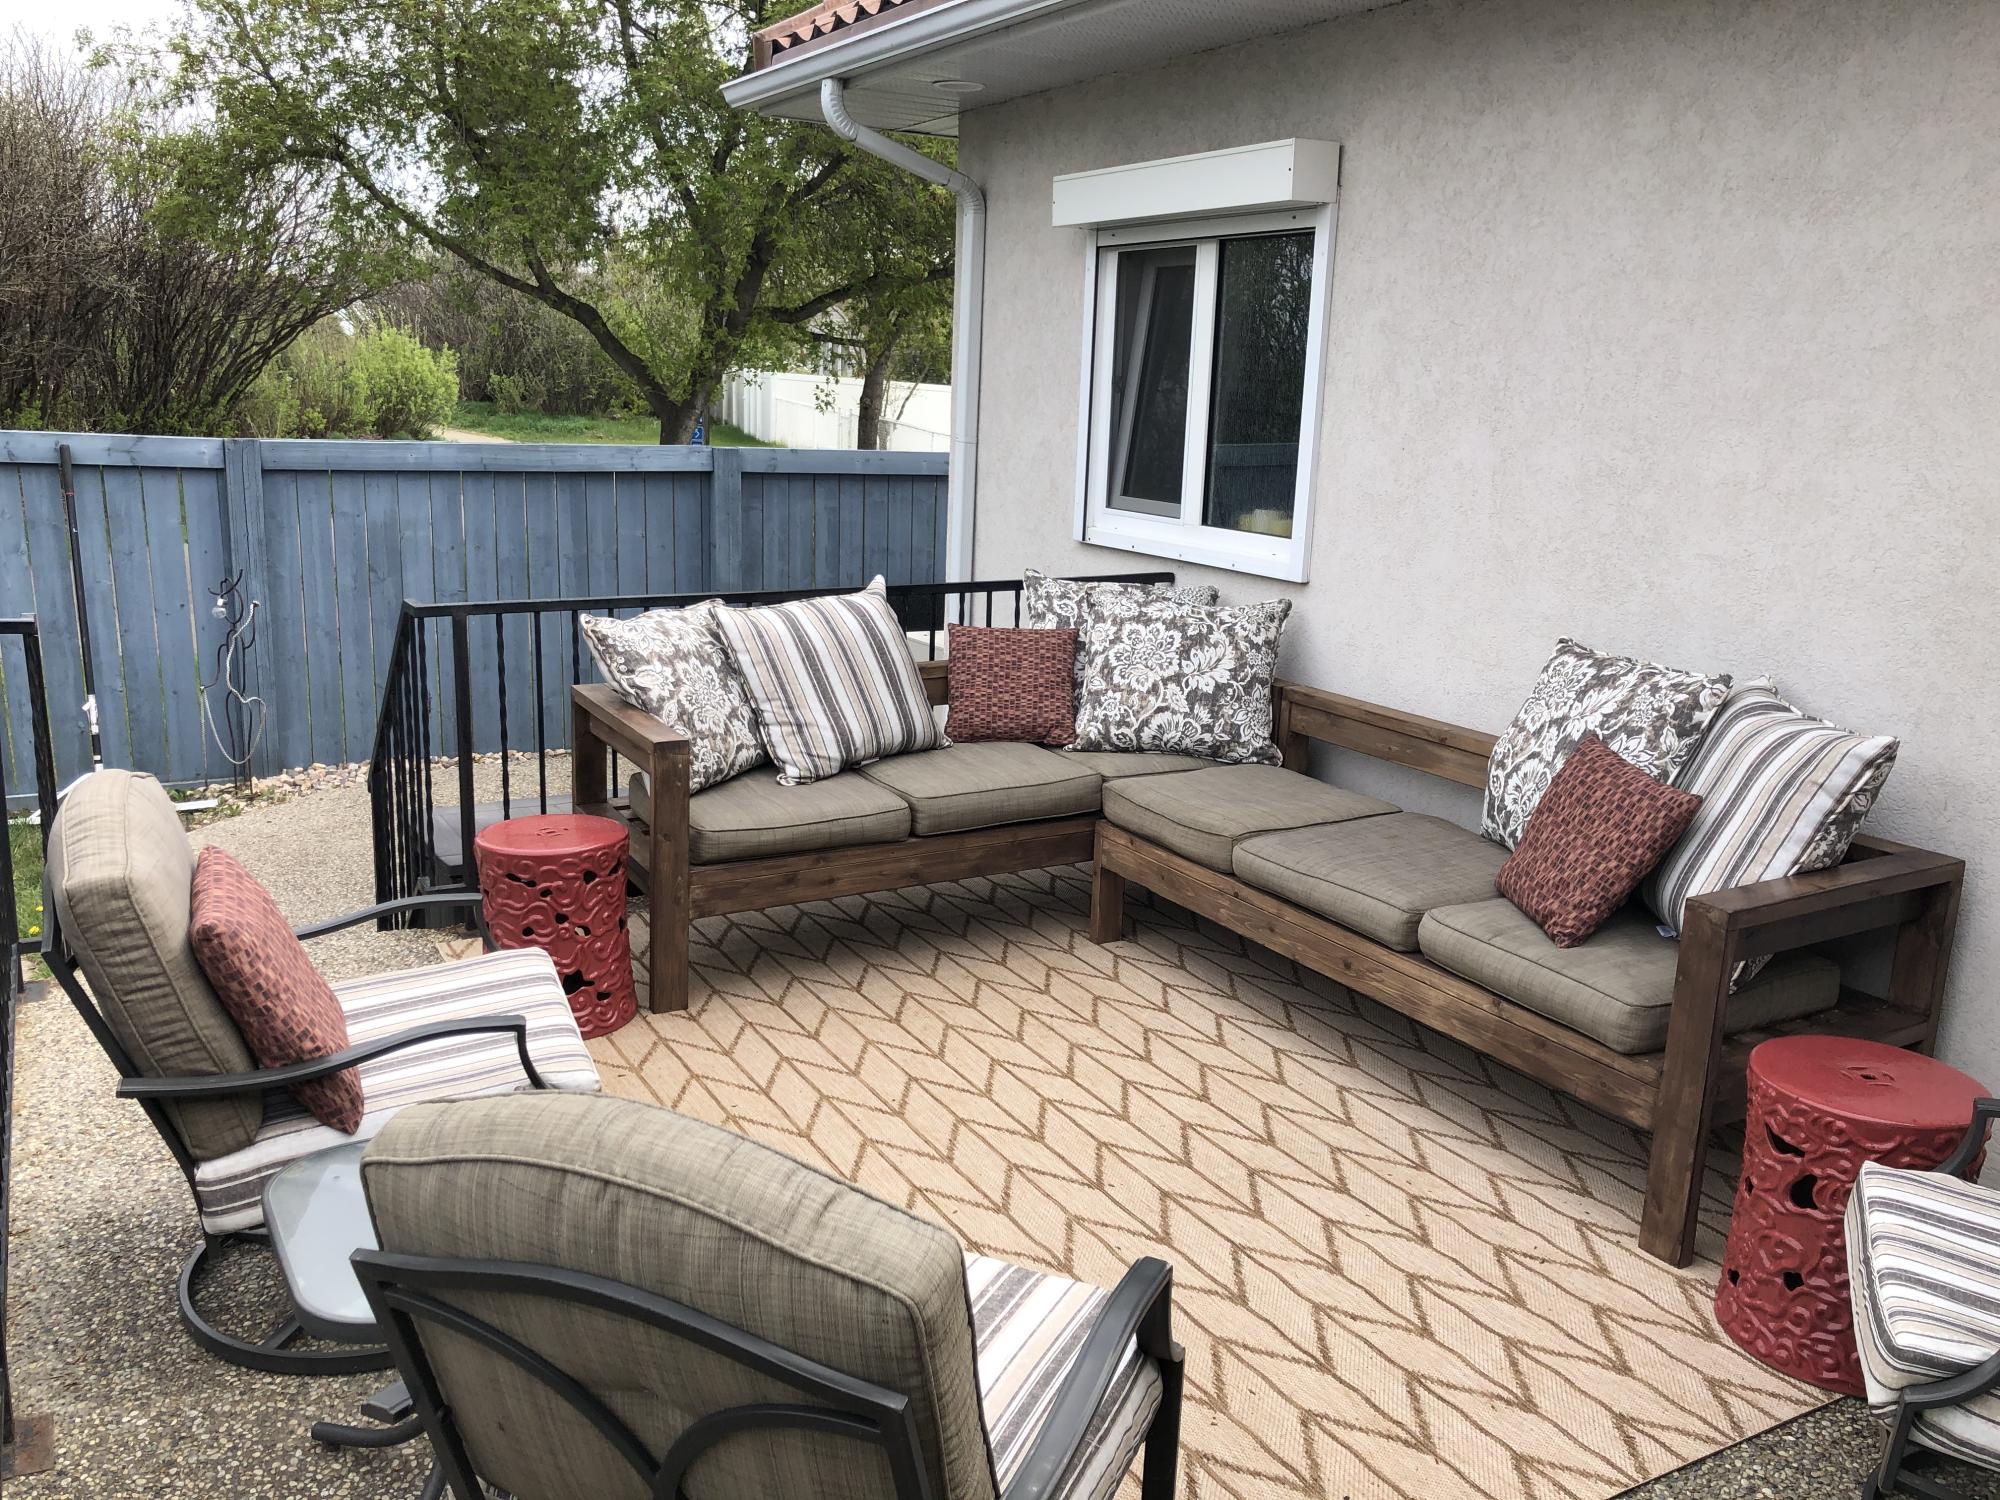
Modern Outdoor Chair with a twist
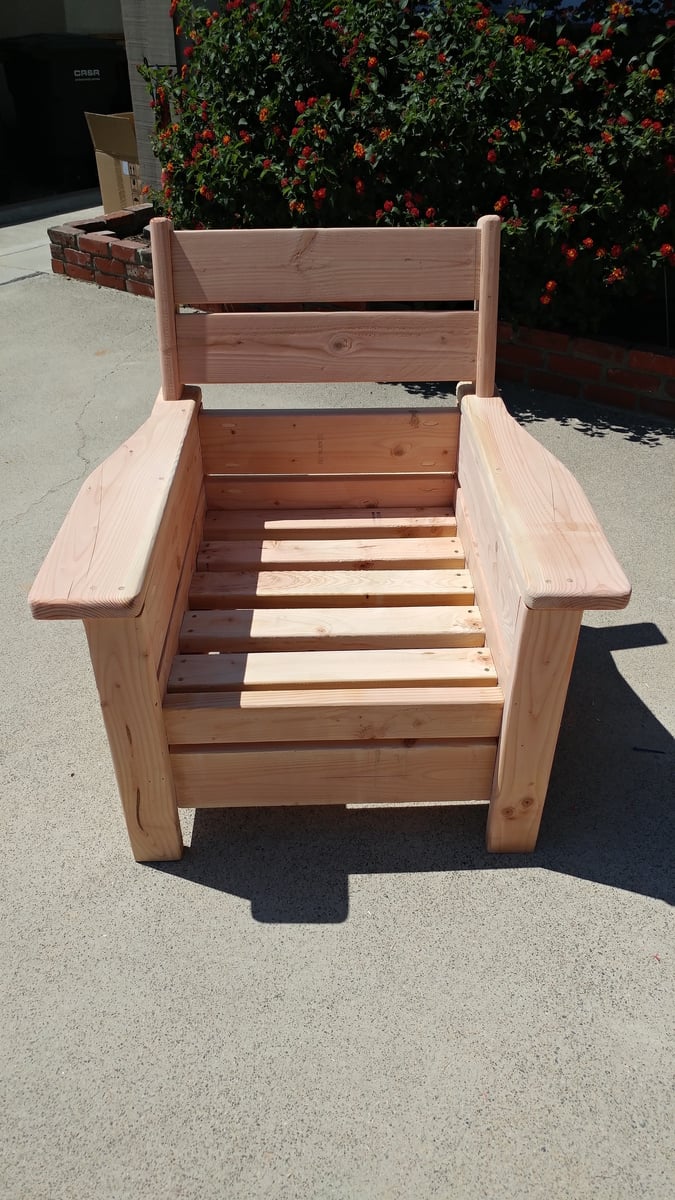
Taken from the Modern Outdoor chair project and added a back. Then decided that I love the andorak style chair arms and thus the Andrmodern chair was born..
For my son's 4th birthday party, we were doing it at our house and needed outdoor seating, so I took on the task of building 3 Toddler picnic tables and 1 smaller one. Building them was not that big of a deal, but painting all 4 took some time! After the party, we sent 1 to my parents, 1 to in-laws & 1 to my bro/sis-in-law, so only ended up with 1 left over. FYI-the picture on the plan is one of mine, thanks Ana!
Sat, 04/04/2020 - 15:43
I’ve build many picnic tables according to your plans, they all love them.
I'm turning my messy sewing room into an organized craft/guest room, so I made a murphy bed to conserve space. I used corrugated tin on the the face of the bed so that I can use it as a magnet board while not in use as a bed.
Fri, 05/17/2013 - 09:54
The estimated cost is $100, but the hardware linked from the original plan was over $300. Do you have an alternate method of mounting this?
Fri, 05/17/2013 - 11:23
I think that link was a suggestion if you want an assisted lift/lowering system, and that hardware is part of what makes regular Murphy beds so expensive. I just used door hinges--3 for $8. It's not that heavy to lift and lower the bed, in my opinion.
Fri, 05/17/2013 - 11:40
Thank you for your reply! If I make this project, I think I'll try the door hinges. It won't be frequently used (a few times a year) and I'm pretty sure we can handle the minimal weight for those few occasions.
P.S. I really like the styling with the wood and corrugated metal, it looks sharp!
Fri, 06/28/2013 - 20:02
thanks for sharing the murphy bed. have been looking for a space solution for my daughter's bedroom. the corrugated tin look sharp in this project--my daughter would like the corrugatged tin as well--except for hot pink stain on the cabinet.
anyone know where to get hot pink stain?
Sun, 09/08/2013 - 20:58
Does anyone have any suggestions on how to bring it up off the floor some?
Wed, 02/10/2016 - 04:24
Paint tin with dry erase or chalkboard on one side for daily notes?
Built three Adirondack Chair, got the dimensions from Ana's Adirondack Chair and modify dimensions for the smaller chair for my daughter. Used ceder and pine. Cost about CDN 40 per chair. Specially I would like to thanks Ana giving information about simple but beautiful furniture designs.
We made this Chicken Coop this summer , with lots of help. We doubled the coop and the chicken run is 8x8 . We used the base of a previous clubhouse!! Thanks so much for the plans
Mon, 10/04/2021 - 16:40
Beautiful, love the finish, thank you for sharing!
We built this coop from an existing playhouse and used Ana's plans to build the run! So easy and turned out perfectly!
We couldn't find the perfect piece that would accommodate a crowd. As always, Ana's easy-to-follow and adaptable plans came through for us! We used a version of the One Arm 2x4 Outdoor Sofa to build this 8x12 sectional.
Tue, 12/14/2021 - 14:06
WOW, that is so awesome and inviting! Thank you for sharing:)
Anything to make Laundry easier and looks good I will build. This is a very simple project that is invaluable to anyone that does laundry. We have it in our master bath to help with separating our laundry.
It is sturdy, functional and is a nice looking piece. The only changes I made was to use 2x2's for the rails instead of the metal L-brackets.
I am cheap and I have expensive taste. I love, love, love Pottery Barn. I also love Michael Kors, Coach, Gucci, Jimmy Choo, and all things pretty. Especially pretty shiny things.
So I regress...
Anyways, I have had this bare spot in my living room and it has slowly been driving me crazy. Through much painstaking research I have decided that I wanted something like the Hyde Pottery Barn Console Table. Okay, not something like.... I wanted the Hyde Pottery Barn Console Table, but it also would cost $500. Hahaha. $500 for a console table. That's just ridiculous says my cheap, fugal self.
So I look at ebay and craigslist... nope, no one selling my dream table. And then a miracle happens.... I stumble across Ana White's blog. I think I've found my new blog BFF!
I followed her plans exactly and I decided to paint the bottom off white and stain the top walnut.
This was my first ever furniture build and I'm so excited by how it turned out!
Thanks, Ana!
Tue, 06/04/2013 - 13:57
You did an amazing job! I'm so glad you found what you wanted and were able to create it yourself!
Built this over a relatively warm Saturday in January. Like most projects, the building wasn't bad but the finishing took forever :)
My wife liked the PB Larking High/Low table, but I didn't like the price. Took about 3 weeks of evenings and weekends.
Used 3/4" MDF Panels for sides, bottom, and top
used 3/4" select Pine for face frame
used 3/4" smooth plywood for drawer faces.
cut additional pine strips at 15/16" and then routed one edge for trim work around drawer face.
same process for right side door, but added 1 1/2" pine to trim along sides and bottom
Attached 2x4's to bottom of table and then covered with MDF panel for skirt.
Skirt is an 1/8" raised from floor to give space for carpet and not cause stress on skirt
used a jig saw on front of skirt for cutout
used decorative molding for under the table top lip, you'll need to figure out your overhang for whatever molding you use.
Used MDF for the changing pad holder. about 3 inches tall and then cut to dimensions of pad.
Topper on the right is just a miniature of the full table, from a contraction perspective.
My dimensions are slightly customized from the below.
Changing Table
Overall: 55" wide x 21" deep x 44" high
Dresser Cabinet: 15" wide x 19" deep x 23" high
Dresser Drawer (3): 31" wide x 18" deep x 7" high
Small Top Drawer (1): 11.5" wide x 15" deep x 5" high
Topper
Overall: 34" wide x 17.5" deep x 3" high
Topper drawer inside small cabinet: 16.5" wide x 11.5" deep x 5" high
Tue, 07/09/2013 - 20:15
if you have a plan or at least dimensions and material list for this project, i believe many people including myself would love to try this one. My wife is due in Oct and would love me to build this for out nursery.
Thanks and great job
Fri, 07/12/2013 - 14:40
Glad she likes it. I have a ton of pics, but only able to post a few here. I tried to add some more detail on my post as well. Basically I looked at the Pottery Barn Kids Larkin High/low Table. When to the store and took some pics, then sat down, drew it out and started building it. I wish I would have done the skirt out of a solid piece of wood instead of MDF, because I'm pretty sure it's gonna get banged around and not hold up as well.
Mon, 09/16/2013 - 15:57
OMG! Amazing! I've been looking at this changing table the last 2 months at pottery barn but so expensive.
Would you be kind enough and email me the plan? My husband said if I can get the plan for him he will make it for me!
Thank you! ❤
Mon, 01/20/2014 - 08:25
Awesome job!!! My wife is in love with this changing table and we just found out PBkids is discontinuing this line of furniture. She's due in August so this may be a good project for me between now and then. If you have plans or more pics I'd absolutely love it if you'd share them
Thanks
Mon, 01/20/2014 - 11:15
Let's see if this works for adding more pictures.
https://www.icloud.com/photostream/#A2G6XBubBLXVb
As for actual plans, I don't really have anything in picture format, other then my sketches and math, but I'll add that too.
This is the 1st Ana White project I ever built. I now have several items of hers under my belt. I built this the summer of 2017 for the solar eclipse. We live directly in the path with longest viewing times. I placed an ad and got responses from all over the country of people wanting to stay on our property. This outhouse like all of Ana's other plans were easy to adapt to fit my needs. I extended the roof to include the covered porch and only used tin. I also added a couple of shelves a 2 mirrors. Almost everything I used to build this were things we already had. It's mainly built used our old swimming pool deck that we had torn down. The versatility and the clarity of Ana's project plans make this my go to building site!!
Thanks for the plans, adapted it to new pine standers but was able to obtain beautiful cherry tree panels from a defunct wood worker in the next village over. Planed those and used those to make a slightly more 'posh' version of your basic model. The supports on the wall you see are from the previous formica shelves. I left them in case the cherry starts rounding down.
Nice outdoor bench and adirondack chairs by Nick!
This is one of the cheapest projects for my kids I have ever completed!! And the most rewarding. I think everyone of my neighbors has been on the teeter totter...including adults :) My kids just love it and I am thinking of making a few for my nephews for Christmas. I was able to find all the wood I needed in my scrap pile. I had the PVC pipe and bolt already also so all I had to make a trip to the store for was the foam for the seats. My son helped me build this in an hour. I liked the unfinished look so I just sprayed it with a little Thompson Water Seal. Thank you Ana White!!
I had trouble with the angled cuts not fitting perfectly. I have a circular saw, not a table saw or miter saw, so I had to measure with a protractor and mark, then try to follow my lines exactly. Tedious, but I like the table. It is mad heavy though!
I built 11 doll highchairs for my daughters 5th "Adopt A Baby" birthday party! These chairs were fast and easy to build and I had a BLAST painting them! The girls loved, loved, loved them! A little extreme for a 5 year old birthday party? Maybe. But definitely worth it!
Fri, 07/15/2011 - 05:13
Wow! That's a LOT of work!!! They turned out absolutely adorable, though.
Beautiful, practical and afternoon naps are so comfortable!
Made from cedar 2x4s and semi transparent stain. I mixed and matched new cushions with ones I already had. I will be adding the matching coffee/end tables soon.
Cute Corner Cabinet by Thrifty and Chic Decor!
I enjoyed this build looking forward to making more.
This is my first time building anything! I had so much fun and it was actually easier than I anticipated. I used the Farmhouse Bed (queen) plan as the basis for my design, but made a couple of tweaks. I wanted the planks in the headboard and footboard to be horizontally oriented instead of vertical. In addition, I bought some hardware for the side rails to hook into my bed posts so that I could easily assemble and disassemble the bed. I went to a lumber mill to select my wood and the worker convinced me to use red oak to build the project, due to the cost and the durability. I stained it with a white wash which I added a sage green tint to so that I could mute the red in the oak a bit. I wasn't able to buy the exact dimensions of lumber noted in the plans so I had to improvise. For example, they didn't have 4x4s so I glued 3 boards together to make my posts. By the time I sanded, the pieces blended beautifully and you can't even tell that it is 3 separate pieces of lumber. I built this bed for our guest room and I can't wait to have guests over!
Thu, 12/08/2022 - 11:28
This bed is stunning, you knocked it out of the park for your first project! Can't wait to see what you build next.
Comments
jkess44
Tue, 06/09/2020 - 13:36
Plans?
Wow! I really like this look, Im sure its very comfortable. Do you have plans to share? I am very much a beginner and need guidance, lol.
Momatt2112
Mon, 08/03/2020 - 09:02
I’d love to know how you…
I’d love to know how you made the changes, love it!
suescrogg
Thu, 03/18/2021 - 09:20
Modern outdoor chair with a twist
Could you please share how you added the back and arms to the modern chair plans.