Community Brag Posts

Rustic table

Modeled after the rustic table.  I made it smaller and taller.  I used Pine boards and golden oak stain and also jacobean stain.  The legs can come off by unscrewing them.  

Built from Plan(s)
Estimated Time Investment
Weekend Project (10-20 Hours)
Finish Used
Golden Oak and Jacobean stain. Poly over that.
Recommended Skill Level
Intermediate

2 x 4 Garage Shelves Built into Basement Storage!

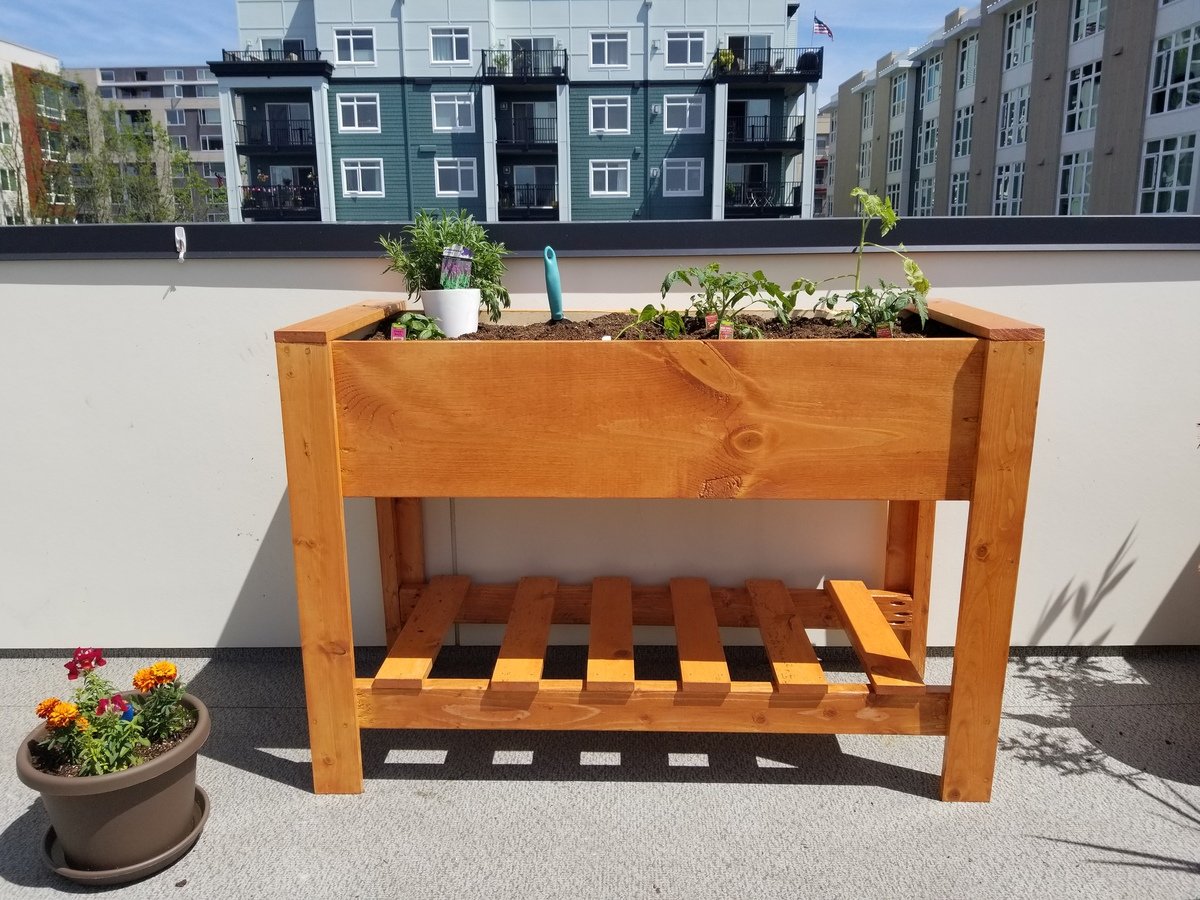
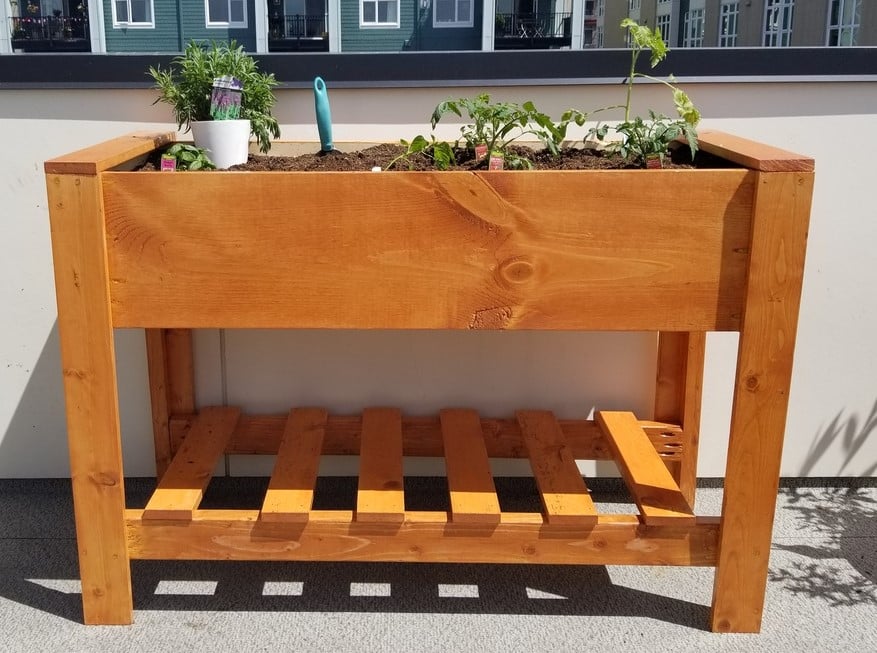
Hello Everyone! This is my FIRST brag post here on Ana-White.com - but not the first project that we've built from her awesome plans. :) 

We have an unfinished basement that desperately needed some shelving because 1. It's our workshop in the Winter and 2. We don't have an official 'storage' room in the basement of our split level home. When I saw these plans I immediately thought they could be modified to fit our space and get my stuff off the floor! 

I modified the plans just enough to fit our space. After reading through them completely, I realized for an 8 ft wide space (beside the stairs) I only needed three supports for the shelves. Easy! The only trick was fitting the shelf into the space AFTER installing the shelves. Because I had walls on two sides (unlike the tutorial) I couldn't do the shelves as the last step. 

I LOVE how these turned out! They are a strong as a ladder (we tested them... :)) and they hold everything I need them to, and a little bit more. It's a definite improvement on my previously messy, cluttered, saw-dust covered space ... :) 

Estimated Cost
Our space was 8ft tall by 8ft wide, so we ended up purchasing about $60 worth of 2x4s to complete the project. We also used 2.5" screws, which are around $4 per box of 75.
Estimated Time Investment
Afternoon Project (3-6 Hours)
Finish Used
None - we left the wood bare and natural because it's just for storage - not for looks. :)
Recommended Skill Level
Beginner

Realized in Blender 3D

Hello everyone!

I'm about to secretly make that jewelry box for my wife. But I first decided to create a 3D version of it in Blender (to visualize how it looks and what I may tweak).

I thought I would share it with you all as it ended up quite well. It's not the sleekest model you'll see... but it was the very first time I used this sofware (it took me several days to finalize this object).

Also note that there are no measures here as I didn't scale it properly.

Anyway... I'll come back later on with the real thing once it's done. I can provide you with the .blend file if you want.

Thanks for the great ideas!! Bye for now

Built from Plan(s)
Estimated Time Investment
Weekend Project (10-20 Hours)
Finish Used
"Walnut" for the doors, the drawers and the back panel. "Bare oak" for all the other panels.
And "old brass" for the hooks and handles.

I found all the materials here: http://matrep.parastudios.de/index.php?p=7
Recommended Skill Level
Beginner

Coffee Station

Submitted by kittykat on Tue, 06/06/2017 - 15:31

Built this to use as a coffee/smoothie station in our kitchen area. We had some extra space and this was the perfect use for it!


My first attempt at making doors.... turned out pretty well. I might add some magnets just to assist keeping the doors from freely swinging.

Built from Plan(s)
Estimated Cost
$100-$125
Estimated Time Investment
Weekend Project (10-20 Hours)
Finish Used
Rust-Oleum Walnut
Recommended Skill Level
Beginner

Simple Modern Outdoor Patio/Deck Collection

Submitted by frmoody on Mon, 07/26/2021 - 14:48

This was a simple yet very time consuming building. Lots of pieces and lots of sanding. I am really pleased with how it turned out. I stained the edges of all the 1 x 4's prior to assembly just to make things easier. I also increased the sides of the chair from 24" to 26" and set the seat height to 18" to match the bench.

Estimated Cost
$255
Estimated Time Investment
Week Long Project (20 Hours or More)
Finish Used
I stained everything with Minwax Gunstock and then finished with three coats of Helmsman Spar Urethane exterior semigloss. I sanded with 600 grit paper between coats.
Recommended Skill Level
Intermediate

Comments

PB Inspired Queen Storage Bed

 A local South Floridian found me through Pine+Main. She needed two beds for her older kids. Client hired me to build two queen size storage beds based on the Sumatra Storage Beds from Pottery Barn. These beds took over eight weeks to build. My first time making drawers boy was that a challenge. I installed full extension drawer glides to access all the content in the drawers. Bed comes together in 3 pieces. It is stained Varathane's Dark Walnut. And the top coat is the Rust-Oleum Triple Thick Polyurethane in a matte finish. Built with Purebond plywood. These beds are super heavy and super strong.  

Estimated Cost
$900
Estimated Time Investment
Week Long Project (20 Hours or More)
Finish Used
Varathane Dark Walnut and Rust-oleum Triple Thick Poly
Recommended Skill Level
Intermediate

Dart Board Case

Submitted by tedgray86 on Tue, 03/17/2015 - 22:04

Easy to build. Just used 1x4's and 1x3's.  

Estimated Cost
$35
Estimated Time Investment
Afternoon Project (3-6 Hours)
Finish Used
Minwax Dark Walnut Stain
Recommended Skill Level
Beginner

Comments

Cross35

Thu, 03/19/2015 - 05:57

Awesome looking project! And well done. Do you happen to have any plans for it? I'd like to have one at my house.

Juancarlosthomas

Mon, 01/02/2017 - 19:22

This is an awesome ide. I would like to build it, but I don't see the plans. Would anyone that has them, please share them?

Kids Birdhouse Project

Submitted by gzarate on Tue, 04/30/2013 - 19:36

My two daughters really enjoyed helping daddy make these birdhouses but most of the loved painting them.

Estimated Cost
$3 to make two
Estimated Time Investment
An Hour or Two (0-2 Hours)
Finish Used
Kid safe paint and I sealed it with exterior clear finish.
Recommended Skill Level
Starter Project

Comments

Eva_15

Tue, 04/30/2013 - 22:33

Hey I was looking through brags and here you are!! I just posted my Cedar Planter on here!

Murphy Bed

Submitted by arkep on Tue, 05/14/2013 - 19:19

I'm turning my messy sewing room into an organized craft/guest room, so I made a murphy bed to conserve space. I used corrugated tin on the the face of the bed so that I can use it as a magnet board while not in use as a bed.

Estimated Cost
$100
Estimated Time Investment
Weekend Project (10-20 Hours)
Finish Used
Polyshades Antique Walnut--two coats with light sanding in between
Recommended Skill Level
Intermediate

Comments

Julie44256

Fri, 05/17/2013 - 09:54

The estimated cost is $100, but the hardware linked from the original plan was over $300. Do you have an alternate method of mounting this?

arkep

Fri, 05/17/2013 - 11:23

I think that link was a suggestion if you want an assisted lift/lowering system, and that hardware is part of what makes regular Murphy beds so expensive. I just used door hinges--3 for $8. It's not that heavy to lift and lower the bed, in my opinion.

Julie44256

Fri, 05/17/2013 - 11:40

Thank you for your reply! If I make this project, I think I'll try the door hinges. It won't be frequently used (a few times a year) and I'm pretty sure we can handle the minimal weight for those few occasions.

P.S. I really like the styling with the wood and corrugated metal, it looks sharp!

iMark

Fri, 06/28/2013 - 20:02

thanks for sharing the murphy bed. have been looking for a space solution for my daughter's bedroom. the corrugated tin look sharp in this project--my daughter would like the corrugatged tin as well--except for hot pink stain on the cabinet.

anyone know where to get hot pink stain?

DorieM

Wed, 02/10/2016 - 04:22

I would love this for my room let me save space versus sideways bed. Maybe spray chalkboard or dry erase on one side magnets to one side and daily to do notes on the other?

Square Picnic Table

Submitted by Anonymous (not verified) on Mon, 10/04/2021 - 15:01

This is a bit larger than Ana’s plan. I added additional support to the table top and added a braced opening for the umbrella. I also went for a more rounded finish by rounding all the corners of the table and benches with my jigsaw and then sanding to create smooth curves.

Built from Plan(s)

Comments

Pallet Shelf!

Submitted by tracysmith on Wed, 03/09/2011 - 16:30

Ok, so no one is going to get really jazzed about this but me, but hey.. I actually had to cut this, which I did on my own with no help from the hubs and nail in the bottom boards. That was a bit tricky cause I used other pallet wood so I didn't have to rob any of the nice stuff from my scrap pile. :-)

Estimated Cost
FREE
Estimated Time Investment
An Hour or Two (0-2 Hours)
Finish Used
We ended up painting these for my Dad and step-Mom, but for my own that I have, we put nothing on them at all.
Recommended Skill Level
Starter Project

Chicken Run

Submitted by Kdline on Mon, 04/13/2015 - 06:36

We built this coop from an existing playhouse and used Ana's plans to build the run!  So easy and turned out perfectly!

Built from Plan(s)
Estimated Time Investment
Day Project (6-9 Hours)
Recommended Skill Level
Beginner

Comments

Slat Bench from Palettes

Submitted by jetpad on Fri, 09/15/2017 - 06:32

This was made from several heavy duty palettes that were used for delivering stone. Because of the wood I could get off the palettes, I switched the thin and thick pieces so that the slat gaps were where the 2x4 pieces were missing instead of the 1x4s. 

Estimated Cost
$10 (for glue and screws)
Estimated Time Investment
Afternoon Project (3-6 Hours)
Finish Used
None
Recommended Skill Level
Beginner

Armoire for Repurposed door

Submitted by JES on Sat, 03/19/2011 - 11:05

This is modified from Ana's Simplest Armoire plan, re-sized to fit the door (already had this, from another project -- I couldn't part with it when that room was remodeled- that gallery glass insert took me so long to make) and deep enough to hang clothes.  Used my favorite new toy, the Kreg jig for this.

Such a fun project, now we're hooked!  We've made a bedroom full of pieces to go with this one, and still making more.

Ana, thanks for the inspiration!

Built from Plan(s)
Estimated Cost
110.00
Estimated Time Investment
Day Project (6-9 Hours)
Finish Used
1 coat Zinsser primer, 2 coats Ace Royal High Hiding white in semi gloss
Recommended Skill Level
Beginner

First Project- reclaimed wood look Queen headboard!

Submitted by jamie_C on Tue, 03/22/2011 - 12:02


Pin For Later! 

First Project- reclaimed wood look Queen headboard!

Estimated Cost
around $75
Estimated Time Investment
Afternoon Project (3-6 Hours)
Finish Used
Used only one coat of Minwax Dark Walnut (really liked the rustic look), and finished with Minwax polyueruthane.

This was a quick build- did all of the cutting, & got it mostly assembled while my toddler was napping! One thing to note- we had to add some wood braces on the back in order to straighten our boards out. They looked ok at the store, but we got them home & realized they were quite warped! Sanding, staining and polyurethaning took additional time that was spread out over a few days (didn't include that in total time). This was great for a first project. I've got lots more on my to-do list now!
Recommended Skill Level
Beginner
Seasonal And Holiday

Cedar Planter with Trellis

Submitted by redhead_61 on Thu, 06/06/2013 - 15:13

I put the two planter boxes on this site together to get a perfect little lattice box for the space by my door. I get lots of compliments and hopefully soon I will have yummy jasmine welcoming my guests.

Built from Plan(s)
Estimated Cost
free with scraps
Estimated Time Investment
Afternoon Project (3-6 Hours)
Finish Used
wood protector
Recommended Skill Level
Beginner

First nightstand

Submitted by juliec on Sat, 04/02/2011 - 13:24

We used ana's plan but modified the top

Built from Plan(s)
Estimated Cost
$35
Estimated Time Investment
Weekend Project (10-20 Hours)
Finish Used
We will use espresso general finishes and several top coats of poly.
Recommended Skill Level
Intermediate

Comments

bridgetschaefer

Thu, 05/30/2019 - 13:00

This is EXACTLY what I'm looking for but I can't find the plans that were used to build it. Do you happen to still have the link for them?

Pottery Barn headboard with barn wood finish

Submitted by Abentley10 on Tue, 05/19/2015 - 02:31

Pottery Barn inspired headboard was created by using a modified version of the Reclaimed Wood headboard. I turned the planks vertical and cut them 32" long. I added a piece of rope ceiling trim. For the finish, I spray painted the whole piece black. After it was dry, I dry brushed cream paint on top. I finished it off with polyurethane.

Estimated Cost
Around $50. I used wood from the 70% off rack at Home Depot.
Estimated Time Investment
Afternoon Project (3-6 Hours)
Finish Used
Barn wood faux finish. Rustoleum black spray paint, cream latex paint, spray polyurethane.
Recommended Skill Level
Beginner

Comments

RenoRustic

Tue, 05/19/2015 - 09:04

I was thinking of running planks vertically for the Reclaimed Headboard too but ended up doing a different headboard all together at the last minute. I really like how yours turned out. Great job on the cost too. I don't think I've ever seen a 70% off rack at Home Depot. Now I want to run up there real quick to find it!

Abentley10

Fri, 05/22/2015 - 22:23

Thank you. Home Depot usually has a cart in the lumber aisles with stacks of wood with minor imperfections. We have scored big when they included the specialty wood.

A cottage bench with shoe rack

Only slightly modified cottage bench - I made the storage area bigger and added shelves to put my shoes. Only my second project so it's not perfect (especially the paint job) but I loooove it! Sure, the shoe rack I had was perfectly functional and bigger, but this is waaay prettier.

Found a perfect red oops paint at Lowes and I even added a little birdie stencil. I have a few more pieces I'm working on and hope to finish soon. Thank you Ana for the plans!
Estimated Time Investment
Weekend Project (10-20 Hours)
Finish Used
Primer and two coats of paint, lightly sanded in between. I skipped the top coat because I want the red color to naturally fade with use.
Recommended Skill Level
Starter Project