Community Brag Posts
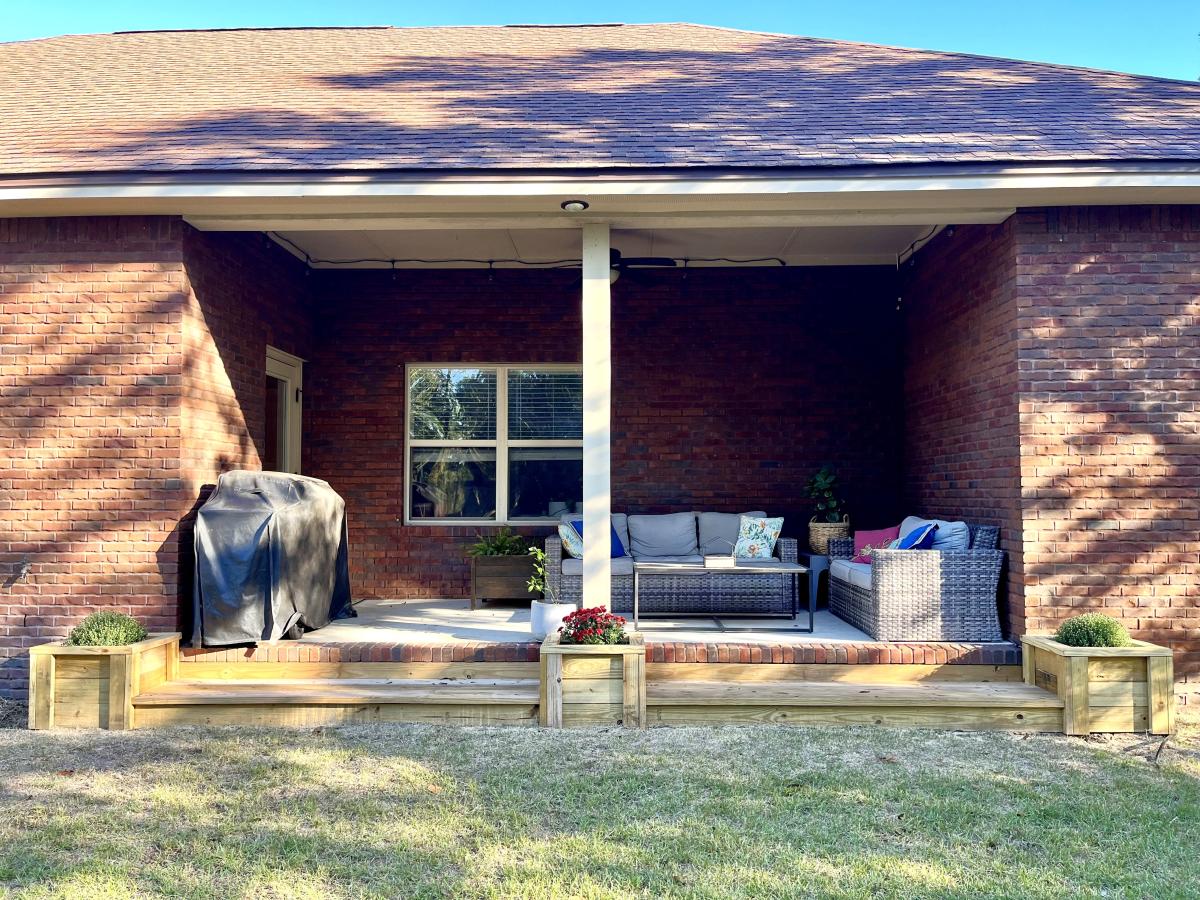
Long Planter Step for Back Porch
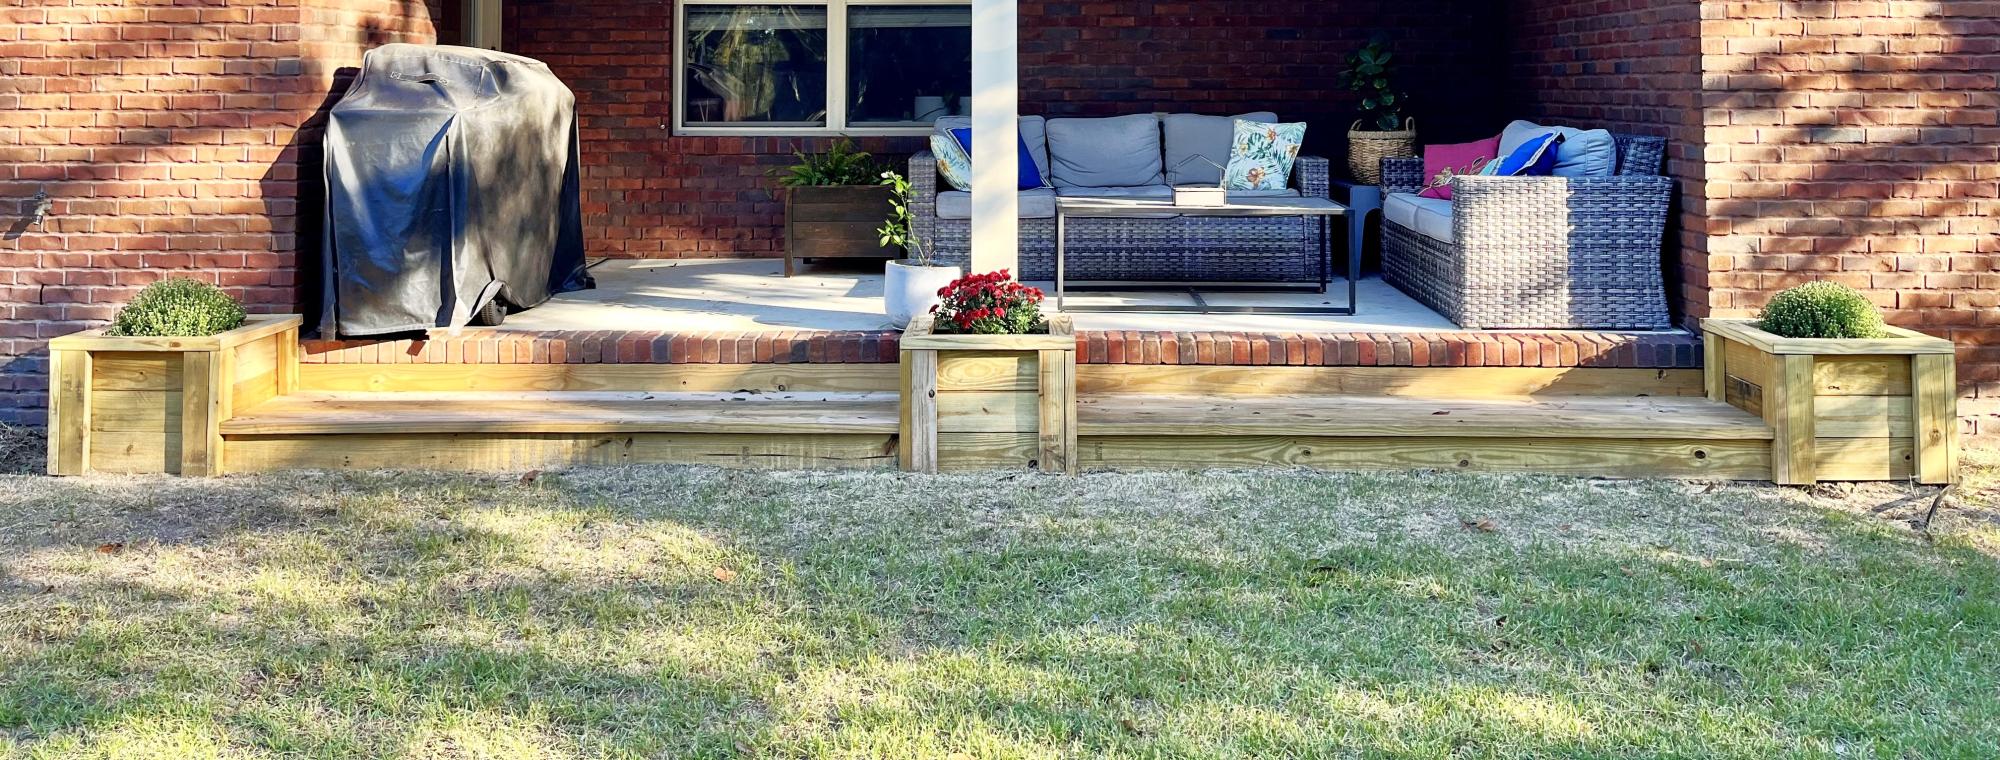
Plan modified to fit our back porch. Thank you so much for the plans! We love our new step.
Built from Plan(s)
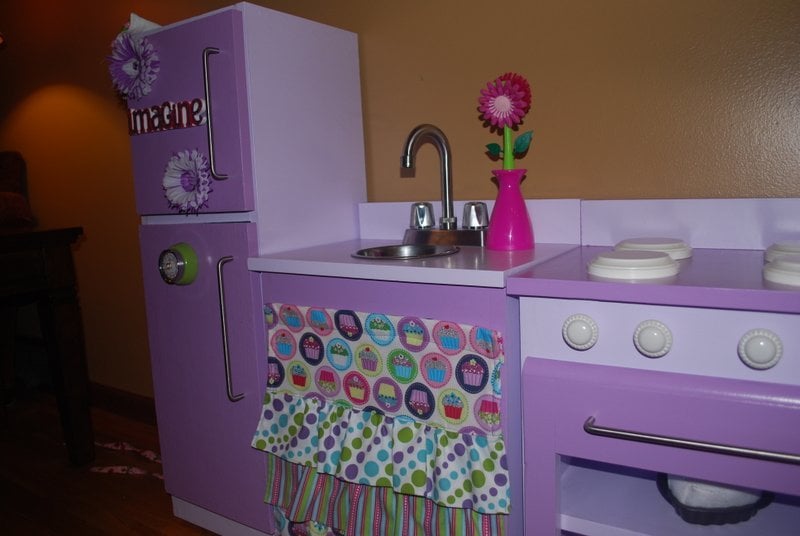
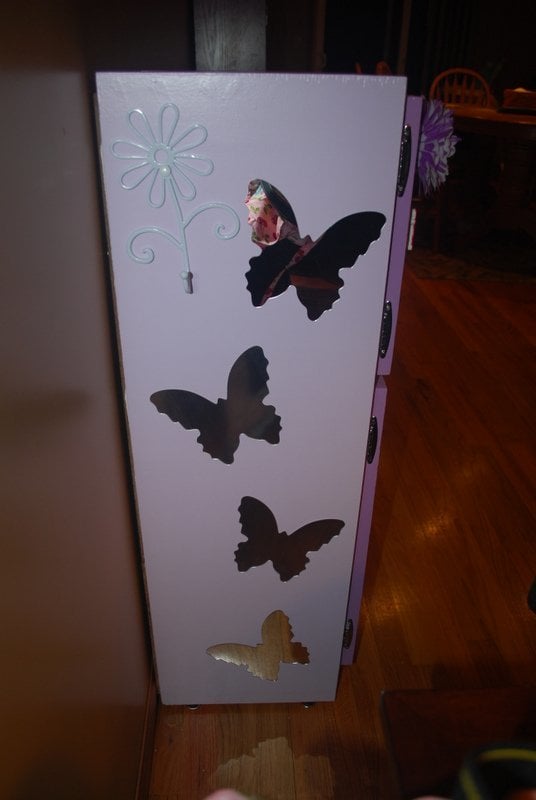
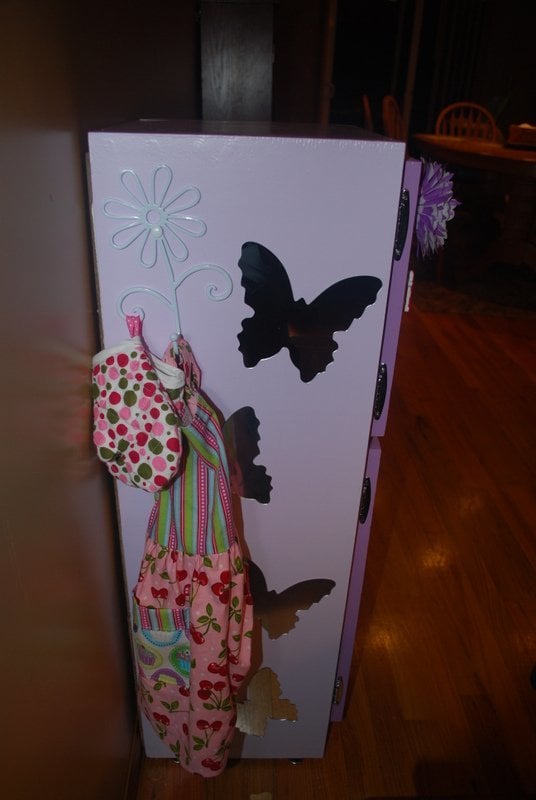
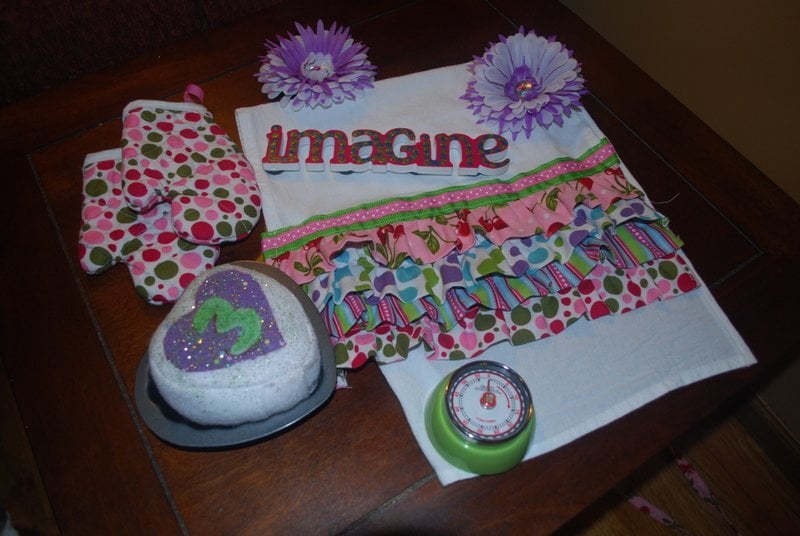
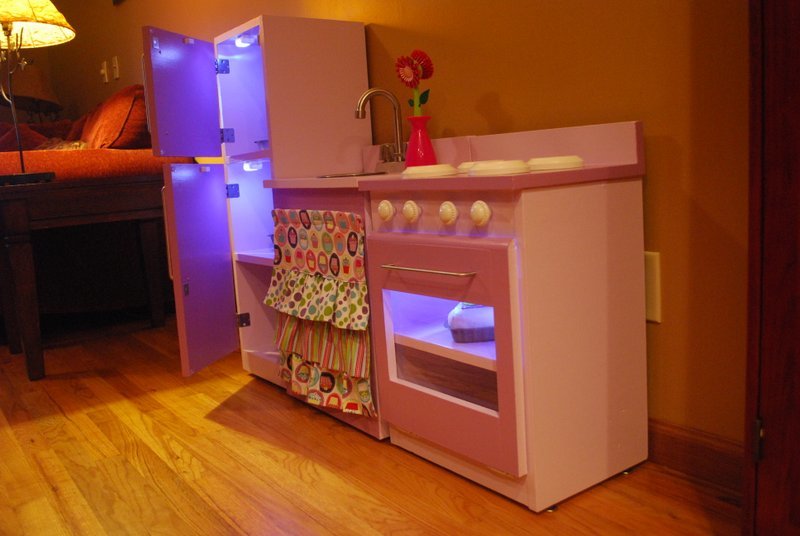
Birthday Play Kitchen
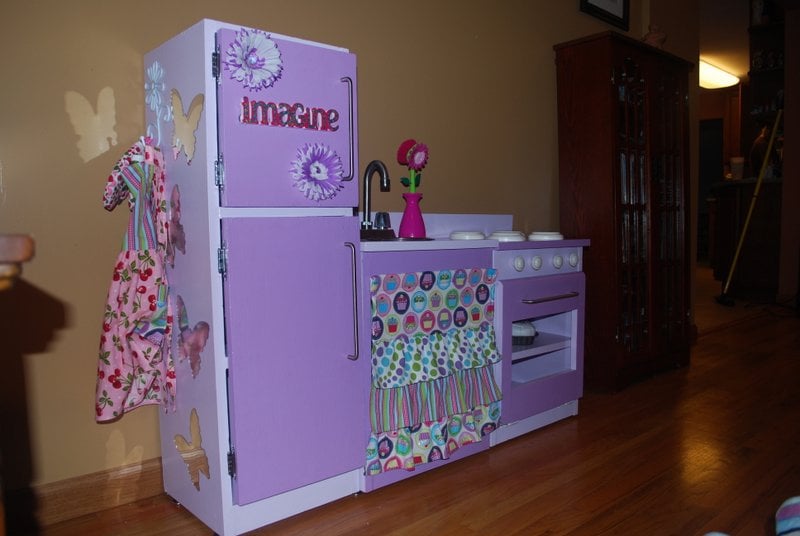
What do you want for your birthday? 'A purple kitchen'....
That's how it all started. My husband and I had no previous woodworking experience and we managed to build these guys.
The devil was in the details here! Building these didn't really take that long, It was the finishing and accessorizing.
Thank God that I know how to sew/craft. I loved the ruffle curtain from crafting chicks so I made that. The apron and oven mitts were made from the same set of fabrics. I ordered the butterfly stick on mirrors on line....they didn't stick that well so we added double stick tape. The front of the fridge is magnetic primed. The flower magnets I made and the imagine was a primed wood precut from Michaels that I painted. Stove burners are plaques for wood burning. Stove knobs, brush, and flower hook all from Hobby Lobby. Bar faucet from ebay and the sink is just a bowl.
The lights were my husbands idea....the fridge lights are magnetic drawer lights that come on when the door is opened and off when closed - just like a real fridge! The oven light is a push button LED light.
My baby was thrilled to receive this. While I loved the PB kitchens, I really think this was much better because it gave my husband and I something to work on together and it was priceless to hear my girl tell everyone that Mommy and Daddy MADE that kitchen just for her!
Built from Plan(s)
Estimated Cost
$150-$200 Probably could have done it cheaper if we didn't add a lot of the extras.
Estimated Time Investment
Week Long Project (20 Hours or More)
Finish Used
2 coats of primer, 2 coats of behr paint, and 3 coats of polyacrylic. The backs are pre primed bead board that we painted white. Magnetic primer on the front of the fridge. Burners are painted with a soft white acrylic and then polyacrylic.
Recommended Skill Level
Beginner
Comments

Sat, 05/05/2012 - 19:27
Love it!! You and your
Love it!! You and your husband did a great job! Really love the light ideas.
Thu, 11/29/2012 - 13:11
Love the color scheme and
Love the color scheme and will be doing similar on the one I am working on now thanks to your posts!! How did you cut the stove door?
Wed, 12/12/2012 - 18:13
Do you have a plan for this,
Do you have a plan for this, or know where I can find one? I would love to make this for my toddler girls.
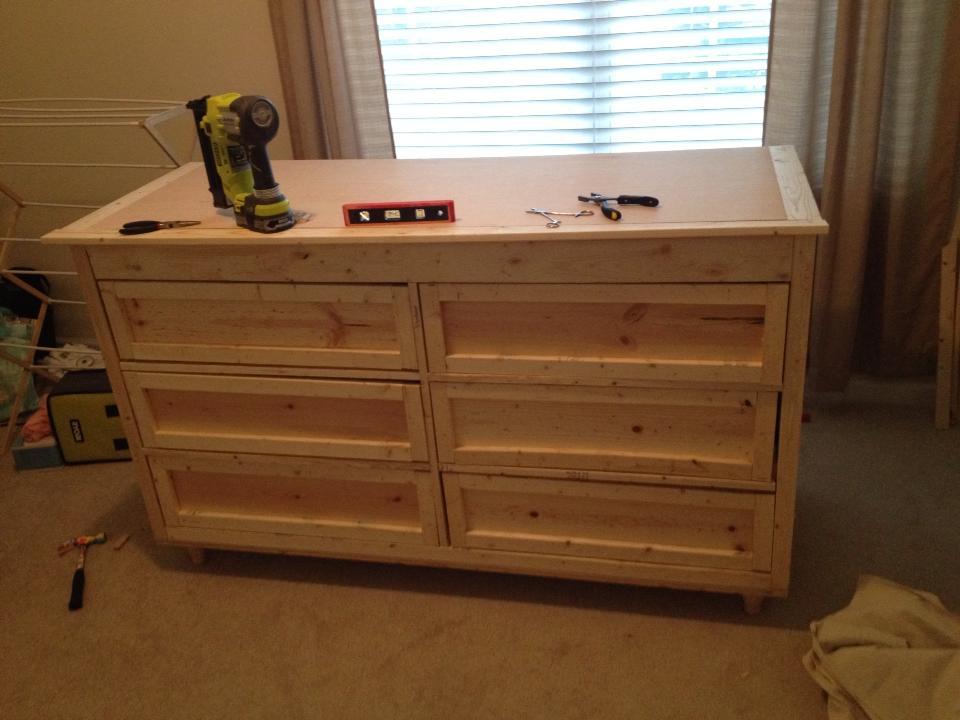
Madison Dresser
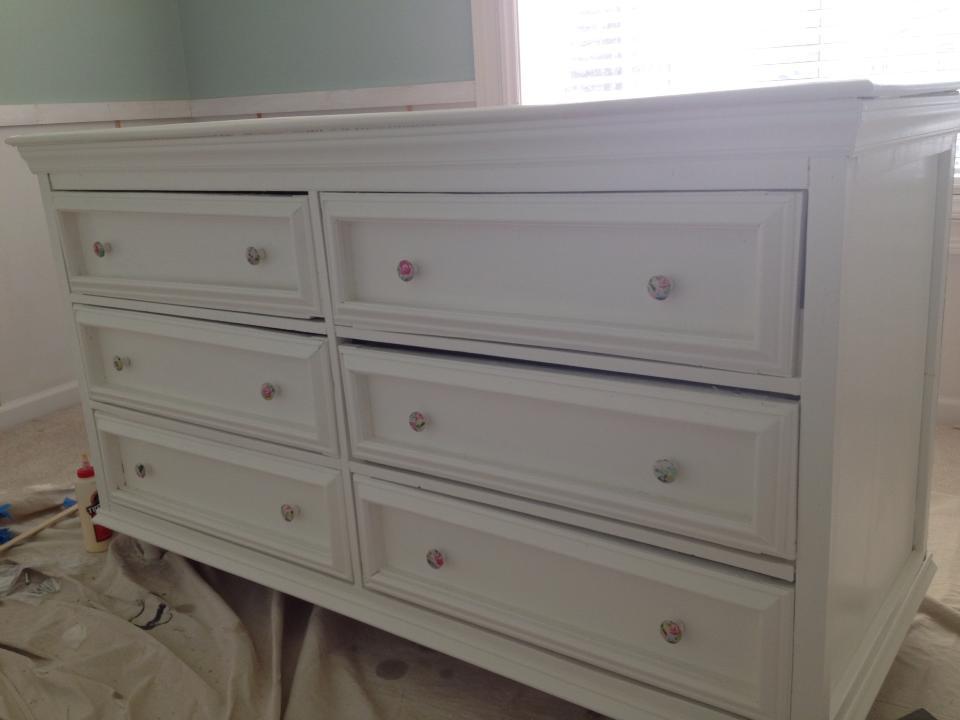
This was my most ambitious project yet - and I did it during my 2nd trimester of my first pregnancy! I knew I wanted a dresser that would double as a changing table & fell in love with the Madison as soon as I saw it. This is no small project - those drawers were certainly a learning experience! Wish I'd paid more attention to the 1x2s (& sprung for top pine to try to get a straighter frame). We're happy with how it's turned out & can't wait to start using it for our daughter when she arrives in May!
Built from Plan(s)
Estimated Time Investment
Week Long Project (20 Hours or More)
Finish Used
Copied the original at Old Paint Design & used Valspar's Polar White (2 coats, semi-gloss) after a coat of primer. Hand brushed the whole thing.
Recommended Skill Level
Intermediate
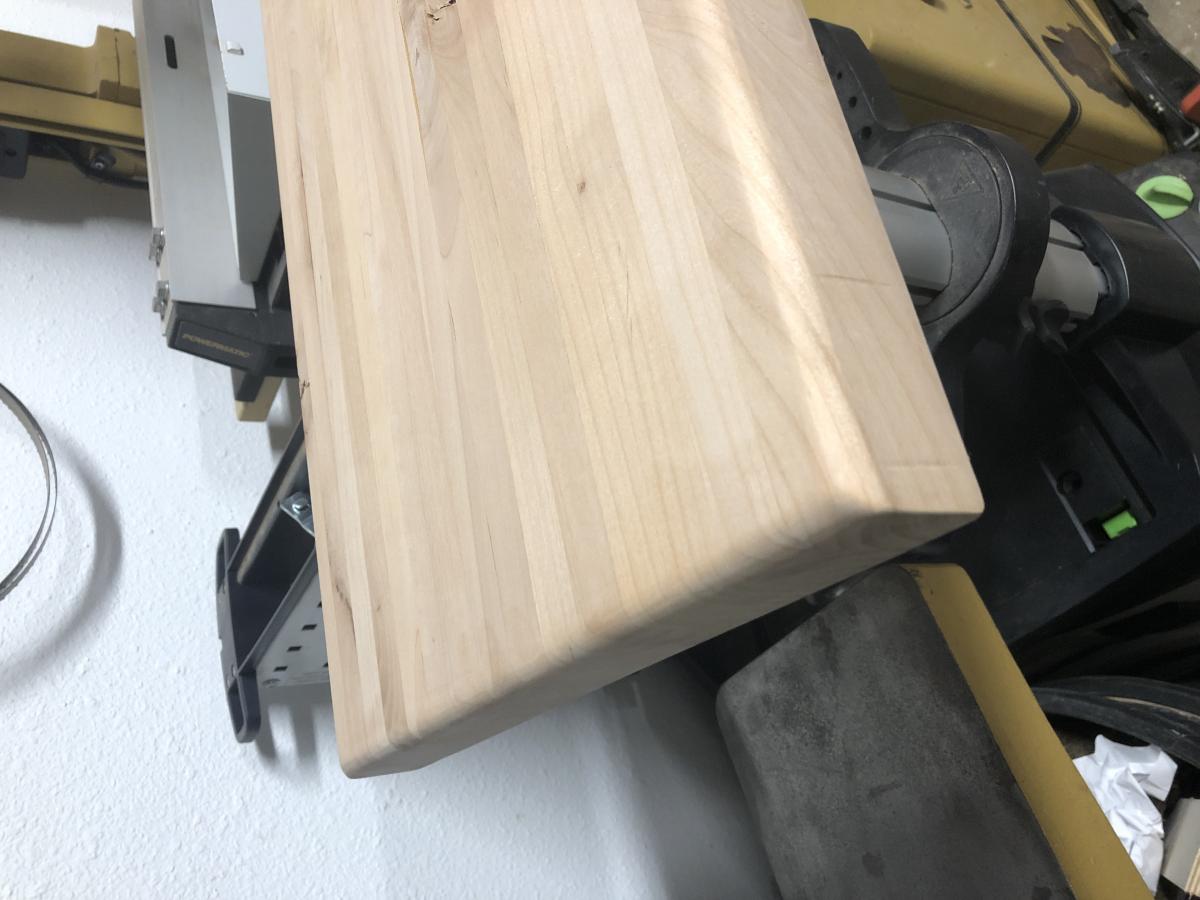
Motorcycle Jacket and Helmet Rack
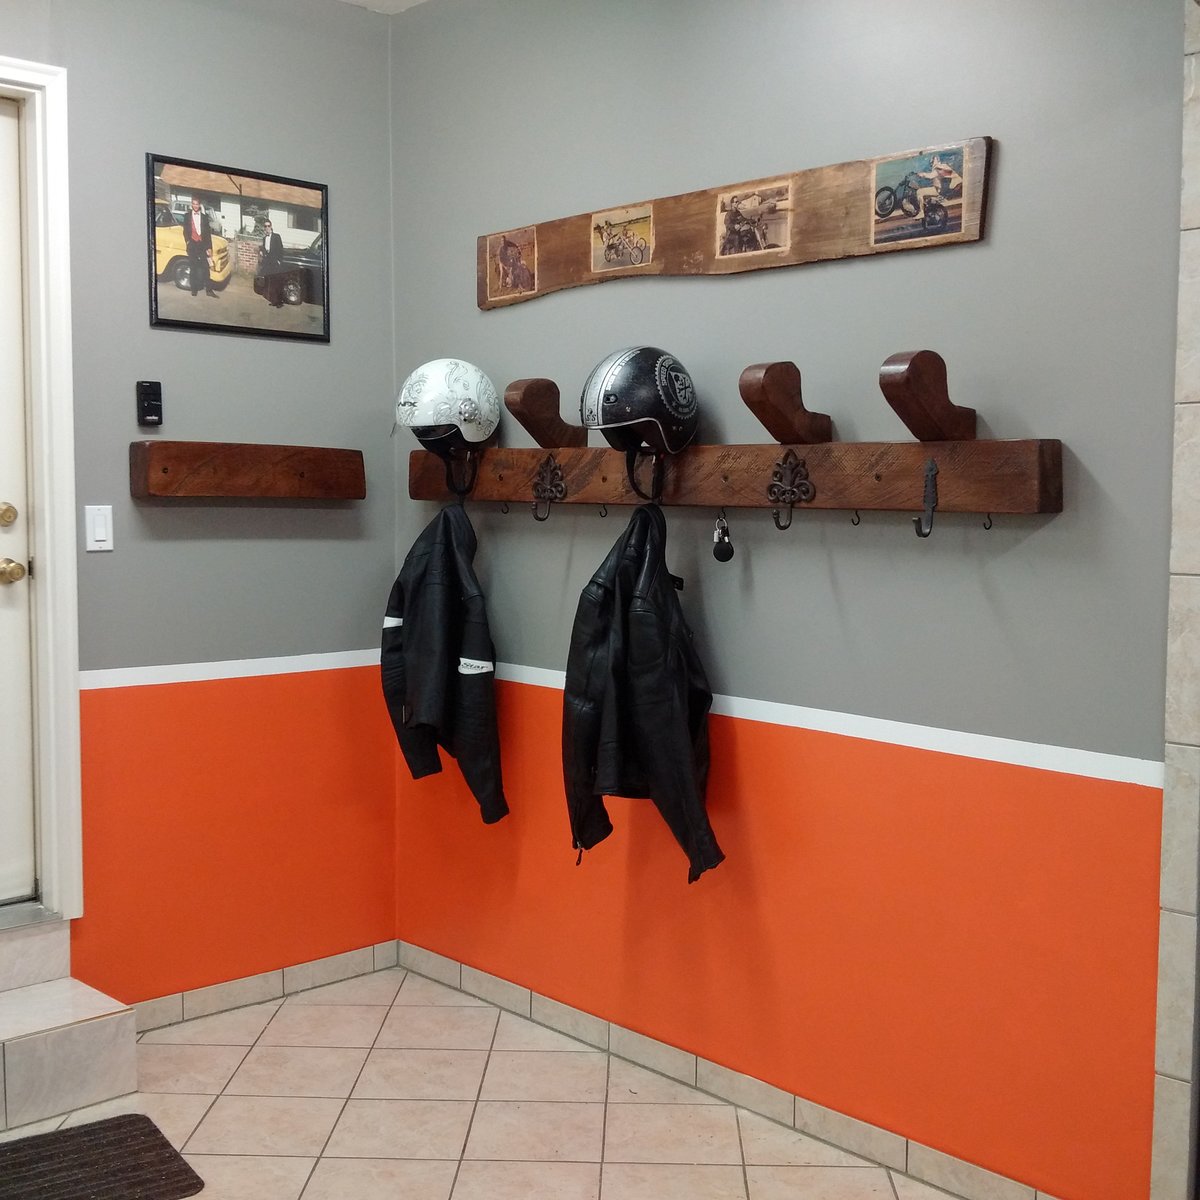
Built from left over Rough Cut Maple. Jaket, Helmet and Key Rack
Estimated Cost
$50
Estimated Time Investment
Afternoon Project (3-6 Hours)
Finish Used
Minwax Stain and Polyurithane
Recommended Skill Level
Beginner
Comments
Sat, 10/03/2020 - 10:22
Do you have the plans for…
Do you have the plans for this? My husband loves it and we'd love to make it.
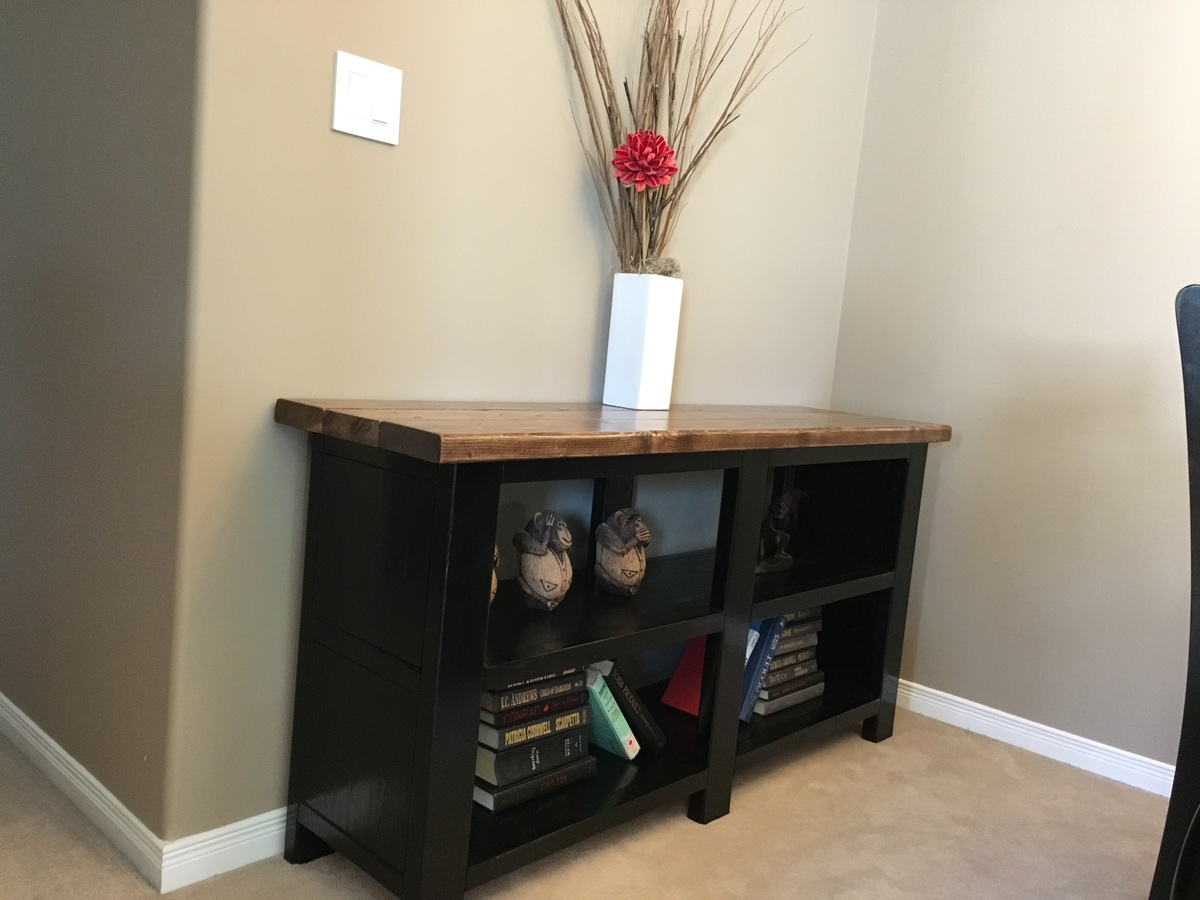
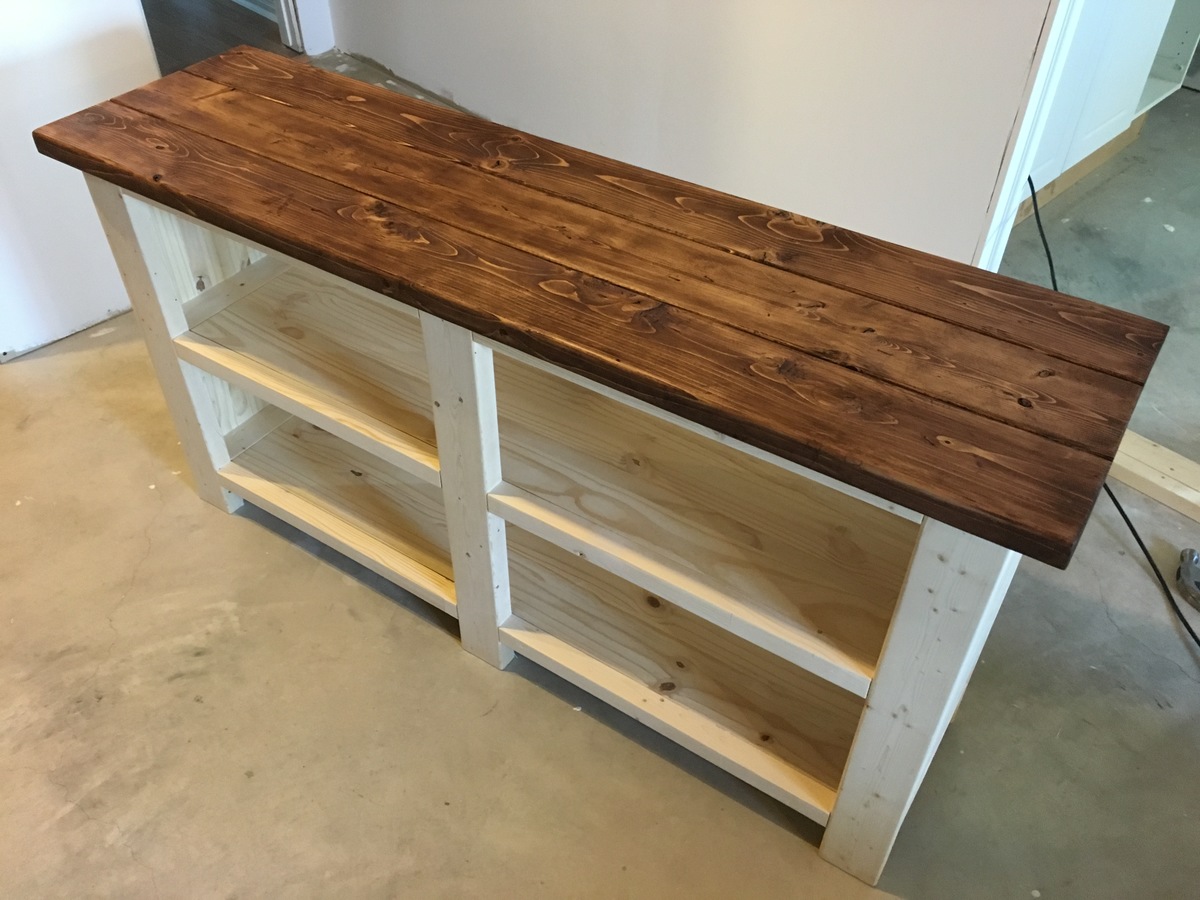
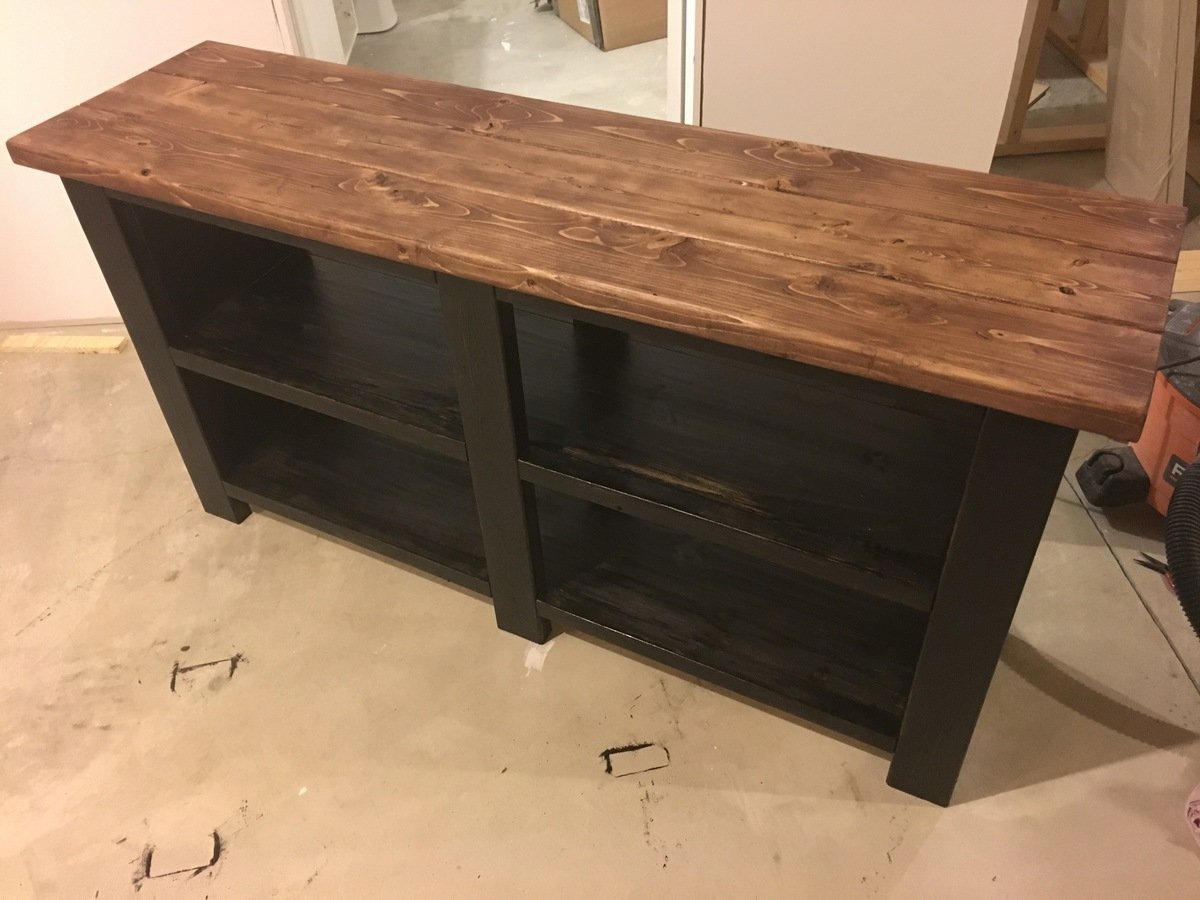
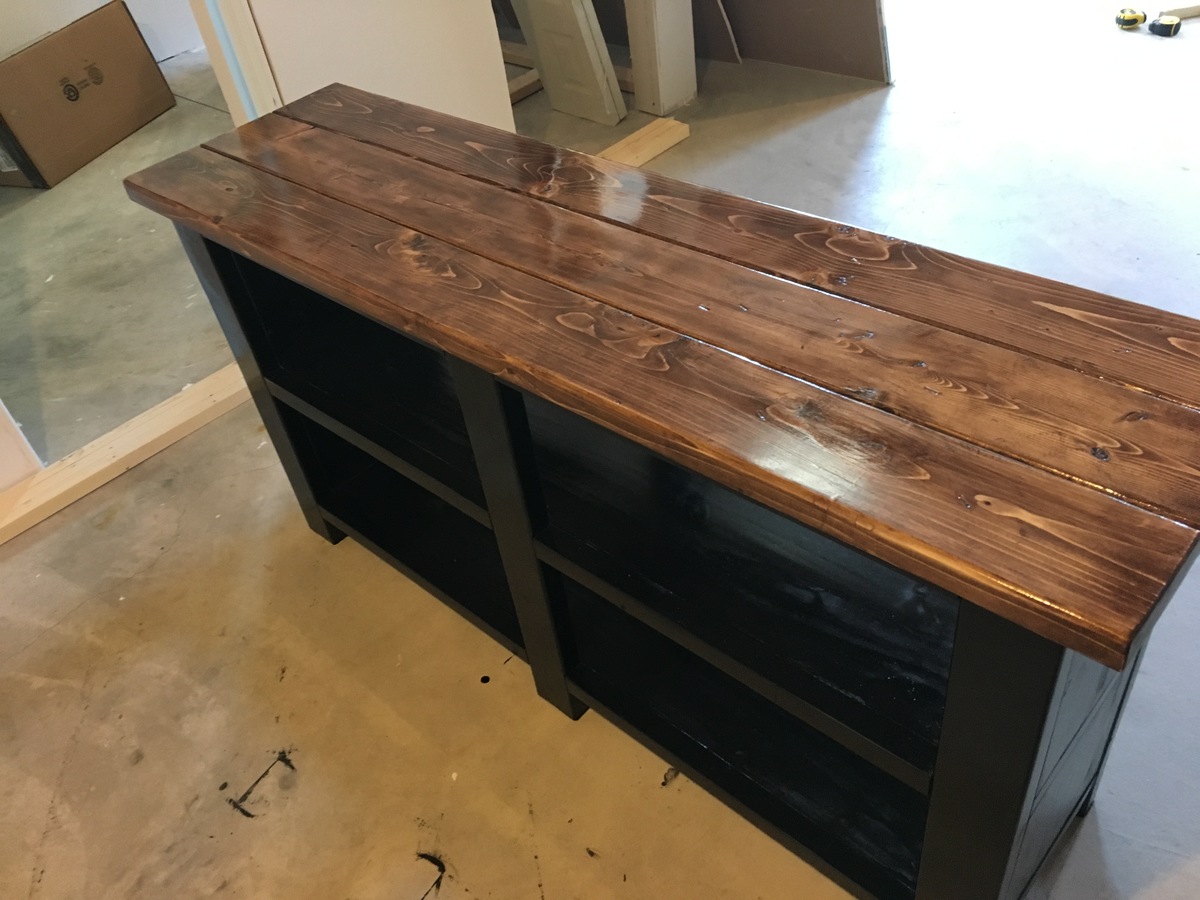
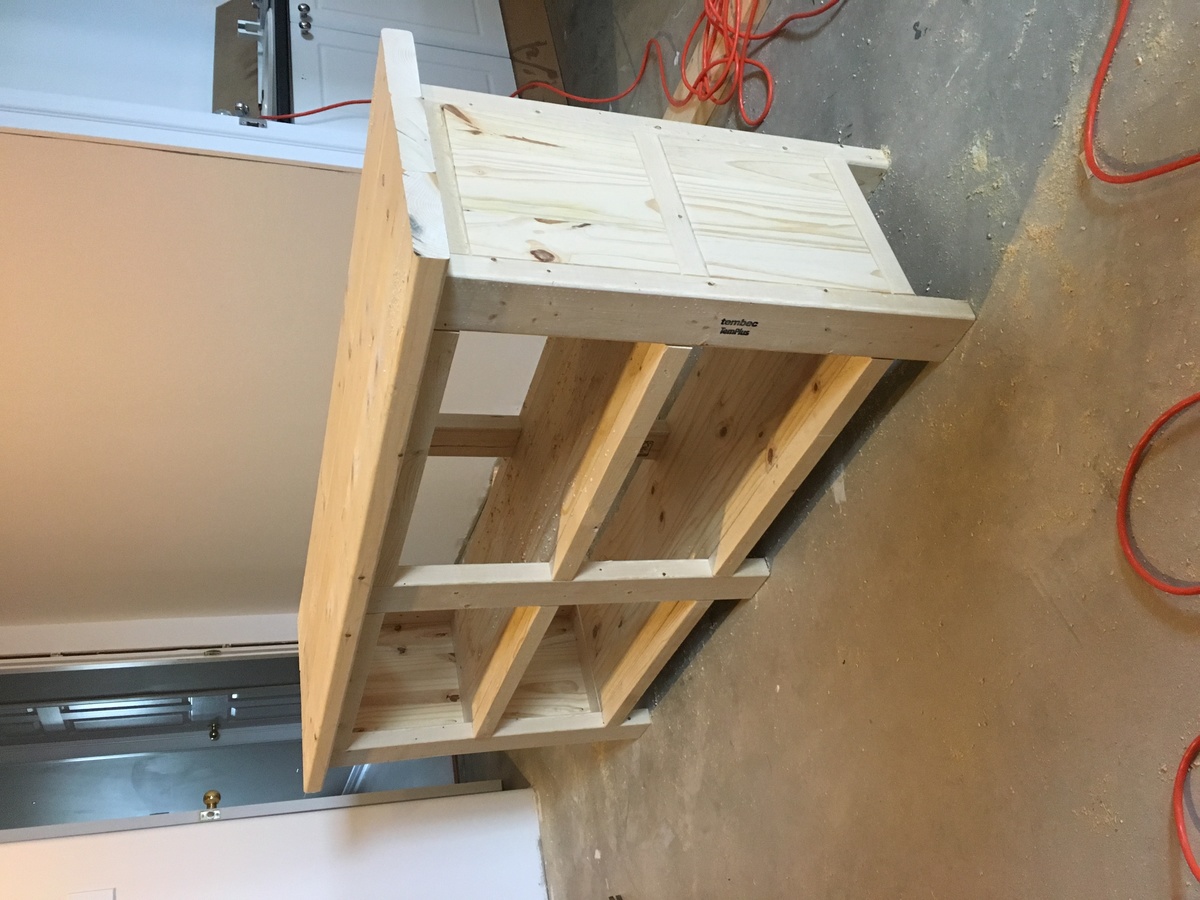
Console Table Build for Entry Table
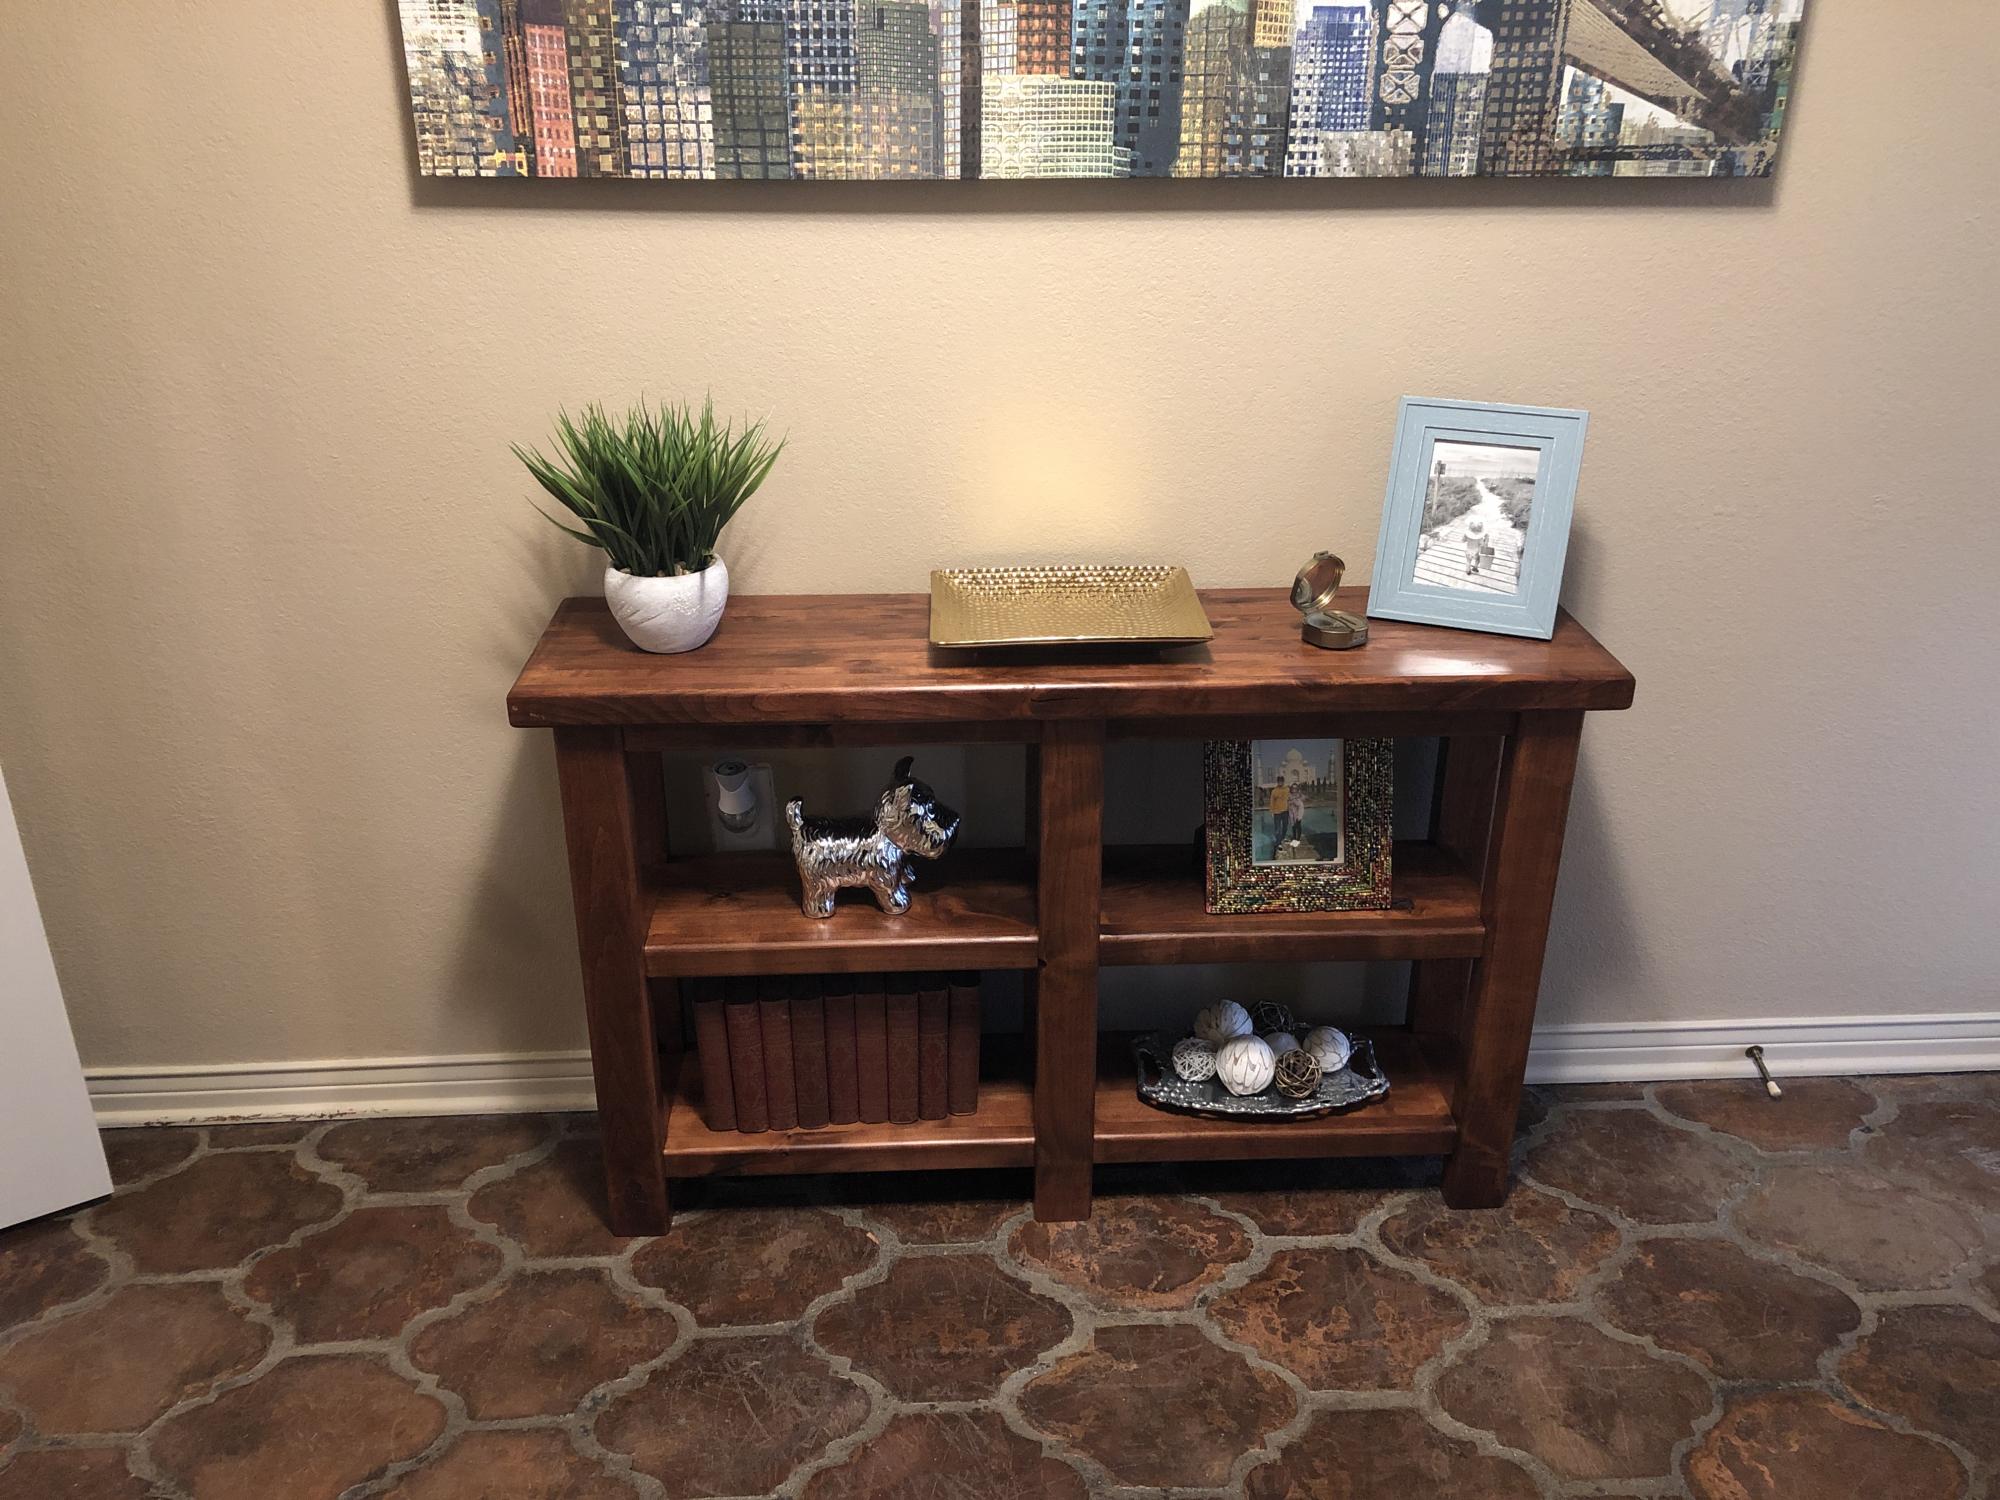
Fantastic plans.
I made some modifications to make this fit my exact needs, but the overall plans and explanation were outstanding. Changes I made are as follows:
- Shorten the length to fit the space I was building for
- Made the entire body out of Alder because I had a surplus laying around my shop
- Created a butcher block style top by laminating together 15 2-inch wide 3/4 pieces
- Put a roundover edge on the top, as well as any of the outside edges on the legs or rails
- Joined the front and back frames to the shelves by using dominos instead of pocket screws
I finished the table with a washcoat of wood conditioner, followed by General Finishes mahogany stain, and put three coats of wipe-on General Finishes Arm-R-Seal satin poly, sanding with 320-grit in between each coat.
Thanks for making these plans available for use! I'm very happy with the results
Built from Plan(s)
Estimated Time Investment
Weekend Project (10-20 Hours)
Finish Used
General Finishes Oil-Based Mahogany Stain
General Finishes Arm-R-Seal Satin Wipe-on Poly
General Finishes Arm-R-Seal Satin Wipe-on Poly
Recommended Skill Level
Beginner
High Top Table with Banquette Seating
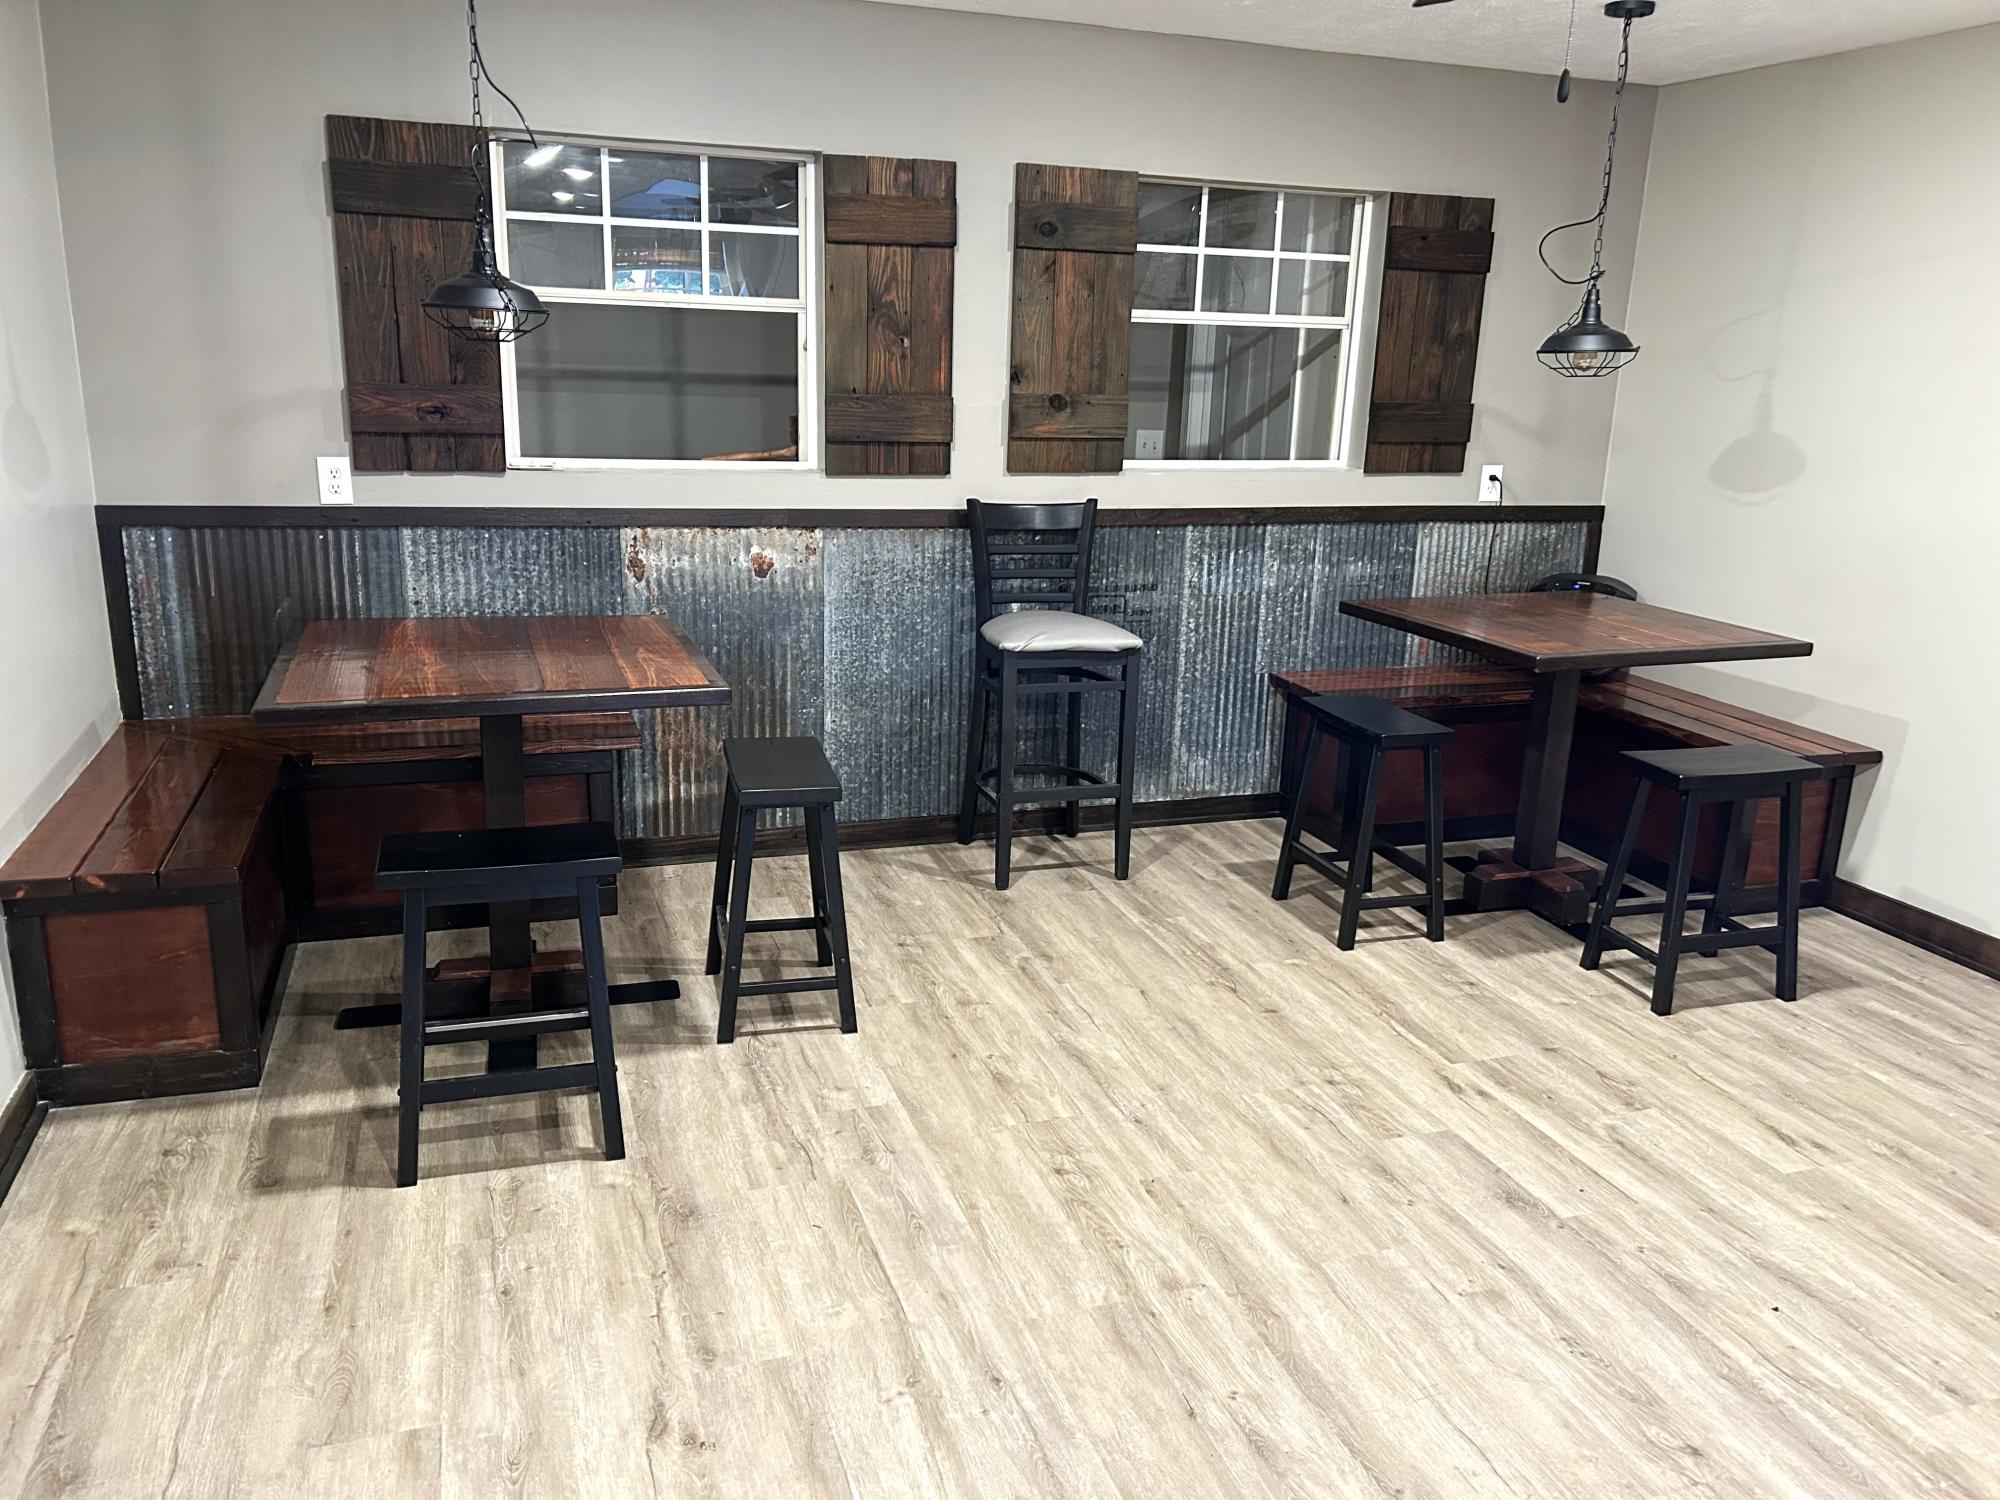
Breakfast Nooks with Pedestal Tables. Shawn Imes
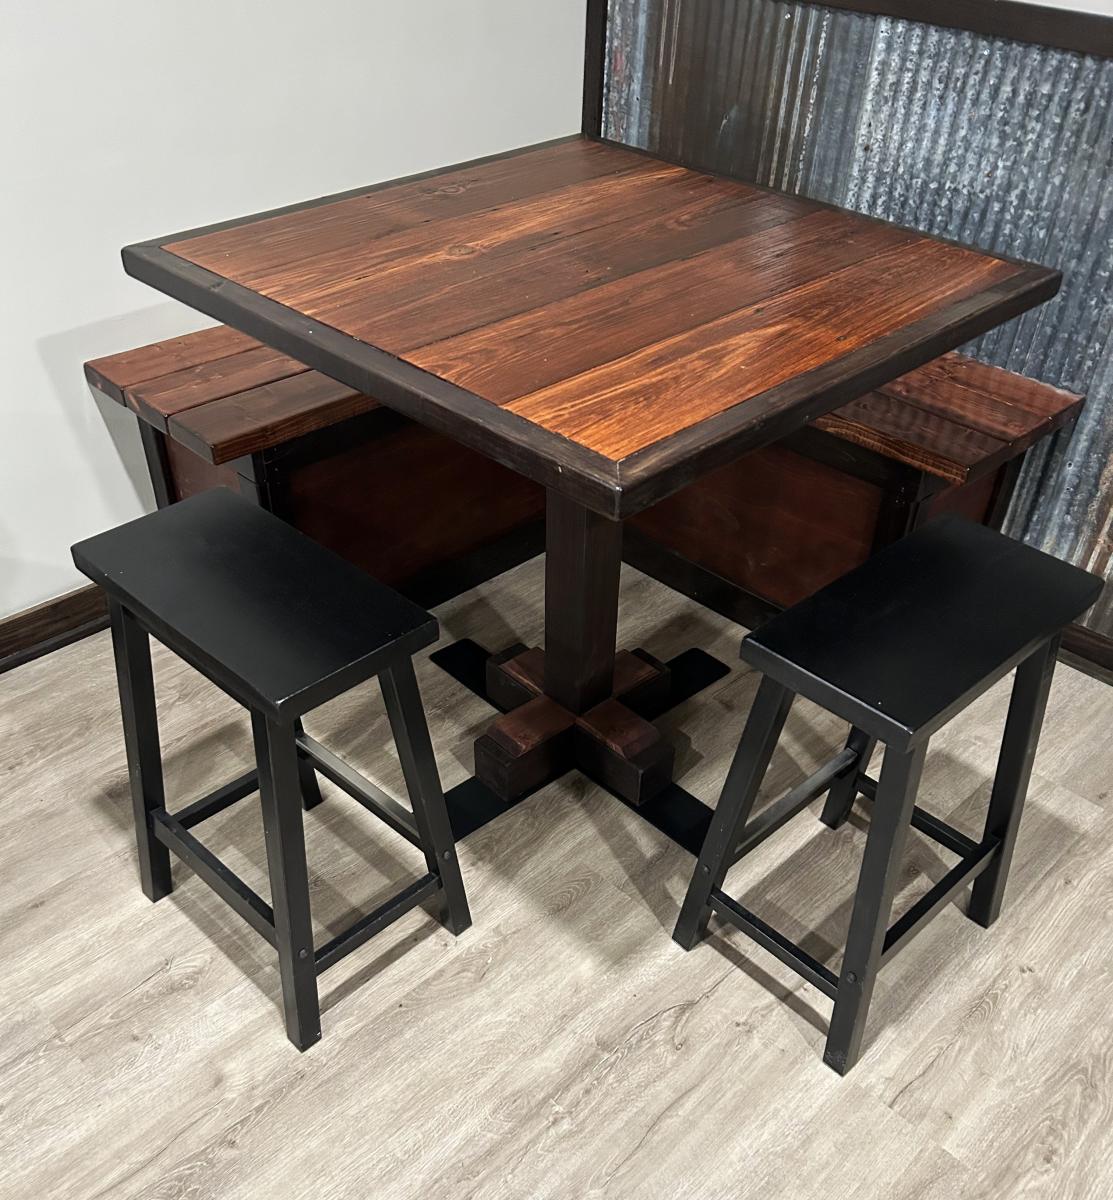
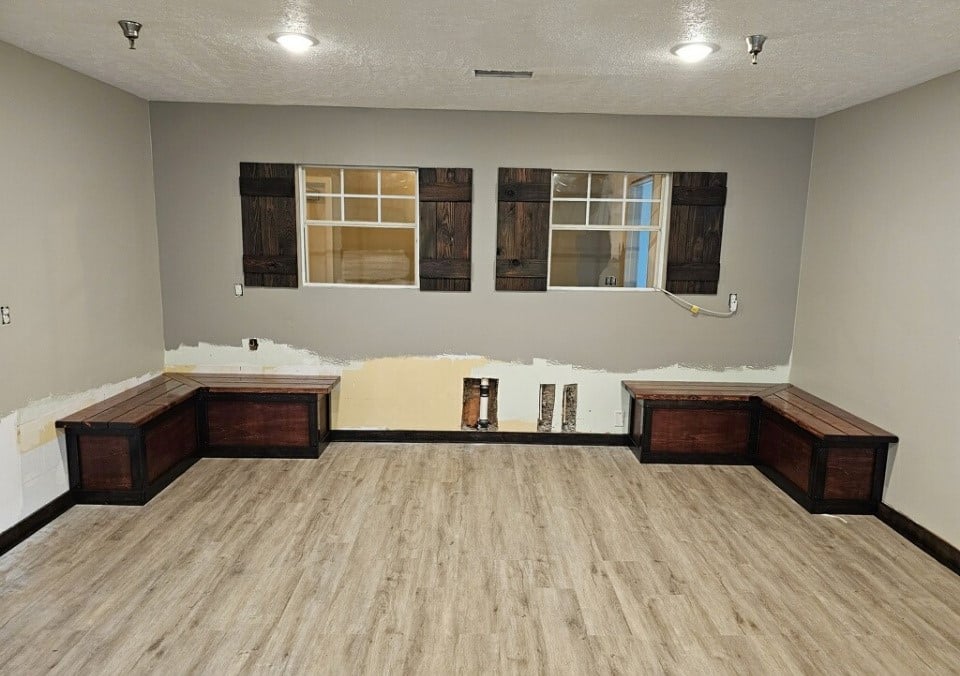
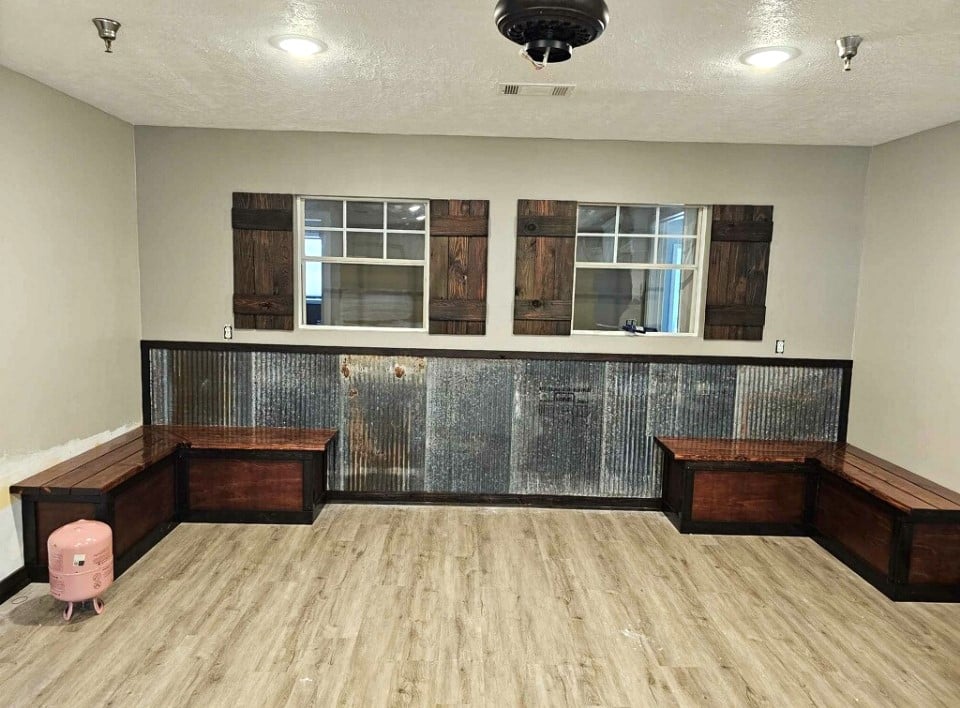
Built from Plan(s)
Ten Dollar Ledges

My husband made these for our God son's 1st birthday gift. He loves them so much. We can't wait to make these for our daughter's nursery as well. These are so easy & beautiful to make.
Built from Plan(s)
Estimated Cost
$50
Estimated Time Investment
An Hour or Two (0-2 Hours)
Finish Used
We used black flat spray paint which which is the longest part of the project, waiting for the paint to dry.
Recommended Skill Level
Starter Project
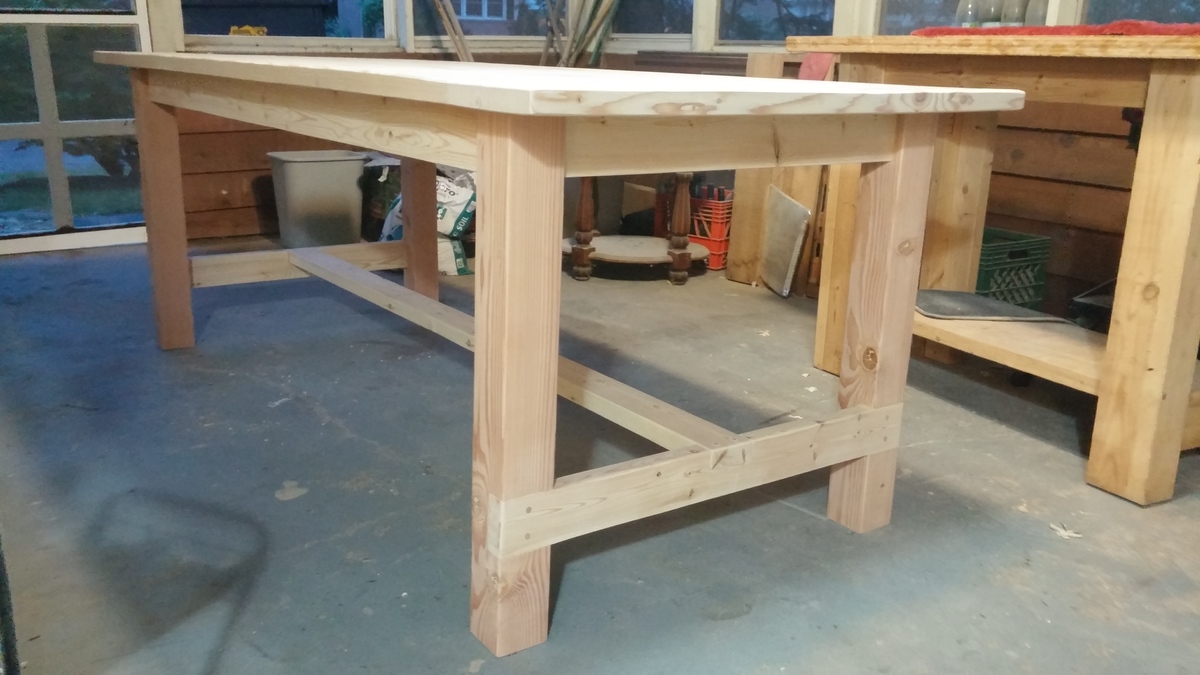
My very FIRST build!! LOVE IT!!

My husband is deployed and I just decided to start building, to keep my mind busy. I built this table & benches, sanded, stained it & had it in my nook in just 6 days!!! I worked on it every night when the kids went to bed. Thank you Ana White!! :) I will be using this site quite a bit to keep me busy!
Built from Plan(s)
Estimated Cost
$140
Estimated Time Investment
Week Long Project (20 Hours or More)
Recommended Skill Level
Beginner
Comments
Tue, 02/25/2014 - 00:56
your very welcome
Thank you for the idea, i am definitetly going to use your design on a future project of mine.
Tue, 02/25/2014 - 00:56
your very welcome
Thank you for the idea, i am definitetly going to use your design on a future project of mine.
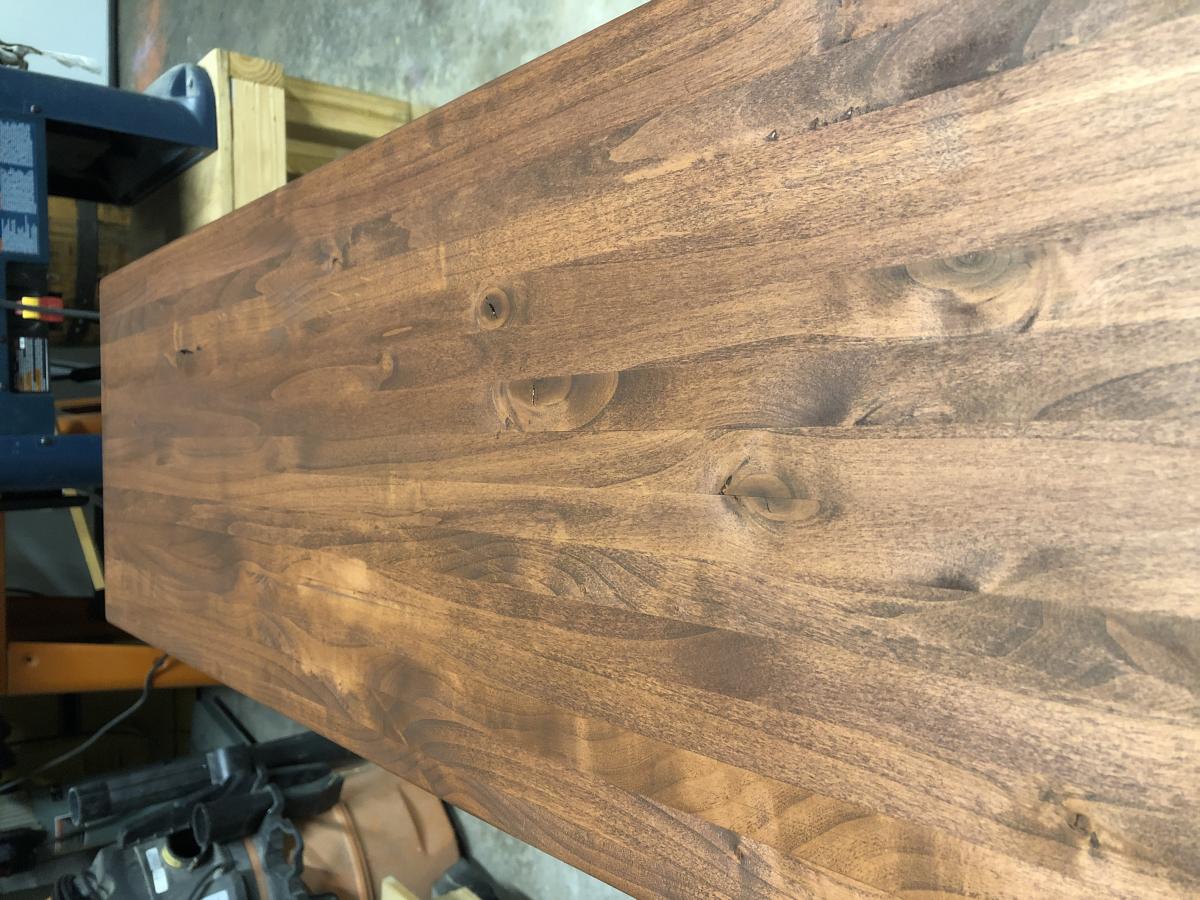
Custom X Console
Thanks for the plans Ana! Here's what I came up with.
Built from Plan(s)
Estimated Cost
$100 CAD
Estimated Time Investment
Weekend Project (10-20 Hours)
Finish Used
The top has Mini wax walnut gel stain with 3 coats of Miniwax water base polycyclic semi gloss. The bottom has 2 coats of Classic black polyshades.
Recommended Skill Level
Intermediate
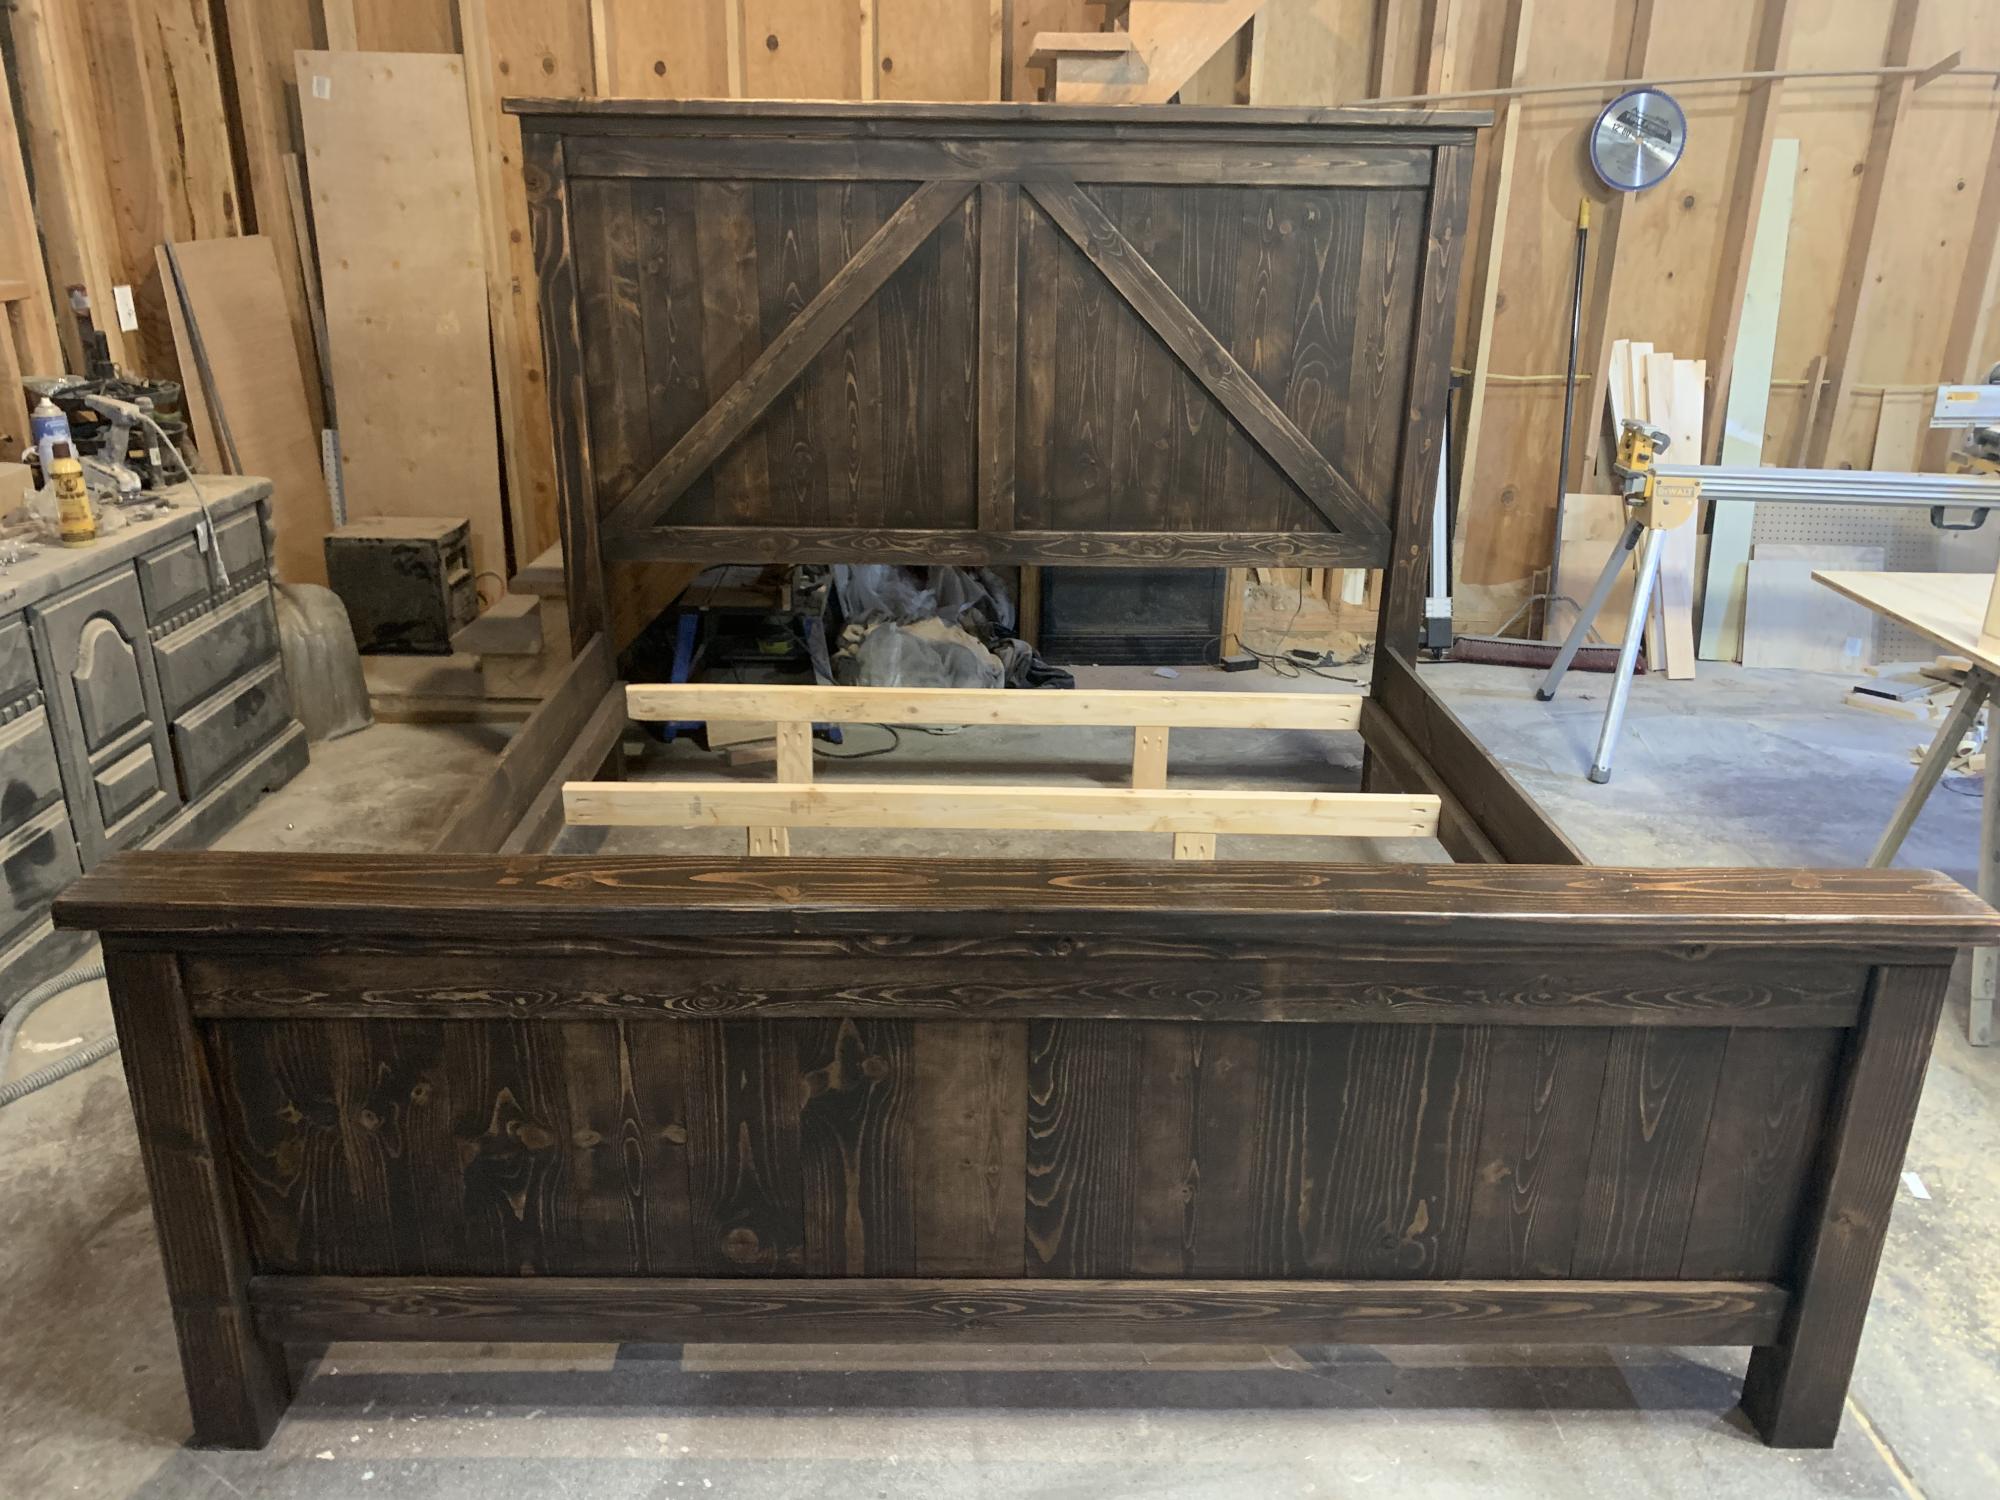
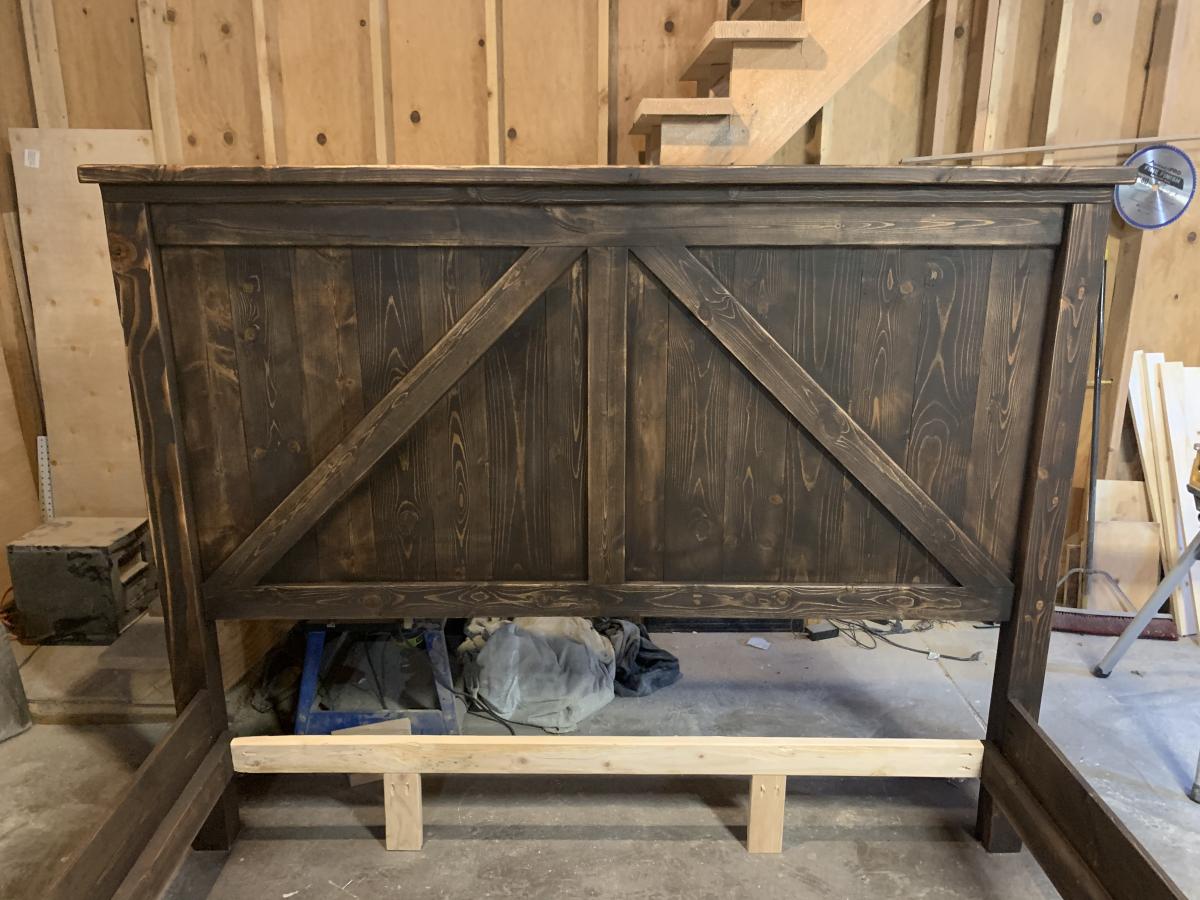
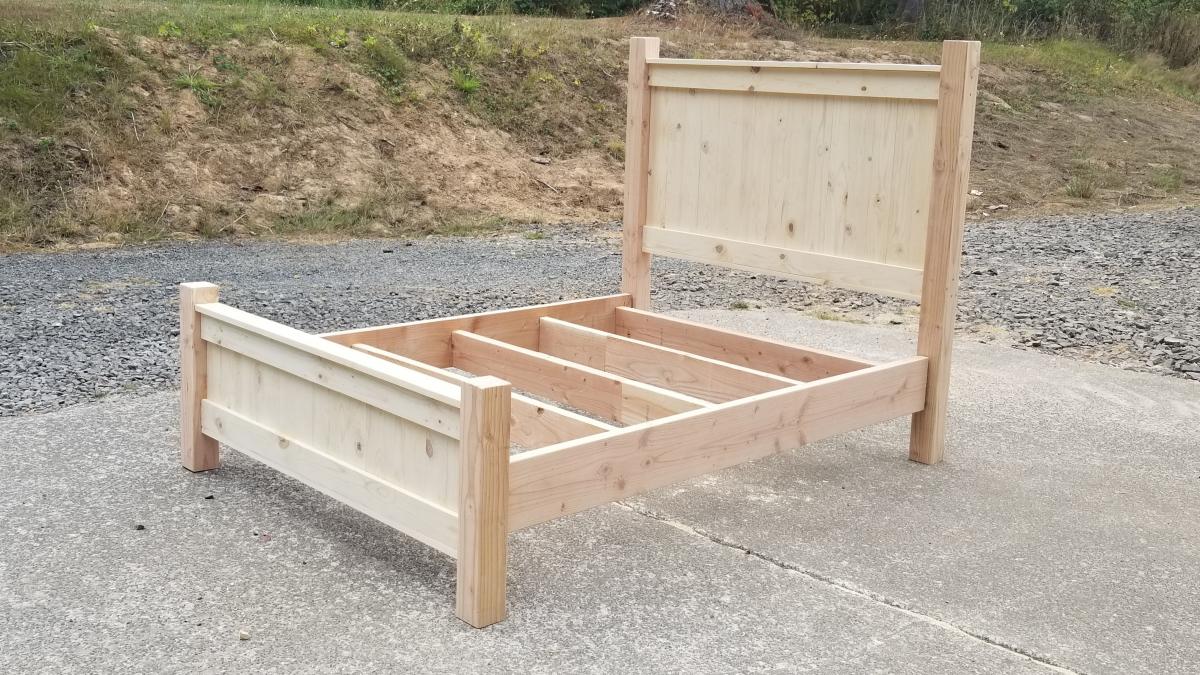
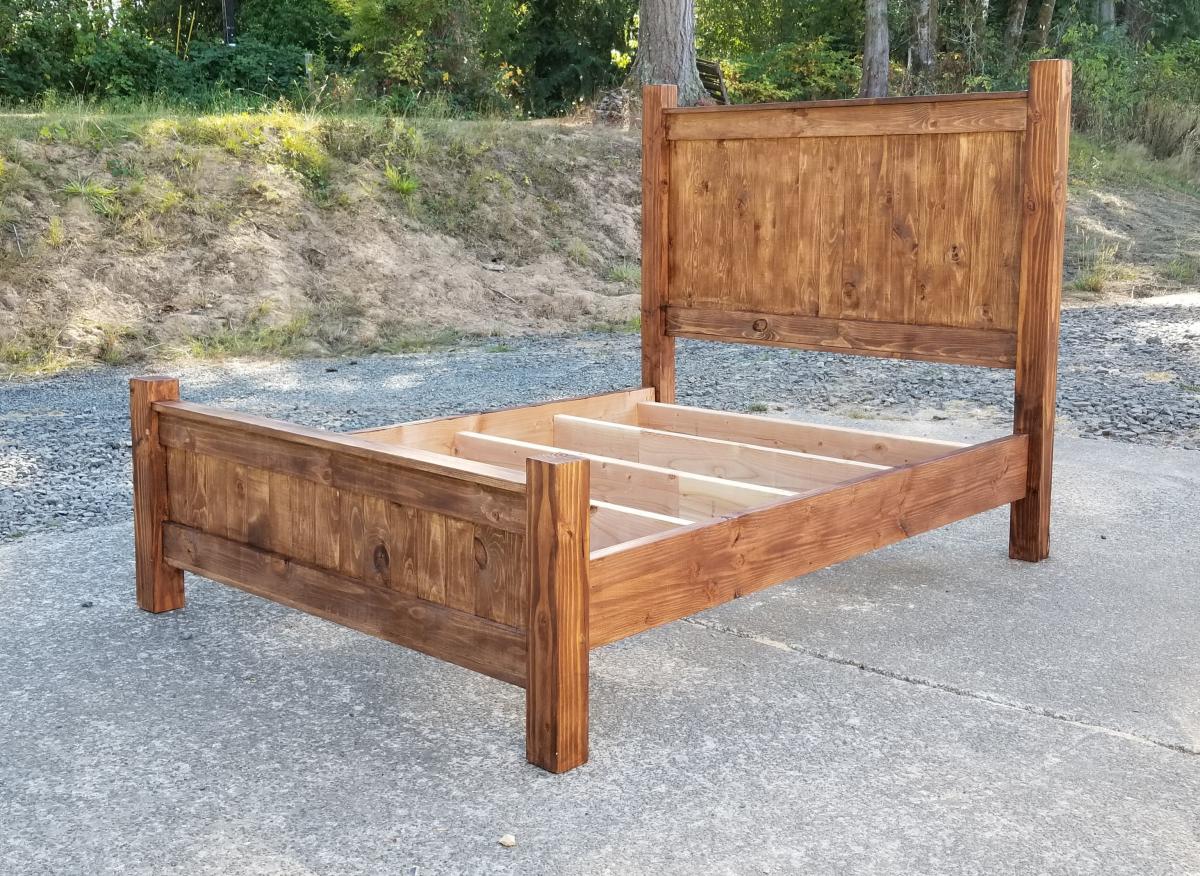
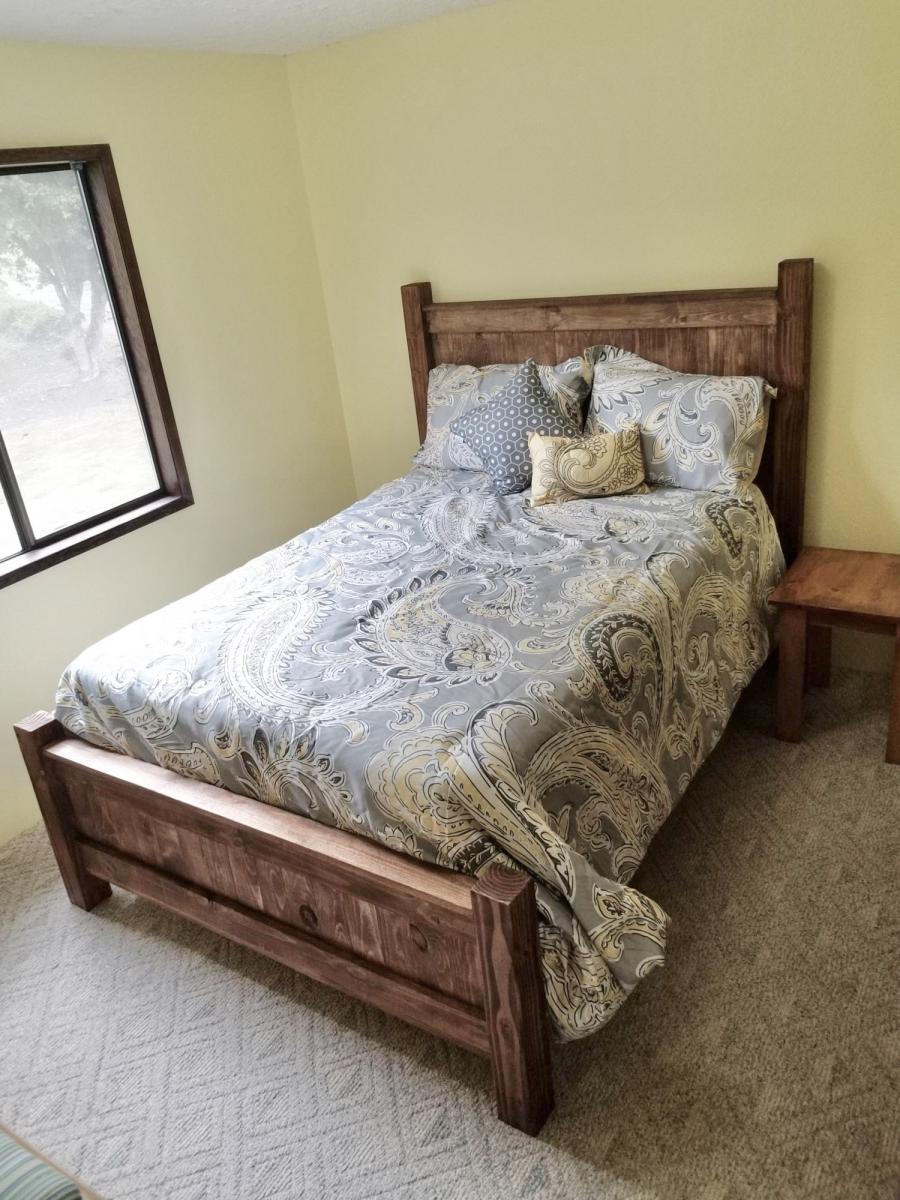
Farmhouse Queen Bed, with modifications

I built this as a full-size bed to put in our spare room. I am not fond of the top of the head and foot boards extending out because it wouldn't square-up with the wall (thank you, OCD). I modified this so that the posts extended above the head and foot board and then trimmed it out inside of the posts. This project took a couple days to build then another day to stain. I used knockdown hardware that was terrible to install and won't do it again... lots of hassle and cursing and bloody knuckles. Overall, I'm very happy with how it turned out and am working on modifying it a little more for our own queen bed with some redwood that my dad had milled up. Stand by for that!
Built from Plan(s)
Estimated Cost
$120
Estimated Time Investment
Weekend Project (10-20 Hours)
Finish Used
Varathane medium oak with satin poly
Recommended Skill Level
Intermediate
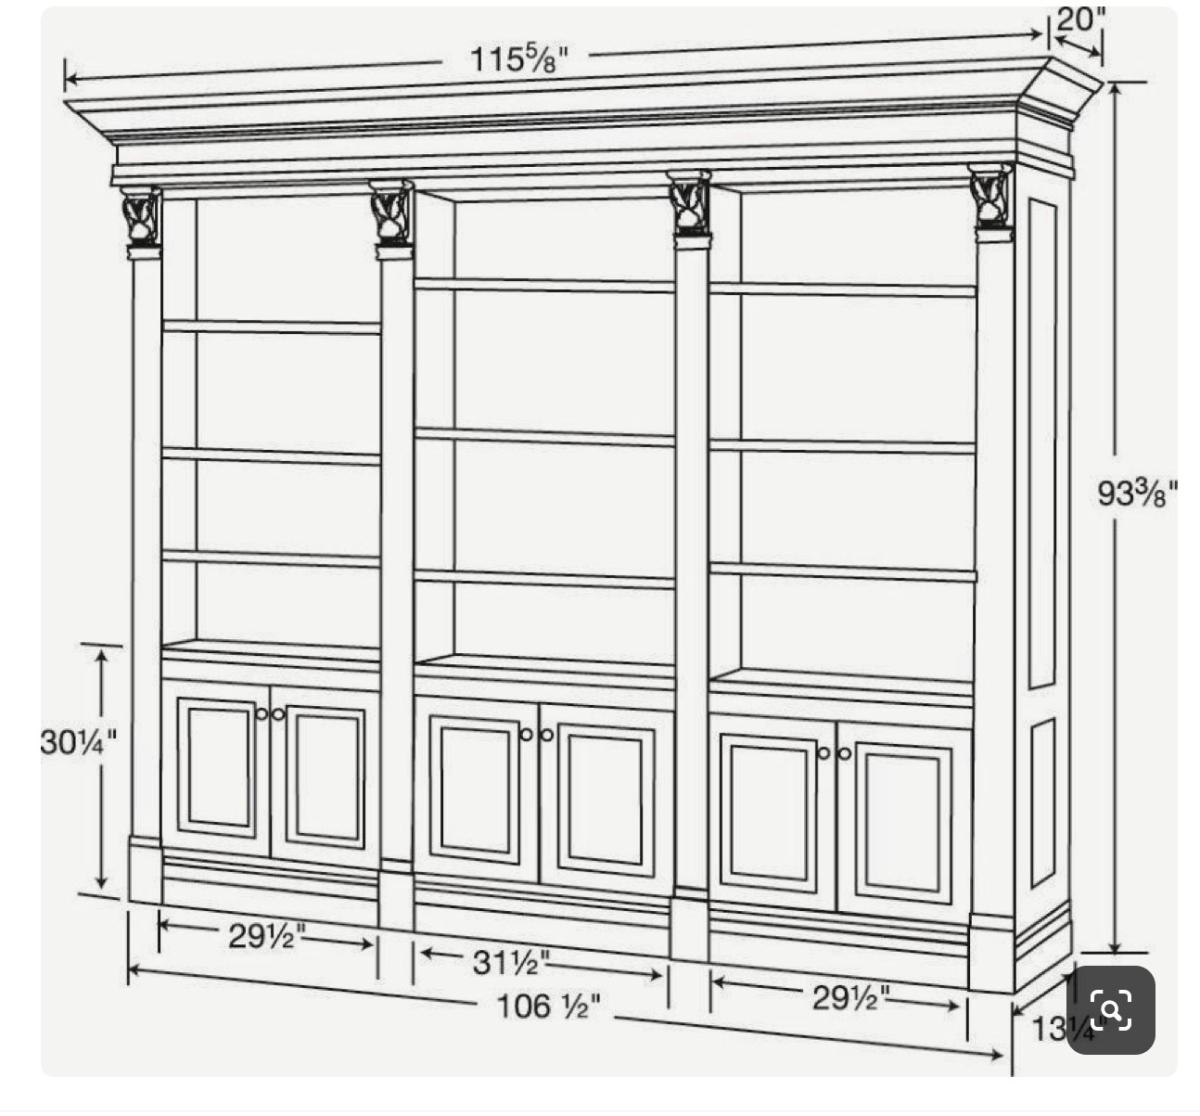
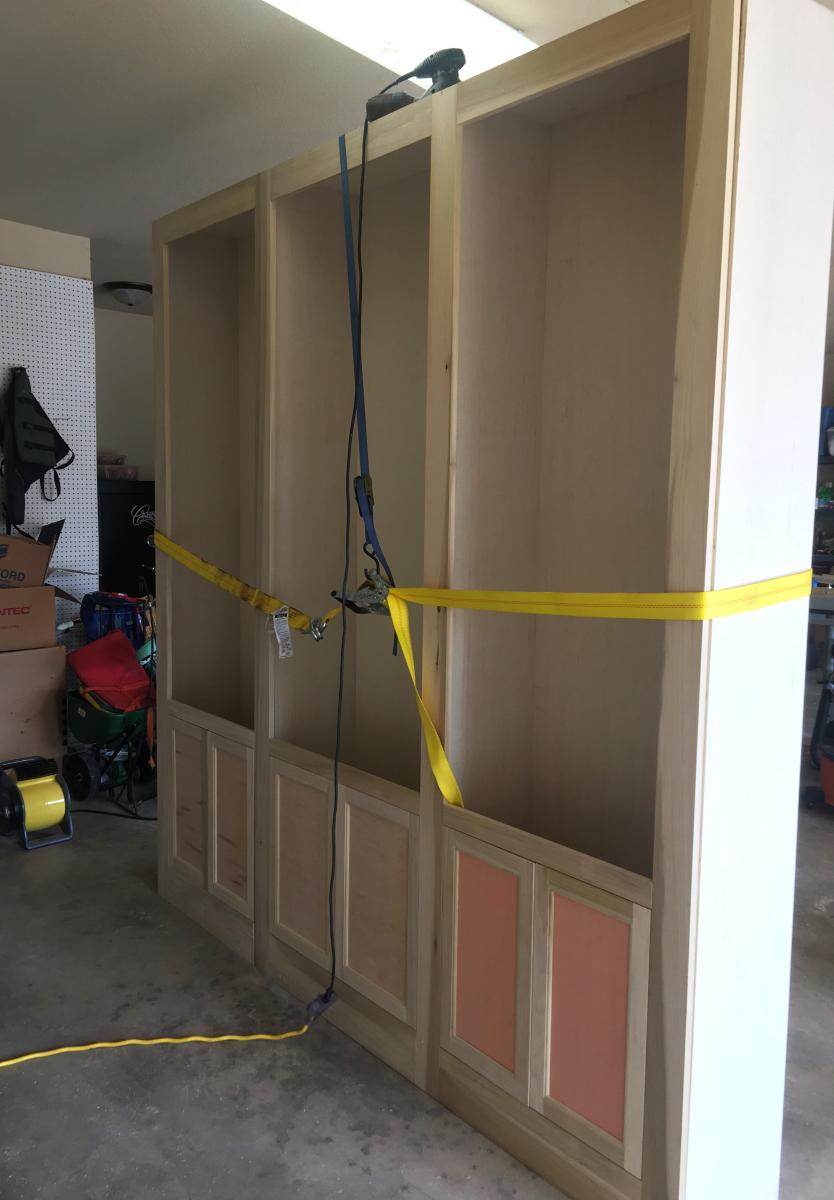
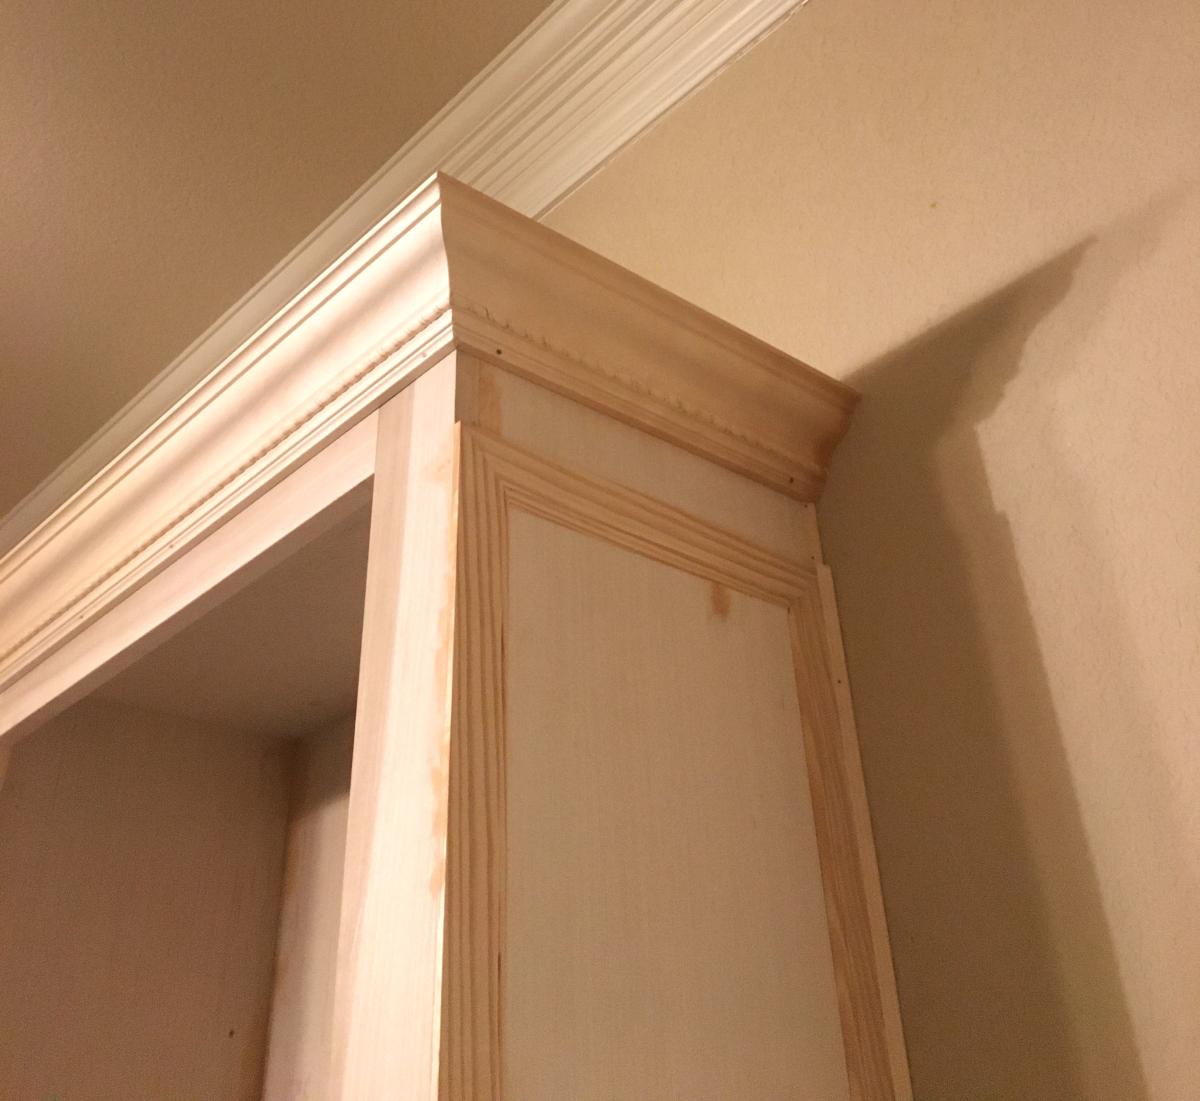
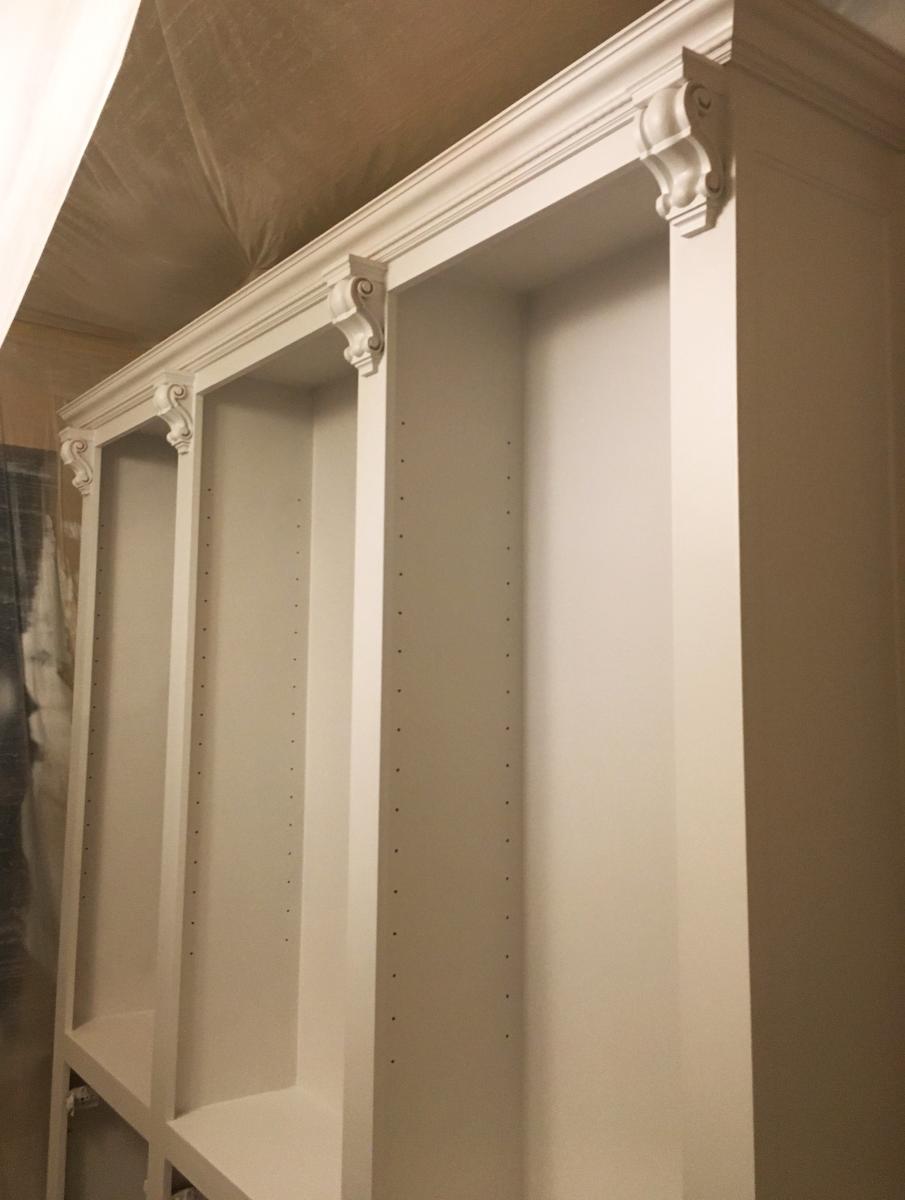
Custom Hutch Cabinet
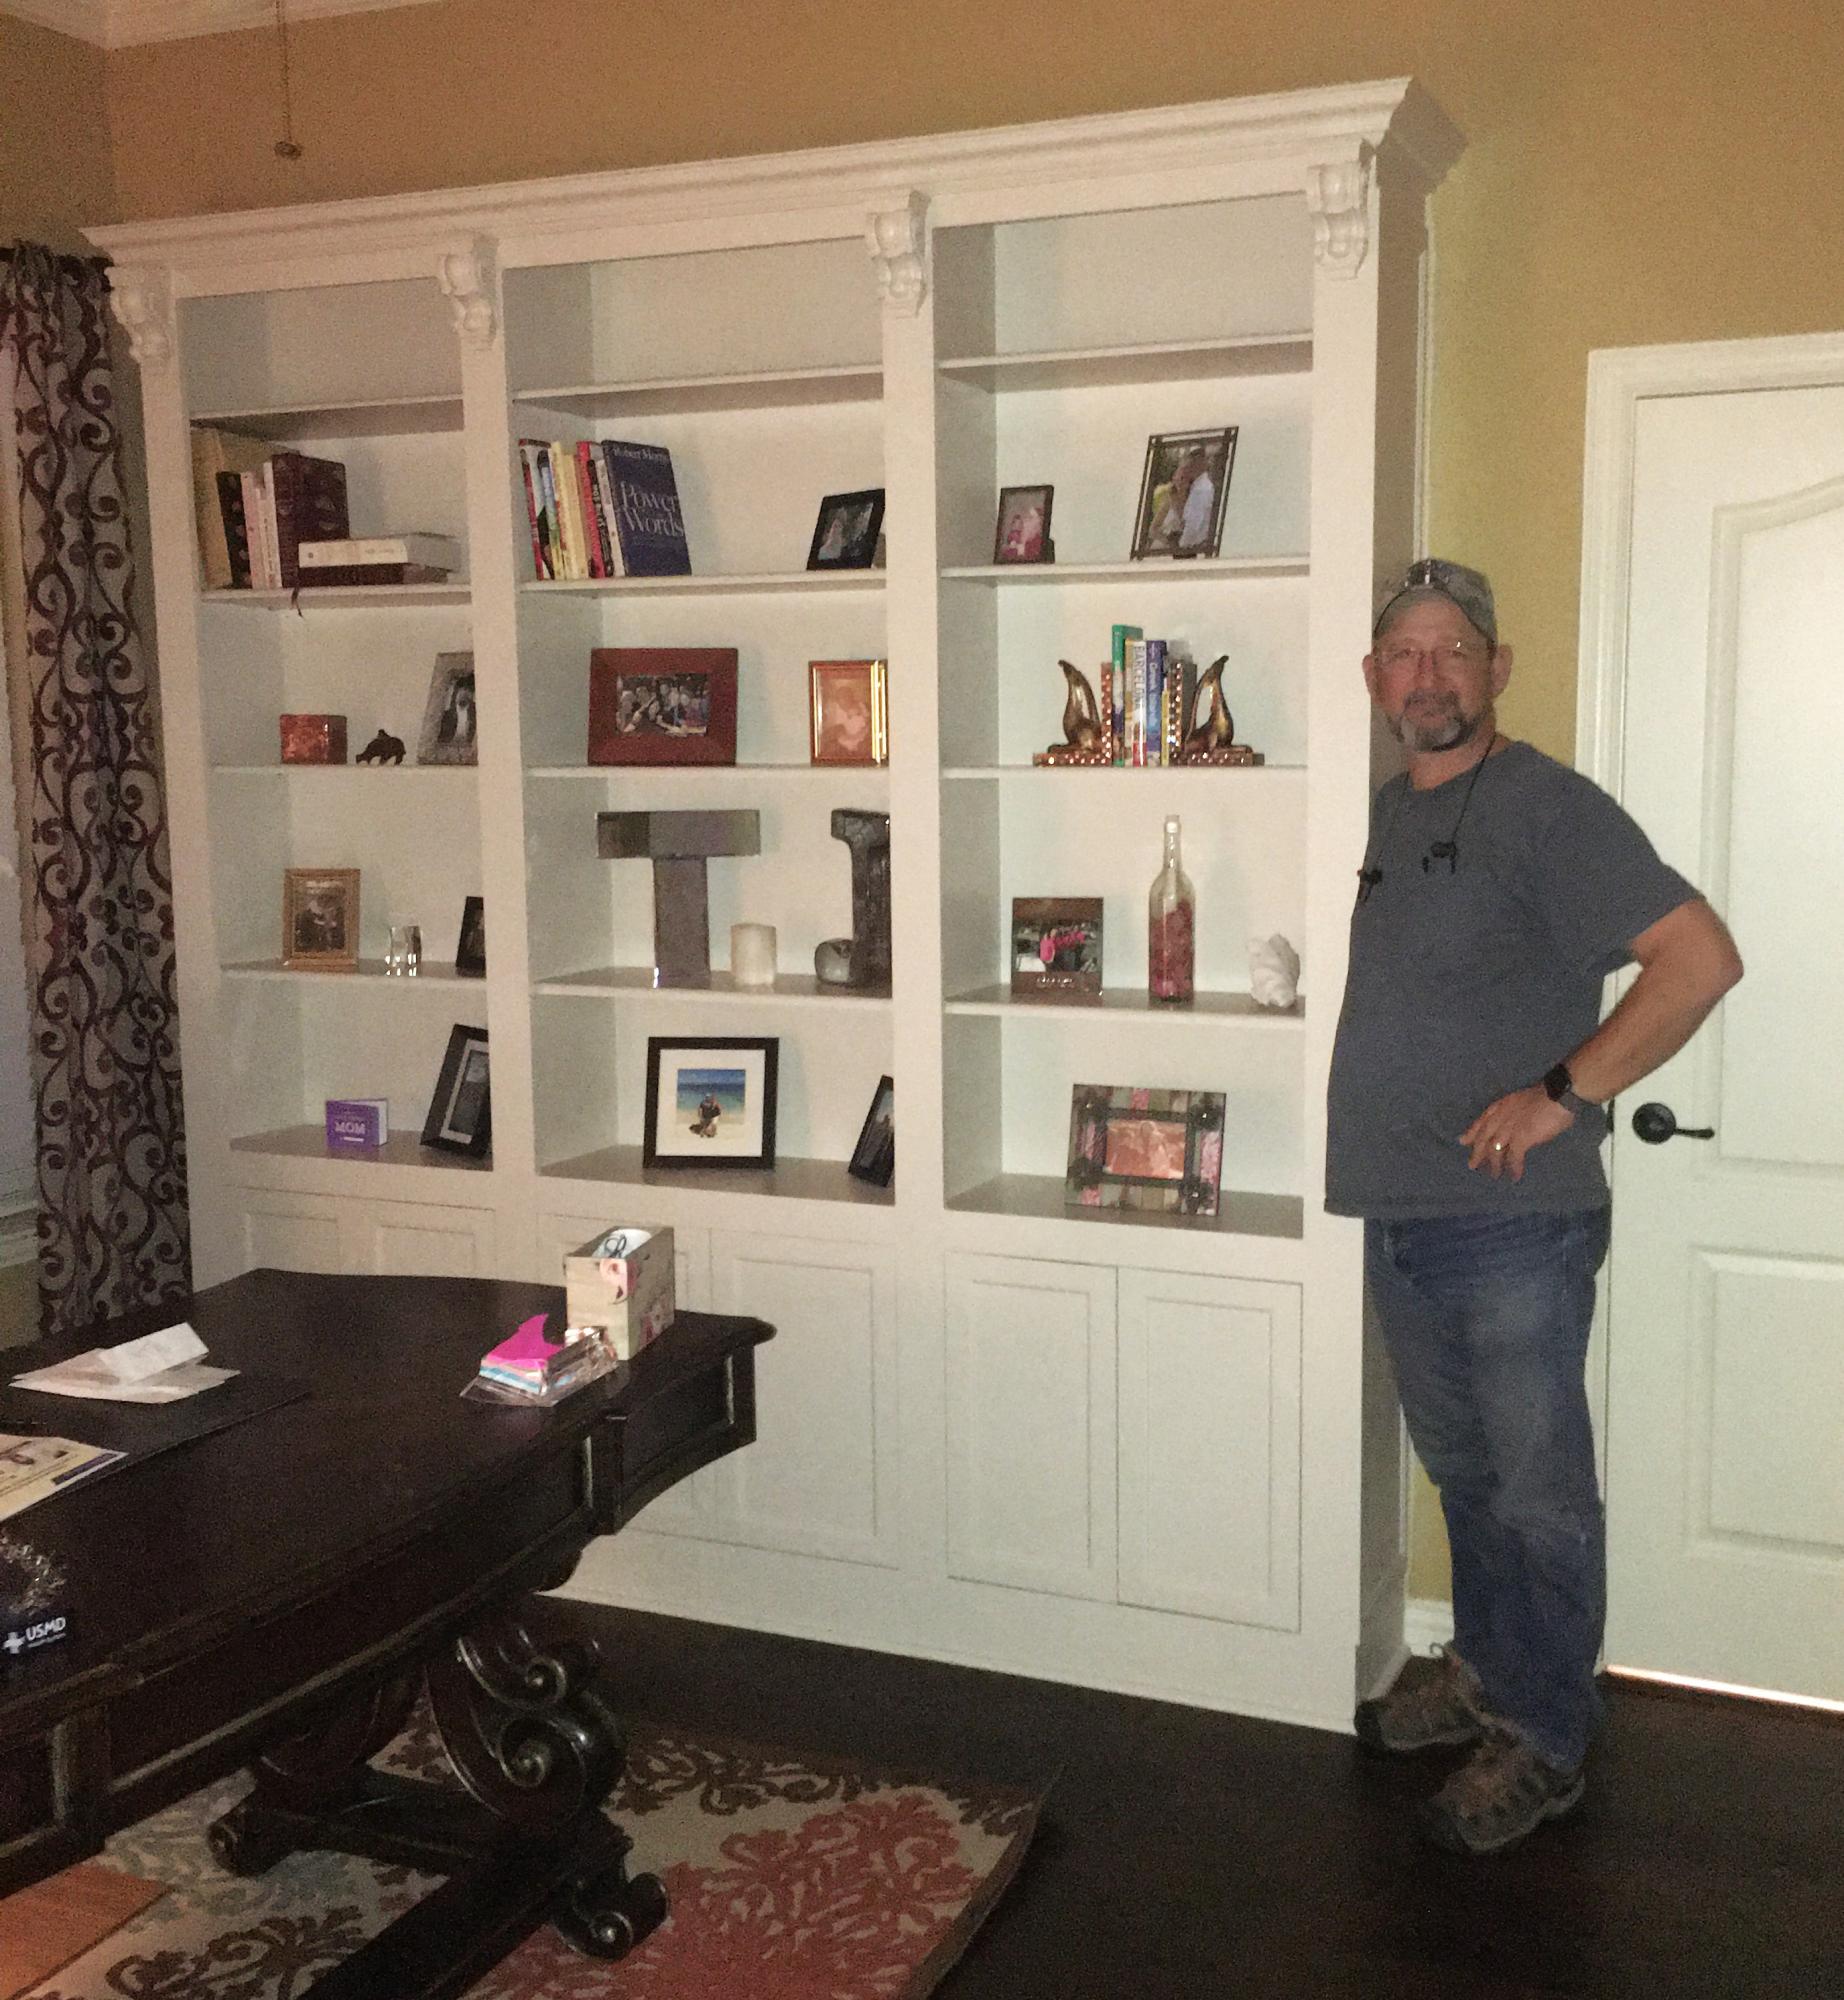
My wife asked if I could build this, showed me the pictured. Well, I’ve never built something that big before but I’ll give it a try. I took the time to draw it all out and get all the measurements down before hand, and it all turned out pretty nice. Most importantly my wife loved it! We paid someone to paint it, because I know my limitations lol.
Bob J - Texas
Simple Adirondack Chair
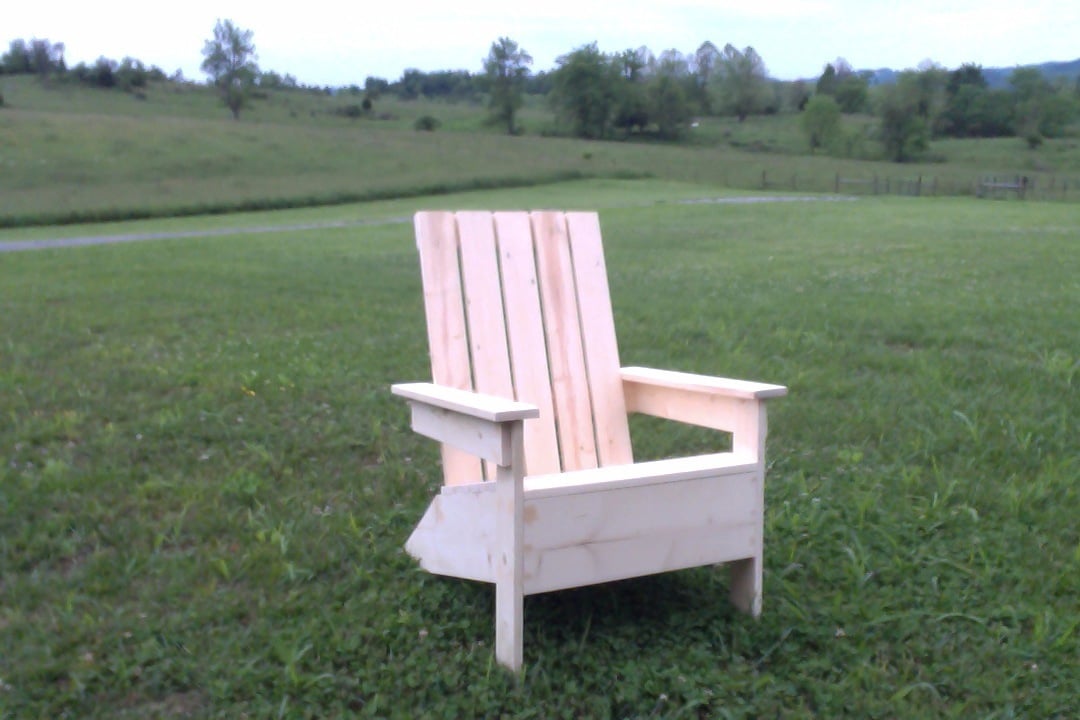
This was the second (larger) type project my husband has completed and I got to help this time! We made this for the loving ladies in our lives for Mother's Day. This one is his mom's and we didn't finish it because we don't know if she'll want to stain or just paint it. It was relatively easy!
Built from Plan(s)
Estimated Cost
25-30
Estimated Time Investment
Afternoon Project (3-6 Hours)
Finish Used
Not completed yet! We are making two for ourselves so I will upload those when we get them finished.
Recommended Skill Level
Beginner
Doll Farmhouse Bed

Santa Claus made our lucky girl a farmhouse bed for her new doll that was an exact mini-me of Mommy and Daddy's king farmhouse bed. Not just that, her grandmother was genererous enough to sew a new blanket and pillow for both our daughter and her dolls using some quilting materials left by her late-great grandmother. She also created a doll mattress some padding material that was used by our daughter's late-great grandfather.

Built from Plan(s)
Estimated Cost
50
Estimated Time Investment
Afternoon Project (3-6 Hours)
Finish Used
Behr off-white #1873 paint distressed with Minwax Special Walnut stain
Recommended Skill Level
Beginner
We love our playhouse!!
We used the free plans. I bought the materials and my son-in-law built it and it only took a day! My grandkids love the playroom now. We have a nice pool in the back yard but when the weather is not good for swimming, the kids were easily bored. Now, the weather doesn't matter! Thanks, Ana White, for inventing and sharing!
Estimated Time Investment
Day Project (6-9 Hours)
Recommended Skill Level
Beginner
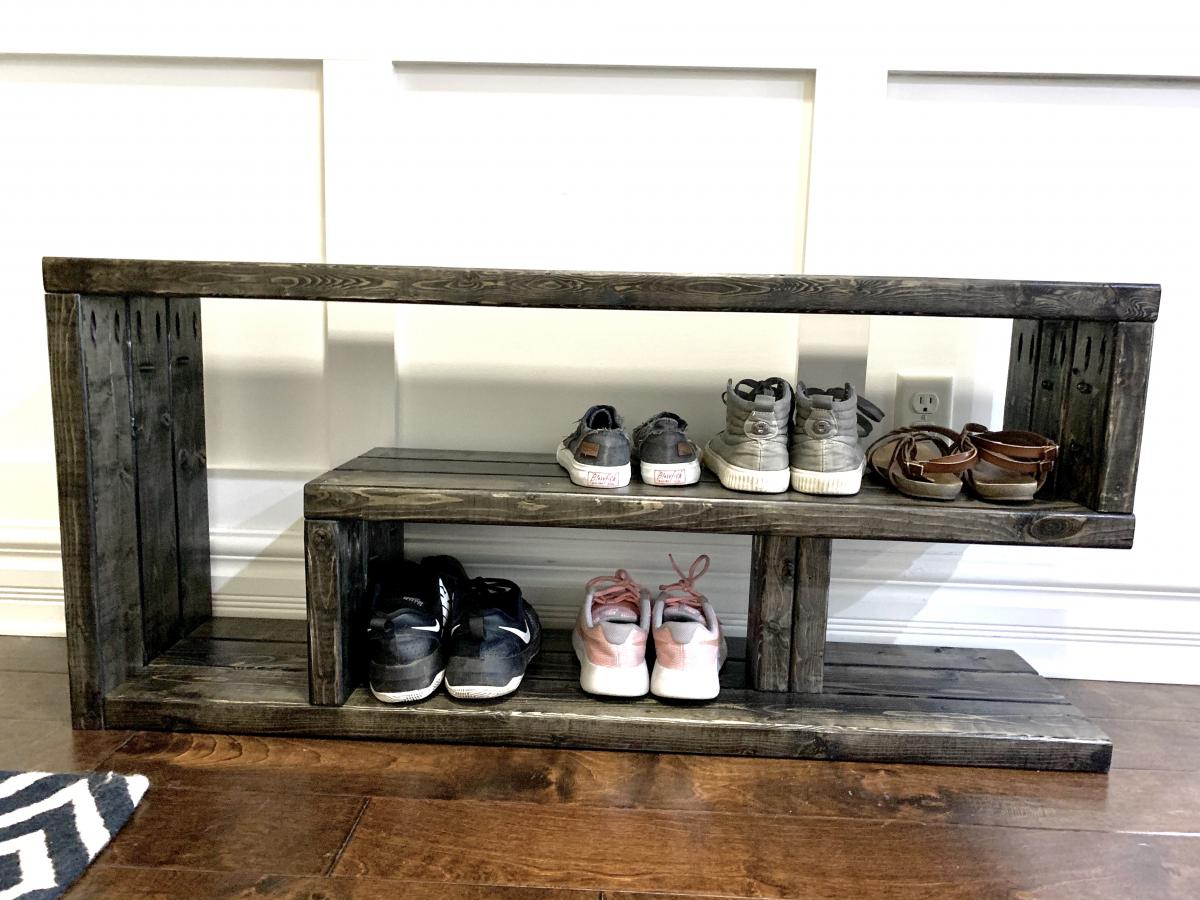
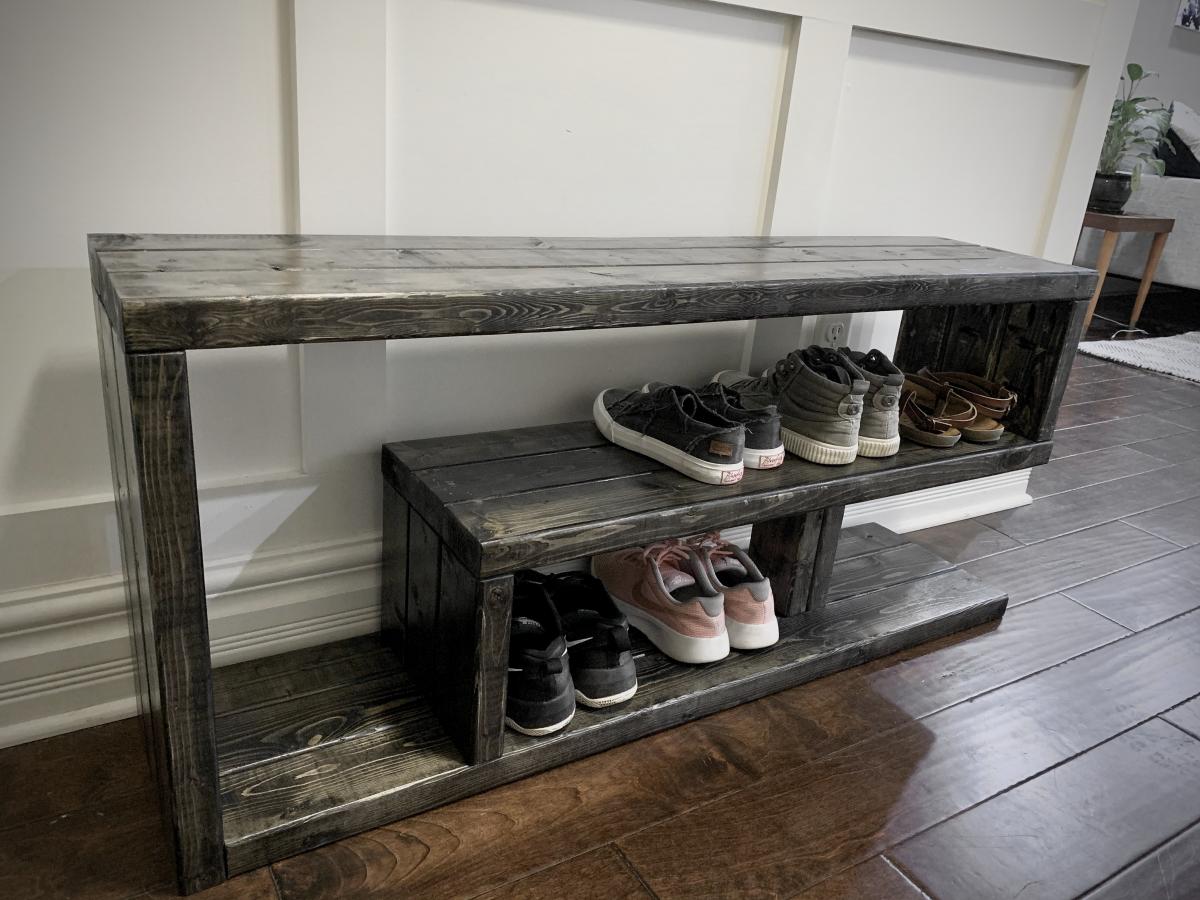
Shoe Rack Bench
This was my very first woodworking project. I definitely made some mistakes but nothing major, and I learned! This was really fun and straightforward. I’m very happy with the results. Plus it’s a very solid piece. It took me awhile because of the dry times for the stain and finish. Everything else was pretty quick, though.
When staining, I just covered one side at a time and quickly wiped it away to get a more rustic look.
Built from Plan(s)
Estimated Cost
$35
Estimated Time Investment
Week Long Project (20 Hours or More)
Finish Used
Minwax Wood Finish - Penetrating Stain - Ebony 2718 - Apply and wipe away within a minute for the rustic look
Minwax Fast-Drying Polyurethane- Clear Satin - 2 coats
Minwax Fast-Drying Polyurethane- Clear Satin - 2 coats
Recommended Skill Level
Beginner
Beautiful DIY Wood Bench
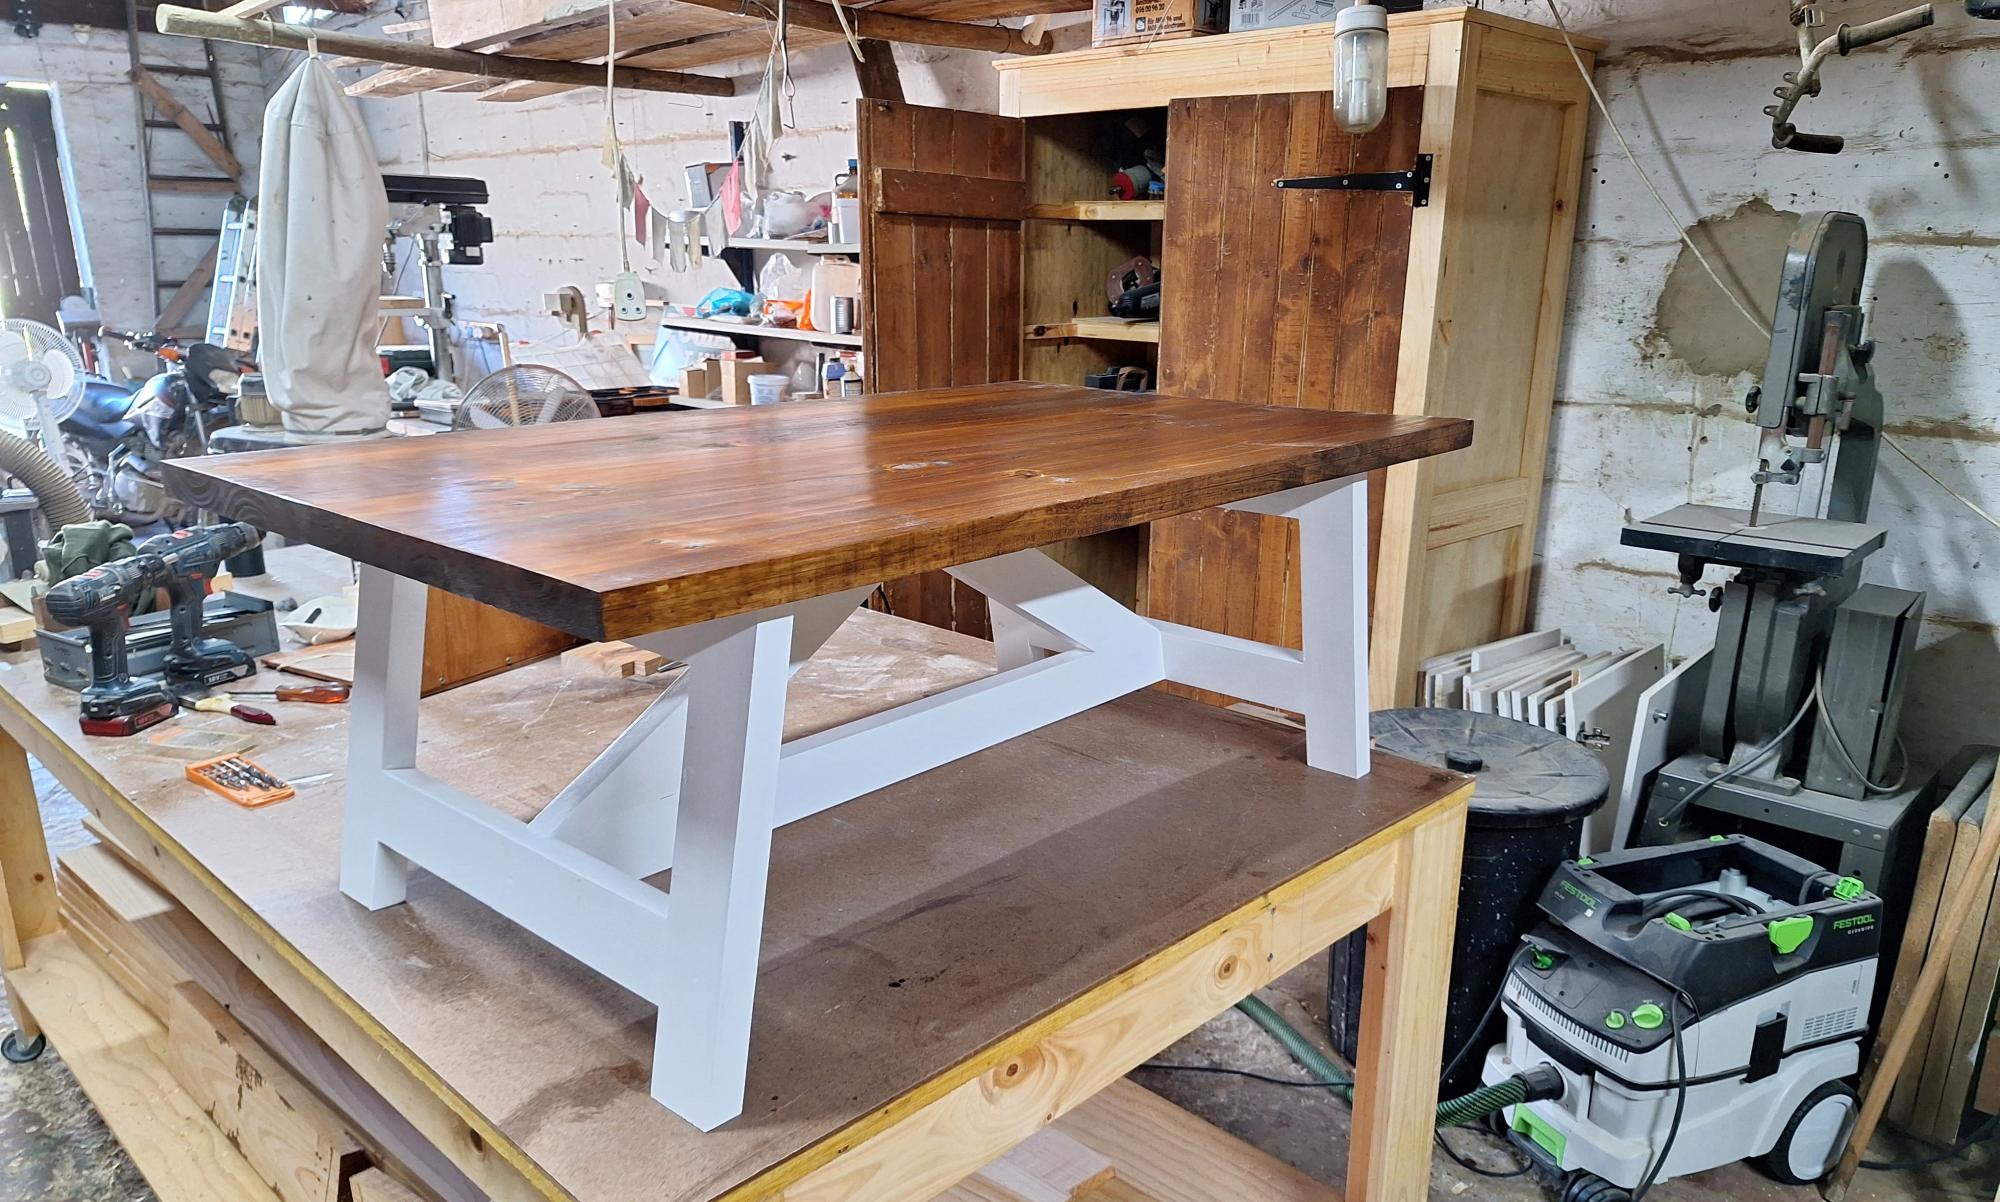
I chose not to use pocket holes, but rather my new Domino joiner. Very happy with the results. My daughter is already trying to claim it.
Gordon Smith
Built from Plan(s)
Simple Outdoor Dining

I'm SUPREMELY impressed with how well these came out. And just to beat the dead horse.... paint your stuff before you put it together. I didn't and it is a MAJOR pain painting between the slats, man. Major. I'm a little impatient. And impulsive.
Built from Plan(s)
Estimated Cost
$120
Estimated Time Investment
Weekend Project (10-20 Hours)
Finish Used
Sanded everything down, linseed oil on cedar boards. Primer and Valspar Bistro White in semi.
Recommended Skill Level
Beginner
Comments

Thu, 05/17/2012 - 04:59
I bow down to your awesomeness...
Ana, thank you so much for the plans, this site, everything. You're an incredible part of this universe.

Mon, 04/01/2013 - 19:13
love the way you finished the table
did you install the legs on the inside of the table top? from the pictures it looks like you did, I like the way it looks and how you finished the top with stain the rest with paint.
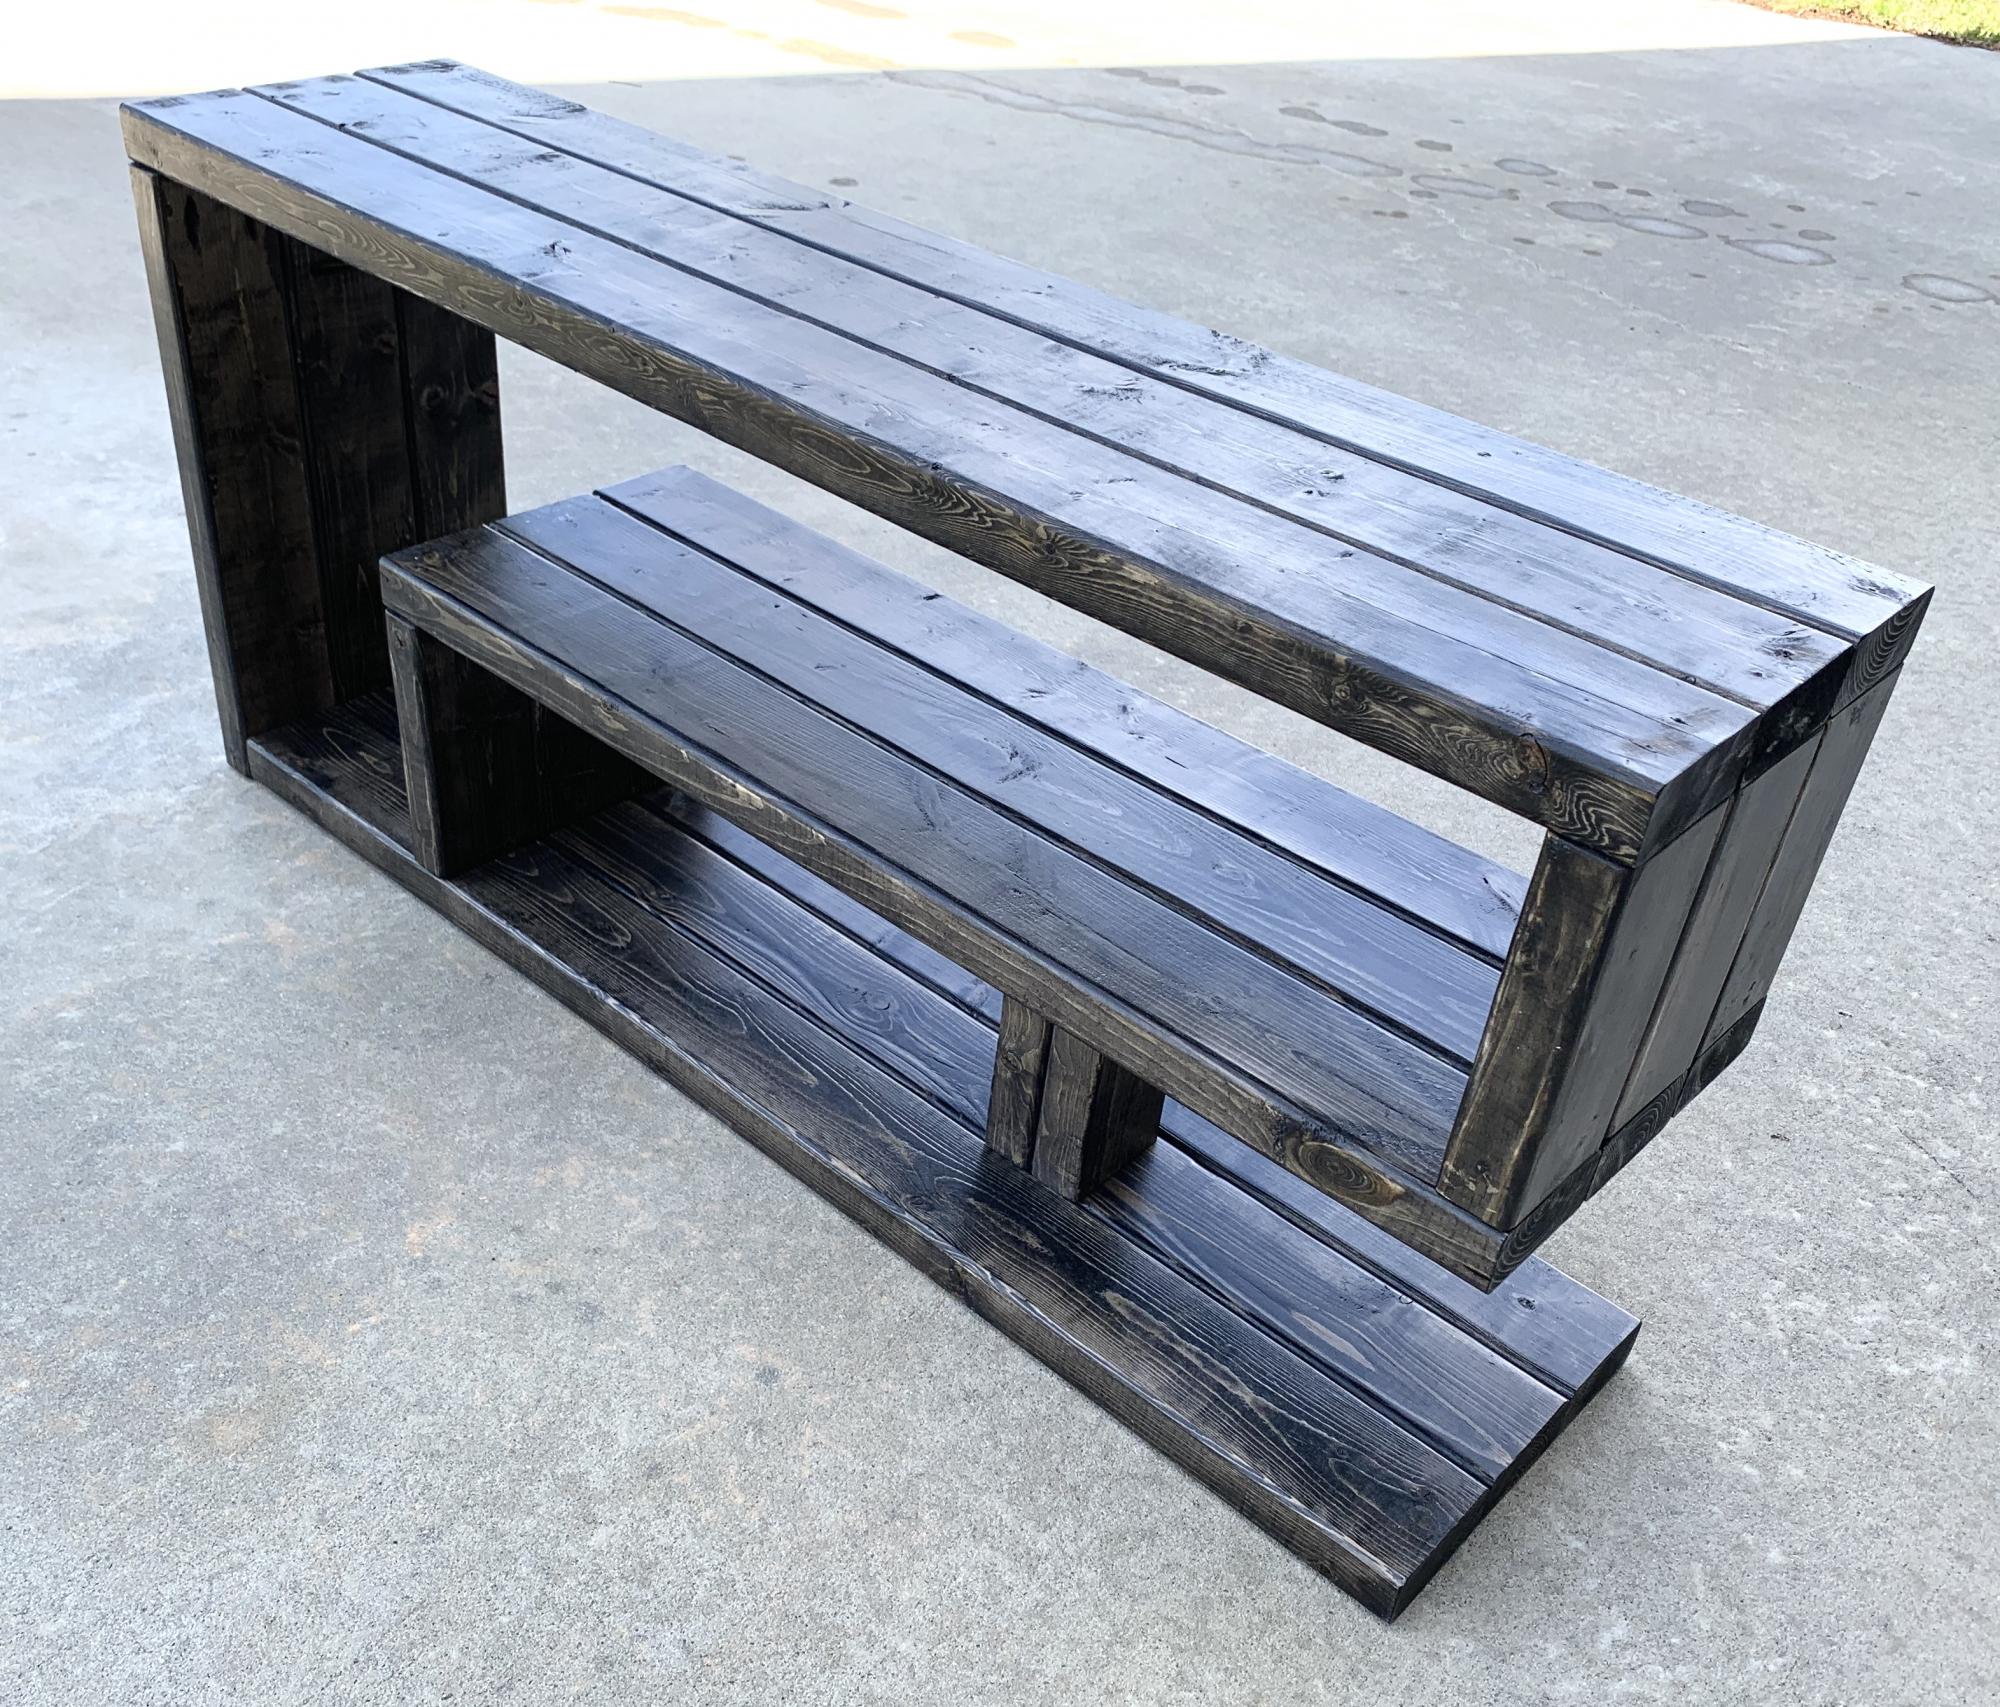
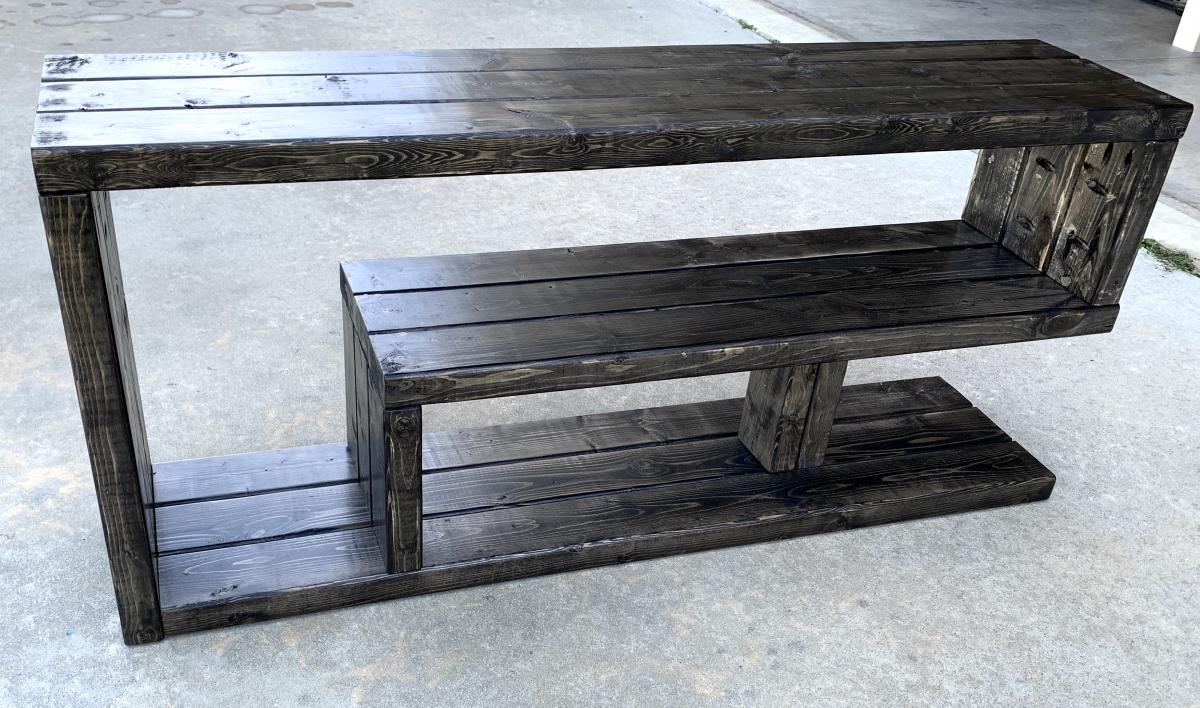
Entryway Table
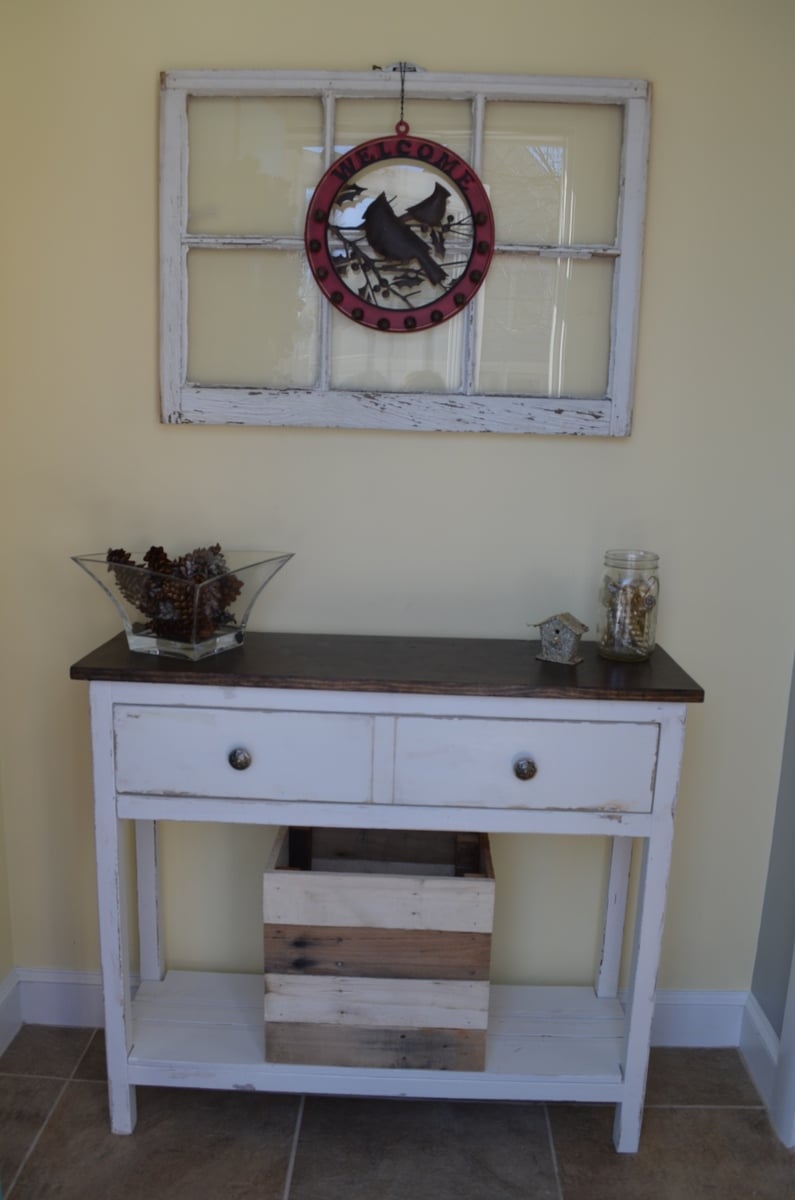
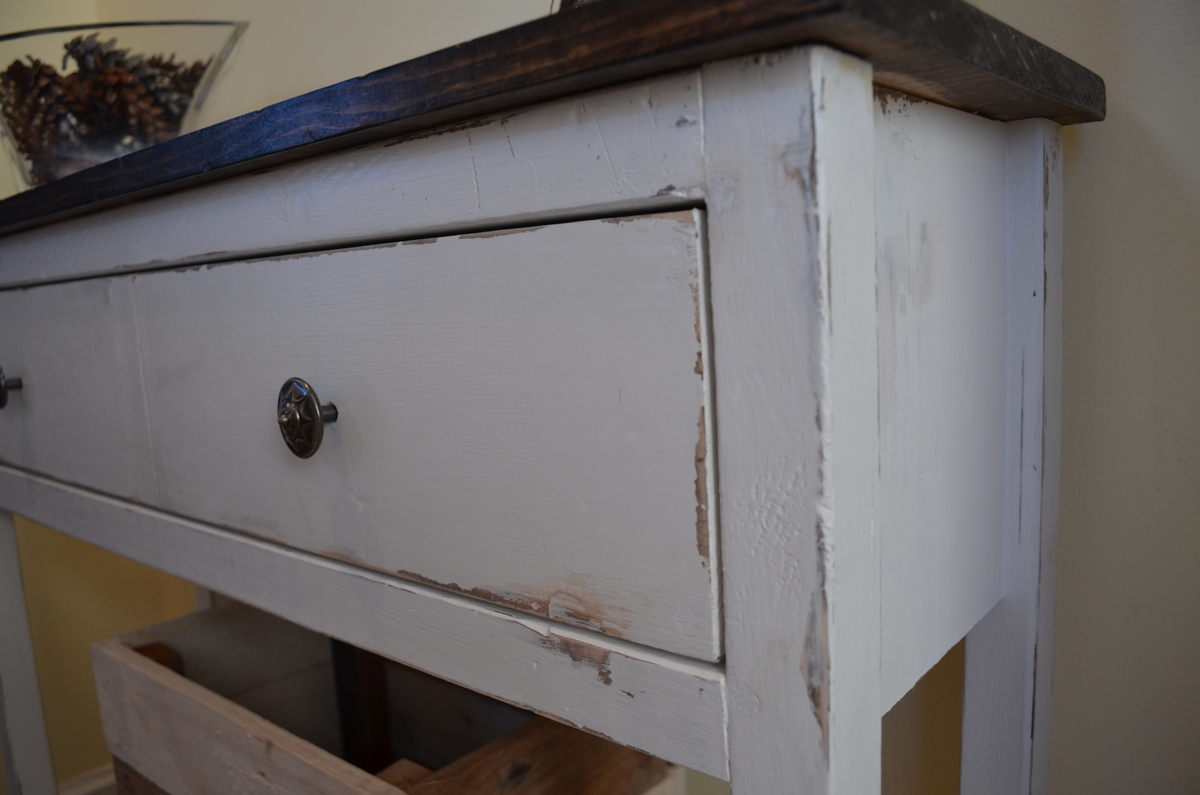
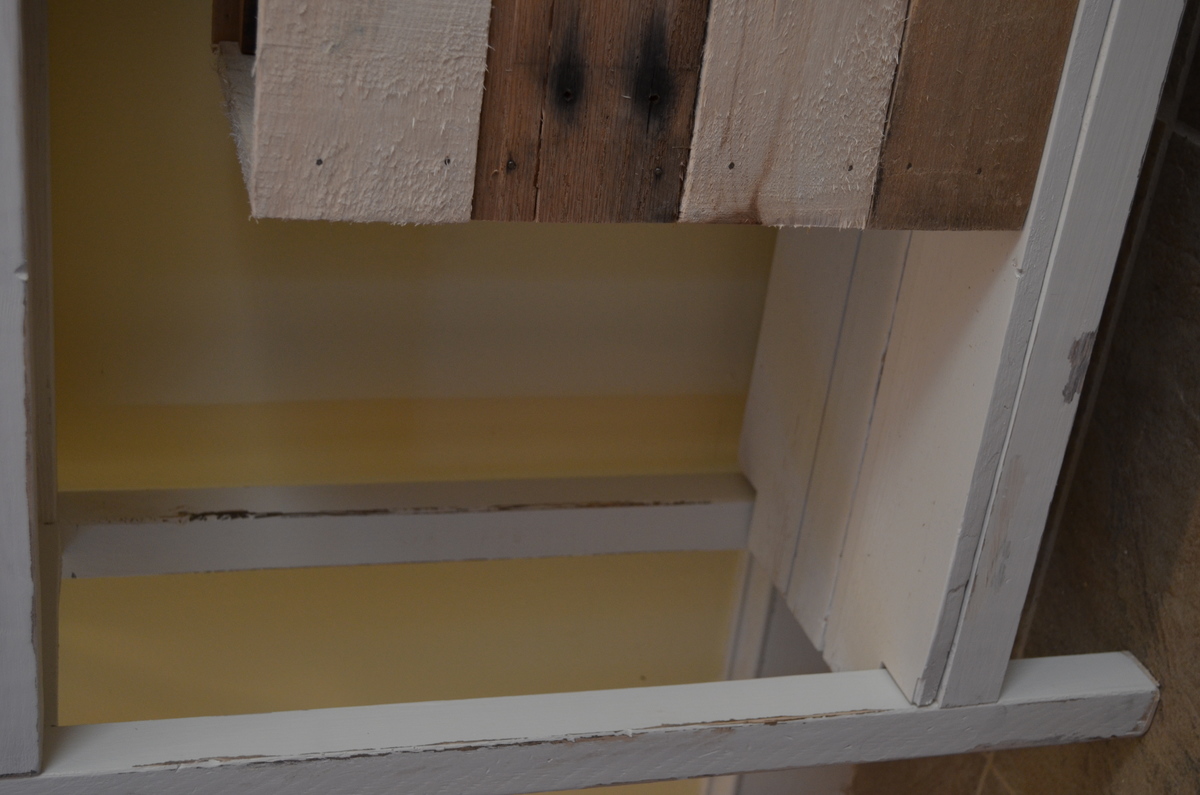
This was my first real project where I did everything on my own, start to finish! No help from my husband. I needed a very small and narrow table for my entryway which is very small. This is the first thing you see when you open the front door. The top board is a 12" board, it fits perfectly in the space. I distressed it to give it a nice rustic look and it looks pretty authentic. The crate below is made of recycled pallet wood and will be used for shoes or umbrellas... I'm very happy with the way it turned out for being my first project (it's a tiny bit wobbly..the leg's aren't perfect, oh well!). And it only cost about $30 for the lumber (not including the stain, paint or finishing wax which I already had). Definitely beats trying to find something in the store!
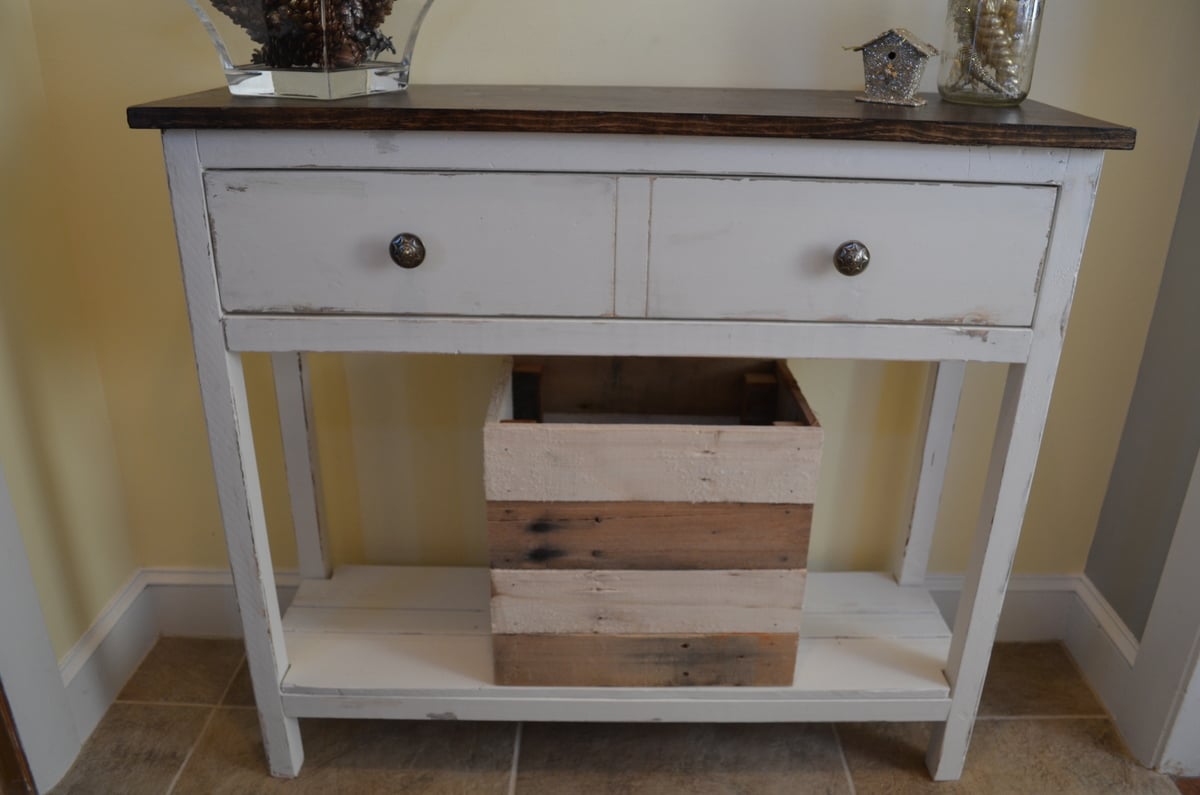
Built from Plan(s)
Estimated Time Investment
Day Project (6-9 Hours)
Finish Used
White ben moore paint which was then distressed, dark walnut minwax stain on top, minwax paste finishing wax over the entire thing (first time I used it and I love it!)
Recommended Skill Level
Beginner
Comments
Farmhouse Table
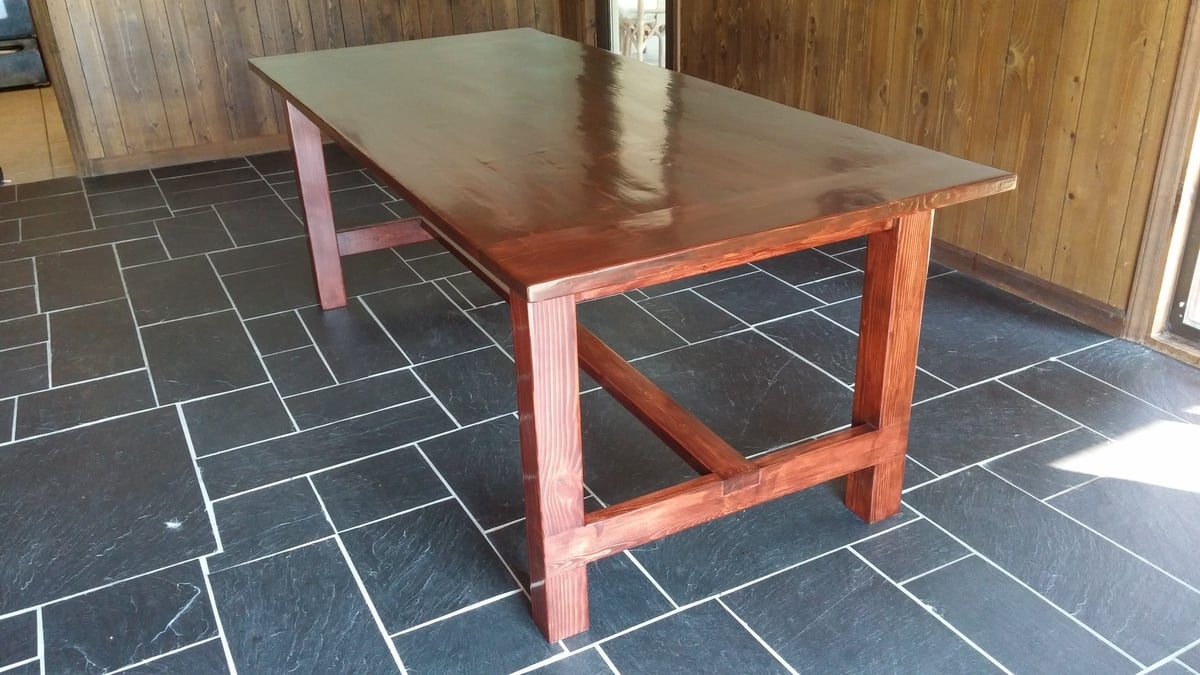
My brother recently became a homeowner and asked me to build him a dining table for his new (and first) house. He picked out the Farmhouse Table plan from the site and I spent a few weekends building this table for him. The most time consuming part of the project was sanding and applying the stain & polyurethane.
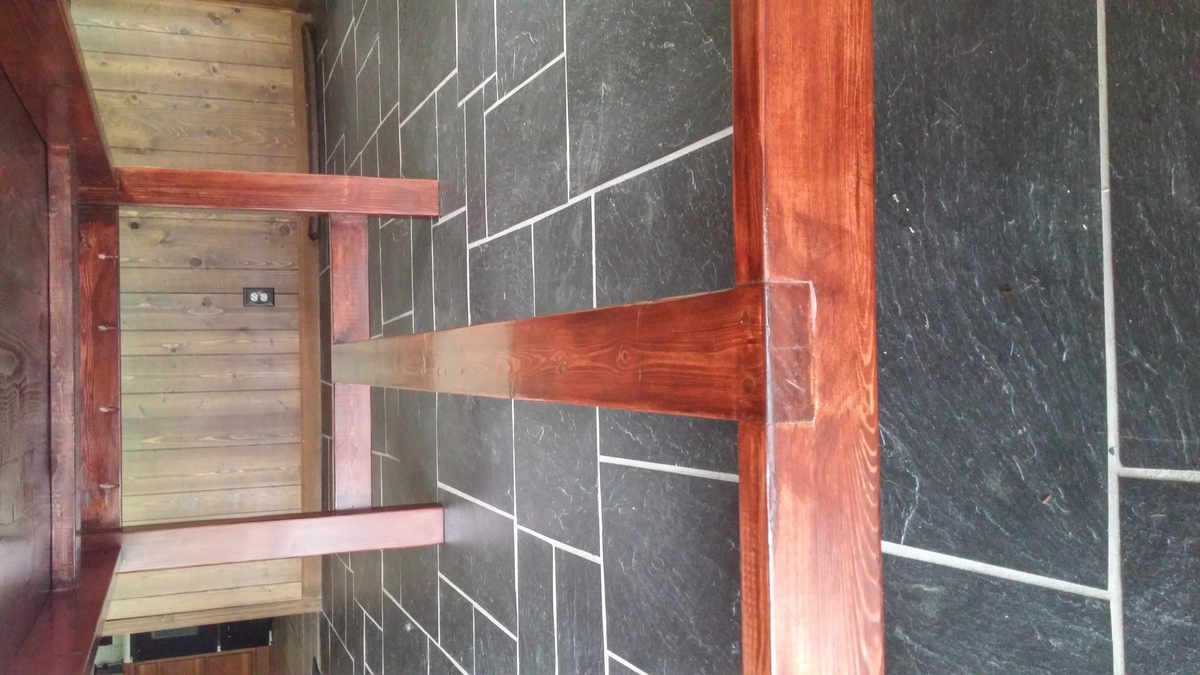

Built from Plan(s)
Estimated Cost
$150
Estimated Time Investment
Week Long Project (20 Hours or More)
Finish Used
They wanted a red-toned finish so I blended Minwax sedona red and dark walnut oil based stain, followed up with a light coat of minwax gel stain in Hickory. Also used Helmsman Spar Urethane in clear satin for top coat.
Recommended Skill Level
Intermediate
Cedar planter for $20

This was my first project using my circular saw and Kreg jig, so I wanted to try something that was not too difficult. It probably took me longer than most as I had to read all the directions on my saw and Kreg jig. Both are super fun to use. Ana’s plans made it super easy! After assembly, I decided to paint it as it needed to be weather/waterproof. I used Behr waterproofing stain &sealer in slate. Love how it turned out! Thanks for the easy to follow plans.

Estimated Cost
$20
Estimated Time Investment
An Hour or Two (0-2 Hours)
Finish Used
Behr Waterproof & Stain sealer. Color: Slate
Recommended Skill Level
Beginner