Community Brag Posts

Cooler chest

Submitted by Anonymous (not verified) on Tue, 06/13/2017 - 09:40

I'll be honest I didn't use these plans to build this cooler chest but this was the first place I saw the concept of building a box around a cooler to make a cooler chest so I give anna props for inspiring me I already had an old cooler to use so it helped keep the cost down I also used 1x4 blue pine and cedar fence picketts and repurposed the bottle opener from a growler carrier (in hindsight the bottle opener on a growler carrier doesnt make sense) all told this cost me about $45

Estimated Cost
$45
Estimated Time Investment
Afternoon Project (3-6 Hours)
Recommended Skill Level
Beginner

Coffee table

I modified the plans and used oak instead of pine. I used black walnut on top is guangzhou on top with white granite strip in the middle

Estimated Cost
I had all the materials in my shop except for the black walnut. That cost $100
Estimated Time Investment
Weekend Project (10-20 Hours)
Finish Used
3 coats of polyurethane
Recommended Skill Level
Advanced

Comments

Bunk Beds for a Small Room

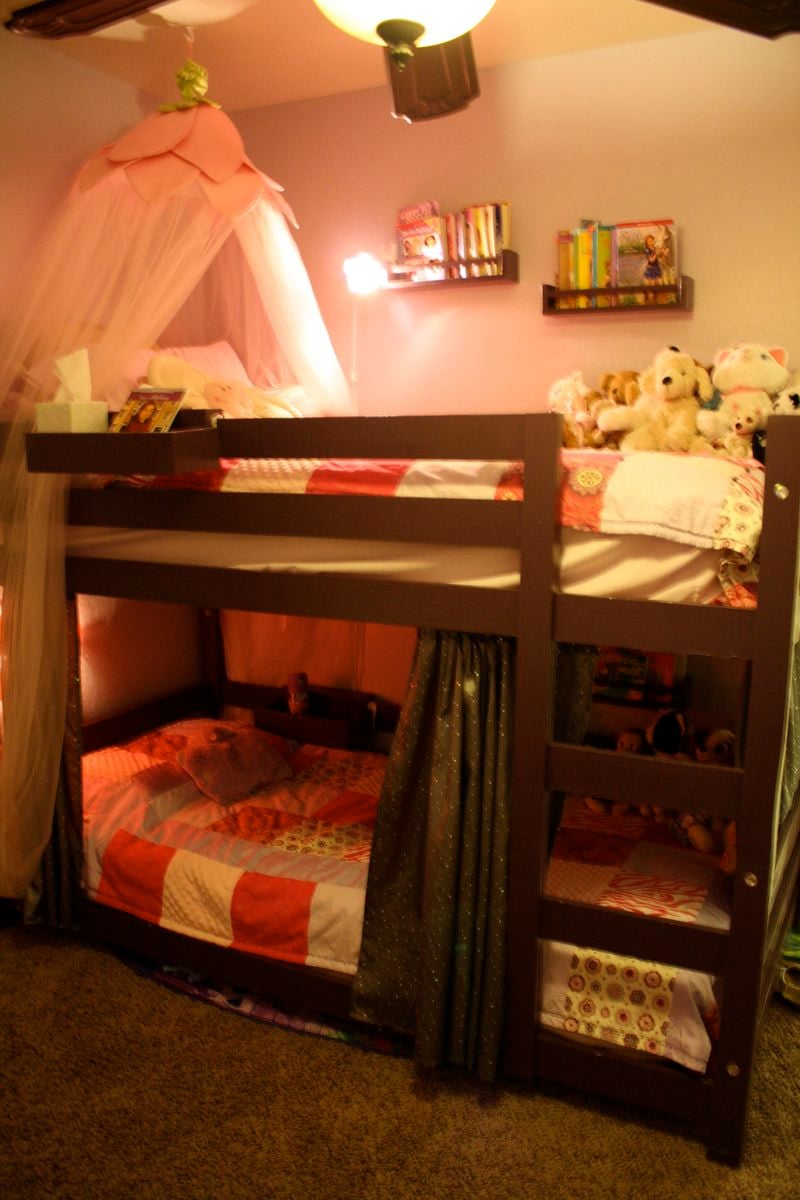
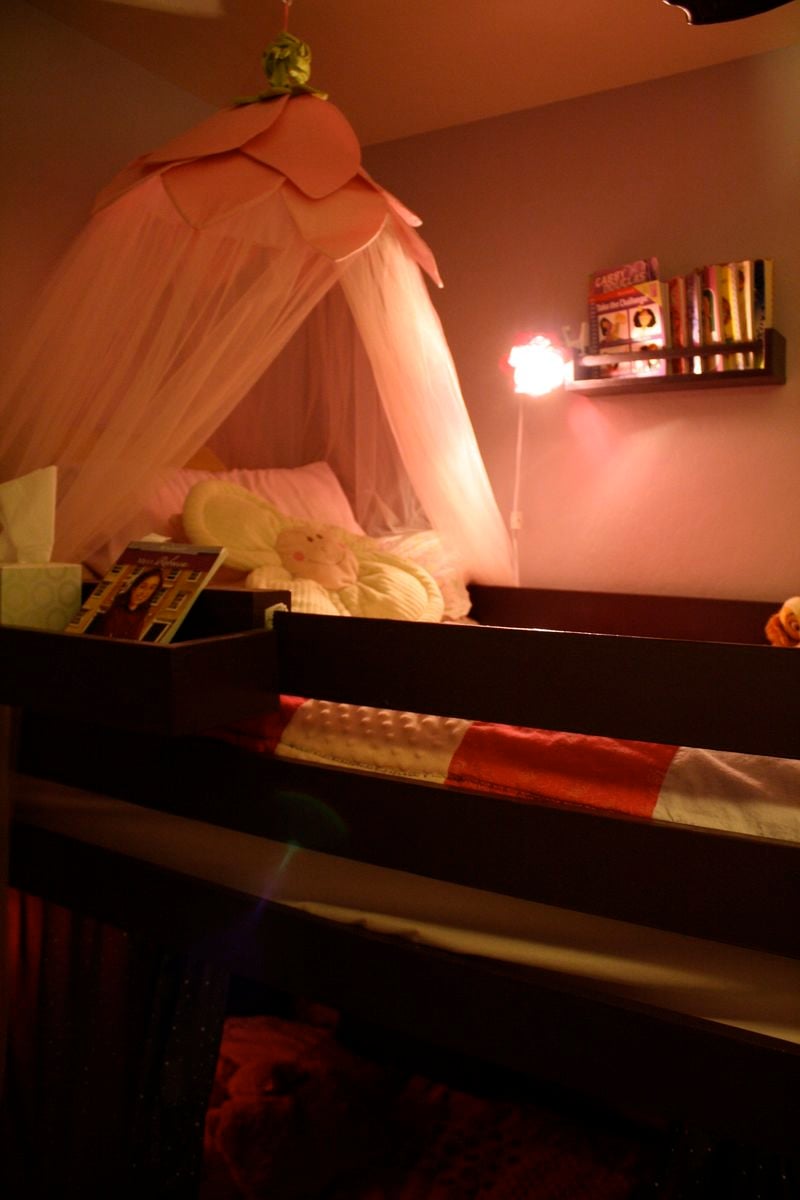
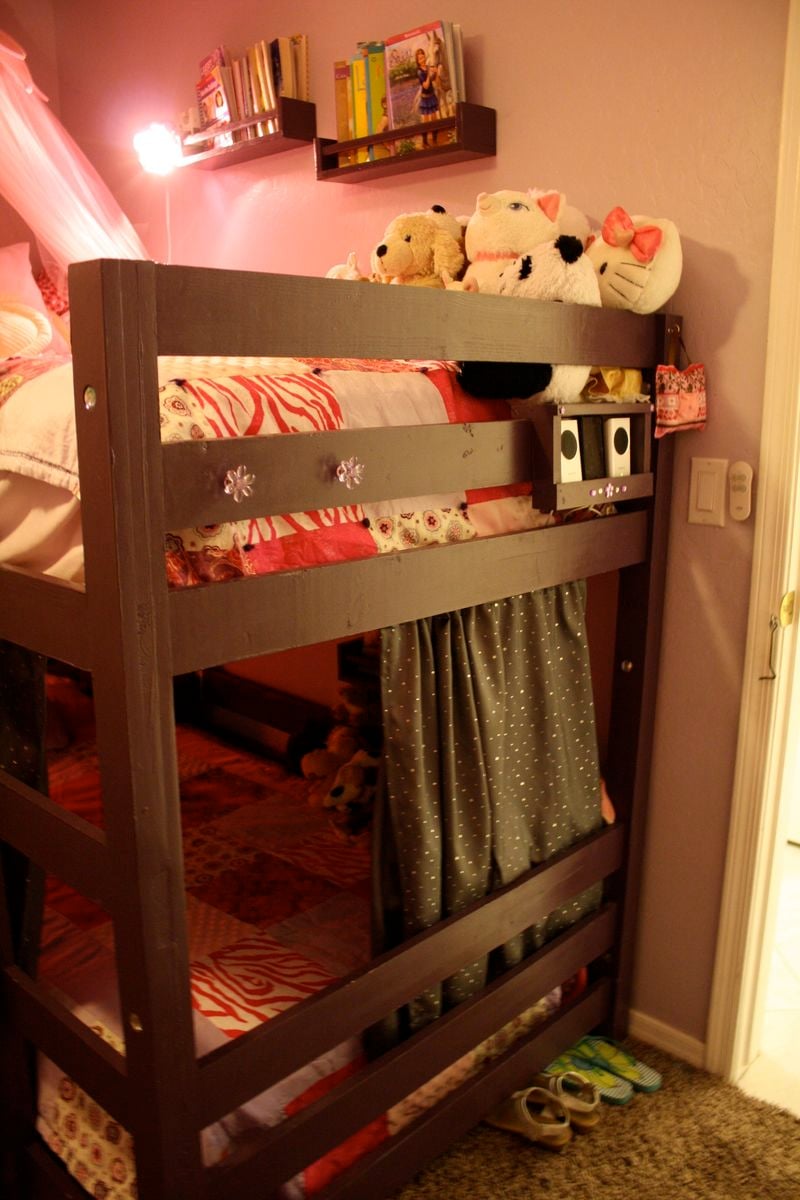
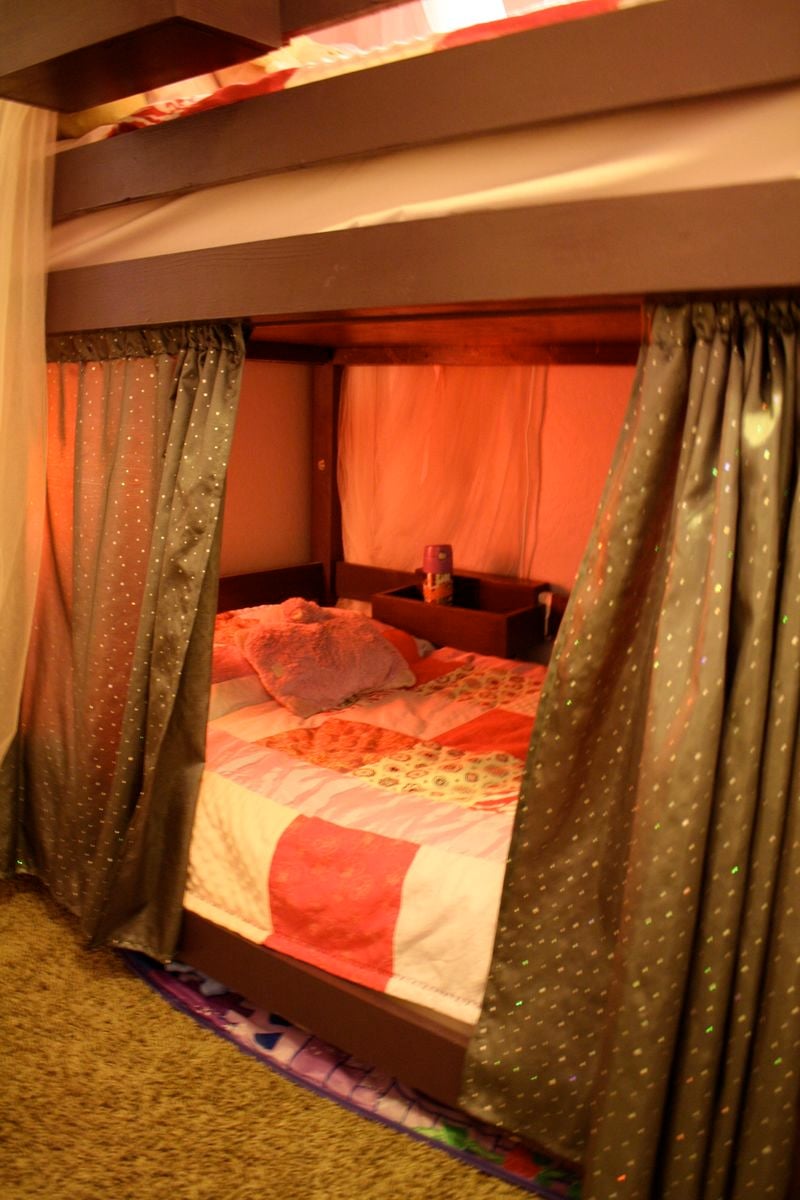
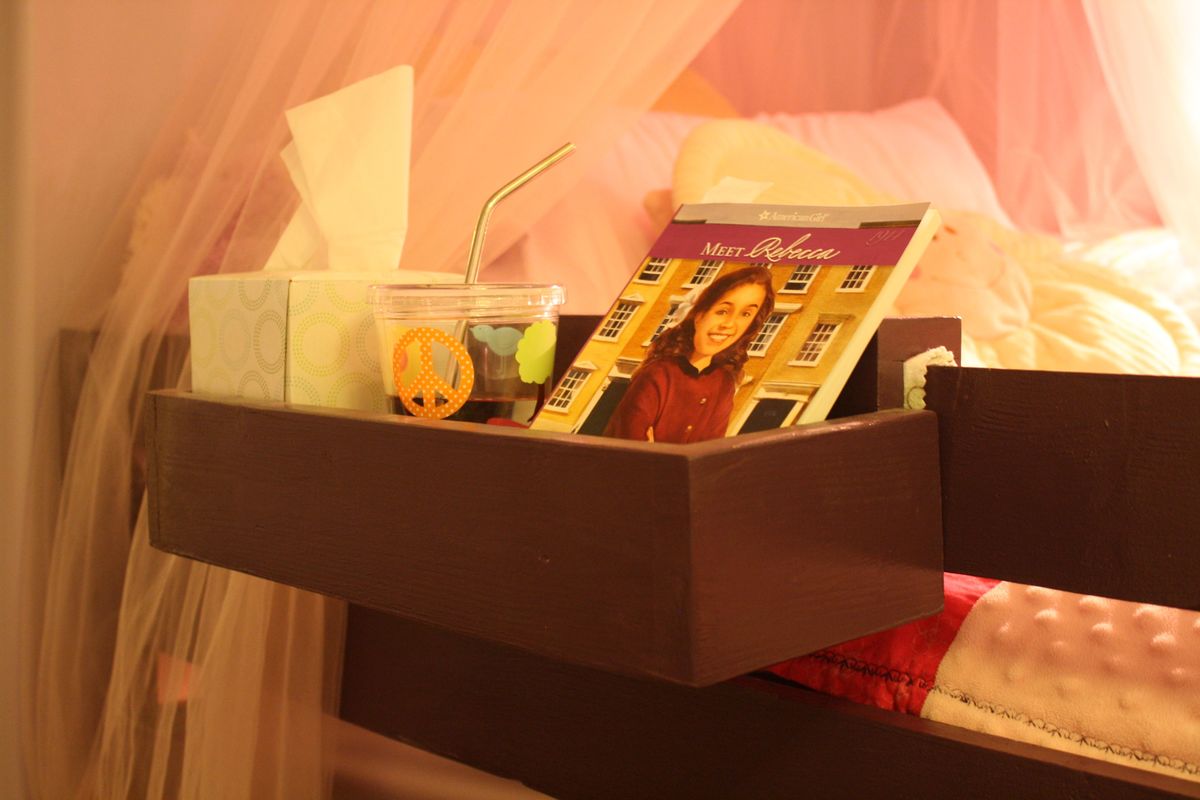
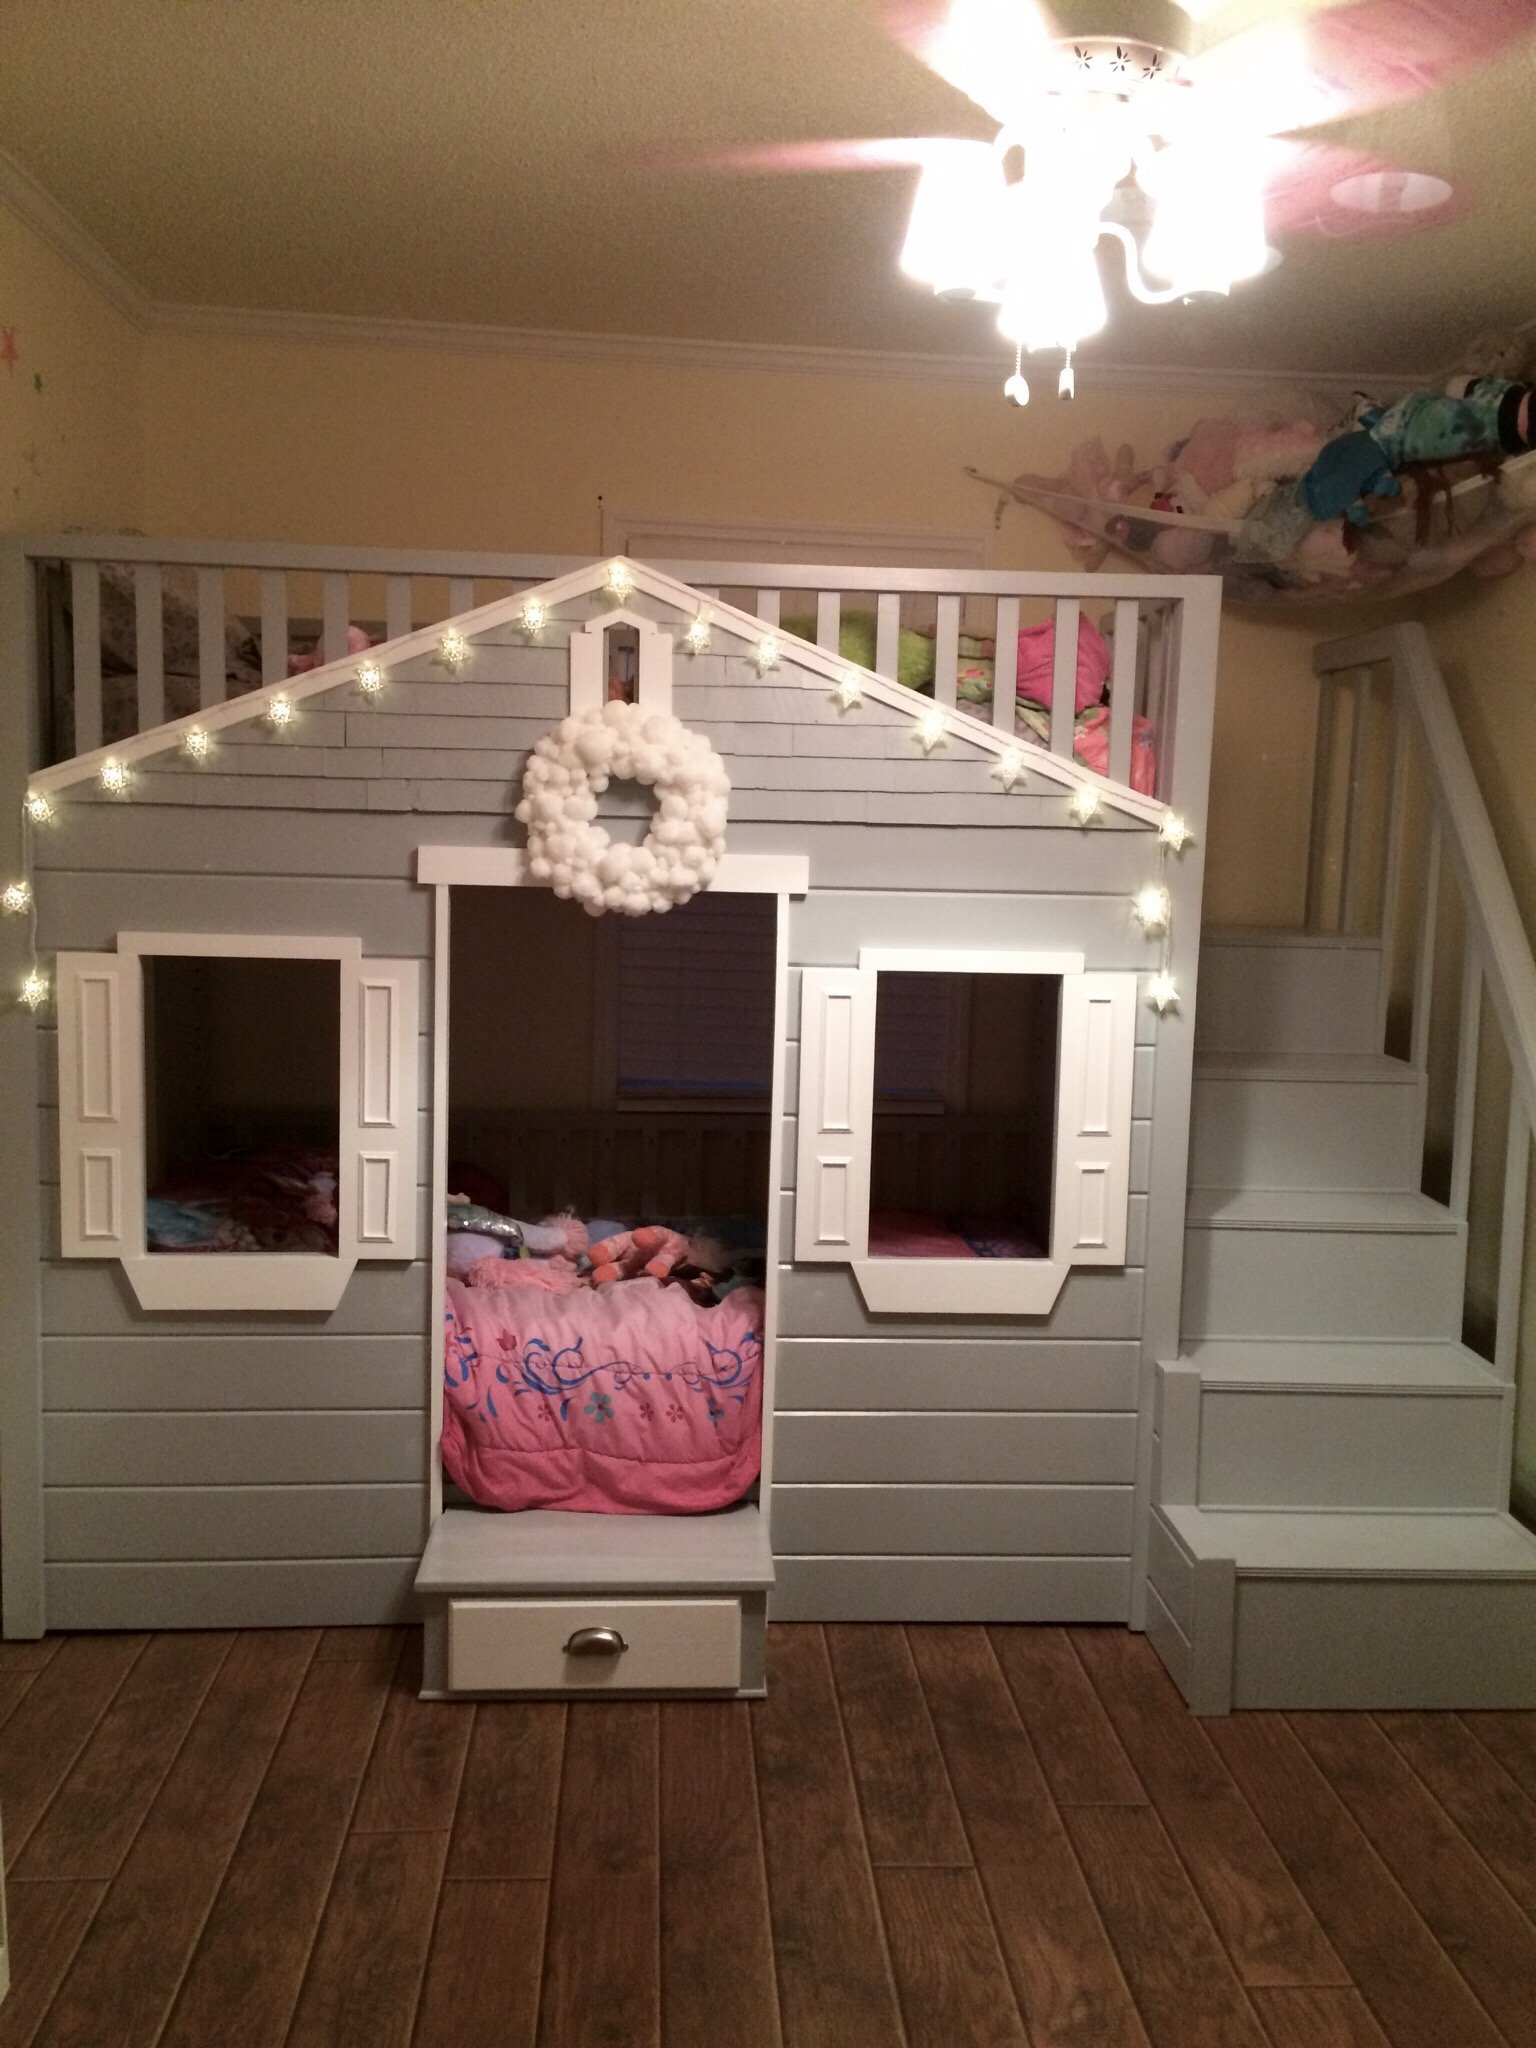
Our bedrooms are 9' x 9' so when our girls needed to move in together, we needed a bunk bed that would be short enough to fit under the fan, have a place for drinks, books, an alarm, and tissues, and also have a place where our youngest could have a dark sleeping space while older sister stays up later.

We're not going to be in this setup for long, so I used common board to keep the cost down as much as possible. The whole bed cost about $200, but I would suggest staying away from common board. It was really warped and couldn't be sanded smooth. We ended up going with a dark, thick paint to cover the wood imperfections. To deal with the warped wood, I made an outline of each end of the bed with painter's tape on the garage floor and used weights to hold the wood where it was suppose to be. I also modified the plans to make the bottom bunk a bit shorter and made the whole thing only 3 inches off the ground. All put together the bed is very sturdy and everything lined up well.

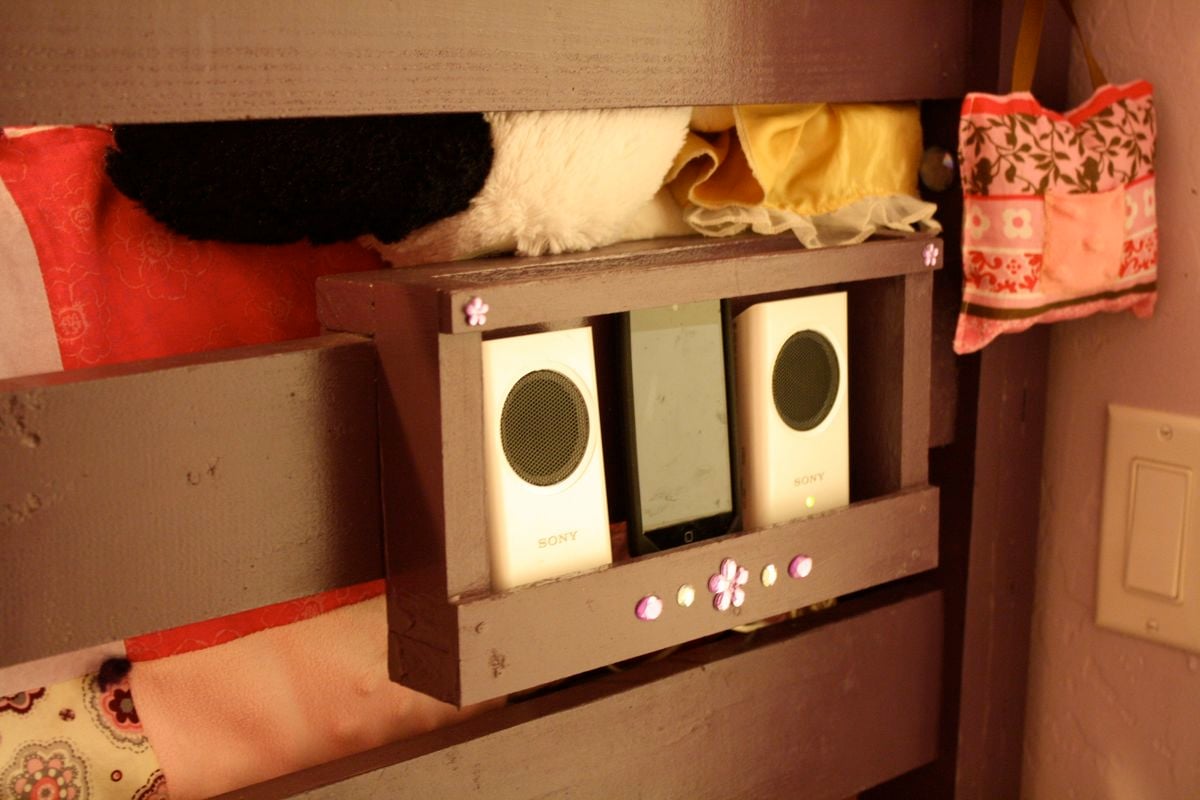
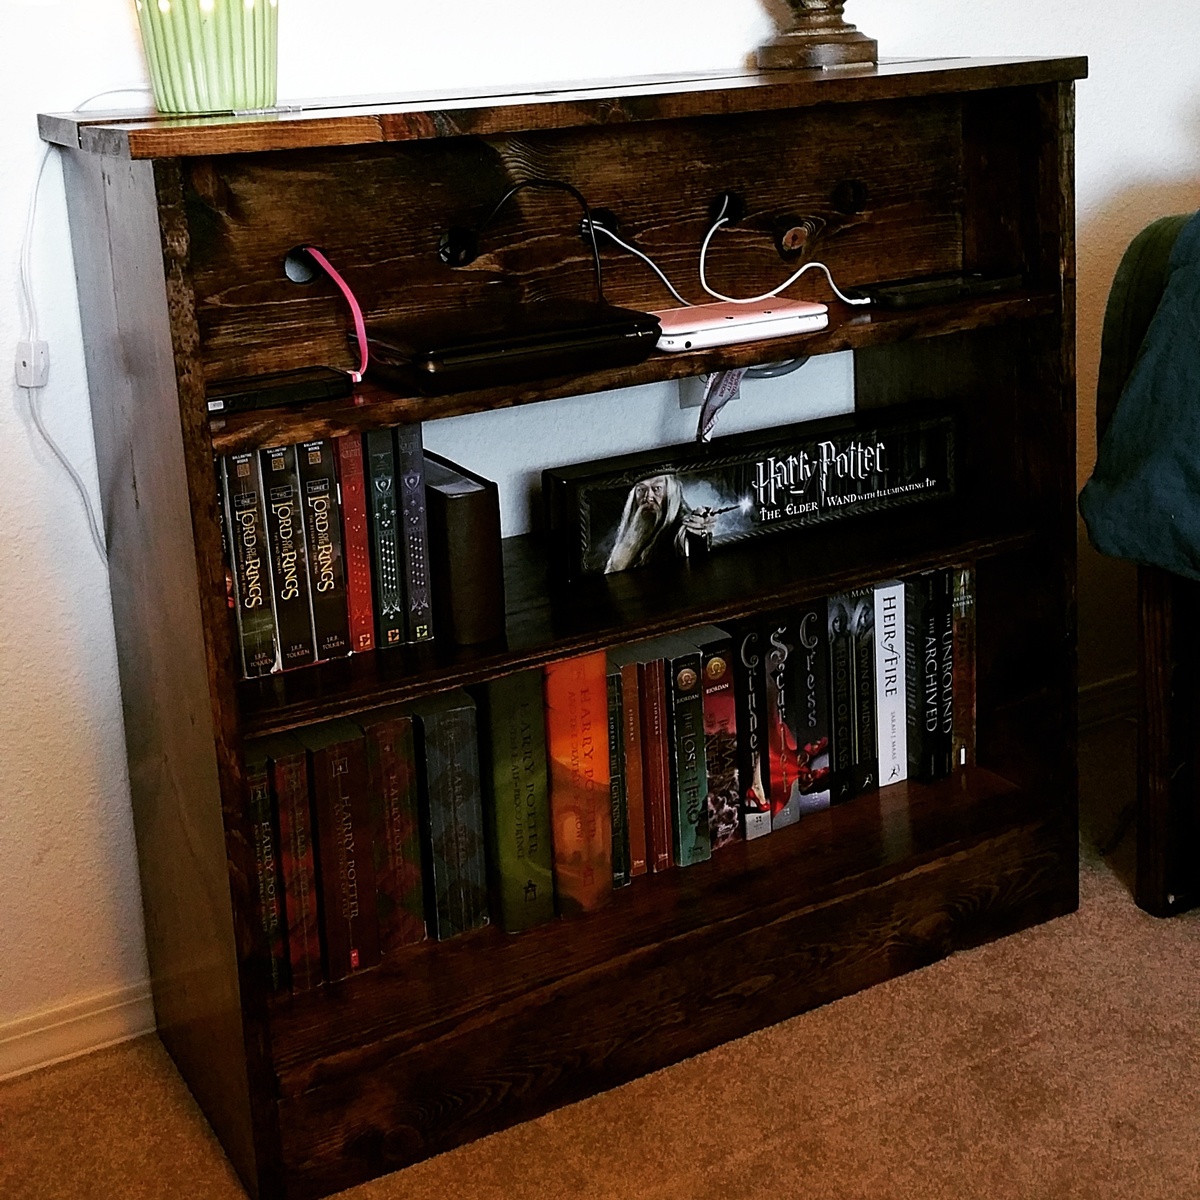
I used some scrap wood to make the holders for drinks and tissues and a holder for the iPod and speakers. These just rest over the railing, so we can move them around if need be. The book racks are Ikea hacks....they're just spice racks painted to match the bed. The curtains are just hung on a 1" dowel set into the same cups that closet rods are put up with. I also added some flower knobs from Target so that the girls can hang a robe when it's cooler outside.

Thanks for the plans Ana! My girls LOVE this bed!

Built from Plan(s)
Estimated Cost
$200
Estimated Time Investment
Week Long Project (20 Hours or More)
Finish Used
Paint and polyurethane coat.
Recommended Skill Level
Intermediate

Comments

Husky Farmhouse Table

Submitted by jleigh333 on Wed, 03/18/2015 - 12:56

I fell in love with this table as soon as I saw it! I made another farhouse table last year (first table I'd ever built) and liked it okay but I had made a lot of mistakes. The old table is now my work table in the garage- which is great because I needed a bigger work surface anyway! I tried to make my table just like Ana's version but I used regular latex flat paint over the stain instead of milk paint (couldn't find the type she used). I was impatient and didn't want to order it and wait for it to be shipped. I was kinda hoping it would flake/crack a little but it didn't. Oh well, I still really like how the legs turned out. I stained them (and the top) with a 50/50 mixture of Minwax stain in dark walnut and classic gray. I used three coats of Minwax fast drying poly on the table top and just rubbed the legs/base with a furniture wax to give them a little bit of a smooth sheen. I also distressed them a little bit. I like how the dark stain kinda bled through the paint. It really helped to add to the antique effect. I wish I had taken more pictures throughout the building process but I was so focused on the job that I just didn't think about it! Anyway, I just love this table! It was really fun to build and the turned legs take it to the next level! 

Built from Plan(s)
Estimated Cost
$400
Estimated Time Investment
Weekend Project (10-20 Hours)
Finish Used
Minwax dark walnut and classic gray mixed 50/50
Minwax fast-drying polyurethane
flat latex paint in an antique white/cream
clear furniture wax
Recommended Skill Level
Beginner

Comments

tammyj

Thu, 02/01/2018 - 10:37

Love this table!!!! Can you tell me the wood species that you used?Love the stain color!!!

tammyj

Thu, 02/01/2018 - 10:38

Love this table!!!! Can you tell me the wood species that you used?Love the stain color!!!

Emersen Buffet-First Brag

Submitted by Anonymous (not verified) on Thu, 06/15/2017 - 19:14

I've built several things from the page but this is the first that I have posted about.  I love this site.  Everything I have built has been so easy because of the way the plans are laid out.  I added my own little touches to the buffet but for the most part I followed the plans as they were.

Estimated Cost
$100
Estimated Time Investment
Day Project (6-9 Hours)
Finish Used
Minwax Early American stain and clear gloss poly.
Recommended Skill Level
Intermediate

black Tall wood planter

Submitted by Anonymous (not verified) on Tue, 08/31/2021 - 08:28

plan was easy to follow! super cost effective because I just used scrap wood found in local stores and nails. It took me longer than expected since scrap woods are not as long so need to do time in sections at a time, but all worth it.

Built from Plan(s)

Comments

1st project

Submitted by Nick K on Mon, 04/29/2013 - 18:28

I found the table here, but ended up using the modified plans for the 72" table from this site - http://tommyandellie.com/index.php/2012/01/13/new-and-improved-farmhous…

I haven't built anything out of wood for 20 years and I had no problems building this table. I also built the bench and two 15" extensions.

Estimated Cost
$200
Estimated Time Investment
Week Long Project (20 Hours or More)
Finish Used
Minwax Pre Stain, Minwax Special Walnut (1 coat), Minwax fast dry Satin Poly
Recommended Skill Level
Intermediate

Table and bench

Submitted by jasondk on Fri, 03/20/2015 - 09:03

Tried to replicate the Double Pedestal table that has no plans provided. I had to modify a bit to the specifications i wanted. Table top bowed up a bit at the ends after i glued it up and when i tried to attach it to the base, it pulled one side of the base up. To fix this, i added a couple of cross beams at the top of the base, to stablilize the base a bit.

I finished with a minwax gel stain, i forget the color. It was a bit too dark for my liking, so when it dried, i took a cabinet scraper (or card scraper) and scraped off some of the finish. Pretty pleased with how it turned out. then i added 3 coats of lacquer. 


Estimated Cost
$150
Estimated Time Investment
Week Long Project (20 Hours or More)
Finish Used
minwax gel stain. Minwax Lacquer
Recommended Skill Level
Intermediate

Comments

Weekend Woodhacks

Fri, 03/20/2015 - 15:06

We will be beginning building our 2 pedestal table in the next month or so and anticipate that outs will be similar in size / style and weight. OUTCH! We know it is going to be heavy. Pleased to see how well yours turned out.

Little Cottage Loft Bed - Revised :)

Submitted by Anonymous (not verified) on Tue, 06/20/2017 - 08:05

My 2 grand girls wanted a cottage bunk bed.  Not wanting to disappoint, I took the plans from the cottage loft bed and modified them, adding a lower bunk.  I also added the steps, with storage on the side instead of the ladder, and made a drawer for the front step for the little one.

I made the wreath from Pom-Poms purchased from Jo-Ann's and battery operated string lights.  

I opted for a cedar shake roof, which was purchased from Home Depot, then painted.

Needless to say, they love it!

Built from Plan(s)
Estimated Cost
Maple T & G - left over from remodeling project
Additional wood and hardware - $275
Estimated Time Investment
Week Long Project (20 Hours or More)
Finish Used
Painted using One of Pottery Barn's grays from Sherwin Williams
Recommended Skill Level
Advanced

Comments

Outdoor Console Table

Submitted by scokenour on Wed, 05/01/2013 - 16:32

I have a small booth at a local Outdoor Market & a client asked if I had any outdoor tables - she needed some for an upcoming party. I tried convincing her that a potting bench would be perfect (since Ana already had plans for that), but she wanted something a little different. She shared a picture of a "Faraday" console table by Pottery Barn, so I used that as my inspiration. I opted for a counter-height table vs. a table height, but both can be easily achieved using the same size balusters, just cut accordingly. I did have a hard time finding "chunky" balusters with a "flat" section on both the top and bottom. I didn't want to use pre-made legs because they are too pricey. At both Orange and Blue they had "skinny" balusters, but at the Orange near my home I found 1 thicker baluster. I had to go to another store to find more in stock, so supplies may vary in your area. The balusters were less than $3 each. Ana was so kind to create plans and I hope you enjoy your table as much as my client enjoyed hers!

Estimated Cost
$40
Estimated Time Investment
Afternoon Project (3-6 Hours)
Finish Used
exterior grade semi-gloss
Recommended Skill Level
Intermediate

Comments

spiceylg

Thu, 05/02/2013 - 07:31

Really like this and love how you used balusters for legs for added detail.

Rustic End Table

Submitted by mtairymd on Sun, 03/22/2015 - 09:04

This End Table matches the shelf from a few weeks ago which is my attempt of matching the $55 Fancy Desk from Ana White.  As with the shelf, the design is simple, easy to make and is relatively low cost (under $25).   

Estimated Cost
$25
Estimated Time Investment
Afternoon Project (3-6 Hours)
Finish Used
PolyShades Classic Black Satin Stain and Polyurethane from Minwax
Recommended Skill Level
Beginner

Comments

Brayden and Harper's Playhouse

Submitted by Anonymous (not verified) on Fri, 06/23/2017 - 07:51

Built by my son and I. Followed the awesome plans for that most part. 

Recommended Skill Level
Intermediate

Comments

Modern Loveseat and Couch

Submitted by Anonymous (not verified) on Sun, 09/26/2021 - 12:00

We were looking for outdoor furniture big enough for our whole family and friends but everything we looked at was over $5000 and really not well made. Ana to the rescue.
We built 2 loveseats and created a couch by doubling the dimensions.
We built the whole thing out of redwood so total wood was about $1000
The cushions were from Overstock and Lowes, approx $300.
There was a too much wiggle room with the cushions so we made a built-in frame to hold them in place. If we built another I would have cut the width down slightly.
We placed a 4X4 and another 2X4 on top of the back to provide more support.
All in all, love the way it turned out.

Seasonal And Holiday

My first DIY project!

Submitted by Celeste808 on Sun, 05/05/2013 - 10:30

Finally Completed!!! Thank you rainy Saturday! So I wanted a new entertainment center of sorts... couldn't find one that was just what I wanted..... so why not just build what I want! Just DIY it. ;)

I used the faux fireplace plan and modified it to have attached shelves on the sides. I also added an extra strip at the top of the fireplace opening so I could mount an LED bar light.

I used 1/4 plywood to make a tile base, penny tile, and 1/2 quarter round to finish out around the entire bottom.

Total project cost was less than $200 including the tile and light!

Best part is the whole thing is movable!

Thanks Anna White for such an awesome plan to start with!

Estimated Time Investment
Week Long Project (20 Hours or More)
Finish Used
MDF & plywood
Recommended Skill Level
Beginner

Comments

spkramer

Wed, 07/03/2013 - 10:24

This whole unit is great. My wife LOVES it, which means I will be building it! Did you purchase the two shelf units or build them yourself? Did you use a pattern or plan? Thanks!

Alisonwunderland

Wed, 07/31/2013 - 13:09

This is amazing! Exactly what I'm looking for! Did you change the depth of the mantel to make sure the shelves would be deep enough to hold things?

Celeste808

Sat, 08/03/2013 - 18:25

I did make the depth of the fireplace deeper so I could have room for the halves on the side. I just sketched out the dimensions I wanted the side shelves and built them along the same lines as the fireplace. Wasn't hard to figure out and just made it to fit the size I needed. The inset of the fireplace does not go all the way back to the wall either, that way the power strip can fit on the floor behind it. Glad you like it and thanks for the compliments!

EAnne

Wed, 07/23/2014 - 14:54

Hi Celeste 808, What a wonderful faux fireplace WITH the bookcases, especially. I'm hoping I can try this in our space challenged bedroom. Did you by any change reply to the chap who asked if you had some kind of dimensions or plans you could pass along to us? I would love to see if we can make it work in the space we have available.
Thanks again for the inspiration,
e

jrybolt26

Mon, 10/28/2013 - 18:25

I absolutely love what you did with this. I am going to have my fiance help me make this for our house. If you still have the dimensions and details of how you built the whole unit I would greatly appreciate it if you could post it.

mommyof2cuties

Sun, 04/13/2014 - 13:00

This is gorgeous & I can't believe it's your 1st project. I would love to build this too. Did you use any particular plans for the side units? If you have any tips or information to share, that would be great! I've actually been trying to make up my own plans using Sketch Up, but that's not working too good, lol. Again, great job & thank you.
Lynda

emswave

Sun, 02/08/2015 - 12:31

I'm dying to know the dimensions you added to the width. Also, the dimensions of the book shelf. I have been trying to draw up plans for the last week and I'm stuck with trying to figure it out by looking at your pictures.

PLEASE HELP!

Thanks!!

mrittgers1

Mon, 07/27/2015 - 09:15

Do you have the blue print of how you built the mantel and side book shelves? I am wanting to go buy supplies to build this tonight!!!


Thank you!

X Desk

Submitted by blenz on Tue, 03/24/2015 - 12:34

Pretty straightforward build, fun to use and build!
 

Built from Plan(s)
Estimated Cost
$70 ish
Estimated Time Investment
Afternoon Project (3-6 Hours)
Recommended Skill Level
Beginner

Comments

Potting Table

Submitted by Anonymous (not verified) on Sun, 06/25/2017 - 17:11

Thanks Ana, built it out of pressure treated wood for South Florida. Had the Home Depot cut most of the wood from your plans.


Estimated Cost
$80
Estimated Time Investment
Afternoon Project (3-6 Hours)
Recommended Skill Level
Intermediate

Montessori bed

Submitted by Anonymous (not verified) on Mon, 10/04/2021 - 12:24

Was a little challenging at first but I was able to pull it off and it came out to be perfect

Comments

Flip Top Storage Bench

Submitted by DMax2010 on Tue, 05/07/2013 - 05:56

I made the entryway cubby from the book and finally couldn't stand the pile of shoes (3 year old) in the front entryway any longer! So I made the bench and my son is thrilled that he can open and close it and put things in it. I have a few touch-ups to do yet from the pocketholes and countersink holes, but I love it! It was really easy to do. I did modify the plans to fit my entryway, so it's about 36 inches long.

I love it!

Estimated Cost
40.00
Estimated Time Investment
Weekend Project (10-20 Hours)
Finish Used
Minwax Pre-Stain Wood Conditioner (1 coat)
Rustoleum Dark Walnut Stain (3 coats)
Rustoleum Soft-touch matte polyurethane (2 coats)

I sanded in between coats of finish and in between polyurethane coats
Recommended Skill Level
Beginner

Charging station/nightstand/bookshelf

I made this a little bit taller and left off the doors since what we really needed was more bookshelf space. I'm very happy with the way it turned out!

Estimated Cost
$50
Estimated Time Investment
An Hour or Two (0-2 Hours)
Finish Used
Dark walnut and two coats of semi-gloss polyurethane
Recommended Skill Level
Beginner

Adjusted Pew Bench

Submitted by Anonymous (not verified) on Tue, 06/27/2017 - 21:13

I liked the other brag post with shorter arms

Really helps add storage to my office.  Thanks Ana and Shanty 2 Chic

Recommended Skill Level
Beginner

Latest Project

Submitted by Anonymous (not verified) on Mon, 10/04/2021 - 12:45

Built this for my mother in law. Was so excited how it turned out.

Built from Plan(s)

Comments