Community Brag Posts

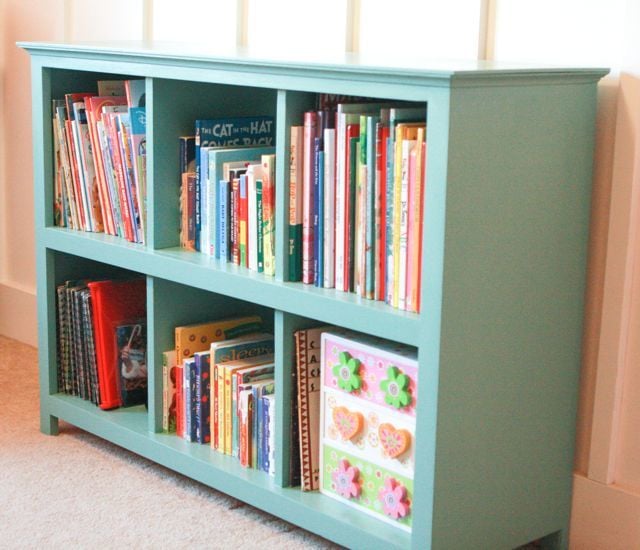
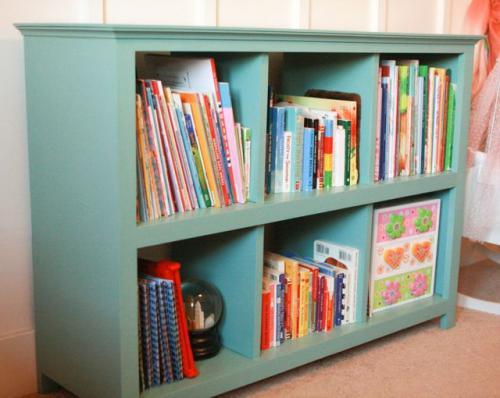
My First Project - 6 Cube Bookshelf

Submitted by katiemakes on Tue, 03/26/2013 - 02:10

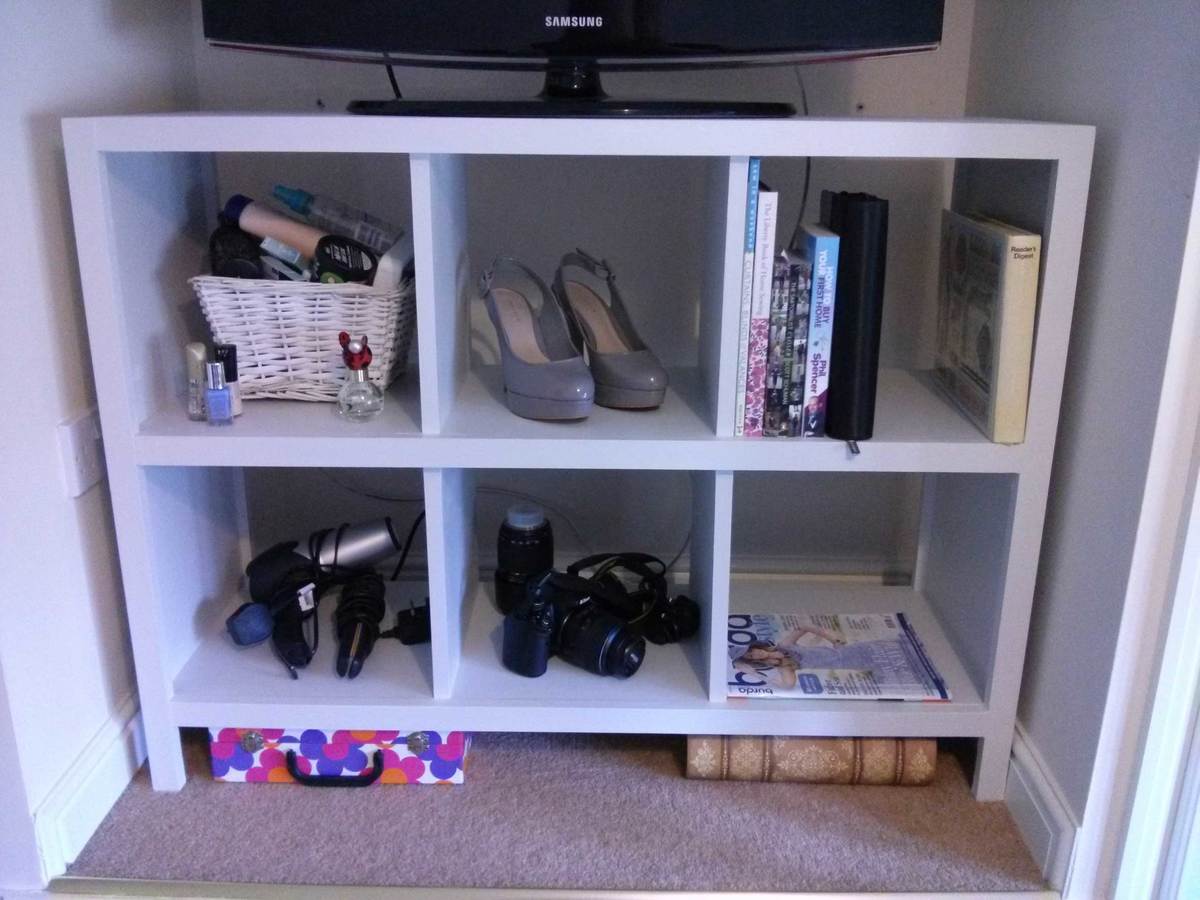
I desperately needed some storage in my workroom and finally decided to make this! It's from the 6 Cube Bookshelf plan and it works perfectly in this space I've got in my workroom.
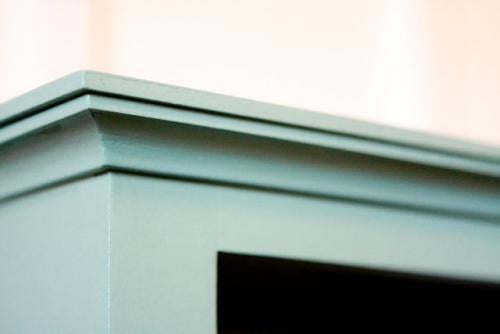
I would've rather used real wood throughout, but this is my first proper project and to keep the cost down I used MDF for the main boards (all cut to size by my local B&Q, yay!) and planed whitewood 1x2s.
I definitely learnt a lot on this project, but most of the mistakes are hidden under the paint :-) and in the end I'm really pleased.
I wanted an off-white finish and, after a baffling time in the paint aisle, chose a very pale grey, it sits in the room perfectly! I'm hoping to make some fabric boxes for it, but not sure what colours I want yet.
Now for the next project...

Built from Plan(s)
Estimated Cost
£70
Estimated Time Investment
Weekend Project (10-20 Hours)
Finish Used
'Grey Tint' (from Homebase) matt emulsion over white primer, with matt clear water-based varnish.
Recommended Skill Level
Beginner

Comments

katiemakes

Tue, 03/26/2013 - 15:07

Thank you :) the fabric problem is made worse because I work in a fabric shop, so just have way too much choice!

My simple entertainment center.

Submitted by senlo1970 on Mon, 05/22/2017 - 19:02

I have a good size bedroom, but things kept cluttering. I needed somthing small where i could store a few thing's like, movies, x-box, and cable box. So decided on the bookshelf. It's the perfect addition to my bedroom set. Thanks Anna for your awesome projects.

Built from Plan(s)
Estimated Time Investment
Afternoon Project (3-6 Hours)
Recommended Skill Level
Beginner

Double Pedestal Table (Modified from Triple Pedestal and Farmhouse Table Plans)

This was my first build and I had a blast! Let me say at the outset that if I can build this table with limited tools and expertise, then so can you! What I lack in know-how, I made up for by not being afraid to try something new. If you do the same, you can sure build this table. This table combines Ana's Triple Pedestal Dining Room Table (pedestals from this plan) and her Farmhouse Table (tabletop modified from this plan). Because Ana's plans are so great and thorough, I will only make note of a few key areas where I either tried something different or where I recommend paying extra close attention. First, on the tabletop, I reduced the length to 90 inches to accommodate our space, and therefore eliminated the center pedestal. As you can see, I alternated 2x10's and 2x8's. I also eliminated the breadboards simply because my wife and I preferred the rustic plank style. I also moved the pedestals in to allow a full 15 inches for a chair to slide underneath. When constructing the tabletop, I used both glue (clamped) and pocket holes on the underside. Don't overdo the glue, as it will tend to drip down (which is the top of the table...I had some drip issues). I also strongly recommend buying/borrowing clamps to keep the top flush or making them from 2x4's as I did. I worked hard on this part, and I'm glad that I did. It was still hard to keep it flush. On the pedestals, I used slightly bulkier decorative pieces (I started the arcs 1.25" from the edge on both ends of the arc). I also attached the top plank directly to the underside of the tabletop rather than to the top of the pedestal in order to both bolster the tabletop and to more easily attach the pedestals precisely where I wanted them. Finally, I drilled shallow flat-bottom holes and used wood bolts to fasten both the pedestals and the crossbeam. This created a nice-looking, low-profile fastener that still enables disassembly should we ever need to move the table (it is HEAVY fully assembled!). The finish is two coats of Minwax Ebony Wood Finish (pre-treated with Minwax Wood Conditioner) and three coats of Minwax Fast-Drying Polyurethane (two coats on pedestals). Thank you, Ana, for the inspiration! Our family has a new table because of it! Thanks to all of you for sharing in our excitement, and I'm happy to share dimensions/details/etc should it be helpful to anyone.

Built from Plan(s)
Estimated Cost
$200
Estimated Time Investment
Week Long Project (20 Hours or More)
Finish Used
Minwax Ebony Wood Finish - 2 coats (pre-treated with Minwax Wood Conditioner); Minwax Polyurethane Satin Clear Coat - 3 coats on tabletop, 2 coats elsewhere
Recommended Skill Level
Intermediate

Comments

Lady Goats

Wed, 05/01/2013 - 12:56

I love what you did with the "arcs" (gotta be careful with words synonymous with this - the word "arches" makes me cringe since I had to rip arches out of nearly all the doorways in my house ;-))! Not sure that I'll ever get around to using this idea, but I must say that I love it!

Pabs

Thu, 07/18/2013 - 05:17

Beautifully done, I like the modifications. Could you please share the dimensions and any detail info please…much appreciated.

NoviceBuilder

Mon, 08/19/2013 - 10:41

Thanks for the kind words. I think I included all of the measurements that differed from the two plans used, but is there a specific measurement(s) that you are looking for? If so, I'd be happy to provide it. Good luck!

Price0909

Sun, 03/09/2014 - 17:23

Could you give me some sizes on the bottom posts? Cuts of 2x4's for the posts etc..
How far apart did you mount the 2 pedestals? We will be putting it in front of a corner bench.
Thanks

NoviceBuilder

Sun, 03/09/2014 - 18:47

The uprights for the pedestals are 22". When you add in the tabletop, the four lateral pieces, and the feet, the table is 30 1/4" tall. As for the spacing of the pedestals, I chose to allow 15" from each end for the chairs to slide all the way under. But it's plenty stable and you really have plenty of freedom here, depending on how many chairs you want to use and how long your table will be.

Patio cooler/Grill cart!

Submitted by Anonymous (not verified) on Thu, 06/22/2017 - 14:06

Great project! I'm new to wood working and have been looking for simple but challenging builds. Needless to say this fit the bill... This grill cart was a great starter build and ultimately became a Father's Day gift!  My Pops loved it! 

I did add a couple of custom pieces: a foldable table top extension and towel bar... things Dad will undoubtedly need as he's an outdoorsman who loves to BBQ!

Thanks for the idea/design plans! 

Estimated Cost
$150
Estimated Time Investment
Weekend Project (10-20 Hours)
Finish Used
Semi-gloss spar urethane (3 coats)
Recommended Skill Level
Beginner

Comments

Modern Adirondack Chair

Submitted by abbulone on Mon, 09/13/2021 - 13:35

First time making this type of chair. Your plan made it really easy to cut and assemble the frame. I just changed the back to different types of flags. I’ve made them for my friends in the fire department, police department, ems, military, and a corrections Officer. They are an absolute hit.

Comments

Teenage Mutant Ninja Turtle Bed

Submitted by KarahM318 on Sun, 05/05/2013 - 20:21

For this project, we followed the plans for the Firetruck Bed and also modified them a bit to fit our needs in the room. From start to finish, this project took two weeks to complete and cost us roughly $200 to build and $100 to paint. We were lucky though in that nearly everything we needed to purchase was on special or sale.

Built from Plan(s)
Estimated Cost
$300
Estimated Time Investment
Week Long Project (20 Hours or More)
Finish Used
Clark & Kensington latex paint & Minwax polycrylic clear coat (semi-gloss)
Recommended Skill Level
Intermediate

Comments

kim20904

Wed, 01/15/2014 - 07:33

can you tell me how you modified the plans to make this bed? I don't know much about building anything but I would like to build this for my son. Thank you Kim

5-Tier Wood Planter

This plan was easy to follow, accurate and came together in just a few hours. I used some reclaimed barn wood for the 2x6s and dog-ear pickets for the remainder.

I made it harder for myself than it had to be. I didn't follow the directions closely enough and cut the box ends at 5 1/2" instead of 5 1/4". That meant that the bottoms had nothing to press-fit against. So, I had to do a little workaround to fix that. I made a 1" shelf at each end of each box so that the bottom could sit on these little shelves. The upside to this mistake is that there was now a drainage slot all along the front and all along the back of each planter box. 

I stained and sealed it. Finally, I lined each planter box with weed matting that I'd cut to size and cut drain slits in. The matting doubles as a way to keep the planting mix from falling out of the long drainage slots while allowing water to drain through the little slits I poked in the fabric. (I poked drain slits only along the front edge so that water would drain into the planter box below instead of onto the ground.)

I'm happy with the plan and the finished planter!

Estimated Cost
$35
Estimated Time Investment
Afternoon Project (3-6 Hours)
Finish Used
One coat of Cabots Premium Stain and Sealer in Gingersnap. One coat of Minwax Helmsman Spar Urethane.
Recommended Skill Level
Beginner

Full size bed size

Submitted by Anonymous (not verified) on Mon, 10/04/2021 - 13:47

Loved your plans for building a bed frame- easy to follow.

Comments

Very first project - planter boxes

Submitted by Howegirl on Sun, 05/26/2013 - 09:25

My very first woodworking project. I learned a lot. Most importantly, to watch my cuts more carefully. Also, a good stain and stencil dress up anything. I used braided jute for handles and love them!

Estimated Time Investment
An Hour or Two (0-2 Hours)
Recommended Skill Level
Starter Project

Comments

Mail Box

I used Ana's plan to make this mailbox for my daughter. I altered the plan a bit from the original. The hardest part was cutting the curve at the top sides, and putting on the door with a toddler helping! This piece is VERY LOVED by my daughter, and gets LOTS of play!

Estimated Cost
about $20 including lock and hinges (I used scrap wood pieces.)
Estimated Time Investment
Afternoon Project (3-6 Hours)
Finish Used
Paint, decoupage
Recommended Skill Level
Intermediate

Double Pedestal Farm Table

Submitted by abrowncoat on Thu, 05/30/2013 - 17:53

I used the Triple Pedestal Farmhouse plans, but that table would have been much too large for the space we have for a table; so I shortened the length a bit and only used two pedestals.

Built from Plan(s)
Estimated Cost
$100 - $150
Estimated Time Investment
Weekend Project (10-20 Hours)
Finish Used
Minwax Antique Walnut Satin
Recommended Skill Level
Beginner

Another cube bookcase

When I find clothes I like, I buy more of the same. Apparently this habit applies to furniture, too. This fall I built two cube bookcases for my 8 year old's bedroom. Last weekend, I built another, this time for my 6 year old. What can I say? The first two worked out so well I needed another!

For this bookcase, I had the lumber (at least the big boards, not the 1x2s) cut at Lowe's. The cuts were precise and square -- everything I want in a cut!

Just as I did with the first two bookcases, I used the Kreg Jig to put this one together and then I topped it with 1/4" MDF, attaching mitered cove molding underneath. At some point this winter I realized that my miter saw was out of square. I'm not good at fixing mechanical things, so my husband did me the favor of squaring the saw for me. Wow, what a difference! My cuts are so much more precise now that the saw is square again. Whew!

One change I made from the first two cube bookcases I built was in the finish. Instead of building and then finishing, I painted the surfaces that would end up on the inside of the bookcase before assembling the whole thing. Last time it was a bit of a nightmare getting into all the corners and inside tops of each cube. Painting the inside ahead of time was much simpler. Once the unit was put together, I sanded and painted the outside, touched up the inside, and then added two coats of poly to both the inside and the outside.

Built from Plan(s)
Estimated Time Investment
Weekend Project (10-20 Hours)
Finish Used
Ralph Lauren "Aged Mint" paint in a flat finish followed by two coats of satin polyurethane. I sanded lightly in between all coats.
Recommended Skill Level
Beginner

Changing Tables for Granddaughter and Grandson

Submitted by Anonymous (not verified) on Fri, 10/08/2021 - 08:50

My wife and I were expecting two grandbabies (a boy and a girl) in the Fall (about 2 to 4 weeks apart). We were asked by one of our Daughter's-In Law to make a changing table. We decided to do it for both grandbabies. These photos represent the result of the inspiration we got from Ana White's changing table design on her website. We liked the basic design but wanted it to have a shiplap look. We also wanted the top drawer to be a full drawer across the top and the middle shelf to be a pull out shelf with a drawer front. We were ecstatic with how they turned out, and so were the parents!

Comments

I learned to use a Kreg Jig for the Rustic X hall tree

Submitted by msbiochem on Tue, 12/21/2021 - 19:31

I made this headboard-inspired version of the rustic X hall tree in about 8 hours with the help of my hubby and son-in-law. I own a miter saw and basic tools, but no Kreg Jig. I thought I would be able to make it without one since I made a similar entry table just screwing the pieces together and hiding the screw heads under the dome-shaped clavos. I planned to do the same with this project but soon realized that the way the 2x4s were attached to one another it would not be possible. My son-in-law allowed me to borrow his Kreg Jig and showed me how to use it. I used the clavos and iron accents to match the sofa table and love the way my version of the rustic X hall tree turned out! The finish is Varathane Classic Wood Stain in Jacobean and the corner accents were purchased from Hobby Lobby.

Built from Plan(s)

Comments

Fancy Jewelry Box

Submitted by JoanneS on Thu, 06/04/2015 - 14:35

One of my friends at work is going to a new job, and this build is her going away gift. It is a variation of the Fancy Jewelry Box, with the following modifications:

Made from select pine, no plywood is visible on the outside on this build.
Slightly smaller, the box is made from 1x6, the back is a ½” x 5 ½” craft board, and the door outsides are 3/8” x 5 ½” craft boards.
The drawer boxes are ¼” thick craft board and the doors and overlay drawer faces are 3/8” thick craft board.
Overall dimensions are 13” wide, 5 ½” deep, and 14 ¼” tall.
The select pine worked very well for the luxe stained finish I was trying to achieve.
Used fancy knobs instead of wood knobs (also swapped out the included screws for shorter ones).

I really took my time on this to get everything just so. The project took about 15 hours in total, including the build, finishing, and decorations - - a bit at a time, spread out over the last couple of weeks.

I'm very happy to say the gift was a big hit!

Built from Plan(s)
Estimated Cost
$90
Estimated Time Investment
Weekend Project (10-20 Hours)
Finish Used
Finish: 2 coats of Varathane Stain + Poly in Early American, with a top coat of Minwax Polycrylic in Gloss. The drawers and doors are lined with embossed felt, and the box bottom and drawer bottoms are covered with sticky-back felt. The ring holder is a scrap of high density foam covered with sticky-back felt. The knobs are acrylic crystal and the back has flat hinges in antique brass (swapped out the included screws for shorter ones on the hinges and knobs). The hooks are ¾” brass shoulder hooks.
Recommended Skill Level
Beginner

Full size Murphy Bed

Submitted by Hartung26 on Wed, 06/26/2013 - 20:07

Used the plans for the twin bed, just added the difference in mattress size to the measurements. Pretty simple really. Used a cam lock centered above the door and a sawtooth picture hanger on the inside as a locking mechanism.

Estimated Cost
$275
Estimated Time Investment
Week Long Project (20 Hours or More)
Finish Used
WinMax English Chestnut
Recommended Skill Level
Intermediate

Comments

spiceylg

Thu, 06/27/2013 - 12:16

Been thinking of building one of these. Yours looks beautiful, nice job!

campbelllsara

Tue, 09/30/2014 - 14:16

Hello,

I have been scowering the internet... I too would like to have my murphy bed raised off of the ground and be a full size murphy bed.  But everytime I try to do "adjustments" and get "creative" it ends in disaster.  I am better at following instructions.  Is there anyway that you could give me the exact measurements for your fullsize bed and let me know how it is that you propped the bed up at the end?

[email protected]


Thank you.

DIY Mobile Lumber Rack

I finally have order in my garage! I built a mobile lumber rack using plans from the Rogue Engineer. My husband and I knocked out this project one Sunday afternoon. It can store a huge load of lumber and best of all, it’s portable. We are very, very pleased with the final project! Storing all our lumber on the rack has freed up a great deal of space in our garage.

Estimated Cost
50
Estimated Time Investment
Afternoon Project (3-6 Hours)
Recommended Skill Level
Beginner

Comments

jennibee

Sun, 06/21/2015 - 16:07

I made one of these about a month ago after seeing it on the Rogue Engineer's website and just love it. It's exactly what we needed since we are always having to move things around in the garage. You did a great job.

jennibee

Sun, 06/21/2015 - 16:08

I made one of these about a month ago after seeing it on the Rogue Engineer's website and just love it. It's exactly what we needed since we are always having to move things around in the garage. You did a great job.

First time project

Submitted by keahunter on Sat, 07/04/2015 - 03:17

This was my first attempt at making anything. Thank you to Ana for providing such easy plans and the encouragement to try something. I think I'm hooked!

Estimated Time Investment
Day Project (6-9 Hours)
Recommended Skill Level
Beginner

Comments

Seasonal And Holiday

Wood Closet Shelving

Submitted by Anonymous (not verified) on Thu, 01/13/2022 - 09:01

My closet system is four separate units that I butted up together and attached to the wall with a "decorative" 2x4 railing around the entirety of the closet. The main unit looks the closest to the real design but is 8 feet long and 8 feet tall to avoid extra cutting of boards. The smaller unit only has one area for hanging up clothes and is around 5 feet long which is just the length of the wall. I also built a unit for holding sheets and towels and another for my wife's shoes.

The plans are really easy to follow but I would suggest a few things:
-Do stain and boards before cutting; this would have been a nightmare otherwise.
-If you use the metal clothing rods (if I could go back in time I would have used wooden dowels) make sure that you put those in before you attach any boards between the support structures. I ended up having a 35 inch gap instead of a 36 inch gap and it killed my momentum.
-I made mine 8 feet tall because it was less to cut and then re-stain; time wise it probably was a scratch cause I had to build it in place and at the end it was very tight to work in the space.

Built from Plan(s)

Comments

Convertible benches

Submitted by Anonymous (not verified) on Thu, 02/17/2022 - 13:43

We love these benches! We actually just leave one of them in bench form and the other in table form for everyday use.

Comments

My $30 Closet Makeover!

Submitted by scokenour on Mon, 07/11/2011 - 12:57

This project is closest to the Simple Closet Organizer, but I wanted to be able to re-use the existing components of the closet. The only purchased materials were one sheet of cabinet grade plywood and dowel rod holders (since I already had paint and screws).

Estimated Cost
$30
Estimated Time Investment
Afternoon Project (3-6 Hours)
Finish Used
sand, prime, sand, paint
Recommended Skill Level
Beginner

Comments