Community Brag Posts

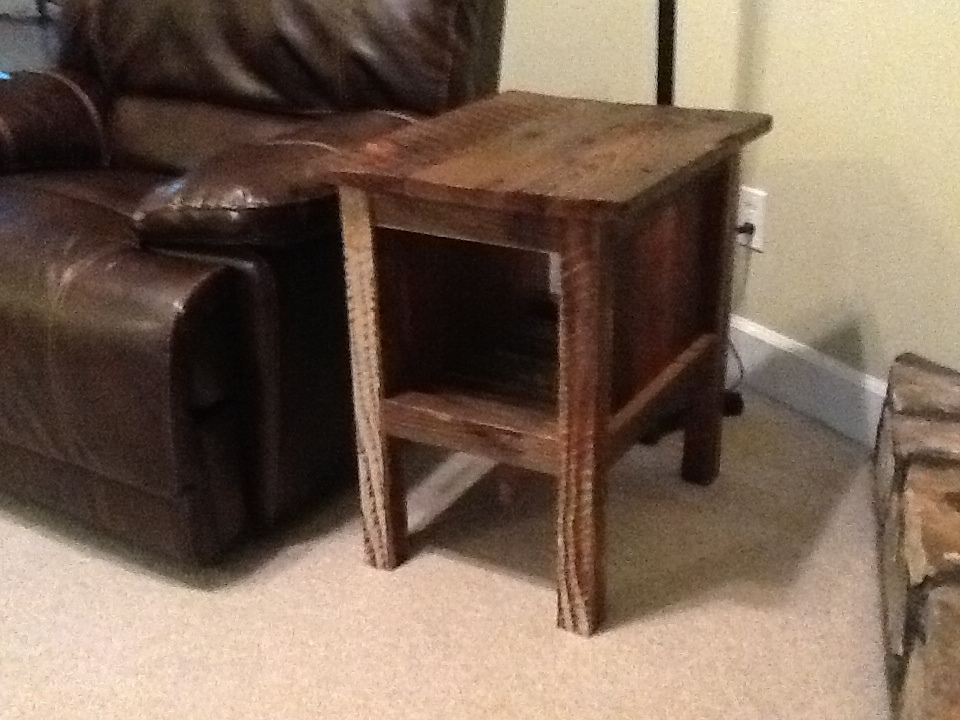
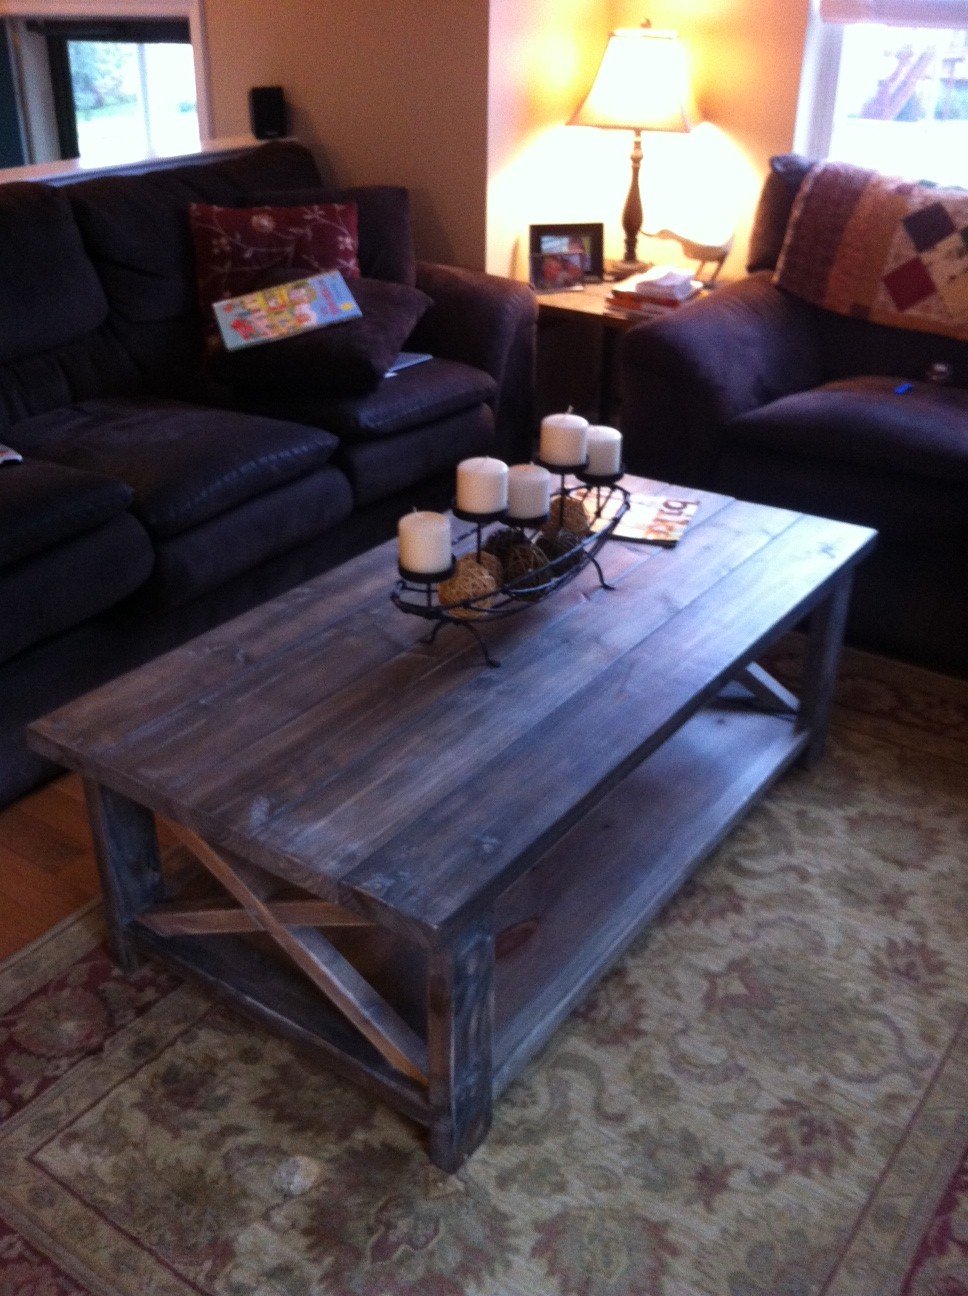
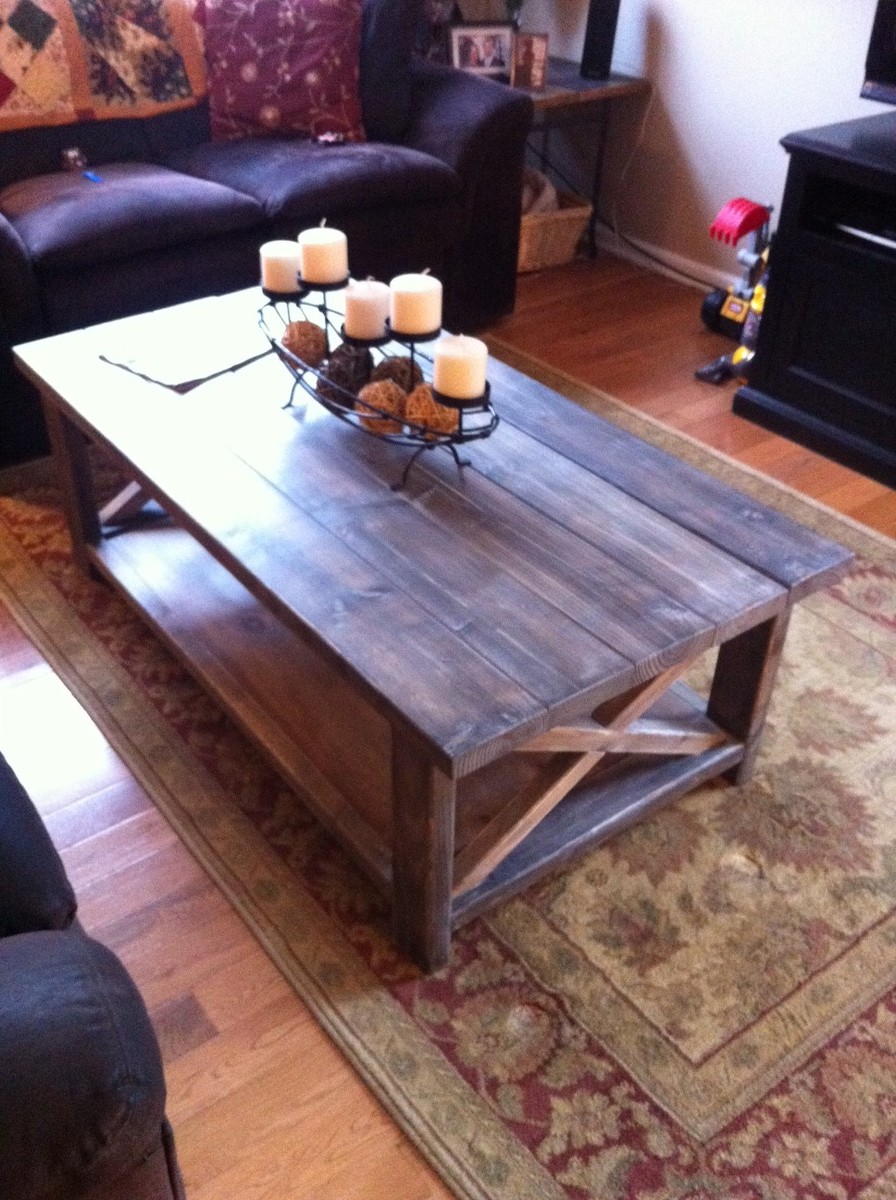
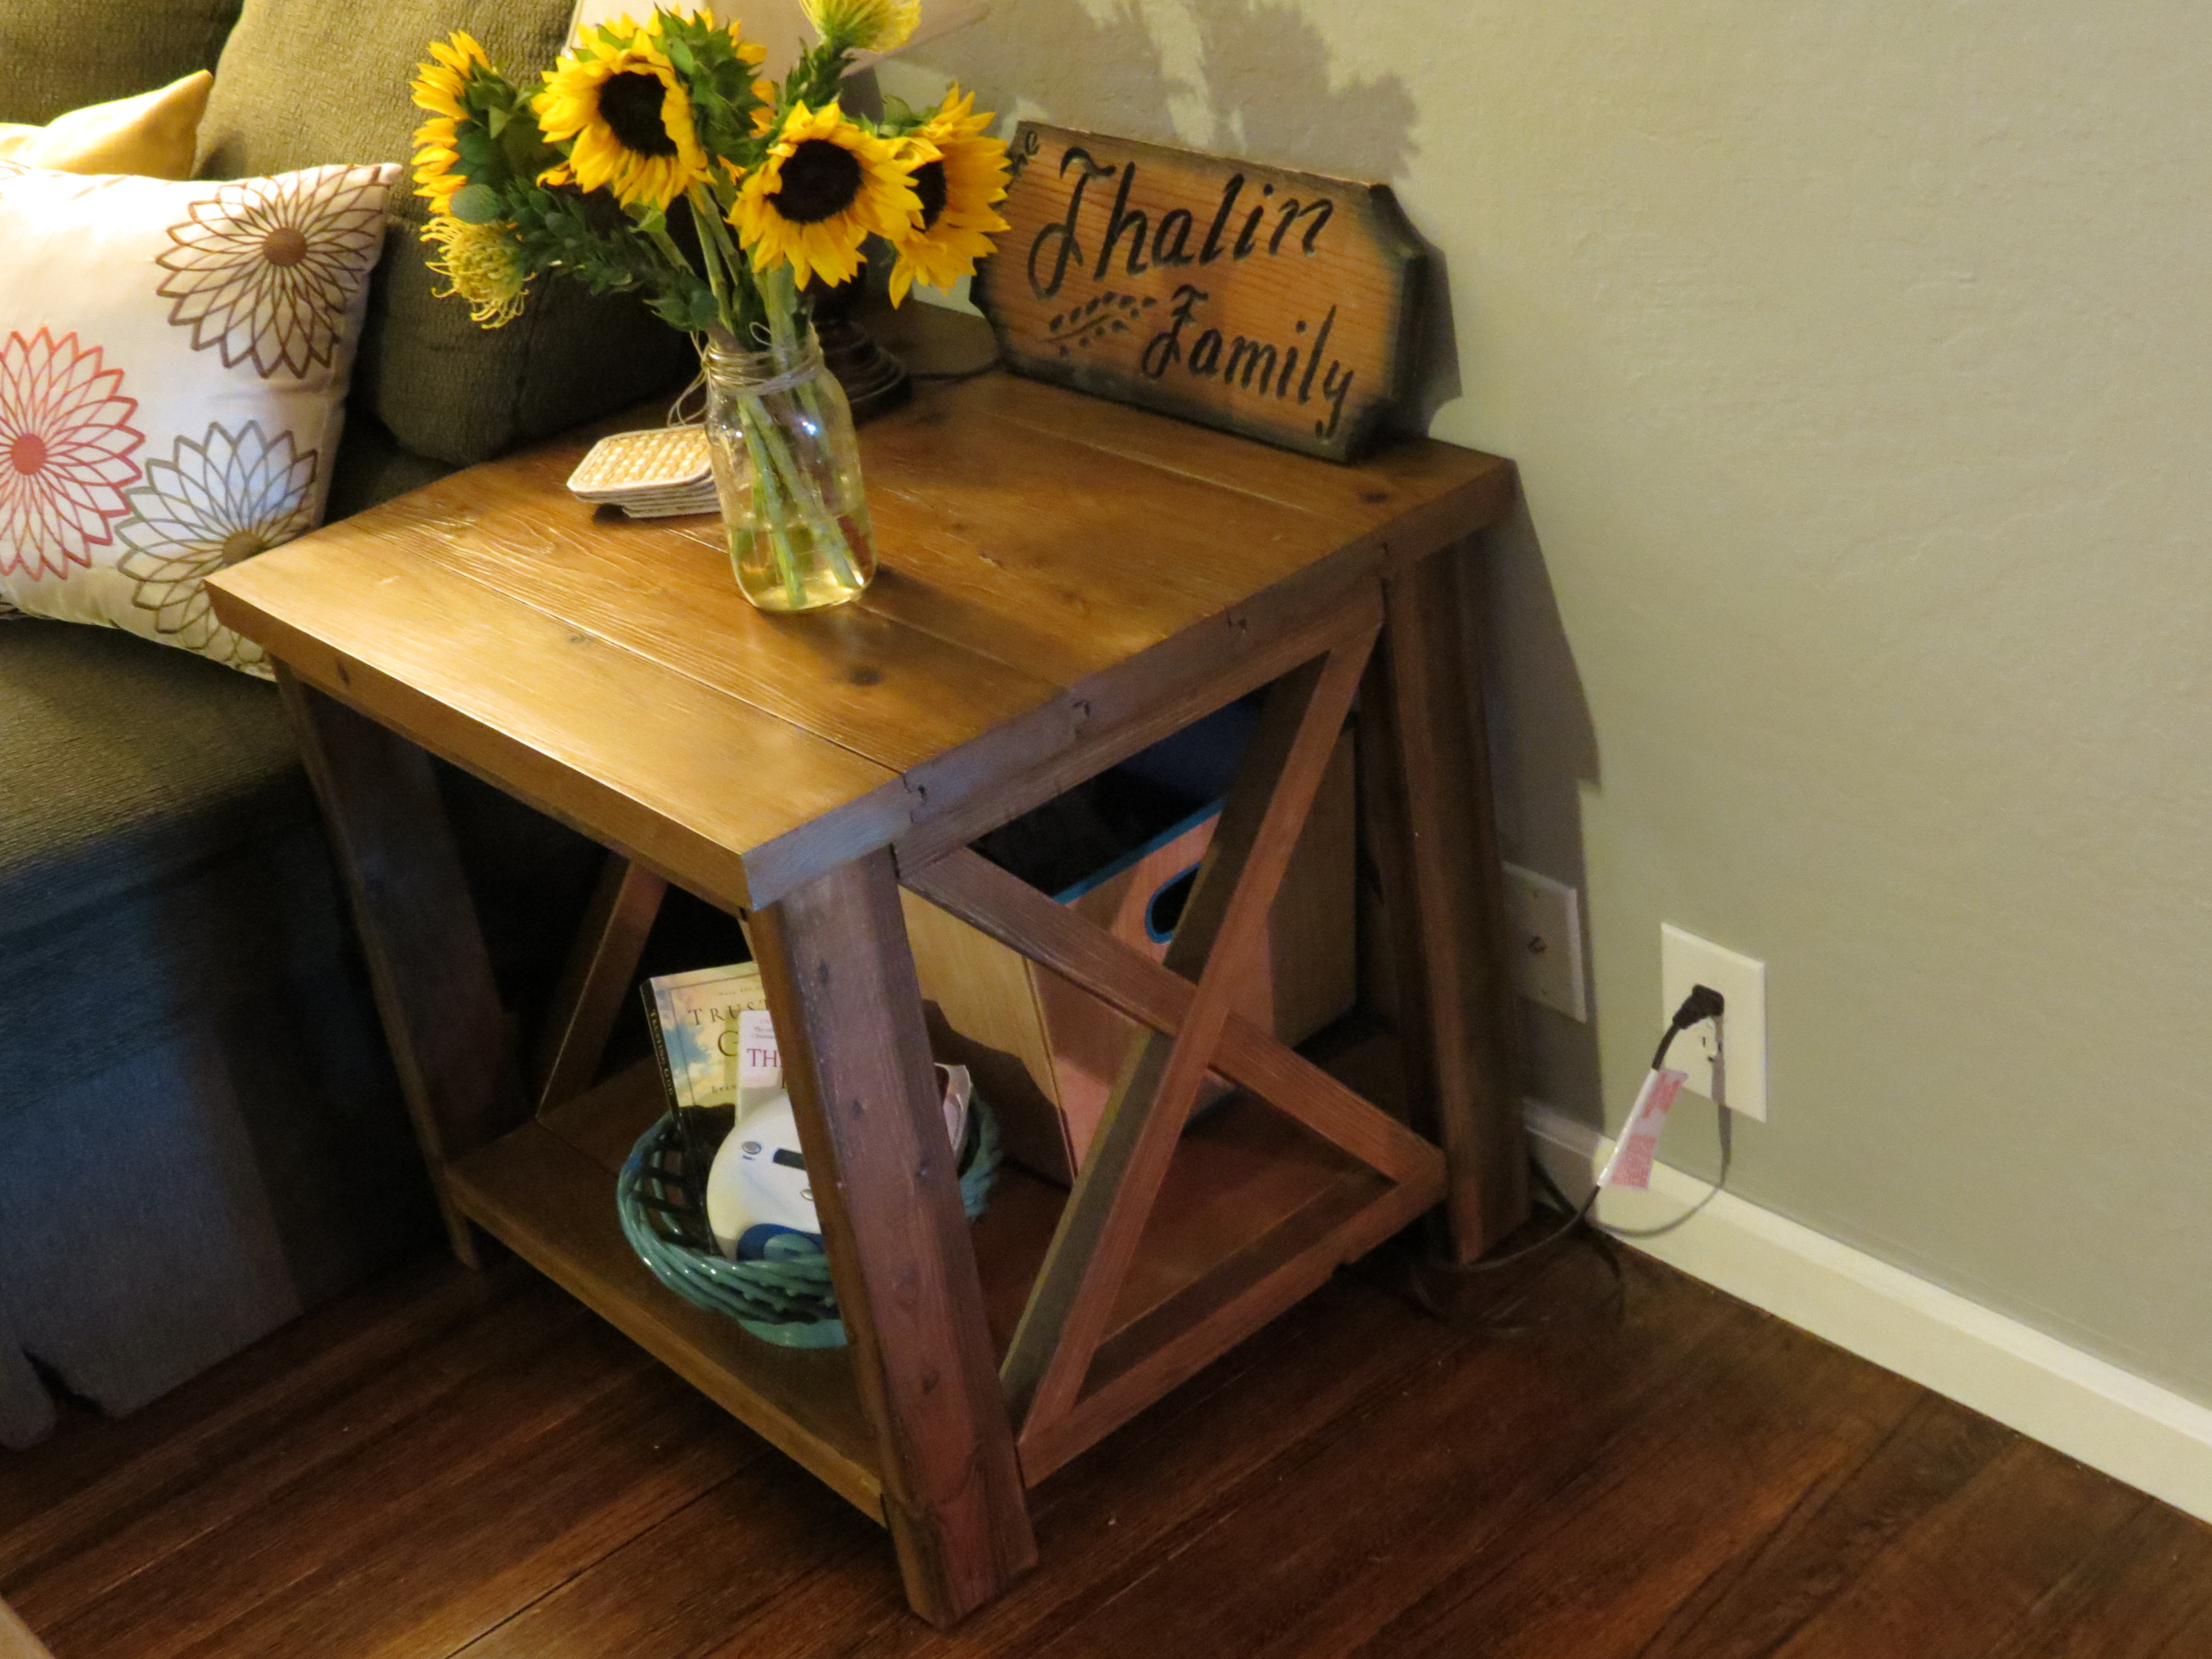
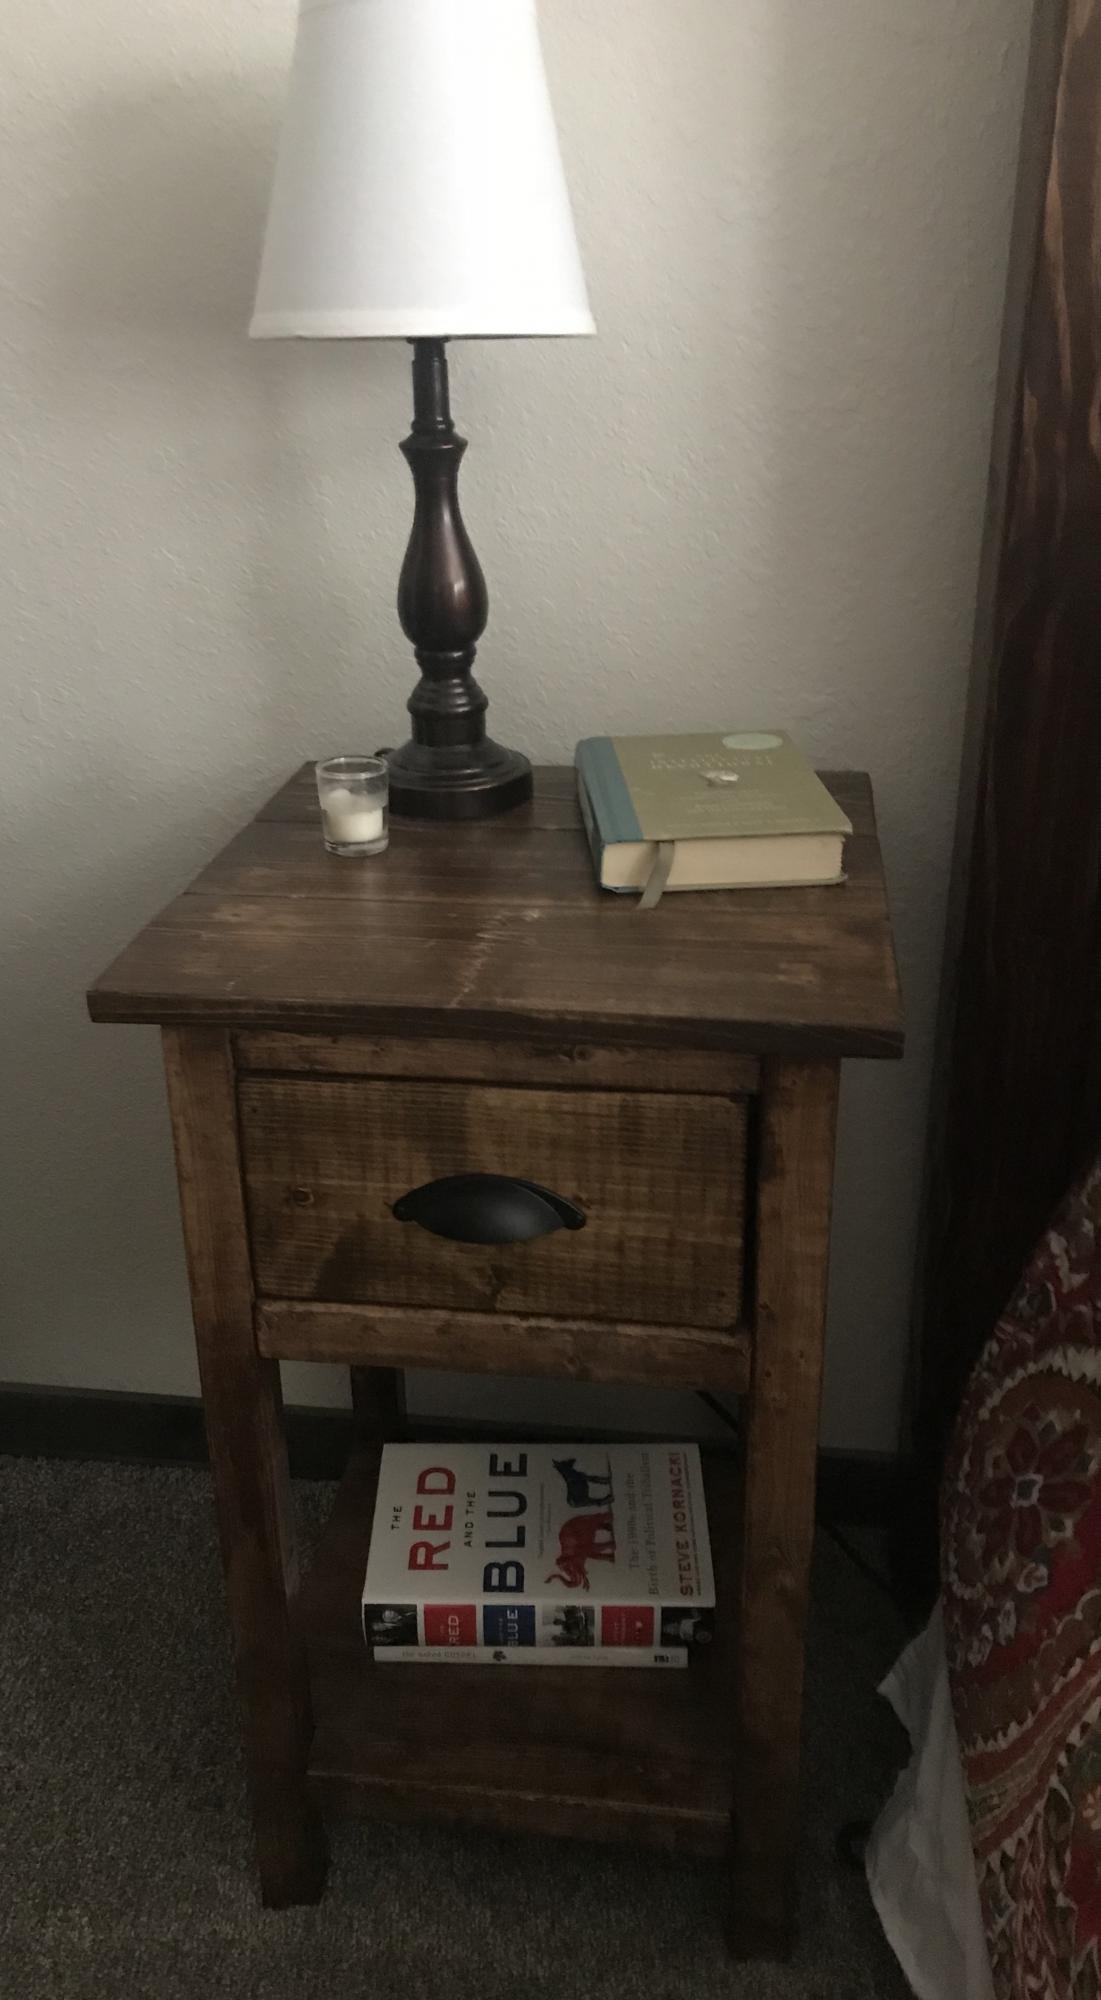
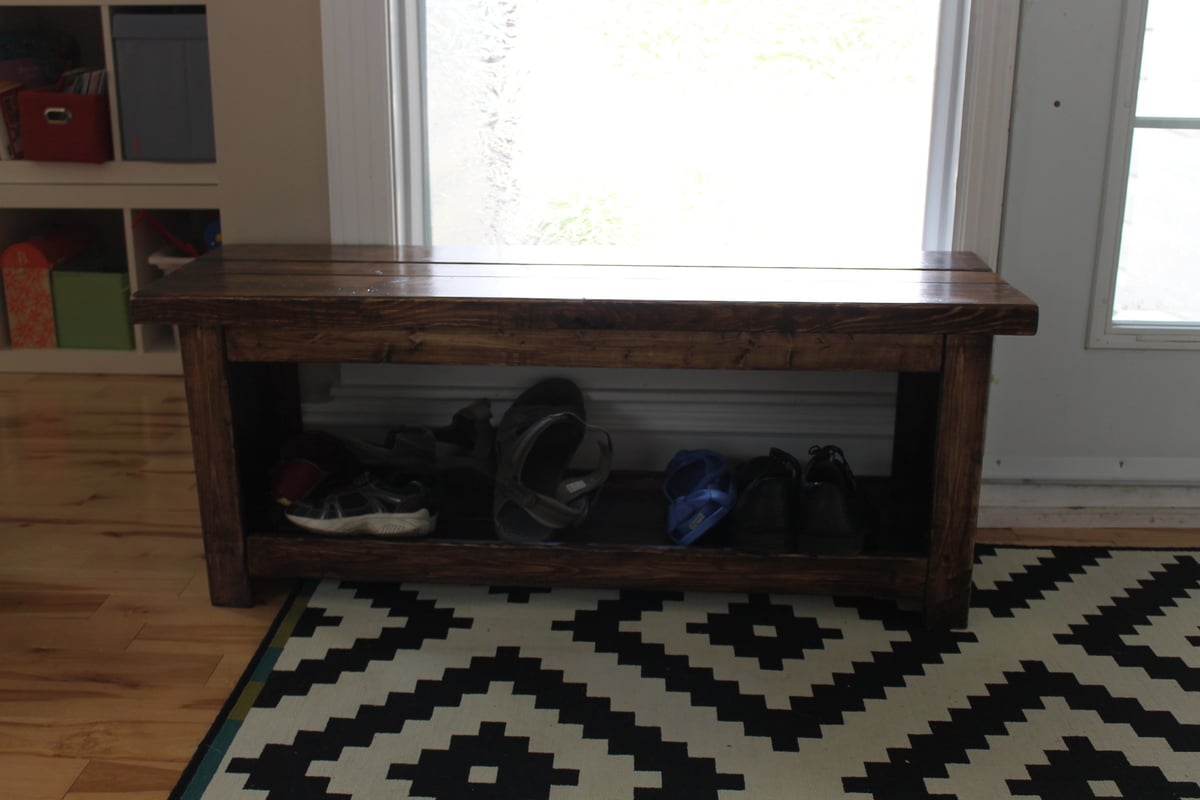
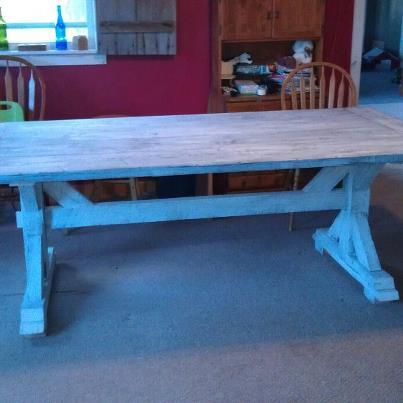
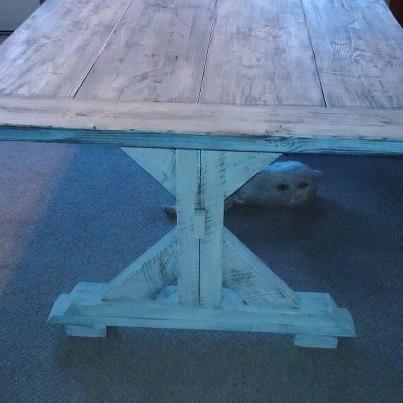
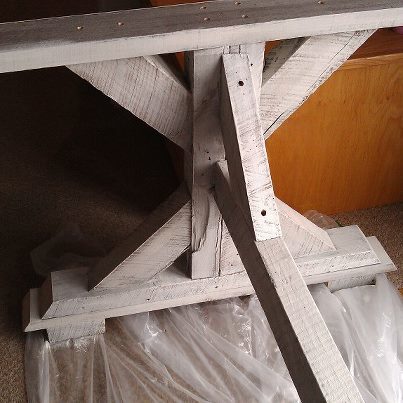
Reclaimed Wood Tidy Up end table

Submitted by baskelding on Mon, 09/03/2012 - 09:24

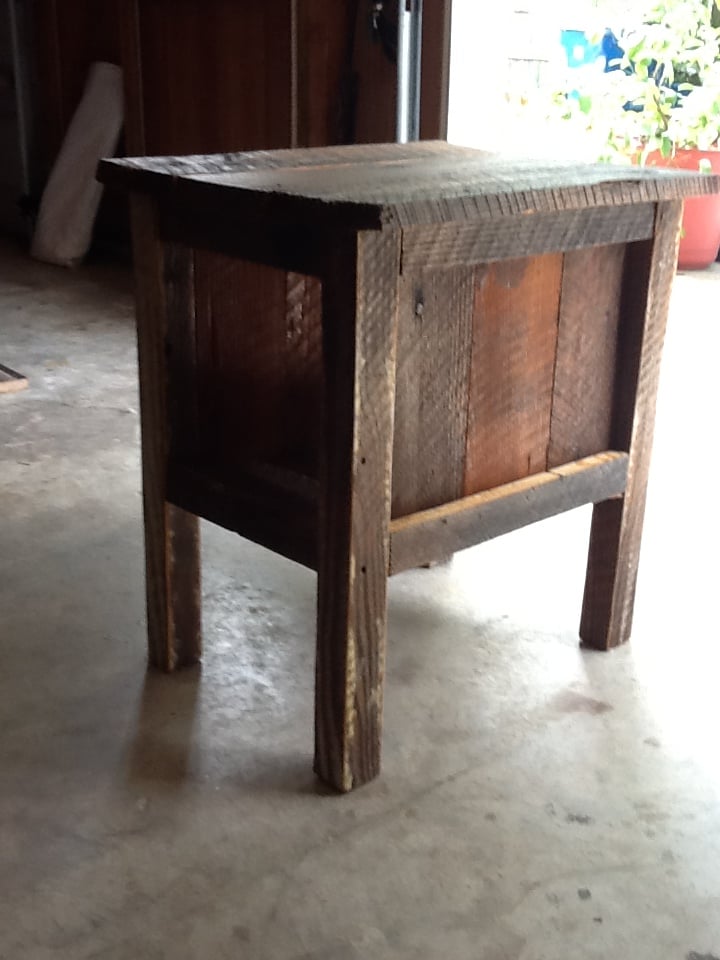
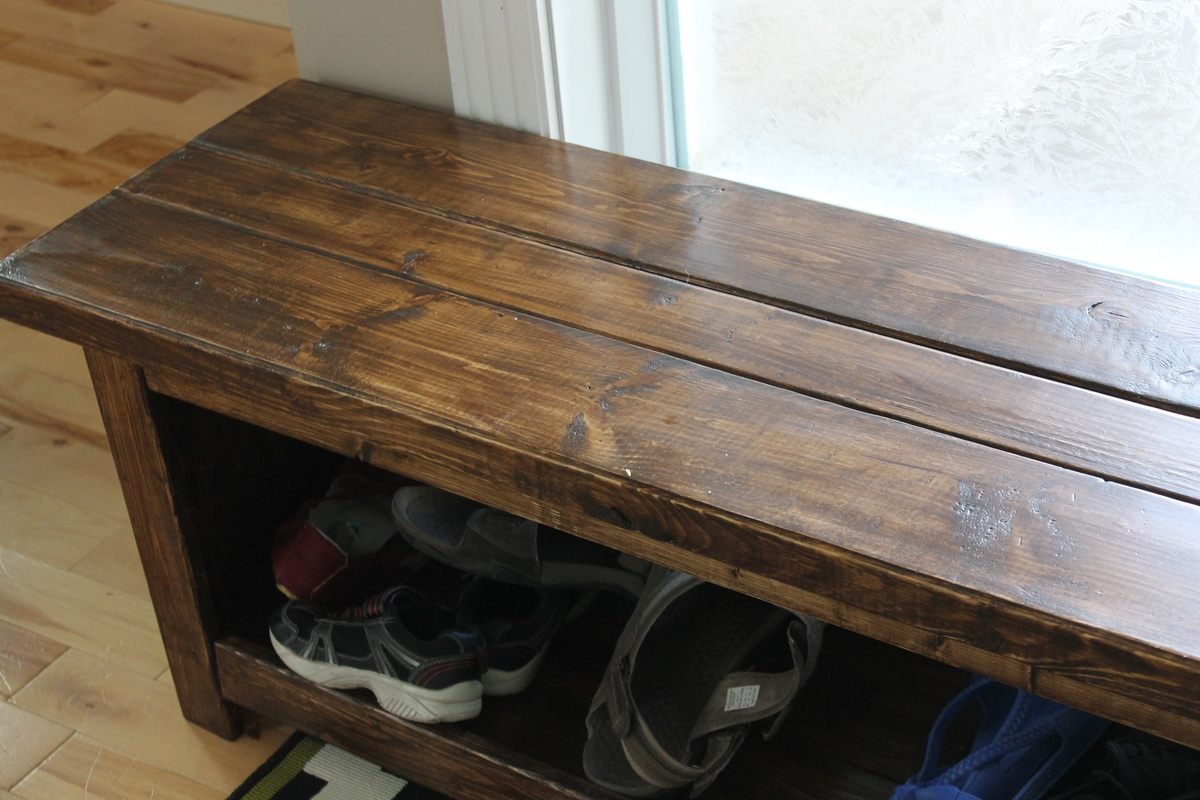
I was given old reclaimed wood from a house built in the 40's or 50's. Old rough cut pine 1x12's. I cut the wood to size to match the plans, however, I did have to modify the plans due to the actual true dimensions of the wood. After assembly, I appled 2 coats of shellac to the entire table. It may need a few more coats, but not wanting a glossy finish, I left it alone. Splinters were and are an issue, and the shellac did help to hold down the splinters.

Not having the 2x2 legs required glueing the 1x's together and glueing a veneer to the sides. If i had the legs the project would have taken less time.

Estimated Time Investment
Weekend Project (10-20 Hours)
Finish Used
Shellac - 2 coats
Recommended Skill Level
Beginner

Comments

brookifer86

Sat, 09/08/2012 - 14:30

I love what you did with this, and that you used salvaged wood. The legs would totally fool me, I'd never know that they were pieced together!

Haley platform bed/reclaimed wood headboard/rustic x leg table

i made this king size head board using Ana's website and for the bed frame i used Shanty 2 Chic's website. i just had to convert the measurements to king size when cutting the boards. thats a rustic x leg end table next to the bed, i built using Ana's website also.

Estimated Cost
$100-$120
Estimated Time Investment
Afternoon Project (3-6 Hours)
Finish Used
watco danish oil dark walnut
Recommended Skill Level
Starter Project

Farmhouse table and benches

Submitted by Anonymous (not verified) on Mon, 10/03/2016 - 07:51

Built this for my Daughters Birthday!!

Estimated Time Investment
Week Long Project (20 Hours or More)
Finish Used
Gel stain oak
Recommended Skill Level
Intermediate

Queen Farmhouse Guest Bed

Submitted by Anonymous (not verified) on Wed, 05/08/2024 - 09:33

Ana - built this Queen Farmhouse Bed from your plans and videos. Really a warm, guest room that I built inspired from your work and detailed plans — thanks again!

Chris K

Built from Plan(s)

X Coffee Table

This was the best piece I have made so far, I had some trouble getting the angles right with the x's but in the end it worked out great and everyone can't believe its just plain old wood! Keep up the great work!

Moving on to the end tables!

Built from Plan(s)
Estimated Cost
$55
Estimated Time Investment
Day Project (6-9 Hours)
Finish Used
I had a great time "experimenting" with the distressed finish too. I recommend testing it on scrap boards first! I finished it with a coat of polyurethene and in the end the color looked fine but it did change it from what it was before the coat.
Recommended Skill Level
Intermediate

Comments

Chrisv1041

Thu, 07/02/2015 - 15:10

How did you stain it and distress it? Did you use the gray paint and water on top of the stain to give it that look?

X-Side Table

Submitted by wthalin on Thu, 07/03/2014 - 07:48

This was my first project from Ana's site and I have to say I was quite pleased how it turned out. This is a very sturdy/heavy duty end table that I am sure will last a very long time. I made mine essentially straight from the plans except changed the X's a little bit to compensate for my limited miter saw.

Built from Plan(s)
Estimated Time Investment
Weekend Project (10-20 Hours)
Finish Used
Steel wool in vinegar as an oxidation stain finished with Vermont Natural Satin PolyWhey.
Recommended Skill Level
Beginner

Industrial Master Closet

Submitted by dkarinen on Wed, 10/05/2016 - 19:22

Our master closet had been empty for a long time due to "analysis paralysis", couldn't decide what to do... until I saw this plan. My husband was gone for a week and I was able to surprise him with an almost finished closet when he got home! I stuck with closet rods instead of galvanized pipes because I knew that would be his preference. I love it! Now to build something for all our shoes...

Built from Plan(s)
Estimated Cost
$200
Estimated Time Investment
Weekend Project (10-20 Hours)
Finish Used
Varathane dark walnut stain, varathane dark walnut stain + poly
Recommended Skill Level
Beginner

Comments

Farmhouse Mini Bedside Table

The hardest part of this project was definitely finding straight 2x2’s at Lowe’s! This was my first drawer too, but after a little headache getting it square I couldn’t be happier with it! It goes perfectly with our Farmhouse/Barndoor Headboard. I can’t say enough good about this site ♥️

Estimated Cost
$20
Estimated Time Investment
Day Project (6-9 Hours)
Finish Used
Minwax Special Walnut
Recommended Skill Level
Intermediate

Armoire

This was the nursery armoire design we used. My husband modified it slightly. Beautiful isn't it.

Estimated Cost
$150-$175
Estimated Time Investment
Week Long Project (20 Hours or More)
Finish Used
paint color is valspar cabin red, with antique glaze over it.
Recommended Skill Level
Intermediate

Comments

Spa bench

Submitted by Joagirard on Fri, 07/04/2014 - 20:50

I had left over wood from previus projects and needed an entry bench. The closest i made my plan inspired by the spa bench.

Built from Plan(s)
Estimated Cost
20$
Estimated Time Investment
An Hour or Two (0-2 Hours)
Finish Used
One coat of dark walnut varathane wood stain applied with an old t-shirt. Followed by 2 coats of varathane satin professional finish. I sanded between the finised coats.
Recommended Skill Level
Starter Project

Comments

andimat

Tue, 03/06/2018 - 19:18

This is exactly how I was hoping to modify this!  What did you use for the sides?  Is the top 2 x 6?  Thank you in advance!

andimat

Tue, 03/06/2018 - 19:20

This is exactly what I wanted to do!  What did you use for the sides?  Is the top 2 x 6s?  

diy Oversized Chair

As I finished the basement, my thoughts turned to the upstairs furniture. We bought a sectional when we moved into our house 2 years ago from Art Van. We paid $2000 for it and it lasted about 3 years. We finally got rid of it after 5 years, but the frame was broke and the cushions were terrible!!


I looked around and couldn't find anything I thought was superior quality that didn't cost an arm and a leg. Quite frankly, this is expensive even to make but I'm up for the challenge.  

Estimated Cost
Frame cost was $120
Estimated Time Investment
Afternoon Project (3-6 Hours)
Recommended Skill Level
Intermediate

Modern Patio Furniture- My Take

Submitted by Anonymous (not verified) on Thu, 07/09/2020 - 18:32

This was my very first build project! Ana White you are AWESOME. Each plan was so easy to follow. I added the headrest based on a version I found in the brag posts. It really does ensure that the back cushions stay in place!!!! Love it!!!!

Estimated Cost
$800
Estimated Time Investment
Week Long Project (20 Hours or More)
Finish Used
I stained it several times with Behr outdoor stain for decking because I wanted a deep red look to match the cushions
Recommended Skill Level
Beginner

Comments

goose71

Sat, 08/15/2020 - 19:22

Thanks. These have been the best alternate plans yet. I was looking for a headrest option as well, wasn't sure they looked as good, but this interpretations is beautiful. i will be copying it for my furniture.

Farmhouse table

Submitted by kathiibeth on Mon, 09/10/2012 - 06:34

This is my take on the farmhouse table featured here on this site. The cut list was modified since I used reclaimed pallet material for my table base. I also used 2x12's for the top since I wanted mine a little bigger then the one on here. I took the extra time and effort to also add breadboard ends just to add the finishing touch to the top. The finish I used was simply whitewash for the base, the top was a combination of oxidation, black wash, white wash and distressing with misc. tools from the garage. We had fun (my husband helped)

Built from Plan(s)
Estimated Cost
$60
Estimated Time Investment
Week Long Project (20 Hours or More)
Finish Used
white wash for base, distressing then black wash and white wash for top. Because I wanted the top to look like it matched the base (mixing wood types adds a challenge) we took time to really distress the top using multiple tools: like a belt sander, chains, planers, and hammers and really added character. After this I oxidized with the vinegar and steel wool mixture and let that dry. Then I went back and used a very diluted black wash to really darken the wood. After that dried I did a white wash and lightly added white to acheive the look I wanted. After that dried I sanded to distress some more and love the results. Practice on scrap material to see what you like most.
Recommended Skill Level
Intermediate

Comments

Wolvesey

Wed, 02/19/2014 - 14:11

What a beautiful table. I would love to make one but can you please tell me how you attached the end panels of wood at right angles to the others and then how you attached the table top to the bases as I see no signs of nails or screws? Many thanks

Fancy X Farmhouse Table

Submitted by aeadams27 on Mon, 07/07/2014 - 18:43

My husband built the table and it was the first time he has built ANYTHING! I stained and varnished it and made the runner. We are so happy with it!

Built from Plan(s)
Estimated Cost
$100
Estimated Time Investment
Weekend Project (10-20 Hours)
Finish Used
rustoleum dark walnut
spar varnish
Recommended Skill Level
Beginner

Grandy Barn Door Console

Submitted by Keldani5 on Sat, 07/11/2020 - 05:38

This project took me a weekend to build. I included pics of the build from start to finish. I love the new barn door hack using the pulley wheels.i used just a regular smoke stain and wax to finish the job.

Built from Plan(s)
Estimated Cost
165.00
Estimated Time Investment
Weekend Project (10-20 Hours)
Finish Used
Stain and wax
Recommended Skill Level
Intermediate

My first real build!

This started with me just slapping some wood together to see what I could do, then ended up with a beautiful (in my opinion) kitchen table. The table frame, legs, and base are all 2x4’s. The table top itself are all 1x4’s. I sanded down all the way to a 3,000 grit (yes, I said 3,000) and got the table top incredibly smooth. Plus, using the 3,000 grit paper really seemed to bring out the natural grain in the wood. I had a lot of fun with this build as it was my first real project. I also had a helper in this build. His name is Dr. Spencer Reid. He’s lazy and doesn’t do much but he is there for moral support. And lovins. 🐈

Estimated Cost
$50
Estimated Time Investment
Week Long Project (20 Hours or More)
Finish Used
1 coat of Varathane Espresso
1 coat of Varathane Black Cherry
3 coats of Varathane Oil Based Polyurethane with light sanding in between each coat
Recommended Skill Level
Beginner

Farmhouse Queen Bed

Submitted by jdharris78 on Sun, 09/16/2012 - 07:32

The hardware store didn't have untreated 4x4's so I used pressure treated wood since I was going to paint it. I adjusted on the plan and picked up bed rail hooks so I can remove the bed rails to move the bed easier. I used a chisel to inset the bed rail hooks. It worked out perfectly.

Built from Plan(s)
Estimated Cost
300
Estimated Time Investment
Day Project (6-9 Hours)
Finish Used
Painted
Recommended Skill Level
Intermediate
Back