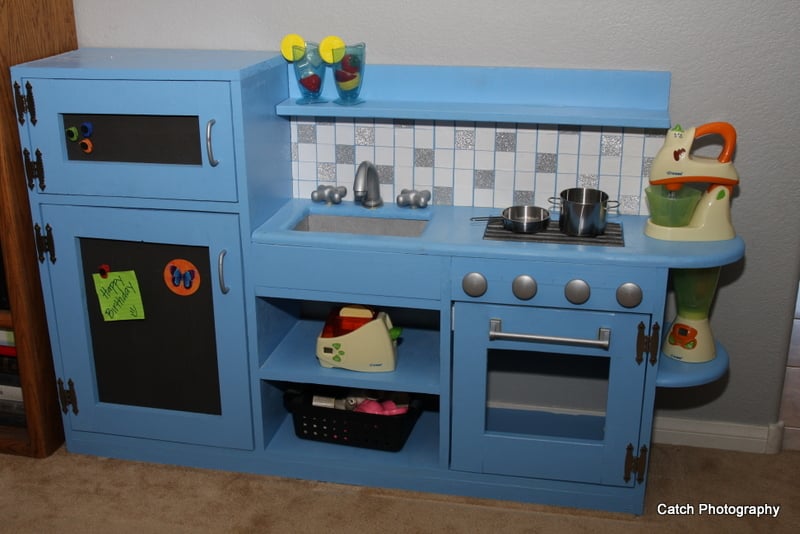


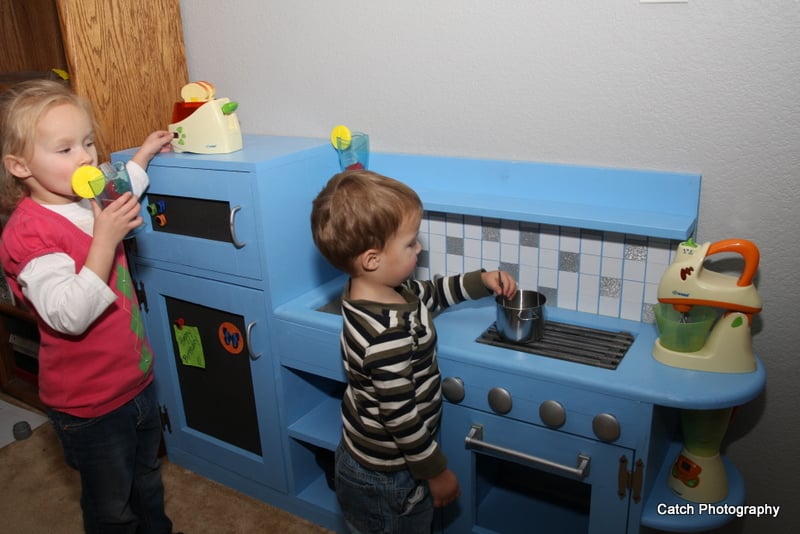
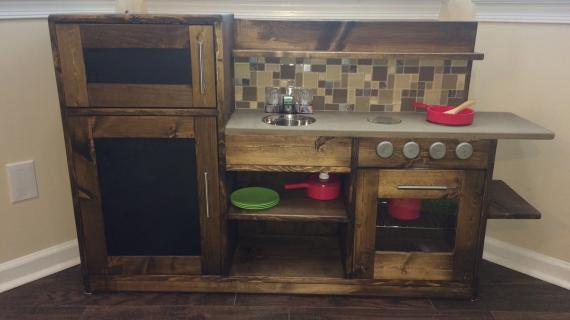
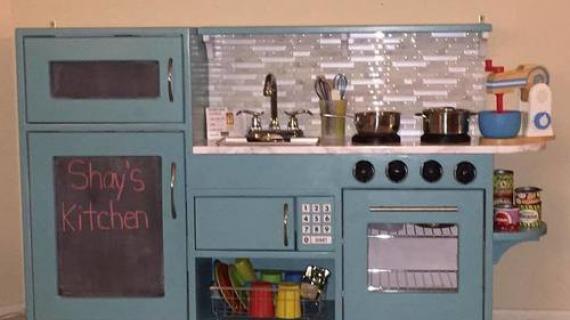
Ana and I talked quite a bit about what my first project would be. I was planning on making the play kitchen for my daughter for her birthday and Ana mentioned she had this already drawn out. AWESOME, considering that her birthday was two weeks away at this point and I had another project I still needed to paint taking up all the room in my garage. I also love this one because it had that little extra storage space and counter space.


Few notes after building.
-I pre-painted this project. I am usually so excited to start building and seeing it take shape that I don't think about it. This was SO much easier. There were a lot of pieces. I measured and drew lines where boards where going to be glued together and did NOT paint there. This allows for better glue adhesion.
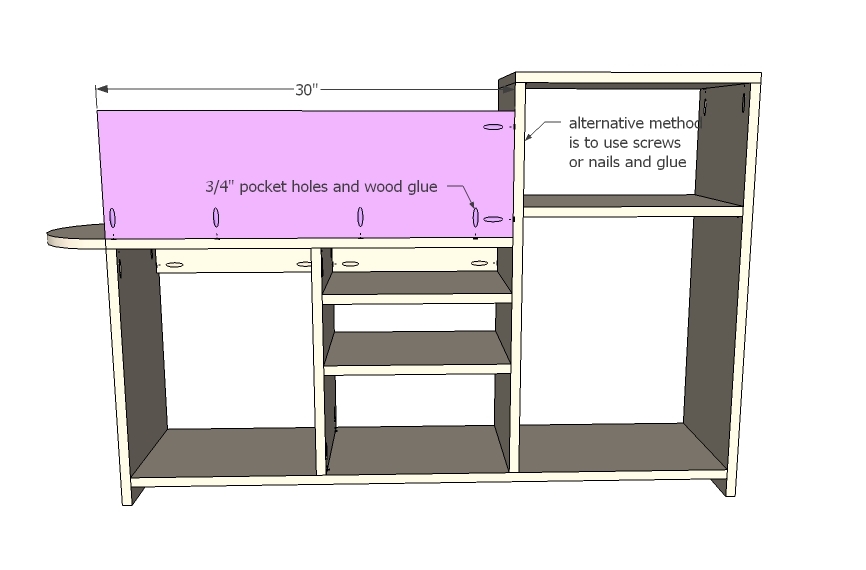
- I put my shelf on the back wall prior to putting it in place. This helped stability when screwing in my shelf however I did not pre-drill my faucet hole. PRE-DRILL your faucet hole before putting the back on. It will save you from trying to drill in too tight of places.

Preparation
3 1x12's @ 8'
1 1x4 @ 8'
2 1x3's @ 8'
1 1x2 @ 8'
1 4x4 sheet of 1/4" plywood
1 8"x10" piece of acrylic plastic
1x12's
1 @ 46 1/2"
1 @ 36" (sink and rounded edge)
1 @ 32"
1 @ 30"
1 @ 29 3/4"
1 @ 20"
1 @ 18"
1 @ 17 3/4"
1 @ 16 1/2"
2 @ 14 1/4"
1 @ 6"
1x4's
1 @ 30"
2 @ 14 1/4"
2 @ 9"
2 @ 5 1/4"
3 @ 2 3/4"
1x3's
2 @ 19 3/4"
2 @ 14"
4 @ 11 1/4"
2 @ 8 3/4"
1x2's
1 @ 46 1/2"
1/4" Plywood
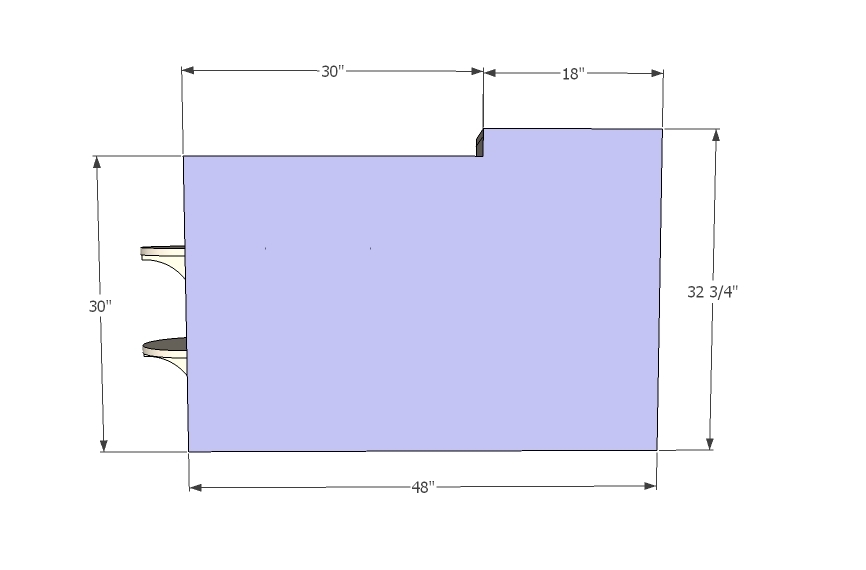
48" x 32 3/4" Kitchen Backing
12 1/4" x 9 3/4" Freezer door backing
12 1/4" x 20 3/4" Fridge door backing
-You could also use bead board for the fridge backing.
- I got my acrylic in that stock size at local Home Depot (but you must use the 1x4's for the stove door frame so it is the right size opening.


Please read through the entire plan and all comments before beginning this project. It is also advisable to review the Getting Started Section. Take all necessary precautions to build safely and smartly. Work on a clean level surface, free of imperfections or debris. Always use straight boards. Check for square after each step. Always predrill holes before attaching with screws. Use glue with finish nails for a stronger hold. Wipe excess glue off bare wood for stained projects, as dried glue will not take stain. Be safe, have fun, and ask for help if you need it. Good luck!
Instructions
Step 1

Step 2
Step 3
Step 4
Step 5
Step 6
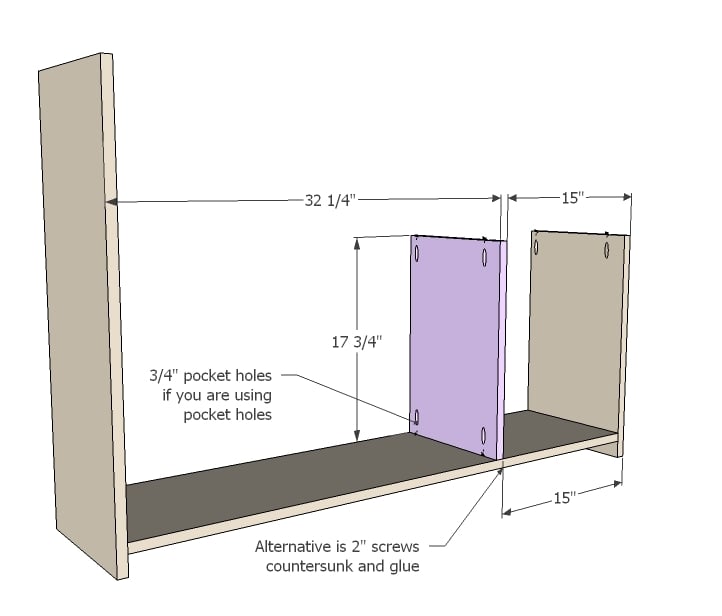
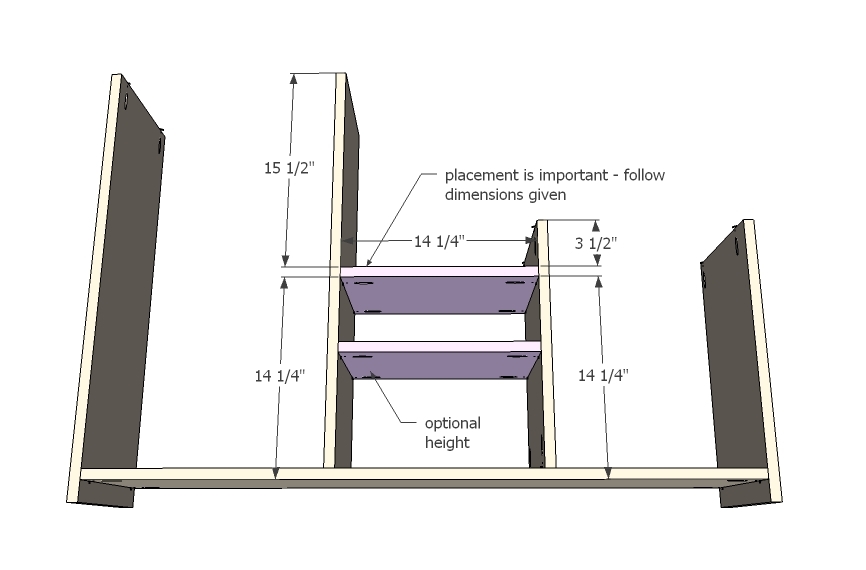
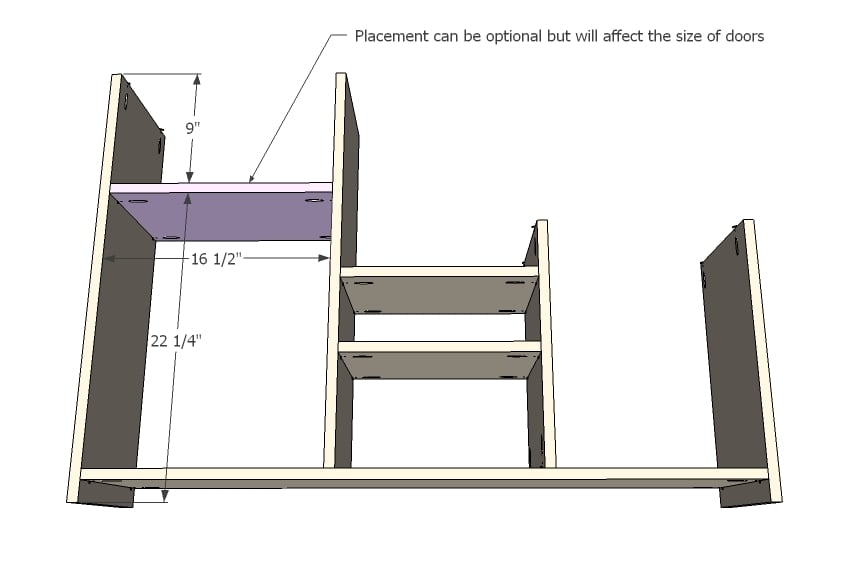
Remember to do this step BEFORE adding the shelf
Step 7

Step 8
Step 9
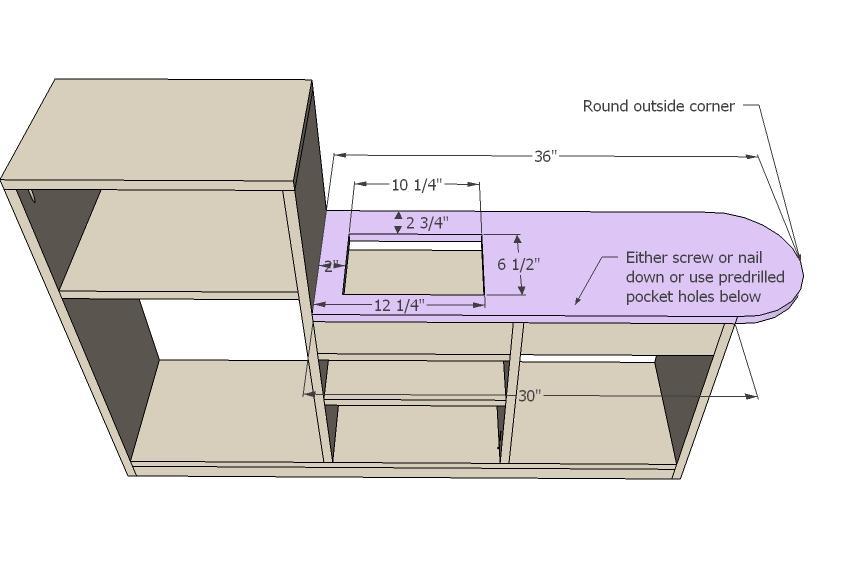
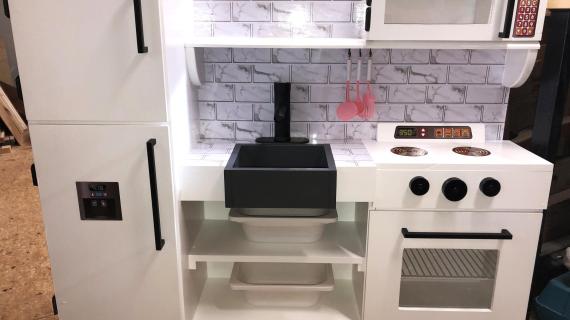
THINK about this step. Choose your sink faucet and knobs BEFORE you make this cute. I went ahead and cut this without thinking about it and did not have quite enough room for my faucet and knobs. Remember that you will be adding a back onto the top of this section so that will take out some room. I also did not have a sink before I cut, so then I had to improvise and ended up building a "under-mount" sink. If you do it like this, then I would make it an inch less deep so hat there is 3 3/4" inches in the back where your faucet will go.
Step 10
Step 11

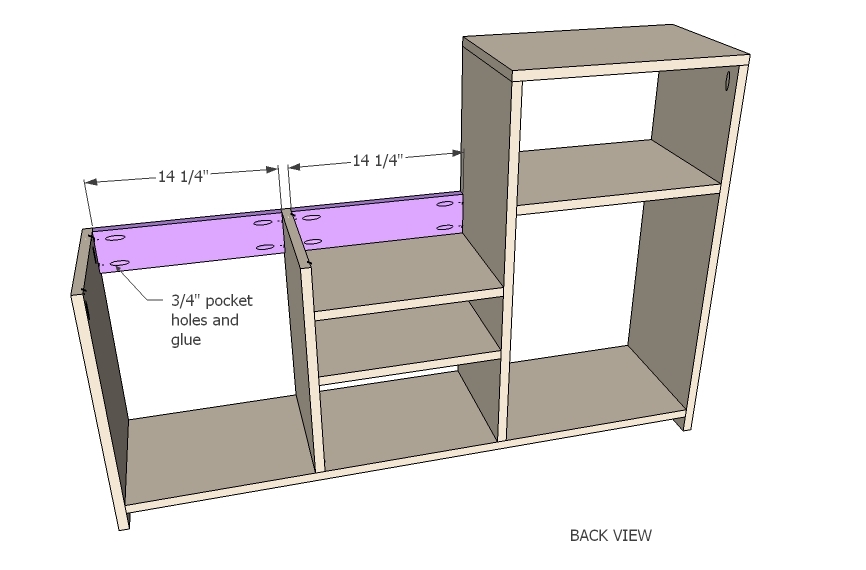
I did not end up adding the bottom supports. I just did some pocket holes to put the shelf as floating since I went for a more modern look.
Step 12

Step 13
Step 14

I just glued my door backings on for now. Eventually I will get a rabbet router bit so they will be more inset into the back of the door.
Step 15
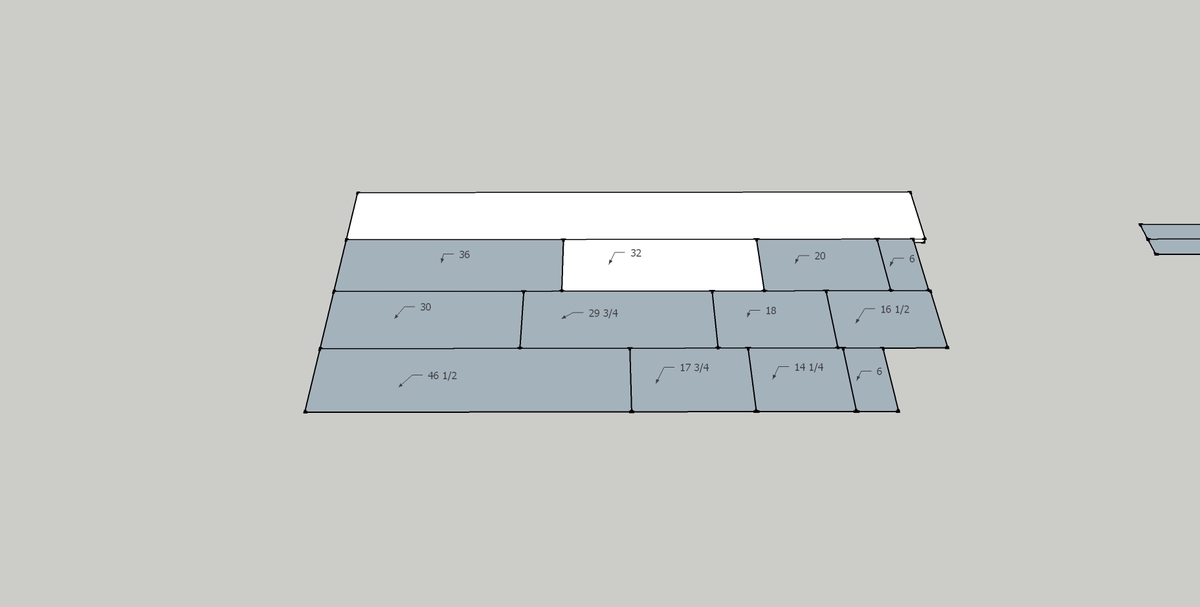
This is how I cut my 1x12's for best efficiency.
Step 16
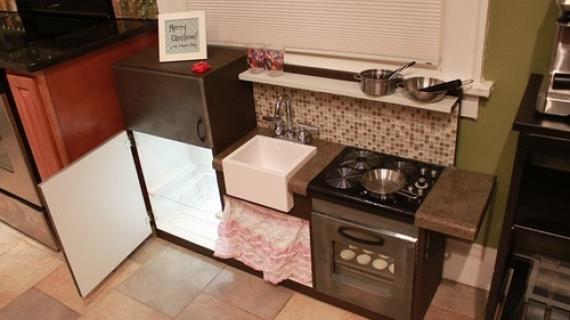
Here is a pic of my "under-mount" sink. This was my solution for cutting a hole and not finding a sink to fit in that hole. I of course had to measure and cut VERY specifically to get it flush and then still had to do some very close "shaving" on the table saw to get it to fit exactly.
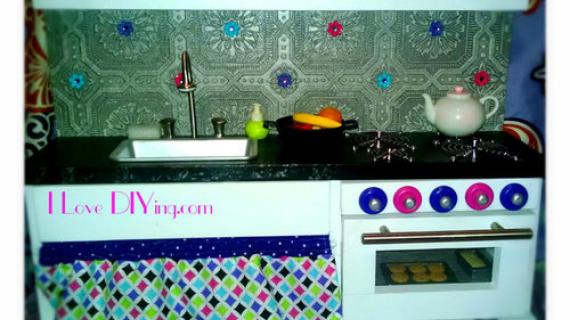
My back splash is really just a few different kinds of scrapbook paper cut into squares and mode podged onto the wood under the shelf. I wanted a tile affect and am pleased that it turned out so well for like $2 extra dollars.
Step 17
I loved the idea of doing a grill like a fancy stove would have. I just cut an extra hole same size as the sink and then glued a 1/4" piece of plywood to the bottom of it. I cut a dowel to size and then drilled the same size holes (as the dowel) into a 1x2 and then cut it down the middle on the table saw so I had two pieces with half a hole just perfect for the dowel. I spray painted black and then a slight mist of silver over the top to get that "grill " look.
Step 18
I used magnetic paint on the insets of the fridge and freezer. I did three coats and still should have done a few more. You have to lay it on thick.
Step 19
Step 20
It is always recommended to apply a test coat on a hidden area or scrap piece to ensure color evenness and adhesion. Use primer or wood conditioner as needed.


Comments
spiceylg
Thu, 01/05/2012 - 06:14
WOW!
This is amazing and the attention to detail impressive! Great job!
Guest (not verified)
Thu, 01/05/2012 - 06:19
Too Cute!
Darling children and a wonderful job on the design and the build. I love the extra customizations like the grill. Kudos!
Laura Fama
Thu, 01/05/2012 - 08:15
I love this!!!
The undermount sink is AWESOME!!! I love the shelves on the side as well... awesome!!!
GUEST (not verified)
Thu, 01/05/2012 - 14:22
ABSOLUTELY LOVE THIS!!!
I had been wanting one of these for my tall 4 year old. I would love to make her one and just adjust the height for her!!
Scott K (not verified)
Thu, 01/05/2012 - 19:45
AMAZING!
I just undertook my first woodworking project and it was a kitchen for my little guy. He loves it and plays with it every day for most of the day. While I am proud of it, this one makes me very jealous! Perhaps I can do something like this in the future for someone else. Magnificent job!!!
Guest (not verified)
Fri, 01/06/2012 - 19:06
Great details.
I sell appliances and kitchen your details are beautiful. the cooktop looks real. Thanks for giving the steps you did to get that look.
Guest (not verified)
Sun, 01/08/2012 - 13:48
Type of wood
Hi great kitchen i read in your list you use plywood for the back.
What kind of wood did you use for the main parts of the kitchen?
also just to clarify as im a novice,
in your shopping list you give your sizes as;
( 3 1x12's @ 8')
does this mean quanitiy 3 1"inch thick 12"inch X 8"inch
or quanitiy 3 1" thich 12 foot by 8 foot.
please explain the dimensions.
Thaks
Dan UK
Tina T. (not verified)
Sun, 03/25/2012 - 00:00
It means 3 boards that are
It means 3 boards that are 1inch thick, 12 inches wide, and 8 feet long.
In reply to Type of wood by Guest (not verified)
claydowling
Sun, 03/25/2012 - 15:59
In addition
What Tina says is accurate. But something that trips a lot of people up the first time is the fact that the wood is not actually one inch thick. It will be 3/4" thick in the store, although it was 1" when they cut the rough lumber out of the log. It will also be about 11 1/2" wide.
Guest (not verified)
Sun, 01/08/2012 - 13:51
Type of wood
Hi great kitchen i read in your list you use plywood for the back.
What kind of wood did you use for the main parts of the kitchen?
also just to clarify as im a novice,
in your shopping list you give your sizes as;
( 3 1x12's @ 8')
does this mean quanitiy 3 1"inch thick 12"inch X 8"inch
or quanitiy 3 1" thich 12 foot by 8 foot.
please explain the dimensions.
Thaks
Dan UK
Gary (not verified)
Sat, 01/14/2012 - 12:04
awsome
i am going to build this for my girls, only thing i am going to change on it is maybe a shelf or 2 in the fridge, GREAT JOB!!!!!
Amanda Watts (not verified)
Sat, 06/30/2012 - 21:00
accessories
What did you use as your "faucet" handles, spout, and for the knobs on the stove?
Chchd (not verified)
Sat, 11/03/2012 - 13:40
Sink,faucet, knobs
In the process of building this for my daughter for Christmas. Where did you find your sink, faucet, and knobs?
Nicolas Determann (not verified)
Fri, 12/14/2012 - 22:48
Childrens Play area
What do you think?
sarah1212
Thu, 08/13/2015 - 12:25
I cant see the instruction
I cant see the instruction photos after step 15! Anywhere I can find those? Dying to build this beautiful piece!
bcy419
Wed, 11/18/2015 - 08:52
Pictures
I'm also interested in this project and can not see the pictues after step 15. Please add if possible. Thank you!
Jess McKinley
Sun, 05/15/2016 - 22:19
Cut list
Hi
can u please explain the cut list I don't understand the measurements
thanks
socalboarder
Thu, 07/14/2016 - 11:56
Error in the Cut List Diagram
I wanted to let people know before they make the same mistake I did. I started cutting my 1 x 12's yesterday and was following the cut diagram. The bottom board that is shown has the 46.5" board and ends with a 6" cut. The top board also has a 6" cut so you end up with two 6" boards and one 14.25" board. The main cut list shows that you need one 6" board and two 14.25" boards. If you cut that 6" board out of the last board, you won't have enough length to get the second of the 14.25" boards you need. I just had to run out and buy another 1x12x4' to make the last 14.25" board. Just beware. Thanks.