

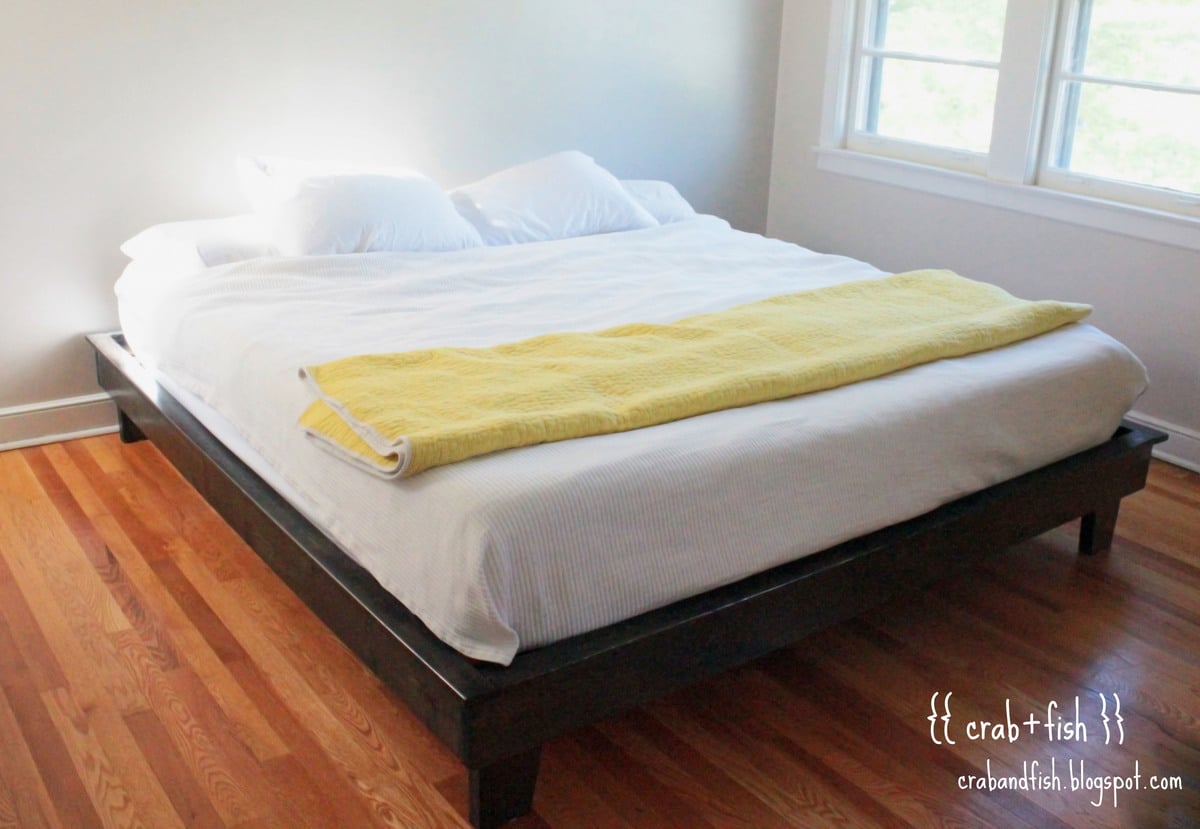
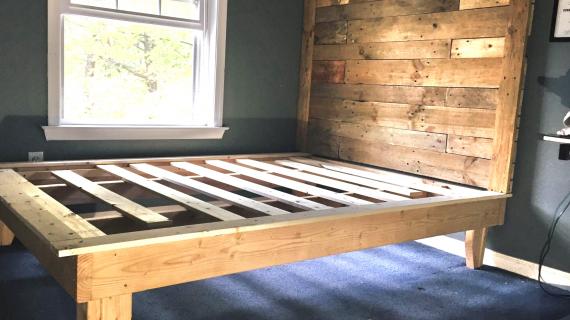
Build your own bed frame! This platform style bed frame is easy to build with off the shelf lumber and basic construction. Stain or paint to match your style or decor. Our free plans include step by step diagrams, shopping lists and cut list.
Related: Pair with our matching headboard plans.
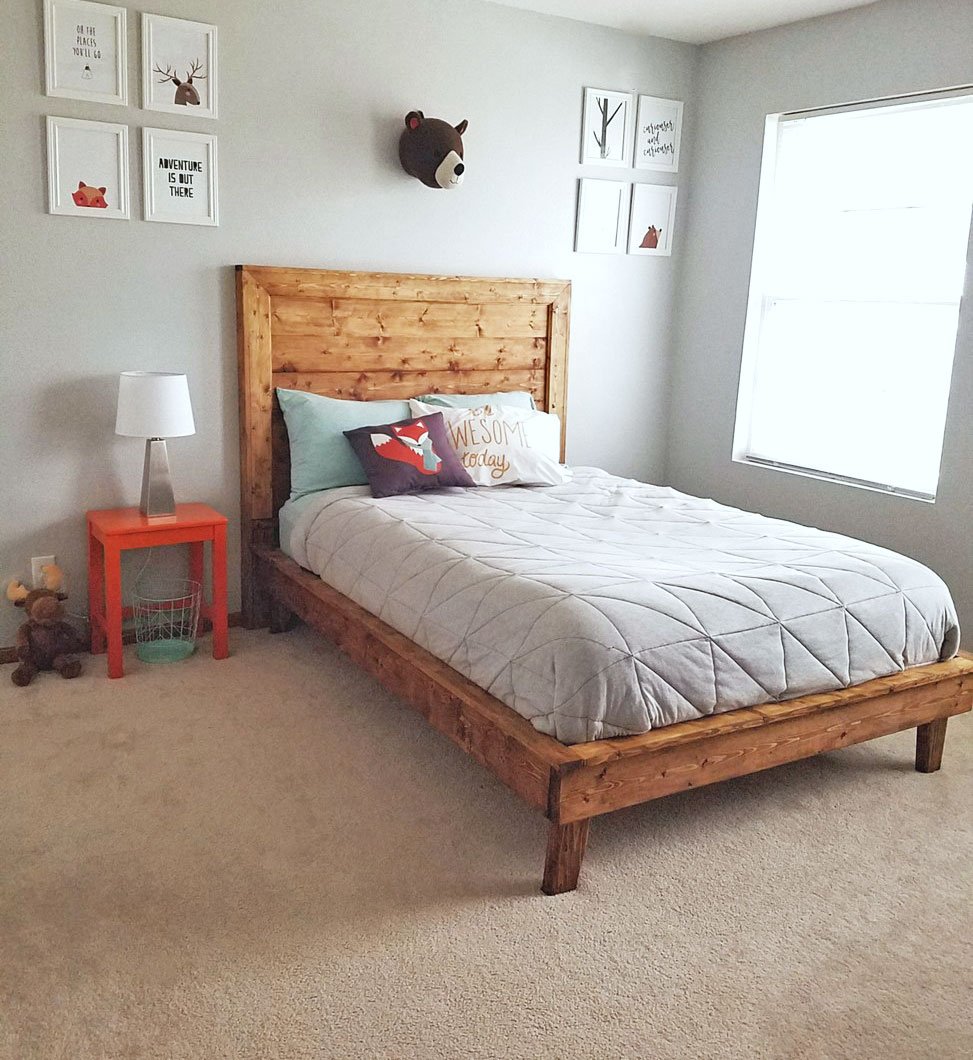
Matching Headboard

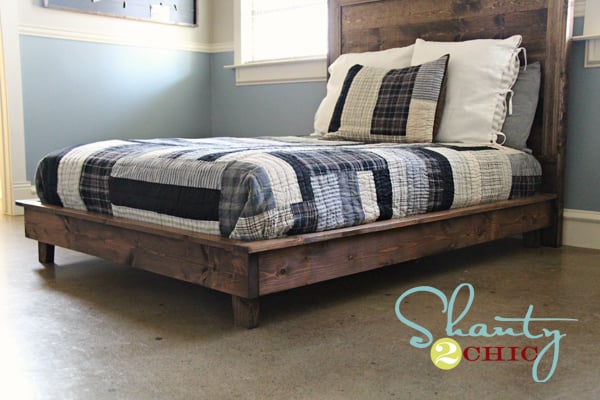
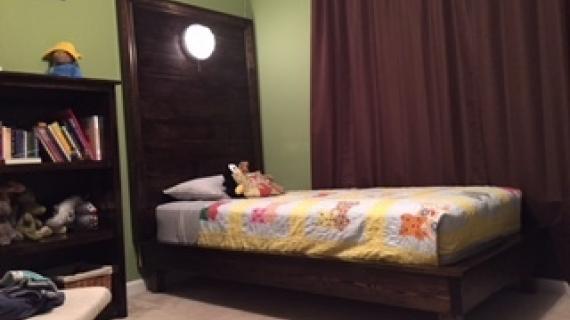
This bed was designed and built in partnership with my friend Whitney at Shanty2Chic. Please take a second to stop over and visit Whitney at Shanty2Chic for lots more details and photos on this bed.
Pin for Later!
Love this bed frame? Pin it to save to build for later!
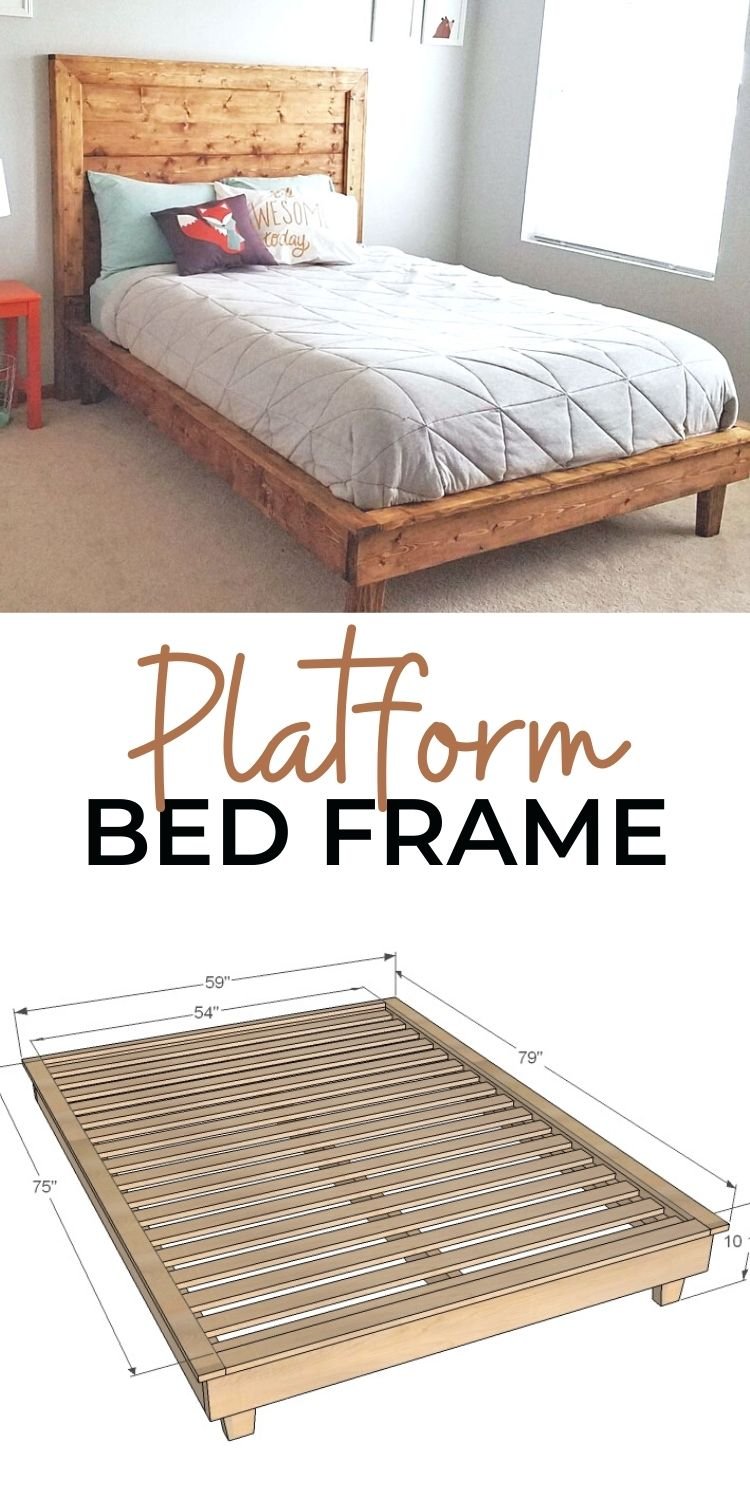
Essential Platform Bed Frame Plans
The free plans for this wood bed frame follow. If you build, please add a brag post - this keeps me inspired and helps other users see different options and creative decisions. Thank you for using Ana White plans.
Preparation
TWIN SIZE SHOPPING LIST (38x75)
- 3 – 2x6 @ 8' long
- 2 – 2x2 @ 8' long
- 2 – 1x3 @ 8' long
- 1 – 1x2 @ 4' long
- 1 – 1x3 @ 4' long
- 5– 1x3 or 1x4 furring strips @ 8' long - bed slats
- 32 - 2-1/2" to 3" long self tapping star bit construction screws (SPAX or GRK brand or similar)
- 50 - 1-1/2" to 2" long self tapping star bit construction screws (SPAX or GRK brand or similar)
- wood glue
- sand paper
- 1-1/2" long brad nails can be used as a substitute for the shorter screws
FULL SIZE SHOPPING LIST (54x75)
- 2 – 2x6 @ 12' long
- 1 - 2x4 @ 8 feet long
- Additional 2x4 or 2x6 needed for the bed legs
- 2 – 2x2 @ 8' long
- 3 – 1x3 @ 8' long
- 1 – 1x2 @ 8' long
- 7 – 1x3 or 1x4 furring strips @ 8' long - bed slats
- 40 - 2-1/2" to 3" long self tapping star bit construction screws (SPAX or GRK brand or similar)
- 60 - 1-1/2" to 2" long self tapping star bit construction screws (SPAX or GRK brand or similar)
- wood glue
- sand paper
- 1-1/2" long brad nails can be used as a substitute for the shorter screws
QUEEN SIZE SHOPPING LIST (60x80)
- 2 – 2x6 @ 12' long
- 1 - 2x4 @ 8 feet long
- Additional 2x4 or 2x6 needed for the bed legs
- 2 – 2x2 @ 8' long
- 3 – 1x3 @ 8' long
- 1 – 1x2 @ 8' long
- 7 – 1x3 or 1x4 furring strips @ 8' long - bed slats
- 40 - 2-1/2" to 3" long self tapping star bit construction screws (SPAX or GRK brand or similar)
- 60 - 1-1/2" to 2" long self tapping star bit construction screws (SPAX or GRK brand or similar)
- wood glue
- sand paper
- 1-1/2" long brad nails can be used as a substitute for the shorter screws
STANDARD KING SIZE CUT LIST (76x80)
- 4 – 2x6 @ 8' long
- 1 - 2x4 @ 8 feet long
- 2 – 2x2 @ 8' long
- 3 – 1x3 @ 8' long
- 1 – 1x2 @ 8' long
- 10 – 1x3 or 1x4 furring strips @ 8' long - bed slats
- 40 - 2-1/2" to 3" long self tapping star bit construction screws (SPAX or GRK brand or similar)
- 60 - 1-1/2" to 2" long self tapping star bit construction screws (SPAX or GRK brand or similar)
- wood glue
- sand paper
- 1-1/2" long brad nails can be used as a substitute for the shorter screws
CALIFORNIA KING SIZE CUT LIST (72x84)
- 4 – 2x6 @ 8' long
- 1 - 2x4 @ 8 feet long
- 2 – 2x2 @ 8' long
- 3 – 1x3 @ 8' long
- 1 – 1x2 @ 8' long
- 10 – 1x3 or 1x4 furring strips @ 8' long - bed slats
- 40 - 2-1/2" to 3" long self tapping star bit construction screws (SPAX or GRK brand or similar)
- 60 - 1-1/2" to 2" long self tapping star bit construction screws (SPAX or GRK brand or similar)
- wood glue
- sand paper
- 1-1/2" long brad nails can be used as a substitute for the shorter screws
TWIN SIZE CUT LIST (38x75)
- 2 – 2x6 @ 75” - side rails
- 2 – 2x6 @ 41” - top and bottom rails
- 2 – 2x2 @ 75” - inside cleat
- 2 – 1x3 @ 79” - side trim
- 1 – 1x2 @ 38” - top trim
- 1 – 1x3 @ 38” - bottom trim
- 4 – 2x4 or 2x6 @ 7” (can be cut longer for longer legs, use a 2x6 for a more modern look) - bed legs
- 10– 1x3 @ 38" - bed slats
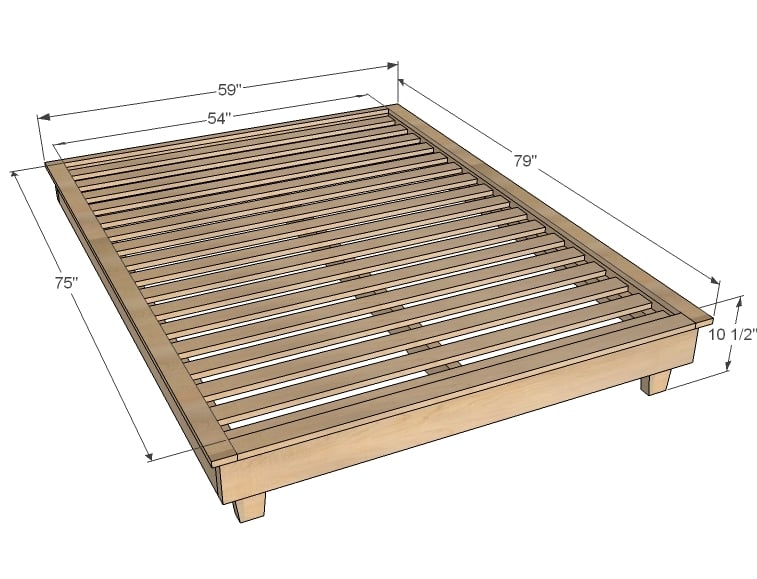
FULL SIZE CUT LIST (54x75)
- 2 – 2x6 @ 75” - side rails
- 2 – 2x6 @ 57” - top and bottom rails
- 2 – 2x2 @ 75” - inside cleat
- 1 – 2x4 @ 75” - center support
- 2 – 1x3 @ 79” - side trim
- 1 – 1x2 @ 54” - top trim
- 1 – 1x3 @ 54” - bottom trim
- 4 – 2x4 or 2x6 @ 7” (can be cut longer for longer legs, use a 2x6 for a more modern look) - bed legs
- 21 – 1x3 @ 27" slats are cut in half to maximize materials of an 8' long board or 10 - 1x3 @ 54" - bed slats
QUEEN SIZE CUT LIST (60x80)
- 2 – 2x6 @ 80” - side rails
- 2 – 2x6 @ 63” - top and bottom rails
- 2 – 2x2 @ 80” - inside cleat
- 1 – 2x4 @ 80” - center support
- 2 – 1x3 @ 84” - side trim
- 1 – 1x2 @ 60” - top trim
- 1 – 1x3 @ 60” - bottom trim
- 4 – 2x4 or 2x6 @ 7” (can be cut longer for longer legs, use a 2x6 for a more modern look) - bed legs
- 21 – 1x3 @ 30" slats are cut in half to maximize materials of an 8' long board or 10 - 1x3 @ 60" - bed slats
STANDARD KING SIZE CUT LIST (76x80)
- 2 – 2x6 @ 80” - side rails
- 2 – 2x6 @ 79” - top and bottom rails
- 2 – 2x2 @ 80” - inside cleat
- 1 – 2x4 @ 80” - center support
- 2 – 1x3 @ 84” - side trim
- 1 – 1x2 @ 76” - top trim
- 1 – 1x3 @ 76” - bottom trim
- 4 – 2x4 or 2x6 @ 7” (can be cut longer for longer legs, use a 2x6 for a more modern look) - bed legs
- 10 – 1x3 @ 76" - bed slats
CALIFORNIA KING SIZE CUT LIST (72x84)
- 2 – 2x6 @ 84” - side rails
- 2 – 2x6 @ 75” - top and bottom rails
- 2 – 2x2 @ 84” - inside cleat
- 1 – 2x4 @ 84” - center support
- 2 – 1x3 @ 88” - side trim
- 1 – 1x2 @ 72” - top trim
- 1 – 1x3 @ 72” - bottom trim
- 4 – 2x4 or 2x6 @ 7” (can be cut longer for longer legs, use a 2x6 for a more modern look) - bed legs
- 10 – 1x3 @ 72" - bed slats
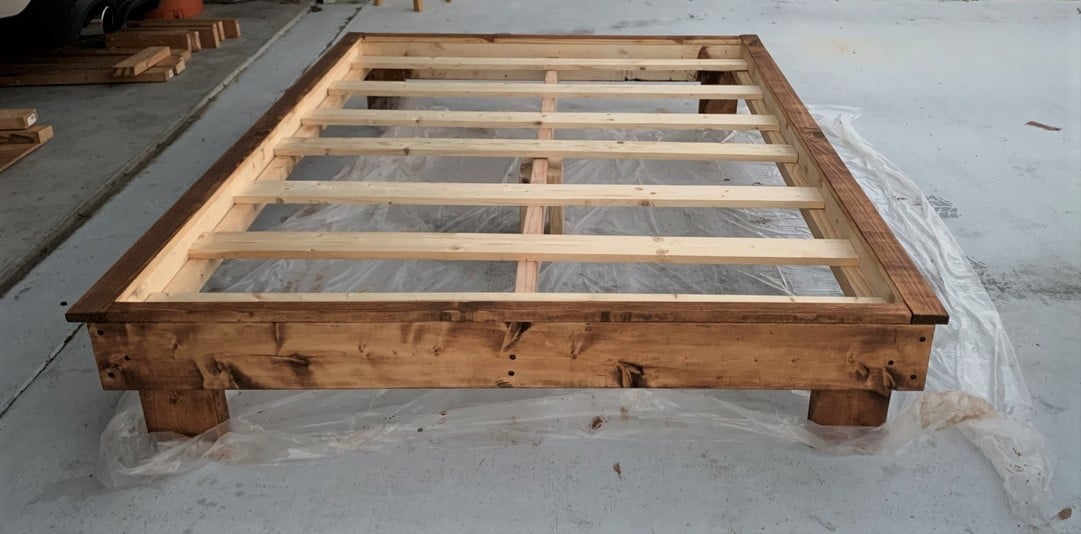
Precise cuts are very important to the success of this project.
I recommend cutting with a compound miter saw or chop saw.
Alternatively, cutting with a circular saw using a cutting guide or straight edge will work, but it is difficult to get precise cuts this way, even for experienced carpenters.


For larger beds, it may become difficult to move into the room after final assembly. You can prefinish pieces first, and build inside the room. Prefinish all 2x6s, the 1x2 and 1x3 top trim boards, and the legs.
Instructions
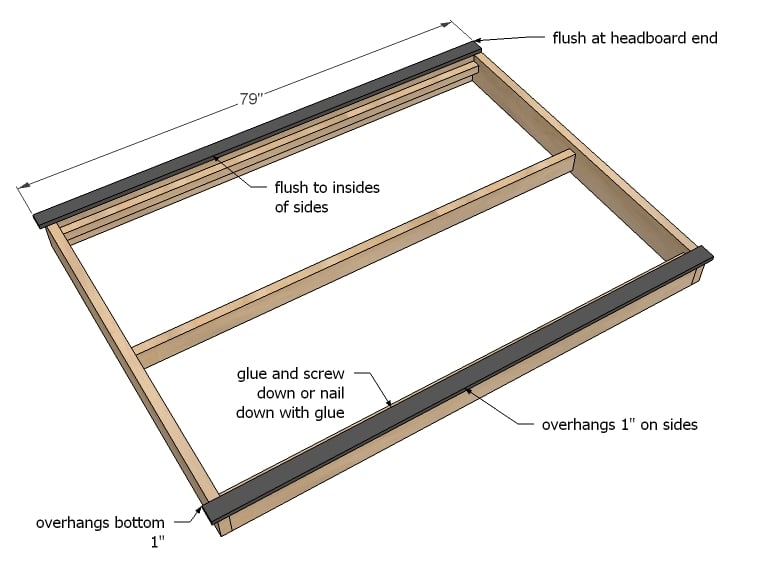
Step 1

Build the 2x6 frame using two screws per corner, 2-1/2" long to 3" long self tapping star bit screws (spax or similar).
Adjust the frame for square by taking opposite diagonals and making sure the two diagonals match.
Step 2

Attach cleats to inside for supporting the slats in later steps. Use 2-1/2" screws and glue, screws about every 8-12".
Step 3

This middle support is important for full size or larger beds. Attach so top is level with top of cleats, as bed slats will sit on top. Use two screws per end.
Step 4
Now we can start trim out. Add trim so it's flush on insides and at head of bed. Attach with either 1-1/2" long self tapping screws or brad nails and glue.
TIP: If you have a Kreg Jig, building the frame first with 3/4" pocket holes and 1-1/4" pocket hole screws, will result in a nicer overall finished bed.
Step 5

Measure and cut the trim for the top and bottom, with the 1x2 trim at the top.
Attach with nails or the shorter screws and glue.
Step 6
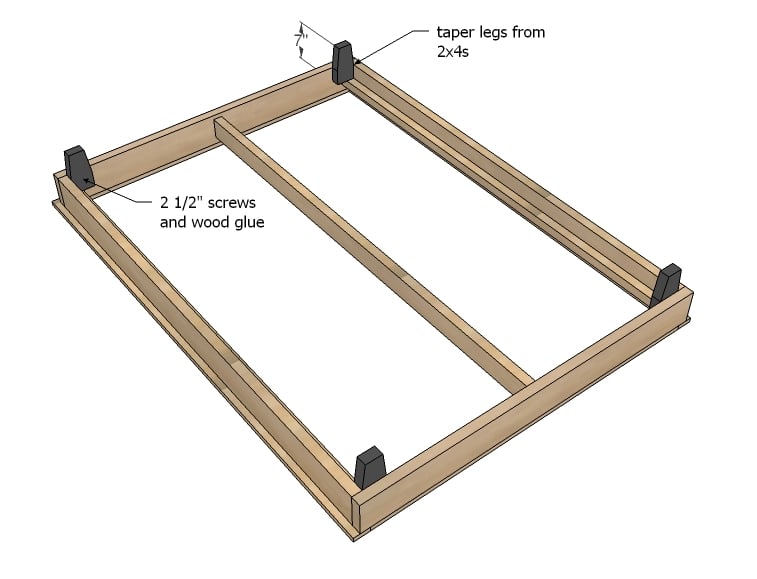
For the bed legs, cut the legs from either 2x4 or 2x6. The 2x6 will result in a stronger bed leg.
You can taper the legs, or even use store bought metal bed feet.
Attach to base of bed, use 3 screws per leg, with glue.
For full size and larger, flip the bed over and measure and cut center legs to support the center 2x4 and attach. (see step 8)
Step 7

Now add the slats. Slat placement and number of slats is dependent of your mattress requirements. Screw the slats down with the shorter screws.
To help take any wobble out of the bed, on a end slats, screw down with four screws (two per end)
Step 8
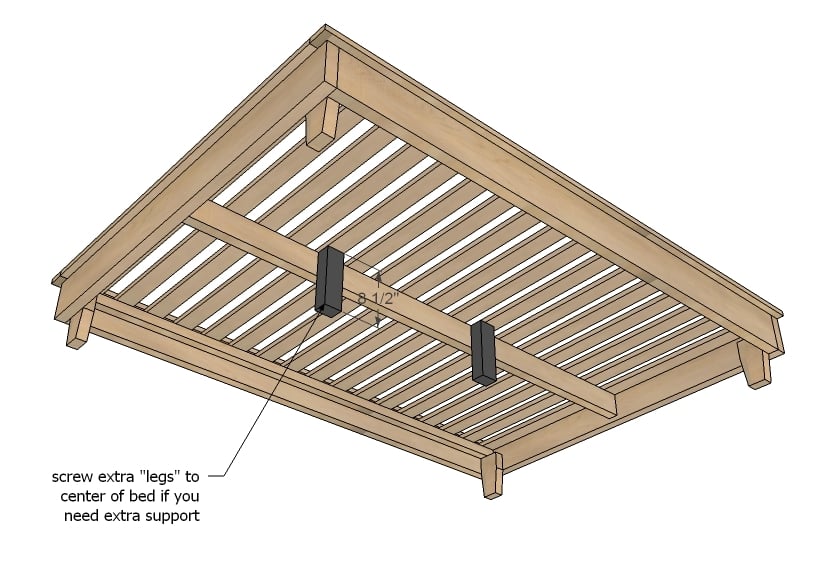
If you find your bed needs a little extra support in the center, here's the best way to beef it up.
It is always recommended to apply a test coat on a hidden area or scrap piece to ensure color evenness and adhesion. Use primer or wood conditioner as needed.


Comments
jennifer T (not verified)
Wed, 01/18/2012 - 10:40
gorgeous!!!
gorgeous!!!
Scentsy Gal (not verified)
Thu, 01/19/2012 - 11:03
It is gorgeous! I can't wait
It is gorgeous! I can't wait to build it!! Ana, you are SO amazing!!!
Kristie (not verified)
Wed, 01/18/2012 - 11:27
King?
I notice King is left out as an option. Is that because you wouldn't recommend going that big?
Caitlin (not verified)
Wed, 01/18/2012 - 15:26
I love that bed so much more
I love that bed so much more than the inspiration bed! Beautiful. :)
Guest (not verified)
Wed, 01/18/2012 - 23:48
love that bed
OMG!! I love the bed!! what a great idea. might have to think about it for my king size bed. love the simplicity of it! thanks for sharing
Guest (not verified)
Thu, 01/19/2012 - 07:44
Platform Bed
Question ~ if I have a boxspring, I just omit the additional 1x3's? I can't wait to make this for my son !!
Beinterra
Thu, 01/19/2012 - 14:07
Simply Easy and Looks Cool
I've done 2 of your projects so far (Bunk Bed and Lockers)and this will most likely be my next! Thanks for the awesome designs. Keep it up!
~Melody (not verified)
Thu, 01/19/2012 - 15:54
Platform Bed Feet
I love the look and ease of the directions of this bed. However, I was wondering how difficult it would be to raise the bed more. Much more. I'm one of those people who prefer high beds. Any thoughts on how to switch it up?
I was thinking instead of using tapered 2x4's for the feet, to use straight cut 4x4's in the taller measurement that I'm interested in. Thoughts? Suggestions?
Allison (not verified)
Sat, 01/21/2012 - 06:41
Just Curious if you have
Just Curious if you have posted the headboard instructions yet?
carolellens@ho… (not verified)
Sat, 01/21/2012 - 07:32
Beautiful!!
Beautiful!!
Guest (not verified)
Sat, 01/21/2012 - 17:16
Cant wait for the headboard
Cant wait for the headboard instructions!!!
Ash (not verified)
Sat, 02/18/2012 - 12:09
Wonderful project. I just
Wonderful project. I just finished making the bed and applied the stain. should I be applying a poly protective coat after the first stain coat? I applied the stain with a natural bristle, is it recommended or cloth is better? will be starting the headboard next :)
Thanks for sharing this great project.
Amanda Crawford (not verified)
Wed, 02/22/2012 - 16:20
Headboard?
Is there another link for the headboard and how/where to attach it to the platform bed frame? This bed is awesome!
Michelle Wolff… (not verified)
Tue, 03/13/2012 - 21:49
hailey bed
Hi - we tried to use the print friendly version of the bed plans but it prints blank pages past the first views and the pdf version will not load - just fyi - thx for posting the plans!
Terry H. (not verified)
Mon, 04/30/2012 - 16:18
Hi Ana, I'm interested in
Hi Ana,
I'm interested in using some of your information and photos in an ebook I'm writing. Would you be agreeable to that? Of course, I would credit you for your work as well as displaying clickable links to your website.
Thanks,
Terry
KirstinD (not verified)
Wed, 05/02/2012 - 10:01
Can't Wait!!
My best friend is getting ready to build this bed for my son's room. We just went and bought all the wood and the stain today. I can't wait to see it all done and in his new room. He's going to love it!!
Thanks for posting this, your ideas are beautiful and brilliant!
James (not verified)
Sat, 06/09/2012 - 19:15
Headboard & other
I would love to get the headboard instructions.
I also was wondering about changing it so the bed is set on an existing base? I have a waterbed frame base that I believe would look great. I like a high bed cause of my height. Suggestions on setting the paltform bed on a base? I hope this makes sense.
Nicole McRae (not verified)
Fri, 06/15/2012 - 05:50
Headboard
Hi all, you can find the headboard plans if you search "hailey" on this site. Two plans will come up, one is the headboard and one the frame itself. They both have the same picture!
I'm about to cut, stain and assemble today...had to buy spruce bc the stores didn't have pine in the dimensions I needed. Had the big pieces cut at the store (went with 2x10's for the base) and the smaller pieces I'm cutting with a handsaw using a square to mark. Also, since I'm not building the headboard, I extended the length of the 1x3's on the side by 1" and and going to use a 1x3 trim at the top. I have two pieces I'd wall trim, so this should allow clearance for that.
Cheers!
Kat Bartle (not verified)
Fri, 06/15/2012 - 15:12
Trim with Kreg Jig?
Hi,
I am planning on tackling this project this weekend; my first project with my brand new Kreg Jig!
But, I am having a bit of trouble working through the trim application in my head. The plans note that KJ users should make frame first and then attach it to the bed.....would you recommend putting the frame together with three inch screws (countersunk) from the outside of the frame? I'm having trouble thinking of another way. One couldn't do it with a Kreg Jig (to my knowledge), because of the 1.5" maximum thickness.
Once the frame assembly problem is solved, would you attach it by drilling pocket holes into inside the main (original/big) bed frame with the trim being the screw-receiving lumber?
Katherine Bartle (not verified)
Fri, 06/15/2012 - 15:15
Kreg Jig and Trim?
Hi,
I am planning on tackling this project this weekend; my first project with my brand new Kreg Jig!
But, I am having a bit of trouble working through the trim application in my head. The plans note that KJ users should make frame first and then attach it to the bed.....would you recommend putting the frame together with three inch screws (countersunk) from the outside of the frame? I'm having trouble thinking of another way. One couldn't do it with a Kreg Jig (to my knowledge), because of the 1.5" maximum thickness.
Once the frame assembly problem is solved, would you attach it by drilling pocket holes into inside the main (original/big) bed frame with the trim being the screw-receiving lumber?
WWRookie
Thu, 07/12/2012 - 10:05
Attaching the headboard to the Frame
Good afternoon, I am fairly new to the wood working world, I would like to build this bed for my daughter and I have printed the plans for both the frame and the headboard. I'm curious how you bolt them together? the headboard looks flush from top to bottom but the frame is going to have an overhang of approx an inch and a half? That's the only part I'm having a hard time with!
Scot (not verified)
Tue, 08/28/2012 - 20:39
Wood Selection
Are you all just using the white wood found at your local hardware store? e.g. http://www.lowes.com/pd_27172-99899-24SE10_0__?productId=3664526&Ntt=wh…
Or do I need to look from something that is dried?
Lukemeister (not verified)
Tue, 08/28/2012 - 21:41
Like It
Very nice, I've been toying with building something like this for a king, thanks for the insight regarding the construction approach, would probably add more supports with a king and maybe more legs but looks doable... and I'd maybe drop it down a few more inches to keep our cats from hiding out underneath
triskelion
Sun, 07/07/2013 - 16:41
King sized
I was looking at making this into a king sized bed as well and was wondering if you had come up with the dimension and appropriate design changes. Would love to know if you have.
Thanks!!!
chi (not verified)
Tue, 10/16/2012 - 20:50
Is this only a matress no
Is this only a matress no boxspring? Is the headboard to short for a boxspring?
Derwyn (not verified)
Tue, 11/13/2012 - 02:53
Thanks Great Plans
Thanks Great Plans thanks for sharing.
momofour09
Mon, 11/26/2012 - 11:14
First project...
What would be the cut-list for a twin? And as the one commenter asked, can I use a boxspring and mattress or just the mattress?
ancutrer
Sun, 02/24/2013 - 19:17
KING PLEASE
i would love to build this in a KING both bed and headboard. Can you please email me the plans for both? Also is there something explaining how to connect the two?
lan99
Sat, 03/02/2013 - 11:55
Most clear instructions I've seen
Wow, this is actually the best I've read on platform bed instructions to date. I just started with this one: http://www.amateurdiy.com/category/woodworking/platform-storage-bed/ But I'm glad I didn't get too far as it's overkill and the instructions aren't near as clean or clear as yours! Nice job.
kongk
Tue, 05/21/2013 - 05:08
This is a great inspiring
This is a great inspiring article.I am pretty much pleased with your good work.You put really very helpful information. Keep it up. Keep blogging. Looking to reading your next post.
Read More about T-Lad Web
Brad L.
Tue, 07/16/2013 - 18:54
Very Tempting!!
I'm considering doing this for my 1st project from this site. I haven't really seen anybody use red cedar to build with. Would that be a decent wood to choose?
toya0908
Mon, 08/19/2013 - 10:52
there is one on here that is
there is one on here that is for a twin platform bed and I made it for my son and it is with real wood and very sturdy and he loves it. Today I am building this full size one I hope you do it
toya0908
Mon, 08/19/2013 - 10:53
there is one on here that is
there is one on here that is for a twin platform bed and I made it for my son and it is with real wood and very sturdy and he loves it. Today I am building this full size one I hope you do it
edgarIII
Wed, 10/23/2013 - 15:51
Question!
This may be dumb as I am just a beginner, but does anyone know what kind of wood and stain is used in the actual picture? I love that look. Thanks!
dbizzle
Wed, 02/12/2014 - 12:36
Based on other projects, I
Based on other projects, I would guess pine with a walnut stain (maybe Minwax special walnut?)
Livelife7
Sun, 12/29/2013 - 11:39
King Plans?
I am in love with this bed frame! Being new to building, is there any way I can get the dimensions for building this bed as a standard King sized bed for the base and headboard?
ibthemom
Tue, 02/11/2014 - 11:45
Height
How would I adjust the height for this bed? I want to use it with a box spring and mattress
ibthemom
Tue, 02/11/2014 - 11:45
Height
How would I adjust the height for this bed? I want to use it with a box spring and mattress
calexander0814
Tue, 04/01/2014 - 18:19
Box Spring implementation
If I was to use a box spring with my mattress would I leave out the slats and just use the edging or just adjust the depth of the edging, slats, and middle support with legs? Also, would you change the feet for the bed too?
I really like this bed and would like to tackle this bed for my sons first big boy bed, which I think he will love moving into.
Any advise would be great.
skyzen
Wed, 04/30/2014 - 12:16
using 1x6 instead of 2x6
I have a small room and a 6 inch mattress to put on it. Can i make it using 1x6 boards instead of 2x6s? I am thinking of using 2x4 as center support and then putting a plywood on top.
jean.cortney
Thu, 08/07/2014 - 18:55
King dimensions?
So what's the conversion dimensions for a king size bed? I'd love to make this!
redredbeard
Fri, 01/16/2015 - 23:33
King Size Cutouts
Ok, since everyone was asking, here are the details for the King size... I have added another support to the frame with additional feet (8 total, instead of originally 6) to accommodate the larger size. This is the 2x4 that goes top to bottom between the frame, in this version you will have 2, both with legs. This is assuming a standard US king size of 76" x 80". To do the math yourself, add 5" to length and 22" to width from standard measurements.
Shopping List: Same, but add an extra 2x4x10 (you might be able to get away with an 8)
Length and Width cuts will be marked with (L) and (W) respectively.
Cutouts:
2 - 2x6 @ 80" (L)
2 - 2x6 @ 79" (W)
2 - 2x2 @ 80" (L)
2 - 2x4 @ 80" (L)
2 - 1x3 @ 84" (L)
1 - 1x2 @ 76" (W)
1 - 1x3 @ 76" (W)
8 - 2x4 @ 7" (Feet)
15 - 1x3 @ 76" (W - Slats)
If people like this I will do this for the headboard as well.
Heathercook
Sun, 03/29/2015 - 11:24
Shopping List: Same, but add
Shopping List: Same, but add an extra 2x4x10 (you might be able to get away with an 8)
what is the extra 2x4x10 for exactly? is it listed in the cut list?
Vmac10
Sat, 07/04/2015 - 10:36
King Headboard
Did you work up the measurements for the headboard?
In reply to King Size Cutouts by redredbeard
bmccormick18608
Wed, 10/21/2015 - 06:40
Headboard Option
Yes please provide for the headboard as well!!! (you can ignore my other comment asking for this since I found it.
Brittany
kotharifamily
Sun, 02/15/2015 - 08:56
king headboard
If you could post you king headboard cut list, I would be greatful
mad212
Wed, 02/25/2015 - 10:41
Queen Size Cutouts??
Can anyone confirm if my queen size cuts are right (which I doubt they are)? I've never built anything except for a couple speaker boxes when I was a kid. I really want to try to build it this weekend as I just got a new queen mattress.
2 - 2x6 @ 80" (L)
2 - 2x6 @ 63" (W)
2 - 2x2 @ 80" (L)
2 - 2x4 @ 80" (L)
2 - 1x3 @ 84" (L)
1 - 1x2 @ 60" (W)
1 - 1x3 @ 60" (W)
4 - 2x4 @ 7" (Feet)
14 - 1x3 @ 60" (W - Slats)
Ana White Admin
Wed, 02/25/2015 - 11:25
Queen
Be sure to measure your mattress. As stated in the plan just above the "cut list" . "This bed is for full size mattresses. To convert to twin, subtract 15" from width. To convert to queen, add 6" to width AND 5" to length. This assumes bed sizes of TWIN: 39" x 75" FULL: 54" x 75" QUEEN: 60" x 80"."
mad212
Fri, 02/27/2015 - 10:28
Do I need to let the wood
Do I need to let the wood acclimate to the room for while or can I just buy the wood at home depot and build the same day?
depsher
Sat, 06/04/2016 - 23:55
Use it right away
I have found its best to build the same day. I'm in Kansas and if any 2 by pine sits, it warps.